
Руководство пользователя камеры
РУССКИЙ
• Перед началом работы с камерой обязательно ознакомьтесь
с данным Руководством, включая раздел «Меры предосторожности».
• Храните это Руководство в надежном месте, чтобы его можно
было использовать в будущем.
У вас уже есть продукция Canon? Зарегистрируйте свои продукты для доступа к программному обеспечению и обновлениям встроенного ПО, а также подпишитесь на рассылку, чтобы получать персонализированные советы и эксклюзивные предложения
Поддержка
Загружайте ПО, встроенное ПО и руководства, а также получите доступ к материалам поддержки для вашего продукта серии PowerShot.
Драйверы
Для выполнения подключения некоторых устройств к компьютеру может потребоваться драйвер. На этой вкладке вы найдете соответствующие драйверы для своего устройства или, в случае отсутствия драйверов, описание совместимости устройства с каждой операционной системой.
Полезная информация. Доступ к программному обеспечению, руководствам и другим материалам можно получить с помощью вкладок, расположенных выше.
Операционная система Обнаруженная операционная система
Программное обеспечение
Программное обеспечение загружать необязательно, но оно обеспечивает дополнительные функции и позволяет максимально эффективно пользоваться возможностями устройства. На этой вкладке можно просмотреть и загрузить доступное программное обеспечение для вашего устройства.
Операционная система Обнаруженная операционная система
Руководства пользователя
Руководства для вашего устройства или программного обеспечения перечислены ниже.
Приложения и функции
На этой вкладке можно посмотреть доступные приложения и функции, совместимые с вашим устройством.
Встроенное ПО
Встроенное ПО — это постоянное программное обеспечение, установленное на устройстве и обеспечивающее его корректную работу. Canon может периодически выпускать обновления для этого встроенного ПО, и если обновление доступно, его можно загрузить ниже.
FAQs
На этой вкладке вы найдете ответы на часто задаваемые вопросы и другую полезную информацию, которая поможет вам в решении вопросов и проблем.
Важная информация
На этой вкладке вы найдете подборку часто задаваемых вопросов, которые, на наш взгляд, будут вам интересны.
Коды ошибок
Код ошибки или сообщение об ошибке может появиться на устройстве по различным причинам. С помощью поля поиска можно найти полезную информацию о конкретном коде ошибки, где будут указаны причина ошибки и необходимые действия по ее устранению.
Технические характеристики
Ниже приведены все технические характеристики данного продукта.
Полезные ссылки
-
-
Ремонт
Поиск центров по ремонту оборудования, полезная информация по процессу ремонта
-
Переработка
Узнайте больше о программе утилизации картриджей Canon
-
Canon ID
Регистрация продукта и управление аккаунтом Canon ID
-
Contents
-
Table of Contents
-
Troubleshooting
-
Bookmarks
Quick Links
Camera User Guide
• Make sure you read this guide, including the «Safety
Precautions» section, before using the camera.
• Store this guide safely so that you can use it in the future.
ENGLISH
Related Manuals for Canon PowerShot SX30 IS
Summary of Contents for Canon PowerShot SX30 IS
-
Page 1
Camera User Guide • Make sure you read this guide, including the «Safety Precautions» section, before using the camera. • Store this guide safely so that you can use it in the future. ENGLISH… -
Page 2: Checking The Package Contents
Adobe Reader is required to view the PDF manuals. Battery Pack NB-7L (with Terminal Cover) Stereo AV Cable AVC-DC400ST DIGITAL CAMERA Solution Disk Lens Cap Battery Charger CB-2LZ/CB-2LZE Neck Strap Case for Hot NS-DC11 Shoe Cap Warranty “Canon Customer Card Support” Leaflet…
-
Page 3: Read This First
This camera’s warranty is only effective in the country of sale. If there is a problem with the camera while abroad, please return it to the country of sale before proceeding with a warranty claim to a Canon Customer Support Help Desk. For Canon Customer Support contacts, please see the customer support list supplied with your camera.
-
Page 4: What Do You Want To Do
Shoot ● Shoot, leaving it to the camera to make settings …25 Take good people shots Portraits (p. 62) Shoot various other scenes Landscape (p. 62) Shoot with special effects Super vivid colors (p. 65) ● Focus on faces …25, 64, 84, 88 ●…
-
Page 5
View ● Look at my pictures …28 ● Automatically play back pictures (slideshow)…123 ● Look at my pictures on a TV …127 ● Look at my pictures on a computer..33 ● Quickly search pictures …120, 121 ● Erase pictures …29, 132 Shoot/View Movies ●… -
Page 6: Table Of Contents
Table of Contents Chapters 1 – 3 explain the basic operations and frequently used functions of this camera. Chapters 4 onward explain the advanced functions, letting you learn more as you read each chapter. Checking the Package Contents …2 Read This First …3 What Do You Want to Do? …4 Table of Contents …6 Safety Precautions…9…
-
Page 7
Shooting Close-ups (Macro) … 73 Changing the Recording Pixel Setting (Image Size) … 74 Changing the Compression Ratio (Image Quality) … 74 Changing the ISO Speed … 76 Adjusting the White Balance … 77 Continuous Shooting… 78 Changing the Tone of an Image (My Colors) … -
Page 8
Table of Contents Displaying Various Images (Smart Shuffle)…125 Changing Image Transitions…126 Viewing Images on a TV…127 Viewing Images on a High-Definition TV…128 Protecting Images…129 Erasing Images…132 Tagging Images as Favorites …134 Organizing Images by Category (My Category) …135 Rotating Images…137 Resizing Images …138 Trimming…139 Adding Effects with the My Colors… -
Page 9: Safety Precautions
If the battery charger becomes wet, unplug it from the outlet and consult your camera distributor or the closest Canon Customer Support Help Desk. • Do not play the supplied CD-ROM(s) in any CD player that does not support data CD-ROMs.
-
Page 10
Safety Precautions • Use only the recommended battery. • Do not place the battery near or in direct flame. • Unplug the power cord periodically and wipe away any dust and dirt that has collected on the plug, the exterior of the power outlet, and the surrounding area. •… -
Page 11
• When using the camera on a beach or at a windy location, be careful not to allow dust or sand to enter the camera. This may cause the camera to malfunction. • In regular use, small amounts of smoke may be emitted from the flash. This is due to the high intensity of the flash burning dust and foreign materials stuck to the front of the unit. -
Page 12: Conventions Used In This Guide
• Icons are used in the text to represent the camera buttons and control dial. • Language that displays on the screen appears inside [ ] (square brackets). • The directional buttons, control dial, and FUNC./SET button are represented by the following icons. Up button Left button Control dial…
-
Page 13: View Movies
This chapter explains preparations before shooting, how to shoot in A mode, and then how to view and erase the images you take. The latter part of this chapter explains how to shoot and view movies and transfer images to a computer. Attaching Included Items/Holding the Camera •…
-
Page 14: Insert The Battery
Use the included charger to charge the battery. Be sure to charge the battery as it is not charged at the time of purchase. CB-2LZ CB-2LZE To protect the battery and prolong its life, do not charge it for longer than 24 hours continuously.
-
Page 15: Battery Charge Indicator
This is a normal characteristic of the battery and does not indicate a problem. However, if the battery bulges to the point where it will no longer fit into the camera, please contact a Canon Customer Support Help Desk. •…
-
Page 16: Compatible Memory Cards (Sold Separately)
Compatible Memory Cards (Sold Separately) • SD memory cards (2 GB and less)* • SDHC memory cards (more than 2 GB, up to and including 32 GB)* • SDXC memory cards (more than 32 GB)* • MultiMediaCards • MMCplus memory cards •…
-
Page 17: Insert The Memory Card
Terminals Label What if [Memory card locked] appears on the screen? SD, SDHC and SDXC memory cards, and Eye-Fi cards have a write-protect tab. If this tab is in the locked position, [Memory card locked] will appear on the screen and you will not be able to take or erase images.
-
Page 18: Removing The Battery And Memory Card
Inserting the Battery and Memory Card Removing the Battery and Memory Card Approximate Number of Shots per Memory Card Memory Card Number of Shots • Values are based on the default settings. • The number of shots that can be taken will vary depending on camera settings, the subject and the memory card used.
-
Page 19: Using The Screen
Using the Screen Adjusting the position of the screen Approx. 180° Approx. 90° Approx. 175° • When the camera is on, opening the screen will turn the screen on and the viewfinder off. Closing the screen with it facing the camera body will turn the screen off and the viewfinder on.
-
Page 20: Setting The Date And Time
Setting the Date and Time The Date/Time settings screen will appear the first time the camera is turned on. Since the dates and times recorded into your images are based on these settings, be sure to set them. Reappearing Date/Time screen Set the correct date and time.
-
Page 21: Changing The Date And Time
Changing the Date and Time You can change the current date and time settings. Date/Time battery • The camera has a built-in date/time battery (backup battery) that allows the date/time settings to be retained for about three weeks after the battery pack has been removed.
-
Page 22: Setting The Display Language
You can change the language that displays on the screen. What if the clock appears when the m button is pressed? The clock will appear if too much time passes between pressing the m button and the n button in Step 2. If the clock appears, press the m button to remove the clock and repeat Step 2.
-
Page 23: Formatting Memory Cards
Formatting Memory Cards Before you use a new memory card or one that has been formatted in other devices, you should format the card with this camera. Formatting (initializing) a memory card erases all data on the memory card. As you cannot retrieve the erased data, exercise adequate caution before formatting the memory card.
-
Page 24: Pressing The Shutter Button
Pressing the Shutter Button Formatting or erasing data on a memory card merely changes the file management information on the card and does not ensure its contents are completely erased. Be careful when transferring or disposing of a memory card. When disposing of a memory card, take precautions such as physically destroying the card to prevent personal information leaks.
-
Page 25: Taking Pictures (Smart Auto)
Taking Pictures (Smart Auto) Since the camera can determine the subject and shooting conditions, you can let it automatically select the best settings for the scene and just shoot. The camera can also detect and focus on faces, setting the color and brightness to optimal levels.
-
Page 26
Taking Pictures (Smart Auto) AF Frame What if an icon appears in the upper right of the screen? The icon for the determined scene will appear in the upper right of the screen. For details on the icons that appear, see “Scene Icons” (p. 180). What is the rectangular gray frame? This is the area that will be recorded in a movie. -
Page 27
What if… • What if the color and brightness of the images do not turn out as expected? The scene icon (p. 180) that appears on the screen may not match the actual scene. If this happens, try shooting in G mode (p. 71). •… -
Page 28: Viewing Images
Viewing Images You can view the images you have taken on the screen. Switching to Shooting mode • Pressing the shutter button halfway while in Playback mode switches the camera to Shooting mode. Enter Playback mode. ● Press the 1 button. The last image you took will appear.
-
Page 29: Erasing Images
Erasing Images You can choose and erase images one at a time. Please note that erased images cannot be recovered. Exercise adequate caution before erasing an image. Enter Playback mode. ● Press the 1 button. The last image you took will appear. Choose an image to erase.
-
Page 30: Shooting Movies
Shooting Movies The camera can automatically select all settings so that you can shoot movies just by pressing the movie button. The audio will record in stereo. Remaining Time Elapsed Time Choose A mode. ● Set the mode dial to A. Compose the shot.
-
Page 31: Stop Shooting
Microphone Magnifying the subject while shooting Pressing the zoom lever while shooting will zoom in on or out from the subject. However, operation sounds will be recorded. When the mode dial is set to A, the icon for the determined scene will •…
-
Page 32: Viewing Movies
Viewing Movies You can view the movies you have shot on the screen. Enter Playback mode. ● Press the 1 button. The last image you took will appear. appears on movies. Choose a movie. ● Press the qr buttons or turn the  dial to choose a movie, then press the m button.
-
Page 33: Transferring Images To A Computer For Viewing
You can use the included software to transfer images you have shot with the camera to a computer for viewing. If you are already using software included with another Canon-brand compact digital camera, install the software from the included CD-ROM, overwriting your current installation.
-
Page 34: Install The Software
Transferring Images to a Computer for Viewing Macintosh Mac OS X (v10.4 – v10.6) Computer model The above OS should be pre-installed on computers with built-in USB ports. PowerPC G4/G5 or Intel Processor (still images), Core Duo 1.66 GHz or higher (movies) Mac OS X v10.4 –…
-
Page 35
Transferring Images to a Computer for Viewing When the installation finishes, click [Restart] or [Finish]. Remove the CD-ROM. ● Remove the CD-ROM when your desktop screen appears. Macintosh Place the CD in the computer’s CD- ROM drive. ● Place the supplied CD-ROM (DIGITAL CAMERA Solution Disk) (p. -
Page 36: Turn On The Camera
For Windows 7, use the following steps to display CameraWindow. Click on the task bar. In the screen that appears, click the Choose [Downloads Images From Canon Camera using Canon CameraWindow] and click [OK]. Double click Turn on the camera.
-
Page 37: Transfer And View Images
Transfer and View Images You can transfer images even without using the image transfer function in the included software by simply connecting your camera to a computer. There are, however, the following limitations. • It may take a few minutes from when you connect the camera to the computer until you can transfer images.
-
Page 38: Accessories
Interface Cable IFC-400PCU* HDMI Cable HTC-100 Battery Charger CB-2LZ/CB-2LZE* (includes hot shoe cap) *Also available for purchase separately. Memory Card USB card reader Canon-Brand PictBridge Compliant Printers Neck Strap NS-DC11 Lens Cap Case for Hot Shoe Cap Windows/Macintosh High-Definition TV…
-
Page 39: Separately Sold Accessories
Separately Sold Accessories The following camera accessories are sold separately. Some accessories are not sold in some regions, or may no longer be available. Power Supplies Using Accessories Abroad The battery charger and the AC adapter kit can be used in regions that have 100 – 240 V (50/60 Hz) AC power.
-
Page 40: Other Accessories
Separately Sold Accessories Flash Speedlite 430EX and 580EX may also be used. Other Accessories Speedlite 270EX/430EX II/580EX II ● A shoe-mounted flash that allows for a wide range of flash photography. Speedlite Bracket SB-E2 ● Prevents unnatural shadows from appearing on the sides of objects when shooting from a vertical position, and is useful for shooting portraits.
-
Page 41
Use of genuine Canon accessories is recommended. This product is designed to achieve excellent performance when used with genuine Canon accessories. Canon shall not be liable for any damage to this product and/or accidents such as fire, etc., caused by the malfunction of non-genuine Canon accessories (e.g., a leakage and/or explosion of a battery pack). -
Page 43: Learning More
Learning More This chapter explains the parts of the camera and what appears on the screen, as well as the basic operating instructions.
-
Page 44: Components Guide
Zoom Lever Shooting: i (Telephoto) / j (Wide Angle) (pp. 25, 30, 58) Playback: k (Magnify) / g (Index) (pp. 120, 125) Shutter Button (p. 24) Strap Mount (p. 13) Mode Dial Flash (pp. 26, 72) Hot Shoe Cap (p. 168) Mode Dial Use the mode dial to change the Shooting mode.
-
Page 45: Print
Screen (LCD Monitor) (pp. 19, 46, 179, 181) (Short Cut) (p. 162) / c (Direct Print) (p. 144) Button Diopter Adjustment Dial (p. 52) Viewfinder (p. 46) Movie Button (pp. 30, 107) Indicator (p. 47) Power Button (p. 20) (Zoom Framing Assist) (p. 91) / d (Jump) (p.
-
Page 46: Screen Display
Screen Display Switching the Display You can change the screen display using the l button. Refer to p. 179 for details on information that appears on the screen. Opening the screen with the power on will turn the screen on, and turn the viewfinder off.
-
Page 47: Indicator
Screen Display in Dark Shooting Conditions The display automatically brightens when shooting in dark conditions, allowing you to check the composition (Night Display function). However, the brightness of the image on the screen, and the brightness of the actual image recorded may be different.
-
Page 48: Func. Menu — Basic Operations
FUNC. Menu – Basic Operations You can set commonly used functions using the ø menu. The menu items and options differ depending on the Shooting mode (pp. 182 – 183). Available Options Menu Items Choose a Shooting mode. ● Set the mode dial to the desired shooting mode.
-
Page 49: Menu — Basic Operations
MENU – Basic Operations Various functions can be set from the menus. The menu items are organized under tabs, such as for shooting (4) and playback (1). The options differ depending on the Shooting mode and the Playback mode (pp. 184 – 187). Display the menu.
-
Page 50: Changing The Sound Settings
Changing the Sound Settings You can silence or adjust the volume of camera sounds. Muting Sounds You can also mute camera sounds by holding down the l button and turning on the power. Adjusting the Volume Display the menu. ● Press the n button.
-
Page 51: Changing The Screen Brightness
Changing the Screen Brightness The screen brightness can be changed in two ways. You can set the brightness of the screen and the viewfinder separately. (Press the l button to switch to the desired display before making settings). Using the Menu Using the l Button •…
-
Page 52: Adjusting The Viewfinder
Adjusting the Viewfinder You can adjust the viewfinder so that the display is clearly visible (Dioptric adjustment). Power Saving Function (Auto Power Down) To save battery power, the screen turns off, and the camera shuts down automatically when it is not operated for a certain time. Power Saving during Shooting The screen will turn off approximately 1 minute after the camera is last operated.
-
Page 53: Returning The Camera To Default Settings
Returning the Camera to Default Settings When you have mistakenly changed a setting, you can reset the camera to the default settings. Are there functions that cannot be reset? The [Date/Time] (p. 21) in the 3 tab, [Language] (p. 22), [Video System] •…
-
Page 54: Low Level Memory Card Formatting
Low Level Memory Card Formatting Perform low level formatting when [Memory card error] appears, the camera does not operate properly, or you think that the recording/reading speed of a memory card has dropped. As you cannot retrieve the erased data, exercise adequate caution before formatting the memory card.
-
Page 55: Clock Functions
• Low level formatting may take longer than standard formatting (p. 23), since all recorded data is erased. • You can stop a low level format of a memory card by choosing [Stop]. When stopping low level formatting, the data will be erased but the memory card can be used without problem.
-
Page 57: Shooting With Commonly Used Functions
Shooting with Commonly This chapter explains how to shoot in different conditions, as well as how to use common functions, such as the self-timer. This chapter assumes the camera is set to A mode for “Zooming in • More Closely on Subjects (Digital Zoom)” (p. 58) to “Using the Self-Timer” (p.
-
Page 58: Zooming In More Closely On Subjects (Digital Zoom)
Zooming in More Closely on Subjects (Digital Zoom) You can use the digital zoom to zoom up to approximately 140x and capture subjects that are too far away for the optical zoom to enlarge. The images may appear coarse, however, depending on the recording pixel setting (p. 74) and the zoom factor used.
-
Page 59
Digital Tele-Converter The focal length of the lens can be increased by approx. 1.7x or approx. 2.1x. This enables a faster shutter speed and less chance of camera shake than the zoom (including digital zoom) used by itself at the same zoom factor. The images may appear coarse, however, depending on the combination of recording pixel (p. -
Page 60: Inserting The Date And Time
Inserting the Date and Time You can insert the shooting date and time in the lower right corner of an image. Once inserted, however, they cannot be deleted. Be sure to check beforehand that the date and time are correctly set (p. 20). You can insert and print the shooting date in images which do not have an embedded date and time as follows.
-
Page 61: Using The Self-Timer
Using the Self-Timer The self-timer can be used to shoot a group photo that includes the photographer. The camera will shoot approximately 10 seconds after the shutter button is pressed. You can change the delay time and number of shots (p. 81). Press the p button.
-
Page 62: Shooting In Various Conditions
Shooting in Various Conditions The camera will select the necessary settings for the conditions in which you wish to shoot when you choose the matching mode. mode, images may appear coarse because the ISO speed (p. 76) is increased to match the shooting conditions. Choose a Shooting mode.
-
Page 63: Shooting In Special Scenes
Shooting in Special Scenes The camera will select the necessary settings for the conditions in which you wish to shoot when you choose the matching mode. Enter K mode. Set the mode dial to K. ● Choose the Shooting mode. After pressing the m button, press the ●…
-
Page 64
Shooting in Special Scenes In t mode, attach the camera to a tripod to prevent the camera from moving and blurring the image. Additionally, you should set the [IS Mode] to [Off] when shooting with a tripod (p. 161). Take shots of people at the beach (Beach) ●… -
Page 65: Adding Effects And Shooting
Adding Effects and Shooting Since you may not achieve the expected results with images shot in , try taking some test shots first. Shooting in Special Scenes Shoot images with vivid colors (Super Vivid) ● Lets you take shots with vivid, intense colors.
-
Page 66: Detecting A Smile And Shooting
Detecting a Smile and Shooting The camera will shoot, even without pressing the shutter button, when it detects a smile. What if a smile is not detected? Smiles are easier to detect if the subject faces the camera, and opens their mouth enough to show some teeth when smiling.
-
Page 67: Using The Wink Self-Timer
Using the Wink Self-Timer Point the camera at a person and press the shutter button fully. The camera will shoot approximately two seconds after it detects a wink. What if a wink is not detected? • Wink a bit slowly. •…
-
Page 68: Using The Face Self-Timer
Using the Face Self-Timer • Shutting both eyes will also be detected as a wink. • If a wink is not detected, the shutter will release approximately 15 seconds later. • If there are no people in the shot when the shutter button is pressed fully, the camera will shoot after a person enters the shot and winks.
-
Page 69: Shoot With The Effects Of A Fish-Eye Lens (Fish-Eye Effect)
Shoot with the Effects of a Fish-Eye Lens (Fish-eye Effect) Changing the number of shots in Step 1, press the op buttons. After choosing Even if your face is not detected after joining the subjects, the shutter will release approximately 15 seconds later. Shoot with the Effects of a Fish-Eye Lens (Fish-eye Effect) Lets you shoot with the distorting effect of a fish-eye lens.
-
Page 70: Take Shots That Look Like A Miniature Model (Miniature Effect)
Take Shots That Look Like a Miniature Model (Miniature Effect) Blurs chosen portions in the top and bottom of an image to produce the effect of a miniature model. If you press the m button in Step 2, the horizontal/vertical orientation of •…
-
Page 71: Choosing Settings Yourself
Choosing Settings Yourself In this chapter you will learn how to use the various functions in G mode to progressively advance your shooting skills. This chapter assumes that you have set the mode dial to G. • G stands for Program AE. •…
-
Page 72: Shooting In Program Ae
You can choose the settings for various functions to suit your preferences. AE stands for Auto Exposure. The focusing range is approximately 5 cm (2.0 in.) – infinity at maximum wide angle (j), and approximately 1.4 m (4.6 ft.) – infinity at maximum telephoto (i).
-
Page 73: Adjusting The Brightness (Exposure Compensation)
Adjusting the Brightness (Exposure Compensation) You can adjust the standard exposure set by the camera in 1/3-stop increments in the range of -2 to +2. Shooting Close-ups (Macro) You can shoot an object at a close distance or even shoot extreme close-ups of it.
-
Page 74: Changing The Recording Pixel Setting (Image Size)
(Image Size) You can choose from five recording pixel (image size) settings. Changing the Compression Ratio (Image Quality) You can choose from the following two compression ratios (image quality): (Fine), (Normal). Choose the recording pixel setting. After pressing the m button, press the ●…
-
Page 75
(Small) 0.3M/640×480 (Widescreen) 3744×2104 • The values in the table are measured according to Canon standards and may change depending on the subject, memory card and camera settings. Approximate Values for Paper Size A3 – A5 5″ x 7″ Postcard size 3.5″… -
Page 76: Changing The Iso Speed
Changing the ISO Speed Automatically adjusts the ISO speed to the Shooting mode and shooting conditions. Fine weather conditions, outdoor shooting. Cloudy, twilight High Nightscapes, dark interiors Changing the ISO speed • Lowering the ISO speed results in sharper images, but there may be an increased chance of subject or image blurring in certain shooting conditions.
-
Page 77: Adjusting The White Balance
Adjusting the White Balance The white balance (WB) function sets the optimal white balance for natural looking colors to match the shooting conditions. Auto Automatically sets the optimal white balance for the shooting conditions. Day Light Fine weather conditions, outdoor shooting Cloudy Cloudy, shady, twilight conditions Tungsten…
-
Page 78: Continuous Shooting
Continuous Shooting As long as you hold the shutter button down, the camera will shoot continuously. Maximum Speed Mode (Approx. images/sec.) Continuous Continuous Shooting AF Continuous Shooting LV* * When in t (p. 64), AF lock (p. 87) or manual focus modes (p. 89), •…
-
Page 79: Changing The Tone Of An Image (My Colors)
Changing the Tone of an Image (My Colors) You can change the tone of an image to sepia or black and white when shooting. My Colors Off Vivid Neutral Sepia Positive Film Lighter Skin Tone Darker Skin Tone Vivid Blue Vivid Green Vivid Red Custom Color…
-
Page 80: Using The Self-Timer To Prevent Camera Shake
Using the Self-Timer to Prevent Camera Shake Custom Color The contrast, sharpness, color saturation, red, green, blue, and skin tones in an image can be chosen and set at 5 different levels. Using the Self-Timer to Prevent Camera Shake The camera will shoot approximately two seconds after the shutter button is pressed, preventing any camera shake that occurs when pressing the shutter button.
-
Page 81: Customizing The Self-Timer
Customizing the Self-Timer You can set the time delay (0 – 30 seconds) and the number of shots (1 – 10 shots). What if the number of shots is set to two or more shots? • Exposure and white balance settings are set with the first shot. •…
-
Page 82: Shooting Using A Tv Monitor
Shooting Using a TV Monitor You can use a TV to display the camera screen content while shooting. • To connect the camera to a TV, follow the Steps in “Viewing Images on a TV” (p. 127). • Shooting procedures are the same as when using the camera screen. TV display is not available when using HDMI Cable HTC-100 (sold separately) to connect the camera to a high-definition TV.
-
Page 83: Getting More Out Of Your Camera
Getting More Out of Your This chapter serves as the advanced version of Chapter 4 and explains how to take pictures using various functions. This chapter assumes that you have set the mode dial to G. • • The sections “Setting the Shutter Speed” (p. 95), “Setting the Aperture Value”…
-
Page 84: Changing The Af Frame Mode
Changing the AF Frame Mode You can change the AF (Auto Focus) frame mode to match the scene you want to shoot. FlexiZone/Center The AF frame is locked to the center. This is effective for focusing on a specific point. In [FlexiZone], you can change the position and size of the AF frame (p.
-
Page 85: Changing The Af Frame Position And Size
Changing the AF Frame Position and Size When the AF frame mode is set to [FlexiZone] (p. 84) you can change the position and size of the AF frame. • The Spot AE Point frame can be linked with the AF frame (p. 92). •…
-
Page 86: Magnifying The Focal Point
Magnifying the Focal Point If you press the shutter button halfway, the AF frame will magnify and you can check the focus. What if the display does not magnify? The display will not appear magnified in [Face Detect] if a face cannot be detected or is too big in relation to the screen.
-
Page 87: Shooting With The Af Lock
• The camera may not be able to focus in some conditions. • In low light conditions, AF frames may not turn blue even after pressing the shutter button halfway. In this case, you can set the focus and exposure with the AF frame setting. •…
-
Page 88: Choosing The Person To Focus On (Face Select)
Choosing the Person to Focus On (Face Select) You can choose a specific person’s face to focus on and then shoot. Set the AF frame to [Face Detect] (p. 84). Enter Face Select mode. ● Point the camera toward the face of the subject and press the After [Face Select: On] appears, a face frame…
-
Page 89: Shooting In Manual Focus Mode
Shooting in Manual Focus Mode You can use manual focus when auto focus is not possible. If you press the shutter button halfway after roughly focusing manually, you can fine tune the focus. MF Distance Indicator • You cannot change the AF mode setting or size while focusing manually (p.
-
Page 90: Focus Bracketing (Focus-Bkt Mode)
Focus Bracketing (Focus-BKT Mode) The camera automatically takes three continuous shots in the following order: one at the position set in manual focus, and one each with focus positions preset farther and nearer. The focus adjustment can be set in 3 levels. In flash settings other than ! (p.
-
Page 91: Reacquiring Zoomed In Subjects (Frame Assist)
Reacquiring Zoomed In Subjects (Frame Assist) If you lose track of your subject while zoomed in, zooming out will make it easier to find. • While the camera is zoomed out, shooting information will not appear on the screen. • If you press the shutter button halfway while in the screen of Step 1, you can shoot at that zoom factor.
-
Page 92: Changing The Metering Method
Changing the Metering Method You can change the metering method (brightness measuring function) to match the shooting conditions. Suitable for standard shooting conditions, including back lit shots. Evaluative Automatically adjusts the exposure to match the shooting conditions. Center Averages the light metered from the entire frame, but gives greater Weighted Avg.
-
Page 93: Shooting With The Ae Lock
Shooting with the AE Lock You can lock the exposure and shoot, or set the focus and exposure separately to shoot. AE stands for “Auto Exposure”. Program Shift If you lock the exposure and turn the  dial, you can change the shutter speed and aperture value combination.
-
Page 94: Auto Exposure Bracketing (Aeb Mode)
Auto Exposure Bracketing (AEB Mode) Auto Exposure Bracketing (AEB Mode) The camera takes 3 continuous shots while automatically adjusting the exposure to standard exposure, underexposure and overexposure, in that order. In flash settings other than ! (p. 26), AEB is not available. •…
-
Page 95: Setting The Shutter Speed
Setting the Shutter Speed You can set the shutter to the speed at which you want to shoot. The camera will set the appropriate aperture value for the shutter speed you set. M stands for “Time value”. Available Shutter Speeds 15″, 13″, 10″, 8″, 6″, 5″, 4″, 3″2, 2″5, 2″, 1″6, 1″3, 1″, 0″8, 0″6, 0″5, 0″4, 0″3, 1/4, 1/5, 1/6, 1/8, 1/10, 1/13, 1/15, 1/20, 1/25, 1/30, 1/40, 1/50, 1/60, 1/80, 1/100, 1/125, 1/160, 1/200, 1/250, 1/320, 1/400, 1/500, 1/640, 1/800, 1/1000, 1/1250, 1/1500, 1/1600, 1/2000,…
-
Page 96: Setting The Aperture Value
Setting the Aperture Value You can set the aperture to a value at which you want to shoot. The camera will set the appropriate shutter speed for the aperture value you set. B stands for “Aperture value”, which refers to the size of the aperture opening inside the lens.
-
Page 97: Setting The Shutter Speed And Aperture Value
Setting the Shutter Speed and Aperture Value You can manually set the shutter speed and aperture to shoot images. D stands for “Manual”. Aperture Value Shutter Speed Standard Exposure Level Exposure Level Exposure Level Indicator • The standard exposure is calculated according to the metering method chosen (p.
-
Page 98: Correcting The Brightness And Shooting (I-Contrast)
Correcting the Brightness and Shooting (i-Contrast) The camera can detect areas in the scene, such as faces or backgrounds, that are too bright or dark and automatically adjust them to the optimum brightness when shooting. Also, when the overall image is lacking in contrast, the camera will automatically correct the image for a sharper impression when shooting.
-
Page 99: Shooting With Slow Synchro
Red-eye correction may be applied to areas other than red eyes. For example, when red make-up has been used around eyes. • You can correct recorded images (p. 142). If you hold down the h button for more than one second, the screen in •…
-
Page 100: Adjusting The Flash Exposure Compensation
Adjusting the Flash Exposure Compensation Just like with Exposure Compensation (p. 73), you can adjust the exposure ±2 stops in 1/3-stop increments when using the flash. Safety FE The camera automatically changes the shutter speed or aperture value when the flash fires to avoid overexposing and blowing out the highlights in the scene.
-
Page 101: Checking For Shut Eyes
You can also set the flash output. Press the n button and choose • [Flash Control] (p. 98) from the 4 tab. Then choose [Flash Output] and press the qr buttons to choose a setting. In M and B modes, you can set the flash output if you press the •…
-
Page 102: Registering Shooting Settings
Registering Shooting Settings You can register commonly used shooting modes and settings to your preference. To switch between registered settings, simply turn the mode dial . Even if you switch shooting modes or turn off the power, settings that usually cancel (self timer, etc.) will be saved. Settings that Can be Registered Shooting modes (G, M, B and D) •…
-
Page 103: Changing The Color And Shooting
Changing the Color and Shooting You can change the look of an image when shooting. However, depending on shooting conditions the image may become coarse, or the colors may not come out as expected. Color Accent You can choose to retain a single color and change the rest to black and white in a composition.
-
Page 104
Changing the Color and Shooting Color Swap You can swap one color in an image for another when recording it. You can only swap one color. Choose Y. ● Follow Steps 1 – 2 on p. 63 to choose Y. Press the l button. -
Page 105
• Using the flash may cause unexpected results in this mode. • Under some conditions, the image may appear coarse. Changing the Color and Shooting Specify the range of colors to be swapped. ● Press the op buttons or turn the  dial to adjust the range of colors to be changed. -
Page 106: Shooting Stitch Assist Images
Shooting Stitch Assist Images Large subjects can be split into several shots that can later be merged together using the included software on a computer to create a panoramic image. • This function is not available when a TV is used as the monitor (p. 82). •…
-
Page 107: Using Various Functions For Shooting Movies
Using Various Functions for This chapter serves as a more advanced version of the “Shooting Movies” and “Viewing Movies” sections in Chapter 1, and explains how to use various functions for shooting and viewing movies. This chapter assumes that the mode dial has been set to E mode. You •…
-
Page 108: Shooting Movies In E Mode
Shooting Movies in E Mode Changing the Movie Mode You can choose between four Movie modes. E Standard Miniature Effect > Color Accent z Color Swap Under some conditions, colors may not turn out as expected in > and z modes.
-
Page 109: Shoot Movies That Look Like A
Shoot Movies That Look Like a Miniature Model (Miniature Effect) You can shoot movies that look like moving miniature models. You create the miniature model effect by choosing the upper and lower portions of the scene that will be blurred and the playback speed, which makes people and objects in the scene move quickly during playback.
-
Page 110
Shoot Movies That Look Like a Miniature Model (Miniature Effect) Playback Speeds and Estimated Playback Times (for 1 Min. Clips) Speed If you press the m button in Step 2, the horizontal/vertical orientation of • the frame will switch, and you can use the qr buttons to change the frame position when it is displayed vertically. -
Page 111: Changing The Image Quality
Memory Card Capacity Image Quality • Based on Canon’s testing standards. • Recording will automatically stop when the clip file size reaches 4 GB, or when the recording time reaches 29 minutes and 59 seconds when shooting in approximately 1 hour when shooting in •…
-
Page 112: Taking Still Images While Shooting A Movie
You can shoot still images while shooting a movie. • While shooting in (p. 74). • While shooting a movie in recording pixel setting you set for still images (p. 74). However, if the recording pixel setting is will be recorded at a setting of •…
-
Page 113: Ae Lock/Exposure Shift
What if 4 changes and you can’t take a still image? You may not be able to take still images when the writing speed to the memory card is slow, or when there is insufficient internal memory. 4 (blinking): Processing recorded image. You can shoot when the icon stops •…
-
Page 114: Sound Settings
Adjusting the Recording Volume You can manually set the recording volume for shooting movies. Using the Wind Filter Wind Filter suppresses noise when the wind is strong. However, unnatural sound may result when used to record in locations with no wind. ●…
-
Page 115: Other Shooting Functions
Other Shooting Functions The following functions can be used in the same way as for still images. Functions marked with a * can be used in the same way as for still images , > or z. when in • Zooming in More Closely On Subjects — The optical and digital zooms (p.
-
Page 116: Playback Functions
Playback Functions The following functions can be used in the same way as for still images. • Erasing Images (p. 29) • Quickly Searching Images (p. 120) • Viewing Images in Filtered Playback (p. 121) • Viewing Slideshows (p. 123) •…
-
Page 117: Editing
Editing You can trim the beginnings and ends of recorded movies. Movie Editing Panel Movie Editing Bar Choose *. Follow Steps 1 – 3 on p. 32 to choose *, ● then press the m button. The movie editing panel and the movie editing bar will appear.
-
Page 118: Save The Edited Movie
Editing • When [Overwrite] is chosen in Step 4, the unedited movie is overwritten with the edited movie, erasing the original. • When there is not enough space left on the memory card, only [Overwrite] can be chosen. • If the battery is depleted partway through editing, the edited movie clips may not be saved.
-
Page 119: Using Various Playback And Editing Functions
Using Various Playback and This chapter explains various ways to play back and edit images. Press the 1 button to enter Playback mode before operating the camera. • • It may not be possible to play back or edit images that have been edited on a computer, had their file name changed, or have been taken on a different camera.
-
Page 120: Quickly Searching Images
Quickly Searching Images Searching Images Using Index Display Displaying multiple images at the same time lets you quickly find the image you want. Searching Images Using the Control Dial Turning the control dial will display images in a line letting you quickly search them.
-
Page 121: Viewing Images In Filtered Playback
Viewing Images in Filtered Playback When there are many images on the memory card, you can filter and display them by a specified filter. You can also protect (p. 129) or delete (p. 132) all images at once while filtered. Jump to Favorites Jump Shot Date Jump to My Category…
-
Page 122
Viewing Images in Filtered Playback What if you can’t choose a filter? Filters that do not have any corresponding images cannot be chosen. Filtered playback In filtered playback (Step 2), you can view filtered images with “Quickly Searching Images” (p. 120), “Viewing Slideshows” (p. 123), and “Magnifying Images” (p. -
Page 123: Viewing Slideshows
Viewing Slideshows You can automatically play back images recorded to a memory card. If you press the qr buttons or turn the  dial during playback, the • image will switch. If you keep the qr buttons pressed, you can fast- forward through images.
-
Page 124: Checking The Focus
You can magnify the area of a recorded image that was inside the AF Frame, or the area of a face that was detected, to check the focus. Press the l button to switch to the focus check display (p. 47). A white frame will appear where the AF frame or face was when the focus was set.
-
Page 125: Magnifying Images
Magnifying Images Approximate Location of Displayed Area You can return to single image playback immediately by pressing the n button while the image is magnified. Displaying Various Images (Smart Shuffle) The camera will choose four images based on the displayed image. If you choose one of those images, the camera will choose four more images letting you enjoy the playing back of images in an unexpected order.
-
Page 126: Changing Image Transitions
Changing Image Transitions • Only still images shot with this camera will play back in Smart Shuffle. • [Smart Shuffle] is not available in the following situations: If there are less than 50 images taken with this camera on the memory card. If you play back images not supported by Smart Shuffle.
-
Page 127: Viewing Images On A Tv
Viewing Images on a TV Using the supplied stereo AV cable (p. 2), you can connect the camera to a TV to view images you have shot. White Yellow Yellow White What if the images don’t display correctly on the TV? Images will not display correctly if the camera’s video output setting (NTSC/PAL) does not match the TV system.
-
Page 128: Viewing Images On A High-Definition Tv
Viewing Images on a High-Definition TV Use the separately sold HDMI Cable HTC-100 to connect the camera to a high-definition TV for an enhanced viewing experience. Operation sounds will not play when connected to a high-definition TV. Turn off the camera and TV. Connect the camera to the TV.
-
Page 129: Protecting Images
Protecting Images You can protect important images so that they cannot be accidentally erased with the camera (pp. 29, 132). Choose a selection method If you format the memory card (pp. 23, 54), protected images will also be erased. Protected images cannot be erased with the camera’s erase function. To erase an image, cancel protection settings first.
-
Page 130
Protecting Images If you switch shooting modes or turn off the power before performing the operations in Step 3, images will not be protected. Select Range Protect the image. ● If you press the n button, a confirmation screen will appear. ●… -
Page 131: Protect Images
Choose images with the  dial You can also choose the first or last image by turning the  dial when the upper screen in Steps 2 and 3 is displayed. Choose All Images You can unlock groups of protected images if you choose [Unlock] in Step 4, while in [Select Range] or Step 2 while in [All Images].
-
Page 132: Erasing Images
Erasing Images You can choose images and then erase them in groups. Since erased images cannot be recovered, exercise adequate caution before erasing. Protected images (p. 129) cannot be erased. Choose a selection method Choosing Images Individually Choose [Erase]. ● Press the n button to choose [Erase] in the 1 tab, then press the m button.
-
Page 133
Select Range Choose All Images Erase. ● If you press the n button, a confirmation screen will appear. ● Press the qr buttons or turn the  dial to choose [OK], then press the m button. Choose [Select Range]. ● Follow Step 2 on p. -
Page 134: Tagging Images As Favorites
Tagging Images as Favorites When you tag images as favorites, you can easily categorize just those images. You can also filter out just those images for viewing, protecting or erasing (p. 121). If you switch Shooting modes or turn off the power before making the setting in Step 3, images will not be tagged as favorites.
-
Page 135: Organizing Images By Category (My Category)
Organizing Images by Category (My Category) You can organize images into categories. You can display the images in a category in Filtered Playback (p. 121) and process all images at once by using the functions below. • Viewing Slideshows (p. 123), Protecting Images (p. 129), Erasing All Images (p.
-
Page 136
Organizing Images by Category (My Category) If you switch Shooting modes or turn off the power before making the setting in Step 4, images will not be tagged as My Category. Select Range Choose an image. ● Press the qr buttons or turn the  dial to choose an image. -
Page 137: Rotating Images
If you choose [Deselect] in Step 4, you can deselect all of the images in the [Select Range] category. Rotating Images You can change the orientation of an image and save it. Movies with a resolution of Choose a category. ●…
-
Page 138: Resizing Images
Resizing Images You can resize images to a lower pixel setting and save the resized image as a separate file. • You cannot resize an image to a larger size. • Images recorded at a pixel setting of 3 cannot be edited. Choose [Resize].
-
Page 139: Trimming
Trimming You can cut out a portion of a recorded image and save it as a new image file. Trimming Area Trimming Area Display Recorded pixels after trimming • Images recorded at a pixel setting of resized to (p. 138) cannot be edited. •…
-
Page 140: Adding Effects With The My Colors Function
Adding Effects with the My Colors Function You can change the color of an image and save it as a separate image. Refer to p. 79 for details on each menu item. If you repeatedly change the color of the same image, the quality will gradually deteriorate and you may not achieve the expected color.
-
Page 141: Correcting The Brightness (I-Contrast)
Correcting the Brightness (i-Contrast) The camera can detect areas in an image, such as faces or backgrounds, that are too dark and automatically adjust them to the optimum brightness. Also, when the overall image is lacking in contrast, the camera will automatically correct the image for a sharper impression.
-
Page 142: Correcting The Red-Eye Effect
You can automatically correct red eyes in images and save them as new files. • Some images may not be corrected properly. • When [Overwrite] in Step 4 is chosen, the uncorrected image is overwritten with the corrected data, erasing the original image. •…
-
Page 143: Printing
Printing This chapter explains how to choose images for printing, and print using a Canon-brand PictBridge compliant printer (sold separately) (p. 41). Please also refer to the Personal Printing Guide. Canon-Brand PictBridge Compliant Printers…
-
Page 144: Printing Images
You can easily print the pictures you take by connecting the camera to a PictBridge compliant printer (sold separately) using the supplied interface cable (p. 2). Turn off the camera and printer. Connect the camera to the printer. ● Open the cover and insert the small plug of the included interface cable (p.
-
Page 145
Refer to the Personal Printing Guide for details on printing. • Refer to p. 41 for Canon-brand Pictbridge compliant printers. • Index printing (p. 147) is not available on certain Canon-brand PictBridge compliant printers (sold separately). Choose an image to print. ●… -
Page 146: Printing From The Print List (Dpof)
Printing from the Print List (DPOF) You can add images to the print list (DPOF) directly after shooting or during playback by pressing the c button. These selection methods comply with the DPOF (Digital Print Order Format) standards. You cannot add images when the camera is connected to the printer. Choose an image.
-
Page 147: Choosing Images For Printing (Dpof)
Choosing Images for Printing (DPOF) You can choose up to 998 images on a memory card for printing and specify settings such as the number of copies so that they can be printed together (p. 150) or processed at a photo developer service. These selection methods comply with the DPOF (Digital Print Order Format) standards.
-
Page 148: Choosing The Number Of Copies
Choosing Images for Printing (DPOF) • With [Index] chosen, the [Date] and [File No.] options cannot be set to [On] at the same time. • The date will be printed in the style set in the [Date/Time] function in the 3 tab (p.
-
Page 149: Set All Images To Print Once
Select Range Set All Images to Print Once Clearing All Selections Choosing Images for Printing (DPOF) Choose [Select Range]. ● In Step 1 on p. 148, choose [Select Range], then press the m button. ● Follow Steps 2 and 3 on p. 130 to choose images.
-
Page 150: Print Added Images
Print Added Images Print Added Images You can print images added to the print list by connecting the camera to a PictBridge compliant printer (pp. 146 – 149). Number of copies to print All selections will be cleared. ● Press the qr buttons or turn the  dial to choose [OK], then press the m button.
-
Page 151: Customizing Camera Settings
Customizing Camera Settings You can customize various settings to suit your shooting preferences. The first part of this chapter explains convenient and commonly used functions. The latter part explains how to change shooting and playback settings to suit your purposes.
-
Page 152: Changing Camera Settings
Changing Camera Settings You can customize convenient and commonly used functions from the 3 tab (p. 49). Changing Sounds You can change each of the camera’s operation sounds. Turning Off Hints & Tips When you choose an item in the ø menu (p. 48) or MENU (p. 49), a description of the function (hints and tips) is displayed.
-
Page 153
Changing the Start-up Screen You can change the start-up screen that appears when you turn on the camera. Registering Recorded Images as the Start-up Screen When you press the 1 button and set the camera to Playback mode, you can register an image. -
Page 154
Changing Camera Settings Register the start-up image or sounds with the included software The dedicated operation sounds and start-up images on the included software can be registered to the camera. Refer to the Software Guide for details. Changing the File Number Assignment Images you shoot are automatically assigned file numbers in the order they were taken, from 0001 –… -
Page 155: Creating Folders By Shooting Date
Creating Folders by Shooting Date Images are saved into folders created each month, however, you can also create folders by shooting date. Changing the Lens Retract Time For safety reasons, the lens retracts about 1 minute after pressing the 1 button when in a Shooting mode (p.
-
Page 156: Setting The Screen Shut-Off Time
Changing Camera Settings Setting the Screen Shut-Off Time You can adjust the time the screen takes to shut off automatically (p. 52). This also works when [Auto Power Down] is set to [Off]. Using the World Clock When travelling abroad, you can record images with local dates and times simply by switching the time zone setting.
-
Page 157
If you change the date or time in the time and date will automatically change. Changing Distance Units You can change the distance units that display in the zoom bar (p. 25) and the MF indicator (p. 89) from m/cm to ft/in. Changing Camera Settings Set the world time zone. -
Page 158: Changing Shooting Function Settings
Changing Shooting Function Settings If you set the mode dial to G, you can change the settings in the 4 tab (p. 49). Before attempting to shoot using a function explained in this chapter in modes other than G mode, check if the function is available in those modes (pp.
-
Page 159: Changing The Flash Timing
Changing the Flash Timing You can change the timing of the flash and shutter. Turning Off the Red-Eye Reduction Function The red-eye reduction lamp lights in order to reduce the red-eye effect that occurs when shooting in dark conditions with the flash. You can turn off this function.
-
Page 160: Customizing Display Information
Changing Shooting Function Settings Changing the Way the Image Displays Right After Shooting You can change the way the image displays right after shooting. Customizing Display Information You can change which information is displayed by switching between custom displays with each press of the l button. ●…
-
Page 161
If you press the shutter button halfway and return to the shooting screen from the custom display settings screen, the settings will not be saved. • Gray items can also be set, however, they may not appear depending on the Shooting mode. •… -
Page 162
Changing Shooting Function Settings • If camera shake is too strong, attach the camera to a tripod. You should also set the IS Mode to [Off] when the camera is attached to a tripod. • When using [Panning], hold the camera horizontally to shoot. Image stabilization does not work when the camera is held vertically. -
Page 163: Registering Commonly Used Shooting Menus (My Menu)
Registering Commonly Used Shooting Menus (My Menu) You can register up to 5 items from commonly used shooting menus to the tab, letting you quickly access these items from a single screen. Choose [My Menu settings]. ● Choose [My Menu settings] in the then press the m button.
-
Page 164: Changing Playback Function Settings
Changing Playback Function Settings • Gray items in Step 2 can also be set, however, they may not be available depending on the Shooting mode. Choose [Set default view] and press the qr buttons to choose [Yes]. My • Menu can now be displayed by pressing the n button when in a Shooting mode.
-
Page 165: 10Useful Information
Useful Information This chapter introduces how to use separately sold accessories (p. 39), troubleshooting tips, and contains lists of functions and items that appear on the screen.
-
Page 166: Using Household Power
Using Household Power If you use AC Adapter Kit ACK-DC50 (sold separately), you can use the camera without worrying about how much charge is left in the battery. Terminals Cord Turn off the camera. Plug the cord into the coupler. ●…
-
Page 167: Using The Lens Hood (Sold Separately)
Do not unplug the plug or power cord with the camera turned on. This could erase images you have taken or damage the camera. Using the Lens Hood (Sold Separately) When shooting a wide-angle photo that is backlit without using a flash, we recommend attaching Lens Hood LH-DC60 to reduce the amount of extraneous light entering the lens.
-
Page 168: Using An Externally Mounted Flash (Sold Separately)
• Using a non-Canon brand flash (particularly a high-voltage flash) or flash accessories may inhibit normal operation or damage the camera. Attach the case for the hot shoe cap to the strap.
-
Page 169
If you hold down the h button for more than one second, you can also display the settings screen. Attaching the Hot Shoe Cap Using an Externally Mounted Flash (Sold Separately) Turn the flash on, then turn the camera on. A red h appears on the screen (or the viewfinder). -
Page 170: Sold Separately
Using an Externally Mounted Flash (Sold Separately) Configuring the Externally Mounted Flash (Sold Separately) Speedlite 270EX, 430EX II, and 580EX II • The maximum flash synchro shutter speed is 1/250 second. • The flash output will automatically adjust when [Flash Mode] is set to [Auto].
-
Page 171
Using Speedlite 430EX II and 580EX II Other Canon Flashes Canon flashes other than the Speedlite EX series will fire at their full strength. For the optimal aperture values and ISO speeds for the distance to the subject, refer to the guide number listed in the flash’s user guide. -
Page 172: Using An Eye-Fi Card
Before using an Eye-Fi card, be sure to check whether Eye-Fi card use is authorized in the country or territory of use (p. 16). When you put a prepared Eye-Fi card into the camera, you can automatically transfer your images wirelessly to a computer, or upload them to a web service.
-
Page 173: Checking Connection Information
Checking Connection Information You can check the Eye-Fi card’s access point SSID, or connection status. Disabling Eye-Fi Transfer You can set the card to disable Eye-Fi transfer. What if [Eye-Fi Settings] does not appear? [Eye-Fi Settings] will only appear when an Eye-Fi card is inserted in the camera. If the Eye-Fi card has a write-protect tab, you will not be able to check the card’s connection status, or set [Eye-Fi trans.] to [Disable] when the tab is in the locked position.
-
Page 174: Troubleshooting
If you think there is a problem with the camera, first check the following. If the items below do not solve your problem, contact a Canon Customer Support Help Desk as listed on the included customer support list. Power You pressed the power button, but nothing happened.
-
Page 175
Image is blurred. • Press the shutter button halfway to focus on the subject, then press fully to shoot (p. 24). • Shoot the subject within the focusing distance (p. 189). • Set the [AF-assist Beam] to [On] (p. 158). •… -
Page 176
Troubleshooting Recording images to the memory card takes a long time, or continuous shooting slows down. • Perform a low-level format of the memory card in the camera (p. 54). Cannot make settings for shooting functions or ø menu. • The items in which settings can be made differ depending on the shooting mode. -
Page 177: List Of Messages That Appear On The Screen
Memory card error (p. 54) • If the same message appears even when a formatted memory card is installed in the correct direction, contact a Canon Customer Support Help Desk (p. 17). Insufficient space on card • There is not enough free space on the memory card to shoot (pp. 25, 30, 57, 71, 107) or edit images (pp.
-
Page 178
If an error code appears directly after taking a picture, the shot may not have been recorded. Check the image in Playback mode. • If this error code reappears, note the Error number (Exx) and contact a Canon Customer Support Help Desk as there may be a problem with the camera. -
Page 179: Information Displayed On The Screen
Information Displayed on the Screen Shooting (Information Display) The same information will display on the viewfinder. Battery Charge Indicator (p. 15) Camera Orientation* White Balance (p. 77) My Colors (p. 79) AEB Shooting (p. 94) / Focus Bracketing (p. 90) Drive Mode (p.
-
Page 180: Scene Icons
Information Displayed on the Screen : Standard, : Held vertically When shooting, the camera detects if it is held vertically or horizontally, and adjusts settings accordingly for the best shot. It also detects orientation during playback, so you can hold the camera in either orientation and it will automatically rotate images for correct viewing.
-
Page 181
Playback (Detailed Information Display) Print List (pp. 146, 147) My Category (p. 135) Shooting mode (p. 182) ISO Speed (p. 76), Playback Speed (Movies) (p. 109) Exposure Compensation (p. 73), Exposure Shift Amount (p. 113) White Balance (p. 77) Histogram (p. 47) Image Editing (pp. -
Page 182: Functions Available In Each Shooting Mode
Functions Available in Each Shooting Mode Function Flash (pp. 26, 72, 99)* Zoom Framing Assist (p. 91) Change AF Frame Position and Size (p. 85) Face Select (p. 88) Exposure Compensation (p. 73) AE Lock (p. 93)/FE Lock (p. 93)/Program Shift (p. 93) AE Lock/Exposure Shift (p.
-
Page 183
— — — — * — — — — — — — — — — — — — — — — — — — — — — — — — — — — — — — — — — — — — —… -
Page 184: Menus
Menus 4 Shooting Menu Function FlexiZone AF Frame (p. 84) Center Face Detect Standard Digital Zoom (p. 58) Digital Tele-converter (1.7x/2.1x) AF-Point Zoom (p. 86) On/Off Servo AF (p. 86) On/Off Continuous AF (p. 78) On/Off AF-assist Beam (p. 158) On/Off MF-Point Zoom (p.
-
Page 185
— — — — — — — — — — — — — — — — — — — — — — — — — — — — — — — — — — — — — — — — — — — — — — — — —… -
Page 186: Set Up Menu
Menus 3 Set up Menu Item Mute Volume Sound Options Hints & Tips LCD Brightness Start-up Image Format File Numbering Create Folder Lens Retract Power Saving Time Zone Date/Time Distance Units Video System Eye-Fi Settings Language Reset All * Default setting My Menu Menu Item My Menu settings…
-
Page 187: Playback Menu
1 Playback Menu Item Smart Shuffle Slideshow Erase Protect Rotate Favorites My Category i-Contrast Red-Eye Correction Trimming Resize My Colors Scroll Display Resume Transition * Default setting 2 Print Menu Item Print Select Images & Qty. Select Range Select All Images Clear All Selections Print Settings Content…
-
Page 188: Handling Precautions
• Use a commercially available blower brush to remove dust from the lens. For stubborn dirt contact a Canon Customer Support Help Desk as listed on the customer support leaflet supplied with your camera. • When you move the camera rapidly from cold to hot temperatures, condensation may form on the internal or external surfaces of the camera.
-
Page 189: Specifications
Specifications Image Sensor Camera Effective Pixels … Approx. 14.1 million pixels Lens Focal Length… 35x zoom: 4.3 (W) – 150.5 (T) mm (35mm film equivalent: Focusing Range … 0 cm (0 in.) – infinity (W), 1.4 m (4.6 ft.) – infinity (T) Image Stabilizer System…
-
Page 190
Specifications Shooting Mode … C2, C1, M, Av, Tv, P, Auto, Portrait, Landscape, Sports, SCN* Digital Zoom … Still images/Movies: Approx. 4.0x (up to approx. 140x in Continuous Shooting Mode … Normal, AF, LV Speed (Normal)… Approx. 1.3 shots/sec. (In P mode) Number of Shots (Approximate) (CIPA compliant) … -
Page 191
Largest Diameter x Length … 69.6 x 27.0 mm (2.74 x 1.06 in.) Weight … Approx. 10 g (0.35 oz.) • All data is based on tests by Canon. • Camera specifications or appearance are subject to change without notice. -
Page 192: Index
Changing … 21 Date/Time Battery… 21 Setting … 20 World Clock … 156 Default Settings … 53 DIGITAL CAMERA Solution Disk … 2 Digital Tele-Converter … 59 Digital Zoom … 58 Display Language… 22 DPOF … 146, 147 Drive Mode … 78 Dynamic mode …
-
Page 193
AF Frame… 26, 84 AF Lock… 87 AF-Point Zoom… 86 Face Select… 88 Servo AF… 86 Focus Check… 124 Focus Lock … 82 Focusing Range … 73 Manual Focus … 89 Foliage (Shooting Mode) … 64 Format Memory Cards, Formatting Formatting (Memory Card) … -
Page 194
Slideshow … 123 Smart Shuffle… 125 Smile (Shooting Mode)… 66 Snow (Shooting Mode)… 64 Software DIGITAL CAMERA Solution Disk … 2 Installation … 34 Software Guide… 2 Transferring Images to a Computer for Viewing … 33 Sound Settings … 50 Sports (Shooting Mode) … -
Page 195
MEMO… -
Page 196
• Reprinting, transmitting, or storing in a retrieval system any part of this guide without the permission of Canon is prohibited. • Canon reserves the right to change the contents of this guide at any time without prior notice. • Illustrations and screenshots in this guide may differ slightly from the actual equipment.
 Модель: Компактная фотокамера Canon PowerShot SX30 IS
Год выпуска: 2010
Количество страниц: 195
Язык: русский
Формат: pdf
Размер: 13,3 Mb
Описание:
Камера Canon PowerShot SX30 IS с 35-кратным оптическим зумом — это подтверждение мастерства Canon в оптических технологиях. Оптический стабилизатор изображения, действие которого эквивалентно уменьшению выдержки на величину до 4,5 ступеней, и функция Zoom Framing Assist помогают без труда снимать четкие фотографии и видео в формате HD.
Содержание
- Проверка комплектности.
- Прочитайте это в первую очередь.
- Что требуется сделать.
- Меры предосторожности.
- Условные обозначения.
- 1. Начало работы.
- Зарядка аккумулятора.
- Поддерживаемые карты памяти (продаются отдельно).
- Установка аккумулятора и карты памяти.
- Использование экрана.
- Установка даты и времени.
- Установка языка.
- Форматирование карт памяти.
- Нажатие кнопки спуска затвора.
- Съемка фотографий (Smart Auto).
- Просмотр изображений.
- Стирание изображений.
- Съемка видеофильмов.
- Просмотр видеофильмов.
- Передача изображений в компьютер для просмотра.
- Дополнительные принадлежности.
- Отдельно продаваемые принадлежности.
- 2. Дополнительные сведения.
- Элементы камеры и их назначение.
- Индикация на экране.
- Индикатор.
- Меню FUNC. – Основные операции.
- MENU – Основные операции.
- Изменение режима звуковых сигналов.
- Изменение яркости экрана.
- Настройка видоискателя.
- Функция экономии энергии (Автовыключение).
- Восстановление в камере настроек по умолчанию.
- Низкоуровневое форматирование карты памяти.
- Функции часов.
- 3. Съемка с часто используемыми функциями.
- Дополнительное увеличение объектов (Цифровой зум).
- Вставка даты и времени.
- Использование таймера автоспуска.
- Съемка в различных условиях.
- Съемка в режиме специальных сюжетов.
- Съемка при обнаружении улыбки.
- Использование таймера при моргании.
- Использование таймера при определении лица.
- Съемка с эффектом объектива «Рыбий глаз» (Эффект Рыбий глаз).
- Съемка кадров, выглядящих как изображение миниатюрной модели (Эффект миниатюры).
- 4. Выбираем настройки самостоятельно.
- Съемка в режиме программной AE.
- Включение вспышки.
- Настройка яркости (компенсация экспозиции).
- Съемка с близкого расстояния (Макро).
- Изменение значения разрешения (размер изображения).
- Изменение коэффициента компрессии (качество изображения).
- Изменение числа ISO.
- Настройка баланса белого.
- Серийная съемка.
- Изменение цветового оттенка изображения (Мои цвета).
- Использование таймера автоспуска для предотвращения сотрясения камеры.
- Настройка таймера автоспуска.
- Съемка с помощью телевизора.
- Изменение композиции кадра с помощью фиксации фокусировки.
- 5. Полное использование возможностей камеры.
- Изменение режима рамки автофокусировки.
- Изменение положения и размера рамки автофокусировки.
- Увеличение точки фокусировки.
- Съемка в режиме следящей автофокусировки.
- Съемка с фиксацией автофокусировки.
- Выбор человека для фокусировки (Выбор лица).
- Съемка в режиме ручной фокусировки.
- Фокусировочная вилка (Фокус-BKT).
- Восстановление наводки на увеличенный объект (Помощь при кадрировке).
- Изменение способа экспозамера.
- Съемка с фиксацией AE.
- Съемка с фиксацией FE.
- Автоматический брекетинг (Режим AEB).
- Установка выдержки затвора.
- Установка величины диафрагмы.
- Установка выдержки затвора и величины диафрагмы.
- Коррекция яркости и съемка (i-Contrast).
- Коррекция «красных глаз».
- Съемка с синхронизацией при длительной выдержке.
- Настройка компенсации экспозиции при съемке со вспышкой.
- Настройка мощности вспышки.
- Проверка наличия закрытых глаз.
- Регистрация параметров съемки.
- Съемка с изменением цветов.
- Съемка панорам.
- 6. Использование различных функций для съемки видеофильмов.
- Съемка видеофильмов в режиме Видео.
- Изменение режима видеосъемки.
- Съемка видеофильмов, выглядящих как изображение миниатюрной модели (Эффект миниатюры).
- Изменение качества изображения.
- Съемка фотографий во время съемки видеофильма.
- Фиксация AE/Сдвиг экспозиции.
- Параметры звука.
- Прочие функции съемки.
- Функции воспроизведения.
- Редактирование.
- 7. Использование различных функций воспроизведения и редактирования.
- Быстрый поиск изображений.
- Просмотр изображений при воспроизведении с фильтром.
- Просмотр слайд-шоу.
- Проверка фокусировки.
- Увеличение изображений.
- Отображение различных изображений (Умное отображение).
- Изменение эффекта перехода между изображениями.
- Просмотр изображений на экране телевизора.
- Просмотр изображений на телевизоре высокой четкости.
- Защита изображений.
- Стирание изображений.
- Пометка изображений как избранных.
- Систематизация изображений по категориям (Моя категория).
- Поворот изображений.
- Изменение размера изображений.
- Кадрировка.
- Добавление эффектов с помощью функции «Мои цвета».
- Коррекция яркости (i-Contrast).
- Коррекция эффекта «красных глаз».
- 8. Печать.
- Печать изображений.
- Печать из списка печати (DPOF).
- Выбор изображений для печати (DPOF).
- Печать добавленных изображений.
- 9. Настройка параметров камеры.
- Изменение параметров камеры.
- Изменение параметров функций съемки.
- Регистрация часто используемых пунктов меню съемки (Моё меню).
- Изменение параметров функций воспроизведения.
- 10. Полезная информация.
- Питание от бытовой электросети.
- Использование бленды объектива (продается отдельно).
- Использование внешней вспышки (продается отдельно).
- Использование карты Eye-Fi.
- Устранение неполадок.
- Список сообщений, отображаемых на экране.
- Информация, отображаемая на экране.
- Функции, доступные в различных режимах съемки.
- Меню.
- Правила обращения.
- Технические характеристики.
- Алфавитный указатель.
Скачать: disk.yandex.ru | mega.co.nz
Раздел: Видео Аудио Фото Оборудование
Тип: Цифровой Фотоаппарат Более 16 Мпикс
Характеристики, спецификации
Общее число пикселов:
14.1 млн
Число эффективных пикселов:
14.1 млн
Максимальное разрешение:
4320 x 3240
Чувствительность:
80 — 1600 ISO, Auto ISO
Баланс белого:
автоматический, ручная установка, из списка
Вспышка:
встроенная, до 5.80 м, подавление эффекта красных глаз, башмак, брекетинг, E-TTL
Стабилизатор изображения (фотосъемка):
оптический, подвижный элемент в объективе
Скорость съемки:
1.3 кадр./сек
Время работы таймера:
2, 10 c
Формат кадра (фотосъемка):
4:3, 16:9
Фокусное расстояние:
24 — 840 мм
Функция «Оптический Zoom»:
35x
Возможность установки сменных насадок:
есть
Число оптических элементов:
13
Число групп оптических элементов:
10
Использование экрана в качестве видоискателя:
есть
Число пикселей видоискателя:
202000
Жидко кристалический экран:
230000 точек, 2.70 дюйма
Тип ЖК экрана:
поворотный
Выдержка по технологии X-Sync:
1/2000 c
Ручная настройка выдержки и диафрагмы:
есть
Автоматическая обработка экспозиции:
с приоритетом затвора, с приоритетом диафрагмы
Экспо коррекция:
+/- 2 EV с шагом 1/3 ступени
Замер экспозиции:
центровзвешенный, общий (Evaluative), точечный
Подсветка автофокуса:
есть
Тип карт памяти:
SD, SDHC, SDXC, MMCPlus, HC MMCPlus
Интерфейсы:
USB 2.0, видео, HDMI, аудио
Формат аккумуляторов:
свой собственный
Количество аккумуляторов:
1
Емкость аккумулятора:
370 фотографий
Запись видео роликов:
есть
Максимальное разрешение видеороликов:
1280×720
Максимальная частота кадров видеоролика:
30 кадров/с
Максимальная частота кадров при съемке HD видео:
25/30 кадров/с при разрешении 1280×720
Функция «Цифровой Zoom»:
4x
Вес устройства:
601 г, с элементами питания
Инструкция к Цифровому Фотоаппарату Более 16 Мпикс Canon PowerShot SX30 IS

Руководство пользователя камеры
• Перед началом работы с камерой обязательно ознакомьтесь
с данным Руководством, включая раздел «Меры предосторожности».
• Храните это Руководство в надежном месте, чтобы его можно
было использовать в будущем.
РУССКИЙ
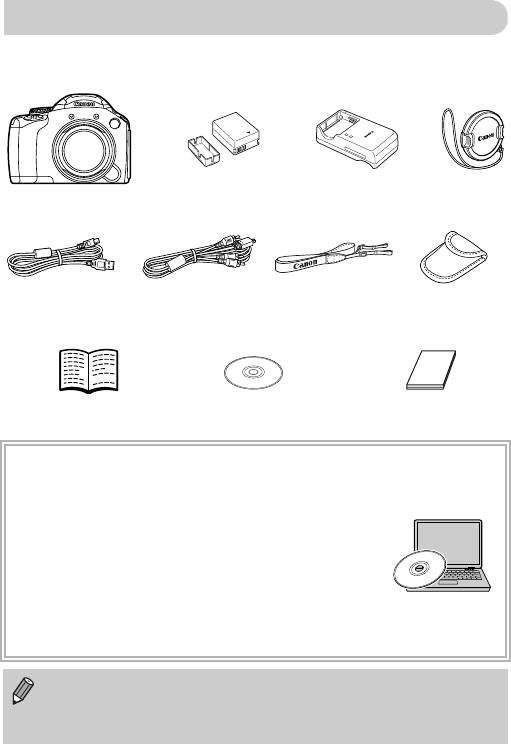
Проверка комплектности
Проверьте наличие в комплекте поставки камеры перечисленных ниже комплектующих.
При отсутствии какой-либо принадлежности обращайтесь по месту приобретения камеры.
Аккумулятор NB-7L
Зарядное устройство
Крышка
Камера (с крышкой
(с крышкой клемм)
CB-2LZ/CB-2LZE
объектива
гнезда внешней вспышки)
Интерфейсный
Стереофонический
Шейный ремень
Чехол для защитной
кабель IFC-400PCU
аудио/видеокабель
NS-DC11
крышки гнезда
AVC-DC400ST
внешней вспышки
Начало работы
Компакт-диск DIGITAL
Гарантийный талон Canon
CAMERA Solution Disk
на русском языке
Использование руководств
Также см. руководства на компакт-диске «DIGITAL CAMERA Manuals Disk».
• Руководство пользователя камеры (настоящее Руководство)
Освоив основные операции, переходите к освоению многочисленных
функций камеры для съемки более сложных фотографий.
• Руководство по персональной печати
Ознакомьтесь с ним, если требуется подключить камеру к принтеру
(продается отдельно) и произвести печать.
• Руководство по программному обеспечению
Ознакомьтесь с ним перед использованием прилагаемого программного обеспечения.
• Карта памяти не входит в комплект поставки.
• Для просмотра руководств в формате PDF требуется программа Adobe Reader. Для
просмотра руководств в формате Word (требуется только для стран Среднего Востока)
можно установить программу Microsoft Word/Word Viewer.
2

Прочитайте это в первую очередь
Тестовые снимки и ограничение ответственности
Для проверки правильности записи изображений сделайте несколько начальных тестовых
снимков и просмотрите их. Обратите внимание на то, что компания Canon Inc., ее филиалы
и дочерние компании, а также дистрибьюторы не несут никакой ответственности за любой
ущерб, обусловленный какой-либо неисправностью камеры и ее принадлежностей (включая
карты памяти), приводящей к сбою в записи изображения или к записи изображения
не тем способом, на который рассчитан аппарат.
Предостережение в отношении нарушения авторских прав
Изображения, снятые данной камерой, предназначены для личного использования.
Не записывайте изображения, защищенные авторскими правами, без предварительного
разрешения владельца авторских прав. В некоторых случаях копирование с помощью
камеры или иного устройства изображений, снятых во время спектаклей или выставок,
а также снимков объектов коммерческого назначения может являться нарушением
авторских прав или других установленных законодательством прав даже в том случае,
если съемка изображения была произведена в целях личного использования.
Ограничения действия гарантии
Условия гарантии на камеру см. в гарантийном талоне Canon на русском языке,
входящем в комплект поставки камеры. Адреса службы поддержки клиентов Canon
см. в гарантийном талоне Canon на русском языке.
ЖК-монитор (Экран) и электронный видоискатель
• Жидкокристаллические монитор и видоискатель изготавливаются с использованием
высокопрецизионных технологий. Более 99,99% пикселов работают в соответствии
с техническими требованиями, но иногда неработающие пикселы могут отображаться
в виде ярких или темных точек. Это не является неисправностью и не влияет на записы-
ваемое изображение.
• Для защиты от царапин во время транспортировки ЖК-монитор может быть закрыт
тонкой пластиковой пленкой. В таком случае перед началом использования камеры
удалите пленку.
Температура корпуса камеры
Будьте осторожны при длительной работе с камерой – ее корпус может нагреться.
Это не является неисправностью.
3
Что требуется сделать
Съемка
● Съемка, все параметры настраиваются автоматически …………………….……. 25
4
Качественная портретная съемка
IwP
Портреты
На пляже
На снежном фоне
(стр. 62)
(стр. 64)
(стр. 64)
Съемка различных других сюжетов
J
O
t
Недостаточная
Пейзаж
Спорт
освещенность
Листва
Фейерверк
(стр. 62)
(стр. 62)
(стр. 63)
(стр. 64)
(стр. 64)
Съемка со специальными эффектами
Сверхъяркие цвета
Эффект плаката
Эффект «Рыбий глаз»
Эффект миниатюры
(стр. 65)
(стр. 65)
(стр. 69)
(стр. 70)
● Фокусировка на лица…..………….………….………….………….…………. 25, 64, 84, 88
● Съемка там, где вспышка запрещена (отключение вспышки)…………………. 26
● Съемка фотографий с самим собой (таймер автоспуска) ……..…….. 61, 80, 81
● Вставка в снимки даты и времени ..………….………….………….………….…………. 60
4

Что требуется сделать
Просмотр
● Просмотр фотографий ………….………….………….………….……….………….………. 28
1
● Автоматическое воспроизведение фотографий (слайд-шоу)……….……….. 123
● Просмотр фотографий на экране телевизора..………….………….………….….. 127
● Просмотр фотографий на экране компьютера ………….………….………….……. 33
● Быстрый поиск фотографий…..………….………….……….………….…………. 120, 121
● Стирание фотографий…………….………….………….………….………….………. 29, 132
5
E
Съемка/просмотр видеозаписей
● Съемка видеофильмов………….………….………….………….……….…………... 30, 107
● Просмотр видеофильмов …………..………….………….………….………….…………... 32
Печать
● Простая печать фотографий……………….………….………….………….………….… 144
2
Сохранение
● Сохранение изображений в компьютере ……………..………..………….…………... 33
3
Прочее
● Отключение звуковых сигналов…………………….……….………….………….………. 50
● Использование камеры за рубежом……….………….………….………….……. 15, 156
● Что отображается на экране ………………….……….………….………….………….… 179

Содержание
В главах 1 – 3 рассматриваются основные операции с данной камерой и ее часто исполь-
зуемые функции. В главе 4 и в последующих главах рассматриваются дополнительные
функции, расширяющие Ваши возможности по мере их изучения.
Проверка комплектности…………….………..…2
Изменение яркости экрана…………………… 51
Прочитайте это в первую очередь …..……….3
Настройка видоискателя…………….………… 52
Что требуется сделать…….…………………..…..4
Функция экономии энергии
(Автовыключение)…………….………..………… 52
Меры предосторожности …………..………..…..9
Восстановление в камере настроек
Условные обозначения ……………..………..…12
по умолчанию ………..………..………..………… 53
1 Начало работы…..…………………... 13
Низкоуровневое форматирование
карты памяти……………………………..………... 54
Зарядка аккумулятора………………..…………14
Функции часов……..………..………..………….. 55
Поддерживаемые карты памяти
(продаются отдельно) …………..………..……..16
3 Съемка с часто используемыми
Установка аккумулятора и карты памяти.….16
функциями…………..……………….…57
Использование экрана ……..………..………...19
Дополнительное увеличение объектов
Установка даты и времени……………………..20
(Цифровой зум)…………………………………… 58
Установка языка…..………..…………………..…22
Вставка даты и времени……………………….. 60
Форматирование карт памяти.…………..…..23
Использование таймера автоспуска……... 61
Нажатие кнопки спуска затвора …………....24
Съемка в различных условиях…………….... 62
Съемка фотографий (Smart Auto)…………..25
Съемка в режиме специальных сюжетов…. 63
Просмотр изображений ….……………………..28
Съемка при обнаружении улыбки ….……… 66
Стирание изображений…………..……………..29
Использование таймера при моргании….. 67
Съемка видеофильмов……..………..………...30
Использование таймера
Просмотр видеофильмов ………….………..…32
при определении лица …………………………. 68
Передача изображений в компьютер
Съемка с эффектом объектива
для просмотра……….…………………..………...33
«Рыбий глаз» (Эффект Рыбий глаз) ………. 69
Дополнительные принадлежности………….38
Съемка кадров, выглядящих как
изображение миниатюрной модели
Отдельно продаваемые принадлежности....39
(Эффект миниатюры)……………………..……. 70
2 Дополнительные сведения ……. 43
4 Выбираем настройки
Элементы камеры и их назначение………..44
самостоятельно …………..……….…71
Индикация на экране………………..………..…46
Съемка в режиме программной AE …….... 72
Индикатор….………..………………..……………..47
Включение вспышки……………..………..……. 72
Меню FUNC. – Основные операции………..48
Настройка яркости (компенсация
MENU – Основные операции…………..……..49
экспозиции)………….………..………..………….. 73
Изменение режима звуковых сигналов…..50
Съемка с близкого расстояния (Макро).… 73
6

Содержание
Изменение значения разрешения
Установка величины диафрагмы……..……..96
(размер изображения)………..………..……….74
Установка выдержки затвора
Изменение коэффициента компрессии
и величины диафрагмы………………………….97
(качество изображения)..………..………..……74
Коррекция яркости и съемка (i-Contrast)......98
Изменение числа ISO…………………………...76
Коррекция «красных глаз»….………………….98
Настройка баланса белого………………….…77
Съемка с синхронизацией
Серийная съемка …………..…………….……….78
при длительной выдержке ……………………..99
Изменение цветового оттенка
Настройка компенсации экспозиции
изображения (Мои цвета)………………………79
при съемке со вспышкой ……………………..100
Использование таймера автоспуска для
Настройка мощности вспышки………..……100
предотвращения сотрясения камеры……..80
Проверка наличия закрытых глаз…….……101
Настройка таймера автоспуска …..…………81
Регистрация параметров съемки …..……..102
Съемка с помощью телевизора………..……82
Съемка с изменением цветов …….………..103
Изменение композиции кадра
Съемка панорам………………………..………..106
с помощью фиксации фокусировки……….82
6 Использование различных
5 Полное использование
функций для съемки
возможностей камеры……..……..83
видеофильмов……………..……….107
Изменение режима рамки
Съемка видеофильмов в режиме E……108
автофокусировки ……….………..………..……..84
Изменение режима видеосъемки .………..108
Изменение положения и размера
Съемка видеофильмов, выглядящих
рамки автофокусировки…………..……………85
как изображение миниатюрной модели
Увеличение точки фокусировки………..……86
(Эффект миниатюры)…………..………………109
Съемка в режиме следящей
Изменение качества изображения………..111
автофокусировки ……….………..………..……..86
Съемка фотографий во время съемки
Съемка с фиксацией автофокусировки….87
видеофильма………………………………………112
Выбор человека для фокусировки
Фиксация AE/Сдвиг экспозиции ……..……113
(Выбор лица)………..………..………..……………88
Параметры звука……………………………..….114
Съемка в режиме ручной фокусировки ….89
Прочие функции съемки…….………………..115
Фокусировочная вилка (Фокус-BKT)………90
Функции воспроизведения ……..………..….116
Восстановление наводки
Редактирование…………..…………………..….117
на увеличенный объект
(Помощь при кадрировке)..……………………91
7 Использование различных
Изменение способа экспозамера ……….…92
функций воспроизведения
и редактирования…………..……..119
Съемка с фиксацией AE…………………..……93
Съемка с фиксацией FE………………………..93
Быстрый поиск изображений………………..120
Автоматический брекетинг (Режим AEB) ….94
Просмотр изображений при
Установка выдержки затвора..………….……95
воспроизведении с фильтром…….………..121
7

Содержание
Просмотр слайд-шоу ….………….…………...123
9 Настройка параметров
Проверка фокусировки……..………..……….124
камеры………….……….……….……..151
Увеличение изображений……………….……125
Изменение параметров камеры…….……. 152
Отображение различных изображений
Изменение параметров
(Умное отображение)..………..………..……..125
функций съемки …..………..………..………… 158
Изменение эффекта перехода между
Регистрация часто используемых
изображениями ………….………..………..……126
пунктов меню съемки (Моё меню)……….. 163
Просмотр изображений на экране
Изменение параметров функций
телевизора…………….…………………..……….127
воспроизведения………….……………………. 164
Просмотр изображений на телевизоре
высокой четкости …………..…………………...128
10 Полезная информация………….165
Защита изображений………….………..……..129
Питание от бытовой электросети…………. 166
Стирание изображений…………..……………132
Использование бленды объектива
Пометка изображений как избранных…..134
(продается отдельно) ……………….………… 167
Систематизация изображений
Использование внешней вспышки
по категориям (Моя категория)…………….135
(продается отдельно) ……………….………… 168
Поворот изображений…………………..……..137
Использование карты Eye-Fi……………….. 172
Изменение размера изображений………..138
Устранение неполадок……..………..………. 174
Кадрировка………..……………………………….139
Список сообщений, отображаемых
Добавление эффектов с помощью
на экране…………………………..………………. 177
функции «Мои цвета»………….………..……..140
Информация, отображаемая на экране.... 179
Коррекция яркости (i-Contrast)…….……….141
Функции, доступные в различных
Коррекция эффекта «красных глаз» …….142
режимах съемки ………………………..………. 182
Меню……………………………..………………….. 184
8 Печать………………..……………….… 143
Правила обращения…………..………………. 188
Печать изображений…………….………..……144
Технические характеристики………………. 189
Печать из списка печати (DPOF)…………..146
Алфавитный указатель……..………..………. 192
Выбор изображений для печати (DPOF)….147
Печать добавленных изображений ……….150
8
Меры предосторожности
• Перед использованием камеры обязательно прочтите приведенные ниже правила техники
безопасности. Строго следите за соблюдением правил надлежащего обращения с камерой.
• Рассматриваемые на последующих страницах меры предосторожности позволят исключить
нанесение травм Вам и другим людям, а также повреждение оборудования.
• Также обязательно изучите руководства, входящие в комплект поставки всех используемых
Вами дополнительных принадлежностей.
Указывает на возможность серьезной травмы,
Предостережение
вплоть до смертельного исхода.
• Запрещается применять вспышку в непосредственной близости от глаз людей.
Воздействие света повышенной интенсивности, испускаемого вспышкой, может привести
к ухудшению зрения. В частности, при съемке детей минимально допустимое расстояние
до ребенка составляет 1 м.
• Оборудование следует хранить в местах, недоступных для детей и подростков.
Ремень: попадание ремня на шею ребенка может привести к удушению.
• Используйте только рекомендованные источники питания.
• Запрещается разбирать, модифицировать или нагревать изделие.
• Не допускайте падения изделия или сильных ударов по нему.
• Если изделие упало или каким-либо другим образом повреждено, во избежание опасности
получения травмы не дотрагивайтесь до его внутренних деталей.
• Если из изделия идет дым, ощущается посторонний запах или изделие работает неправильно,
немедленно прекратите использование изделия.
• Запрещается чистить оборудование органическими растворителями, такими как спирт, бензин
или растворитель для краски.
• Не допускайте контакта изделия с водой (например, морской) или другими жидкостями.
• Не допускайте попадания в камеру жидкостей или посторонних предметов.
Возможно поражение электрическим током или возгорание.
В случае попадания внутрь камеры жидкости или посторонних предметов немедленно выключите
питание камеры и извлеките из нее аккумулятор.
В случае намокания зарядного устройства отсоедините его от электрической розетки и обратитесь
к дистрибьютору камеры или в ближайшее отделение службы поддержки клиентов компании Canon.
• Не пытайтесь проигрывать прилагаемый компакт-диск (или диски) в проигрывателе,
не поддерживающем воспроизведение компакт-дисков с записанными данными.
Воспроизведение таких компакт-дисков в проигрывателях музыкальных компакт-дисков может
привести к повреждению громкоговорителей. При прослушивании через наушники громких звуков,
возникающих при проигрывании этих компакт-дисков в музыкальных проигрывателях, возможно
повреждение слуха.
9

Меры предосторожности
• Пользуйтесь только рекомендованным аккумулятором.
• Не оставляйте аккумулятор рядом с открытым огнем и не бросайте его в огонь.
• Регулярно отсоединяйте кабель питания и удаляйте пыль и загрязнения, скапливающиеся
на вилке, внутренних поверхностях электрической розетки и на окружающих областях.
• Не беритесь за кабель питания влажными руками.
• При использовании оборудования следите, чтобы его мощность не превышала номинальной
нагрузочной способности электрической розетки или соединительных проводов. Не исполь-
зуйте оборудование с поврежденным кабелем или вилкой питания, а также следите, чтобы
вилка была полностью вставлена в розетку.
• Не допускайте соприкосновения металлических предметов (например, булавок или ключей)
с контактами или вилкой, а также загрязнения контактов или вилки.
Возможен взрыв или утечка электролита из аккумулятора и, как следствие, поражение электри-
ческим током или пожар. Это может привести к получению травмы и повреждению окружающей
обстановки. Если при протечке аккумулятора вытекший из него электролит попал в глаза, в рот,
на кожу или на одежду, немедленно смойте его водой.
Указывает на возможность травмы.
Предупреждение
• Держа камеру за ремень, соблюдайте осторожность, чтобы не ударять камеру и не подвергать
ее чрезмерным механическим нагрузкам и тряске.
• Будьте осторожны, чтобы не допускать ударов или сильного нажатия на объектив.
Это может привести к травме или к поломке камеры.
• Следите, чтобы в процессе съемки не закрывать вспышку пальцами или одеждой.
Это может привести к ожогам или повреждению вспышки.
• Не используйте, не оставляйте и не храните изделие в следующих местах:
— под яркими солнечными лучами;
— в местах, в которых температура превышает 40°C;
— во влажных и пыльных местах.
В противном случае возможна протечка, перегрев или взрыв аккумулятора, и, в результате,
поражение электрическим током, возникновение пожара или причинение ожогов и других травм.
Высокая температура может привести к деформации корпуса камеры или зарядного устройства.
• При длительном просмотре эффекты перехода между кадрами слайд-шоу могут вызывать
дискомфорт.
Указывает на возможность повреждения оборудования.
Предупреждение
• Не направляйте камеру на яркие источники света (солнце и т. п.).
В противном случае возможно повреждение датчика изображения.
10
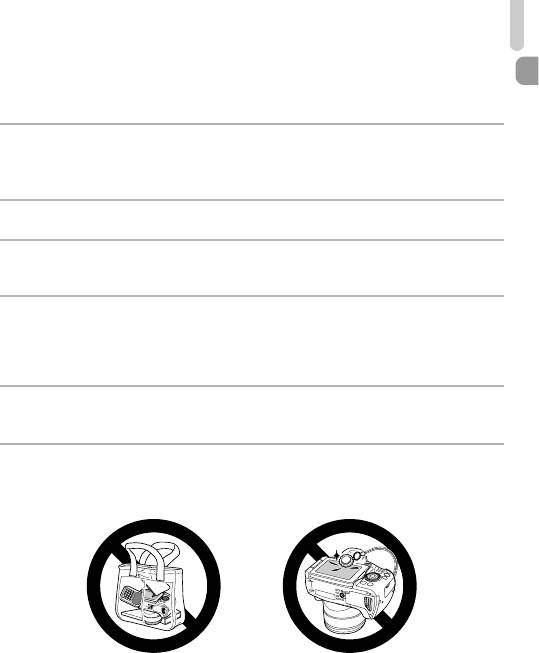
Меры предосторожности
• При использовании камеры на пляже или в ветреных местах не допускайте попадания внутрь
камеры пыли или песка.
Это может привести к неполадкам в работе камеры.
• При обычном использовании от вспышки может идти небольшой дымок.
Это вызвано тем, что из-за высокой интенсивности вспышки сгорают пыль и другие посторон-
ние материалы, попавшие на линзу вспышки. Во избежание перегрева и повреждения вспышки
удаляйте с нее грязь, пыль и другие посторонние материалы с помощью ватной палочки.
• Если камера не используется, извлеките из нее аккумулятор и уберите его на хранение.
Если оставить аккумулятор в камере, он может протечь и повредить камеру.
• Перед тем как выбросить аккумулятор, закройте его клеммы лентой или другим изоляци-
онным материалом.
Контакт с другими металлическими предметами может привести к возгоранию или взрыву.
• Отключайте зарядное устройство от электрической розетки после завершения зарядки или
когда Вы не пользуетесь зарядным устройством.
• Во время зарядки не кладите на зарядное устройство никакие предметы, например одежду.
Если устройство длительное время остается подключенным к электрической розетке, оно
может перегреться и деформироваться, что, в свою очередь, может привести к возгоранию.
• Не оставляйте аккумулятор в местах, доступных домашним животным.
Если животное укусит аккумулятор, возможна протечка, перегрев или взрыв аккумулятора,
и, в результате, возникновение пожара или причинение ущерба.
• Перенося камеру в сумке, закрывайте экран лицевой стороной внутрь, чтобы исключить
контакт твердых предметов с экраном.
• Не закрепляйте аксессуары на ремне.
В противном случае возможно возникновение неполадок или повреждение экрана.
11
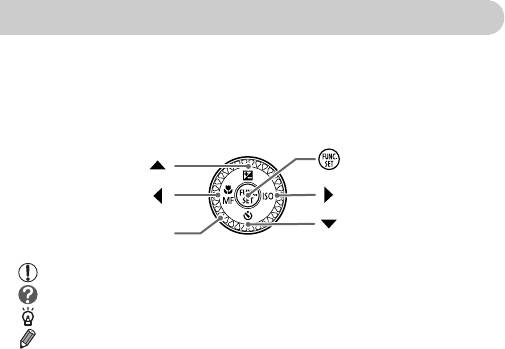
Условные обозначения
• Кнопки и диск управления камеры обозначаются в тексте значками.
• Текст, отображаемый на экране, заключается в скобки [ ] (квадратные скобки).
• Кнопки направления, диск управления и кнопка FUNC./SET обозначаются
следующими значками.
Кнопка FUNC./SET
Кнопка «Вверх»
Кнопка «Влево»
Кнопка «Вправо»
Кнопка «Вниз»
Диск управления
Â
• : Предостережения
• : Рекомендации по устранению неполадок
• : Советы по наиболее полному использованию возможностей камеры
• : Дополнительная информация
• (стр. xx): Ссылка на страницу («xx» обозначает номер страницы)
• В этом Руководстве предполагается, что для всех функций установлены значения
по умолчанию.
• В настоящем Руководстве для карт памяти различных типов, которые могут исполь-
зоваться в данной камере, используется общий термин «карта памяти».
12
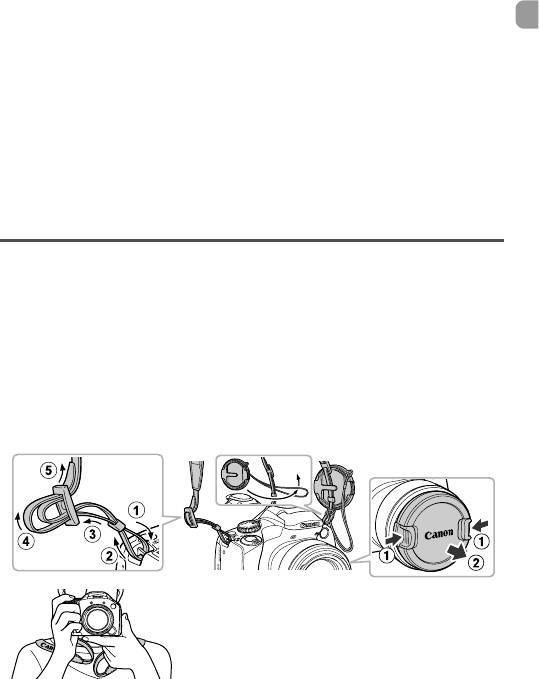
1
Начало работы
В этой главе рассматриваются подготовка к съемке, порядок съемки в режиме
A и порядок просмотра и стирания снятых изображений. В последней части
этой главы рассматриваются съемка и просмотр видеофильмов, а также передача
изображений в компьютер.
Закрепление деталей из комплекта поставки/как правильно
держать камеру
• Закрепите прилагаемый ремень и наденьте его на шею, чтобы случайно не уронить
камеру во время ее использования.
• Закрепите прилагаемый шнурок крышки объектива на ремне.
• Перед включением камеры обязательно снимайте крышку объектива. Когда крышка
объектива не используется, закрепляйте ее на ремне.
• Когда камера не используется, храните ее с установленной крышкой объектива.
• Подробные сведения о прилагаемом чехле для защитной крышки гнезда внешней
вспышки см. на стр. 168.
Надежно удерживая камеру по краям, прижмите
руки к телу.
13
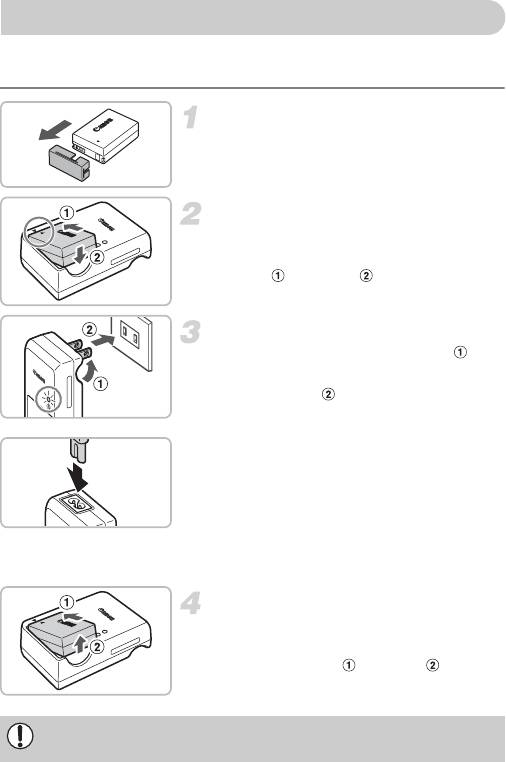
Зарядка аккумулятора
Для зарядки аккумулятора пользуйтесь зарядным устройством из комплекта поставки.
Обязательно зарядите аккумулятор, так как он продается незаряженным.
Снимите крышку.
Установите аккумулятор.
● Совместив метки o на аккумуляторе и зарядном
устройстве, установите аккумулятор, сдвинув его
внутрь ( ) и опустив ( ).
Зарядите аккумулятор.
● Для CB-2LZ: откройте контакты вилки ( )
и подключите зарядное устройство к электри-
ческой розетке ( ).
CB-2LZ
● Для CB-2LZE: подключите кабель питания
к зарядному устройству, затем подключите
CB-2LZE
другой конец кабеля к электрической розетке.
X Индикатор зарядки загорается оранжевым цветом,
и начинается зарядка.
X После завершения зарядки цвет индикатора
зарядки меняется на зеленый. Зарядка занимает
приблизительно 2 ч 20 мин.
Извлеките аккумулятор.
● Отсоедините зарядное устройство от электри-
ческой розетки, затем извлеките аккумулятор,
сдвинув его внутрь ( ) и подняв ( ).
Для защиты аккумулятора и продления срока его службы длительность непрерывной
зарядки не должна превышать 24 ч.
14
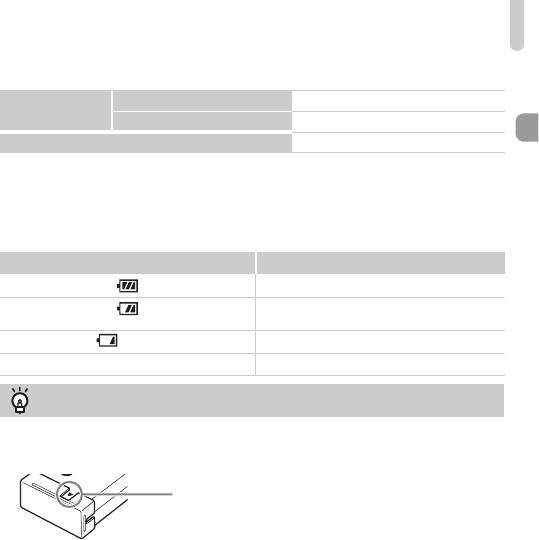
Зарядка аккумулятора
Приблизительное возможное количество снимков
Количество
С ЖК-монитором* Прибл. 370
снимков
С видоискателем Прибл. 400
Время воспроизведения
Прибл. 10 ч
* Указанное возможное количество снимков получено на основе стандарта измерения ассоциации CIPA.
• В некоторых условиях съемки доступное количество кадров может быть меньше указанного выше.
Индикатор заряда аккумулятора
Для индикации заряда аккумулятора на экране отображается значок или сообщение.
Дисплей Описание
Достаточный заряд.
Аккумулятор несколько разряжен, но имеет
достаточный заряд.
(мигает красным цветом) Почти полностью разряжен. Зарядите аккумулятор.
«Поменяйте батарею» Разряжен. Зарядите аккумулятор.
Эффективное использование аккумулятора и зарядного устройства
• Заряжайте аккумулятор в день его предполагаемого использования или накануне.
Заряженные аккумуляторы разряжаются за счет естественного саморазряда, даже если
они не используются.
Установите крышку на заряженный аккумулятор
таким образом, чтобы была видна метка o.
• Порядок длительного хранения аккумулятора.
Разрядите аккумулятор и извлеките его из камеры. Установите крышку клемм и уберите акку-
мулятор на хранение. При хранении неразряженного аккумулятора в течение длительного
времени (около 1 года) возможно сокращение срока его службы или ухудшение характеристик.
• Зарядным устройством можно пользоваться также и в других странах.
Зарядным устройством можно пользоваться в регионах с напряжением сети переменного
тока 100 – 240 В (50/60 Гц). Если вилка не подходит к розетке, приобретите специальный
переходник. Не используйте при заграничных поездках электрические трансформаторы,
так как они приведут к повреждениям.
• Аккумулятор может вздуться.
Это обычное состояние аккумулятора, которое не является признаком неисправности. Однако
если аккумулятор вздуется настолько, что перестанет помещаться в камеру, обратитесь
в службу поддержки клиентов компании Canon.
• Если аккумулятор быстро разряжается даже после зарядки, это означает, что закончился
срок его службы. Приобретите новый аккумулятор.
15
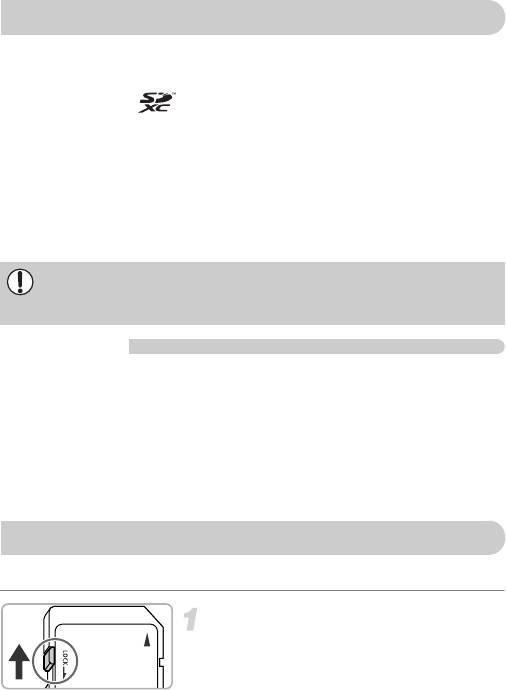
Поддерживаемые карты памяти (продаются отдельно)
• Карты памяти SD (2 Гбайта и менее)*
• Карты памяти SDHC (более 2 Гбайт, до 32 Гбайт включительно)*
• Карты памяти SDXC
(более 32 Гбайт)*
• Карты памяти MultiMediaCard
• Карты памяти MMCplus
• Карты памяти HC MMCplus
• Карты Eye-Fi
* Эта карта памяти соответствует стандартам SD. В зависимости от модели, некоторые карты могут
работать неправильно.
В зависимости от версии ОС компьютера, карты памяти SDXC могут не распознаваться
при использовании имеющихся в продаже устройств чтения карт памяти. Заранее
убедитесь, что ОС поддерживает эту функцию.
О картах Eye-Fi
Это изделие может не поддерживать все функции карты Eye-Fi (в том числе беспровод-
ную передачу). При возникновении проблем при работе с картой Eye-Fi, пожалуйста,
проконсультируйтесь с производителем карты.
Также имейте в виду, что во многих странах и регионах для пользования картой Eye-Fi
требуется специальное разрешение, без которого ее применение запрещено. Для
выяснения того, разрешено ли применение данной карты в данном регионе, пожалуйста,
проконсультируйтесь с производителем карты.
Установка аккумулятора и карты памяти
Установите прилагаемый аккумулятор и карту памяти (продается отдельно).
Проверьте положение язычка защиты
от записи на карте памяти.
● Если на карте памяти есть язычок защиты от
записи и он установлен в положение блокировки,
запись изображений невозможна. Сдвиньте язычок
до щелчка в фиксаторе.
16
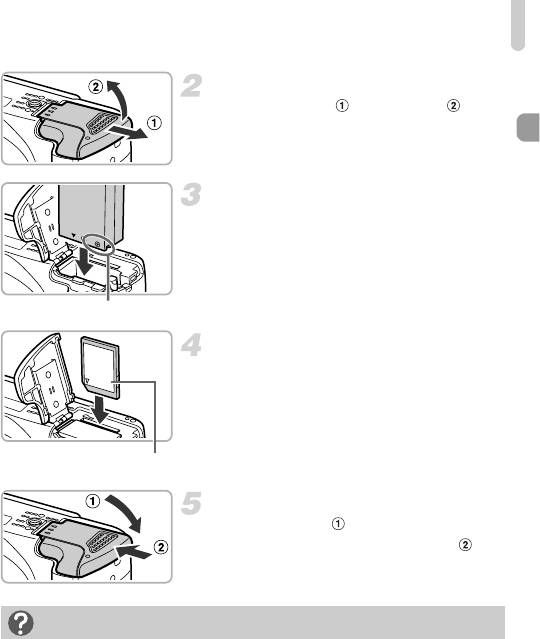
Установка аккумулятора и карты памяти
Откройте крышку.
● Сдвиньте крышку ( ) и откройте ее ( ).
Установите аккумулятор.
● Установите аккумулятор, как показано на рисунке,
до фиксации со щелчком.
● Обязательно устанавливайте аккумулятор
в правильной ориентации – в противном случае
он не зафиксируется.
Контакты
Установите карту памяти.
● Установите карту памяти, как показано на рисунке,
до фиксации со щелчком.
● Убедитесь в правильной ориентации карты памяти.
При установке карты памяти в неправильном
положении можно повредить камеру.
Этикетка
Закройте крышку.
● Закройте крышку ( ), затем нажмите на крышку
и сдвиньте ее до щелчка в фиксаторах ( ).
Что означает сообщение на экране [Карта памяти блокирована]?
На картах памяти SD, SDHC и SDXC, а также на картах Eye-Fi предусмотрен язычок защиты
от записи.
Если этот язычок находится в положении блокировки, на экране отображается сообщение
[Карта памяти блокирована] и невозможна запись или стирание изображений.
17
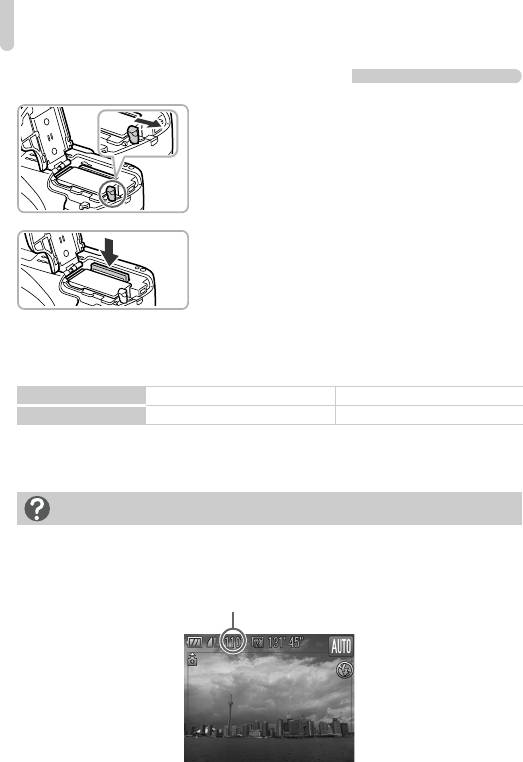
Установка аккумулятора и карты памяти
Извлечение аккумулятора и карты памяти
Извлеките аккумулятор.
● Откройте крышку и нажмите фиксатор аккуму-
лятора в направлении стрелки.
X Аккумулятор выдвинется вверх.
Извлеките карту памяти.
● Нажмите на карту памяти до щелчка, затем
медленно отпустите ее.
X Карта памяти выдвинется вверх.
Приблизительное количество снимков, которые можно записать
на карту памяти
Карта памяти
4 Гбайта 16 Гбайт
Количество снимков
1058 4334
• Значения для настроек по умолчанию.
• Возможное количество записанных снимков зависит от настроек камеры, объекта съемки и исполь—
зуемой карты памяти.
Можно ли проверить оставшееся количество снимков?
Оставшееся количество снимков можно проверить, когда камера находится в режиме съемки
(стр. 25).
Приблизительное количество снимков,
которые можно записать на карту памяти
18
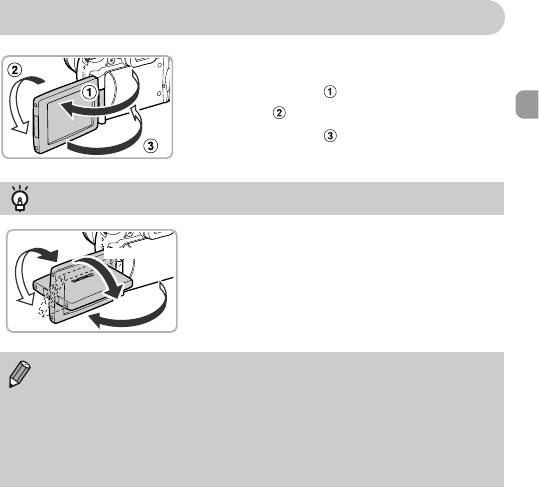
Использование экрана
Откройте экран.
● Откройте экран ( ) и разверните его вперед
на 180°( ).
● Закройте экран ( ).
Настройка положения экрана
Прибл. 180°
• Можно свободно настраивать угол наклона и ориентацию
Прибл. 90°
экрана в соответствии с условиями съемки.
• Когда камера не используется, экран должен быть закрыт
лицевой стороной к корпусу камеры.
Прибл.
175°
• Если камера включена, при открытии экрана он включается, а видоискатель
выключается. При закрытии экрана лицевой стороной к корпусу камеры экран
выключается, а видоискатель включается.
• Если в режиме съемки экран открыт и развернут в направлении объектива, изобра-
жение отражается по горизонтали (зеркальное изображение). Для отмены функции
зеркального отображения нажмите кнопку n, выберите вкладку 4 и пункт
[Реверс дисплея], затем кнопками qr выберите значение [Выкл.].
19
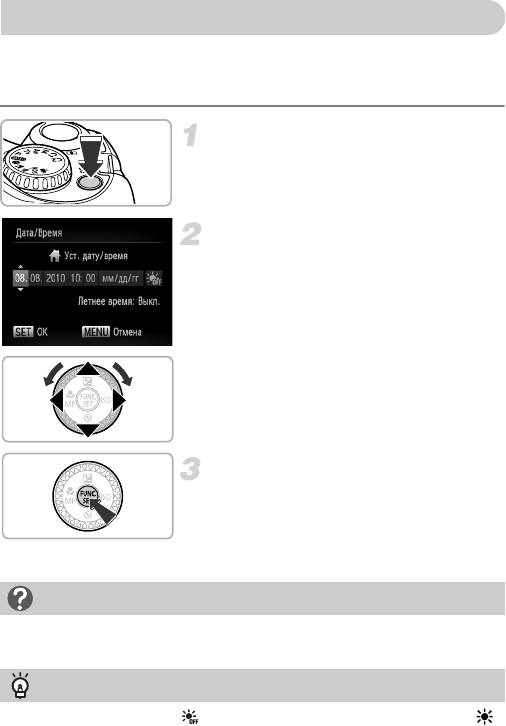
Установка даты и времени
При первом включении камеры отображается экран установки даты/времени. Так как
дата и время, записываемые вместе с изображениями, основаны на этих параметрах,
обязательно установите их.
Включите камеру.
● Нажмите кнопку ON/OFF.
X Отображается экран «Дата/Время».
Установите дату и время.
● Кнопками qr выберите параметр.
● Нажимая кнопки op или поворачивая диск Â,
установите значение.
Завершите установку.
● Нажмите кнопку m.
X После установки даты и времени экран «Дата/
Время» закрывается.
● При нажатии кнопки ON/OFF камера выключается.
Снова отображается экран «Дата/Время»
Установите правильную дату и время. Если дата и время не установлены, экран «Дата/Время»
отображается при каждом включении камеры.
Установка летнего времени
Если на шаге 2 был выбран значок и кнопками op или диском Â был выбран значок ,
устанавливается летнее время (часы переводятся на 1 ч вперед).
20