Fujifilm INSTAX mini LiPlay Instant Camera Manual
Before Use
Before using the camera, check the following has been included.
Supplied Accessories

Notes on Disposing of the Camera
A built-in lithium ion battery is used for this camera.
When you dispose of the camera, follow your local regulations and dispose of it properly.
Please refer to the supplied CONTACT INFORMATION sheet for inquiry.
Do not remove the built-in battery by yourself; otherwise, you may be injured.
Disposal of Electric and Electronic Equipment inPrivate Households
Disposal of used Electrical & ElectronicEquipment
(Applicable in the European Union and other European countries with separate collection systems)
For customers in Turkey:
EEE Complies with Directive
About This Camera
Main Features
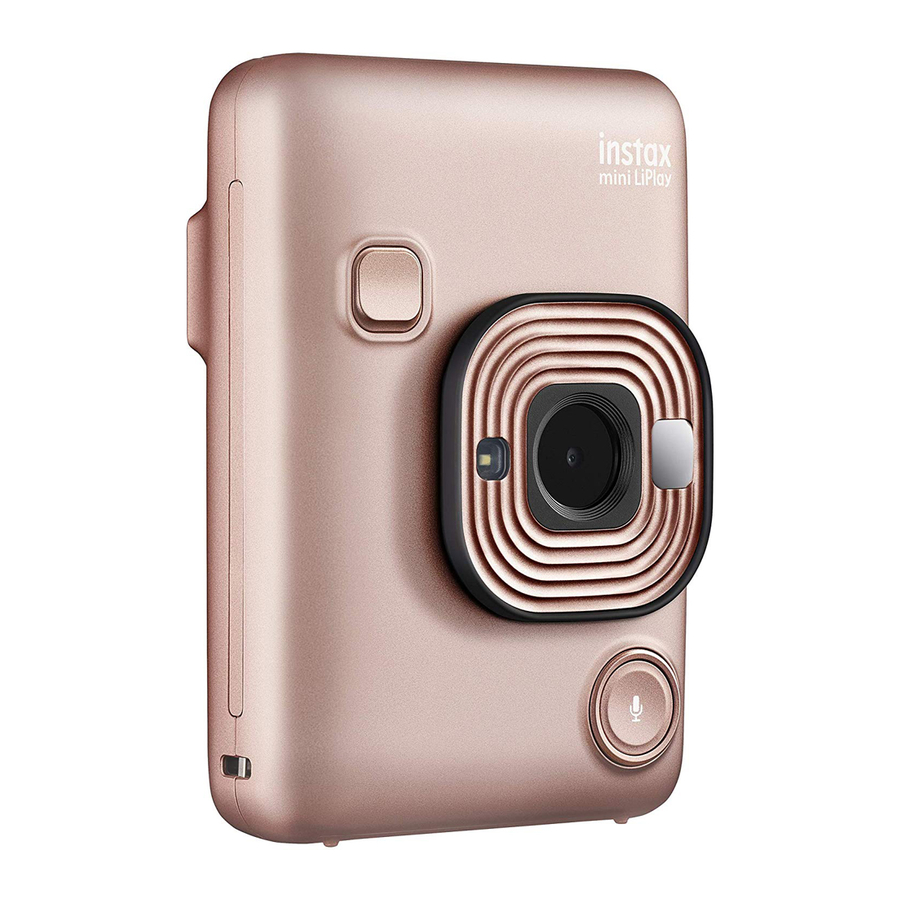
- The «INSTAX mini LiPlay» is the most compact INSTAX product available on the market
- You can perfectly position your photo using the LCD monitor and save the image onto the camera memory or micro SD card
- You can select a photo from your photo library and print it using the INSTAX print feature
- You can edit your photos by using 10 photo frames and 6 filters
- You can save your photos with the recorded sound
- Stylish and luxurious design
- Equipped with selfie mirror to easily position selfies
Functions Available with the Smartphone App
- Sound function
Record sound with the camera, convert it to QR code and print the QR code on a photo (Print with sound). Sound is played when QR codes printed with the INSTAX print feature are read with your smartphone. - Remote shooting function
Control the camera with your smartphone for remote shooting of photos. - Shortcut function
You can select photo frames on your smartphone and assign the frames to the 3 shortcut buttons located on the side of the camera. - Direct print
Transfer a photo from your smartphone to the camera, and print it with the INSTAX print feature. Before sending the photo, you can use the smartphone app to move, rotate, zoom in, zoom out, or crop the photo.
Part Names

- Film ejection slot
- Shutter button
- Flash/Self-timer lamp
- Strap hook
- USB port
 (Sound) button
- Lens
- Selfie mirror
- Film door lock
- Film door
 (Shortcut 1) button
- Reset button*
 (Shortcut 2) button
 (Shortcut 3) button
- Micro SD card slot
 (Power) button
- Microphone
- Speaker
- Cross key (
 )
) - MENU/OK button
 (Back) button
 (Playback) button
 (Print) button
- LCD monitor
LCD Monitor
The shooting screen displays on the LCD monitor when the power is switched on.
- To switch from the shooting screen to the playback screen, press
 (Playback).
 - To switch from the playback screen to the shooting screen, press the shutter button.
While the shooting screen or playback screen is displayed, press ![]() (Back) to display the following information on the LCD monitor.
(Back) to display the following information on the LCD monitor.
- Current date and time
- Exposure
- Frame name
- Filter name
- Number of images available*
- Number of prints with sound images waiting to be sent
- Remaining film indicator
- Bluetooth connection status indicator
- Battery level indicator
- Flash indicator
- Frame No. indicator
- Shooting date/time information
- Transmission status indicator of print with sound images
*When using the internal memory,  is displayed. The icon displays in red when the number of available images is 10 or less.
Cross Key Guide Display
When starting up or switching screens (Shooting screen ![]() Playback screen), the cross key guide appears for a short time.
Playback screen), the cross key guide appears for a short time.
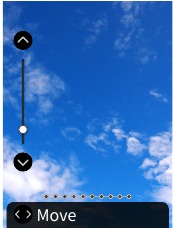
Using the Cross Key
The (  ) keys are used to select menu items, or to recall the functions assigned to the keys. The [MENU/OK] button is used to display the menu or to make a selection.
 Move up
 Move left
 Move down
 Move right
- Menu display/Make selection
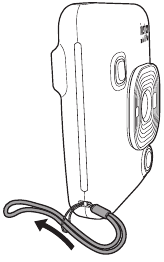
Attaching the Strap
Attach the strap as shown below.
- Put the strap around your wrist when carrying the camera or taking photos to avoid dropping the camera.
Charging the Battery
Turn off the camera before charging the battery. Battery will not charge if the camera is powered on.
Ensure USB is correctly attached as indicated.
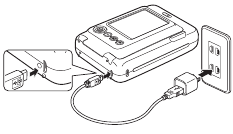
Connect the camera and a USB AC adapter supplied with your smartphone using the supplied USB cable, then connect the USB AC adapter to an indoor power outlet.
- Charging time is approximately 2 to 3 hours.
Charging Status Indication
| While charging | Self-timer lamp lights up. |
| Charging finished | Self-timer lamp goes off. |
| Charging error | Self-timer lamp flashes. |
Charging from a PC:
- Connect the camera and PC directly. Do not connect via a USB hub or keyboard.
- If the PC goes into sleep mode while charging, charging is discontinued. To continue charging, exit sleep mode and then reconnect the USB cable.
- The battery may not charge depending on the specifications, settings or conditions of the PC.
Note
- The battery cannot be removed.
- The battery has not been charged during manufacture. Please charge the battery fully before use.
- For notes about the battery, please refer to «Simple Camera Care».
Powering on/off
Press and hold (Power) to power on or off.
Checking the Battery Level
The battery level is displayed on the LCD monitor when pressing ![]() (Back) on the shooting screen or playback screen.
(Back) on the shooting screen or playback screen.
- If you do not use the camera for a certain period of time, it will turn off automatically. You are able to set the amount of time until the power is turned off.
- During shooting mode, press
 (Playback) to display the playback screen and enter playback mode.
 - Press the shutter button fully during playback mode to display the shooting screen and select shooting mode.
Initial Settings
When turning the camera on for the first time after purchase, a screen will be displayed automatically to set the language, date and time, and also to pair a smartphone.
Please install the «INSTAX mini LiPlay» app on your smartphone before carrying out pairing registration.
- If you are using an Android OS smartphone, please search for «INSTAX mini LiPlay» in Google Play Store and install it. *Requirements for Android OS smartphones: Android Ver. 5.0 or higher with Google Play Store installed
- If you are using an iOS smartphone, please search for «INSTAX mini LiPlay» in the App Store and install it. *Requirements for iOS smartphones: iOS Ver. 10 or higher
Depending on your smartphone model, you may not be able to use «INSTAX mini LiPlay» even if you have installed it and your smartphone meets the above requirements.
This setting can also be configured later If you want to configure the settings later or reconfigure the settings, set the [LANG], [DATE/TIME] and [Bluetooth SETTINGS] in the SET-UP MENU
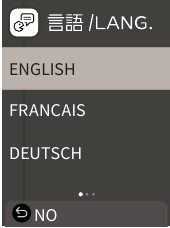
- Turn on the power
- When you turn on the power for the first time after purchase, the Language Setting (/LANG.) screen is displayed.
- Select the language you wish to use and press [MENU/OK]
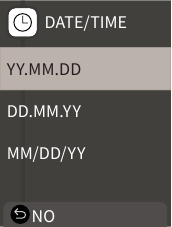
- Set the date order and press [MENU/OK] DATE/TIME
- Set the year, month, day, hour and minute then press [MENU/OK]
Move the cursor by using, then change the number using .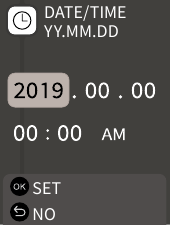
Next, configure the pairing settings. - Press [MENU/OK]
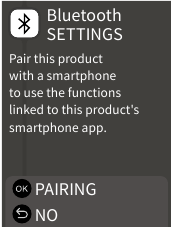
- If you do not wish to set pairing, press
 (Back) to finish the initial settings.
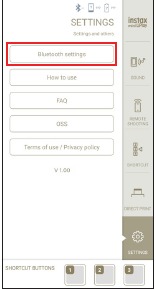
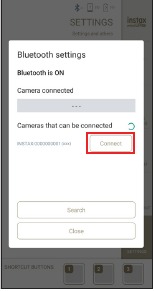
- Launch the smartphone app «INSTAX mini LiPlay» and press [SETTINGS]

- Press [Bluetooth settings] on the smartphone app
- Press [Connect] on the smartphone app
- You can confirm camera’s OWN NAME by accessing the Set-up Menu.
Next, select the menu items in the following order: [Bluetooth SETTINGS], [INFORMATION], [OWN NAME].
- Allow pairing
- Confirm that pairing registration is complete
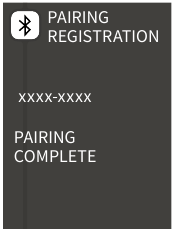
When pairing registration is complete, the screen changes to the shooting screen.
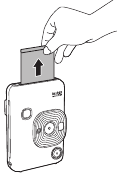
Loading/Unloading the Film Pack
Loading the Film Pack
- Slide the film door lock and open the film door

- Insert film pack by aligning the yellow marks

- Close the film door
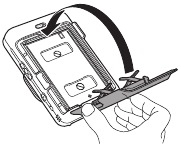
- Remove the black film cover that is automatically rejected

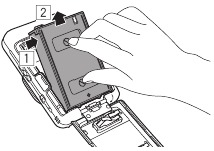
Unloading a Used Film Pack
- Slide the film door lock and open the film door

- Grasp the rectangular holes on the film pack, then pull film pack out from the camera
Basic Shooting and Playback
Shooting
The following steps describe the basic shooting procedure.
- Turn on the power
- Hold the camera
- Configure the frame and filter, etc as needed
- Decide the composition to shoot
- Press the shutter button halfway to focus on the subject
A beep will sound and the green AF frame will display on LCD monitor.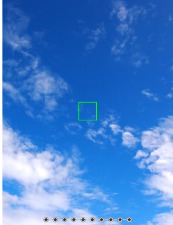
When the subject is in focus
A red AF frame will display on the LCD monitor. Either change the composition or use the AF/AE lock.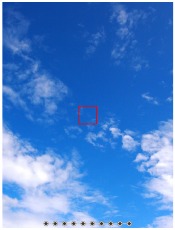
When the subject is not in focus - Press the shutter button down fully to take a photo
The photo is taken and the image is saved to the internal memory or memory card.
- For the steps on how to print an image you have taken, please refer to «Printing».
- When shooting, steady your arms against your body and hold the camera firmly with both hands.
- Be careful not to touch the camera lens when pressing the shutter button.
- Gently press the shutter button fully to take a picture, ensuring that the camera does not move or shake.
- Be careful not to cover the flash or lens with your fingers or the strap.
- The flash may fire when you fully press the shutter button to take a picture in low light or backlit conditions. You can change the flash settings so that the flash does not fire.
Notes on the internal memory
- When the internal memory is full, the shutter does not release and you cannot shoot photos. Please delete some images or use a memory card.
- If the camera experiences a malfunction, images in the internal memory may be corrupted or lost.
- It is recommended that you copy important images to another media format (Hard disk, CD-R, CD-RW, DVD-R, etc.) as a backup.
- If you submit your camera for repair, we cannot guarantee the integrity of the data in the internal memory.
- When repairing the camera, we may need to check the data in the internal memory.
Playing Back Images
You can play back images on the LCD monitor.
- Turn on the power
- Press
 (Playback)
The last image taken is displayed. - Press or to select the image you want to play back
- Press the shutter button fully to return to the Shooting screen.
Changing the Playback Screen Display
You can zoom in on the image and change the number of images displayed on the LCD monitor.
Zooming images
- Select the image you want to zoom in on and press [MENU/OK]
The playback menu is displayed. - Press or to select [ZOOM]
- Press [MENU/OK]
The zoom screen is displayed. - Zoom in or out of the image with and
Change the Number of Images Displayed
While displaying the playback screen, press (Playback) to change the number of images displayed.
Printing
You can print the images using the following procedure.
- Turn on the power
- Press (Playback)
The last image taken is displayed. - Press or to select the image you want to print
- Select desired settings such as frame and zoom
- Press
 (Print)
 - Press or to select [PRINT] or [PRINT WITH SOUND]
Note
To print with sound, it is necessary to link with the sound function of the smartphone app.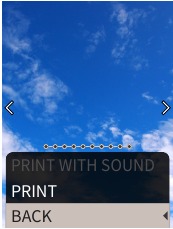
- Press [MENU/OK]
Printing starts.
- When the sound of film unloading stops, hold the top of the film and remove it
Note
Be careful not to obstruct the film ejection slot with your fingers or the strap.
Remaining Film Indicator
The remaining number of film is indicated by the dots at the bottom of the screen. Each time a film is printed, a dot changes to a small square. The dots will display in red when the number of film remaining is 2 or less.
- For handling of the film, please refer to the FUJIFILM Instant Film «INSTAX mini» instruction manual.
- Film development takes about 90 seconds (the time varies depending on the ambient temperature).
Selecting the Frame and Filter
Selecting the Frame
Follow the procedure below to select the frame type.
- On the shooting screen or playback screen, press
The following guide is displayed.
- Press or to select the frame type
- Press or [MENU/OK]
The frame is applied and the display returns to the previous screen.
- Press
 (Back) to return to the previous screen without applying the frame.
 - To cancel the frame you have applied, select «No Frame» under frame type.
You can also press a shortcut button to select the frame assigned to that button.
Selecting the Filter
Follow the procedure below to select the filter type.
- On the shooting screen, press
The following guide is displayed.
- Press or to select the filter type
- Press or [MENU/OK]
The filter is applied and the display returns to the previous screen.
- Press (Back) to return to the previous screen without applying the filter.
- To cancel the filter you have applied, select «No Filter» under filter type.
Recording Sound in Images
This camera allows recorded sound to be recorded in images.
Recording Sound When Shooting
You can switch between two recording modes, [After shooting] and [Before & after], to suit to your preferences or purpose of use.
The recording mode can be switched in Rec Settings of the shooting menu.
Recording Sound Immediately after Shooting When After shooting Is Set
- Press (Sound) on the shooting screen
An explanation on the recording mode is displayed. - Press [MENU/OK] or (Sound)
The recording mode starts, and a recording icon is displayed at the top right of the screen.
- Press the shutter button halfway to focus on the subject
- Press the shutter button down fully
Recording starts after shooting.
- The maximum recording time is approximately 10 seconds. After approximately 10 seconds elapse, recording ends and the screen changes automatically.
- If you press (Sound) again during recording, recording ends at that point in time.
- Press [MENU/OK] to print with sound
Note
To print with sound, it is necessary to link with the sound function of the smartphone app.
Recording Sound before and after Shooting When Before & after Is Set
- Press (Sound) on the shooting screen
The recording mode starts, and a recording animation is displayed at the bottom of the screen.
- Press the shutter button halfway to focus on the subject
- Press the shutter button down fully
A photo is taken and sound is recorded for the 5 seconds before and 5 seconds after you pressed the shutter button fully.
- To exit the recording mode, press (Sound) again.
Recording Sound When Playing Back
- Press (Sound) on the single image playback screen
An explanation on the recording mode is displayed. - Press [MENU/OK] or (Sound)
The recording starts, and a recording icon is displayed at the center of the screen.
- The maximum recording time is approximately 10 seconds. After approximately 10 seconds elapse, recording ends automatically.
- If you press (Sound) again during recording, recording ends at that point in time.
- Press to check the recording
The recording is played back.
Various Types of Shooting
Shoot Using the Self-timer
Use the self-timer for group photos or to prevent the camera from shaking.
- On the shooting screen, press
The following guide is displayed.
- Press or to select [2 SEC] or [10 SEC]
- Press [MENU/OK] or
An icon showing the self-timer length that has been set will display in the upper right of the screen.
- Press (Back) to return to the previous screen without applying the setting.
- Fully press the shutter button
If you selected [2 SEC]:
When you press the shutter button, the self-timer lamp blinks.
If you selected [10 SEC]:
When you press the shutter button, the self-timer lamp lights up and blinks for 3 seconds before shooting.
Press (Back) to cancel the self-timer.
Shooting Using the Flash
Use the flash to shoot at night or in dark environments. You can change the flash setting to prevent the flash from firing.
- On the shooting screen, press
The following guide is displayed.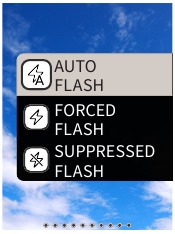
- Press or to select the flash setting
- For details about the flash settings, please refer to «Types of Flash».
- Press [MENU/OK] or
- Fully press the shutter button
- If you press the shutter button whilst the flash is charging, the self-timer lamp will blink and the shutter will not release.
Types of Flash
 Auto flash
The flash fires automatically if the surroundings are dark. This setting is suitable for most situations.
 Forced Flash
The flash fires regardless of the surrounding brightness. Use when the subject is dark due to backlighting.
 Suppressed Flash
The flash does not fire even when the surroundings are dark.
This setting is suitable for shooting in places where flash photography is prohibited.
It is recommended to stabilize the camera on a table, etc. when using suppressed flash in dark surroundings.
Taking a Photo of Yourself (Selfie)
You can take a photo of yourself using the selfie mirror.
- Hold the camera firmly with the lens 30cm to 50cm from your face
- Hold the camera firmly, as it is particularly prone to camera shake in dark environments.

- Check your composition in the selfie mirror and shoot
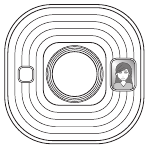
- Do not stare at the flash when shooting. Staring at the flash may temporarily effect vision.
Shooting Using the AF/AE Lock
When shooting, holding the shutter button halfway locks the focus, called «AF lock». The brightness or exposure will also be locked called «AE lock». This will be useful when you want to place the subject outside the center of the screen whilst shooting.
- Press the shutter button halfway to focus on the subject
When you press the shutter button halfway, AF and AE are locked. - Decide upon your composition while pressing the shutter button halfway
- Press the shutter button fully to shoot
It is recommended to use the AE/AF lock when shooting the following subjects, as they can be difficult to focus on.
- Shiny subjects such as a mirror or car body
- Subjects that are moving at high speed
- Subjects on the other side of a glass
- Dark subjects that absorb light without reflecting it such as hair or fur
- Non-solid subjects such as smoke or flames
- Subject with little contrast with the background (such as a person wearing clothes with the same color as the background)
- When there is a large contrast difference in the AF frame and the subject is close to it (such as a subject in front of a background with a strong contrast)
Printing from Print History
You can find images printed previously and retain the settings (such as image effects) for printing. You can print the images you have taken previously using the following procedure.
- Press [MENU/OK] on the playback screen
The playback menu is displayed. - Press or and select [PRINT HISTORY]
- Press [MENU/OK]
- Press or to select the image you want to print
- Press
 (Print)
 - Press or to select [PRINT] or [PRINT WITH SOUND]
Note
To print with sound, it is necessary to link with the sound function of the smartphone app.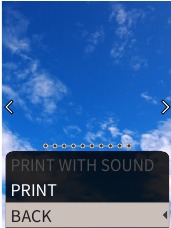
- Press [MENU/OK]
Printing starts.
- To print with sound, use to change the print position of the QR Code as needed.
- To cancel printing, select [BACK] or press (Back).
- When the sound of the film unloading stops, hold the top of the film and remove it
Note
Be careful not to obstruct the film ejection slot with your fingers or the strap.
Using a Memory Card
The camera can save approximately 45 images in the internal memory, but you can save more images by using a memory card.
Notes on memory card
- Micro SD and micro SDHC memory cards are compatible with this camera. Using a memory card other than the specified type may cause damage to the camera.
- Because memory cards are small, infants may accidentally swallow them. Keep out of reach of children. Please consult your doctor immediately if an infant swallows a memory card.
- Do not turn off the camera or remove the memory card while formatting the memory card or recording or erasing data
Doing so may damage the memory card - Do not use or store a memory card in an environment prone to strong static electricity or electrical noise.
- If you insert a memory card charged with static electricity into the camera, the camera may malfunction. If this happens, turn off the power and then turn it on again.
- Do not put a memory card in your trouser pocket. When you sit down, stress may be applied to the memory card causing it to break.
- When you remove a memory card after prolonged use, it may be warm, but this is normal.
- Do not attach labels, etc. onto memory cards. Labels may become unattached from the memory card whilst being inserted and removed from the camera which may cause the camera to malfunction.
Notes on using a memory card in a PC
- Be sure to use the camera to format unused memory cards and memory cards used on the PC and other devices before use.
- When you format a memory card with the camera, shoot and record images, a folder is automatically created. Do not use a computer to change or delete the memory card folder names or file names. The memory card may become unusable by the camera.
- Please do not use the PC to delete images from the memory card. Always use the camera to delete images from the memory card.
- When editing an image file, copy or move the image file to a hard disk, etc. for editing.
Inserting a Memory Card
- Open the card slot cover

- Insert the memory card all the way until a click is heard. Ensure the correct orientation is used as shown below

- Close the card slot cover

- When removing a memory card, push against the memory card with your finger and slowly release your finger from the card. The lock is released and the memory card can be removed.
Note
Take care when removing a memory card, it may be ejected forcefully if you release your finger suddenly. Please release the card gently.
You can change various settings related to shooting from the shooting menu.
- Press [MENU/OK] on the shooting screen
The shooting menu displays. SHOOTING MENU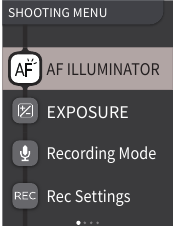
- Press or to select the item to set
- For a description of each item, please refer to «Shooting Menu Items».
- Change the settings
- Press [MENU/OK]
The settings are applied and the display returns to the shooting screen.
[AF ILLUMINATOR]
If you select ON, the AF Illuminator will be lit during the period from when you press the shutter button halfway until the subject is in focus, making it easier to focus on dark subjects.
- Depending on the scene, it may be difficult to focus even if the flash is used.
- When shooting close to the subject, the effect of the AF Illuminator may not be sufficient.
- Do not use the AF illuminator in close proximity to human eyes.
[EXPOSURE]
Adjust the brightness of the image. Exposure is used when the subject is too bright or too dark, or when the contrast between the subject and the background (difference in brightness) is large.
- The set exposure value is retained even after moving the image data to a PC, etc.
[Recording Mode]
Starts the recording mode set in [Rec Settings].
[Rec Settings]
Switches to [After shooting] or [Before & after].
For a description of the following items, please refer to «Using the Set-up Menu».
[PRINT SETTINGS] / [Bluetooth SETTINGS] / [CROSS KEY GUIDE] / [DATE/TIME] / [LANG.] / [SOUND SET-UP] / [PLAYBACK VOLUME] / [AUTO POWER OFF] / [RESET] / [FRAME DATA RESET] / [FORMAT] / [FIRMWARE UPGRADE]
You can change various settings related to playback from the playback menu.
- Press [MENU/OK] on the playback screen
The playback menu is displayed.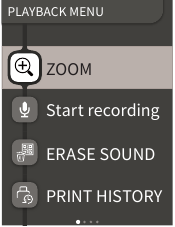
- Press or to select the item
- For a description of each item, please refer to «Playback Menu Items».
- Change the settings
- Press [MENU/OK]
The settings are applied and the display returns to the previous screen.
[ZOOM]
Please refer to «Zooming images».
[Start recording]
Records sound in images. In the case of images with sound already recorded, the sound will be overwritten.
[ERASE SOUND]
Erases only the sound from images with sound.
[PRINT HISTORY]
- Display up to the last 50 images that were printed.
- Select an image and press
 (Print) to start printing.
 - You can clear the print history one image at a time by pressing [MENU/OK].
[ERASE]
You can erase images one by one or erase them all at once.
[IMAGE ROTATE]
Display an image rotated by 90 degrees.
[COPY]
Copy images from the internal memory to a memory card or from a memory card to the internal memory.
Follow the procedure below.
- Select [COPY] from the playback menu
- Select the copy destination and press [MENU/OK]
- Select [FRAME] or [ALL FRAMES] and press [MENU/OK] If you selected [ALL FRAMES], copying starts. If you selected [FRAME], proceed to step 4.
- Press or to select the image to copy
- Press or to select [COPY]
- Press [MENU/OK]
For a description of the following items, please refer to «Using the Set-up Menu».
[PRINT SETTINGS] / [Bluetooth SETTINGS] / [CROSS KEY GUIDE] / [DATE/TIME] / [LANG.] / [SOUND SET-UP] / [PLAYBACK VOLUME] / [AUTO POWER OFF] / [RESET] / [FRAME DATA RESET] / [FORMAT] / [FIRMWARE UPGRADE]
Follow the procedure below to change settings with the set-up menu.
- On the shooting screen or playback screen, press [MENU/OK]
- Press or to select the item to set
- For a description of each item, please refer to «Set-up Menu Items».
- Change the settings
- Press [MENU/OK]
The settings are applied and the display returns to the previous screen.
[PRINT SETTINGS]
Change the print position and print color of the QR Code printed on print with sound.
Note
To print with sound, it is necessary to link with the sound function of the smartphone app.
[Default QR Code Position]:
Change the default QR code position.
[QR Code Color]:
Change the QR Code printing color.
Bluetooth SETTINGS
Please install the smartphone app on your smartphone before pairing registration.
[PAIRING REGISTRATION]:
When you connect with your smartphone via Bluetooth for the first time, you will need to pair the devices. Please refer to the following procedure for pairing.
- Select [Bluetooth SETTINGS] from the playback menu
- Select [PAIRING REGISTRATION] and press [MENU/OK]
- Press [SETTINGS] on the smartphone app
- Press [Bluetooth settings] on the smartphone app
- Press [Connect]
- Allow pairing
[DELETE PAIRING REG]:
You can delete information of a smartphone registered for pairing.
[INFORMATION]:
Displays the Bluetooth address, name, and registered terminal name of the main unit.
[CROSS KEY GUIDE]
Sets whether to show or hide the cross key guide.
[DATE/TIME]
Set the date and time.
[DATE STAMP]
Writes the date to images. Select [OFF] if you want to remove the date written to images.
[LANG]
Set the language to be displayed on the LCD monitor.
[SOUND SET-UP]
Set the volume of the operation sound, shutter volume and start up sound. Select [OFF] if you want to turn off the sound.
[PLAYBACK VOLUME]
Set the playback volume of the recorded sounds.
[AUTO POWER OFF]
Sets the time until the power is automatically turned off when the camera is not in use.
[RESET]
Resets the settings to the default settings.
The date and time set in date/time are not reset.
[FRAME DATA RESET]
Resets the default frame settings used for the shortcut buttons.
[FORMAT]
Format the camera’s internal memory or a memory card inserted in the card slot. All saved images will be deleted.
[FIRMWARE UPGRADE]
Upgrade the firmware version.
Insert the memory card containing the firmware into the card slot and follow the instructions on the screen.
Download the latest firmware from the FUJIFILM website.
Functions Available by Linking with the Smartphone App
The following functions can be used by linking with the smartphone app «INSTAX mini LiPlay».
Sound Function
You can convert the sound recorded by the camera into a QR Code and print it together with an image (Print with sound).
- The sound is played when the QR code printed with a sound image is read by a smartphone, etc.
- You can play or delete the sound on images with sound that you have previously printed using the smartphone app.
Note
If you delete an image with sound using the smartphone application, the sound will no longer be able to be played even if the QR Code is read.
Remote Shooting Function
You can set flash and self-timer options with the smartphone app and shoot remotely.
Shortcut Function
The three shortcut buttons on the side of the camera can be set in the smartphone app.
Direct Print Function
You can send an image from your smartphone to the camera and print it with the INSTAX printing function. Before sending, you can move, rotate and zoom the image with the smartphone app.
Specifications
Camera Function
| Image sensor | 1/5 type CMOS primary color filter |
| Number of recorded pixels | 2560 × 1920 pixels |
| Storage media | Internal memory, micro SD/micro SDHC memory card |
| Storage capacity | Approximately 45 images in internal memory, approximately 850 images per 1 GB in micro SD/micro SDHC memory card |
| Recording method | DCF compliant Exif Ver 2.3 |
| Focus distance | f = 28 mm (35 mm film equivalent) |
| Aperture | F2.0 |
| Auto focus | Single AF (with AF Illuminator) |
| Shooting distance | 10 cm to ∞ |
| Shutter speed | 1/4 second to 1/8000 second (automatic switching) |
| Shooting sensitivity | ISO100 to 1600 (automatic switching) |
| Exposure control | Program AE |
| Exposure | −2.0 EV to +2.0 EV (1/3 EV step) |
| Metering method | TTL 256 split metering, multi metering |
| White balance | Auto |
| Flash | Auto flash / Forced flash/Suppressed flash Shooting range with flash: Approximately 50 cm to 1.5 m |
| Self-timer | Approximately 2 seconds / approximately 10 seconds |
| Image effects | 6 filters, 10 frames (3 available with shortcuts) |
| Sound recording | Possible to record sound when shooting or playing back single image. Possible to overwrite. |
Print Function
| Film used | FUJIFILM instant film «INSTAX mini» (sold separately) |
| Number of films | 10 films/pack |
| Film size | 86 mm × 54 mm |
| Screen size | 62 mm × 46 mm |
| Print pixel count | 800 × 600 dots |
| Print resolution | 12.5 dots / mm (318 dpi, 80 μm dot pitch) |
| Print gradation | RGB gradation of 256 colors |
| Printable image format | JPEG images taken with this unit |
| Print output time | Approximately 12 seconds |
| Print function | Images in the internal memory and images in the memory card can be printed |
| Reprint | Reprint is possible for images stored in Print history (up to 50) |
Other
| Smartphone app linked functions | Sound playback function from printed images, smartphone image print function, remote shooting function, frame selection function |
| LCD monitor | 2.7-inch TFT color LCD monitor Pixel count: Approximately 230,000 dots |
| External interface | Micro USB Micro-B (for charging only) |
| Power supply | Lithium ion battery (internal type: not removable) |
| Charging function | Built-in battery |
| Possible number of printed images | Approximately 100 (from full charge) *The number of prints depends on the usage conditions. |
| Charging time | Approximately 2-3 hours *Charging time depends on the temperature. |
| Main unit dimensions | 82.5 mm × 122.9 mm × 36.7 mm (excluding projecting parts) |
| Main unit weight | Approximately 255 g |
| Operating environment | Temperaturee: +5 ºC to +40 ºC Humidity: 20% to 80% (no condensation) |
*The above specifications are subject to change for performance improvement.
Troubleshooting
Please check the following items before considering a problem to be a malfunction. If the problem persists even after taking action, please contact our service center for repair or visit the website below.
FUJIFILM website: http://www.fujifilm.com/
If the following problem occurs…
| Problem | Possible causes and solutions |
| I cannot turn on the camera. | The battery may be exhausted. Please charge the camera. |
| The battery is exhausted quickly. | If you use the camera in a very cold environment, the battery will drain quickly. Please keep the camera warm before shooting. |
| Camera shuts down during use. | The battery level may be low. Please charge the camera. |
| Charging does not start. |
|
| It takes too long to charge. | At low temperatures, charging may take some time. |
| The self-timer lamp flashes while charging. | Charge the battery in a temperature range of +5°C to +40°C. If you cannot charge the battery within this range, please contact our support center. |
| I cannot shoot when I press the shutter button. |
|
| I cannot focus the camera. | Use the AF/AE lock to shoot subjects that are difficult to focus on. |
| The flash does not fire. | Check that the suppressed flash setting has not been selected. Select a setting other than the suppressed flash setting. |
| Even though the flash fired, the image is dark. |
|
| The image is blurred. |
|
| The camera does not work properly. |
|
| The film pack does not load or does not load smoothly. |
|
| The film does not unload. |
|
| Some or all of the finished prints are white. | Do not open the film door until all film exposures have been used. Unexposed film will be prematurely exposed if the door is opened. Prematurely exposed film will be white with no images. |
| The print is uneven. |
|

Documents / Resources
References
 Fujifilm [Global]
Download manual
Here you can download full pdf version of manual, it may contain additional safety instructions, warranty information, FCC rules, etc.
Download Fujifilm INSTAX mini LiPlay Instant Camera Manual
-
Canon Powershot SD30
Wrist Strap WS-900Supplied with CameraMultiMediaCardMMC-16MBattery PackNB-4L (*1)Battery ChargerCB-2LV / CB-2LVE (*1)All Weather CaseAW-DC40TV / VideoAudio / VideoIN TerminalAV CableAVC-DC300 (*1)Canon Digital CameraSolution DiskUSB Card ReaderDirect InterfaceCable (*2)SD Memory Card (*4)SDC-128MSDC-512MSHUSB PortPC Ca …
Powershot SD30 Digital Camera, 2
-
Casio QV-10
1Liquid Crystal Digital CameraQV-10 BOwner’s Manual英IntroductionCongratulations upon your se-lection of the QV-10 Liquid Crys-tal Digital Camera. The QV-10comes with its own built-in liquidcrystal color monitor that let’syou instantly view the picturesyou take.To get the most out of the QV-10, be sure to carefull …
QV-10 Digital Camera, 23
-
Sony DSC-W220/P
DSC-W220/PCyber-shot® Digital Still Camera The Sony® Cyber-shot® DSC-W220 combines point-and-shoot ease-of-use with advanced features in a sophisticated, compact design. Intelligent Scene Recognition (iSCN) can recognize five different scene conditions and automatically adjust camera settings, and Face Detection …
DSC-W220/P Digital Camera, 2
-
FujiFilm FINEPIX S7000
Gold markingS7000S7000FGS-305108-FGBL00306-200(1) EA. Loading the batteries1.Check that the camera isturned off (indicator lampgoes off) before openingthe battery cover.1.Set the Power switch to“q” and set the Mode dialto “B”.2.Press the Shutter buttondown halfway to adjust thefocus.3.Press the Shutter buttondo …
FINEPIX S7000 Digital Camera, 2
-
Lumens VC-B20D
VC-B20D HD Camera Installation Guide — English [Important] To download the latest version of Quick Start Guide, multilingual user manual, software, or driver, etc., please visit Lumens http://www.Mylumens.com …
VC-B20D IP Camera, 29
-
Megxon TX3000
165mm+-2122mm+-2 Table Of Contents ——————————————————— 4Safety Notes Introduction —————————————————— 5-9 Accessories Included ———————————————— 5 External View ——————————————— …
TX3000 Digital Camera, 6
-
Panasonic LUMIX DMC-FX75
Basic Operating InstructionsDigital CameraModel No. DMC-FX75 Before connecting, operating or adjusting this product,please read the instructions completely.Please also refer to the Operating Instructions (PDF format) contained on the CD-ROM (supplied).You can learn about advanced operation methods and check the Trouble …
LUMIX DMC-FX75 Digital Camera, 36
-
Panasonic DMC-TZ9
VQT2T02Basic Operating InstructionsDigital CameraModel No. DMC-TZ9DMC-TZ8Before use, please read these instructions completely.Please also refer to Operating Instructions (PDF format) recorded on the CD-ROM containing the Operating Instructions (supplied). You can learn about advanced operation methods and check the Tr …
DMC-TZ9 Digital Camera, 15
![]()
CS
[OKAMŽITÝ TISK + DIGITÁLNÍ TECHNOLOGIE]
Uživatelská příručka (plná verze)
|
INSTAX MINI HM1 |
BODM1P301-C00 |

Obsah
Před použitím 3
Poznámky k likvidaci fotoaparátu 3
O tomto fotoaparátu 3
Hlavní vlastnosti 3
Funkce dostupné s aplikací pro chytré telefony 3
Názvy součástí 4 LCD displej 5 Používání tlačítka Cross Key 6 Připevnění poutka 6
Nabíjení baterie 7
Indikace stavu nabíjení 7
Zapnutí/vypnutí fotoaparátu 7
Kontrola stavu nabití baterie 7
Počáteční nastavení 8
Zakládání/vykládání filmové kazety„INSTAX mini“ 9
Zakládání filmové kazety 9
Vyložení použité filmové kazety 10
Základní pořizování snímků a přehrávání 10
Fotografování 10
Přehrávání snímků 11
Změny zobrazení snímků na obrazovce přehrávání 11
Tisk 12
Ukazatel zbývajícího filmu 13
Výběr rámečku a filtru 13
Výběr rámečku 13
Výběr filtru 13
Přidání zvuku ke snímkům 14
Přidání zvuku při fotografování 14
Přidání zvuku při přehrávání snímků 15
Různé druhy fotografování 15
Fotografování pomocí samospouště 15 Fotografování s využitím blesku 15 Fotografování sebe sama (selfie) 16 Fotografování s použitím blokace zaostření/expozice 16
Tisk z PRINT HISTORY 17
Použití paměťové karty 17
Vložení paměťové karty 17
Použití nabídky SHOOTING MENU 18 Použití nabídky PLAYBACK MENU 19 Použití nabídky nastavení 19
Funkce dostupné propojením s aplikací v chytrém telefonu 20
Funkce záznamu zvuku 20 Funkce dálkového pořizování snímků 20 Funkce zkratek 20 Funkce přímého tisku 20
Technické vlastnosti 21
Odstraňování potíží 22
DŮLEŽITÉ BEZPEČNOSTNÍ UPOZORNĚNÍ 23
Péče o fotoaparát podle zdravého rozumu 23
Zařízení Bluetooth®: Upozornění 24
2

Před použitím
Před použitím fotoaparátu proveďte následující kroky.
|
Dodávané příslušenství |
|
|
• USB kabel pro nabíjení (1) |
• Poutko (1) |
• Uživatelská příručka (1)
Poznámky k likvidaci fotoaparátu
Tento fotoaparát používá vestavěnou lithium-iontovou baterii.
Při likvidaci fotoaparátu postupujte podle místních předpisů a zlikvidujte jej správně.
V případě dotazů viz přiložený list KONTAKTNÍ INFORMACE. Není-li na listu uvedena vaše země či oblast, obraťte se na svého místního distributora.
UPOZORNĚNÍ
Neodstraňujte vestavěnou baterii sami; v opačném případě by mohlo dojít ke zranění.
Likvidace použitých elektrických a elektronických zařízení
(platí v Evropské unii a dalších evropských zemích se systémen sběru tříděného odpadu)
Tento symbol na výrobku, v návodu nebo v záručních podmínkách nebo na obalu znamená, že produkt nelze likvidovat jako komunální odpad. Je nutno odnést jej na příslušné sběrné místo pro recyklaci elektrických a elektronických zařízení.
Zajištěním řádné likvidace tohoto produktu pomůžete zabránit případným nežádoucím vlivům na životní prostředí a veřejné zdraví, k nimž může v případě nesprávného nakládání s odpadem tohoto typu dojít.
Recyklace materiálů pomáhá zachovávat přírodní zdroje. Podrobnější informace o recyklaci produktu získáte u místního úřadu, u společnosti zajišťující svoz komunálního odpadu nebo v prodejně, kde jste produkt zakoupili.
V zemích mimo Eu: Chcete-li zlikvidovat tento produkt, obraťte se na místní úřady a zeptejte se na správný způsob likvidace.
Tento symbol na bateriích či akumulátorech znamená, že s těmito bateriemi nesmí být zacházeno jako s běžným domovním odpadem.
EEE splňuje směrnici.
CS
O tomto fotoaparátu
Hlavní vlastnosti
●●Nejmenší produkt instax dostupný na trhu.
●●Svůj snímek můžete dokonale umístit pomocí LCD displeje a uložit jej do paměti fotoaparátu nebo na kartu micro SD.
●●Lze vybrat obrázek z knihovny fotografií a vytisknout jej pomocí funkce tisku instax.
●●Fotografie můžete upravovat za pomoci 10 rámečků a 6 filtrů. ●●Obrázky můžete ukládat s nahraným zvukem.
●●Stylový a luxusní design.
●●Fotoaparát je vybaven předním zrcátkem pro snadné pořizování autoportrétů.
Funkce dostupné s aplikací pro chytré telefony
●●Funkce záznamu zvuku
Nahrajte fotoaparátem zvuk, převeďte jej do QR kódu a vytiskněte QR kód na fotografii (PRINT WITH SOUND). Zvuk se přehraje, pokud načtete svým chytrým telefonem QR kód vytištěný pomocí funkce tisku instax.
●●Vzdálené ovládání fotoaparátu
Ovládejte fotoaparát pomocí svého chytrého telefonu pro možnost vzdáleného pořizování snímků.
●●Funkce zkratek
Na svém chytrém telefonu můžete vybrat pro fotografii rámeček a také přiřadit rámečky ke 3 tlačítkům zkratek, které jsou umístěny na boční straně fotoaparátu.
●●Přímý tisk
Přeneste obrázek ze svého chytrého telefonu do fotoaparátu a vytiskněte jej pomocí funkce tisku instax. Před jejím odesláním můžete fotografii pomocí aplikace v chytrém telefonu posouvat, otáčet, zvětšovat, zmenšovat nebo oříznout.
3

Názvy součástí
Přední strana
1
2
8
3
7
|
6 |
||||
|
4 |
||||
|
5 |
||||
|
Zadní strana |
||||
|
9 |
||||
|
10 |
||||
|
11 |
FILM |
|||
|
12 |
1 |
|||
|
2 |
1 |
24 |
||
|
13 |
3 |
2 |
||
|
3 |
||||
|
14 |
15 |
|||
|
16 |
23 |
|||
|
17 |
||||
|
18 |
22 |
|||
|
21 |
||||
|
19 |
20 |
|||
1Výstupní štěrbina filmu
2Tlačítko spouště
3Blesku/Kontrolka samospouště
4Očko na popruh
5USB port
6Tlačítko  (Zvuk)
7Objektiv
8Zrcátko pro autoportréty
9Zámek dvířek filmu
10Dvířka filmu
11
 (Tlačítko zkratky 1)
12Tlačítko Reset*
13
 (Tlačítko zkratky 2)
14
 (Tlačítko zkratky 3)
15Slot pro paměťovou kartu Micro SD
16Tlačítko  (Zapnutí)
17Mikrofon
18Reproduktor
19Cross key (

 )
)
20Tlačítko MENU/OK
21Tlačítko  (Zpět)
22Tlačítko  (Přehrávání)
23Tlačítko  (Tisk)
24LCD displej
*Pokud fotoaparát nefunguje správně, resetujte fotoaparát stisknutím tlačítka Reset.
4

CS
LCD displej
Po zapnutí napájení se na LCD displeji objeví obrazovka fotografování.
•Pokud chcete přepnout z obrazovky fotografování na obrazovku přehrávání, stiskněte tlačítko  (Přehrávání).
•Pokud chcete přepnout z obrazovky přehrávání na obrazovku fotografování, stiskněte tlačítko spouště.
Pokud máte otevřenou obrazovku fotografování nebo obrazovku přehrávání, stisknutím tlačítka  (Zpět) zobrazíte na LCD displeji následující údaje.
Obrazovka fotografování
|
1 |
||||||||||||||||||||
|
2 |
10 |
|||||||||||||||||||
|
4 |
No Frame |
|||||||||||||||||||
|
3 |
No Filter |
|||||||||||||||||||
|
9 |
||||||||||||||||||||
|
5 |
||||||||||||||||||||
|
6 |
8 |
|||||||||||||||||||
7
Obrazovka přehrávání
11
12
13
No Frame
 No Filter
1Aktuální datum a čas
2Expozice
3Název rámečku
4Název filtru
5Počet dostupných snímků*
6Počet snímků typu PRINT WITH SOUND čekajících na odeslání
7Ukazatel zbývajícího filmu
8Ukazatel stavu Bluetooth připojení
9Ukazatel stavu nabití baterie
10Ukazatel blesku
11Ukazatel čísla snímku
12Údaje o datu/času pořízení snímku
13Ukazatel stavu přenosu snímků typu PRINT WITH SOUND
*Při používání funkce INTERNAL MEMORY se zobrazuje  . Pokud počet dostupných snímků činí 10 nebo méně, je ikonka červená.
■■Zobrazení CROSS KEY GUIDE
Při spouštění nebo při přepínání obrazovek (obrazovka fotografování  obrazovka přehrávání) se na krátkou dobu objeví navigační vodítko CROSS KEY GUIDE.
Obrazovka fotografování Obrazovka přehrávání
CROSS KEY GUIDE
5

Používání tlačítka Cross Key
Tlačítka 

 (nahoru, dolů, doleva a doprava) slouží k výběru položek nabídky nebo k vyvolání funkcí přiřazených tlačítkům

 . Tlačítko [MENU/OK] slouží k zobrazení nabídky nebo k provedení výběru.
1
5
2


 4
4
3
1 
 Pohyb nahoru
2 
 Pohyb doleva
3 
 Pohyb dolů
4 
 Pohyb doprava
5 Zobrazení nabídky / provedení výběru
Připevnění poutka
Poutko připevněte dle následujícího obrázku.
•Při přenášení fotoaparátu nebo při fotografování provlékněte poutkem zápěstí, aby vám fotoaparát neupadl.
6

Nabíjení baterie
Před zahájením nabíjení baterie fotoaparát vypněte. Pokud je fotoaparát zapnutý, baterie se nabíjet nebude.
Dbejte na správné připojení kabelu, jak je znázorněno.
Pomocí přiloženého USB kabelu propojte fotoaparát a USB adaptér dodávaný s vaším chytrým telefonem. Poté zapojte USB adaptér do elektrické zásuvky.
• Doba nabíjení je přibližně 2 až 3 hodiny.
CS
Zapnutí/vypnutí fotoaparátu
|
Stisknutím a podržením |
(Zapnutí) fotoaparát zapnete |
||
|
nebo vypnete. |
|||
Indikace stavu nabíjení
|
Během nabíjení |
Rozsvítí se kontrolka samospouště. |
|
Nabíjení dokončeno |
Kontrolka samospouště zhasne. |
|
Chyba při nabíjení |
Kontrolka samospouště bliká. |
Nabíjení z počítače:
•Připojte fotoaparát přímo k počítači. Nepřipojujte jej přes USB rozbočovač nebo klávesnici.
•Pokud počítač během nabíjení přejde do režimu spánku, nabíjení se přeruší. Pokud chcete v nabíjení dále pokračovat, ukončete režim spánku a znovu připojte USB kabel.
•V závislosti na modelu, nastavení či provozních podmínkách počítače se baterie nemusí nabít.
Poznámka
•Baterii nelze vyjmout.
•Baterie není z výroby nabita. Před použitím baterii prosím zcela nabijte.
•Informace o baterii naleznete v kapitole„Péče o fotoaparát podle zdravého rozumu“. (str. 23)
Kontrola stavu nabití baterie
Stav nabití baterie se na LCD displeji zobrazí po stisknutí tlačítka  (Zpět) na obrazovce fotografování nebo na obrazovce přehrávání.
|
Zobrazení |
Stav nabití baterie |
Baterie je dostatečně nabitá.
Baterie je nabitá z poloviny nebo méně.
Doporučujeme ji dobít.
Baterie není nabitá dostatečně. Nabijte ji prosím co nejdříve.
•Pokud je již baterie nabita málo, objeví se v pravé spodní části LCD displeje ikona 
 .
.
•Jakmile se baterie vybije úplně, na LCD displeji se objeví ikona  a fotoaparát se vypne.
•Pokud fotoaparát po určitou dobu nepoužíváte, automaticky se vypne. Dobu do vypnutí nečinného fotoaparátu můžete nastavit. (str. 20)
•V režimu fotografování otevřete stisknutím tlačítka  (Přehrávání) obrazovku přehrávání a přejdete do režimu přehrávání.
•V režimu přehrávání otevřete stisknutím tlačítka spouště až na doraz obrazovku fotografování a vyberte režim fotografování.
7

Počáteční nastavení
Při prvním zapnutí fotoaparátu po zakoupení se automaticky otevřou obrazovky nastavení jazyka, data a času a také obrazovka spárování s chytrým telefonem.
Před provedením registrace spárování si prosím do svého chytrého telefonu nainstalujte aplikaci„INSTAX mini LiPlay“.
•Pokud používáte chytrý telefon s operačním systémem Android, vyhledejte aplikaci„INSTAX mini LiPlay“ v obchodě Google Play a nainstalujte ji.
*Požadavky na chytré telefony s operačním systémem Android: Android ver. 5.0 nebo vyšší s nainstalovaným obchodem Google Play Store
•Pokud používáte chytrý telefon s operačním systémem iOS, vyhledejte aplikaci„INSTAX mini LiPlay“ v obchodě App Store a nainstalujte ji.
*Požadavky na chytré telefony s operačním systémem iOS:
iOS ver. 10 nebo vyšší
V závislosti na modelu vašeho chytrého telefonu není zaručeno, že budete moci používat aplikaci„INSTAX mini LiPlay“, i když jste ji nainstalovali a váš chytrý telefon splňuje výše uvedené požadavky.
Toto nastavení lze rovněž provést později. Pokud chcete tato nastavení provést později nebo je změnit, nastavte
položky [ /LANG.], [DATE/TIME] a [Bluetooth SETTINGS] v nabídce NASTAVENÍ.
1 Zapněte fotoaparát
•Po prvním zapnutí fotoaparátu od zakoupení se otevře obrazovka nastavení jazyka ( /LANG.).
2 Vyberte jazyk, který chcete používat, a stiskněte tlačítko [MENU/OK]
ENGLISH
FRANCAIS
DEUTSCH
 NO
NO
3 Nastavte formát data a stiskněte tlačítko [MENU/OK]
 DATE/TIME YY.MM.DD DD.MM.YY MM/DD/YY
 NO
NO
4 Zadejte rok, měsíc, den, hodinu a minutu a poté stiskněte tlačítko [MENU/OK]
|
Pohybujte kurzorem pomocí |
a poté změňte číslo |
|
|
pomocí |
. |
DATE/TIME
YY.MM.DD
 SET
SET
 NO
NO
Následně proveďte nastavení spárování.
5 Stiskněte tlačítko [MENU/OK]
Bluetooth
SETTINGS
Pair this product with a smartphone to use the functions
linked to this product’s smartphone app.
PAIRING
 NO
NO
•Pokud si nepřejete spárování nastavit, stisknutím tlačítka  (Zpět) počáteční nastavení dokončíte.
6 Spusťte v chytrém telefonu aplikaci„INSTAX mini LiPlay“ a stiskněte [SETTINGS]
8
 Loading…
You can only view or download manuals with
Sign Up and get 5 for free
Upload your files to the site. You get 1 for each file you add
Get 1 for every time someone downloads your manual
Buy as many as you need
For customers in Turkey:
EEE Complies with Directive
About This Camera
Main Features
- The «INSTAX mini LiPlay» is the most compact INSTAX product available on the market
- You can perfectly position your photo using the LCD monitor and save the image onto the camera memory or micro SD card
- You can select a photo from your photo library and print it using the INSTAX print feature
- You can edit your photos by using 10 photo frames and 6 filters
- You can save your photos with the recorded sound
- Stylish and luxurious design
- Equipped with selfie mirror to easily position selfies
Functions Available with the Smartphone App
- Sound function
Record sound with the camera, convert it to QR code and print the QR code on a photo (Print with sound). Sound is played when QR codes printed with the INSTAX print feature are read with your smartphone. - Remote shooting function
Control the camera with your smartphone for remote shooting of photos. - Shortcut function
You can select photo frames on your smartphone and assign the frames to the 3 shortcut buttons located on the side of the camera. - Direct print
Transfer a photo from your smartphone to the camera, and print it with the INSTAX print feature. Before sending the photo, you can use the smartphone app to move, rotate, zoom in, zoom out, or crop the photo.
Part Names
- Film ejection slot
- Shutter button
- Flash/Self-timer lamp
- Strap hook
- USB port
- (Sound) button
- Lens
- Selfie mirror
- Film door lock
- Film door
- (Shortcut 1) button
- Reset button*
- (Shortcut 2) button
- (Shortcut 3) button
- Micro SD card slot
- (Power) button
- Microphone
- Speaker
- Cross key ( )
- MENU/OK button
- (Back) button
- (Playback) button
- (Print) button
- LCD monitor
LCD Monitor
The shooting screen displays on the LCD monitor when the power is switched on.
- To switch from the shooting screen to the playback screen, press (Playback).
- To switch from the playback screen to the shooting screen, press the shutter button.
While the shooting screen or playback screen is displayed, press ![]() (Back) to display the following information on the LCD monitor.
(Back) to display the following information on the LCD monitor.
- Current date and time
- Exposure
- Frame name
- Filter name
- Number of images available*
- Number of prints with sound images waiting to be sent
- Remaining film indicator
- Bluetooth connection status indicator
- Battery level indicator
- Flash indicator
- Frame No. indicator
- Shooting date/time information
- Transmission status indicator of print with sound images
*When using the internal memory, is displayed. The icon displays in red when the number of available images is 10 or less.
Cross Key Guide Display
When starting up or switching screens (Shooting screen ![]() Playback screen), the cross key guide appears for a short time.
Playback screen), the cross key guide appears for a short time.
Using the Cross Key
The ( ) keys are used to select menu items, or to recall the functions assigned to the keys. The [MENU/OK] button is used to display the menu or to make a selection.
- Move up
- Move left
- Move down
- Move right
- Menu display/Make selection
Attaching the Strap
Attach the strap as shown below.
- Put the strap around your wrist when carrying the camera or taking photos to avoid dropping the camera.
Charging the Battery
Turn off the camera before charging the battery. Battery will not charge if the camera is powered on.
Ensure USB is correctly attached as indicated.
Connect the camera and a USB AC adapter supplied with your smartphone using the supplied USB cable, then connect the USB AC adapter to an indoor power outlet.
- Charging time is approximately 2 to 3 hours.
Charging Status Indication
| While charging | Self-timer lamp lights up. |
| Charging finished | Self-timer lamp goes off. |
| Charging error | Self-timer lamp flashes. |
Charging from a PC:
- Connect the camera and PC directly. Do not connect via a USB hub or keyboard.
- If the PC goes into sleep mode while charging, charging is discontinued. To continue charging, exit sleep mode and then reconnect the USB cable.
- The battery may not charge depending on the specifications, settings or conditions of the PC.
Note
- The battery cannot be removed.
- The battery has not been charged during manufacture. Please charge the battery fully before use.
- For notes about the battery, please refer to «Simple Camera Care».
Powering on/off
Press and hold (Power) to power on or off.
Checking the Battery Level
The battery level is displayed on the LCD monitor when pressing ![]() (Back) on the shooting screen or playback screen.
(Back) on the shooting screen or playback screen.
- If you do not use the camera for a certain period of time, it will turn off automatically. You are able to set the amount of time until the power is turned off.
- During shooting mode, press (Playback) to display the playback screen and enter playback mode.
- Press the shutter button fully during playback mode to display the shooting screen and select shooting mode.
Initial Settings
When turning the camera on for the first time after purchase, a screen will be displayed automatically to set the language, date and time, and also to pair a smartphone.
Please install the «INSTAX mini LiPlay» app on your smartphone before carrying out pairing registration.
- If you are using an Android OS smartphone, please search for «INSTAX mini LiPlay» in Google Play Store and install it. *Requirements for Android OS smartphones: Android Ver. 5.0 or higher with Google Play Store installed
- If you are using an iOS smartphone, please search for «INSTAX mini LiPlay» in the App Store and install it. *Requirements for iOS smartphones: iOS Ver. 10 or higher
Depending on your smartphone model, you may not be able to use «INSTAX mini LiPlay» even if you have installed it and your smartphone meets the above requirements.
This setting can also be configured later If you want to configure the settings later or reconfigure the settings, set the [LANG], [DATE/TIME] and [Bluetooth SETTINGS] in the SET-UP MENU
- Turn on the power
- When you turn on the power for the first time after purchase, the Language Setting (/LANG.) screen is displayed.
- Select the language you wish to use and press [MENU/OK]
- Set the date order and press [MENU/OK] DATE/TIME
- Set the year, month, day, hour and minute then press [MENU/OK]
Move the cursor by using, then change the number using .
Next, configure the pairing settings. - Press [MENU/OK]
- If you do not wish to set pairing, press (Back) to finish the initial settings.
- Launch the smartphone app «INSTAX mini LiPlay» and press [SETTINGS]
- Press [Bluetooth settings] on the smartphone app
- Press [Connect] on the smartphone app
- You can confirm camera’s OWN NAME by accessing the Set-up Menu.
Next, select the menu items in the following order: [Bluetooth SETTINGS], [INFORMATION], [OWN NAME].
- Allow pairing
- Confirm that pairing registration is complete
When pairing registration is complete, the screen changes to the shooting screen.
Loading/Unloading the Film Pack
Loading the Film Pack
- Slide the film door lock and open the film door
- Insert film pack by aligning the yellow marks
- Close the film door
- Remove the black film cover that is automatically rejected
Unloading a Used Film Pack
- Slide the film door lock and open the film door
- Grasp the rectangular holes on the film pack, then pull film pack out from the camera
Basic Shooting and Playback
Shooting
The following steps describe the basic shooting procedure.
- Turn on the power
- Hold the camera
- Configure the frame and filter, etc as needed
- Decide the composition to shoot
- Press the shutter button halfway to focus on the subject
A beep will sound and the green AF frame will display on LCD monitor.
When the subject is in focus
A red AF frame will display on the LCD monitor. Either change the composition or use the AF/AE lock.
When the subject is not in focus - Press the shutter button down fully to take a photo
The photo is taken and the image is saved to the internal memory or memory card.
- For the steps on how to print an image you have taken, please refer to «Printing».
- When shooting, steady your arms against your body and hold the camera firmly with both hands.
- Be careful not to touch the camera lens when pressing the shutter button.
- Gently press the shutter button fully to take a picture, ensuring that the camera does not move or shake.
- Be careful not to cover the flash or lens with your fingers or the strap.
- The flash may fire when you fully press the shutter button to take a picture in low light or backlit conditions. You can change the flash settings so that the flash does not fire.
Notes on the internal memory
- When the internal memory is full, the shutter does not release and you cannot shoot photos. Please delete some images or use a memory card.
- If the camera experiences a malfunction, images in the internal memory may be corrupted or lost.
- It is recommended that you copy important images to another media format (Hard disk, CD-R, CD-RW, DVD-R, etc.) as a backup.
- If you submit your camera for repair, we cannot guarantee the integrity of the data in the internal memory.
- When repairing the camera, we may need to check the data in the internal memory.
Playing Back Images
You can play back images on the LCD monitor.
- Turn on the power
- Press (Playback)
The last image taken is displayed. - Press or to select the image you want to play back
- Press the shutter button fully to return to the Shooting screen.
Changing the Playback Screen Display
You can zoom in on the image and change the number of images displayed on the LCD monitor.
Zooming images
- Select the image you want to zoom in on and press [MENU/OK]
The playback menu is displayed. - Press or to select [ZOOM]
- Press [MENU/OK]
The zoom screen is displayed. - Zoom in or out of the image with and
Change the Number of Images Displayed
While displaying the playback screen, press (Playback) to change the number of images displayed.
Printing
You can print the images using the following procedure.
- Turn on the power
- Press (Playback)
The last image taken is displayed. - Press or to select the image you want to print
- Select desired settings such as frame and zoom
- Press (Print)
- Press or to select [PRINT] or [PRINT WITH SOUND]
Note
To print with sound, it is necessary to link with the sound function of the smartphone app. - Press [MENU/OK]
Printing starts.
- When the sound of film unloading stops, hold the top of the film and remove it
Note
Be careful not to obstruct the film ejection slot with your fingers or the strap.
Remaining Film Indicator
The remaining number of film is indicated by the dots at the bottom of the screen. Each time a film is printed, a dot changes to a small square. The dots will display in red when the number of film remaining is 2 or less.
- For handling of the film, please refer to the FUJIFILM Instant Film «INSTAX mini» instruction manual.
- Film development takes about 90 seconds (the time varies depending on the ambient temperature).
Selecting the Frame and Filter
Selecting the Frame
Follow the procedure below to select the frame type.
- On the shooting screen or playback screen, press
The following guide is displayed. - Press or to select the frame type
- Press or [MENU/OK]
The frame is applied and the display returns to the previous screen.
- Press (Back) to return to the previous screen without applying the frame.
- To cancel the frame you have applied, select «No Frame» under frame type.
You can also press a shortcut button to select the frame assigned to that button.
Selecting the Filter
Follow the procedure below to select the filter type.
- On the shooting screen, press
The following guide is displayed. - Press or to select the filter type
- Press or [MENU/OK]
The filter is applied and the display returns to the previous screen.
- Press (Back) to return to the previous screen without applying the filter.
- To cancel the filter you have applied, select «No Filter» under filter type.
Recording Sound in Images
This camera allows recorded sound to be recorded in images.
Recording Sound When Shooting
You can switch between two recording modes, [After shooting] and [Before & after], to suit to your preferences or purpose of use.
The recording mode can be switched in Rec Settings of the shooting menu.
Recording Sound Immediately after Shooting When After shooting Is Set
- Press (Sound) on the shooting screen
An explanation on the recording mode is displayed. - Press [MENU/OK] or (Sound)
The recording mode starts, and a recording icon is displayed at the top right of the screen. - Press the shutter button halfway to focus on the subject
- Press the shutter button down fully
Recording starts after shooting.
- The maximum recording time is approximately 10 seconds. After approximately 10 seconds elapse, recording ends and the screen changes automatically.
- If you press (Sound) again during recording, recording ends at that point in time.
- Press [MENU/OK] to print with sound
Note
To print with sound, it is necessary to link with the sound function of the smartphone app.
Recording Sound before and after Shooting When Before & after Is Set
- Press (Sound) on the shooting screen
The recording mode starts, and a recording animation is displayed at the bottom of the screen.
- Press the shutter button halfway to focus on the subject
- Press the shutter button down fully
A photo is taken and sound is recorded for the 5 seconds before and 5 seconds after you pressed the shutter button fully.
- To exit the recording mode, press (Sound) again.
Recording Sound When Playing Back
- Press (Sound) on the single image playback screen
An explanation on the recording mode is displayed. - Press [MENU/OK] or (Sound)
The recording starts, and a recording icon is displayed at the center of the screen.
- The maximum recording time is approximately 10 seconds. After approximately 10 seconds elapse, recording ends automatically.
- If you press (Sound) again during recording, recording ends at that point in time.
- Press to check the recording
The recording is played back.
Various Types of Shooting
Shoot Using the Self-timer
Use the self-timer for group photos or to prevent the camera from shaking.
- On the shooting screen, press
The following guide is displayed. - Press or to select [2 SEC] or [10 SEC]
- Press [MENU/OK] or
An icon showing the self-timer length that has been set will display in the upper right of the screen.
- Press (Back) to return to the previous screen without applying the setting.
- Fully press the shutter button
If you selected [2 SEC]:
When you press the shutter button, the self-timer lamp blinks.
If you selected [10 SEC]:
When you press the shutter button, the self-timer lamp lights up and blinks for 3 seconds before shooting.
Press (Back) to cancel the self-timer.
Shooting Using the Flash
Use the flash to shoot at night or in dark environments. You can change the flash setting to prevent the flash from firing.
- On the shooting screen, press
The following guide is displayed. - Press or to select the flash setting
- For details about the flash settings, please refer to «Types of Flash».
- Press [MENU/OK] or
- Fully press the shutter button
- If you press the shutter button whilst the flash is charging, the self-timer lamp will blink and the shutter will not release.
Types of Flash
Auto flash
The flash fires automatically if the surroundings are dark. This setting is suitable for most situations.
Forced Flash
The flash fires regardless of the surrounding brightness. Use when the subject is dark due to backlighting.
Suppressed Flash
The flash does not fire even when the surroundings are dark.
This setting is suitable for shooting in places where flash photography is prohibited.
It is recommended to stabilize the camera on a table, etc. when using suppressed flash in dark surroundings.
Taking a Photo of Yourself (Selfie)
You can take a photo of yourself using the selfie mirror.
- Hold the camera firmly with the lens 30cm to 50cm from your face
- Hold the camera firmly, as it is particularly prone to camera shake in dark environments.
- Check your composition in the selfie mirror and shoot
- Do not stare at the flash when shooting. Staring at the flash may temporarily effect vision.
Shooting Using the AF/AE Lock
When shooting, holding the shutter button halfway locks the focus, called «AF lock». The brightness or exposure will also be locked called «AE lock». This will be useful when you want to place the subject outside the center of the screen whilst shooting.
- Press the shutter button halfway to focus on the subject
When you press the shutter button halfway, AF and AE are locked. - Decide upon your composition while pressing the shutter button halfway
- Press the shutter button fully to shoot
It is recommended to use the AE/AF lock when shooting the following subjects, as they can be difficult to focus on.
- Shiny subjects such as a mirror or car body
- Subjects that are moving at high speed
- Subjects on the other side of a glass
- Dark subjects that absorb light without reflecting it such as hair or fur
- Non-solid subjects such as smoke or flames
- Subject with little contrast with the background (such as a person wearing clothes with the same color as the background)
- When there is a large contrast difference in the AF frame and the subject is close to it (such as a subject in front of a background with a strong contrast)
Printing from Print History
You can find images printed previously and retain the settings (such as image effects) for printing. You can print the images you have taken previously using the following procedure.
- Press [MENU/OK] on the playback screen
The playback menu is displayed. - Press or and select [PRINT HISTORY]
- Press [MENU/OK]
- Press or to select the image you want to print
- Press (Print)
- Press or to select [PRINT] or [PRINT WITH SOUND]
Note
To print with sound, it is necessary to link with the sound function of the smartphone app. - Press [MENU/OK]
Printing starts.
- To print with sound, use to change the print position of the QR Code as needed.
- To cancel printing, select [BACK] or press (Back).
- When the sound of the film unloading stops, hold the top of the film and remove it
Note
Be careful not to obstruct the film ejection slot with your fingers or the strap.
Using a Memory Card
The camera can save approximately 45 images in the internal memory, but you can save more images by using a memory card.
Notes on memory card
- Micro SD and micro SDHC memory cards are compatible with this camera. Using a memory card other than the specified type may cause damage to the camera.
- Because memory cards are small, infants may accidentally swallow them. Keep out of reach of children. Please consult your doctor immediately if an infant swallows a memory card.
- Do not turn off the camera or remove the memory card while formatting the memory card or recording or erasing data
Doing so may damage the memory card - Do not use or store a memory card in an environment prone to strong static electricity or electrical noise.
- If you insert a memory card charged with static electricity into the camera, the camera may malfunction. If this happens, turn off the power and then turn it on again.
- Do not put a memory card in your trouser pocket. When you sit down, stress may be applied to the memory card causing it to break.
- When you remove a memory card after prolonged use, it may be warm, but this is normal.
- Do not attach labels, etc. onto memory cards. Labels may become unattached from the memory card whilst being inserted and removed from the camera which may cause the camera to malfunction.
Notes on using a memory card in a PC
- Be sure to use the camera to format unused memory cards and memory cards used on the PC and other devices before use.
- When you format a memory card with the camera, shoot and record images, a folder is automatically created. Do not use a computer to change or delete the memory card folder names or file names. The memory card may become unusable by the camera.
- Please do not use the PC to delete images from the memory card. Always use the camera to delete images from the memory card.
- When editing an image file, copy or move the image file to a hard disk, etc. for editing.
Inserting a Memory Card
- Open the card slot cover
- Insert the memory card all the way until a click is heard. Ensure the correct orientation is used as shown below
- Close the card slot cover
- When removing a memory card, push against the memory card with your finger and slowly release your finger from the card. The lock is released and the memory card can be removed.
Note
Take care when removing a memory card, it may be ejected forcefully if you release your finger suddenly. Please release the card gently.
You can change various settings related to shooting from the shooting menu.
- Press [MENU/OK] on the shooting screen
The shooting menu displays. SHOOTING MENU - Press or to select the item to set
- For a description of each item, please refer to «Shooting Menu Items».
- Change the settings
- Press [MENU/OK]
The settings are applied and the display returns to the shooting screen.
[AF ILLUMINATOR]
If you select ON, the AF Illuminator will be lit during the period from when you press the shutter button halfway until the subject is in focus, making it easier to focus on dark subjects.
- Depending on the scene, it may be difficult to focus even if the flash is used.
- When shooting close to the subject, the effect of the AF Illuminator may not be sufficient.
- Do not use the AF illuminator in close proximity to human eyes.
[EXPOSURE]
Adjust the brightness of the image. Exposure is used when the subject is too bright or too dark, or when the contrast between the subject and the background (difference in brightness) is large.
- The set exposure value is retained even after moving the image data to a PC, etc.
[Recording Mode]
Starts the recording mode set in [Rec Settings].
[Rec Settings]
Switches to [After shooting] or [Before & after].
For a description of the following items, please refer to «Using the Set-up Menu».
[PRINT SETTINGS] / [Bluetooth SETTINGS] / [CROSS KEY GUIDE] / [DATE/TIME] / [LANG.] / [SOUND SET-UP] / [PLAYBACK VOLUME] / [AUTO POWER OFF] / [RESET] / [FRAME DATA RESET] / [FORMAT] / [FIRMWARE UPGRADE]
You can change various settings related to playback from the playback menu.
- Press [MENU/OK] on the playback screen
The playback menu is displayed. - Press or to select the item
- For a description of each item, please refer to «Playback Menu Items».
- Change the settings
- Press [MENU/OK]
The settings are applied and the display returns to the previous screen.
[ZOOM]
Please refer to «Zooming images».
[Start recording]
Records sound in images. In the case of images with sound already recorded, the sound will be overwritten.
[ERASE SOUND]
Erases only the sound from images with sound.
[PRINT HISTORY]
- Display up to the last 50 images that were printed.
- Select an image and press (Print) to start printing.
- You can clear the print history one image at a time by pressing [MENU/OK].
[ERASE]
You can erase images one by one or erase them all at once.
[IMAGE ROTATE]
Display an image rotated by 90 degrees.
[COPY]
Copy images from the internal memory to a memory card or from a memory card to the internal memory.
Follow the procedure below.
- Select [COPY] from the playback menu
- Select the copy destination and press [MENU/OK]
- Select [FRAME] or [ALL FRAMES] and press [MENU/OK] If you selected [ALL FRAMES], copying starts. If you selected [FRAME], proceed to step 4.
- Press or to select the image to copy
- Press or to select [COPY]
- Press [MENU/OK]
For a description of the following items, please refer to «Using the Set-up Menu».
[PRINT SETTINGS] / [Bluetooth SETTINGS] / [CROSS KEY GUIDE] / [DATE/TIME] / [LANG.] / [SOUND SET-UP] / [PLAYBACK VOLUME] / [AUTO POWER OFF] / [RESET] / [FRAME DATA RESET] / [FORMAT] / [FIRMWARE UPGRADE]
Follow the procedure below to change settings with the set-up menu.
- On the shooting screen or playback screen, press [MENU/OK]
- Press or to select the item to set
- For a description of each item, please refer to «Set-up Menu Items».
- Change the settings
- Press [MENU/OK]
The settings are applied and the display returns to the previous screen.
[PRINT SETTINGS]
Change the print position and print color of the QR Code printed on print with sound.
Note
To print with sound, it is necessary to link with the sound function of the smartphone app.
[Default QR Code Position]:
Change the default QR code position.
[QR Code Color]:
Change the QR Code printing color.
Bluetooth SETTINGS
Please install the smartphone app on your smartphone before pairing registration.
[PAIRING REGISTRATION]:
When you connect with your smartphone via Bluetooth for the first time, you will need to pair the devices. Please refer to the following procedure for pairing.
- Select [Bluetooth SETTINGS] from the playback menu
- Select [PAIRING REGISTRATION] and press [MENU/OK]
- Press [SETTINGS] on the smartphone app
- Press [Bluetooth settings] on the smartphone app
- Press [Connect]
- Allow pairing
[DELETE PAIRING REG]:
You can delete information of a smartphone registered for pairing.
[INFORMATION]:
Displays the Bluetooth address, name, and registered terminal name of the main unit.
[CROSS KEY GUIDE]
Sets whether to show or hide the cross key guide.
[DATE/TIME]
Set the date and time.
[DATE STAMP]
Writes the date to images. Select [OFF] if you want to remove the date written to images.
[LANG]
Set the language to be displayed on the LCD monitor.
[SOUND SET-UP]
Set the volume of the operation sound, shutter volume and start up sound. Select [OFF] if you want to turn off the sound.
[PLAYBACK VOLUME]
Set the playback volume of the recorded sounds.
[AUTO POWER OFF]
Sets the time until the power is automatically turned off when the camera is not in use.
[RESET]
Resets the settings to the default settings.
The date and time set in date/time are not reset.
[FRAME DATA RESET]
Resets the default frame settings used for the shortcut buttons.
[FORMAT]
Format the camera’s internal memory or a memory card inserted in the card slot. All saved images will be deleted.
[FIRMWARE UPGRADE]
Upgrade the firmware version.
Insert the memory card containing the firmware into the card slot and follow the instructions on the screen.
Download the latest firmware from the FUJIFILM website.
Functions Available by Linking with the Smartphone App
The following functions can be used by linking with the smartphone app «INSTAX mini LiPlay».
Sound Function
You can convert the sound recorded by the camera into a QR Code and print it together with an image (Print with sound).
- The sound is played when the QR code printed with a sound image is read by a smartphone, etc.
- You can play or delete the sound on images with sound that you have previously printed using the smartphone app.
Note
If you delete an image with sound using the smartphone application, the sound will no longer be able to be played even if the QR Code is read.
Remote Shooting Function
You can set flash and self-timer options with the smartphone app and shoot remotely.
Shortcut Function
The three shortcut buttons on the side of the camera can be set in the smartphone app.
Direct Print Function
You can send an image from your smartphone to the camera and print it with the INSTAX printing function. Before sending, you can move, rotate and zoom the image with the smartphone app.
Specifications
Camera Function
| Image sensor | 1/5 type CMOS primary color filter |
| Number of recorded pixels | 2560 × 1920 pixels |
| Storage media | Internal memory, micro SD/micro SDHC memory card |
| Storage capacity | Approximately 45 images in internal memory, approximately 850 images per 1 GB in micro SD/micro SDHC memory card |
| Recording method | DCF compliant Exif Ver 2.3 |
| Focus distance | f = 28 mm (35 mm film equivalent) |
| Aperture | F2.0 |
| Auto focus | Single AF (with AF Illuminator) |
| Shooting distance | 10 cm to ∞ |
| Shutter speed | 1/4 second to 1/8000 second (automatic switching) |
| Shooting sensitivity | ISO100 to 1600 (automatic switching) |
| Exposure control | Program AE |
| Exposure | −2.0 EV to +2.0 EV (1/3 EV step) |
| Metering method | TTL 256 split metering, multi metering |
| White balance | Auto |
| Flash | Auto flash / Forced flash/Suppressed flash Shooting range with flash: Approximately 50 cm to 1.5 m |
| Self-timer | Approximately 2 seconds / approximately 10 seconds |
| Image effects | 6 filters, 10 frames (3 available with shortcuts) |
| Sound recording | Possible to record sound when shooting or playing back single image. Possible to overwrite. |
Print Function
| Film used | FUJIFILM instant film «INSTAX mini» (sold separately) |
| Number of films | 10 films/pack |
| Film size | 86 mm × 54 mm |
| Screen size | 62 mm × 46 mm |
| Print pixel count | 800 × 600 dots |
| Print resolution | 12.5 dots / mm (318 dpi, 80 μm dot pitch) |
| Print gradation | RGB gradation of 256 colors |
| Printable image format | JPEG images taken with this unit |
| Print output time | Approximately 12 seconds |
| Print function | Images in the internal memory and images in the memory card can be printed |
| Reprint | Reprint is possible for images stored in Print history (up to 50) |
Other
| Smartphone app linked functions | Sound playback function from printed images, smartphone image print function, remote shooting function, frame selection function |
| LCD monitor | 2.7-inch TFT color LCD monitor Pixel count: Approximately 230,000 dots |
| External interface | Micro USB Micro-B (for charging only) |
| Power supply | Lithium ion battery (internal type: not removable) |
| Charging function | Built-in battery |
| Possible number of printed images | Approximately 100 (from full charge) *The number of prints depends on the usage conditions. |
| Charging time | Approximately 2-3 hours *Charging time depends on the temperature. |
| Main unit dimensions | 82.5 mm × 122.9 mm × 36.7 mm (excluding projecting parts) |
| Main unit weight | Approximately 255 g |
| Operating environment | Temperaturee: +5 ºC to +40 ºC Humidity: 20% to 80% (no condensation) |
*The above specifications are subject to change for performance improvement.
Troubleshooting
Please check the following items before considering a problem to be a malfunction. If the problem persists even after taking action, please contact our service center for repair or visit the website below.
FUJIFILM website: http://www.fujifilm.com/
If the following problem occurs…
| Problem | Possible causes and solutions |
| I cannot turn on the camera. | The battery may be exhausted. Please charge the camera. |
| The battery is exhausted quickly. | If you use the camera in a very cold environment, the battery will drain quickly. Please keep the camera warm before shooting. |
| Camera shuts down during use. | The battery level may be low. Please charge the camera. |
| Charging does not start. |
|
| It takes too long to charge. | At low temperatures, charging may take some time. |
| The self-timer lamp flashes while charging. | Charge the battery in a temperature range of +5°C to +40°C. If you cannot charge the battery within this range, please contact our support center. |
| I cannot shoot when I press the shutter button. |
|
| I cannot focus the camera. | Use the AF/AE lock to shoot subjects that are difficult to focus on. |
| The flash does not fire. | Check that the suppressed flash setting has not been selected. Select a setting other than the suppressed flash setting. |
| Even though the flash fired, the image is dark. |
|
| The image is blurred. |
|
| The camera does not work properly. |
|
| The film pack does not load or does not load smoothly. |
|
| The film does not unload. |
|
| Some or all of the finished prints are white. | Do not open the film door until all film exposures have been used. Unexposed film will be prematurely exposed if the door is opened. Prematurely exposed film will be white with no images. |
| The print is uneven. |
|
Documents / Resources
References
- Fujifilm [Global]
Download manual
Here you can download full pdf version of manual, it may contain additional safety instructions, warranty information, FCC rules, etc.
Download Fujifilm INSTAX mini LiPlay Instant Camera Manual
-
Canon Powershot SD30
Wrist Strap WS-900Supplied with CameraMultiMediaCardMMC-16MBattery PackNB-4L (*1)Battery ChargerCB-2LV / CB-2LVE (*1)All Weather CaseAW-DC40TV / VideoAudio / VideoIN TerminalAV CableAVC-DC300 (*1)Canon Digital CameraSolution DiskUSB Card ReaderDirect InterfaceCable (*2)SD Memory Card (*4)SDC-128MSDC-512MSHUSB PortPC Ca …
Powershot SD30 Digital Camera, 2
-
Casio QV-10
1Liquid Crystal Digital CameraQV-10 BOwner’s Manual英IntroductionCongratulations upon your se-lection of the QV-10 Liquid Crys-tal Digital Camera. The QV-10comes with its own built-in liquidcrystal color monitor that let’syou instantly view the picturesyou take.To get the most out of the QV-10, be sure to carefull …
QV-10 Digital Camera, 23
-
Sony DSC-W220/P
DSC-W220/PCyber-shot® Digital Still Camera The Sony® Cyber-shot® DSC-W220 combines point-and-shoot ease-of-use with advanced features in a sophisticated, compact design. Intelligent Scene Recognition (iSCN) can recognize five different scene conditions and automatically adjust camera settings, and Face Detection …
DSC-W220/P Digital Camera, 2
-
FujiFilm FINEPIX S7000
Gold markingS7000S7000FGS-305108-FGBL00306-200(1) EA. Loading the batteries1.Check that the camera isturned off (indicator lampgoes off) before openingthe battery cover.1.Set the Power switch to“q” and set the Mode dialto “B”.2.Press the Shutter buttondown halfway to adjust thefocus.3.Press the Shutter buttondo …
FINEPIX S7000 Digital Camera, 2
-
Lumens VC-B20D
VC-B20D HD Camera Installation Guide — English [Important] To download the latest version of Quick Start Guide, multilingual user manual, software, or driver, etc., please visit Lumens http://www.Mylumens.com …
VC-B20D IP Camera, 29
-
Megxon TX3000
165mm+-2122mm+-2 Table Of Contents ——————————————————— 4Safety Notes Introduction —————————————————— 5-9 Accessories Included ———————————————— 5 External View ——————————————— …
TX3000 Digital Camera, 6
-
Panasonic LUMIX DMC-FX75
Basic Operating InstructionsDigital CameraModel No. DMC-FX75 Before connecting, operating or adjusting this product,please read the instructions completely.Please also refer to the Operating Instructions (PDF format) contained on the CD-ROM (supplied).You can learn about advanced operation methods and check the Trouble …
LUMIX DMC-FX75 Digital Camera, 36
-
Panasonic DMC-TZ9
VQT2T02Basic Operating InstructionsDigital CameraModel No. DMC-TZ9DMC-TZ8Before use, please read these instructions completely.Please also refer to Operating Instructions (PDF format) recorded on the CD-ROM containing the Operating Instructions (supplied). You can learn about advanced operation methods and check the Tr …
DMC-TZ9 Digital Camera, 15
![]()
CS
[OKAMŽITÝ TISK + DIGITÁLNÍ TECHNOLOGIE]
Uživatelská příručka (plná verze)
|
INSTAX MINI HM1 |
BODM1P301-C00 |
Obsah
Před použitím 3
Poznámky k likvidaci fotoaparátu 3
O tomto fotoaparátu 3
Hlavní vlastnosti 3
Funkce dostupné s aplikací pro chytré telefony 3
Názvy součástí 4 LCD displej 5 Používání tlačítka Cross Key 6 Připevnění poutka 6
Nabíjení baterie 7
Indikace stavu nabíjení 7
Zapnutí/vypnutí fotoaparátu 7
Kontrola stavu nabití baterie 7
Počáteční nastavení 8
Zakládání/vykládání filmové kazety„INSTAX mini“ 9
Zakládání filmové kazety 9
Vyložení použité filmové kazety 10
Základní pořizování snímků a přehrávání 10
Fotografování 10
Přehrávání snímků 11
Změny zobrazení snímků na obrazovce přehrávání 11
Tisk 12
Ukazatel zbývajícího filmu 13
Výběr rámečku a filtru 13
Výběr rámečku 13
Výběr filtru 13
Přidání zvuku ke snímkům 14
Přidání zvuku při fotografování 14
Přidání zvuku při přehrávání snímků 15
Různé druhy fotografování 15
Fotografování pomocí samospouště 15 Fotografování s využitím blesku 15 Fotografování sebe sama (selfie) 16 Fotografování s použitím blokace zaostření/expozice 16
Tisk z PRINT HISTORY 17
Použití paměťové karty 17
Vložení paměťové karty 17
Použití nabídky SHOOTING MENU 18 Použití nabídky PLAYBACK MENU 19 Použití nabídky nastavení 19
Funkce dostupné propojením s aplikací v chytrém telefonu 20
Funkce záznamu zvuku 20 Funkce dálkového pořizování snímků 20 Funkce zkratek 20 Funkce přímého tisku 20
Technické vlastnosti 21
Odstraňování potíží 22
DŮLEŽITÉ BEZPEČNOSTNÍ UPOZORNĚNÍ 23
Péče o fotoaparát podle zdravého rozumu 23
Zařízení Bluetooth®: Upozornění 24
2
Před použitím
Před použitím fotoaparátu proveďte následující kroky.
|
Dodávané příslušenství |
|
|
• USB kabel pro nabíjení (1) |
• Poutko (1) |
• Uživatelská příručka (1)
Poznámky k likvidaci fotoaparátu
Tento fotoaparát používá vestavěnou lithium-iontovou baterii.
Při likvidaci fotoaparátu postupujte podle místních předpisů a zlikvidujte jej správně.
V případě dotazů viz přiložený list KONTAKTNÍ INFORMACE. Není-li na listu uvedena vaše země či oblast, obraťte se na svého místního distributora.
UPOZORNĚNÍ
Neodstraňujte vestavěnou baterii sami; v opačném případě by mohlo dojít ke zranění.
Likvidace použitých elektrických a elektronických zařízení
(platí v Evropské unii a dalších evropských zemích se systémen sběru tříděného odpadu)
Tento symbol na výrobku, v návodu nebo v záručních podmínkách nebo na obalu znamená, že produkt nelze likvidovat jako komunální odpad. Je nutno odnést jej na příslušné sběrné místo pro recyklaci elektrických a elektronických zařízení.
Zajištěním řádné likvidace tohoto produktu pomůžete zabránit případným nežádoucím vlivům na životní prostředí a veřejné zdraví, k nimž může v případě nesprávného nakládání s odpadem tohoto typu dojít.
Recyklace materiálů pomáhá zachovávat přírodní zdroje. Podrobnější informace o recyklaci produktu získáte u místního úřadu, u společnosti zajišťující svoz komunálního odpadu nebo v prodejně, kde jste produkt zakoupili.
V zemích mimo Eu: Chcete-li zlikvidovat tento produkt, obraťte se na místní úřady a zeptejte se na správný způsob likvidace.
Tento symbol na bateriích či akumulátorech znamená, že s těmito bateriemi nesmí být zacházeno jako s běžným domovním odpadem.
EEE splňuje směrnici.
CS
O tomto fotoaparátu
Hlavní vlastnosti
●●Nejmenší produkt instax dostupný na trhu.
●●Svůj snímek můžete dokonale umístit pomocí LCD displeje a uložit jej do paměti fotoaparátu nebo na kartu micro SD.
●●Lze vybrat obrázek z knihovny fotografií a vytisknout jej pomocí funkce tisku instax.
●●Fotografie můžete upravovat za pomoci 10 rámečků a 6 filtrů. ●●Obrázky můžete ukládat s nahraným zvukem.
●●Stylový a luxusní design.
●●Fotoaparát je vybaven předním zrcátkem pro snadné pořizování autoportrétů.
Funkce dostupné s aplikací pro chytré telefony
●●Funkce záznamu zvuku
Nahrajte fotoaparátem zvuk, převeďte jej do QR kódu a vytiskněte QR kód na fotografii (PRINT WITH SOUND). Zvuk se přehraje, pokud načtete svým chytrým telefonem QR kód vytištěný pomocí funkce tisku instax.
●●Vzdálené ovládání fotoaparátu
Ovládejte fotoaparát pomocí svého chytrého telefonu pro možnost vzdáleného pořizování snímků.
●●Funkce zkratek
Na svém chytrém telefonu můžete vybrat pro fotografii rámeček a také přiřadit rámečky ke 3 tlačítkům zkratek, které jsou umístěny na boční straně fotoaparátu.
●●Přímý tisk
Přeneste obrázek ze svého chytrého telefonu do fotoaparátu a vytiskněte jej pomocí funkce tisku instax. Před jejím odesláním můžete fotografii pomocí aplikace v chytrém telefonu posouvat, otáčet, zvětšovat, zmenšovat nebo oříznout.
3
Názvy součástí
Přední strana
1
2
8
3
7
|
6 |
||||
|
4 |
||||
|
5 |
||||
|
Zadní strana |
||||
|
9 |
||||
|
10 |
||||
|
11 |
FILM |
|||
|
12 |
1 |
|||
|
2 |
1 |
24 |
||
|
13 |
3 |
2 |
||
|
3 |
||||
|
14 |
15 |
|||
|
16 |
23 |
|||
|
17 |
||||
|
18 |
22 |
|||
|
21 |
||||
|
19 |
20 |
|||
1Výstupní štěrbina filmu
2Tlačítko spouště
3Blesku/Kontrolka samospouště
4Očko na popruh
5USB port
6Tlačítko (Zvuk)
7Objektiv
8Zrcátko pro autoportréty
9Zámek dvířek filmu
10Dvířka filmu
11 (Tlačítko zkratky 1)
12Tlačítko Reset*
13 (Tlačítko zkratky 2)
14 (Tlačítko zkratky 3)
15Slot pro paměťovou kartu Micro SD
16Tlačítko (Zapnutí)
17Mikrofon
18Reproduktor
19Cross key ()
20Tlačítko MENU/OK
21Tlačítko (Zpět)
22Tlačítko (Přehrávání)
23Tlačítko (Tisk)
24LCD displej
*Pokud fotoaparát nefunguje správně, resetujte fotoaparát stisknutím tlačítka Reset.
4
CS
LCD displej
Po zapnutí napájení se na LCD displeji objeví obrazovka fotografování.
•Pokud chcete přepnout z obrazovky fotografování na obrazovku přehrávání, stiskněte tlačítko (Přehrávání).
•Pokud chcete přepnout z obrazovky přehrávání na obrazovku fotografování, stiskněte tlačítko spouště.
Pokud máte otevřenou obrazovku fotografování nebo obrazovku přehrávání, stisknutím tlačítka (Zpět) zobrazíte na LCD displeji následující údaje.
Obrazovka fotografování
|
1 |
||||||||||||||||||||
|
2 |
10 |
|||||||||||||||||||
|
4 |
No Frame |
|||||||||||||||||||
|
3 |
No Filter |
|||||||||||||||||||
|
9 |
||||||||||||||||||||
|
5 |
||||||||||||||||||||
|
6 |
8 |
|||||||||||||||||||
7
Obrazovka přehrávání
11
12
13
No Frame
No Filter
1Aktuální datum a čas
2Expozice
3Název rámečku
4Název filtru
5Počet dostupných snímků*
6Počet snímků typu PRINT WITH SOUND čekajících na odeslání
7Ukazatel zbývajícího filmu
8Ukazatel stavu Bluetooth připojení
9Ukazatel stavu nabití baterie
10Ukazatel blesku
11Ukazatel čísla snímku
12Údaje o datu/času pořízení snímku
13Ukazatel stavu přenosu snímků typu PRINT WITH SOUND
*Při používání funkce INTERNAL MEMORY se zobrazuje . Pokud počet dostupných snímků činí 10 nebo méně, je ikonka červená.
■■Zobrazení CROSS KEY GUIDE
Při spouštění nebo při přepínání obrazovek (obrazovka fotografování obrazovka přehrávání) se na krátkou dobu objeví navigační vodítko CROSS KEY GUIDE.
Obrazovka fotografování Obrazovka přehrávání
CROSS KEY GUIDE
5
Používání tlačítka Cross Key
Tlačítka (nahoru, dolů, doleva a doprava) slouží k výběru položek nabídky nebo k vyvolání funkcí přiřazených tlačítkům . Tlačítko [MENU/OK] slouží k zobrazení nabídky nebo k provedení výběru.
1
5
24
3
1 Pohyb nahoru
2 Pohyb doleva
3 Pohyb dolů
4 Pohyb doprava
5 Zobrazení nabídky / provedení výběru
Připevnění poutka
Poutko připevněte dle následujícího obrázku.
•Při přenášení fotoaparátu nebo při fotografování provlékněte poutkem zápěstí, aby vám fotoaparát neupadl.
6
Nabíjení baterie
Před zahájením nabíjení baterie fotoaparát vypněte. Pokud je fotoaparát zapnutý, baterie se nabíjet nebude.
Dbejte na správné připojení kabelu, jak je znázorněno.
Pomocí přiloženého USB kabelu propojte fotoaparát a USB adaptér dodávaný s vaším chytrým telefonem. Poté zapojte USB adaptér do elektrické zásuvky.
• Doba nabíjení je přibližně 2 až 3 hodiny.
CS
Zapnutí/vypnutí fotoaparátu
|
Stisknutím a podržením |
(Zapnutí) fotoaparát zapnete |
||
|
nebo vypnete. |
|||
Indikace stavu nabíjení
|
Během nabíjení |
Rozsvítí se kontrolka samospouště. |
|
Nabíjení dokončeno |
Kontrolka samospouště zhasne. |
|
Chyba při nabíjení |
Kontrolka samospouště bliká. |
Nabíjení z počítače:
•Připojte fotoaparát přímo k počítači. Nepřipojujte jej přes USB rozbočovač nebo klávesnici.
•Pokud počítač během nabíjení přejde do režimu spánku, nabíjení se přeruší. Pokud chcete v nabíjení dále pokračovat, ukončete režim spánku a znovu připojte USB kabel.
•V závislosti na modelu, nastavení či provozních podmínkách počítače se baterie nemusí nabít.
Poznámka
•Baterii nelze vyjmout.
•Baterie není z výroby nabita. Před použitím baterii prosím zcela nabijte.
•Informace o baterii naleznete v kapitole„Péče o fotoaparát podle zdravého rozumu“. (str. 23)
Kontrola stavu nabití baterie
Stav nabití baterie se na LCD displeji zobrazí po stisknutí tlačítka (Zpět) na obrazovce fotografování nebo na obrazovce přehrávání.
|
Zobrazení |
Stav nabití baterie |
Baterie je dostatečně nabitá.
Baterie je nabitá z poloviny nebo méně.
Doporučujeme ji dobít.
Baterie není nabitá dostatečně. Nabijte ji prosím co nejdříve.
•Pokud je již baterie nabita málo, objeví se v pravé spodní části LCD displeje ikona .
•Jakmile se baterie vybije úplně, na LCD displeji se objeví ikona a fotoaparát se vypne.
•Pokud fotoaparát po určitou dobu nepoužíváte, automaticky se vypne. Dobu do vypnutí nečinného fotoaparátu můžete nastavit. (str. 20)
•V režimu fotografování otevřete stisknutím tlačítka (Přehrávání) obrazovku přehrávání a přejdete do režimu přehrávání.
•V režimu přehrávání otevřete stisknutím tlačítka spouště až na doraz obrazovku fotografování a vyberte režim fotografování.
7
Počáteční nastavení
Při prvním zapnutí fotoaparátu po zakoupení se automaticky otevřou obrazovky nastavení jazyka, data a času a také obrazovka spárování s chytrým telefonem.
Před provedením registrace spárování si prosím do svého chytrého telefonu nainstalujte aplikaci„INSTAX mini LiPlay“.
•Pokud používáte chytrý telefon s operačním systémem Android, vyhledejte aplikaci„INSTAX mini LiPlay“ v obchodě Google Play a nainstalujte ji.
*Požadavky na chytré telefony s operačním systémem Android: Android ver. 5.0 nebo vyšší s nainstalovaným obchodem Google Play Store
•Pokud používáte chytrý telefon s operačním systémem iOS, vyhledejte aplikaci„INSTAX mini LiPlay“ v obchodě App Store a nainstalujte ji.
*Požadavky na chytré telefony s operačním systémem iOS:
iOS ver. 10 nebo vyšší
V závislosti na modelu vašeho chytrého telefonu není zaručeno, že budete moci používat aplikaci„INSTAX mini LiPlay“, i když jste ji nainstalovali a váš chytrý telefon splňuje výše uvedené požadavky.
Toto nastavení lze rovněž provést později. Pokud chcete tato nastavení provést později nebo je změnit, nastavte
položky [ /LANG.], [DATE/TIME] a [Bluetooth SETTINGS] v nabídce NASTAVENÍ.
1 Zapněte fotoaparát
•Po prvním zapnutí fotoaparátu od zakoupení se otevře obrazovka nastavení jazyka ( /LANG.).
2 Vyberte jazyk, který chcete používat, a stiskněte tlačítko [MENU/OK]
ENGLISH
FRANCAIS
DEUTSCH
NO
3 Nastavte formát data a stiskněte tlačítko [MENU/OK]
DATE/TIME YY.MM.DD DD.MM.YY MM/DD/YY
NO
4 Zadejte rok, měsíc, den, hodinu a minutu a poté stiskněte tlačítko [MENU/OK]
|
Pohybujte kurzorem pomocí |
a poté změňte číslo |
|
|
pomocí |
. |
DATE/TIME
YY.MM.DD
SET
NO
Následně proveďte nastavení spárování.
5 Stiskněte tlačítko [MENU/OK]
Bluetooth
SETTINGS
Pair this product with a smartphone to use the functions
linked to this product’s smartphone app.
PAIRING
NO
•Pokud si nepřejete spárování nastavit, stisknutím tlačítka (Zpět) počáteční nastavení dokončíte.
6 Spusťte v chytrém telefonu aplikaci„INSTAX mini LiPlay“ a stiskněte [SETTINGS]
8
Loading…
You can only view or download manuals with
Sign Up and get 5 for free
Upload your files to the site. You get 1 for each file you add
Get 1 for every time someone downloads your manual
Buy as many as you need
Гибридная камера мгновенной печати FUJIFILM BODM1P102-200 Instax Mini LiPlay

Перед использованием
Перед использованием камеры убедитесь, что у вас есть следующее.
Входящие в комплект аксессуары
- USB-кабель для зарядки (1)
- Наручный ремешок (1)
- Руководство пользователя (1)
Эта книга представляет собой краткое руководство по использованию «instax mini LiPlay».
Подробное руководство по «instax mini LiPlay» можно найти по следующему адресу: web сайте и загрузите цифровое руководство пользователя (полная версия).
https://instax.com/mini_liplay/support/manuals/
Вы также можете отсканировать следующий QR-код, чтобы загрузить цифровое руководство пользователя (полная версия).

Сам текстовый QR-код является зарегистрированным товарным знаком и словесным знаком Denso Wave Incorporated.
Примечания по утилизации камеры
В этой камере используется встроенный литий-ионный аккумулятор.
При утилизации камеры соблюдайте местные правила и утилизируйте ее надлежащим образом.
Пожалуйста, обратитесь к прилагаемому листу КОНТАКТНАЯ ИНФОРМАЦИЯ для запроса.
Если ваша страна или регион не указаны в таблице, обратитесь к местному дистрибьютору.
ВНИМАНИЕ: Не извлекайте встроенный аккумулятор самостоятельно; в противном случае вы можете получить травму.
Утилизация электрического и электронного оборудования в частных домах
Утилизация бывшего в употреблении электрического и электронного оборудования (Применимо в Европейском Союзе и других европейских странах с системами раздельного сбора отходов) Этот символ на изделии, в руководстве и в гарантии и/или на его упаковке указывает на то, что данное изделие не подлежит утилизации. относятся к бытовым отходам. Вместо этого его следует отнести в соответствующий пункт сбора для утилизации электрического и электронного оборудования. Обеспечив правильную утилизацию этого продукта, вы поможете предотвратить потенциальные негативные последствия для окружающей среды и здоровья человека, которые в противном случае могли бы быть вызваны неправильным обращением с отходами этого продукта. Переработка материалов поможет сохранить природные ресурсы. Для получения более подробной информации об утилизации этого продукта обратитесь в местную городскую администрацию, службу по утилизации бытовых отходов или в магазин, где вы приобрели продукт. В странах за пределами ЕС: Если вы хотите утилизировать этот продукт, обратитесь в местные органы власти и узнайте о правильном способе утилизации.
Названия деталей
Фронт

- Слот для выброса пленки
- Кнопка спуска затвора
- Вспышка/автоспуск lamp
- Крючок для ремня
- USB-порт
- Кнопка (Звук)
- объектив
- Зеркало для селфи
- Пленочный дверной замок
- Пленка дверь
- (Кнопка быстрого доступа для выбора кадра 1)
- Кнопка сброса1
задний
- (Кнопка быстрого доступа для выбора кадра 2)
- (Кнопка быстрого доступа для выбора кадра 3)
- Слот для Micro SD карты
- (Кнопка питания
- Микрофон
- Кнопка выбора динамика
- Кнопка МЕНЮ/ОК
- (Кнопка назад
- Кнопка (воспроизведение)
- Кнопка (Печать)
- ЖК монитор
Если камера не работает должным образом, нажмите кнопку сброса, чтобы перезагрузить камеру.
Замена батареи


Об этой камере
Основные особенности
- «instax mini LiPlay» — самый компактный продукт instax, доступный на рынке.
- Вы можете идеально расположить изображение с помощью ЖК-монитора и сохранить изображение в память камеры или на карту памяти micro SD.
- Вы можете выбрать изображение из своей фототеки и распечатать его с помощью функции печати instax.
- Вы можете редактировать свои фотографии, используя 10 фоторамок и 6 фильтров.
- Вы можете сохранить свои изображения с записанным звуком.
- Стильный и роскошный дизайн.
- Оснащен передним зеркалом для удобного позиционирования селфи.
Функции, доступные в приложении для смартфона
- Аудио функция
Запишите звук с помощью камеры, преобразуйте его в QR-код и распечатайте QR-код на изображении. Звук воспроизводится, когда QR-коды, напечатанные с помощью функции печати instax, считываются вашим смартфоном. - Удаленное управление камерой
Управляйте камерой со своего смартфона для удаленной съемки изображений. - Функция быстрого доступа
Вы можете выбрать фоторамки на своем смартфоне и назначить рамки 3 кнопкам быстрого доступа, расположенным сбоку камеры. - Прямая печать
Перенесите изображение со смартфона на камеру и распечатайте его с помощью функции печати instax. Перед отправкой изображения вы можете использовать приложение для смартфона, чтобы переместить, повернуть, увеличить или обрезать изображение.
Зарядка аккумулятора
- Выключите камеру перед зарядкой аккумулятора. Аккумулятор не будет заряжаться, если камера включена.
- Будьте осторожны, чтобы правильно подключить кабель, как указано.

Подключите камеру с помощью прилагаемого USB-кабеля к USB-адаптеру переменного тока (поставляется со смартфоном), затем подключите USB-адаптер переменного тока к внутренней розетке.
- Время зарядки составляет от 2 до 3 часов.
Индикация состояния зарядки
- Во время зарядки: Автоспуск лamp загорается.
- Зарядка завершена: Автоспуск лamp уходит.
- Ошибка зарядки: Автоспуск лamp мигает.
ВАЖНОЕ ЗАМЕЧАНИЕ ПО БЕЗОПАСНОСТИ
Этот продукт был разработан с учетом требований безопасности и
также обеспечивать безопасное обслуживание при правильном обращении в соответствии с Руководством пользователя и предоставленными инструкциями. Важно, чтобы и продукт, и
Пленка «instax mini» обрабатывается надлежащим образом и используется только для печати изображений в соответствии с инструкциями в Руководстве пользователя и в инструкциях к пленке «instax mini». Для вашего удобства и безопасности, пожалуйста, следуйте тому, что написано в Руководстве пользователя. Также рекомендуется хранить Руководство пользователя в безопасном, легкодоступном месте, где вы можете обратиться к нему в случае необходимости.
ПРЕДУПРЕЖДЕНИЕ
- Этот символ указывает на опасность, которая может привести к травме или смерти. Пожалуйста, следуйте этим инструкциям.
- Камера нагревается, испускает дым, издает запах гари или выглядит ненормально.
- Камера упала в воду, или внутрь камеры попали посторонние предметы, такие как вода или металл.
- Поскольку аккумулятор встроен в камеру, не подвергайте его нагреванию, не бросайте в открытый огонь, не пытайтесь ронять и не подвергайте ударам. Это может привести к взрыву камеры.
- Никогда не пытайтесь разбирать этот продукт. Вы можете получить травму.
- Если с камерой что-то не так, никогда не пытайтесь ремонтировать ее самостоятельно. Вы можете получить травму.
- Если этот продукт упал или поврежден так, что видна внутренняя часть, не прикасайтесь к нему. Обратитесь к дилеру FUJIFILM. Не прикасайтесь к деталям или выступающим частям внутри задней крышки. Вы можете получить травму.
- Никогда не мочите этот продукт и не трогайте его мокрыми руками. Это может привести к поражению электрическим током.
- Как только аккумулятор полностью зарядится, сразу же отсоедините кабель USB.
- Хранить в недоступном для маленьких детей месте. Этот продукт может вызвать травму в руках ребенка.
- Не накрывайте и не заворачивайте камеру или адаптер переменного тока тканью или одеялом. Это может привести к накоплению тепла и деформации корпуса или стать причиной возгорания.
Простой уход за камерой
- Уход за камерой
- Не открывайте дверцу пленки, пока не израсходуете пленку; в противном случае остальная часть пленки экспонируется и становится белой, и пленку больше нельзя использовать.
- Ваша камера — хрупкий объект. Не подвергайте его воздействию воды, песка или песчаных материалов и не роняйте его.
- Не используйте ремешок, предназначенный для сотовых телефонов или других подобных электронных устройств. Эти ремни обычно
слишком слаб, чтобы надежно удерживать камеру. В целях безопасности используйте только ремни, предназначенные для вашей камеры, и используйте их только по назначению и в соответствии с инструкциями. - Не используйте растворители, такие как разбавитель или спирт, для удаления грязи.
- Не оставляйте камеру под прямыми солнечными лучами или в жарких местах, например в автомобиле. Не оставляйте это в damp места на длительный срок.
- Газ, отпугивающий моль, например нафталин, может повредить камеру и отпечатки. Храните камеру и отпечатки в безопасном и сухом месте.
- Обратите внимание, что диапазон температур, в котором можно использовать камеру, составляет от +5 °C до +40 °C.
- Примите все меры к тому, чтобы печатные материалы не нарушали авторские права, права на изображение, неприкосновенность частной жизни или другие личные права и не оскорбляли общественную порядочность. Действия, нарушающие права других лиц, противоречащие общественной порядочности или причиняющие неудобства, могут быть наказуемы по закону или иным образом преследоваться в судебном порядке.
- Обращение с ЖК-монитором
Поскольку ЖК-монитор можно легко поцарапать или повредить острыми или твердыми предметами, рекомендуется прикрепить к монитору защитный лист (имеется в продаже).- Зарядка аккумулятора
Аккумулятор при поставке не заряжен. Полностью зарядите аккумулятор перед использованием.
Зарядите аккумулятор с помощью прилагаемого USB-кабеля. Время зарядки увеличивается при температуре окружающей среды ниже +10 °C или выше +35 °C. Не пытайтесь заряжать аккумулятор при температуре выше +40 °C или при температуре ниже +5 °C, так как аккумулятор не будет заряжаться.
Срок службы батареи
При нормальной температуре аккумулятор можно заряжать около 300 раз. Заметное уменьшение времени, в течение которого аккумулятор будет удерживать заряд, указывает на то, что срок его службы подошел к концу.
- Зарядка аккумулятора
- Предостережения: обращение с аккумулятором
Аккумулятор и корпус камеры могут нагреваться на ощупь после продолжительного использования. Это нормально. - Сертификационные знаки, полученные камерой, находятся внутри пленочной камеры.
- Предостережения во время печати

instax mini» Уход за пленкой и печатью
См. Инструкции по использованию пленки FUJIFILM Instant Film «instax mini». Следуйте всем инструкциям по безопасному и правильному использованию.
- Храните пленку в прохладном месте. Не оставляйте пленку в местах с экстремально высокой температурой (например, в закрытом автомобиле) на много часов.
- Не прокалывайте, не рвите и не разрезайте пленку «instax mini». Если пленка повреждена, не используйте ее.
- Когда вы загружаете пачку пленки, используйте ее как можно скорее.
- Если пленка хранилась в месте с очень высокой или низкой температурой, доведите ее до комнатной температуры перед началом печати изображений.
- Обязательно используйте пленку до истечения срока годности или даты «Использовать до».
- Избегайте досмотра зарегистрированного багажа в аэропорту и других сильных рентгеновских лучей. На неиспользованной пленке может появиться эффект запотевания и т.п. Мы рекомендуем взять камеру и/или пленку в самолет в качестве ручной клади. (Для получения дополнительной информации свяжитесь с каждым аэропортом.)
- Избегайте яркого света и храните проявленные отпечатки в прохладном и сухом месте.
- Не прокалывайте и не разрезайте эту пленку, так как она содержит небольшое количество едкой пасты (высокощелочной). Никогда не позволяйте детям или животным брать пленку в рот. Также обратите внимание, чтобы паста не попала на кожу или одежду.
- В случае попадания пасты внутри пленки на кожу или одежду немедленно смойте ее большим количеством воды. Если паста попала в глаза или рот, немедленно промойте это место большим количеством воды и обратитесь к врачу. Обратите внимание, что щелочь внутри пленки остается активной в течение примерно 10 минут после того, как изображение было напечатано. См. Инструкции по использованию пленки FUJIFILM Instant Film «instax mini». Следуйте всем инструкциям для безопасного и правильного использования.
Меры предосторожности при обращении с пленкой и отпечатками
Подробнее см. Инструкции и предупреждения на FUJIFILM Instant Film «instax mini».
Информация для отслеживания в Европе
- Производитель: Корпорация FUJIFILM
- Адрес Город: 7-3, Акасака 9-Чомэ, Минато-ку, Токио
- Страна: ЯПОНИЯ Авторизованный представитель в Европе:
ФУДЖИФИЛЬМ ЕВРОПА ГМБХ
- Адрес Город: Дюссельдорф Heesenstrasse 31, 40549
- Страна: Германия
Устройства Bluetooth®: предостережения
ВАЖНО: Прочтите следующие примечания, прежде чем использовать встроенный в продукт передатчик Bluetooth.
- Используйте только как часть сети Bluetooth.
FUJIFILM не несет ответственности за ущерб, возникший в результате несанкционированного использования. Не используйте в приложениях, требующих высокой степени надежности, напримерample в медицинских устройствах или других системах, которые могут прямо или косвенно влиять на человеческую жизнь. При использовании устройства на компьютере и
другие системы, которые требуют большей степени надежности, чем сети Bluetooth, обязательно примите все необходимые меры предосторожности для обеспечения безопасности и предотвращения сбоев. - Используйте только в той стране, в которой было приобретено устройство.
Это устройство соответствует правилам, регулирующим устройства Bluetooth в стране, в которой оно было приобретено. При использовании устройства соблюдайте все правила размещения. FUJIFILM не несет ответственности за проблемы, связанные с использованием в других юрисдикциях. - Беспроводные данные (изображения) могут быть перехвачены третьими лицами.
Безопасность данных, передаваемых по беспроводным сетям, не гарантируется. - Не используйте устройство в местах, подверженных воздействию магнитных полей, статического электричества или радиопомех.
Не используйте передатчик вблизи микроволновых печей или в других местах, подверженных воздействию магнитных полей, статического электричества или радиопомех, которые могут помешать приему беспроводных сигналов. Взаимные помехи могут возникать, когда передатчик используется рядом с другими беспроводными устройствами, работающими в диапазоне 2.4 ГГц. - Передатчик Bluetooth работает в диапазоне 2.4 ГГц. Стандартная мощность составляет 3.16 мВт.
- Это устройство работает на той же частоте, что и коммерческие, образовательные, медицинские устройства и беспроводные передатчики.
Он также работает на той же частоте, что и лицензионные передатчики, и специальные нелицензированные низковольтные передатчики.tage передатчики, используемые в системах слежения за радиочастотной идентификацией для сборочных линий и в других подобных приложениях. - Чтобы предотвратить взаимодействие с вышеуказанными устройствами, соблюдайте следующие меры предосторожности.
Перед использованием этого устройства убедитесь, что передатчик радиочастотной идентификации не работает. Если вы заметили, что это устройство вызывает помехи в низковольтныхtage системы отслеживания радиочастотной идентификации, обратитесь к представителю FUJIFILM. - По закону могут быть наказаны:
- Разборка или модификация данного устройства.
- Удаление этикеток сертификации устройств.
- Информация о товарных знаках
Словесный знак и логотипы Bluetooth® являются зарегистрированными товарными знаками, принадлежащими Bluetooth SIG, Inc., и любое использование таких знаков компанией FUJIFILM осуществляется по лицензии.
Если у вас есть какие-либо вопросы об этом изделии, обратитесь к авторизованному дистрибьютору FUJIFILM или посетите веб-сайт webсайт ниже:
http://www.fujifilm.com/
Документы / Ресурсы
Рекомендации