
Ru_01
Ru_01
Воспроизведение данного руководства в любой форме,
полностью или частично (кроме краткого цитирования в
критических статьях и обзорах) без письменного разрешения
корпорации NIKON CORPORATION запрещено.
Отпечатано в Европе
CT9L01(1D)
6MM7921D-01
ЦИФРОВАЯ ФОТОКАМЕРА
Руководство пользователя
Ru
-
Contents
-
Table of Contents
-
Troubleshooting
-
Bookmarks
Quick Links
DIGITAL CAMERA
User’s Manual
En
Related Manuals for Nikon Coolpix L22
Summary of Contents for Nikon Coolpix L22
-
Page 1
DIGITAL CAMERA User’s Manual… -
Page 2: Trademark Information
Adobe and Acrobat are registered trademarks of Adobe Systems Inc. SD and SDHC Logos are trademarks of SD-3C, LLC. PictBridge is a trademark. All other trade names mentioned in this manual or the other documentation provided with your Nikon product are trademarks or registered trademarks of their respective holders.
-
Page 3
Introduction First Steps Basic Photography and Playback: Easy Auto Mode Shooting in the Auto Mode Shooting Suited for the Scene Taking Pictures of Smiling Faces (Smart Portrait Mode) More on Playback Movies Connecting to Televisions, Computers and Printers Shooting, Playback and Setup Menus Technical Notes… -
Page 4: For Your Safety
For Your Safety To prevent damage to your Nikon product or injury to yourself or to others, read the following safety precautions in their entirety before using this equipment. Keep these safety instructions where all those who use the product will read them.
-
Page 5
The EN-MH2 rechargeable batteries Do not handle the power cable or go are for use with Nikon digital cameras near the battery charger during only, and are compatible with lightning storms. Failure to observe COOLPIX L22/L21. -
Page 6
Should the monitor break, care should and output jacks, use only the cables be taken to avoid injury caused by provided or sold by Nikon for the broken glass and to prevent liquid purpose, to maintain compliance with crystal from the monitor touching the product regulations. -
Page 7: Notices
Interface Cables harmful interference to radio Use the interface cables sold or communications. However, there is no provided by Nikon for your equipment. guarantee that interference will not Using other interface cables may occur in a particular installation. If this…
-
Page 8
Notices Notice for customers in Canada CAUTION This Class B digital apparatus complies with Canadian ICES-003. ATTENTION Cet appareil numérique de la classe B est conforme à la norme NMB-003 du Canada. Symbol for Separate Collection in European Countries This symbol indicates that this product is to be collected separately. -
Page 9: Table Of Contents
Table of Contents For Your Safety……………………….ii WARNINGS……………………………. ii Notices …………………………. v Introduction ……………………….1 About This Manual ……………………..1 Information and Precautions………………….2 Parts of the Camera……………………..4 The Camera Body …………………………4 The Monitor…………………………..8 Basic Operations………………………10 A (shooting mode) button …………………….10 c (playback) button……………………….10 The Multi Selector…………………………11 d button …………………………..12…
-
Page 10
Table of Contents A Auto Mode……………………….. 29 Shooting in the Auto Mode………………….29 Using the Flash……………………….30 Taking Pictures with the Self-timer ………………..32 Macro Mode……………………….33 Exposure Compensation ……………………34 C Shooting Suited for the Scene………………..35 Using the Scene Mode ……………………35 Setting the Scene Mode……………………..35 Features …………………………….36 Taking Pictures for Food Mode……………………43 Taking Pictures for a Panorama ……………………44… -
Page 11
Table of Contents Connecting to Televisions, Computers and Printers …………58 Connecting to a TV……………………..58 Connecting to a Computer…………………..59 Before Connecting the Camera……………………59 Transferring Pictures from a Camera to a Computer …………..60 Connecting to a Printer……………………64 Connecting the Camera and Printer………………….65 Printing Pictures One at a Time ……………………66 Printing Multiple Pictures ……………………..67 Creating a DPOF Print Order: Print Set………………70… -
Page 12
Table of Contents Basic Camera Setup: The Setup Menu………………85 Displaying the Setup Menu………………………86 a Menus ……………………………87 c Welcome Screen……………………….88 d Date…………………………….89 e Monitor Settings ……………………….92 f Date Imprint…………………………94 w Electronic VR…………………………95 U Motion detection……………………….96 h AF Assist …………………………..97 i Sound Settings …………………………98 k Auto Off …………………………..99 l Format Memory/m Format Card……………….. -
Page 13: Introduction
Introduction About This Manual Thank you for your purchase of a Nikon COOLPIX L22/COOLPIX L21 digital camera. This manual was written to help you enjoy taking pictures with your Nikon digital camera. Read this manual thoroughly before use, and keep it where all those who use the product will read it.
-
Page 14: Information And Precautions
Before taking pictures on important occasions (such as at weddings or before taking the camera on a trip), take a test shot to ensure that the camera is functioning normally. Nikon will not be held liable for damages or lost profits that may result from product malfunction.
-
Page 15
Information and Precautions Notice Concerning Prohibition of Copying or Reproduction Note that simply being in possession of material that was digitally copied or reproduced by means of a scanner, digital camera or other device may be punishable by law. Items prohibited by law from being copied or reproduced Do not copy or reproduce paper money, coins, securities, government bonds or local government bonds, even if such copies or reproductions are stamped “Sample”. -
Page 16: Parts Of The Camera
Parts of the Camera The Camera Body COOLPIX L22 Front View Lens cover closed Shutter-release button ……24 Built-in flash …………30 Zoom control ……….23 Lens …………114, 124 f : wide ……….23 Speaker …………..57 : tele …………. 23 Power connector cover (for connecting h : Thumbnail playback ….48…
-
Page 17
Parts of the Camera COOLPIX L22 Rear View 2 3 4 6 7 8 9 Monitor …………..8 Battery-chamber/ memory card slot cover ….14, 18 d button …..12, 56, 73, 81, 86 Tripod socket k (apply selection) button ….11 Pin cover ……….. 58, 60, 65 A (shooting mode) button …. -
Page 18
Parts of the Camera COOLPIX L21 Front View Lens cover closed Shutter-release button ……24 Built-in flash …………30 Zoom control ……….23 Lens …………114, 124 f : wide ……….23 Built-in microphone ……..55 : tele …………. 23 Power connector cover (for connecting h : Thumbnail playback ….48 optional AC adapter) …….110 : playback zoom …… -
Page 19
Parts of the Camera COOLPIX L21 Rear View 2 3 4 6 7 8 9 Monitor …………..8 Battery-chamber/ memory card slot cover ….14, 18 d button …..12, 56, 73, 81, 86 Speaker …………..57 k (apply selection) button ….11 Tripod socket A (shooting mode) button …. -
Page 20: The Monitor
Parts of the Camera The Monitor The following indicators may appear in the monitor during shooting and playback (actual display varies with current camera settings). The indicators and photo info displayed during shooting and playback will turn off after a few seconds (A 92). Shooting 10 10 10 11…
-
Page 21
Parts of the Camera Playback 15/05/2010 12:00 15/05/2010 12:00 15/05/2010 12:00 9999.JPG 9999.JPG 9999.JPG 999 999 999 999 9999 9999 9999 9999 00 00 Date of recording ……..16 Internal memory indicator ….26 Time of recording ……..16 Movie playback indicator …… 57 Volume ………….. -
Page 22: Basic Operations
Basic Operations A (shooting mode) button When A is pressed in playback mode, the camera enters shooting mode. When A is pressed in shooting mode, the shooting-mode selection menu is displayed, which allows you to change the shooting mode. Shooting-mode Selection Menu The multi selector (A 11) can be used to select one of the following shooting modes.
-
Page 23: The Multi Selector
Basic Operations The Multi Selector This section describes standard uses of the multi selector to select modes, select menu options and to apply selection. Operate the multi selector by pressing it up, down, left, right, and by pressing k. For Shooting Display m (flash mode) menu (A 30)/select the item above.
-
Page 24: D Button
Basic Operations d button Upper tab: Menus available for Shooting menu the current mode are Image mode displayed. White balance Lower tab: Display the setup Continuous Color options menu. Exit Displayed when the menu contains two or more pages. Set up AF assist Displayed when Motion detection…
-
Page 25: Help Displays
Basic Operations Help Displays COOLPIX L22 COOLPIX L21 Continuous Choose single frame, continuous mode, BSS (camera chooses sharpest shot in series), or multi-shot 16. Exit Back About the Shutter-release Button Press the shutter- Press the shutter- release button release button the rest…
-
Page 26: First Steps
First Steps Inserting the Batteries Open the battery-chamber/memory card slot cover. Inserting the Batteries. Close the battery-chamber/memory card slot cover. Applicable Batteries Turning On and Off the Camera COOLPIX L22 COOLPIX L21…
-
Page 27
Inserting the Batteries Removing the Batteries Additional Precautions Regarding Batteries Batteries with peeling Batteries with insulation that Batteries with a flat does not cover the area negative terminal around the negative terminal. Notes for EN-MH1 Rechargeable Batteries, MH-70/71 Battery Charger Battery Type Battery type A Alkaline Batteries… -
Page 28: Setting Display Language, Date And Time
Setting Display Language, Date and Time Press the power switch to turn on the camera. COOLPIX L22 COOLPIX L21 Use the multi selector to choose the desired language and press Choose Yes and press k. Date Set time and date?
-
Page 29
Setting Display Language, Date and Time Change the date and time. Date 2 0 1 0 D M Y Edit Choose the order in which the day, month Date and year are displayed and press k or K. 2010 Edit Press A to exit the screen. -
Page 30: Inserting Memory Cards
Inserting Memory Cards Images are saved in the camera’s internal memory (approximately 19 MB) or on removable Secure Digital (SD) memory cards (available separately) (A 110). Confirm the power-on lamp and the monitor are off and open the battery-chamber/ memory card slot cover. Be sure to turn off the camera before opening the battery-chamber/memory card slot cover.
-
Page 31: Removing Memory Cards
Inserting Memory Cards Removing Memory Cards Before removing memory cards, turn the camera off and confirm that the power-on lamp and the monitor are off. Open the battery-chamber/memory card slot cover and press the card in (1) to partially eject the card.
-
Page 32: G Basic Photography And Playback: Easy Auto Mode
(A 28). Press the power switch to turn on the camera. The power-on lamp (green) will light COOLPIX L22 COOLPIX L21 for a moment and the monitor will turn on. The lens will extend at this time.
-
Page 33: Indicators Displayed In G (Easy Auto) Mode
Step 1 Turn the Camera On and Select G (Easy Auto) Mode Indicators Displayed in G (Easy auto) Mode Shooting mode When using easy auto mode, U, e, f, g, h, i, or j is displayed to Motion detection indicator indicate the shooting mode selected by the Reduce the blurring caused by camera for the current subject and framing.
-
Page 34: Step 2 Frame A Picture
Step 2 Frame a Picture Ready the camera. Hold the camera steadily in both hands, keeping your fingers and other objects away from the lens, flash, self- timer lamp and microphone. When taking pictures in “tall” orientation, turn the camera so that the built-in flash is above the lens.
-
Page 35: Using The Zoom
Step 2 Frame a Picture Using the Zoom Use the zoom control to COOLPIX L22 COOLPIX L21 activate optical zoom. f Zoom out g Zoom in f Zoom out g Zoom in Rotate the zoom control to g to zoom in on the subject.
-
Page 36: Step 3 Focus And Shoot
Step 3 Focus and Shoot Press the shutter-release button halfway. Press halfway (A 13) to focus. When the subject is in focus, the focus area will glow green. When a face is detected: When no faces are detected: 1 / 1 2 5 1 / 1 2 5 F3.1 F3.1 1/125…
-
Page 37
Step 3 Focus and Shoot During Recording While pictures are being recorded, the number of exposures remaining display will blink. Do not open the battery-chamber/memory card slot cover. Removing the battery or the memory card while data is being saved may result in loss of data or in damage to the saved data, camera or card. -
Page 38: Step 4 Viewing And Deleting Pictures
Step 4 Viewing and Deleting Pictures Viewing Pictures (Playback Mode) Press c (playback). A (shooting mode) button c (playback) The last picture taken will be displayed in full-frame playback mode. Use the multi selector H, I, J or K to view additional pictures.
-
Page 39
Step 4 Viewing and Deleting Pictures Playback Mode The following options are available in full-frame playback mode. Option Description The picture can be enlarged up to about g (i) 10×. Press k to return to full-frame Playback zoom playback. Rotate the zoom control to f to display 4, 9 or 16 picture thumbnails. -
Page 40: Easy Auto Mode
Easy auto mode Automatic Scene Selection The camera automatically selects one of the following scenes when you point the camera at a subject. U Auto mode (general use) e Portrait (A 36) f Landscape (A 36) h Night portrait (A 37) g Night landscape (A 39) i Close-up (A 40) j Backlight (A 41)
-
Page 41: A Auto Mode
Auto Mode Shooting in the Auto Mode In A (auto) mode, macro mode (A 33) and exposure compensation (A 34) can be applied and pictures can be taken using the flash mode (A 30) and self-timer (A 32). Pressing the d button in A (auto) mode allows you to set the items in the shooting menu (A 72) according to shooting conditions.
-
Page 42: Using The Flash
Using the Flash The flash mode allows you to specify the settings according to shooting conditions. For L22, the flash has a range of approx. 0.5-7.0 m (1 ft. 8 in.-23 ft.) when the camera is zoomed out all the way, and 0.5-3.0 m (1 ft. 8 in.-9 ft. 10 in.) when the maximum optical zoom is applied.
-
Page 43
Red-eye Reduction This camera uses advanced red-eye reduction (“In-Camera Red-Eye Fix”). If the camera detects “red-eye” when a picture is taken, Nikon’s own In-Camera Red-Eye Fix processes the image before it is saved. Note the following when taking pictures: The time required to save images increases slightly. -
Page 44: Taking Pictures With The Self-Timer
When the shutter is released, the self-timer will be set to OFF. To stop the timer before a picture is taken, press the shutter-release button again. COOLPIX L22 COOLPIX L21…
-
Page 45: Macro Mode
Macro Mode Macro mode is used for taking pictures of objects as close as 5 cm (2 in.). Note that the flash may be unable to light entire subject at distances of less than 50 cm (1 ft. 8 in.). When using G (easy auto) mode (A 20), the macro mode button cannot be used to activate macro mode.
-
Page 46: Exposure Compensation
Exposure Compensation Exposure compensation is used to alter exposure from the value suggested by the camera to make pictures brighter or darker. Press o (exposure compensation) on the multi selector. The exposure compensation guide is displayed. Press the multi selector H or I to select the desired setting and press k.
-
Page 47: C Shooting Suited For The Scene
Shooting Suited for the Scene Using the Scene Mode Camera settings are automatically optimized for the selected subject type. The following scene modes are available. b Portrait f Party/indoor j Night landscape m Fireworks show c Landscape g Beach/snow k Close-up n Copy d Sports h Sunset…
-
Page 48: Features
Using the Scene Mode Features The following icons are used for descriptions in this section: X = flash mode (A 30), n = self-timer (A 32), p = macro mode (A 33), o = exposure compensation (A 34). b Portrait Use this mode for taking portraits in which the main subject stands out clearly.
-
Page 49: Night Portrait O
Using the Scene Mode d Sports Use this mode for dynamic action shots that freeze the action in a single shot and record motion in a series of pictures. The camera focuses on the subject in the center of the frame.
-
Page 50
Using the Scene Mode f Party/indoor Captures the effects of candlelight and other indoor background lighting. Camera focuses on subject in center of frame. As pictures are easily affected by camera shake, hold the camera steadily. In a dark place, the use of a tripod is recommended. -
Page 51
Using the Scene Mode i Dusk/dawn Preserves the colors seen in the weak natural light before sunrise or after sunset. Camera focuses at infinity. The focus area or focus indicator (A always glows green when the shutter-release button is pressed halfway. Note, however, that objects in the foreground may not always be in focus.
 -
Page 52
Using the Scene Mode k Close-up Photograph flowers, insects and other small objects at close range. Macro mode (A 33) will turn ON and the zoom will move to a position that allows macro shooting. The camera can focus on objects as close as about 5 cm (2 in.) at the widest zoom position, and as close as about 7 cm (2.8 in.) at the position where G is displayed. -
Page 53
Using the Scene Mode m Fireworks show Slow shutter speeds are used to capture the expanding burst of light from fireworks. Camera focuses at infinity. When the shutter-release button is pressed halfway, the focus indicator (A always glows green. Note, however, that objects in the foreground may not always be in focus. -
Page 54
Using the Scene Mode p Panorama assist Use when taking a series of pictures that will later be joined to form a single panorama using the supplied Panorama Maker software. See Taking Pictures for a Panorama (A 44) for details. Off* Off* 0.0*… -
Page 55: Taking Pictures For Food Mode
Using the Scene Mode Taking Pictures for Food Mode Use this mode when taking pictures of food. Press A in shooting mode to display the shooting-mode selection menu and use the multi selector to select u Food (A 35). The macro mode (A 33) will turn ON and the zoom will automatically move to the closest possible Food shooting position.
-
Page 56: Taking Pictures For A Panorama
Using the Scene Mode Taking Pictures for a Panorama The camera focuses on the subject in the center of the frame. Use a tripod for best results. Press A in shooting mode to display the shooting-mode selection menu and use the multi selector to select p Panorama assist (A 35).
-
Page 57: More Information
Using the Scene Mode Press k when shooting is completed. Panorama Assist Image mode Note on R Panorama Maker More Information…
-
Page 58: F Taking Pictures Of Smiling Faces (Smart Portrait Mode)
Taking Pictures of Smiling Faces (Smart Portrait Mode) Using Smart Portrait Mode Press A in shooting mode to display the shooting-mode selection menu and use the multi selector H and I to select F, Smart portrait then press k. Frame the picture. The shutter is automatically released.
-
Page 59
Using Smart Portrait Mode Face Detection and Smiling Face Detection features Auto Off (Standby Mode) When Using Smart Portrait Mode Functions Available in Smart Portrait Mode Image mode A More Information… -
Page 60: More On Playback
More on Playback Viewing Multiple Pictures: Thumbnail Playback Description H I J Choose pictures ➝ ➝ Display the calendar/ Change the number of frames displayed ➝ ➝ Reduce the number of frames displayed Switch to full-frame playback Switch to shooting mode Thumbnail Playback Mode Display Protect icon…
-
Page 61: Calendar Display
Viewing Multiple Pictures: Thumbnail Playback Calendar Display Description H I J Choose date Switch to full-frame playback Switch to thumbnail display Calendar display…
-
Page 62: Taking A Closer Look: Playback Zoom
Taking a Closer Look: Playback Zoom 3.0 3.0 × Description Zoom in Zoom out H I J View other areas of picture Switch to full-frame playback Crop picture Switch to shooting mode Pictures taken using face detection × × H I J…
-
Page 63: Editing Pictures
Editing Pictures Editing function Description D-Lighting (A 52) Small picture (A 53) Crop (A 54) Notes on In-camera Editing P 3968×2232 P 3200×1800 Image mode Restrictions on Picture Editing Copies Created By: Can Be Edited By: D-Lighting Small picture Crop Original Pictures and Edited Copies…
-
Page 64: Enhancing Brightness And Contrast: D-Lighting
Editing Pictures Enhancing Brightness and Contrast: D-Lighting Select the desired picture from full-frame (A 26) or thumbnail (A 48) playback mode and press d. Use the multi selector to choose Playback menu I D-Lighting and press k. D-Lighting Print set Slide show Delete Small picture…
-
Page 65: Resizing Pictures: Small Picture
Editing Pictures Resizing Pictures: Small Picture l 640×480 m 320×240 n 160×120 Select the desired picture from full-frame (A 26) or thumbnail (A 48) playback mode and press d. Use the multi selector to choose g Small Playback menu picture and press k. D-Lighting Print set Slide show…
-
Page 66: Creating A Cropped Copy: Crop
Editing Pictures Creating a Cropped Copy: Crop Rotate the zoom control to g (i) in full-frame playback mode to zoom in on the image. COOLPIX L22 COOLPIX L21 Rotate Image A Refine copy composition. H I J 4.0 .0 ×…
-
Page 67: D Movies
Movies Recording Movies Press A in shooting mode to display the shooting-mode selection menu and use the multi selector H and I to select D, then press k. Movie Press the shutter-release button all the way down to start recording. Recording Movies While the Camera is Saving Movies Options Available When Shooting Movies…
-
Page 68: The Movie Menu
The Movie Menu Movie options Displaying the Movie Menu Movie options TV movie 640 Small size 320 Exit D Selecting Movie Options Option Resolution and Frame Rate I TV movie 640 (default setting) S Small size 320 Movie Options and Maximum Movie Length Internal memory Option Memory card (4 GB)*…
-
Page 69: Movie Playback
Movie Playback 15/05/2010 15:30 15/05/2010 15:30 0010.AVI 0010.AVI 0010.AVI Pausing During Volume playback indicator Press Description Rewind Advance Pause Deleting Movie Files Erase 1 image? Erase 1 image? Erase 1 image?
-
Page 70: Connecting To Televisions, Computers And Printers
Connecting to Televisions, Computers and Printers Connecting to a TV Turn off the camera. COOLPIX L22 COOLPIX L21 Connect the camera to the TV using the supplied audio video cable. Yellow White Tune the television to the video channel. Hold down c to turn on the camera.
-
Page 71: Connecting To A Computer
Connecting to a Computer Before Connecting the Camera Install the Software Compatible Operating Systems Windows Macintosh Note on Power Source…
-
Page 72: Transferring Pictures From A Camera To A Computer
Connecting to a Computer Transferring Pictures from a Camera to a Computer Start the computer to which Nikon Transfer was installed. Turn off the camera. Connect the camera to the computer using the supplied USB cable. Turn on the camera.
-
Page 73
Connecting to a Computer Start Nikon Transfer installed on the computer. Windows 7 Devices and Printers K L22/L21 Change program Import pictures and videos Copy pictures to a folder on my computer Change program Copy pictures to a folder on my computer… -
Page 74
Connecting to a Computer Disconnecting the Camera and Computer Using a Card Reader Starting Nikon Transfer or ViewNX Manually All Programs ➝ Nikon Transfer ➝ Nikon Transfer Start All Programs ➝ ViewNX ➝ ViewNX Nikon Transfer ViewNX Nikon Software ➝ Nikon Transfer Applications ➝… -
Page 75
Connecting to a Computer Viewing the Help File for Nikon Transfer or ViewNX Help ➝ Nikon Transfer Help ViewNX Help Panorama Creation with Panorama Maker Panorama assist Windows Start All Programs ArcSoft Panorama Maker 5 Panorama Maker 5 Macintosh Applications… -
Page 76: Connecting To A Printer
Connecting to a Printer Take pictures Select pictures for printing using Print set option (A 70) Connect to printer (A 65) Print pictures one at a Print multiple pictures (A 67) time(A 66) Turn camera off and disconnect USB cable Note on Power Source Printing Pictures Print set…
-
Page 77: Connecting The Camera And Printer
Connecting to a Printer Connecting the Camera and Printer Turn off the camera. COOLPIX L22 COOLPIX L21 Turn on the printer. Connect the camera to the printer using the supplied USB cable. Turn on the camera. COOLPIX L22 COOLPIX L21…
-
Page 78: Printing Pictures One At A Time
Connecting to a Printer Printing Pictures One at a Time Use the multi selector to choose the desired Print selection picture and press k. 1 5 / 0 5 2 0 1 0 NO. 12 [ 12] Choose Copies and press k. PictBridge Start print Copies…
-
Page 79: Printing Multiple Pictures
Connecting to a Printer Choose Start print and press k. PictBridge Start print Copies Paper size Exit Printing starts. Printing 0 0 2 / 0 0 4 Cancel Current print/ total number of prints Printing Multiple Pictures When the print selection screen is displayed, press d.
-
Page 80
Connecting to a Printer Choose Print selection, Print all images or Print menu DPOF printing and press k. Print selection Print all images DPOF printing Paper size Exit Print selection Print selection Back Print selection Start print Cancel prints Start print Cancel Exit Print all images… -
Page 81
Connecting to a Printer DPOF printing Print set A DPOF printing Start print Cancel prints Start print View images Cancel Exit View View images images Back Printing starts. Printing 0 0 2 / 0 1 0 Cancel Current print/ total number of prints Paper Size Default… -
Page 82: Creating A Dpof Print Order: Print Set
Creating a DPOF Print Order: Print Set Press d in playback mode. Use the multi selector to choose Print set and Playback menu press k. D-Lighting Print set Slide show Delete Small picture Exit Choose Select images and press k. Print set Select images Delete print set…
-
Page 83: Date Imprint
Creating a DPOF Print Order: Print Set Choose whether or not to also print shooting Print set date and photo information. Done Date Date Info Info Exit Done 15/05/2010 15:30 15/05/2010 15:30 0004.JPG 0004.JPG 0004.JPG Notes on Printing Shooting Date and Photo Information When the Date and Info options are enabled in the print set menu, shooting date and photo information are printed on pictures when a DPOF-compatible printer (A 128) which supports printing of shooting date and photo information is used.
-
Page 84: Shooting, Playback And Setup Menus
Shooting, Playback and Setup Menus Shooting Options: The Shooting Menu While shooting in A (auto) mode (A 29), the shooting menu contains the following options. A 74 Image mode Choose image size and quality. Also available when using other shooting modes (except movie mode).
-
Page 85: Displaying The Shooting Menu
Shooting Options: The Shooting Menu Displaying the Shooting Menu Press A in shooting mode to display the shooting-mode selection menu and set the shooting menu to A (auto) mode (A 29). Press d to display the shooting menu. Shooting menu Image mode White balance Continuous…
-
Page 86: A Image Mode
Shooting Options: The Shooting Menu A Image mode Set A (Auto) mode (A 29) M d (shooting menu) M A image mode Pictures taken with a digital camera are recorded as image files. The size of the files, and with it the number of images that can be recorded, depends on the size and quality of the images.
-
Page 87
Shooting Options: The Shooting Menu Image mode If the image mode setting is changed, the new image mode setting is also applied to other shooting modes (except movie mode). This feature cannot be used simultaneously with certain features. ➝ “Camera Settings that Cannot Be Set at the Same Time”… -
Page 88: B White Balance
Shooting Options: The Shooting Menu B White Balance Set A (Auto) mode (A 29) M d (shooting menu) M B White Balance The color of light reflected from an object varies with the color of the light source. The human brain is able to adapt to changes in the color of the light source, with the result that white objects appear white whether seen in the shade, direct sunlight, or under incandescent lighting.
-
Page 89: Preset Manual
Shooting Options: The Shooting Menu Preset Manual Preset manual is used with mixed lighting or to compensate for light sources with a strong color cast (for example, to make pictures taken under a lamp with a red shade look as though they had been taken under white light). Place a white or gray reference object under the lighting that will be used during shooting.
-
Page 90: C Continuous
Shooting Options: The Shooting Menu C Continuous Set A (Auto) mode (A 29) M d (shooting menu) M C Continuous Change settings to Continuous or BSS (best shot selector). Flash will be switched off for Continuous, BSS or Multi-shot 16, and focus, exposure and white balance are fixed at the values for the first picture in each series.
-
Page 91: F Color Options
Shooting Options: The Shooting Menu Note on Multi-shot 16 Smear (A 115) visible in the monitor when shooting with Multi-shot 16 is visible in the saved image. Avoiding bright objects such as the sun, reflections of the sun, and electric lights is recommended to avoid smear effects.
-
Page 92: Camera Settings That Cannot Be Set At The Same Time
Shooting Options: The Shooting Menu Camera Settings that Cannot Be Set at the Same Time Certain settings in the shooting menu cannot be used with other functions. Restricted Functions Setting Description If set to Continuous, BSS, or Multi- Flash mode Continuous (A 78) shot 16, the flash cannot be used.
-
Page 93: Playback Options: The Playback Menu
Playback Options: The Playback Menu The following functions are available in playback mode. A 52 D-Lighting Enhances brightness and contrast in dark portions of pictures. A 70 Print set Select pictures to print and the number of copies for each. A 83 Slide show View pictures stored in the internal memory or on a memory card in an automatic…
-
Page 94
Playback Options: The Playback Menu Selecting Multiple Pictures The screen shown at right will be displayed in the Erase selected images menus (shown below) when choosing pictures. Playback menu: Print set: Select images (A 70) Delete: Erase selected images (A 84) Back Setup menu: Welcome screen: Select an image… -
Page 95: Slide Show
Playback Options: The Playback Menu b Slide Show Press c (playback mode) M d (playback menu) M b Slide show View pictures stored in the internal memory or on a memory card in an automatic slide show. Use the multi selector to choose Start and Slide show press k.
-
Page 96: Delete
Playback Options: The Playback Menu c Delete Press c (playback mode) M d (playback menu) M c Delete Delete selected pictures or all pictures. Erase selected images Delete selected pictures. ➝ “Selecting Multiple Pictures“ (A 82) Erase all images Delete all pictures. Notes on Deletion Once deleted, pictures cannot be recovered.
-
Page 97: Basic Camera Setup: The Setup Menu
Basic Camera Setup: The Setup Menu The setup menu contains the following settings. A 87 Menus Select the method for displaying menus. A 88 Welcome screen Specify the welcome screen displayed when the camera is turned on. A 89 Date Set camera clock and choose home and destination time zones.
-
Page 98: Displaying The Setup Menu
Basic Camera Setup: The Setup Menu A 105 Battery type Select the type of batteries used. A 106 Protect Protect selected pictures from accidental deletion. A 107 Rotate image Change the orientation of a picture. A 108 Copy Copy files between memory card and internal memory. A 109 Firmware version Display camera firmware version.
-
Page 99: Menus
Basic Camera Setup: The Setup Menu Press K or k. Set up You can now select an item from the setup menu. Menus Welcome screen Use the multi selector to choose and apply settings Date (A 11). Monitor settings Date imprint To exit the setup menu, press the d or press J and Electronic VR select another tab.
-
Page 100: Welcome Screen
Basic Camera Setup: The Setup Menu c Welcome Screen Press d M z (setup menu) (A 86) M c Welcome screen Specify the welcome screen displayed when the camera is turned on. None (default setting) The welcome screen is not displayed when the camera is turned on; the shooting mode or playback mode screen is displayed.
-
Page 101: Date
Basic Camera Setup: The Setup Menu d Date Press d M z (setup menu) (A 86) M d Date Set the camera clock. Date Set camera clock to current date and time. Use the multi selector to set the date and time. Highlight an item (day, month, year, hour, minute, and the order in which day, month, and year are displayed): Press J or K.
-
Page 102
Basic Camera Setup: The Setup Menu Press K. Time zone 1 5 / 0 5 / 2 0 1 0 1 5 : 3 0 London, Casablanca Home time zone Travel destination Exit Press J or K to select the travel destination 1 0 : 3 0 — 0 5 : 0 0 region (time zone). -
Page 103
Basic Camera Setup: The Setup Menu Time Zones Date Time zone Time zone… -
Page 104: Monitor Settings
Basic Camera Setup: The Setup Menu e Monitor Settings Press d M z (setup menu) (A 86) M e Monitor settings Photo info ➝ A Image review Brightness…
-
Page 105
Basic Camera Setup: The Setup Menu Photo Info Shooting mode Playback mode 15/05/2010 15:30 15/05/2010 15:30 0004.JPG 0004 JPG 0004.JPG Show info Show info Auto info Hide (default setting) info Hide info 15/05/2010 15:30 15/05/2010 15:30 0004 JPG 0004.JPG 0004 JPG Auto info Framing grid Auto… -
Page 106: Date Imprint
Basic Camera Setup: The Setup Menu f Date Imprint Press d M z (setup menu) (A 86) M f Date imprint Imprint the shooting date and time on pictures. Date can be printed from printers that do not support the date imprinting (A 71).
-
Page 107: Electronic Vr
Basic Camera Setup: The Setup Menu w Electronic VR Press the d button M z (Setup menu) (A 85) M w Electronic VR Choose whether to use electronic VR (vibration reduction) when taking still pictures. Auto When all of the following conditions are met while taking still pictures, electronic VR is applied and the effects of camera shake are reduced.
-
Page 108: U Motion Detection
Basic Camera Setup: The Setup Menu U Motion detection Press d M z (setup menu) (A 86) M U Motion detection Set whether or not the camera automatically increases the shutter speed to reduce blurring when motion is detected while shooting still pictures. Auto (default setting) In order to reduce the effects of camera shake or subject movement, ISO sensitivity and shutter speed are increased when the camera detects camera…
-
Page 109: Af Assist
Basic Camera Setup: The Setup Menu h AF Assist Press d M z (setup menu) (A 86) M h AF assist Change settings for AF-assist illumination. Auto (default setting) AF-assist illumination will be used to assist the focus operation when the subject is poorly lit.
-
Page 110: Sound Settings
Basic Camera Setup: The Setup Menu i Sound Settings Press d M z (setup menu) (A 86) M i Sound settings Adjust the following sound settings. Button sound Turn the button sound On or Off. When On (default setting) is selected, a beep will sound once when operations are completed successfully, two times when the focus has been locked, and three times when an error is detected, and welcome sound is played when the camera is turned on.
-
Page 111: Auto Off
Basic Camera Setup: The Setup Menu k Auto Off Press d M z (setup menu) (A 86) M k Auto off When the camera is on and a period of time passes without any operations, the camera will enter the standby mode (A 15) to save power. When the camera enters standby mode, the power-on lamp flashes.
-
Page 112: Format Memory/M Format Card
Basic Camera Setup: The Setup Menu l Format Memory/m Format Card Press d M z (setup menu) (A 86) M l Format memory/m Format card Use this option to format the internal memory or a memory card. Formatting internal memory Format memory To format the internal memory, remove the memory All images will…
-
Page 113: Language
Basic Camera Setup: The Setup Menu n Language Press d M z (setup menu) (A 86) M n Language Select the language used for camera monitor display. Czech Polish Danish Portuguese German Russian (default setting) Finnish Spanish Swedish Greek Turkish French Arabic Indonesian…
-
Page 114: Blink Warning
Basic Camera Setup: The Setup Menu d Blink Warning Press d M z (setup menu) (A 86) M d Blink warning Choose whether or not blinking eyes are detected when using face detection (A 24) in the following shooting modes. G (easy auto) mode Portrait (A 36) and Night portrait (A 37) scene modes When the camera detects that one or more human subjects have closed their eyes…
-
Page 115: Reset All
Basic Camera Setup: The Setup Menu p Reset All Press d M z (setup menu) (A 86) M p Reset all When Reset is selected, the camera’s settings will be restored to their default values. Pop-up Menu Option Default value Flash mode (A 30) Auto Self-timer (A 32)
-
Page 116
Basic Camera Setup: The Setup Menu Setup Menu Option Default value Menus (A 87) Text Welcome screen (A 88) None Photo info (A 92) Auto info Image review (A 92) Brightness (A 92) Date imprint (A 94) Electronic VR (A 95) Motion detection (A 96) Auto AF assist (A 97) -
Page 117: Battery Type
To ensure that the camera shows the correct battery level (A 20), choose the type that matches the batteries currently in use. Alkaline (default setting) LR6/L40 (AA-size) Alkaline batteries Nikon EN-MH2 Ni-MH (nickel metal hydride) COOLPIX (Ni-MH) rechargeable batteries Lithium…
-
Page 118: Protect
Basic Camera Setup: The Setup Menu d Protect Press d M z (setup menu) (A 86) M d Protect Protect selected pictures from accidental deletion. You can turn protection on and off for images selected in the picture selection screen. ➝ “Selecting Multiple Pictures”…
-
Page 119: Rotate Image
Basic Camera Setup: The Setup Menu f Rotate Image Press d M z (setup menu) (A 86) M f Rotate image Set the picture orientation (vertical or horizontal frame) displayed on the camera monitor after the pictures are taken. Pictures can be rotated 90° clockwise or counterclockwise. Pictures that were recorded in the portrait (vertical) orientation can be rotated up to 180°…
-
Page 120: Copy
Basic Camera Setup: The Setup Menu h Copy Press d M z (setup menu) (A 86) M h Copy Copy pictures between the internal memory and a memory card. Select an option from the copy screen using Copy the multi selector and press k. q: Copy pictures from internal memory to memory card.
-
Page 121: Firmware Version
Basic Camera Setup: The Setup Menu r Firmware Version Press d M z (setup menu) (A 86) M r Firmware version View the current camera firmware version. COOLPIX L22 Ver.x.x Back…
-
Page 122: Technical Notes
Technical Notes Optional Accessories Rechargeable Ni-MH batteries EN-MH2-B2 (set of two EN-MH2 Rechargeable batteries)* battery Rechargeable Ni-MH batteries EN-MH2-B4 (set of four EN-MH batteries)* Battery Charger MH-72 (includes two rechargeable Ni-MH batteries EN-MH2)* Battery charger Battery Charger MH-73 (includes four rechargeable Ni-MH batteries EN-MH2)* AC Adapter EH-65A <How to attach EH-65A>…
-
Page 123: Image File And Folder Names
Files are stored in folders named with a folder number followed by a five- character identifier: “P_” plus a three-digit sequence number for pictures taken using panorama assist (e.g. “101P_001”; A 44) and “NIKON” for all other pictures (e.g. “100NIKON”). When the number of files within a folder reaches 9999, a new folder will be created.
-
Page 124: Caring For The Camera
Caring for the Camera To ensure continued enjoyment of this Nikon product, observe the following precautions when using or storing the device: Keep dry The device will be damaged if immersed in water or subjected to high humidity. Do not drop The product may malfunction if subjected to strong shock or vibration.
-
Page 125: The Battery
Caring for the Camera The Battery Check the battery level when taking the camera out, and replace the batteries if necessary (A 20). If possible, carry spare batteries when taking pictures on important occasions. When recharging rechargeable batteries, do not recharge batteries that contain a different amount of charge, or batteries of different model numbers.
-
Page 126: Cleaning
Caring for the Camera Cleaning Avoid touching glass parts with your fingers. Remove dust or lint with a blower (typically a small device with a rubber bulb attached to one end that is pumped to produce a stream of air out the other end). To remove fingerprints Lens or other stains that cannot be removed with a blower, wipe the lens with a soft cloth, using a spiral motion that starts at the center of the lens and working…
-
Page 127: Storage
Images in the monitor may be difficult to see under bright lighting. The monitor is lit by an LED backlight. Should the monitor begin to dim or flicker, contact your Nikon-authorized service representative. Notes on Smear White or colored streaks may be visible when bright subjects are framed in the monitor. This phenomenon, known as “smear,”…
-
Page 128: Error Messages
All data saved on the Card is not formatted. formatted for use in memory card will be Format card? COOLPIX L22/L21. deleted. If there is any data on the card that you want to keep, select No, and backup the data to a…
-
Page 129
File not created with File cannot be viewed on – File contains no image COOLPIX L22/L21. this camera. View file using data. the computer or any other devices which was used to create or edit this file. -
Page 130
Error Messages Display Problem Solution Lens error Lens error. Turn camera off and then on again. If error persists, contact retailer or Nikon- authorized service representative. USB cable disconnected Turn camera off, reconnect Communications error during printing. USB cable. System error… -
Page 131: Troubleshooting
Troubleshooting If the camera fails to function as expected, check the list of common problems below before consulting your retailer or Nikon-authorized service representative. Refer to the page numbers in the right-most column for more information. Display, Settings and Power Supply…
-
Page 132
Turn the camera off, remove and replace the battery, then turn the camera on again. In the event of continued malfunction, contact your retailer or Nikon-authorized service representative. Note that disconnecting the power source as described above may result in the loss of any data not recorded to internal memory or the memory card at the time the problem occurred. -
Page 133
Troubleshooting Problem Cause/Solution Digital zoom cannot be used. Digital zoom cannot be used in the following situations. When Portrait or Night portrait is selected 36, 37 for Scene mode. When using smart portrait mode. Just before recording a movie (up to 2× can be applied while recording movies). -
Page 134
Battery exhausted. USB cable is not correctly connected. Camera is not recognized by the computer. – Computer is not set to launch Nikon Transfer – automatically. For more information about Nikon Transfer, refer to help information contained in Nikon Transfer. -
Page 135
Troubleshooting Problem Cause/Solution Pictures to be printed are not Memory card contains no pictures. Replace displayed. memory card. Remove memory card to print pictures from internal memory. Cannot select paper size with Even when using a PictBridge compatible 66, 67 camera. -
Page 136: Specifications
1/2.5-in. CCD; total pixels: 8.29 million Lens 3.6× optical zoom, NIKKOR lens 6.7-24.0mm COOLPIX L22: angle of view equivalent to that of 37-134mm Focal length lens in 35mm [135] format COOLPIX L21: angle of view equivalent to that of 41-145mm…
-
Page 137
File system DCF, Exif 2.2, and DPOF compliant Still images: JPEG File formats Movies: AVI (Motion-JPEG compliant) COOLPIX L22: 12M (High) [4000 × 3000P] 12M [4000 × 3000] 8M [3264 × 2448] 5M [2592 × 1944] 3M [2048 × 1536] PC [1024 ×… -
Page 138
Self-timer Approx. 10 seconds Built-in flash COOLPIX L22: [W]: 0.5 to 7.0 m (1 ft. 8 in. to 23 ft.), [T]: 0.5 to 3.0 m (1 ft. 8 in. to 9 ft. 10 in.) Range (approx.) COOLPIX L21: [W]: 0.5 to 5.5 m (1 ft. 8 in. to 18 ft.), [T]: 0.5 to 2.5 m (1 ft. -
Page 139
Supplied batteries are for trial use only. Specifications Nikon will not be held liable for any errors this manual may contain. The appearance of this product and its specifications are subject to change without notice. -
Page 140: Supported Standards
Specifications Supported Standards DCF: Design Rule for Camera File System is a standard widely used in the digital camera industry to ensure compatibility among different makes of camera. DPOF: Digital Print Order Format is an industry-wide standard that allows pictures to be printed from print orders stored on the memory card. Exif version 2.2: This camera supports Exif (Exchangeable Image File Format for Digital Still Cameras) version 2.2, a standard that allows information stored with photographs to be used for optimal color reproduction when images are…
-
Page 141: Index
Index Symbols Battery level 20 k (apply selection) button 5, 7, 11 Battery type 15, 105 c (Playback) button 5, 7 Battery-chamber 5, 7 A Auto mode 29 Battery-chamber/memory card slot cover l Delete button 5, 7, 26, 57 5, 7, 14, 18 c D-Lighting 52 Beach/snow g 38 G Easy auto mode 20, 28…
-
Page 142
Formatting internal memory 100 FSCN 111 Nickel-metal hydride batteries 14 Full-frame playback mode 26, 27 Night landscape j 39 Night Portrait e 37 Nikon Transfer 60 Halfway 13 Number of Exposures Remaining 20, 75 Help 13 Optical zoom 23 Identifier 111… -
Page 143
Index Playback 26, 27, 48, 50, 57 Smart Portrait Mode 46 Playback button 5, 7, 10 Sound settings 98 Playback menu 81 Speaker 4, 6 Sports d 37 Playback zoom 50 Portrait b 36 SSCN 111 Power 14, 16, 20 Standard color 79 Power switch 4, 6, 14, 20 Strap 13… -
Page 144
No reproduction in any form of this manual, in whole or in part (except for brief quotation in critical articles or reviews), may be made without written authorization from NIKON CORPORATION. CT9K01(11) -
Page 145
Nikon Quick Start Guide Take the Camera Out of the Box First Steps Shooting and Playback Installing the Supplied Software Applications Transferring Pictures to a Computer Other Functions i;— <- » COOLPIX COOLPI)C _~» «~ ,,~QC),LPIX’,,’-22/’L2’l ‘,,’ ‘,,’~, » «… -
Page 146
Search Nikon’s continuously updated Knowledge Database for the latest technical support information. • Use «Ask Nikon a Question» to receive a prompt reply from a Nikon professional advisor to your e-mail. • Download the latest versions of Nikon software or firmware updates for your product. or register to receive e-mail notification for software or firmware updates. -
Page 147
Supplied batteries are for trial use only. Illustrations and text displays shown in this manual are for COOLPIX L22. Illustrations and text displays for COOLPIX L21 may also be shown in this manual if necessary. -
Page 148
Attach the Camera Strap Step Insert the Batteries and a Memory Card* Step When a memory card is not inserted, the camera stores pictures in the internal memory (approximately 19 MB). If you wish to store pictures in the internal memory, do not insert a memory card in step 2.2. -
Page 149
— — — — — — , — — — — — — — — — — — — , , — — Insert the batteries or a memory card. Removing the memory card. Press the card in to partially eject the card. The card can then be removed by hand. -
Page 150
Turn On the Camera Step Press the power switch to turn on the camera. COOLPIX L22 COOLPIX L21 The power-on lamp (green) will light for a moment and the monitor will turn on. Auto Power Off in Shooting Mode (Standby Mode) If no operations are performed for about 30 seconds (default setting), the monitor willturn off automatically and the camera will enter standby mode. -
Page 151
Choose a Language and Set the Camera Clock Step A language-selection dialog is displayed the first time the camera is turned on. Follow the steps below to choose a language and set the time and date. The Multi Selector Use the multi selector to choose and apply settings. Operate the multi selector by pressing it up, down, left, right, or by pressing Move the highlight up. -
Page 152
Edit the date. Choose the order in which 0 Yare Press the multi selector up or down to displayed and press The settings are applied. edit the highlighted item. Press right to move the highlight in the following order: Hour Minute 0 Y (the order in which the month, day, and year are displayed). -
Page 153
Cannot take pictures. Replace with Battery exhausted. new batteries. Frame a Picture Step COOLPIX L21 COOLPIX L22 Zoom control Zoom control Zoom control Rotate the zoom control to to zoom in on the subject so that it fills a larger area of the frame. -
Page 154
Focus and Shoot Step Press the shutter-release button halfway, stopping when you feel resistance. ,e:=»‘~ • When the camera recognizes Flash lamp Focus area people’s faces in step 2: Focus will be on the face framed by a yellow double border. Once the face comes into focus, the yellow double border will turn green. -
Page 155
• Deleted pictures cannot be recovered. • To exit without deleting the picture, choose No and press ..Pages 26-27 of the User’s Manual Turn Off the Camera StepS Press the power switch to turn the camera off. COOLPIX L22 COOLPIX L21 PlaYbaCk. Shooting and… -
Page 156
Use the supplied Software Suite CD to install software, such as Nikon Transfer and ViewNX. Nikon Transfer allows you to copy (transfer) pictures to a computer. ViewNX allows you to view pictures that have been transferred to a computer. Before You Begin: System Requirements for Supplied Software Applications Confirm that your system meets the following requirements. -
Page 157
The Software Suite installer dialog will be displayed. If Nikon Transfer or ViewNX is Already Installed The Language Selection dialog will not be displayed. The Install Center window is displayed in the language selected when Nikon TransferNiewNX was first installed. -
Page 158
~»‘» Other Installation Options Custom Install: Install selected software. Link to Nikon: Download trial versions of other Nikon software from a Nikon website or visit Nikon technical support websites*. my Picturetown (Photo Storage and Sharing Service): Connect to Nikon’s convenient and easy-to-use photo management site, my Picturetown*. Not available in some areas. -
Page 159
Accept. When the Read Me dialog is displayed, read the contents of this document carefully and click OK. • When the Auto-Launch setting dialog is displayed while installing Nikon Transfer, click Yes to have Nikon Transfer start automatically whenever the camera is connected. -
Page 160
Install the suggested software, available online. Recommended software, available over the Internet, can be downloaded. An Internet connection is required. :•… . • The software displayed varies depending upon the r;1Ip::Ee!’fl~ :SH~y·tt>~»2;O»»‘»r\!l!l’.lIte»,~T!,.:>;:::).~»‘\i..~,,=~t:l ,ClI,.( P~rtS. -
Page 161
Using a Reliable Power Source Nikon recommends using a fully charged batteries to prevent the camera from turning off unexpectedly. Turn off the camera. -~—_._—— Connect the camera to the computer using the supplied USB cable. Check to be sure that the connector is in the correct orientation and insert the plug straight. -
Page 162
• MacOS X Nikon Transfer will start automatically when the camera is connected to the computer if Yes was selected in the Auto-Launch setting dialog when Nikon Transfer was first installed. • If there are a large number of images on the memory card, it may take some time for Nikon Transfer to start. -
Page 163
— Mac OS X: Open the Applications folder, then double-click Nikon Software -. ViewNX -. ViewNX. You can also click the ViewNX icon in the dock. • For more information on using Nikon Transfer or ViewNX, refer to the help information contained in Nikon Transfer or ViewNX. -
Page 164
Selecting a Shooting Mode Pressing the shooting mode button (0) during shooting will display the shooting-mode selection menu. Choose the shooting mode with the multi selector, and ® press to change to that mode. Shooting-mode Selection Menu Easy auto mode Auto Mode White balance, continuous shooting and color options in the shooting menu can be set for shooting. -
Page 165
Flash Mode, Self-Timer, Macro Mode and Exposure Compensation Use the multi selector in shooting mode to apply the following settings. Flash Mode tAUlO The flash mode setting can be changed. In (auto) mode, ··».=- . . · . · . · · . ‘ . · <0 t<§>… -
Page 166
(&) is displayed at the lower right of the menu screen to view the help for the currently selected option. Rotate the zoom control to (@) again to return to the menu screen. COOLPIX L22 COOLPIX L21 … Page 13 of the User’s Manual •… -
Page 167
Playback Mode The following options are available in full-frame playback mode. COOLPIX L22 COOLPIX L21 Option Description Press the multi selector up, down, left, or right to view 6kCQ~ Select pictures to @C@@ additional pictures. view ..Page 26 of the User’s Manual… -
Page 168
Other Features of the COOLPIX L22/L21 ~ Scene mode, ~ Smart portrait mode In scene mode, you can selecting a scene to take pictures. In smart portrait mode, the camera detects a smiling face using face priority, it releases the shutter automatically. -
Page 170
Nikon. User’s Manual • • I,! I.SI CT9l\OlI4~·’ 6MM1<J14N 01 COOLPIX L22/L21… -
Page 171
Nikon • Atlh~h~aflo’ih ‘ ~ Ima!J~» Sma» photostor age and sharin Pictur~t’~’~’ik~ mypducotowo Search… -
Page 172
2GB FREE! Closer. Bring Your Circle dig’ photos IljOY »» ._—- learn More mypieturetown Search http://mypicturetown.com ~11″… -
Page 174
(fT) legal residents of the 50 United States and D.C., 18 years of age or older as of the date of entry. Enter by registering Nikon product purchase at Nikonusa.comlregistration or by postal mail. One winner will be chosen for each calendar month during the Sweepstakes period. -
Page 175
Nikon Incorrect x H x • Dimensions (W COOLPIX L22: 97.7 60.5 28.3 (3.9 Approx. in.) (excluding projections) COOLPIX L21: Approx. 61.1 28.3 (3.7 in.) (excluding projections) COOLPIX L21: (5.8 • Weight: Approx. oz.) (including battery and SO memory card) Correct •… -
Page 176
For Your Safety To prevent damage to your Nikon product or injury to yourself or to others, read the following safety precautions in their entirety before using this equipment. Keep these safety instructions where all those who use the product will read them. -
Page 177
(1) year from the date of purchase. During this period if this product is found to be defective in material or workmanship, Nikon Inc. or one of its authorized service facilities will at its option, either repair or replace this Product without charge, subject to the following conditions, limitations and exclusions: 1.
Раздел: Видео Аудио Фото Оборудование
Тип: Цифровой Фотоаппарат Более 16 Мпикс
Характеристики, спецификации
Разрешение матрицы:
12 МПикс
Макс. разрешение:
4000×3000 Пикс
Используемая оптика:
Nikkor Optical Zoom
Фокусное расстояние:
6.7 — 24 мм
Минимальная дистанция съемки:
от 30 см
Оптическое увеличение:
3.6x
Цифровое увеличение:
14.3x
Стабилизатор изображения:
цифровой
Серийная съемка:
1.2 кадр/сек
Автоматическая фокусировка:
Да
Дальность действия вспышки:
7 м
Диапазон выдержки:
4 — 1/1000 сек
Разрешение ЖК дисплея:
230000 Пикс
Качество видеосъемки:
640×480 Пикс
Скорость видеосъемки:
30 кадр/сек
Тип исп. батареи:
2 x AA (LR 6)
Интерфейс связи с ПК:
USB 2.0
Ремень на запястье:
в комплекте
Габаритные размеры (В*Ш*Г):
61*98*28 см
Краткое описание:
12 МПикс;3.6x;640×480 Пикс;2 x AA (LR 6)
Вид гарантии:
гарантийный талон
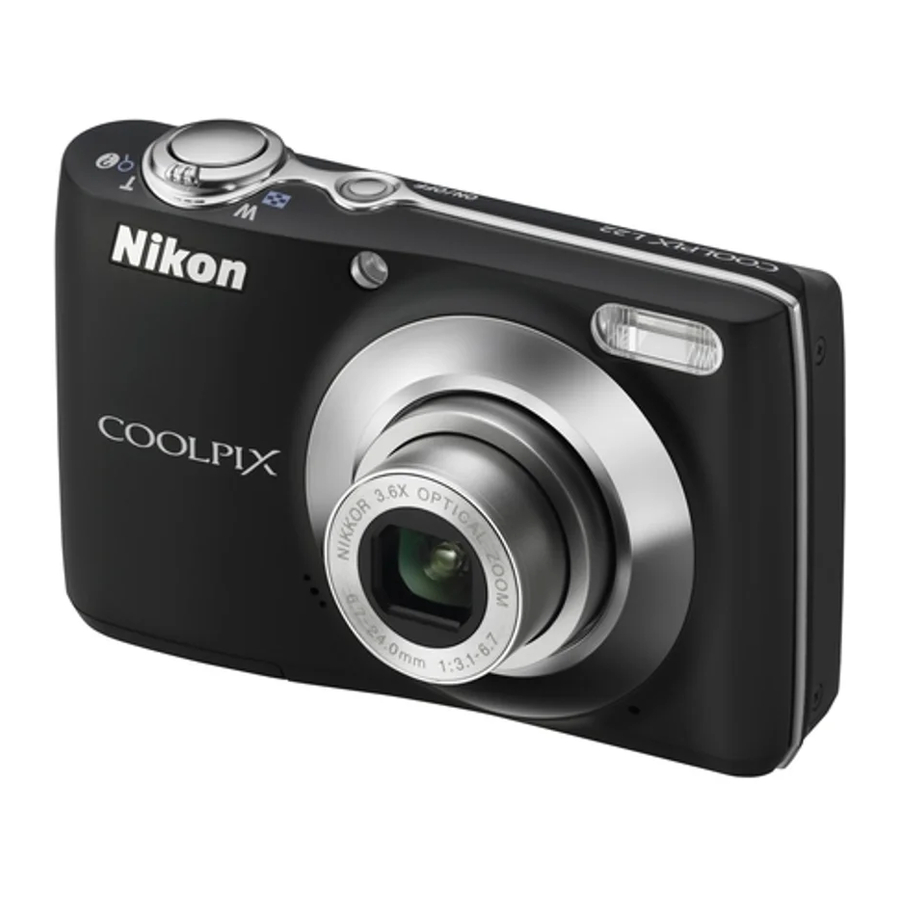
Инструкция к Цифровому Фотоаппарату Более 16 Мпикс Nikon Coolpix L22 Black
ЦИФРОВАЯ ФОТОКАМЕРА
Руководство пользователя
Воспроизведение данного руководства в любой форме,
полностью или частично (кроме краткого цитирования в
критических статьях и обзорах) без письменного разрешения
корпорации NIKON CORPORATION запрещено.
Отпечатано в Европе
Ru
CT9L01(1D)
6MM7921D-01
Ru_01 Ru_01
Сведения о товарных знаках
• Microsoft, Windows и Windows Vista являются зарегистрированными товарными
знаками или товарными знаками корпорации Майкрософт в США и/или других
странах.
• Macintosh, Mac OS и QuickTime являются товарными знаками компании Apple Inc.
• Adobe и Acrobat являются зарегистрированными товарными знаками
корпорации Adobe Systems Inc.
• Логотипы SD и SDHC являются товарными знаками SD-3C, LLC.
• PictBridge является товарным знаком.
• Все другие торговые наименования, приводимые в настоящем руководстве и в
другой документации, которая поставляется вместе с изделиями компании
Nikon, являются товарными знаками или зарегистрированными товарными
знаками своих владельцев.

Введение
Первые шаги
Съемка и просмотр снимков:
G
Простой авто режим
A Съемка в авто режиме
C Съемка сюжетов
Съемка улыбающихся лиц (режим
F
интеллектуального портрета)
Дополнительные сведения о режиме
c
просмотра
D Видеоролики
Подключение к телевизору, компьютеру и принтеру
d Меню съемки, просмотра и настройки
Технические примечания
i

Меры предосторожности
Перед началом работы с устройством внимательно изучите следующие меры
безопасности во избежание получения травм и повреждения изделия Nikon.
Всем лицам, использующим данное изделие, следует ознакомиться с
инструкциями по безопасности.
Возможные последствия нарушения указанных мер безопасности обозначены
следующим символом:
Данным символом отмечены предупреждения и сведения, с которыми
необходимо ознакомиться до начала работы с изделием Nikon во избежание
травм.
ПРЕДУПРЕЖДЕНИЯ
В случае неисправности
Не пользуйтесь фото-
выключите фотокамеру
камерой или сетевым
блоком
При появлении дыма или необычного
питания при наличии
в
запаха, исходящего из фотокамеры
воздухе легковоспла-
или блока питания, отсоедините блок
меняющихся газов
питания от сети и немедленно
Не работайте с электронным
извлеките батареи, стараясь не
оборудованием и с фотокамерой
допустить ожогов. Продолжение
при наличии в воздухе
работы с устройством может
легковоспламеняющихся газов: это
привести к получению травм. После
может привести к взрыву или пожару.
извлечения батареи или отключения
источника питания доставьте изделие
Меры предосторожности при
для проверки в ближайший
обращении с ремнем
авторизованный сервисный центр
фотокамеры
компании Nikon.
Запрещается надевать ремень
Не разбирайте фотокамеру
фотокамеры на шею младенца или
ребенка.
Прикосновение к внутренним частям
фотокамеры или сетевого блока
Храните в недоступном для
питания может привести к получению
детей месте
травм. Ремонт должен производиться
Примите особые меры
только квалифицированными
предосторожности во избежание
специалистами. В случае повреждения
попадания батарей и других небольших
корпуса фотокамеры или сетевого
предметов детям в рот.
блока питания в результате падения
или другого происшествия отключите
сетевой блок питания и/или извлеките
батареи и доставьте изделие для
проверки в ближайший
авторизованный сервисный центр
Nikon.
ii

Меры предосторожности
Соблюдайте меры
• Не перевозите и не храните
предосторожности при
батареи вместе с металлическими
предметами, например
обращении с батареями
украшениями или шпильками.
Неправильное обращение с
•
Из полностью разряженных батарей
батареями может привести к их
может вытекать жидкость. Во
протеканию или взрыву. При
избежание повреждения изделия
обращении с батареями для данного
извлекайте из него разряженные
изделия соблюдайте следующие
батареи.
меры предосторожности.
• Немедленно прекратите
• Перед заменой батарей выключите
использовать батарею, если вы
изделие. Если используется
заметили в ней какие-либо
сетевой блок питания, убедитесь,
изменения, например смену
что он отключен от сети.
окраски или деформацию.
• Используйте только батареи,
• В случае попадания жидкости,
рекомендованные для данного
вытекшей из поврежденной
изделия (A 14). Не используйте
батареи, на одежду или кожу
старые и новые батареи
немедленно смойте ее большим
одновременно, а также батареи
количеством воды.
разных производителей или типов.
•
Если никель-металлогидридные
Во время эксплуатации
аккумуляторные батареи Nikon EN-MH2
зарядного устройства
(EN-MH2-B2 или EN-MH2-B4)
(поставляется отдельно)
приобретаются отдельно, заряжайте и
соблюдайте следующие
используйте каждую из них в
меры предосторожности:
комплекте. Не смешивайте батареи из
различных пар.
• Не допускайте попадания воды на
•
Аккумуляторные батареи EN-MH2
устройство. Несоблюдение
этого
предназначены для использования
требования может привест
и
только с цифровыми фотокамерами
к возгоранию или поражению
Nikon и совместимы с моделями
электрическим током.
COOLPIX L22/L21.
• Пыль на металлических частях
Не используйте аккумуляторные
сетевой вилки или вокруг них
батареи EN-MH2 с несовместимыми
необходимо удалять с помощью
устройствами.
сухой ткани. Продолжение работы
с устройством может привести к
• Соблюдайте полярность установки
возгоранию.
батарей.
• Не пользуйтесь сетевым шнуром и
• Не закорачивайте и не разбирайте
не находитесь рядом с зарядным
батареи. Не удаляйте и не
устройством во время грозы.
вскрывайте изоляцию или корпус
Несоблюдение этого требования
батарей.
может привести к поражению
• Не допускайте воздействия
электрическим током.
пламени или высоких температур
на батареи.
• Не погружайте батареи в воду и не
допускайте попадания на них воды.
iii

Меры предосторожности
•
Берегите шнур питания от повреждений,
Компакт-диски
не вносите в него конструктивные
Запрещается воспроизводить компакт-диски,
изменения, не перегибайте его и не
прилагаемые к изделию, в аудиопроигрывателях
тяните за него с силой, не ставьте на него
компакт-дисков. Воспроизведение компакт—
тяжелые предметы, не подвергайте его
дисков с данными на аудиопроигрывателе
воздействию высоких температур или
может привести к нарушениям слуха или
открытого огня. В случае повреждения
повреждению оборудования.
изоляции сетевого шнура и оголения
проводов отнесите его для проверки в
Соблюдайте осторожность при
авторизованный сервисный центр Nikon.
использовании вспышки
Несоблюдение этого требования может
привести к возгоранию или поражению
Применение вспышки рядом с глазами снимаемого
электрическим током.
человека может привести к временному ухудшению
•
Не прикасайтесь к сетевой вилке или
зрения. Особую осторожность следует соблюдать при
к зарядному устройству мокрыми
фотографировании детей: вспышка должна находится на
руками. Несоблюдение этого
расстоянии не менее 1 м от объекта съемки.
требования может привести
Не используйте вспышку, когда
к поражению электрическим током.
ее излучатель соприкасается с
•
Не используйте с преобразователями
напряжения или преобразователями
телом человека или каким-либо
постоянного тока. Несоблюдение этого
предметом
требования может привести
Несоблюдение этой меры
к повреждению изделия, а также к его
предосторожности может привес
ти к
перегреву или возгоранию.
ожогам или пожару.
Используйте только
Избегайте контакта
соответствующие кабели
с жидкокристаллическим
При подключении кабелей к входным и
веществом
выходным разъемам и гнездам
Если монитор разбился, необходимо
фотокамеры используйте только
предпринять срочные меры во избежание
специальные кабели Nikon,
травм осколками стекла и предупредить
поставляемые вместе с фотокамерой
попадание жидкокристаллического
или продаваемые отдельно.
вещества на кожу, в глаза и в рот.
Соблюдайте осторожность при
Отключите питание, если вы
обращении с подвижными
находитесь в самолете или в
частями фотокамеры
больнице
Будьте внимательны. Следите за тем,
Если вы находитесь в самолете, отключите
чтобы ваши пальцы и другие
питание во время взлета или посадки. При
предметы не были зажаты крышкой
использовании фотокамеры в больнице,
объектива или другими подвижными
следуйте инструкциям, принятым в данной
частями фотокамеры.
больнице. Электромагнитные волны,
излучаемые данной фотокамерой, могут
прерывать работу электронных систем
самолетов или медицинских инструментов.
iv
Уведомления
Символ для раздельной
утилизации, применяемый
в европейских странах
Данный символ означает, что
изделие должно
утилизироваться отдельно.
Следующие замечания
касаются только
пользователей в
европейских странах.
• Данное изделие предназначено
для раздельной утилизации
в соответствующих пунктах
утилизации. Не выбрасывайте
изделие вместе с бытовым
мусором.
• Подробные сведения можно
получить у продавца или в местной
организации, ответственной за
вторичную переработку отходов.
Этот символ на батарее
указывает на то, что данная
батарея подлежит
раздельной утилизации.
Следующие замечания касаются
только пользователей в европейских
странах:
• Все батареи, независимо от того,
промаркированы ли они этим
символом или нет, подлежат
раздельной утилизации в
соответствующих пунктах сбора.
Не выбрасывайте их вместе с
бытовыми отходами.
• Подробные сведения можно
получить у продавца или в местной
организации, ответственной за
вторичную переработку отходов.
v

Оглавление
Меры предосторожности …………………………………………….………………………………….…………..…… ii
ПРЕДУПРЕЖДЕНИЯ………………….…………..………………….…………………………………………….…………..……………….ii
Уведомления ………………………………..………………………………….……………………..……………………………. v
Введение ……….……….…………..……….…………..……….…………..……….……………………………………..……..1
Об этом руководстве………………………………………………………………………………………………………….. 1
Информация и меры предосторожности ……..……………………..………………………………….……. 2
Основные части фотокамеры…………………………..…………………………………………………………….… 4
Корпус фотокамеры……………….………………….…………..………………….…………………………………………….………..4
Монитор…………………………………………….……………………………….…………..………………….……..………………….………..8
Основные операции …………………..……………………………………………………………………………………..10
A кнопка (режим съемки)……………..………………….……………………………….………………………..…………….10
c кнопка (просмотр)……………………….………………….……………………………….………………….…….…………….10
Мультиселектор ………………………………………….…………..……………………………….……………………………….……..11
Кнопка d…………….…………..………………….…………………………………………….…………..………………….…………….12
Переключение между вкладками ……………..………………………..………………….………………………….…….12
Экраны справки………………..……………………………….……………………………….…………..…..……….…………………..13
Спусковая кнопка затвора……………………..…………..………………….……………………………….….………..……..13
Прикрепление ремня фотокамеры………………..……………………………….………………………..…………….13
Первые шаги………….……………….…………..……….……………………………………………………………….….. 14
Установка батарей…………………………………..……………………..………………………………….………………14
Применимые батареи………………….………………………..………………….……………………………….…………………..14
Включение и выключение фотокамеры…………………………..………………….………………………………..14
Настройка языка отображения, даты и времени …………………………..…………………………..16
Установка карты памяти ………………………..………………………………………………………………….……..18
Извлечение карт памяти ………………….………………….……………………………….………………………..…………….19
G Съемка и просмотр снимков: Простой авто режим…………….…………..……….………. 20
Шаг 1. Включение фотокамеры и выбор режима G (Простой авто режим)……….20
Индикаторы, отображаемые в режиме G (Простой авто режим)…………………………..21
Шаг 2. Компоновка кадра ………………………………….……………………………………………………….…….22
Использование зума…………………………..……………………………….……………………………….…………..…………….23
Шаг 3. Фокусировка и съемка…………………………..…………………………………………………………..…24
Шаг 4. Просмотр и удаление снимков…………………………………..………………………………………26
Просмотр снимков (режим просмотра)……………..………………….…………..………………………………..26
Удаление снимков…………………..…………..………………….……………………………….………………………..…………….26
Простой авто режим……………………………….……………………..………………………………….………………28
vi

Оглавление
A Авто режим …………..…………..……….…………..……….…………………………….…………..……………….. 29
Съемка в авто режиме ……………………………………….…………………………………………………….……….29
Использование вспышки……………………….……………………..………………………………….………………30
Съемка с автоспуском…………………………….……………………………………………………………….………..32
Режим макросъемки……………………………….……………………………………………………………….………..33
Поправка экспозиции………………..………………………………….……………………..………………….…..…..34
C Съемка сюжетов……………….…………..……….…………………………………………………………………... 35
Использование сюжетного режима……………….……………………………………………………………..35
Настройка сюжетного режима………………………………………………………….………………………..…..………..35
Функции……………………………………….…………..……………………………….…………………..……………………………………..36
Съемка в режиме еды………………………..……………………………….……………………………….…..………………..…..43
Снимки для панорамы ………………..……………………………….…………..………………….……………………………..…44
F Съемка улыбающихся лиц (режим интеллектуального портрета)……………….. 46
Использование режима интеллектуального портрета………………..…………………………..46
c Дополнительные сведения о режиме просмотра ……………………………………………. 48
Просмотр нескольких снимков: просмотр уменьшенных изображений …………….48
Отображение календаря……………………………………..………………….……………………………….…………………..49
Просмотр крупным планом: увеличение при просмотре .………………………………….…..50
Редактирование снимков………………………………….………………………………………………………...…..51
Повышение яркости и контраста: D-Lighting………………..……………………………….…………………..52
Изменение размера снимков: уменьшить снимок…………………..……………………………….……..53
Создание кадрированных копий: кадрирование ………………………………….…………..…………….54
D Видеоролики ………..……………………………………………………………………….…………..……..…….….. 55
Запись видеороликов ………………………………………..…………………………………………………….……….55
Меню видео ………………………………….………………………………….……………………..………..…………………56
D Выбор параметров видео……………………….………………….……………………………….…………..…………….56
Просмотр видеороликов …………………………………………………………………………………………….…..57
Удаление видеороликов ……………………………………..………………….………………………………….………………..57
vii

Оглавление
Подключение к телевизору, компьютеру и принтеру ……………………..……….…………... 58
Подключение к телевизору……………………………………………………..…………………………………..….58
Подключение к компьютеру…………………………………………………………………………………………...59
Перед подключением фотокамеры……………………….………………….…………..…………………………….….59
Передача снимков с фотокамеры на компьютер……………….………………….…………..…………….60
Подключение к принтеру…………………………………………………………………………………………………64
Подключение фотокамеры к принтеру……………………..………………….……………………………….……..65
Поочередная печать снимков………………………………….…………..……………………………….……….…..……..66
Печать нескольких снимков………………….………………….…………..………………….………………….……..……..67
Создание задания печати DPOF: задание печати ………………………….…………………………..70
d Меню съемки, просмотра и настройки ……………..……….……….…………..……….………. 72
Параметры съемки: меню съемки………………………………………………………………….………………72
Отображение меню съемки…………………………………………….……………………………….…………...……………73
A Режим изображения………………………………………..………………….……………………………….…………………..74
B Баланс белого ………………………………..………………….……………………………….…………….………………………..76
C Непрерывный…………………….…………..………………….……………………………….……………..……………………….78
F Параметры цвета ……………………………………….………………………..………………….………….…………………….79
Настройки фотокамеры, которые нельзя установить одновременно…………………..80
Параметры просмотра: меню просмотра………………………………………..…………………………..81
Отображение меню просмотра………………………………………………….…………..………………….…….……...81
b Показ слайдов…………….…………………………………………….…………..………………….………………………………..83
c Удалить ……………………..……………………………….…………..……………………………….…..……….………………….……..84
viii

Оглавление
Основные настройки фотокамеры: меню настройки ……….………………………………….…..85
Отображение меню настройки………………………..………………….……………………………….…………...……..86
a Меню ………………….………………….…………..……………………………….……………………..…….………..…………………..87
c Экран приветствия………………………………………………….…………..………………….………………………………..88
d Дата…………………………….……………………………….…………..………………….…………………………………………….……..89
e Настройка монитора ……………………………………..………………….……………………………….…..……….……..92
f Впечатывание даты ………………..……………………………….…………..………………….…………….…………..……..94
w Электронный VR ………………..…………..………………….……………………………….……………….……….…………….95
U Обнаружение движения………………………………..………………….……………………………….…………………..96
h АФ–помощь………………………………………………….……………………………….…………..……..………..………..……..97
i Настройка звука…………………………….…………………………………………….…………..………..………..…………….98
k Автовыключение………..…………………………………………….…………..………………….…………...…………………..99
l Форматирование памяти/m Форматирование карты памяти ……………..………….100
n Язык/Language…………….………………….……………………………….………………………………..………….………….101
o Режим видео ……………………………….……………………………….……………………………….…………..………….101
d Предупреждение о закрытых глазах…………………….………………….……………………………….…..102
p Сброс всех значений…………….………………….……………………………….…………..……………………………..103
s Тип батарей ……………………………….……………………………….…………..……………………………….………………..105
d Защита……………….………………….…………..………………….……………………………….………………………..………….106
f Повернуть снимок………………………..……………………………….……………………………….…….…….………….107
h Копирование……………….………………….……………………………….……………………………….…………..………….108
r Версия прошивки ………………….………………….……………………………….…………..…………….……………....109
ix

Оглавление
Технические примечания………..…………………………….…………………………………………………....110
Дополнительные принадлежности ……………………………………….…………………………………… 110
Рекомендованные карточки памяти ……………..……………………………….……………………………….…..110
Имена файлов изображений и имена папок…………………………………..……………………….. 111
Уход за фотокамерой ………………………………………………………………..…………………………….…….. 112
Чистка………………………..…………..………………….…………………………………………….….…….………………………………..114
Хранение ……………………………..…………………………………………….…………..………………….……..………………….…..115
Сообщения об ошибках ………………………………………………..………………………………….………..…. 116
Поиск и устранение неисправностей………………………………………………………………………... 119
Технические характеристики…………………………..……………………..…………………………………... 124
Поддерживаемые стандарты ……………………………………………………….…………..………………….………….128
Алфавитный указатель …………………………..……………………..………………………………….…………… 129
x

Введение
Об этом руководстве
Благодарим вас за приобретение цифровой фотокамеры Nikon COOLPIX L22/
COOLPIX L21. Это руководство поможет вам в полной мере воспользоваться всеми
ее преимуществами. Перед применением фотокамеры внимательно прочтите
данное руководство и держите его в месте, доступном для всех, кто будет
Введение
использовать фотокамеру.
Символы и обозначения
Для облегчения поиска необходимой информации используются следующие
символы и обозначения.
Этим символом обозначены
предупреждения, с которыми необходимо
Этим символом обозначены полезные
B
D
ознакомиться во избежание повреждения
советы по работе с фотокамерой.
фотокамеры.
Этот символ указывает на то, что в другом
Этим символом обозначены примечания, с
месте данного руководства или в
краткое
C
которыми необходимо ознакомиться перед
A
руководство
содержится дополнительная
использованием фотокамеры.
информация.
Обозначения
•
В этом руководстве наименования изделий “COOLPIX L22” и “COOLPIX L21” иногда
могут сокращаться до “L22” и “L21”.
•
Карточка памяти Secure Digital (SD) далее именуется “карточкой памяти”.
•
Настройки на момент покупки далее называются “настройками по умолчанию”.
•
Пункты меню, отображаемые на мониторе фотокамеры, названия кнопок и текст сообщений,
отображаемых на мониторе компьютера, обозначены полужирным шрифтом.
Примеры изображения на мониторе
На примерах в данном руководстве мониторы иногда показаны без
изображений. Это позволяет лучше видеть символы на мониторах.
Рисунки и изображения на экране
• Рисунки и текст на экране, приведенные в данном руководстве, относятся к
модели COOLPIX L22. При необходимости в данном руководстве могут
также содержаться рисунки и текст на экране, относящиеся к модели
COOLPIX L21.
• Рисунки и текст на экране, приведенные в данном руководстве, в
некоторых случаях могут не соответствовать действительности.
C Карточки памяти
Снимки, сделанные данной фотокамерой, могут сохраняться во внутренней памяти или на
сменных карточках памяти. Если установлена карточка памяти, то новые снимки сохраняются
на нее, а операции удаления, просмотра и форматирования применяются только к снимкам,
сохраненным на карточке памяти. Карточку памяти необходимо извлечь, если требуется
отформатировать внутреннюю память либо использовать ее для сохранения, удаления или
просмотра снимков.
1

Информация и меры предосторожности
Концепция “постоянного совершенствования”
В рамках развиваемой компанией Nikon концепции постоянного совершенствования
пользователям предоставляется регулярно обновляемая информация о поддержке
Введение
выпущенных изделий и учебные материалы на следующих веб-сайтах:
• Для пользователей в США: http://www.nikonusa.com/
• Для пользователей в Европе и Африке: http://www.europe-nikon.com/support/
• Для пользователей в странах Азии, Океании и Ближнего Востока:
http://www.nikon-asia.com/
Посетите один из этих веб-сайтов для получения последних сведений об изделиях, советов, ответов
на часто задаваемые вопросы и общих рекомендаций по фотосъемке и обработке цифровых
изображений. Дополнительные сведения можно получить у региональных представителей
компании Nikon. Контактные сведения см. на веб-сайте:
http://imaging.nikon.com/
Используйте только фирменные электронные принадлежности
Nikon
Фотокамеры Nikon COOLPIX отвечают самым современным стандартам и имеют сложную
электронную схему. Только фирменные электронные принадлежности Nikon (в том числе
зарядные устройства, батареи и сетевые блоки питания), одобренные корпорацией Nikon
специально для использования с данной моделью цифровой фотокамеры Nikon, полностью
соответствуют необходимым эксплуатационным параметрам и требованиям техники
безопасности для данной электронной схемы.
ИСПОЛЬЗОВАНИЕ ЭЛЕКТРОННЫХ ПРИНАДЛЕЖНОСТЕЙ ДРУГИХ ПРОИЗВОДИТЕЛЕЙ МОЖЕТ
ПРИВЕСТИ К ПОВРЕЖДЕНИЮ ФОТОКАМЕРЫ И АННУЛИРОВАНИЮ ГАРАНТИИ
NIKON.
Для получения сведений о фирменных принадлежностях Nikon обратитесь к местному
официальному торговому представителю компании Nikon.
Перед съемкой важных событий
Перед съемкой важных событий, например свадьбы, или перед тем как взять фотокамеру в
путешествие, сделайте пробный снимок, чтобы убедиться в правильности работы фотокамеры.
Компания Nikon не несет ответственности за убытки или упущенную выгоду, возникшие в результате
неправильной работы изделия.
О руководствах
• Никакая часть руководств, включенных в комплект поставки данного продукта, не может
быть воспроизведена, передана, переписана, сохранена в системе резервного копирования
или переведена на любой язык в любой форме любыми средствами без предварительного
письменного разрешения Nikon.
• Компания Nikon сохраняет за собой право изменять любые характеристики аппаратного и
программного обеспечения, описанного в данных руководствах, в любое время и без
предварительного уведомления.
• Компания Nikon не несет ответственности за какой бы то ни было ущерб, вызванный применением
данного изделия.
• Были приложены все усилия для того, чтобы обеспечить точность и полноту приведенной в
руководствах информации. Компания Nikon будет благодарна за любую информацию о
замеченных ошибках и упущениях, переданную в ближайшее представительство компании
(адрес сообщается отдельно).
2

Информация и меры предосторожности
Уведомление о запрещении копирования или воспроизведения
Необходимо помнить, что даже простое обладание материалом, скопированным
или воспроизведенным цифровым способом с помощью сканера, цифровой фотокамеры или
другого устройства, может преследоваться по закону.
Введение
• Материалы, копирование или воспроизведение которых запрещено законом
Не копируйте и не воспроизводите денежные банкноты, монеты, ценные бумаги,
государственные ценные бумаги и ценные бумаги органов местного самоуправления, даже
если такие копии и репродукции отмечены штампом “образец”. Запрещено копирование и
воспроизведение денежных банкнот, монет и ценных бумаг других государств. Запрещено
копирование и воспроизведение негашеных почтовых марок и почтовых открыток,
выпущенных государством, без письменного разрешения государственных органов.
Запрещено копирование и воспроизведение печатей государственных учреждений и
документов, заверенных в соответствии с законодательством.
• Предостережения относительно копирования и воспроизведения
Копии и репродукции ценных бумаг, выпущенных частными компаниями (акции, векселя,
чеки, подарочные сертификаты и т. д.), сезонных билетов или купонов помечаются
предупреждениями согласно требованиям государственных органов, кроме минимального
числа копий, необходимых для использования компанией в деловых целях. Не копируйте и
не воспроизводите государственные паспорта; лицензии, выпущенные государственными
учреждениями и частными компаниями; удостоверения личности и такие документы, как
пропуска или талоны на питание.
• Уведомления о соблюдении авторских прав
Копирование или воспроизведение книг, музыкальных произведений, произведений
живописи, гравюр, географических карт, чертежей, фильмов и фотографий
с зарегистрированным авторским правом охраняется государственным и международным
законодательством об авторском праве. Не используйте изделие для изготовления
незаконных копий, нарушающих законодательство об авторском праве.
Утилизация устройств хранения данных
Обратите внимание, что при удалении изображений или форматировании устройств хранения
данных, таких как карточки памяти или внутренняя память фотокамеры, исходные данные
изображений уничтожаются не полностью. В некоторых случаях файлы, удаленные с
отслуживших свой срок устройств хранения данных, можно восстановить с помощью
имеющихся в продаже программных средств. Информацией личного характера могут
воспользоваться злоумышленники. Ответственность за обеспечение конфиденциальности
любой подобной информации лежит исключительно на пользователе.
Прежде чем избавиться от неиспользуемых устройств хранения данных или передать право
собственности на них другому лицу, следует стереть всю информацию с помощью имеющегося
в продаже специального программного обеспечения или отформатировать устройство, а
затем заполнить его изображениями, не содержащими личной информации (например, видами
ясного неба). Не забудьте также заменить изображения, выбранные в качестве заставки
приветствия (A 88). При физическом уничтожении устройств хранения данных соблюдайте
меры предосторожности, чтобы не нанести ущерба здоровью или имуществу.
3
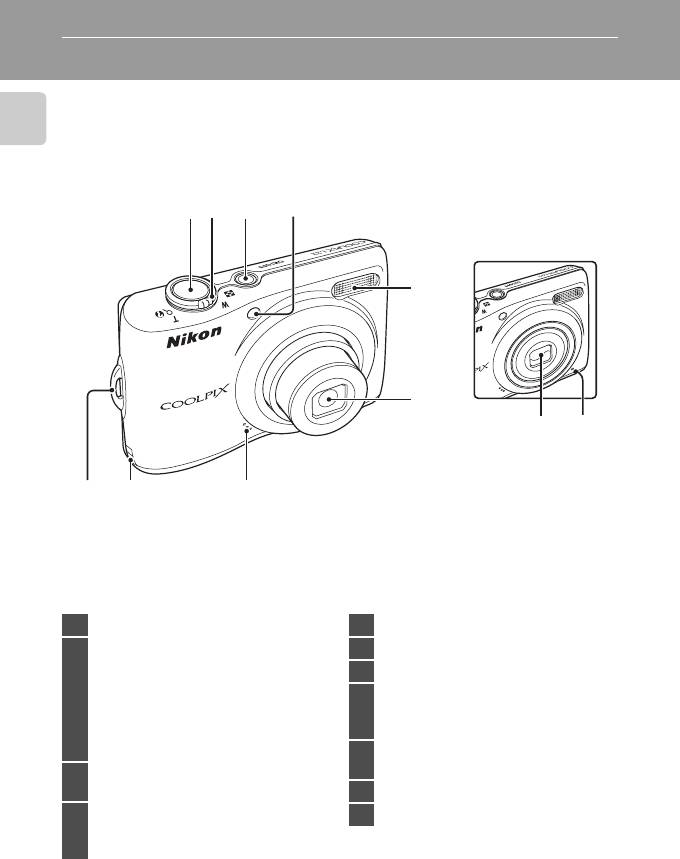
Основные части фотокамеры
Корпус фотокамеры
COOLPIX L22 – вид спереди
Введение
13
2
4
Крышка объектива
закрыта
5
6
1110
9
8
7
1 Спусковая кнопка затвора …………..…24
5 Встроенная вспышка …………………………30
Кнопка зуммирования …………….………..23
6 Объектив ……………..…………………….. 114, 124
f : уменьшение зума ………………..23
7 Динамик …………………………….…………..………..57
g : увеличение зума …………………23
Крышка разъема питания (для
2
h : просмотр уменьшенных
8
подсоединения дополнительного
изображений ……………………..…48
сетевого блока питания) ……….…..…..110
i
: увеличение при просмотре
….50
j : справка …………….…………………..…13
Проушина для ремня
9
фотокамеры ………..………………….………………13
Выключатель питания/индикатор
3
включения питания
……………………….20, 99
10 Крышка объектива ……………………………112
Индикатор автоспуска …………………..…32
11 Встроенный микрофон ………………….…55
4
Вспомогательная подсветка
АФ ………..………………….…………..………………25, 97
4

Основные части фотокамеры
COOLPIX L22 – вид сзади
Введение
1234 6789
5
1312 1410 11
1 Монитор …………………………..………………………..8
Батарейный отсек/
9
крышка гнезда для карты
2 Кнопка d ………………..12, 56, 73, 81, 86
памяти ……..……………………………….……….14, 18
3 Кнопка k (сделать выбор) …………….11
10 Штативное гнездо
4 A кнопка (режим съемки) ……………..10
11 Крышка разъема ……..……………..58, 60, 65
5 Индикатор вспышки ………………..………..31
Разъем USB и аудио-/
6 c кнопка (просмотр) ……………….10, 26
12
видеовыход ……………………………..58, 60, 65
7 Мультиселектор ………………………………..…11
13 Гнездо для карты памяти …………………18
8 l кнопка (удалить) ………………26, 27, 57
14 Батарейный отсек ……………….………………14
5
Основные части фотокамеры
COOLPIX L21 – вид спереди
Введение
13
2
4
Крышка объектива
закрыта
5
6
10
9
8
7
1 Спусковая кнопка затвора …………..…24
5 Встроенная вспышка …………………………30
Кнопка зуммирования …………….………..23
6 Объектив ……………..…………………….. 114, 124
f : уменьшение зума ………………..23
7 Встроенный микрофон ………………….…55
g : увеличение зума …………………23
Крышка разъема питания (для
2
h : просмотр уменьшенных
8
подсоединения дополнительного
изображений ………………………..48
сетевого блока питания) ……….…..…..110
i
: увеличение при просмотре … 50
j : справка …………….…………………..…13
Проушина для ремня
9
фотокамеры ………..………………….………………13
Выключатель питания/индикатор
3
включения питания
……………………….20, 99
10 Крышка объектива ……………………………112
Индикатор автоспуска …………………..…32
4
Вспомогательная подсветка
АФ ………..………………….…………..………………25, 97
6
Основные части фотокамеры
COOLPIX L21 – вид сзади
123456789
Введение
10
12
1413 1511
1 Монитор …………………………..………………………..8
Батарейный отсек/
9
крышка гнезда для карты
2 Кнопка d ………………..12, 56, 73, 81, 86
памяти ……..……………………………….……….14, 18
3 Кнопка k (сделать выбор) …………….11
10 Динамик …………………………….…………..………..57
4 A кнопка (режим съемки) ……………..10
11 Штативное гнездо
5 Индикатор вспышки ………………..………..31
12 Крышка разъема ……..……………..58, 60, 65
6 c кнопка (просмотр) ……………….10, 26
Разъем USB и аудио-/
7 Мультиселектор ………………………………..…11
13
видеовыход ……………………………..58, 60, 65
8 l кнопка (удалить) ………………26, 27, 57
14 Гнездо для карты памяти …………………18
15 Батарейный отсек ……………….………………14
7
Основные части фотокамеры
Монитор
В режиме съемки и просмотра на мониторе могут появляться следующие индикаторы
(фактическое изображение на мониторе зависит от текущих настроек фотокамеры).
Введение
Индикаторы и информация о фото, отображаемые во время съемки и
просмотра, отключаются через несколько секунд (A 92).
Съемка
1
*
Изменяется в зависимости от текущего режима съемки. Более подробные сведения см. в разделе о соответствующем режиме.
2
*
S и L отображаются на модели L22, а z отображается на модели L21.
8
m
00
1
1
1
m
00
s
m
00
1
1
1
m
00
s
F3.11/125
+1.0
+1.0
+1.0
999
9 9 9
999
999
9 9 9
999
9999
9 9 9 9
1/125 F3.1
9999
10
4
6
5
26
123
7
10
25
8
9
24
10 11
23
12
13
14
22
21
20
17
16
15
a
b
19
18
*1
1 Режим съемки
……….20, 29, 35, 46, 55
a
Число оставшихся кадров (снимков)
… 20
15
2 Режим макросъемки ………….……………… 33
b Длина видеоролика ………………….... 55
3 Индикатор зума ………………………….….23, 33
16 Индикатор внутренней памяти …… 21
4 Индикатор AE/AF-L ……..…………………..… 45
17 Диафрагма …………………………………………….. 24
5 Индикатор фокусировки ………………… 24
18 Зона фокусировки ……………………….22, 24
6 Режим вспышки …………….…………………….. 30
Зона фокусировки (система
19
распознавания лиц) …………………….22, 24
7
Индикатор уровня заряда батареи
… 20
20 Выдержка………..………………….…………..………. 24
8 Обнаружение движения ….………..21, 96
21 Чувствительность …..………………………….. 31
9 Электронный VR ………………….………………95
22
Величина коррекции экспозиции …34
10
Индикатор “Дата не установлена”
….89, 116
23 Параметры цвета ……………………………….. 79
11 Индикатор пункта назначения ……. 89
24 Режим баланса белого …………………….. 76
12 Впечатывание даты …………….……………… 94
25 Режим непрерывной съемки ……….. 78
13 Параметры видео ……………………..……….. 56
14 Режим изображения
*
2
26 Индикатор автоспуска …………………….. 32
…………….……….. 74
Основные части фотокамеры
Введение
Просмотр
15/05/2010 12:00
* Отображаемые символы зависят он настроек режима съемки. На модели L22
отображаются S и L, а на модели L21 отображается z.
9
1 5 / 0 5 / 2 0 1 0 1 2 : 0 0
9999.JPG
9 9 9 9 . J P G
9999.JPG
999
9 9 9
999
9 9 9
12
3
4
15/05/2010 12:00
10
5
6
999999
a
9999
b
9 9 9 9
99999999
9 9 9 9
999
9999
9 9 9
999
9 9 9
14
13
11
12
7
9
8
999
999
m
00
1
m
00
s
m
00
1
m
00
s
1 Дата записи …………………………………………… 16
8 Индикатор внутренней памяти …… 26
2 Время записи ………………………..………………16
Индикатор просмотра
9
видеоролика ………………………………..………. 57
3 Громкость …….………………….…………………….. 57
10 Символ задания печати …………..………. 70
Индикатор уровня заряда
4
батареи ………….………………….…………………….. 20
11 Уменьшенный снимок ……………..………. 53
*
5 Параметры видео
……………..……………… 56
12 Символ D-Lighting ……………………..………. 52
*
6 Режим изображения
……………………….. 74
13 Символ защиты ……………………..……………106
a Номер текущего кадра/
14 Номер и тип файла …………………………..111
7
общее число кадров …………………… 26
b Длина видеоролика …………..……….. 57
Основные операции
A кнопка (режим съемки)
• При нажатии кнопки A в режиме просмотра
Введение
фотокамера переключается на режим съемки.
• При нажатии в режиме съемки кнопки A
отображается меню выбора режима съемки, в
котором можно изменить режим съемки.
Меню выбора режима съемки
Мультиселектором (A 11) можно выбрать один из следующих режимов
съемки.
1
Простой авто режим
1 G Простой авто режим (A 20)
Простой авто режим
*
2 b Сюжет (A 35)
2
3 F Интеллектуальный портрет (A 46)
3
4 D Режим съемки видеороликов (A 55)
4
5 A Авто режим (A 29)
5
* Отображаемые символы меняются в зависимости от последнего выбранного режима.
Если нажать кнопку A при отображенном меню выбора режима съемки,
фотокамера возвращается в режим съемки без изменения текущего режима
съемки.
c кнопка (просмотр)
• При нажатии в режиме съемки кнопки c
фотокамера переключается на режим
просмотра.
• Если фотокамера выключена, нажатие и
удерживание нажатой кнопки c приведет к
включению фотокамеры в режиме просмотра.
10
Основные операции
Мультиселектор
В этом разделе описаны стандартные способы использования
мультиселектора для выбора режимов и пунктов меню и для подтверждения
Введение
выбора.
Мультиселектор приводится в действие нажатием его кнопок “вверх”, “вниз”,
“влево”, “вправо” и k.
Для съемки
Отображение меню m (режим вспышки) (A 30)/выбор
элемента сверху.
Отображение
Отображение меню
разметки
o
n (авто-спуск)
(коррекция
(A 32).
экспозиции) (
A
34).
Режим вспышки
Подтверждение выбранных значений.
Отображение меню p (режим макросъемки) (A 33)/выбор элемента ниже.
Для просмотра
Отображение
Отображение
предыдущего
следующего
снимка.
снимка.
На экране меню
11
1 5 / 0 5 /2 0 1 0 1 5 :3 0
0 0 0 4 . JP G
0004.JPG
44
15/05/2010 15:30
44
Выбор элемента
Меню съемки
Подтвердить выбор
сверху.
Режим изображения
(перейти к следующему
Баланс белого
Выбор элемента
Непрерывный
экрану).
Параметры цвета
слева/возврат к
Выбор элемента
предыдущему
справа/переход к
Выход
экрану.
следующему экрану
Выбор
(подтверждение
элемента снизу.
выбора).
C Мультиселектор.
В этом руководстве символами H, I, J и K в некоторых случаях обозначаются
функциональные кнопки мультиселектора “вверх”, “вниз”, “влево” и “вправо”.

Основные операции
Кнопка d
Нажмите кнопку
d
, чтобы вывести на монитор меню для выбранного режима.
Введение
• Мультиселектором подтвердите настройки (A 11).
•
Выберите вкладку в левой части монитора для отображения соответствующего меню.
• Для выхода из экрана меню повторно нажмите кнопку d.
Верхняя вкладка: отображаются
Меню съемки
меню, доступные в
Режим изображения
текущем режиме.
Баланс белого
Нижняя вкладка: отображение меню
Непрерывный
Параметры цвета
настройки.
Выход
Отображается, если меню
содержит несколько страниц.
Отображается,
Настройка
АФ-помощь
если перед
Обнаруж. движения
Ав то
данным пунктом
АФ-помощь
Выкл.
есть другие
Настройка звука
пункты меню.
Ав то выкл.
Форматир. карточки
Отображается, если
Язык/Language
Выход
за данным пунктом
Выход
меню следует еще
Выбрав пункт меню, нажмите кнопку
k
Нажмите кнопку k или K
один или несколько
или
K
мультиселектора, чтобы отобразить
мультиселектора, чтобы
пунктов.
параметры выбранного пункта.
подтвердить выбор.
Переключение между вкладками
Меню съемки
Меню съемки
Настройка
Режим изображения
Режим изображения
Меню
Баланс белого
Баланс белого
Экран приветств ия
Непрерывный
Непрерывный
Дата
Параметры цвета
Параметры цвета
Настройка монитора
Впечатывание даты
Электронный VR
Выход
Выход
Выход
Для выделения вкладки
Нажмите кнопку мультиселектора
Отображается
нажмите кнопку
HI
, чтобы выбрать вкладку, и
выбранное меню.
мультиселектора J.
нажмите кнопку
k
или
K
.
При использовании следующих режимов можно отобразить вкладки, нажав
кнопку мультиселектора J во время отображения меню.
• Простой авто режим, сюжетный режим, режим интеллектуального портрета
и режим съемки видеороликов
12
Основные операции
Экраны справки
Чтобы просмотреть описание выбранного пункта, поверните кнопку зуммирования
в сторону
g
(
j
), когда в правом нижнем углу экрана меню отображается
M
/
j
.
Введение
Чтобы вернуться к исходному меню, поверните кнопку зуммирования в
сторону g (j) еще раз.
COOLPIX L22 COOLPIX L21
Непрерывный
Выберите режим: один кадр,
непрерывная съемка, BSS (выбор
камерой самого резкого снимка)
или мультикадр 16.
НазадВыход
Спусковая кнопка затвора
Фотокамера оснащена двухпозиционной спусковой кнопкой затвора. Для
фокусировки и установки экспозиции нажимайте спусковую кнопку затвора
наполовину до появления небольшого сопротивления. Фокус и экспозиция
блокируются, пока спусковая кнопка затвора удерживается нажатой
наполовину. Чтобы сделать снимок, нажмите спусковую кнопку затвора до
конца. Не прикладывайте усилий при нажатии спусковой кнопки затвора. Это
может вызвать дрожание фотокамеры и стать причиной смазывания снимков.
Для фокусировки и
Чтобы сделать
установки экспозиции
снимок, нажмите
нажмите спусковую кнопку
спусковую кнопку
затвора наполовину.
затвора до конца.
Прикрепление ремня фотокамеры
2
3
1
13
Первые шаги
Установка батарей
1 Откройте крышку батарейного отсека/
3
гнезда для карты памяти.
• Перед открытием крышки батарейного отсека/
гнезда для карты памяти во избежание выпадения
батарей разверните фотокамеру верхней частью
Первые шаги
вниз.
1
2
2 Установка батарей.
• Убедитесь в правильности ориентации
положительного (+) и отрицательного (–) контактов,
как это показано на наклейке в верхней части
батарейного отсека, и установите батареи.
3 Закройте крышку батарейного отсека/
1
гнезда для карты памяти.
2
Применимые батареи
•
Две щелочные батареи LR6/L40 (типоразмер AA) (батареи входят в комплект поставки)
• Две литиевые батареи FR6/L91 (типоразмер AA)
• Две аккумуляторные (никель-металлгидридные) батареи EN-MH2 Ni-MH
Включение и выключение фотокамеры
Для включения фотокамеры
COOLPIX L22 COOLPIX L21
нажмите выключатель питания.
Индикатор включения питания
(зеленый) загорается на короткое
время, а затем включается
монитор. При выключении
фотокамеры выключается как
индикатор включения питания, так и монитор.
• Если фотокамера выключена, нажатие и удержание кнопки c приведет к
включению фотокамеры в режиме просмотра (A 26).
14
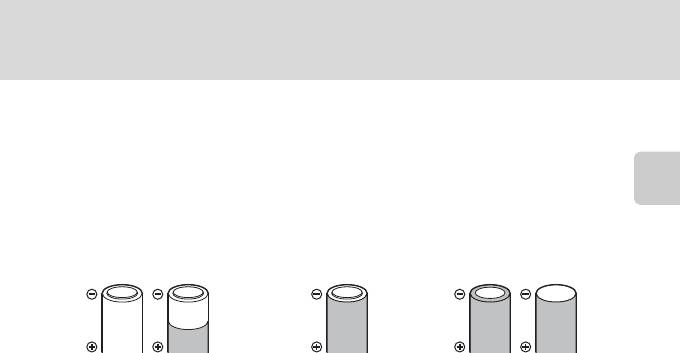
Установка батарей
B Извлечение батарей
До открывания крышки батарейного отсека/гнезда для карты памяти убедитесь, что индикатор
включения питания не горит, и монитор не включен.
B
Дополнительные меры предосторожности при обращении с батареями
• Изучите предупреждения и меры предосторожности (A iii, 113) и следуйте им.
• Перед использованием батареи прочтите и примите к сведению предупреждения о батарее
Первые шаги
на странице iii и в разделе “Батарея” (A 113).
• Не используйте старые и новые батареи одновременно, а также батареи разных
производителей или типов.
• Нельзя использовать батареи со следующими дефектами:
Батареи с
Батареи с изоляцией, не
Батареи с плоским
отслаивающимися
закрывающей область вокруг
отрицательным
поверхностями
отрицательного контакта.
контактом
B
Аккумуляторные батареи EN-MH1 и зарядное устройство MH-70/71 Примечание
С этой камерой также могут использоваться аккумуляторные батареи EN-MH1 Ni-MH.
Перед использованием батареи прочтите и примите к сведению предупреждения о батарее в
разделе “Батарея” (A 113).
B Тип батарей
Если в меню настройки (A 85) выбрать Тип батарей (A 105) в соответствии с типом
батарей, установленных в фотокамере, батареи будут работать более эффективно.
Настройкой по умолчанию является тип батарей, входящих в комплект поставки фотокамеры при ее
покупке. Если используются батареи другого типа, включите фотокамеру и измените настройку (
A
105).
C Щелочные батареи
Срок службы щелочных батарей может существенно зависеть от изготовителя. Выберите надежную марку.
C Другие источники питания
Для длительного непрерывного питания фотокамеры используйте сетевой блок питания EH-65A
(приобретается дополнительно) (
A
110).
Ни при каких обстоятельствах не используйте
сетевой блок питания другой модели или другого производителя.
Несоблюдение этой меры
предосторожности может привести к перегреву или повреждению фотокамеры.
C
Автоматическое выключение питания в режиме съемки (режим ожидания)
Если примерно 30 секунд (установка по умолчанию) не производится никаких действий,
монитор автоматически выключается, и фотокамера переходит в режим ожидания. Еще через
три минуты функция автоматического выключения выключает фотокамеру автоматически.
•
Если монитор отключен в режиме ожидания (индикатор включения питания мигает), его вновь
можно включить, нажав выключатель питания, спусковую кнопку затвора, кнопку
A
или кнопку
c
.
• Время, необходимое для перехода фотокамеры в режим ожидания, можно изменить
настройкой Автовыключение (A 99) в меню настройки (A 85).
15
Оглавление
Аннотация для Цифрового Фотоаппарата Более 16 Мпикс Nikon Coolpix L22 Black в формате PDF
Топ 10 инструкций
Другие инструкции
Инструкция и руководство для
Nikon COOLPIX-L22
87 страниц подробных инструкций и пользовательских руководств по эксплуатации на русском
 02:17
02:17
Ремонт крышки аккумуляторной батареи АКБ Nikon Coolpix L22, l23, L24, L25, L27, L28.
 05:33
05:33
Не открывается объектив / Выпадает в ошибку. Фотокамера Nikon Coolpix S600
 05:23
05:23
Nikon Coolpix L22 battery door replacement
 07:55
07:55
Видеообзор Nikon CoolPix L21 L22 L23
 06:28
06:28
Nikon Coolpix L22 Review
 03:29
03:29
Nikon Coolpix L22 Battery Door Broken
Нажмите на кнопку для помощи


Комментарии
— Что занимает последние 6 страниц инструкции по эксплуатации автомобиля «Таврия»?
— Расписания электричек и поездов.
-
Инструкции по эксплуатации
1

Nikon COOLPIX L22 инструкция по эксплуатации
(148 страниц)
- Языки:Русский
-
Тип:
PDF -
Размер:
9.57 MB -
Описание:
Фотоаппарат
Просмотр
На NoDevice можно скачать инструкцию по эксплуатации для Nikon COOLPIX L22. Руководство пользователя необходимо для ознакомления с правилами установки и эксплуатации Nikon COOLPIX L22. Инструкции по использованию помогут правильно настроить Nikon COOLPIX L22, исправить ошибки и выявить неполадки.