![]()
Operation Manual
Thank you for selecting the ZOOM G1N/G1XN (hereafter simply called the «G1N/G1XN«).
Please take the time to read this manual carefully to get the most out of the unit and to ensure optimum performance and reliability.
Keep this manual at hand for future reference.
Contents
|
SAFETY PRECAUTIONS / Usage Precautions · · · · · 2 |
Using the built-in expression pedal (G1XN only) 20 |
|
|
Terms Used in This Manual · · · · · · · · · · · · · · · · · · 3 |
[PEDAL ASSIGN] key operation· · · · · · · · · · · · · ·20 |
|
|
Adjusting the expression pedal · · · · · · · · · · · · · ·20 |
||
|
Controls and Functions / Connections (G1N) · · · · 4 |
Effect Types and Parameters · · · · · · · · · · · · · · · · 21 |
|
|
Controls and Functions / Connections (G1XN) · · · 6 |
Explanation of symbols · · · · · · · · · · · · · · · · · · · ·21 |
|
|
Selecting a Patch for Playing · · · · · · · · · · · · · · · · · 8 |
PATCH LEVEL· · · · · · · · · · · · · · · · · · · · · · · · · ·21 |
|
|
COMP/EFX module · · · · · · · · · · · · · · · · · · · · ·21 |
||
|
Using the Tuner · · · · · · · · · · · · · · · · · · · · · · · · · · · 10 |
DRIVE module · · · · · · · · · · · · · · · · · · · · · · · · ·22 |
|
|
Using the Rhythm Function · · · · · · · · · · · · · · · · · 12 |
EQ module · · · · · · · · · · · · · · · · · · · · · · · · · · · ·23 |
|
|
Editing a Patch · · · · · · · · · · · · · · · · · · · · · · · · · · · 14 |
ZNR/AMP module · · · · · · · · · · · · · · · · · · · · · ·23 |
|
|
MODULATION module · · · · · · · · · · · · · · · · · ·24 |
||
|
Storing/Copying Patches · · · · · · · · · · · · · · · · · · · 16 |
DELAY module · · · · · · · · · · · · · · · · · · · · · · · · ·25 |
|
|
Restoring Factory Defaults · · · · · · · · · · · · · · · · ·17 |
REVERB module · · · · · · · · · · · · · · · · · · · · · · ·26 |
|
|
Changing the Way Patches Are Called Up · · · · · · 18 |
Rhythm Function Preset Patterns · · · · · · · · · · · ·26 |
|
|
Using an External Foot Switch or Pedal |
Specifications · · · · · · · · · · · · · · · · · · · · · · · · · · · · 27 |
|
|
(G1N only) · · · · · · · · · · · · · · · · · · · · · · · · · · · · · · 18 |
Troubleshooting · · · · · · · · · · · · · · · · · · · · · · · · · · 27 |
|
|
Using a foot switch · · · · · · · · · · · · · · · · · · · · · · ·18 |
||
|
Using an expression pedal· · · · · · · · · · · · · · · · · ·19 |
||
© ZOOM Corporation
Reproduction of this manual, in whole or in part, by any means, is prohibited.
SAFETY PRECAUTIONS / Usage Precautions
SAFETY PRECAUTIONS
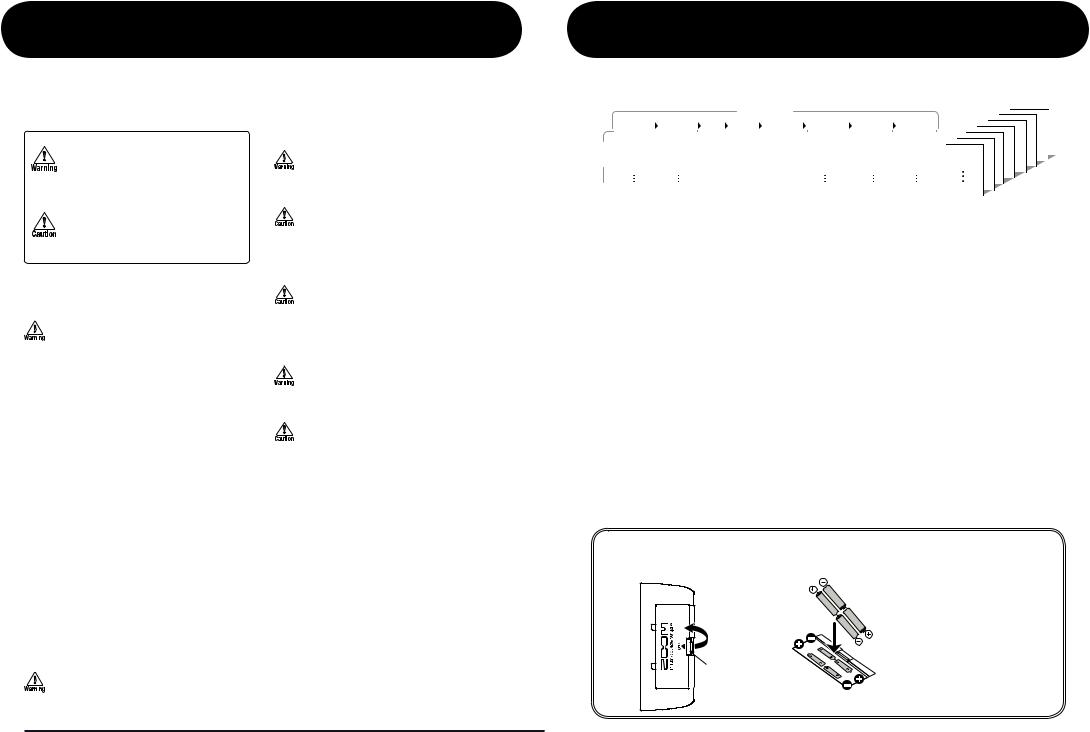
In this manual, symbols are used to highlight warnings and cautions for you to read so that accidents can be prevented. The meanings of these symbols are as follows:
This symbol indicates explanations about extremely dangerous matters. If users ignore this symbol and handle the device incorrectly, serious injury or death could result.
This symbol indicates explanations about dangerous matters. If users ignore this symbol and handle the device incorrectly, bodily injury and damage to the equipment could result.
Please observe the following safety tips and precautions to ensure hazard-free use of the G1N/G1XN.
Power requirements
Since power consumption of this unit is fairly high, we recommend the use of an AC adapter whenever possible. When powering the unit from batteries, use only alkaline types.
[AC adapter operation]
•Be sure to use only an AC adapter which supplies 9
V DC, 300 mA and is equipped with a «center minus» plug (Zoom AD-0006). The use of an adapter other than the specified type may damage the unit and pose a safety hazard.
•Connect the AC adapter only to an AC outlet that supplies the rated voltage required by the adapter.
•When disconnecting the AC adapter from the AC outlet, always grasp the adapter itself and do not pull at the cable.
•During lightning or when not using the unit for an extended period, disconnect the AC adapter from the AC outlet.
[Battery operation]
•Use four conventional IEC R6 (size AA) batteries
(alkaline).
•The G1N/G1XN cannot be used for recharging.
•Pay close attention to the labelling of the battery to make sure you choose the correct type.
•When not using the unit for an extended period, remove the batteries from the unit.
•If battery leakage has occurred, wipe the battery compartment and the battery terminals carefully to remove all remnants of battery fluid.
•While using the unit, the battery compartment cover should be closed.
Environment
To prevent the risk of fire, electric shock or malfunction, avoid using your G1N/G1XN in environments where it will be exposed to:
•Extreme temperatures
•Heat sources such as radiators or stoves
•High humidity or moisture
•Excessive dust or sand
•Excessive vibration or shock
Handling
•Never place objects filled with liquids, such as vases, on the G1N/G1XN since this can cause elec-
tric shock.
•Do not place naked flame sources, such as lighted candles, on the G1N/G1XN since this can cause fire.
•The G1N/G1XN is a precision instrument. Do not
exert undue pressure on the keys and other controls. Also take care not to drop the unit, and do not subject it to shock or excessive pressure.
•Take care that no foreign objects (coins or pins etc.) or liquids can enter the unit.
Connecting cables and input and output jacks
You should always turn off the power to the G1N/ G1XN and all other equipment before connecting or disconnecting any cables. Also make sure to disconnect all connection cables and the power cord before moving the G1N/G1XN.
Alterations
Never open the case of the G1N/G1XN or attempt to modify the product in any way since this can result in damage to the unit.
Volume
Do not use the G1N/G1XN at a loud volume for a long time since this can cause hearing impairment.
Usage Precautions
Electrical interference
For safety considerations, the G1N/G1XN has been designed to provide maximum protection against the emission of electromagnetic radiation from inside the device, and protection from external interference. However, equipment that is very susceptible to interference or that emits powerful electromagnetic waves should not be placed near the G1N/G1XN, as the possibility of interference cannot be ruled out entirely.
With any type of digital control device, the G1N/G1XN included, electromagnetic interference can cause malfunctioning and can corrupt or destroy data. Care should be taken to minimize the risk of damage.
Cleaning
Use a soft, dry cloth to clean the G1N/G1XN. If necessary, slightly moisten the cloth. Do not use abrasive cleanser, wax, or solvents (such as paint thinner or cleaning alcohol), since these may dull the finish or damage the surface.
Please keep this manual in a convenient place for future reference.
Terms Used in This Manual
This section explains some important terms that are used throughout the G1N/G1XN manual.
|
Effect modules |
BANK |
3 |
|||||||||||||||||||||||||||||||||||||
|
BANK |
2 |
0 |
|||||||||||||||||||||||||||||||||||||
|
PATCH |
|||||||||||||||||||||||||||||||||||||||
|
BANK |
1 |
||||||||||||||||||||||||||||||||||||||
|
COMP/EFX |
DRIVE |
EQ |
ZNR |
AMP |
MODULATION |
DELAY |
REVERB |
PATCH 0 |
|||||||||||||||||||||||||||||||
|
BANK |
0 PATCH |
1 |
|||||||||||||||||||||||||||||||||||||
|
PATCH 0 |
|||||||||||||||||||||||||||||||||||||||
|
Compressor |
FD COMBO |
ZNR |
Amp Sim. |
Chorus |
Delay |
Hall |
BANK |
d |
PATCH 1 |
||||||||||||||||||||||||||||||
|
PATCH 0 |
|||||||||||||||||||||||||||||||||||||||
|
BANK |
C PATCH 1 |
||||||||||||||||||||||||||||||||||||||
|
PATCH 0 |
|||||||||||||||||||||||||||||||||||||||
|
Effect |
Auto Wah |
VX COMBO |
Ensemble |
Tape Echo |
Room |
BANK |
b |
PATCH 1 |
|||||||||||||||||||||||||||||||
|
types |
BANK |
A PATCH 1 |
PATCH |
9 |
|||||||||||||||||||||||||||||||||||
|
PATCH 0 |
|||||||||||||||||||||||||||||||||||||||
|
Booster |
US BLUES |
Flanger |
Analog |
Spring |
PATCH 1 |
PATCH 9 |
|||||||||||||||||||||||||||||||||
|
PATCH |
0 |
||||||||||||||||||||||||||||||||||||||
|
Delay |
PATCH 1 |
PATCH9 |
|||||||||||||||||||||||||||||||||||||
|
Tremolo |
BG CRUNCH |
Step |
Arena |
PATCH |
1 |
PATCH 9 |
|||||||||||||||||||||||||||||||||
|
PATCH 9 |
|||||||||||||||||||||||||||||||||||||||
|
PATCH 9 |
|||||||||||||||||||||||||||||||||||||||
|
PATCH9 |
|||||||||||||||||||||||||||||||||||||||
|
PATCH 9 |
|||||||||||||||||||||||||||||||||||||||
•Effect module
As shown in the illustration above, a patch in the G1N/G1XN can be thought of as a combination of up to eight single effects. Each such effect is referred to as an effect module.
•Effect type
Some effect modules have several different effects which are referred to as effect types. For example, the MODULATION module is comprised of chorus, flanger, pitch shifter, and other effect types. Only one of these can be selected at a time.
•Effect parameter
All effect modules have various parameters that can be adjusted. These are called effect parameters or simply parameters. When thinking of an effect module as a compact effect, the parameters change the tone and effect intensity similar to the knobs on the device.
•Patch
In the G1N/G1XN, effect module combinations
Operating the G1N/G1XN on batteries
are stored and called up in units referred to as patches. A patch is comprised of information about the on/off status and effect parameter settings used in each module.
• Bank
A group of ten patches is called a bank.
The memory of the G1N/G1XN comprises a total of 8 banks, labelled with letters A to d (user-editable banks) and numbers 0 to 3 (read-only preset banks), as shown in the illustration at top right.
•Mode
The internal status of the G1N/G1XN is referred to as the operation mode. The function of keys and controls differs, depending on the respective mode. Modes of the G1N/G1XN include play mode for selecting and playing patches, rhythm mode for playing a rhythm pattern, edit mode for modifying effects, and store mode for saving patches.
|
1. Turn the G1N/G1XN over and |
2. Insert four fresh IEC |
|
open the cover of the battery |
R6 (size AA) batteries. |
|
compartment on the bottom. |
Four IEC R6 (size AA) batteries
 Latch
Latch
Press latch to release
 and then lift cover.
3.Close the cover of the battery compartment.
When the batteries are getting low, the indication «bt» appears on the display.
When operating the G1N/G1XN on batteries, it is advisable to disconnect the guitar cable plug from the [INPUT] jack when not using the unit, to conserve battery power.
|
2 |
ZOOM G1N/G1XN |
ZOOM G1N/G1XN |
3 |
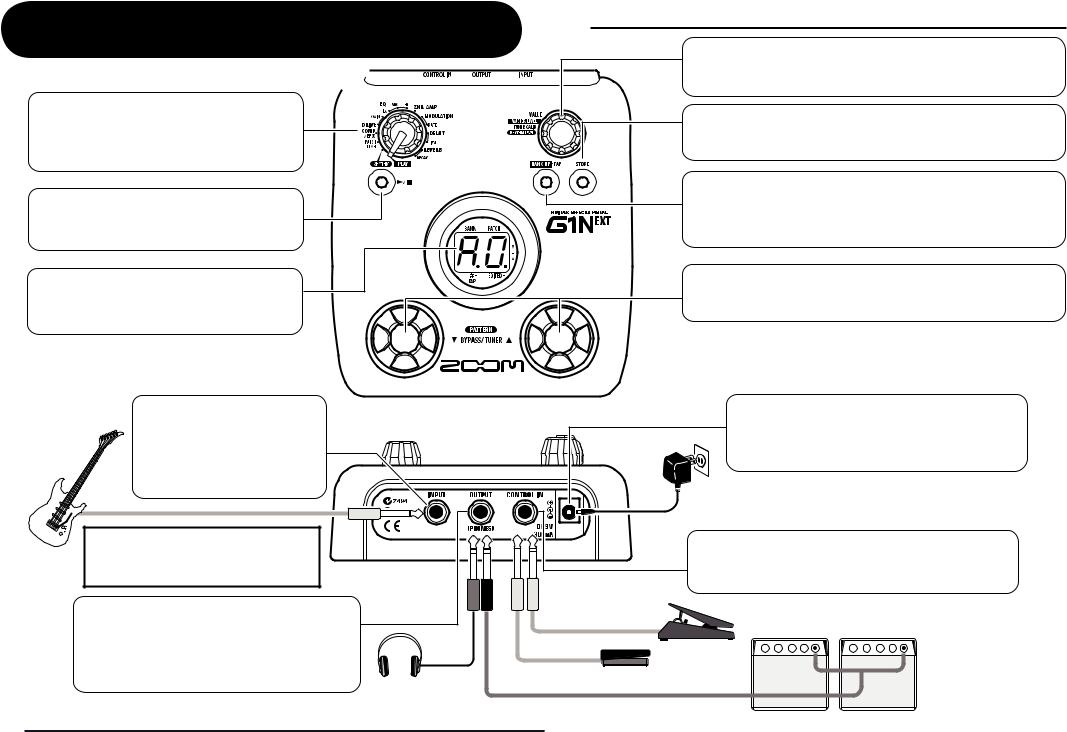
Controls and Functions / Connections (G1N)
Controls and Functions / Connections (G1N)
[VALUE] knob
Top Panel
Module selector
Switches between play mode, rhythm mode, and edit mode. In edit mode, the knob selects the module/parameter for operation.
This knob serves for changing parameter values and setting the level of the overall patch.
[STORE] key
Serves for storing edited patches in memory and for copying patches to another location.
[BANK UP·TAP] key
|
RHYTHM [ / ] key |
In play mode, the key switches to the next higher bank. In other |
|
|
Serves to start and stop the rhythm pattern in |
modes, the key serves for manual adjustment of rhythm pattern |
|
|
play mode and rhythm mode. |
tempo as well as parameters related to timing and cycle. |
|
|
Display |
[ ]/[ ] foot switches |
|
|
Shows bank and patch numbers, setting values, |
These switches are used for selecting patches, controlling the tuner, |
|
|
and other functions. |
||
|
and other information for operating the G1N. |
||
|
[INPUT] jack |
Rear Panel |
[DC IN] jack |
|
|
Serves for connecting the guitar. |
An AC adapter (ZOOM AD-0006) with a rated |
||
|
When operating the G1N on |
output of 9 volts DC, 300 mA (center minus plug) |
||
|
Guitar |
batteries, inserting the guitar |
can be plugged into this jack. |
|
|
cable plug into this jack will |
|||
|
turn the unit on. |
AC adapter
|
When operating the G1N on batteries, it is |
[CONTROL IN] jack |
|
|
advisable to disconnect the guitar cable |
||
|
Serves for connection of the optional foot switch (FS01) |
||
|
plug from the [INPUT] jack when not using |
||
|
the unit, to conserve battery power. |
or expression pedal (FP01/FP02). |
|
|
[OUTPUT/PHONES] jack |
FP01/FP02 |
|
|
This stereo phone jack serves for connection to |
Guitar amplifier |
|
|
the guitar amplifier. It is also possible to use a Y |
||
|
cable for sending the output to two amplifiers, or |
FS01 |
|
|
to plug a pair of stereo headphones into this jack. |
||
|
Headphones |
|
4 |
ZOOM G1N/G1XN |
ZOOM G1N/G1XN |
5 |

Controls and Functions / Connections (G1XN)
Controls and Functions / Connections (G1XN)
Top Panel
Module selector
Switches between play mode, rhythm mode, and edit mode. In edit mode, the knob selects the module/parameter for operation.
RHYTHM [ / ] key
Serves to start and stop the rhythm pattern in play mode and rhythm mode.
Display
Shows bank and patch numbers, setting values, and other information for operating the G1XN.
Rear Panel
Guitar
When operating the G1XN on batteries, it is advisable to disconnect the guitar cable plug from the [INPUT] jack when not using the unit, to conserve battery power.
[INPUT] jack
Serves for connecting the guitar. When operating the G1XN on batteries, inserting the guitar cable plug into this jack will turn the unit on.
|
[VALUE] knob |
|
|
This knob serves for changing parameter values and setting the |
|
|
level of the overall patch. |
|
|
Expression pedal |
|
|
Can be used as a volume pedal or as a real-time controller for |
|
|
adjusting effect parameters. (For details, see page 20.) |
|
|
[PEDAL ASSIGN] key |
|
|
Selects the module to be controlled by the built-in expression pedal. |
|
|
[STORE] key |
|
|
Serves for storing edited patches in memory and for copying |
|
|
patches to another location. |
|
|
[BANK UP·TAP] key |
|
|
In play mode, the key switches to the next higher bank. In other |
|
|
modes, the key serves for manual adjustment of rhythm pattern |
|
|
tempo as well as parameters related to timing and cycle. |
|
|
[ ]/[ ] foot switches |
|
|
These switches are used for selecting patches, controlling the tuner, |
|
|
and other functions. |
|
|
[DC IN] jack |
|
|
An AC adapter (ZOOM AD-0006) with a rated output |
|
|
of 9 volts DC, 300 mA (center minus plug) can be |
|
|
plugged into this jack. |
|
|
AC adapter |
[OUTPUT/PHONES] jack |
|
This stereo phone jack serves for connection to the guitar |
|
|
amplifier. It is also possible to use a Y cable for sending the |
|
|
output to two amplifiers, or to plug a pair of stereo |
|
|
headphones into this jack. |
Headphones
Guitar amplifier
|
6 |
ZOOM G1N/G1XN |
ZOOM G1N/G1XN |
7 |
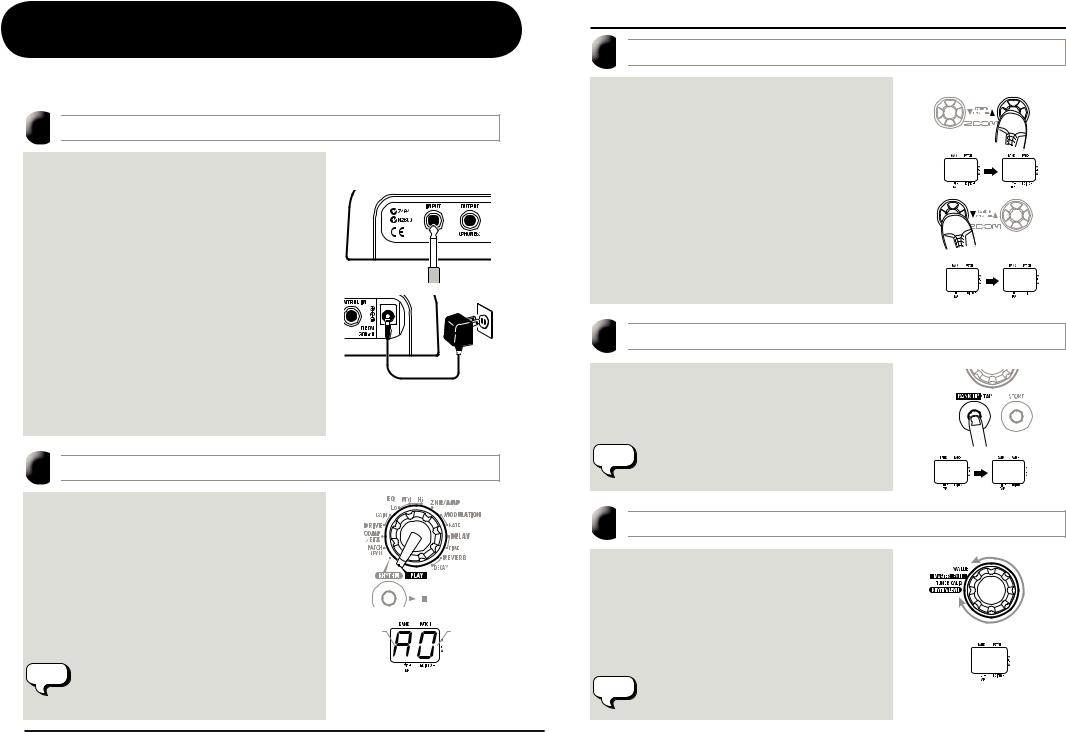
Selecting a Patch for Playing (Play Mode)
This section explains basic functions of the play mode.
 1
1
 Turn power on
The volume control on the connected amplifier should be turned down.
When using the unit on batteries
Plug a shielded cable into the [INPUT] jack.
When using the unit with an AC adapter
Plug the cable from the adapter into the [DC IN] jack.
Turn the guitar amplifier on and adjust the volume to a suitable position.
 2
2
 Set the G1N/G1XN to play mode
Set the Module selector to «PLAY».
The bank and patch number are shown on the display.
Immediately after turning the G1N/G1XN on, the unit
HINT will be in play mode, regardless of the position of the
Module selector.
Selecting a Patch for Playing (Play Mode)
 3
3
 Select a patch
Use the foot switches.
Press the [ ] foot switch to call up the next higher patch.
Press the [ ] foot switch to call up the next lower patch.
Repeatedly pressing one foot switch cycles through patches in the order A0 – A9 … d0 – d9, 00 – 09 …
30 – 39, A0.
 4
4
 Directly switch a bank
Press the [BANK UP·TAP] key.
Repeatedly pressing the key cycles through banks in the order A … d, 0 … 3, A.
|
HINT |
With the G1N, using the foot switch (FS01) to switch |
|
banks is also possible (g p. 18). |
 5
5
 Adjust the master level
Operate the [VALUE] knob.
The master level setting appears on the display.
The master level setting applies to all patches. The setting range is 0 – 98, 1.0. It will be reset to 80 when power is turned off and then on again.
When using headphones, this knob adjusts the listening
HINT volume.
|
8 |
ZOOM G1N/G1XN |
ZOOM G1N/G1XN |
9 |
 Loading…
Руководства Zoom G1NEXT + AD0016 Размер файлов: 1677 KB, Язык: English, Формат: pdf, Платформа: Windows/Linux, Дата: 2015-11-15
На данной странице вы можете скачать руководства Zoom G1NEXT + AD0016. Мы предлагаем вам ознакомиться с руководством пользователя, инструкцией по сервисному обслуживанию и ремонту.
Также здесь вы найдете список заказных номеров на комплектующие Zoom G1NEXT + AD0016.
Все файлы предоставляются исключительно в ознакомительных целях. И не являютя руководством по ремонту, а направлены лишь на то чтобы помочь вам более детально ознакомиться с принципом построения устройства.
Содержимое представленных здесь руководств требуют от вас знания технического английского языка.
Если вы собираетесь скачать руководство по сервисному обслуживанию Zoom G1NEXT + AD0016, иными словами сервис мануал, вы дожны обладать хотя бы минимальными познаниями в области электроники и пониманием базовых принципов работы электромеханических устройств.
Для просмотра руководств вам понадобится Adobe Acrobat Reader версии 9 и выше либо другая программа для просмотра pdf файлов.
В связи с популярностью информации представленной на сайте и ее бесплатного предоставления конечному пользователю, убедительная просьба использовать специальные программные продукты для многопотокового скачивания файлов.
Руководства для Zoom G1NEXT + AD0016
- Руководство пользователя (User manual)
- Руководство по сервисному обслуживанию (Service manual)
- Руководство по ремонту (Repair manual)
- Перечень комплектующих (PartList)
Thank you for selecting the ZOOM G1N/G1XN (hereafter simply called the
«G1N/G1XN»).
Please take the time to read this manual carefully to get the most out of the
unit and to ensure optimum performance and reliability.
Keep this manual at hand for future reference.
SAFETY PRECAUTIONS / Usage Precautions · · · · · 2
Terms Used in This Manual · · · · · · · · · · · · · · · · · · 3
Controls and Functions / Connections (G1N) · · · · 4
Controls and Functions / Connections (G1XN) · · · 6
Selecting a Patch for Playing · · · · · · · · · · · · · · · · · 8
Using the Tuner · · · · · · · · · · · · · · · · · · · · · · · · · · · 10
Using the Rhythm Function · · · · · · · · · · · · · · · · · 12
Editing a Patch · · · · · · · · · · · · · · · · · · · · · · · · · · · 14
Storing/Copying Patches · · · · · · · · · · · · · · · · · · · 16
Restoring Factory Defaults · · · · · · · · · · · · · · · · ·17
Changing the Way Patches Are Called Up · · · · · · 18
Using an External Foot Switch or Pedal
(G1N only) · · · · · · · · · · · · · · · · · · · · · · · · · · · · · · 18
Using a foot switch · · · · · · · · · · · · · · · · · · · · · · ·18
Using an expression pedal · · · · · · · · · · · · · · · · · ·19
© ZOOM Corporation
Operation Manual
Contents
Reproduction of this manual, in whole or in part,
by any means, is prohibited.
Using the built-in expression pedal (G1XN only) 20
[PEDAL ASSIGN] key operation · · · · · · · · · · · · · ·20
Adjusting the expression pedal · · · · · · · · · · · · · ·20
Effect Types and Parameters · · · · · · · · · · · · · · · · 21
Explanation of symbols · · · · · · · · · · · · · · · · · · · ·21
PATCH LEVEL · · · · · · · · · · · · · · · · · · · · · · · · · ·21
COMP/EFX module · · · · · · · · · · · · · · · · · · · · ·21
DRIVE module · · · · · · · · · · · · · · · · · · · · · · · · ·22
EQ module · · · · · · · · · · · · · · · · · · · · · · · · · · · ·23
ZNR/AMP module · · · · · · · · · · · · · · · · · · · · · ·23
MODULATION module · · · · · · · · · · · · · · · · · ·24
DELAY module · · · · · · · · · · · · · · · · · · · · · · · · ·25
REVERB module · · · · · · · · · · · · · · · · · · · · · · ·26
Rhythm Function Preset Patterns · · · · · · · · · · · ·26
Specifications · · · · · · · · · · · · · · · · · · · · · · · · · · · · 27
Troubleshooting · · · · · · · · · · · · · · · · · · · · · · · · · · 27
- Manuals
- Brands
- ZOOM Manuals
- Music Pedal
- G1 X Four
Manuals and User Guides for ZOOM G1 X Four. We have 5 ZOOM G1 X Four manuals available for free PDF download: Operation Manual, Service Manual, Quick Manual
Zoom G1 X Four Operation Manual (61 pages)
Multi-Effects Processor
Brand: Zoom
|
Category: Music Pedal
|
Size: 12.71 MB
Table of Contents
-
Introduction
2
-
Terms Used in this Manual
3
-
Table of Contents
4
-
-
Contents
4
-
Structure
5
-
-
Names of Parts
7
-
Loading Batteries
9
-
Connecting
10
-
Adjusting the Overall Audio Character and Output Level
11
-
Level �������������������
12
-
Using Patches (MEMORY Mode)
12
-
Switching to MEMORY Mode
12
-
Selecting Patches and Banks
13
-
Changing Individual Patch Settings
14
-
-
Mode) ������������������
16
-
Turning Effects ON/OFF with Footswitches (STOMP Mode)
16
-
Activating STOMP Mode
16
-
Turning Effects ON/OFF with Footswitches
17
-
-
Editing Effects (EDIT Mode)
18
-
Activating EDIT Mode
18
-
Selecting Effects
19
-
Turning Effects ON/OFF
19
-
Changing Effect Types
20
-
Adjusting Effect Parameters
21
-
Changing the Effect Order
22
-
-
Managing Patches
23
-
Saving Patches
23
-
Swapping Patches
25
-
Adjusting the Master Tempo
27
-
Setting the AUTO SAVE Function
28
-
Setting the PRESELECT Function
31
-
Setting the BANK HOLD Function
34
-
-
Making Power and Display Settings
35
-
Setting the Type of Batteries Used
35
-
Setting the ECO Mode
36
-
Setting the Backlight Time
37
-
Adjusting the Display Contrast
38
-
-
Using the Tuner
39
-
Activating the Tuner
39
-
Tuning a Guitar
39
-
Changing Tuner Settings
41
-
-
Using Rhythms
43
-
Activating the Rhythm Function
43
-
Setting the Rhythm
44
-
Starting/Stopping Rhythm Playback
45
-
Rhythm Patterns
46
-
-
Using the Looper
47
-
Activating the Looper
47
-
Setting the Looper
48
-
Recording and Playing Loops
50
-
Overdubbing Loops
51
-
Clearing the Loop
52
-
-
Using the Expression Pedal ( Only)
53
-
Setting Pedal Effects
53
-
Adjusting the Pedal
54
-
-
Managing the Firmware
56
-
Checking the Firmware Versions
56
-
Updating the Firmware
57
-
Restoring Factory Default Settings
58
-
-
Troubleshooting
59
-
Specifications
60
Advertisement
ZOOM G1 X Four Operation Manual (16 pages)
Guitar Effects Pedal
Brand: ZOOM
|
Category: Music Pedal
|
Size: 1.58 MB
Table of Contents
-
Table of Contents
1
-
SAFETY PRECAUTIONS / Usage Precautions
2
-
Terms Used in this Manual
2
-
Controls and Functions / Connections
3
-
Selecting a Patch
4
-
Using the Tuner
5
-
Using the Rhythm Function
6
-
Editing a Patch
7
-
Storing/Copying Patches
8
-
Changing the Way Patches Are Called up
9
-
Using a Foot Switch or Pedal
9
-
Using the Foot Switch (FS01) (G1 Only)
9
-
Using the Expression Pedal
9
-
-
Effect Types and Parameters
10
-
Linking Effects
10
-
Explanation of Symbols
10
-
Patch Level
10
-
COMP/EFX (Compressor/Efx)
10
-
Module
11
-
EQ Module
11
-
ZNR/AMP (Znr/Amp Simulator) Module
11
-
MODULATION Module
12
-
DELAY Module
12
-
REVERB Module
13
-
-
G1/G1X Preset Pattern
13
-
-
Restoring Factory Defaults
13
-
Special Features of G1X
14
-
[PEDAL ASSIGN] Key Operation
14
-
Adjusting the Expression Pedal
14
-
-
Specifications
14
-
Troubleshooting
14
-
Patch List
16
-

Zoom G1 X Four Service Manual (33 pages)
Brand: Zoom
|
Category: Music Pedal
|
Size: 5.8 MB
Table of Contents
-
Table of Contents
2
-
Specifications
3
-
Function Test
4
-
Back up User’s Data
9
-
Recovering the Factory Default
11
-
Special Function Start up
12
-
Circuit Check Specifications
15
-
PCB Parts Layout and Pattern
16
-
Circuit Diagram
17
-
Exploded View
20
-
Parts List
22
-
Spare Parts Order List
28
-
Spare Parts Order Sheet
30
-
Supplement: Identification of Main PCB
31
-
Supplement: the Major Difference between before No.022150 and after No.022151
32
Advertisement

Zoom G1 X Four Quick Manual (13 pages)
Multi-Effects Processor
Brand: Zoom
|
Category: Music Pedal
|
Size: 2.03 MB
Table of Contents
-
Loading Batteries
2
-
Editing Effects (EDIT Mode)
5
-
Using the Tuner
7
-
Using Rhythms
8
-
Using the Looper
9
-
Setting List
10
-
Specifications
11

Zoom G1 X Four Quick Manual (13 pages)
Multi-Effects Processor
Brand: Zoom
|
Category: Recording Equipment
|
Size: 2.39 MB
Table of Contents
-
Loading Batteries
2
-
Using the Tuner
7
-
Using Rhythms
8
-
Using the Looper
9
-
Setting List
10
-
Specifications
11
Advertisement
Related Products
-
Zoom G1U
-
Zoom G1N
-
Zoom G1XN
-
ZOOM G1 Four
-
Zoom G1N EXT
-
Zoom G1XN EXT
-
Zoom G1on
-
Zoom G1Xon
-
ZOOM G2.1u
-
Zoom G2Nu
ZOOM Categories
Recording Equipment
Modem
Music Pedal
![]()
Network Router
Measuring Instruments
More ZOOM Manuals
А вдруг, оно кому-нибудь надо?

Примерно за год до наших поучительных событий приключилась со мной такая история. Тут надо для начала заметить, что на досуге я, бывает, люблю понажимать на струны гитары жёлтой. Правда, музыкальным талантом не сподобил меня Господь, да — одно другому не мешает. В-о-от… Решил я однажды купить себе гитарную приставку, а поскольку денег у меня — нельзя сказать, чтоб много — то и подошёл я к этому вопросу со всей возможной отвественностию. То есть: представил я себе для начала — а что мне, собственно, хотелось бы купить? Ну, думаю — это должна быть самая лучшая приставка за самые маленькие деньги, йопта! Коротко и ясно.
Ага. Полез я в электрическую сеть интернет искать себе приставку в соответствии с означенными контурами. Долго ли, коротко ли — а нашёл. Японской фирмы ZOOM, а модель ея называлась — G1XNext. И накрученная и недорогая — в точности такая, как мне и надо!
Ага. Стал звонить я по интернет-магазинам — нет нигде такой приставки! То есть — есть, и практически у всех, но не она, а её предыдущая модель — G1X — безо всякой там Next. И нельзя сказать, чтобы они сильно друг от друга отличались — у Next добавился, вроде, какой-то там типа, «ламповый» сатуратор — а мне он, если честно — и даром ведь не нужен! Как зайцу стоп-сигнал он мне там нужен! Как пеликану — радиобакен. Но, себе на беду — пошёл я тут на принцип. Как-так, думаю — цена у них одинаковая, а мне, значить, суют ея — без сатуратора?! Не-е-е… Обзвонил я, в общем, всех и вся, и — нашёл таки ея в оччень пластилиновой местности. Аж в самой Виннице! В ПП, как у них там обычно и бывает — Грицук.
Нет, там мне тоже — мозги покомпостровали слегонца, типа — ищем, ищем, щас найдём, уже почти нашли, ждите ответа, йопта! Но однако, всё же — отыскали и даже выслали мне ея «Новой почтою».
Во-от… Приходит посылка, смотрю — коробка немного трёпаная, но это-ж ничего не значит — мало ли, где она у них там в магазине обреталась? Приставка ведь сама — с иголочки! Принёс я ея домой, отыскал подходящий блок питания, (она БП не комплектовалась, за него эти крохоборы — ещё 250 гр. просили) включаю. Молчит зараза. Причём — не просто ведь, молчит — а в момент, когда втыкаю я в неё гитарный штекер раздаётся в динамиках звук, — весьма для меня интересный! Знакомый мне звук! Переходный процесс… Ага…
Взвесив все «за» и «против» решил я, что «такого Кузьму я и сам возьму». То есть — я, конечно, не уважаемый  vladimir_krm, — в создании плазменных двигателей для спутниковых систем мне даже и во сне участвовать не приходилось
 Но, кое-какой опыт за плечами, всё же — имею. И — довольно жёсткий, я бы сказал, практический опыт. Ладно…
Разобрал я это их (а точнее — уже моё) изделие. Полез в электрическую сеть интернет — схемы там, ессно, не отыскал. Но, исходя из услышанного увлекательного звука — интересовал меня, в первую очередь, входной ея каскад.

Его-то и разрисовал я тогда по печатной плате:
 Loading…
Руководства Zoom G1NEXT + AD0016 Размер файлов: 1677 KB, Язык: English, Формат: pdf, Платформа: Windows/Linux, Дата: 2015-11-15
На данной странице вы можете скачать руководства Zoom G1NEXT + AD0016. Мы предлагаем вам ознакомиться с руководством пользователя, инструкцией по сервисному обслуживанию и ремонту.
Также здесь вы найдете список заказных номеров на комплектующие Zoom G1NEXT + AD0016.
Все файлы предоставляются исключительно в ознакомительных целях. И не являютя руководством по ремонту, а направлены лишь на то чтобы помочь вам более детально ознакомиться с принципом построения устройства.
Содержимое представленных здесь руководств требуют от вас знания технического английского языка.
Если вы собираетесь скачать руководство по сервисному обслуживанию Zoom G1NEXT + AD0016, иными словами сервис мануал, вы дожны обладать хотя бы минимальными познаниями в области электроники и пониманием базовых принципов работы электромеханических устройств.
Для просмотра руководств вам понадобится Adobe Acrobat Reader версии 9 и выше либо другая программа для просмотра pdf файлов.
В связи с популярностью информации представленной на сайте и ее бесплатного предоставления конечному пользователю, убедительная просьба использовать специальные программные продукты для многопотокового скачивания файлов.
Руководства для Zoom G1NEXT + AD0016
- Руководство пользователя (User manual)
- Руководство по сервисному обслуживанию (Service manual)
- Руководство по ремонту (Repair manual)
- Перечень комплектующих (PartList)
Thank you for selecting the ZOOM G1N/G1XN (hereafter simply called the
«G1N/G1XN»).
Please take the time to read this manual carefully to get the most out of the
unit and to ensure optimum performance and reliability.
Keep this manual at hand for future reference.
SAFETY PRECAUTIONS / Usage Precautions · · · · · 2
Terms Used in This Manual · · · · · · · · · · · · · · · · · · 3
Controls and Functions / Connections (G1N) · · · · 4
Controls and Functions / Connections (G1XN) · · · 6
Selecting a Patch for Playing · · · · · · · · · · · · · · · · · 8
Using the Tuner · · · · · · · · · · · · · · · · · · · · · · · · · · · 10
Using the Rhythm Function · · · · · · · · · · · · · · · · · 12
Editing a Patch · · · · · · · · · · · · · · · · · · · · · · · · · · · 14
Storing/Copying Patches · · · · · · · · · · · · · · · · · · · 16
Restoring Factory Defaults · · · · · · · · · · · · · · · · ·17
Changing the Way Patches Are Called Up · · · · · · 18
Using an External Foot Switch or Pedal
(G1N only) · · · · · · · · · · · · · · · · · · · · · · · · · · · · · · 18
Using a foot switch · · · · · · · · · · · · · · · · · · · · · · ·18
Using an expression pedal · · · · · · · · · · · · · · · · · ·19
© ZOOM Corporation
Operation Manual
Contents
Reproduction of this manual, in whole or in part,
by any means, is prohibited.
Using the built-in expression pedal (G1XN only) 20
[PEDAL ASSIGN] key operation · · · · · · · · · · · · · ·20
Adjusting the expression pedal · · · · · · · · · · · · · ·20
Effect Types and Parameters · · · · · · · · · · · · · · · · 21
Explanation of symbols · · · · · · · · · · · · · · · · · · · ·21
PATCH LEVEL · · · · · · · · · · · · · · · · · · · · · · · · · ·21
COMP/EFX module · · · · · · · · · · · · · · · · · · · · ·21
DRIVE module · · · · · · · · · · · · · · · · · · · · · · · · ·22
EQ module · · · · · · · · · · · · · · · · · · · · · · · · · · · ·23
ZNR/AMP module · · · · · · · · · · · · · · · · · · · · · ·23
MODULATION module · · · · · · · · · · · · · · · · · ·24
DELAY module · · · · · · · · · · · · · · · · · · · · · · · · ·25
REVERB module · · · · · · · · · · · · · · · · · · · · · · ·26
Rhythm Function Preset Patterns · · · · · · · · · · · ·26
Specifications · · · · · · · · · · · · · · · · · · · · · · · · · · · · 27
Troubleshooting · · · · · · · · · · · · · · · · · · · · · · · · · · 27
- Manuals
- Brands
- ZOOM Manuals
- Music Pedal
- G1 X Four
Manuals and User Guides for ZOOM G1 X Four. We have 5 ZOOM G1 X Four manuals available for free PDF download: Operation Manual, Service Manual, Quick Manual
Zoom G1 X Four Operation Manual (61 pages)
Multi-Effects Processor
Brand: Zoom
|
Category: Music Pedal
|
Size: 12.71 MB
Table of Contents
-
Introduction
2
-
Terms Used in this Manual
3
-
Table of Contents
4
-
-
Contents
4
-
Structure
5
-
-
Names of Parts
7
-
Loading Batteries
9
-
Connecting
10
-
Adjusting the Overall Audio Character and Output Level
11
-
Level �������������������
12
-
Using Patches (MEMORY Mode)
12
-
Switching to MEMORY Mode
12
-
Selecting Patches and Banks
13
-
Changing Individual Patch Settings
14
-
-
Mode) ������������������
16
-
Turning Effects ON/OFF with Footswitches (STOMP Mode)
16
-
Activating STOMP Mode
16
-
Turning Effects ON/OFF with Footswitches
17
-
-
Editing Effects (EDIT Mode)
18
-
Activating EDIT Mode
18
-
Selecting Effects
19
-
Turning Effects ON/OFF
19
-
Changing Effect Types
20
-
Adjusting Effect Parameters
21
-
Changing the Effect Order
22
-
-
Managing Patches
23
-
Saving Patches
23
-
Swapping Patches
25
-
Adjusting the Master Tempo
27
-
Setting the AUTO SAVE Function
28
-
Setting the PRESELECT Function
31
-
Setting the BANK HOLD Function
34
-
-
Making Power and Display Settings
35
-
Setting the Type of Batteries Used
35
-
Setting the ECO Mode
36
-
Setting the Backlight Time
37
-
Adjusting the Display Contrast
38
-
-
Using the Tuner
39
-
Activating the Tuner
39
-
Tuning a Guitar
39
-
Changing Tuner Settings
41
-
-
Using Rhythms
43
-
Activating the Rhythm Function
43
-
Setting the Rhythm
44
-
Starting/Stopping Rhythm Playback
45
-
Rhythm Patterns
46
-
-
Using the Looper
47
-
Activating the Looper
47
-
Setting the Looper
48
-
Recording and Playing Loops
50
-
Overdubbing Loops
51
-
Clearing the Loop
52
-
-
Using the Expression Pedal ( Only)
53
-
Setting Pedal Effects
53
-
Adjusting the Pedal
54
-
-
Managing the Firmware
56
-
Checking the Firmware Versions
56
-
Updating the Firmware
57
-
Restoring Factory Default Settings
58
-
-
Troubleshooting
59
-
Specifications
60
Advertisement
ZOOM G1 X Four Operation Manual (16 pages)
Guitar Effects Pedal
Brand: ZOOM
|
Category: Music Pedal
|
Size: 1.58 MB
Table of Contents
-
Table of Contents
1
-
SAFETY PRECAUTIONS / Usage Precautions
2
-
Terms Used in this Manual
2
-
Controls and Functions / Connections
3
-
Selecting a Patch
4
-
Using the Tuner
5
-
Using the Rhythm Function
6
-
Editing a Patch
7
-
Storing/Copying Patches
8
-
Changing the Way Patches Are Called up
9
-
Using a Foot Switch or Pedal
9
-
Using the Foot Switch (FS01) (G1 Only)
9
-
Using the Expression Pedal
9
-
-
Effect Types and Parameters
10
-
Linking Effects
10
-
Explanation of Symbols
10
-
Patch Level
10
-
COMP/EFX (Compressor/Efx)
10
-
Module
11
-
EQ Module
11
-
ZNR/AMP (Znr/Amp Simulator) Module
11
-
MODULATION Module
12
-
DELAY Module
12
-
REVERB Module
13
-
-
G1/G1X Preset Pattern
13
-
-
Restoring Factory Defaults
13
-
Special Features of G1X
14
-
[PEDAL ASSIGN] Key Operation
14
-
Adjusting the Expression Pedal
14
-
-
Specifications
14
-
Troubleshooting
14
-
Patch List
16
-
Zoom G1 X Four Service Manual (33 pages)
Brand: Zoom
|
Category: Music Pedal
|
Size: 5.8 MB
Table of Contents
-
Table of Contents
2
-
Specifications
3
-
Function Test
4
-
Back up User’s Data
9
-
Recovering the Factory Default
11
-
Special Function Start up
12
-
Circuit Check Specifications
15
-
PCB Parts Layout and Pattern
16
-
Circuit Diagram
17
-
Exploded View
20
-
Parts List
22
-
Spare Parts Order List
28
-
Spare Parts Order Sheet
30
-
Supplement: Identification of Main PCB
31
-
Supplement: the Major Difference between before No.022150 and after No.022151
32
Advertisement
Zoom G1 X Four Quick Manual (13 pages)
Multi-Effects Processor
Brand: Zoom
|
Category: Music Pedal
|
Size: 2.03 MB
Table of Contents
-
Loading Batteries
2
-
Editing Effects (EDIT Mode)
5
-
Using the Tuner
7
-
Using Rhythms
8
-
Using the Looper
9
-
Setting List
10
-
Specifications
11
Zoom G1 X Four Quick Manual (13 pages)
Multi-Effects Processor
Brand: Zoom
|
Category: Recording Equipment
|
Size: 2.39 MB
Table of Contents
-
Loading Batteries
2
-
Using the Tuner
7
-
Using Rhythms
8
-
Using the Looper
9
-
Setting List
10
-
Specifications
11
Advertisement
Related Products
-
Zoom G1U
-
Zoom G1N
-
Zoom G1XN
-
ZOOM G1 Four
-
Zoom G1N EXT
-
Zoom G1XN EXT
-
Zoom G1on
-
Zoom G1Xon
-
ZOOM G2.1u
-
Zoom G2Nu
ZOOM Categories
Recording Equipment
Modem
Music Pedal
![]()
Network Router
Measuring Instruments
More ZOOM Manuals
А вдруг, оно кому-нибудь надо?
Примерно за год до наших поучительных событий приключилась со мной такая история. Тут надо для начала заметить, что на досуге я, бывает, люблю понажимать на струны гитары жёлтой. Правда, музыкальным талантом не сподобил меня Господь, да — одно другому не мешает. В-о-от… Решил я однажды купить себе гитарную приставку, а поскольку денег у меня — нельзя сказать, чтоб много — то и подошёл я к этому вопросу со всей возможной отвественностию. То есть: представил я себе для начала — а что мне, собственно, хотелось бы купить? Ну, думаю — это должна быть самая лучшая приставка за самые маленькие деньги, йопта! Коротко и ясно.
Ага. Полез я в электрическую сеть интернет искать себе приставку в соответствии с означенными контурами. Долго ли, коротко ли — а нашёл. Японской фирмы ZOOM, а модель ея называлась — G1XNext. И накрученная и недорогая — в точности такая, как мне и надо!
Ага. Стал звонить я по интернет-магазинам — нет нигде такой приставки! То есть — есть, и практически у всех, но не она, а её предыдущая модель — G1X — безо всякой там Next. И нельзя сказать, чтобы они сильно друг от друга отличались — у Next добавился, вроде, какой-то там типа, «ламповый» сатуратор — а мне он, если честно — и даром ведь не нужен! Как зайцу стоп-сигнал он мне там нужен! Как пеликану — радиобакен. Но, себе на беду — пошёл я тут на принцип. Как-так, думаю — цена у них одинаковая, а мне, значить, суют ея — без сатуратора?! Не-е-е… Обзвонил я, в общем, всех и вся, и — нашёл таки ея в оччень пластилиновой местности. Аж в самой Виннице! В ПП, как у них там обычно и бывает — Грицук.
Нет, там мне тоже — мозги покомпостровали слегонца, типа — ищем, ищем, щас найдём, уже почти нашли, ждите ответа, йопта! Но однако, всё же — отыскали и даже выслали мне ея «Новой почтою».
Во-от… Приходит посылка, смотрю — коробка немного трёпаная, но это-ж ничего не значит — мало ли, где она у них там в магазине обреталась? Приставка ведь сама — с иголочки! Принёс я ея домой, отыскал подходящий блок питания, (она БП не комплектовалась, за него эти крохоборы — ещё 250 гр. просили) включаю. Молчит зараза. Причём — не просто ведь, молчит — а в момент, когда втыкаю я в неё гитарный штекер раздаётся в динамиках звук, — весьма для меня интересный! Знакомый мне звук! Переходный процесс… Ага…
Взвесив все «за» и «против» решил я, что «такого Кузьму я и сам возьму». То есть — я, конечно, не уважаемый vladimir_krm, — в создании плазменных двигателей для спутниковых систем мне даже и во сне участвовать не приходилось Но, кое-какой опыт за плечами, всё же — имею. И — довольно жёсткий, я бы сказал, практический опыт. Ладно…
Разобрал я это их (а точнее — уже моё) изделие. Полез в электрическую сеть интернет — схемы там, ессно, не отыскал. Но, исходя из услышанного увлекательного звука — интересовал меня, в первую очередь, входной ея каскад.
Его-то и разрисовал я тогда по печатной плате:
Смотрю, и глазам не верю, что за притча? Работает входной каскад без начального смещения. (Ну тут, значить — вру. Точнее — привираю :))). Звук этот, пресловутый, переходный этот процесс, как раз и намекнул мне крупным шрифтом на отсутствие начального смещения во входном каскаде! А намёки я обычно понимаю! Как там народная пословица гласит? «Старый конь борозды не испортит»? А начёт — «неглубоко вспашет» — так это мы ещё посмотрим, йопта! Но удивило тут меня другое. Как ни высматривал я, как ни искал, а не нашёл на плате даже и намёка на дорожки, на которые устанавливались бы те самые элементы, обеспечивающие начальное смещение этого их BC817-25 (код на корпусе — 6BW). М-да…
Тут-то Менделеева и передёрнуло! Стоять-то там у японцев должен был транзистор полевой! С n-каналом, йопта! А китайский пацан, коий заряжал бобины в робот, ошибся и не ту бобину в него всобачил! И засандалил он этих биполярных транзисторов тыщ в десять гитарных приставок! По числу транзисторов в бобине, йопта! (Всего ведь один на той плате должен был стоять полевой транзистор…) Ну ладно, пускай — три тыщи там их было, а не десять… :))))
То-то, их нигде и не было видать, приставок этих… То есть, изначально — они были, но с продажи пришлось их все снять. Не, не все — позвонил тут с Донбасса один, так ему тогда одну и всучили! И ведь — удалось же! Один шанс из тысячи — попали на специалиста, которому было, что называется — «не в падлу».
Стал я думать и гадать, а как же выйти мне из данной ситуации? Ни одного «полевика» под руками у меня как раз не оказалось… Обратил я тут гордый взор свой на то, что было под руками. А именно — на то, что всобачил тудой этот их сумрачный китайский гений. А что — думаю. Всем мне этот их BC817-25 мил! Ну, будет у меня не истоковый, а эмиттерный повторитель, входное сопротивление всё равно ведь выйдет — ничего. Выходное сопротивление самой гитары — в пределах нескольких килоом (хоть и зависит оно, конечно, от положения движка регулятора громкости…) Но, всё равно, думаю: на глазок — входного сопротивления первого каскада — более чем хватит…
Сказано — сделано! Дополнил я схему сходу ещё тремя элементами, разместил их над платой навесным монтажом. Вышло у меня — вот что:


Включил ея, смотрю — работает, падлюка. Ну, я её собрал, хотел ещё им в Винницу сгоряча отзвониться, да, думаю, — будет их…
Схему на листок зарисовал, в пакет с документами её сунул — и забыл об этом случае. А сегодня вот — чинил её слегка, ну и — вспомнил я о той эпопее… Думаю — а напишу-ка я о тех моих, э-э-э… приключениях пост, а вдруг, оно кому-нибудь надо?
ЗЫ. Да ведь и отработала она с тех пор, верой и правдой — уже целых два с половиной года…

Эта модель пришла на смену ZOOM G1. Next — означает следущее поколение. Самое первое что вы заметите — это 15 новых звуков.
Компания ZOOM продолжила пополнение модельного ряда компактных гитарных процессоров на основе нового 32-битного DSP-чипа ZFX-3. По сравнению с предшествующей моделью, ZOOM G2, в ZOOM G1XNext прибавилось эмуляторов звучания популярных усилителей и педалей эффектов. Вместе с тем G1XN за счет пластикового корпуса — более легок (вес без батарей — всего 600 г), также более компактен и более экономичен в потреблении энергии: время работы на одном комплекте батарей (4 штуки размера AA) увеличилось с 7,5 часов (G2) до 12. Но основные изменения коснулись управления возможностями процессора: логика ZOOM G1N подразумевает максимальную простоту работы с прибором.
Новый способ достичь драйва.
Первое, что Вы заметите включив новый ZOOM G1Next / ZOOM G1XNext это абсолютно новые перегрузы. Разработки основанные на передовом чипе ZFX привели компанию Zoom к 15-ти абсолютно новым моделям усилителей и педалей эффектов. Новые звуки достоверно и точно передают мощь, гармонии и обертона классических ламповых усилителей. Кроме того благодаря чипу ZFX процессор уникально реагирует на вашу игру и позволяет использовать его в произведениях требующих максимальной отдачи и динамики или в плоских, но очень скоростных пассажах. Новые технологии поразят Вас.
Легко и просто.
Никогда еще редактировать эффекты в процессорах небыло так просто. Выберите нужный модуль эффектов, настройте предоставленные значения и все, эффект готов. С помощью этой простейшей системы, Вы можете в реальном времени менять Ваши настройки в зависимости от ситуации и это не займет у Вас львиную долю времени которого всегда нехватает, особенно на сцене. Нужно подстроить инструмент? Легко. Просто нажмите обе кнопки переключения эффектов и включится тюнер, а благодаря достаточно крупному дисплею с подстветкой работать с тюнером удобно стоя, даже на самой темной сцене.
Легендарные звуки рок сцены.
В G1N/G1XN есть 9 пресетов которые имитируют звуки таких легенд рок сцены как Джимми Хендрикс (Jimi Hendrix), Джимми Пэйдж (Jimmy Page), Эрик Клептон (Eric Clapton) и многих других. Кроме того в процессорах есть 21 пресет от гитарных героев современности, таких как: Майкл Эммот (Michael Amott), Кико Лоуреиро (Kiko Loureiro), Риччи Котзен (Richie Kotzen), Роб Каггиано (Rob Caggiano), Майк Стоун (Mike Stone), и Мэтт Бачанд (Matt Bachand). Заключает цепочку предустановленных пресетов 10 типов специально созданных звуков для различных ситуаций. Тут есть звук для игры аккордами, арпеджио, исполнения соло партий и другие. Если Вы не нашли подходящий для Вас звук в уже предустановленных заводских пресетах, ничего страшного. У Вас в распоряжении 40 пустых банков для создания собственного легендарного звука!
Технические характеристики Zoom G1XNext
Типов эффектов: 54
Максимум эффектов одновременно: 8
Программ: 80 (40 заводских / 40 пользовательских)
Частота сэмплирования: 96 кГц
A/D конвертация сигнала: 24 бит 128-кратное ре-сэмплирование
D/A конвертация сигнала : 24 бит 128-кратное ре-сэмплирование
Обработка сигнала: 32 бит
АЧХ: 20Гц-40кГц (+1 дБ/-4 дБ)
Педаль экспрессии: Да
Дисплей: LED
Вход: 1/4 Джек
External send/return: 1/4
Линейный выход L(Mono)/R: 1/4
Выход на наушники: 1/4
Питание: адаптер Zoom AD-0016, (входит в комплект)
Размеры: 234 мм (Ш) x 155 мм (Г) x 52 мм (В)
Вес: 600 грамм
Обзор №1
Достоинства:
Многофункциональность
Недостатки:
Нет
Купил процессор ZOOM G1XNext эффектов в прошлом году совместно с электрогитарой и комбоусилителем сыну.
Эта штука со встроенной педалью экспрессии, хроматическим тюнером и драм-машиной. Звучит все это как-то специализированно, но тем не менее. Тюнер имеет 8 модулей, которые в свою очередь производят 54 эффекта. Кроме всего прочего тут имеется 40 предустановленных патчей самых крутых гитаристов планеты. Вот так вот, и не иначе.
Технические составляющие перечислять не буду, благо дело кому интересно, всегда могут найти информацию в специализированных местах. Отмечу только свои наблюдения.
При всех вышеперечисленных высоких технологиях, педаль имеет на удивление очень простое управление. Выбераем на раз два необходимый модуль эффектов, настраиваем значения, и, о боги, эффект готов!
Если кому-то известны такие имена, как Эрик Клептон, Джимми Хендрикс, то можно сымитировать их звучание при игре с помощью так называемых пресетов.
Теперь о драм-машине в ZOOM G1XN, она там есть. Это такая штука, вот представьте, что с Вами еще рядом барабанщик, с которым можно сыграть на пару. Там более 40 ритмов или еще, как их называют спецы, паттернов. Очень здорово.
Об этом маленьком чуде можно говорить бесконечно. Это и чип ZFX, который улавливает все детали игры и преобразовать его в звук, и система подавления шумов ZNR, получается умопомрачительный прозрачный звук и много всего другого полезного в этом деле.
Время использования: 1 год
Стоимость: 4000 руб.
Год выпуска/покупки: 2013
Обзор №2
Достоинства:
Дешёвый, функциональный
Недостатки:
Для новичков
Сам басист. Купил ZOOM G1XN вместе с электрогитарой для того, что бы придумывать минимальный аккомпанимент для баса. Свои 150 мёртвых президентов процессор оправдывает на 100%. Правда новичку будет трудно разобраться с настройками, всем этим множеством эффектов.
Но благодаря ему вы сможете в пару нажатий переходить от жёсткого дисторшна к овердрайву, оь чистого гитарного к вахваху)
Очень радует наличие встроенной драм машины — и как метроном, и поимпровизировать под разные барабасики неплохо)
В итоге — если вы новичок, не уверены в каком жанре будете играть, что значит тот или иной эффект, берите, не пожалеете.
Год выпуска/покупки: 2013
Обзор №3
Достоинства:
цена,качество,звук
Недостатки:
нет
Небогатый набор эффектов в процессоре ZOOM G1XN помогает новичку хотя бы освоить под разные стили игры гитару. Но на этой штуке можно ещё записать довольно не плохую партию.
Встроенный тюнер, байпас и драм машина, сидеть дома и тренироваться по ударные, играть в стиле метал, джаз и блюз и разные примочки можно накрутить на этом процессоре.
Качество я бы сказал не плохое. пластик крепкий, хороший удар ногой выдержит.
С дисплеем тоже в порядке, он не крякнет если вы будете таскать процессор то домой то на репетицию, проверено!
Блок питания или батарейку крону для питания, выбор за вами.
Я посоветую подкопить и купить этой же фирмы но получше.
Общее впечатление: процессор для новичков
Краткое содержание страницы № 1
Operation Manual
Thank you for selecting the ZOOM G1N/G1XN (hereafter simply called the
«G1N/G1XN»).
Please take the time to read this manual carefully to get the most out of the
unit and to ensure optimum performance and reliability.
Keep this manual at hand for future reference.
Contents
SAFETY PRECAUTIONS / Usage Precautions · · · ·2 · Using the built-in expression pedal (G1XN only) 20
[PEDAL ASSIGN] key operation · · · · · · · · · · · · · 20 ·
Terms Used in This Manual · · · · ·
Краткое содержание страницы № 2
Terms Used in This Manual Terms Used in This Manual SAFETY PRECAUTIONS / Usage Precautions • Extreme t emperature s SAFETY PRECAUTIONS This section explains some important terms that are used throughout the G1N/G1XN manual. • Heat sources such as radiators or stoves In this manual, symbols are used to highlight warnings and • High humidity or mo isture cautions for you to read so that accidents can be prevented. BANK 3 • Excessive dust or sand Effect modules BANK 2 The meanings of t
Краткое содержание страницы № 3
Controls and Functions / Connections (G1N) Controls and Functions / Connections (G1N) [VALUE] knob This knob serves for changing parameter values and setting the Top Panel level of the overall patch. Module selector [STORE] key Switches between play mode, rhythm mode, Serves for storing edited patches in memory and for copying and edit mode. In edit mode, the knob selects patches to another location. the module/parameter for operation. [BANK UP·TAP] key RHYTHM [ R/ P] key In play mod
Краткое содержание страницы № 4
Controls and Functions / Connections (G1XN) Controls and Functions / Connections (G1XN) [VALUE] knob This knob serves for changing parameter values and setting the Top Panel level of the overall patch. Module selector Expression pedal Switches between play mode, Can be used as a volume pedal or as a real-time controller for rhythm mode, and edit mode. adjusting effect parameters. (For details, see page 20.) In edit mode, the knob selects the module/parameter for operation. [PEDAL A
Краткое содержание страницы № 5
Selecting a Patch for Playing (Play Mode) Selecting a Patch for Playing (Play Mode) Select a patch 3 This section explains basic functions of the play mode. Use the foot switches. Press the [ ] foot switch to call up the next higher Q Turn power on 1 patch. The volume control on the connected amplifier A 0 A 1 should be turned down. Press the [ ] foot switch to call up the next lower W patch. When using the unit on batteries Plug a shielded cable into the [INPUT] jack. Repeated
Краткое содержание страницы № 6
Using the Tuner Using the Tuner Tune your instrument 2 To use the tuner function of the G1N/G1XN, the built-in effects must be bypassed (temporarily Play the open string to tune, and adjust the pitch. turned off) or muted (original sound and effect sound turned off). The left side of the display shows the note The right side of the display shows a symbol that which is closest to the current pitch. indicates by how much the tuning is off. Switch to bypass or mute 1 Pitch is high Pitch is c
Краткое содержание страницы № 7
Using the Rhythm Function (Rhythm Mode) Using the Rhythm Function (Rhythm Mode) Adjust the rhythm volume 4 This section describes how to use the built-in rhythm function that plays realistic drum sounds in Turn the [VALUE] knob. various patterns. The current setting (0 – 30) is shown briefly on the Select rhythm mode 1 2 5 display. Set the Module selector to the «RHYTHM» position. Adjust the tempo 5 The number of the currently selected rhythm pattern (01 – 40) appears on the display.
Краткое содержание страницы № 8
Editing a Patch (Edit Mode) Editing a Patch (Edit Mode) Change the setting 2 The patches of the G1N/G1XN can be freely edited by changing the effect type used by the Turn the [VALUE] knob. various modules and by changing the parameter settings. Try editing the currently selected patch to create your own sound. The setting of the selected item changes, and a dot (.) appears in the bottom right of the display. This indicates that a setting has been changed from the Select the effect modul
Краткое содержание страницы № 9
Storing/Copying Patches (Store Mode) Storing/Copying Patches (Store Mode) Press the [STORE] key once more 3 An edited patch can be stored in a user bank (A – d). It is also possible to store an existing patch in When the store/copy process is completed, the G1N/ another location to create a copy. G1XN returns to the previous mode, with the target patch selected. In play mode or edit mode, press the [STORE] key 1 To cancel the store process, operate the [VALUE] knob B 8 HINT before pres
Краткое содержание страницы № 10
Using an External Foot Switch or Pedal (G1N only) Changing the Way Patches Are Called Up • Rhythm mode When you press the foot switch two times or more, the G1N detects the interval and This section describes how to change the patch selection method of the G1N/G1XN to «pre- automatically adjusts the tempo acc ordingly select». In this mode, you first select the patch to use next, and then perform an additional step to (tap tempo function). activate the patch. Display Control targe
Краткое содержание страницы № 11
Effect Types and Parameters Using the built-in expression pedal (G1XN only) Effect Types and Parameters T he G1XN l e t s you a dj ust t he vol um e or 4. To toggle the module assigned to the Explanation of symbols parameters in real time using the expression pedal between on and off, briefly pedal on the unit. This section explains how to push the pedal fully down. • T ap • Module selector use this capability. W h e n t h e m o d u l e i s o f f , t h e r e s p e c t i
Краткое содержание страницы № 12
Effect Types and Parameters Effect Types and Parameters Slow Attack LEAD EXTREME DS S 1 S 9 L D E D This ef fect reduces the attack rate of each individual note. Higher settings result in slower attack times. High gain sound with the most powerful gain Smooth, bright distortion sound. of any distortion effect in the world. Pedal Vox ACO.SIM (Acoustic Simulator) V 1 V 9 This ef fect simulates a vintage V ox wah pedal at half-open. Higher settings shift the emphasized frequency A upwards
Краткое содержание страницы № 13
Effect Types and Parameters Effect Types and Parameters n MODULATION module Pitch Bend Pedal Position MODULATION (Type&Prm1) RATE (Prm2) Sets the initial value for the pitch shift This effect allows using the expression pedal amount (the value that is active when the B 1 B 9 0 1 0 to change the pitch in real time. Right-digit Controls the value of parameter 2 pedal is at rest). The original sound/effect Selects the MODULATION module settings select the pitch change type caused of the M
Краткое содержание страницы № 14
Effect Types and Parameters S p e c i fi c a ti o n s Specifications n REVERB module REVERB (Type&Prm1) Effect types 54 Selects the REVERB module effect type and controls parameter 1 at the same time. Effect modules max. 8 simultaneous modules Patch memory User area: 10 patches x 4 banks = 40 Hall Preset area: 10 patches x 4 banks = 40 H 1 H 9 This reverb ef fect simulates the acoustics of a concert hall. Higher right-digit settings increase the mixing Total 80 patches ratio of the
Краткое содержание страницы № 15
The FCC r egulation war ning (for U.S.A.) This equipment has been tested and found to comply with the limits for a Class B digital device, pursuant to Part 15 of the FCC Rules. These limits are designed to provide reasonable protection against harmful interference in a residential installation. This equipment generates, uses, and can radiate radio frequency energy and, if not installed and used in a c c o r d a n c e w i t h t h e i n s t r u c t i o