Connecting the base station
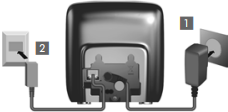
Please note:
- The mains adapter must always be connected, as the phone will not operate without mains connection.
- Use only the mains adapter and phone cord supplied. Pin connections on telephone cables can vary.
- The answering machine (A120A only) is ready for use approx. 30 seconds after the base has been connected.
Connecting the charging cradle (if included)
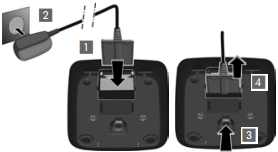
Connect the flat plug to the power supply  .
.
Plug the mains adapter into the plug socket  .
.
If you need to disconnect the plug from the charging cradle, press the release button ![]() and disconnect the plug
and disconnect the plug ![]() .
.
Setting up the handset for use
The display is protected by a plastic film. Please remove the protective film!
Inserting the batteries and closing the battery cover
Use only the rechargeable batteries recommended by Gigaset Communications GmbH, i.e. never use conventional (non-rechargeable) batteries as this could result in significant health risks and personal injury. For example, the batteries could explode. The phone could also malfunction or be damaged as a result of using batteries that are not of the recommended type.
- Insert the batteries with the polarity in the correct direction.
The polarity is indicated in the battery compartment.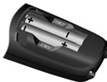

Initial charging and discharging of the batteries
The correct charge status can only be displayed if the batteries are first fully charged and discharged.
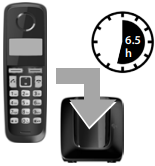
- Charge the handset in the base for 6.5 hours.
Please note
The handset must only be placed in the designated Gigaset base or charging cradle. - After charging, remove the handset from the base and only replace it when the batteries are fully discharged.
Please note
- The handset is pre-registered with the base. If you have purchased a model with multiple handsets, all handsets will already be registered with the base. You do not need to register the handset again. The internal handset number appears in the top left of the display, e.g. 1. However, if a handset is not registered with the base (Register HS or Put into base is displayed), please register the handset manually.
- If you have purchased multiple devices, you can upgrade your Gigaset to a cordless PABX by registering all A120/A220 handsets at the same base.
- After the first battery charge and discharge, you may place your handset in the charger after every call.
- Always repeat the charging and discharging procedure if you remove the batteries from the handset and reinsert them.
- The batteries may warm up during charging. This is not dangerous.
- After a while, the charge capacity of the batteries will decrease for technical reasons.
Setting the date and time
Set the date and time so that the correct date and time can be assigned to incoming calls, and so that the alarm can be used.
MENU ►  Settings ► OK ► Date/Time ► OK ► Date ►
 ![]() (enter the day, month and year in 6-digit format) ► OK ► Time ►
(enter the day, month and year in 6-digit format) ► OK ► Time ► ![]() (enter hours and minutes in 4-digit format) ► OK (display message: Saved)
(enter hours and minutes in 4-digit format) ► OK (display message: Saved)
► ![]() (press and hold to return to idle status)
(press and hold to return to idle status)
When entering the time and date, you can move the position of an entry to the left or right by pressing the control key up or down.
Please note
If your phone receives the date and time during calling line display (e.g., via your network provider, a router or PABXs), you can specify whether this data should be copied to your phone:
Activating/deactivating the handset
Press and hold the  key to activate or deactivate the handset. If you place a deactivated handset in the base station or charging cradle, it will automatically activate after approx. 30 seconds.
If you remove the handset from the base station/charging cradle, the display turns off briefly.
Making calls
Making external calls and ending calls
External calls are calls using the public telephone network.
 (Enter the phone number) ►
 ![]() .
.
The phone number is dialled. (Or you can first press and hold talk key ![]() [dial tone] and then enter the number.) During the call you can adjust the earpiece volume using
[dial tone] and then enter the number.) During the call you can adjust the earpiece volume using ![]() and set the volume with .
and set the volume with .
End the call/cancel dialling: Press the end call key .
You can automatically insert a network provider dialling code before any phone number.
Accepting a call
Press the talk key  to accept the call.
When Auto Answer is activated (see menu overview), simply remove the handset from the base station/charging cradle.
Calling Line Identification
When you get a call, the caller’s number will be displayed on your handset; the caller’s name will be displayed if it is stored in the directory.
Prerequisites:
- You have asked your network provider for the caller’s number (CLIP) to be displayed on your handset screen.
- The caller has asked the network provider for his/her number to be identified (CLI).
External call appears in the display if you have not requested CLIP, Withheld appears if the caller has withheld CLI, and Unavailable appears if CLI has not been requested.
Handsfree operation (Gigaset A220 only)
In handsfree mode, you activate the loudspeaker so that you can hear the caller without having to hold the handset to your ear. During a call activate or deactivate handsfree mode by pressing the handsfree key ![]() .
.
For instructions on adjusting the handsfree mode volume see menu overview.
Automatic network provider preselection
You can store a call-by-call number (preselection number), which is automatically placed in front of numbers when you dial them. If, for example, you wish to make international calls via special network providers, you can save the relevant dialling code here.
In the «With Preselect» list, specify the dialling codes or the first digits of the dialling codes that you wish to assign to the preselection number.
In the «Without Presel» list, enter any exceptions to the «With Preselect» list.

Enter preselection number via menu.
Permanently deactivating preselection: Delete the preselection number with  .
.
Temporarily cancelling preselection: (press and hold) ► MENU ► Preselect off ► OK ► (enter number) or ![]() (use number from directory) ► The number is dialled without Preselection.
(use number from directory) ► The number is dialled without Preselection.
Using the directory and lists
Directory
To open the directory: press control key  .
.
You can save up to 50 (A120/A120A) or 80 (A220) phone numbers (max. 22 digits) with corresponding names (max. 14 characters). Enter letters/characters.
Storing the first number in the directory
► New Entry? ► OK ► (enter number) ► OK ► (enter name) ► OK
Storing further numbers in the directory
► MENU ► New Entry ► OK ► (enter number) ► OK ► (enter name) ► OK
Selecting a directory entry
Open the directory with . You have the following options:
Dialling with the directory
► (select entry) ►
Using other functions
► (select entry) ► MENU
The following functions can be selected with : New Entry/Show Number/Edit Entry/Use Number/Delete Entry/Send Entry/Delete List/Send List/Shortcut
Sending the directory to another handset
Prerequisites:
- The sending and receiving handsets must both be registered to the same base station.
- The other handset and the base station can send and receive directory entries.
► (select entry) ► MENU ► Send Entry/Send List ► OK ► (enter the internal number of the receiving handset) ► OK
Using shortcut keys
You can assign directory entries to the keys 2–9:
► (select entry) ► MENU ► Shortcut ► OK ► (select key) ► OK or (press the key you want to assign the entry to)
To dial, press and hold the required shortcut key.
Last number redial list
This list contains the ten last dialled numbers.
Dialling from the last number redial list
(press briefly) ► (select entry) ►
Managing entries in the last number redial list
(press briefly) ► (select entry) ► MENU
The following functions can be selected with : Use Number/Copy to Dir./Delete Entry/Delete List
Calls list/answering machine list/network mailbox list
Press MENU ► Messages ► OK, to open the list overview. If you have new messages, only lists with new messages are displayed. Scroll through the lists by pressing .
An advisory tone sounds as soon as a new entry appears in the calls list/answering machine list/network mailbox list. New messages appears in the display.
Please note
If calls are saved in the network mailbox, you will receive a message if the appropriate settings have been made (depending on your network provider).
Calls list
Prerequisites: CLIP
Depending on the type of list set, the calls list contains answered calls, missed calls and calls recorded from the answering machine (A120A only).
Depending on the type of list set, all numbers of the last 25 incoming calls are saved or just the missed calls are saved.
Open the calls list
MENU ► Messages ► OK ► CallsList
The calls list is displayed as follows:
Number of new entries + number of old, read entries
Press OK to open the list.
The last incoming call is displayed. If necessary, use to select another entry.
Using other functions
(select entry) ► MENU
The following functions can be selected with : Delete Entry/Copy to Dir./Date/Time/Status/Delete List
Calling back a caller from the calls list
MENU ► Messages ► CallsList 01+02 ► OK ► (select entry) ►
Answering machine list (A120A only)/network mailbox list
You can use these lists to listen to messages on the answering machine (see «Playing back/deleting messages») or network mailbox.
Operating the answering machine (A120A only)
The answering machine is operated from the handset. You can record your own announcement messages using the handset. The pre-recorded announcement is used if no personal announcement is available.
If the memory is full, Memory full! appears in the display and the answering machine switches itself off automatically. It activates again automatically when you delete old messages.
The answering machine has already been preset at the factory. Make individual settings using the handset.
How to set a delay time (time period after which you would like the answering machine to answer a call), as well as how to set the recording length and activate call screening during the recording, see menu overview.
Activating/deactivating the answering machine
MENU ► Answer Machine ► OK ► Answer Mach. ► OK (✓ = on)
When you switch on the answering machine, the ± icon appears in the display.
Recording your own announcement
MENU ► Answer Machine ► OK ► Announcements ► OK ► Rec announce ► OK ► Speak after OK ► OK
You hear the ready tone (short tone). Now say your announcement (at least 3 sec.). Press OK to confirm or press or  to reject your recording. After recording, the announcement is played back for you to check.
Please note:
Recording ends automatically when the max. recording time of 170 seconds is reached or if there is a break in speaking of more than 2 seconds.
Playing back or deleting announcements
See menu overview.
Playing back/deleting messages
There are three ways to start playing back messages on the answering machine.
If you have new messages, playback will start with the first new message, otherwise with the first old message.
Messages consist of
- the message header (number/date/time) and
- the message body (recorded text).
The header is played back first, then the body. The phone number or the name is displayed.
Stopping and controlling playback
Controlling playback depends on the point in time at which the corresponding key is pressed.
During message playback:
Additional functions during message playback
Press the display key MENU. Playback stops.
Select the relevant function using : Dial Number/Continue/Handset Volume/Copy to Dir./Delete all old
Deleting an individual message
During playback: Press key  or the display key .
Deleting all old messages
During playback or pause:
MENU ► Delete all old ► OK (Confirm the security prompt)
Accepting a call from the answering machine
You can accept a call while the answering machine is recording the caller’s message:
MENU ► Accept ► OK
You can also accept the call by:
- pressing the talk key
- removing the handset from the base/charger (if Auto Answer is activated)
Recording stops and you can speak to the caller.
Setting a different language
You can change the language for the voice prompt and default announcement.
MENU ► Answer Machine ► OK ► Language ► OK ► (select language) ► OK
Operating when on the move (remote operation)
You can check your answering machine from any other telephone (hotel, pay phone etc.).
Prerequisites:
- You have set a system PIN other than 0000.
- The phone you are using for remote operation has tone dialling (DTMF) i. e., you hear different tones when you press the keys.
Calling the answering machine and playing messages
(Dial your own number.) ► When you hear your announcement, press ![]() and enter the system PIN.
and enter the system PIN.
The following keys are used for operation:
![]() During the number/date/time announcement: Skip to the start of the previous message.
During the number/date/time announcement: Skip to the start of the previous message.
During the message playback: Skip to the start of the current message.
![]() Stop playback. Press again to resume.
Stop playback. Press again to resume.
![]() Go to the next message.
Go to the next message.
![]() Delete current message.
Delete current message.
Activating the answering machine
(Enter your own number and allow the phone to ring until you hear the message: «Please enter PIN») ► (Enter system PIN)
Your answering machine is activated. It tells you how much memory time is left. The messages are now played back. The answering machine cannot be deactivated remotely.
Network mailbox
The network mailbox is the answering machine in your provider’s telephone network. More information is available from your provider. You cannot use the network mailbox unless you have requested it from your provider.
In order to use the network mailbox quickly and easily via the network mailbox list, the menu and to use fast access via key  , you will need to enter the number in your phone:
MENU ► Answer Machine ► OK ► Netw. Mailbox/Net Mailbox ► (enter number) ► OK
Locating a handset («Paging»)
You can locate your handset using the base.
- Briefly press the registration/paging key on the base.
All handsets will ring at the same time («paging»), even if the ringers are switched off.
Ending paging: Briefly press the registration/paging key on the base or press the talk key or the end call key on the handset.
Registering handsets manually
You can register up to four handsets on your base station. Each additional handset must be registered on the base station in order for it to work properly!
Registration takes approx. 1 minute. Handsets are assigned the lowest available internal number (1-4). If the internal numbers 1–4 are already assigned to other devices, the number 4 will be overwritten.
De-registering handsets
You can de-register all other registered handsets from each of the registered Gigaset handsets.
MENU ► Settings ► OK ► Handset ► OK ► De-register HS ► Select the internal party you wish to de-register. The handset you are currently using is indicated by <. ► OK ► Enter the base system PIN (default setting: 0000) ► OK
Using multiple handsets
Making internal calls
Internal calls are free calls to other handsets that are registered to the same base station.
2 handsets are registered
Press the display key INT, the other handset is called.
More than 2 handsets are registered
Calling a specific handset
INT ► (1…4, enter internal number of the handset) or
INT ► (Select the internal party) ► OK or ► the handset is called
Calling all handsets («group call»)
INT ► ![]() or INT ► Call all ► OK or ► all handsets are called
or INT ► Call all ► OK or ► all handsets are called
When a participant answers you can speak to them. To end the call, press .
Internal consultation call/connecting a call
You are in conversation with an external participant. Press the INT display key and call one or all handsets. The external participant hears the hold music. When the internal participant answers: If necessary, announce the external call.
Either press the end call key (the call is transferred to the internal participant), or press the display key . You are reconnected with the external participant.
When transferring a call you can also press the end call key before the internal participant answers.
Listening in to an external call
You are conducting an external call. An internal participant can listen in on this call and take part in the conversation (conference). Prerequisite: The Listening in function must be activated.
Activating/deactivating listening in
MENU ► Settings ► OK ► Base ► OK ► Listening in ► OK (✓ = on)
Internal listening in (conference)
You want to listen in to an existing external call. Press and hold the key. You can listen in to the call. All participants hear a signal tone.
To end: press the end call key . All participants hear a signal tone.
If the first internal participant presses the end call key , the handset that has «listened in» remains connected to the external participant.
Setting the alarm clock
Activating/deactivating the alarm clock
MENU ► Alarm Clock ► OK ► Activation ► OK (✓ = on)
When activated: ► (Set the wake-up time) ► OK
When the alarm clock rings, press any key to switch it off for 24 hours. If the alarm clock is set, the wake-up icon ![]() will appear on the screen and the wake-up time will be displayed instead of the date.
will appear on the screen and the wake-up time will be displayed instead of the date.
Setting the wake-up time
MENU ► Alarm Clock ► OK ► Wake-up time ► OK
Enter the wake-up time in hours and minutes, then press OK.
Phone settings
For details on how to make audio settings, see menu overview.
For details on how to set the system PIN on the base station, see the menu overview.
Changing the display language
MENU ► Settings ► OK ► Handset ► OK ► Language ► OK ► (select language) ► OK
The current language is indicated by ✓.
If you accidentally choose a language you do not understand:
MENU ►  (press the keys one after the other) ► (select language) ► OK
Activating/deactivating music on hold
You can make it so that your external participant hears music in case of internal recall and during call transfer.
MENU ►  ►The number for the current setting flashes:
0 = off; 1 = on ► enter number ► OK.
Repeater mode
With a repeater you can increase the range of your base station. You will need to activate repeater mode. Repeater mode and No Radiation mode cancel each other out.
Resetting the handset
You can reset individual settings and changes that you have made. Entries in the directory, the calls list and the handset’s registration to the base station will be retained.
MENU ► Settings ► OK ► Handset ► OK ► Reset Handset ► OK ► Reset? ► OK
Cancel the reset with .
Restoring the base station
When restoring factory settings the No Radiation mode is deactivated, individual settings are reset and all lists are deleted.
The date and time are retained. The answering machine (A120A only) is ready for use approx. 15 seconds after the base has been reset.
Handsets are still registered, the system PIN is not reset.
MENU ► Settings ► OK ► Base ► OK ► Base Reset ► OK ► Reset? ► OK
Resetting the base using the key on the base
All handsets are de-registered and the system PIN is reset to the original code 0000.
Carry out the following steps: Remove the mains cable from the base. Hold down the registration/paging key on the base and reconnect the power cable to the base at the same time. Hold the key down for at least 5 seconds.
Operating the base station on the PABX/router
Operating on the router
When operating the Gigaset on an analogue port of a router you can reduce problems with echoes by activating the Echo mode. If you have no problems with echoes, this function should be deactivated.
Operating on the PABX
The following settings are only necessary when your PABX requires them; see the user guide for your PABX.
When entering the digits, enter them slowly one after the other.
Changing the dialling mode
MENU ►  ► The number for the set dialling mode flashes:
0 = touch tone dialling (DTMF); 1 = dial pulsing (DP) ► enter number ► OK.
Setting recall
MENU ►  ► The number for the current recall flashes:
0 = 80 ms; 1 = 100 ms; 2 = 120 ms; 3 = 400 ms; 4 = 250 ms; 5 = 300 ms; 6 = 600 ms; 7 = 800 ms ► enter number ► OK.
Changing pause after line seizure
You can set the length of the pause inserted between pressing the talk key and sending the phone number.
MENU ►  ► The number for the current pause length flashes:
1 = 1 sec.; 2 = 3 sec.; 3 = 7 sec. ► enter number ► OK.
Changing the pause after the recall key
MENU ►  ► The number for the current pause length flashes:
1 = 800 ms; 2 = 1600 ms; 3 = 3200 ms ► enter number ► OK.
Entering letters/characters
Standard characters
Press the relevant key the number of times indicated.
Briefly press the hash key ![]() to switch from from «Abc» to «123» mode, from «123» to «abc» mode and from «abc» to «Abc» mode.
to switch from from «Abc» to «123» mode, from «123» to «abc» mode and from «abc» to «Abc» mode.

1) Space
Specifications
Batteries
Technology: Nickel-metal-hydride (NiMH); Size: AAA (Micro, HR03); Voltage: 1.2 V; Capacity: 400 — 1000 mAh
General specifications
| DECT standard | is supported | |
| GAP standard | is supported | |
| Range | up to 300 m outdoors, up to 50 m indoors | |
| Base station power supply | 230 V ~/50 Hz | |
| Radio frequency range | 1880-1900 MHz | |
| Transmission power | 10 mW average power per channel, 250 mW pulse power | |
| Environmental conditions in operation | +5°C to +45°C, 20% to 75% relative humidity | |
| Base station power consumption | A120/A220 | A120A |
In standby mode
|
ca. 1.0 W ca. 0.8 W |
ca. 1.2 W ca. 1.0 W |
| During a call | ca. 1.0 W | ca. 1.2 W |
Questions and answers
If you have any queries about the use of your telephone, visit our website at www.gigaset.com/service for 24-hour support. The table below contains a list of common problems and possible solutions.
| Problem | Cause | Solution |
| Nothing appears in the display. |
The handset is not switched on. The batteries are flat. |
Press the end call key Charge or replace the batteries. |
| No wireless connection to the base station, Base flashes in the display. |
The handset is outside the range of the base station. The handset is not registered. The base station is not turned on. |
Move the handset closer to the base station. Register the handset. Check the mains connector on the base station. |
| You cannot hear a ringer/dialling tone from the fixed line network. | The phone cord supplied has not been used or has been replaced by a new cord with the wrong jack connections. | Please always use the phone cord supplied or ensure that the pin connections are correct when purchasing from a retailer: 3-4 assignment of telephone leads/EURO CTR37. |
|
Error tone sounds after system PIN prompt. PIN forgotten. |
The system PIN you have entered is incorrect. |
Reset the system PIN to the default 0000. All handsets are de-registered. All settings are reset. All lists are deleted. |
If the handset has come into contact with liquid:
- Switch off the handset and remove the battery pack immediately.
- Allow the liquid to drain from the handset.
- Pat all parts dry, then place the handset with the battery compartment open and the keypad facing down in a dry, warm place for at least 72 hours (not in a microwave, oven etc.).
- Do not switch on the handset again until it is completely dry.
When it has fully dried out, you will normally be able to use it again.
Here you can download full pdf version of manual, it may contain additional safety instructions, warranty information, FCC rules, etc.
Посмотреть инструкция для Gigaset A120 бесплатно. Руководство относится к категории телефоны, 53 человек(а) дали ему среднюю оценку 8.5. Руководство доступно на следующих языках: русский. У вас есть вопрос о Gigaset A120 или вам нужна помощь? Задайте свой вопрос здесь
Не можете найти ответ на свой вопрос в руководстве? Вы можете найти ответ на свой вопрос ниже, в разделе часто задаваемых вопросов о Gigaset A120.
Какой вес Gigaset A120?
Gigaset A120 имеет вес 120 g.
Инструкция Gigaset A120 доступно в русский?
Да, руководствоGigaset A120 доступно врусский .
Не нашли свой вопрос? Задайте свой вопрос здесь

Please note:
- The mains adapter must always be connected, as the phone will not operate without mains connection.
- Use only the mains adapter and phone cord supplied. Pin connections on telephone cables can vary.
- The answering machine (A120A only) is ready for use approx. 30 seconds after the base has been connected.
Connecting the charging cradle (if included)
Connect the flat plug to the power supply .
Plug the mains adapter into the plug socket .
If you need to disconnect the plug from the charging cradle, press the release button ![]() and disconnect the plug
and disconnect the plug ![]() .
.
Setting up the handset for use
The display is protected by a plastic film. Please remove the protective film!
Inserting the batteries and closing the battery cover
Use only the rechargeable batteries recommended by Gigaset Communications GmbH, i.e. never use conventional (non-rechargeable) batteries as this could result in significant health risks and personal injury. For example, the batteries could explode. The phone could also malfunction or be damaged as a result of using batteries that are not of the recommended type.
- Insert the batteries with the polarity in the correct direction.
The polarity is indicated in the battery compartment.
Initial charging and discharging of the batteries
The correct charge status can only be displayed if the batteries are first fully charged and discharged.
- Charge the handset in the base for 6.5 hours.
Please note
The handset must only be placed in the designated Gigaset base or charging cradle. - After charging, remove the handset from the base and only replace it when the batteries are fully discharged.
Please note
- The handset is pre-registered with the base. If you have purchased a model with multiple handsets, all handsets will already be registered with the base. You do not need to register the handset again. The internal handset number appears in the top left of the display, e.g. 1. However, if a handset is not registered with the base (Register HS or Put into base is displayed), please register the handset manually.
- If you have purchased multiple devices, you can upgrade your Gigaset to a cordless PABX by registering all A120/A220 handsets at the same base.
- After the first battery charge and discharge, you may place your handset in the charger after every call.
- Always repeat the charging and discharging procedure if you remove the batteries from the handset and reinsert them.
- The batteries may warm up during charging. This is not dangerous.
- After a while, the charge capacity of the batteries will decrease for technical reasons.
Setting the date and time
Set the date and time so that the correct date and time can be assigned to incoming calls, and so that the alarm can be used.
MENU ► Settings ► OK ► Date/Time ► OK ► Date ► ![]() (enter the day, month and year in 6-digit format) ► OK ► Time ►
(enter the day, month and year in 6-digit format) ► OK ► Time ► ![]() (enter hours and minutes in 4-digit format) ► OK (display message: Saved)
(enter hours and minutes in 4-digit format) ► OK (display message: Saved)
► ![]() (press and hold to return to idle status)
(press and hold to return to idle status)
When entering the time and date, you can move the position of an entry to the left or right by pressing the control key up or down.
Please note
If your phone receives the date and time during calling line display (e.g., via your network provider, a router or PABXs), you can specify whether this data should be copied to your phone:
Activating/deactivating the handset
Press and hold the key to activate or deactivate the handset. If you place a deactivated handset in the base station or charging cradle, it will automatically activate after approx. 30 seconds.
If you remove the handset from the base station/charging cradle, the display turns off briefly.
Making calls
Making external calls and ending calls
External calls are calls using the public telephone network.
(Enter the phone number) ► ![]() .
.
The phone number is dialled. (Or you can first press and hold talk key ![]() [dial tone] and then enter the number.) During the call you can adjust the earpiece volume using
[dial tone] and then enter the number.) During the call you can adjust the earpiece volume using ![]() and set the volume with .
and set the volume with .
End the call/cancel dialling: Press the end call key .
You can automatically insert a network provider dialling code before any phone number.
Accepting a call
Press the talk key to accept the call.
When Auto Answer is activated (see menu overview), simply remove the handset from the base station/charging cradle.
Calling Line Identification
When you get a call, the caller’s number will be displayed on your handset; the caller’s name will be displayed if it is stored in the directory.
Prerequisites:
- You have asked your network provider for the caller’s number (CLIP) to be displayed on your handset screen.
- The caller has asked the network provider for his/her number to be identified (CLI).
External call appears in the display if you have not requested CLIP, Withheld appears if the caller has withheld CLI, and Unavailable appears if CLI has not been requested.
Handsfree operation (Gigaset A220 only)
In handsfree mode, you activate the loudspeaker so that you can hear the caller without having to hold the handset to your ear. During a call activate or deactivate handsfree mode by pressing the handsfree key ![]() .
.
For instructions on adjusting the handsfree mode volume see menu overview.
Automatic network provider preselection
You can store a call-by-call number (preselection number), which is automatically placed in front of numbers when you dial them. If, for example, you wish to make international calls via special network providers, you can save the relevant dialling code here.
In the «With Preselect» list, specify the dialling codes or the first digits of the dialling codes that you wish to assign to the preselection number.
In the «Without Presel» list, enter any exceptions to the «With Preselect» list.
Enter preselection number via menu.
Permanently deactivating preselection: Delete the preselection number with .
Temporarily cancelling preselection: (press and hold) ► MENU ► Preselect off ► OK ► (enter number) or ![]() (use number from directory) ► The number is dialled without Preselection.
(use number from directory) ► The number is dialled without Preselection.
Using the directory and lists
Directory
To open the directory: press control key .
You can save up to 50 (A120/A120A) or 80 (A220) phone numbers (max. 22 digits) with corresponding names (max. 14 characters). Enter letters/characters.
Storing the first number in the directory
► New Entry? ► OK ► (enter number) ► OK ► (enter name) ► OK
Storing further numbers in the directory
► MENU ► New Entry ► OK ► (enter number) ► OK ► (enter name) ► OK
Selecting a directory entry
Open the directory with . You have the following options:
Dialling with the directory
► (select entry) ►
Using other functions
► (select entry) ► MENU
The following functions can be selected with : New Entry/Show Number/Edit Entry/Use Number/Delete Entry/Send Entry/Delete List/Send List/Shortcut
Sending the directory to another handset
Prerequisites:
- The sending and receiving handsets must both be registered to the same base station.
- The other handset and the base station can send and receive directory entries.
► (select entry) ► MENU ► Send Entry/Send List ► OK ► (enter the internal number of the receiving handset) ► OK
Using shortcut keys
You can assign directory entries to the keys 2–9:
► (select entry) ► MENU ► Shortcut ► OK ► (select key) ► OK or (press the key you want to assign the entry to)
To dial, press and hold the required shortcut key.
Last number redial list
This list contains the ten last dialled numbers.
Dialling from the last number redial list
(press briefly) ► (select entry) ►
Managing entries in the last number redial list
(press briefly) ► (select entry) ► MENU
The following functions can be selected with : Use Number/Copy to Dir./Delete Entry/Delete List
Calls list/answering machine list/network mailbox list
Press MENU ► Messages ► OK, to open the list overview. If you have new messages, only lists with new messages are displayed. Scroll through the lists by pressing .
An advisory tone sounds as soon as a new entry appears in the calls list/answering machine list/network mailbox list. New messages appears in the display.
Please note
If calls are saved in the network mailbox, you will receive a message if the appropriate settings have been made (depending on your network provider).
Calls list
Prerequisites: CLIP
Depending on the type of list set, the calls list contains answered calls, missed calls and calls recorded from the answering machine (A120A only).
Depending on the type of list set, all numbers of the last 25 incoming calls are saved or just the missed calls are saved.
Open the calls list
MENU ► Messages ► OK ► CallsList
The calls list is displayed as follows:
Number of new entries + number of old, read entries
Press OK to open the list.
The last incoming call is displayed. If necessary, use to select another entry.
Using other functions
(select entry) ► MENU
The following functions can be selected with : Delete Entry/Copy to Dir./Date/Time/Status/Delete List
Calling back a caller from the calls list
MENU ► Messages ► CallsList 01+02 ► OK ► (select entry) ►
Answering machine list (A120A only)/network mailbox list
You can use these lists to listen to messages on the answering machine (see «Playing back/deleting messages») or network mailbox.
Operating the answering machine (A120A only)
The answering machine is operated from the handset. You can record your own announcement messages using the handset. The pre-recorded announcement is used if no personal announcement is available.
If the memory is full, Memory full! appears in the display and the answering machine switches itself off automatically. It activates again automatically when you delete old messages.
The answering machine has already been preset at the factory. Make individual settings using the handset.
How to set a delay time (time period after which you would like the answering machine to answer a call), as well as how to set the recording length and activate call screening during the recording, see menu overview.
Activating/deactivating the answering machine
MENU ► Answer Machine ► OK ► Answer Mach. ► OK (✓ = on)
When you switch on the answering machine, the ± icon appears in the display.
Recording your own announcement
MENU ► Answer Machine ► OK ► Announcements ► OK ► Rec announce ► OK ► Speak after OK ► OK
You hear the ready tone (short tone). Now say your announcement (at least 3 sec.). Press OK to confirm or press or to reject your recording. After recording, the announcement is played back for you to check.
Please note:
Recording ends automatically when the max. recording time of 170 seconds is reached or if there is a break in speaking of more than 2 seconds.
Playing back or deleting announcements
See menu overview.
Playing back/deleting messages
There are three ways to start playing back messages on the answering machine.
If you have new messages, playback will start with the first new message, otherwise with the first old message.
Messages consist of
- the message header (number/date/time) and
- the message body (recorded text).
The header is played back first, then the body. The phone number or the name is displayed.
Stopping and controlling playback
Controlling playback depends on the point in time at which the corresponding key is pressed.
During message playback:
Additional functions during message playback
Press the display key MENU. Playback stops.
Select the relevant function using : Dial Number/Continue/Handset Volume/Copy to Dir./Delete all old
Deleting an individual message
During playback: Press key or the display key .
Deleting all old messages
During playback or pause:
MENU ► Delete all old ► OK (Confirm the security prompt)
Accepting a call from the answering machine
You can accept a call while the answering machine is recording the caller’s message:
MENU ► Accept ► OK
You can also accept the call by:
- pressing the talk key
- removing the handset from the base/charger (if Auto Answer is activated)
Recording stops and you can speak to the caller.
Setting a different language
You can change the language for the voice prompt and default announcement.
MENU ► Answer Machine ► OK ► Language ► OK ► (select language) ► OK
Operating when on the move (remote operation)
You can check your answering machine from any other telephone (hotel, pay phone etc.).
Prerequisites:
- You have set a system PIN other than 0000.
- The phone you are using for remote operation has tone dialling (DTMF) i. e., you hear different tones when you press the keys.
Calling the answering machine and playing messages
(Dial your own number.) ► When you hear your announcement, press ![]() and enter the system PIN.
and enter the system PIN.
The following keys are used for operation:
![]() During the number/date/time announcement: Skip to the start of the previous message.
During the number/date/time announcement: Skip to the start of the previous message.
During the message playback: Skip to the start of the current message.
![]() Stop playback. Press again to resume.
Stop playback. Press again to resume.
![]() Go to the next message.
Go to the next message.
![]() Delete current message.
Delete current message.
Activating the answering machine
(Enter your own number and allow the phone to ring until you hear the message: «Please enter PIN») ► (Enter system PIN)
Your answering machine is activated. It tells you how much memory time is left. The messages are now played back. The answering machine cannot be deactivated remotely.
Network mailbox
The network mailbox is the answering machine in your provider’s telephone network. More information is available from your provider. You cannot use the network mailbox unless you have requested it from your provider.
In order to use the network mailbox quickly and easily via the network mailbox list, the menu and to use fast access via key , you will need to enter the number in your phone:
MENU ► Answer Machine ► OK ► Netw. Mailbox/Net Mailbox ► (enter number) ► OK
Locating a handset («Paging»)
You can locate your handset using the base.
- Briefly press the registration/paging key on the base.
All handsets will ring at the same time («paging»), even if the ringers are switched off.
Ending paging: Briefly press the registration/paging key on the base or press the talk key or the end call key on the handset.
Registering handsets manually
You can register up to four handsets on your base station. Each additional handset must be registered on the base station in order for it to work properly!
Registration takes approx. 1 minute. Handsets are assigned the lowest available internal number (1-4). If the internal numbers 1–4 are already assigned to other devices, the number 4 will be overwritten.
De-registering handsets
You can de-register all other registered handsets from each of the registered Gigaset handsets.
MENU ► Settings ► OK ► Handset ► OK ► De-register HS ► Select the internal party you wish to de-register. The handset you are currently using is indicated by <. ► OK ► Enter the base system PIN (default setting: 0000) ► OK
Using multiple handsets
Making internal calls
Internal calls are free calls to other handsets that are registered to the same base station.
2 handsets are registered
Press the display key INT, the other handset is called.
More than 2 handsets are registered
Calling a specific handset
INT ► (1…4, enter internal number of the handset) or
INT ► (Select the internal party) ► OK or ► the handset is called
Calling all handsets («group call»)
INT ► ![]() or INT ► Call all ► OK or ► all handsets are called
or INT ► Call all ► OK or ► all handsets are called
When a participant answers you can speak to them. To end the call, press .
Internal consultation call/connecting a call
You are in conversation with an external participant. Press the INT display key and call one or all handsets. The external participant hears the hold music. When the internal participant answers: If necessary, announce the external call.
Either press the end call key (the call is transferred to the internal participant), or press the display key . You are reconnected with the external participant.
When transferring a call you can also press the end call key before the internal participant answers.
Listening in to an external call
You are conducting an external call. An internal participant can listen in on this call and take part in the conversation (conference). Prerequisite: The Listening in function must be activated.
Activating/deactivating listening in
MENU ► Settings ► OK ► Base ► OK ► Listening in ► OK (✓ = on)
Internal listening in (conference)
You want to listen in to an existing external call. Press and hold the key. You can listen in to the call. All participants hear a signal tone.
To end: press the end call key . All participants hear a signal tone.
If the first internal participant presses the end call key , the handset that has «listened in» remains connected to the external participant.
Setting the alarm clock
Activating/deactivating the alarm clock
MENU ► Alarm Clock ► OK ► Activation ► OK (✓ = on)
When activated: ► (Set the wake-up time) ► OK
When the alarm clock rings, press any key to switch it off for 24 hours. If the alarm clock is set, the wake-up icon ![]() will appear on the screen and the wake-up time will be displayed instead of the date.
will appear on the screen and the wake-up time will be displayed instead of the date.
Setting the wake-up time
MENU ► Alarm Clock ► OK ► Wake-up time ► OK
Enter the wake-up time in hours and minutes, then press OK.
Phone settings
For details on how to make audio settings, see menu overview.
For details on how to set the system PIN on the base station, see the menu overview.
Changing the display language
MENU ► Settings ► OK ► Handset ► OK ► Language ► OK ► (select language) ► OK
The current language is indicated by ✓.
If you accidentally choose a language you do not understand:
MENU ► (press the keys one after the other) ► (select language) ► OK
Activating/deactivating music on hold
You can make it so that your external participant hears music in case of internal recall and during call transfer.
MENU ► ►The number for the current setting flashes:
0 = off; 1 = on ► enter number ► OK.
Repeater mode
With a repeater you can increase the range of your base station. You will need to activate repeater mode. Repeater mode and No Radiation mode cancel each other out.
Resetting the handset
You can reset individual settings and changes that you have made. Entries in the directory, the calls list and the handset’s registration to the base station will be retained.
MENU ► Settings ► OK ► Handset ► OK ► Reset Handset ► OK ► Reset? ► OK
Cancel the reset with .
Restoring the base station
When restoring factory settings the No Radiation mode is deactivated, individual settings are reset and all lists are deleted.
The date and time are retained. The answering machine (A120A only) is ready for use approx. 15 seconds after the base has been reset.
Handsets are still registered, the system PIN is not reset.
MENU ► Settings ► OK ► Base ► OK ► Base Reset ► OK ► Reset? ► OK
Resetting the base using the key on the base
All handsets are de-registered and the system PIN is reset to the original code 0000.
Carry out the following steps: Remove the mains cable from the base. Hold down the registration/paging key on the base and reconnect the power cable to the base at the same time. Hold the key down for at least 5 seconds.
Operating the base station on the PABX/router
Operating on the router
When operating the Gigaset on an analogue port of a router you can reduce problems with echoes by activating the Echo mode. If you have no problems with echoes, this function should be deactivated.
Operating on the PABX
The following settings are only necessary when your PABX requires them; see the user guide for your PABX.
When entering the digits, enter them slowly one after the other.
Changing the dialling mode
MENU ► ► The number for the set dialling mode flashes:
0 = touch tone dialling (DTMF); 1 = dial pulsing (DP) ► enter number ► OK.
Setting recall
MENU ► ► The number for the current recall flashes:
0 = 80 ms; 1 = 100 ms; 2 = 120 ms; 3 = 400 ms; 4 = 250 ms; 5 = 300 ms; 6 = 600 ms; 7 = 800 ms ► enter number ► OK.
Changing pause after line seizure
You can set the length of the pause inserted between pressing the talk key and sending the phone number.
MENU ► ► The number for the current pause length flashes:
1 = 1 sec.; 2 = 3 sec.; 3 = 7 sec. ► enter number ► OK.
Changing the pause after the recall key
MENU ► ► The number for the current pause length flashes:
1 = 800 ms; 2 = 1600 ms; 3 = 3200 ms ► enter number ► OK.
Entering letters/characters
Standard characters
Press the relevant key the number of times indicated.
Briefly press the hash key ![]() to switch from from «Abc» to «123» mode, from «123» to «abc» mode and from «abc» to «Abc» mode.
to switch from from «Abc» to «123» mode, from «123» to «abc» mode and from «abc» to «Abc» mode.
1) Space
Specifications
Batteries
Technology: Nickel-metal-hydride (NiMH); Size: AAA (Micro, HR03); Voltage: 1.2 V; Capacity: 400 — 1000 mAh
General specifications
| DECT standard | is supported | |
| GAP standard | is supported | |
| Range | up to 300 m outdoors, up to 50 m indoors | |
| Base station power supply | 230 V ~/50 Hz | |
| Radio frequency range | 1880-1900 MHz | |
| Transmission power | 10 mW average power per channel, 250 mW pulse power | |
| Environmental conditions in operation | +5°C to +45°C, 20% to 75% relative humidity | |
| Base station power consumption | A120/A220 | A120A |
In standby mode
|
ca. 1.0 W ca. 0.8 W |
ca. 1.2 W ca. 1.0 W |
| During a call | ca. 1.0 W | ca. 1.2 W |
Questions and answers
If you have any queries about the use of your telephone, visit our website at www.gigaset.com/service for 24-hour support. The table below contains a list of common problems and possible solutions.
| Problem | Cause | Solution |
| Nothing appears in the display. |
The handset is not switched on. The batteries are flat. |
Press the end call key Charge or replace the batteries. |
| No wireless connection to the base station, Base flashes in the display. |
The handset is outside the range of the base station. The handset is not registered. The base station is not turned on. |
Move the handset closer to the base station. Register the handset. Check the mains connector on the base station. |
| You cannot hear a ringer/dialling tone from the fixed line network. | The phone cord supplied has not been used or has been replaced by a new cord with the wrong jack connections. | Please always use the phone cord supplied or ensure that the pin connections are correct when purchasing from a retailer: 3-4 assignment of telephone leads/EURO CTR37. |
|
Error tone sounds after system PIN prompt. PIN forgotten. |
The system PIN you have entered is incorrect. |
Reset the system PIN to the default 0000. All handsets are de-registered. All settings are reset. All lists are deleted. |
If the handset has come into contact with liquid:
- Switch off the handset and remove the battery pack immediately.
- Allow the liquid to drain from the handset.
- Pat all parts dry, then place the handset with the battery compartment open and the keypad facing down in a dry, warm place for at least 72 hours (not in a microwave, oven etc.).
- Do not switch on the handset again until it is completely dry.
When it has fully dried out, you will normally be able to use it again.
Here you can download full pdf version of manual, it may contain additional safety instructions, warranty information, FCC rules, etc.
Посмотреть инструкция для Gigaset A120 бесплатно. Руководство относится к категории телефоны, 53 человек(а) дали ему среднюю оценку 8.5. Руководство доступно на следующих языках: русский. У вас есть вопрос о Gigaset A120 или вам нужна помощь? Задайте свой вопрос здесь
Не можете найти ответ на свой вопрос в руководстве? Вы можете найти ответ на свой вопрос ниже, в разделе часто задаваемых вопросов о Gigaset A120.
Какой вес Gigaset A120?
Gigaset A120 имеет вес 120 g.
Инструкция Gigaset A120 доступно в русский?
Да, руководствоGigaset A120 доступно врусский .
Не нашли свой вопрос? Задайте свой вопрос здесь
Lombok / Russland ru / A31008-M2401-S301-1-5619 / Lombok.fm / 03.04.2012
L
ombok
16+
16, V
e
rsion
1,1
5
.11.20
11
1
Gigaset A120/A120A/A220/A220A
Краткие сведения о трубке
1 Уровень заряда аккумуляторов:
= e V U
(от нулевого до полного)
=
мигает: аккумуляторы почти
разряжены
e V U
мигает: идет зарядка
2 Значок автоответчика (только A120A/
A220A)
3 Экранные кнопки
4 Кнопка отбоя и кнопка включения/
выключения
5 Кнопка разговора/громкой связи
6 Клавиша управления (
u)
7 Кнопка телефонной книги (нажать
клавишу управления вниз)
8 Кнопка 1
Открытие автоответчика (только A120A/
A220A)/сетевого почтового ящика
9 Кнопка «звездочка» (*)
Включение/отключение сигналов вызова
(длительное нажатие);
при установленном соединении:
переключение с импульсного на тональный
набор (кратковременное нажатие)
10 Кнопка 0/кнопка дозвона
Консультационный вызов (мигает):
длительное нажатие
11 Кнопка #
Включение/отключение блокировки
клавиатуры (длительное нажатие);
переключение между прописными/
строчными буквами и цифрами; вставка
паузы при наборе (длительное нажатие)
12 Микрофон
(режим громкой связи — только A220/
A220A)
A120/A120A
A220/A220A
1
± V
11.12.
11:56
INT
MENU
1
2
3
4
5
6
7
8
9
10
11
12
Экранные кнопки:
Нажатие кнопки запускает функцию, которая отображается
над этой кнопкой на экране.
Обратите внимание!
При появлении нового сообщения в списке вызовов/списке автоответчика/
списке сетевого почтового ящика (
¢
стр. 6) на экране отображается сообщение
Новые сообщ.
Вид
Действие при нажатии
INT
Вызов других зарегистрированных трубок
¢
стр. 9.
MENU Открытие главного меню или подменю (см. обзор
меню
¢
стр. 16.
“
Возврат вверх на один уровень меню.
U
Прокрутка вверх/вниз или регулировка громкости
кнопкой
u
.
T
Перемещение курсора влево/вправо кнопкой
u
.
˜
Удаление введенных символов по одному справа
налево.
ОК
Подтверждение функции меню или сохранение
записи.
Экономичный режим ECO DECT
Во время разговора уровень радиосигнала трубки автоматически настраивается в
соответствии с расстоянием между трубкой и базовым блоком: чем меньше расстояние,
тем ниже мощность сигнала (излучение).
При нахождении трубки в режиме ожидания радиосигнал трубки отключается. При этом
базовый блок продолжает поддерживать связь с трубкой, используя меньшее число
радиосигналов.
Кроме того, радиосигналы базового блока отключаются, когда включен параметр Без
излучения.
MENU
¤
u
Настройки
¤
OK
¤
u
Базовый блок
¤
OK
¤
u
ECO DECT
¤
OK
¤
Без излучения
¤
OK (
‰
= излучение отключается, значок в левом углу экрана)
Обратите внимание!
◆
Все зарегистрированные телефоны должны поддерживать эту функцию.
◆
Для быстрого подключения входящих вызовов трубка периодически на короткий
период времени переключается в режим приема. Это увеличивает потребление
энергии и, следовательно, сокращает время ожидания и разговора.
Краткие сведения о
базовом блоке
Кнопка регистрации/
поиска трубок:
Поиск трубок
(кратковременное
нажатие, «Поиск трубок»
¢
стр. 9
Регистрация трубок
(длительное нажатие
¢
стр. 9.
Страницы и текст этой инструкции
. Страница №1") Инструкция dect Gigaset A120(A)
Инструкция dect Gigaset A120(A)
. Страница №2") Информация отображена на картинке
Информация отображена на картинке
. Страница №3") Информация отображена на картинке
Информация отображена на картинке
. Страница №4") Информация отображена на картинке
Информация отображена на картинке
. Страница №5") Информация отображена на картинке
Информация отображена на картинке
Как использовать наш сайт инструкций OnlineManuals.ru
Наша цель состоит в том, чтобы предоставить вам быстрый доступ к содержанию инструкции для dect Gigaset A120(A).
С помощью онлайн просмотра, Вы можете быстро просмотреть содержимое инструкции и найти решение проблемы с dect Gigaset A120(A).
Для Вашего удобства
Если листать руководство пользователя dect Gigaset A120(A) прямо на сайте, не очень удобно для Вас, есть два возможных решения:
• Просмотр в полноэкранном режиме — легко просмотреть руководство пользователя (без загрузки его на свой компьютер), Вы можете использовать режим полноэкранного просмотра.
Для просмотра инструкции пользователя dect Gigaset A120(A) на полном экране, используйте кнопку «Открыть в Pdf-viewer».
• Загрузка на компьютер — Вы можете также скачать Инструкция dect Gigaset A120(A) на свой компьютер и сохранить его в файлах.
Многие люди предпочитают читать документы не на экране, а в печатной версии.
Возможность печати руководства пользователя также была предусмотрена на нашем сайте,
и вы можете использовать ее, нажав на иконку «печать» в Pdf-viewer.
Нет необходимости печатать все руководство dect Gigaset A120(A), можно выбрать только нужные страницы инструкции.