У вас уже есть продукция Canon? Зарегистрируйте свои продукты для доступа к программному обеспечению и обновлениям встроенного ПО, а также подпишитесь на рассылку, чтобы получать персонализированные советы и эксклюзивные предложения
Поддержка
Загружайте ПО, встроенное ПО и руководства, а также получите доступ к материалам поддержки для вашего продукта серии EOS.
Драйверы
Для выполнения подключения некоторых устройств к компьютеру может потребоваться драйвер. На этой вкладке вы найдете соответствующие драйверы для своего устройства или, в случае отсутствия драйверов, описание совместимости устройства с каждой операционной системой.
Полезная информация. Доступ к программному обеспечению, руководствам и другим материалам можно получить с помощью вкладок, расположенных выше.
Операционная система Обнаруженная операционная система
Программное обеспечение
Программное обеспечение загружать необязательно, но оно обеспечивает дополнительные функции и позволяет максимально эффективно пользоваться возможностями устройства. На этой вкладке можно просмотреть и загрузить доступное программное обеспечение для вашего устройства.
Операционная система Обнаруженная операционная система
Руководства пользователя
Руководства для вашего устройства или программного обеспечения перечислены ниже.
Приложения и функции
На этой вкладке можно посмотреть доступные приложения и функции, совместимые с вашим устройством.
Встроенное ПО
Встроенное ПО — это постоянное программное обеспечение, установленное на устройстве и обеспечивающее его корректную работу. Canon может периодически выпускать обновления для этого встроенного ПО, и если обновление доступно, его можно загрузить ниже.
FAQs
На этой вкладке вы найдете ответы на часто задаваемые вопросы и другую полезную информацию, которая поможет вам в решении вопросов и проблем.
Важная информация
На этой вкладке вы найдете подборку часто задаваемых вопросов, которые, на наш взгляд, будут вам интересны.
Коды ошибок
Код ошибки или сообщение об ошибке может появиться на устройстве по различным причинам. С помощью поля поиска можно найти полезную информацию о конкретном коде ошибки, где будут указаны причина ошибки и необходимые действия по ее устранению.
Технические характеристики
Ниже приведены все технические характеристики данного продукта.
Полезные ссылки
-
-
Ремонт
Поиск центров по ремонту оборудования, полезная информация по процессу ремонта
-
Переработка
Узнайте больше о программе утилизации картриджей Canon
-
Canon ID
Регистрация продукта и управление аккаунтом Canon ID
- Manuals
- Brands
- Canon Manuals
- Digital Camera
- EOS 6D Mark II
- Instruction manual
-
Contents
-
Table of Contents
-
Troubleshooting
-
Bookmarks
Quick Links
E
Instruction manuals (PDF files) and software can be downloaded
from the Canon Web site (p.4, 596).
INSTRUCTION
www.canon.com/icpd
MANUAL
Related Manuals for Canon EOS 6D Mark II
Summary of Contents for Canon EOS 6D Mark II
-
Page 1
Instruction manuals (PDF files) and software can be downloaded from the Canon Web site (p.4, 596). INSTRUCTION www.canon.com/icpd MANUAL… -
Page 2: Introduction
Introduction The EOS 6D Mark II is a digital single-lens reflex camera featuring a full-frame (approx. 35.9 x 24.0 mm) CMOS sensor with approx. 26.2 effective megapixels, DIGIC 7, normal ISO speed range of ISO 100 — ISO 40000 (for still photos), high-precision and high-speed 45-point AF (up to 45 cross-type points), maximum continuous shooting speed of approx.
-
Page 3: Item Check List
Be careful not to lose any of the above items. For items sold separately, see the System Map (p.514). When you need Lens Instruction Manuals, download them from the Canon Web site (p.4). The Lens Instruction Manuals (PDF files) are for lenses sold individually.
-
Page 4: Instruction Manuals
Canon Web site to your computer or the like. Downloading the Instruction Manuals (PDF Files) The Instruction Manuals (PDF files) can be downloaded from the Canon Web site to your computer or the like. Instruction Manual (PDF files) download site: •…
-
Page 5: Compatible Cards
The Instruction Manuals (PDF files) can be downloaded to your smartphone or tablet using the QR code. www.canon.com/icpd A software application is required to read out the QR code. Select your country or region of residence, then download the Instruction Manuals.
-
Page 6: Quick Start Guide
Quick Start Guide Insert the battery (p.42) Upon purchase, charge the battery to start using (p.40). Insert the card (p.43) With the card’s label facing toward the back of the camera, insert it into the card slot. Attach the lens (p.53) Align the red mount index on the lens with the red mount index on the…
-
Page 7
Quick Start Guide Flip out the LCD monitor (p.46) When the LCD monitor displays the date/time/zone setting screen, see page 49. Focus on the subject (p.56) Look through the viewfinder and aim the viewfinder center over the subject. Press the shutter button halfway, and the camera will focus on the subject. -
Page 8: Conventions Used In This Manual
Conventions Used in this Manual Icons in this Manual <6> : Indicates the Main Dial. <5> : Indicates the Quick Control Dial. <9> : Indicates the Multi-controller. <W><X><Y><Z> : Indicates the direction of the shift or move when the key on the Multi-controller is pressed. <0>…
-
Page 9: Chapters
Chapters Introduction Getting Started and Basic Camera Operations Basic Shooting Setting the AF and Drive Modes Image Settings GPS Settings Advanced Operations for Photographic Effects Flash Photography Shooting with the LCD Monitor (Live View Shooting) Shooting Movies Image Playback Post-Processing Images Sensor cleaning Print Order and Photobook Set-up Customizing the Camera…
-
Page 10: Table Of Contents
Contents Introduction Item Check List…………….. 3 Instruction Manuals …………….4 Compatible Cards…………….5 Quick Start Guide …………….6 Conventions Used in this Manual…………. 8 Chapters………………. 9 Index to Features …………….18 Safety Precautions …………….. 22 Handling Precautions …………..25 Nomenclature …………….. 28 Getting Started and Basic Camera Operations Charging the Battery …………..
-
Page 11
Contents Formatting the Card …………….70 Before You Start …………….73 Disabling the Beeper …………..73 Setting the Power-off Time/Auto Power Off……..73 Setting the Image Review Time ………..74 Turning the LCD Monitor Off/On ……….74 Reverting the Camera to the Default Settings……75 l Displaying the Grid in the Viewfinder …….. -
Page 12
Contents 8: r Panning……………..114 8: 4 Shooting Close-ups …………116 8: P Shooting Food…………..117 8: y Shooting Candlelight Portraits ……..118 8: 6 Shooting Night Portraits (With a Tripod) ……119 8: F Shooting Night Scenes (Handheld) ……. 120 8: G Shooting Backlit Scenes ……….121 Q Quick Control ……………. -
Page 13
Contents Customizing a Picture Style …………180 Registering a Picture Style…………183 B: Setting the White Balance…………185 u White Balance Correction …………191 Auto Correction of Brightness and Contrast ……… 194 Setting Noise Reduction ……………195 Highlight Tone Priority …………..199 Correction of Lens Aberrations due to Optical Characteristics .. -
Page 14
Contents a: Manual Exposure …………..241 q Selecting the Metering Mode……….243 O Setting the Desired Exposure Compensation ……245 h Auto Exposure Bracketing (AEB)……….. 247 A Locking the Exposure for Shooting (AE Lock) ……249 F: Long (Bulb) Exposures …………250 w: HDR (High Dynamic Range) Shooting …… -
Page 15
Contents Shooting Movies k Shooting Movies …………..326 Shooting Function Settings …………339 Setting the Movie Recording Quality……….341 Setting the Sound Recording …………346 Shooting HDR Movies…………..348 a Shooting Time-lapse Movies……….349 Shooting Video Snapshots…………361 Menu Function Settings …………..371 Image Playback x Image Playback …………..388 B: Shooting Information Display ……….391 H Index display (Multiple-image Display) ……..399… -
Page 16
Contents Slide Show (Auto Playback) …………424 Viewing Images on a TV Set …………427 L Erasing Images……………. 430 Adjusting the LCD Monitor Brightness ……… 434 Setting the Auto Rotation of Vertical Images …….. 435 Post-Processing Images R Processing RAW Images with the Camera……438 S Resizing JPEG Images………… -
Page 17
Contents Registering My Menu …………..505 w: Registering Custom Shooting Modes……..510 Reference System Map ……………… 514 Checking the Battery Information……….516 Using a Household Power Outlet……….520 H Using Eye-Fi Cards …………..522 Function Availability Table by Shooting Mode…….526 Menu Settings ……………. -
Page 18: Index To Features
Index to Features Power LCD monitor Charging the battery p.40 Vari-angle p.46 Battery level p.48 Touch control p.67 Checking battery Brightness p.434 information p.516 Half-press Off/On p.74 Household power outlet p.520 Electronic level p.80 Auto power off p.73 Shooting mode guide p.89 Feature guide p.90…
-
Page 19
Index to Features Image Recording Settings Shooting Creating/Selecting a Shooting mode p.35 folder p.209 • Basic Zone modes p.35 File numbering p.211 • SCN mode p.108 • Creative Zone modes p.36 Image Quality Aspect ratio p.168 Image-recording quality p.162 HDR mode p.253 ISO speed (still photos) p.170… -
Page 20
Index to Features Flash Movie Shooting External flash p.278 Autoexposure shooting p.326 Flash exposure Manual exposure compensation p.278 shooting p.330 FE lock p.278 ISO speed (movie) p.372 Flash function settings p.281 AF method p.308 Flash Custom Function Movie Servo AF p.373 settings p.286… -
Page 21
Index to Features Playback Customization Image review time p.74 Custom Functions (C.Fn) p.469 Single-image display p.388 Custom Controls p.497 Shooting information My Menu p.505 display p.391 Custom shooting mode p.510 Index display p.399 Sensor Cleaning and Dust Image browsing Reduction (Jump display) p.400 Setting image search… -
Page 22: Safety Precautions
If you experience any malfunctions, problems, or damage to the product, contact the nearest Canon Service Center or the dealer from whom you purchased the product. Follow the warnings below. Otherwise, death or serious Warnings: injuries may result.
-
Page 23
Safety Precautions Do not use the equipment where there is flammable gas. This is to prevent an explosion or a fire. If you drop the equipment and the casing breaks open to expose the internal parts, do not touch the exposed internal parts. There is a possibility of an electrical shock. Do not disassemble or modify the equipment. -
Page 24
Safety Precautions Follow the cautions below. Otherwise, physical injury or Cautions: property damage may result. Do not use or store the product in a high-temperature location such as inside a car under the hot sun. The product may become hot and cause burns. Doing so may also cause battery leakage or explosion, which will degrade the performance or shorten the life of the product. -
Page 25: Handling Precautions
If you accidentally drop the camera into water or are concerned that moisture (water), dirt, dust, or salt may have gotten inside it, promptly consult the nearest Canon Service Center. Never leave the camera near anything having a strong magnetic field such as a magnet or electric motor.
-
Page 26
Do not use cleaners that contain organic solvents to clean the camera body or lens. For stubborn dirt, take the camera to the nearest Canon Service Center. Do not touch the camera’s electrical contacts with your fingers. This is to prevent the contacts from corroding. -
Page 27
Handling Precautions LCD Panel and LCD Monitor Although the LCD monitor is manufactured with very high precision technology with over 99.99% effective pixels, 0.01% or fewer of the pixels may be dead, and there may also be spots of black, red, or other colors. This is not a malfunction. -
Page 28: Nomenclature
Nomenclature <R> Drive mode selection <f> AF operation/AF method selection button button (p.156, 159) (p.130, 305/308) <i> ISO speed setting <B> AF area selection button (p.136, 482) button (p.170) GPS antenna <q> Metering mode selection button (p.243) Lens mount index (p.53) Flash sync contacts <U>…
-
Page 29
Nomenclature LCD panel (p.33, 34) <p> AF start button (p.56, 130, 292, 337) Eyecup (p.270) <A> AE lock/ FE lock button Viewfinder eyepiece (p.249, 278) <S> AF point selection button <B> Info button (p.136, 137) (p.60, 80, 84, 91, 293, 298, 334, 388) Power switch (p.47) Speaker… -
Page 30
Nomenclature <A> Live View shooting/ <k> Movie shooting switch (p.289/325) <0> Start/Stop button Dioptric adjustment knob (p.55) (p.290, 326) <V> Focal plane mark Access lamp (p.44) Strap mount (p.38) <u> Index/ Magnify/ Card slot Reduce button cover (p.43) (p.399/317, 321, 404) Battery Accessory positioning hole compartment… -
Page 31
Nomenclature Viewfinder Information Display Electronic level (p.81) Large Zone AF frame (p.140) Area AF frame (p.140) Spot metering circle (p.244) Aspect ratio line 16:9 (p.168) Focusing screen Aspect ratio line 1:1 (p.168) Grid (p.79) <S> AF point <O> Spot AF point Aspect ratio (p.139) line 4:3… -
Page 32
Nomenclature <i> ISO speed (p.170) <o> Focus indicator (p.94, 131) <A> AE lock (p.249) Maximum burst for AEB in-progress continuous shooting (p.167) (p.247) Number of remaining multiple exposures (p.259) <D> Flash-ready (p.278) ISO speed (p.170) Improper FE lock warning Consecutive self-timer shots (p.159) <d>… -
Page 33: Lcd Panel
Nomenclature LCD Panel Drive mode (p.156, 159) <A> Highlight tone priority (p.199) u Single shooting o High-speed continuous shooting <i> ISO speed (p.170) i Low-speed continuous shooting B Silent single shooting ISO speed (p.170) M Silent continuous shooting Consecutive self-timer shots Q Self-timer: 10 sec./remote control (p.159) k Self-timer: 2 sec./remote control…
-
Page 34
Nomenclature <P> Multiple-exposure shooting <a> Time-lapse movie shooting (p.349) (p.258) <s> Bluetooth function <H> Bulb timer shooting/ Interval timer shooting <z> Warning icon (p.251/267) (p.489) <l> Wi-Fi function <r> GPS acquisition status Battery level (p.48) <x> Logging function <O> Exposure compensation Exposure level indicator (p.245) Exposure compensation amount… -
Page 35: Shooting Mode
Nomenclature Mode Dial You can set the shooting mode. Turn the Mode Dial while holding down the Mode Dial center (Mode Dial lock release button). Basic Zone All you do is press the shutter button. The camera sets everything to suit the subject or scene for shooting.
-
Page 36
Nomenclature Creative Zone These modes give you more control for shooting various subjects as desired. d : Program AE (p.234) s : Shutter-priority AE (p.236) f : Aperture-priority AE (p.238) a : Manual exposure (p.241) F : Bulb (p.250) Custom shooting mode You can register the shooting mode (<d>, <s>, <f>, <a>, or <F>), AF operation, menu settings, etc. -
Page 37
Nomenclature Battery Charger LC-E6 Charger for Battery Pack LP-E6N/LP-E6 (p.40). Power plug Battery pack slot Charge lamp IMPORTANT SAFETY INSTRUCTIONS-SAVE THESE INSTRUCTIONS. DANGER-TO REDUCE THE RISK OF FIRE OR ELECTRIC SHOCK, CAREFULLY FOLLOW THESE INSTRUCTIONS. For connection to a supply not in the U.S.A., use an attachment plug adapter of the proper configuration for the power outlet, if needed. -
Page 38: Attaching The Strap
Nomenclature Attaching the Strap Pass the end of the strap through the camera’s strap mount eyelet from the bottom. Then pass it through the strap’s buckle as shown in the illustration. Pull the strap to take up any slack and make sure the strap will not loosen from the buckle.
-
Page 39: Getting Started And Basic Camera Operations
Getting Started and Basic Camera Operations This chapter describes preparatory steps before you start shooting and the basic camera operations.
-
Page 40: Charging The Battery
Charging the Battery Remove the protective cover. Detach the protective cover provided with the battery. Attach the battery. As shown in the illustration, attach the battery securely to the charger. To detach the battery, follow the above procedure in reverse. Recharge the battery.
-
Page 41
Charging the Battery Tips for Using the Battery and Charger Upon purchase, the battery is not fully charged. Charge the battery before use. Recharge the battery on the day before or on the day it is to be used. Even during storage, a charged battery will gradually drain and lose its capacity. After recharging the battery, detach it and disconnect the charger from the power outlet. -
Page 42: Installing And Removing The Battery
Installing and Removing the Battery Load a fully-charged Battery Pack LP-E6N (or LP-E6) into the camera. The camera’s viewfinder becomes bright when a battery is installed, and darkens when the battery is removed. If the battery is not installed, the image in the viewfinder becomes blurred and you cannot perform focusing.
-
Page 43: Installing And Removing The Card
Installing and Removing the Card You can use an SD, SDHC, or SDXC memory card (sold separately) with the camera. The captured images are recorded onto the card. Make sure the card’s write-protect switch is set upward to enable writing and erasing. Installing the Card Open the cover.
-
Page 44: Removing The Card
Installing and Removing the Card Removing the Card Open the cover. Set the power switch to <2>. Check that the access lamp is off, then open the cover. If [Recording…] is displayed on the LCD monitor, close the cover. Access lamp Remove the card.
-
Page 45
Installing and Removing the Card When the access lamp is lit or blinking, it indicates that images are being written to, read from, or erased from the card, or data is being transferred. Do not open the card slot cover during this time. Also, never do any of the following while the access lamp is lit or blinking. -
Page 46: Using The Lcd Monitor
Using the LCD Monitor After you flip out the LCD monitor, you can set menu functions, use Live View shooting, shoot movies, or play back photos and movies. You can change the direction and angle of the LCD monitor. Flip out the LCD monitor. Rotate the LCD monitor.
-
Page 47: Turning On The Power
Turning on the Power If you turn on the power switch and the date/time/zone setting screen appears, see page 49 to set the date/time/zone. <1> : The camera turns on. <2> : The camera is turned off and does not function. Set the power switch to this position when not using the camera.
-
Page 48: Battery Level
Turning on the Power z Battery Level Indicator When the power switch is set to <1>, the battery level will be indicated in one of six levels. A blinking battery icon < > indicates that the battery will soon be exhausted. Display Level (%) 100 — 70…
-
Page 49: Setting The Date, Time, And Zone
Setting the Date, Time, and Zone When you turn on the power for the first time or if the date/time/zone have been reset, the date/time/zone setting screen will appear. Follow the steps below to set the time zone first. Set the camera to the time zone in which you currently live so that when you travel, you can simply change the setting to the correct time zone for your destination, and the camera will automatically adjust the date/ time.
-
Page 50
3 Setting the Date, Time, and Zone Press the <Y> <Z> keys to select [Zone], then press <0>. Press the <W> <X> keys to select the time zone, then press <0>. If your desired time zone is not listed, press the <M> button, then proceed to the next step to set it (with the time difference from the Coordinated Universal Time, UTC). -
Page 51
3 Setting the Date, Time, and Zone Set the daylight saving time. Set it as necessary. Press the <Y> <Z> keys to select [Y]. Press <0> so <r> is displayed. Press the <W> <X> keys to select [Z], then press <0>. When the daylight saving time is set to [Z], the time set in step 4 will advance by 1 hr. -
Page 52: Selecting The Interface Language
Selecting the Interface Language Display the menu screen. Press the <M> button to display the menu screen. Under the [52] tab, select [LanguageK]. Press the <Q> button and select the [5] tab. Press the <Y> <Z> keys to select the [52] tab. Press the <W>…
-
Page 53: Attaching And Detaching A Lens
Attaching and Detaching a Lens The camera is compatible with all Canon EF lenses. The camera cannot be used with EF-S or EF-M lenses. Attaching a Lens Remove the caps. Remove the rear lens cap and the body cap by turning them as shown by the arrows.
-
Page 54: Detaching
Attaching and Detaching a Lens Detaching the Lens While pressing the lens release button, turn the lens as shown by the arrow. Turn the lens until it stops, then detach it. Attach the rear lens cap to the detached lens. Do not look at the sun directly through any lens.
-
Page 55: Basic Shooting Operations
Basic Shooting Operations Adjusting the Viewfinder Clarity Turn the dioptric adjustment knob. Turn the knob left or right so that the AF points in the viewfinder look sharp. If the knob is difficult to turn, remove the eyecup (p.270). If the camera’s dioptric adjustment still cannot provide a sharp viewfinder image, using E-series Dioptric Adjustment Lenses (sold separately) is recommended.
-
Page 56: Shutter Button
Basic Shooting Operations Shutter Button The shutter button has two steps. You can press the shutter button halfway. Then you can further press the shutter button completely. Pressing Halfway This activates autofocusing and the automatic exposure system that sets the shutter speed and aperture.
-
Page 57: Mode Dial
Basic Shooting Operations Mode Dial Turn the dial while holding down the lock release button at the center of the dial. Use it to set the shooting mode. Main Dial After pressing a button, turn the <6> dial. When you press a button such as <f>, <R>, <i>, or <q>, the respective function remains selectable for approx.
-
Page 58
Basic Shooting Operations Quick Control Dial After pressing a button, turn the <5> dial. When you press a button such as <f>, <i>, or <q>, the respective function remains selectable for approx. 6 sec. (9). During this time, you can turn the <5>… -
Page 59
Basic Shooting Operations Multi-controller The <9> consists of an eight-direction key. Use it to select the AF point, correct the white balance, move the AF point or magnifying frame during Live View shooting or movie shooting, set the Quick Control, etc. You can also use it to select menu items. -
Page 60: Lcd Panel Illumination
Basic Shooting Operations U LCD Panel Illumination You can illuminate the LCD panel by pressing the <U> button. Turn on (9) or off the LCD panel illumination by pressing the <U> button. During a bulb exposure, pressing the shutter button completely will turn off the LCD panel illumination.
-
Page 61: Q Quick Control For Shooting Functions
Q Quick Control for Shooting Functions You can directly select and set the shooting functions displayed on the LCD monitor with intuitive operations. This is called Quick Control. Press the <Q> button The Quick Control screen will appear. Set the desired functions. Press the <W>…
-
Page 62
Q Quick Control for Shooting Functions Functions Settable with the Quick Control Creative Zone modes Aperture (p.238) Shutter speed (p.236) Flash exposure compensation (p.278, 285) Exposure compensation/ ISO speed (p.170) AEB setting Wi-Fi function (p.245/247) Picture Style (p.176) Custom Controls (p.497) Image-recording quality AF operation (p.130) (p.162) -
Page 63: Quick Control
Q Quick Control for Shooting Functions Quick Control Select the desired function and press <0>. The function setting screen will appear. Turn the <6> or <5> dial, then press the <Y> <Z> keys to change the setting. There are also functions that are set by pressing a button <0>…
-
Page 64: Menu Operations And Configurations
Menu Operations and Configurations You can configure various settings with the menus such as the image- recording quality, date/time, etc. <M> button <Q> button <6> Main Dial LCD monitor <5> Quick Control Dial Multi-controller <0> button <W><X><Y><Z> keys Basic Zone Modes Menu Screen * In Basic Zone modes, some tabs and menu items do not appear.
-
Page 65
3 Menu Operations and Configurations Menu Setting Procedure Display the menu screen. Press the <M> button to display the menu screen. Select a tab. Each time you press the <Q> button, the main tab (group of functions) will switch. Press the Multi-controller’s <Y> <Z>… -
Page 66
3 Menu Operations and Configurations The description of menu functions hereafter assumes that you have pressed the <M> button to display the menu screen. You can also tap on the menu screen or turn the <6> or <5> dial to operate the menu. -
Page 67: Operating The Camera With Touch Screen
d Operating the Camera with Touch Screen You can operate the camera by tapping on the LCD monitor (touch- sensitive panel) with your fingers. Sample Screen (Quick Control) Use your finger to tap on (touch briefly and then remove your finger from) the LCD monitor.
-
Page 68: The Screen
d Operating the Camera with Touch Screen Drag Sample Screen (Menu screen) Slide your finger while touching the LCD monitor. Sample Screen (Scale display) Examples of operations possible by dragging your finger on the screen Selecting a menu tab or item after pressing the <M> button Setting with scale display Quick Control Selecting AF points (except with Live View shooting)
-
Page 69
d Operating the Camera with Touch Screen 3 Setting the Touch Control Response Select [Touch control]. Under the [54] tab, select [Touch control], then press <0>. Set the touch control response setting. Select the desired setting, then press <0>. [Standard] is the normal setting. [Sensitive] provides a more reactive touch screen response than [Standard]. -
Page 70: Formatting The Card
Formatting the Card If the card is new or was previously formatted by another camera or computer, format the card with this camera. When the card is formatted, all images and data on the card will be erased. Even protected images will be erased, so make sure there is nothing you need to keep.
-
Page 71
3 Formatting the Card Format the card in the following cases: The card is new. The card was formatted by a different camera or a computer. The card is full of images or data. A card-related error is displayed (p.567). Low-level Formatting Perform low-level formatting if the card’s writing or reading speed seems slow or if you want to totally erase the data on the card. -
Page 72
3 Formatting the Card If you format an SDXC card with this camera and then insert it into another camera, an error may be displayed and the card may become unusable. Certain computer operating systems or card readers may not recognize a card formatted in exFAT. -
Page 73: Before You Start
Before You Start 3 Disabling the Beeper You can prevent the beeper from sounding when focus is achieved, during self-timer shooting, and during touch operations. Select [Beep]. Under the [54] tab, select [Beep], then press <0>. Select [Disable]. Select [Disable], then press <0>. The beeper will not sound.
-
Page 74: Setting The Image Review Time
Before You Start 3 Setting the Image Review Time You can set how long the image is displayed on the LCD monitor immediately after shooting. To keep the captured image displayed, set [Hold]. To not have the captured image displayed, set [Off]. Select [Image review].
-
Page 75: Reverting The Camera To The Default Settings
Before You Start 3 Reverting the Camera to the Default SettingsN The camera’s shooting function settings and menu settings can be reverted to their defaults. Select [Clear all camera settings]. Under the [55] tab, select [Clear all camera settings], then press <0>. Select [OK].
-
Page 76
Before You Start Shooting Function Settings Image Recording Settings AF operation One-Shot AF Image quality Automatic AF area selection Aspect ratio selection AF mode Picture Style Auto Disable after One- Lens electronic Auto Lighting Standard Shot AF Optimizer q (Evaluative Lens aberration correction Metering mode metering) -
Page 77
Before You Start Camera Settings Live View Shooting Settings Image review time 2 sec. Live View shooting Enable One-Shot AF Release shutter AF operation Enable without card AF method u+Tracking Image jump w/6 e (10 images) Touch Shutter Disable Disable 8 sec. -
Page 78
Before You Start Movie Shooting Settings Movie Servo AF Enable Movie recording NTSC:L6X PAL:L5X size AF method u+Tracking Sound recording Auto Movie Servo AF track sensitivity Wind filter Auto Disable Attenuator Movie Servo AF Speed kISO speed settings When active Always on ISO speed Auto… -
Page 79: Displaying The Grid In The Viewfinder
Displaying the Grid in the Viewfinder You can display a grid in the viewfinder to help you check the camera tilt or compose the shot. Select [Viewfinder display]. Under the [52] tab, select [Viewfinder display], then press <0>. Select [Grid display]. Select [Show].
-
Page 80: Q Displaying The Electronic Level
Displaying the Electronic Level You can display the electronic level on the LCD monitor and in the viewfinder to help you correct the camera tilt. Displaying the Electronic Level on the LCD Monitor Press the <B> button. Each time you press the <B> button, the screen display will change.
-
Page 81: Electronic Level
3 Displaying the Electronic Level 3 Displaying the Electronic Level in the Viewfinder An electronic level can be displayed on the upper part of the viewfinder. Since this indicator is displayed during shooting, you can take the picture while checking the camera tilt. Select [Viewfinder display].
-
Page 82: Setting The Viewfinder Information Display
Setting the Viewfinder Information DisplayN The shooting function settings (Battery level, Shooting mode, AF operation, Image quality (image type), Drive mode, Metering mode, Flicker detection) can be displayed in the viewfinder. By default, only Flicker detection is checkmarked [X]. Select [Viewfinder display]. Under the [52] tab, select [Viewfinder display], then press <0>.
-
Page 83
3 Setting the Viewfinder Information DisplayN If no card is inserted in the camera, the image-recording quality (image type: JPEG/RAW) will not be displayed. Regardless of whether it is checkmarked, the respective information will appear in the viewfinder in the following cases: when you change the shooting mode, when you press the <f>, <R>, or <q>… -
Page 84: B Button Functions
B Button Functions During viewfinder shooting, when you press the <B> button with the camera being ready to shoot, you can toggle the display between the electronic level (p.80) and Quick Control screen (p.86). [z button display options] under the [54] tab enables you to select the options displayed when the <B>…
-
Page 85
B Button Functions If you turn off the power with the electronic level or Quick Control screen displayed, the same screen will be displayed when you turn on the power again. To cancel this function, press the <B> button a number of times until the screen is blank, then turn off the power switch. -
Page 86: Quick Control Screen
B Button Functions Quick Control Screen AE lock Aperture Shutter speed Highlight tone priority ISO speed Shooting modes Exposure level Flash exposure indicator compensation Exposure compensation Wi-Fi function White balance Custom Controls correction Image-recording Picture Style quality AF operation Possible shots/ Quick Control icon Auto cleaning Battery level…
-
Page 87
B Button Functions Button Operations with Quick Control Screen Displayed When you press the <f>, <R>, <i>, <q>, <S>, or <B> button, the setting screen appears and you can set it with <6>, <5>, <9>, or <B> button. AF operation Drive mode ISO speed Metering mode… -
Page 88: R Setting The Multi Function Lock
R Setting the Multi Function Lock By setting the <R> switch upward, you can prevent the settings from being changed by accidentally operating the Main Dial, Quick Control Dial, or Multi-controller or by inadvertently tapping on the touch screen. For details on the Multi function lock switch, see page 59. Select [Multi function lock].
-
Page 89: Setting The Shooting Mode Guide
Setting the Shooting Mode Guide When you turn the Mode Dial to select a shooting mode, a brief description (shooting mode guide) of the shooting mode can be displayed on the screen. During viewfinder shooting, the mode guide appears when the Quick Control screen or electronic level is displayed. By default, it is set to [Enable].
-
Page 90: Setting The Feature Guide
Setting the Feature Guide When using Quick Control, a brief description (feature guide) of the selected function can be displayed. The Feature guide can be displayed during viewfinder shooting, Live View shooting, and movie shooting. By default, it is set to [Enable]. Select [Feature guide].
-
Page 91: Help
Help When [zHelp] is displayed at the bottom of the menu screen, the feature’s description (Help) can be displayed. Press the <B> button to display the Help. Press it again to turn off the Help display. If the Help fills more than one screen, a scroll bar will appear on the right edge. In such a case, press <W>…
-
Page 92
Help Help Display Text Size You can select the text size for the Help display. By default, it is set to [Small]. Select [Help text size]. Under the [53] tab, select [Help text size], then press <0>. Set the text size. Select [Small] or [Standard], then press <0>. -
Page 93: Basic Shooting
Basic Shooting This chapter describes how to use the Basic Zone modes on the Mode Dial for best results. With Basic Zone modes, all you do is point and shoot, and the camera sets everything automatically (p.127, 526). Also, because advanced shooting function settings cannot be changed, you can enjoy shooting photographs without worrying about botched pictures due to misoperation.
-
Page 94: A Fully Automatic Shooting (Scene Intelligent Auto)
A Fully Automatic Shooting (Scene Intelligent Auto) <A> is a fully automatic mode. The camera analyzes the scene and sets the optimum settings automatically. It can also adjust focus automatically on either the still or moving subject by detecting the motion of the subject (p.97).
-
Page 95
A Fully Automatic Shooting (Scene Intelligent Auto) Take the picture. Press the shutter button completely to take the picture. The captured image will be displayed for approx. 2 sec. on the LCD monitor. The <A> mode makes the colors look more impressive in nature, outdoor, and sunset scenes. -
Page 96
The shutter speed display is blinking. Since it is too dark, taking the picture may result in a blurred subject due to camera shake. Using a tripod or a Canon EX-series Speedlite (sold separately, p.278) is recommended. When the external flash was used, the bottom part of the picture came out unnaturally dark. -
Page 97: A Full Auto Techniques (Scene Intelligent Auto)
A Full Auto Techniques (Scene Intelligent Auto) Recomposing the Shot Depending on the scene, positioning the subject toward the left or right to include a balanced background will result in a picture with better perspective. In the <A> mode, pressing the shutter button halfway to focus on a still subject will lock the focus on that subject.
-
Page 98: A Live View Shooting
A Full Auto Techniques (Scene Intelligent Auto) A Live View Shooting You can shoot while viewing the image on the LCD monitor. This is called “Live View shooting”. For details, see page 289. Set the Live View shooting/Movie shooting switch to <A>. Display the Live View image on the LCD monitor.
-
Page 99
A Full Auto Techniques (Scene Intelligent Auto) You can also rotate the LCD monitor to shoot at different angles. For details, see page 46. Normal angle Low angle High angle… -
Page 100: C Creative Auto Shooting
C Creative Auto Shooting <C> is a fully-automatic shooting mode that is a step more advanced from <A>. You can first adjust the photo’s ambience, background blur, etc. before shooting. By pressing the <Q> button, you can set 1. Ambience-based shots, 2. Background blur setting, 3.
-
Page 101
C Creative Auto Shooting (1) Ambience-based shots (4) AF point selection (2) Background blur Possible shots Battery level Image-recording quality (3) Drive mode (1) Ambience-based shots You can select and shoot with the ambience you want to convey in your images. -
Page 102
C Creative Auto Shooting Ambience Settings gAmbience: Standard This provides standard image characteristics. h Vivid The subject looks crisp, sharp and vivid. Effective for making the picture look more impressive than with [g Ambience: Standard]. i Soft The subject is less defined, giving the picture a softer and daintier look. -
Page 103
C Creative Auto Shooting (2) Background blur You can adjust the degree of background blur. Turn the <6> or <5> dial to set the effect. With the (2) item on page 101 selected, press <0> to display the screen shown on the left. -
Page 104
C Creative Auto Shooting (3) Drive mode You can select single shooting, continuous shooting, or self-timer. Turn the <6> or <5> dial to select the desired mode. Pressing <0> will display the screen shown on the left. Turn the <6> dial to select the desired setting. -
Page 105
C Creative Auto Shooting Using Effect Preview in Live View Shooting In the <C> mode, when you set the [Ambience-based shots] or [Background blur], shooting while checking the resulting effect on the Live View image is recommended. Display the Live View image. Set the Live View/Movie shooting switch to <A>, then press the <0>… -
Page 106
C Creative Auto Shooting Set [Background Blur]. Press the <Q> button to exit the Quick Control. Turn the <6> or <5> dial to adjust the blur while checking it on the screen (p.103). While you adjust it, [Simulating blur] will be displayed. Take the picture. -
Page 107: 8: Special Scene Mode
8: Special Scene Mode The camera will automatically choose the appropriate settings when you select a shooting mode for your subject or scene. * <8> stands for Special Scene. Set the Mode Dial to <8>. Press the <Q> button The Quick Control screen will appear. Select [Choose scene].
-
Page 108: Scn Mode
8: Special Scene Mode SCN Modes 2: Portrait (p.109) q: Group Photo 3: Landscape (p.111) (p.110) 5: Sports (p.112) C: Kids (p.113) r: Panning (p.114) 4: Close-up (p.116) y: Candlelight (p.118) P: Food (p.117) G: HDR Backlight F: Handheld Night 6: Night Portrait Control (p.121) (p.119)
-
Page 109: 8: 2 Shooting Portraits
8: 2 Shooting Portraits The <2> (Portrait) mode blurs the background to make the human subject stand out. It also makes skin tones and hair look softer. Shooting Tips Select the location where the distance between the subject and the background is the farthest. The further the distance between the subject and background, the more blurred the background will look.
-
Page 110: 8: Q Shooting Group Photos
8: q Shooting Group Photos Use the <q> (Group Photo) mode to shoot group photos. You can take a picture in which both the people in the front and people in the back are all in focus. Shooting Tips Use a wide-angle lens. When using a zoom lens, use the wide-angle end to make it easy to get all the people in the group in focus at once, from the front row to the back.
-
Page 111: 8: 3 Shooting Landscapes
8: 3 Shooting Landscapes Use the <3> (Landscape) mode for expansive scenery or to have everything in focus from near to far. For vivid blues and greens, and very sharp and crisp images. Shooting Tips With a zoom lens, use the wide-angle end. When using a zoom lens, set the lens to the wide-angle end to make the objects near and far in focus.
-
Page 112: 8: 5 Shooting Moving Subjects
8: 5 Shooting Moving Subjects Use the <5> (Sports) mode to shoot a moving subject, such as a running person or a moving vehicle. Shooting Tips Use a telephoto lens. Use of a telephoto lens is recommended to enable shooting from a distance.
-
Page 113: 8: C Photographing Children
8: C Photographing Children To photograph the children running around, use <C> (Kids). Skin tones will look healthy. Shooting Tips Track the subject with the Area AF frame. After aiming the Area AF frame over the subject, press the shutter button halfway to start focusing.
-
Page 114: 8: R Panning
8: r Panning If you want to take a picture with the feel of speed and a blurred motion effect on the subject’s background, use <r> (Panning). With Live View shooting, if you use a lens supporting the <r> mode, subject blur is detected, corrected, and reduced.
-
Page 115
[Effect] to [Med] or [Min] to reduce the blur. See the cautions on page 122. To see which lenses support the <r> mode, refer to the Canon Web site. When using a lens supporting the <r> mode during Live View shooting, subject blur can be corrected and the shutter speed will be set automatically according to the setting of [Effect], regardless of the lens’s… -
Page 116: 8: 4 Shooting Close-Ups
8: 4 Shooting Close-ups When you want to shoot flowers or small things up close, use the <4> (Close-up) mode. To make small things appear much larger, use a macro lens (sold separately). Shooting Tips Use a simple background. A simple background makes small objects such as flowers stand out better.
-
Page 117: 8: P Shooting Food
8: P Shooting Food When you want to take pictures of food, use <P> (Food). The photo will look bright and appetizing. Also, depending on the light source, the reddish tinge will be suppressed in the pictures taken under tungsten lights, etc.
-
Page 118: 8: Y Shooting Candlelight Portraits
8: y Shooting Candlelight Portraits When you want to photograph a person in candlelight, use <y> (Candlelight). The atmosphere of candlelight is reflected in the color tones of the picture. Shooting Tips Use the center AF point to focus. Aim the center AF point in the viewfinder on the subject, then shoot. Prevent camera shake if the numeric display (shutter speed) in the viewfinder blinks.
-
Page 119: 8: 6 Shooting Night Portraits (With A Tripod)
8: 6 Shooting Night Portraits (With a Tripod) When you want to photograph people at night and obtain a natural- looking night scene in the background, use the <6> (Night Portrait) mode. Note that an external Speedlite is required for shooting. Using a tripod is recommended.
-
Page 120: 8: F Shooting Night Scenes (Handheld)
8: F Shooting Night Scenes (Handheld) Using a tripod when shooting a night scene gives the best results. However, the <F> (Handheld Night Scene) mode enables you to shoot night scenes even while handholding the camera. In this shooting mode, four shots are taken consecutively for each picture, and the resulting one image with reduced camera shake is recorded.
-
Page 121: 8: G Shooting Backlit Scenes
8: G Shooting Backlit Scenes When shooting a scene having both the bright and dark areas, use the <G> (HDR Backlight Control) mode. When you take one picture in this mode, three consecutive shots are taken at different exposures. This results in one image, with a wide tonal range, that has minimized the clipped shadows caused by backlighting.
-
Page 122
Cautions for the <8> Modes • <q> Group Photo Since distortion correction is applied, the camera records an image area narrower than the one seen through the viewfinder. (The image periphery is slightly trimmed and the resolution looks slightly lowered.) Also, during Live View shooting, the angle of view changes slightly. -
Page 123
• <r> Panning (continued) If the lens does not support the <r> mode, subject blur will not be corrected. However, the automatic shutter speed adjustment alone will take effect according to the setting of [Effect]. When shooting under bright light such as a sunny summer day or when shooting a slow subject, the set degree of panning effect may not be obtained. -
Page 124
• <6> Night Portrait Tell the subject to keep still even after the flash fires. During Live View shooting, achieving focus may be difficult when the face of the subject looks dark. In such a case, set the lens’s focus mode switch to <MF>… -
Page 125
• <F> Handheld Night Scene (continued) If you shoot a moving subject, the subject’s movement may leave afterimages, or the surrounding area of the subject may become dark. The image alignment may not function properly with repetitive patterns (lattice, stripes, etc.), flat or single-tone images, or images significantly misaligned due to camera shake. -
Page 126: Q Quick Control
Q Quick Control In Basic Zone modes, pressing the <Q> button sets the items shown in the tables on the next page with the Quick Control. Set the Mode Dial to a Basic Zone mode. Press the <Q> button Example: < A > mode The Quick Control screen will appear.
-
Page 127
Q Quick Control Settable Functions in Basic Zone Modes o: Default setting : User selectable : Not selectable Function Ambience-based shots (p.101) Background blur (p.103) Single shooting High-speed continuous shooting Low-speed continuous shooting Drive Silent single shooting mode Silent continuous shooting (p.156) 10-sec. -
Page 128
Q Quick Control o: Default setting : User selectable : Not selectable Function Color tone (p.106) Brightness (p.106) Single shooting High-speed continuous shooting Low-speed continuous shooting Drive Silent single shooting mode Silent continuous shooting (p.156) 10-sec. self-timer/Remote control 2-sec. self-timer/Remote control Self-timer: Continuous shooting AF point selection (p.136, 137) *1: If you change the shooting mode or set the power switch to <2>, all the… -
Page 129: Setting The Af And Drive Modes
Setting the AF and Drive Modes The AF points in the viewfinder are arranged to make AF shooting suitable for a wide variety of subjects and scenes. You can also select the AF operation and drive mode that best match the shooting conditions and subject. The M icon at the upper right of the page title indicates that the function is available only in Creative Zone modes (<d>, <s>, <f>, <a>, <F>).
-
Page 130: F: Selecting The Af Operation
f: Selecting the AF OperationN You can select the AF operation characteristics to suit the shooting conditions or subject. In Basic Zone modes, the optimum AF operation is set automatically for the respective shooting mode. Set the lens’s focus mode switch to <AF>.
-
Page 131
f: Selecting the AF OperationN One-Shot AF for Still Subjects Suited for still subjects. When you press the shutter button halfway, the camera will focus only once. The AF point that achieves focus is displayed, and the focus indicator <o> in the viewfinder will also light AF point With the camera in the default Focus indicator… -
Page 132: Ai Servo Af For Moving Subjects
f: Selecting the AF OperationN AI Servo AF for Moving Subjects This AF operation is suited for moving subjects when the focusing distance keeps changing. While you hold down the shutter button halfway, the camera will keep focusing on the subject continuously.
-
Page 133
f: Selecting the AF OperationN AF Points Lighting Up in Red By default, the AF points light up in red when focus is achieved in low- light conditions or on a dark subject. In Creative Zone modes, you can set whether to have the AF points light up in red when focus is achieved (p.488). -
Page 134: S Selecting The Af Area And Af Point
S Selecting the AF Area and AF Point The camera has 45 AF points for autofocusing. You can select the AF area selection mode and AF point(s) suiting the scene or subject. Depending on the lens used, the number of usable AF points, AF point patterns, Area AF frame shape, etc.
-
Page 135
S Selecting the AF Area and AF Point G Large Zone AF (Manual selection of zone) The AF area is divided into three focusing zones (left, center, and right) for focusing. H Automatic selection AF The Area AF frame (entire AF area) is used to focus. -
Page 136
S Selecting the AF Area and AF Point Selecting the AF Area Selection Mode Press the <S> or <B> button Look through the viewfinder and press the <S> or <B> button. Press the <B> button. Each time you press the <B> button, the AF area selection mode changes. -
Page 137: Af Point Selection
S Selecting the AF Area and AF Point Selecting the AF Point Manually You can manually select the AF point or zone. Press the <S> or <B> button The AF points will be displayed in the viewfinder. In the Zone AF mode or Large Zone AF mode, the selected zone will be displayed.
-
Page 138
S Selecting the AF Area and AF Point AF Point Display Indications Pressing the <S> or <B> button lights up the AF points that are cross-type AF points for high-precision autofocusing. The blinking AF points are horizontal-line or vertical-line sensitive. For details, see pages 143-148. -
Page 139: Af Area Selection Mode
AF Area Selection Mode Single-point Spot AF (Manual selection) For pinpoint focusing over a narrower area than with Single-point AF. Select one AF point < > to focus. Effective for pinpoint focusing or focusing on overlapping subjects such as an animal in a cage. Since Single-point Spot AF covers a very small area, focusing may be difficult during handheld or low-light shooting or for a moving subject.
-
Page 140
AF Area Selection Mode Large Zone AF (Manual selection of zone) The AF area is divided into three focusing zones (left, center, and right) for focusing. Since the focusing area is larger than with Zone AF and all the AF points in the selected zone are used for Automatic selection AF, it is superior to Single-point AF in tracking the subject, and it is effective for moving subjects. -
Page 141
AF Area Selection Mode When AI Servo AF mode is set for Zone AF, Large Zone AF, or Automatic selection AF, the active AF point <r> will keep switching to track the subject. However, under certain shooting conditions (such as when the subject is small), it may not be able to track the subject. -
Page 142: Color Tracking
AF Area Selection Mode AF Using Color Tracking With the camera in its default state, if the AF area selection mode is set to Zone AF (Manual selection of zone), Large Zone AF (Manual selection of zone), or Auto selection AF, color tracking AF detecting colors comparable to human skin tones will be performed (except in <8: 3r4Py6F>…
-
Page 143: Af Sensor
AF Sensor The camera’s AF sensor has 45 AF points. The illustration below shows the AF sensor pattern corresponding to each AF point. When using lenses with a maximum aperture of f/2.8 or faster, high-precision AF is possible at the viewfinder center. Depending on the lens used, the number of usable AF points, AF point patterns, Area AF frame shape, etc.
-
Page 144
AF Sensor This focusing sensor is geared to obtain higher precision focusing for lenses with a maximum aperture of f/2.8 or faster. A diagonal cross pattern makes it easier to focus on the subjects that may be difficult to focus. It is provided at the center AF point. These focusing sensors are geared for lenses with a maximum aperture of f/5.6 or faster (and some supporting f/8). -
Page 145: Lenses And Usable Af Points
AF points will stay lit.) Regarding lighting up or blinking of the AF points, see page 138. Regarding new lenses released after the EOS 6D Mark II (in the second half of 2017), check the Canon Web site to see which group they belong Some lenses may not be available in certain countries or regions.
-
Page 146
Lenses and Usable AF Points Group B Autofocusing with 45 points is possible. All the AF area selection modes are selectable. : Cross-type AF point. Subject tracking performance is superior and high-precision focusing is achieved. Group C Autofocusing with 45 points is possible. All the AF area selection modes are selectable. -
Page 147
Lenses and Usable AF Points Group E Autofocusing with the 35 points is possible. (Not possible with all 45 AF points.) All the AF area selection modes are selectable. During automatic AF point selection, the outer frame marking the AF area (Area AF frame) will be different from 45-point Automatic selection AF. -
Page 148
Lenses and Usable AF Points Group G Autofocusing with 27 points is possible. (Not possible with all 45 AF points.) Large Zone AF (manual selection of zone) cannot be selected in AF area selection mode. During automatic AF point selection, the outer frame marking the AF area (Area AF frame) will be different from 45-point Automatic selection AF. -
Page 149: Lens Group
Lenses and Usable AF Points Lens Group Designations EF180mm f/3.5L Macro USM EF14mm f/2.8L USM EF180mm f/3.5L Macro USM EF14mm f/2.8L II USM + Extender EF1.4x I/II/III EF15mm f/2.8 Fisheye EF200mm f/1.8L USM EF20mm f/2.8 USM EF200mm f/1.8L USM EF24mm f/1.4L USM + Extender EF1.4x I/II/III EF24mm f/1.4L II USM EF200mm f/1.8L USM…
-
Page 150
Lenses and Usable AF Points EF300mm f/4L IS USM EF500mm f/4L IS II USM + Extender EF2x I/II/III H (f/8) EF300mm f/4L IS USM + Extender EF1.4x I/II/III EF500mm f/4.5L USM EF300mm f/4L IS USM EF500mm f/4.5L USM + Extender EF2x I/II/III H (f/8) + Extender EF1.4x I/II/III H (f/8)*… -
Page 151
Lenses and Usable AF Points EF28-70mm f/2.8L USM EF55-200mm f/4.5-5.6 II USM EF28-70mm f/3.5-4.5 EF70-200mm f/2.8L USM EF28-70mm f/3.5-4.5 II EF70-200mm f/2.8L USM + Extender EF1.4x I/II/III EF28-80mm f/2.8-4L USM EF70-200mm f/2.8L USM EF28-80mm f/3.5-5.6 + Extender EF2x I/II/III EF28-80mm f/3.5-5.6 USM EF70-200mm f/2.8L IS USM EF28-80mm f/3.5-5.6 II EF70-200mm f/2.8L IS USM… -
Page 152
Lenses and Usable AF Points EF90-300mm f/4.5-5.6 USM EF200-400mm f/4L IS USM Extender 1.4x: With built-in Ext. 1.4x EF100-200mm f/4.5A EF200-400mm f/4L IS USM EF100-300mm f/4.5-5.6 USM Extender 1.4x + Extender EF1.4x I/II/III B EF100-300mm f/5.6 EF200-400mm f/4L IS USM EF100-300mm f/5.6L Extender 1.4x: With built-in Ext.1.4x + Extender EF1.4x I/II/III… -
Page 153: When Autofocus Fails
When Autofocus Fails Autofocus may fail to achieve focus (focus indicator <o> in the viewfinder blinks) with special subjects such as the following: Subjects Difficult to Focus on Subjects with very low contrast (Example: Blue skies, solid-color flat surfaces, etc.) Subjects in very low light Strongly backlit or reflective subjects (Example: Cars with highly reflective bodies, etc.)
-
Page 154: Mf: Manual Focus
MF: Manual Focus If focus cannot be achieved with autofocus, follow the procedure below to focus manually. Set the lens’s focus mode switch to <MF>. <4 L> will be displayed on the LCD panel. Focus on the subject. Focusing ring Turn the lens focusing ring until the subject looks sharp in the viewfinder.
-
Page 155: Setting Lens Electronic Mf
Setting Lens Electronic MFN With the following USM and STM lenses equipped with electronic manual focusing, you can set whether to use electronic manual focusing after autofocusing in One-Shot AF mode. The default setting is [Disable after One-Shot AF]. EF50mm f/1.0L USM EF300mm f/2.8L USM EF600mm f/4L USM EF85mm f/1.2L USM…
-
Page 156: Selecting The Drive Mode
i Selecting the Drive Mode Single and continuous drive modes are provided. You can select the drive mode suiting the scene or subject. Press the <R> button Select the drive mode. While looking at the LCD panel or in the viewfinder, turn the <6> dial. u : Single shooting When you press the shutter button completely, only one shot will be taken.
-
Page 157
i Selecting the Drive Mode i : Low-speed continuous shooting While you hold down the shutter button completely, you can shoot continuously at max. approx. 3.0 shots/sec. (except the <r> mode). Note that during Live View shooting, if [AF operation] is set to [Servo AF], subject tracking is given priority (Subject-tracking priority) at a continuous shooting speed of max. -
Page 158
i Selecting the Drive Mode The approx. 6.5 shots/sec. maximum high-speed continuous shooting speed <o> (p.156) is achieved under the following conditions: Fully charged battery pack, 1/500 sec. or faster shutter speed, maximum aperture (varies depending on the lens), at room temperature (23°C / 73°F), flicker reduction disabled, and Live View shooting with One-Shot AF*. -
Page 159: Using The Self-Timer
j Using the Self-timer Use the self-timer when you want to be in the picture such as a commemorative photograph. Press the <R> button Select the self-timer. While looking at the LCD panel or in the viewfinder, turn the <6> dial. Q : Shoot in 10 sec.
-
Page 160
j Using the Self-timer If you do not look through the viewfinder when you press the shutter button, attach the eyepiece cover (p.270). If stray light enters the viewfinder when the picture is taken, it may throw off the exposure. With <q>, the interval between multiple shots may be prolonged depending on shooting conditions such as the image-recording quality and external flash use. -
Page 161: Image Settings
Image Settings This chapter describes image-related functions: Image- recording quality, aspect ratio, ISO speed, Picture Style, white balance, Auto Lighting Optimizer, noise reduction, highlight tone priority, lens aberration correction, anti- flicker shooting, and other functions. The M icon at the upper right of the page title indicates that the function is available only in Creative Zone modes (<d>, <s>, <f>, <a>, <F>).
-
Page 162: Setting The Image-Recording Quality
Setting the Image-Recording Quality You can select the pixel count and the image quality. Seven JPEG quality settings are provided: 73, 83, 74, 84, 7a, 8a, and b. Three RAW image-recording quality settings are provided: 1, 41, and 61 (p.166). Select [Image quality].
-
Page 163
3 Setting the Image-Recording Quality Image-recording Quality Setting Examples 73 only 1 only 1+73 61+74… -
Page 164
3 Setting the Image-Recording Quality Guide to Image-Recording Quality Settings (Approx.) Maximum Burst Image Pixels Print File Size Possible High Quality Recorded Size (MB) Shots Standard Speed JPEG 1000 1950 1870 3570 2820 6.5M 5310 3.8M 4170 32.6 25.3 6.5M 17.4 RAW+JPEG 32.6 + 7.5… -
Page 165
3 Setting the Image-Recording Quality The number of possible shots is based on Canon’s testing standards and an 8 GB card. The maximum burst during continuous shooting is based on Canon’s standard testing SD card (Standard: 8 GB, High-speed: UHS-I 16 GB) and testing standards (<o>… -
Page 166: Raw Images
Previous versions of DPP Ver.4.x cannot process RAW images taken with this camera. If a previous version of DPP Ver.4.x is installed on your computer, obtain and install the latest version of DPP from the Canon Web site to update it (p.596). (The previous version will be overwritten.) Note that DPP Ver.3.x or earlier cannot process RAW images taken with…
-
Page 167: Maximum Burst
3 Setting the Image-Recording Quality Maximum Burst for Continuous Shooting The approximate maximum burst is displayed at the bottom right of the viewfinder and Quick Control screen. If the maximum burst for continuous shooting is 99 or higher, “99” will be displayed.
-
Page 168: Setting The Aspect Ratio
Setting the Aspect RatioN You can change the image’s aspect ratio. [3:2] is set by default. When [4:3], [16:9], or [1:1] is set, frame lines indicating the image area will be displayed in the viewfinder. During Live View shooting, the image appears with the surrounding area masked in black on the LCD monitor.
-
Page 169
3 Setting the Aspect RatioN Aspect Ratio 16:9 With viewfinder shooting With Live View shooting Aspect Ratio and Pixel Count (Approx.) Image Quality 16:9 6240×4160 5536×4160* 6240×3504* 4160×4160 (26.0 megapixels) (23.0 megapixels) (21.9 megapixels) (17.3 megapixels) 4160×2768* 3680×2768* 4160×2336* 2768×2768 (11.5 megapixels) (10.2 megapixels) (9.7 megapixels) -
Page 170: I: Setting The Iso Speed For Still Photos
i: Setting the ISO Speed for Still PhotosN Set the ISO speed (image sensor’s sensitivity to light) to suit the ambient light level. In Basic Zone modes, the ISO speed is set automatically (p.172). Regarding the ISO speed during movie shooting, see pages 327 and 331.
-
Page 171
i: Setting the ISO Speed for Still PhotosN As H1 (equivalent to ISO 51200) and H2 (equivalent to ISO 102400) are expanded ISO speed settings, noise (dots of light, banding, etc.) and irregular colors will be more noticeable, and the resolution lower compared with the standard setting. -
Page 172: Iso Auto
i: Setting the ISO Speed for Still PhotosN ISO Auto If the ISO speed is set to “A” (Auto), the actual ISO speed to be set will be displayed when you press the shutter button halfway. As indicated below, the ISO speed will be set automatically to suit the shooting mode.
-
Page 173
i: Setting the ISO Speed for Still PhotosN 3 Setting the Manually-Settable ISO Speed Range You can set the manually-settable ISO speed range (minimum and maximum limits). You can set the minimum limit within L (equivalent to ISO 50) to H1 (equivalent to ISO 51200), and the maximum limit within ISO 100 to H2 (equivalent to ISO 102400). -
Page 174
i: Setting the ISO Speed for Still PhotosN 3 Setting the ISO Speed Range for ISO Auto You can set the automatic ISO speed range for ISO Auto within ISO 100 — ISO 40000. You can set the minimum limit within ISO 100 — ISO 25600, and the maximum limit within ISO 200 — ISO 40000. -
Page 175
i: Setting the ISO Speed for Still PhotosN 3 Setting the Minimum Shutter Speed for ISO Auto You can set the minimum shutter speed so that the shutter speed set automatically will not be too slow when ISO Auto is set. This is effective in the <d>… -
Page 176: Selecting A Picture Style
Selecting a Picture StyleN Just by selecting a preset Picture Style, you can obtain image characteristics effectively matching your photographic expression or the subject. In Basic Zone modes, [D] (Auto) is set automatically. Select [Picture Style]. Under the [z3] tab, select [Picture Style], then press <0>.
-
Page 177
3 Selecting a Picture StyleN Picture Style Characteristics D Auto The color tone will be adjusted automatically to suit the scene. The colors will look vivid for blue skies, greenery and sunsets, particularly in nature, outdoor and sunset scenes. If the desired color tone is not obtained with [Auto], use another Picture Style. -
Page 178
3 Selecting a Picture StyleN U Faithful Suited for processing the image with a computer. The color of a subject that is captured in sunlight at a color temperature of 5200K will be adjusted to match the subject’s colorimetrical color. For subdued images with modest brightness and color saturation. -
Page 179
3 Selecting a Picture StyleN Symbols The Picture Style selection screen has icons for [Strength], [Fineness], or [Threshold] for [Sharpness] as well as [Contrast] and other parameters. The numerals indicate the values for these parameters set for the respective Picture Style. Symbols Sharpness Strength… -
Page 180: Customizing A Picture Style
Customizing a Picture StyleN You can customize the Picture Styles. You can change or adjust the parameter settings of Picture Styles such as [Strength], [Fineness], or [Threshold] for [Sharpness] as well as [Contrast] and other parameters from the default settings. To see the resulting effects, take test shots.
-
Page 181
3 Customizing a Picture StyleN Set the parameter. Press the <Y> <Z> keys to adjust the parameter, then press <0>. Press the <M> button to save the adjusted parameter settings. The Picture Style selection screen will reappear. The value of parameter settings different from the default will be displayed in blue. -
Page 182
3 Customizing a Picture StyleN V Monochrome Adjustment Besides the effects described on the preceding page such as [Contrast], or [Strength], [Fineness] and [Threshold] for [Sharpness], you can also set [Filter effect] and [Toning effect]. kFilter effect With a filter effect applied to a monochrome image, you can make white clouds or green trees stand out more. -
Page 183: Registering A Picture Style
Registering a Picture StyleN You can select a base Picture Style such as [Portrait] or [Landscape], adjust its parameters as desired and register it under [User Def. 1], [User Def. 2], or [User Def. 3]. Useful when you want to preset multiple Picture Styles with different settings.
-
Page 184
3 Registering a Picture StyleN Select a parameter. Select the parameter (such as [Strength] under [Sharpness]) to be set, then press <0>. Set the parameter. Adjust the effect level of the parameter, then press <0>. For details, see “Customizing a Picture Style”… -
Page 185: B: Setting The White Balance
B: Setting the White BalanceN White balance (WB) is for making the white areas look white. Normally, the Auto [Q] (Ambience priority) or [Qw] (White priority) setting will obtain the correct white balance. If natural-looking colors cannot be obtained with Auto, you can select the white balance to match the light source or set it manually by shooting a white object.
-
Page 186: White Balance
B: Setting the White BalanceN White Balance To the human eye, a white object looks white regardless of the type of lighting. With a digital camera, the white for color correction basis is decided depending on the color temperature of the illumination, and then the color is adjusted with software to make the white areas look white.
-
Page 187: Auto White Balance
B: Setting the White BalanceN Q Auto White Balance With [Q] (Ambience priority), you can increase the intensity of the image’s warm color cast when shooting a tungsten-light scene. If you select [Qw] (White priority), you can reduce the intensity of the image’s warm color cast.
-
Page 188: O Custom White Balance
B: Setting the White BalanceN O Custom White Balance With custom white balance, you can manually set the white balance for the specific light source of the shooting location. Make sure to perform this procedure under the light source at the actual location of the shoot. Shoot a white object.
-
Page 189
B: Setting the White BalanceN Select [White balance]. Under the [z2] tab, select [White balance], then press <0>. Select the custom white balance. Select [ ], then press <0>. If the exposure obtained in step 1 differs greatly from the standard exposure, a correct white balance may not be obtained. -
Page 190: P Setting The Color Temperature
B: Setting the White BalanceN P Setting the Color Temperature You can set the white balance’s color temperature numerically. This is for advanced users. Select [White balance]. Under the [z2] tab, select [White balance], then press <0>. Set the color temperature. Select [P].
-
Page 191: White Balance Correction
u White Balance CorrectionN You can correct the white balance that is set. This adjustment will have the same effect as using a commercially-available color temperature conversion filter or color compensating filter. Each color can be corrected to one of nine levels. This function is for advanced users, particularly for those users who understand the use of color temperature conversion and color compensating filters and their effects.
-
Page 192: White Balance Auto Bracketing
u White Balance CorrectionN White Balance Auto Bracketing With just one shot, three images with different color tones can be recorded simultaneously. Based on the color temperature of the current white balance setting, the image will be bracketed with a blue/amber bias and magenta/green bias.
-
Page 193
u White Balance CorrectionN During white balance bracketing, the maximum burst for continuous shooting will be lower. Since three images are recorded for one shot, it takes longer to record the image to the card. You can also set white balance correction and AEB together with white balance bracketing. -
Page 194: Auto Correction Of Brightness And Contrast
Auto Correction of Brightness and ContrastN If the image comes out dark or the contrast is low, the brightness and contrast can be corrected automatically. This function is called Auto Lighting Optimizer. The default setting is [Standard]. With JPEG images, the correction is applied when the image is captured. In Basic Zone modes, [Standard] is set automatically.
-
Page 195: Setting Noise Reduction
Setting Noise ReductionN High ISO Speed Noise Reduction This function reduces the noise generated in the image. Although noise reduction is applied at all ISO speeds, it is particularly effective at high ISO speeds. When shooting at low ISO speeds, the noise in the darker parts of the image (shadow areas) can further be reduced.
-
Page 196
3 Setting Noise ReductionN Cautions for Setting Multi Shot Noise Reduction If there is significant misalignment in the image due to camera shake, the noise reduction effect may become smaller. If you are handholding the camera, keep it steady to prevent camera shake. -
Page 197: Exposures
3 Setting Noise ReductionN Long Exposure Noise Reduction For images exposed for 1 sec. or longer, noise (dots of light and banding) typical of long exposures can be reduced. Select [Long exp. noise reduction]. Under the [z3] tab, select [Long exp.
-
Page 198
3 Setting Noise ReductionN With [Auto] or [Enable] set, the noise reduction process after the picture is taken may take the same amount of time as that for the exposure. However, even when noise reduction process is in progress, you can continue to take pictures as long as the maximum burst indicator in the viewfinder shows “1”… -
Page 199: Highlight Tone Priority
Highlight Tone PriorityN You can reduce overexposed, clipped highlights. Select [Highlight tone priority]. Under the [z3] tab, select [Highlight tone priority], then press <0>. Select [Enable]. Highlight details are improved. The dynamic range is expanded from the standard 18% gray to bright highlights.
-
Page 200: Correction Of Lens Aberrations Due To Optical Characteristics
Correction of Lens Aberrations due to Optical CharacteristicsN Peripheral light fall-off is a phenomenon that makes the image corners look darker due to the optical characteristics of the lens. Color fringing along subject outlines is called chromatic aberration. Image distortion due to optical characteristics of the lens is called distortion.
-
Page 201: Chromatic Aberration Correction
3 Correction of Lens Aberrations due to Optical CharacteristicsN Select [Enable]. Check that [Correction data available] is displayed for the attached lens. Select [Enable], then press <0>. Take the picture. The image will be recorded with the peripheral illumination corrected. Depending on shooting conditions, noise may appear on the image periphery.
-
Page 202: Distortion Correction
3 Correction of Lens Aberrations due to Optical CharacteristicsN Distortion Correction Select [Distortion correction]. Select [Enable]. Check that [Correction data available] is displayed for the attached lens. Select [Enable], then press <0>. Take the picture. The image will be recorded with the distortion corrected.
-
Page 203
3 Correction of Lens Aberrations due to Optical CharacteristicsN Diffraction Correction Select [Diffraction correction]. Select [Enable]. Select [Enable], then press <0>. Take the picture. The image will be recorded with the diffraction corrected. Depending on shooting conditions, noise may be intensified together with the effects of correction. -
Page 204
3 Correction of Lens Aberrations due to Optical CharacteristicsN Lens Correction Data The lens correction data for lens aberration corrections is registered (stored) in the camera. With [Enable] selected, the peripheral illumination correction, chromatic aberration correction, distortion correction, and diffraction correction will be applied automatically. With EOS Utility (EOS software, p.594), you can check which lenses have their correction data registered in the camera. -
Page 205
JPEG images already taken. When using a non-Canon lens, setting the corrections to [Disable] is recommended even if [Correction data available] is displayed. If you use the magnified view during Live View shooting, the peripheral illumination correction and distortion correction will not be reflected in the image displayed on the screen. -
Page 206: Reducing Flicker
Reducing FlickerN If you shoot an image with a fast shutter speed under a light source such as fluorescent light, the blinking of the light source causes flicker and the image may be vertically unevenly exposed. If continuous shooting is used under these conditions, uneven exposures or colors across the images may result.
-
Page 207
3 Reducing FlickerN The color tone of the captured images when [z4: Anti-flicker shoot.] is set to [Enable] may look different from when [Disable] is set. Flicker at a frequency other than 100 Hz or 120 Hz cannot be detected. Also, if the flickering frequency of the light source changes during continuous shooting, effects of the flicker cannot be reduced. -
Page 208: Setting The Color Space
Setting the Color SpaceN The range of reproducible colors is called “color space”. With this camera, you can set the color space for captured images to sRGB or Adobe RGB. For normal shooting, sRGB is recommended. In Basic Zone modes, [sRGB] is set automatically. Select [Color space].
-
Page 209: Creating And Selecting A Folder
Creating and Selecting a Folder You can freely create and select the folder where the captured images are to be saved. This operation is optional since a folder will be created automatically for saving captured images. Creating a Folder Select [Select folder]. Under the [51] tab, select [Select folder], then press <0>.
-
Page 210: Selecting A Folder
3 Creating and Selecting a Folder Selecting a Folder Select a folder on the folder selection Lowest file number screen, then press <0>. Number of images in folder The folder where the captured images will be saved is selected. Subsequently captured images will be recorded into the selected folder.
-
Page 211: File Numbering Methods
File Numbering Methods The captured images are assigned a IMG_0001.JPG (Example) sequential four-digit file number from 0001 to 9999 and saved in one folder. You can File number change how the file number is assigned. Select [File numbering]. Under the [51] tab, select [File numbering], then press <0>.
-
Page 212
3 File Numbering Methods Continuous When you wish to continue the file numbering sequence even after the card is replaced or a new folder is created. Even after you replace the card or create a new folder, the file numbering continues in sequence up to 9999. This is useful when you want to save images numbered anywhere between 0001 to 9999 on multiple cards or in multiple folders into one folder on a computer. -
Page 213: Auto Reset
3 File Numbering Methods Auto Reset When you wish to restart the file numbering from 0001 each time the card is replaced or a new folder is created. When you replace the card or create a folder, the file numbering restarts from 0001 for the new images saved.
-
Page 214: Setting Copyright Information
Setting Copyright InformationN When you set the copyright information, it will be recorded to the image as Exif information. Select [Copyright information]. Under the [55] tab, select [Copyright information], then press <0>. Select the item to be set. Select [Enter author’s name] or [Enter copyright details], then press <0>.
-
Page 215
3 Setting Copyright InformationN Checking the Copyright Information When you select [Display copyright info.] in step 2, you can check the [Author] and [Copyright] information that you entered. Deleting the Copyright Information When you select [Delete copyright information] in step 2, you can delete the [Author] and [Copyright] information. -
Page 217: Gps Settings
GPS Settings This chapter describes the camera’s built-in GPS settings. The EOS 6D Mark II can receive satellite navigation signals from GPS satellites (USA), GLONASS satellites (Russia), and Quasi-Zenith Satellite System (QZSS) “Michibiki” (Japan). The GPS function is set to [Disable] by default.
-
Page 218: Gps Features
GPS Features Geotagging Images Geotag information* (latitude, longitude, elevation) and coordinated universal time* can be appended to images. Shooting locations of geotagged images can be displayed on a map on a computer. *1: Certain traveling conditions or GPS settings may cause inaccurate geotag information to be added to images.
-
Page 219
GPS Features Viewing Images and Information on a Virtual Map With Map Utility (EOS software, p.595), you can view the shooting locations and the route traveled on a map displayed on a computer. Map data ©2017 ZENRIN… -
Page 220: Gps Precautions
To avoid violating GPS function regulations, visit the Canon Web site to check where the use is allowed. Note that Canon cannot be held liable for any problems arising from GPS function use in other countries and regions. Model Number…
-
Page 221: Acquiring Gps Signals
Acquiring GPS Signals To acquire GPS signals, take the camera outside where the sky is unobstructed. Face the top of the camera toward the sky while keeping your hands, etc. away from the camera top. When the signal acquisition conditions are good, it will take the camera approx.
-
Page 222
Acquiring GPS Signals GPS Acquisition Status The GPS acquisition status is indicated by the [r] icon displayed on the camera’s LCD panel. Constant r: Signal acquired Blinking r: Signal not acquired yet When you shoot while [r] is constantly displayed, the image will be geotagged. -
Page 223
Acquiring GPS Signals Poor GPS Coverage Under the following conditions, the GPS satellite signal will not be properly acquired. As a result, the geotag information may not be recorded or inaccurate geotag information may be recorded. Indoors, underground, in tunnels or forests, between buildings, or in valleys. -
Page 224
Acquiring GPS Signals Viewing GPS Information Check the [GPS] setting. Check that [GPS] is set to [Mode 1] or [Mode 2]. Select [GPS information display]. The GPS information will be displayed. Take the picture. When you shoot after GPS signal acquisition, the image will be geotagged. -
Page 225
Acquiring GPS Signals Geotagging Information Play back the images and press the <B> button to display the shooting information screen (p.392). Then tilt <9> up or down to check the geotag information. Latitude Longitude Elevation UTC (Coordinated Universal Time) When you shoot a movie, the GPS information at the time when shooting begins is recorded. -
Page 226: Setting The Positioning Interval
Setting the Positioning Interval The interval (time) to update the geotag information can be set. Although updating the geotag information at shorter intervals will record more accurate location information, it will reduce the number of possible shots because it will drain the battery faster. Check the [GPS] setting.
-
Page 227: Setting Time From Gps On The Camera
Setting Time from GPS on the Camera The time information obtained from GPS signals can be set on the camera. The margin of error is approx. ±1 sec. Check the [GPS] setting. Check that [GPS] is set to [Mode 1] or [Mode 2].
-
Page 228: Logging The Route Traveled
Logging the Route Traveled When using the GPS logging function, the geotag information of the route the camera travels is automatically recorded in the camera’s internal memory. With Map Utility (EOS software, p.595), you can view the shooting locations and the route traveled on a map displayed on a computer.
-
Page 229
Logging the Route Traveled Geotag Information Logs Geotag information for the route the camera travels is recorded at the intervals set with [Position update intvl] (p.226). The log data is saved in the camera’s internal memory by date. The table below shows how many days’… -
Page 230
Logging the Route Traveled Downloading Log Data to a Computer The log data in the camera’s internal memory can be downloaded to a computer with EOS Utility (EOS software, p.594) or downloaded from a card after transferring the data to the card. When you use Map Utility (EOS software, p.595) to open a log file saved on the computer, the camera’s travel route will be displayed on a map. -
Page 231
Logging the Route Traveled The GPS antenna is located at the top of the camera body. For this reason, even when carrying the camera, such as in a bag, try to keep the top of the camera facing upwards, and do not place anything on top of it. Set the camera time and date as accurately as possible. -
Page 233: Advanced Operations For Photographic Effects
Advanced Operations for Photographic Effects In Creative Zone modes, you can change various settings of the camera as you desire to obtain a wide variety of shooting results, by selecting the shutter speed and/or aperture, adjusting the exposure as you prefer, etc. The M icon at the upper right of the page title indicates that the function is available only in Creative Zone modes (<d>, <s>, <f>, <a>, <F>).
-
Page 234: D: Program Ae
d: Program AE The camera automatically sets the shutter speed and aperture to suit the subject’s brightness. This is called Program AE. * <d> stands for Program. * AE stands for Auto Exposure. Set the Mode Dial to <d>. Focus on the subject. Look through the viewfinder and aim the AF point over the subject.
-
Page 235: Program Shift
d: Program AE If the “30″” shutter speed and the lowest f/number blink, it indicates underexposure. Increase the ISO speed or use flash. If the “4000” shutter speed and the highest f/number blink, it indicates overexposure. Lower the ISO speed or use an ND filter (sold separately) to reduce the amount of light entering the lens.
-
Page 236: S: Shutter-Priority Ae
s: Shutter-Priority AE In this mode, you set the shutter speed and the camera automatically sets the aperture to obtain the standard exposure matching the brightness of the subject. This is called shutter-priority AE. A faster shutter speed can freeze the action of a moving subject. A slower shutter speed can create a blurred effect, giving the impression of motion.
-
Page 237
s: Shutter-Priority AE If the lowest f/number blinks, it indicates underexposure. Turn the <6> dial to set a slower shutter speed until the aperture stops blinking or set a higher ISO speed. If the highest f/number blinks, it indicates overexposure. Turn the <6>… -
Page 238: F: Aperture-Priority Ae
f: Aperture-Priority AE In this mode, you set the desired aperture and the camera sets the shutter speed automatically to obtain the standard exposure matching the subject brightness. This is called aperture-priority AE. A higher f/number (smaller aperture hole) will make more of the foreground and background fall within acceptable focus.
-
Page 239
f: Aperture-Priority AE If the “30″” shutter speed blinks, it indicates underexposure. Turn the <6> dial to set a larger aperture (lower f/ number) until the shutter speed blinking stops or set a higher ISO speed. If the “4000” shutter speed blinks, it indicates overexposure. -
Page 240: Depth-Of-Field Preview
f: Aperture-Priority AE Depth-of-Field PreviewN The aperture opening (diaphragm) changes only at the moment when the picture is taken. Otherwise, the aperture remains fully open. Therefore, when you look at the scene through the viewfinder or on the LCD monitor, the depth of field will look narrow (shallow). Press the depth-of-field preview button to stop down the lens to the current aperture setting and check the depth of…
-
Page 241: A: Manual Exposure
a: Manual Exposure In this mode, you set both the shutter speed and aperture as desired. To determine the exposure, refer to the exposure level indicator in the viewfinder or use a commercially-available exposure meter. This method is called manual exposure. * <a>…
-
Page 242
a: Manual Exposure Exposure Compensation with ISO Auto If the ISO speed is set to A (AUTO) for manual exposure shooting, you can set exposure compensation (p.245) as follows: [z2: Expo.comp./AEB] Under [8C.Fn III-4: Custom Controls], with [ : Expo comp (hold btn, turn )] (p.502). -
Page 243: Selecting The Metering Mode
q Selecting the Metering ModeN You can select one of four methods to measure the subject brightness. In Basic Zone modes, evaluative metering is set automatically. (In the <8: y> mode, center-weighted average metering is set automatically.) Press the <q> button Select the metering mode.
-
Page 244: Spot Metering
q Selecting the Metering ModeN Spot metering Effective when metering a specific part of the subject or scene. Spot metering covers approx. 3.2% of the viewfinder area at the center. The spot metering circle will be displayed in the viewfinder. Center-weighted average metering The metering is averaged for the entire scene with the viewfinder center weighted more heavily.
-
Page 245: O Setting The Desired Exposure Compensation
O Setting the Desired Exposure CompensationN Exposure compensation can brighten (increased exposure) or darken (decreased exposure) the standard exposure set by the camera. Exposure compensation can be set in the <d>, <s>, and <f> shooting modes. Although you can set the exposure compensation up to ±5 stops in 1/3-stop increments for viewfinder shooting, the exposure compensation indicator in the viewfinder and on the LCD panel can display the setting only up to ±3 stops.
-
Page 246
O Setting the Desired Exposure CompensationN For Live View and movie shooting, the exposure compensation can be set only up to ±3 stops. If [z2: Auto Lighting Optimizer] (p.194) is set to any setting other than [Disable], the image may still look bright even if a decreased exposure compensation for a darker image is set. -
Page 247: Auto Exposure Bracketing (Aeb)
h Auto Exposure Bracketing (AEB)N By changing the shutter speed, aperture, or ISO speed automatically, you can bracket the exposure up to ±3 stops in 1/3-stop increments for three consecutive shots. This is called AEB. * AEB stands for Auto Exposure Bracketing. Select [Expo.comp./AEB].
-
Page 248
h Auto Exposure Bracketing (AEB)N If [z2: Auto Lighting Optimizer] (p.194) is set to any setting other than [Disable], the effect of AEB may be reduced. During AEB shooting, <A> will blink in the viewfinder. If the drive mode is set to <u> or <B>, press the shutter button three times for each shot. -
Page 249: A Locking The Exposure For Shooting (Ae Lock)
A Locking the Exposure for Shooting (AE Lock)N You can lock the exposure when you want to set the focus and exposure separately or when you are to take multiple shots at the same exposure setting. Press the <A> button to lock the exposure, then recompose and take the picture.
-
Page 250: F: Long (Bulb) Exposures
F: Long (Bulb) Exposures In this mode, the shutter stays open as long as you hold down the shutter button completely, and closes when you let go of the shutter button. This photographic technique is called “bulb exposure”. Use bulb exposures for night scenes, fireworks, the heavens, and other subjects requiring long exposures.
-
Page 251: Bulb Timer
F: Long (Bulb) Exposures With [z3: Long exp. noise reduction], you can reduce the noise generated during long exposures (p.197). For bulb exposures, using a tripod and bulb timer is recommended. You can also use mirror lockup (p.265) in combination. You can also shoot bulb exposures by using Remote Switch RS-80N3 (sold separately) or Timer Remote Controller TC-80N3 (sold separately, p.276).
-
Page 252
F: Long (Bulb) Exposures Set the desired exposure time. Select the hour, minute, or second. Press <0> so <r> is displayed. Set the desired number, then press <0>. (Returns to <s>.) Select [OK]. The set time will be displayed on the menu screen. -
Page 253: W: Hdr (High Dynamic Range) Shooting
w: HDR (High Dynamic Range) ShootingN You can shoot still photos with clipped highlights and shadows reduced for a high dynamic range of tones even in high-contrast scenes. HDR shooting is effective for landscape and still-life shots. With HDR shooting, three images of different exposures (standard exposure, underexposure, and overexposure) are captured consecutively for each shot and then merged together automatically.
-
Page 254
w: HDR (High Dynamic Range) ShootingN Effects P: Natural For images preserving a wide tonal range where the highlight and shadow details would otherwise be lost. Clipped highlights and shadows will be reduced. A: Art standard While the clipped highlights and shadows will be reduced more than with [Natural], the contrast will be lower, and the gradation flatter to have the picture look like a painting. -
Page 255
w: HDR (High Dynamic Range) ShootingN Set [Continuous HDR]. Select either [1 shot only] or [Every shot], then press <0>. With [1 shot only], HDR shooting will be canceled automatically after the shooting ends. With [Every shot], HDR shooting continues until the setting in step 2 is set to [Disable HDR]. -
Page 256
w: HDR (High Dynamic Range) ShootingN You cannot select RAW or RAW+JPEG image quality. The HDR mode cannot be set if RAW or RAW+JPEG is set. HDR shooting is not possible with expanded ISO speeds (L, H1, H2). HDR shooting is possible within ISO 100 — ISO 40000 (varies depending on the settings of [Minimum] and [Maximum] for [ISO speed range]). -
Page 257
w: HDR (High Dynamic Range) ShootingN When shooting HDR images with [Auto Image Align] set to [Enable], AF point display information (p.397) and Dust Delete Data (p.452) will not be appended to the image. If you perform handheld HDR shooting with [Auto Image Align] set to [Enable], image periphery will be slightly trimmed and resolution will be slightly lowered. -
Page 258: P Multiple Exposures
P Multiple ExposuresN You can shoot two to nine exposures to be merged into one image. With Live View shooting (p.289), you can see in real time how the exposures are merged when you shoot multiple-exposure images. Select [Multiple exposure]. Under the [z3] tab, select [Multiple exposure], then press <0>.
-
Page 259
P Multiple ExposuresN Set the [No. of exposures]. Select the number of exposures, then press <0>. You can set it from 2 to 9 exposures. Set [Continue Mult-exp]. Select either [1 shot only] or [Continuously], then press <0>. With [1 shot only], multiple-exposure shooting will be canceled automatically after the shooting ends. -
Page 260
P Multiple ExposuresN Shoot subsequent exposures. The captured image combining the multiple exposures will be displayed. When you perform Live View shooting, the multiple-exposure images merged so far will be displayed. By pressing the <B> button, you can display only the Live View image. -
Page 261
P Multiple ExposuresN For multiple-exposure shooting, the settings will be automatically switched to [Disable] for the following: all the items of [z1: Lens aberration correction], [z2: Auto Lighting Optimizer], and [z3: Highlight tone priority]. If [z3: Picture Style] is set to [Auto], [Standard] will be applied for shooting. -
Page 262
P Multiple ExposuresN Merging Multiple Exposures with an Image Recorded on the Card You can select a 1 image recorded on the card as the first single exposure. The image data of the selected 1 image will remain intact. You can only select 1 images. You cannot select 41/61 or JPEG images. -
Page 263
P Multiple ExposuresN You can also select a 1 multiple-exposure image as the first single exposure. If you select [Deselect img], the image selection for the first image will be canceled. Checking and Deleting Multiple Exposures During Shooting Before you finish shooting the set number of exposures, you can press the <x>… -
Page 264
P Multiple ExposuresN Are there any restrictions on the image-recording quality? All JPEG image-recording quality settings can be selected. If 41 or 61 is set, the merged multiple-exposure image will be saved as a 1 image. Image Quality Setting Merged Multiple-Exposure JPEG JPEG 41/61… -
Page 265: Mirror Lockup
2 Mirror LockupN Camera vibrations caused by the mirror’s reflex action when the picture is taken is called “mirror shock”. Mirror lockup keeps the mirror up before and during exposure to reduce blur caused by camera vibrations. Useful when shooting close-ups (macro photography), using a super telephoto lens, shooting at slow shutter speeds, etc.
-
Page 266
2 Mirror LockupN Do not point the camera toward an intense light source, such as the sun or an intense artificial light source. Doing so may damage the image sensor or the camera’s internal components. In very bright light, such as at the beach or a ski slope on a sunny day, take the picture promptly after mirror lockup is stabilized. -
Page 267: H Interval Timer Shooting
H Interval Timer Shooting With the interval timer, you can set the shooting interval and the number of shots. The camera will repeat taking one shot with the set interval until the set number of shots are taken. Select [Interval timer]. Under the [z4] tab (the [z1] tab in Basic Zone modes), select [Interval timer], then press <0>.
-
Page 268
H Interval Timer Shooting Select [OK]. Number of shots Shooting interval The interval timer settings will be displayed on the menu screen. When you exit the menu, <H> will be displayed on the LCD panel. Take the picture. First shot is taken and shooting continues according to the interval timer settings. -
Page 269
H Interval Timer Shooting Do not point the camera toward an intense light source, such as the sun or an intense artificial light source. Doing so may damage the image sensor or the camera’s internal components. If the lens’s focus mode switch is set to <AF>, the camera will not shoot when focus is not achieved. -
Page 270: Using The Eyepiece Cover
Using the Eyepiece Cover When you take a picture without looking through the viewfinder, such as when you use the self-timer, bulb exposure, or a remote switch, stray light entering the viewfinder may cause the picture to look dark (underexposed). To prevent this, use the eyepiece cover (p.38) attached to the camera strap.
-
Page 271: Remote Control Shooting
Remote Control Shooting You can use Remote Controller RC-6 (with infrared control, sold separately) or Wireless Remote Control BR-E1 (with Bluetooth, sold separately) for remote control shooting. Remote Controller RC-6 (Sold Separately) You can shoot remotely up to approx. 5 meters/ 16.4 feet away from the camera.
-
Page 272
Remote Control Shooting Press the remote controller’s release (transmit) button. Point the remote controller toward the camera’s remote control sensor, then press the release (transmit) button. The self-timer/remote control lamp Remote lights up and the picture is taken. control sensor If you select <q>… -
Page 273: Pairing
Remote Control Shooting Wireless Remote Control BR-E1 (Sold Separately) Wireless Remote Control BR-E1 (sold separately) compatible with ® Bluetooth low energy technology enables remote control shooting up to approx. 5 meters/16.4 feet from the camera. To use the BR-E1, you must first pair the camera and remote controller so they recognize each other.
-
Page 274
Remote Control Shooting Select [Pairing]. Select [Pairing], then press <0>. Press and hold the <W> button and <T> button on the BR-E1 simultaneously for 3 sec. or more. Pairing starts. For instructions after the pairing is complete, refer to the BR-E1’s Instruction Manual. -
Page 275
Remote Control Shooting Canceling the Pairing To pair the camera with another Wireless Remote Control BR-E1 (sold separately), clear the paring (registration) with the current remote controller. You can check the connection status of the camera and remote controller on the [Check/clear connection info] screen in step Select [Wireless communication settings]. -
Page 276: Using A Remote Switch
Using a Remote Switch You can connect any EOS accessory equipped with an N3-type terminal such as the Remote Switch RS-80N3 or Timer Remote Controller TC-80N3 (each sold separately) to shoot with the camera (p.515). To operate the accessory, refer to its Instruction Manual. Open the terminal cover.
-
Page 277: Flash Photography
Flash Photography This chapter describes how to shoot with external EX- series Speedlites (sold separately) and how to set Speedlite settings on the camera’s menu screen.
-
Page 278: D Flash Photography
D Flash Photography EOS-dedicated, EX-series Speedlites Using an EX-series Speedlite (sold separately) makes flash photography easy. For operation procedures, refer to the EX-series Speedlite’s Instruction Manual. This camera is a Type-A camera that can use all the features of EX-series Speedlites. To set the flash functions and flash Custom Functions on the camera’s menu screen, see pages 281-287.
-
Page 279
If it is difficult to achieve focus with autofocus, the EOS-dedicated, external Speedlite will automatically emit the AF-assist beam as necessary. Canon Speedlites Other Than the EX-series With an EZ/E/EG/ML/TL-series Speedlite set to A-TTL or TTL autoflash mode, the flash can be fired at full output only. -
Page 280
1/60 sec. to 1/30 sec. Cautions for Live View Shooting If you use a non-Canon flash unit with Live View shooting, set [z5: Silent LV shoot.] to [Disable] (p.303). The flash will not be fired if it is set to [Mode 1] or [Mode 2]. -
Page 281: Setting The Flash Function
Setting the Flash FunctionN With an EX-series Speedlite having compatible flash function settings, you can use the camera’s menu screen to set the Speedlite’s functions and Custom Functions. Attach the Speedlite to the camera and turn on the Speedlite before setting the flash functions. For details on the Speedlite’s functions, refer to the Speedlite’s Instruction Manual.
-
Page 282
3 Setting the Flash FunctionN Flash Sync. Speed in Av Mode You can set the flash-sync speed for flash photography in the <f> aperture- priority AE mode. : Auto The flash sync speed is set automatically within a range of 1/180 sec. -
Page 283: Flash Function Settings
3 Setting the Flash FunctionN Flash Function Settings The screen display and setting options will vary depending on the Speedlite model, current flash mode, Speedlite’s Custom Function settings, etc. For details on the Speedlite’s functions, refer to the Speedlite’s Instruction Manual. Sample display Wireless functions / Flash ratio control Flash zoom…
-
Page 284
3 Setting the Flash FunctionN Wireless functions / Flash ratio control Wireless (multiple) flash photography is possible with radio or optical transmission. For details on wireless flash, refer to the Instruction Manual of a Speedlite compatible with wireless flash photography. With a macro flash (MR-14EX II, etc.) compatible with flash function settings, you can set the flash ratio between flash… -
Page 285
3 Setting the Flash FunctionN Shutter synchronization Normally, set this to [First-curtain synchronization] so that the flash fires immediately after the exposure starts. If [Second-curtain synchronization] is set, the flash will be fired right before the shutter closes. When this is combined with a slow shutter speed, you can create a trail of light such as from car headlights at night with a more natural feel. -
Page 286: Settings
3 Setting the Flash FunctionN When using second-curtain synchronization, set the shutter speed to 1/25 sec. or slower. If the shutter speed is 1/30 sec. or faster, first-curtain synchronization will be applied automatically even if [Second-curtain synchronization] is set. With an EX-series Speedlite not compatible with flash function settings, you can only set the following: [Flash firing], [E-TTL II meter.], and [Flash exposure compensation] under [Flash function settings].
-
Page 287
3 Setting the Flash FunctionN Clearing Flash Function Settings / Flash C.Fn Settings Select [Clear settings]. Select the settings to be cleared. Select [Clear flash settings] or [Clear all Speedlite C.Fn’s], then press <0>. On the confirmation dialog, select [OK]. Then the flash settings or Custom Function settings will all be cleared. -
Page 289: Shooting) With The Lcd Monitor
Shooting with the LCD Monitor (Live View Shooting) You can shoot while viewing the image on the camera’s LCD monitor. This is called “Live View shooting”. Live View shooting is enabled by setting the Live View shooting/ Movie shooting switch to <A>. If you handhold the camera and shoot while viewing the LCD monitor, camera shake may cause blurred images.
-
Page 290: A Shooting With The Lcd Monitor
A Shooting with the LCD Monitor Set the Live View shooting/Movie shooting switch to <A>. Display the Live View image. Press the <0> button. The Live View image will appear on the LCD monitor. The Live View image will be displayed in the brightness level closely matching that of the actual image to be captured.
-
Page 291
A Shooting with the LCD Monitor Enabling Live View Shooting Set [z4: Live View shoot.] (under the [z1] tab in Basic Zone modes) to [Enable]. Number of Possible Shots with Live View Shooting (Approx. number of shots) Room Temperature Low Temperatures Temperature (23°C / 73°F) (0°C / 32°F) -
Page 292
A Shooting with the LCD Monitor Do not point the camera toward an intense light source, such as the sun or an intense artificial light source. Doing so may damage the image sensor or the camera’s internal components. In the <8: y> mode, Live View shooting is not possible. In the <8: q>… -
Page 293
A Shooting with the LCD Monitor Information Display Each time you press the <B> button, the information display will change. Maximum burst Battery level Temperature warning Possible shots/Seconds remaining on self-timer Number of remaining multiple exposures HDR shooting/ AF point (Live 1-point AF) Multiple exposures/ Multi Shot Noise Electronic level… -
Page 294
A Shooting with the LCD Monitor Warnings Do not hold the camera in the same position for long periods of time. Even if the camera does not feel too hot, prolonged contact with the same body part may cause skin redness or blistering due to low-temperature contact burns. -
Page 295
A Shooting with the LCD Monitor Scene Icons In the <A> shooting mode, the camera detects the scene type and sets everything automatically to suit the scene. The detected scene type is indicated on the upper left of the screen. Subject Portrait Non-portrait… -
Page 296
A Shooting with the LCD Monitor *3: The icon of the scene selected from the detectable scenes will be displayed. *4: Displayed when all the following conditions apply: The shooting scene is dark, it is a night scene, and the camera is mounted on a tripod. -
Page 297
A Shooting with the LCD Monitor Final Image Simulation Final image simulation is a function that shows the Live View image with the effects of the current settings for Picture Style, white balance, and other shooting functions applied. The Live View image will automatically reflect the function settings listed below. -
Page 298
A Shooting with the LCD Monitor B Button Display Options You can set the information to be displayed on the image for when you press the <B> button during Live View shooting or movie shooting. Select [zbutton LV display options]. Under the [54] tab, select [zbutton LV display options], then press <0>. -
Page 299
A Shooting with the LCD Monitor Edit the options. Select what you want to be displayed and press <0> to add a checkmark [X]. For the information you do not want to be displayed, press <0> to remove the checkmark [X]. Then select [OK] to register the setting. -
Page 300: Shooting Function Settings
Shooting Function Settings f/R/i/q Settings When the Live View image is displayed, if you press the <f>, <R>, <i>, or <q> button, the setting screen will appear on the LCD monitor and you can turn the <6> or <5> dial to set the respective shooting function.
-
Page 301
Shooting Function Settings Q Quick Control With the image displayed on the LCD monitor, you can press the <Q> button and set the following functions. In Creative Zone modes, the following can be set: AF method, AF operation, Drive mode, Metering mode, Image quality, White balance, Picture Style, and Auto Lighting Optimizer. -
Page 302: Menu Function Settings
Menu Function Settings With Live View shooting, menu options exclusive to Live View shooting will appear under the [z5] tab (the [z2] tab in Basic Zone modes). The settable functions on this menu screen apply only to Live View shooting. They do not work with viewfinder shooting (settings are disabled).
-
Page 303: Exposure Simulation
3 Menu Function Settings Exposure simulationN Exposure simulation simulates and displays how the brightness (exposure) of the actual image will look. • Enable (g) The displayed image brightness will be close to the actual brightness (exposure) of the resulting image. If you set exposure compensation, the image brightness will change accordingly.
-
Page 304
(regardless of the [Silent LV shoot.] setting). When using a non-Canon flash unit, set it to [Disable]. The flash will not be fired if it is set to [Mode 1] or [Mode 2]. -
Page 305: Selecting The Af Operation
Selecting the AF OperationN You can select the AF operation characteristics to suit the shooting conditions or subject. In Basic Zone modes, the optimum AF operation is set automatically for the respective shooting mode. Press the <f> button. Select the AF operation. Press the <Y>…
-
Page 306
Selecting the AF OperationN One-Shot AF for Still Subjects Suited for still subjects. When you press the shutter button halfway, the camera will focus only once. When focus is achieved, the AF point will turn green and the beeper will sound. The focus remains locked while you hold down the shutter button halfway, allowing you to recompose the image before taking the picture. -
Page 307
Selecting the AF OperationN Servo AF for Moving Subjects This AF operation is suited for moving subjects. While you hold down the shutter button halfway, the camera will keep focusing on the subject continuously. When focus is achieved, the AF point will turn blue. The exposure is set at the moment the picture is taken. -
Page 308: Focusing With Af (Af Method)
Focusing with AF (AF Method) Selecting the AF Method You can set the AF method to [u+Tracking] (p.309), [Smooth zone] (p.311), or [Live 1-point AF] (p.313) to suit the shooting conditions and subject. If you want to focus manually, set the lens’s focus mode switch to <MF>, magnify the image, and focus manually (p.321).
-
Page 309
Focusing with AF (AF Method) u(face)+Tracking: c The camera detects and focuses on human faces. If a face moves, the AF point <p> also moves to track the face. Display the Live View image. Press the <0> button. The Live View image will appear on the LCD monitor. -
Page 310
Focusing with AF (AF Method) Take the picture. Check the focus and exposure, then press the shutter button completely to take the picture (p.290). Focusing on a subject other than a human face • Tap on the subject (or spot) where you want to focus. •… -
Page 311
Focusing with AF (AF Method) Smooth Zone: o Focus can be achieved with a larger area (Zone AF frame) than the AF point of [Live 1-point AF] (p.313). Display the Live View image. Press the <0> button. The Live View image will appear on the LCD monitor. -
Page 312
Focusing with AF (AF Method) Take the picture. Check the focus and exposure, then press the shutter button completely to take the picture (p.290). If the camera does not focus on the target subject, switch to [Live 1-point AF] (p.313) and focus again. -
Page 313
Focusing with AF (AF Method) Live 1-point AF: d The camera focuses with a single AF point. This is effective when you want to focus on a particular subject. Display the Live View image. Press the <0> button. The Live View image will appear on the LCD monitor. -
Page 314
Focusing with AF (AF Method) Take the picture. Check the focus and exposure, then press the shutter button completely to take the picture (p.290). During movie shooting, if [z4: Movie Servo AF] is set to [Enable], the AF point will be displayed larger in step 1. -
Page 315
Focusing with AF (AF Method) Notes for AF AF Operation Even when focus is achieved, pressing the shutter button halfway will focus again. The image brightness may change during and after the AF operation. Depending on the subject and shooting conditions, it may take longer to focus, or the continuous shooting speed may decrease. -
Page 316
Focusing with AF (AF Method) Shooting Conditions that Make Focusing Difficult Subject with low-contrast such as the blue sky, solid-color flat surfaces or when highlight or shadow details are clipped. Subjects in low light. Stripes and other patterns where there is contrast only in the horizontal direction. -
Page 317: Magnified View
Focusing with AF (AF Method) Magnified View When the AF method is [Smooth zone] or [Live 1-point AF] mode, either press the <u> button or tap on [d] displayed on the bottom right of the screen. You can magnify the image by approx. 5x or 10x and check the focus.
-
Page 318
Focusing with AF (AF Method) If focusing is difficult in the magnified view, return to the normal view and perform AF. If you perform AF in the normal view and then use the magnified view, accurate focus may not be achieved. AF speed differs between normal view and magnified view. -
Page 319: Shooting With The Touch Shutter
x Shooting with the Touch Shutter Just by tapping on the LCD monitor screen, you can focus and take the picture automatically. Display the Live View image. Press the <0> button. The Live View image will appear on the LCD monitor. Enable the Touch Shutter.
-
Page 320
x Shooting with the Touch Shutter Even if you set the drive mode to <o> or <i>, the camera will still shoot in the single shooting mode. Even if [AF operation] is set to [Servo AF], tapping on the screen will focus on the image with [One-Shot AF]. -
Page 321: Mf: Focusing Manually
MF: Focusing Manually You can magnify the image and focus precisely with MF (manual focus). Set the lens’s focus mode switch to <MF>. Turn the lens focusing ring to focus roughly. Display the magnifying frame. Press the <u> button or tap on [d] on the lower right of the screen.
-
Page 322: Manual Focusing
MF: Focusing Manually Focus manually. While looking at the magnified image, turn the lens focusing ring to focus. After achieving focus, press the <u> button to return to the normal view. Take the picture. Check the exposure, then press the shutter button completely to take the picture (p.290).
-
Page 323
General Live View Shooting Cautions Image Quality When you shoot at high ISO speeds, noise (such as dots of light and banding) may become noticeable. Shooting in high temperatures may cause noise and irregular colors in the image. If Live View shooting is used continuously for a prolonged period, the camera’s internal temperature may rise, and image quality may deteriorate. -
Page 324
General Live View Shooting Cautions Live View Image Under low- or bright-light conditions, the Live View image may not reflect the brightness of the captured image. Even if a low ISO speed is set, noise may be noticeable in the displayed Live View image under low light. -
Page 325: Shooting Movies
Shooting Movies Movie shooting is enabled by setting the Live View shooting/ Movie shooting switch to <k>. Before shooting movies, see page 343 and make sure the card is able to record movies at the desired movie- recording quality setting. If you handhold the camera and shoot movies, camera shake can cause blurred movies.
-
Page 326: Shooting Movies
k Shooting Movies Autoexposure Shooting When the shooting mode is set to <A>, <C>, <d>, <s>, <f>, or <F>, autoexposure control will take effect to suit the scene’s current brightness. Set the Live View shooting/Movie shooting switch to <k>. The Live View image will appear on the LCD monitor.
-
Page 327
k Shooting Movies ISO Speed in the <A> and <C> Modes The ISO speed will be set automatically within ISO 100 — ISO 25600. ISO Speed in the <d>, <s>, <f>, and < > Modes The ISO speed will be set automatically within ISO 100 — ISO 25600. Under [z2: k ISO speed settings], if you set [ISO Auto] to [Max.:H2 (102400)] (p.372), the maximum limit of the automatic ISO speed setting range will be expanded to H2 (equivalent to ISO… -
Page 328
k Shooting Movies Cautions for the <A>, <C>, <d>, <s>, <f>, and <F> Modes In the <A> and <C> modes, the scene icon for the scene detected by the camera is displayed on the upper left of the screen (p.329). You can lock the exposure (AE lock) by pressing the <A>… -
Page 329
k Shooting Movies Scene Icons In the <A> and <C> modes, the camera detects the scene type and sets the exposure automatically to suit the scene. The detected scene type is indicated on the upper left of the screen. Non-Portrait Subject Background Portrait… -
Page 330: Shooting
k Shooting Movies Manual Exposure Shooting You can manually set the shutter speed, aperture, and ISO speed for movie shooting. Using manual exposure to shoot movies is for advanced users. Set the Live View shooting/Movie shooting switch to <k>. Set the Mode Dial to <a>. Set the ISO speed.
-
Page 331
k Shooting Movies ISO Speed in the <a> Mode With [AUTO] (A), the ISO speed will be set automatically within ISO 100 — ISO 25600. Under [z2:k ISO speed settings], if you set [ISO Auto] to [Max.:H2 (102400)] (p.372), the maximum limit of the automatic ISO speed setting range will be expanded to H2 (equivalent to ISO 102400). -
Page 332
k Shooting Movies For movie shooting, the ISO speed cannot be expanded to L (equivalent to ISO 50). When switching from still photo shooting to movie shooting, check the camera settings again before shooting movies. During movie shooting, avoid changing the shutter speed or aperture. Doing so may record the changes in the exposure or create more noise at high ISO speeds. -
Page 333: Still Photo Shooting
k Shooting Movies Settable Shutter Speeds The settable shutter speeds in the <a> manual exposure shooting mode vary depending on the frame rate of the movie recording quality. (sec.) Frame Rate Shutter Speed 1/4000 — 1/60 1/4000 — 1/50 1/4000 — 1/30 1/4000 — 1/25 The settable shutter speeds will differ for time-lapse movie shooting (p.349).
-
Page 334
k Shooting Movies Information Display Each time you press the <B> button, the information display will change. Movie shooting mode/Scene icon • : Autoexposure (A/C) • : Autoexposure (d/s/f/F) • : Manual exposure (a) • u : HDR movie shooting (8) •… -
Page 335
k Shooting Movies When the [z4: AF method] is [Smooth zone] or [Live 1-point AF], you can press the <B> button to display the electronic level (p.80). You can set what is displayed for when you press the <B> button (p.298). -
Page 336
k Shooting Movies Cautions for Movie Shooting Do not point the camera toward an intense light source, such as the sun or an intense artificial light source. Doing so may damage the image sensor or the camera’s internal components. If you shoot something that has fine detail, moire or false colors may result. -
Page 337
k Shooting Movies Warnings Do not hold the camera in the same position for long periods of time. Even if the camera does not feel too hot, prolonged contact with the same body part may cause skin redness or blistering due to low-temperature contact burns. -
Page 338
k Shooting Movies Final Image Simulation Final image simulation is a function that shows the movie as it will look with the current settings for the Picture Style, white balance and other shooting functions applied. During movie shooting, the image will automatically reflect the function settings listed below. -
Page 339: Shooting Function Settings
Shooting Function Settings f/i Settings With the image displayed on the LCD monitor, if you press the <f> or <i> button, the setting screen will appear on the LCD monitor and you can turn the <6> dial to set the respective function. During manual-exposure shooting (p.330), you can press the <i>…
-
Page 340
Shooting Function Settings Select a function and set it. Press the <W> <X> keys to select a function. The settings of the selected function and Feature guide will appear on the screen. Turn the <6> or <5> dial to set it. To set the white balance correction or Picture Style parameters, press the <B>… -
Page 341: Setting The Movie Recording Quality
Setting the Movie Recording Quality With [z1: Movie rec. size], you can set the movie recording quality (image size, frame rate, and compression method). The movie will be recorded as an MP4 file. The frame rate displayed on the [z1: Movie rec.
-
Page 342
3 Setting the Movie Recording Quality Frame rate (fps: frame per second) 8 59.94fps/6 29.97fps For areas where the TV system is NTSC (North America, Japan, South Korea, Mexico, etc.). 7 50.00 fps/5 25.00 fps For areas where the TV system is PAL (Europe, Russia, China, Australia, etc.). -
Page 343
3 Setting the Movie Recording Quality Cards that Can Record Movies When shooting movies, use a large-capacity card with a writing/reading speed (required card performance) shown in the table below or higher than the standard specification. Test the card by taking a few movies in the desired quality (p.341) and make sure the card can properly record the movie. -
Page 344
3 Setting the Movie Recording Quality To obtain better performance with the card, formatting the card with the camera before shooting movies is recommended (p.75). To check the card’s writing/reading speed, refer to the card manufacturer’s Web site, etc. For bit rates, see page 574. Total Movie Recording Time and File Size Per Minute Normal movie (Approx.) -
Page 345
3 Setting the Movie Recording Quality Movie Files Exceeding 4 GB Even if you shoot a movie exceeding 4 GB, you can keep shooting without interruption (except the time-lapse movie shooting). Using SD/SDHC cards formatted with the camera If you use the camera to format an SD/SDHC card, the camera will format it in FAT32. -
Page 346: Setting The Sound Recording
Setting the Sound Recording You can shoot movies while recording sound with the built-in stereo microphones or an external stereo microphone. You can also freely adjust the sound-recording level. Use [z1: Sound recording] to set sound recording functions. Sound Recording/Sound-Recording Level Auto : The sound-recording level is adjusted automatically.
-
Page 347: Microphone
3 Setting the Sound Recording Attenuator Automatically suppresses sound distortion caused by loud noises. Even if [Sound rec.] is set to [Auto] or [Manual] for shooting, sound distortion may still result if there is a very loud sound. In such a case, setting it to [Enable] is recommended.
-
Page 348: Shooting Hdr Movies
Shooting HDR Movies If you set the Mode Dial to <8>, you can shoot movies with clipped highlights reduced for a high dynamic range of tones even in high- contrast scenes. HDR movie will be recorded in L6X (NTSC) or L5X (PAL).
-
Page 349: Shooting Time-Lapse Movies
a Shooting Time-lapse Movies Still photos shot at a set interval can be stitched together automatically to create a 4K or Full HD time-lapse movie. A time-lapse movie shows how a subject changes in a much shorter period of time than the actual time it took.
-
Page 350: Recording Size
a Shooting Time-lapse Movies Select the desired movie recording size. Select [EnableH (3840×2160)] or [EnableL (1920×1080)]. EnableH (3840×2160) The movie is recorded in 4K quality. The aspect ratio is 16:9. The frame rate of the recorded movie is 29.97fps (6) for NTSC and 25.00fps (5) for PAL, and its recording format is Motion JPEG (J) and its movie file format is MOV (D).
-
Page 351
a Shooting Time-lapse Movies Set the shooting interval. Select [Interval]. Check the [k Time required] and [3: Playback time] displayed at the bottom of the screen to set the number. Select the hour, minute, or second. Time required Playback time Press <0>… -
Page 352
a Shooting Time-lapse Movies Select the exposure’s setting method. Select [Auto exposure]. Fixed 1st frame When taking the first shot, metering is performed to set the exposure automatically to match the brightness. The exposure setting for the first shot will be applied to subsequent shots. Other shooting-related settings for the first shot will also be applied for subsequent shots. -
Page 353
a Shooting Time-lapse Movies Set the beeper. Select [Beep as img taken]. If [Disable] is set, the beeper will not sound for shooting. Check the settings. Time required Playback time Time required Indicates the time required to shoot the set number of shots with the set interval. -
Page 354
a Shooting Time-lapse Movies Read the message. Read the message and select [OK]. Take test shots. As with Live View shooting, set the exposure and shooting functions, then press the shutter button halfway to focus. Press the shutter button completely to take test shots. -
Page 355
a Shooting Time-lapse Movies Press the <0> button. The camera will be ready to start shooting a time-lapse movie. To return to step 13, press the <0> button again. Shoot the time-lapse movie. Number of shots Press the <B> button and check again the “Time required”… -
Page 356
a Shooting Time-lapse Movies Using a tripod is recommended. Taking test shots for still photos as in step 14 and shooting test movies for time-lapse movies beforehand is recommended. Regardless of the [z1: Movie rec. size] setting, 4K time-lapse movies are recorded in H6J(NTSC)/H5J(PAL), while Full HD time-lapse movies are recorded in L 6 W(NTSC)/L 5 W(PAL). -
Page 357
a Shooting Time-lapse Movies Do not point the camera toward an intense light source, such as the sun or an intense artificial light source. Doing so may damage the image sensor or the camera’s internal components. If the camera is connected to a computer with the interface cable (sold separately), or if an HDMI cable is connected to the camera, you cannot select [Enable]. -
Page 358
a Shooting Time-lapse Movies If a shutter speed longer than the shooting interval such as when the long exposure is set, or if a slow shutter speed is set automatically, the camera may not be able to shoot at the set interval. Also, shooting may not be performed when the shutter speed and the shooting interval are nearly the same. -
Page 359
a Shooting Time-lapse Movies When time-lapse movie shooting ends, the settings are cleared automatically, and the camera returns to normal movie shooting. Note that if you set a slow shutter speed for time-lapse movie shooting and the settings are automatically cleared, the shutter speed may be automatically changed to a speed within the settable range for normal movie shooting. -
Page 360
a Shooting Time-lapse Movies You can use Remote Controller RC-6 (sold separately, p.271) or Wireless Remote Control BR-E1 (sold separately, p.273) to start and stop the time- lapse movie shooting. Set [z5: Remote control] to [Disable] beforehand. With Remote Controller RC-6 Camera Status/ <o>… -
Page 361: Shooting Video Snapshots
Shooting Video Snapshots You can shoot a series of short movie clips lasting approx. 2 sec., 4 sec., or 8 sec. called video snapshots. The video snapshots can be joined together into a single movie called a video snapshot album. You can thereby show short and quick highlights of a trip or event.
-
Page 362
3 Shooting Video Snapshots Select [Album settings]. Select [Create a new album]. Select [Snapshot length]. Set the snapshot length. Select the desired snapshot length, then press <0>. Select [OK]. Exit the menu. Press the <M> button to exit the menu. A blue bar will appear to indicate the snapshot length. -
Page 363
3 Shooting Video Snapshots Creating a Video Snapshot Album Shoot the first video snapshot. Press the <0> button, then shoot. The blue bar indicating the shooting duration will gradually decrease. After the set shooting duration elapses, the shooting stops automatically. The confirmation screen will appear (p.364-365). -
Page 364
3 Shooting Video Snapshots Options in Steps 10 and 11 Function Description The movie clip will be saved as the video JSave as album (Step 10) snapshot album’s first video snapshot. The video snapshot just recorded will be added to the album recorded immediately JAdd to album (Step 11) before. -
Page 365
3 Shooting Video Snapshots [1 Playback video snapshot] Operations in Steps 10 and 11 Function Playback Description By pressing <0>, you can play back or pause the video 7 Play snapshot recorded immediately before. Displays the first scene of the album’s first video 5 First frame snapshot. -
Page 366
3 Shooting Video Snapshots Adding to an Existing Album Select [Add to existing album]. Follow step 5 on page 362 to select [Add to existing album], then press <0>. Select an existing album. Turn the <5> dial to select an existing album, then press <0>. -
Page 367
3 Shooting Video Snapshots Cautions for Shooting Video Snapshots You can add to an album only the video snapshots with the same duration (approx. 2 sec., 4 sec., or 8 sec. each). Note that if you do any of the following while shooting video snapshots, a new album will be created for subsequent video snapshots. -
Page 368
3 Shooting Video Snapshots Playing Back an Album You can play back a video snapshot album in the same way as a normal movie (p.419). Play back the movie. Press the <x> button to display an image. Select the album. In the single-image display, the [st] icon displayed on the upper left of the screen indicates a video… -
Page 369
3 Shooting Video Snapshots Editing an Album After shooting, you can rearrange, delete, or play back the video snapshots in the album. Select [X]. On the movie playback panel displayed, select [X] (Edit), then press <0>. The editing screen will be displayed. Select an editing operation. -
Page 370
3 Shooting Video Snapshots Save the edited album. Press the <M> button to return to the Editing panel at the screen bottom. Select [W] (Save), then press <0>. The save screen will appear. To save it as a new album, select [New file]. -
Page 371: Menu Function Settings
Menu Function Settings When the Live View shooting/Movie shooting switch is set to <k>, some menu options under the [z1] tab will be switched to movie shooting items. Movie recording size You can set the movie recording quality (image size, frame rate, and compression method).
-
Page 372
3 Menu Function Settings kISO speed settingsN ISO speed In the <a> mode, you can set the ISO speed manually. You can also select ISO Auto. You can also use the <i> button for these settings. ISO speed range For movie shooting, you can set the manual ISO speed setting range (minimum and maximum limits). -
Page 373: Movie Servo Af
3 Menu Function Settings When the Live View shooting/Movie shooting switch is set to <k>, the [z4] tab will be displayed as the menu options exclusive to movie shooting. (In Basic Zone modes, it will be the [z2] tab.) Movie Servo AF With this function enabled, the camera focuses on the subject continuously during movie shooting.
-
Page 374
3 Menu Function Settings When [Disable] is set: Press the shutter button halfway or press the <p> button to focus. Cautions When [Movie Servo AF] is Set to [Enable] Shooting Conditions that Make Focusing Difficult • A fast-moving subject approaching or moving away from the camera. •… -
Page 375: Sensitivity
3 Menu Function Settings Movie Servo AF tracking sensitivityN You can change the Movie Servo AF’s tracking sensitivity to one of seven levels. This affects the responsiveness of AF tracking sensitivity when the subject strays from the AF points, such as during panning or when an obstacle cuts across the AF points.
-
Page 376: Movie Servo Af Speed
* Lenses supporting slow focus transition during movie shooting USM and STM lenses released in and after 2009 are compatible. For details, refer to the Canon Web site. With certain lenses, even if the AF speed is adjusted, the speed may not change.
-
Page 377
3 Menu Function Settings Metering timerN You can change how long the exposure setting is displayed (AE lock time). Grid display With [3×3 l] or [6×4 m], you can display grid lines to help you level the camera vertically or horizontally. Also, with [3×3+diag n], the grid is displayed together with diagonal lines to help you compose with better balance by aligning the intersections over the subject. -
Page 378
3 Menu Function Settings V button function You can set the functions performed by pressing the shutter button halfway or completely during movie shooting. Setting Pressing halfway Pressing completely Metering and AF No function Metering only No function Metering and AF Starts/stops movie shooting Metering only Starts/stops movie shooting… -
Page 379
3 Menu Function Settings When the Live View shooting/Movie shooting switch is set to <k>, the [z5] tab will be displayed as the menu options exclusive to movie shooting. (In Basic Zone modes, it will be the [z3] tab.) Video snapshot You can shoot video snapshots. -
Page 380
(the subject momentarily looks out of focus) due to the effects of the Movie digital IS. When using a TS-E lens, fish-eye lens, or non-Canon lens, setting Movie digital IS to [Disable] is recommended. The effect of Movie digital IS will not be reflected in any magnified image. -
Page 381: Remote Control Shooting
3 Menu Function Settings Remote control shooting When [Enable] is set, you can start or stop movie shooting using Remote Controller RC-6 (sold separately, p.271) or Wireless Remote Control BR-E1 (sold separately, p.273). • When using Remote Controller RC-6 Set the switch to the <2> position, then press the transmit button. If the switch is set to <o>…
-
Page 382
3 Menu Function Settings General Movie Shooting Cautions Red <E> Internal Temperature Warning Icon If the camera’s internal temperature increases due to prolonged movie shooting or under a high ambient temperature, a red <E> icon will appear. The red <E> icon indicates that movie shooting will soon be terminated automatically. -
Page 383
3 Menu Function Settings General Movie Shooting Cautions Recording and Image Quality If you use a card with a slow writing speed, a five- level indicator may appear on the right of the screen during movie shooting. It indicates how much data has not yet been written to the card (remaining capacity of the internal buffer memory). -
Page 387: Image Playback
Image Playback This chapter describes how to play back and erase the captured images (still photos/movies), how to view them on a TV screen, and other playback-related functions. Images shot and saved with another device The camera may not be able to properly display images captured with a different camera, edited with a computer, or that have had their file names changed.
-
Page 388: Image Playback
x Image Playback Single-Image Display Play back the image. Press the <x> button. The last image captured or played back will appear. Select an image. To play back images starting with the last image captured, turn the <5> dial counterclockwise. To play back images starting with the first captured image, turn the dial clockwise.
-
Page 389
x Image Playback Exit the image playback. Press the <x> button to exit the image playback and return to shooting-ready state. When RAW images shot with [z4: Aspect ratio] set to an option other than [3:2] (p.168) are played back, frame lines indicating the image area will be displayed. -
Page 390
x Image Playback 3 Grid Display In the single-image display, you can overlay the grid on the image playback. With [33: Playback grid], you can select [3×3 l], [6×4 m], or [3×3+diag This function is convenient for checking the image’s vertical or horizontal tilt as well as composition. -
Page 391: B: Shooting Information Display
B: Shooting Information Display Sample Information for Still Photos Basic information display Bluetooth function Eye-Fi transfer completed Wi-Fi function Rating Wi-Fi signal strength/ Eye-Fi transmission status Protect images Battery level Playback No./ Folder number — Total images/ File numbering Number of found images Shutter speed Image-recording…
-
Page 392
B: Shooting Information Display Shooting information display • Detailed Information for Creative Zone Mode Images Aperture Exposure compensation amount Histogram (Brightness/RGB) Shooting date and time ISO speed Shutter speed Highlight tone priority Scroll bar Shooting mode/ Multiple exposure/ Metering mode Time-lapse movie: Test shots White balance… -
Page 393
B: Shooting Information Display • Detailed Information for Basic Zone Mode Images Level of the Ambience ambience effect Background blur Level of blurred motion effect Brightness Color tone * [Brightness] indicator is displayed for images whose brightness was adjusted for shooting. -
Page 394
B: Shooting Information Display Lens / Histogram information • Histogram (Brightness) Lens name Histogram (RGB) Focal length White balance information • Picture Style information 1 Picture Style information 2 • •… -
Page 395: Gps Information
B: Shooting Information Display Color space / • Noise reduction information Lens aberration • correction information GPS information • Latitude Longitude Elevation UTC (Coordinated Universal Time) The GPS information screen is not displayed when GPS information is not recorded to the images. Even if you use the camera to play back an image taken by another camera (with GPS information recorded), the GPS information will not be displayed.
-
Page 396
B: Shooting Information Display Sample Movie Information Display Move playback/Video snapshot playback Aperture Shutter speed ISO speed Movie shooting mode/ HDR movie/ HDR movie (in 8 Movie digital IS modes)/ Time-lapse movie/ Video snapshot File size Recording time Movie recording format Movie recording size Compression rate/ Movie recording method… -
Page 397
B: Shooting Information Display Highlight alert When [33: Highlight alert] is set to [Enable], overexposed, clipped highlights will blink. To obtain more detailed gradation in the blinking areas where you want the gradation to be faithfully reproduced, set the exposure compensation to a negative amount and shoot again for a better result. -
Page 398
B: Shooting Information Display Histogram The brightness histogram shows the exposure level distribution and overall brightness. The RGB histogram is for checking the color saturation and gradation. The display can be switched with [33: Histogram disp]. [Brightness] display Sample Histograms This histogram is a graph showing the distribution of the image’s brightness level. -
Page 399: H Index Display (Multiple-Image Display)
H Index display (Multiple-image Display) Search for images quickly with the index display showing 4, 9, 36, or 100 images on one screen. Press the <u> button. During image playback or when the camera is ready to shoot, press the <u>…
-
Page 400: Jump Display (Jumping Through Images)
e Jump Display (Jumping Through Images) In the single-image display, you can turn the <6> dial to jump through the images forward or backward according to the jump method set. Select [Image jump w/6]. Under the [32] tab, select [Image jump w/6], then press <0>.
-
Page 401
e Jump Display (Jumping Through Images) Browse by jumping. Press the <x> button to play back images. In the single-image display, turn the <6> dial. You can browse by the set method. Jump method Playback position To search images by shooting date, select [g: Date]. To search images by folder, select [h: Folder]. -
Page 402: Filtering Images For Playback
Filtering Images for Playback You can play back images filtered according to search conditions. After setting the image search conditions, you can play back and display only the found images. Note that the following can be done for the found images: Erase protection, rating, slide show, deletion, print order, and photobook order.
-
Page 403
t Filtering Images for Playback Implement the search conditions. Read the message that appears. Select [OK], then press <0>. The search condition is specified. Display the found images. Press the <3> button to play back images. Only the images that match the set conditions (filtered) will be played back. -
Page 404: Magnifying Images
u Magnifying Images You can magnify a captured image by approx. 1.5x to 10x on the LCD monitor. Magnify the image. The image can be magnified as follows: 1. During image playback, 2. During the image review after image capture, and 3. From the shooting- ready state.
-
Page 405
u Magnifying Images 3 Setting the Initial Magnification Ratio and Position Under the [33] tab, when you select [Magnificatn (apx)], you can set the initial magnification ratio and position for the magnified view. 1x (no magnification) The image is not magnified. The magnified view will start with the single-image display. -
Page 406: Playing Back With The Touch Screen
d Playing Back with the Touch Screen The LCD monitor is a touch-sensitive panel that you can touch with your fingers for various playback operations. First, press the <x> button to play back images. Browsing Images Swipe with one finger. With single-image display, touch the LCD monitor with one finger.
-
Page 407
d Playing Back with the Touch Screen Reducing Image (Index Display) Pinch two fingers. Touch the screen with two fingers spread apart, and pinch your fingers together on the screen. Each time you pinch your fingers, the image will shrink. If you pinch the single-image display, it will change to the 4-image index display. -
Page 408: Rotating The Image
b Rotating the Image You can rotate the displayed image to the desired orientation. Select [Rotate image]. Under the [31] tab, select [Rotate image], then press <0>. Select an image. Turn the <5> dial to select the image to be rotated. You can also select an image in the index display (p.399).
-
Page 409: K Protecting Images
K Protecting Images You can protect important images from being accidentally erased by the camera’s erase function. 3 Protecting a Single Image Select [Protect images]. Under the [31] tab, select [Protect images], then press <0>. Select [Select images]. An image will be displayed. Select the image to be protected.
-
Page 410
K Protecting Images 3 Specifying the Range of Images to be Protected While looking at the images in the index display, you can specify the first and last images for a range to protect all the specified images at once. Select [Select range]. -
Page 411
K Protecting Images 3 Protecting All Images in a Folder or on a Card You can protect all the images in a folder or on a card at once. When you select [All images in folder] or [All images on card] in [31: Protect images], all the images in the folder or on the card will be protected. -
Page 412: Setting Ratings
p Setting Ratings You can rate images (still photos and movies) with one of the five rating marks: l/m/n/o/p. This function is called rating. 3 Rating a Single Image Select [Rating]. Under the [32] tab, select [Rating], then press <0>. Select [Select images].
-
Page 413
p Setting Ratings 3 Rating by Specifying the Range While looking at the images in the index display, you can specify the first and last images for a range to rate all the specified images at once. Select [Select range]. Select [Select range] in [32: Rating], then press <0>. -
Page 414
p Setting Ratings 3 Rating All Images in a Folder or on a Card You can rate all the images in a folder or on a card at once. Under [32: Rating], when you select [All images in folder] or [All images on card], all the images in the folder or on the card will be rated. -
Page 415: Q Quick Control For Playback
Q Quick Control for Playback During playback, you can press the <Q> button to set the following: [J: Protect images], [b: Rotate image], [9: Rating], [R: RAW image processing (1 images only)], [S: Resize (JPEG image only)], [N: Cropping (JPEG images only)], [ : Highlight alert], [ : AF point display], [e: Image jump w/6], [t: Image search], and [q: Send images to smartphone*].
-
Page 416
Q Quick Control for Playback Exit the setting. Press the <Q> button to exit the Quick Control. To rotate an image, set [51: Auto rotate] to [OnzD] (p.435). If [51: Auto rotate] is set to [OnD] or [Off], the [b Rotate image] setting will be recorded to the image, but the camera will not rotate the image for display. -
Page 417: Enjoying Movies
k Enjoying Movies The three main ways to play back and enjoy movies are as follows: Playback on a TV Set (p.427) By connecting the camera to a TV set with an HDMI cable, you can play back the camera’s still photos and movies on the TV set.
-
Page 418
k Enjoying Movies Playback and Editing with a Computer The movie files recorded on the card can be transferred to a computer and played back or edited with pre-installed or general-purpose software compatible with the movie’s recording format. To play back or edit a movie with commercially-available software, use software compatible with MP4-format and MOV-format movies. -
Page 419: Playing Back Movies
k Playing Back Movies Play back the image. Press the <x> button to play back an image. Select a movie. Turn the <5> dial to select the movie to be played back. In the single-image display, the <s1> icon displayed on the upper left indicates a movie.
-
Page 420
k Playing Back Movies Movie Playback Panel Operation Playback Description 7 Play* Pressing <0> toggles between playback and stop. Adjusts the slow motion speed by turning the <5> 8 Slow motion dial. The slow motion speed is indicated on the upper right of the screen. -
Page 421
k Playing Back Movies Playback with the Touch Screen Tap [7] at the center of the screen. The movie will start playing back. To display the movie playback panel, tap <s1> or <st> on the upper left of the screen. To pause the movie while it is playing back, tap on the screen. -
Page 422: Editing A Movie’s First And Last Scenes
X Editing a Movie’s First and Last Scenes You can edit out the first and last scenes of a movie in approx. 1-sec. increments. On the movie playback screen, select [X]. The movie editing panel will be displayed at the bottom of the screen. Specify the part to be edited out.
-
Page 423
X Editing a Movie’s First and Last Scenes Save the edited movie. Select [W], then press <0>. The save screen will appear. To save it as a new movie, select [New file]. To save it and overwrite the original movie file, select [Overwrite], then press <0>. -
Page 424: Slide Show (Auto Playback)
Slide Show (Auto Playback) You can play back the images on the card as an automatic slide show. Specify the images to be played back. To play back all the images on the card, go to step 2. If you want to specify the images to be played back in the slide show, filter the images with [Set image search conditions] under the [32] tab…
-
Page 425: Start The Slide Show
3 Slide Show (Auto Playback) Transition effect Background music Start the slide show. Select [Start], then press <0>. After [Loading image…] is displayed, the slide show will start. Exit the slide show. To exit the slide show and return to the setting screen, press the <M>…
-
Page 426
3 Slide Show (Auto Playback) Selecting the Background Music If you use EOS Utility (EOS software, p.594) to copy background music tracks to the card, you can play the background music together with the slide show. Select [Background music]. Set [Background music] to [On], then press <0>. -
Page 427: Viewing Images On A Tv Set
Viewing Images on a TV Set By connecting the camera to a TV set with an HDMI cable, you can play back the camera’s still photos and movies on the TV set. For the HDMI cable, HDMI Cable HTC-100 (sold separately) is recommended. If the picture does not appear on the TV screen, check if the [53: Video system] is correctly set to [For NTSC] or [For PAL] (depending on the video system of your TV set).
-
Page 428
Viewing Images on a TV Set When the camera is connected to a TV set with an HDMI cable, 4K time- lapse movies will be played back in Full HD quality (cannot be played back in 4K quality). Adjust movie sound volume with the TV set. The sound volume cannot be adjusted with the camera. -
Page 429
Viewing Images on a TV Set Press the camera’s <x> button. An image will appear on the TV screen and you can use the TV set’s remote control for playback. Select an image. Point the remote control toward the TV set and press the button to select an image. -
Page 430: L Erasing Images
L Erasing Images You can either select and erase unnecessary images one by one or erase them in one batch. Protected images (p.409) will not be erased. Once an image is erased, it cannot be recovered. Make sure you no longer need the image before erasing it.
-
Page 431
L Erasing Images 3 Checkmarking [X] Images to Be Erased in a Batch By adding checkmarks <X> to the images to be erased, you can erase all those images at once. Select [Erase images]. Under the [31] tab, select [Erase images], then press <0>. -
Page 432
L Erasing Images 3 Specifying the Range of Images to be Erased While looking at the images in the index display, you can specify the first and last images for a range to erase all the specified images at once. Select [Select range]. -
Page 433
L Erasing Images 3 Erasing All Images in a Folder or on a Card You can erase all the images in a folder or on a card at once. When [31: Erase images] is set to [All images in folder] or [All images on card], all the images in the folder or on the card will be erased. -
Page 434: Adjusting The Lcd Monitor Brightness
Adjusting the LCD Monitor Brightness You can adjust the brightness of the LCD monitor to make it easier to view. Select [LCD brightness]. Under the [52] tab, select [LCD brightness], then press <0>. Adjust the brightness. Referring to the gray chart, press the <Y>…
-
Page 435: Setting The Auto Rotation Of Vertical Images
Setting the Auto Rotation of Vertical Images Images shot in vertical orientation are rotated automatically to the proper orientation for viewing, so they will not be displayed in horizontal orientation when played back on the camera’s LCD monitor or viewed on a computer screen. You can change the setting of this feature.
-
Page 437: Post-Processing Images
Post-Processing Images This chapter describes RAW image processing, JPEG image resizing, and JPEG image cropping. The M icon at the upper right of the page title indicates that the function is available only in Creative Zone modes (<d>, <s>, <f>, <a>, <F>). The camera may not be able to process images taken with another camera.
-
Page 438: R Processing Raw Images With The Camera
R Processing RAW Images with the CameraN You can process 1 images with the camera and save them as JPEG images. As the RAW image itself does not change, you can apply different processing conditions to create any number of JPEG images from it.
-
Page 439
R Processing RAW Images with the CameraN Displaying the setting screen Press <0> to display the selected function’s setting screen. Turn the <6> or <5> dial to change the setting. Press <0> to finalize the setting and return to the previous screen. -
Page 440
R Processing RAW Images with the CameraN Magnified View You can magnify the image by pressing the <u> button in step 3. The magnification will vary depending on the [Image quality] setting under [x1: RAW image processing]. With <9>, you can scroll around the magnified image. -
Page 441: Brightness Adjustment
R Processing RAW Images with the CameraN RAW Image Processing Options Brightness adjustment You can adjust the image brightness up to ±1 stop in 1/3-stop increments. The displayed image will reflect the setting’s effect. White balance (p.185) You can select the white balance. If you select [Q] and press the <B>…
-
Page 442
R Processing RAW Images with the CameraN Color space (p.208) You can select either sRGB or Adobe RGB. Since the camera’s LCD monitor is not compatible with Adobe RGB, the difference in the image will hardly be perceptible when either color space is set. Lens aberration correction (p.200) Peripheral illumination correction… -
Page 443
R Processing RAW Images with the CameraN (p.203) Diffraction correction The diffraction by the lens aperture degrading the image sharpness can be corrected. If [Enable] is set, the corrected image will be displayed. If the effect is difficult to discern, magnify the image (p.440). -
Page 444: S Resizing Jpeg Images
S Resizing JPEG Images You can resize a JPEG image to make the pixel count lower and save it as a new image. Resizing an image is possible only with JPEG 3, 4, and a images. JPEG b and RAW images cannot be resized. Select [Resize].
-
Page 445
S Resizing JPEG Images Resize Options by Original Image Quality Available Resize Settings Original Image Quality Image Sizes Sizes for resized images are shown below. (Approx. pixels) Image Quality Full-frame (3:2) 4:3 (aspect ratio) 4160×2768* (11.5 megapixels) 3680×2768* (10.2 megapixels) 3120×2080 (6.5 megapixels) 2768×2080* (5.8 megapixels) 2400×1600 (3.8 megapixels) -
Page 446: N Cropping Jpeg Images
N Cropping JPEG Images You can crop a captured JPEG image and save it as another image. Cropping an image is possible only with JPEG 3, 4, a, and b images. Images shot in RAW cannot be cropped. Select [Cropping]. Under the [x2] tab, select [Cropping], then press <0>.
-
Page 447
N Cropping JPEG Images Moving the Cropping Frame Use <9> to move the frame over the image vertically or horizontally. Move the cropping frame until it covers the desired image area. Correcting the Tilt You can correct image tilt by ±10°. Press the <B> button, then while checking the tilt against the grid, turn the <5>… -
Page 449: Sensor Cleaning
Besides dust entering the camera from outside, in rare cases, lubricant from the camera’s internal parts may adhere to the front of the sensor. If visible spots still remain after the automatic sensor cleaning, having the sensor cleaned by a Canon Service Center is recommended.
-
Page 450: Automatic Sensor Cleaning
f Automatic Sensor Cleaning Whenever you set the power switch to <1> or <2>, the Self Cleaning Sensor Unit automatically shakes off the dust on the front of the sensor. Normally, you need not pay attention to this operation. However, you can manually perform sensor cleaning or can disable this unit as follows.
-
Page 451
f Automatic Sensor Cleaning For best results, perform the sensor cleaning with the camera placed upright and stable on a table or other flat surface. Even if you repeat the sensor cleaning, the result will not improve much. Immediately after the sensor cleaning is finished, the [Clean nowf] option remains disabled temporarily. -
Page 452: Appending Dust Delete Data
Appending Dust Delete DataN Normally, the Self Cleaning Sensor Unit will eliminate most of the dust that may be visible on captured images. However, for the case where visible dust still remains, you can append the Dust Delete Data to the image for erasing the dust spots later.
-
Page 453
3 Appending Dust Delete DataN Shoot a solid-white object. At a distance of 20 cm — 30 cm (0.7 ft. — 1.0 ft.), fill the viewfinder with a patternless, solid-white object and take a picture. The picture will be taken in aperture- priority AE mode at an aperture of f/22. -
Page 454: Dust Delete Data
3 Appending Dust Delete DataN Dust Delete Data After the Dust Delete Data is obtained, it is appended to all the JPEG and RAW images captured thereafter. Before an important shoot, it is recommended that you update the Dust Delete Data by obtaining it again.
-
Page 455: Manual Sensor Cleaning
Before cleaning the sensor, detach the lens from the camera. The image sensor is extremely delicate. If the sensor needs to be cleaned directly, having it done by a Canon Service Center is recommended. Select [Sensor cleaning].
-
Page 456
If the battery level becomes low while cleaning the sensor, the beeper will sound as a warning. Stop cleaning the sensor. If a smudge that cannot be removed with a blower remains, having the sensor cleaned by a Canon Service Center is recommended. -
Page 457: Print Order And Photobook Set-Up
Print order and Photobook Set-up Digital Print Order Format (DPOF) (p.458) You can specify printing instructions such as the image selection, quantity to print, etc. for the images recorded on the card. Specifying Images for a Photobook (p.464) You can specify the images for printing in a photobook from those saved on the card.
-
Page 458: W Digital Print Order Format (Dpof)
W Digital Print Order Format (DPOF) DPOF (Digital Print Order Format) enables you to print images recorded on the card according to your printing instructions such as the image selection, quantity to print, etc. You can print multiple images in one batch or create a print order for a photofinisher.
-
Page 459
W Digital Print Order Format (DPOF) Standard Prints one image on one sheet. Multiple thumbnail images are printed on Index one sheet. Print type Both Prints both the standard and index prints. [On] imprints the recorded date of the captured Date image. -
Page 460
W Digital Print Order Format (DPOF) RAW images or movies cannot be specified for printing. If you print an image with a large image size using the [Index] or [Both] setting (p.458), the index print may not be printed with certain printers. In such a case, resize the image (p.444), then print the index print. -
Page 461
W Digital Print Order Format (DPOF) 3 Specifying Images for Printing Selecting Images Select and specify the images one by one. If you press the <u> button and turn the <6> dial counterclockwise, you can select an image from a three-image display. -
Page 462
W Digital Print Order Format (DPOF) Selecting Multiple Images Select Range Under [Multiple], select [Select range]. Select the first and last images of the desired range, then all the images in the range will be marked with the checkmark [X]. A print order for one copy of each image will be set. -
Page 463
W Digital Print Order Format (DPOF) If the search conditions are set with [32: Set image search conditions] (p.402) and you select [Multiple], the display will change to [Mark all found images] and [Clear all found images]. All found images If you select [Mark all found images], a print order for one copy of all the images filtered by the search… -
Page 464: Specifying Images For A Photobook
p Specifying Images for a Photobook You can specify up to 998 images to be printed in a photobook. When you use EOS Utility (EOS software) to transfer images to a computer, the specified images for a photobook will be copied to a dedicated folder.
-
Page 465
p Specifying Images for a Photobook 3 Specifying the Image Range for a Photobook While looking at the images in the index display, you can specify the first and last images for a range to all the specified images at once. Select [Multiple]. -
Page 466
p Specifying Images for a Photobook 3 Specifying All Images in a Folder or on a Card You can specify all the images in a folder or on a card at once for a photobook. Under [x1: Photobook Set-up], you can set [Multiple] to [All images in folder] or [All images on card] to specify all the images in the folder or on… -
Page 467: Customizing The Camera
Customizing the Camera You can make fine adjustments to various camera functions and change the functionality of buttons and dials to suit your picture-taking preferences with Custom Functions and Custom Controls. You can also save the camera’s current settings to the <w>…
-
Page 468: Setting Custom Functions
Setting Custom FunctionsN Select the [8] tab. Select the desired group. Select [C.Fn I: Exposure], [C.Fn II: Autofocus], or [C.Fn III: Operation/ Others], then press <0>. Select the Custom Function Custom Function number number. Press the <Y> <Z> keys to select the Custom Function number, then press <0>.
-
Page 469: Custom Functions
Custom FunctionsN C.Fn I: Exposure A LV k Movie Shooting Shooting Exposure level increments ISO speed setting increments p.471 Bracketing auto cancel Bracketing sequence p.472 Number of bracketed shots Safety shift p.473 Exposure compensation auto cancel p.474 Metering mode, AE locked after focus C.Fn II: AF A LV k Movie…
-
Page 470
3 Custom FunctionsN A LV k Movie C.Fn II: AF Shooting Shooting AF area selection method p.482 Orientation linked AF point p.483 Initial AF point, AI Servo AF p.484 Auto AF point selection: Color p.485 AF point selection movement p.486 AF point display during focus p.487 Viewfinder display illumination… -
Page 471: Custom Function Settings
Custom Function SettingsN C.Fn I: Exposure C.Fn I-1 Exposure level increments 0: 1/3-stop 1: 1/2-stop Sets 1/2-stop increments for the shutter speed, aperture, exposure compensation, AEB, flash exposure compensation, etc. When [1:1/2-stop] is set, the display will be as shown below. C.Fn I-2 ISO speed setting increments 0: 1/3-stop…
-
Page 472
3 Custom Function SettingsN C.Fn I-4 Bracketing sequence The AEB shooting sequence and white balance bracketing sequence can be changed. 0: 09-9+ 1: -909+ 2: +909- White Balance Bracketing B/A Direction M/G Direction 0 : Standard exposure 0 : Standard white balance 0 : Standard white balance — : Decreased exposure — : Blue bias — : Magenta bias + : Increased exposure + : Amber bias… -
Page 473: Safety Shift
3 Custom Function SettingsN C.Fn I-6 Safety shift 0: Disable 1: Shutter speed/Aperture Takes effect in the <s> shutter-priority AE and <f> aperture- priority AE modes. If the subject brightness changes and the standard exposure cannot be obtained within the autoexposure range, the camera will automatically change the manually-selected setting to obtain the standard exposure.
-
Page 474
3 Custom Function SettingsN C.Fn I-7 Exposure compensation auto cancel 0: Disable The exposure compensation setting will not be canceled even if you set the power switch to <2>. 1: Enable When you set the power switch to <2>, the exposure compensation setting will be canceled. -
Page 475: Functions
3 Custom Function SettingsN C.Fn II: AF C.Fn II-1 Tracking sensitivity Sets the subject-tracking sensitivity during AI Servo AF when an obstacle cuts across the AF points or when the subject strays from the AF point. Default setting. Suitable for moving subjects in general. Locked on: -2 / Locked on: -1 The camera will try to continue focusing on the subject even if an obstacle cuts across the AF points or if the subject strays from the…
-
Page 476
3 Custom Function SettingsN C.Fn II-2 Acceleration/deceleration tracking This sets the tracking sensitivity for moving subjects whose speed can momentarily change dramatically by starting or stopping suddenly, etc. Suited for subjects that move at a steady speed (minor changes in moving speed). -
Page 477
3 Custom Function SettingsN C.Fn II-3 AF point auto switching This sets the switching sensitivity of the AF points as they track the subject moving dramatically up, down, left, or right. This setting takes effect when the AF area selection mode is set to Zone AF, Large Zone AF, or Automatic selection AF. -
Page 478
3 Custom Function SettingsN C.Fn II-4 AI Servo 1st image priority You can set the AF operation characteristics and shutter-release timing for the first shot with AI Servo AF. Equal priority Equal priority is given to focusing and shutter release. Release priority Pressing the shutter button takes the picture immediately even if focus has not been achieved. -
Page 479
3 Custom Function SettingsN C.Fn II-5 AI Servo 2nd image priority With AI Servo AF for continuous shooting, you can preset the AF operation characteristics and shutter-release timing for the subsequent shots after the first shot in continuous shooting. Equal priority Equal priority is given to focusing and continuous shooting speed. -
Page 480
3 Custom Function SettingsN C.Fn II-6 AF-assist beam firing Enables or disables the EOS-dedicated external Speedlite’s AF-assist beam. 0: Enable The external Speedlite emits the AF-assist beam when necessary. 1: Disable The external Speedlite will not emit the AF-assist beam. This prevents the AF-assist beam from disturbing others. -
Page 481
3 Custom Function SettingsN C.Fn II-7 Lens drive when AF impossible If focus cannot be achieved with autofocus, you can have the camera keep searching for the precise focus or have it stop searching. 0: Continue focus search If focus cannot be achieved with autofocus, the lens is driven to search for the precise focus. -
Page 482
3 Custom Function SettingsN C.Fn II-9 AF area selection method You can set the method for changing the AF area selection mode. 0: S 9 AF area selection button After you press the <S> or <B> button, pressing the <B> button will change the AF area selection mode. -
Page 483
3 Custom Function SettingsN C.Fn II-10 Orientation linked AF point You can set the AF point or the AF area selection mode + AF point separately for vertical shooting and horizontal shooting. 0: Same for both vert/horiz The same AF area selection mode and manually-selected AF point (or zone) are used for both vertical shooting and horizontal shooting. -
Page 484
3 Custom Function SettingsN C.Fn II-11 Initial AF Point, AI Servo AF You can set the AI Servo AF’s starting AF point for when the AF area selection mode is set to Auto selection AF. 0: Auto The AF point that AI Servo AF starts with is set automatically to suit the shooting conditions. -
Page 485
3 Custom Function SettingsN C.Fn II-12 Auto AF point selection: Color tracking Use this function to autofocus by recognizing colors equivalent to skin tones. This function works when the AF area selection mode is set to Zone AF (manual selection of zone), Large Zone AF (manual selection of zone), or Automatic selection AF. -
Page 486
3 Custom Function SettingsN C.Fn II-13 AF point selection movement You can set either to stop the selection at the outer edge or it can cycle around to the opposite side in AF point selection. 0: Stops at AF area edges Useful if you often use an AF point along the edge. -
Page 487
3 Custom Function SettingsN C.Fn II-14 AF point display during focus You can set whether to display the AF point(s) before AF starts (shooting ready), when AF starts, during AF, when focus is achieved, and when the metering timer is active after focus is achieved. 0 : Selected (constant) 1 : All (constant) 2 : Selected (pre-AF,focused) -
Page 488
3 Custom Function SettingsN C.Fn II-15 Viewfinder display illumination You can set whether the AF points in the viewfinder will light up in red when focus is achieved. 0: Auto The AF points achieving focus in low light or with a dark subject will automatically light up in red. -
Page 489
3 Custom Function SettingsN C.Fn III: Operation/Others C.Fn III-1 Warnings z in viewfinder When any of the following functions are set, the <z> icon can be displayed in the viewfinder and on the LCD panel (p.31). Select the function for which you want the warning icon to appear, then press <0>… -
Page 490
3 Custom Function SettingsN C.Fn III-2 Dial direction during Tv/Av 0: Normal 1: Reverse direction Dial turning direction when setting the shutter speed and aperture can be reversed. In the <a> shooting mode, the turning direction of the <6> and <5>… -
Page 491: 8: Fine Adjustment Of Af’s Point Of Focus
8: Fine Adjustment of AF’s Point of FocusN Fine adjustment of the AF’s point of focus is possible for viewfinder shooting. This is called “AF Microadjustment”. Before making the adjustment, read “General Cautions for AF Microadjustment” and “Notes for AF Microadjustment” on page 496. Normally, this adjustment is not required.
-
Page 492
8: Fine Adjustment of AF’s Point of FocusN Make the adjustment. Set the adjustment amount. The adjustable range is ±20 steps. Setting it toward “-: ” will shift the point of focus in front of the standard point of focus. Setting it toward “+: ”… -
Page 493
8: Fine Adjustment of AF’s Point of FocusN 2: Adjust by Lens You can make the adjustment for each lens and register the adjustment in the camera. You can register the adjustment for up to 40 lenses. When you autofocus with a lens whose adjustment is registered, the point of focus will always be shifted by the adjustment amount. -
Page 494
8: Fine Adjustment of AF’s Point of FocusN Entering the Serial Number Select the digit to be entered, then press <0> so r> is displayed. < Enter the number, then press <0>. After entering all the digits, select [OK]. Lens Serial Number In step 3, if “*”… -
Page 495
8: Fine Adjustment of AF’s Point of FocusN Make the adjustment. Single focal length lens For a zoom lens, select the wide- angle (W) or telephoto (T) end. Pressing <0> will turn off the orange frame and make the adjustment possible. Set the adjustment amount, then press <0>. -
Page 496
8: Fine Adjustment of AF’s Point of FocusN When shooting with the intermediate range (focal length) of a zoom lens, the AF’s point of focus is corrected automatically relative to the adjustments made for the wide-angle and telephoto ends. Even if only the wide-angle or telephoto end is adjusted, a correction will be made automatically for the intermediate range. -
Page 497: 8: Custom Controls
8: Custom ControlsN You can assign frequently-used functions to camera buttons or dials according to your preferences for easy operations. Select [C.Fn III: Operation/ Others]. Under the [8] tab, select [C.Fn III: Operation/Others], then press <0>. Select [4: Custom Controls]. The Custom Controls setting screen will appear.
-
Page 498
8: Custom ControlsN Assignable Functions to Camera Controls Function Page Metering and AF start AF stop ONE SHOT z AI SERVO/SERVO Direct AF point selection Pause Movie Servo AF Metering start AE lock/FE lock AE lock (hold) AE lock AE lock (while button pressed) FE lock Set ISO speed (hold button, turn Exposure compensation (hold button, turn… -
Page 499
8: Custom ControlsN < > stands for “AF stop button” provided on super telephoto lenses equipped with Image Stabilizer. -
Page 500
8: Custom ControlsN : Metering and AF start When you press the button assigned to this function, metering and AF are performed. : AF stop The AF will stop while you hold down the button assigned to this function. Useful when you want to stop the AF during AI Servo AF. : ONE SHOT z AI SERVO/SERVO You can switch the AF operation. -
Page 501
8: Custom ControlsN Exposure : Metering start When you press the shutter button halfway, exposure metering is performed. (AF is not performed.) : AE lock/FE lock When you press the button assigned to this function, you can lock the exposure (AE lock) while the metering timer is active. Useful when you want to set the focus and exposure separately. -
Page 502
8: Custom ControlsN : FE lock For flash photography, pressing the button assigned to this function will fire a preflash and retain the required flash output (FE lock). : Set ISO speed (hold button, turn You can set the ISO speed by holding down the button assigned with this function and turning the <6>… -
Page 503
8: Custom ControlsN Image : Image quality Press <0> to display the recording quality setting screen (p.162) on the LCD monitor. : Picture Style Press <0> to display the Picture Style selection screen (p.176) on the LCD monitor. : White balance selection Press <0>… -
Page 504
8: Custom ControlsN : Flash function settings Press <0> to display the flash function setting screen (p.283). : Wi-Fi function Press <0> to display the wireless communication setting screen (p.540). : No function (disabled) Use this setting when you do not want to assign any function to the button. -
Page 505: Registering My Menu
Registering My MenuN Under My Menu tab, you can register menu items and Custom Functions whose settings you change frequently. You can also name the registered menu tabs, and press the <M> button to display the My Menu tab first. Creating and Adding My Menu Tab Select [Add My Menu tab].
-
Page 506
3 Registering My MenuN Select [Select items to register]. Register the desired items. Select the option to be set, then press <0>. Select [OK] on the confirmation dialog. You can register up to six items. To return to the screen in step 2, press the <M>… -
Page 507: Enter Text
3 Registering My MenuN Delete tab You can delete the My Menu tab currently displayed. Select [Delete tab] to delete the [MY MENU*] tab. Rename tab You can rename the My Menu tab from [MY MENU*]. Select [Rename tab]. Enter text. Press the <L>…
-
Page 508
3 Registering My MenuN Deleting all My Menu tabs / Deleting all items You can delete all the created My Menu tabs or My Menu items registered under them. Delete all My Menu tabs You can delete all My Menu tabs you created. When you select [Delete all My Menu tabs], all the tabs from [MY MENU1] to [MY MENU5] will be deleted and the [9] tab will revert to its default. -
Page 509
3 Registering My MenuN Menu Display Settings You can select [Menu display] to set the menu screen that is to appear first when you press the <M> button. Normal display Displays the last displayed menu screen. Display from My Menu tab Displays with the [9] tab selected. -
Page 510: W: Registering Custom Shooting Modes
w: Registering Custom Shooting ModesN You can register current camera settings, such as the shooting functions, menu functions, and Custom Function settings, as Custom shooting modes under the Mode Dial’s <w> and <x> positions. Select [Custom shooting mode (C1, C2)]. Under the [55] tab, select [Custom shooting mode (C1, C2)], then press <0>.
-
Page 511: Menu Functions
w: Registering Custom Shooting ModesN My Menu settings will not be registered under Custom shooting modes. Even in the <w> and <x> modes, you can still change shooting function settings and menu settings. Settings To Be Registered Shooting Function Settings Shooting mode, Shutter speed, Aperture, ISO speed, AF operation, AF area selection mode, AF point, Drive mode, Metering mode, Exposure compensation amount, AEB increment, Flash exposure compensation amount…
-
Page 512
w: Registering Custom Shooting ModesN [z4 (Movie shooting)] Movie Servo AF, AF method, Movie Servo AF tracking sensitivity, Movie Servo AF speed, Metering timer, Grid, V button function [z5 (Movie shooting)] Video snapshot, Time-lapse movie (setting), Movie digital IS, Remote control [x2] Slide show (settings), Image jump with 6 [x3] Highlight alert, AF point display, Playback grid, Histogram display, Magnification (approx.) -
Page 513: Reference
Reference This chapter provides reference information for system accessories, camera features, etc. Certification Logo Select [55: Certification Logo Display] and press <0> to display some of the logos of the camera’s certifications. Other certification logos can be found in this Instruction Manual, on the camera body, and on the camera’s package.
-
Page 514: System Map
System Map ST-E2 ST-E3-RT 270EX II 430EX III-RT/ 600EX II-RT Macro Ring Lite Macro Twin Lite 430EX III MR-14EX II MT-24EX Bundled Accessories Eyepiece Extender EP-EX15 Eyecup Eb Rubber Frame Eb E-series Dioptric Adjustment Lenses Strap Angle Finder C Battery Pack Battery Charger LP-E6N LC-E6…
-
Page 515
System Map Directional Stereo Timer Remote Remote Wireless Microphone Controller Switch Controller DM-E1 TC-80N3 RS-80N3 LC-5 Remote Wireless Controller Remote RC-6 Control BR-E1 EF lenses HDMI Cable HTC-100 (2.9 m/9.5 ft.) TV/Monitor Interface Cable IFC-400PCU (1.3 m/4.3 ft.) Connect Station Interface Cable CS100 IFC-200U (1.9 m/6.2 ft.) -
Page 516: Checking The Battery Information
Using a genuine Canon Battery Pack LP-E6N/LP-E6 is recommended. If you use batteries that are not genuine Canon products, the camera’s full performance may not be attained or malfunction may result. The shutter count is the number of still photos taken. (Movie shooting is not counted.)
-
Page 517
3 Checking the Battery Information Registering Batteries to the Camera You can register up to six LP-E6N/LP-E6 batteries to the camera. To register multiple batteries to the camera, follow the procedure below for each battery. Press the <B> button. With the battery info. screen displayed, press the <B>… -
Page 518
3 Checking the Battery Information Labeling Serial Numbers on Batteries It is convenient to label each registered Battery Pack LP-E6N/LP-E6 with their serial numbers, using commercially-available labels. Write the serial number on a Serial number label. Write the serial number displayed on the battery history screen on a label approx. -
Page 519
3 Checking the Battery Information Checking the Remaining Capacity of a Registered Battery You can check the remaining capacity of any battery (even when not installed) and also when it was last used. Look for the serial number. Serial number Date last used Refer to the battery’s serial number label and look for the battery’s serial number on the battery history screen. -
Page 520: Using A Household Power Outlet
Using a Household Power Outlet You can power the camera with a household power outlet by using the DC Coupler DR-E6 and AC Adapter AC-E6N (each sold separately). Place the cord in the groove. Carefully insert the DC coupler’s cord into the groove without damaging the cord.
-
Page 521
Using a Household Power Outlet Do not use an AC adapter other than the AC-E6N (sold separately). While the camera’s power switch is on, do not connect or disconnect the power cord or connector, or disconnect the DC coupler. After using the camera, unplug the power plug from the power outlet. AC Adapter Kit ACK-E6 can also be used. -
Page 522: H Using Eye-Fi Cards
H Using Eye-Fi Cards With a commercially-available Eye-Fi card already set up, you can automatically transfer captured images to a computer or upload them to an online service via a wireless LAN. The image transfer is a function of the Eye-Fi card. For instructions on how to set up and use the Eye-Fi card or to troubleshoot any image transfer problems, refer to the Eye-Fi card’s instruction manual or contact the card manufacturer.
-
Page 523
H Using Eye-Fi Cards Display the connection information. Select [Connection info.], then press <0>. Check the [Access point SSID:]. Check that an access point is displayed for [Access point SSID:]. You can also check the Eye-Fi card’s MAC address and firmware version. Press the <M>… -
Page 524
H Using Eye-Fi Cards Cautions for Using Eye-Fi Cards Under [Wi-Fi settings] of [51: Wireless communication settings], if [Wi-Fi] set to [Enable], image transfer with an Eye-Fi card will not be possible. If “J” is displayed, an error occurred while retrieving the card information. -
Page 526: Function Availability Table By Shooting Mode
Function Availability Table by Shooting Mode Still Photo Shooting (A, C, Creative Zone) o: Set automatically k: User selectable : Not selectable/Disabled Function Shooting with ambience selection Background blur setting Image-recording quality JPEG Aspect ratio Automatically set/Auto ISO speed Manually set Auto Picture Style Manual selection…
-
Page 527
Function Availability Table by Shooting Mode Function Single shooting High-speed continuous shooting Low-speed continuous shooting Silent single shooting* Drive Silent continuous shooting* 10-sec. self-timer/Remote control 2-sec. self-timer/Remote control Self-timer: Continuous Evaluative metering Partial metering Metering Spot metering Center-weighted average metering Program shift Exposure compensation AE lock… -
Page 528
Function Availability Table by Shooting Mode Still Photo Shooting (8: 2 q 3 5C r) o: Set automatically k: User selectable : Not selectable/Disabled Function Brightness Color tone Panning effect Image-recording quality JPEG Aspect ratio Automatically set/Auto ISO speed Manually set Auto Picture Style Manual selection… -
Page 529
Function Availability Table by Shooting Mode Function Single shooting High-speed continuous shooting Low-speed continuous shooting Silent single shooting* Drive Silent continuous shooting* 10-sec. self-timer/Remote control 2-sec. self-timer/Remote control Self-timer: Continuous Evaluative metering Partial metering Metering Spot metering Center-weighted average metering Program shift Exposure compensation AE lock… -
Page 530
Function Availability Table by Shooting Mode Still Photo Shooting (8: 4 P y 6 F G) o: Set automatically k: User selectable : Not selectable/Disabled Function Brightness Color tone Panning effect Image-recording quality JPEG Aspect ratio Automatically set/Auto ISO speed Manually set Auto Picture Style… -
Page 531
Function Availability Table by Shooting Mode Function Single shooting High-speed continuous shooting Low-speed continuous shooting Silent single shooting* Drive Silent continuous shooting* 10-sec. self-timer/Remote control 2-sec. self-timer/Remote control Self-timer: Continuous Evaluative metering Partial metering Metering Spot metering Center-weighted average metering Program shift Exposure compensation AE lock… -
Page 532
Function Availability Table by Shooting Mode Movie Shooting o: Set automatically k: User selectable : Not selectable/Disabled A/C 8 d/s/f/F Function Movie recording quality selectable Auto Custom Sound recording Wind filter Attenuator HDR movie Time-lapse movie Full HD Video snapshot Automatically set/Auto ISO speed Manually set… -
Page 533
Function Availability Table by Shooting Mode d/s/f/F Function u+Tracking Smooth zone Live 1-point AF Manual focusing (MF) Movie servo AF • Tracking sensitivity • AF speed Metering Program shift Exposure Exposure compensation AE lock GPS function Remote control shooting Quick Control Touch operation *1: Automatically set to NTSC: L 6 X/PAL:L 5 X. -
Page 534: Menu Settings
3Menu Settings Viewfinder Shooting (Basic Zone Modes) z: Shooting 1 (Red) Page 1 / 41 / 61 Image quality* 73, 83, 74, 84, 7a, 8a, b Image review time Off / 2 sec. / 4 sec. / 8 sec. / Hold Release shutter Enable / Disable without card…
-
Page 535
3Menu Settings Viewfinder Shooting and Live View Shooting (Creative Zone Modes) z: Shooting 1* (Red) Page 1 / 41 / 61 Image quality 73, 83, 74, 84, 7a, 8a, b Image review time* Off / 2 sec. / 4 sec. / 8 sec. / Hold Release shutter Enable / Disable without card*… -
Page 536
3Menu Settings z: Shooting 2 (Red) Page Exposure compensation: ±5 stops* in 1/3- or Exposure 1/2-stop increments compensation/ AEB setting* AEB: ±3 stops in 1/3- or 1/2-stop increments ISO speed / ISO speed range / Auto range / zISO speed settings* Minimum shutter speed Disable / Low / Standard / High Auto Lighting … -
Page 537: Software
3Menu Settings z: Shooting 3 (Red) Page DAuto / PStandard / QPortrait / RLandscape / uFine Detail / Picture Style SNeutral / UFaithful / VMonochrome / WUser Defined 1-3 Noise reduction for Disable / Auto / Enable long exposures* High ISO speed noise Disable / Low / Standard / High / Multi Shot reduction Noise Reduction*…
-
Page 538
3Menu Settings z: Shooting 4 (Red) Page Interval timer* Disable / Enable (Interval / Number of shots) Bulb timer Disable / Enable (Exposure time) Anti-flicker shooting* Disable / Enable Mirror lockup* Disable / Enable Aspect ratio 3:2 / 4:3 / 16:9 / 1:1 Live View shooting* Enable / Disable *1: Not displayed for Live View shooting. -
Page 539
3Menu Settings 3: Playback 1 (Blue) Page Protect images Protect images Rotate image Rotate images Erase images Erase images Print order Specify images to be printed (DPOF) Photobook set-up Specify images for a photobook RAW image processing Process 1 images 3: Playback 2 (Blue) Page Cropping… -
Page 540
3Menu Settings 5: Set-up 1 (Yellow) Page Select folder Create and select a folder Numbering: Continuous / Auto reset File numbering Manual reset Vertical image auto OnzD / OnD / Off rotation Format card Erase data on the card by formatting Displayed when a commercially-available Eye- Eye-Fi settings Fi card is inserted… -
Page 541
3Menu Settings 5: Set-up 2 (Yellow) Page 1 min. / 2 min. / 4 min. / 8 min. / 15 min. / 30 Auto power off min. / Disable LCD brightness LCD brightness adjustable to 7 levels LCD off/on* Remains on / Shutter btn. Date (year, month, day) / Time (hr., min., sec.) / Date/Time/Zone Daylight saving time / Time zone… -
Page 542
3Menu Settings 5: Set-up 4 (Yellow): For viewfinder shooting Page Touch operation Standard / Sensitive / Disable Beep Enable / Touch / Disable Power source / Remaining capacity / Shutter Battery information count / Recharge performance Auto cleaningf: Enable / Disable Sensor cleaning Clean nowf Clean manually… -
Page 543: Software
3Menu Settings 5: Set-up 5 (Yellow) Page Custom shooting Register setting / Clear settings / Auto update modes (C1, C2) settings Clear all camera Resets the camera to the default settings settings Display copyright information / Enter author’s Copyright information name / Enter copyright details / Delete copyright information URL and QR code for downloading Instruction…
-
Page 544
3Menu Settings 8: Custom Functions (Orange) Page C.Fn I: Exposure C.Fn II: Autofocus Customize camera functions as desired C.Fn III: Operation/ Others Clear all Custom Clear Custom Function settings Functions (C.Fn) 9: My Menu (Green) Page Add My Menu tab Add My Menu tabs 1-5 Delete all My Menu tabs Delete all My Menu tabs Delete all items… -
Page 545
3Menu Settings Movie Shooting z: Shooting 1 (Red) Page 1920×1080 / 1280×720 NTSC: 59.94p / 29.97p / 23.98p Movie recording size PAL: 50.00p / 25.00p Standard (IPB) / Light (IPB) Sound recording* : Auto / Manual / Disable Sound-recording level Sound recording Wind filter: Auto / Disable Attenuator: Disable / Enable… -
Page 546
3Menu Settings z: Shooting 4* (Red) Page Movie Servo AF Enable / Disable AF method u+Tracking / Smooth zone / Live 1-point AF Movie Servo AF Locked on (-3/-2/-1) / 0 / Responsive (+1/+2/+3) tracking sensitivity When active: Always on / During shooting Movie Servo AF Speed AF speed: Slow (-7/-6/-5/-4/-3/-2/-1) / Standard / Fast (+1/+2) -
Page 547
3Menu Settings z: Shooting 5* (Red) Page Video snapshot: Enable / Disable Album settings: Create a new album / Add to Video snapshot existing album Show confirm message: Enable / Disable Time-lapse movie: Disable / Enable H(3840×2160) / Enable L(1920×1080) Shooting interval (hr., min., sec.) Number of shots Time-lapse movie… -
Page 548: Troubleshooting Guide
The battery does not recharge. If the battery’s remaining capacity (p.516) is 94% or higher, the battery will not be recharged. Do not use any battery other than genuine Canon Battery Pack LP-E6N/LP-E6. The charger’s lamp blinks at high speed.
-
Page 549
[Does this battery/do these batteries display the Canon logo?] is displayed. Do not use any battery other than genuine Canon Battery Pack LP-E6N/LP-E6. Remove and install the battery again (p.42). If the electrical contacts are dirty, use a soft cloth to clean them. -
Page 550
Troubleshooting Guide The camera turns off by itself. Auto power off is in effect. If you do not want auto power off to take effect, set [52: Auto power off] to [Disable] (p.73). Even if [52: Auto power off] is set to [Disable], the LCD monitor will still turn off after the camera is left idle for approx. -
Page 551
Troubleshooting Guide The card cannot be used. If a card error message is displayed, see page 45 or 567. An error message is displayed when the card is inserted in another camera. Since SDXC cards are formatted in exFAT, if you format a card with this camera and then insert it into another camera, an error may be displayed and it may not be possible to use the card. -
Page 552
Troubleshooting Guide There are fewer AF points or the Area AF frame shape is different. Depending on the attached lens, the number of usable AF points and patterns and Area AF frame shape vary. The lenses are categorized into 8 groups from A to H (p.145). Check which group your lens belongs to. -
Page 553
The maximum burst shown in the table on page 164 is based on Canon’s testing card. (The faster the card’s writing speed, the higher the actual maximum burst will be.) Therefore, the maximum burst displayed in the viewfinder may differ from the actual maximum burst. -
Page 554
Troubleshooting Guide ISO 100 cannot be set. ISO speed expansion cannot be selected. If [z3: Highlight tone priority] is set to [Enable], the settable ISO speed range will be ISO 200 — ISO 40000 (for still photo shooting). Even if you set [ISO speed range] to expand the setting range, you cannot select L (equivalent to ISO 50), H1 (equivalent to ISO 51200), or H2 (equivalent to ISO 102400). -
Page 555
The flash does not fire. Make sure the flash is securely attached to the camera. If you use a non-Canon flash unit with Live View shooting, set [z5: Silent LV shoot.] to [Disable] (p.303). The flash always fires at full output. -
Page 556
Troubleshooting Guide Remote control shooting is not possible. When taking still photos, set the drive mode to <Q> or <k> (p.157). When shooting movies, set [z5: Remote control] to [Enable] (p.381). Check the position of the remote controller’s release timing switch. -
Page 557
Troubleshooting Guide Shot images are not displayed when continuous shooting is performed during Live View shooting. If the image-recording quality is set to 41 or 61, the shot images are not displayed during continuous shooting (p.291). During movie shooting, the red E icon is displayed. It indicates that the camera’s internal temperature is high. -
Page 558
Troubleshooting Guide The manually set ISO speed changes when switching to movie shooting. For viewfinder shooting and Live View shooting, the ISO speed will be set according to [ISO speed range] under [z2: zISO speed settings] (p.173). For movie shooting, the ISO speed will be set according to [ISO speed range] under [z2: kISO speed settings] (p.372). -
Page 559
Troubleshooting Guide The subject looks distorted during movie shooting. If you move the camera to the left or right (panning) or shoot a moving subject, the image may look distorted. The problem may be more noticeable in time-lapse movie shooting. I cannot take still photos during movie shooting. -
Page 560
Troubleshooting Guide Operation Problems I cannot change the setting with the <6>, <5>, <9>, or <d>. Set the <R> switch downward (lock release) (p.59). Check the [54: Multi function lock] setting (p.88). Touch operation is not possible. Make sure [54: Touch control] is set to [Standard] or [Sensitive] (p.69). -
Page 561
Troubleshooting Guide The file name’s first character is an underscore (“_”). Set [z2: Color space] to [sRGB]. If [Adobe RGB] is set, the first character will be an underscore (p.208). The file name starts with “MVI_”. It is a movie file (p.211). The file numbering does not start from 0001. -
Page 562
Troubleshooting Guide [###] is displayed. If the number of images recorded on the card exceeds the number the camera can display, [###] will be displayed. In the viewfinder, the AF point display speed is slow. In low temperatures, the display speed of the AF points may become slower due to the AF point display device’s (liquid crystal) characteristics. -
Page 563
Troubleshooting Guide Playback Problems Part of the image blinks in black. [33: Highlight alert] is set to [Enable] (p.397). A red box is displayed on the image. [33: AF point disp.] is set to [Enable] (p.397). During image playback, the AF points are not displayed. The AF points are not displayed when the following types of images are played back: •… -
Page 564
Troubleshooting Guide Operation sound and mechanical sound can be heard during movie playback. If you operate the camera’s dials or lens during movie shooting, the operation sound will also be recorded. Using the Directional Stereo Microphone DM-E1 (sold separately) is recommended (p.347). -
Page 565: Software
Troubleshooting Guide My card reader does not recognize the card. Depending on the card reader used and the computer’s operating system, SDXC cards may not be correctly recognized. In such a case, connect your camera to the computer with the interface cable (sold separately), then transfer the images to the computer using EOS Utility (EOS software, p.594).
-
Page 566: Software
Troubleshooting Guide Sensor Cleaning Problems The shutter makes a sound during sensor cleaning. Under [54: Sensor cleaning], when you select [Clean nowf], the shutter will make a mechanical sound during the cleaning, but no picture will be recorded to the card (p.450). Automatic sensor cleaning does not work.
-
Page 567: Error Codes
Communications between the camera and lens is faulty. Clean the lens contacts. Clean the electrical contacts on the camera and lens, use a genuine Canon lens, or remove and install the battery again (p.27, 28, 42). Card cannot be accessed. Reinsert/change card or format card with the camera.
-
Page 568: Specifications
Auto/Manual, Appending Dust Delete Data • Recording System Recording format: Design rule for Camera File System (DCF) 2.0 Image type: JPEG, RAW (14-bit Canon original), RAW+JPEG simultaneous recording possible Pixels recorded: L (Large) : Approx. 26.0 megapixels (6240 x 4160) M (Medium) : Approx.
-
Page 569: Image Processing During Shooting
Specifications • Image Processing During Shooting Picture Style: Auto, Standard, Portrait, Landscape, Fine Detail, Neutral, Faithful, Monochrome, User Defined 1 — 3 White balance: Auto (Ambience priority), Auto (White priority), Preset (Daylight, Shade, Cloudy, Tungsten light, White fluorescent light, Flash), Custom, Color temperature setting (approx.
-
Page 570: Exposure Control
Specifications • Autofocus (during viewfinder shooting) Type: TTL secondary image-registration, phase-difference detection with the dedicated AF sensor AF points: Max. 45 points (Cross-type AF point: Max. 45 points) * Number of available AF points, Dual cross-type AF points, and Cross-type AF points vary depending on the lens used.
-
Page 571
Specifications Shooting mode: Basic Zone modes: Scene Intelligent Auto, Creative Auto, Special Scene (Portrait, Group Photo, Landscape, Sports, Kids, Panning, Close-up, Food, Candlelight, Night Portrait, Handheld Night Scene, HDR Backlight Control) Creative Zone modes: Program AE, Shutter-priority AE, Aperture-priority AE, Manual exposure, Bulb exposure, Custom shooting modes (C1/C2) ISO speed… -
Page 572: Multiple Exposures
Specifications • Multiple Exposures Number of multiple 2 to 9 exposures exposures: Multiple-exposure control:Additive, average • Shutter Type: Electronically-controlled, focal-plane shutter Shutter speed: 1/4000 sec. to 30 sec. (total shutter speed range; available range varies by shooting mode), Bulb, X-sync at 1/180 sec.
-
Page 573
Specifications * Based on Canon’s standard testing SD card (Standard: 8 GB, High-speed: 16 GB, UHS-I compatible) and standard testing conditions (High-speed continuous shooting, ISO 100, Standard Picture Style). * Figures in parentheses are the number of shots when a Canon’s standard testing UHS-I SD card is used. -
Page 574
Specifications • Movie Shooting Recording format: * For time-lapse movies: MOV format Movie: MPEG-4 AVC/H.264 Variable (Average) bit rate * For 4K time-lapse movies: Motion JPEG Audio: Movie recording size: Full HD (1920×1080), HD (1280×720) * For time-lapse movies: 4K (3840×2160) and Full HD selectable Frame rate: 59.94p/29.97p/23.98p (with NTSC) -
Page 575
Specifications [Time-lapse movie] (Reading speed) 4K Time-lapse movie (29.97p/25.00p) : UHS-I 90 MB/sec. or faster Full HD Time-lapse movie (29.97p/25.00p) : UHS-I Speed Class 3 or faster Focus method: Dual pixel CMOS AF AF method: Face+Tracking, Smooth zone, Live 1-point AF Manual focusing (approx. -
Page 576
Specifications ISO speed settings: For movie shooting, you can set the ISO speed range, maximum limit for ISO Auto, and maximum limit for time- lapse movie shooting with ISO Auto Sound recording: Built-in stereo microphones, external stereo microphone jack provided Sound-recording level adjustable, wind filter provided, attenuator provided Grid display:… -
Page 577: Print Ordering
Specifications Highlight alert: Overexposed highlights blink AF point display: Provided (may not be displayed depending on shooting conditions) Grid display: 3 types Magnified view: Approx. 1.5x-10x, initial magnification and position settable Image search: Search conditions settable (by rating, date, folder, protected, file type) Image browsing method:1 image, 10 images, Specified number, Date, Folder, Movies, Stills, Protect, Rating…
-
Page 578
Specifications Geotag information Latitude, Longitude, Elevation, Coordinated Universal appended to image: Time (UTC), Satellite signal acquisition status Position update interval: 1 sec., 5 sec., 10 sec., 15 sec., 30 sec., 1 min., 2 min., 5 min. Time setting: GPS time data set to camera Log data: One file per day, NMEA format * Change in time zone creates another file. -
Page 579: Dimensions And Weight
Working humidity: 85% or less All the data above is based on Canon’s testing standards and CIPA (Camera & Imaging Products Association) testing standards and guidelines. Dimensions and weight listed above are based on CIPA Guidelines (except weight for camera body only).
-
Page 580
The Bluetooth word mark and logos are registered trademarks owned by Bluetooth SIG, Inc. and any use of such marks by Canon Inc. is under license. Other trademarks and trade names are those of their respective owners. All other trademarks are the property of their respective owners. -
Page 581: Software
Third party software This product includes third party software. expat.h Copyright (c) 1998, 1999, 2000 Thai Open Source Software Center Ltd Permission is hereby granted, free of charge, to any person obtaining a copy of this software and associated documentation files (the «Software»), to deal in the Software without restriction, including without limitation the rights to use, copy, modify, merge, publish, distribute, sublicense, and/or sell copies of the Software, and to permit persons to…
-
Page 582
Canon accessories. Therefore, using this product with genuine accessories is highly recommended. Canon shall not be liable for any damage to this product and/or accidents such as malfunction, fire, etc. caused by the failure of non-genuine Canon accessories (e.g., a leakage and/or explosion of a battery pack). Please note… -
Page 584
If such changes or modifications should be made, you could be required to stop operation of the equipment. Canon U.S.A. Inc. One Canon Park, Melville, NY 11747, U.S.A. Tel No. 1-800-OK-CANON (1-800-652-2666) CAN ICES-3 (B) / NMB-3 (B) -
Page 585
USA and Canada only: The Lithium ion/polymer battery that powers the product is recyclable. Please call 1-800-8-BATTERY for information on how to recycle this battery. For CA, USA only Included lithium battery contains Perchlorate Material – special handling may apply. See www.dtsc.ca.gov/hazardouswaste/perchlorate/ for details. -
Page 593: Software Start Guide / Downloading Images To A Computer
Software Start Guide / Downloading Images to a Computer This chapter describes about the EOS software, how to download and install the software, how to use the Software Instruction Manuals (PDF files), and how to transfer images to a computer.
-
Page 594: Software Start Guide
Software Start Guide Software Overview You can download the following EOS software from the Canon Web site (p.596). You cannot install the EOS software to a computer without an Internet connection. EOS Utility With the camera connected to a computer, EOS Utility enables you to transfer still photos and movies shot with the camera to the computer.
-
Page 595
Software Start Guide Map Utility Shooting locations can be displayed on a map on a computer screen by using the geotag location information recorded with GPS function. EOS MOVIE Utility This software enables you to play back the time-lapse movies you shot. -
Page 596
(The previous version will be overwritten.) Download the software. Connect to the Internet from a computer and access the following Canon Web site. www.canon.com/icpd Select your country or region of residence and download the software. -
Page 597: Software Instruction Manuals
Software Start Guide Downloading the Software Instruction Manuals Software Instruction Manuals (PDF files) can be downloaded from the Canon Web site to your computer. Software Instruction Manual Download Site www.canon.com/icpd To view the Instruction Manuals (PDF files), Adobe Acrobat Reader DC or other Adobe PDF viewer (most recent version recommended) is required.
-
Page 598: Downloading Images To A Computer
Downloading Images to a Computer You can use EOS software to download images from the camera to a computer. There are two ways to do this. Downloading by Connecting the Camera to the Computer Install the software (p.596) Use the interface cable (sold separately) to connect the camera to the computer.
-
Page 599: Downloading Images With A Card Reader
Downloading Images to a Computer Downloading Images with a Card Reader You can use a card reader to download images to a computer. Install the software (p.596) Insert the card into the card reader. Use Digital Photo Professional to download the images. Refer to the Digital Photo Professional Instruction Manual (p.597).
-
Page 600: Index
Index Numerics Area AF frame ….135, 140 Beeper ……..73 10- or 2-sec. self-timer….159 Color tracking….142, 485 w1280x720 (movie)….341 Cross-type focusing ….143 L1920x1080 (movie) ….341 Difficult subjects for AF ..153, 316 H3840x2160 Direct AF point selection..500 Dual cross-type focusing ..
-
Page 601
Index Auto power off……47, 73 Auto reset……..213 w/x (Custom shooting) …. 510 Auto time setting (GPS) ….227 C(Creative Auto) ……100 Autofocus 9 AF Camera Automatic selection (AF)..135, 140 Camera shake…… 55, 96 Av (Aperture-priority AE)….238 Camera vibration blur..96, 265 Default settings …… -
Page 602
Index Contrast ……..181, 194 Downloading images to a Copyright information….214 computer ……..598 Creative Auto ……..100 DPOF Creative Zone modes …..36 (Digital Print Order Format)..458 Cropping (images) ……446 Dragging……… 68 Cross-type focusing ……143 Drive mode……..156 Custom Controls ……497 Dual cross-type focusing…. -
Page 603
Index Faithful (U) …….178 Flash mode……..283 FAT32……..71, 345 Flash sync contacts ……28 FE lock ……….278 Flash sync. speed in Av mode ..282 Feature guide……..90 Focus indicator ……. 94, 131 Focus lock ……97, 131 (Flash Exposure Bracketing)..285 Focus mode switch.. -
Page 604
Index HDR shooting …….253 Histogram …….. 398 Image-recording Help ……….91 quality …… 162, 164, 341 Text size ……..92 Index display……399 High dynamic range 9 HDR Jump display (image browsing) 400 High ISO speed noise reduction …195 Magnifying images….404 High-Definition ……341 Manual reset …… -
Page 605
Index Jump display ………400 AF operation ……305 Exposure simulation….303 u+Tracking ……309 Grid display ……302 Kids ……….113 Information display….293 Live 1-point AF……313 Manual focusing……. 321 Landscape ……..111 Metering timer ……302 Landscape (R)……177 Possible shots……291 Quick Control …… -
Page 606
Index Medium External microphone….347 File size……344, 345 (image-recording quality) ….164 Frame rate ……. 342 Memory cards 9 Cards Grid display……377 Menu……….64 HDR movie shooting….348 Dimmed menu items ….66 Information display….334 My Menu……..505 Manual exposure shooting..330 Setting procedure …….65 Metering timer…… -
Page 607
Battery level ……. 48, 516 Long exposures ……197 Charging ……..40 Nomenclature……..28 Household power ….. 520 Non-Canon flash units ….280 Possible shots…. 48, 164, 291 Normal (Image-recording quality) .162 Recharge performance …. 516 NTSC ……342, 427, 541 Pressing completely ……. 56 Pressing halfway …… -
Page 608
Index Remote control terminal..28, 276 w/x (Custom shooting) ..510 C(Creative Auto) ….100 Remote controller ….271, 273 A (Scene Intelligent Auto)..94 Remote switch ……276 P (Program AE) ……. 234 Repeat (slide show) ……424 8 (Special scene) ….107 Resizing ……..444 Tv (Shutter-priority AE) …. -
Page 609
Index Standard (IPB) ……342 Standard (P)……177 Vari-angle LCD monitor …. 46, 99 M icon……….8 Vertical image auto rotation..435 Strap ……….38 Video snapshots ……361 Strength (Sharpness) ….181 Video system….341, 427, 541 Subjects difficult to Viewfinder focus ……153, 316, 374 Dioptric adjustment …. -
Page 610
The descriptions in this Instruction Manual are current as of March 2017. For information on the compatibility with any products introduced after this date, contact any Canon Service Center. For the latest version Instruction Manual, refer to the Canon Web site.
Раздел: Видео Аудио Фото Оборудование
Тип: Зеркальный Фотоаппарат
Характеристики, спецификации
Разрешение ЖК дисплея:
1040000 Пикс
Наим. аккум. в комплекте:
LP-E6N
Емкость аккумулятора:
1865 мАч
Разъем для внешней вспышки:
1
Разъем для микрофона 3.5 мм:
1 шт
Разъем для наушников 3.5 мм:
1 шт
Интерфейс связи с ПК:
USB 2.0
Кабель для цифр.подкл. (HDMI):
доп.опция
Зарядное устройство в комплекте:
Да
Ремень для переноски:
в комплекте
Материал изготовления корпуса:
алюминиевый сплав
Габаритные размеры (В*Ш*Г):
11*14.4*7.5 см
Площадь покрытия кадра:
100 %
Видоискатель:
оптический/электронный
Обратите внимание:
Высочайшая чувствительность матрицы
Удачное решение:
Эффективная съемка контрастных сцен
Важная особенность:
Управление и передача фото по Wi-Fi
Пользователи оценят:
Запись гео-координат и маршрутов
Система очистки матрицы от пыли:
Да
Разрешение матрицы:
26.2 МПикс
Размер матрицы:
полнокадровая 35.9 x 24 мм
Количество объективов:
доп.опция
Используемая оптика:
доп.опция
Выбор чувствительности:
авто/ручной
Количество точек автофокусировки:
45
Диапазон ISO:
100 — 102400
Диапазон выдержки:
30 — 1/4000 сек
Серийная съемка:
6.5 кадр/сек
Поддержка технологии Wi-Fi:
Да
Качество видеосъемки:
FullHD (1920×1080 Пикс)
Скорость видеосъемки:
60 кадр/сек
Тип карты памяти:
SD, SDHC, SDXC
Инструкция к Зеркальному Фотоаппарату Canon EOS 6D Mark II
Инструкция по эксплуатации
РУССКИЙ
Инструкции по эксплуатации (PDF-файлы) и программное
обеспечение можно загрузить с веб-сайта Canon (стр. 4, 596).
www.canon.com/icpd

Введение
EOS 6D Mark II — это цифровая однообъективная зеркальная
камера, оснащенная полноразмерным (прибл. 35,9 x 24,0 мм)
датчиком CMOS с прибл. 26,2 млн эффективных пикселов, процес-
сором DIGIC 7, с обычным диапазоном чувствительности ISO 100 –
ISO 40000 (для фотографий), высокоточной и высокоскоростной
45-точечной системой автофокусировки (до 45 точки AF крестового
типа), максимальной скоростью серийной съемки прибл. 6,5 кадра/с,
с поддержкой съемки в режиме Live View, с поддержкой режима
видеосъемки Full HD, с поддержкой интервальной съемки 4K,
с системой Dual-Pixel CMOS AF, функцией Wi-Fi/NFC/Bluetooth
(беспроводная связь) и функцией GPS.
Перед началом съемки обязательно ознакомьтесь
со следующей информацией
Во избежание несчастных случаев, а также для получения качест-
венных снимков сначала ознакомьтесь с разделами «Меры предос-
торожности» (стр. 22–24) и «Правила обращения» (стр. 25–27).
Кроме того, внимательно ознакомьтесь с этой инструкцией, чтобы
правильно пользоваться камерой.
Для дальнейшего ознакомления с камерой во время ее
использования см. данную инструкцию по эксплуатации
При чтении данной инструкции сделайте несколько пробных снимков
и оцените результаты. Это поможет лучше изучить камеру. Храните
эту инструкцию в надежном месте, чтобы можно было обращаться
к ней по мере необходимости.
Проверка камеры перед использованием и ограничение
ответственности
После съемки просмотрите снятые изображения и убедитесь, что
они правильно записаны. В случае если из-за неисправности камеры
или карты памяти невозможно записать изображения или передать
их в компьютер, корпорация Canon не несет ответственности за какие-
либо убытки или причиненные неудобства.
Авторские права
Законодательство некоторых стран допускает использование фото-
графий людей или некоторых объектов только для личных целей.
Следует также помнить, что на некоторых общественных мероприя-
тиях, выставках и т. п. фотосъемка может быть запрещена даже
для личных целей.
2
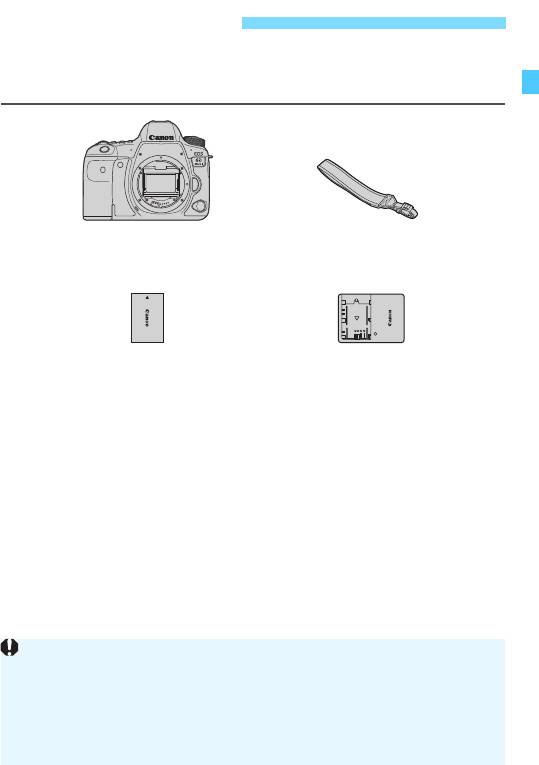
Комплект поставки
В первую очередь убедитесь, что в комплект поставки камеры входят
все перечисленные ниже компоненты. При отсутствии каких-либо
компонентов обращайтесь к своему дилеру.
* Зарядное устройство LC-E6E поставляется с кабелем питания.
Интерфейсный кабель и HDMI-кабель не входят в комплект поставки
камеры.
Диск CD-ROM с программным обеспечением не входит в комплект
поставки камеры.
Список инструкций по эксплуатации приведен на следующей странице.
Описание программного обеспечения см. на стр. 594.
Если приобретен комплект объектива, проверьте наличие объективов.
Не теряйте перечисленные выше компоненты.
Отдельно продаваемые принадлежности см. в разделе «Состав системы»
(стр. 514).
3
Камера
Ремень
(с наглазником и крышкой корпуса камеры)
Аккумулятор LP-E6N
Зарядное устройство
(с защитной крышкой)
LC-E6E*
Если требуются инструкции по эксплуатации объективов, загрузите
их с веб-сайта Canon (стр. 4).
Инструкции по эксплуатации объективов (PDF-файлы) предназначены
для объективов, продаваемых отдельно. Обратите внимание, что при
приобретении комплекта с объективом некоторые прилагаемые к объек—
тиву принадлежности могут не соответствовать указанным в инструкции
по эксплуатации объектива.

Инструкции по эксплуатации
Краткое справочное руководство
Более подробные инструкции по эксплуатации (PDF-
файлы) можно загрузить с веб-сайта Canon в компьютер
или другое устройство.
Загрузка инструкций по эксплуатации (PDF-файлы)
Инструкции по эксплуатации (PDF-файлы) можно загрузить с веб-
сайта Canon в компьютер или другое устройство.
Сайт для загрузки инструкций по эксплуатации
(PDF-файлы):
• Инструкция по эксплуатации камеры
• Инструкция по эксплуатации функции Wi-Fi (беспроводная
связь)
• Инструкция по эксплуатации объектива
• Инструкция по работе с программным обеспечением
www.canon.com/icpd
4
Для просмотра инструкций по эксплуатации (PDF-файлов) требу-
ется программа Adobe Acrobat Reader DC или другое средство
просмотра Adobe PDF (рекомендуется новейшая версия).
Программу Adobe Acrobat Reader DC можно бесплатно загрузить
из Интернета.
Дважды щелкните загруженную инструкцию по эксплуатации (PDF-
файл), чтобы открыть ее.
Сведения о порядке использования программного обеспечения для
просмотра PDF-файлов см. в Справке этого ПО и т. п.

Совместимые карты
Загрузка инструкций по эксплуатации с помощью QR-кода
Инструкции по эксплуатации (PDF-файлы) можно загрузить в смарт-
фон или планшет с помощью QR-кода.
5
www.canon.com/icpd
Для чтения QR-кода требуется программное приложение.
Выберите страну или регион проживания, затем загрузите инструкции
по эксплуатации.
Выберите пункт [Ссылка на руководство/ПО] на вкладке [55] для
отображения QR-кода на ЖК-экране камеры.
Совместимые карты
С камерой могут использоваться указанные ниже карты памяти,
независимо от их емкости.
Новую карту памяти или карту памяти,
ранее отформатированную (инициализированную) в другой
камере или в компьютере, необходимо отформатировать в этой
камере (стр. 70).
Карты памяти SD/SDHC*/SDXC*
* Поддерживаются карты UHS-I.
Карты памяти, пригодные для записи видео
При видеосъемке используйте карту большой емкости с высокими
характеристиками (достаточно высокими скоростями записи и чтения),
достаточными для выбранного качества видеозаписи. Подробные
сведения см. на стр. 343.
В данной инструкции по эксплуатации термин «карта» включает
в себя карты памяти SD, SDHC и SDXC.
*
Карта для записи фотографий или видео не входит в комп-
лект поставки камеры.
Ее следует приобрести дополнительно.
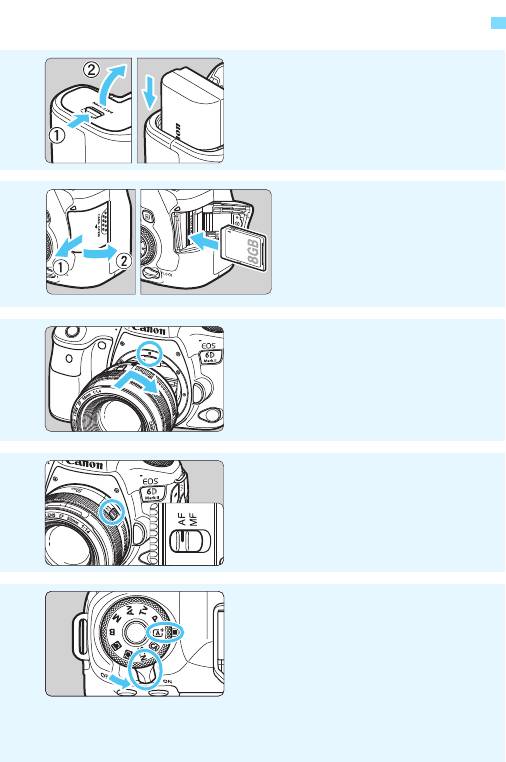
Краткое руководство по началу работы
Вставьте аккумулятор (стр. 42).
1
Перед началом эксплуатации
после покупки зарядите аккуму-
лятор (стр. 40).
Вставьте карту памяти
2
(стр. 43).
Разверните карту этикеткой
к задней стороне камеры
и вставьте карту в отсек
карты памяти.
Установите объектив (стр. 53).
3
Чтобы установить объектив,
совместите красную индексную
метку крепления на объективе
с красной индексной меткой
крепления на камере.
Установите переключатель
4
режима фокусировки на
объективе в положение <AF>
(стр. 53).
Установите переключатель
5
питания в положение <1>,
затем установите режим
съемки <A>
(стр. 47).
Поверните диск установки режима,
удерживая нажатой кнопку в его
центре.
Все необходимые настройки камеры
устанавливаются автоматически.
6
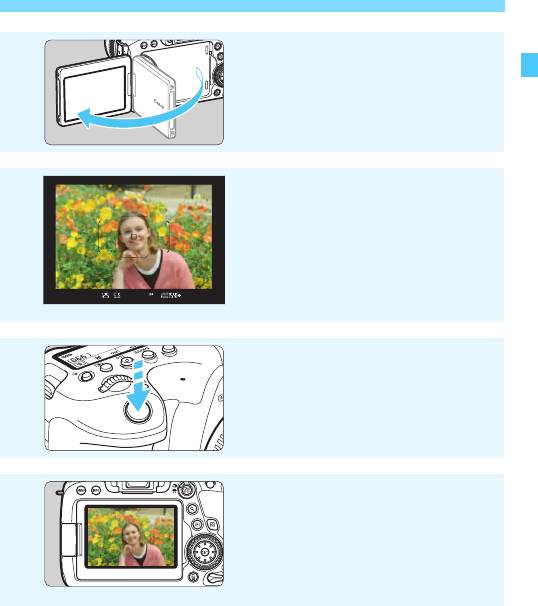
Краткое руководство по началу работы
Откройте ЖК-экран (стр. 46).
6
Если на ЖК-экране появился
экран установки параметров
даты, времени и часового пояса,
см. стр. 49.
Сфокусируйтесь на объект
7
(стр. 56).
Смотря в видоискатель, наведите
центр видоискателя на объект.
Наполовину нажмите кнопку спуска
затвора — камера сфокусируется
на объект.
Произведите съемку (стр. 56).
8
Для съемки полностью нажмите
кнопку спуска затвора.
Просмотрите снимок.
9
Снятое изображение отображается
на ЖК-экране в течение прибл. 2 с.
Для повторного отображения изоб-
ражения нажмите кнопку <x>
(стр. 388).
Сведения о съемке с просмотром на ЖК-экране см. в разделе
«Съемка в режиме Live View» (стр. 289).
Порядок просмотра отснятых изображений см. в разделе
«Просмотр изображений» (стр. 388).
Порядок удаления изображений см. в разделе «Удаление
изображений» (стр. 430).
7

Обозначения, используемые
в настоящей инструкции
Значки, используемые в настоящей инструкции
<6> : обозначает главный диск управления.
<5> : обозначает диск быстрого управления.
<9>:обозначает джойстик.
<W><X><Y><Z>:
обозначает направление сдвига или перемещения
при нажатии кнопки на джойстике.
<0> : обозначает кнопку установки настроек.
0/9/4/ : после нажатия кнопки управления этот значок
7/8
обозначает, сколько времени (в секундах) соответ-
ствующая настройка будет оставаться активной
после отпускания кнопки.
Время будет 4, 6, 8, 10 или 16 с, соответственно.
* Помимо указанного выше, при обсуждении соответствующих операций
и функций в этой инструкции также используются значки и символы, нане-
сенные на кнопки камеры или отображаемые на ее ЖК-экране.
3 : обозначает функцию, которую можно изменить, нажав кнопку
<M> для изменения настройки.
M : этот значок с правой стороны заголовка страницы означает,
что данная функция доступна только в режимах творческой
зоны (<d>, <s>, <f>, <a> и <F>).
(стр. ***)
: за дополнительной информацией обращайтесь к указанным
страницам.
: предупреждение для предотвращения неполадок при съемке.
: дополнительная информация.
: рекомендации или советы для более эффективной съемки.
: рекомендации по устранению неполадок.
Примечания об инструкциях и примерах фотографий
Во всех операциях, описываемых в данной инструкции, предпола-
гается, что переключатель питания установлен в положение <1>,
а переключатель <R> сдвинут вниз (блокировка управления
выключена) (стр. 47, 59).
Предполагается, что для всех параметров меню и пользовательских
функций установлены значения по умолчанию.
Иллюстрации в примерах, приведенных в Инструкции, относятся
к камере с установленным объективом EF50mm f/1.4 USM.
Примеры фотографий, отображаемых на камере и используемых
в данной инструкции, служат только для иллюстрации.
8

Список глав
Введение
2
Начало работы и основные операции с камерой
39
Основные операции съемки
93
Выбор режимов AF и режимов работы затвора
129
Настройки изображений
161
Настройки GPS
217
Дополнительные операции для получения
233
фотоэффектов
Съемка со вспышкой
277
Съемка с просмотром изображения на ЖК-экране
289
(Съемка в режиме Live View)
Видеосъемка
325
Просмотр изображений
387
Последующая программная обработка изображений
437
Очистка датчика изображения
449
Заказ печати и настройка фотокниги
457
Пользовательская настройка камеры
467
Справочная информация
513
Вводное руководство по программному
593
обеспечению/загрузка изображений в компьютер
9
1
2
3
4
5
6
7
8
9
10
11
12
13
14
15
16

Содержание
Введение 2
Комплект поставки…………………………………..…..………………………. 3
Инструкции по эксплуатации ……………..………………..……………….. 4
Совместимые карты ……………..…………..………………………..……….. 5
Краткое руководство по началу работы………………….…..…………. 6
Обозначения, используемые в настоящей инструкции …………… 8
Список глав ……………..…………………………..…………..…………..…….. 9
Указатель функций …………….……………..…………...……………..…… 18
Меры предосторожности……………………….…………..…………..…… 22
Правила обращения………………………………..………..……………….. 25
Обозначения ……………………..……………..………………………..……… 28
Начало работы и основные операции с камерой 39
1
Зарядка аккумулятора ……………..……………..……..………………….. 40
Установка и извлечение аккумулятора ……………….……………….. 42
Установка и извлечение карты памяти ……………….…………..…… 43
Использование ЖК-экрана………………………………….……….……… 46
Включение питания ……..……………..…………..…….………..…………. 47
Установка даты, времени и часового пояса …………………..…….. 49
Выбор языка интерфейса ……………….……………………….…………. 52
Установка и снятие объектива……………………………..…..…………. 53
Основные операции съемки ………………….……………..………..…… 55
Q Быстрое управление функциями съемки……………..……….… 61
3 Использование меню и его конфигурации…………………… 64
d Управление камерой с помощью сенсорного экрана ………… 67
10

Содержание
Форматирование карты памяти…..………………………….…………….70
Перед началом работы…………………………………………..……………73
Отключение звукового сигнала ………………..……………..…………73
Установка задержки отключения питания/Автоотключение
…….73
Установка времени просмотра изображения ……………………...74
Отключение и включение ЖК-экрана ………………………….……..74
Восстановление в камере настроек по умолчанию ……………..75
l Отображение сетки в видоискателе……………….………..……..79
Q Отображение электронного уровня …………………….…………80
Настройка отображения информации в видоискателе…………..82
Функции кнопки B ………………………….…………………………..…..84
R Задание блокировки управления………………………..….….88
Задание указаний по режимам съемки ……….……………....……….89
Задание руководства по функциям …………………..…………..……..90
Помощь ……………..……………..…………..……..………………………..91
Основные операции съемки 93
2
A Полностью автоматическая съемка
(интеллектуальный сценарный режим) ………………..……….……...94
A Приемы съемки в полностью автоматическом
режиме (интеллектуальный сценарный режим) ………………..…..97
C Съемка в творческом авторежиме …………………………..……100
8: Режим съемки специальных сцен…………………………..….107
8: 2 Съемка портретов ………..…………..……………………….…109
8: q Съемка групповых фотографий……….…………..………. 110
8: 3 Съемка пейзажей …………………….…………..……..……… 111
11

Содержание
8: 5 Съемка движущихся объектов ……………………………..112
8: C Съемка детей………….…………………………..…..…………..113
8: r Съемка с проводкой……………………………………..……..114
8: 4 Съемка крупным планом………….……………………….…..116
8: P Съемка еды……….…………………………………….……………117
8: y Съемка портретов при свете свечей ……………………...118
8: 6
Съемка портретов в ночное время (со штативом)
…….119
8: F Съемка ночных сюжетов (съемка с рук) ……………….. 120
8: G Съемка сюжетов в контровом свете ………………….…. 121
Q Быстрое управление…………………….……………….………….…. 126
Выбор режимов AF и режимов работы затвора 129
3
f: Выбор режима AF ………………..…………..……………………….. 130
S Выбор области и точки AF ……………………..…………..……….. 134
Режим выбора области автофокусировки ………..…………....….. 139
Датчик автофокусировки…………………………………..………………. 143
Объективы и используемые точки AF…………..…………….……… 145
Когда автофокусировка не работает………………………………….. 153
MF: Ручная фокусировка………………………………………….……….. 154
Настройка ручной электронной фокусировки объектива…….. 155
i Выбор режима работы затвора ……………………………..…….. 156
j Использование автоспуска ……..…………………………..……….. 159
Настройки изображений 161
4
Установка качества записи изображений ……………….…….……. 162
Задание соотношения сторон…………….…………………………..…. 168
12

Содержание
i: Установка чувствительности ISO для фотографий……….170
Выбор стиля изображения ………………………………….…….……….176
Настройка стиля изображения………………..…………….……………180
Регистрация стиля изображения ………………..…………..………….183
B: Настройка баланса белого ……………………………….………..185
u Коррекция баланса белого……………………….……….….……… 191
Автокоррекция яркости и контрастности ……………..……..………194
Настройка шумоподавления ……………………………………..……….195
Приоритет светов ………….……………..……………..…………………….199
Коррекция аберрации объектива, связанной
с оптическими характеристиками ……..……………………….……….200
Подавление мерцания……………………..………………………………..206
Установка цветового пространства………………..………..…….……208
Создание и выбор папки……………….………………….…….………….209
Способы нумерации файлов…………………………………..…………. 211
Настройка информации об авторских правах …………………..…214
Настройки GPS 217
5
Функции GPS ………………..…………..………………………………………218
Меры предосторожности при использовании GPS..……………..220
Получение сигналов GPS……………………….…………..…………..…221
Настройка интервала позиционирования …………….………..……226
Установка времени в камере с помощью GPS …………………....227
Регистрация пройденного маршрута……….……………………….…228
13

Содержание
Дополнительные операции для получения фотоэффектов
233
6
d: Программа AE…………..…………..………………………..………….. 234
s: AE с приоритетом выдержки……………………………...………. 236
f: AE с приоритетом диафрагмы…………..……………………….. 238
a: Ручная экспозиция ………………………………..………..………….. 241
q Выбор режима замера экспозиции………………..…………..…. 243
O Установка требуемой компенсации экспозиции……………… 245
h Автоматический брекетинг экспозиции (AEB)…………….…. 247
A Фиксация экспозиции для съемки (Фиксация AE) ………….. 249
F: Длительные ручные выдержки ……………………..…………..…. 250
w:
Съемка HDR (расширенный динамический диапазон)
….. 253
P Мультиэкспозиция ………..……………..……………………………… 258
2 Блокировка зеркала…………………………..……………………….. 265
H Съемка с интервальным таймером……………………..…. 267
Использование крышки окуляра……………………………..…………. 270
Съемка с дистанционным управлением………………………..…… 271
Использование дистанционного переключателя ………………… 276
Съемка со вспышкой 277
7
D Съемка со вспышкой…………….……………..………..……………… 278
Настройка функции вспышки……………..…………………….……….. 281
Съемка с просмотром изображения на ЖК-экране
8
(Съемка в режиме Live View)
289
A Съемка с просмотром изображения на ЖК-экране ……….. 290
Настройки функций съемки ………………………………………………. 300
14

Содержание
Настройка функций меню……….………………………….………………302
Выбор режима AF………………..……………..………..…………..……….305
Фокусировка с AF (Метод AF)……..……………………….……………..308
x Съемка при касании……………………………………..………………319
MF: Ручная фокусировка …………………………………..……………….321
Видеосъемка 325
9
k Видеосъемка ……………………………..…………….………………….326
Настройки функций съемки…………..…………………….……………..339
Установка качества видеозаписи…………………………………..……341
Настройка записи звука ………………..…………………………..……….346
Съемка видео HDR ………………………………………..………………….348
a Интервальная съемка……………….…………………………..……349
Съемка видеофрагментов…………………………………..…………..…361
Настройка функций меню……….………………………….………………371
10
Просмотр изображений 387
x Просмотр изображений …………………….……………..………..…388
B: Отображение информации о съемке……….……………..…391
H
Индексный режим (отображение нескольких изображений)
….399
e Режим перехода (переход между изображениями)………….400
t Фильтрация изображений для просмотра …………………..…402
u Увеличение изображений……………….………………………..……404
d Просмотр изображений с помощью сенсорного экрана ……406
b Поворот изображения……..……………..………………………..……408
K Защита изображений .…………..………………………..…………….409
15

Содержание
p Выставление оценок………………………..………………………….. 412
Q Быстрое управление при просмотре …………..…………….….. 415
k Просмотр видеозаписей .…………..……………………..…………. 417
k Воспроизведение видеозаписей …………………..………..……. 419
X Редактирование первого и последнего
фрагментов видеозаписи………………………………………………….. 422
Слайд-шоу (Автовоспроизведение) …………………………..………. 424
Просмотр изображений на экране телевизора ……………..….... 427
L Удаление изображений …………………………………………..……. 430
Настройка яркости ЖК-экрана………………….…………..…………… 434
Настройка автоповорота вертикально
ориентированных изображений ..……………..……………………….. 435
11
Последующая программная обработка изображений
437
R Обработка изображений RAW с помощью камеры………. 438
S Изменение размера изображений JPEG ……………..……….. 444
N Кадрирование изображений JPEG……….…………………..…… 446
12
Очистка датчика изображения 449
f Автоматическая очистка датчика изображения …………… 450
Добавление данных для удаления пыли……………………….…… 452
Очистка датчика изображения вручную ……………..………..……. 455
13
Заказ печати и настройка фотокниги 457
W Цифровой формат управления печатью (DPOF) …………… 458
p Выбор изображений для фотокниги………………………………. 464
16

Содержание
Пользовательская настройка камеры 467
14
Установка пользовательских функций……………….……….….……468
Пользовательские функции………………………………………………..469
Настройки пользовательских функций ……………………….……….471
8: Точная настройка фокуса для точки AF……………………...…491
8: Назначение элементов управления………………………………497
Регистрация параметров в «Мое Меню» ……………………….……505
w: Регистрация пользовательских режимов съемки …………..510
Справочная информация 513
15
Состав системы……………………..…………………..…………………..…514
Проверка информации об аккумуляторе ……………..………..……516
Питание камеры от бытовой электросети ………………..……….…520
H Использование карт Eye-Fi……………………………….….……….522
Таблица доступности функций в зависимости
от режимов съемки…….……………………………………….…………..…526
Настройки меню ………………………..…………..…………..…………..…534
Руководство по поиску и устранению неполадок ………..……....548
Коды ошибок………………………………..…………...…………..………….567
Технические характеристики……………….……………………………..568
Вводное руководство по программному обеспечению/
16
загрузка изображений в компьютер
593
Вводное руководство по программному обеспечению …………594
Загрузка изображений в компьютер ………………………….………..598
Алфавитный указатель …………………….…………..….…………..……600
17

Указатель функций
Питание
ЖК-экран
Зарядка аккумулятора
стр. 40
Переменный угол
стр. 46
Уровень заряда
Сенсорное управление
стр. 67
аккумулятора
стр. 48
Яркость
стр. 434
Проверка информации
Откл./Вкл. при нажатии
об аккумуляторе
стр. 516
наполовину
стр. 74
Бытовая электросеть
стр. 520
Электронный уровень
стр. 80
Автоотключение
стр. 73
Указания по режимам
съемки
стр. 89
Карты памяти
Руководство по функциям
стр. 90
Форматирование
стр. 70
Помощь
стр. 91
Спуск затвора без карты
стр. 44
Автофокусировка
Карты, поддерживающие
видеосъемку
стр. 343
Режим AF
стр. 130
Режим выбора области AF
стр. 134
Объектив
Выбор точки AF
стр. 137
Установка
стр. 53
Группа объектива
стр. 149
Снятие
стр. 54
Пользовательская настройка
функций автофокусировки
стр. 475
Базовые настройки
Слежение за цветом
стр. 142
Язык
стр. 52
Точная настройка AF
стр. 491
Дата/время/часовой пояс
стр. 49
Ручная фокусировка
стр. 154
Звуковой сигнал
стр. 73
Ручная электронная
Информация об
фокусировка
стр. 155
авторских правах
стр. 214
Сброс всех настроек камеры
стр. 75
Замер экспозиции
Режим замера
Видоискатель
экспозиции
стр. 243
Диоптрийная регулировка
стр. 55
Крышка окуляра
стр. 270
Работа затвора
Электронный уровень
стр. 81
Режим работы затвора
стр. 156
Отображение сетки
стр. 79
Автоспуск
стр. 159
Отображение информации
Максимальная
в видоискателе
стр. 82
длина серии
стр. 167
18

Указатель функций
Настройки записи изображений
Съемка
Создание и выбор папки
стр. 209
Режим съемки
стр. 35
Нумерация файлов
стр. 211
•
Режимы базовой зоны
стр. 35
•Режим SCN
стр. 108
Качество изображения
•
Режимы творческой зоны
стр. 36
Качество записи
Соотношение сторон
стр. 168
изображений
стр. 162
Режим HDR
стр. 253
Чувствительность ISO
Мультиэкспозиция
стр. 258
(фотографии)
стр. 170
Блокировка зеркала
стр. 265
Стиль изображения
стр. 176
Таймер ручной выдержки
стр. 251
Баланс белого
стр. 185
Интервальный таймер
стр. 267
Auto Lighting Optimizer
Просмотр глубины
(Автокоррекция яркости)
стр. 194
резкости
стр. 240
Шумоподавление для
Дистанционный
высоких значений ISO
стр. 195
переключатель
стр. 276
Шумоподавление при
Дистанционное
длительных выдержках
стр. 197
управление
стр. 271
Приоритет светов
стр. 199
• Регистрация
стр. 273
Коррекция аберрации
Быстрое управление
стр. 61
объектива
стр. 200
Блокировка управления
стр. 88
Подавление мерцания
стр. 206
Коды ошибок
стр. 567
Цветовое пространство
стр. 208
Экспозиция
Компенсация экспозиции
стр. 245
Компенсация экспозиции
сM+ISO Авто
стр. 242
AEB
стр. 247
Фиксация AE
стр. 249
Безопасный сдвиг
стр. 473
GPS
GPS
стр. 217
Регистрация
стр. 228
19

Указатель функций
Вспышка
Видеосъемка
Внешняя вспышка
стр. 278
Съемка с автоматической
Компенсация
установкой экспозиции
стр. 326
экспозиции вспышки
стр. 278
Съемка с ручной
Фиксация FE
стр. 278
установкой экспозиции
стр. 330
Настройки вспышки
стр. 281
Чувствительность ISO
(видео)
стр. 372
Настройки
пользовательских
Метод AF
стр. 308
функций вспышки
стр. 286
Видео Servo AF
стр. 373
Чувствительность
Съемка в режиме Live View
слежения Видео Servo AF
стр. 375
Съемка в режиме
Скорость Видео
Live View
стр. 289
Servo AF
стр. 376
Режим AF
стр. 305
Качество видеозаписи
стр. 341
Метод AF
стр. 308
HDR видео
стр. 348
Съемка при касании
стр. 319
Интервальная съемка
стр. 349
Увеличение при
Видеофрагменты
стр. 361
просмотре
стр. 317
Запись звука
стр. 346
Ручная фокусировка
стр. 321
Микрофон
стр. 347
Имитация экспозиции
стр. 303
Фильтр ветра
стр. 346
Бесшумная съемка
Аттенюатор
стр. 347
в режиме LV
стр. 303
Съемка с дистанционным
управлением
стр. 381
20

Указатель функций
Просмотр
Пользовательская настройка
Время просмотра
Пользовательские
изображения
стр. 74
функции (C.Fn)
стр. 469
Отображение одного
Назначение элементов
изображения
стр. 388
управления
стр. 497
Отображение
Мое меню
стр. 505
информации о съемке
стр. 391
Пользовательские
Индексный режим
стр. 399
режимы съемки
стр. 510
Просмотр изображений
Очистка датчика изображения
(режим перехода)
стр. 400
и уменьшение загрязнений
Задание условий
Очистка датчика
поиска изображений
стр. 402
изображения
стр. 450
Увеличение при просмотре
стр. 404
Добавление данных
Поворот изображения
стр. 408
для удаления пыли
стр. 452
Защита
стр. 409
Ручная очистка
Оценка
стр. 412
датчика изображения
стр. 455
Просмотр видеозаписи
стр. 419
Редактирование первого
Программное обеспечение
и последнего фрагментов видео
стр. 422
Вводное руководство
Слайд-шоу
стр. 424
по программному
Просмотр изображений
обеспечению
стр. 594
на экране телевизора
стр. 427
Инструкция
Удаление
стр. 430
по эксплуатации
Сенсорный спуск затвора
стр. 406
программного
Быстрое управление
стр. 415
обеспечения
стр. 597
Редактирование изображений
Функции Wi-Fi/NFC/Bluetooth
Обработка изображения RAW
стр. 438
Инструкция по эксплуатации
Изменение размера JPEG
стр. 444
функции Wi-Fi (беспроводная
Кадрирование JPEG
стр. 446
связь)
Печать/настройка фотокниги
Заказ печати (DPOF)
стр. 458
Настройка фотокниги
стр. 464
21

Меры предосторожности
Следующие меры предосторожности призваны исключить повреж-
дения, а также травмы фотографа и других лиц. Перед использова-
нием изделия обязательно внимательно ознакомьтесь с этими мерами
предосторожности и соблюдайте их. В случае любых неполадок,
проблем или повреждения изделия обращайтесь в ближайший
сервисный центр Canon или к дилеру, у которого оно было
приобретено.
Учитывайте приведенные ниже предостере-
Предостережения:
жения. Несоблюдение этих требований может
привести к смерти или тяжелым травмам.
Во избежание пожара, перегрева, утечки химических веществ, взрывов и пораже-
ния электрическим током соблюдайте указанные ниже меры предосторожности.
• Используйте только те аккумуляторы, источники питания и дополнительные
аксессуары, которые указаны в настоящей Инструкции по эксплуатации.
Не используйте самодельные или модифицированные аккумуляторы, а также
поврежденное изделие.
• Соблюдайте полярность установки аккумулятора.
• Не разбирайте и не модифицируйте аккумулятор, а также не допускайте
его короткого замыкания. Запрещается нагревать аккумулятор или что-либо
припаивать к нему. Не подвергайте аккумулятор воздействию огня или воды.
Не допускайте сильных ударов по аккумулятору.
• Запрещается заряжать аккумулятор, если температура воздуха отличается
от допустимой для зарядки (работы). Кроме того, запрещается превышать
время зарядки, указанное в Инструкции по эксплуатации.
•
Не вставляйте посторонние металлические предметы в электрические контакты
камеры, дополнительных аксессуаров, соединительных кабелей и т. п.
Утилизируя аккумулятор, изолируйте его электрические контакты с помощью
ленты. При контакте с другими металлическими предметами или элементами
питания возможно возгорание или взрыв.
Если во время зарядки аккумулятора он излишне нагрелся, появился дым или
запах, немедленно отсоедините зарядное устройство от электрической розетки,
чтобы прекратить зарядку. При несоблюдении этого требования возможно возго-
рание, термические повреждения или поражение электрическим током.
Если аккумулятор протек, изменил цвет, потерял форму, от него идет дым или
запах, немедленно извлеките его. Будьте осторожны, чтобы не обжечься. При
продолжении использования возможно возгорание, поражение электрическим
током или ожоги.
Не допускайте попадания веществ, вытекших из элемента питания, в глаза,
на кожу или одежду. Возможна потеря зрения или кожные заболевания. Если
жидкость, вытекшая из элемента питания или аккумулятора, попала в глаза,
на кожу или одежду, промойте пораженное место большим количеством чистой
воды, но не трите его. Немедленно обратитесь к врачу.
Не оставляйте кабели вблизи источников тепла. При нагревании возможна дефор-
мация кабеля или оплавление изоляции, что может стать причиной пожара или
удара электрическим током.
22

Меры предосторожности
Не держите камеру в одном положении длительное время. Даже если камера
не сильно нагрелась, продолжительный контакт с какой-либо деталью может
вызвать покраснение кожи или образование волдырей из-за низкотемператур-
ного ожога. Людям с проблемами кровообращения или с низкой чувствитель-
ностью кожи, а также во время съемки при высокой температуре рекомендуется
использовать штатив.
Не направляйте вспышку на водителей. Это может привести к аварии.
Когда камера или аксессуары не используются, прежде чем убирать их на хране-
ние, обязательно извлекайте аккумулятор, а также отсоединяйте вилку электро-
питания и соединительные кабели от оборудования. Это исключает поражение
электрическим током, перегрев, возгорание и коррозию.
Не используйте оборудование в местах, в которых присутствует горючий газ.
Это необходимо для предотвращения взрыва или возгорания.
Если при падении оборудования поврежден его корпус и видны внутренние
детали, не касайтесь таких открытых деталей. Возможно поражение электри-
ческим током.
Не разбирайте оборудование и не вносите изменений в его конструкцию.
Находящиеся под высоким напряжением внутренние детали могут вызвать
поражение электрическим током.
Не смотрите на солнце или очень яркие источники света через камеру или
объектив. Это может нанести вред зрению.
Храните оборудование в местах, недоступных для детей, в том числе во время
использования. Ремни или шнуры могут случайно стать причиной удушья, пораже-
ния электрическим током или травмы. Удушье или травма также могут произойти,
если ребенок случайно проглотит деталь камеры или дополнительный аксессуар.
Если ребенок проглотил деталь или дополнительный аксессуар, немедленно
обратитесь к врачу.
Не используйте и не храните оборудование в пыльных или сырых местах. Также
не допускайте контакта аккумулятора с металлическими предметами; во избежа-
ние короткого замыкания храните аккумулятор с установленной защитной крышкой.
Это исключит возгорание, перегрев, поражение электрическим током и ожоги.
Перед использованием камеры в самолете или больнице выясните, разрешена
ли съемка. Электромагнитное излучение от камеры может помешать работе
приборов самолета или медицинского оборудования в больнице.
Во избежание пожара и поражения электрическим током соблюдайте указанные
ниже меры безопасности.
• Обязательно полностью вставляйте вилку кабеля питания в электрическую
розетку.
• Не беритесь за вилку кабеля питания влажными руками.
• Отсоединяя кабель питания, беритесь за его вилку.
• Не допускайте царапин, порезов и слишком сильного изгиба кабеля питания,
а также не ставьте на кабель тяжелые предметы. Не перекручивайте и не
связывайте кабели.
•
Не подключайте к одной электрической розетке слишком много вилок кабелей
питания.
• Не используйте кабель, если у него повреждены проводники или изоляция.
23

Меры предосторожности
Периодически извлекайте вилку кабеля питания и сухой тканью удаляйте пыль
вокруг электрической розетки. Если в воздухе много пыли, влаги или масла,
намокшая пыль на электрической розетке может стать причиной короткого
замыкания и пожара.
Запрещается подсоединять аккумулятор напрямую к электрической розетке
или гнезду прикуривателя автомобиля. Аккумулятор может дать течь, пере-
греться или взорваться, вызвав пожар или причинив ожоги или травмы.
Если изделие используется ребенком, взрослый должен подробно объяснить
ему порядок эксплуатации изделия. Необходимо наблюдать за детьми, исполь-
зующими данное изделие. Неправильное использование может привести к пора-
жению электрическим током или травме.
Не оставляйте объектив или камеру с установленным объективом на солнце
без крышки объектива. В противном случае солнечные лучи,
сконцентрированные объективом, могут вызвать пожар.
При использовании изделия не закрывайте его тканью и не заворачивайте
в ткань. В противном случае возможен перегрев устройства и, как следствие,
его деформация или возгорание.
Будьте осторожны, чтобы не допустить намокания камеры. Если изделие упало
в воду или внутрь него попала вода или металлические предметы, немедленно
извлеките аккумулятор. Это исключит возгорание, поражение электрическим
током и ожоги.
Запрещается использовать для чистки изделия растворители, бензин или прочие
органические растворители. В противном случае возможен пожар или угроза
здоровью.
Учитывайте приведенные ниже предупреждения.
Предупреждения:
Несоблюдение этих требований может привести
к травмам или повреждению имущества.
Не используйте и не храните изделие в местах с высокой температурой, например
в автомобиле под ярким солнцем. Нагревшееся изделие может стать причиной
ожога. Несоблюдение этого требования также может вызывать протечку или
взрыв аккумулятора и, в результате, ухудшение параметров или сокращение
срока службы изделия.
Не переносите камеру, установленную на штатив. Это может привести к травме
или несчастному случаю. Также убедитесь, что штатив достаточно прочен для
установки камеры и объектива.
Не оставляйте изделие на длительное время в местах с низкой температурой.
Прикосновение к холодному изделию может привести к травме.
Не допускайте срабатывания вспышки в непосредственной близости от глаз.
Возможно повреждение зрения.
24

Правила обращения
Уход за камерой
Камера представляет собой высокоточный аппарат. Избегайте падения
камеры и механических воздействий на нее.
Данная камера не является водонепроницаемой, ее нельзя использовать
под водой.
Для обеспечения максимальной защиты камеры от пыли и капель воды,
крышка разъемов, крышка отсека аккумулятора, крышка гнезда карты
памяти и все остальные крышки должны быть плотно закрыты.
Конструкция этой камеры защищает от пыли и капель влаги, помогая
предотвратить попадание внутрь камеры неожиданно попадающих
на нее песка, пыли, грязи или воды. Однако полностью исключить
попадание внутрь камеры грязи, пыли, воды или соли невозможно.
По мере возможности не допускайте попадания внутрь камеры грязи,
пыли, воды или соли.
Если в камеру попала вода, досуха протрите ее сухой чистой тканью.
Если в камеру попала грязь, песок или соль, удалите их чистой хорошо
отжатой влажной тканью.
Использование камеры с местах с большим количеством грязи или пыли
может привести к неполадкам.
Рекомендуется чистить камеру после работы с ней. Если на камере
остается грязь, пыль, вода или соль, это может привести к неполадкам.
Если камера упала в воду или есть основания считать, что внутрь камеры
попала влага (вода), грязь, пыль или соль, незамедлительно обратитесь
в ближайший сервисный центр компании Canon.
Не оставляйте камеру вблизи от устройств, генерирующих сильные
магнитные поля, например, рядом с магнитами или
электродвигателями. Старайтесь не пользоваться камерой вблизи
мощных источников радиоволн, например больших антенн. Сильные
магнитные поля могут вызвать сбои в работе камеры или уничтожить
данные изображений.
Не оставляйте камеру в местах с высокой температурой, например
в автомобиле, стоящем на открытом солнце. Высокие температуры
могут привести к сбоям в работе камеры.
Камера содержит высокоточные электронные компоненты. Запрещается
самостоятельно разбирать камеру.
25

Правила обращения
Во время движения зеркала не удерживайте его пальцем и т. п. В против-
ном случае может возникнуть неисправность.
Для удаления пыли с объектива, видоискателя, зеркала и фокусировоч-
ного экрана пользуйтесь имеющимися в продаже специальными чистя—
щими устройствами с грушей. Не используйте для протирки корпуса
камеры или объектива чистящие средства, содержащие органические
растворители. Для удаления стойких загрязнений обращайтесь в ближай—
ший сервисный центр Canon.
Не прикасайтесь пальцами к электрическим контактам камеры. Это
предотвратит их коррозию. Корродированные контакты могут привести
к неполадкам в работе камеры.
Если камера быстро переносится с холода в теплое помещение, то на
камере и ее внутренних деталях может образоваться конденсат. Во избе-
жание конденсации сначала поместите камеру в закрывающийся пласти-
ковый пакет. Перед извлечением камеры из пакета подождите, пока она
нагреется.
При образовании на камере конденсата не пользуйтесь ею. Это предот-
вратит повреждение камеры. В случае обнаружения конденсации снимите
объектив, извлеките из камеры карту памяти и аккумулятор и подождите,
пока конденсат испарится. Камерой можно пользоваться только после
испарения конденсата.
Если не планируется использовать камеру в течение длительного времени,
извлеките из нее аккумулятор и храните камеру в сухом, прохладном
помещении с хорошей вентиляцией. Даже в периоды, когда камера не
используется, иногда несколько раз нажимайте кнопку спуска затвора
для проверки работоспособности камеры.
Не храните камеру в помещениях с химическими веществами, вызыва—
ющими ржавчину и коррозию (например, в фотолабораториях).
Если камера не использовалась в течение длительного времени, перед
использованием камеры следует проверить все ее функции. В том случае,
если камера некоторое время не использовалась, или приближается
важная съемка, например поездка за границу, отнесите камеру на
проверку в ближайший сервисный центр Canon или проверьте камеру
самостоятельно, чтобы убедиться в ее надлежащей работе.
При многократной серийной съемке или длительной работе в режиме
Live View или в режиме видеосъемки камера может сильно нагреться.
Это не является дефектом.
При наличии яркого света внутри или снаружи области изображения
может возникать паразитная засветка.
26

Правила обращения
ЖК-дисплей и ЖК-экран
Хотя ЖК-экран изготовлен по высокоточной технологии и имеет более
чем 99,99% эффективных пикселов, 0,01% или менее пикселов могут
не работать, и могут быть видны черные, красные точки или точки других
цветов. Это не является дефектом. Они не оказывают влияния на запи-
санные изображения.
Если ЖК-экран оставался включенным длительное время, возможно
появление остаточного изображения. Однако это временное явление,
которое пройдет, если не использовать камеру несколько дней.
При низких температурах возможно некоторое замедление смены изоб-
ражений на экране ЖК-экрана, а при высоких температурах экран может
выглядеть темным. При комнатной температуре обычные свойства экрана
восстанавливаются.
Карты памяти
Для защиты карты и хранящихся на ней данных учтите следующее:
Не допускайте падения карты памяти, не сгибайте карту и не мочите ее.
Не применяйте к ней силу и не допускайте механических воздействий
или сотрясений.
Не прикасайтесь к контактам карты пальцами или металлическими
предметами.
Не прикрепляйте наклеек или подобных элементов на карту.
Не храните и не используйте карту памяти вблизи от объектов, имеющих
сильное магнитное поле, таких как телевизоры, громкоговорители или
магниты. Избегайте также мест скопления статического электричества.
Не оставляйте карты памяти под прямыми солнечными лучами или рядом
с нагревательными приборами.
Храните карту памяти в чехле.
Не храните карты памяти в жарких, пыльных или сырых помещениях.
Объектив
После снятия объектива с камеры поставьте объектив
задним концом вверх и наденьте заднюю крышку объек—
тива, чтобы не поцарапать поверхность объектива
и не повредить электрические контакты.
27
Контакты
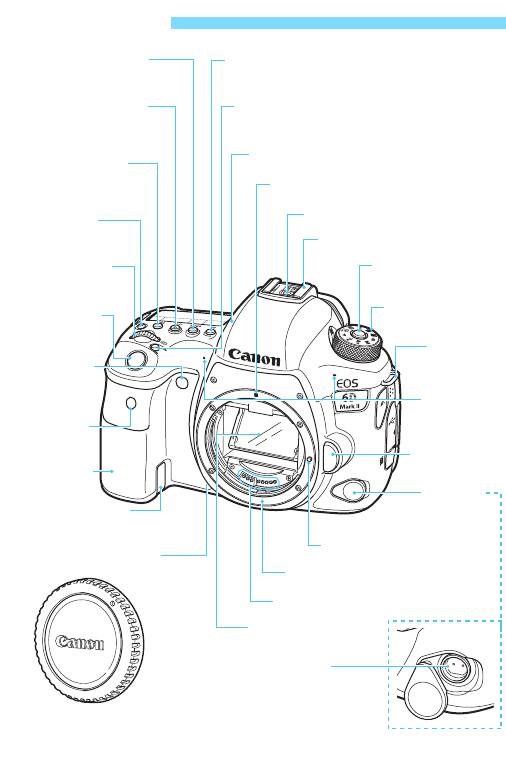
Обозначения
28
<R> Кнопка выбора
<f> Кнопка выбора режима AF/метода AF
режима работы затвора
(стр. 130, 305/308)
(стр. 156, 159)
<i> Кнопка установки
<B> Кнопка выбора области автофокуси-
чувствительности ISO
ровки (стр. 136, 482)
(стр. 170)
Антенна GPS
<q> Кнопка выбора
режима замера экспо-
Индексная метка крепления объектива
зиции (стр. 243)
(стр. 53)
Контакты синхронизации вспышки
<U> Кнопка
подсветки ЖК-
Горячий башмак (стр. 278)
дисплея (стр. 60)
Кнопка разблокировки
<6> Главный
диска установки
диск управления
режима (стр. 57)
(стр. 57)
Диск установки
Кнопка спуска
режима (стр. 35, 57)
затвора
(стр. 56)
Крепление
ремня
Индикатор авто-
(стр. 38)
спуска/дистанци-
онного управления
Встроенные
(стр. 159)
микрофоны
Датчик дистан-
(стр.
326
,
347
)
ционного управ-
ления (стр. 272)
Кнопка разблоки-
ровки объектива
Ручка-держатель
(стр. 54)
(Отсек аккумуля-
тора)
Крышка
Отверстие для кабеля
разъемов
переходника постоянного
тока (стр. 520)
Штифт фиксации объектива
Кнопка просмотра глубины
резкости (стр. 240)
Крепление объектива
Контакты (стр. 27)
Зеркало
(стр. 265, 455)
Разъем дистанционного
управления (типа N3)
(стр. 276)
Крышка корпуса
камеры (стр. 53)
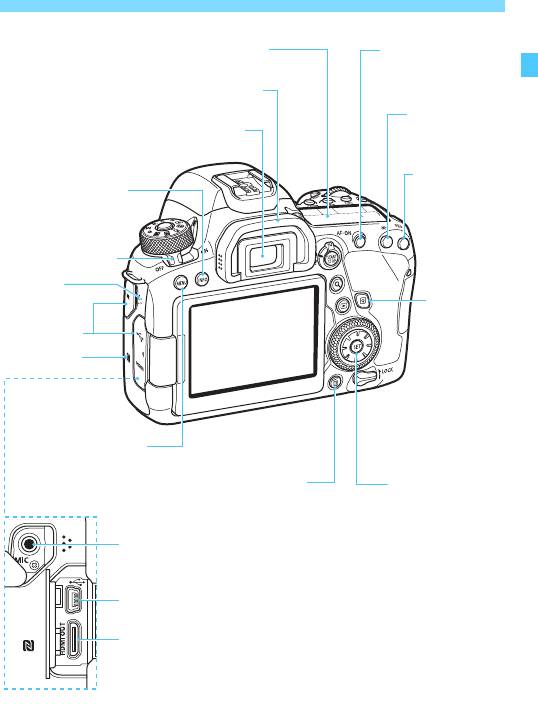
Обозначения
* Используется для подключений Wi-Fi с помощью функции NFC.
29
ЖК-дисплей (стр. 33, 34)
<p>
Кнопка включения AF
(стр. 56, 130, 292,
Наглазник (стр. 270)
337)
<A> Кнопка
фиксации AE/
Окуляр видоискателя
фиксации FE
(стр. 249, 278)
<S> Кнопка
<B> Кнопка
выбора точки
информации
AF (стр. 136,
(стр. 60, 80, 84,
137)
91, 293, 298,
334, 388)
Переключатель
питания (стр. 47)
Динамик
<Q>
Кнопка
Крышка
быстрого
разъемов
управления
(стр. 61)
P (N-метка)*
<M> Кнопка меню
(стр. 64)
<L> Кнопка удаления
<0> Кнопка
(стр. 430)
установки настроек
(стр. 64)
<Y> Входной разъем для внешнего микрофона (стр. 347)
<g> Цифровой разъем (стр. 598)
<D> Выходной мини-разъем HDMI (стр. 427)
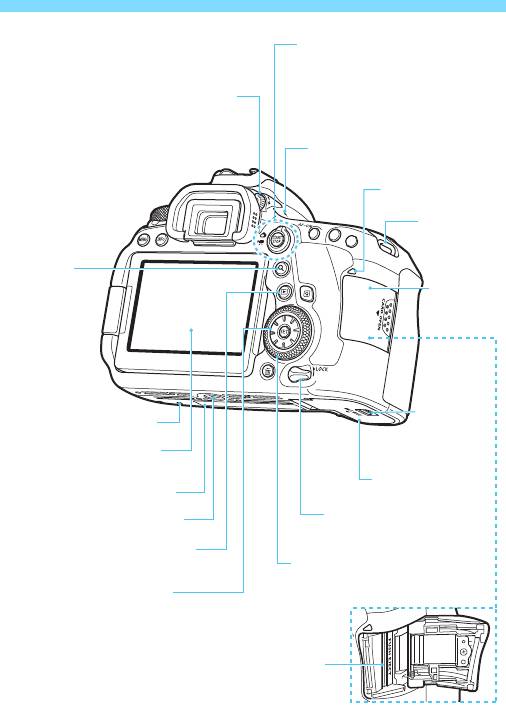
Обозначения
30
Переключатель съемки в режиме
Live View <A>/видеосъемки
<k> (стр. 289/325)
<0> Кнопка «Старт/Стоп»
Ручка диоптрийной регулировки
(стр. 290, 326)
(стр. 55)
<V> Метка фокальной
плоскости
Индикатор обращения
к карте (стр.
44
)
Крепление
ремня
(стр. 38)
<u> Кнопка
индекса/увеличе-
Крышка
ния/уменьшения
отсека карты
(стр. 399/317,
памяти
321, 404)
(стр.
43
)
Рычаг фикса-
Установочное отверстие
тора крышки
для аксессуаров
отсека акку-
мулятора
ЖК-экран (стр. 46, 64,
(стр.
42
)
290, 326, 404)
Крышка отсека акку-
Серийный номер
мулятора (стр. 42)
Переключатель блокировки
Штативное гнездо
управления (стр. 59)
<x> Кнопка просмотра
(стр. 388)
<5> Диск быстрого управления
(стр. 58)
<9> <W> <X> <Y> <Z>
Джойстик (стр. 59)
Отсек карты памяти (стр. 43)
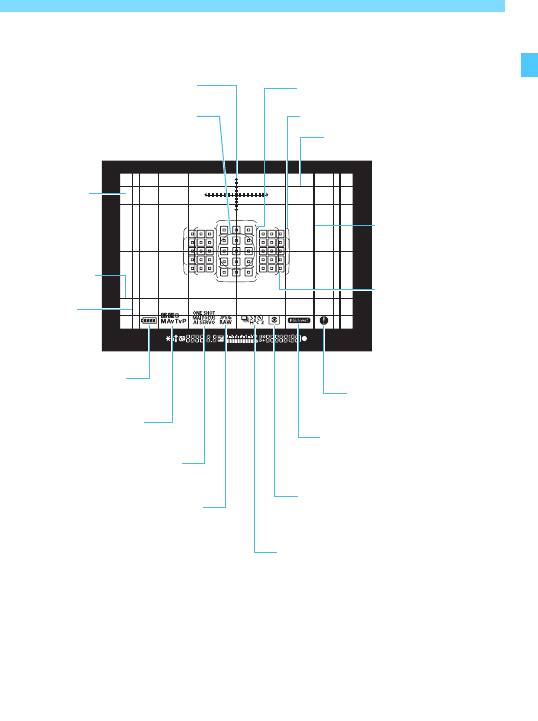
Обозначения
Отображение информации в видоискателе
*
На экране отображаются только установки, применимые к текущему режиму.
31
Электронный уровень (стр. 81)
Рамка большой зоны AF (стр. 140)
Круг точечного замера (стр. 244)
Рамка области AF (стр. 140)
Линия соотношения сторон
16:9 (стр. 168)
Фокусировоч-
ный экран
Линия соотношения
сторон 1:1 (стр. 168)
Сетка (стр. 79)
<S> Точка AF
<O> Уменьшенная
Линия соот-
точка AF (стр. 139)
ношения
сторон 4:3
(стр. 168)
<z> Уровень
заряда аккумулятора
<z> Значок преду-
(стр. 48)
преждения (стр. 489)
Режим съемки (стр. 35)
<G> Обнаружение
мерцания (стр. 206)
Режим AF (стр. 130)
Режим замера экспозиции
JPEG/RAW (стр. 162)
(стр. 243)
Режим работы затвора (стр. 156, 159)
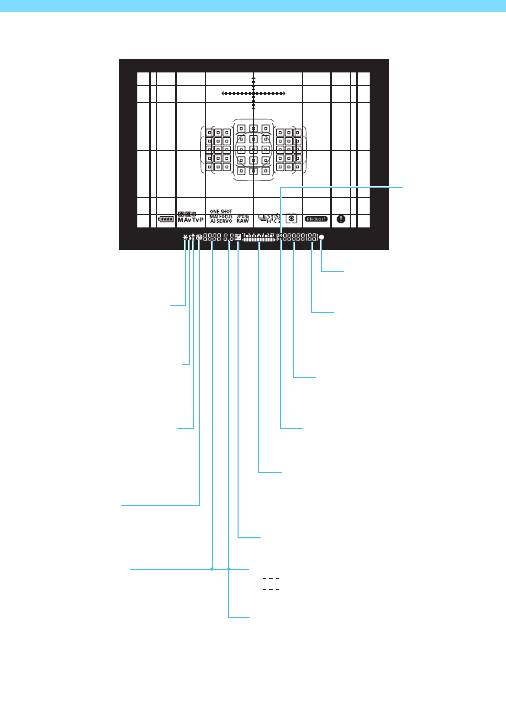
Обозначения
32
<i> Чувстви-
тельность
ISO
(стр. 170)
<o> Индикатор фокуси-
ровки (стр. 94, 131)
<A> Фиксация AE (стр. 249)
Максимальная длина серии
Работа в режиме AEB
при серийной съемке
(стр. 167)
(стр. 247)
Оставшееся число мульти-
экспозиций
(стр. 259)
<D> Вспышка готова (стр. 278)
Индикатор неправильной
Чувствительность ISO (стр. 170)
фиксации экспозиции
Число кадров при съемке с авто-
вспышки
спуском (стр. 159)
<d> Фиксация FE (стр. 278)
<A> Приоритет светов (стр. 199)
Работа в режиме FEB
(стр. 285)
<e> Высокоскоростная синхро-
Индикатор величины экспозиции
низация (стр. 285)
Величина компенсации экспозиции
(стр. 245)
<y> Компенсация
Диапазон AEB (стр. 247)
экспозиции вспышки
(стр. 278)
<O> Компенсация экспозиции (стр. 245)
Выдержка (стр. 236)
Выбор точки AF
Ручная выдержка (buLb) (стр. 250)
([ ] AF, SEL [ ], SEL AF)
Фиксация экспозиции (FEL)
Занят (buSY)
Диафрагма (стр. 238)
Предупреждение блокировки
управления (L)
Карта отсутствует (Card)
Карта памяти заполнена (FuLL)
Ошибка карты памяти (Card)
Коды ошибок (Err)
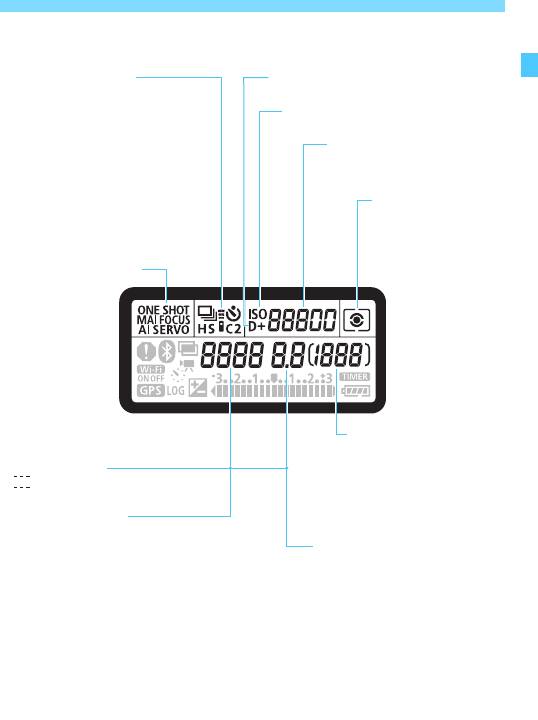
Обозначения
ЖК-дисплей
*
На экране отображаются только установки, применимые к текущему режиму.
33
Режим работы затвора
<A> Приоритет светов (стр. 199)
(стр. 156, 159)
u Покадровая съемка
<i> Чувствительность ISO
o Высокоскоростная серийная
(стр. 170)
съемка
i
Низкоскоростная серийная съемка
Чувствительность ISO (стр.
170
)
B Бесшумная покадровая съемка
Число кадров при съемке
M Бесшумная серийная съемка
с автоспуском (стр. 159)
Q Таймер автоспуска: 10 c/дист.
управление
Режим замера экспо-
k Таймер автоспуска: 2 c/дист.
зиции (стр. 243)
управление
q Оценочный замер
q Таймер автоспуска: серийная
w Частичный замер
r Точечный замер
Режим AF (стр. 130, 305)
e Центрально-взве-
X
шенный замер
Покадровый AF
9
AI Focus AF
Z
AI Servo AF
K
Servo AF
4 L
Ручная фокуси-
ровка (стр. 154, 321)
Возможное количество
снимков
Обратный отсчет автоспуска
Выбор точки AF
Время ручной длительной
([ ] AF, SEL [ ], SEL AF)
выдержки
Номер ошибки
Количество оставшихся
Выдержка
кадров
Ручная выдержка (buLb)
Фиксация экспозиции (FEL)
Диафрагма
Оставшееся число снимков для
интервальной съемки
Занят (buSY)
Предупреждение блокировки
управления (L)
Очистка датчика изображения (CLn)
Карта отсутствует (Card)
Карта памяти заполнена (FuLL)
Ошибка карты памяти (Card)
Коды ошибок (Err)
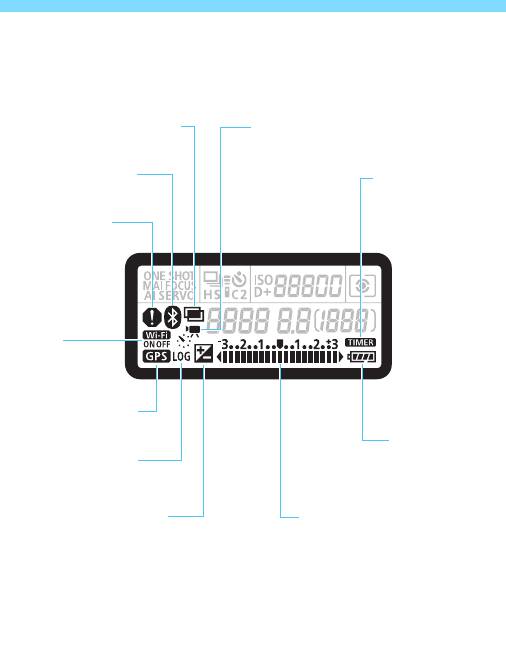
Обозначения
34
<P> Съемка с мультиэкспози-
<a> Интервальная съемка (стр. 349)
цией (стр. 258)
<s>
Функция Bluetooth
<H>
Съемка с таймером
ручной выдержки/
съемка с интервальным
<z> Значок пре-
таймером (стр. 251/267)
дупреждения
(стр. 489)
<l>
Функция Wi-Fi
<r> Состояние
приема GPS
Уровень заряда
аккумулятора
<x> Функция записи
(стр. 48)
данных
<O> Компенсация экспози-
Индикатор величины экспозиции
ции (стр. 245)
Величина компенсации экспо-
зиции (стр. 245)
Диапазон AEB (стр. 247)
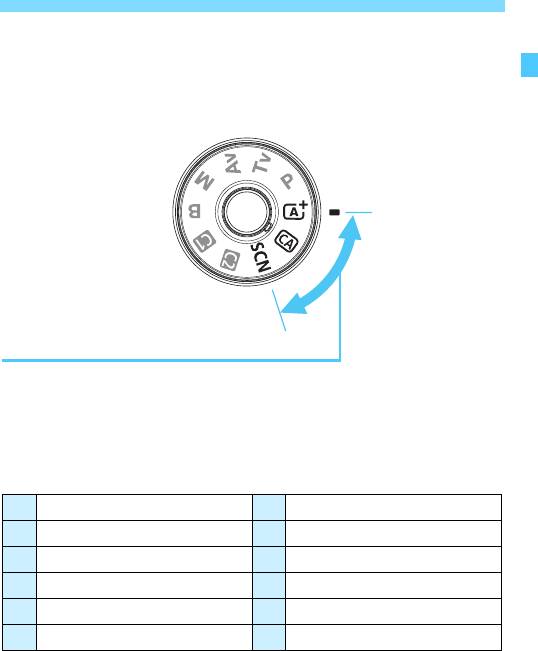
Обозначения
Диск установки режима
Можно настроить режим съемки. Поверните диск установки режима,
удерживая нажатой центральную кнопку диска (кнопка разблоки-
ровки диска установки режима).
35
Базовая зона
Достаточно нажать кнопку спуска затвора. Камера устанавливает
настройки, соответствующие снимаемому объекту или сцене.
A : Интеллектуальный сценарный режим (стр. 94)
C : Творческий авторежим (стр. 100)
8 : Специальная сцена (стр. 107)
2 Портрет (стр. 109) 4 Крупный план (стр. 116)
q Групповое фото (стр. 110) P Еда (стр. 117)
3 Пейзаж (стр. 111) y Свет свечей (стр. 11
5 Спорт (стр. 112) 6 Ночной портрет (стр. 119)
C Дети (стр. 113) F Съемка с рук ночью (стр. 120)
r Съемка с проводкой (стр. 114) G
HDR контрового света
(стр. 121)
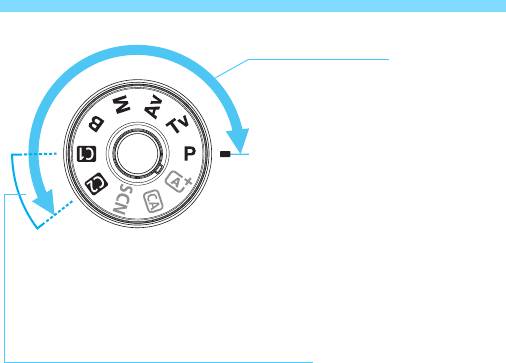
Обозначения
36
Творческая зона
Эти режимы расширяют возмож-
ности управления камерой при
съемке различных объектов.
d : Программа AE (стр. 234)
s : AE с приоритетом
выдержки (стр. 236)
f : AE с приоритетом диа-
фрагмы (стр. 238)
a : Ручная экспозиция
(стр. 241)
F : Длительная ручная
выдержка (стр. 250)
Пользовательские режимы съемки
Можно зарегистрировать режим съемки (<d>, <s>, <f>,
<a> или <F>), режим AF, параметры меню и т. д. для позиций
<w> и <x> диска установки режима (стр. 510).

Обозначения
Зарядное устройство LC-E6E
Зарядное устройство для аккумулятора LP-E6N/LP-E6 (стр. 40).
37
Кабель питания
Индикатор заряда
аккумулятора
Отсек
аккумулятора
Гнездо кабеля питания
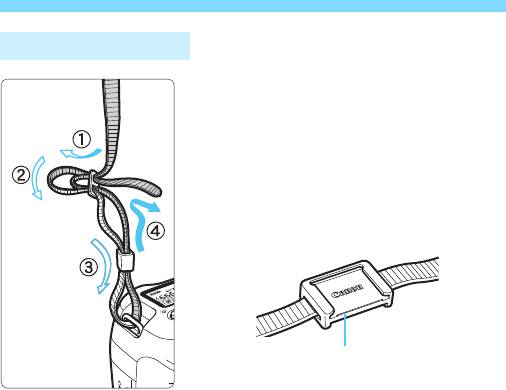
Обозначения
Закрепление ремня
Проденьте конец ремня через крепление
ремня, предусмотренное на камере с
нижней стороны. Затем проденьте ремень
через пряжку, как показано на рисунке.
Натяните ремень, чтобы убедиться, что
он не провисает и не выскочит из пряжки.
На ремне также есть закрепленная
крышка окуляра (стр. 270).
38
Крышка окуляра

1
Начало работы и основные
операции с камерой
В этой главе рассматриваются подготовительные
этапы перед началом съемки и основные операции
с камерой.
39
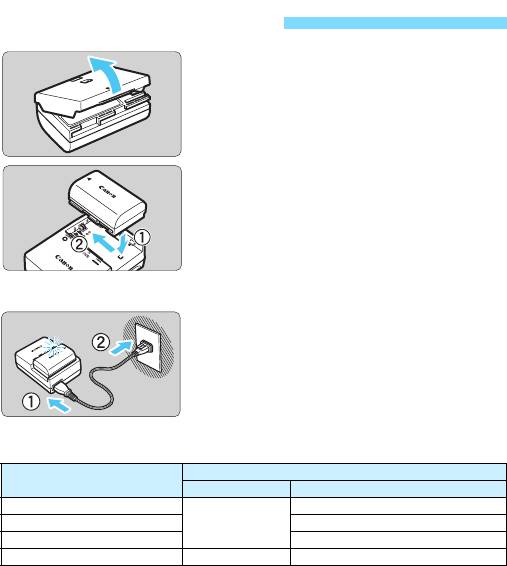
Зарядка аккумулятора
Снимите защитную крышку.
1
Снимите защитную крышку с акку-
мулятора.
Установите аккумулятор.
2
Надежно установите аккумулятор
в зарядное устройство, как показано
на рисунке.
Для снятия аккумулятора выполните
описанные выше операции в обрат-
ном порядке.
Зарядите аккумулятор.
3
Подключите кабель питания к заряд-
ному устройству и вставьте вилку
шнура в сетевую розетку.
Зарядка начинается автоматически,
и индикатор заряда аккумулятора
мигает оранжевым цветом.
Уровень заряда
Индикатор заряда аккумулятора
аккумулятора
Цвет Индикация
0–49%
Мигает раз в секунду
50–74% Мигает два раза в секунду
Оранжевый
75% или выше Мигает три раза в секунду
Полный заряд Зелёный Включен
Полная зарядка полностью разряженного аккумулятора при
комнатной температуре (23 °C) занимает примерно 2 ч 30 мин.
Время, необходимое для зарядки аккумулятора, сильно зависит
от температуры окружающей среды и уровня заряда аккумулятора.
В целях безопасности зарядка при низких температурах (5 – 10 °C)
занимает больше времени (до 4 часов).
40
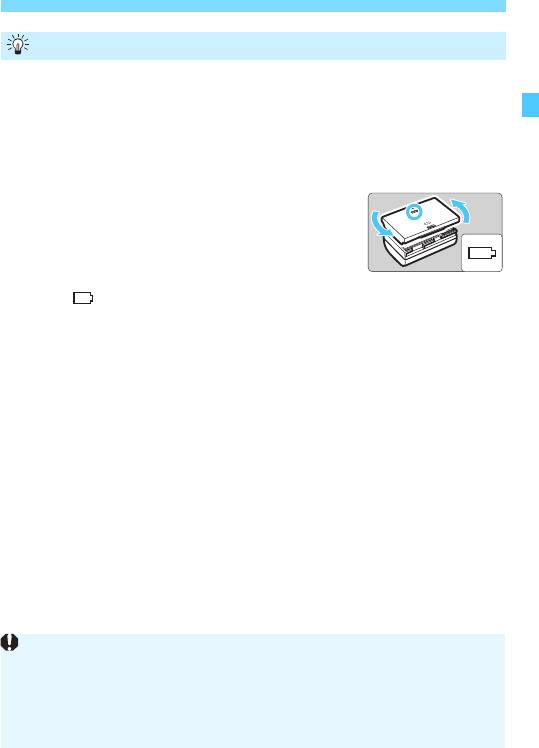
Зарядка аккумулятора
Рекомендации по использованию аккумулятора и зарядного устройства
Входящий в комплект поставки аккумулятор заряжен не полностью.
Обязательно зарядите аккумулятор перед использованием.
Заряжайте аккумулятор накануне или в день предполагаемого
использования.
Даже неиспользуемый заряженный аккумулятор постепенно
разряжается и теряет свою емкость.
После зарядки аккумулятора извлеките его и отсоедините зарядное
устройство от электрической розетки.
Крышку можно надевать в разной ориентации,
чтобы отличить заряженный аккумулятор
от незаряженного.
Если аккумулятор заряжен, наденьте крышку
таким образом, чтобы совместить отверстие в форме аккумуля-
тора < >
с синей наклейкой на аккумуляторе. Если аккумулятор
разряжен, наденьте крышку в противоположной ориентации.
Если камера не используется, извлеките из нее аккумулятор.
Если аккумулятор в течение длительного времени остается в камере,
будет постоянно потребляться небольшой ток, что может привести
к слишком сильной разрядке аккумулятора и сокращению срока его
службы. Аккумулятор следует хранить с установленной защитной
крышкой. При хранении полностью заряженного аккумулятора его
технические характеристики могут ухудшиться.
Зарядным устройством можно пользоваться в других странах.
Зарядное устройство рассчитано на напряжение источника питания
от 100 до 240 В переменного тока частотой 50/60 Гц. При необхо-
димости используйте имеющийся в продаже переходник вилки для
соответствующей страны или региона. Не подключайте зарядное
устройство к портативным преобразователям напряжения. При этом
возможно повреждение зарядного устройства.
Если аккумулятор быстро разряжается даже после полной
зарядки, это говорит об окончании срока его службы.
Проверьте уровень эффективной емкости аккумулятора
(стр. 516)
и приобретите новый аккумулятор.
41
После отсоединения кабеля зарядного устройства не прикасайтесь
к штырям вилки кабеля питания зарядного устройства приблизи-
тельно в течение 10 секунд.
Если остаточная емкость аккумулятора (стр. 516) составляет 94%
или выше, то его зарядить невозможно.
Зарядное устройство из комплекта поставки нельзя использовать
для зарядки какого-либо иного аккумулятора, кроме LP-E6N/LP-E6.
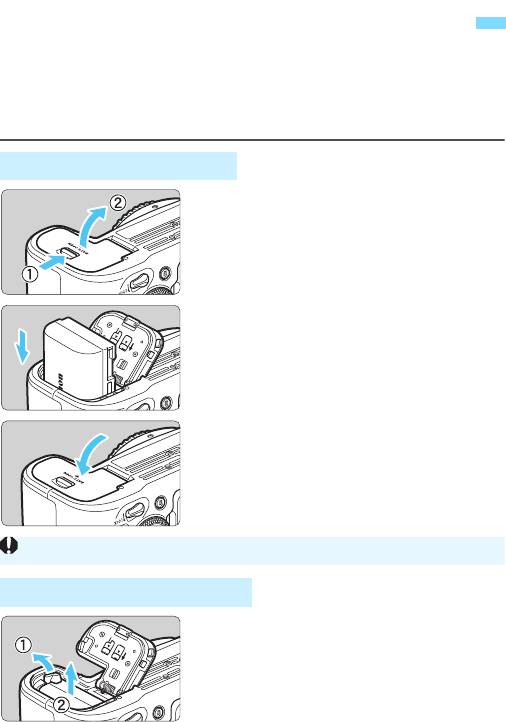
Установка и извлечение аккумулятора
Установите в камеру полностью заряженный аккумулятор LP-E6N (или
LP-E6).
После установки аккумулятора включается подсветка видо-
искателя, после извлечения аккумулятора видоискатель становится
темным. Если аккумулятор не установлен, изображение в видо-
искателе становится размытым и фокусировка невозможна.
Установка аккумулятора
Откройте крышку.
1
Сдвиньте рычажок в показанном
стрелками направлении, затем
откройте крышку.
Вставьте аккумулятор.
2
Вставьте его концом с электричес-
кими контактами.
Вставьте аккумулятор до фиксации
со щелчком.
Закройте крышку.
3
Нажмите на крышку до характер-
ного щелчка.
Извлечение аккумулятора
Откройте крышку и извлеките аккумулятор.
Нажмите рычаг фиксатора аккуму-
лятора в направлении, показанном
стрелкой, и извлеките аккумулятор.
Для предотвращения короткого замы-
кания закройте аккумулятор защитной
крышкой, входящей в комплект
поставки (стр. 40).
42
Запрещается использовать любые другие аккумуляторы, кроме LP-E6N или LP-E6.
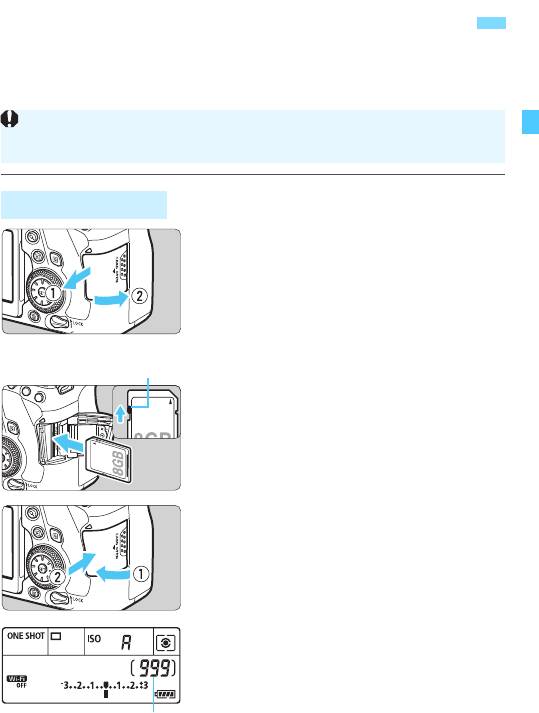
Установка и извлечение карты памяти
С этой камерой можно использовать карты памяти SD, SDHC или
SDXC (продаются отдельно). Снятые изображения записываются
на карту.
Установка карты
Откройте крышку.
1
Откройте крышку, сдвинув
ее в направлении, показанном
стрелками.
Вставьте карту памяти.
2
Держите карту стороной с этикет-
кой к себе и вставьте ее в камеру
до фиксации со щелчком, как
показано на рисунке.
Закройте крышку.
3
Закройте крышку и сдвиньте ее
в направлении стрелок до закрытия
с характерным щелчком.
При установке переключателя пита-
ния в положение <1> на панели
ЖК—дисплея отобразится возможное
количество кадров.
43
Убедитесь в том, что переключатель защиты карты от записи уста-
новлен в верхнее положение для обеспечения записи и стирания.
Переключатель защиты
от записи
Возможное количество
снимков
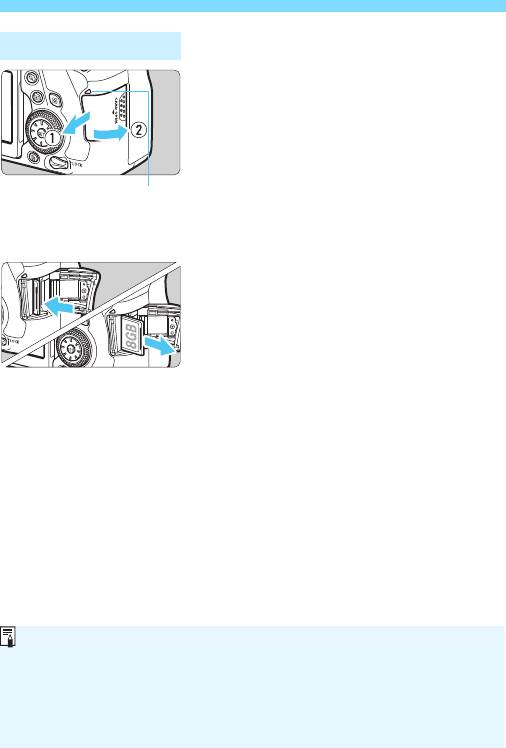
Установка и извлечение карты памяти
Извлечение карты
Откройте крышку.
1
Установите переключатель питания
в положение <2>.
Убедитесь, что индикатор обра-
щения к карте не горит, и откройте
крышку.
Если на ЖК-экране отображается
сообщение [
Производится запись…
],
закройте крышку.
Извлеките карту памяти.
2
Слегка нажмите на карту и отпус-
тите ее, чтобы она выдвинулась
наружу.
Выньте карту памяти и закройте
крышку.
44
Индикатор обращения
к карте
Также можно использовать карты памяти UHS-I SDHC или SDXC.
Возможное количество снимков зависит от оставшейся емкости
карты памяти, настроек качества записи изображений, чувствитель—
ности ISO и т. д.
Если для параметра [z1: Спуск затвора без карты] выбрано значе-
ние [Запрещён], то съемка без карты будет невозможна (стр. 535).

Установка и извлечение карты памяти
45
Если индикатор обращения к карте мигает или горит постоянно,
это означает, что на карту записываются изображения, с карты
считываются изображения, с карты удаляются изображения
или производится передача данных. В течение этого времени
не открывайте крышку отсека карты памяти.
Кроме того, когда горит или мигает индикатор обращения к карте,
запрещается выполнять перечисленные ниже действия. В против-
ном случае возможно повреждение данных изображений, карты
или камеры.
•Извлекать карту.
• Извлекать аккумулятор.
• Встряхивать камеру или стучать по ней.
• Отсоединять и подсоединять кабель питания (если использу-
ются принадлежности для питания от сети переменного тока
(продаются отдельно, стр. 520)).
Если карта памяти уже содержит изображения, нумерация изобра-
жений может начаться не с номера 0001 (стр. 211).
Если на ЖК-экране отображается сообщение об ошибке, связанной
с картой памяти, извлеките и заново установите карту. Если ошибка
не устранена, используйте другую карту.
Следует скопировать изображения с карты памяти в компьютер при
наличии такой возможности, а затем отформатировать карту памяти
в этой камере (стр. 70). Нормальная работа карты может восстано-
виться.
Не прикасайтесь к контактам карты пальцами или металлическими
предметами. Не допускайте попадания пыли или воды на контакты.
Загрязнение контактов может привести к их неисправности.
Мультимедийные карты (MMC) использовать нельзя. (Будет отобра-
жаться ошибка карты.)
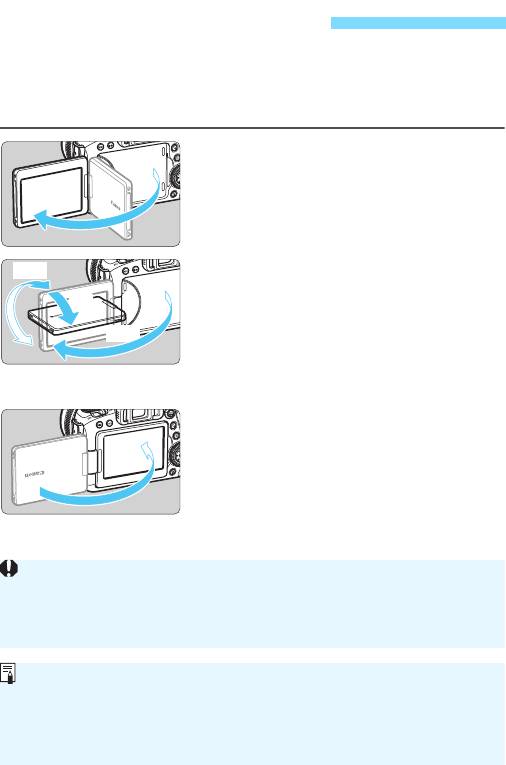
Использование ЖК-экрана
Открыв ЖК-экран, можно задавать функции меню, производить
съемку в режиме Live View или видеосъемку, а также просматривать
фотографии или видеозаписи. Направление и угол наклона ЖК-
экрана можно изменять.
Откройте ЖК-экран.
1
Поверните ЖК-экран.
180°
2
Если ЖК-экран открыт, его можно
90°
поворачивать вверх, вниз или на
180° непосредственно к объекту
175°
съемки.
На рисунке указан приблизитель-
ный угол наклона.
Поверните его к себе.
3
Обычно при работе с камерой ЖК-
экран обращен к фотографу.
46
При повороте ЖК-экрана будьте осторожны и не прикладывайте
чрезмерных усилий, чтобы не сломать шарнир.
Если к разъему камеры подключен кабель, угол поворота разложен-
ного ЖК-экрана ограничивается.
Если камера не используется, закройте ЖК-экран лицевой стороной
внутрь. Это позволит защитить экран.
Если во время съемки в режиме Live View или видеосъемки ЖК-экран
повернут к объекту съемки, изображение на экране представляет
собой зеркальное отражение (перевернуты левая и правая стороны).
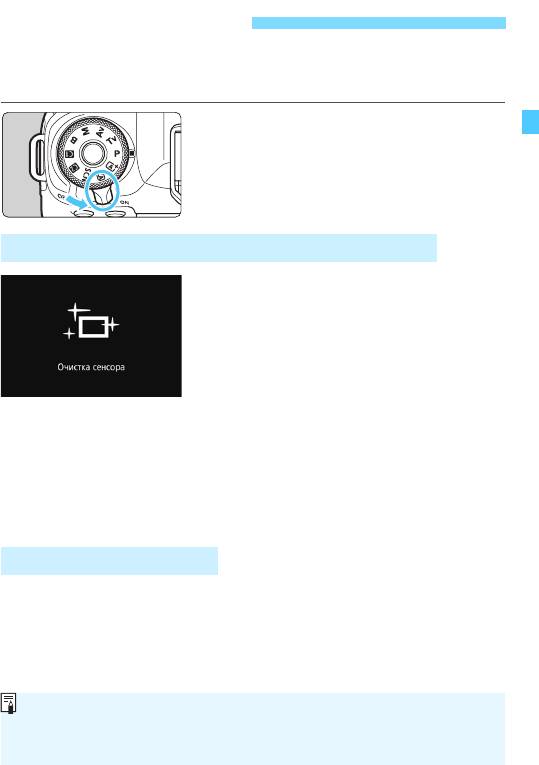
Включение питания
Если при включении питания камеры отображается экран
установки даты, времени и часового пояса, для задания этих
параметров см. стр. 49.
<1> : Камера включается.
<2> : Камера выключена и не рабо-
тает. Установите переключа-
тель питания в это положение,
если камера не используется.
Автоматическая очистка датчика изображения
Каждый раз при установке переклю-
чателя питания в положение <1>
или <2> автоматически выполня-
ется очистка датчика изображения.
(Может быть слышен негромкий
шум.) Во время очистки датчика
изображения на ЖК-экране отобра-
жается <f>.
Если наполовину нажать кнопку спуска затвора (стр. 56), когда
производится чистки датчика, чиста останавливается и вы можете
немедленно произвести съемку.
Если в течение короткого промежутка времени несколько раз
изменить положение переключателя питания <1>/<2>,
значок <f> может не появиться. Это нормально и не является
неполадкой.
3 Автоотключение
Если камера не использовалась в течение прибл. 1 мин, она авто-
матически выключается для экономии заряда аккумулятора.
Для повторного включения камеры просто наполовину нажмите
кнопку спуска затвора (стр. 56).
Задержку автоматического выключения можно изменить с помощью
параметра [52: Автоотключение] (стр. 73).
47
Если во время записи изображения на карту памяти переключатель
питания установлен в положение <2>, отображается сообщение
[Производится запись…] и питание выключается после завершения
записи.
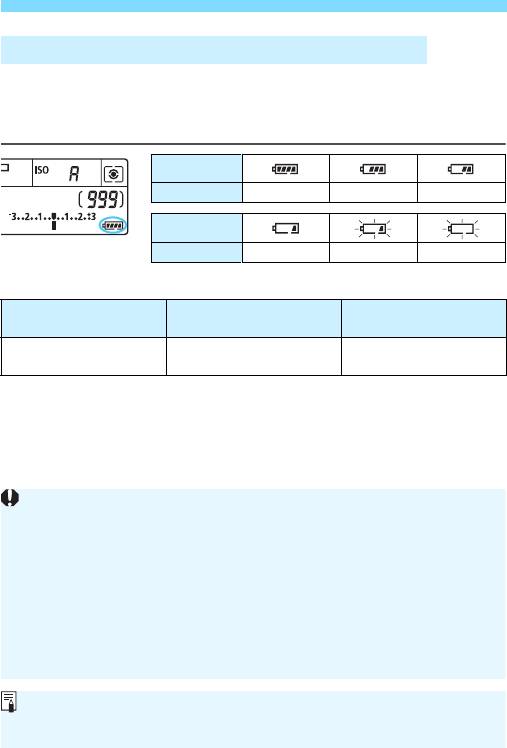
Включение питания
z Индикатор уровня заряда аккумулятора
Когда переключатель питания установлен в положение <1>, инди-
катор уровня заряда аккумулятора показывает одно из шести значе—
ний. Мигание значка аккумулятора <b> означает, что скоро
аккумулятор полностью разрядится.
Индикация
Уровень заряда (%)
100 – 70 69 – 50 49 – 20
Индикация
Уровень заряда (%)
19 – 10 9 – 1 0
Возможное количество снимков при съемке с видоискателем
Комнатная температура
Низкая температура
Температура
(23 °C)
(0 °C)
Возможное
Прибл. 1200 снимков Прибл. 1100 снимков
количество снимков
Приведенные выше цифры рассчитаны для работы с полностью заряжен-
ным аккумулятором LP-E6N без использования съемки в режиме Live View
по стандартам тестирования CIPA (Ассоциация производителей камер
и устройств обработки изображения).
При использовании ручки-держателя аккумуляторов BG-E21 (продается
отдельно) с двумя аккумуляторами LP-E6N возможное количество снимков
приблизительно удваивается.
48
Любое из следующих действий ускоряет разрядку аккумулятора.
• Длительное нажатие кнопки спуска затвора наполовину.
• Частая активация только функции автофокусировки без осуществления съемки.
• Использование функции Image Stabilizer (Стабилизатор изображения) объектива.
• Частое использование ЖК-экрана.
• Использование функции GPS, Wi-Fi или Bluetooth.
В зависимости от фактических условий съемки возможное количество
снимков может сокращаться.
Объектив получает питание от аккумулятора камеры. С некоторыми
объективами аккумулятор может разряжаться быстрее, чем с другими.
При низкой температуре воздуха съемка может быть невозможна
даже при достаточном уровне заряда аккумулятора.
Возможное количество снимков при съемке в режиме Live View см. на стр.
291
.
Для проверки состояния аккумулятора см. меню [54: Инфор.
о батарее] (стр. 516).
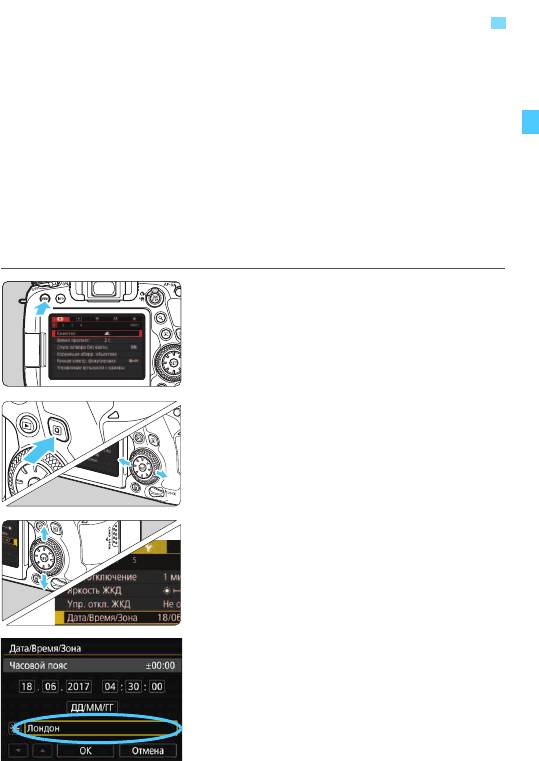
3
Установка даты, времени и часового пояса
При первом включении питания или после сброса значений даты,
времени и часового пояса открывается экран установки этих пара-
метров. Сначала установите часовой пояс, следуя приведенным
ниже инструкциям.
Установите в камере часовой пояс места проживания, чтобы при
поездке в место, находящееся в другом часовом поясе, можно
было просто выбрать его в камере — установленные дата и время
будут настроены автоматически.
Учтите, что дата и время, добавляемые к записываемому изоб-
ражению, будут основаны на данных параметрах даты и времени.
Обязательно установите правильные дату и время.
Откройте экран меню.
1
Для отображения экрана меню
нажмите кнопку <M>.
На вкладке [52] выберите
2
[Дата/Время/Зона].
Нажмите кнопку <Q> и выберите
вкладку [5].
Кнопками <Y> <Z> выберите
вкладку [52].
Кнопками <W> <X> выберите
параметр [Дата/Время/Зона]
и нажмите <0>.
Установите часовой пояс.
3
По умолчанию установлен
[Лондон].
Кнопками <Y> <Z> выберите
пункт [Часовой пояс], затем
нажмите кнопку <0>.
49
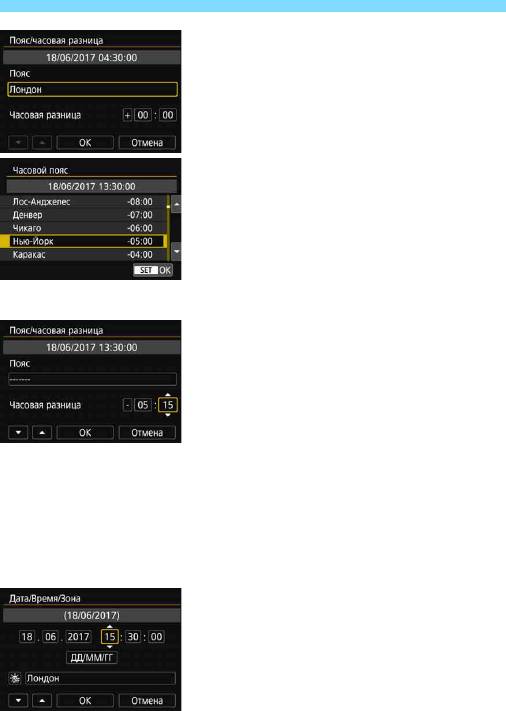
3 Установка даты, времени и часового пояса
Кнопками <Y> <Z> выберите
[Пояс] и нажмите <0>.
Выберите часовой пояс кнопками
<W> <X>, затем нажмите <0>.
Если в списке нет требуемого часо-
вого пояса, нажмите кнопку <M>
и задайте пояс на следующем шаге
(указав часовую разницу с универ-
сальным глобальным временем,
UTC).
Чтобы указать часовую разницу
с UTC, кнопками <Y> <Z> выбе-
рите параметр (+/–/ч/мин) для
пункта [Часовая разница].
Нажмите кнопку <0> для отобра-
жения символа <r>.
Установите значение кнопками
<W> <X> и нажмите <0>.
(Восстанавливается вид <s>.)
После ввода часового пояса или
часовой разницы кнопками <Y>
<Z> выберите [OK] и нажмите
кнопку <0>.
Установите дату и время.
4
Выберите число кнопками <
Y
> <
Z
>.
Нажмите кнопку <0> для отобра-
жения символа <r>.
Установите значение кнопками
<W> <X> и нажмите <0>.
(Восстанавливается вид <s>.)
50
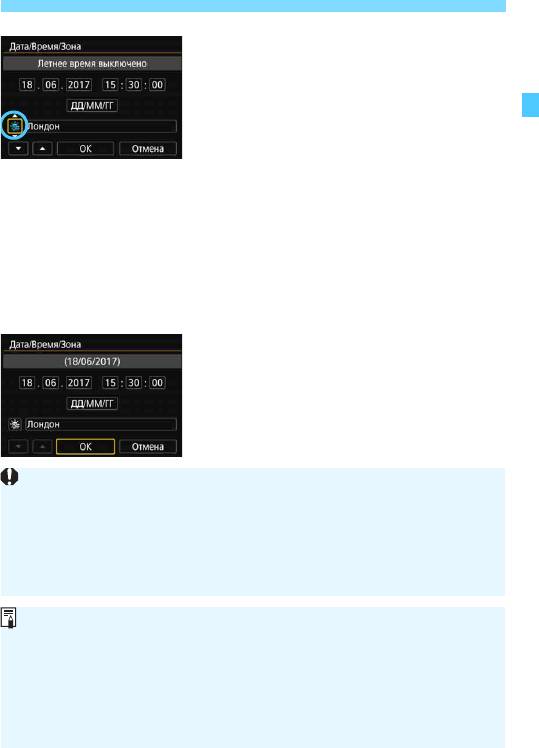
3 Установка даты, времени и часового пояса
Настройте переход на летнее время.
5
Задайте требуемое значение.
Кнопками <Y> <Z> выберите [Y].
Нажмите кнопку <0> для отобра-
жения символа <r>.
Кнопками <W> <X> выберите пара-
метр [Z] и нажмите <0>.
Если для функции перехода на
летнее время задано значение [Z],
то время, установленное в шаге 4,
будет переведено на 1 час вперед.
При установке значения [Y] пере-
ход на летнее время будет отменен,
и время будет передвинуто на 1 час
назад.
Выйдите из режима настройки.
6
Кнопками <Y> <Z> выберите [OK]
и нажмите <0>.
Будут установлены дата, время,
часовой пояс и летнее время.
51
Настройки даты, времени и часового пояса могут быть сброшены,
если камера хранится без аккумулятора, аккумулятор разрядился
или камера подвергалась воздействию отрицательных температур
в течение длительного времени. Если это произошло, заново уста-
новите дату, время и часовой пояс.
После изменения значения параметра [Пояс/часовая разница]
убедитесь, что установлены правильные значения даты и времени.
Отсчет даты и времени начинается после выбора [OK] на шаге 6.
На шаге 3 время в пункте [Часовой пояс] является разницей по
времени относительно универсального глобального времени (UTC).
Даже если для параметра [52: Автоотключение] задано значение
[1 мин.], [2 мин.] или [4 мин.], когда отображается экран [52: Дата/
Время/Зона], время автоотключения составляет прибл. 6 мин.
С помощью функции GPS возможна автоматическая коррекция
времени (стр. 227).
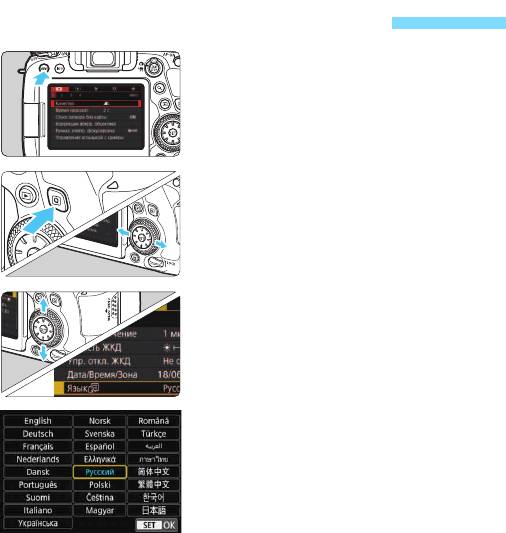
3 Выбор языка интерфейса
Откройте экран меню.
1
Для отображения экрана меню
нажмите кнопку <M>.
На вкладке [52] выберите пункт
2
[ЯзыкK].
Нажмите кнопку <Q> и выберите
вкладку [5].
Кнопками <Y> <Z> выберите
вкладку [52].
Кнопками <W> <X> выберите пункт
[Язык
K] и нажмите <0>.
Задайте нужный язык.
3
Выберите нужный язык кнопками
<W> <X> и нажмите <0>.
Язык интерфейса изменяется.
52
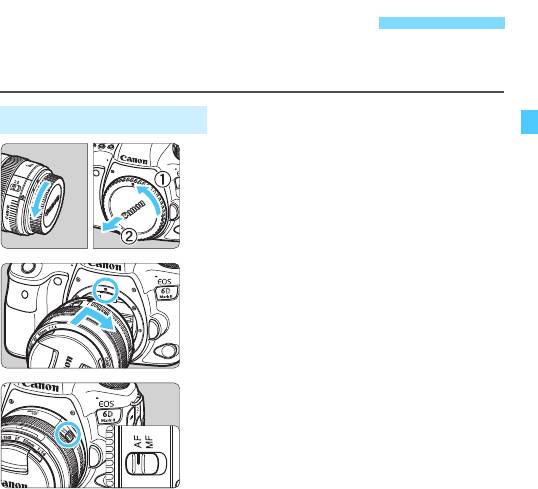
Установка и снятие объектива
Камера совместима со всеми объективами Canon EF. Объективы
EF-S и EF-M не поддерживаются.
Установка объектива
Снимите крышки.
1
Снимите заднюю крышку объектива
и крышку корпуса камеры, повернув
их в направлении стрелок, показан-
ных на рисунке.
Установите объектив.
2
Совместив красные индексные
метки на объективе и камере,
поверните объектив в направлении,
указанном стрелкой, до фиксации.
Установите переключатель
3
режима фокусировки на
объективе в положение <AF>.
<AF> означает автофокусировку.
<MF> означает ручную фокусировку.
Автофокусировка не работает.
Снимите переднюю крышку
4
объектива.
53
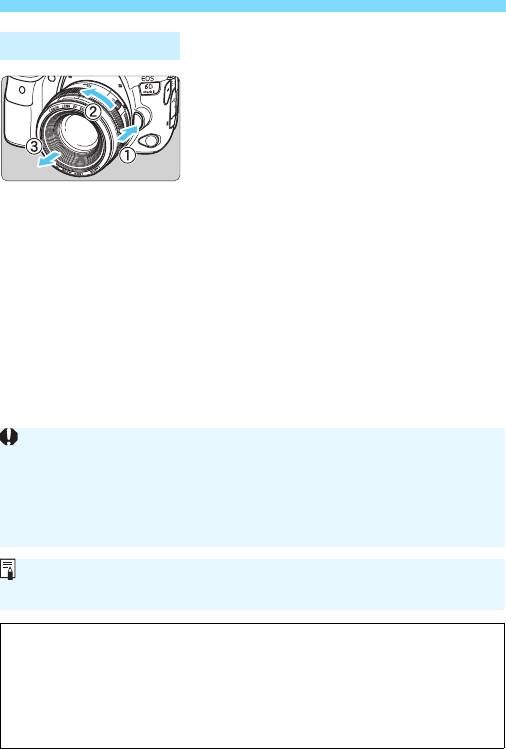
Установка и снятие объектива
Снятие объектива
Удерживая нажатой кнопку
разблокировки объектива,
поверните объектив так,
как показано стрелкой.
Поверните объектив до упора,
затем снимите его.
Наденьте на снятый объектив
заднюю крышку объектива.
54
Не смотрите прямо на солнце через какой-либо объектив. Это может
вызвать потерю зрения.
При установке или снятии объектива установите переключатель
питания камеры в положение <2>.
Если передняя часть объектива (кольцо фокусировки) вращается
во время автофокусировки, не прикасайтесь к вращающейся части.
Инструкции по использованию объектива см. в документе «Инструкция
по эксплуатации объектива» (стр. 4).
Рекомендации по предотвращению появления пятен и следов от пыли
При смене объективов делайте это быстро в местах с минимальной
запыленностью.
При хранении камеры без объектива обязательно устанавливайте
крышку корпуса камеры.
Перед установкой крышки корпуса камеры удалите с нее пыль.
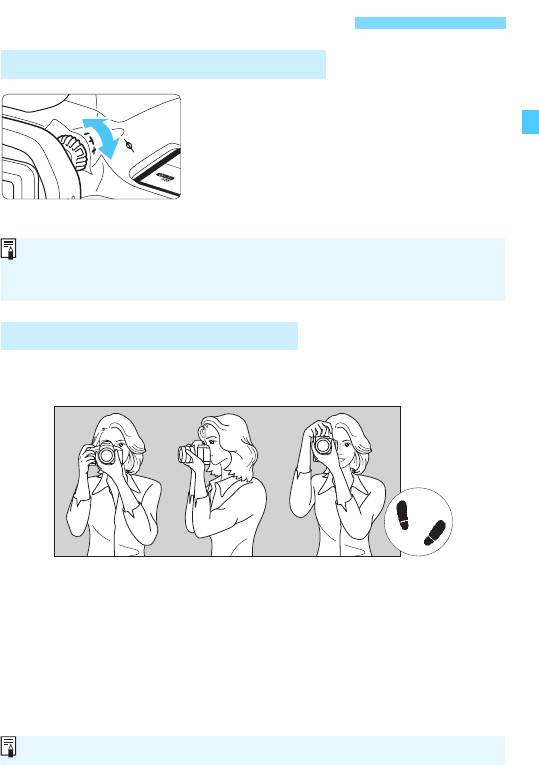
Основные операции съемки
Настройка четкости видоискателя
Вращайте ручку диоптрийной
регулировки.
Поворачивая ручку влево или вправо,
добейтесь резкого изображения
точек AF в видоискателе.
Если ручка поворачивается с трудом,
снимите наглазник (стр. 270).
Как правильно держать камеру
Для получения четких фотографий держите камеру неподвижно,
чтобы свести к минимуму ее сотрясение.
1. Плотно обхватите правой рукой ручку-держатель камеры.
2. Левой рукой поддерживайте объектив снизу.
3. Положите правый указательный палец на кнопку спуска затвора.
4. Слегка прижмите руки и локти к груди.
5. Для обеспечения устойчивости поставьте одну ногу немного впереди
другой.
6. Прижмите камеру к лицу и посмотрите в видоискатель.
55
Если диоптрийная регулировка камеры не позволяет получить четкое
изображение в видоискателе, рекомендуется использовать линзы
диоптрийной регулировки серии E (продаются отдельно).
Съемка в вертикальном положенииСъемка в горизонтальном положении
Сведения о съемке с просмотром на ЖК-экране см. на стр. 289.
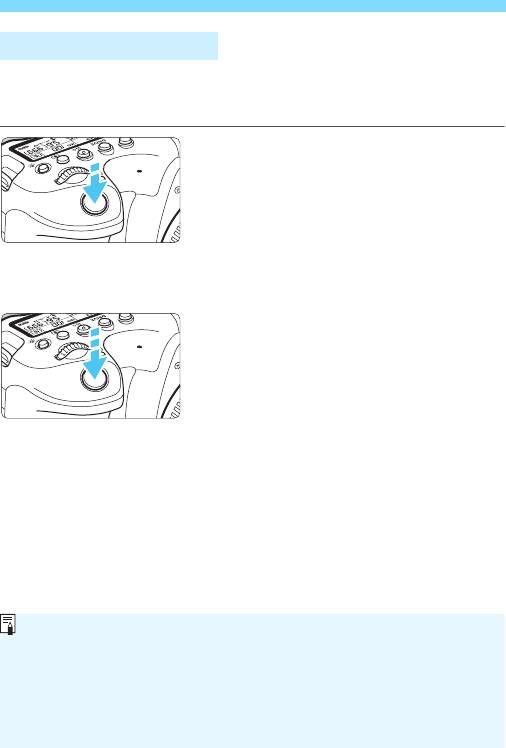
Основные операции съемки
Кнопка спуска затвора
Кнопка спуска затвора срабатывает в два этапа. Можно нажать
кнопку спуска затвора наполовину. Затем кнопка спуска затвора
нажимается до упора.
Нажатие наполовину
Этим нажатием активизируется функция
автофокусировки и система автоэкспо—
зиции, которая устанавливает выдержку
и величину диафрагмы.
Значение экспозиции (выдержка и диа-
фрагма) отобразится в видоискателе
и на ЖК-дисплее в течение прибл. 4 с
(таймер замера экспозиции/0).
Полное нажатие
Этим нажатием осуществляется спуск
затвора, и производится съемка.
Предотвращение сотрясения камеры
Движение камеры во время экспозиции при съемке без исполь-
зования штатива называется сотрясением камеры. Это может
привести к смазыванию изображения. Во избежание сотрясения
камеры обратите внимание на следующее:
• Держите камеру неподвижно, как показано на предыдущей
странице.
• Нажмите кнопку спуска затвора наполовину для автофокусировки,
затем медленно нажмите кнопку спуска затвора полностью.
56
В режимах творческой зоны нажатие кнопки <
p
> приводит к выпол-
нению той же операции, что и нажатие кнопки спуска затвора наполовину.
Если сразу полностью нажать кнопку спуска затвора или нажать
ее наполовину, а затем сразу же до упора, камера производит съемку
с некоторой задержкой.
Даже если открыто меню или просматривается изображение, можно
вернуться в состояние готовности к съемке, наполовину нажав кнопку
спуска затвора.
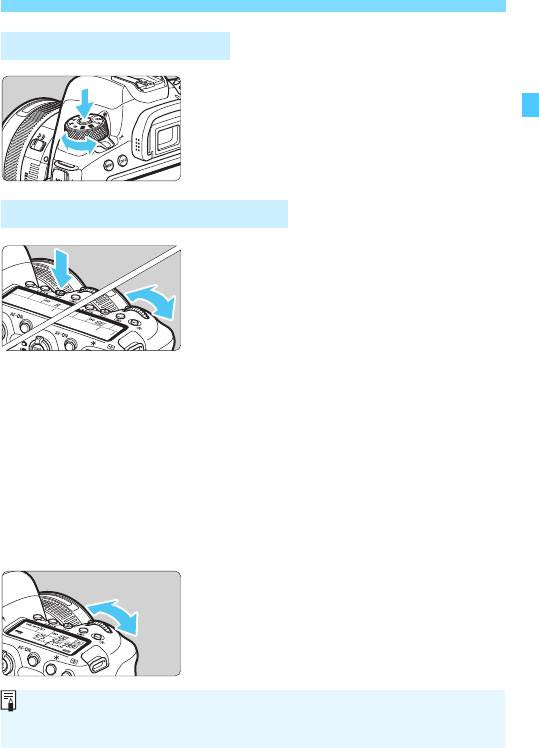
Основные операции съемки
Диск установки режима
Поверните диск, удерживая
нажатой центральную кнопку
разблокировки диска.
Используйте его для установки режима
съемки.
6 Главный диск управления
(1)
Нажав кнопку, поверните
диск <6>.
При нажатии кнопки <f>, <R>,
<i> или <q> соответствующая
функция остается доступной для выбора
в течение прибл. 6 с (9). В течение
этого времени можно повернуть диск
<6> для изменения настройки.
После завершения работы таймера
или при нажатии наполовину кнопки
спуска затвора камера возвращается
в режим готовности к съемке.
Используйте этот диск для выбора
режима автофокусировки, режима
работы затвора, чувствительности
ISO, режима замера, точки авто-
фокусировки и т. д.
(2)
Поверните только диск <6>.
Глядя в видоискатель или на ЖК-
дисплей, поворачивайте диск <6>.
Используйте этот диск для задания
выдержки, диафрагмы и т. д.
57
Операции, описанные в пункте (1), можно выполнять, даже если пере-
ключатель блокировки <R> сдвинут вверх (блокировка управления,
стр. 59).
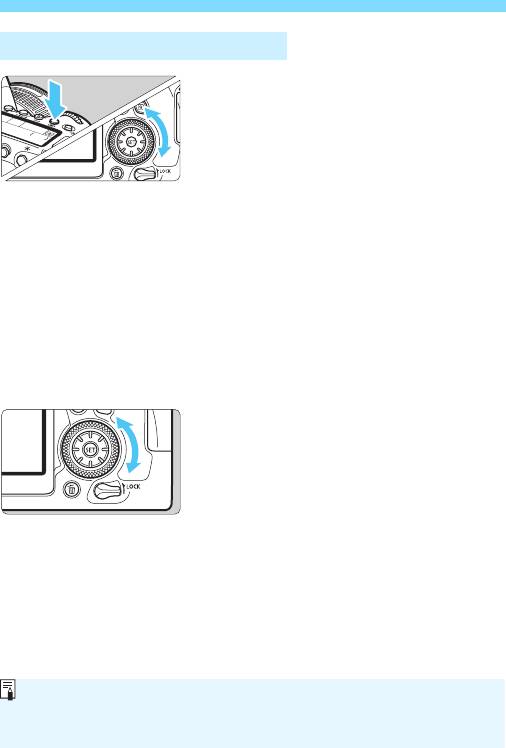
Основные операции съемки
5 Диск быстрого управления
(1)
Нажав кнопку, поверните
диск <5>.
При нажатии кнопки <f>, <i>
или <q> соответствующая функция
остается доступной для выбора в тече-
ние прибл. 6 с (9). В течение этого
времени можно повернуть диск <5>
для изменения настройки.
После завершения работы таймера
или при нажатии наполовину кнопки
спуска затвора камера возвращается
в режим готовности к съемке.
Используйте этот диск для выбора
режима автофокусировки, чувстви-
тельности ISO, режима замера, точки
автофокусировки и т. д.
(2)
Поверните только диск <5>.
Глядя в видоискатель или на ЖК-
дисплей, поворачивайте диск <
5>.
Используйте этот диск для задания
величины компенсации экспозиции,
величины диафрагмы для ручной
экспозиции и т. п.
58
Операции, описанные в пункте (1), можно выполнять, даже если пере-
ключатель блокировки <R> сдвинут вверх (блокировка управления,
стр. 59).

Основные операции съемки
9 Джойстик
Джойстик <9> состоит из восьми кнопок направления.
Он служит для выбора точки AF,
коррекции баланса белого, переме-
щения точки AF или рамки увеличе—
ния при съемке в режиме Live View
или видеосъемке, задания быстрого
управления и т. п.
Кроме того, его можно использовать
для выбора пунктов меню.
R Блокировка управления
Если задать параметр [54: Блокировка управления] и сдвинуть
переключатель <R> вверх, можно исключить изменение
настроек при случайном повороте главного диска управления,
диска быстрого выбора и джойстика или при случайном касании
сенсорного экрана.
Подробнее о параметре [54: Блокировка управления]
см.настр.88.
Переключатель блокировки <R>
сдвинут вверх: блокировка включена
Переключатель блокировки <R>
сдвинут вниз: блокировка отключена
59
Корректировать баланс белого и перемещать рамку увеличения при
просмотре можно даже в том случае, когда переключатель <R>
установлен в верхнее положение (блокировка управления).
По умолчанию диск <5> будет заблокирован, когда переключатель
блокировки управления находится в заблокированном положении.

Основные операции съемки
U Подсветка ЖК-дисплея
Подсветку ЖК-дисплея можно включить,
нажав кнопку <U>. Включите (9)
или выключите подсветку ЖК-дисплея
нажатием кнопки <U>.
Отображение экрана быстрого управления
После нескольких нажатий кнопки <B> (стр. 84) отображается
экран быстрой настройки (стр. 86). Это позволяет проверить
текущие настройки функций съемки.
Нажатие кнопки <Q> позволяет выполнять быстрое управление
настройками функций съемки (стр. 61).
Затем можно нажать кнопку <
B
>, чтобы выключить экран
(стр.
84
).
60
В режиме ручной длительной выдержки при полном нажатии кнопки
спуска затвора подсветка ЖК-дисплея отключается.
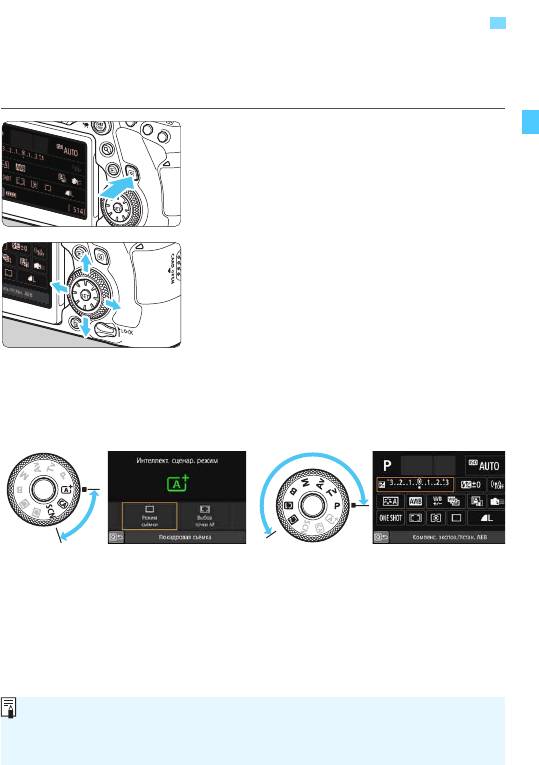
Q
Быстрое управление функциями съемки
С помощью интуитивно понятных операций можно напрямую выби-
рать и задавать функции съемки, отображаемые на ЖК-экране. Это
называется быстрым управлением.
Нажмите кнопку <Q> (7).
1
Отобразится экран быстрого
управления.
Настройте требуемые функции.
2
Кнопками <W> <X> <Y> <Z>
выберите функцию.
Отображаются настройки выбран-
ной функции и руководство по функ-
циям (стр. 90).
Для изменения настройки поверните
диск <6> или <5>.
Произведите съемку.
3
Для съемки полностью нажмите
кнопку спуска затвора.
Отобразится снятое изображение.
61
Режимы базовой зоны Режимы творческой зоны
Сведения о функциях, настраиваемых в режимах базовой зоны,
и порядок их настройки см. на стр. 126.
Для быстрых настроек можно также нажимать на экран (стр. 67).
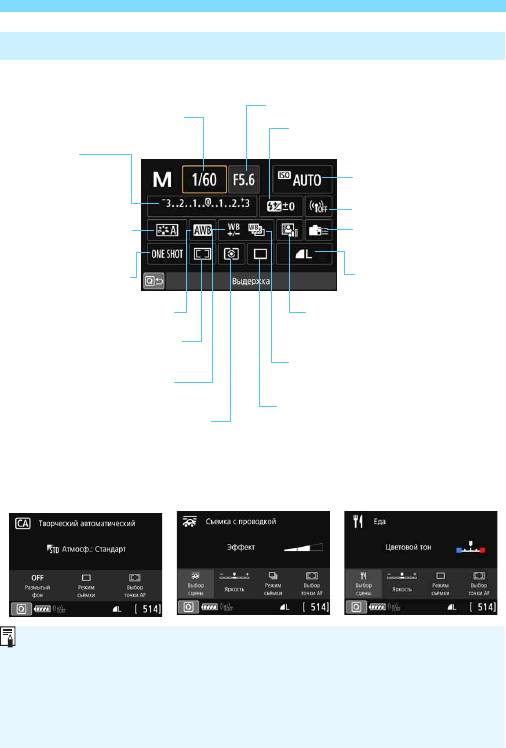
Q Быстрое управление функциями съемки
Функции, задаваемые с помощью быстрого управления
Режимы творческой зоны
Режимы базовой зоны (пример экрана)
62
Диафрагма (стр. 238)
Выдержка (стр. 236)
Компенсация экспозиции
вспышки (стр. 278, 285)
Настройка
компенсации
Чувствительность ISO
экспозиции/AEB
(стр. 170)
(стр. 245/247)
Функция Wi-Fi
Стиль изображения
Назначение элементов
(стр. 176)
управления (стр. 497)
Режим AF (стр. 130)
Качество записи
изображений (стр. 162)
Баланс белого (стр. 185)
Auto Lighting Optimizer
(Автокоррекция яркости)
Режим выбора области
(стр. 194)
AF/выбор точки AF
Брекетинг баланса белого
(стр. 192)
Коррекция баланса белого
(стр. 191)
Режим работы затвора (стр. 156)
Режим замера экспозиции
(стр. 243)
Режим <C>
Режим <r> Режим <P>
В режимах базовой зоны настраиваемые функции быстрого управления
зависят от режима съемки (стр. 127). В режимах базовой зоны воз—
можна настройка следующих функций быстрого управления: [Выбор
эффекта съемки
], [
Размытый фон
], [
Режим съёмки
], [
Выбор точки AF
],
[Эффект] (Съемка с проводкой), [Яркость] и [Цветовой тон].
Описание экрана быстрого управления см. на стр. 86.
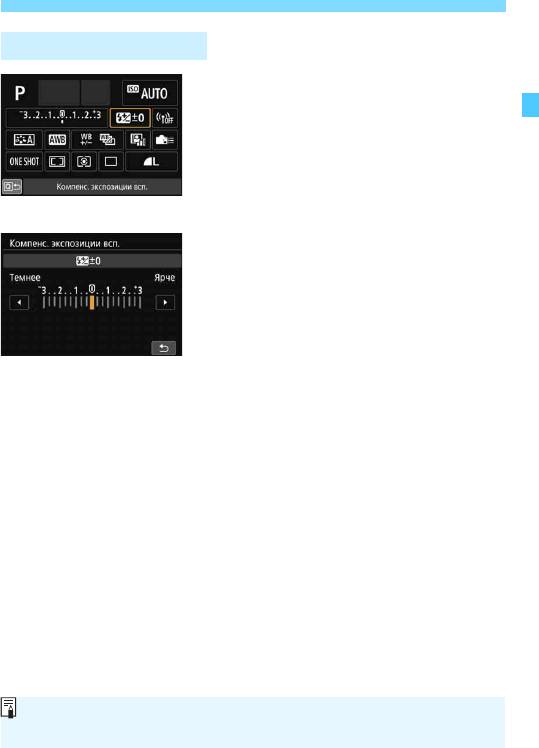
Q Быстрое управление функциями съемки
Быстрое управление
Выберите требуемую функцию
и нажмите <0>. Открывается
экран настройки функции.
Поворачивайте диск <6> или
<5>, затем нажимайте кнопки <Y>
<
Z
> для изменения настройки. Есть
также функции, которые задаются
нажатием кнопки в соответствии
с этими операциями.
Нажмите кнопку <0> для заверше-
ния настройки и возврата к преды-
дущему экрану.
Затем выберите <7> (стр. 497),
<H> (стр. 134) или <k> и нажмите
кнопку <M> для выхода из
настройки.
63
Подробные сведения о функциях Wi-Fi см. в инструкции по эксплуатации
функции Wi-Fi (беспроводная связь) (стр. 4).
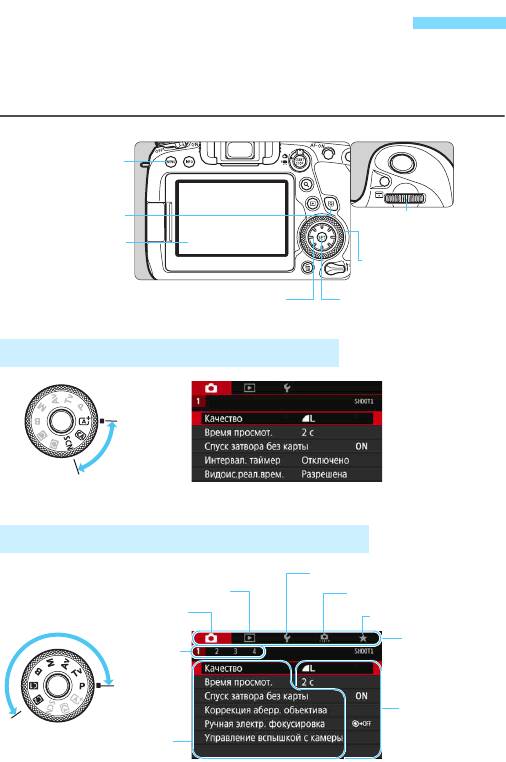
3 Использование меню и его
конфигурации
С помощью меню можно задавать различные настройки, такие как
качество записи изображений, дату/время и т. д.
Экран меню режимов базовой зоны
*
В режимах базовой зоны некоторые вкладки и пункты меню не отображаются.
Экран меню режимов творческой зоны
64
Кнопка <M>
Кнопка <Q>
<6> Главный
диск управления
ЖК-экран
<5> Диск быстрого
управления
Джойстик
Кнопка <0>
Кнопки <W><X><Y><Z>
5: Настройка
3: Просмотр
8:
Пользовательские функции
z: Съемка
9: Мое меню
Основные
Дополни—
вкладки
тельные
вкладки
Настройки меню
Пункты меню
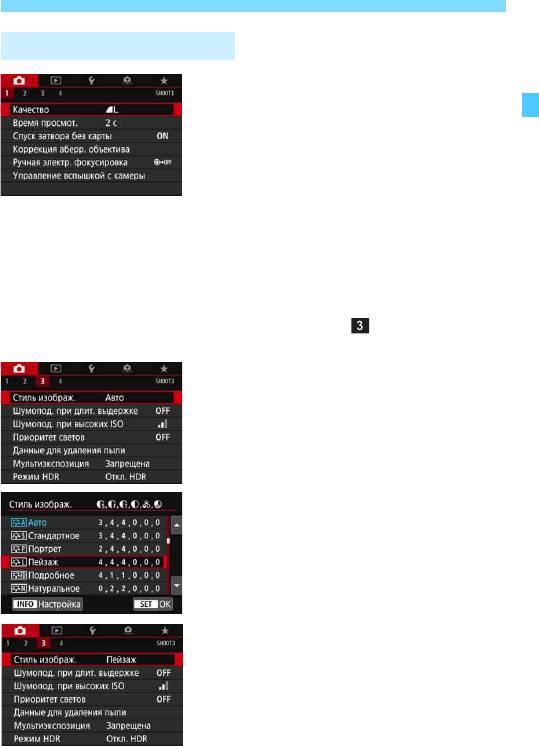
3 Использование меню и его конфигурации
Порядок работы с меню
Откройте экран меню.
1
Для отображения экрана меню
нажмите кнопку <M>.
Выберите вкладку меню.
2
При каждом нажатии кнопки <Q>
выполняется переход к следующей
главной вкладке (группе функций).
C помощью кнопок <Y> <Z> джой-
стика выберите дополнительную
вкладку.
Например, значок вкладки [z3]
в этом руководстве относится к
экрану, отображаемому при выборе
третьего поля [ ] в левой части
вкладки z (Съемка).
Выберите требуемый вариант.
3
Кнопками <
W
> <
X
> джойстика выбе-
рите пункт, затем нажмите <0>.
Выберите значение.
4
Кнопками <W> <X> или <Y> <Z>
выберите нужную настройку.
Текущая настройка указана синим
цветом.
Задайте настройку.
5
Для этого нажмите <0>.
Выйдите из режима настройки.
6
Нажмите кнопку <
M
> для выхода
из меню и возврата в состояние
готовности к съемки.
65
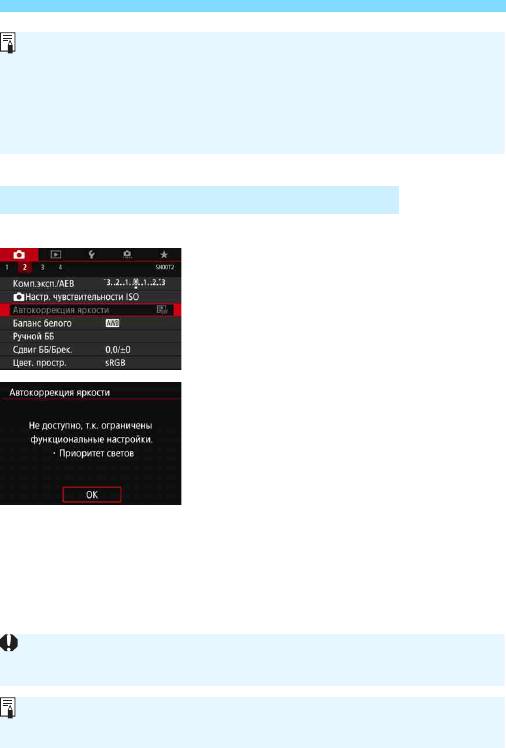
3 Использование меню и его конфигурации
Пункты меню, выделенные серым цветом
Пример: Приоритет светов
Пункты меню, выделенные серым
цветом, невозможно установить. Пункт
меню отображается серым цветом, если
его переопределяет другая функция.
Чтобы просмотреть переопределя-
ющую функцию, можно выбрать этот
пункт меню и нажать <0>.
При отмене настройки переопределя-
ющей функции пункт меню, отобра-
жавшийся серым цветом, становится
доступным для установки.
66
В приводимых далее описаниях функций меню предполагается, что
была нажата кнопка <M> для отображения экрана меню.
Для управления меню можно также нажимать на экран меню или
поворачивать диск <6> или <5>.
Для отмены операции нажмите кнопку <M>.
Подробнее о каждом пункте меню см. на стр. 534.
С помощью команды [
5
5: Сброс всех настроек камеры
] можно вернуть
для настроек всех функций меню значения по умолчанию (стр. 75).
Для некоторых пунктов меню, выделенных серым цветом, просмотр
переопределяющей функции недоступен.
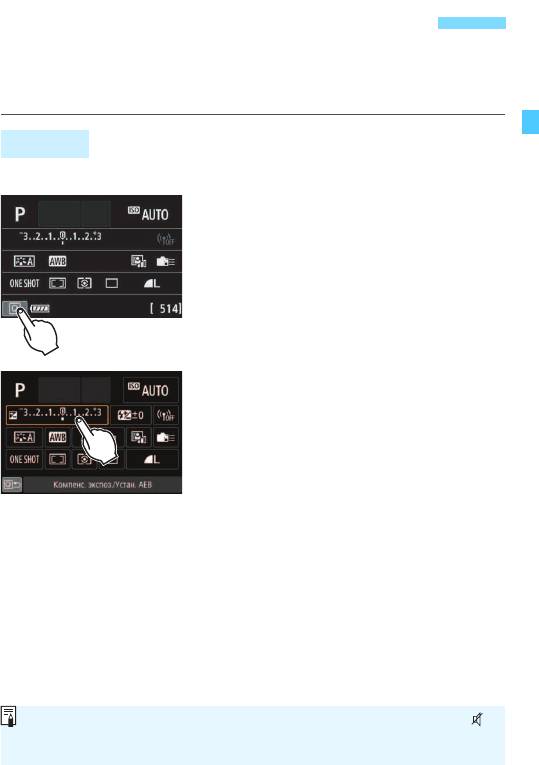
d Управление камерой с помощью
сенсорного экрана
Камерой можно управлять, нажимая ЖК-экран (сенсорный экран)
пальцами.
Касание
Пример экрана (быстрая настройка)
Коснитесь ЖК-экрана пальцем
(коснитесь на долю секунды
и уберите палец).
С помощью касания на ЖК-экране
можно выбирать разные отобража-
емые меню, значки и т. п.
Например, при касании пункта [Q]
отображается экран быстрого управ-
ления. При касании [Q] будет
выполнен возврат на предыдущий
экран.
Примеры операций с использованием касания экрана
Установка функций меню после нажатия кнопки <M>
Быстрое управление
Настройка функции после нажатия кнопки <f>, <R>,
<i>, <q> или <S>
AF при касании в режиме Live View и в режиме видеосъемки
Съемка при касании в режиме Live View
Задание функций в режиме Live View и в режиме видеосъемки
Операции воспроизведения
67
Если в параметре [54: Звук. подтвер.] выбрано значение [Коснитесь ],
звуковой сигнал во время операций с сенсорным экраном подаваться
не будет (стр. 73).

d Управление камерой с помощью сенсорного экрана
Перемещение пальца по экрану
Пример экрана (экран меню)
Коснувшись ЖК-экрана, проведите
по нему пальцем.
Пример экрана (шкала)
Примеры операций с использованием перемещения пальца
по экрану
Выбор вкладки или пункта меню после нажатия кнопки <M>
Настройка при отображении шкалы
Быстрое управление
Выбор точек AF (кроме съемки в режиме Live View)
Задание функций съемки в режиме Live View и в режиме видео-
съемки
Операции воспроизведения
68
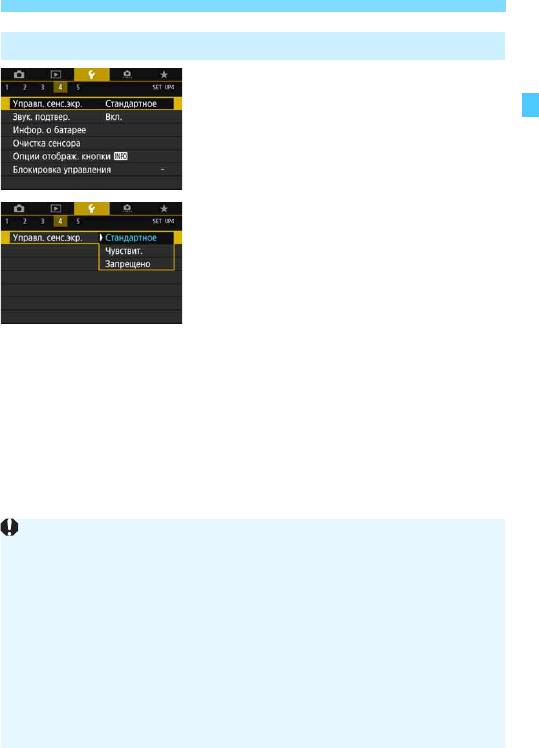
d Управление камерой с помощью сенсорного экрана
3 Настройка чувствительности сенсорного экрана
Выберите пункт [Управл.
1
сенс.экр.].
На вкладке [54] выберите пункт
[Управл. сенс.экр.], затем нажмите
кнопку <0>.
Задайте настройку чувствительности
2
сенсорного управления.
Выберите настройку, затем нажмите
кнопку <0>.
[
Стандартное
] — обычная установка.
[
Чувствит.
] — более высокая чувст-
вительность к касаниям по сравне-
нию с настройкой [Стандартное].
Попробуйте обе настройки и выбе-
рите предпочтительную.
Для отключения сенсорных операций
выберите [Запрещено].
69
Предупреждения по управлению с помощью сенсорного экрана
Так как ЖК-экран нечувствителен к давлению, не касайтесь его
острыми предметами, такими как шариковые ручки, и не нажимайте
на него ногтем.
Не касайтесь сенсорного экрана влажными пальцами.
Если ЖК-экран увлажнен или у вас влажные пальцы, возможны сбои
и отсутствие отклика сенсорного экрана. В этом случае отключите
питание и удалите влагу тканью.
При установке на ЖК—экран имеющихся в продаже защитных пленок
или наклеек чувствительность сенсорного экрана может снизиться.
Если быстро выполнять сенсорные операции, когда задано значение
[
Чувствит.
], отклик сенсорного экрана может быть плохим.
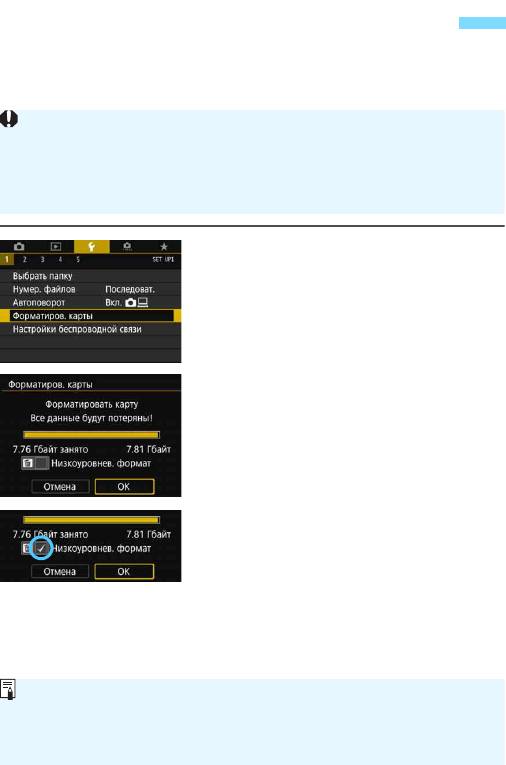
3 Форматирование карты памяти
Новую карту памяти или карту памяти, ранее отформатированную
в другой камере или в компьютере, необходимо отформатировать
в этой камере.
Выберите [Форматиров. карты].
1
На вкладке [51] выберите пункт
[Форматиров. карты], затем
нажмите кнопку <0>.
Отформатируйте карту.
2
Выберите [
OK
], затем нажмите
<
0
>.
Выполняется форматирование карты
памяти.
Для выполнения низкоуровневого
форматирования нажмите кнопку
<
L
>, чтобы установить флажок <
X
>
у пункта [Низкоуровнев. формат],
затем выберите [OK].
70
При форматировании карты памяти с нее удаляются все данные.
Удаляются даже защищенные изображения, поэтому убедитесь,
что на карте нет важной информации. При необходимости перед
форматированием карты перенесите изображения и данные на
персональный компьютер или в другое место.
Емкость карты памяти, отображаемая на экране форматирования
карты, может быть меньше емкости, указанной на карте.
В данном устройстве используется технология exFAT, лицензиро-
ванная корпорацией Microsoft.

3 Форматирование карты памяти
Выполняйте форматирование карты в следующих
случаях:
Используется новая карта.
Карта была отформатирована в другой камере или
в компьютере.
Карта заполнена изображениями или данными.
Отображается сообщение об ошибке, связанное с картой
(стр. 567).
Форматы файлов на картах
Карты SD/SDHC форматируются в FAT32. Карты SDXC форма-
тируются в exFAT.
При съемке видеофильма с картой, отформатированной под
exFAT, видеофильм записывается в один файл (не разделяется
на несколько файлов), даже если его размер превышает 4 ГБ.
(Видеофайл будет более 4 ГБ.)
71
Низкоуровневое форматирование
Низкоуровневое форматирование следует выполнять в том случае,
если скорость записи или чтения карты оказывается низкой или
если требуется удалить с карты все данные полностью.
Поскольку низкоуровневое форматирование удаляет все секторы
записи на карте памяти, такое форматирование может занять
больше времени по сравнению с обычным.
Низкоуровневое форматирование можно остановить, выбрав
[Отмена]. Даже в этом случае обычное форматирование будет
уже завершено и карту можно будет использовать обычным
образом.

3 Форматирование карты памяти
72
Если в этой камере отформатировать SDXC-карту и установить
ее в другую камеру, может появиться сообщение об ошибке и исполь-
зовать карту будет невозможно. Некоторые операционные системы
компьютеров и устройства чтения карт памяти могут не распознавать
карты, отформатированные для файловой системы exFAT.
При форматировании карты памяти или удалении с нее данных
изменяется только информация о размещении файлов. Полное
удаление фактических данных не производится. Помните об этом,
продавая или выбрасывая карту. При утилизации карты памяти
выполните низкоуровневое форматирование или уничтожьте карту
физически, чтобы исключить кражу личных данных с карты.
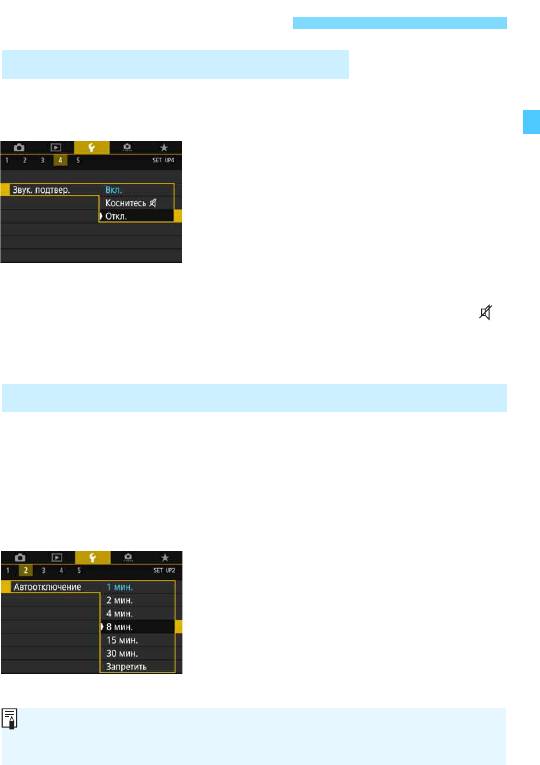
Перед началом работы
3 Отключение звукового сигнала
Можно отключить звуковой сигнал, подаваемый при достижении
фокусировки, во время съемки с автоспуском и при выполнении
сенсорных операций.
Выберите пункт [Звук. подтвер.].
1
На вкладке [54] выберите пункт
[Звук. подтвер.] и нажмите кнопку
<0>.
Выберите пункт [Откл.].
2
Выберите пункт [Откл.] и нажмите
кнопку <0>.
Звуковой сигнал не будет подаваться.
Если выбран режим [Коснитесь ],
звуковой сигнал будет отсутствовать
только для сенсорных операций.
3
Установка задержки отключения питания/Автоотключение
Для экономии заряда аккумулятора камера автоматически выклю-
чается по истечении указанного промежутка времени. По умолчанию
установлена 1 мин, но эту настройку можно изменить. Если вы не
хотите, чтобы камера автоматически отключалась, установите для
этого параметра значение [Запретить].
После выключения питания камеру можно снова включить, нажав
кнопку спуска затвора или любую другую кнопку.
Выберите пункт [Автоотключение].
1
На вкладке [52] выберите пункт
[Автоотключение], затем нажмите
кнопку <0>.
Задайте нужное время.
2
Выберите настройку, затем нажмите
кнопку <0>.
73
Даже если установлено значение [Запретить], для экономии энергии
прибл. через 30 мин ЖК-экран автоматически выключается. (Питание
камеры не выключается.)
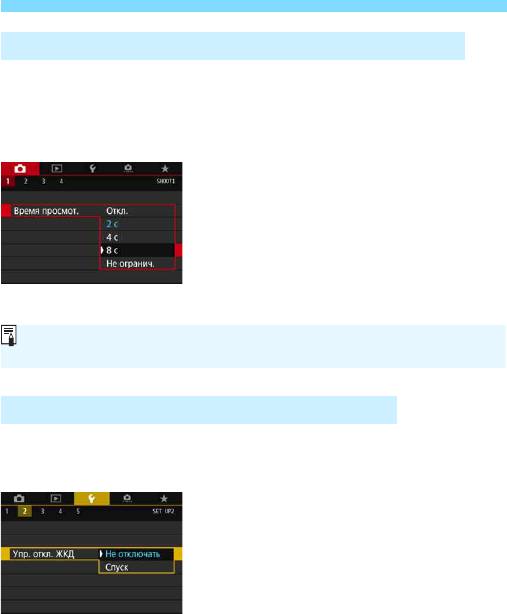
Перед началом работы
3 Установка времени просмотра изображения
Можно задать время, в течение которого изображение отображается
на ЖК-экране сразу после съемки. Чтобы снятое изображение посто—
янно отображалось после съемки, задайте значение [Не огранич.].
Чтобы снятое изображение не отображалось на ЖК-экране, задайте
значение [Откл.].
Выберите [Время просмот.].
1
На вкладке [z1] выберите пункт
[Время просмот.], затем нажмите
кнопку <0>.
Задайте нужное время.
2
Выберите настройку, затем нажмите
кнопку <0>.
3 Отключение и включение ЖК-экрана
Для экрана быстрой настройки (стр. 61) или электронного уровня
(стр. 80) можно задать, будут ли они отображаться при наполовину
нажатой кнопке спуска затвора во время съемки с видоискателем.
Выберите [Упр. откл. ЖКД].
1
На вкладке [52] выберите пункт
[Упр. откл. ЖКД], затем нажмите
кнопку <0>.
Задайте требуемое значение.
2
Выберите настройку, затем нажмите
кнопку <0>.
[
Не отключать
]
: ЖК-экран не отключается даже при нажатии
кнопки спуска затвора наполовину. Чтобы
отключить ЖК-экран, нажмите кнопку <B>.
[Спуск]: При нажатии кнопки спуска затвора наполовину
ЖК-экран выключается. При отпускании кнопки
спуска затвора экран включается.
74
Если задано значение [Не огранич.], изображение отображается
до автоотключения.
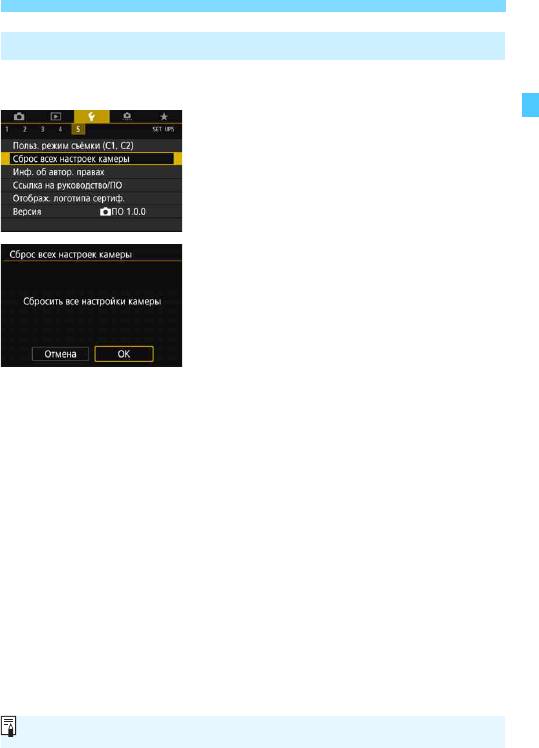
Перед началом работы
3
Восстановление в камере настроек по умолчанию
N
Настройки функций съемки камеры и настройки меню можно вернуть
к значениям по умолчанию.
Выберите [Сброс всех настроек
1
камеры].
На вкладке [55] выберите пункт
[Сброс всех настроек камеры],
затем нажмите кнопку <0>.
Выберите [OK].
2
Для настроек камеры восстанав-
ливаются значения, показанные
на стр. 76–78.
75
Порядок сброса всех настроек пользовательских функций см. на стр. 468.
Перед началом работы
Настройки функций съемки Настройки записи
Функция AF
Покадровый AF Качество 73
Режим выбора
Автоматический
Соотношение сторон
3:2
области AF
выбор AF
Стиль изображения
Авто
Ручная электронная
Запрещена после
Auto Lighting Optimizer
Стандартная
фокусировка
покадр. AF
(Автокоррекция яркости)
Режим замера
q
(Оценочный замер)
Коррекция аберр. объектива
zНастройки чувствительности ISO Коррекция
Чувствительность ISO
Авто
периферийной
Включить
Диапазон
Минимум: 100
освещенности
выбора ISO
Максимум: 40000
Коррекция
Автоматический
Минимум: 100
хроматической
Включить
диапазон
Максимум: 12800
аберрации
Максимальная
Коррекция
Автоматически
Отключить
выдержка для авто
искажений
Режим работы затвора
u
(Покадровая съемка)
Коррекция
Включить
Компенсация
дифракции
Отменена
экспозиции/AEB
Q (Приоритет
Баланс белого
Компенсация экспо—
атмосферы)
Отменена
зиции вспышки
Ручной баланс
Отменен
Мультиэкспозиция
Запрещена
белого
Режим HDR
Откл. HDR
Сдвиг баланса белого
Отменен
Интервальный таймер
Отключено
Брекетинг
Отменен
Таймер ручной выдержки
Отключено
баланса белого
Подавление мерцания
Отключено
Цветовое пространство
sRGB
Блокировка зеркала
Запрещена
Шумоподавление при
Откл.
Отображение в видоискателе
длительной выдержке
Электронный уровень
Скрыть
Шумоподавление при
Стандартное
Отображение сетки
Скрыть
высоких значениях ISO
Показать/скрыть
Выбрано только обна-
Приоритет светов
Запрещён
в видоискателе
ружение мерцания
Нумерация файлов
Последовательно
Пользовательские
Данные для
Без изменений
Удалены
функции
удаления пыли
Управление вспышкой с камеры
Вспышка
Разрешена
Режим вспышки
Оценочный экспо-
E-TTL II
замер вспышки
Выдержка синхрони-
Авто
зации вспышки в Av
76
Перед началом работы
Настройки камеры Параметры съемки в режиме
Время просмотра изображения
2 с
Видоис.реал.врем.
Разрешена
Спуск затвора без карты
Разрешен
Функция AF
Покадровый AF
Переход с/6
e
(10 изображений)
Метод AF
u+Слежение
Выдел.переэкс.зон
Запрещено
Съемка при касан.
Отключить
Индикация точки AF
Запрещено
Таймер замера
8 с
Показывать сетку
Откл.
Отображение сетки
Скрыть
Гистограмма
Яркость
Имитация экспозиции
Вкл.
2x (увеличение
Бесшум.с ЖКД-вид.
Режим 1
Увеличение (прибл.)
от центра)
Управление HDMI
Запрещено
Автоповорот верти-
Вкл.zD
кальных изображений
Настройки беспроводной связи
Wi-Fi
Отключить
Функция Bluetooth
Отключить
Автоотключение
1 мин
Яркость ЖКД
Упр. откл. ЖКД
Не отключать
Дата/Время/Часовой пояс
Без изменений
Язык
Без изменений
GPS
Выключено
ТВ-стандарт
Без изменений
Указания по режимам съемки
Разрешено
Руководство
Разрешено
Разм. шрифта пом.
Маленький
Управление с помощью
Стандарт
сенсорного экрана
Звуковое подтверждение
Вкл.
Автоочистка
Разрешить
Опции отображения
Выбраны обе
кнопки z
Опции отображения
Без изменений
кнопки z на ЖКД
Блокировка
Только
5
(Диск
управления
быстрого выбора)
Пользовательские режимы съемки
Без изменений
Информация об авторских правах
Без изменений
Настроить: Мое меню
Без изменений
Отображ. меню
Нормальное отображение
77
Перед началом работы
Параметры видеосъемки
Параметры
NTSC:L6X
Видео Servo AF
Включить
видеозаписи
PAL:L5X
Метод AF
u+Слежение
Запись звука
Авто
Чувствит. слежения
0
Фильтр ветра
Авто
Видео Servo AF
Аттенюатор
Отключить
Скорость Видео Servo AFO
kНастр. чувствительности ISO Режим работы
Всегда вкл.
Чувствитель-
Скорость AF
0 (Стандартная)
Авто
ность ISO
Таймер замера
8 с
Диапазон
Отображение сетки
Скрыть
выбора чувст-
Минимум: 100
Функ. кнопки
V
/-
вительности
Максимум: 25600
ISO
Видеофрагменты
Отключить
ISO авто
Максимум 25600
Интервальная
Отключено
a ISO авто
Максимум 12800
съемка
Цифровой IS
Отключить
для видео
Съемка с дис-
танционным
Запрещено
управлением
78

3
Отображение сетки в видоискателе
Отображение сетки в видоискателе помогает проверить наклон
камеры или сгладить снимок.
Выберите [Отображение
1
в видоискателе].
На вкладке [52] выберите пункт
[Отображение в видоискателе],
затем нажмите кнопку <0>.
Выберите пункт [Отображение
2
сетки].
Выберите пункт [Показать].
3
При выходе из меню сетка отобра-
зится в видоискателе.
79
Отобразить сетку на ЖК-экране можно при съемке в режиме Live View
и перед началом видеосъемки (стр. 302, 377).
Если значение параметра [52: Отображение в видоискателе]
отличается от значения по умолчанию, справа от [52: Отображение
в видоискателе] отображается звездочка «*».
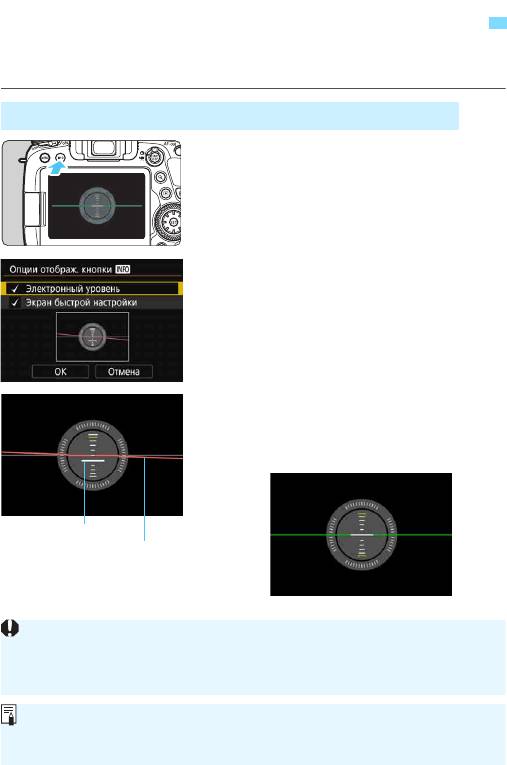
3
Отображение электронного уровня
Для корректировки наклона камеры можно вывести электронный
уровень на ЖК-экран и в видоискатель.
Отображение электронного уровня на ЖК-экране
Нажмите кнопку <B>.
1
При каждом нажатии кнопки <
B
>
вид экрана изменяется.
Отобразите электронный уровень.
Если электронный уровень не отоб-
ражается, включите отображение
электронного уровня в пункте
[54: Опции отображ. кнопки z]
(стр. 84).
Проверьте угол наклона камеры.
2
Наклон по горизонтальной и вертикаль-
ной осям отображается с шагом 1°.
Изменение цвета линии с красного
на зеленый обозначает, что угол
наклона почти скорректирован.
80
По вертикали
По горизонтали
Даже при скорректированном наклоне допустимый предел погреш-
ности составляет примерно ±1°.
Если камера сильно наклонена, допустимый предел погрешности
электронного уровня будет больше.
Во время съемки в режиме Live View и до начала видеосъемки можно
отображать электронный уровень, как описано выше (за исключением
режима u+Слежение).
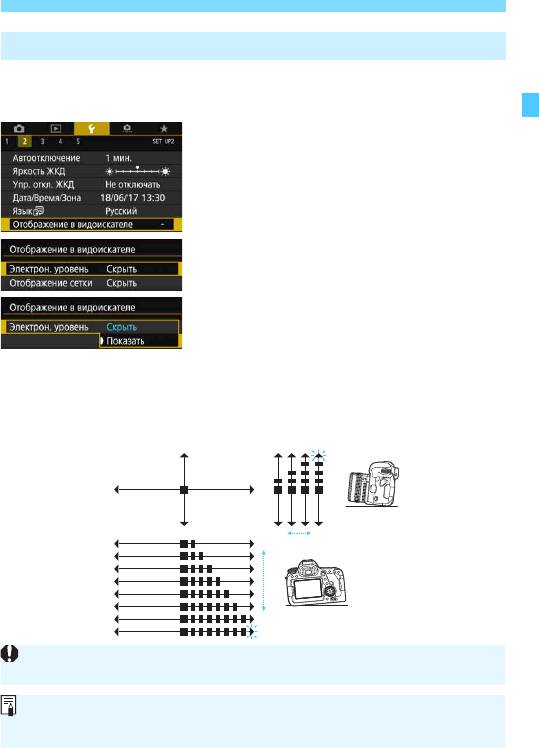
3 Отображение электронного уровня
3
Отображение электронного уровня в видоискателе
Можно отобразить электронный уровень в верхней части видо-
искателя. Так как этот индикатор отображается во время съемки,
можно снимать изображения, контролируя наклон.
Выберите [Отображение
1
в видоискателе].
На вкладке [52] выберите пункт
[Отображение в видоискателе],
затем нажмите кнопку <0>.
Выберите пункт [Электрон. уровень].
2
Выберите пункт [Показать].
3
Нажмите кнопку спуска затвора
4
наполовину.
Можно отображать электронный уровень
в верхней части видоискателя.
Этот уровень также работает при
вертикальной съемке.
1°
4°
и более
1°
7°
7,5°
и более
81
Даже при скорректированном наклоне допустимый предел погрешности
составляет примерно ±1°.
Если значение параметра [52: Отображение в видоискателе] отлича-
ется от значения по умолчанию, справа от [52: Отображение в видо-
искателе] отображается звездочка «*».
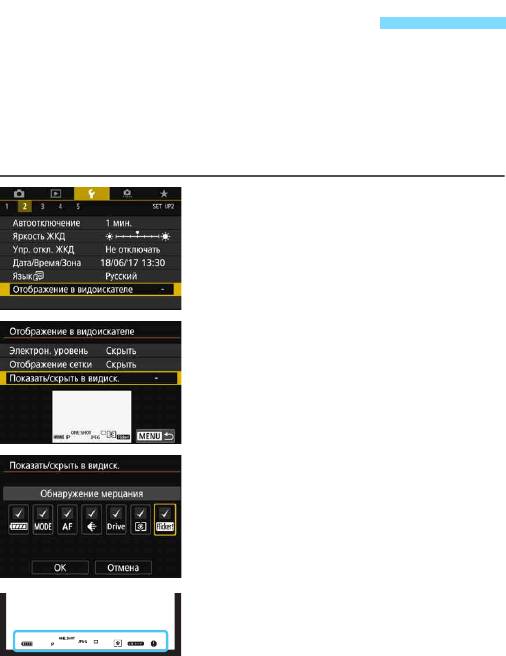
3
Настройка отображения
информации в видоискателеN
В видоискателе могут отображаться настройки функции съемки
(уровень заряда аккумулятора, режим съемки, режим AF, качество
изображения (тип изображения), режим работы затвора, режим
замера, обнаружение мерцания).
По умолчанию флажком [
X
] отмечено только обнаружение мерцания.
Выберите [Отображение
1
в видоискателе].
На вкладке [52] выберите пункт
[Отображение в видоискателе],
затем нажмите кнопку <0>.
Выберите [Показать/скрыть
2
ввидоиск.].
Отметьте флажками [X]
3
информацию, которая
должна отображаться.
Выберите информацию для отобра-
жения и кнопкой <0> установите
флажок [X].
Повторяйте процедуру, чтобы
установить флажки [X] для всей
информации, которую требуется
отображать. Затем выберите [OK].
При выходе из меню выбранная
информация отображается в видо-
искателе (стр. 31).
82

3 Настройка отображения информации в видоискателеN
83
Если в камере не установлена карта памяти, качество записи изобра-
жений (тип изображения: JPEG/RAW) не отображается.
Независимо от установленных флажков, соответствующая информа
—
ция отображается в видоискателе в следующих случаях: при измене—
нии режима съемки, при нажатии кнопки <f>, <R> или <q>,
при использовании переключателя режима фокусировки объектива
и в случае, когда используется объектив с функцией электронной
ручной фокусировки и при повороте кольца фокусировки объектива
происходит переключение между режимами AF и MF (стр. 155).
Даже если пункт [Батарея] не отмечен, при низком уровне заряда
аккумулятора в видоискателе отображается значок контроля заряда
аккумулятора ( / ).
Если значение параметра [52: Отображение в видоискателе]
отличается от значения по умолчанию, справа от [52: Отображение
в видоискателе] отображается звездочка «*».
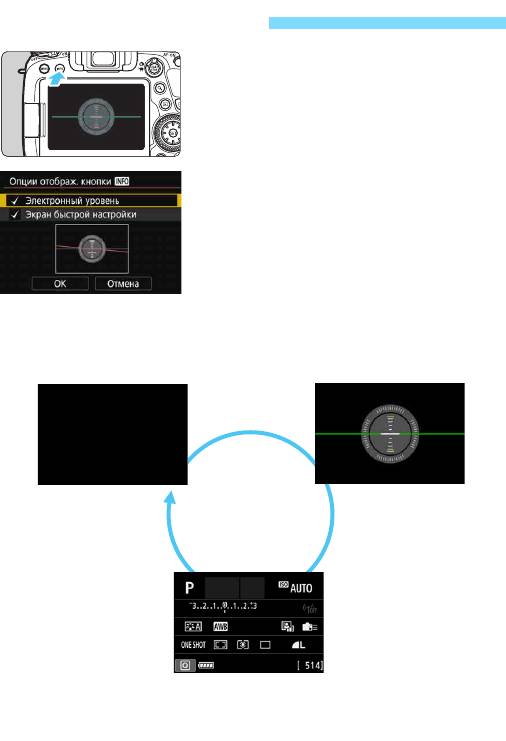
Функции кнопки B
Когда при съемке с видоискателем
камера готова к съемке, кнопкой <
B
>
можно переключать индикацию между
электронным уровнем (стр. 80) и экра-
ном быстрой настройки (стр. 86).
[Опции отображ. кнопки z] на
вкладке [54] позволяют выбрать эле-
менты, отображаемые при нажатии
кнопки <B>.
Выберите требуемую опцию отоб-
ражения, затем нажмите <0> для
добавления флажка [X].
Затем выберите [OK] для регистра-
ции настройки.
84
Электронный уровень
Экран быстрой настройки

Функции кнопки B
85
Если выключить камеру, когда отображается электронный уровень
или экран быстрой настройки, при включении камеры открывается
этот же экран. Для отмены этой функции несколько раз нажмите
кнопку <B>, пока экран не станет пустым, затем выключите камеру.
Удалить флажки для обоих пунктов невозможно.
Даже если отключить отображение пункта [Электронный уровень],
для режима съемки Live View и режима видеосъемки он все равно
будет отображаться при нажатии кнопки <B>. Обратите внимание,
что, в зависимости от значения параметра [z5: Метод AF], элек-
тронный уровень может не отображаться.
При нажатии кнопки <Q> включается быстрое управление (стр. 61).
Во время съемки в режиме Live View или видеосъемки пункты, отоб—
ражаемые на вкладке [54], изменяются на [Опции отобр. кнопки z
на ЖКД] (стр. 298).
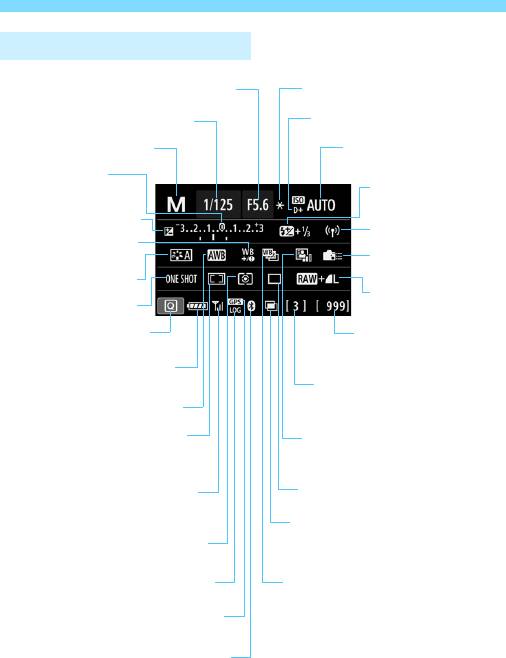
Функции кнопки B
Экран быстрой настройки
*
На экране отображаются только установки, применимые к текущему режиму.
86
Диафрагма
Фиксация AE
Выдержка
Приоритет светов
Режимы съемки
Чувствительность ISO
Индикатор вели-
чины экспозиции
Компенсация
экспозиции вспышки
Компенсация экспозиции
Функция Wi-Fi
Коррекция баланса
Назначение элементов
белого
управления
Стиль изображения
Качество записи
Функция AF
изображений
Значок быстрого
Возможное число
управления
снимков/Автоочистка
Уровень заряда
аккумулятора
Максимальная длина серии/
Оставшееся число мульти-
Баланс белого
экспозиций
Режим выбора области AF/
Auto Lighting Optimizer
выбор точки AF
(Автокоррекция яркости)
Сила сигнала Wi-Fi/состояние
Режим работы затвора
передачи с помощью карты
Eye-Fi
Мультиэкспозиция/HDR/
Шумоподавление при
Режим замера
серийной съемке
Функция записи данных
Брекетинг баланса белого
Состояние приема GPS
Функция Bluetooth
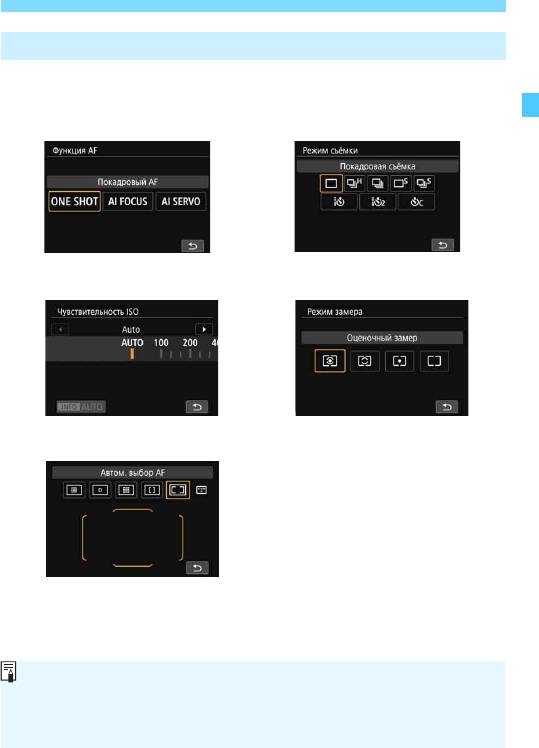
Функции кнопки B
Работа кнопок при открытом экране быстрой настройки
При нажатии кнопки <f>, <R>, <i>, <q>, <S> или <B>
открывается экран настройки, на котором дисками <6>, <5>,
<9> или кнопкой <B> можно задать значение.
87
Функция AF Режим работы затвора
Режим замераЧувствительность ISO
Выбор области AF/точки AF
Если ничего не отображается даже после нажатия кнопки, нажмите
кнопку <B> для отображения электронного уровня или экрана
быстрой настройки. Затем нажмите любую из указанных выше кнопок
для открытия соответствующего экрана.
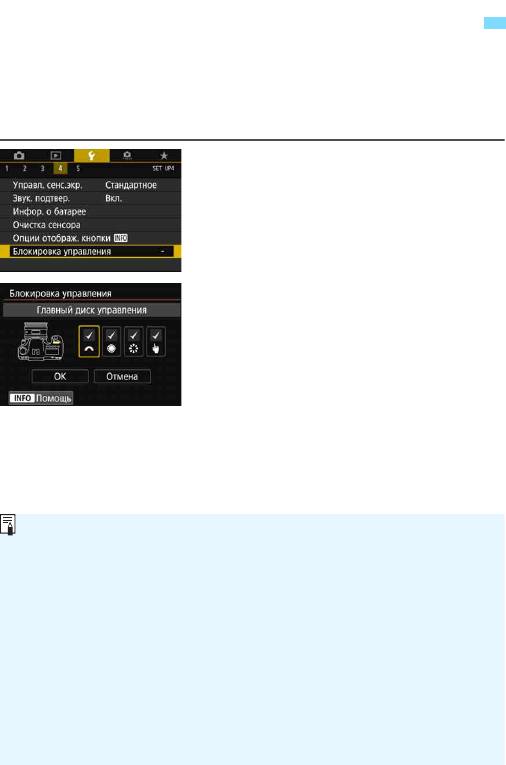
R
Задание блокировки управления
Если сдвинуть переключатель <R> вверх, можно исключить
изменение настроек при случайном использовании главного диска
управления, диска быстрого выбора и джойстика или при случайном
касании сенсорного экрана.
Подробнее о переключателе блокировки управления см. на стр. 59.
Выберите пункт [Блокировка
1
управления].
На вкладке [54] выберите пункт
[Блокировка управления], затем
нажмите кнопку <0>.
Установите флажок [X] у органа
2
управления камеры, который
требуется заблокировать.
Выберите орган управления камеры
и нажмите кнопку <0> для уста-
новки флажка [X].
Выберите [OK].
Когда переключатель <R>
сдвинут вверх, органы управления
камеры, для которых установлен
флажок [X], будут заблокированы.
88
Когда переключатель блокировки <
R
> сдвинут вверх и вы пыта-
етесь использовать одну из заблокированных настроек камеры,
в видоискателе и на ЖК-дисплее отображается значок <L>. На экране
быстрой настройки (стр. 61) отображается значок [LOCK]. Во время
съемки в режиме Live View или видеосъемки на экране съемки отоб—
ражается значок [LOCK].
По умолчанию диск <5> будет заблокирован, когда переключатель
блокировки управления находится в заблокированном положении.
В режимах базовой зоны возможна установка только параметра
[hУправл. сенсорным экраном].
Быстрое управление (стр. 61) можно использовать независимо
от настройки блокировки управления.
Если установлено значение, отличное от значения по умолчанию,
справа от пункта [54: Блокировка управления] отображается
звездочка «*».
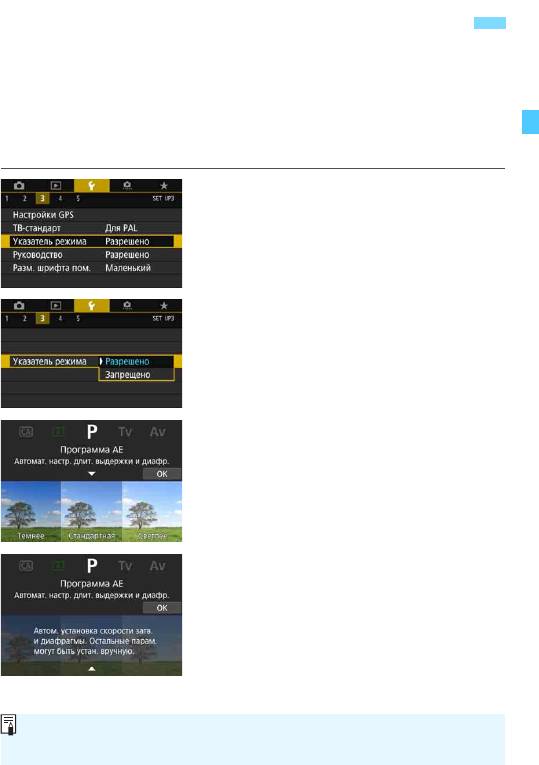
Задание указаний по режимам съемки
При повороте диска установки режима для выбора режима съемки
на экране может отображаться краткое описание режима съемки
(указания по режимам съемки). При съемке с видоискателем указа-
ния по режимам появляются, если отображается экран быстрой
настройки или электронный уровень. По умолчанию задано значение
[Разрешено].
Выберите пункт [Указатель
1
режима].
На вкладке [53] выберите пункт
[
Указатель режима
], затем нажмите
кнопку <0>.
Выберите [Разрешено].
2
Если отображать указания по режи-
мам не требуется, выберите значе-
ние [Запрещено].
Поворачивайте диск установки
3
режима.
Отображается краткое описание
выбранного режима съемки.
Нажмите клавишу <X>.
4
Отображается более подробное
описание.
Чтобы убрать указания по режиму,
нажмите кнопку <0> или наполо-
вину нажмите кнопку спуска затвора.
89
В режиме <8> нажмите кнопку <0> на шаге 3 или 4, затем выбе-
рите режим съемки.
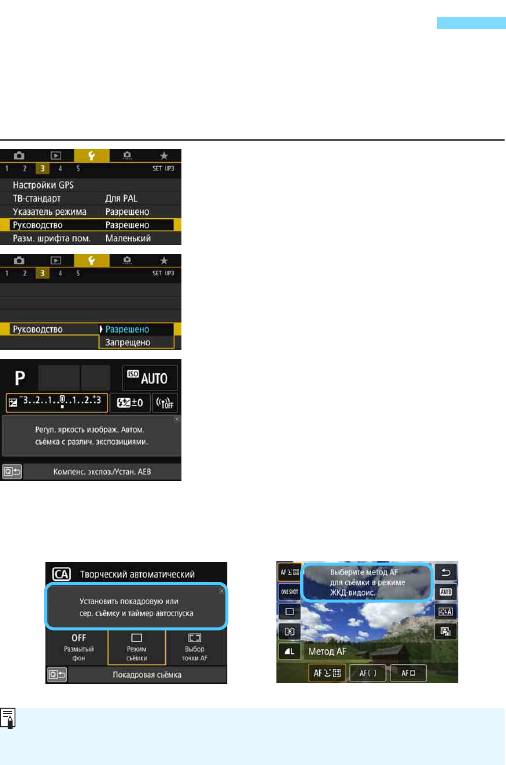
Задание руководства по функциям
При использовании быстрой настройки может отображаться краткое
описание (руководство по функции) для выбранной функции. Руко-
водство по функциям может отображаться при съемке с видоиска-
телем, съемке в режиме Live View или видеосъемке. По умолчанию
задано значение [Разрешено].
Выберите [Руководство].
1
На вкладке [53] выберите пункт
[Руководство], затем нажмите
кнопку <0>.
Выберите [Разрешено].
2
Если отображать руководство по
функциям не требуется, выберите
значение [Запрещено].
Когда камера готова к съемке,
3
нажмите кнопку <Q>.
Закройте меню и нажмите кнопку
<Q>, когда камера будет готова
ксъемке.
При нажатии <
9
> для выбора пункта
после небольшой задержки отобража-
ется руководство по функциям.
90
Съемка в режиме Live View/
Съемка с видоискателем
видеосъемка
Для некоторых функций руководство по функциям отображается
также и на дополнительном экране.
Чтобы закрыть руководство по функциям, коснитесь его.
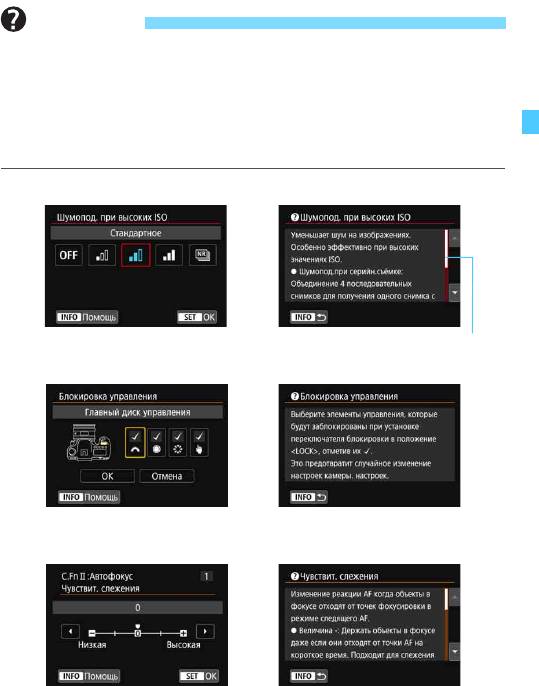
Помощь
При наличии в нижней части экрана меню пункта [zПомощь]
можно вывести на экран описание функции (справка). Для отобра-
жения справки нажмите кнопку <B>. Снова нажмите эту кнопку,
чтобы выключить справку. Если справка приведена на двух или более
экранах, справа появится полоса прокрутки. В таком случае для
прокрутки нажимайте кнопки <W> <X> или поворачивайте диск <5>.
Пример: [z3: Шумопод. при высоких ISO]
Пример: [54: Блокировка управления]
Пример: [8C.Fn II-1: Чувствит. слежения]
91
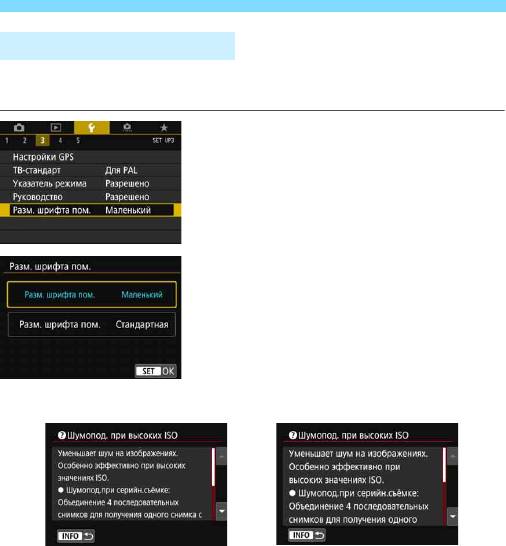
Помощь
Размер шрифта помощи
Можно выбрать размер текста для отображения помощи. По умолча-
нию задано значение [Маленький].
Выберите [Разм. шрифта пом.].
1
На вкладке [53] выберите пункт
[Разм. шрифта пом.] и нажмите
кнопку <0>.
Задайте размер текста.
2
Выберите [Маленький] или
[Стандартная], затем нажмите
кнопку <0>.
Пример: [z3: Шумопод. при высоких ISO]
92
Размер текста: Маленький
Размер текста: Стандартная
Оглавление
Аннотация для Зеркального Фотоаппарата Canon EOS 6D Mark II в формате PDF
Топ 10 инструкций
Другие инструкции
Языки:

Canon EOS 6D Mark II инструкция по эксплуатации
(610 страниц)
- Языки:Русский
-
Тип:
PDF -
Размер:
11.04 MB -
Описание:
This document contains instructions on how to use your product.
Просмотр

Canon EOS 6D Mark II инструкция по эксплуатации
(183 страницы)
- Языки:Русский
-
Тип:
PDF -
Размер:
29.59 MB -
Описание:
This document contains instructions on how to use Digital Photo Professional software.
Просмотр

Canon EOS 6D Mark II инструкция по эксплуатации
(121 страница)
- Языки:Русский
-
Тип:
PDF -
Размер:
15.27 MB -
Описание:
This document contains instructions on how to use EOS Utility software.
Просмотр

Canon EOS 6D Mark II инструкция по эксплуатации
(170 страниц)
- Языки:Русский
-
Тип:
PDF -
Размер:
2.26 MB -
Описание:
This document contains instructions on how to use the Wi-Fi functionality for your product.
Просмотр

Canon EOS 6D Mark II инструкция по эксплуатации
(610 страниц)
- Языки:Русский
-
Тип:
PDF -
Размер:
10.84 MB -
Описание:
This document contains instructions on how to use your product.
Просмотр

Canon EOS 6D Mark II инструкция по эксплуатации
(22 страницы)
- Языки:Русский
-
Тип:
PDF -
Размер:
1.7 MB -
Описание:
This document contains instructions on how to use your product. It corresponds to version 1.8 of the software.
Просмотр

Canon EOS 6D Mark II инструкция по эксплуатации
(100 страниц)
- Языки:Русский
-
Тип:
PDF -
Размер:
11.06 MB -
Описание:
This document contains instructions on how to use your product. It corresponds to version 3.8 of the software.
Просмотр

Canon EOS 6D Mark II инструкция по эксплуатации
(29 страниц)
- Языки:Русский
-
Тип:
PDF -
Размер:
3.11 MB -
Описание:
This document contains instructions on how to use your product. It corresponds to version 1.7 of the software.
Просмотр

Canon EOS 6D Mark II инструкция по эксплуатации
(149 страниц)
- Языки:Русский
-
Тип:
PDF -
Размер:
28.04 MB -
Описание:
This document contains instructions on how to use your product. It corresponds to version 4.8 of the software.
Просмотр

Canon EOS 6D Mark II инструкция по эксплуатации
(183 страницы)
- Языки:Английский
-
Тип:
PDF -
Размер:
29.53 MB -
Описание:
This document contains instructions on how to use Digital Photo Professional software.
Просмотр

Canon EOS 6D Mark II инструкция по эксплуатации
(121 страница)
- Языки:Английский
-
Тип:
PDF -
Размер:
12.13 MB -
Описание:
This document contains instructions on how to use EOS Utility software.
Просмотр

Canon EOS 6D Mark II инструкция по эксплуатации
(170 страниц)
- Языки:Английский
-
Тип:
PDF -
Размер:
3.28 MB -
Описание:
This document contains instructions on how to use the Wi-Fi functionality for your product.
Просмотр

Canon EOS 6D Mark II инструкция по эксплуатации
(29 страниц)
- Языки:Английский
-
Тип:
PDF -
Размер:
3.67 MB -
Описание:
This document contains instructions on how to use your product. It corresponds to version 1.7 of the software.
Просмотр

Canon EOS 6D Mark II инструкция по эксплуатации
(100 страниц)
- Языки:Английский
-
Тип:
PDF -
Размер:
12.08 MB -
Описание:
This document contains instructions on how to use your product. It corresponds to version 3.8 of the software.
Просмотр

Canon EOS 6D Mark II инструкция по эксплуатации
(149 страниц)
- Языки:Английский
-
Тип:
PDF -
Размер:
31.71 MB -
Описание:
This document contains instructions on how to use your product. It corresponds to version 4.8 of the software.
Просмотр

Canon EOS 6D Mark II инструкция по эксплуатации
(183 страницы)
- Языки:Украинский
-
Тип:
PDF -
Размер:
29.85 MB -
Описание:
This document contains instructions on how to use Digital Photo Professional software.
Просмотр

Canon EOS 6D Mark II инструкция по эксплуатации
(183 страницы)
- Языки:Шведский
-
Тип:
PDF -
Размер:
29.67 MB -
Описание:
This document contains instructions on how to use Digital Photo Professional software.
Просмотр

Canon EOS 6D Mark II инструкция по эксплуатации
(183 страницы)
- Языки:Финский
-
Тип:
PDF -
Размер:
29.67 MB -
Описание:
This document contains instructions on how to use Digital Photo Professional software.
Просмотр

Canon EOS 6D Mark II инструкция по эксплуатации
(183 страницы)
- Языки:Словацкий
-
Тип:
PDF -
Размер:
29.93 MB -
Описание:
This document contains instructions on how to use Digital Photo Professional software.
Просмотр

Canon EOS 6D Mark II инструкция по эксплуатации
(121 страница)
- Языки:Словацкий
-
Тип:
PDF -
Размер:
13.69 MB -
Описание:
This document contains instructions on how to use EOS Utility software.
Просмотр

Canon EOS 6D Mark II инструкция по эксплуатации
(183 страницы)
- Языки:Португальский
-
Тип:
PDF -
Размер:
29.73 MB -
Описание:
This document contains instructions on how to use Digital Photo Professional software.
Просмотр

Canon EOS 6D Mark II инструкция по эксплуатации
(121 страница)
- Языки:Португальский
-
Тип:
PDF -
Размер:
13.58 MB -
Описание:
This document contains instructions on how to use EOS Utility software.
Просмотр

Canon EOS 6D Mark II инструкция по эксплуатации
(183 страницы)
- Языки:Нидерландский
-
Тип:
PDF -
Размер:
29.74 MB -
Описание:
This document contains instructions on how to use Digital Photo Professional software.
Просмотр

Canon EOS 6D Mark II инструкция по эксплуатации
(121 страница)
- Языки:Нидерландский
-
Тип:
PDF -
Размер:
13.61 MB -
Описание:
This document contains instructions on how to use your product. It corresponds to version 3.6 of the software.
Просмотр

Canon EOS 6D Mark II инструкция по эксплуатации
(183 страницы)
- Языки:Венгерский
-
Тип:
PDF -
Размер:
29.84 MB -
Описание:
This document contains instructions on how to use Digital Photo Professional software.
Просмотр

Canon EOS 6D Mark II инструкция по эксплуатации
(121 страница)
- Языки:Венгерский
-
Тип:
PDF -
Размер:
12.31 MB -
Описание:
This document contains instructions on how to use EOS Utility software.
Просмотр

Canon EOS 6D Mark II инструкция по эксплуатации
(183 страницы)
- Языки:Казахский
-
Тип:
PDF -
Размер:
29.77 MB -
Описание:
This document contains instructions on how to use Digital Photo Professional software.
Просмотр

Canon EOS 6D Mark II инструкция по эксплуатации
(121 страница)
- Языки:Казахский
-
Тип:
PDF -
Размер:
14.88 MB -
Описание:
This document contains instructions on how to use EOS Utility software.
Просмотр

Canon EOS 6D Mark II инструкция по эксплуатации
(183 страницы)
- Языки:Итальянский
-
Тип:
PDF -
Размер:
53.89 MB -
Описание:
This document contains instructions on how to use Digital Photo Professional software.
Просмотр

Canon EOS 6D Mark II инструкция по эксплуатации
(121 страница)
- Языки:Итальянский
-
Тип:
PDF -
Размер:
13.67 MB -
Описание:
This document contains instructions on how to use EOS Utility software.
Просмотр

Canon EOS 6D Mark II инструкция по эксплуатации
(183 страницы)
- Языки:Французский
-
Тип:
PDF -
Размер:
28.44 MB -
Описание:
This document contains instructions on how to use Digital Photo Professional software.
Просмотр

Canon EOS 6D Mark II инструкция по эксплуатации
(121 страница)
- Языки:Французский
-
Тип:
PDF -
Размер:
13.58 MB -
Описание:
This document contains instructions on how to use EOS Utility software.
Просмотр

Canon EOS 6D Mark II инструкция по эксплуатации
(183 страницы)
- Языки:Испанский
-
Тип:
PDF -
Размер:
26.77 MB -
Описание:
This document contains instructions on how to use Digital Photo Professional software.
Просмотр

Canon EOS 6D Mark II инструкция по эксплуатации
(121 страница)
- Языки:Испанский
-
Тип:
PDF -
Размер:
12.44 MB -
Описание:
This document contains instructions on how to use EOS Utility software.
Просмотр

Canon EOS 6D Mark II инструкция по эксплуатации
(183 страницы)
- Языки:Эстонский
-
Тип:
PDF -
Размер:
30.13 MB -
Описание:
This document contains instructions on how to use Digital Photo Professional software.
Просмотр

Canon EOS 6D Mark II инструкция по эксплуатации
(121 страница)
- Языки:Эстонский
-
Тип:
PDF -
Размер:
14.84 MB -
Описание:
This document contains instructions on how to use EOS Utility software.
Просмотр

Canon EOS 6D Mark II инструкция по эксплуатации
(183 страницы)
- Языки:Греческий
-
Тип:
PDF -
Размер:
30.28 MB -
Описание:
This document contains instructions on how to use Digital Photo Professional software.
Просмотр

Canon EOS 6D Mark II инструкция по эксплуатации
(121 страница)
- Языки:Греческий
-
Тип:
PDF -
Размер:
12.64 MB -
Описание:
This document contains instructions on how to use EOS Utility software.
Просмотр

Canon EOS 6D Mark II инструкция по эксплуатации
(183 страницы)
- Языки:Немецкий
-
Тип:
PDF -
Размер:
51.58 MB -
Описание:
This document contains instructions on how to use Digital Photo Professional software.
Просмотр

Canon EOS 6D Mark II инструкция по эксплуатации
(121 страница)
- Языки:Немецкий
-
Тип:
PDF -
Размер:
12.61 MB -
Описание:
This document contains instructions on how to use EOS Utility software.
Просмотр

Canon EOS 6D Mark II инструкция по эксплуатации
(183 страницы)
- Языки:Датский
-
Тип:
PDF -
Размер:
29.64 MB -
Описание:
This document contains instructions on how to use Digital Photo Professional software.
Просмотр

Canon EOS 6D Mark II инструкция по эксплуатации
(183 страницы)
- Языки:Чешский
-
Тип:
PDF -
Размер:
29.85 MB -
Описание:
This document contains instructions on how to use Digital Photo Professional software.
Просмотр

Canon EOS 6D Mark II инструкция по эксплуатации
(121 страница)
- Языки:Чешский
-
Тип:
PDF -
Размер:
12.31 MB -
Описание:
This document contains instructions on how to use EOS Utility software.
Просмотр

Canon EOS 6D Mark II инструкция по эксплуатации
(609 страниц)
- Языки:Турецкий
-
Тип:
PDF -
Размер:
39.28 MB -
Описание:
This document contains instructions on how to use your product.
Просмотр

Canon EOS 6D Mark II инструкция по эксплуатации
(610 страниц)
- Языки:Шведский
-
Тип:
PDF -
Размер:
9.78 MB -
Описание:
This document contains instructions on how to use your product.
Просмотр

Canon EOS 6D Mark II инструкция по эксплуатации
(610 страниц)
- Языки:Финский
-
Тип:
PDF -
Размер:
9.8 MB -
Описание:
This document contains instructions on how to use your product.
Просмотр

Canon EOS 6D Mark II инструкция по эксплуатации
(170 страниц)
- Языки:Словацкий
-
Тип:
PDF -
Размер:
3.54 MB -
Описание:
This document contains instructions on how to use the Wi-Fi functionality for your product.
Просмотр

Canon EOS 6D Mark II инструкция по эксплуатации
(170 страниц)
- Языки:Португальский
-
Тип:
PDF -
Размер:
3.53 MB -
Описание:
This document contains instructions on how to use the Wi-Fi functionality for your product.
Просмотр

Canon EOS 6D Mark II инструкция по эксплуатации
(610 страниц)
- Языки:Португальский
-
Тип:
PDF -
Размер:
9.91 MB -
Описание:
This document contains instructions on how to use your product.
Просмотр

Canon EOS 6D Mark II инструкция по эксплуатации
(170 страниц)
- Языки:Нидерландский
-
Тип:
PDF -
Размер:
3.79 MB -
Описание:
This document contains instructions on how to use the Wi-Fi functionality for your product.
Просмотр

Canon EOS 6D Mark II инструкция по эксплуатации
(610 страниц)
- Языки:Нидерландский
-
Тип:
PDF -
Размер:
9.88 MB -
Описание:
This document contains instructions on how to use your product.
Просмотр

Canon EOS 6D Mark II инструкция по эксплуатации
(170 страниц)
- Языки:Венгерский
-
Тип:
PDF -
Размер:
3.59 MB -
Описание:
This document contains instructions on how to use the Wi-Fi functionality for your product.
Просмотр

Canon EOS 6D Mark II инструкция по эксплуатации
(610 страниц)
- Языки:Венгерский
-
Тип:
PDF -
Размер:
10.25 MB -
Описание:
This document contains instructions on how to use your product.
Просмотр

Canon EOS 6D Mark II инструкция по эксплуатации
(170 страниц)
- Языки:Латышский
-
Тип:
PDF -
Размер:
3.53 MB -
Описание:
This document contains instructions on how to use the Wi-Fi functionality for your product.
Просмотр

Canon EOS 6D Mark II инструкция по эксплуатации
(170 страниц)
- Языки:Казахский
-
Тип:
PDF -
Размер:
3.64 MB -
Описание:
This document contains instructions on how to use the Wi-Fi functionality for your product.
Просмотр

Canon EOS 6D Mark II инструкция по эксплуатации
(610 страниц)
- Языки:Казахский
-
Тип:
PDF -
Размер:
11.92 MB -
Описание:
This document contains instructions on how to use your product.
Просмотр

Canon EOS 6D Mark II инструкция по эксплуатации
(170 страниц)
- Языки:Итальянский
-
Тип:
PDF -
Размер:
3.79 MB -
Описание:
This document contains instructions on how to use the Wi-Fi functionality for your product.
Просмотр

Canon EOS 6D Mark II инструкция по эксплуатации
(610 страниц)
- Языки:Итальянский
-
Тип:
PDF -
Размер:
9.93 MB -
Описание:
This document contains instructions on how to use your product.
Просмотр

Canon EOS 6D Mark II инструкция по эксплуатации
(610 страниц)
- Языки:Французский
-
Тип:
PDF -
Размер:
16.51 MB -
Описание:
This document contains instructions on how to use your product.
Просмотр

Canon EOS 6D Mark II инструкция по эксплуатации
(170 страниц)
- Языки:Испанский
-
Тип:
PDF -
Размер:
3.55 MB -
Описание:
This document contains instructions on how to use the Wi-Fi functionality for your product.
Просмотр

Canon EOS 6D Mark II инструкция по эксплуатации
(610 страниц)
- Языки:Испанский
-
Тип:
PDF -
Размер:
16.28 MB -
Описание:
This document contains instructions on how to use your product.
Просмотр

Canon EOS 6D Mark II инструкция по эксплуатации
(610 страниц)
- Языки:Эстонский
-
Тип:
PDF -
Размер:
10.96 MB -
Описание:
This document contains instructions on how to use your product.
Просмотр

Canon EOS 6D Mark II инструкция по эксплуатации
(170 страниц)
- Языки:Немецкий
-
Тип:
PDF -
Размер:
3.67 MB -
Описание:
This document contains instructions on how to use the Wi-Fi functionality for your product.
Просмотр

Canon EOS 6D Mark II инструкция по эксплуатации
(610 страниц)
- Языки:Немецкий
-
Тип:
PDF -
Размер:
9.94 MB -
Описание:
This document contains instructions on how to use your product.
Просмотр

Canon EOS 6D Mark II инструкция по эксплуатации
(170 страниц)
- Языки:Датский
-
Тип:
PDF -
Размер:
3.49 MB -
Описание:
This document contains instructions on how to use the Wi-Fi functionality for your product.
Просмотр

Canon EOS 6D Mark II инструкция по эксплуатации
(610 страниц)
- Языки:Датский
-
Тип:
PDF -
Размер:
9.77 MB -
Описание:
This document contains instructions on how to use your product.
Просмотр

Canon EOS 6D Mark II инструкция по эксплуатации
(610 страниц)
- Языки:Чешский
-
Тип:
PDF -
Размер:
10.41 MB -
Описание:
This document contains instructions on how to use your product.
Просмотр

Canon EOS 6D Mark II инструкция по эксплуатации
(22 страницы)
- Языки:Финский
-
Тип:
PDF -
Размер:
1.89 MB -
Описание:
This document contains instructions on how to use your product. It corresponds to version 1.8 of the software.
Просмотр

Canon EOS 6D Mark II инструкция по эксплуатации
(22 страницы)
- Языки:Португальский
-
Тип:
PDF -
Размер:
1.89 MB -
Описание:
This document contains instructions on how to use your product. It corresponds to version 1.8 of the software.
Просмотр

Canon EOS 6D Mark II инструкция по эксплуатации
(22 страницы)
- Языки:Латышский
-
Тип:
PDF -
Размер:
1.66 MB -
Описание:
This document contains instructions on how to use your product. It corresponds to version 1.8 of the software.
Просмотр

Canon EOS 6D Mark II инструкция по эксплуатации
(22 страницы)
- Языки:Итальянский
-
Тип:
PDF -
Размер:
2.25 MB -
Описание:
This document contains instructions on how to use your product. It corresponds to version 1.8 of the software.
Просмотр

Canon EOS 6D Mark II инструкция по эксплуатации
(22 страницы)
- Языки:Французский
-
Тип:
PDF -
Размер:
2.4 MB -
Описание:
This document contains instructions on how to use your product. It corresponds to version 1.8 of the software.
Просмотр

Canon EOS 6D Mark II инструкция по эксплуатации
(22 страницы)
- Языки:Испанский
-
Тип:
PDF -
Размер:
2.07 MB -
Описание:
This document contains instructions on how to use your product. It corresponds to version 1.8 of the software.
Просмотр

Canon EOS 6D Mark II инструкция по эксплуатации
(22 страницы)
- Языки:Немецкий
-
Тип:
PDF -
Размер:
2.27 MB -
Описание:
This document contains instructions on how to use your product. It corresponds to version 1.8 of the software.
Просмотр

Canon EOS 6D Mark II инструкция по эксплуатации
(22 страницы)
- Языки:Датский
-
Тип:
PDF -
Размер:
1.89 MB -
Описание:
This document contains instructions on how to use your product. It corresponds to version 1.8 of the software.
Просмотр

Canon EOS 6D Mark II инструкция по эксплуатации
(22 страницы)
- Языки:Чешский
-
Тип:
PDF -
Размер:
1.93 MB -
Описание:
This document contains instructions on how to use your product. It corresponds to version 1.8 of the software.
Просмотр

Canon EOS 6D Mark II инструкция по эксплуатации
(100 страниц)
- Языки:Украинский
-
Тип:
PDF -
Размер:
10.88 MB -
Описание:
This document contains instructions on how to use your product. It corresponds to version 3.8 of the software.
Просмотр

Canon EOS 6D Mark II инструкция по эксплуатации
(149 страниц)
- Языки:Украинский
-
Тип:
PDF -
Размер:
27.92 MB -
Описание:
This document contains instructions on how to use your product. It corresponds to version 4.8 of the software.
Просмотр

Canon EOS 6D Mark II инструкция по эксплуатации
(100 страниц)
- Языки:Шведский
-
Тип:
PDF -
Размер:
11.66 MB -
Описание:
This document contains instructions on how to use your product. It corresponds to version 3.8 of the software.
Просмотр

Canon EOS 6D Mark II инструкция по эксплуатации
(29 страниц)
- Языки:Шведский
-
Тип:
PDF -
Размер:
3.04 MB -
Описание:
This document contains instructions on how to use your product. It corresponds to version 1.7 of the software.
Просмотр

Canon EOS 6D Mark II инструкция по эксплуатации
(149 страниц)
- Языки:Шведский
-
Тип:
PDF -
Размер:
31.77 MB -
Описание:
This document contains instructions on how to use your product. It corresponds to version 4.8 of the software.
Просмотр

Canon EOS 6D Mark II инструкция по эксплуатации
(29 страниц)
- Языки:Финский
-
Тип:
PDF -
Размер:
3.04 MB -
Описание:
This document contains instructions on how to use your product. It corresponds to version 1.7 of the software.
Просмотр

Canon EOS 6D Mark II инструкция по эксплуатации
(100 страниц)
- Языки:Финский
-
Тип:
PDF -
Размер:
11.66 MB -
Описание:
This document contains instructions on how to use your product. It corresponds to version 3.8 of the software.
Просмотр

Canon EOS 6D Mark II инструкция по эксплуатации
(149 страниц)
- Языки:Финский
-
Тип:
PDF -
Размер:
32.12 MB -
Описание:
This document contains instructions on how to use your product. It corresponds to version 4.8 of the software.
Просмотр

Canon EOS 6D Mark II инструкция по эксплуатации
(29 страниц)
- Языки:Словацкий
-
Тип:
PDF -
Размер:
3.09 MB -
Описание:
This document contains instructions on how to use your product. It corresponds to version 1.7 of the software.
Просмотр

Canon EOS 6D Mark II инструкция по эксплуатации
(100 страниц)
- Языки:Словацкий
-
Тип:
PDF -
Размер:
11.72 MB -
Описание:
This document contains instructions on how to use your product. It corresponds to version 3.8 of the software.
Просмотр

Canon EOS 6D Mark II инструкция по эксплуатации
(100 страниц)
- Языки:Португальский
-
Тип:
PDF -
Размер:
11.91 MB -
Описание:
This document contains instructions on how to use your product. It corresponds to version 3.8 of the software.
Просмотр

Canon EOS 6D Mark II инструкция по эксплуатации
(29 страниц)
- Языки:Португальский
-
Тип:
PDF -
Размер:
3.06 MB -
Описание:
This document contains instructions on how to use your product. It corresponds to version 1.7 of the software.
Просмотр

Canon EOS 6D Mark II инструкция по эксплуатации
(149 страниц)
- Языки:Португальский
-
Тип:
PDF -
Размер:
32 MB -
Описание:
This document contains instructions on how to use your product. It corresponds to version 4.8 of the software.
Просмотр

Canon EOS 6D Mark II инструкция по эксплуатации
(100 страниц)
- Языки:Польский
-
Тип:
PDF -
Размер:
11.79 MB -
Описание:
This document contains instructions on how to use your product. It corresponds to version 3.8 of the software.
Просмотр

Canon EOS 6D Mark II инструкция по эксплуатации
(29 страниц)
- Языки:Нидерландский
-
Тип:
PDF -
Размер:
3.05 MB -
Описание:
This document contains instructions on how to use your product. It corresponds to version 1.7 of the software.
Просмотр

Canon EOS 6D Mark II инструкция по эксплуатации
(100 страниц)
- Языки:Нидерландский
-
Тип:
PDF -
Размер:
11.61 MB -
Описание:
This document contains instructions on how to use your product. It corresponds to version 3.8 of the software.
Просмотр

Canon EOS 6D Mark II инструкция по эксплуатации
(149 страниц)
- Языки:Нидерландский
-
Тип:
PDF -
Размер:
31.77 MB -
Описание:
This document contains instructions on how to use your product. It corresponds to version 4.8 of the software.
Просмотр

Canon EOS 6D Mark II инструкция по эксплуатации
(100 страниц)
- Языки:Венгерский
-
Тип:
PDF -
Размер:
11.69 MB -
Описание:
This document contains instructions on how to use your product. It corresponds to version 3.8 of the software.
Просмотр

Canon EOS 6D Mark II инструкция по эксплуатации
(29 страниц)
- Языки:Венгерский
-
Тип:
PDF -
Размер:
3.08 MB -
Описание:
This document contains instructions on how to use your product. It corresponds to version 1.7 of the software.
Просмотр

Canon EOS 6D Mark II инструкция по эксплуатации
(149 страниц)
- Языки:Венгерский
-
Тип:
PDF -
Размер:
32.35 MB -
Описание:
This document contains instructions on how to use your product. It corresponds to version 4.8 of the software.
Просмотр

Canon EOS 6D Mark II инструкция по эксплуатации
(100 страниц)
- Языки:Литовский
-
Тип:
PDF -
Размер:
10.74 MB -
Описание:
This document contains instructions on how to use your product. It corresponds to version 3.8 of the software.
Просмотр

Canon EOS 6D Mark II инструкция по эксплуатации
(29 страниц)
- Языки:Литовский
-
Тип:
PDF -
Размер:
3.09 MB -
Описание:
This document contains instructions on how to use your product. It corresponds to version 1.7 of the software.
Просмотр

Canon EOS 6D Mark II инструкция по эксплуатации
(149 страниц)
- Языки:Литовский
-
Тип:
PDF -
Размер:
27.72 MB -
Описание:
This document contains instructions on how to use your product. It corresponds to version 4.8 of the software.
Просмотр

Canon EOS 6D Mark II инструкция по эксплуатации
(29 страниц)
- Языки:Латышский
-
Тип:
PDF -
Размер:
3.07 MB -
Описание:
This document contains instructions on how to use your product. It corresponds to version 1.7 of the software.
Просмотр

Canon EOS 6D Mark II инструкция по эксплуатации
(100 страниц)
- Языки:Латышский
-
Тип:
PDF -
Размер:
10.78 MB -
Описание:
This document contains instructions on how to use your product. It corresponds to version 3.8 of the software.
Просмотр

Canon EOS 6D Mark II инструкция по эксплуатации
(149 страниц)
- Языки:Латышский
-
Тип:
PDF -
Размер:
27.69 MB -
Описание:
This document contains instructions on how to use your product. It corresponds to version 4.8 of the software.
Просмотр

Canon EOS 6D Mark II инструкция по эксплуатации
(100 страниц)
- Языки:Казахский
-
Тип:
PDF -
Размер:
10.86 MB -
Описание:
This document contains instructions on how to use your product. It corresponds to version 3.8 of the software.
Просмотр

Canon EOS 6D Mark II инструкция по эксплуатации
(29 страниц)
- Языки:Казахский
-
Тип:
PDF -
Размер:
3.11 MB -
Описание:
This document contains instructions on how to use your product. It corresponds to version 1.7 of the software.
Просмотр

Canon EOS 6D Mark II инструкция по эксплуатации
(149 страниц)
- Языки:Казахский
-
Тип:
PDF -
Размер:
27.8 MB -
Описание:
This document contains instructions on how to use your product. It corresponds to version 4.8 of the software.
Просмотр

Canon EOS 6D Mark II инструкция по эксплуатации
(100 страниц)
- Языки:Итальянский
-
Тип:
PDF -
Размер:
11.84 MB -
Описание:
This document contains instructions on how to use your product. It corresponds to version 3.8 of the software.
Просмотр

Canon EOS 6D Mark II инструкция по эксплуатации
(29 страниц)
- Языки:Итальянский
-
Тип:
PDF -
Размер:
3.04 MB -
Описание:
This document contains instructions on how to use your product. It corresponds to version 1.7 of the software.
Просмотр

Canon EOS 6D Mark II инструкция по эксплуатации
(149 страниц)
- Языки:Итальянский
-
Тип:
PDF -
Размер:
32.62 MB -
Описание:
This document contains instructions on how to use your product. It corresponds to version 4.8 of the software.
Просмотр

Canon EOS 6D Mark II инструкция по эксплуатации
(29 страниц)
- Языки:Французский
-
Тип:
PDF -
Размер:
3.05 MB -
Описание:
This document contains instructions on how to use your product. It corresponds to version 1.7 of the software.
Просмотр

Canon EOS 6D Mark II инструкция по эксплуатации
(100 страниц)
- Языки:Французский
-
Тип:
PDF -
Размер:
12.09 MB -
Описание:
This document contains instructions on how to use your product. It corresponds to version 3.8 of the software.
Просмотр

Canon EOS 6D Mark II инструкция по эксплуатации
(149 страниц)
- Языки:Французский
-
Тип:
PDF -
Размер:
32.03 MB -
Описание:
This document contains instructions on how to use your product. It corresponds to version 4.8 of the software.
Просмотр

Canon EOS 6D Mark II инструкция по эксплуатации
(100 страниц)
- Языки:Испанский
-
Тип:
PDF -
Размер:
12.03 MB -
Описание:
This document contains instructions on how to use your product. It corresponds to version 3.8 of the software.
Просмотр

Canon EOS 6D Mark II инструкция по эксплуатации
(29 страниц)
- Языки:Испанский
-
Тип:
PDF -
Размер:
3.05 MB -
Описание:
This document contains instructions on how to use your product. It corresponds to version 1.7 of the software.
Просмотр

Canon EOS 6D Mark II инструкция по эксплуатации
(149 страниц)
- Языки:Испанский
-
Тип:
PDF -
Размер:
30.77 MB -
Описание:
This document contains instructions on how to use your product. It corresponds to version 4.8 of the software.
Просмотр

Canon EOS 6D Mark II инструкция по эксплуатации
(100 страниц)
- Языки:Эстонский
-
Тип:
PDF -
Размер:
10.6 MB -
Описание:
This document contains instructions on how to use your product. It corresponds to version 3.8 of the software.
Просмотр

Canon EOS 6D Mark II инструкция по эксплуатации
(29 страниц)
- Языки:Эстонский
-
Тип:
PDF -
Размер:
3.01 MB -
Описание:
This document contains instructions on how to use your product. It corresponds to version 1.7 of the software.
Просмотр

Canon EOS 6D Mark II инструкция по эксплуатации
(149 страниц)
- Языки:Эстонский
-
Тип:
PDF -
Размер:
28.41 MB -
Описание:
This document contains instructions on how to use your product. It corresponds to version 4.8 of the software.
Просмотр

Canon EOS 6D Mark II инструкция по эксплуатации
(29 страниц)
- Языки:Греческий
-
Тип:
PDF -
Размер:
3.15 MB -
Описание:
This document contains instructions on how to use your product. It corresponds to version 1.7 of the software.
Просмотр

Canon EOS 6D Mark II инструкция по эксплуатации
(100 страниц)
- Языки:Греческий
-
Тип:
PDF -
Размер:
11.94 MB -
Описание:
This document contains instructions on how to use your product. It corresponds to version 3.8 of the software.
Просмотр

Canon EOS 6D Mark II инструкция по эксплуатации
(149 страниц)
- Языки:Греческий
-
Тип:
PDF -
Размер:
33.13 MB -
Описание:
This document contains instructions on how to use your product. It corresponds to version 4.8 of the software.
Просмотр

Canon EOS 6D Mark II инструкция по эксплуатации
(100 страниц)
- Языки:Немецкий
-
Тип:
PDF -
Размер:
11.81 MB -
Описание:
This document contains instructions on how to use your product. It corresponds to version 3.8 of the software.
Просмотр

Canon EOS 6D Mark II инструкция по эксплуатации
(29 страниц)
- Языки:Немецкий
-
Тип:
PDF -
Размер:
3.06 MB -
Описание:
This document contains instructions on how to use your product. It corresponds to version 1.7 of the software.
Просмотр

Canon EOS 6D Mark II инструкция по эксплуатации
(149 страниц)
- Языки:Немецкий
-
Тип:
PDF -
Размер:
32.48 MB -
Описание:
This document contains instructions on how to use your product. It corresponds to version 4.8 of the software.
Просмотр

Canon EOS 6D Mark II инструкция по эксплуатации
(29 страниц)
- Языки:Датский
-
Тип:
PDF -
Размер:
3.06 MB -
Описание:
This document contains instructions on how to use your product. It corresponds to version 1.7 of the software.
Просмотр

Canon EOS 6D Mark II инструкция по эксплуатации
(100 страниц)
- Языки:Датский
-
Тип:
PDF -
Размер:
11.62 MB -
Описание:
This document contains instructions on how to use your product. It corresponds to version 3.8 of the software.
Просмотр

Canon EOS 6D Mark II инструкция по эксплуатации
(149 страниц)
- Языки:Датский
-
Тип:
PDF -
Размер:
32.04 MB -
Описание:
This document contains instructions on how to use your product. It corresponds to version 4.8 of the software.
Просмотр

Canon EOS 6D Mark II инструкция по эксплуатации
(29 страниц)
- Языки:Чешский
-
Тип:
PDF -
Размер:
3.07 MB -
Описание:
This document contains instructions on how to use your product. It corresponds to version 1.7 of the software.
Просмотр

Canon EOS 6D Mark II инструкция по эксплуатации
(100 страниц)
- Языки:Чешский
-
Тип:
PDF -
Размер:
11.72 MB -
Описание:
This document contains instructions on how to use your product. It corresponds to version 3.8 of the software.
Просмотр

Canon EOS 6D Mark II инструкция по эксплуатации
(149 страниц)
- Языки:Чешский
-
Тип:
PDF -
Размер:
31.87 MB -
Описание:
This document contains instructions on how to use your product. It corresponds to version 4.8 of the software.
Просмотр