Перейти к контенту
![]()
Русские электронные инструкции по эксплуатации
Постоянно обновляемый большой каталог документации по эксплуатации и использованию современных устройств и оборудования на русском языке. Бесплатное скачивание файлов.
Поиск:
Главная
♥ В закладки
Просмотр инструкции в pdf


Инструкция по эксплуатации кофеварки VITEK VT-1517.
Скачать инструкцию к кофеварке VITEK VT-1517 (1,19 МБ)

Инструкции кофеварок VITEK
« Инструкция к кофеварке ILLY Iperespresso Y3.2 Black
» Инструкция к кофеварке Smeg ECF01BLEU
Вам также может быть интересно

Инструкция к кофеварке VITEK VT-1524 GD

Инструкция к соковыжималке VITEK VT-3660

Инструкция к электрогрилю VITEK VT-2634R

Инструкция к кофеварке Vitek VT-1514 BK

Инструкция к миксеру VITEK VT-1406

Инструкция к фену VITEK VT-8220

Инструкция к метеостанции VITEK VT-3532 BK

Инструкция к электрогрилю VITEK VT-2637
Добавить комментарий
Имя *
Email *
Сайт
Комментарий


![]()


Сохранить моё имя, email и адрес сайта в этом браузере для последующих моих комментариев.
- Добавить инструкцию
- Заказать инструкцию
- Политика конфиденциальности
![]() размер PDF файла инструкции 1,2mb
размер PDF файла инструкции 1,2mb
1
/
VT-1
517 BN
Co ff\f\f ma\b\fr
Es pr\fsso /Ca ppu ccino
4
10 17
24
31
37
43
50 57
VT-1517_IM.indd 119.03.2014 14:57:53 1
2
7
3
5
6
4
12
12
9
8
10
11
16
17
1820
24
25
21
22
19
13
14
15
23
VT-1517_IM.indd 219.03.2014 14:57:53 VT-1517_IM.indd 319.03.2014 14:57:54 1717
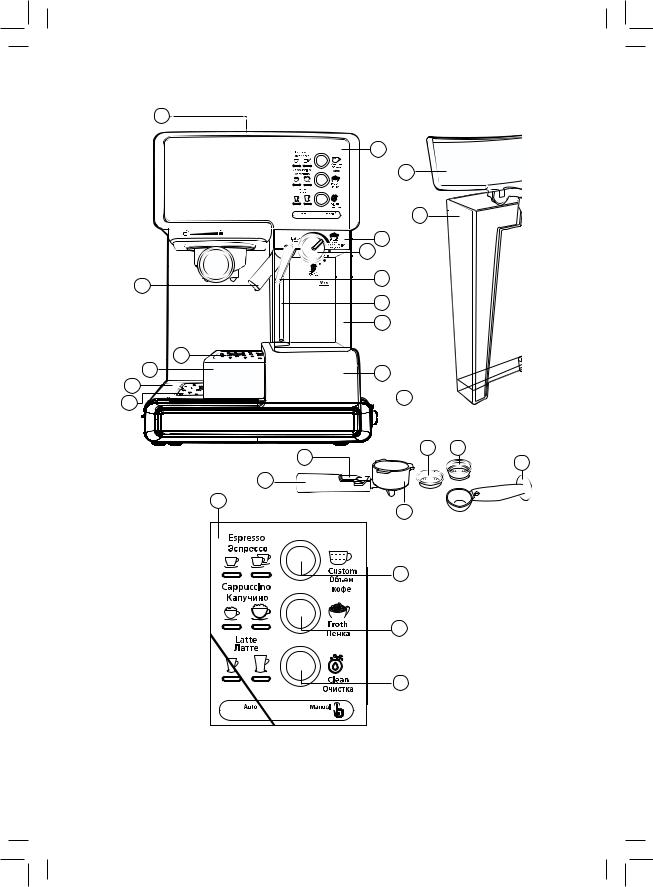
КОФЕВАРК А ЭСПРЕССО/К АПУЧИНО/ЛАТТЕ
Описание1. Площадка для подогрева чашек2. Трубка\bкапучинатор 3. Выдвижной поддон для капель4. Крышка выдвижного поддона5. Поддон для капель6. Крышка поддона для капель7. Крышка емкости для молока8. Ручка регулировки угла наклона трубки\b
капучинатора
9. Регулятор (интенсивности) подачи молоч\b
ной пенки
10. Трубка забора молока из емкости11. Емкость для молока12. Панель управления13. Корпус кофеварки14. Кнопка включения/выключен\oия (I/O)15. Крышка емкости для воды16. Съемная емкость для воды17. Ручка держателя фильтра18. Фиксатор фильтра19. Держатель фильтра20. Фильтр для приготовления одной порции
напитка
21. Фильтр для приготовления двойной пор\b
ции напитка
22. Мерная ложка с уплотнителем молотого
кофе
Панель управления
23. Кнопка приготовления эспрессо24. Кнопка приготовления капучино25. Кнопка приготовления латте
Внимание!
ЂЂЂ Для дополнительной защиты целе-
сообразно установить в цепи пита-
ния устройство защитного отключения
(УЗО) с номинальным током срабатыва-
ния, не превышающи\uм 30 мА. Для уста-
новки УЗО обратитесь к специалисту.
Меры безопасности
Перед использованием устройства внима\b
тельно ознакомьтесь с руководством по экс\b
плуатации. Сохраняйте данное руководство в
течение всего срока эксплуатации.
Неправильное обращение с устройством
может привести к его поломке, причинению
вреда пользователю или его имуществу. При
пользовании электрическими прибора\b
ми необходимо всегда соблюдать основные
меры предосторожности, в том числе:
ЂЂЂ Внимательно прочитайте все инструкции.ЂЂЂ Используйте кофеварку только по ее пря\b
мому назначению.
ЂЂЂ Убедитесь, что напряжение электриче\b
ской сети соответствует напряжению,
указанному на корпусе устройства.
ЂЂЂ Используйте сетевую розетку с надежным
контактом заземления.
ЂЂЂ Во избежание риска возникновения пожа\b
ра не используйте переходники при под\b
ключении устройства к электрической
розетке.
ЂЂЂ Не включайте кофеварку без воды.ЂЂЂ Используйте только принадлежности,
входящие в комплект поставки.
ЂЂЂ Перед включением кофеварки убедитесь,
что все съемные детали установлены пра\b
вильно.
ЂЂЂ Не дотрагивайтесь до горячих частей и
поверхностей кофеварки.
ЂЂЂ Соблюдайте осторожность во время
работы с выходящим паром.
ЂЂЂ Запрещается снимать держатель фильтра
во время работы кофеварки.
ЂЂЂ Устанавливайте устройство на ровную
устойчивую поверхность.
ЂЂЂ Во избежание пожара, удара электриче\b
ским током или физических поврежде\b
ний не погружайте вилку сетевого шнура,
сетевой шнур или корпус кофеварки в
воду или другие жидкости.
ЂЂЂ Всегда отключайте кофеварку от электри\b
ческой сети, когда она не используется,
или перед чисткой.
ЂЂЂ Для отключения кофеварки от сети выклю\b
чите кофеварку нажатием кнопки (14), а
затем выньте сетевую вилку из розетки.
ЂЂЂ Следите за тем, чтобы сетевой шнур не
свешивался c края стола и не соприкасал\b
ся с горячими поверхностями.
ЂЂЂ Не ставьте кофеварку на горячие поверх\b
ности.
ЂЂЂ Не используйте кофеварку вне помещений.ЂЂЂ Никогда не оставляйте кофеварку в местах
с температурой ниже 0`C.
ЂЂЂ Из соображений безопасности детей
не оставляйте полиэтиленовые пакеты,
VT-1517_IM.indd 1719.03.2014 14:57:55
14.. Cuppppppppp 18
используемые в качестве упаковки, без
надзора.
ЂЂЂ Внимание! Не разрешайте детям играть с
полиэтиленовыми пакетами или пленкой.
Опасность удушья!
ЂЂЂ Не разрешайте детям использовать
устройство в качестве игрушки.
ЂЂЂ Не оставляйте работающее устройство
без присмотра, будьте особенно внима\b
тельны, если поблизости от работающе\b
го устройства находятся дети или лица с
ограниченными возможностями.
ЂЂЂ Данное устройство не предназначено для
использования детьми и лицами с ограни\b
ченными возможностями, если им не даны
соответствующие и понятные им инструк\b
ции о безопасном пользовании устрой\b
ством и тех опасностях, которые могут
возникать при его неправильном пользо\b
вании, лицом, отвечающим за их безопас\b
ность.
ЂЂЂ Не пользуйтесь кофеваркой с поврежден\b
ной вилкой сетевого шнура, поврежден\b
ным сетевым шнуром, в случае ее непра\b
вильной работы или после любых повреж\b
дений.
ЂЂЂ Запрещается самостоятельно ремонтиро\b
вать кофеварку, для ремонта обратитесь
в ближайший авторизованный сервисный
центр.
УСТРОЙСТВО ПРЕДНАЗНАЧЕНО ТОЛЬКО
ДЛЯ ДОМАШНЕГО ИСПОЛЬЗОВАНИЯ
Подготовка к работе
ЂЂЂ Убедитесь, что устройство находится в
выключенном состоянии.
ЂЂЂ Внимание! Перед первым использо-
ванием кофеварки извлеките красную
резиновую пробку из резервуара для
воды (16).
ЂЂЂ Перед первым использованием кофевар\b
ки промойте все ее съемные части теплой
водой и просушите.
ЂЂЂ Перед включением убедитесь, что напря\b
жение электрической сети соответству\b
ет напряжению, указанному на корпусе
устройства.
ЂЂЂ Снимите емкость (16), наполните ее холод\b
ной водой до отметки MAX и установите на
место (рис.1).
ЂЂЂ Снимите емкость для молока (11), также
наполните её холодной водой до отметки
МАХ и установите её на место (рис.2).
ЂЂЂ Выберите один из фильтров для кофе (20
или 21) и установите его в держатель (19),
совместив выступ на фильтре с прорезью
в держателе (19) и поверните фильтр по/
против часовой стрелке (рис. 3, 4).
ЂЂЂ Установите держатель фильтра в кофе\b
варку. Выступы держателя (19) должны
совпасть с пазами на бойлере (рис.5),
после чего поверните ручку держателя
фильтра (17) в правую сторону до упора
(рис.6,7).
ЂЂЂ Поставьте подходящую чашку на соответ\b
ствующий поддон (3 или 5) и с помощью
ручки (8) направьте трубку\bкапучинатор
(2) в чашку (рис.8).
ЂЂЂ Вставьте вилку сетевого шнура в розетку.ЂЂЂ Включите кофеварку нажатием кнопки
(14), подсветка кнопок (23, 24 и 25) на
панели управления начнет мигать.
ЂЂЂ Когда подсветка кнопок перестанет
мигать, нажмите и удерживайте кнопку
приготовления эспрессо (23) в течение
3 секунд. Позвольте воде течь в течение
80\b90 секунд.
ЂЂЂ Повторным нажатием кнопки (23) отклю\b
чите подачу воды в чашу.
ЂЂЂ Поворотом регулятора подачи молоч\b
ной пенки (9) выберите режим промывки
«Очистка».
ЂЂЂ Затем нажмите и удерживайте кнопку
приготовления капучино (24) в течение
3 секунд. Позвольте воде течь в течение
80\b90 секунд.
ЂЂЂ Повторным нажатием кнопки (24) отклю\b
чите подачу воды в чашу.
ЂЂЂ Подсветка кнопок управления будет
постоянно гореть, что свидетельствует о
том, что устройство готово к эксплуатации
и бойлер промыт.
Внимание!
ЂЂЂ Запрещается снимать держатель фильтра
(19) в процессе работы устройства.
ЂЂЂ Не снимайте держатель фильтра (19)
сразу же после приготовления кофе, так
как внутри фильтра может быть избыточ\b
ное давление воды и пара, дождитесь
остывания кофеварки.
VT-1517_IM.indd 1819.03.2014 14:57:55
14. Cup 19
ЂЂЂ Для снятия держателя фильтра (19) повер\b
ните ручку в левую сторону и снимите дер\b
жатель.
Как выбрать правиль\eный объем чашки
Напиток Примерное
количество
готового
продукта
Эспрессо Одна порция
Двойная порция 30\b40 мл
70\b80 мл
Капучино Одна порция
Двойная порция 170 мл
280 мл
Латте Одна порция
Двойная порция 340 мл
430 мл
Примечание:
ЂЂЂ Используемые чашки необходимо предва\b
рительно нагреть, во время нагрева воды в
бойлере, установите чашки на площадку (1).
Приготовление кофе эспре\eссо
ЂЂЂ Убедитесь, что устройство находится в
выключенном положении.
ЂЂЂ Снимите емкость (16), наполните ее холод\b
ной водой и установите на место (рис.1).
ЂЂЂ Выберите один из фильтров для кофе (20
или 21) и установите его в держатель (19),
совместив выступ на фильтре с прорезью
в держателе (19) и поверните фильтр по/
против часовой стрелке (рис. 3, 4).
ЂЂЂ Насыпьте молотый кофе в фильтр: 2 пол\b
ные мерные ложки \b для приготовления
двойной порции кофе и 1 полную ложку
\b для приготовления одной порции кофе,
разровняйте и слегка утрамбуйте молотый
кофе обратной стороной мерной ложки
(22).
ЂЂЂ Установите держатель фильтра в кофе\b
варку. Выступы держателя (19) должны
совпасть с пазами на бойлере (рис.5),
после чего поверните ручку держателя
фильтра (17) в правую сторону до упора
(рис.6,7).
ЂЂЂ Поставьте подходящую чашку на соответ\b
ствующий поддон (3 или 5) и с помощью
ручки (8) направьте трубку\bкапучинатор (2)
в чашку (рис.8).
ЂЂЂ Вставьте вилку сетевого шнура в розетку.
ЂЂЂ Включите кофеварку нажатием кнопки
(14), подсветка кнопок (23, 24 и 25) на
панели управления начнет мигать.
Примечание: В целях безопасности устрой-
ство автоматически переходит в режим ожи-
дания (отключается нагрев бойлера, гаснет
подсветка кнопок управления), если им не
пользуются в течение 15 минут. Для возвра-
та в рабочий режим нажмите любую кнопку
управления.
ЂЂЂ Когда кнопки на панели управления пере\b
станут мигать, нажмите на кнопку при\b
готовления эспрессо (23) один раз для
приготовления одной порции кофе (30\b
40 мл).
Примечание: Подсветка кнопки (23) пере-
стает мигать раньше остальных ЂЂЂ это нор-
мально.
ЂЂЂ Нажмите дважды на кнопку (23) для при\b
готовления двойной порции эспрессо.
ЂЂЂ Нажмите и удерживайте кнопку (23) в
течение 3 секунд для приготовления пор\b
ции эспрессо по вашему усмотрению.
Устройство может приготовить до 150 мл
эспрессо, а затем отключится.
Спросить у мастера «Что делать?»
— Вам ответят при первой возможности.
Использование инструкции для кофемашины VITEK VT1517 BN бесплатно. Инструкция по эксплуатации VITEK VT1517 BN доступна для скачивания из открытых источников.
Код: 51020
Извините, товара сейчас нет в наличии
Бесплатная доставка
по Красноярску
Извините, товара сейчас нет в наличии
Новости интернет-магазина «Лаукар»:
Дополнительная информация в категории Кофеварка:
В интернет-магазине бытовой техники «Лаукар» Вы можете скачать инструкцию к товару Кофеварка Vitek VT-1517 BN совершенно бесплатно.
Все инструкции, представленные на сайте интернет-магазина бытовой техники «Лаукар», предоставляются производителем товара.
Перед началом использования товара рекомендуем Вам ознакомиться с инструкцией по применению.
Для того чтобы скачать инструкцию, Вам необходимо нажать на ссылку «скачать инструкцию», расположенную ниже, а в случае, если ссылки нет,
Вы можете попробовать обратиться к данной странице позднее,
возможно специалисты интернет-магазина бытовой техники «Лаукар» еще не успели загрузить для скачивания инструкцию к товару:
Кофеварка Vitek VT-1517 BN.

Фирма-производитель оставляет за собой право на внесение изменений в конструкцию, дизайн и комплектацию товара: Кофеварка Vitek VT-1517 BN. Пожалуйста, сверяйте информацию о товаре с информацией на
официальном сайте компании производителя.
![]()
VT-1517 BN
Coffee maker
Espresso/Cappuccino
Кофеварка
Эспрессо/Капучино
4
10
17
24
31
37
43
50
57
1
|
VT-1517_IM.indd 1 |
19.03.2014 14:57:53 |
1
 Автоматический Ручной
2
4
3 5 6
18
17
12
12
15
16
7
9
8
10
11
13

 14
14
20 21
22
19
23
24
25
 Автоматический Ручной
|
VT-1517_IM.indd 2 |
19.03.2014 14:57:53 |

|
VT-1517_IM.indd 3 |
19.03.2014 14:57:54 |

ENGLISH
COFFEE MAKER ESPRESSO/ CAPPUCCINO / LATTE
Description
1.Cup warming tray
2.Cappuccinator pipe
3.Pull-out drip tray
4.Pull-out tray lid
5.Drip tray
6.Drip tray lid
7.Milk tank lid
8.Cappuccinator pipe angle adjustment bar
9.Frothed milk supply (intensity) knob
10.Milk intake pipe
11.Milk tank
12.Control panel
13.Coffee maker body
14.On/Off button (I/O)
15.Water tank lid
16.Removable water tank
17.Filter holder handle
18.Filter clamp
19.Filter holder
20.Filter for one espresso cup
21.Filter for two espresso cups
22.Ground coffee measuring spoon with tamper
Control panel
23.Espresso button
24.Cappuccino button
25.Latte button
Attention!
•For additional protection it is reasonable to install a residual current device (RCD) with nominal operation current not exceeding 30 mA. To install RCD contact a specialist.
Safety measures
Read these instructions carefully before using the unit. Keep this instruction during the whole operation period.
Mishandling the unit can lead to its breakage and cause harm to the user or damage to his/ her property.
Always observe the main safety measures when using electric appliances, namely:
•Read this instruction manual carefully.
•Use the coffee maker according to its intended purpose only.
•Make sure that the mains voltage corresponds to the voltage specified on the unit body.
4
•Use the socket with reliable grounding contact.
•In order to avoid fire do not use adapters for connecting the unit to the mains.
•Do not switch the coffee maker on if the water tank is empty.
•Use only the accesories supplied.
•Before switching the unit on, make sure that all removable parts are installed properly.
•Do not touch hot parts and surfaces of the coffee maker.
•Be careful while operating with outgoing steam.
•Do not remove the filter holder during coffee maker operation.
•Place the unit on a flat steady surface.
•To avoid fire, electric shock or physical injuries do not immerse the electric cord, the plug or the coffee maker body into water or other liquids.
•Unplug the coffee maker if you don’t use it and before cleaning.
•To disconnect the coffee maker from the mains switch it off by pressing the button (14) and then remove the power plug from the socket.
•Do not let the power cord hang over the edge of the table and touch hot surfaces.
•Do not place the coffee maker on hot surfaces.
•Do not use the coffee maker outdoors.
•Do not leave the coffee maker in places with the temperature below 0°C.
•For children safety reasons do not leave polyethylene bags, used as a packaging, unattended.
•Attention! Do not allow children to play with polyethylene bags or film. Danger of suffocation!
•Do not allow children to use the unit as a toy.
•Do not leave the operating unit unattended; be especially careful if children or disabled persons are near the operating unit.
•This unit is not intended for usage by children or disabled persons unless they are given all the necessary instructions by a person who is responsible for their safety on safety measures and information about danger that can be caused by improper usage of the unit.
•Do not use the coffee maker if the power cord or the plug is damaged, if the unit mal-
|
VT-1517_IM.indd 4 |
19.03.2014 14:57:54 |

ENGLISH
functions or if there are other damages in the unit.
•Do not repair the coffee maker by yourself; always apply to the authorized service center.
THE UNIT IS INTENDED FOR HOUSEHOLD USAGE ONLY
Before using the unit
•Make sure that the unit is switched off.
•Attention! Before using the coffee maker for the first time remove the red rubber plug from the water tank (16).
•Before using the coffee maker for the first time, wash all removable parts with warm water and dry them.
•Before switching the unit on, make sure that the mains voltage corresponds to the voltage specified on the unit body.
•Remove the water tank (16), fill it with cold water till the MAX mark and install it back to its place (pic. 1).
•Remove the milk tank (11), fill it with cold water till the MAX mark as well and install it back to its place (pic. 2).
•Select one of the coffee filters (20 or 21), and insert it into the holder (19), matching the ledge on the filter with the hole on the holder
(19)and turn the filter clockwise/anticlockwise (pic. 3, 4).
•Install the filter holder into the coffee maker. Holder ledges (19) should match the groves on the boiler (pic. 5) and then turn the filter holder handle (17) to the right till bumping (pic. 6, 7).
•Place a corresponding cup on the respective tray (3 or 5) and turn the cappuccinator pipe
(2)to the cup using the bar (8) (pic. 8).
•Insert the power plug into the mains socket.
•Switch the coffee maker on by pressing the button (14), the illumination of the buttons (23, 24 and 25) on the control panel will start flashing.
•When the illumination stops flashing, press and hold the espresso button (23) for 3 seconds. Let the water run for 80-90 seconds.
•Press the button (23) once again to switch water supply off.
•Select the washing mode “Cleaning” by turning the frothed milk supply knob (9).
5
•Then press and hold the cappuccino button (24) for 3 seconds. Let the water run for 80-90 seconds.
•Press the button (24) once again to switch water supply off.
•The illumination of control buttons will light up constantly, that means that the unit is ready for operation and the boiler is clean.
Attention!
•Do not remove the filter holder (19) during the unit operation.
•Do not remove the filter holder (19) immediately after preparing coffee as there is redundant water and steam pressure inside, let the coffee maker cool down completely.
•To remove the filter holder (19) turn the handle to the left and remove the holder.
Choosing the appropriate cup
|
Drink |
Estimated |
|
|
volume of the |
||
|
ready product |
||
|
Espresso |
One cup |
30-40 ml |
|
Two cups |
70-80 ml |
|
|
Cappuccino |
One cup |
170 ml |
|
Two cups |
280 ml |
|
|
Latte |
One cup |
340 ml |
|
Two cups |
430 ml |
Note:
•The cups should be preliminary heated up, to do this, put the cups on the tray (1) while water heats up in the boiler.
Making espresso
•Make sure that the unit is switched off.
•Remove the water tank (16), fill it with cold water and install back to its place (pic. 1).
•Select one of the coffee filters (20 or 21), and insert it into the holder (19), matching the ledge on the filter with the hole on the holder (19) and turn the filter clockwise/anticlockwise (pic. 3, 4).
•Add ground coffee into the filter: 2 full measuring spoons — to make two coffee cups and 1 full spoon — to make one coffee cup, make even and slightly tamp the ground coffee with the back side of the measuring spoon (22).
|
VT-1517_IM.indd 5 |
19.03.2014 14:57:54 |

ENGLISH
•Install the filter holder into the coffee maker. Holder ledges (19) should match the groves on the boiler (pic. 5) and then turn the filter holder handle (17) to the right till bumping (pic. 6, 7).
•Place a corresponding cup on a respective tray (3 or 5) and turn the cappuccinator pipe
(2) to the cup using the bar (8) (pic. 8).
•Insert the power plug into the mains socket.
•Switch the coffee maker on by pressing the button (14), the illumination of the buttons (23, 24 and 25) on the control panel will start flashing.
Note: If you don’t use the unit for 15 minutes, it will switch to the stand-by mode automatically for safety reasons (boiler heating is switched off, the illumination of control buttons goes out). Press any control button to switch back the operating mode.
•When the control buttons stop flashing, press the espresso button (23) once to make one coffee cup (30-40 ml).
Note: Illumination of the button (23) stops flashing before the others — it is normal.
•Press the button (23) twice to make two cups of espresso.
•Press and hold the button (23) for 3 seconds to make espresso at your discretion. The unit can make up to 150 ml espresso and then will be switched off.
•At your discretion you can switch the coffee supply off by pressing the button (23) again.
Note: Repeated making of coffee should be performed after at least 5 min interval.
Making cappuccino
Attention! Be careful not to get burns by the outgoing steam.
•Make sure that the unit is switched off.
•Remove the water tank (16), fill it with cold water and install back to its place (pic. 1).
•Remove the milk tank (11), fill it with milk as well and install back to its place (pic. 2).
•Add ground coffee into the filter: 2 full measuring spoons — to make two coffee cups and 1 full spoon — to make one coffee cup, make even and slightly tamp the ground coffee with the back side of the measuring spoon (22).
•Install the filter holder into the coffee maker. Holder ledges (19) should match the groves
6
on the boiler (pic. 5) and then turn the filter holder handle (17) to the right till bumping (pic. 6, 7).
•Place a corresponding cup on the respective tray (3 or 5) and turn the cappuccinator pipe
(2) to the cup using the bar (8) (pic. 8).
•Insert the power plug into the mains socket.
•Switch the coffee maker on by pressing the button (14).
•The illumination of the buttons (23, 24 and 25) on the control panel will start flashing.
•Select the “Cappuccino” mode by turning the frothed milk supply knob (9).
Note: If you don’t use the unit for 15 minutes, it will switch to the stand-by mode automatically for safety reasons (boiler heating is switched off, the illumination of control buttons goes out). Press any control button to switch back the operating mode.
•When the control buttons stop flashing, press the cappuccino button (24) once to make one cup of cappuccino.
•Press the button (24) twice to make two cups of cappuccino.
Making latte
Attention! Be careful not to get burns by the outgoing steam.
•Make sure that the unit is switched off.
•Remove the water tank (16), fill it with cold water and install back to its place (pic. 1).
•Remove the milk tank (11), fill it with milk as well and install back to its place (pic. 2).
•Add ground coffee into the filter: 2 full measuring spoons — to make two coffee cups and 1 full spoon — to make one coffee cup, make even and slightly tamp the ground coffee with the back side of the measuring spoon (22).
•Install the filter holder into the coffee maker. Holder ledges (19) should match the groves on the boiler (pic. 5) and then turn the filter holder handle (17) to the right till bumping (pic. 6, 7).
•Place a corresponding cup on the respective tray (3 or 5) and turn the cappuccinator pipe
(2) to the cup using the bar (8) (pic. 8).
•Insert the power plug into the mains socket.
•Switch the coffee maker on by pressing the button (14).
|
VT-1517_IM.indd 6 |
19.03.2014 14:57:54 |

ENGLISH
•The illumination of the buttons (23, 24 and 25) on the control panel will start flashing.
•Select the “Latte” mode by turning the frothed milk supply knob (9).
Note: If you don’t use the unit for 15 minutes, it will switch to the stand-by mode automatically for safety reasons (boiler heating is switched off, the illumination of control buttons goes out). Press any control button to switch back the operating mode.
•When the control buttons stop flashing, press the latte button (25) once to make one cup of latte.
•Press the button (25) twice to make two cups of latte.
Making frothed milk
You can make necessary amount of frothed milk anytime. You can use the frothed milk for making hot chocolate, macchiato, chai tea etc.
•Press and hold the button (24) for 3 seconds to make frothed milk.
•You can switch this function off by pressing the button (24) again at your discretion.
•It is important that milk for making frothed milk is fresh and without additives, i.e. socalled long storage milk is not suitable for this purpose. Take usual whole milk with fat content from 4 to 6%, cream fat content should be not less than 10%.
•In case there is some milk or cream left in the tank (11) after making coffee, you can remove the milk tank and put it in the fridge (pic. 9).
How to make a good espresso
•Use fresh ground coffee for “espresso” coffee makers.
•Make even and slightly tamp the ground coffee in the filter (20 or 21), you can do it with the back side of the measuring spoon (22).
•Coffee strength depends on the quality and grinding of coffee beans. If coffee is pouring out too long, this means the coffee powder is too fine or it is tamped too strongly.
Cleaning of the cappuccinator pipe and the milk tank
Attention! Clean the cappuccinator pipe after every use.
•Make sure that there is enough water in the water tank (16).
7
•Clean the cappuccinator pipe (2) right after milk or cream frothing — put the corresponding cup on the tray (5) and turn the cappuccinator pipe (2) to the cup using the bar (8).
•Set the frothed milk supply (intensity) knob
(9) to the «Cleaning» position.
•Press and hold the button (25) for 3 seconds to activate cleaning mode. Cleaning cycle takes about 30 seconds. Pour out the water and the rest of milk from the cup.
•Remove the milk tank from the unit body and remove the lid (7).
•Slightly pull the cappuccinator pipe angle adjustment bar and remove it.
•Remove the milk intake pipe (10).
•Wash all the details and the lid itself with warm water and dry them thoroughly.
•You can wash the milk tank in a dish washing machine.
•Install the cappuccinator pipe and the milk intake pipe back to its place.
Descaling
For effective operation of the coffee maker we recommend removing scale every 2-3 months and more often when using “hard” water.
•Make sure that the unit is switched off.
•Make citric acid solution: 2 teaspoons and 1 l of water and pour this solution into the water tank (16). Install the water tank (16) back to its place.
•Remove the milk tank (11), fill it with cold water till the MAX mark as well and install back to its place (pic. 2).
•Select one of the coffee filters (20 or 21), and insert it into the holder (19), matching the ledge on the filter with the hole on the holder
(19)and turn the filter clockwise/anticlockwise (pic. 3, 4).
•Install the filter holder into the coffee maker. Holder ledges (19) should match the groves on the boiler (pic. 5) and then turn the filter holder handle (17) to the right (pic. 6, 7).
•Place the corresponding cup on the respective tray (3 or 5) and turn the cappuccinator pipe (2) to the cup using the bar (8) (pic. 8).
•Insert the power plug into the mains socket.
•Switch the coffee maker on by pressing the button (14), the illumination of the buttons
|
VT-1517_IM.indd 7 |
19.03.2014 14:57:54 |

ENGLISH
(23, 24 and 25) on the control panel will start flashing.
•When the control buttons stop flashing, press the espresso button (23) twice.
•Repeat the boiler cleaning procedure with small intervals till there is no citric acid solution in the tank.
•After finishing of the cleaning process fill the tank (16) with water and repeat this procedure 2-3 times to wash off the rest of citric acid or descaling reagent.
Note:
•To remove scale you can use special scale removers, strictly following the instructions
on their usage.
Cleaning
•Cleaning the filters (20, 21): you can wash the filters in a dish washing machine. If the openings are blocked with the ground cof-
fee remnants, you can clean the filters with a small brush.
•Wipe the coffee maker body with a soft damp cloth. Do not use metal brushes or abrasives.
•Do not immerse the coffee maker body into water or other liquids.
•Wash the removable parts of the coffee maker with warm water and a soft detergent.
Drip trays
•Remove the lid from the tray, remove the tray and pour out water, put the tray back to its place, put the grid on the tray.
•If necessary, wash the trays and the lids with water and soft detergent, then rinse and dry.
Troubleshooting
|
Failure |
Cause |
Solution |
|
The unit cannot be |
No voltage in the socket. |
Make sure that the socket is operating. |
|
switched on |
||
|
Check whether the plug is completely |
||
|
The plug is not completely inserted |
inserted into the socket. |
|
|
into the socket. |
||
|
Water leaks from the |
The water tray is overfilled. |
Pour out water from the tray. |
|
lower part of the unit |
||
|
Coffee leakage from |
Loose connection of filter and |
Clean the edges of the filter. |
|
the filter holder |
boiler gasket, ground coffee got |
|
|
on the edges of the filter. |
||
|
Coffee |
Wrong process of scale removal in |
See chapters |
|
has a foreign smell |
the boiler |
«Before using the unit», «Descaling» and |
|
repeat described process several times. |
||
|
Use fresh ground coffee. |
||
|
Improper storage of coffee |
||
|
Keep coffee in a dry cool place. |
||
|
Steam doesn’t froth |
Low temperature of the outgoing |
Froth milk only after the illumination of |
|
the milk |
steam. |
control buttons stops flashing. |
|
Use narrow high container for frothed |
||
|
milk. |
||
|
The container is too big or of |
Use only whole milk with fat content |
|
|
improper size. |
4-6%. |
|
|
You used skimmed milk |
||
|
All indicators and |
The water tank (16) is empty. |
Fill the water tank (16) with water. |
|
control buttons |
||
|
illumination flash. |
||
|
8 |
|
VT-1517_IM.indd 8 |
19.03.2014 14:57:54 |
ENGLISH
Technical specifications
Removable water tank volume: 1.65 L Power supply: 220-240 V, ~ 50 Hz Power consumption: 1050–1238 W
The manufacturer preserves the right to change the design and the specifications of the unit without a preliminary notification.
Unit operating life is 5 years
Guarantee
Details regarding guarantee conditions can be obtained from the dealer from whom the appliance was purchased. The bill of sale or receipt must be produced when making any claim under the terms of this guarantee.
This product conforms to the EMC-Re- quirements as laid down by the Council Directive 2004/108/ЕС and to the Low Voltage Regulation (2006/95/ЕС)
9
|
VT-1517_IM.indd 9 |
19.03.2014 14:57:54 |

DEUTSCH
|
KAFFEEMASCHINE FÜR ESPRESSO/ |
und zwar: |
|||||||
|
CAPPUCCINO/LATTE |
• |
Lesen Sie alle Anweisungen aufmerksam |
||||||
|
durch. |
||||||||
|
Beschreibung |
• Benutzen |
Sie |
die |
Kaffeemaschine |
nur |
|||
|
1. |
Aufheizplatte für Tassen |
bestimmungsgemäß. |
||||||
|
2. |
Cappuccinatore-Rohr |
• Vergewissern |
Sie |
sich, |
dass |
die |
||
|
3. |
Ausziehbare Tropfschale |
Netzspannung mit der Spannung des Geräts, |
||||||
|
4. |
Deckel der ausziehbaren Schale |
die am Gehäuse des Geräts angegeben ist, |
||||||
|
5. |
Tropfschale |
übereinstimmt. |
||||||
|
6. |
Deckel der Tropfschale |
• |
Benutzen Sie die Steckdose mit sicherer |
|||||
|
7. |
Deckel des Milchbehälters |
Erdung. |
||||||
|
8. |
Griff zur Cappuccinatore-Neigungsregelung |
• Zur Vermeidung der Feuergefahr benutzen |
||||||
|
9. |
Regler der Milchschaumzufuhr (Intensität) |
Sie keine Adapterstecker beim Anschluss |
||||||
|
10. Milcheinlaufrohr |
des Geräts an die elektrische Steckdose. |
|||||||
|
11. |
Milchbehälter |
• |
Schalten Sie die Kaffeemaschine ohne |
|||||
|
12. Bedienungsplatte |
Wasser nicht an. |
|||||||
|
13. |
Gehäuse der Kaffeemaschine |
• |
Benutzen Sie nur das Zubehör, das zum |
|||||
|
14. |
Ein-/Ausschalttaste (I/O) |
Lieferumfang gehört. |
||||||
|
15. Deckel des Wasserbehälters |
• |
Vor der Einschaltung der Kaffeemaschine |
||||||
|
16. Abnehmbarer Wasserbehälter |
vergewissern Sie sich, dass alle abnehmba- |
|||||||
|
17. |
Griff des Filterhalters |
ren Teile korrekt eingebaut sind. |
||||||
|
18. Filterhalterung |
• Berühren |
Sie heiße |
Teile und |
Oberflächen |
||||
|
19. Filterhalter |
der Kaffeemaschine nicht. |
|||||||
|
20. Filter für Zubereitung von einer Tasse Kaffee |
• Seien Sie vorsichtig während des Betriebs |
|||||||
|
21. Filter für Zubereitung von zwei Tassen Kaffee |
mit austretendem Dampf. |
|||||||
|
22. Messlöffel mit Presse des gemahlenen |
• Es ist nicht gestattet, den Filterhalter wäh- |
|||||||
|
Kaffees |
rend des Betriebs der Kaffeemaschine abzu- |
|||||||
|
Bedienungsplatte |
nehmen. |
|||||||
|
23. Taste der Espresso-Zubereitung |
• Stellen Sie das Gerät auf eine gerade stabile |
|||||||
|
24. Taste der Cappuccino-Zubereitung |
Oberfläche auf. |
|||||||
|
25. Taste der Latte-Zubereitung |
• |
Um Brandund Stromschlagrisiko oder |
||||||
|
Verletzungen zu vermeiden, tauchen Sie nie |
||||||||
|
Achtung! |
den Stecker des Netzkabels, das Netzkabel |
|||||||
|
• |
AlszusätzlicherSchutzisteszweckmäßig, |
oder das Gehäuse der Kaffeemaschine ins |
||||||
|
den FI-Schalter mit Nennstrom maximal |
Wasser oder andere Flüssigkeiten. |
|||||||
|
bis 30 mA im Stromversorgungskreis |
• Trennen |
Sie |
die |
Kaffeemaschine |
vom |
|||
|
aufzustellen. Wenden Sie sich dafür an |
Stromnetz immer ab, wenn Sie diese nicht |
|||||||
|
einen Spezialisten. |
benutzen und vor der Reinigung. |
|||||||
|
• |
Um die Kaffeemaschine vom Stromnetz |
|||||||
|
Sicherheitsmaßnahmen |
abzutrennen, schalten Sie diese durch das |
|||||||
|
Lesen Sie vor der ersten Inbetriebnahme des |
Drücken der Taste (14) ab und dann ziehen |
|||||||
|
Geräts diese Bedienungsanleitung aufmerksam |
Sie den Netzstecker aus der Steckdose her- |
|||||||
|
durch. Behalten Sie diese Bedienungsanleitung |
aus. |
|||||||
|
während der ganzen Betriebsperiode. |
• Achten Sie darauf, dass das Netzkabel vom |
|||||||
|
Nicht ordnungsgemäße Nutzung des Geräts |
Tisch nicht frei hängt und heiße Gegenstände |
|||||||
|
kann zu seiner Störung führen und einen |
nicht berührt. |
|||||||
|
gesundheitlichen und materiellen Schaden beim |
• Es ist nicht gestattet, die Kaffeemaschine auf |
|||||||
|
Nutzer hervorrufen. |
heiße Oberflächen zu stellen. |
|||||||
|
Beim Gebrauch der elektrischen Geräte sind |
• Benutzen Sie die Kaffeemaschine draußen |
|||||||
|
wichtige Sicherheitsmaßnahmen zu beachten, |
nicht. |
|||||||
|
10 |
|
VT-1517_IM.indd 10 |
19.03.2014 14:57:55 |
![]()
DEUTSCH
•Lassen Sie die Kaffeemaschine nie an Orten mit der Temperatur unter 0°C.
•Aus Kindersicherheitsgründen lassen Sie Plastiktüten, die als Verpackung verwendet werden, nie ohne Aufsicht.
•Achtung! Lassen Sie Kinder mit
Plastiktüten oder Folien nicht spielen.
Erstickungsgefahr!
•Es ist nicht gestattet, das Gerät den Kindern als Spielzeug zu geben.
•Lassen Sie die Kaffeemaschine nie im laufenden Betrieb unbeaufsichtigt, besondere Vorsichtsmaßnahmen sind in den Fällen angesagt, wenn sich Kinder oder behinderte Personen während der Nutzung des Geräts in der Nähe aufhalten.
•Dieses Gerät darf von Kindern und behinderten Personen nicht genutzt werden, außer wenn die Person, die für ihre Sicherheit verantwortlich ist, ihnen entsprechende und verständliche Anweisungen über sichere Nutzung des Geräts und die Gefahren bei seiner falschen Nutzung gibt
•Benutzen Sie die Kaffeemaschine nicht, wenn der Netzstecker oder das Netzkabel verletzt ist, beim nicht ordnungsgemäßen Betrieb der Kaffeemaschine oder wenn irgendwelche Störungen auftreten.
•Es ist nicht gestattet, das Gerät selbständig zu reparieren, wenden Sie sich dafür an einen autorisierten (bevollmächtigten) Kundendienst.
DAS GERÄT IST NUR FÜR DEN GEBRAUCH IM HAUSHALT GEEIGNET
Vorbereitung zur Inbetriebnahme
•Vergewissern Sie sich, dass das Gerät ausgeschaltet ist.
•Achtung! Vor der ersten Nutzung der Kaffeemaschine nehmen Sie den roten Gummistopfen aus dem Wasserbehälter (16) heraus.
•Vor der ersten Nutzung der Kaffeemaschine waschen Sie alle abnehmbaren Teile mit Warmwasser und trocknen Sie diese ab.
•Vor dem Einschalten des Geräts vergewissern Sie sich, dass die Netzspannung und die Spannung am Gehäuse des Geräts übereinstimmen.
11
•Nehmen Sie den Behälter (16) ab, füllen Sie ihn mit Kaltwasser bis zur „MAX“- Wasserstandsmarke auf und stellen Sie diesen zurück auf (Abb. 1).
•Nehmen Sie den Milchbehälter (11) ab, füllen Sie ihn ebenfalls mit Kaltwasser bis zur „MAX“-Wasserstandsmarke auf und stellen Sie diesen zurück auf (Abb. 2).
•Wählen Sie einen von den Kaffeefiltern (20 oder 21) und setzen Sie ihn in den Halter (19) ein, indem Sie den Vorsprung am Filter und den Schlitz im Halter (19) zusammenfallen lassen und drehen Sie den Filter im/entgegen dem Uhrzeigersinn (Abb. 3, 4).
•Stellen Sie den Filterhalter in die Kaffeemaschine ein. Dabei sollen die Vorsprünge des Filterhalters (19) mit den Aussparungen des Boilers zusammenfallen (Abb. 5), wonach drehen Sie den Griff des Filterhaltes (17) nach rechts bis zum Einrasten (Abb. 6, 7).
•Stellen Sie eine passende Tasse auf die entsprechende Tropfschale (3 oder 5) und richten Sie das Cappuccinatore—Rohr (2) in die Tasse mittels des Griffs (8) (Abb. 8).
•Stecken Sie den Netzstecker in die Steckdose.
•Schalten Sie die Kaffeemaschine durch das Drucken der Taste (14) ein, die Beleuchtung der Tasten (23, 24 und 25) auf der Bedienungsplatte wird blinken.
•Nachdem die Beleuchtung der Tasten zu blinken aufhört, drücken und halten Sie die Taste der Espresso-Zubereitung (23) innerhalb von 3 Sekunden. Lassen Sie das Wasser innerhalb von 80-90 Sekunden fließen.
•Schalten Sie die Wasserzufuhr durch das nochmalige Drücken der Taste (23) aus.
•WählenSiedenBetrieb«Reinigung»durchdas Drehen des Reglers der Milchschaumzufuhr
(9).
•Dann drücken und halten Sie die Taste der Cappuccino-Zubereitung (24) innerhalb von 3 Sekunden. Lassen Sie das Wasser innerhalb von 80-90 Sekunden fließen.
•Schalten Sie die Wasserzufuhr durch das nochmalige Drücken der Taste (24) aus.
•Die Beleuchtung der Tasten der Bedienungsplatte wird konstant aufleuchten,
|
VT-1517_IM.indd 11 |
19.03.2014 14:57:55 |

DEUTSCH
was bedeutet, dass das Gerät betriebsbereit ist und der Boiler gewaschen ist.
Achtung!
•Es ist nicht gestattet, den Filterhalter (19) während des Betriebs der Kaffeemaschine abzunehmen.
•Es ist nicht gestattet, den Filterhalter (19) sofort nach der Kaffeezubereitung abzunehmen, weil innerhalb des Filters Wasserund Dampfüberdruck entstehen kann, warten Sie ab, bis die Kaffeemaschine abgekühlt ist.
•Um den Filterhalter (19) abzunehmen, drehen Sie den Griff nach links und nehmen Sie den Filterhalter ab.
Wahl des richtigen Tassenvolumens
|
Getränk |
Ungefähre |
|
|
Menge des |
||
|
Fertiggetränks |
||
|
Espresso |
Eine Portion |
30-40 ml |
|
Doppelte |
70-80 ml |
|
|
Portion |
||
|
Cappuccino |
Eine Portion |
170 ml |
|
Doppelte |
280 ml |
|
|
Portion |
||
|
Latte |
Eine Portion |
340 ml |
|
Doppelte |
430 ml |
|
|
Portion |
|
Anmerkung: |
||
|
• Erwärmen Sie vorher |
die benutz- |
|
|
ten |
Tassen, stellen Sie dafür die Tassen |
|
|
auf |
die Aufheizplatte (1) |
während der |
Wassererwärmung im Boiler.
Zubereitung von Espresso
•Vergewissern Sie sich, dass das Gerät ausgeschaltet ist.
•Nehmen Sie den Behälter (16) ab, füllen Sie ihn mit Kaltwasser auf und stellen Sie diesen zurück auf (Abb. 1).
•Wählen Sie einen von den Kaffeefiltern (20 oder 21) und setzen Sie ihn in den Halter (19) ein, indem Sie den Vorsprung am Filter und den Schlitz im Halter (19) zusammenfallen lassen und drehen Sie den Filter im/entgegen dem Uhrzeigersinn (Abb. 3, 4).
•Schütten Sie den gemahlenen Kaffee in den Filter ein: 2 volle Messlöffel – für die
12
Zubereitung von zwei Tassen Kaffee und 1 voller Löffel– für die Zubereitung von einer Tasse Kaffee, ebnen und stampfen Sie leicht den gemahlenen Kaffee mit Rückseite des Messlöffels (22).
•Stellen Sie den Filterhalter in die Kaffeemaschine ein. Die Vorsprünge des Filterhalters (19) sollen mit den Aussparungen des Boilers zusammenfallen (Abb. 5), wonach drehen Sie den Griff des Filterhaltes (17) nach rechts bis zum Einrasten (Abb. 6, 7).
•Stellen Sie eine passende Tasse auf die entsprechende Tropfschale (3 oder 5) und richten Sie das Cappuccinatore-Rohr (2) in die Tasse mittels des Griffs (8) (Abb. 8).
•Stecken Sie den Netzstecker in die Steckdose.
•Schalten Sie die Kaffeemaschine durch das Drucken der Taste (14) ein, die Beleuchtung der Tasten (23, 24 und 25) auf der Bedienungsplatte wird blinken.
Anmerkung: Falls das Gerät innerhalb von 15 Minuten nicht betätigt wird, schaltet es sich zum Sicherheitszweck in den Wartezustand automatisch um (die Boilererwärmung schaltet sich aus, die Beleuchtung der Tasten der Bedienungsplatte erlischt). Zur Rückstellung in den Betriebszustand drücken Sie beliebige Taste der Bedienungsplatte.
•Wenn die Tasten der Bedienungsplatte zu blinken aufhören, drücken Sie die Taste der Espresso-Zubereitung (23) einmal, um eine
Portion Kaffee (30-40 ml) zu kochen.
Anmerkung: Die Beleuchtung der Taste (23) hört auf als erste zu blinken – das ist normal.
•Zur Zubereitung von doppelter Portion Espresso drücken Sie die Taste (23) zweimal.
•Drücken und halten Sie die Taste (23) innerhalb von 3 Sekunden zur Zubereitung von Espresso nach Ihrem Belieben. Das Gerät kann bis 150 ml Espresso kochen, dann schaltet es sich aus.
•Durch das nochmalige Drücken der Taste (23) können Sie die Kaffeezufuhr in die Tasse nach Ihrem Belieben ausschalten.
Anmerkung:
•Führen Sie nachfolgende Kaffeezubereitung mit Pausen von nicht weniger als 5 Minuten durch.
|
VT-1517_IM.indd 12 |
19.03.2014 14:57:55 |

DEUTSCH
Zubereitung von Cappuccino
Achtung! Gefahr der Verbrühungen mit heißem Dampf.
•Zur Zubereitung von doppelter Portion Cappuccino drücken Sie die Taste (24) zweimal.
•Vergewissern Sie sich, dass das Gerät ausgeschaltet ist.
•Nehmen Sie den Behälter (16) ab, füllen Sie ihn mit Kaltwasser auf und stellen Sie diesen zurück auf (Abb. 1).
•Nehmen Sie den Milchbehälter (11) ab, füllen Sie ihn mit Milch auf und stellen Sie diesen zurück auf (Abb. 2).
•Schütten Sie den gemahlenen Kaffee in den Filter ein: 2 volle Messlöffel – für die Zubereitung von zwei Tassen Kaffee und 1 voller Löffel– für die Zubereitung von einer Tasse Kaffee, ebnen und stampfen Sie leicht den gemahlenen Kaffee mit Rückeite des Messlöffels (22).
•Stellen Sie den Filterhalter in die Kaffeemaschine ein. Die Vorsprünge des Filterhalters (19) sollen mit den Aussparungen des Boilers zusammenfallen (Abb. 5), wonach drehen Sie den Griff des Filterhaltes (17) nach rechts bis zum Einrasten (Abb. 6, 7).
•Stellen Sie eine passende Tasse auf die entsprechende Tropfschale (3 oder 5) und richten Sie das Cappuccinatore-Rohr (2) in die Tasse mittels des Griffs (8) (Abb. 8).
•Stecken Sie den Netzstecker in die Steckdose.
•Schalten Sie die Kaffeemaschine mit der Taste (14) ein.
•Die Beleuchtung der Tasten (23, 24 und 25) auf der Bedienungsplatte wird blinken.
•Wählen Sie den Betrieb «Cappuccino» durch das Drehen des Reglers der Milchschaumzufuhr (9).
Anmerkung: Falls das Gerät innerhalb von 15 Minuten nicht betätigt wird, schaltet es sich zum Sicherheitszweck in den Wartezustand automatisch um (die Boilererwärmung schaltet sich aus, die Beleuchtung der Tasten der Bedienungsplatte erlischt). Zur Rückstellung in den Betriebszustand drücken Sie beliebige Taste der Bedienungsplatte.
•Wenn die Tasten der Bedienungsplatte zu blinken aufhören, drücken Sie die Taste der Cappuccino-Zubereitung (24) einmal, um eine Portion Kaffee zu kochen.
13
Zubereitung von Latte
Achtung! Gefahr der Verbrühungen mit heißem Dampf.
•Vergewissern Sie sich, dass das Gerät ausgeschaltet ist.
•Nehmen Sie den Behälter (16) ab, füllen Sie ihn mit Kaltwasser auf und stellen Sie diesen zurück auf (Abb. 1).
•Nehmen Sie den Milchbehälter (11) ab, füllen Sie ihn mit Milch auf und stellen Sie diesen zurück auf (Abb. 2).
•Schütten Sie den gemahlenen Kaffee in den Filter ein: 2 volle Messlöffel – für die Zubereitung von zwei Tassen Kaffee und 1 voller Löffel– für die Zubereitung von einer Tasse Kaffee, ebnen und stampfen Sie leicht den gemahlenen Kaffee mit Rückeite des Messlöffels (22).
•Stellen Sie den Filterhalter in die Kaffeemaschine ein. Die Vorsprünge des Filterhalters (19) sollen mit den Aussparungen des Boilers zusammenfallen (Abb. 5), wonach drehen Sie den Griff des Filterhaltes (17) nach rechts bis zum Einrasten (Abb. 6, 7).
•Stellen Sie eine passende Tasse auf die entsprechende Tropfschale (3 oder 5) und richten Sie das Cappuccinatore-Rohr (2) in die Tasse mittels des Griffs (8) (Abb. 8).
•Stecken Sie den Netzstecker in die Steckdose.
•Schalten Sie die Kaffeemaschine mit der Taste (14) ein.
•Die Beleuchtung der Tasten (23, 24 und 25) auf der Bedienungsplatte wird blinken.
•Wählen Sie den Betrieb «Latte» durch das Drehen des Reglers der Milchschaumzufuhr
(9).
Anmerkung:Falls das Gerät innerhalb von 15 Minuten nicht betätigt wird, schaltet es sich zum Sicherheitszweck in den Wartezustand automatisch um (die Boilererwärmung schaltet sich aus, die Beleuchtung der Tasten der Bedienungsplatte erlischt). Zur Rückstellung in den Betriebszustand drücken Sie beliebige Taste der Bedienungsplatte.
|
VT-1517_IM.indd 13 |
19.03.2014 14:57:55 |

DEUTSCH
•Wenn die Tasten der Bedienungsplatte zu blinken aufhören, drücken Sie die Taste der Latte-Zubereitung (25) einmal, um eine Portion Latte zu zubereiten.
•Zur Zubereitung von doppelter Portion Latte drücken Sie die Taste (25) zweimal.
Zubereitung von Milchschaum
Sie können erforderliche Menge von Milchschaum zu jeder Zeit machen. Milchschaum kann zur Zubereitung von heißem Schokoladengetränk, Macchiato, Tee mit Gewürzen usw. benutzt werden.
•Drücken und halten Sie die Taste (24) innerhalb von 3 Sekunden zur Zubereitung von Milchschaum.
•Durch das nochmalige Drücken der Taste (24) können Sie diese Funktion nach Ihrem Belieben ausschalten.
•Es ist wichtig, dass die für Milchschaumzubereitung benutzte Milch
frisch und ohne Konservierungsstoffe ist, das heißt, keine Milch mit dauernder Aufbewahrungsfrist. Benutzen Sie einfache Vollmilch mit 4-6% Fett und Sahne mit nicht weniger als 10% Fett.
•Wenn es nach der Kaffeezubereitung im Behälter (11) Milch oder Sahne gibt, können Sie den Milchbehälter herausnehmen und ihn in den Kühlschrank stellen (Abb. 9).
Hinweise für leckeren Espresso
•Benutzen Sie frisch gemahlenen Kaffee, der für die Kaffemaschinen „Espresso“ geeignet ist.
•Ebnen und stampfen Sie leicht den gemahlenen Kaffee im Filter (20 oder 21) mit Rückseite des Messlöffels (22).
•Die Stärke des gekochten Kaffee hängt von der Qualität und der Feinheit der gemahlenen Kaffeebohnen. Wenn sich der Kaffee zu lang einfließt, das bedeutet, dass der Kaffee zu fein gemahlen oder zu stark gestampft ist.
Reinigung des Cappuccinatore—Rohrs und des Milchbehälters
Achtung! Reinigen Sie das Cappuccinatore— Rohr nach jeder Nutzung.
•Vergewissern Sie sich, dass Wasser im Behälter (16) vorhanden ist.
14
•Sofort nach dem Milchoder Sahnenaufschlagen reinigen Sie das Cappuccinatore-Rohr (2) — stellen Sie passende Tasse auf die Tropfschale (5) und richten Sie das Cappuccinatore-Rohr (2) in die Tasse mittels des Griffs (8).
•Stellen Sie den Regler der Milchschaumzufuhr
(9) in die Position «Reinigung».
•Drücken und halten Sie die Taste (25) innerhalb von 3 Sekunden zum Aktivieren des Reinigungsbetriebs. Der Reinigungszyklus dauert etwa 30 Sekunden. Gießen Sie Wasser und Restmilch aus der Tasse.
•Nehmen Sie den Milchbehälter aus dem Gehäuse des Geräts heraus und nehmen Sie den Deckel (7) ab.
•ZiehenSieleichtdenGriffzurCappuccinatoreNeigungsregelung und nehmen Sie ihn heraus.
•Nehmen Sie das Milcheinlaufrohr (10) ab.
•Waschen Sie alle Deckelteile und den Deckel mit Warmwasser und trocknen Sie diese sorgfältig ab.
•Den Milchbehälter können Sie in der Geschirrspülmaschine waschen.
•Stellen Sie das Cappuccinatore-Rohr und das Milcheinlaufrohr zurück auf.
Kalkentfernung
Zwecks eines effektiven Betriebs der Kaffeemaschine führen Sie die Entkalkung jede 2-3 Monate und noch öfter, wenn Sie hartes Wasser benutzen.
•Vergewissern Sie sich, dass das Gerät ausgeschaltet ist.
•Bereiten Sie Zitronensäurelösung zu: 2 Teelöffel für 1 Liter Wasser und gießen Sie erhaltene Lösung in den Wasserbehälter (16) ein. Stellen Sie den Behälter (16) zurück auf.
•Nehmen Sie den Milchbehälter (11) ab, füllen Sie ihn mit Kaltwasser bis zur „MAX“- Wasserstandsmarke auf und stellen Sie diesen zurück auf (Abb. 2).
•Wählen Sie einen von den Kaffeefiltern (20 oder 21) und setzen Sie ihn in den Halter (19) ein, indem Sie den Vorsprung am Filter und den Schlitz im Halter (19) zusammenfallen lassen und drehen Sie den Filter im/entgegen dem Uhrzeigersinn (Abb. 3, 4).
|
VT-1517_IM.indd 14 |
19.03.2014 14:57:55 |

DEUTSCH
•Stellen Sie den Filterhalter in die Kaffeemaschine ein. Die Vorsprünge des Filterhalters (19) sollen mit den Aussparungen des Boilers zusammenfallen (Abb. 5), wonach drehen Sie den Griff des Filterhaltes (17) nach rechts (Abb. 6, 7).
|
• Stellen Sie eine |
passende Tasse auf |
|
die Tropfschale (5) und richten Sie das |
|
|
Cappuccinatore-Rohr (2) in die Tasse mittels |
|
|
des Griffs (8) (Abb. |
8). |
•Stecken Sie den Netzstecker in die Steckdose.
•Schalten Sie die Kaffeemaschine durch das Drucken der Taste (14) ein, die Beleuchtung der Tasten (23, 24 und 25) auf der Bedienungsplatte wird blinken.
•Wenn die Tasten der Bedienungsplatte zu blinken aufhören, drücken Sie die Taste der Espresso-Zubereitung (23) zweimal.
•Wiederholen Sie die Reinigung des Boilers mit kleinen Pausen bis es keine Zitronensäurelösung im Behälter vorhanden gibt.
•Nach der Reinigung gießen Sie Wasser in den Behälter (16) und wiederholen Sie diese Prozedure zweibis dreimal, um die Reste der Zitronensäure oder des Entkalkungsmittels zu entfernen.
Anmerkung:
•Zur Entkalkung können Sie unter Beachtung der Betriebsanleitung spezielle Entkalkungsmittel verwenden.
Störungen, ihre Ursachen und Beseitigung
Reinigung
•Reinigung der Filter (20, 21): die Filter können Sie in der Geschirrspülmaschine waschen. Falls die Öffnungen mit den Kaffeeresten verstopft sind, können Sie diese mit einer kleinen Bürste reinigen.
•WischenSiedasGehäusederKaffeemaschine mit einem weichen angefeuchteten Tuch ab. Es ist nicht gestattet, Metallbürsten und Abrasivmittel für die Reinigung des Geräts zu benutzen.
•Es ist nicht gestattet, das Gehäuse der Kaffeemaschine ins Wasser oder andere Flussigkeiten zu tauchen.
•Es ist nicht gestattet, das Gehäuse der Kaffeemaschine ins Wasser oder andere Flussigkeiten zu tauchen.
•Waschen Sie abnehmbare Teile der Kaffeemaschine mit Warmwasser und einem weichen Reinigungsmittel.
Tropfschalen
•Nehmen Sie den Deckel von der Tropfschale ab, nehmen Sie die Tropfschale ab und gießen Sie Wasser daraus ab, stellen Sie die Tropfschale zurück, stellen Sie das Gitter auf die Tropfschale auf.
•Bei der Notwendigkeit waschen Sie die Tropfschalen und die Deckel mit Wasser und einem weichen Reinigungsmittel, danach spülen und trocknen Sie diese ab.
|
Störung |
Ursache |
Beseitigung |
|
Die Kaffeemaschine |
Keine Netzspannung in der |
Vergewissern Sie sich, dass die |
|
schaltet sich nicht ein. |
Steckdose. |
Steckdose funktioniert. |
|
Der Netzstecker des Netzkabels |
Prüfen Sie, ob der Stecker fest in der |
|
|
sitzt in der Steckdose nicht fest. |
Steckdose sitzt. |
|
|
Ausfließen von Wasser |
Die Tropfschale ist überfüllt. |
Gießen Sie Wasser aus der |
|
aus dem Untereil der |
Tropfschale ab. |
|
|
Kaffeemaschine. |
||
|
Ausfließen von Kaffee |
Undichte Verbindung des Filters |
Reinigen Sie Ränder des Filters. |
|
aus dem Filterhalter. |
und des Verdichters im Boiler, der |
|
|
gemahlene Kaffee wurde auf die |
||
|
Ränder des Filters verschüttet. |
||
|
15 |
|
VT-1517_IM.indd 15 |
19.03.2014 14:57:55 |
DEUTSCH
|
Störung |
Ursache |
Beseitigung |
|
Der zubereitete Kaffee |
Die Entkalkung im Boiler wurde |
Siehe die Abschnitte |
|
hat einen fremden |
nicht richtig durchgeführt. |
„Vorbereitung zur Inbetriebnahme“ |
|
Geruch. |
und „Entkalkung“ und führen Sie |
|
|
diese Prozeduren mehrmals durch. |
||
|
Der Kaffee wurde nicht richtig |
Benutzen Sie den frisch gemahlenen |
|
|
aufbewahrt. |
Kaffee. |
|
|
Bewahren Sie den Kaffee an einem |
||
|
kühlen trockenen Ort auf. |
||
|
Der Dampf schlägt |
Die Temperatur des austretenden |
Schlagen Sie Milch nur dann auf, |
|
Milch nicht auf. |
Dampfes ist zu niedrig. |
wenn die Beleuchtung der Tasten der |
|
Bedienungsplatte zu blinken aufhört. |
||
|
Der Behälter ist zu groß oder passt |
Zum Milchaufschlagen |
|
|
nicht. |
benutzen Sie enges, hohes Geschirr. |
|
|
Sie haben Entfettungsmilch |
Benutzen Sie nur Vollmilch 4-6% |
|
|
genutzt. |
Fett. |
|
|
Alle Anzeigen und |
Kein Wasser im Behälter (16). |
Gießen Sie Wasser in den |
|
die Beleuchtung |
Wasserbehälter (16) ein. |
|
|
der Tasten auf der |
||
|
Bedienungsplatte |
||
|
blinken. |
Technische Eigenschaften
Fassungsvermögen des abnehmbaren Wasserbehälters: 1,65 l Stromversorgung: 220-240 V ~ 50 Hz Aufnahmeleistung: 1050–1238 W
Der Hersteller behält sich das Recht vor, Design und technische Eigenschaften des Geräts ohne Vorbenachrichtigung zu verändern.
Die Nutzungsdauer des Geräts beträgt 5 Jahre
Gewährleistung
Ausführliche Bedingungen der Gewährleistung kann man beim Dealer, der diese Geräte verkauft hat, bekommen. Bei beliebiger Anspruchserhebung soll man während der Laufzeit der vorliegenden Gewährleistung den Check oder die Quittung über den Ankauf vorzulegen.
Das vorliegende Produkt entspricht den Forderungen der elektromagnetischen Verträglichkeit, die in 2004/108/ EC — Richtlinie des Rates und den Vorschriften 2006/95/EC über die Niederspannungsgeräte vorgesehen sind.
16
|
VT-1517_IM.indd 16 |
19.03.2014 14:57:55 |

|
русский |
|||||
|
КОФЕВАРКА ЭСПРЕССО/КАПУЧИНО/ЛАТТЕ |
При пользовании электрическими прибора- |
||||
|
ми необходимо всегда соблюдать основные |
|||||
|
Описание |
меры предосторожности, в том числе: |
||||
|
1. |
Площадка для подогрева чашек |
• Внимательно прочитайте все инструкции. |
|||
|
2. |
Трубка-капучинатор |
• Используйте кофеварку только по ее пря- |
|||
|
3. |
Выдвижной поддон для капель |
мому назначению. |
|||
|
4. |
Крышка выдвижного поддона |
• |
Убедитесь, что напряжение электриче- |
||
|
5. |
Поддон для капель |
ской сети соответствует напряжению, |
|||
|
6. |
Крышка поддона для капель |
указанному на корпусе устройства. |
|||
|
7. |
Крышка емкости для молока |
• Используйте сетевую розетку с надежным |
|||
|
8. |
Ручка регулировки угла наклона трубки- |
контактом заземления. |
|||
|
капучинатора |
• Во избежание риска возникновения пожа- |
||||
|
9. |
Регулятор (интенсивности) подачи молоч- |
ра не используйте переходники при под- |
|||
|
ной пенки |
ключении устройства |
к электрической |
|||
|
10. |
Трубка забора молока из емкости |
розетке. |
|||
|
11. |
Емкость для молока |
• Не включайте кофеварку без воды. |
|||
|
12. |
Панель управления |
• |
Используйте только |
принадлежности, |
|
|
13. |
Корпус кофеварки |
входящие в комплект поставки. |
|||
|
14. |
Кнопка включения/выключения (I/O) |
• Перед включением кофеварки убедитесь, |
|||
|
15. |
Крышка емкости для воды |
что все съемные детали установлены пра- |
|||
|
16. |
Съемная емкость для воды |
вильно. |
|||
|
17. |
Ручка держателя фильтра |
• Не дотрагивайтесь до горячих частей и |
|||
|
18. |
Фиксатор фильтра |
поверхностей кофеварки. |
|||
|
19. |
Держатель фильтра |
• Соблюдайте осторожность во время |
|||
|
20. |
Фильтр для приготовления одной порции |
работы с выходящим паром. |
|||
|
напитка |
• Запрещается снимать держатель фильтра |
||||
|
21. |
Фильтр для приготовления двойной пор- |
во время работы кофеварки. |
|||
|
ции напитка |
• |
Устанавливайте устройство на ровную |
|||
|
22. |
Мерная ложка с уплотнителем молотого |
устойчивую поверхность. |
|||
|
кофе |
• Во избежание пожара, удара электриче- |
||||
|
Панель управления |
ским током или физических поврежде- |
||||
|
23. |
Кнопка приготовления эспрессо |
ний не погружайте вилку сетевого шнура, |
|||
|
24. |
Кнопка приготовления капучино |
сетевой шнур или корпус кофеварки в |
|||
|
25. |
Кнопка приготовления латте |
воду или другие жидкости. |
|||
|
Внимание! |
• Всегда отключайте кофеварку от электри- |
||||
|
ческой сети, когда она не используется, |
|||||
|
• |
Для дополнительной защиты целе- |
||||
|
или перед чисткой. |
|||||
|
сообразно установить в цепи пита- |
|||||
|
• Для отключения кофеварки от сети выклю- |
|||||
|
ния устройство защитного отключения |
чите кофеварку нажатием кнопки (14), а |
||||
|
(УЗО) с номинальным током срабатыва- |
|||||
|
затем выньте сетевую вилку из розетки. |
|||||
|
ния, не превышающим 30 мА. Для уста- |
|||||
|
• Следите за тем, чтобы сетевой шнур не |
|||||
|
новки УЗО обратитесь к специалисту. |
свешивался c края стола и не соприкасал- |
||||
|
Меры безопасности |
ся с горячими поверхностями. |
||||
|
• Не ставьте кофеварку на горячие поверх- |
|||||
|
Перед использованием устройства внима- |
|||||
|
тельно ознакомьтесь с руководством по экс- |
ности. |
||||
|
• Не используйте кофеварку вне помещений. |
|||||
|
плуатации. Сохраняйте данное руководство в |
• Никогда не оставляйте кофеварку в местах |
||||
|
течение всего срока эксплуатации. |
с температурой ниже 0°C. |
||||
|
Неправильное обращение с устройством |
|||||
|
• |
Из соображений безопасности детей |
||||
|
может привести к его поломке, причинению |
не оставляйте полиэтиленовые пакеты, |
||||
|
вреда пользователю или его имуществу. |
|||||
|
17 |
|
VT-1517_IM.indd 17 |
19.03.2014 14:57:55 |

русский
|
используемые в качестве упаковки, без |
• Снимите емкость для молока (11), также |
|||||||
|
надзора. |
наполните её холодной водой до отметки |
|||||||
|
• Внимание! Не разрешайте детям играть с |
МАХ и установите её на место (рис.2). |
|||||||
|
полиэтиленовыми пакетами или пленкой. |
• Выберите один из фильтров для кофе (20 |
|||||||
|
Опасность удушья! |
или 21) и установите его в держатель (19), |
|||||||
|
• Не разрешайте детям использовать |
совместив выступ на фильтре с прорезью |
|||||||
|
устройство в качестве игрушки. |
в держателе (19) и поверните фильтр по/ |
|||||||
|
• |
Не оставляйте работающее устройство |
против часовой стрелке (рис. 3, 4). |
||||||
|
без присмотра, будьте особенно внима- |
• |
Установите держатель фильтра в кофе- |
||||||
|
тельны, если поблизости от работающе- |
варку. Выступы держателя (19) должны |
|||||||
|
го устройства находятся дети или лица с |
совпасть с пазами на бойлере (рис.5), |
|||||||
|
ограниченными возможностями. |
после чего поверните ручку держателя |
|||||||
|
• Данное устройство не предназначено для |
фильтра (17) в правую сторону до упора |
|||||||
|
использования детьми и лицами с ограни- |
(рис.6,7). |
|||||||
|
ченными возможностями, если им не даны |
• Поставьте подходящую чашку на соответ- |
|||||||
|
соответствующие и понятные им инструк- |
ствующий поддон (3 или 5) и с помощью |
|||||||
|
ции о безопасном пользовании устрой- |
ручки (8) направьте трубку-капучинатор |
|||||||
|
ством и тех опасностях, которые могут |
(2) в чашку (рис.8). |
|||||||
|
возникать при его неправильном пользо- |
• Вставьте вилку сетевого шнура в розетку. |
|||||||
|
вании, лицом, отвечающим за их безопас- |
• |
Включите |
кофеварку нажатием |
кнопки |
||||
|
ность. |
(14), подсветка кнопок (23, 24 и 25) на |
|||||||
|
• Не пользуйтесь кофеваркой с поврежден- |
панели управления начнет мигать. |
|||||||
|
ной вилкой сетевого шнура, поврежден- |
• Когда подсветка |
кнопок перестанет |
||||||
|
ным сетевым шнуром, в случае ее непра- |
мигать, нажмите и удерживайте кнопку |
|||||||
|
вильной работы или после любых повреж- |
приготовления эспрессо (23) в течение |
|||||||
|
дений. |
3 секунд. Позвольте воде течь в течение |
|||||||
|
• |
Запрещается самостоятельно ремонтиро- |
80-90 секунд. |
||||||
|
вать кофеварку, для ремонта обратитесь |
• Повторным нажатием кнопки (23) отклю- |
|||||||
|
в ближайший авторизованный сервисный |
чите подачу воды в чашу. |
|||||||
|
центр. |
• |
Поворотом регулятора подачи молоч- |
||||||
|
УСТРОЙСТВО |
ПРЕДНАЗНАЧЕНО ТОЛЬКО |
ной пенки (9) выберите режим промывки |
||||||
|
«Очистка». |
||||||||
|
ДЛЯ ДОМАШНЕГО ИСПОЛЬЗОВАНИЯ |
||||||||
|
• |
Затем нажмите и удерживайте кнопку |
|||||||
|
Подготовка к работе |
приготовления капучино (24) в течение |
|||||||
|
3 секунд. Позвольте воде течь в течение |
||||||||
|
• |
Убедитесь, |
что устройство находится в |
||||||
|
80-90 секунд. |
||||||||
|
выключенном состоянии. |
||||||||
|
• Повторным нажатием кнопки (24) отклю- |
||||||||
|
• |
Внимание! Перед первым использо- |
|||||||
|
ванием кофеварки извлеките красную |
чите подачу воды в чашу. |
|||||||
|
• |
Подсветка |
кнопок |
управления |
будет |
||||
|
резиновую пробку из резервуара для |
постоянно гореть, что свидетельствует о |
|||||||
|
воды (16). |
||||||||
|
том, что устройство готово к эксплуатации |
||||||||
|
• Перед первым использованием кофевар- |
||||||||
|
и бойлер промыт. |
||||||||
|
ки промойте все ее съемные части теплой |
||||||||
|
водой и просушите. |
Внимание! |
|||||||
|
• Перед включением убедитесь, что напря- |
• Запрещается снимать держатель фильтра |
|||||||
|
жение электрической сети соответству- |
(19) в процессе работы устройства. |
|||||||
|
ет напряжению, указанному на корпусе |
• |
Не снимайте держатель фильтра (19) |
||||||
|
устройства. |
сразу же после приготовления кофе, так |
|||||||
|
• Снимите емкость (16), наполните ее холод- |
как внутри фильтра может быть избыточ- |
|||||||
|
ной водой до отметки MAX и установите на |
ное давление воды и пара, дождитесь |
|||||||
|
место (рис.1). |
остывания кофеварки. |
|||||||
|
18 |
|
VT-1517_IM.indd 18 |
19.03.2014 14:57:55 |

русский
•Для снятия держателя фильтра (19) поверните ручку в левую сторону и снимите держатель.
Как выбрать правильный объем чашки
|
Напиток |
Примерное |
|
|
количество |
||
|
готового |
||
|
продукта |
||
|
Эспрессо |
Одна порция |
30-40 мл |
|
Двойная порция |
70-80 мл |
|
|
Капучино |
Одна порция |
170 мл |
|
Двойная порция |
280 мл |
|
|
Латте |
Одна порция |
340 мл |
|
Двойная порция |
430 мл |
Примечание:
•Используемые чашки необходимо предварительно нагреть, во время нагрева воды в бойлере, установите чашки на площадку (1).
Приготовление кофе эспрессо
•Убедитесь, что устройство находится в выключенном положении.
•Снимите емкость (16), наполните ее холодной водой и установите на место (рис.1).
•Выберите один из фильтров для кофе (20 или 21) и установите его в держатель (19), совместив выступ на фильтре с прорезью
вдержателе (19) и поверните фильтр по/ против часовой стрелке (рис. 3, 4).
•Насыпьте молотый кофе в фильтр: 2 полные мерные ложки — для приготовления двойной порции кофе и 1 полную ложку
—для приготовления одной порции кофе, разровняйте и слегка утрамбуйте молотый кофе обратной стороной мерной ложки (22).
•Установите держатель фильтра в кофеварку. Выступы держателя (19) должны совпасть с пазами на бойлере (рис.5), после чего поверните ручку держателя фильтра (17) в правую сторону до упора (рис.6,7).
•Поставьте подходящую чашку на соответствующий поддон (3 или 5) и с помощью ручки (8) направьте трубку-капучинатор (2)
вчашку (рис.8).
•Вставьте вилку сетевого шнура в розетку.
19
•Включите кофеварку нажатием кнопки (14), подсветка кнопок (23, 24 и 25) на панели управления начнет мигать.
Примечание: В целях безопасности устройство автоматически переходит в режим ожидания (отключается нагрев бойлера, гаснет подсветка кнопок управления), если им не пользуются в течение 15 минут. Для возврата в рабочий режим нажмите любую кнопку управления.
•Когда кнопки на панели управления перестанут мигать, нажмите на кнопку приготовления эспрессо (23) один раз для приготовления одной порции кофе (3040 мл).
Примечание: Подсветка кнопки (23) перестает мигать раньше остальных – это нормально.
•Нажмите дважды на кнопку (23) для приготовления двойной порции эспрессо.
•Нажмите и удерживайте кнопку (23) в течение 3 секунд для приготовления порции эспрессо по вашему усмотрению. Устройство может приготовить до 150 мл эспрессо, а затем отключится.
•По вашему усмотрению Вы можете отключить подачу кофе в чашу повторным нажатием кнопки (23).
Примечание:
•Повторное приготовление кофе рекомендуется производить с интервалами не менее 5 минут.
Приготовление капучино Внимание! Опасайтесь ожогов выходящим горячим паром.
•Убедитесь, что устройство находится в выключенном положении.
•Снимите емкость (16), наполните ее холодной водой и установите на место (рис.1).
•Снимите емкость для молока (11), также наполните её молоком и установите её на место (рис.2).
•Насыпьте молотый кофе в фильтр: 2 полные мерные ложки — для приготовления двойной порции кофе и 1 полную ложку — для приготовления одной порции кофе, разровняйте и слегка утрамбуйте молотый кофе обратной стороной мерной ложки (22).
|
VT-1517_IM.indd 19 |
19.03.2014 14:57:55 |

русский
•Установите держатель фильтра в кофеварку. Выступы держателя (19) должны совпасть с пазами на бойлере (рис.5), после чего поверните ручку держателя фильтра (17) в правую сторону до упора (рис.6,7).
•Поставьте подходящую чашку на соответствующий поддон (3 или 5) и с помощью ручки (8) направьте трубку-капучинатор
(2) в чашку (рис.8).
•Вставьте вилку сетевого шнура в розетку.
•Включите кофеварку нажатием кнопки (14).
•Подсветка кнопок (23, 24 и 25) на панели управления начнет мигать.
•Поворотом регулятора подачи молочной пенки (9) выберите режим «Капучино».
Примечание: В целях безопасности устройство автоматически переходит в режим ожидания (отключается нагрев бойлера, гаснет подсветка кнопок управления), если им не пользуются в течение 15 минут. Для возврата в рабочий режим нажмите любую кнопку управления.
•Когда кнопки на панели управления перестанут мигать, нажмите на кнопку приготовления капучино (24) один раз для приготовления одной порции кофе.
•Нажмите дважды на кнопку (24) для приготовления двойной порции капучино.
Приготовление латте Внимание! Опасайтесь ожогов выходящим горячим паром.
после чего поверните ручку держателя фильтра (17) в правую сторону до упора (рис.6,7).
•Поставьте подходящую чашку на соответствующий поддон (3 или 5) и с помощью ручки (8) направьте трубку-капучинатор
(2) в чашку (рис.8).
•Вставьте вилку сетевого шнура в розетку.
•Включите кофеварку нажатием кнопки (14).
•Подсветка кнопок (23, 24 и 25) на панели управления начнет мигать.
•Поворотом регулятора подачи молочной пенки (9) выберите режим «Латте».
Примечание: В целях безопасности устройство автоматически переходит в режим ожидания (отключается нагрев бойлера, гаснет подсветка кнопок управления), если им не пользуются в течение 15 минут. Для возврата в рабочий режим нажмите любую кнопку управления.
•Когда кнопки на панели управления перестанут мигать, нажмите на кнопку приготовления латте (25) один раз для приготовления одной порции латте.
•Нажмите дважды на кнопку (25) для приготовления двойной порции латте.
Приготовление молочной пенки
Вы можете приготовить необходимое количество молочной пенки в любое время. Молочная пенка может также использоваться для приготовления горячего шоколада, маккиято, чая со специями и т.д.
•Убедитесь, что устройство находится в • Нажмите и удерживайте кнопку (24)
|
выключенном положении. |
в течение 3 секунд для приготовления |
|
• Снимите емкость (16), наполните ее холод- |
молочной пенки. |
|
ной водой и установите на место (рис.1). |
• По вашему усмотрению вы можете отклю- |
|
• Снимите емкость для молока (11), также |
чить данную функцию повторным нажати- |
|
наполните её молоком и установите её на |
ем кнопки (24). |
|
место (рис.2). |
• Важно, чтобы молоко, используемое для |
|
• Насыпьте молотый кофе в фильтр: 2 пол- |
приготовления пенки, было свежим и |
|
ные мерные ложки — для приготовления |
без консервантов, то есть не так назы- |
|
двойной порции кофе и 1 полную ложку |
ваемое молоко длительного хранения. |
|
— для приготовления одной порции кофе, |
Используется обычное цельное молоко |
|
разровняйте и слегка утрамбуйте моло- |
жирностью от 4 до 6%, жирность сливок |
|
тый кофе обратной стороной мерной |
должна быть не менее 10%. |
|
ложки (22). |
• В случае если после приготовления кофе |
|
• Установите держатель фильтра в кофе- |
в емкости (11) ещё осталось молоко или |
|
варку. Выступы держателя (19) должны |
сливки, вы можете извлечь емкость для |
|
совпасть с пазами на бойлере (рис.5), |
молока и убрать её в холодильник (рис.9). |
|
20 |
|
VT-1517_IM.indd 20 |
19.03.2014 14:57:55 |
 Loading…
You can only view or download manuals with
Sign Up and get 5 for free
Upload your files to the site. You get 1 for each file you add
Get 1 for every time someone downloads your manual
Buy as many as you need
Ароматная чашка свежеприготовленного кофе не проблема с кофеваркой Vitek VT-1517!
Хороший выбор
Стильная кофеварка приготовит для вас за считанные секунды латте, эспрессо или капучино.
Особенности
Два съемных резервуара для воды и молоко (1,5 л и 300 мл соответственно) помогут вам приготовить кофе на небольшую компанию. К тому же их не только легко наполнять, но и мыть.
Встроенный капучинатор значительно облегчает вам приготовление таких напитков как капучино или латте. Вам всего лишь нужно залить молоко в соответствующий резервуар и выбрать нужную опцию в меню, после этого кофеварка приготовит напиток за вас. При этом вы можете выбрать подходящий для себя объем.
Данный прибор помимо всего прочего имеет поддон для подогрева чашек.
Автоматическая очистка
Благодаря этой системе, которая грамотно предусмотрена в данной кофеварке, уход за ней стал еще проще.