Quick Guide
 Step One
Download Logitech Options to use all the possibilities this mouse has to offer. To download and learn more about the possibilities go to logitech.com/options.
 Step Two
Turn your mouse on.
 Step Three
This mouse allows you to use it with up to three different computers. Just use the Easy Switch™ button to change the channel. Select the channel you want and go to the next step.
 Step Four
To connect your mouse to your computer press the Easy-Switch™ button for 3 seconds. When it blinks fast it means it’s in discoverable mode.
 Step Five
Choose if you want to pair with Bluetooth or with the provided Unifying receiver.
Product Overview
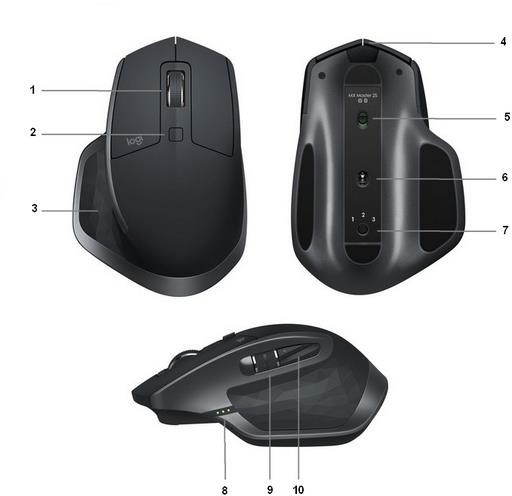
MX MASTER 2S AT A GLANCE

1 – Speed-adaptive scroll wheel
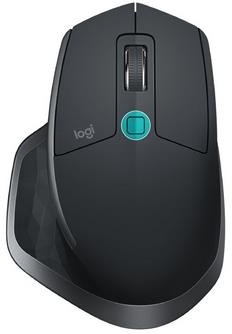
2 – Manual shift button
3 – Gesture button
4 – Micro USB port
5 – On/Off button
6 – Darkfield high precision sensor
7 – Easy-Switch & connect button
8 – Battery status LED
9 – Thumb wheel
10 – Back/forward buttons
Features:
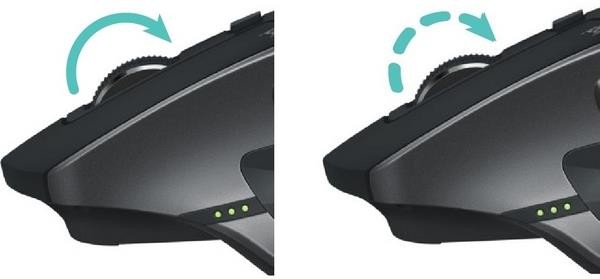
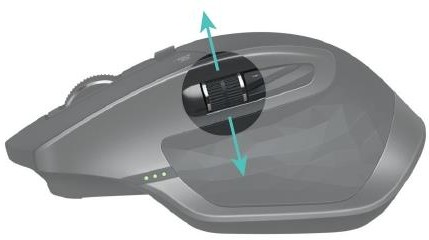
Speed adaptive scroll-wheel
If SmartShift™ is enabled, the speed-adaptive scroll wheel shifts between two scrolling modes automatically, in response to your touch.
- Click-to-click (ratchet) mode — ideal for precise navigation of items and lists.
- Hyper-fast (freespin) mode — near-frictionless spinning, letting you fly through long documents and web pages.


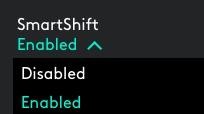
Enable SmartShift
Select Enable from the SmartShift pull-down menu on the Point and scroll tab.

Turn off SmartShift by selecting Disable from the SmartShift pull-down menu.
When SmartShift is disabled, spinning or braking the scroll wheel has no effect on the current scrolling mode.
Switch modes manually
Whether SmartShift is enabled or disabled, you can manually switch between modes by pressing the mode shift button.
By default, mode shift is assigned to the button on top of the mouse. (Check current button assignments on the Mouse tab.)

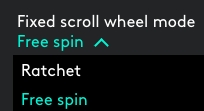
Set a fixed scroll wheel mode
If you prefer to use just one mode, you can fix the scroll wheel to either click-to-click (ratchet) or hyper-fast (freespin) mode.
On the Point and scroll tab, select Ratchet or Freespin from the Fixed scroll wheel mode pulldown menu.

IMPORTANT!
You can fix the scroll wheel mode only if SmartShift is disabled and mode shift is not assigned to any MX Master button.
To activate fixed scroll wheel mode:
- Select Disable from the SmartShift pull-down menu.
- On the Mouse tab, click the highlighted mode shift button and select an action other than mode shift.
For more help, see the MX Master 2S FAQ page
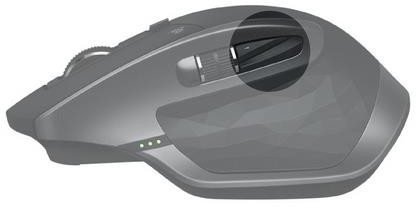
Thumb wheel
Scroll side to side effortlessly with a stroke of your thumb.

To scroll horizontally:
- Spin the thumb wheel up (to scroll right) or down (to scroll left)
Install Logitech Options software to extend thumb wheel capabilities:
- Invert scrolling direction
- Reproduce touch-based gestures
- Adjust scrolling speed and resolution
- Navigate tabbed content
- Switch apps
- Swipe between full-screen apps (Mac only)
- Switch between full-screen apps (Windows 8 only)
- Zoom in and out
- Adjust volume
- Control screen brightness
- Display notifications (Mac only)
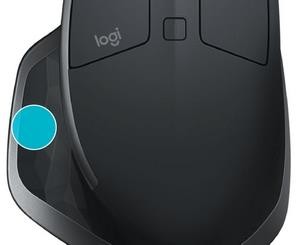
Gesture button
GESTURES STREAMLINE NAVIGATION AND DESKTOP MANAGEMENT
Install Logitech Options software to enable gestures for managing media, panning, zoom, and rotation, plus custom tasks.
Assign up to five different actions to the Gesture button. Or map gestures to other MX Master buttons, including the middle button or manual shift button.

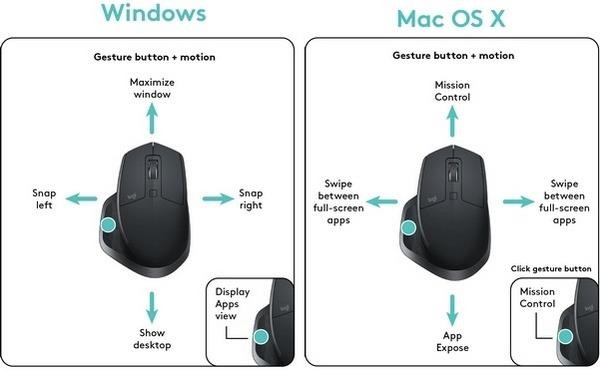
To perform a gesture:
- Hold down the Gesture button while moving the mouse left, right, up, or down.
The figure below shows the gestures for managing windows in Windows 8 and in Mac OS X.


Back/Forward buttons
Conveniently located at your thumb, the back and forward buttons enhance navigation and simplify tasks.

To move back and forward:
- Press the back or forward button to navigate web or document pages, depending on the location of the mouse pointer.
NOTE: On the Mac, enabling of the back/forward buttons requires installation of Logitech Options software.
Install Logitech Options software to unlock new capabilities for the back/forward buttons
In addition to enabling the buttons for use with Macs, Logitech Options software lets you map other useful functions to the buttons, including OS navigation, zoom, dictionary lookup, and more.
Battery

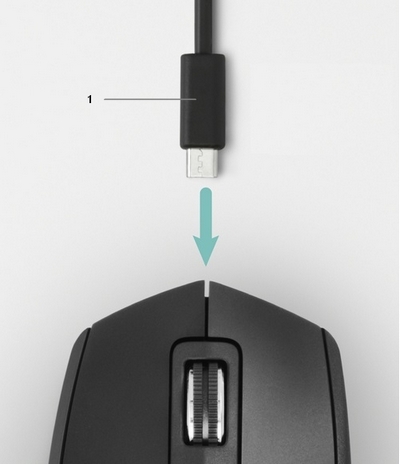
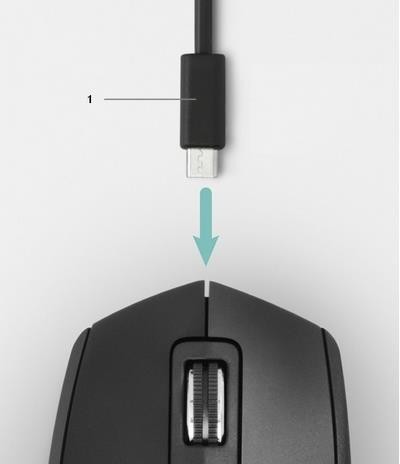
1 – Charging cable
RECHARGE
- Connect one end of the provided charging cable to the Micro-USB port on the mouse and the other end to a USB power source.
A minimum of 3 minutes charging gives you enough power for a full day of use. Depending on how you use the mouse, a full charge can last up to 70 days*.
* Based on eight hours of daily use. Battery life may vary depending on user and operating conditions.
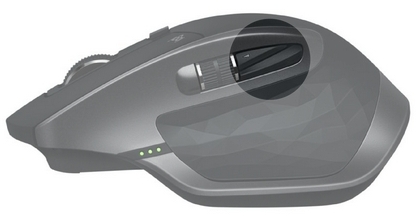
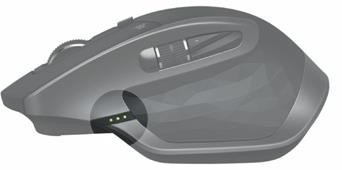
CHECK BATTERY STATUS
Three LED lights on the side of the mouse indicate battery status.

Install Logitech Options software to receive battery status notifications, including low-charge warnings.
| LEDs Lit | Color | Indications |
| 3 | Green | 100% Charge |
| 2 | Green | 66% Charge |
| 1 | Green | 33% Charge |
| 1 | Red | 10% Charge Recharge now! |
logitech.com

Here you can download full pdf version of manual, it may contain additional safety instructions, warranty information, FCC rules, etc.
Мышь Logitech MX Master 2S, лазерная, беспроводная, USB, графитовый [910-005966]
- Тип: лазерная, беспроводная, Bluetooth/Радио, USB/Bluetooth;
- Сенсор: 4000 dpi,
- Количество кнопок: 7; колесо прокрутки;
- Дизайн: для правой руки;
- Размеры (ДхШхВ): 126 х 86 х 46 мм;
Появились вопросы о товаре?

- Тип: лазерная, беспроводная, Bluetooth/Радио, USB/Bluetooth;
- Сенсор: 4000 dpi,
- Количество кнопок: 7; колесо прокрутки;
- Дизайн: для правой руки;
- Размеры (ДхШхВ): 126 х 86 х 46 мм;
Появились вопросы о товаре?
Хочу быть в курсе акций и новинок
Контакты
- Журнал
- Акции
- Покупателям
- Информация
- Доставка
- Гарантия
- Кредит и рассрочка
- Сервисные центры
- Услуги
- Корпоративным клиентам
- Аренда помещений
- Партнёрская программа
- Обзоры
- Форум
- Клуб Ситилинк
- Конфигуратор
- Подбор расходных материалов
- Ситилинк
- Новости
- Вакансии
- Документы
Мы используем файлы cookie. Подробнее
Мы используем файлы cookie для вашего удобства пользования сайтом и повышения качества рекомендаций. Подробнее
|
|
Related Devices:
|
Types of Manuals:
The main types of Logitech MX Master 2S instructions:
- User guide — rules of useing and characteristics
- Service manual — repair, diagnostics, maintenance
- Operation manual — description of the main functions of equipment
Mouse Instructions by Logitech:
-
Prestigio PMSL1P
High Performance Mouse EN — 1 Package Contents 1. Prestigio Mouse Main Unit 2. USB Receiver 3. Travel Case 4. Quick Guide 5. Warranty Card 6. AAA Alkaline Battery X 2 Produc …
PMSL1P Mouse, 3
-
Rosewill RM-6500
3. Button wake-up: If you want to re-use the mouse while it is at “The Sleep Mode”, you can press the button of mouse.4. You can re-utilize the mouse successfully after pressing the button of mouse.• To optimize the performance of your R/F reception, please make your receiver at least 8 inches (20 cm) away …
RM-6500 Mouse, 2
-
Philips SPM4600BB/93
Wired Laser Mouse SPM4600User manualGuía de usuarioCSESENThis device complies with Part 15 of the FCC Rules. Operation is subject to the followingtwo conditions:1 this device may not cause harmful interference, and 2 this device must accept any interference received, including interference that may causeundesired oper …
SPM4600BB/93 Mouse, 2
-
Avago ADNK-3083
ADNK-3083Optical Mouse Designer’s KitDesign GuideADNS-3080’s Delta_X and Delta_Y registers to obtain any horizontal and vertical motion information happening as a result of the mouse being moved. The four-wire syn-chronous serial port is used to set and read parameters in the ADNS-3080, and to read out the motion, …
ADNK-3083 Mouse, 20
-
HP SpaceBall 5000 USB
SpaceBall 5000 USBInstallation StepsThis document describes how to connect the SpaceBall 5000 USB to an HP workstation.1. Attach the USB connector at the end of the SpaceBall cable to any available USB port of the host workstation. If the system is already on, the SpaceBall beeps twice when properly …
SpaceBall 5000 USB Mouse, 3
-
Hama M410
00057271/00057251-04.06www.hama.deHama GmbH & Co KGPostfach 80 86651 Monheim/GermanyTel. +49 (0)9091/502-0 Fax +49 (0)9091/[email protected] 26.04.2006 11:54 Uhr Seite 2 …
M410 Mouse, 11
-
IOne Lynx-R7 A
Lynx-R7 2006/4/4 2.4GHz Wireless Optical Mouse User Guide Thank you for purchasing Lynx-R7 2.4GHz Wireless Optical Mouse. Please read this user guide to help you using this product easily. If you have any questions, please contact us at the website www.ione.com.tw, www.ione-usa.com or www.itron-europe.co …
Lynx-R7 A Mouse, 5
Для данного продукта пока нет загружаемых файлов
Для данного продукта пока нет вопросов и ответов
По данному продукту нет документов.
На данный товар нет запчастей
Для данного товара нет изображений
GETTING STARTED
Questions about your MX MASTER 2S? We’ve got the answers, videos, downloads and information you need. Search for articles or select a topic below to get started.
Product Overview
MX MASTER 2S AT A GLANCE

| 1 – Speed-adaptive scroll wheel | 6 – Darkfield high precision sensor |
| 2 – Manual shift button | 7 – Easy-Switch & connect button |
| 3 – Gesture button | 8 – Battery status LED |
| 4 – Micro USB port | 9 – Thumb wheel |
| 5 – On/Off button | 10 – Back/forward buttons |
Features:
Speed adaptive scroll-wheel
If SmartShift™ is enabled, the speed-adaptive scroll wheel shifts between two scrolling modes automatically, in response to your touch.
- Click-to-click (ratchet) mode — ideal for precise navigation of items and lists.
- Hyper-fast (freespin) mode — near-frictionless spinning, letting you fly through long documents and web pages.

Enable SmartShift
Select Enable from the SmartShift pull-down menu on the Point and scroll tab.

Turn off SmartShift by selecting Disable from the SmartShift pull-down menu.
When SmartShift is disabled, spinning or braking the scroll wheel has no effect on the current scrolling mode.
Switch modes manually
Whether SmartShift is enabled or disabled, you can manually switch between modes by pressing the mode shift button.
By default, mode shift is assigned to the button on top of the mouse. (Check current button assignments on the Mouse tab.)

Set a fixed scroll wheel mode
If you prefer to use just one mode, you can fix the scroll wheel to either click-to-click (ratchet) or hyper-fast (freespin) mode.
On the Point and scroll tab, select Ratchet or Freespin from the Fixed scroll wheel mode pull-down menu.
IMPORTANT!
You can fix the scroll wheel mode only if SmartShift is disabled and mode shift is not assigned to any MX Master button.
To activate fixed scroll wheel mode:
- Select Disable from the SmartShift pull-down menu.
- On the Mouse tab, click the highlighted mode shift button and select an action other than mode shift.
For more help, see the MX Master 2S FAQ page
Thumb wheel
Scroll side to side effortlessly with a stroke of your thumb.

To scroll horizontally:
- Spin the thumb wheel up (to scroll right) or down (to scroll left)
Install Logitech Options software to extend thumb wheel capabilities:
- Invert scrolling direction
- Reproduce touch-based gestures
- Adjust scrolling speed and resolution
- Navigate tabbed content
- Switch apps
- Swipe between full-screen apps (Mac only)
- Switch between full-screen apps (Windows 8 only)
- Zoom in and out
- Adjust volume
- Control screen brightness
- Display notifications (Mac only)
Gesture button
GESTURES STREAMLINE NAVIGATION AND DESKTOP MANAGEMENT
Install Logitech Options software to enable gestures for managing media, panning, zoom, and rotation, plus custom tasks.
Assign up to five different actions to the Gesture button. Or map gestures to other MX Master buttons, including the middle button or manual shift button.

To perform a gesture:
- Hold down the Gesture button while moving the mouse left, right, up, or down.
The figure below shows the gestures for managing windows in Windows 8 and in Mac OS X.

Back/Forward buttons
Conveniently located at your thumb, the back and forward buttons enhance navigation and simplify tasks.
To move back and forward:
- Press the back or forward button to navigate web or document pages, depending on the location of the mouse pointer.
NOTE: On the Mac, enabling of the back/forward buttons requires installation of Logitech Options software.
Install Logitech Options software to unlock new capabilities for the back/forward buttons
In addition to enabling the buttons for use with Macs, Logitech Options software lets you map other useful functions to the buttons, including OS navigation, zoom, dictionary lookup, and more.
Battery
1 – Charging cable
RECHARGE MX MASTER 2S
- Connect one end of the provided charging cable to the Micro-USB port on the mouse and the other end to a USB power source.
A minimum of 3 minutes charging gives you enough power for a full day of use. Depending on how you use the mouse, a full charge can last up to 70 days*.
* Based on eight hours of daily use. Battery life may vary depending on user and operating conditions.
CHECK BATTERY STATUS
Three LED lights on the side of the mouse indicate battery status.

Install Logitech Options software to receive battery status notifications, including low-charge warnings.
| LEDs Lit | Color | Indications |
| 3 | Green | 100% Charge |
| 2 | Green | 66% Charge |
| 1 | Green | 33% Charge |
| 1 | Red | 10% Charge Recharge now! |
Вопросы и ответы
Отобразить все загруженные файлы

Телефонные номера для справки по определенному продукту
Номера телефонов для связи
Product Overview
MX MASTER 2S AT A GLANCE
| 1 – Speed-adaptive scroll wheel | 6 – Darkfield high precision sensor |
| 2 – Manual shift button | 7 – Easy-Switch & connect button |
| 3 – Gesture button | 8 – Battery status LED |
| 4 – Micro USB port | 9 – Thumb wheel |
| 5 – On/Off button | 10 – Back/forward buttons |
Features:
Speed adaptive scroll-wheel
If SmartShift™ is enabled, the speed-adaptive scroll wheel shifts between two scrolling modes automatically, in response to your touch.
- Click-to-click (ratchet) mode — ideal for precise navigation of items and lists.
- Hyper-fast (freespin) mode — near-frictionless spinning, letting you fly through long documents and web pages.
Enable SmartShift
Select Enable from the SmartShift pull-down menu on the Point and scroll tab.
Turn off SmartShift by selecting Disable from the SmartShift pull-down menu.
When SmartShift is disabled, spinning or braking the scroll wheel has no effect on the current scrolling mode.
Switch modes manually
Whether SmartShift is enabled or disabled, you can manually switch between modes by pressing the mode shift button.
By default, mode shift is assigned to the button on top of the mouse. (Check current button assignments on the Mouse tab.)
Set a fixed scroll wheel mode
If you prefer to use just one mode, you can fix the scroll wheel to either click-to-click (ratchet) or hyper-fast (freespin) mode.
On the Point and scroll tab, select Ratchet or Freespin from the Fixed scroll wheel mode pull- down menu.

IMPORTANT!
You can fix the scroll wheel mode only if SmartShift is disabled and mode shift is not assigned to any MX Master button.
To activate fixed scroll wheel mode:
- Select Disable from the SmartShift pull-down menu.
- On the Mouse tab, click the highlighted mode shift button and select an action other than mode shift.
For more help, see the MX Master 2S FAQ page
Thumb wheel
Scroll side to side effortlessly with a stroke of your thumb.
To scroll horizontally:
- Spin the thumb wheel up (to scroll right) or down (to scroll left)
Install Logitech Options software to extend thumb wheel capabilities:
- Invert scrolling direction
- Reproduce touch-based gestures
- Adjust scrolling speed and resolution
- Navigate tabbed content
- Switch apps
- Swipe between full-screen apps (Mac only)
- Switch between full-screen apps (Windows 8 only)
- Zoom in and out
- Adjust volume
- Control screen brightness
- Display notifications (Mac only)
Gesture button
GESTURES STREAMLINE NAVIGATION AND DESKTOP MANAGEMENT
Install Logitech Options software to enable gestures for managing media, panning, zoom, and rotation, plus custom tasks.
Assign up to five different actions to the Gesture button. Or map gestures to other MX Master buttons, including the middle button or manual shift button.
To perform a gesture:
- Hold down the Gesture button while moving the mouse left, right, up, or down.
The figure below shows the gestures for managing windows in Windows 8 and in Mac OS X.
Back/Forward buttons
Conveniently located at your thumb, the back and forward buttons enhance navigation and simplify tasks.
To move back and forward:
- Press the back or forward button to navigate web or document pages, depending on the location of the mouse pointer.
NOTE: On the Mac, enabling of the back/forward buttons requires installation of Logitech Options software.
Install Logitech Options software to unlock new capabilities for the back/forward buttons
In addition to enabling the buttons for use with Macs, Logitech Options software lets you map other useful functions to the buttons, including OS navigation, zoom, dictionary lookup, and more.
Battery
1 – Charging cable RECHARGE MX MASTER 2S
- Connect one end of the provided charging cable to the Micro-USB port on the mouse and the other end to a USB power source.
A minimum of 3 minutes charging gives you enough power for a full day of use. Depending on how you use the mouse, a full charge can last up to 70 days*.
* Based on eight hours of daily use. Battery life may vary depending on user and operating conditions.
CHECK BATTERY STATUS
Three LED lights on the side of the mouse indicate battery status.
Install Logitech Options software to receive battery status notifications, including low-charge warnings.
| LEDs Lit | Color | Indications |
| 3 | Green | 100% Charge |
| 2 | Green | 66% Charge |
| 1 | Green | 33% Charge |
| 1 | Red | 10% Charge Recharge now! |