Требуется руководство для вашей O-Synce minipc free Велокомпьютер? Ниже вы можете просмотреть и загрузить бесплатно руководство в формате PDF. Кроме того, приведены часто задаваемые вопросы, рейтинг изделия и отзывы пользователей, что позволит оптимально использовать ваше изделие. Если это не то руководство, которое вы искали, – свяжитесь с нами.
Ваше устройство неисправно, и в руководстве отсутствует решение? Перейдите в Repair Café для получения бесплатных ремонтных услуг.
Руководство

Рейтинг
Сообщите нам, что вы думаете о O-Synce minipc free Велокомпьютер, оставив оценку продукта. Хотите поделиться вашими впечатлениями от данного изделия или задать вопрос? Вы можете оставить комментарий в нижней части страницы.
Довольны ли вы данным изделием O-Synce?
Да Нет
3 голоса
Часто задаваемые вопросы
Наша служба поддержки выполняет поиск полезной информации по изделиям и отвечает на часто задаваемые вопросы. Если вы заметили неточность в наших часто задаваемых вопросах, сообщите нам об этом с помощью нашей контактной формы.
Зачем нужно указывать размер колеса? Проверенный
Для расчета пробега велокомпьютер использует количество оборотов колеса. Пробег равен количеству оборотов, умноженному на размер колеса.
Это было полезно (3998)
Аккумулятор в моем устройстве окислился, могу ли я его безопасно использовать? Проверенный
Ja, устройство все еще можно безопасно использовать. Во-первых снимаем оксидизд АКБ. Никогда не используйте для этого голые руки. Затем протрите батарейный отсек ватным тампоном, смоченным уксусом или лимонным соком. Дайте ему высохнуть и вставьте новые батарейки.
Это было полезно (675)
Сколько миль в одном километре? Проверенный
1 километр равен 0,621 мили. 10 километров равны 6,21 мили. 1 миля равна 1,609 километра. 10 миль равны 16,09 километра.
Это было полезно (670)

mini_pc free
mini_pc free
1x 1x
1x
1x 4x
www.o-synce.com _ Offi ce Asia/USA: Hong Kong _ Offi ce Europe: Weinheim/Germany
B
D
E
A
1x
C
F
1x 1x 1x
PC-Setup:
As an owner of the mini_pc setting
tool you can easily setup your mini_pc
through the setup software, which
you can download from our website
www.o-synce.com in the software
section.
Manual setting:
Set: Change digit. Hold for > 3 sec. to
run through numbers
Mode: Confirmation, screen jumps
automatically to next position
Switch on:
Insert the battery.
Clock Mode:
„24“ is blinking. Choose „12“ or „24“
with S. Approve with M.
Time, Units:
Time Set: Enter TIME menu. Select
hours, minutes, km/h or mi/h each. Set
each digit with S and confirm with M.
Note: By holding the buttons, counting
up and down will be accelerated.
Reset:
Remove the battery and replace it
upside down. Afterwards insert it the
correct way up, respectively change the
battery if these was empty.
PC-Setup:
Wenn Sie ein mini_pc setting tool
haben, können Sie Ihren mini_pc in nur
wenigen Minuten über die Setup Soft-
ware einstellen, welche Sie kostenlos
von unserer Website unter Software
herunter laden können.
Manuelles Setup:
Set: Zahlenwert ändern, länger als 3
Sek. für Durchlauf halten
Mode: Bestätigen, Anzeige springt
automatisch zur nächsten Stelle
Einschalten:
Legen Sie die Batterie ein.
Uhrzeit Modus:
„24“ blinkt. Mit S „12“ oder „24“
auswählen. Mit
M
bestätigen.
Uhrzeit, Einheiten:
Uhrzeit einstellen: Begeben Sie sich ins
TIME-Menü. Stunden, Minuten, km/h
oder mi/h jeweils mit S auswählen und
mit
M
bestätigen.
Hinweis: Durch halten der Tasten wird
das Auf-bzw. Abzählen beschleunigt.
Reset:
Bitte entnehmen Sie die Batterie und le-
gen diese verkehrt herum ein. Danach
legen Sie die Batterie erneut richtig ein
bzw. wechseln Sie die Batterie sofern
diese leer ist.
Réglage par l’intermédiaire d’un
ordinateur:
Vous pouvez facilement effectuer le ré-
glage de l’mini_pc à l’aide du mini_pc
setting tool et du logiciel setup gratuit,
que vous pouvez télécharger à partir du
site www.o-synce.com, dans l’onglet «
Software » (logiciel).
Réglage manuel:
Set Changer les chiffres. Maintenir
appuyé pour > 3 sec. pour faire défiler
les chiffres.
Mode: Confirmer, l’affichage passe
automatiquement à la position suivant.
Allumer:
Insérez la batterie.
Horloge sur 12 h ou 24 h:
Le chiffre « 24 » clignote. Sélectionnez
« 12 » ou « 24 » avec S, confirmez
avec M.
Heure et unités de mesure de la
vitesse: Pour régler l’heure : Accédez
au menu TIME (heure). Sélectionnez les
heures, les minutes, les km/ h ou les
mi/h avec (S), convirmez avec M.
Remarque : Le fait de maintenir les bou-
tons enfoncés accélère l’incrémentation
et la décrémentation.
Reset:
Enlevez la pile et replacez là à l’envers
dans le compteur. Puis remettez la pile
de façon correcte ou remplacez là par
une nouvelle pile si nécessaire.
The wheel size can be measured most
accurately by rolling up the wheel.
Otherwise, determine the value from
the ETRTO-table. Enter each digit with
S and confirm with M and change to
the next figure.
Der Radumfang wird am genauesten
durch Abrollen festgestellt. Er kann aber
auch aus der ETRTO-Tabelle ermittelt
werden. Jede Stelle mit S eingeben,
mit
M
bestätigen und zur nächsten
Stelle wechseln.
La façon la plus précise de mesurer
la taille d’un pneu est de faire pivoter
la roue. Vous pouvez également vous
reporter au tableau de l’Organisation
technique européenne du pneumatique
et de la jante (ETRTO — European
Tyre and Rim Technical Organization).
Sélectionnez chaque chiffre avec S, puis
confirmez avec M. Le chiffre suivant
sera automatiquement sélectionné.
Set each digit with S and confirm
with M.
Jede Stelle mit S eingeben, mit
M
bestätigen und zur nächsten Stelle
wechseln.
Sélectionnez chaque chiffre avec S, puis
confirmez votre sélection avec M. Le
chiffre suivant sera automatiquement
sélectionné.
Upper display
The upper line constantly shows the
speed (up to 199,9 km/h). The arrows
▼ and ▲ indicate, if the current speed
is higher or lower than the present
average speed.
Lower Display
Click through the functions by pressing
the computer unit in the lower part.
(M MODE key) Following data can be
chosen: Time – stopwatch – distance
– odometer –
average speed – maximum speed.
Setting:
To set the functions TIME & ODO:
Press the computer unit in the lower
part (M MODE key) in TIME & ODO and
hold longer than 4 sec.
Reset:
By pressing the computer unit in the
lower part (M-Mode key) & hold for 2
sec. in mode ATM, DST and AVG all
current data will be reseted.
By pressing the computer unit in the
lower part (M-Mode key) & hold for 2
sec. in mode MAX only the value of
maximum speed will be reset.
To save batteries, please remove the
bike computer after training from the
holder.
Bitte entfernen Sie den Radcomputer
nach dem Training von der Halterung,
um die Batterie zu schonen.
Pour économiser la pile, veuillez retirer
le compteur de son socle après chaque
entraînement.
Change of Battery (CR2032) is necessa-
ry after approx. 2 years. Before change,
take note of wheel size and odometer,
and enter after battery change again.
Turn the battery compartment cover
with a fitting coin to left. Remove the
cover plate carefully. Insert the battery
with correct polarity. You should see the
„+“, when compartment is open. Check
the seal fitting and replace, if required.
Der Batteriewechsel (CR2032) erfolgt
nach etwa 2 Jahren, Vor dem Wechsel
müssen Radgröße und Gesamtstrecke
notiert und anschließend wieder neu
eingegeben werden. Den Batteriedeckel
mit einer Münze nach links drehen und
vorsichtig entnehmen. Batterie mit der
Plus-Seite nach oben zeigend einlegen.
Auf richtigen Sitz der Dichtung achten
und gegebenenfalls gegen eine neue
ersetzen.
Il est nécessaire de remplacer la
pile (CR2032) après environ un an,
ou lorsque l’affichage est de faible
intensité. Avant de remplacer la pile,
veuillez noter la taille des pneus et la
valeur affichée à l’odomètre, car vous
devrez entrer ces valeurs une fois la
pile remplacée. À l’aide d’une pièce de
monnaie, faites tourner le couvercle du
compartiment de la pile dans le sens
contraire des aiguilles d’une montre.
Retirez le couvercle délicatement. In-
sérez la nouvelle pile en vous assurant
de respecter les polarités. Une fois le
couvercle du compartiment de la pile
ouvert, vous devriez voir le symbole
« + ». Vérifiez le joint d’étanchéité et
remplacez-le si nécessaire.
Oberes Display
In der oberen Zeile wird konstant die
Geschwindigkeit angezeigt (bis 199,9
km/h). Die Pfeile ▼ und ▲ zeigen an,
ob die Momentangeschwindigkeit hö-
her oder niedriger liegt, als die bisherige
Durchschnittsgeschwindgkeit.
Unteres Display
Drücken Sie auf den unteren Be-
reich des Displays (M) um zwischen
folgenden Werten umzuschalten:
Uhrzeit – Stoppuhr – Distanz – Odo-
meter – Durchschnittsgeschwindigkeit
– Maximalgeschwindigkeit.
Neueinstellungen:
Um TIME und ODO neu einzustellen:
Drücken Sie länger als 4 Sek. im Menü
TIME & ODO auf den unteren Bereich
des Displays (M).
Löschen/Rücksetzen:
Durch Drücken des unteren Bereichs
des Displays für 2 Sek. in den Ansichten
ATM, DST & AVG werden alle aktuellen
Tourdaten gelöscht.
Durch Drücken des unteren Bereichs
des Displays (M) für 2 Sek. in den
Ansicht MAX wird nur de bisherige Ma-
ximalgeschwindigkeit. zurückgesetzt.
Écran superiéur
La ligne supérieure affiche constam-
ment la vitesse (jusqu’à 199,9 km/h).
Les symboles ▼ et ▲ indiquent si
la vitesse actuelle est supérieure ou
inférieure à la vitesse moyenne.
Écran inférieur
Pour appeler les fonctions — heure, chro-
nomètre, distance, odomètre, vitesse
moyenne et vitesse maximale — de la
touche M appuyez brièvement la partie
basse du compteur.
Reconfiguration de:
Du mode heure, TIME: M > 4 sec. en
mode TIME/ Odométre, ODO: M > 4
sec. en mode ODO
Remise à zéro:
Si vous maintenez M enfoncé pendant
2 secondes en mode ATM, DST ou
AVG, toutes les données relatives à la
randonnée actuelle seront effacées.
Si vous maintenez M enfoncé pendant
2 sec. en mode MAX, seule la vitesse
maximale sera remise à zéro.
EN
DE FR
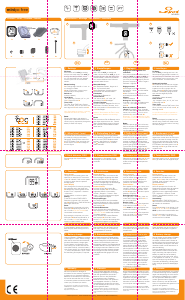
2 Radumfang L (mm)
3 Total distance, ODO 3 Gesamtstrecke ODO
3 Distance totale et odomètre
4 Functions 4 Funktionen 4 Fonctionnalités
5 General remarks 5 Allgemeine Hinweise 5 Remarque générale
6 Battery change 6 Batteriewechsel
6 Remplacement de la pile
1 Settings 1 Réglages1 Einstellungen
2 Wheel size L (mm) 2 Taille des pneus (mm)
NL
PC-Setup
Met de mini_pc setting tool kunt u de
fietscomputer gemakkelijk instellen via
de gratis setup PC-Software, die u vanaf
onze website www.o-synce.com in de
sectie ‘software’ kunt downloaden.
Handmatig instellen:
SET-toets om de nummers te wijzigen.
Houd deze knop mnimaal 3 seconden
ingedrukt om de nummers door te
lopen. Met de M MODE-toets waarde
instellen – het display springt automa-
tisch naar de volgende positie.
Aanzetten:
Inschakelen: plaats de batterij.
Clock modus
„24“ knippert. Kies „12“ of „24“ met
S. Bevestig met
M
.
Time, Units
Tijd instellen: Activeer TIME menu. Kies
hours, minutes, km/h of mi/h met S, en
bevestig met
M
.
Let op: Door de knoppen ingedrukt te
houden, versnelt u het op- en aftellen.
Reset:
Verwijder de batterij en plaats hem an-
dersom terug. Plaats hem daarna weer
terug op de correcte manier of vervang
hem als hij leeg is.
De bandenmaat kan eenvoudig
opgemeten worden door het wiel op te
meten of de maat af te lezen vanaf de
zijkant van de buitenband. Een andere
mogelijkheid is de maat aflezen van de
ETRTO-tabel. Voer ieder getal in met S,
bevestig met
M
en ga verder met het
volgende cijfer.
Voer ieder getal in met S , bevestig met
M
en ga verder met het volgende cijfer.
Display boven
De bovenste regel laat continue de
snelheid zien (tot 199,9 km/h). De
pijlen ▼ en ▲ laten zien, of de huidige
snelheid hoger of lager is dan de
gemiddelde snelheid.
Display onderaf
Voor het oproepen van functies. M
Mode-toets activeren door de onderste
display in te drukken. De volgende
gegevens kunnen opgevraagd worden:
Tijd – stopwatch – afstand – totale
afstand – gemiddelde snelheid – maxi-
mum snelheid.
Verandering:
M Mode-toets in TIME & ODO houd
deze minstens 4 seconden ingedruk om
de waarden te veranderen.
Reset:
Door M 2 seconden in te drukken in de
mode ATM, DST en AVG, verwijderd u
ALLE op dat moment beschikbare data.
Door S 2 seconden in te drukken in
modus MAX, reset u alleen de waarde
van de maximum snelheid.
Spaar de batterij door de computer uit
de houder te verwijderen na gebruik.
Het vervangen van de batterij (CR2032)
is nodig na ongeveer een jaar, of als
het display zwakker wordt. Noteer de
bandenmaat en de kilometerstand voor-
dat u de batterij vervangt en voer deze
naderhand weer in zoals beschreven in
deze handleiding.
Draai het batterijkapje naar links met
een passend muntstuk. Verwijder het
kapje voorzichtig. Verwijder de oude
batterij en plaats de nieuwe batterij,
met de polen op de juiste wijze, terug
in het apparaat. U moet de „+“ kunnen
zien als het kapje nog verwijderd is.
Controleer de afdichting, vervang deze
indien nodig en plaats het batterijkapje
terug.
1 Instellingen
3 Totale afstand, ODO
4 Functies
5 Algemene opmerking
6 Battery change
2 Bandemaat L (mm)
We are only liable for damages in
accordance to the statutory regulations
in respect to our contractual partners.
Batteries are excluded from warranties
but can be returned after use. In case
of a warranty please contact the retailer
where you purchased your device
.
This product is compliant with the Directive
1999/5/EC.The relevant Declaration of Confor-
mity is available at
http://www.o-synce.com.
o-synce haftet gegenüber unserem
jeweiligen Vertragspartner für Mängel
nach den gesetzlichen Vorschriften.
Batterien sind von der Gewährleis-
tung ausgenommen. Entladene
Batterien können aber nach Gebrauch
zurückgegeben werden. Im Falle der
Gewährleistung wenden Sie sich bitte
an den Händler, bei dem Sie Ihr o-synce
Produkt gekauft haben.
Dieses Produkt ist konform mit der Richtlinie
1999/5/EC. Die zugehörige Konformitätserklä-
rung ist erhältlich unter http://www.o-synce.
com.
Notre responsabilité se limite aux dom-
mages, conformément aux dispositions
légales de nos partenaires contractuels.
Les piles ne sont pas couvertes par
la garantie. Les piles peuvent être
retournées après usage. Pour toute ré-
clamation au titre de la garantie, veuillez
communiquer avec votre détaillant.
Ce produit est conforme à la directive 1999/5/
EC. La déclaration de conformité pertinente est
disponible à l’adresse suivante : http://www.o-
synce.com.
We zijn enkel aansprakelijk voor schade
in overeenstemming met de wettelijke
regels met betrekking tot onze contrac-
tuele partners. Batterijen zijn uitgeslo-
ten van garanties. Batterijen kunnen
worden geretourneerd na gebruik.
Neem contact op met de leverancier
waar u uw apparaat heeft gekocht in het
geval van een garantie.
Dit product is compatibel met de richtlijn
1999/5/EC. Dedesbetreffende conformiteitsver-
klaring en garantiekaart is beschikbaar op
http://www.o-synce.com.
7 Warranty 7 Garantie 7 Garantie 7 Garantie
Content / Inhalt / Contenu / Inhoud Installation / Montage / Installation / Installatie
View the manual for the O-Synce Mini Free E-SY Touch here, for free. This manual comes under the category bicycle computers and has been rated by 2 people with an average of a 7.8. This manual is available in the following languages: -. Do you have a question about the O-Synce Mini Free E-SY Touch or do you need help? Ask your question here
The O-Synce Mini Free E-SY Touch is a bicycle computer that offers a range of features to enhance the cycling experience. Designed for easy installation and use, this computer provides accurate information for tracking your cycling performance.
Featuring a touch screen interface, the O-Synce Mini Free E-SY Touch allows for intuitive navigation and effortless operation. With its compact size and sleek design, this computer seamlessly integrates into your bike’s handlebar setup.
The O-Synce Mini Free E-SY Touch offers a variety of functions to assist in tracking your ride. It provides data on speed, distance traveled, and average speed, allowing you to monitor your progress and set personal goals. Additionally, it includes a timer and a clock for timekeeping purposes.
Equipped with wireless technology, this bicycle computer eliminates the need for cumbersome wires and allows for a clean and organized setup. The wireless transmission also ensures accurate and consistent data transfer.
The O-Synce Mini Free E-SY Touch is powered by a long-lasting battery, providing reliable performance for extended periods of time. This eliminates the need for frequent battery replacements, saving you time and money.
Overall, the O-Synce Mini Free E-SY Touch is a reliable and user-friendly bicycle computer that offers essential features for tracking your cycling performance. With its touch screen interface, wireless technology, and durable construction, it is a valuable accessory for any cyclist looking to enhance their riding experience.
General
Can’t find the answer to your question in the manual? You may find the answer to your question in the FAQs about the O-Synce Mini Free E-SY Touch below.
A battery in my bicycle computer has started to corrode. Is the device still safe to use?
The product can still be used safely after proper cleaning. Remove the battery with gloves and clean the battery compartment with a toothbrush and vinegar. After drying, new batteries can be inserted into the device.
What is GPS?
GPS is a system that can be used all over the globe to determine your location by means of satellites.
What does the abbreviation GPS stand for?
The abbreviation GPS stands for ‘Global Positioning System’.
Do I need internet for GPS?
No, no internet is required to receive GPS.
How do I set up the O-Synce Mini Free E-SY Touch on my bike?
To set up the O-Synce Mini Free E-SY Touch on your bike, start by attaching the mounts securely to your handlebars or stem using the provided straps. Then, slide the computer onto the mount until it clicks into place. Finally, adjust the angle of the display for optimal visibility.
How do I pair the bicycle computer with external sensors?
To pair the O-Synce Mini Free E-SY Touch with external sensors, first ensure that your sensors (such as heart rate monitor or speed/cadence sensor) are properly installed on your bike. Then, go to the menu on the computer and select the appropriate sensor type. Follow the on-screen instructions to complete the pairing process.
How can I customize the data displayed on the screen?
To customize the data displayed on the O-Synce Mini Free E-SY Touch screen, press and hold the ‘Menu’ button. Navigate through the options using the up and down buttons until you reach the desired data field. Press the ‘Menu’ button again to select it, and then use the up and down buttons to choose the data type you want to display.
How do I start and stop recording my ride?
To start recording your ride with the O-Synce Mini Free E-SY Touch, press the ‘Start’ button located on the lower part of the computer. To stop recording, press the ‘Stop’ button.
Can I upload my ride data to a computer or smartphone?
Yes, you can upload your ride data from the O-Synce Mini Free E-SY Touch to a computer or smartphone. Connect the computer to your device using the provided USB cable, or sync it via Bluetooth if your smartphone supports it. Once connected, you can transfer your ride data to compatible apps or software for further analysis and tracking.
Is the manual of the O-Synce Mini Free E-SY Touch available in English?
Unfortunately, we do not have the manual for the O-Synce Mini Free E-SY Touch available in English. This manual is available in -.
Is your question not listed? Ask your question here
![]()
Русский
- Bedienungsanleitung O-Synce Mini Free E-SY Touch
- O-Synce Mini Free E-SY Touch User Manual
- Manual Usuario O-Synce Mini Free E-SY Touch
- Mode d’emploi O-Synce Mini Free E-SY Touch
- Istruzioni O-Synce Mini Free E-SY Touch
- инструкция O-Synce Mini Free E-SY Touch
- O-Synce Mini Free E-SY Touchの取扱説明書
- Handleiding O-Synce Mini Free E-SY Touch
- Manual de uso O-Synce Mini Free E-SY Touch
Вам нужна инструкция? Мы поможем Вам ее найти и сэкономить Ваше время.
- 1 stron
- 1.79 mb
Изделие O-Synce Mini Free E-SY Touch, а также другие, которыми Вы пользуетесь ежедневно, наверняка вы получили в комплекте с инструкцией обслуживания. Из опыта наших пользователей мы знаем, что большинство из Вас не уделили этому особого внимания. Большая часть инструкций, сразу же после покупки попадает в корзину для мусора вместе с коробкой — это ошибка. Ознакомьтесь с информацией, касающейся инструкции O-Synce Mini Free E-SY Touch, которая поможет Вам в будущем сэкономить нервы и избежать головной боли.
Важная подсказка — не забывайте хотя бы раз прочитать инструкцию O-Synce Mini Free E-SY Touch
Если вы не хотите каждый раз читать информационные брошюры, касающиеся, тех или O-Synce Mini Free E-SY Touch иных изделий, достаточно, прочитать их раз — сразу же после покупки устройства. Вы получите основное знания, касающиеся поддержания изделия O-Synce Mini Free E-SY Touch в хорошем эксплуатационном состоянии, так, чтобы без проблем достигнуть его планируемого цикла работы. Затем инструкцию можно отложить на полку и вернуться к ней только в случае, если вы не уверены, правильно ли проводится техобслуживание изделия. Правильный уход является необходимым элементом Вашего удовольствия O-Synce Mini Free E-SY Touch.
Раз в году пересмотрите шкафчик, в котором держите инструкции для всех устройств, — выбросите те, которыми вы уже не пользуетесься. Это поможет Вам сохранять порядок в своей домашней базе инструкций обслуживания.
Summary of Contents for O-Synce Mini Free E-SY Touch
Что находится в инструкции O-Synce Mini Free E-SY Touch? Почему стоит ее прочитать?
- Гарантия и подробности, касающиеся техобслуживания изделия
Хорошей идеей будет прикрепить чек к странице инструкции. Если что-то плохое случится во время использования O-Synce Mini Free E-SY Touch, у вас будет комплект документов, необходимый для гарантийного ремонта. В этой части инструкции вы найдете информацию об авторизованных сервисных центрахO-Synce Mini Free E-SY Touch а также, как самостоятельно правильно ухаживать за оборудованием — так, чтобы не потерять гарантийных прав. - Указания по монтажу и Setup
Не терять нервов и времени на самостоятельную попытку установки и первого запуска изделия. Воспользуйтесь рекомендациями производителя O-Synce Mini Free E-SY Touch чтобы правильно запустить изделие, без лишнего риска повреждения оборудования. - Информация, касающаяся дополнительных запчастей (входящих в комплект а также являющихся опцией)
Пересматривая эту часть документа вы сможете проверить, доставлен ли ваш O-Synce Mini Free E-SY Touch с полним комплектом аксессуаров. Вы также сможете узнать, какие дополнительные запчасти или аксессуары для O-Synce Mini Free E-SY Touch Вы сможете найти и докупить к своему устройству. - Troubleshooting
Самые частые проблемы, касающиеся O-Synce Mini Free E-SY Touch и методы их решения. Это очень полезная часть руководства по обслуживанию — она позволит Вам сэкономить много времени на поиск решений. 90% проблем с O-Synce Mini Free E-SY Touch повторяется у многих пользователей. - Требования, касающиеся питания и энергетический класс
Информация, касающаяся количества потребляемой энергии, а также рекомендации, касающиеся установки и питания O-Synce Mini Free E-SY Touch. Прочитайте, чтобы оптимально пользоваться O-Synce Mini Free E-SY Touch и не использовать большего количества ресурсов, нежели это необходимо для правильной работы изделия. - Специальные функции O-Synce Mini Free E-SY Touch
Здесь вы можешь узнать, как персонализировать изделие O-Synce Mini Free E-SY Touch. Вы узнаете, какие дополнительные функции могут помочь Вам удобно использовать продукт O-Synce Mini Free E-SY Touch а также, какие функции Вашего устройства оптимальны для выполнения конкретной деятельности.
Как видите в инструкции вы найдете информацию, которая реально поможет Вам в использовании Вашего изделия. Стоит с ней ознакомиться, чтобы избежать разочарований, возникающих из более короткого, нежели предусматривалось, периода исправности изделия O-Synce Mini Free E-SY Touch. Если все же вы не хотите копить инструкции в своем доме, наш сайт поможет Вам в этом — вы должны найти у нас руководство по обслуживанию большинства из своих устройств, а также O-Synce Mini Free E-SY Touch.
Комментарии (0)
Смотреть руководство для O-Synce Mini Free E-SY Touch ниже. Все руководства на ManualsCat.com могут просматриваться абсолютно бесплатно. Нажав кнопку «Выбор языка» вы можете изменить язык руководства, которое хотите просмотреть.

MANUALSCAT | RU
Вопросы и ответы
У вас есть вопрос о O-Synce Mini Free E-SY Touch, но вы не можете найти ответ в пользовательском руководстве? Возможно, пользователи ManualsCat.com смогут помочь вам и ответят на ваш вопрос. Заполните форму ниже — и ваш вопрос будет отображаться под руководством для O-Synce Mini Free E-SY Touch. Пожалуйста, убедитесь, что вы опишите свои трудности с O-Synce Mini Free E-SY Touch как можно более детально. Чем более детальным является ваш вопрос, тем более высоки шансы, что другой пользователь быстро ответит на него. Вам будет автоматически отправлено электронное письмо, чтобы проинформировать вас, когда кто-то из пользователей ответит на ваш вопрос.
Задать вопрос о O-Synce Mini Free E-SY Touch
- Бренд:
- O-Synce
- Продукт:
- велокомпьютеры
- Модель/название:
- Mini Free E-SY Touch
- Тип файла:
- Доступные языки:
- —