Настройка контроллера Rain Bird серии ESP-RZX
Разработчики компании Rain Bird не устают работать над внедрением передовых технологий для усовершенствования своих контроллеров и добавлять новые возможности с гибким планированием. Программатор, который мы сегодня будем учиться настраивать, идеально подходит для управления поливом частных приусадебных участков любой конфигурации. Он достаточно прост в установке и удобен в использовании, его интуитивно легко программировать даже новичкам.
Существует две разновидности модели RZX: для установки внутри помещения и для уличного размещения. Наружный контроллер оснащён герметичной крышкой, ему не страшны атмосферные осадки и его нет необходимости демонтировать на зимний период. Модель, которая предназначена для установки внутри помещения, имеет влагопроницаемый корпус, но его невысокая стоимость позволяет минимизировать риски попадания влаги путём правильной эксплуатации.
Контроллеры данной марки с поддержкой Wi-Fi предназначены для небольших участков. В контроллерах ограниченное количество станций 4, 6, 8 для внутреннего монтажа и для установки все помещения наружные модели.
Особенности контроллера:
— Совместимость с LNK Wi-Fi-модулем компании Rain Bird;
— Большой ЖК-дисплей с удобным интерфейсом;
— Возможность установки датчика дождя;
— Позонное программирование позволяет создавать независимые графики полива для каждой зоны;
— 6 независимых моментов запуска на каждую зону;
— 4 варианта выбора дней полива для каждой зоны: заданные дни недели, НЕЧЕТНЫЕ календарные дни, ЧЕТНЫЕ календарные дни, циклический полив (через каждые 1–14 дней);
— Ручной режим полива для ВСЕХ зон или ОТДЕЛЬНОЙ зоны.
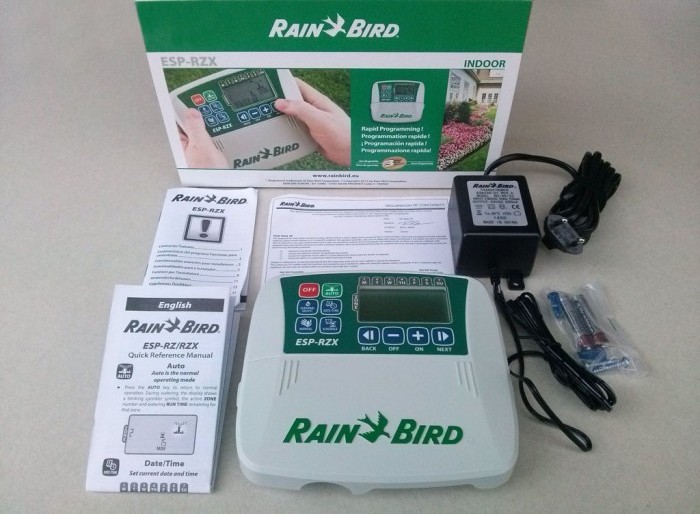
Рассмотрим на примере модели ESP-RZX для размещения внутри помещения как настроить начало полива, продолжительность полива и количество дней полива, а также научимся как запускать ручной режим орошения и выключать контроллер. В его комплект входит сам корпус программатора, батарейки питания, винты для крепления, блок питания и детальная инструкция по программированию.
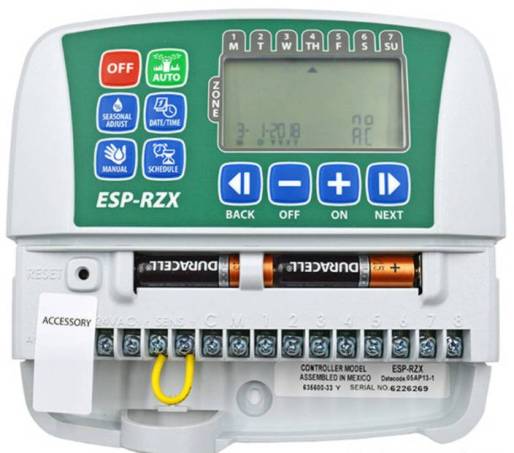
Основными элементами корпуса контроллера являются: жидкокристаллический дисплей, клеммный бокс, набор клавиш для ввода программных настроек, два отсека для батареек ААА. Батареи резервного питания могут пригодиться в случае отсутствия основного питания для того, чтобы сохранить установленные настройки. Клеммный блок содержит разъёмы подключения от 1 до 8 станций, мастер-клапан (главный кабель для подсоединения к электромагнитным клапанам), место для подключения датчика дождя и разъём для питания.
Простой интерфейс пользователя позволяет удобно представлять и описывать каждую функцию контроллера на отдельном экране.
Кнопка AUTO на панели корпуса означает автоматический режим и служит для того, чтобы после вынужденной остановки работы системы вернуться в нормальный режим.
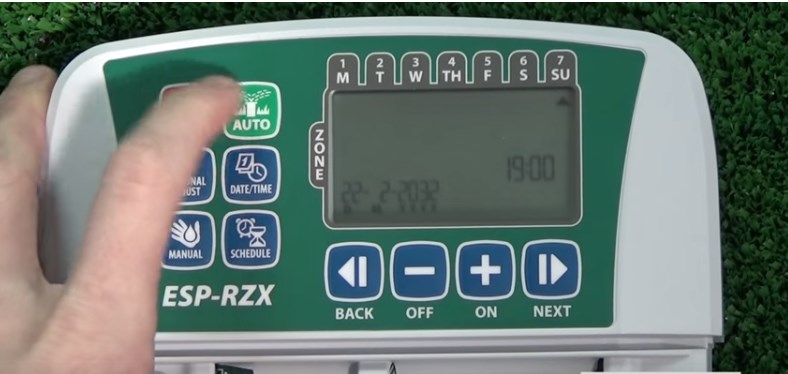
Устанавливаем дату и время
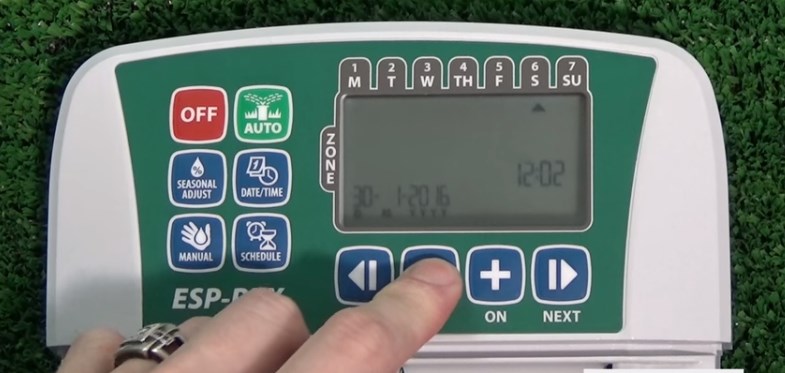
Кнопка DATA предназначена для настройки текущей даты и времени. Клавиши навигации BACK и NEXT используются для перехода между значениями, а ПЛЮС и МИНУС для изменения этих значений. Для установки даты и времени нажимаем на кнопку DATA/TIME и при помощи клавиш навигации выставляем текущую дату и время. Каждое мигающее значение подсказывает о том, что именно мы в данный момент изменяем. По окончании ввода всех показателей, нажимаем на кнопку AUTO.
Создание графиков полива
Создание графиков полива
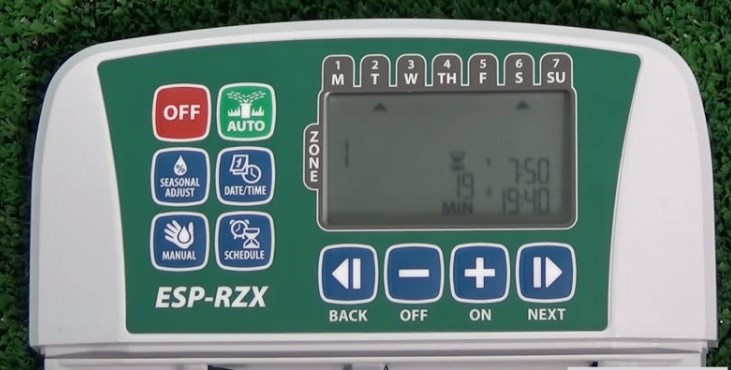
Кнопка CSHEDULE предназначена для программирования настроек для каждой зоны полива. В этом режиме мы можем выбрать зону полива, установить в ней продолжительность полива, количество стартов в течение дня и запрограммировать дни полива. Нажимая на кнопку CSHEDULE, слева на экране по умолчанию отображается мигающая цифра 1, которая означает, что мы начинаем настраивать первую зону полива. Клавишами навигации можно выбрать любую из необходимых зон. С помощью клавиш ПЛЮС и МИНУС легко выставляются требуемые значения каждого параметра, а клавишей NEXT осуществляется переход к этим параметрам (каждый настраиваемый параметр начинает мигать, сигнализируя о готовности меняться). Контроллер позволяет выбрать 4 режима полива в течение дня. Внизу, на фото дисплея видно, что 1-ая зона запрограммирована на полив в течение 19 минут, дважды в день в 7-50 ч. и в 19-40 ч., по вторникам и субботам.
Что касается выбора дней полива, то у контроллера предусмотрена возможность выставить 4 варианта: четные или нечетные дни, цикличность графика полива или дни полива, заданные пользователем. Каждый из этих параметров последовательно отображается на экране дисплея путём нажатия клавиши NEXT. Выбор необходимого графика полива остаётся за пользователем. После окончания всех настроек необходимо нажать на кнопку AUTO, которая вернёт нас к заданным настройкам.
Настройка ручного режима полива
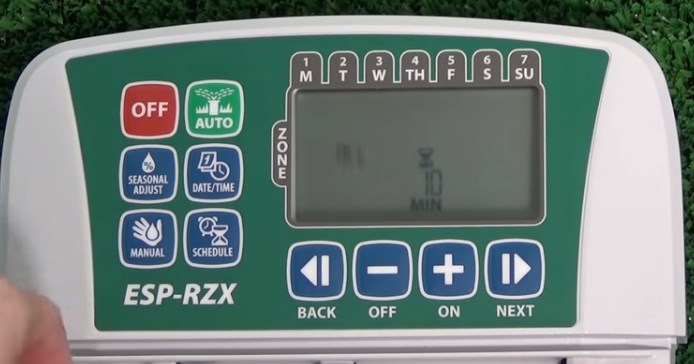
Кнопка MANUAL предназначена для выбора ручного режима и немедленного запуска автоматического полива любой отдельно выбранной зоны или сразу для всех запрограммированных зон. Нажимаем на кнопку MANUAL, клавишей ПЛЮС выбираем требуемую зону и настраиваем продолжительность полива для неё. После завершения выбора значений нажимаем на кнопку NEXT. На дисплее появился значок, обозначающий, что полив пошел.
Ввод корректировок в программы
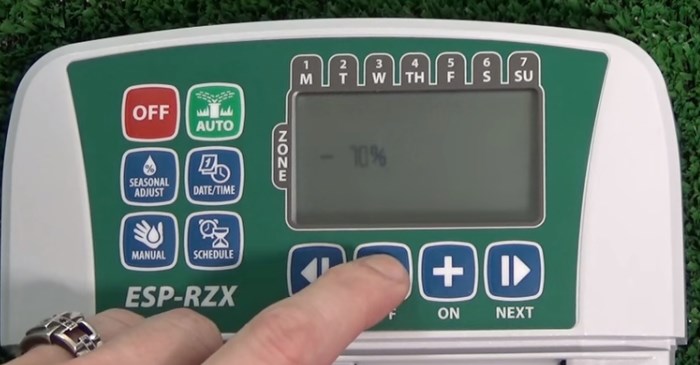
Кнопка SEASONAL ADJUST служит для сезонных регулировок полива. Эта функция помогает пользователям легко приспособить графики полива к изменению сезонных требований по орошению. С помощью неё можно увеличить или уменьшить продолжительность полива для всех зон. Используя клавиши навигации ПЛЮС и МИНУС, выбираем значение, на которое хотим увеличить или уменьшить полив в процентном соотношении от установленных раннее значений. Функцией сезонных корректировок очень удобно пользоваться при смене погодных условий, при этом нет нужды полностью перенастраивать программы полива.
Как полностью остановить автоматический полив?
Кнопка OFF служит для полного отключения и остановки всей системы полива. Если требуется возобновить режим автоматического полива, то достаточно нажать на кнопку AUTO.
Как настроить обход датчика дождя?
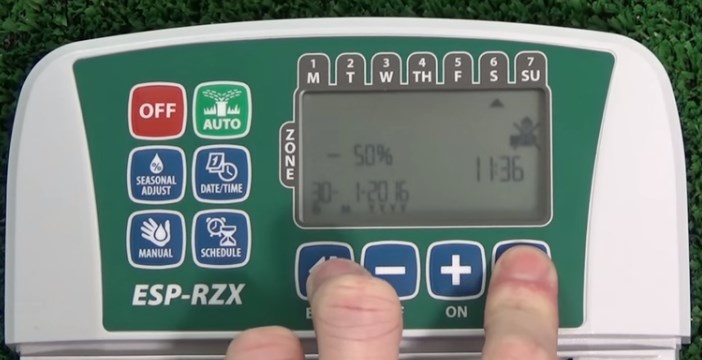
Если на вашем контроллере подключен датчик дождя, то можно воспользоваться имеющейся функцией позонного обхода показателей датчика погоды. Для этого необходимо одновременно зажать клавиши BACK и NEXT. На экране появится значок, обозначающий неактивность датчика дождя. Для возврата к прежним настройкам поступаем тем же способом.
Вернуться ко всем статьям ►
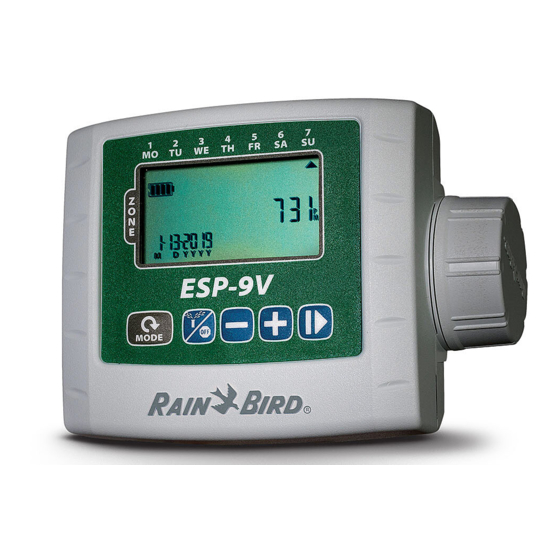
Rain Bird ESP-9V Manual
Controls and Indicators

Operating Modes
Introduction
Thank you for choosing Rain Bird’s ESP-9V Battery-Operated Controller. The ESP-9V is designed to provide worry-free automatic irrigation in the absence of AC power or in areas where installing new field wires is not practical.
Operation and Setup
Contractor Rapid ProgrammingTM
At initial programming, the controller automatically copies the start times and watering days from Zone 1 to all other zones.
NOTE: If multiple zones have the same or overlapping watering times, the controller will water the zones in sequence (multiple zones will not run at the same time).
NOTE: Changes to a zone’s schedule made after initial programming will only affect the zone being modified.
NOTE: You may re-activate the Contractor Rapid ProgrammingTM feature by resetting factory defaults.
Set Date
Press the MODE button until the Set Date screen is displayed. The last two digits of the year will begin to flash.
Set Time
Press the MODE button until the Set Time screen is displayed.
- Press + or – to set the hour (ensure that AM/PM setting is correct); then press

- Press + or – to set the minutes.
- Press the MODE button again to enter the Watering Start Times screen.
Set Zone Watering Start Times
Press the MODE button until the Watering Start Times screen is displayed.
NOTE: Adjustments are set in 10 minute increments.
NOTE: To remove a Start Time, press + or – until -:- (OFF) is displayed. (-:- is just before 12:00 AM.)
NOTE: The controller will not water multiple zones at the same time. If two or more zones have the same (or overlapping) start times, the controller will wait until the first zone is finished watering before starting the rest of the zones in sequence. This method is called «start time stacking».
Set Zone Watering Days
Press the MODE button until the Watering Days screen is displayed.
Custom Days
Watering Day Options
Additional Watering Day options are also available:
- Cyclic Days (1-30)
- Odd Days (Will NOT water on the 31st of the month)
- Even Days
To change a zone’s watering day type, simply press the + and – buttons at the same time while setting Zone Watering Days.
Cyclic Days

Odd Days

NOTE: ODD schedules will not water on the 31st of the month.
Even Days

Set Zone Watering Run Times
Press the MODE button until the Watering Run Times screen is displayed.
Auto Run
Press the MODE button until the AUTO RUN screen is displayed.
In AUTO RUN mode, the ESP-9V will irrigate each zone per its pro grammed schedule. If any zones are scheduled to run at the same time and day, your controller will place those zones in a queue and irrigate one valve at a time, starting with the lowered numbered zone first.
NOTE: After 5 minutes of inactivity, the controller will revert to AUTO RUN mode (unless the controller is in OFF) and turn off the display. Press any key to turn the display back on.
Off
Press the  button until the OFF screen is displayed.
Selecting the OFF mode will cancel any active watering and prevent any irrigation from starting automatically.
NOTE: Select the AUTO RUN mode to resume normal operation. Programmed irrigation schedules will NOT run if the controller is left in OFF mode.
NOTE: If you intend to stop automatic irrigation only for a few days, we suggest you use the «Delay Watering» feature described.
NOTE: To re-initiate watering, press the
button again to return to AUTO RUN mode.
Manual Watering
Press the button until the Manual Watering screen is displayed.
NOTE: To water the scheduled runtime for each zone: Press – when setting manual runtime until the screen shows «SCH» MIN.
One-touch Manual Start
Water ALL zones immediately according to their previously scheduled run times:
- With the controller in AUTO RUN mode, press and hold for 3 seconds to begin watering all zones that have a programmed runtime.
Seasonal Adjust
Press the MODE button until the Seasonal Adjust screen is displayed.
The SEASONAL ADJUST mode allows you to increase or decrease the run times for all zones by a certain percentage (10% to 200%).
- Press + or – to increase or decrease the setting.
NOTE: SEASONAL ADJUST applies to ALL automatic watering.
Special Features
Delay Watering
Delay automatic irrigation for up to 9 days.
Contractor Default Save
Save irrigation schedules for future retrieval.
Contractor Default Restore
Restore previously saved irrigation schedules.
Factory Default Restore
Restore the controller’s factory default settings.
All programmed irrigation schedules currently stored in memory will be lost. However, Contractor Default settings remain stored in separate memory and are not affected by Factory Default Restore, and can be recalled after restoring Factory Defaults.
Rain Sensor Bypass
Set sensor to Active or Bypass for all zones.
Installation
Valve Wiring
Wires may be extended up to 100 feet (30 meters) (18 AWG / 0.75 mm² minimum wire size) from the controller. All wire connections should be made using appropriate water-proof splice kits (not provided).
- Attach the black wires from each solenoid to the black (common) wire(s) on the ESP-9V.
- Attach one red wire from each solenoid to the appropriate zone wire on the ESP-9V.
- Connect an optional Master Valve.

NOTE: The ESP-9V can be mounted on a DC latching solenoid using the included solenoid bracket, or on a wall using the optional wall-mount bracket (Model: 9VMOUNT).

Batteries
The Rain Bird ESP-9V uses two alkaline 9-Volt batteries (not included) to operate. Your controller will function using either one or two 9-Volt batteries. Under normal conditions, the expected life is 1 year for a single battery and two years when using two 9-Volt batteries.
Replacing Batteries
- Remove the battery compartment cap.
- Install one or two 9-Volt alkaline batteries on the battery clips provided.
- Re-install the battery compartment cap.
NOTE: Do not mix new batteries with old ones. Doing so could reduce the battery life and cause the controller to stop working prematurely.
Optional Rain Sensor
- Cut the yellow loop in half and remove about 1/2″ of insulation
NOTE: Cut the yellow wire loop only when installing a rain sensor.
- Connect the sensor to the terminals with waterproof connectors.
BACK OF CONTROLLER
Troubleshooting
| Problem | Possible Cause | Possible Solution |
No Display |
Display is in sleep/power save mode. | Press any key to wake up display. |
| Batteries are dead. | Replace batteries. | |
Automatic irrigation not starting |
Missing start time, run time or watering days. | Set start time, run time and watering days. |
| Sensor wire loop cut but no rain sensor installed. | Re-connect the sensor wires or bypass the sensor operation. | |
| Rain Delay is set. | De-activate rain delay. | |
Automatic irrigation started but
|
No water pressure. | Turn on main water supply. |
| Faulty wiring. | Check for open/short circuits in wiring. | |
| Faulty Solenoid. | Replace solenoid. | |
| Incompatible Solenoid. | Must use a 9V-latching solenoid (Rain Bird K80920) or other compatible DC latching solenoid. | |
Controller is watering more than
|
Excessive Start Times, Run Times or Watering Days. Modify Start Times, Run Times or Watering Days as desired. | |
| Seasonal adjust set. | Reduce the seasonal adjust value as needed. | |
«Manual Watering ALL» is not watering some zones or isn’t available as an option |
One or more zones don’t have a programmed start time or run time. | Program a start time and run time for all desired zones. |
Rain Bird Corporation
6991 East Southpoint Road
Tucson, AZ 85756
EE. UU.
Tel.: (520) 741-6100
Fax: (520) 741-6522
Rain Bird International
1000 West Sierra Madre Avenue
Azusa, CA 91702
EE. UU.
Tel.: +1 (626) 963-9311
Fax: +1 (626) 852-7343
Rain Bird Europe SNC
900, rue Ampère, B.P. 72000
13792 Aix en Provence Cedex 3
FRANCIA
Tel.: (33) 4 42 24 44 61
Fax: (33) 4 42 24 24 72
Rain Bird France SNC
900, rue Ampère, B.P. 72000
13792 Aix en Provence Cedex 3
FRANCIA
Tel.: (33) 4 42 24 44 61
Fax: (33) 4 42 24 24 72
Rain Bird Ibérica. S.A.
Polígono Ind. Pinares Llanos
C/ Carpinteros, 12, 2ºC
28670 Villaviciosa de Odón, Madrid
ESPAÑA
Tel.: (34) 91 632 48 10
Fax: (34) 91 632 46 45
Rain Bird Deutschland GmbH
Königstraße 10c
70173 Stuttgart
DEUTSCHLAND
Tel.: +49 (0)711 222 54 158
Fax: +49 (0)711 222 54 200
Rain Bird Sverige AB
C/O Matrisen
Stortorget 29
211 34 Malmö
Tel.: (46) 42 25 04 80
Fax: (46) 42 20 40 65
Rain Bird Türkiye
Çamlık Mh. Dinç Sokak Sk. No.4 D:59-60
34775 Ümraniye, İstanbul
TÜRKİYE
Tel.: (90) 216 443 75 23
 2015 Rain Bird Corporation
 Registered trademark of Rain Bird Corporation
www.rainbird.
www.rainbird.eu
P/N: 690235-01 EN 02JL15

Videos
Rain Bird ESP-9V — How to Program (video)
Documents / Resources
References
Home — EUR | Rain Bird
Download manual
Here you can download full pdf version of manual, it may contain additional safety instructions, warranty information, FCC rules, etc.
Download Rain Bird ESP-9V Manual
![]()
8 (843) 211-07-92
8 (843) 246-02-92
8 (927) 420-70-50
Заказать звонок
ФИО *
Телефон *
Пройдите проверку:*
loading… 
Controls and Indicators
Operating Modes
Introduction
Thank you for choosing Rain Bird’s ESP-9V Battery-Operated Controller. The ESP-9V is designed to provide worry-free automatic irrigation in the absence of AC power or in areas where installing new field wires is not practical.
Operation and Setup
Contractor Rapid ProgrammingTM
At initial programming, the controller automatically copies the start times and watering days from Zone 1 to all other zones.
NOTE: If multiple zones have the same or overlapping watering times, the controller will water the zones in sequence (multiple zones will not run at the same time).
NOTE: Changes to a zone’s schedule made after initial programming will only affect the zone being modified.
NOTE: You may re-activate the Contractor Rapid ProgrammingTM feature by resetting factory defaults.
Set Date
Press the MODE button until the Set Date screen is displayed. The last two digits of the year will begin to flash.
Set Time
Press the MODE button until the Set Time screen is displayed.
- Press + or – to set the hour (ensure that AM/PM setting is correct); then press
- Press + or – to set the minutes.
- Press the MODE button again to enter the Watering Start Times screen.
Set Zone Watering Start Times
Press the MODE button until the Watering Start Times screen is displayed.
NOTE: Adjustments are set in 10 minute increments.
NOTE: To remove a Start Time, press + or – until -:- (OFF) is displayed. (-:- is just before 12:00 AM.)
NOTE: The controller will not water multiple zones at the same time. If two or more zones have the same (or overlapping) start times, the controller will wait until the first zone is finished watering before starting the rest of the zones in sequence. This method is called «start time stacking».
Set Zone Watering Days
Press the MODE button until the Watering Days screen is displayed.
Custom Days
Watering Day Options
Additional Watering Day options are also available:
- Cyclic Days (1-30)
- Odd Days (Will NOT water on the 31st of the month)
- Even Days
To change a zone’s watering day type, simply press the + and – buttons at the same time while setting Zone Watering Days.
Cyclic Days
Odd Days
NOTE: ODD schedules will not water on the 31st of the month.
Even Days
Set Zone Watering Run Times
Press the MODE button until the Watering Run Times screen is displayed.
Auto Run
Press the MODE button until the AUTO RUN screen is displayed.
In AUTO RUN mode, the ESP-9V will irrigate each zone per its pro grammed schedule. If any zones are scheduled to run at the same time and day, your controller will place those zones in a queue and irrigate one valve at a time, starting with the lowered numbered zone first.
NOTE: After 5 minutes of inactivity, the controller will revert to AUTO RUN mode (unless the controller is in OFF) and turn off the display. Press any key to turn the display back on.
Off
Press the
Selecting the OFF mode will cancel any active watering and prevent any irrigation from starting automatically.
NOTE: Select the AUTO RUN mode to resume normal operation. Programmed irrigation schedules will NOT run if the controller is left in OFF mode.
NOTE: If you intend to stop automatic irrigation only for a few days, we suggest you use the «Delay Watering» feature described.
NOTE: To re-initiate watering, press the
Manual Watering
Press the
NOTE: To water the scheduled runtime for each zone: Press – when setting manual runtime until the screen shows «SCH» MIN.
One-touch Manual Start
Water ALL zones immediately according to their previously scheduled run times:
- With the controller in AUTO RUN mode, press and hold
Seasonal Adjust
Press the MODE button until the Seasonal Adjust screen is displayed.
The SEASONAL ADJUST mode allows you to increase or decrease the run times for all zones by a certain percentage (10% to 200%).
- Press + or – to increase or decrease the setting.
NOTE: SEASONAL ADJUST applies to ALL automatic watering.
Special Features
Delay Watering
Delay automatic irrigation for up to 9 days.
Contractor Default Save
Save irrigation schedules for future retrieval.
Contractor Default Restore
Restore previously saved irrigation schedules.
Factory Default Restore
Restore the controller’s factory default settings.
All programmed irrigation schedules currently stored in memory will be lost. However, Contractor Default settings remain stored in separate memory and are not affected by Factory Default Restore, and can be recalled after restoring Factory Defaults.Rain Sensor Bypass
Set sensor to Active or Bypass for all zones.
Installation
Valve Wiring
Wires may be extended up to 100 feet (30 meters) (18 AWG / 0.75 mm² minimum wire size) from the controller. All wire connections should be made using appropriate water-proof splice kits (not provided).
- Attach the black wires from each solenoid to the black (common) wire(s) on the ESP-9V.
- Attach one red wire from each solenoid to the appropriate zone wire on the ESP-9V.
- Connect an optional Master Valve.
NOTE: The ESP-9V can be mounted on a DC latching solenoid using the included solenoid bracket, or on a wall using the optional wall-mount bracket (Model: 9VMOUNT).
Batteries
The Rain Bird ESP-9V uses two alkaline 9-Volt batteries (not included) to operate. Your controller will function using either one or two 9-Volt batteries. Under normal conditions, the expected life is 1 year for a single battery and two years when using two 9-Volt batteries.
Replacing Batteries
- Remove the battery compartment cap.
- Install one or two 9-Volt alkaline batteries on the battery clips provided.
- Re-install the battery compartment cap.
NOTE: Do not mix new batteries with old ones. Doing so could reduce the battery life and cause the controller to stop working prematurely.
Optional Rain Sensor
- Cut the yellow loop in half and remove about 1/2″ of insulation
NOTE: Cut the yellow wire loop only when installing a rain sensor.
- Connect the sensor to the terminals with waterproof connectors.
BACK OF CONTROLLER
Troubleshooting
Problem Possible Cause Possible Solution No Display
Display is in sleep/power save mode. Press any key to wake up display. Batteries are dead. Replace batteries. Automatic irrigation not starting
Missing start time, run time or watering days. Set start time, run time and watering days. Sensor wire loop cut but no rain sensor installed. Re-connect the sensor wires or bypass the sensor operation. Rain Delay is set. De-activate rain delay. Automatic irrigation started but
no watering occursNo water pressure. Turn on main water supply. Faulty wiring. Check for open/short circuits in wiring. Faulty Solenoid. Replace solenoid. Incompatible Solenoid. Must use a 9V-latching solenoid (Rain Bird K80920) or other compatible DC latching solenoid. Controller is watering more than
expectedExcessive Start Times, Run Times or Watering Days. Modify Start Times, Run Times or Watering Days as desired. Seasonal adjust set. Reduce the seasonal adjust value as needed. «Manual Watering ALL» is not watering some zones or isn’t available as an option
One or more zones don’t have a programmed start time or run time. Program a start time and run time for all desired zones. Rain Bird Corporation
6991 East Southpoint Road
Tucson, AZ 85756
EE. UU.
Tel.: (520) 741-6100
Fax: (520) 741-6522Rain Bird International
1000 West Sierra Madre Avenue
Azusa, CA 91702
EE. UU.
Tel.: +1 (626) 963-9311
Fax: +1 (626) 852-7343Rain Bird Europe SNC
900, rue Ampère, B.P. 72000
13792 Aix en Provence Cedex 3
FRANCIA
Tel.: (33) 4 42 24 44 61
Fax: (33) 4 42 24 24 72Rain Bird France SNC
900, rue Ampère, B.P. 72000
13792 Aix en Provence Cedex 3
FRANCIA
Tel.: (33) 4 42 24 44 61
Fax: (33) 4 42 24 24 72Rain Bird Ibérica. S.A.
Polígono Ind. Pinares Llanos
C/ Carpinteros, 12, 2ºC
28670 Villaviciosa de Odón, Madrid
ESPAÑA
Tel.: (34) 91 632 48 10
Fax: (34) 91 632 46 45Rain Bird Deutschland GmbH
Königstraße 10c
70173 Stuttgart
DEUTSCHLAND
Tel.: +49 (0)711 222 54 158
Fax: +49 (0)711 222 54 200Rain Bird Sverige AB
C/O Matrisen
Stortorget 29
211 34 Malmö
Tel.: (46) 42 25 04 80
Fax: (46) 42 20 40 65Rain Bird Türkiye
Çamlık Mh. Dinç Sokak Sk. No.4 D:59-60
34775 Ümraniye, İstanbul
TÜRKİYE
Tel.: (90) 216 443 75 23
www.rainbird.
www.rainbird.euP/N: 690235-01 EN 02JL15
Videos
Rain Bird ESP-9V — How to Program (video)
Documents / Resources
References
Home — EUR | Rain Bird
Download manual
Here you can download full pdf version of manual, it may contain additional safety instructions, warranty information, FCC rules, etc.
Download Rain Bird ESP-9V Manual
![]()
8 (843) 211-07-92
8 (843) 246-02-92
8 (927) 420-70-50
Заказать звонок
ФИО *
Телефон *
Пройдите проверку:*
loading…
Rain Bird Corporation является ведущим мировым производителем и поставщиком продуктов и услуг для орошения со штаб-квартирой в Азусе, Калифорния. Компания производит системы полива для сельского хозяйства, университетов, парков, ферм, полей для гольфа, жилых и коммерческих ландшафтов, а также спортивных площадок примерно в 130 странах. Их официальный webсайт RAIN BIRD.com.
Каталог руководств пользователя и инструкций для продуктов RAIN BIRD можно найти ниже. Продукция RAIN BIRD запатентована и зарегистрирована под торговыми марками Rain Bird Corporation
Контактная информация:
Адрес: 970 W Sierra Madre Ave Azusa, CA, 91702-1873 США
Сотрудники (этот сайт): Фактический 125 год
Сотрудники (все сайты): 912 ПредставитьДоход: $ 532.01 миллионов Рельефная
Год начала: 1933
Зарегистрировано: 1946
Рейтинг ESG: 1.0
Средний показатель по отрасли ESG: 2.81
Найти
Узнайте, как устанавливать и обслуживать роторы и ударные спринклеры Rain Bird серии 11000, с помощью этого подробного руководства по эксплуатации и техническому обслуживанию. Включает пошаговые инструкции по регулировке дуги, регулировке полного/частичного круга и многому другому. Обеспечьте правильную установку и обслуживание для достижения оптимальной производительности.
Программируйте контроллер полива из любого места с помощью Wi-Fi-таймера RAINBIRD01EC99 Homeowner Smart Irrigation. Эта установка совместима с маршрутизаторами Wi-Fi 2.4 ГГц и 802.11 b/g/n и включает модуль LNK WiFi и мобильное приложение Rain Bird. Легко подключайте систему орошения и управляйте ею, получайте доступ к прогнозам погоды, настраивайте параметры и многое другое. Наслаждайтесь удобством удаленного программирования с помощью этого интеллектуального таймера Wi-Fi.
Откройте для себя интуитивно понятную центральную систему управления CirrusPRO от Central Control Technologies. Эта современная система орошения для гольфа обеспечивает реакцию в режиме реального времени и точное управление водой. Совместимый с программным обеспечением Rain Bird, он обеспечивает мобильное управление и настраиваемые информационные панели. Включает инструкции по мобильному управлению и использованию дополнительной метеостанции WS-PRO2.
Откройте для себя систему корневого полива Rain Bird D40932, специализированную систему полива, предназначенную для эффективного питания корневой системы. Эта простая в установке система способствует здоровому росту и развитию деревьев и кустарников. Шаги по установке и инструкции по использованию можно найти здесь.
Это подробное руководство по установке и эксплуатации интеллектуального Wi-Fi дождевателя Rain Bird ST8I-2.0 содержит пошаговые инструкции и полезные советы. Получите максимальную отдачу от вашей спринклерной системы с помощью этого полезного руководства.
Узнайте, как установить и устранить неполадки высокоэффективных линейных клапанов CPHVVBSPMM и CPHVVBSPFF, из этого подробного руководства пользователя. Эти клапаны, идеально подходящие для использования вне помещений, работают от сети переменного тока 24 В и поставляются с подробными инструкциями по установке и советами по устранению неполадок.
Узнайте, как настроить картридж NCC EN для IQ4 — облачный контроллер, с помощью этой информации о продукте и руководства по использованию модульной многообъектной системы централизованного управления IQ4 от RAIN BIRD. Настройте картридж для удаленного управления и мониторинга через платформу IQ-Cloud, а также настройте переадресацию портов или динамический DNS, чтобы обеспечить связь с отдельными сателлитными контроллерами IQ. Узнайте локальные адреса CloudFront вашего сайта для настройки белого списка.
Узнайте о приложении Agency Rewards для входа в RAIN BIRD с помощью этого руководства пользователя. Доступ к pdf file чтобы узнать, как использовать и максимизировать преимущества этого продукта. Узнайте больше о его возможностях и функциях.
Руководство пользователя контроллера Rain Bird ESP-TM2 содержит пошаговые инструкции по установке и эксплуатации этой мощной системы орошения. Благодаря таким функциям, как максимальное количество станций 12, поддержка датчика дождя/мороза, а также ручное управление станциями и программами, этот удобный контроллер идеально подходит как для домовладельцев, так и для профессионалов. Получите максимальную отдачу от вашего ESP-TM2 с помощью этого подробного руководства.
Руководство пользователя дождевальной системы RAIN BIRD 32HE, номер модели 0077985082093, содержит исчерпывающие инструкции по установке и эксплуатации. Загрузите PDF-файл для получения подробной информации об использовании номера детали 1009030804 и советов по устранению неполадок.
Посмотреть инструкция для Rain Bird ESP-RZXe бесплатно. Руководство относится к категории контроллеры, 19 человек(а) дали ему среднюю оценку 8.7. Руководство доступно на следующих языках: русский. У вас есть вопрос о Rain Bird ESP-RZXe или вам нужна помощь? Задайте свой вопрос здесь
Не можете найти ответ на свой вопрос в руководстве? Вы можете найти ответ на свой вопрос ниже, в разделе часто задаваемых вопросов о Rain Bird ESP-RZXe.
Аккумулятор в моем устройстве контроллер начал ржаветь. Безопасно ли пользоваться устройством?
Продукт безопасен для использования после надлежащей очистки. Извлеките аккумулятор, надев перчатки, и очистите аккумуляторный отсек зубной щеткой, смоченной уксусом. После высыхания установите в устройство новые аккумуляторы.
Инструкция Rain Bird ESP-RZXe доступно в русский?
Да, руководствоRain Bird ESP-RZXe доступно врусский .
Не нашли свой вопрос? Задайте свой вопрос здесь