- Manuals
- Brands
- Subaru Manuals
- Automobile
- forester 2019
- Quick manual
-
Contents
-
Table of Contents
-
Bookmarks
Quick Links
Quick Guide
Forester
2019
Love. It’s what makes a Subaru, a Subaru.
Related Manuals for Subaru forester 2019
Summary of Contents for Subaru forester 2019
-
Page 1
Quick Guide Forester 2019 Love. It’s what makes a Subaru, a Subaru. -
Page 2
Guide is optional at extra cost. Specific options may be available only in combination with other options. Specific combinations of equipment or features may vary from time to time, and by geographic area. Subaru of America, Inc. reserves the right to change or discontinue at any time, without notice: Prices,… -
Page 3
Table of Contents Getting Started Instrument Panel Gauges Personalize 10-11 Controls 12-19 20-23 While Operating 24-25 Safety/In Case of Emergency Additional Information 26-28… -
Page 4: Remote Keyless Entry
Remote Keyless Entry Lock/Arm Unlocking the Rear Gate • Press to lock all doors and the rear gate. • Press to unlock the rear gate. • If any of the doors or the rear gate Panic Alarm are not fully closed, five rapid chirps •…
-
Page 5
Seating Power Driver’s Seat (if equipped) Do not adjust the seat while driving. Seatback Move the switch in the Forward/Backward, corresponding direction to adjust Angle and Height the angle of the seatback. Move the switch toward the front or rear to move the seat forward Lumbar Support or backward. -
Page 6: Seat Controls
Seating Seat Controls Do not adjust seats while driving. Forward/Backward Pull up on the lever below the front of the driver’s seat to move the seat forward or backward. Raise/Lower Seat Cushion To adjust the height of the driver’s seat, pull up or push down the seat height adjustment lever, located on the lower left side front of the seat.
-
Page 7: Folding The Rear Seat
Folding the Rear Seat Lower the headrests. Pull up on the release knob on the seat side that you want to fold down. To return the seatback to its original position, raise the seatback until it locks into place, making sure that it is securely locked. If equipped, release latches are located on either side of the cargo area.
-
Page 8: Instrument Panel
Instrument Panel PAGE 12, 20 NUMBER…
-
Page 9
14-17… -
Page 10
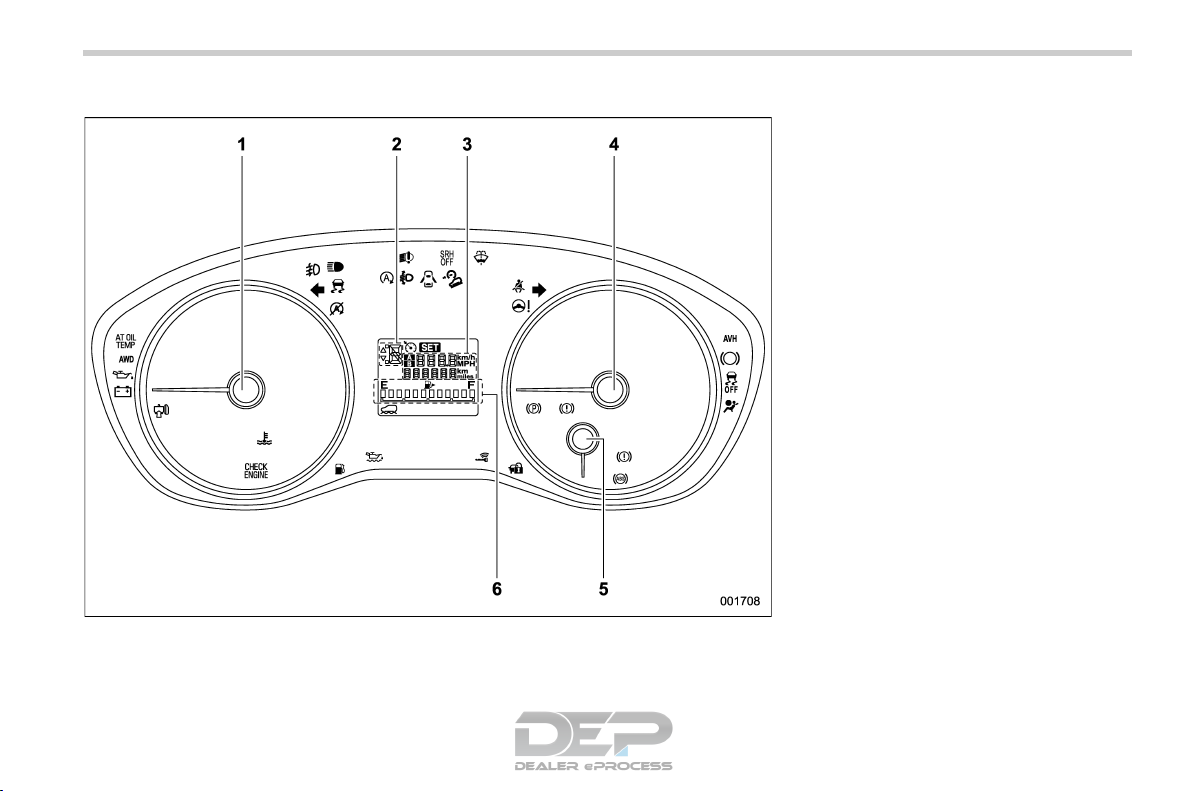
Gauges Tachometer Forester Forester Premium Forester Sport Forester Limited Forester Touring Immediate Attention Caution Informational Trip meter reset button Fuel gauge Seatbelt warning Brake system Front passenger seatbelt Hot coolant temperature/ warning (Located on Cold coolant temperature overhead console) SRS airbag system High beam indicator light Security indicator light AT OIL TEMP… -
Page 11
Speedometer Trip meter and odometer Pre-Collision Braking Auto Vehicle Hold operation System OFF light Vehicle Dynamics Control/ Lane Departure Warning Vehicle Dynamics Control OFF light operation Vehicle Dynamics Control OFF Auto Vehicle Hold ON CHECK ENGINE/ Turn signals Malfunction indicator Front fog light indicator Tire pressure warning light light (if equipped) -
Page 12: Tilt And Telescopic Steering Column
Personalize Tilt and Telescopic Steering Column Pull the lever down firmly to adjust the height and lengthwise position of the column; firmly push the lever back up to lock the column in place. Do not adjust while driving. i/SET Combination Meter Display Controls Use the controls to display and switch selected items in the combination meter display.
-
Page 13: Power Exterior Mirrors
Please see your Owner’s Manual for programming instructions or visit www.subaru.com/homelink to view a how-to video.
-
Page 14: Light Controls
Controls Light Controls Push forward to change from low Turns on headlights, instrument beam to high beam. Pull the lever panel illumination, parking lights, back to center to return to low beam. tail lights and license plate lights. Push slightly up for lane change or fully up for right turn signal.
-
Page 15: Windshield Wipers
INT. HIGH Windshield Wipers To turn on the wipers, press the wiper control lever down one level for intermittent, two levels for low, or three levels for high speed. Return the lever to the “OFF” position to stop the wipers. For a single wipe, move the lever up. To spray washer fluid, pull and hold the lever toward you.
-
Page 16: Automatic Climate Control System
Controls Automatic Climate Control System (if equipped) Operation in Manual Mode Automatic On and Off This system automatically controls Recirculated/Outside Air Button outlet air temperature, fan speed, air Press the air inlet selection button to flow distribution, air inlet control, and air prevent outside air from being drawn conditioner compressor operation.
-
Page 17
Located in the multi-function display; top center of dash Air Conditioner Button Rear Window Defogger Button Press the “A/C” button to activate Press the button to turn on the the air conditioning. Press it again to defogger. It will automatically shut turn off the air conditioning. -
Page 18
Controls Dual Zone Automatic Climate Control System (if equipped) Operation in Manual Mode Automatic On and Off This system automatically controls Recirculated/Outside Air Button outlet air temperature, fan speed, Press the air inlet selection button to air flow distribution, air inlet control, prevent outside air from being drawn and air conditioner compressor into the passenger compartment. -
Page 19
Located in the multi-function display; top center of dash SYNC Button Defroster Button Press the button to synchronize both Press the button to defrost or the driver’s side and passenger’s dehumidify the windshield and side temperatures using the front door windows. driver’s side temperature control. -
Page 20: Steering Wheel Audio Controls
(+) to increase volume or down (–) to decrease volume. Press the button to select the Voice recognition switch; desired audio mode – FM, AM, please refer to your SUBARU SXM, CD, AUX, MEDIA. STARLINK Owner’s Manual. ™ USB Port The USB ports are located in the front of the center console.
-
Page 21: Adaptive Cruise Control
Adaptive Cruise Control Press to increase following Press to activate or distance setting while using deactivate Adaptive Cruise Adaptive Cruise Control. Control function. Press and hold to switch to Conventional Cruise Control. RES/+ switch SET/– switch Press to decrease following distance Press to activate setting while using Adaptive Cruise or deactivate…
-
Page 22
While Operating Instrument Panel Switches (lower left) Please refer to your Owner’s Manual for details on these switches. Power rear gate switch (if equipped) Steering Responsive Headlights OFF switch (if equipped) Rear gate memory switch (if equipped) Vehicle Dynamics Control OFF switch Auto Start Stop OFF switch Blind Spot Detection/Rear Cross Traffic Alert OFF switch (if equipped) -
Page 23
Automatic Transmission Shift Mode The automatic transmission gives you ultimate control with two different driving modes: Normal Mode and Low Mode. Normal Mode When the selector lever is in the “D” (Drive) position, the transmission is in Normal shift mode. The shift position indicator on the instrument panel shows “D”, and the transmission automatically shifts into a suitable forward gear. -
Page 24
While Operating Electronic Parking Brake (EPB) To apply, depress the brake pedal and pull up the parking brake switch. The brake system warning light on the instrument panel and the indicator light on the parking brake switch will illuminate and “PARK” will appear in the combination meter display. -
Page 25
X-MODE ® (if equipped) X-MODE is the integrated control system of the engine, AWD and Vehicle ® Dynamics Control system. To activate, press the X-MODE switch (Premium) or turn the switch to the right or left (Sport/Limited/Touring). To deactivate, turn the switch to the right (Premium) or press the switch (Sport/Limited/Touring). -
Page 26: Child Restraint System
Safety/In Case of Emergency Child Restraint System Your vehicle is equipped with Lower Anchors and Tethers for CHildren (LATCH). For maximum safety, first carefully read the LATCH system instructions from the device manufacturer, as well as the installation instructions in your Owner’s Manual, to properly install the LATCH compatible restraint system.
-
Page 27
AWD system. A flatbed truck is the only recommended way to properly transport your AWD vehicle. If towing is necessary, it is best done by your Subaru Retailer or a commercial towing service. Subaru Roadside Assistance Subaru Roadside Assistance is free and standard on your vehicle. -
Page 28: Additional Information
Additional Information Fuel Use regular unleaded gasoline with an octane rating of 87 AKI or higher. Consult the Owner’s Manual for more detailed information. Fuel Capacity • 16.6 US gal (63 liters, 13.9 lmp gal) • When the low fuel indicator light is displayed on the instrument panel, approximately 2.5 US gallons (9.5 liters, 2.1 Imp gal) of fuel remain.
-
Page 29: Engine Oil
Engine Oil Use only the following oils: • ILSAC GF-5, which can be identified with the ILSAC certification mark (Starburst mark). • Or API classification SN with the words “RESOURCE CONSERVING”. — Use 0W-20 synthetic, replacement interval 6,000 miles under normal driving conditions.
-
Page 30: Engine Compartment
Engine Compartment Please refer to your Owner’s Manual for more information. 2.5 L Engine Air Cleaner Element Engine Coolant Reservoir Engine Oil Dipstick Windshield Washer Tank Radiator Cap Battery Engine Oil Filter Main Fuse Box Engine Oil Filler Cap Brake Fluid Reservoir…
-
Page 31
One Subaru Drive Camden, NJ 08103-9800 MSA5B1902A Issued August 2018 Printed in USA 08/18…
Представленная ниже информация для ознакомления, а не для коммерческого использования.
Если что-то не открывается, пишите в личку. При репосте не забывайте ссылки на этот БЖ.
+++++++++++++++++++++++++++++++++++++++++++++++
+++++++++++++++++++++++++++++++++++++++++++++++
Руководство владельца Subaru Forester I (SF) — файл pdf
disk.yandex.ru/i/DtLIPRMqvXHX4g
Руководство по сервисному обслуживанию Subaru Forester I (SF) 1997-2001 MY — zip-архив
(Мультимедийная книга Subaru Forester с 1997 г.)
disk.yandex.ru/d/2LtfvY0NzRmzww
Subaru Forester с 1997 г. выпуска. Устройство Обслуживание Ремонт (Переработанное издание) — файл pdf
drive.google.com/file/d/0…4WWNjQzg/view?usp=sharing
+++++++++++++++++++++++++++++++++++++++++++++++
Руководство по техническому обслуживанию Subaru Forester II (SG) 2004 MY — файл pdf
yadi.sk/i/NKxH1DR4m68Wzg
Руководство по эксплуатации Subaru Forester II (SG) 2005 MY — файл pdf
drive.google.com/file/d/0…5MHJmYlk/view?usp=sharing
Руководство по эксплуатации Subaru Forester II (SG) 2007 MY — файл pdf
drive.google.com/file/d/0…zdi1Cb0E/view?usp=sharing
Руководство по обслуживанию Subaru Forester II (SG) 2008 MY — файл pdf
drive.google.com/file/d/0…5ell0MDg/view?usp=sharing
+++++++++++++++++++++++++++++++++++++++++++++++
Руководство по ремонту и эксплуатации Subaru Forester III (SH) 2009 MY — файл pdf
drive.google.com/file/d/0…SUkVMT2M/view?usp=sharing
Руководство по сервисному обслуживанию Subaru Forester III (SH) 2009 MY — сжатый архив
disk.yandex.ru/d/B96-Gk7pODUIYQ
drive.google.com/file/d/0…PR21RT2c/view?usp=sharing
Руководство по сервисному обслуживанию Subaru Forester III (SH) 2012 MY — zip-архив
yadi.sk/d/WyoA6UE8prtNW
+++++++++++++++++++++++++++++++++++++++++++++++
Руководство по сервисному обслуживанию Subaru Forester IV (SJ) 2014 MY — zip-архив
drive.google.com/file/d/0…ydE1vTEk/view?usp=sharing
или
disk.yandex.ru/d/ZmJB58ifGLEsRg
Руководство по эксплуатации Subaru Forester IV (SJ) 2014 MY — файл pdf
drive.google.com/file/d/0…kM1dnS00/view?usp=sharing
+++++++++++++++++++++++++++++++++++++++++++++++
Руководство по обслуживанию и ремонту Subaru Forester SK (SM G8240GR FORESTER 19MY, версия 002) — файл ISO в rar-архиве.
yadi.sk/d/nnaihovx9Le_dQ или drive.google.com/file/d/1…_mFo-IS9/view?usp=sharing
Взято здесь cloud.mail.ru/public/HRZT/mfMRZ48dH
Руководство по эксплуатации Subaru Forester V (SK) 2019 MY — файл pdf
yadi.sk/i/H3Eh8Lm1IYQYgA
Краткое руководство по эксплуатации Subaru Forester V (SK) 2019 MY — файл pdf
yadi.sk/i/Fe1V-7hYZE59pA
Eyesight Руководство SK — файл pdf
yadi.sk/i/hZXPw5enDtoTqw
Starlink Руководство SK — файл pdf
yadi.sk/i/yDhy1Qx86FDbbg
+++++++++++++++++++++++++++++++++++++++++++++++
+++++++++++++++++++++++++++++++++++++++++++++++
Инструкция по эксплуатации автомобиля Subaru Forester 2005 модельного года (SG) — файл pdf
drive.google.com/file/d/0…BZkhGTEU/view?usp=sharing
Инструкция по эксплуатации автомобиля Subaru Forester 2007 модельного года (SG) — файл pdf
drive.google.com/file/d/0…SMzFxSHc/view?usp=sharing
Инструкция по эксплуатации автомобиля Subaru Forester 2011 модельного года (SH) — файл pdf drive.google.com/file/d/0…Ib0lEbm8/view?usp=sharing
Инструкция по эксплуатации автомобиля Subaru Forester 2012 модельного года (SH) — файл pdf drive.google.com/file/d/0…0cEE1bDg/view?usp=sharing
Инструкция по эксплуатации автомобиля Subaru Forester 2013 модельного года (SJ) — файл pdf drive.google.com/file/d/0…LZEgxbGM/view?usp=sharing
Инструкция по эксплуатации автомобиля Subaru Forester 2014 модельного года (SJ) — файл pdf drive.google.com/file/d/0…tOWt4elk/view?usp=sharing
Инструкция по эксплуатации автомобиля Subaru Forester 2015 модельного года (SJ) — файл pdf
drive.google.com/file/d/0…WZkI5SWs/view?usp=sharing
Инструкция по эксплуатации автомобиля Subaru Forester 2016 модельного года (SJ) — файл pdf
drive.google.com/file/d/0…kS3FSQVU/view?usp=sharing
+++++++++++++++++++++++++++++++++++++++++++++++
Subaru Forester Owner’s Manuals (ENG) — руководства по эксплуатации Subaru Forester на английском языке
Subaru Forester I (SF) 1998 Owner’s Manual ENG yadi.sk/d/OApC-oKBFMhGo
Subaru Forester I (SF) 1999 Owner’s Manual ENG yadi.sk/d/V6d3vPaGFMi5X
Subaru Forester I (SF) 2000 Owner’s Manual ENG yadi.sk/d/1Kb7E0RLFMiAS
Subaru Forester I (SF) 2001 Owner’s Manual ENG yadi.sk/d/OeuIrbH-FMiE2
Subaru Forester I (SF) 2002 Owner’s Manual ENG yadi.sk/d/7dlwPQT5FMiHm
Subaru Forester II (SG) 2003 Owner’s Manual ENG yadi.sk/d/8B5M3PEuFMiNv
Subaru Forester II (SG) 2004 Owner’s Manual ENG yadi.sk/d/DTiMBz4WFMiTP
Subaru Forester II (SG) 2005 Owner’s Manual ENG yadi.sk/d/tG-w1PzAFMiYG
Subaru Forester II (SG) 2006 Owner’s Manual ENG yadi.sk/d/h8RcBfgFFMic2
Subaru Forester II (SG) 2007 Owner’s Manual ENG yadi.sk/d/5heDeXV3FMifh
Subaru Forester II (SG) 2008 Owner’s Manual ENG yadi.sk/d/KTL_5eO7FMikE
Subaru Forester III (SH) 2009 Owner’s Manual ENG yadi.sk/d/CEPVhIngFMipG
Subaru Forester III (SH) 2010 Owner’s Manual ENG yadi.sk/d/Ee_eL7omFMiti
Subaru Forester III (SH) 2011 Owner’s Manual ENG yadi.sk/d/1Jacl7TMFMizz
Subaru Forester III (SH) 2012 Owner’s Manual ENG yadi.sk/d/44rqNMDzFMj7A
Subaru Forester IV (SJ) 2013 Owner’s Manual ENG yadi.sk/d/k40hjMB8FMjAd
Subaru Forester IV (SJ) 2014 Owner’s Manual ENG yadi.sk/d/mTlbnLRoFMjEX
Subaru Forester V (SK) 2019 Owner’s Manual ENG yadi.sk/d/8BgNvdXr5ryIxg
+++++++++++++++++++++++++++++++++++++++++++++++
Subaru Forester 2001 Service Manual ENG yadi.sk/d/PQ4ylgUpFNzot взято здесь manualov.net/Subaru.php
Subaru Forester 2003 Service Manual ENG — файл pdf yadi.sk/i/Yd-Gbfua3E38PH взято здесь
www.drive2.ru/l/466065937657758129/
Subaru Forester 2004 Service Manual ENG yadi.sk/d/_BMMdFxqFP28v взято здесь manualov.net/Subaru.php
Subaru Forester 2007 Service Manual (ENG) yadi.sk/d/B6rTskG3cxMbq взято здесь manualov.net/Subaru.php
Subaru Forester 2007 Service Manual ENG yadi.sk/d/X4CZKXSDcxMGW взято здесь auto-b.ru/blog/Subaru/2065.html
Subaru Forester IV (SJ) 2014 MY Service Manual (ENG) yadi.sk/d/zl1LmYEebjUsr + дополнение по ремонту кузова yadi.sk/d/hcob_9VJBQkDZ
пароль к архивам: forestermoscowclub взято здесь forester-moscowclub.ru/showthread.php?p=694911
+++++++++++++++++++++++++++++++++++++++++++++++
Схемы электропроводки:
Subaru Forester I (SF) 1998 Wires Diagram Section (EN) Электросхемы дорестайл SF — файлы pdf в архиве
yadi.sk/d/aCZSAQ2GqQQxT или
drive.google.com/file/d/1…ziEs-HcU/view?usp=sharing
Subaru Forester I (SF) 2001 Wires Diagram Section (EN) Электросхемы рестайл SF — файлы pdf в архиве
yadi.sk/d/f7GjJ6MIqQR3m
Схема электропроводки Subaru Forester SG 02-05 дорестайл Русский мануал — файл pdf
yadi.sk/i/daoWHmQ_qQQW7 или
drive.google.com/file/d/0…d1jolSTlJMVlJZFMwMW8/view
Схема электропроводки Subaru Forester SG 06-08 рестайл Русский мануал — файл pdf
yadi.sk/i/LfAHumyGqQQWD
+++++++++++++++++++++++++++++++++++++++++++++++
Мануалы и аксессуары для других Subaru (cпасибо tarasusNN): здесь.
+++++++++++++++++++++++++++++++++++++++++++++++
инструкцияSubaru Forester (2019)

2019 Forester Owner’s Manual
A8240BE-A
Issued July 2018
Printed in USA 07/18
2019A
SUBARU CORPORATION
TOKYO, JAPAN
One Subaru Drive
Camden, NJ 08103-9800
Vehicles shown on the cover of this booklet
may not be available in all markets. Please see
your Subaru Retailer for a Product Brochure
detailing all currently available models.
MSA5M1902A
2019
Love. It’s what makes a Subaru, a Subaru.
Forester
OWNER’S MANUAL
WARNING: Operating, servicing and maintaining a
passenger vehicle or off-road vehicle can expose you to
chemicals including engine exhaust, carbon monoxide,
phthalates and lead, which are known to the State of California
to cause cancer and birth defects or other reproductive harm.
To minimize exposure, avoid breathing exhaust, do not idle
the engine except as necessary, service your vehicle in a
well-ventilated area and wear gloves or wash your hands
frequently when servicing your vehicle. For more information
go to www.P65Warnings.ca.gov/passenger-vehicle.
Посмотреть инструкция для Subaru Forester (2019) бесплатно. Руководство относится к категории автомобили, 13 человек(а) дали ему среднюю оценку 8.5. Руководство доступно на следующих языках: английский. У вас есть вопрос о Subaru Forester (2019) или вам нужна помощь? Задайте свой вопрос здесь
- Blank Page
- Blank Page
Главная
| Subaru | |
| Forester (2019) | |
| автомобиль | |
| английский | |
| Руководство пользователя (PDF), Правила техники безопасности (PDF) |
Не можете найти ответ на свой вопрос в руководстве? Вы можете найти ответ на свой вопрос ниже, в разделе часто задаваемых вопросов о Subaru Forester (2019).
Как перевести мили в километры?
1 миля равна 1,609344 километрам, а 1 километр — 0,62137119 милям.
Где я могу узнать идентификационный номер транспортного средства Subaru?
Место размещения идентификационного номера транспортного средства зависит от марки и типа транспортного средства. Номер может быть выбит на раме транспортного средства или указан на номерном знаке. Чтобы узнать место расположения идентификационного номера транспортного средства лучше всего ознакомиться с руководством по эксплуатации Subaru Forester (2019).
Что такое идентификационный номер транспортного средства (VIN)?
Идентификационный номер транспортного средства — уникальный для каждого транспортного средства идентификационный номер. Аббревиатура VIN расшифровывается как «Vehicle Identification Number» (Идентификационный номер транспортного средства).
Когда транспортному средству Subaru требуется техническое обслуживание?
Регулярное техническое обслуживание необходимо всем транспортным средствам. С информацией о том, как часто необходимо проходить техническое обслуживание и чему именно стоит уделять особое внимание можно ознакомиться в инструкции по техническому обслуживанию. Как правило, транспортное средство требует технического обслуживания каждые 2 года или 30 000 километров пробега.
Когда следует заменять тормозную жидкость на Subaru?
Тормозную жидкость рекомендуется менять каждые два года.
В чем разница между топливом E10 и E5?
В топливе E10 содержится до десяти процентов этанола, в то время как в E5 содержится менее пяти процентов. Соответственно, топливо E10 менее вредит окружающей среде.
Одна или несколько дверей не открываются изнутри. Что мне делать?
Скорее всего, замок оснащен защитой от детей и поэтому не может быть открыт изнутри. Процедура открытия замка с защитой от детей зависит от марки и типа замка.
Автомобильный радиоприемник не включается, что делать?
Если автомобильный радиоприемник не включен, на него не будет подаваться питание. Убедитесь, что красный провод подключен к контактному источнику питания, а желтый провод — к источнику питания постоянной мощности.
Инструкция Subaru Forester (2019) доступно в русский?
К сожалению, у нас нет руководства для Subaru Forester (2019), доступного в русский. Это руководство доступно в английский.
Не нашли свой вопрос? Задайте свой вопрос здесь
Информация касательно стоимости, модельного ряда, характеристик, наличия комплектации продукции/автомобиля и наличия опции и/или оборудования в такойкомплектации (далее – «Информация»), изложенная на данном сайте и прайс-листах, носит исключительно информативный характер, зависит от местных условий, ограничений и, следовательно может различаться в зависимости от моделей и комплектаций, и не является публичной офертой, согласно ст. 447 Гражданского Кодекса РК. Максимальные цены и Информация изложенные на данном сайте и прайс-листах могут, без предварительного уведомления со стороны Дистрибутора, отличаться от фактических цен и информаций Дилера на местах продаж, в связи с чем подробную и актуальную Информацию Вы можете получить у официального Дилера в Вашем городе. Основные условия приобретения какого-либо автомобиля или продукции определяются в соответствующих договорах купли-продажи.
![]()
2023 TOO «Subaru Kazakhstan» в составе КМК «Астана Моторс»
© 2023
Руководство по эксплуатации на Субару Форестер 5 с 2019 года в кузове S5 с моторами FB20B, FB25B и полным приводом
Характеристики Форестер 5
ип привода Полный (4WD)
Тип кузова SUV
Тип трансмиссии Вариатор
Время разгона 0-100 км/ч, с 9.5
Клиренс (высота дорожного просвета), мм 220
Максимальная скорость, км/ч 207
Габариты кузова (Д x Ш x В), мм 4625 x 1815 x 1730
Колесная база, мм 2670
Минимальный радиус разворота, м 5.4
Ширина передней колеи, мм 1565
Ширина задней колеи, мм 1570
Масса, кг 1677
Максимальная грузоподъёмность 546
Допустимая полная масса, кг 2223
Допустимый вес прицепа без тормозов, кг 750
Допустимый вес прицепа с тормозами, кг 1400
Объем багажника, л 505 (1775)
Расход топлива в городском цикле, л/100 км 9.3
Расход топлива за городом, л/100 км 6.3
Расход топлива в смешанном цикле, л/100 км 7,4
Передняя подвеска Независимая, амортизационная стойка типа МакФерсон
Задняя подвеска Независимая, на двойных поперечных рычагах
Передние тормоза Дисковые вентилируемые
Задние тормоза Дисковые вентилируемые
Стояночный тормоз электронный
Субару Форестер 5 руководство
Foreword
Foreword
SFWAA
Congratulations on choosing a SUBARU vehicle. This Owner’s
Manual has all the information necessary to keep your SUBARU in
excellent condition and to properly maintain the emission control
system for minimizing emission pollutants. We urge you to read this
manual carefully so that you may understand your vehicle and its
operation. For information not found in this Owner’s Manual, such
as details concerning repairs or adjustments, please contact the
SUBARU dealer from whom you purchased your SUBARU or the
nearest SUBARU dealer.
The information, specifications and illustrations found in this
manual are those in effect at the time of printing. SUBARU
CORPORATION reserves the right to change specifications and
designs at any time without prior notice and without incurring any
obligation to make the same or similar changes on vehicles
previously sold. This Owner’s Manual applies to all models and
covers all equipment, including factory installed options. Some
explanations, therefore may be for equipment not installed in your
vehicle.
Please leave this manual in the vehicle at the time of resale. The next
owner will need the information found herein.
SUBARU CORPORATION, TOKYO, JAPAN
“SUBARU” and the six–star cluster design are registered trademarks of SUBARU CORPORATION.
C
*
Copyright 2018 SUBARU CORPORATION


Vehicle types
This manual describes the following vehicle types.
SFWAB


Warranties
& Warranties for U.S.A.
SUBARU vehicles distributed by Subaru of
S00
S00AA
S00AA01
America, Inc. and sold at retail by an
authorized SUBARU dealer in the United
States come with the following warranties:
. SUBARU Limited Warranties
. Federal Emission Control Systems
Warranties
. California Emissions Control Sys-
tems Warranties
All warranty information, including applicability, details of coverage and exclusions,
is in the “Warranty and Maintenance
Booklet”. Read these warranties carefully.
& Warranties for Canada
SUBARU vehicles distributed by Subaru
S00AA05
Canada, Inc. and sold at retail by an
authorized SUBARU dealer in Canada
come with the following warranties:
. SUBARU Limited Warranty
. Emission Control System Warranty
All warranty information, including applicability, details of coverage and exclusions,
is in the “Warranty and Service Booklet”.
Read these warranties carefully.
& Warranties except for U.S.A.
and Canada
All warranty information, including details
of coverage and exclusions, is in the
“Warranty and Maintenance Booklet”.
Read these warranties carefully.
S00AA06
How to use this Owner’s
Manual
& Using your Owner’s Manual
Before you operate your vehicle, carefully
read this manual. To protect yourself and
extend the service life of your vehicle,
follow the instructions in this manual.
Failure to observe these instructions may
result in serious injury and damage to your
vehicle.
This manual is composed of fourteen
chapters. Each chapter begins with a brief
table of contents, so you can usually tell at
a glance if that chapter contains the
information you want.
Chapter 1: Seat, seatbelt and SRS airbags
This chapter informs you how to use the
seat and seatbelt and contains precautions for the SRS airbags.
Chapter 2: Keys and doors
This chapter informs you how to operate
the keys, locks and windows.
Chapter 3: Instruments and controls
This chapter informs you about the operation of instrument panel indicators and how
to use the instruments and other switches.
S00AB
S00AB01
1
– CONTINUED –
2
Chapter 4: Climate control
This chapter informs you how to operate
the climate control.
Chapter 5: Audio
This chapter informs you about your audio
system.
Chapter 6: Interior equipment
This chapter informs you how to operate
interior equipment.
Chapter 7: Starting and operating
This chapter informs you how to start and
operate your SUBARU.
Chapter 8: Driving tips
This chapter informs you how to drive your
SUBARU in various conditions and explains some safety tips on driving.
Chapter 9: In case of emergency
This chapter informs you what to do if you
have a problem, such as a flat tire or
engine overheating.
Chapter 10: Appearance care
This chapter informs you how to keep your
SUBARU looking good.
Chapter 11: Maintenance and service
This chapter informs you when you need to
take your SUBARU to the dealer for
scheduled maintenance and informs you
how to keep your SUBARU running
properly.
Chapter 12: Specifications
This chapter informs you about dimensions and capacities of your SUBARU.
Chapter 13: Consumer information and
reporting safety defects
This chapter informs you about Uniform
tire quality grading standards and Reporting safety defects.
Chapter 14: Index
This is an alphabetical listing of all that’s in
this manual. You can use it to quickly find
something you want to read.
For models with EyeSight system:
For details about the EyeSight system,
refer to the Owner’s Manual supplement
for the EyeSight system.
& Safety warnings
You will find a number of WARNINGs,
CAUTIONs and NOTEs in this manual.
These safety warnings alert you to potential hazards that could result in injury to you
or others.
Please read these safety warnings as well
as all other portions of this manual carefully in order to gain a better understanding
of how to use your SUBARU vehicle safely.
S00AB02
WARNING
A WARNING indicates a situation in
which serious injury or death could
result if the warning is ignored.
CAUTION
A CAUTION indicates a situation in
which injury or damage to your
vehicle, or both, could result if the
caution is ignored.
NOTE
A NOTE gives information or suggestions how to make better use of your
vehicle.
3
& Safety symbol
S00AB03
You will find a circle with a slash through it
in this manual. This symbol means “Do
not”, “Do not do this”, or “Do not let this
happen”, depending upon the context.
& Abbreviation list
You may find several abbreviations in this
S00AB04
manual. The meanings of the abbreviations are shown in the following list.
Abbreviation Meaning
A/C Air conditioner
ABS Anti-lock brake system
AKI Anti knock index
ALR Automatic locking retractor
ALR/ELR
AVH Auto Vehicle Hold
AWD All-wheel drive
BSD/RCTA
CVT
DRL Daytime running light
EBD
ELR Emergency locking retractor
GAW Gross axle weight
GAWR Gross axle weight rating
GPS Global positioning system
GVW Gross vehicle weight
GVWR Gross vehicle weight rating
INT Intermittent
Automatic locking retractor/
Emergency locking retractor
Blind Spot Detection/Rear
Cross Traffic Alert
Continuously variable transmission
Electronic brake force distribution
Abbreviation Meaning
LATCH
LED Light emitting diode
MIL Malfunction indicator light
MMT
OBD On-board diagnostics
RAB Reverse Automatic Braking
RON Research octane number
SI-DRIVE SUBARU Intelligent Drive
SRH
SRS
TIN Tire identification number
TPMS
Lower anchors and tethers for
children
Methylcyclopentadienyl manganese tricarbonyl
Steering Responsive Headlight
Supplemental restraint system
Tire pressure monitoring system
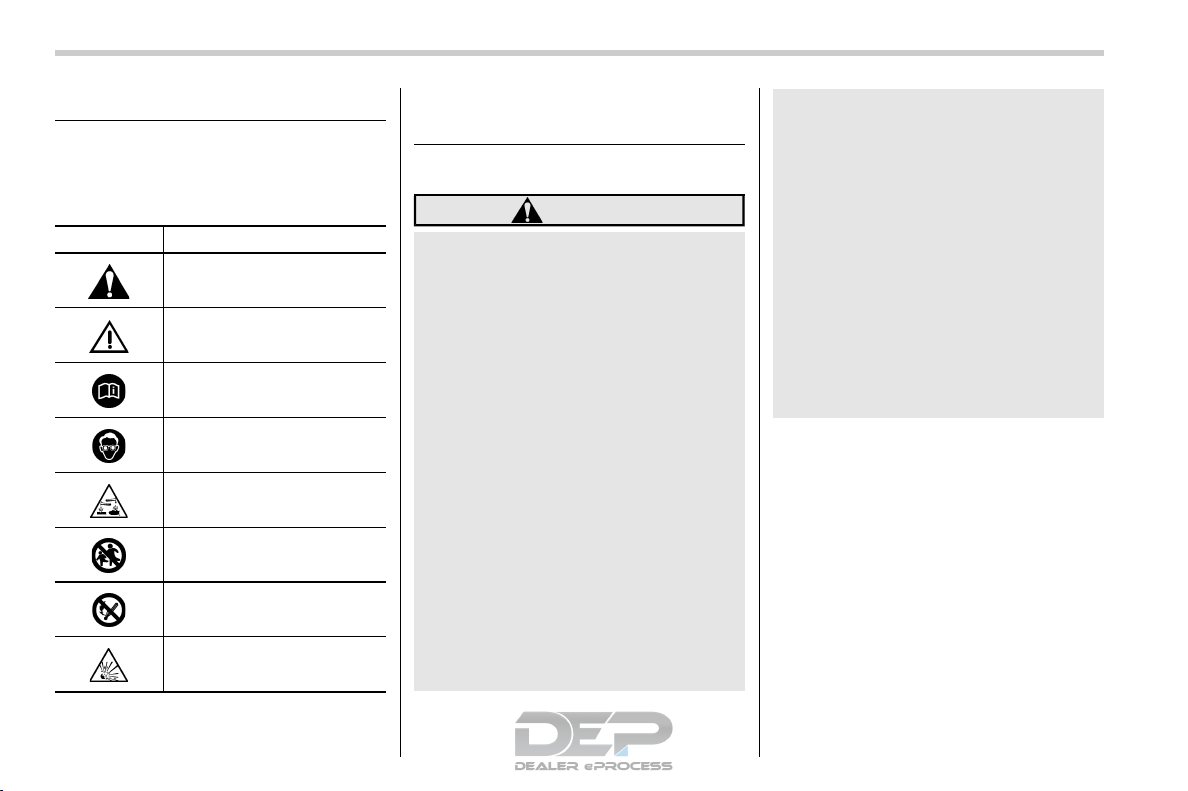
4
Vehicle symbols
S00AC
There are some of the symbols you may
see on your vehicle.
For warning and indicator lights, refer to
“Warning and indicator lights” FP24.
Mark Name
WARNING
CAUTION
Read these instructions carefully
Wear eye protection
Battery fluid contains sulfuric
acid
Keep children away
Keep flames away
Prevent explosions
Safety precautions when
driving
& Seatbelt and SRS airbag
WARNING
. All persons in the vehicle must
fasten their seatbelts BEFORE
the vehicle starts to move. Otherwise, the possibility of serious
injury becomes greater in the
event of a sudden stop or accident.
. To obtain maximum protection in
the event of an accident, the
driver and all passengers must
always wear seatbelts when in
the vehicle. The SRS (Supplemental Restraint System) airbag
does not do away with the need to
fasten seatbelts. In combination
with the seatbelts, it offers the
best combined protection in case
of a serious accident.
Not wearing a seatbelt increases
the chance of severe injury or
death in a crash even when the
vehicle has the SRS airbag.
S00AD
S00AD01
. The SRS airbags deploy with
considerable speed and force.
Occupants who are out of the
proper position when the SRS
airbag deploys could suffer very
serious injuries. Because the
SRS airbag needs enough space
for deployment, the driver should
always sit upright and well back
in the seat as far from the steering wheel as practical while still
maintaining full vehicle control
and the front passenger should
move the seat as far back as
possible and sit upright and well
back in the seat.
For instructions and precautions, carefully
read the following sections.
. For the seatbelt system, refer to “Seatbelts” FP47.
. For the SRS airbag system, refer to
“SRS airbag (Supplemental Restraint System airbag)” FP73.
5
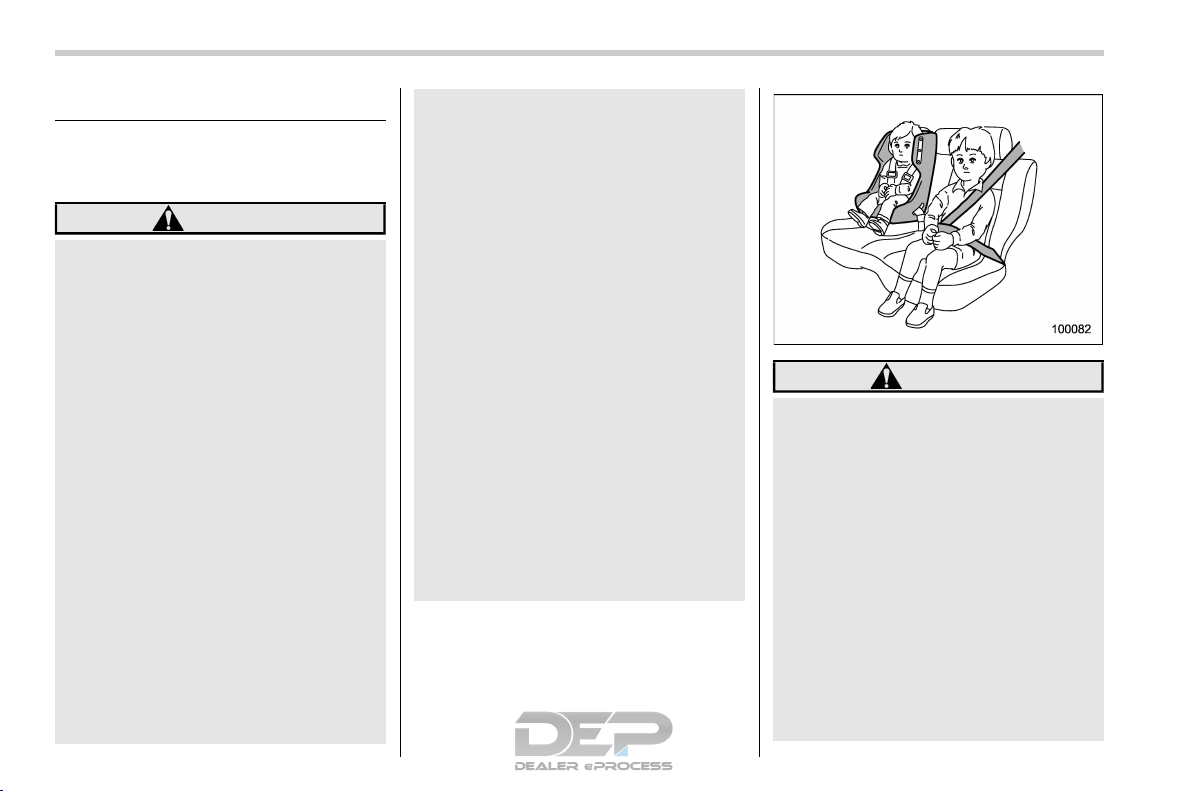
& Child safety
WARNING
. Never hold a child on your lap or
in your arms while the vehicle is
moving. The passenger cannot
protect the child from injury in a
collision, because the child will
be caught between the passenger and objects inside the vehicle.
. While riding in the vehicle, infants
and small children should always
be seated in the REAR seat in an
infant or child restraint system
which is appropriate for the
child’s age, height and weight. If
a child is too big for a child
restraint system, the child should
sit in the REAR seat and be
restrained using the seatbelts.
According to accident statistics,
children are safer when properly
restrained in the rear seating
positions than in the front seating
positions. Never allow a child to
stand up or kneel on the seat.
. Place children in the REAR seat
properly restrained at all times in
a child restraint device or in a
seatbelt. The SRS airbag deploys
S00AD02
with considerable speed and
force and can injure or even kill
children, especially if they are not
restrained or improperly restrained. Because children are
lighter and weaker than adults,
their risk of being injured from
deployment is greater.
. NEVER INSTALL A CHILD SEAT
IN THE FRONT SEAT. DOING SO
RISKS SERIOUS INJURY OR
DEATH TO THE CHILD BY PLACING THE CHILD’S HEAD TOO
CLOSE TO THE SRS AIRBAG.
. Always turn the child safety locks
to the “LOCK” position when
children sit in the rear seat.
Serious injury could result if a
child accidentally opens the door
and falls out. Refer to “Child
safety locks” FP137.
. Always lock the passenger’s win-
dows using the lock switch when
children are riding in the vehicle.
Failure to follow this procedure
could result in injury to a child
operating the power window. Refer to “Windows” FP138.
. Never leave unattended children,
adults or animals in the vehicle.
They could accidentally injure
themselves or others through
inadvertent operation of the vehicle. Also, on hot or sunny days,
temperature in a closed vehicle
could quickly become high enough to cause severe or possibly
fatal injuries to them.
. When leaving the vehicle, close
all windows and lock all doors.
For instructions and precautions, carefully
read the following sections.
. For the seatbelt system, refer to “Seatbelts” FP47.
. For the child restraint system, refer to
“Child restraint systems” FP59.
. For the SRS airbag system, refer to
“SRS airbag (Supplemental Restraint System airbag)” FP73.
– CONTINUED –
6
& Engine exhaust gas (carbon
monoxide)
WARNING
. Never inhale engine exhaust gas.
Engine exhaust gas contains
carbon monoxide, a colorless
and odorless gas which is dangerous, or even lethal, if inhaled.
. Always properly maintain the en-
gine exhaust system to prevent
engine exhaust gas from entering
the vehicle.
. Never run the engine in a closed
space, such as a garage, except
for the brief time needed to drive
the vehicle in or out of it.
. Avoid remaining in a parked ve-
hicle for a lengthy time while the
engine is running. If that is unavoidable, then use the ventilation fan to force fresh air into the
vehicle.
. Always keep the front ventilator
inlet grille free from snow, leaves
or other obstructions to ensure
that the ventilation system always works properly.
. If at any time you suspect that
exhaust fumes are entering the
S00AD03
vehicle, have the problem
checked and corrected as soon
as possible. If you must drive
under these conditions, drive
only with all windows fully open.
. Keep the rear gate closed while
driving to prevent exhaust gas
from entering the vehicle.
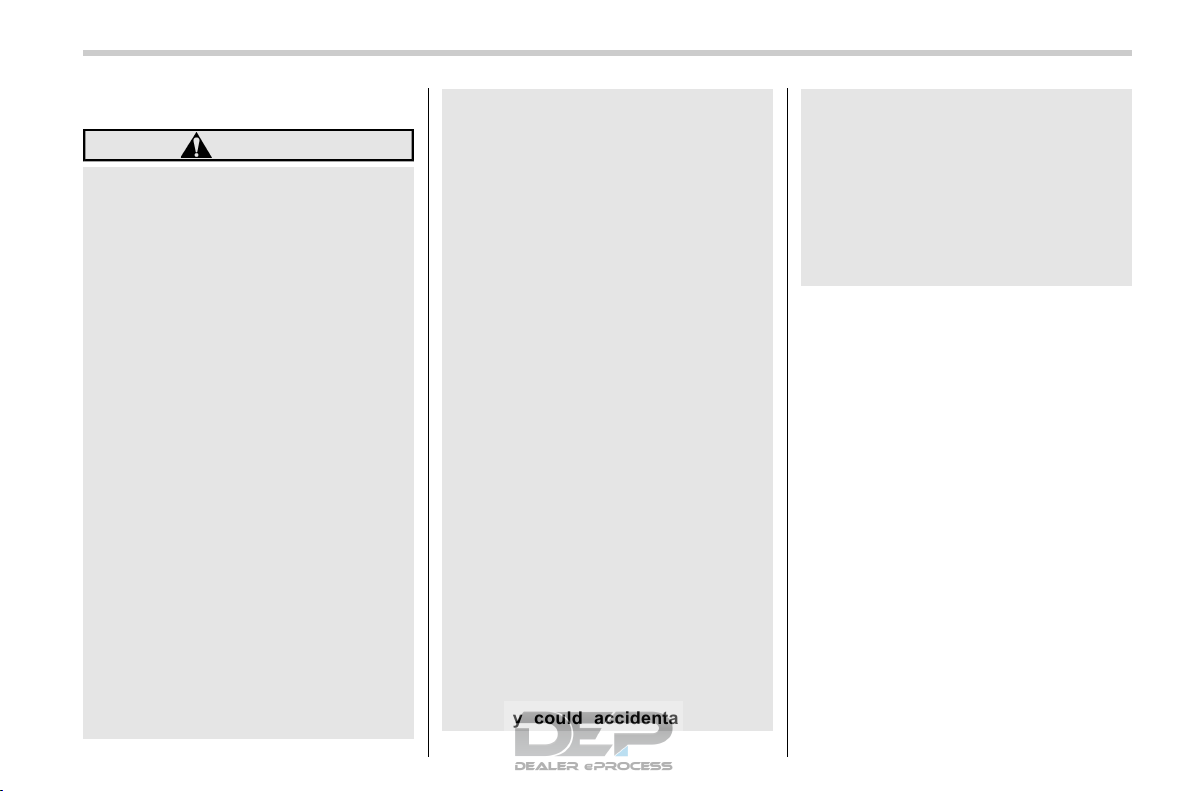
& Drinking and driving
S00AD04
WARNING
Drinking and then driving is very
dangerous. Alcohol in the bloodstream delays your reaction time
and impairs your perception, judgment and attentiveness. If you drive
after drinking – even if you drink just
a little – it will increase the risk of
being involved in a serious or fatal
accident, injuring or killing yourself,
your passengers and others. In
addition, if you are injured in the
accident, alcohol may increase the
severity of that injury.
Please don’t drink and drive.
Drunken driving is one of the most frequent
causes of accidents. Since alcohol affects
all people differently, you may have con-
sumed too much alcohol to drive safely
even if the level of alcohol in your blood is
below the legal limit. The safest thing you
can do is never drink and drive. However if
you have no choice but to drive, stop
drinking and sober up completely before
getting behind the wheel.
& Drugs and driving
S00AD05
WARNING
There are some drugs (over the
counter and prescription) that can
delay your reaction time and impair
your perception, judgment and attentiveness. If you drive after taking
them, it may increase your, your
passengers’ and other persons’ risk
of being involved in a serious or fatal
accident.
If you are taking any drugs, check with
your doctor or pharmacist or read the
literature that accompanies the medication
to determine if the drug you are taking can
impair your driving ability. Do not drive
after taking any medications that can make
you drowsy or otherwise affect your ability
to safely operate a motor vehicle. If you
have a medical condition that requires you
to take drugs, please consult with your
doctor.

7
Never drive if you are under the influence
of any illicit mind-altering drugs. For your
own health and well-being, we urge you
not to take illegal drugs in the first place
and to seek treatment if you are addicted
to those drugs.
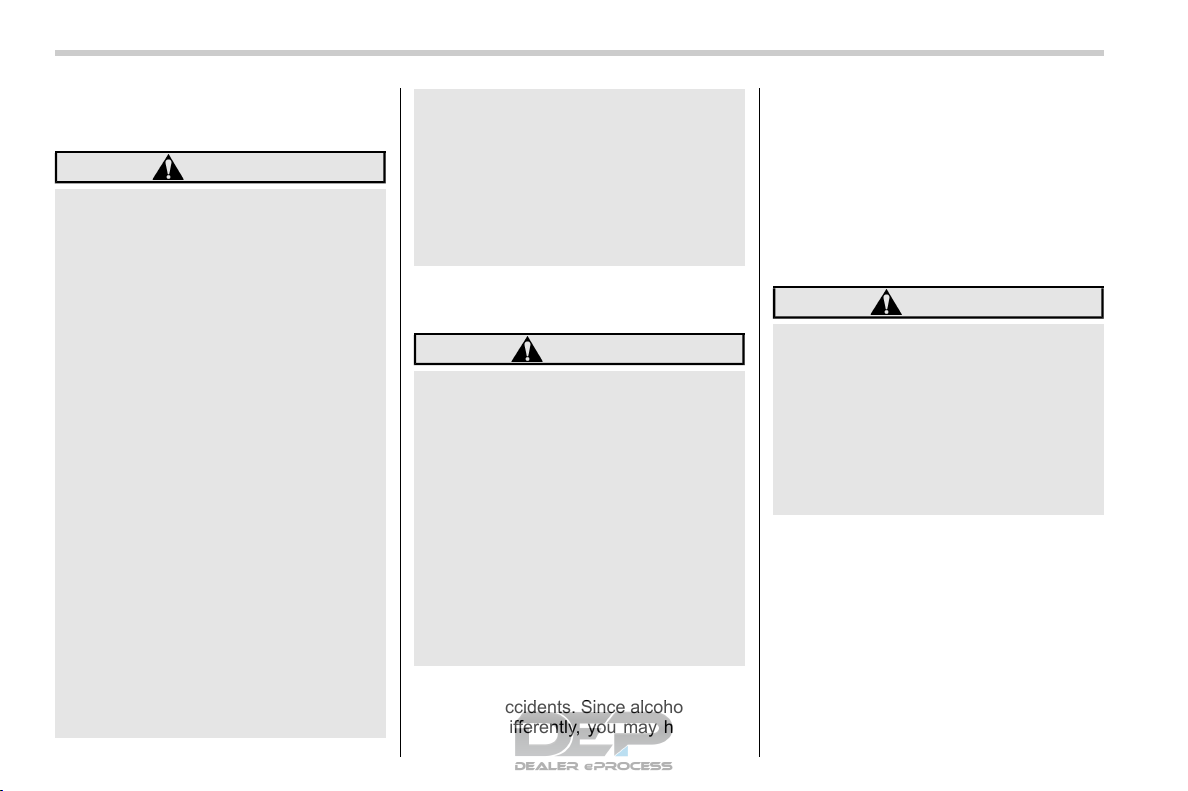
& Driving when tired or sleepy
S00AD06
WARNING
When you are tired or sleepy, your
reaction time will be delayed and
your perception, judgment and attentiveness will be impaired. If you
drive when tired or sleepy, your,
your passengers’ and other persons’ chances of being involved in
a serious accident may increase.
Please do not continue to drive but instead
find a safe place to rest if you are tired or
sleepy. On long trips, you should make
periodic rest stops to refresh yourself
before continuing on your journey. When
possible, you should share the driving with
others.
& Modification of your vehicle
S00AD07
CAUTION
Your vehicle should not be modified
other than with genuine SUBARU
parts and accessories. Other types
of modifications could affect its
performance, safety or durability,
and may even violate governmental
regulations. In addition, damage or
performance problems resulting
from modification may not be covered under warranties.
& Use of cell phones/texting
and driving
CAUTION
Do not talk on a cell phone or text
while driving; it may distract your
attention from driving and lead to an
accident. If you use a cell phone to
talk or text, first pull off the road and
park in a safe place. In some States/
Provinces, it may be lawful to talk on
a phone while driving, but only if the
phone is hands-free.
S00AD16
& Driving vehicles equipped
with navigation system
WARNING
Do not allow the monitor to distract
your attention from driving. Also, do
not operate the controls of the
navigation system while driving.
The loss of attention to driving could
lead to an accident. If you wish to
operate the controls of the navigation system, first take the vehicle off
the road and stop it in a safe
location.
& Driving with pets
Unrestrained pets can interfere with your
driving and distract your attention from
driving. In a collision or sudden stop,
unrestrained pets or cages can be thrown
around inside the vehicle and hurt you or
your passengers. Besides, the pets can be
hurt under these situations. It is also for
their own safety that pets should be
properly restrained in your vehicle. Restrain a pet with a special traveling harness
which can be secured to the rear seat with
a seatbelt or use a pet carrier which can be
secured to the rear seat by routing a
seatbelt through the carrier’s handle.
– CONTINUED –
S00AD09
S00AD10
8
Never restrain pets or pet carriers in the
front passenger’s seat. For further information, consult your veterinarian, local
animal protection society or pet shop.
& Tire pressures
Check and, if necessary, adjust the pressure of each tire (including the spare) at
least once a month and before any long
journey.
Check the tire pressure when the tires are
cold. Use a pressure gauge to adjust the
tire pressures to the values shown on the
tire placard. For detailed information, refer
to “Tires and wheels” FP459.
S00AD11
WARNING
Driving at high speeds with
excessively low tire pressures
can cause the tires to deform
severely and to rapidly become hot. A sharp increase in
temperature could cause tread
separation, and destruction of
the tires. The resulting loss of
vehicle control could lead to
an accident.
& Attaching accessories
WARNING
. Do not attach any accessories,
labels or stickers (other than
properly placed inspection stickers) to the windshield. Such
items may obstruct your view.
. If it is necessary to attach an
accessory (such as an electronic
toll collection (ETC) device or
security pass) to the windshield,
consult your SUBARU dealer for
details on the proper location.
S00AD15
General information
& California Perchlorate Advi-
sory
Certain vehicle components, such as airbag modules, seatbelt pretensioners and
keyless entry transmitter batteries, may
contain perchlorate material. Special
handling may apply for service or vehicle
end of life disposal. See www.dtsc.ca.gov/
hazardouswaste/perchlorate.
& Noise from under the vehicle
NOTE
You may hear a noise from under the
vehicle approximately 5 to 10 hours
after the ignition switch is turned to the
“LOCK”/“OFF” position. However, this
does not indicate a malfunction. This
noise is caused by the operation of the
fuel evaporation leakage checking system and the operation is normal. The
noise will stop after approximately 15
minutes.
& Event data recorder
This vehicle is equipped with an event data
recorder (EDR). The main purpose of an
EDR is to record, in certain crash or near
crash-like situations, such as an air bag
S00AK
S00AK03
S00AK01
S00AK04

9
deployment or hitting a road obstacle, data
that will assist in understanding how a
vehicle’s systems performed. The EDR is
designed to record data related to vehicle
dynamics and safety systems for a short
period of time, typically 30 seconds or less.
The EDR in this vehicle is designed to
record such data as:
. How various systems in your vehicle
were operating;
. Whether or not the driver and passenger safety belts were buckled/fastened;
. How far (if at all) the driver was
depressing the accelerator and/or brake
pedal; and,
. How fast the vehicle was traveling.
These data can help provide a better
understanding of the circumstances in
which crashes and injuries occur. NOTE:
EDR data are recorded by your vehicle
only if a non-trivial crash situation occurs;
no data are recorded by the EDR under
normal driving conditions and no personal
data (e.g., name, gender, age, and crash
location) are recorded. However, other
parties, such as law enforcement, could
combine the EDR data with the type of
personally identifying data routinely acquired during a crash investigation.
To read data recorded by an EDR, special
equipment is required, and access to the
vehicle or the EDR is needed. In addition
to the vehicle manufacturer, other parties,
such as law enforcement, that have the
special equipment, can read the information if they have access to the vehicle or
the EDR.
— — — — — — — — — — — — — — — — — — — — — — — — — — — — — — — — — — — — — — — —
— — — — — — — — — — — — — — — — — — — — — — — — — — — — — — — — — — — — — — — —
— — — — — — — — — — — — — — — — — — — — — — — — — — — — — — — — — — — — — — — —
— — — — — — — — — — — — — — — — — — — — — — — — — — — — — — — — — — — — — — — —
— — — — — — — — — — — — — — — — — — — — — — — — — — — — — — — — — — — — — — — —
— — — — — — — — — — — — — — — — — — — — — — — — — — — — — — — — — — — — — — — —
— — — — — — — — — — — — — — — — — — — — — — — — — — — — — — — — — — — — — — — —
— — — — — — — — — — — — — — — — — — — — — — — — — — — — — — — — — — — — — — — —
— — — — — — — — — — — — — — — — — — — — — — — — — — — — — — — — — — — — — — — —
— — — — — — — — — — — — — — — — — — — — — — — — — — — — — — — — — — — — — — — —
— — — — — — — — — — — — — — — — — — — — — — — — — — — — — — — — — — — — — — — —
— — — — — — — — — — — — — — — — — — — — — — — — — — — — — — — — — — — — — — — —
— — — — — — — — — — — — — — — — — — — — — — — — — — — — — — — — — — — — — — — —
Table of contents
Seat, seatbelt and SRS airbags
Keys and doors
Instruments and controls
Climate control
Audio
Interior equipment
Starting and operating
Driving tips
In case of emergency
Appearance care
Maintenance and service
Specifications
Consumer information and reporting safety defects
1
2
3
4
5
6
7
8
9
10
11
12
13
Index
14

12
Illustrated index
& Exterior
S00AE
S00AE01
1) Engine hood (page 447)
2) Front wipers (page 239)
3) Replacing bulbs (page 476)
4) Headlights (page 229)
5) Moonroof (page 149)
6) Roof rails (page 396)
7) Outside mirror (page 248)
 Door locks (page 131)
9) Tire pressure (page 462)
10) Flat tires (page 415)
11) Snow tires (page 392)
12) Fog lights (page 236)
13) Tie-down hooks (page 423)
14) Towing hook (page 423)
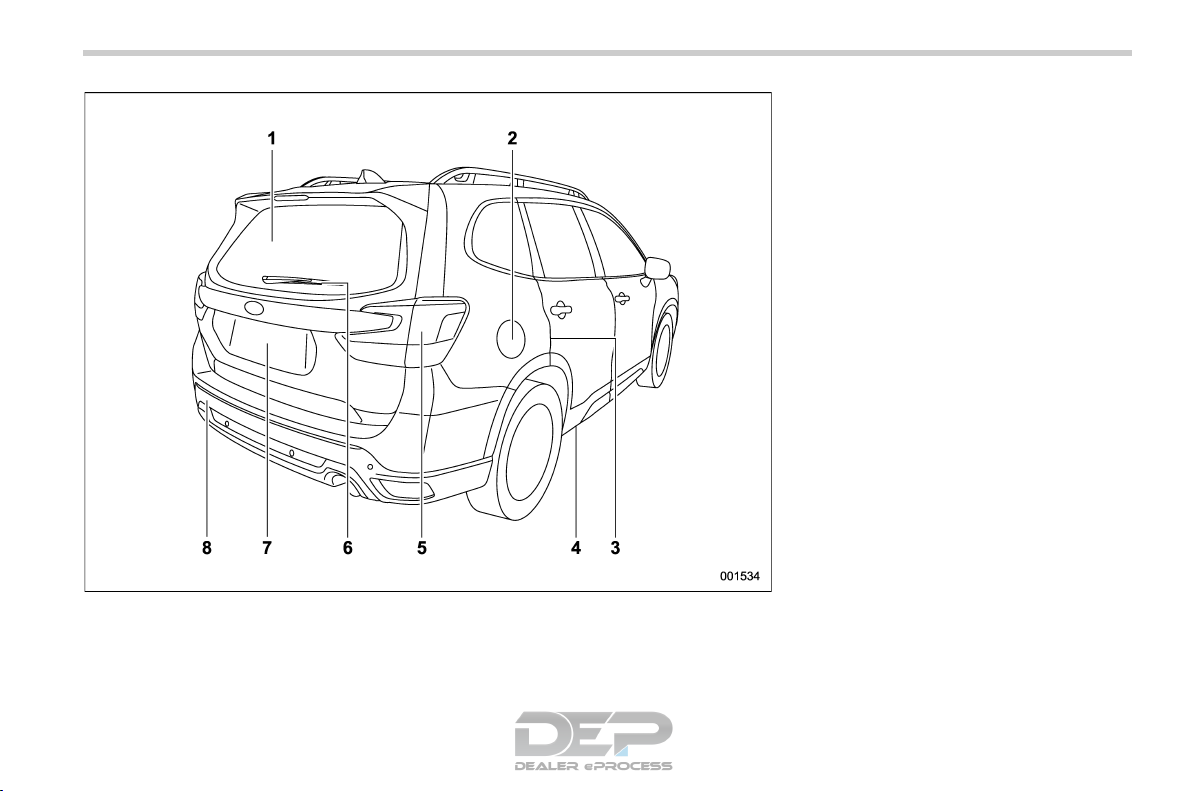
1) Rear window defogger (page 250)
2) Fuel filler lid and cap (page 292)
3) Child safety locks (page 137)
4) Tie-down hole (page 423)
5) Replacing bulbs (page 476)
6) Rear window wiper (page 240)
7) Rear gate (page 141)
Towing hook (page 423)
13
– CONTINUED –
14
& Interior
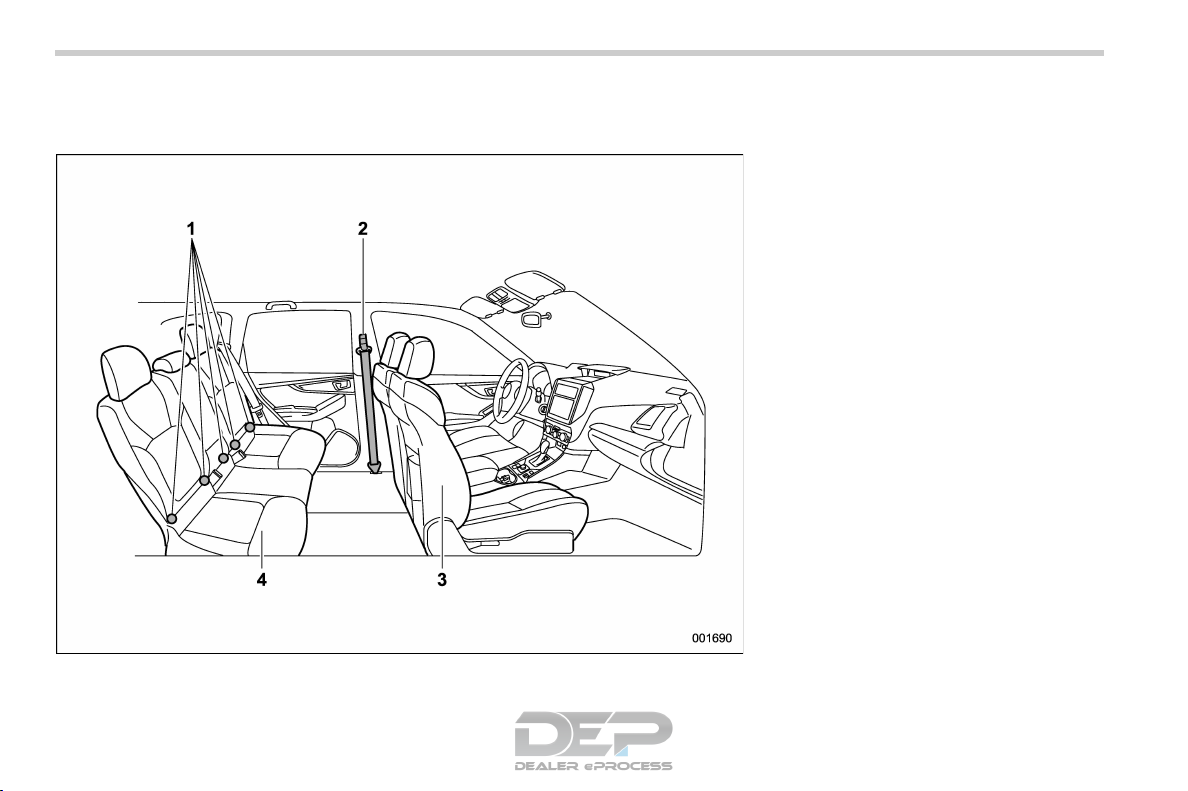
! Passenger compartment area
S00AE02
S00AE0201
1) Lower anchorages for child restraint
system (page 68)
2) Seatbelt (page 47)
3) Front seat (page 32)
4) Rear seat (page 39)

1) Power windows (page 138)
2) Door locks (page 132)
3) Select lever (page 309)
4) USB power supply (page 282)
5) Front power supply socket (page 280)
6) Glove box (page 278)
7) Cup holder (page 278)
Center console (page 278)
15
– CONTINUED –
16
1) Button for SUBARU STARLINK
2) Moonroof switch (page 150)
3) Electronic parking brake switch (page
332)
4) Auto Vehicle Hold switch (page 334)
5) X-MODE switch (page 326)
6) Front seat heater switches (page 46)
7) USB power supply (page 282)
Rear seat heater switches (page 46)
NOTE
. For U.S.-spec. models with SUBARU
STARLINK: Refer to the Owner’s Manual supplement for SUBARU STARLINK
Safety and Security.
. For models with EyeSight system:
Refer to the Owner’s Manual supplement for the EyeSight system.
17
& Instrument panel
S00AE03
1) Seat position memory switch (page 37)
2) Power rear gate switch (page 142)
3) Steering Responsive Headlight OFF
switch (page 235)
4) Memory switch (page 142)
5) Illumination brightness control dial (page
164)
6) Combination meter (page 160)
7) Type A multi-function display (black and
white) (page 197)/Type B multi-function
display (color LCD) (page 203)
Audio*
9) Hazard warning flasher switch (page
160)
10) Climate control panel (page 257)
11) Tilt/Telescopic steering wheel (page 251)
12) Driver Monitoring System OFF switch
(page 380)
13) Fuse box (page 474)
14) BSD/RCTA OFF switch (page 351)
15) Auto Start Stop OFF switch (page 339)
16) Hood lock release knob (page 447)
17) Vehicle Dynamics Control OFF switch
(page 325)
*: For details about how to use the audio
and navigation system (if equipped),
refer to the separate navigation/audio
Owner’s Manual.
– CONTINUED –
18
1) Audio control switches*
2) INFO button for type A multi-function
display (black and white) (page 198)/
INFO button for type B multi-function
display (color LCD) (page 205)
3) Cruise control switches (page 346)
4) Shift paddle (page 312)
5) SI-DRIVE switches (page 318)
6) Heated Steering Wheel switch (page
252)
7) SRS airbag (page 73)
Horn (page 253)
9) Combination meter display control
switches (page 189)
10) Talk switch for voice command system*/
Hands-free phone switches*
*: For details about how to use the
switches, refer to the separate navigation/audio Owner’s Manual.
NOTE
For models with EyeSight system:
Refer to the Owner’s Manual supplement for the EyeSight system.

19
& Light control and wiper control levers/switches
S00AE04
1) Windshield wiper (page 237)
2) Mist (page 239)
3) Windshield washer (page 239)
4) Rear window wiper and washer switch
(page 240)
5) Wiper intermittent time control switch
(page 239)
6) Windshield wiper and washer switches
(page 239)
7) Light control switch (page 229)
Fog light switch (page 236)
9) Headlight ON/OFF/AUTO (page 229)
10) Headlight flasher High/Low beam change
(page 231)
11) Turn signal lever (page 237)
– CONTINUED –
20
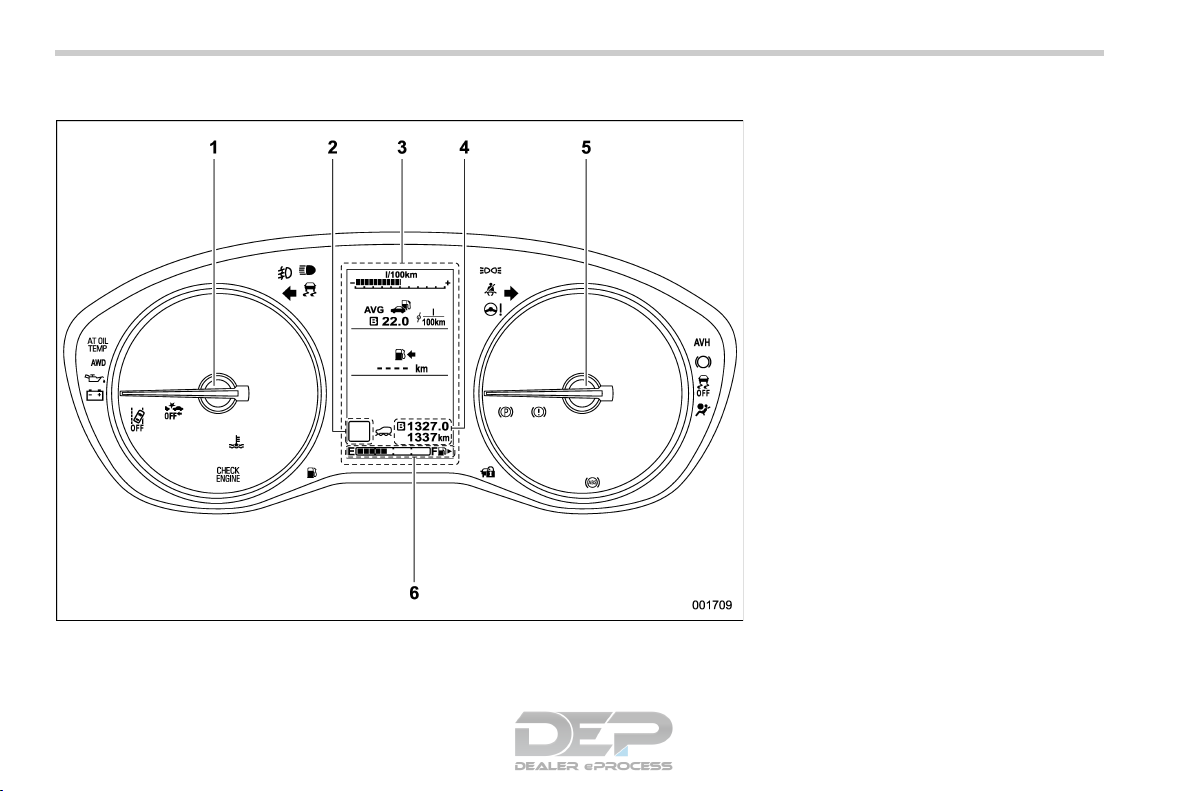
& Combination meter
! U.S.-spec. models
The illustration above is a typical example. For some models, the combination meter may be
slightly different than that shown in the illustration.
S00AE05
S00AE0549
1) Tachometer (page 160)
2) Select lever/gear position indicator (page
184)
3) Combination meter display (color LCD)
(page 189)
4) Trip meter and odometer (page 161)
5) Speedometer (page 160)
6) Fuel gauge (page 162)
21
! Except U.S.-spec. models (type A)
The illustration above is a typical example. For some models, the combination meter may be
slightly different than that shown in the illustration.
S00AE0531
1) Tachometer (page 160)
2) Select lever/gear position indicator (page
184)
3) Trip meter and odometer (page 161)
4) Speedometer (page 160)
5) ECO gauge (page 162)
6) Fuel gauge (page 162)
– CONTINUED –
22
! Except U.S.-spec. models (type B)
The illustration above is a typical example. For some models, the combination meter may be
slightly different than that shown in the illustration.
S00AE0519
1) Tachometer (page 160)
2) Select lever/gear position indicator (page
184)
3) Combination meter display (color LCD)
(page 189)
4) Trip meter and odometer (page 161)
5) Speedometer (page 160)
6) Fuel gauge (page 162)
23
– CONTINUED –
24
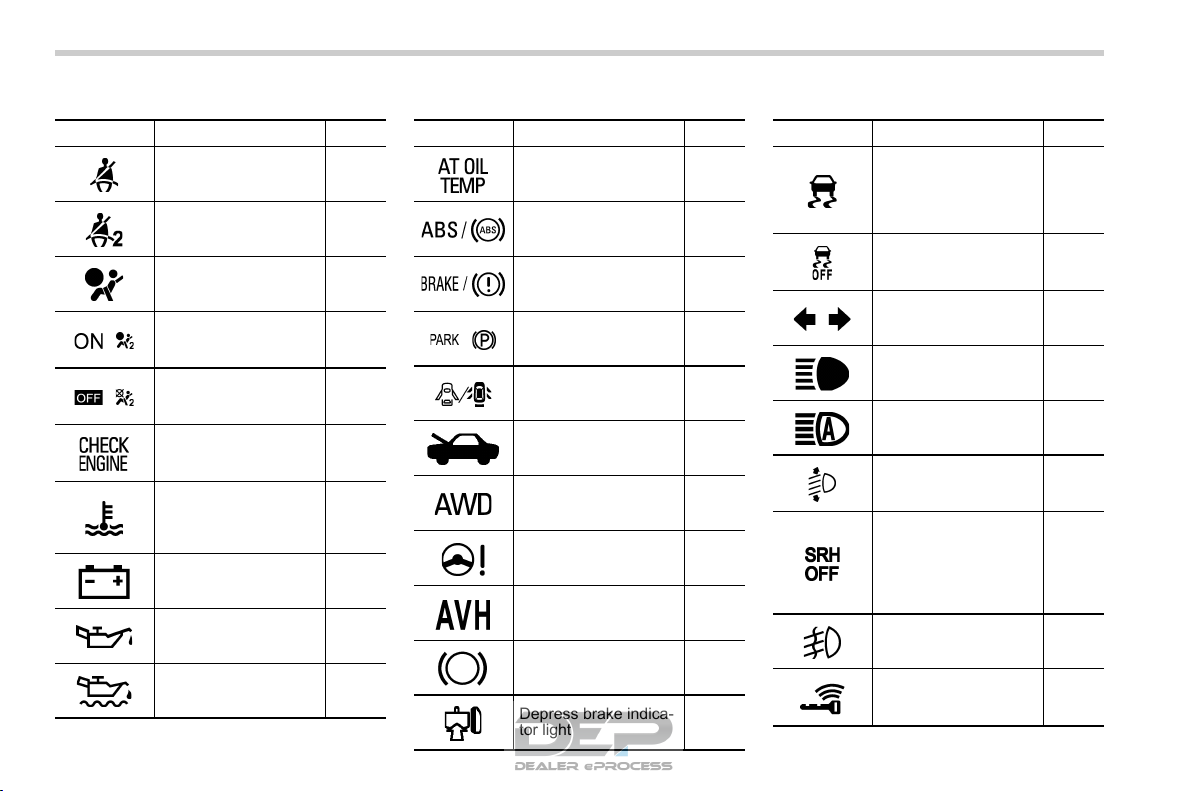
& Warning and indicator lights
Mark Name Page
Seatbelt warning light 165
Front passenger’s
seatbelt warning light
SRS airbag system
warning light
Front passenger’s
frontal airbag ON indi-
/
cator
Front passenger’s
frontal airbag OFF in-
/
dicator
CHECK ENGINE
warning light/Malfunction indicator light
Coolant temperature
low indicator light/
Coolant temperature
high warning light
Charge warning light 169
Oil pressure warning
light
Engine oil level warning light
S00AE06
165
167
167
167
168
168
169
170
Mark Name Page
AT OIL TEMP warning
light
ABS warning light 172
Brake system warning
light
Electronic parking
/
brake indicator light
Door open warning
light
Engine hood open
warning light
AWD warning light 175
Power steering warning light
Auto Vehicle Hold ON
indicator light
Auto Vehicle Hold operation indicator light
Depress brake indica-
tor light
170
173
173
175
175
176
175
175
175
Mark Name Page
Vehicle Dynamics
Control warning light/
Vehicle Dynamics
Control operation indicator light
Vehicle Dynamics
Control OFF indicator
light
Turn signal indicator
lights
High beam indicator
light
High beam assist indicator light (if equipped)
Automatic headlight
beam leveler warning
light (if equipped)
Steering Responsive
Headlight warning
light/Steering Responsive Headlight OFF indicator light (if
equipped)
Front fog light indicator
light (if equipped)
Access key warning
indicator light (if
equipped)
176
178
185
185
185
186
186
186
178
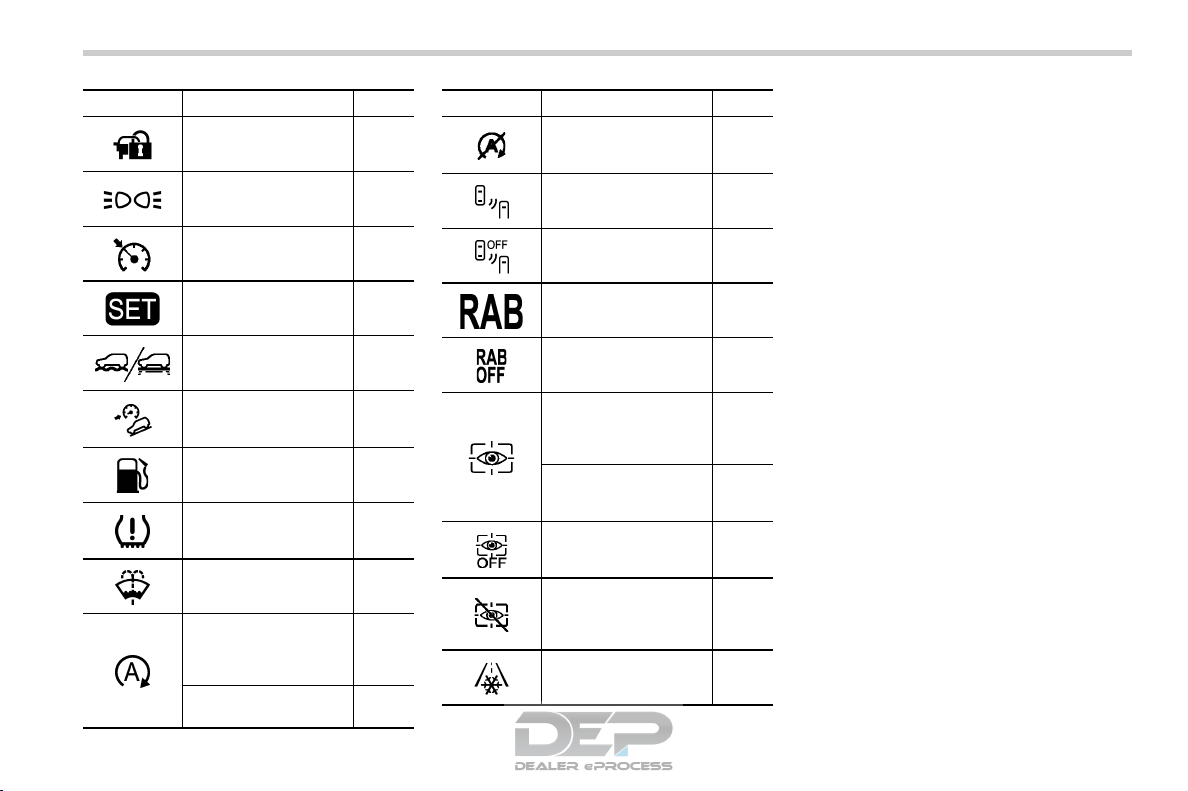
25
Mark Name Page
Security indicator light 183
Headlight indicator
light (if equipped)
Cruise control indicator light (if equipped)
Cruise control set indicator light (if equipped)
X-MODE indicator light
(if equipped)
Hill descent control indicator light (if
equipped)
Low fuel warning light 175
Low tire pressure
warning light
(U.S.-spec. models)
Windshield washer
fluid warning light
Auto Start Stop warning light/Auto Start
Stop OFF indicator
light (yellow)
Auto Start Stop indicator light (green)
186
185
186
187
187
171
170
186
187
Mark Name Page
Auto Start Stop No
Activity Detected indicator light
BSD/RCTA warning
light (if equipped)
BSD/RCTA OFF indicator light (if equipped)
RAB warning light (if
equipped)
RAB OFF indicator
light (if equipped)
Driver Monitoring System operation indicator
light (green) (if
equipped)
Driver Monitoring System warning light (yellow) (if equipped)
Driver Monitoring System OFF indicator light
(if equipped)
Driver Monitoring System temporary stop indicator light (if
equipped)
Icy road surface warning light (if equipped)
187
188
188
188
188
188
188
188
188
189
26
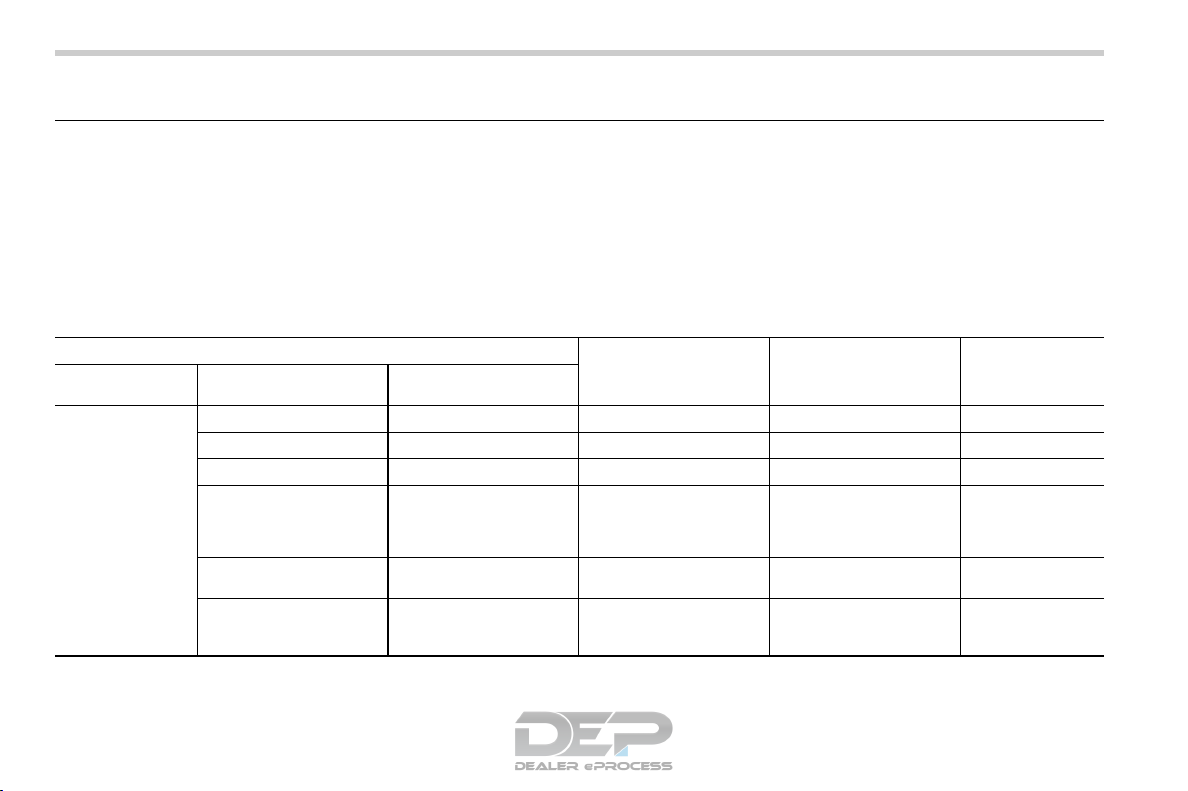
Function settings
& Function settings and adjustments on the combination meter display (color LCD)
If your vehicle is equipped with a combination meter display (color LCD), setting adjustments to the following items can be manually
changed within the display to meet your personal requirements.
NOTE
. If your vehicle is not equipped with a combination meter display (color LCD), setting changes to the following items will
need to be performed by a SUBARU dealer. Refer to “Function settings and adjustments performed by a dealer” FP29.
. For setting adjustments to the following items, refer to the appropriate page for details.
S00AF
S00AF01
1st menu/vehicle
system
Screen Settings
Item
2nd menu/adjustable ve-
hicle system setting
Welcome Screen — On/Off On 190
Good-bye Screen — On/Off On 190
Gauge Initial Movement — On/Off On 163
Units —
Tire Pressure Units (U.S.spec. models)
Languages —
3rd menu/selectable ve-
hicle system setting
— kPa/PSi PSi 193
Available settings Factory default setting
km, km/h, Liter/mile,
MPH, Gallon
English/Español/Français
U.S.-spec models: mile,
MPH, Gallon
Other models: km, km/h,
Liter
U.S.-spec models: English
Other models: Français
Page reference for
the vehicle system
operation
197 and 203
203
27
Item
1st menu/vehicle
system
Warning Volume* — — Max/Mid/Min Mid
EyeSight
RAB (if equipped) Sonar Audible Alarm — On/Off On 367
2nd menu/adjustable ve-
hicle system setting
Lead Vehicle Acquisition
Sound
Lead Vehicle Moving
Monitor Function
Cruise Control Acceleration Characteristics*
Select Drive on Left/Drive
on Right
3rd menu/selectable ve-
hicle system setting
— On/Off On
— On/Off On
—
—
Available settings Factory default setting
Lv.4 (Dynamic)/Lv.3
(Standard)/Lv.2 (Comfort)/Lv.1 (ECO)
Drive on Left/Drive on
Right
Lv.3 (Standard)
Drive on Right
Page reference for
the vehicle system
operation
355 and 367
For details about
EyeSight system,
refer to the Owner’s Manual supplement for the
EyeSight system.
Refer to the Owner’s Manual supplement for the
EyeSight system.
– CONTINUED –
28
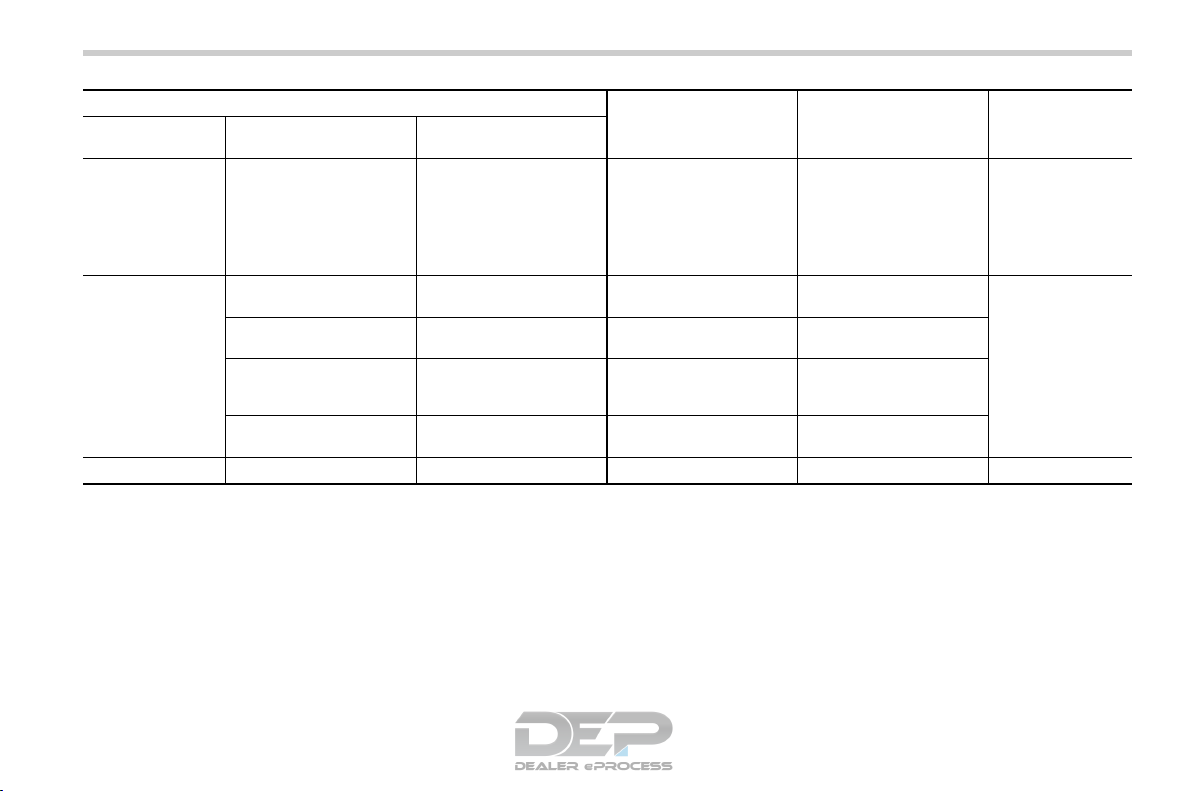
Item
1st menu/vehicle
system
Vehicle Setting
Default Settings — — No/Yes —
*: You can also set this while driving.
2nd menu/adjustable ve-
hicle system setting
Keyless Entry System
Defogger — 15 minutes/Continuous 15 minutes 250
Interior Light —
Auto Door Lock and Unlock
Auto Light Sensor — Max/Mid/Low/Min Mid 230
Welcome Lighting
One-touch lane changer — On/Off On 237
Door mirror setting
3rd menu/selectable ve-
hicle system setting
Audible Signal On/Off On 123
Hazard Warning Flasher On/Off On 115
Driver Door Unlock Driver Door Only/All Driver Door Only 117
Rear Gate/Trunk Unlock Rear Gate/Trunk Only/All Rear Gate/Trunk Only 117
Auto Door Lock
Auto Door Unlock
Approaching Time Set
Leaving Time Set
Reverse Tilt-Down Mirrors
Available settings Factory default setting
10 seconds/20 seconds/
30 seconds/Off
Vehicle Speed/Shift Into
or Out of PARK/Off
Shift Into or Out of PARK/
Ignition OFF/Driver Door
Open/Off
30 seconds/60 seconds/
90 seconds/Off
30 seconds/60 seconds/
90 seconds/Off
On/Off On 195
30 seconds 275
Vehicle Speed 133
Driver Door Open 133
30 seconds 230
30 seconds 230
Page reference for
the vehicle system
operation
195
29
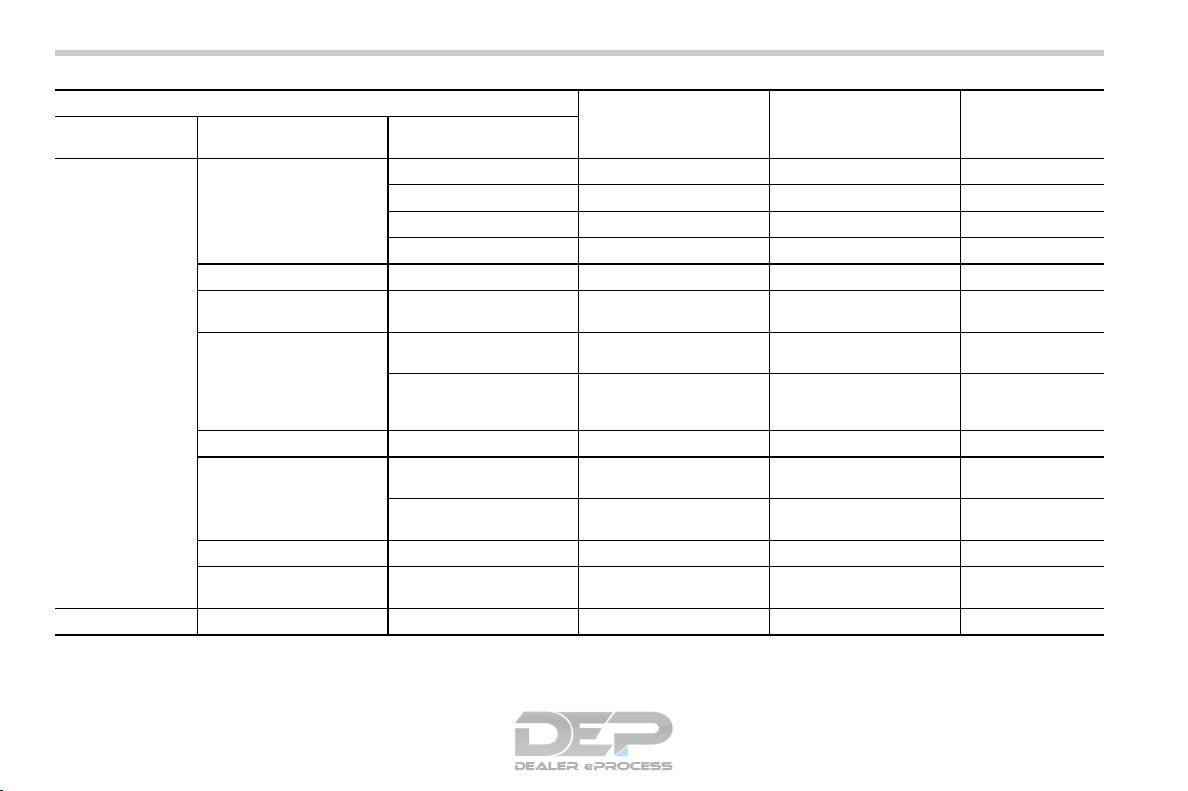
& Individual settings and adjustments excluding combination meter display (color LCD)
For setting adjustments to the following items, refer to the appropriate page for details.
Item Function Available settings Factory default setting Page
Alarm system Alarm system Operation/Non-operation Operation 136
Remote keyless entry system Audible signal Operation/Non-operation Operation
& Function settings and adjustments performed by a dealer
A SUBARU dealer can change the setting adjustments of the following items to meet your personal requirements. Contact the nearest
S00AF02
129
S00AF03
SUBARU dealer for details.
Item Function Available settings Factory default setting
Alarm system
Alarm/panic alarm
Keyless Access (if equipped) Audible signal volume Level 1 to 7 Level 5
Remote keyless entry system
Key lock-in prevention Key lock-in prevention Operation/Non-operation Operation
Battery drainage prevention function
Seatbelt warning Sounds a chime while driving Operation/Non-operation Operation
Auto on/off headlights Auto-on/off wiper-linked Operation/Non-operation Operation
Reverse gear interlocked rear wiper Reverse gear interlocked rear wiper Operation/Non-operation
Auto dimmer cancel
High beam assist function (if
equipped)
Monitoring start delay time (after
closure of doors)
Dome light, cargo area light, and
map lights illumination
Hazard warning flasher Operation/Non-operation Operation
Audible signal volume Level 1 to 7 Level 5
Battery drainage prevention function
Sensitivity of the operation of the
auto dimmer cancel
High beam assist function Operation/Non-operation Operation
0 seconds/30 seconds 30 seconds
ON/OFF OFF
Operation/Non-operation Operation
U.S.-spec. models: Non-operation
Other models: Operation
OFF/Min/Low/Mid/Hi/Max Mid
– CONTINUED –
30
Item Function Available settings Factory default setting
Power rear gate open and close
function
Outside mirrors reverse tilt-down
Power rear gate opening and closing by remote control key/access
key
Reverse interlocking outside mirror
target customize
Reverse interlocking outside mirror
last memory customize
Operation/Non-operation Operation
Right and left mirrors/right mirror Right mirror
Operation/Non-operation
Non-operation
Seat, seatbelt and SRS airbags
1-1. Seats………………………………………………………… 32
Safety tips ……………………………………………………32
Manual seat (if equipped)………………………………..35
Power seat (if equipped) …………………………………36
S01
1-2. Rear seats ………………………………………………… 39
Armrest (if equipped)……………………………………..40
Folding down the rear seatback ……………………….40
Reclining the seatback (if equipped) …………………42
1-3. Head restraints …………………………………………. 43
Front seats …………………………………………………..43
Rear seats ……………………………………………………44
1-4. Seat heater (if equipped)……………………………. 46
Safety precautions…………………………………………46
Front seat heater …………………………………………..46
Rear seat heater (if equipped) ………………………….46
1-5. Seatbelts…………………………………………………… 47
Seatbelt safety tips ………………………………………..47
Emergency Locking Retractor (ELR) …………………49
Automatic Locking Retractor/Emergency
Locking Retractor (ALR/ELR) …………………………49
Seatbelt warning light and chime ……………………..50
Fastening the seatbelt ……………………………………50
Seatbelt maintenance……………………………………..56
1-6. Seatbelt pretensioners ………………………………. 56
Seatbelt with shoulder belt pretensioner ……………57
Seatbelt with shoulder belt and lap belt
pretensioners ……………………………………………..57
System monitors …………………………………………..58
System servicing …………………………………………. 58
Precautions against vehicle modification…………..58
1-7. Child restraint systems……………………………… 59
Safety tips for installing child restraint systems …61
Where to place a child restraint system ……………. 61
Choosing a child restraint system …………………… 63
Installing child restraint systems with ALR/ELR
seatbelt…………………………………………………….. 63
Installing a booster seat ………………………………… 67
Installation of child restraint systems by use of
lower and tether anchorages (LATCH) ……………. 68
Top tether anchorages …………………………………..71
1-8. SRS airbag (Supplemental Restraint
System airbag) ……………………………………….. 73
General precautions regarding SRS airbag
system………………………………………………………73
General precautions regarding SRS airbag
system for accessories and any objects ………….75
General precautions regarding SRS airbag
system and children…………………………………….77
Components ………………………………………………..80
SUBARU advanced frontal airbag system ………….82
SRS side airbag and SRS curtain airbag ……………94
SRS airbag system monitors ………………………… 101
SRS airbag system servicing………………………… 102
Precautions against vehicle modification………… 103
How to contact the vehicle manufacturer
concerning modifications for persons with
disabilities that may affect the advanced
airbag system ………………………………………….. 104
1
32
Seats
1-1. Seats
& Safety tips
! Safety tips for seat
WARNING
. Never adjust the seat while driv-
ing, as it may cause loss of
vehicle control or personal injury.
. Before adjusting the seat, make
sure the hands and feet of rear
seat passengers and cargo are
clear of the adjusting mechanism.
. After adjusting the seat, move it
back and forth to make sure it is
securely locked. If the seat is not
securely locked, it may move or
the seatbelt may not operate
properly.
. Do not put objects under the front
seats. They may interfere with
front seat locking and cause an
accident.
. Seatbelts provide maximum re-
straint when the occupant sits
well back and upright in the seat.
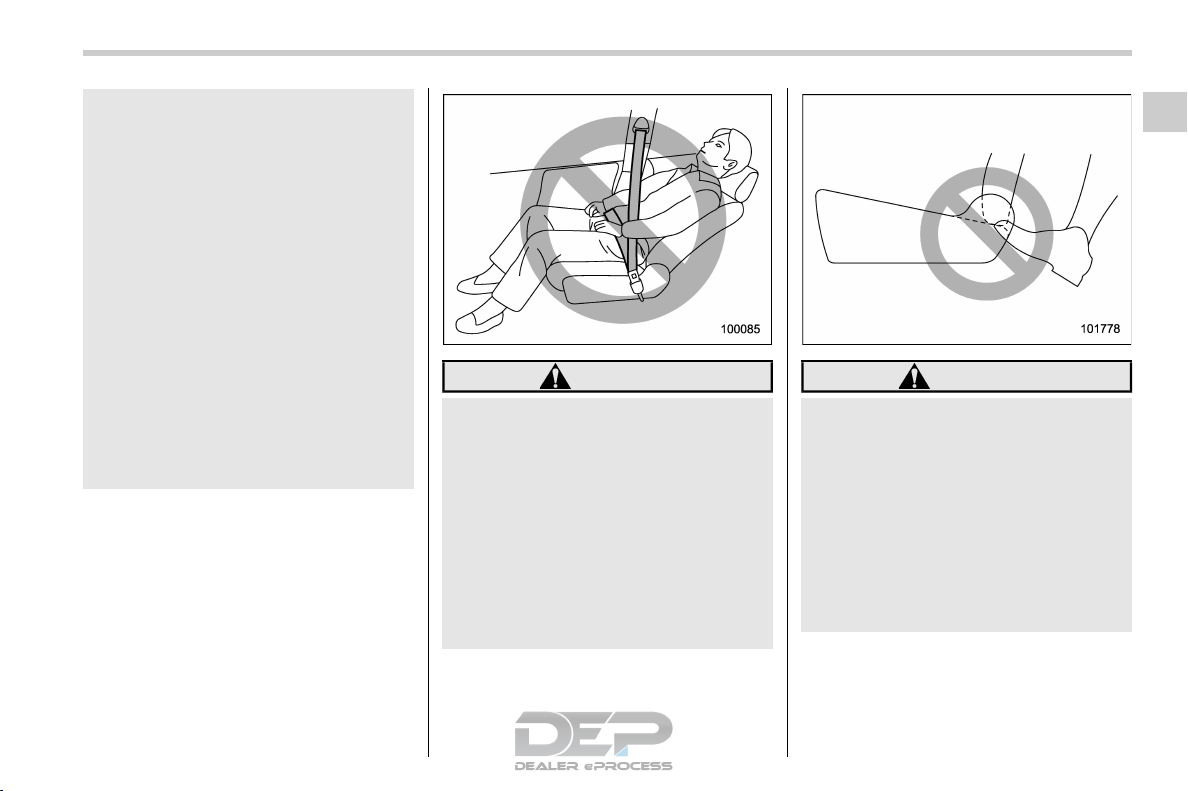
To reduce the risk of sliding
under the seatbelt in a collision,
the front seatbacks should be
S01AQ
S01AQ01
S01AQ0101
always used in the upright position while the vehicle is running.
If the front seatbacks are not
used in the upright position in a
collision, the risk of sliding under
the lap belt and of the lap belt
sliding up over the abdomen will
increase, and both can result in
serious internal injury or death.
. The SRS airbags deploy with
considerable speed and force.
Occupants who are out of the
proper position when the SRS
airbag deploys could suffer very
serious injuries. Because the
SRS airbag needs enough space
for deployment, the driver should
always sit upright and well back
in the seat as far from the steering wheel as practical while still
maintaining full vehicle control
and the front passenger should
move the seat as far back as
possible and sit upright and well
back in the seat.
WARNING
Place children in the rear seat properly restrained at all times. The SRS
airbag deploys with considerable
speed and force and can injure or
even kill children, especially if they
are not restrained or improperly
restrained. Because children are
lighter and weaker than adults, their
risk of being injured from deployment is greater. For that reason, we
strongly recommend that ALL children (including those in child seats
and those that have outgrown child
restraint devices) sit in the REAR
seat properly restrained at all times
in a child restraint device or in a
seatbelt, whichever is appropriate
for the child’s age, height and
weight. Secure ALL types of child
restraint devices (including forward
facing child seat) in the REAR seats
at all times.
NEVER INSTALL A CHILD SEAT IN
THE FRONT SEAT. DOING SO RISKS
SERIOUS INJURY OR DEATH TO
THE CHILD BY PLACING THE
CHILD’S HEAD TOO CLOSE TO
THE SRS AIRBAG.
According to accident statistics,
children are safer when properly
restrained in the rear seating positions than in the front seating positions. For instructions and precautions concerning child restraint systems, refer to “Child restraint systems” FP59.
WARNING
To prevent the passenger from sliding under the seatbelt in the event of
a collision, always put the seatback
in the upright position while the
vehicle is in motion. Also, do not
place objects such as cushions
between the passenger and the seatback. If you do so, the risk of sliding
under the lap belt and of the lap belt
sliding up over the abdomen will
increase, and both can result in
serious internal injury or death.
Seats
WARNING
Do not let rear passengers rest their
feet between the front seatback and
seat cushion. Doing so may lead to
defective operation of the following
systems and could result in serious
injury.
. Occupant detection system
. SRS side airbag
. Seat heater (if equipped)
. Power seat (if equipped)
33
Seat, seatbelt and SRS airbags
– CONTINUED –
34
Seats
WARNING
Seatbelts provide maximum restraint when the occupant sits well
back and upright in the seat. Do not
put cushions or any other materials
between occupants and seatbacks
or seat cushions. If you do so, the
risk of sliding under the lap belt and
of the lap belt sliding up over the
abdomen will increase, and both can
result in serious internal injury or
death.
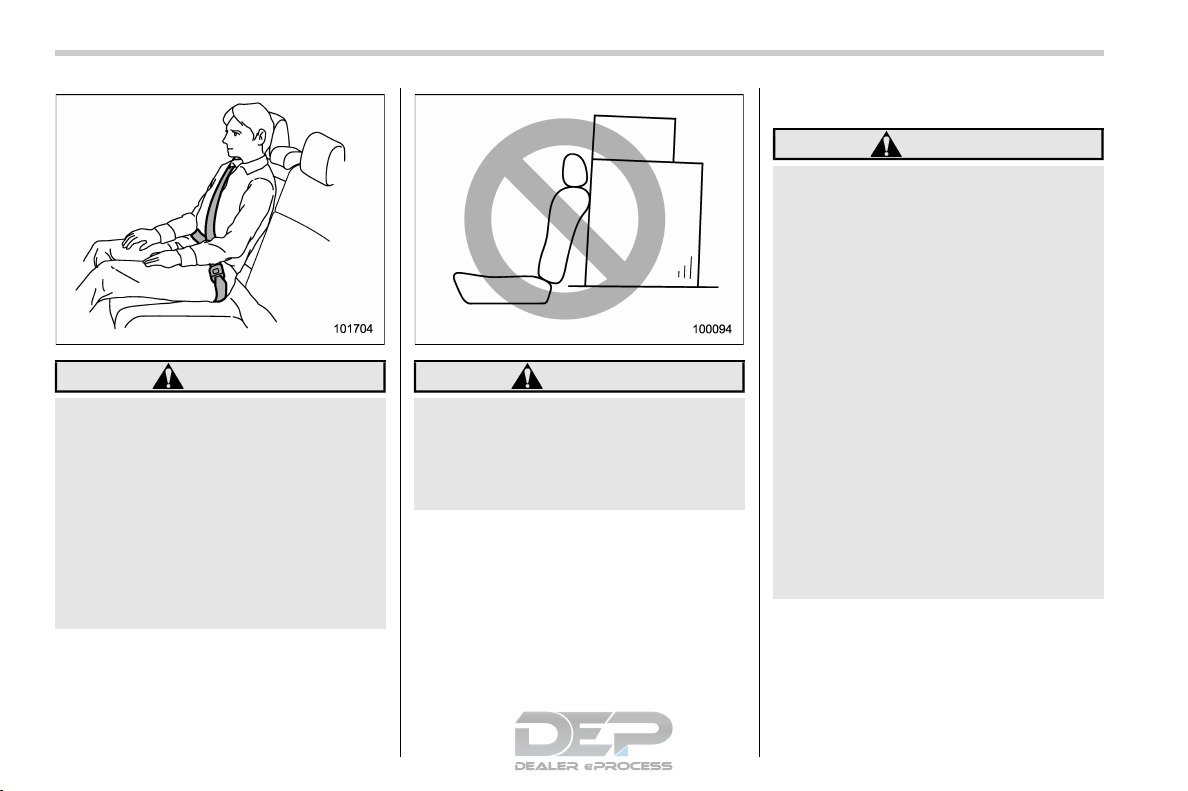
WARNING
Never stack luggage or other cargo
higher than the top of the seatback
because it could tumble forward and
injure passengers in the event of a
sudden stop or accident.
! Safety tips for head restraint
S01AQ0102
WARNING
. Never drive the vehicle with the
head restraints removed because
they are designed to reduce the
risk of serious neck injury in the
event that the vehicle is struck
from the rear. Also, never install
the head restraints the opposite
way round. Doing so will prevent
the head restraints from functioning as intended. Therefore, when
you remove the head restraints,
you must reinstall all head restraints correctly to protect vehicle occupants.
. All occupants, including the dri-
ver, should not operate a vehicle
or sit in a vehicle’s seat until the
head restraints are placed in their
proper positions in order to minimize the risk of neck injury in the
event of a crash.
Seats
35
& Manual seat (if equipped)
! Forward and backward adjustment
S01AQ05
S01AQ0501
Pull the lever upward and slide the seat to
the desired position. Then release the
lever and move the seat back and forth to
make sure that it is securely locked into
place.
! Reclining the seatback
S01AQ0502
Pull the reclining lever up and adjust the
seatback to the desired position. Then
release the lever and make sure the
seatback is securely locked into place.
The seatback placed in a reclined position
can spring back upward with force when
the lever is pulled. When operating the
lever to return the seatback, hold the
seatback lightly so that it may be raised
back gradually.
! Seat height adjustment (driver’s
seat)
1) When the lever is pushed down, the seat
is lowered.
2) When the lever is pulled up, the seat
rises.
S01AQ0503
The height of the seat can be adjusted by
moving the seat adjustment lever up and
down.
Seat, seatbelt and SRS airbags
– CONTINUED –
36
Seats
& Power seat (if equipped)
! Driver’s seat
1) Seat position forward/backward control switch
To adjust the seat forward or backward,
move the control switch forward or
S01AQ06
S01AQ0601
backward. During forward/backward adjustment of the seat, the seat cushion
angle or height cannot be adjusted.
2) Seat cushion angle control switch
To adjust the seat cushion angle, pull up
or push down the front end of the control
switch.
3) Seat height control switch
To adjust the seat height, pull up or push
down the rear end of the control switch.
4) Seatback angle (reclining) control
switch
To adjust the angle of the seatback, move
the control switch.
5) Lumbar support control switch
To increase lower back support, push the
front side of the switch. To decrease
lower back support, push the rear side of
the switch.
! Front passenger’s seat
1) Seat position forward/backward control switch
To adjust the seat forward or backward,
move the control switch forward or
backward.
2) Seat cushion angle control switch
To adjust the seat cushion angle, pull up
or push down the front end of the control
switch.
3) Seat height control switch
To adjust the seat height, pull up or push
down the rear end of the control switch.
4) Seatback angle (reclining) control
switch
To adjust the angle of the seatback, move
the control switch.
S01AQ0602
Seats
37
! Memory function (driver’s seat – if
equipped)
S01AQ0603
WARNING
. To avoid loss of vehicle control or
personal injury, never perform
the following operations while
driving.
– Adjusting the seat
– Retrieving the seat position
. Before adjusting the seat, make
sure that cargo or the hands and
feet of rear seat passengers are
clear of the adjusting mechanism.
. Perform the seat position retrie-
val before driving. Be sure to
confirm that the select lever is in
the “P” position, and the parking
brake is applied, when adjusting
the seat position. Do not drive
until the retrieval of the seat
position is complete.
. When retrieving a registered seat
position, make sure the hands,
feet and possessions of rear seat
passengers are clear of the seat
adjusting mechanism.
. When any unusual conditions or
malfunctions occur during the
retrieval of the seat position, stop
the retrieval of the seat position
by performing any of the following.
– Operate any of the power seat
switches.
– Press the “SET” button.
– Press button “1” or “2”.
– Operate the outside mirror
control switch.
Some seat positions can be registered.
Register the seat position with button “1” or
“2” or each of the key fobs and retrieve the
seat position.
The following seat positions can be registered.
. Forward/backward position of the seat
. Angle of the seatback
. Angle of the seat cushion
. Height of the seat
. Angle of the outside mirrors
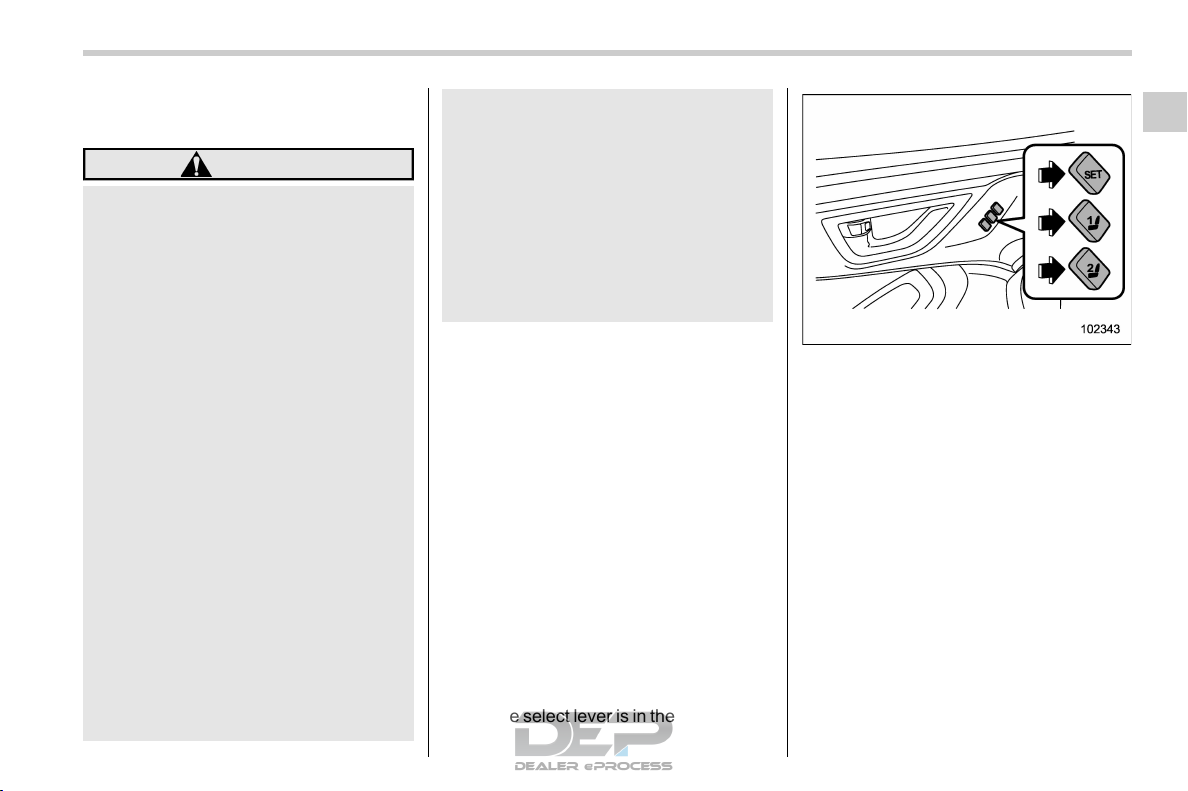
! Registration of seat position with
button “1” or “2”
S01AQ060301
1. Adjust the seat position under the
following conditions.
. The parking brake is applied.
. The select lever is in the “P” position.
2. Press and hold the “SET” button, then
press button “1” or “2” to register the seat
position.
A chirp will sound once, and the seat
position is registered.
! Registration of seat position with
a key fob
S01AQ060302
1. Adjust the seat position under the
following conditions.
. The parking brake is applied.
. The ignition switch is in the “LOCK”/
“OFF” position.
. The select lever is in the “P” position.
– CONTINUED –
Seat, seatbelt and SRS airbags
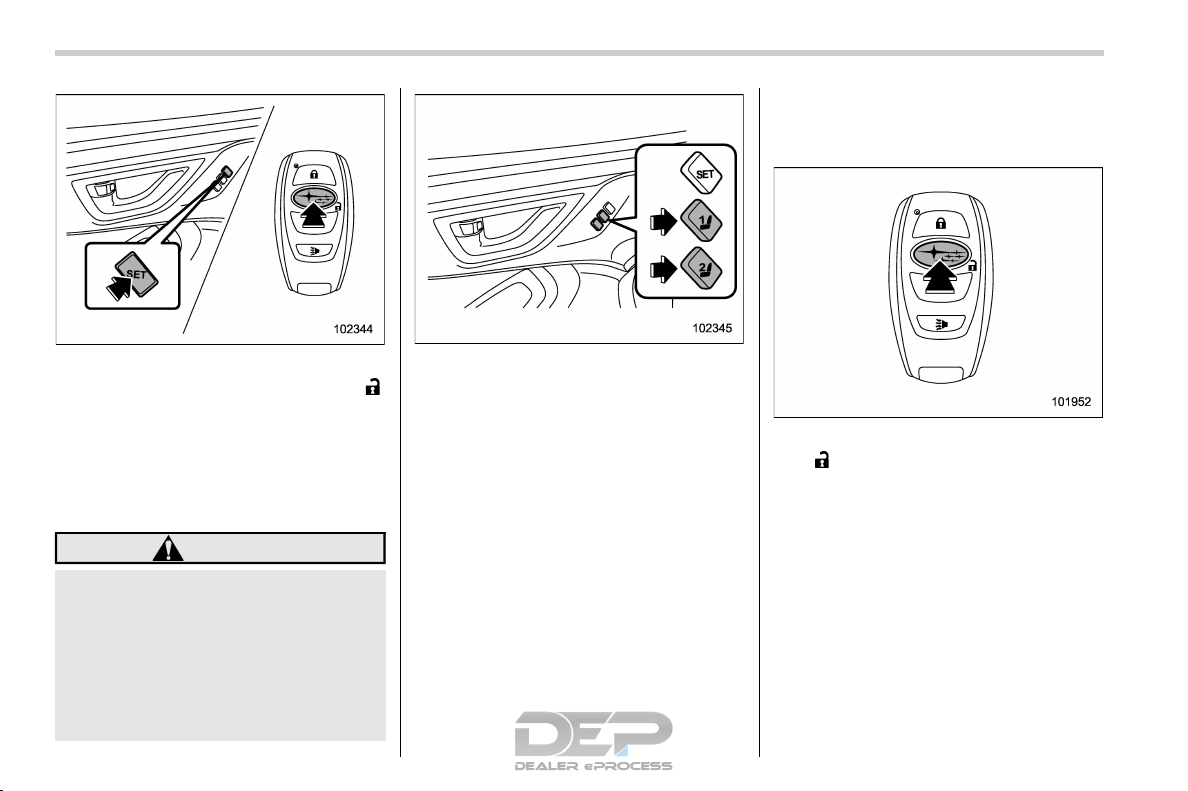
38
Seats
! Retrieval of the seat position
registered with access key fob
S01AQ060304
1. Hold the registered access key fob.
2. Hold the access key fob and press and
hold the “SET” button, then press the “
button of the access key fob.
A chirp will sound once, and the seat
position is registered.
! Retrieval of seat position regis-
tered with button “1” or “2”
S01AQ060303
WARNING
Be sure to press the correct button
to retrieve your registered seat position. If the seat position is not
optimum for you, it may adversely
affect your driving and may reduce
the effectiveness of the seatbelt.
That could result in an accident
involving serious injury or death.
1. Turn the ignition switch to the “ON”
position.
”
2. Put the select lever is in the “P” position
and apply the parking brake, then press
button “1” or “2”.
A chirp will sound and the seat and outside
mirror move to the registered position.
NOTE
. If a new position is registered to the
same button, the previously registered
seat position data will be deleted.
. If the vehicle battery is removed, the
registered seat position data will not be
deleted. However, deviation of the registered seat position may occur.
2. Unlock the driver’s door by pressing
the “
” button or touching the sensor
behind the door handle.
3. Open the driver’s door.
A chirp will sound and the seat moves to
the registered position.
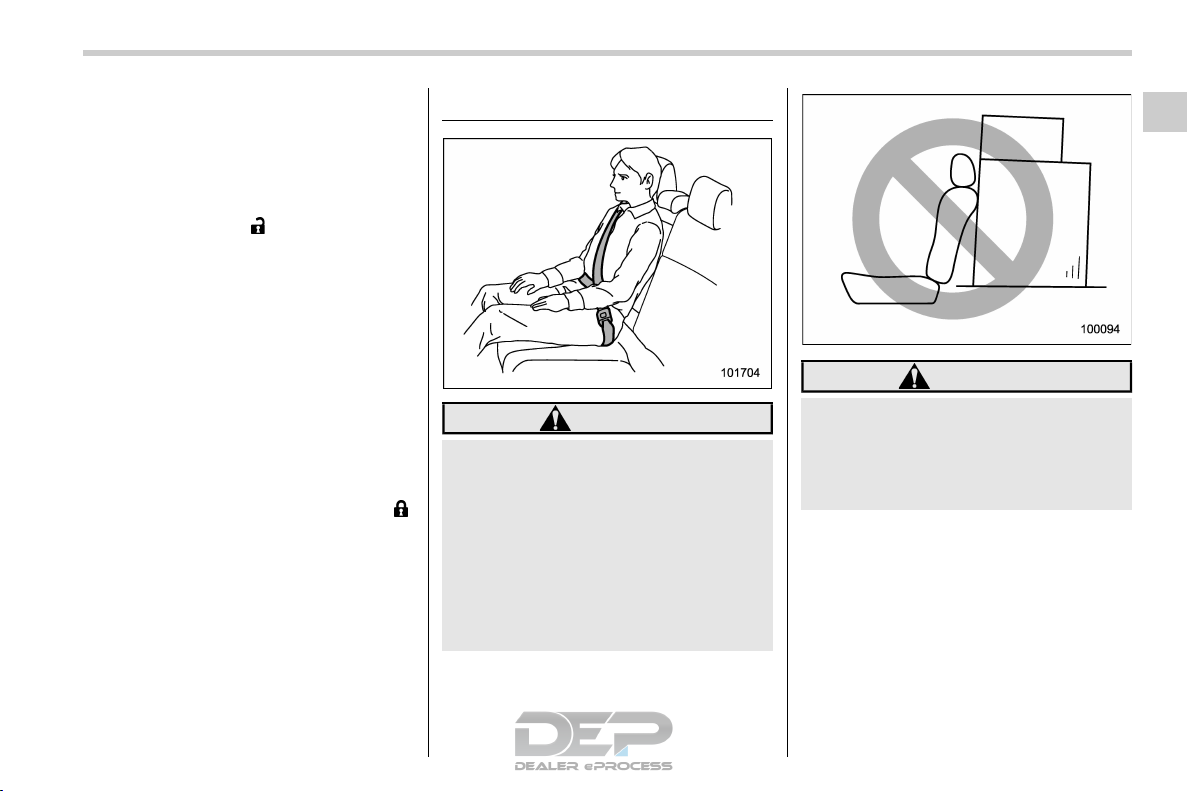
Rear seats
39
NOTE
. If the keyless access function is
disabled, the seat position cannot be
retrieved by touching the sensor behind the driver’s door handle. However,
the seat position can still be retrieved
by pressing the “
access key fob. For information about
how to enable/disable the keyless access function, refer to “Disabling keyless access function” FP120.
. If a new position is registered for the
same access key fob, the previously
registered seat position data will be
deleted.
! Clearing the registered seat posi-
tion with access key fob
1. Close the driver’s door.
2. Hold the access key fob and press and
hold the “SET” button, then press the “
button on the access key fob.
A chirp will sound, and the registered seat
position will be cleared.
” button on the
S01AQ060305
1-2. Rear seats
WARNING
Seatbelts provide maximum restraint when the occupant sits well
back and upright in the seat. Do not
”
put cushions or any other materials
between occupants and seatbacks
or seat cushions. If you do so, the
risk of sliding under the lap belt and
of the lap belt sliding up over the
abdomen will increase, and both can
result in serious injury or death.
S01AC
Seat, seatbelt and SRS airbags
WARNING
Never stack luggage or other cargo
higher than the top of the seatback
because it could tumble forward and
injure passengers in the event of a
sudden stop or accident.
– CONTINUED –
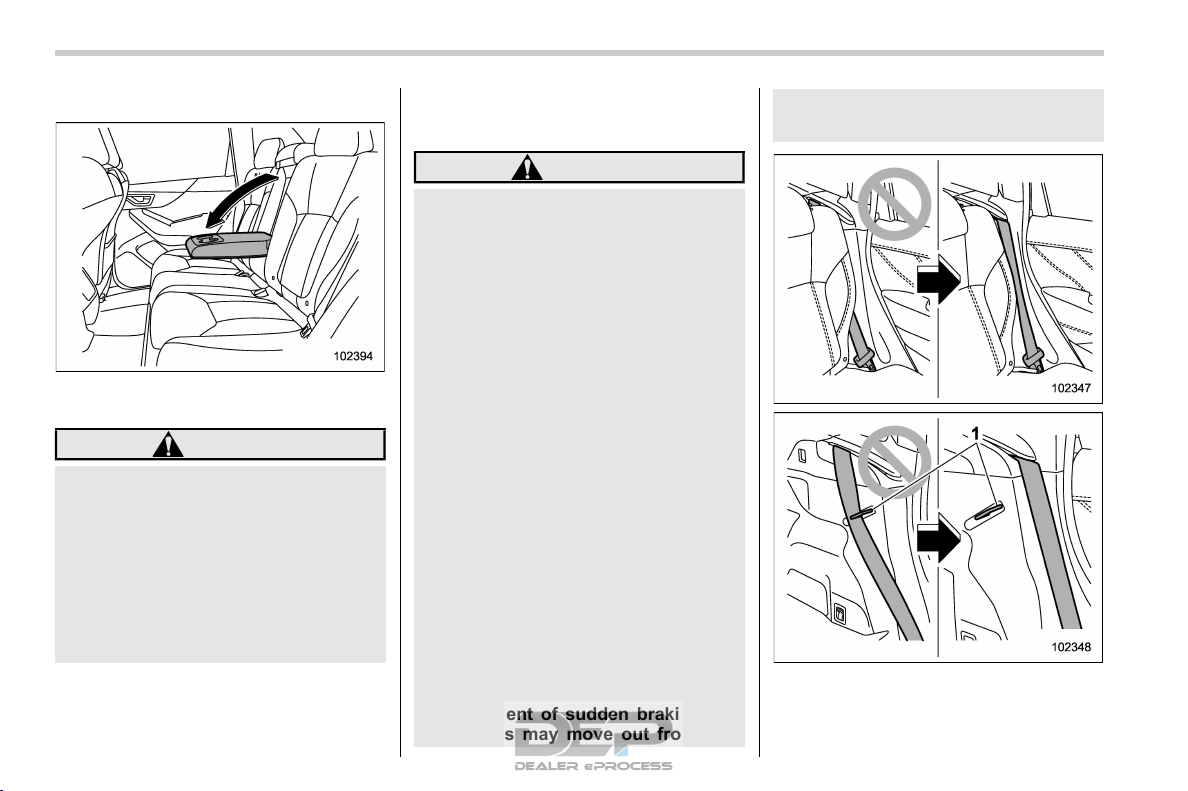
40
Rear seats
& Armrest (if equipped)
To lower the armrest, pull down the top
edge of the armrest.
S01AC01
WARNING
. To avoid serious injury, passen-
gers must never be allowed to sit
on the center armrest.
. When using the seatbelt, do not
allow it to become tangled with
an arm rest. The seatbelt will not
perform its original function in an
emergency and it may cause a
serious injury.
& Folding down the rear seat-
back
WARNING
. When you fold down the seat-
back, check that there are no
passengers or objects on the rear
seat. Not doing so creates a risk
of injury or property damage if
the seatback suddenly folds
down.
. Never allow passengers to ride
on the folded rear seatback or in
the cargo area. Doing so may
result in serious injury or death.
. Secure all objects and especially
long items properly to prevent
them from being thrown around
inside the vehicle and causing
serious injury during a sudden
stop, a sudden steering maneuver or a rapid acceleration.
. When you return the seatback to
its original position, shake the
seatback back and forth to confirm that it is securely fixed in
place. If the seatback is not
securely fixed in place, the seatback may suddenly fold down in
the event of sudden braking, or
objects may move out from the
S01AC02
cargo area, which could cause
serious injury or death.
1) Securing hook
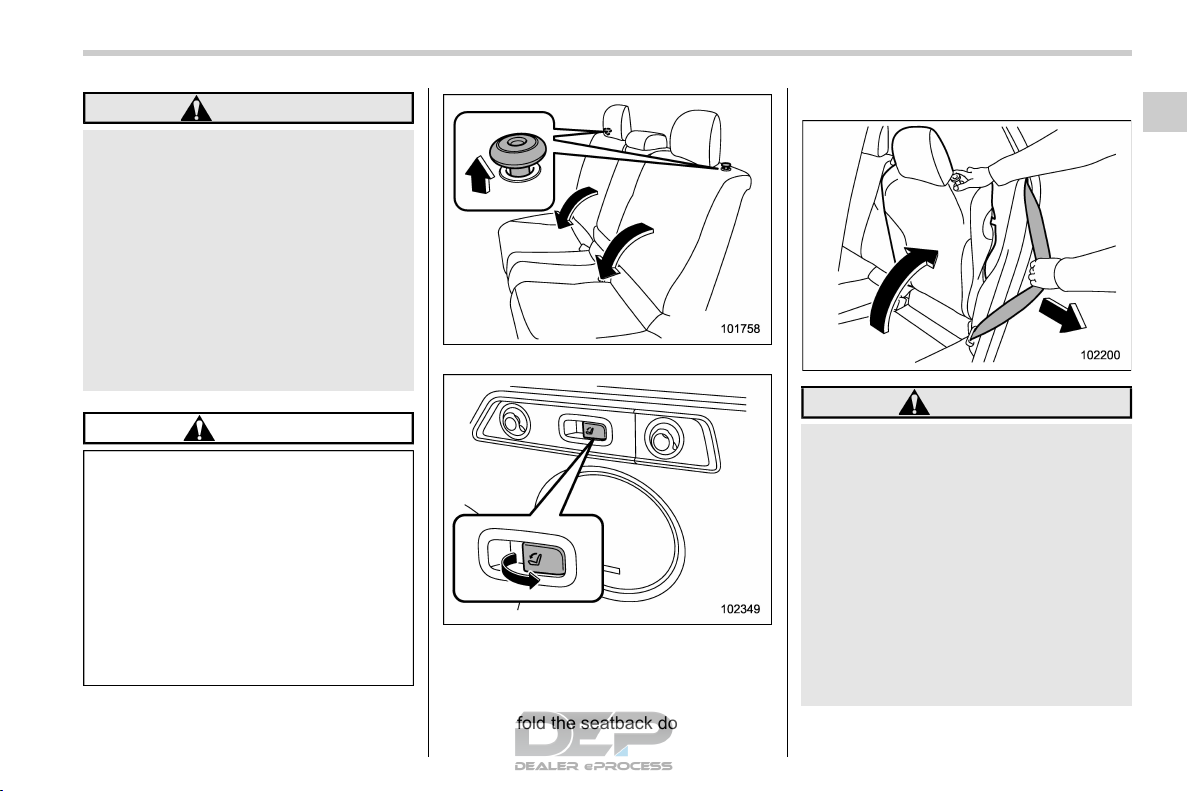
Rear seats
41
WARNING
When the seatback is returned to its
original position, observe the following precautions. Failure to do so
may lead to serious injury or an
accident because the operation efficiency of the seatbelt is inhibited.
. The seatbelt should not be
caught in the seatback and it
should be fully visible.
. The seatbelt should not pass
behind the securing hook for the
seatback.
CAUTION
. Do not hang luggage etc. on the
securing hook. The possibility
exists that the seatback may not
be able to be fixed firmly in place.
This could lead to unexpected
accidents.
. While driving, if something hits
the release latch, it is possible
that the seatback will fold down.
Be careful that no luggage etc.
hits the latch.
1. Lower the head restraint of the rear
center seating position.
Release knob
Release latch on both sides of the cargo
area (if equipped)
2. Unlock the seatback by pulling the lock
release knob or release latch (if equipped)
and then fold the seatback down.
! Return the rear seatback
S01AC0204
WARNING
When returning the seatback to its
original position, observe the following precaution.
Failure to observe the precaution
may damage the seatbelt, impairing
its effectiveness, and possibly result in a serious injury.
. When returning the seatback to
its original position, pull the
seatbelt out towards the vehicle
exterior so that it will not be
caught between the seatback
and the trim.
– CONTINUED –
Seat, seatbelt and SRS airbags
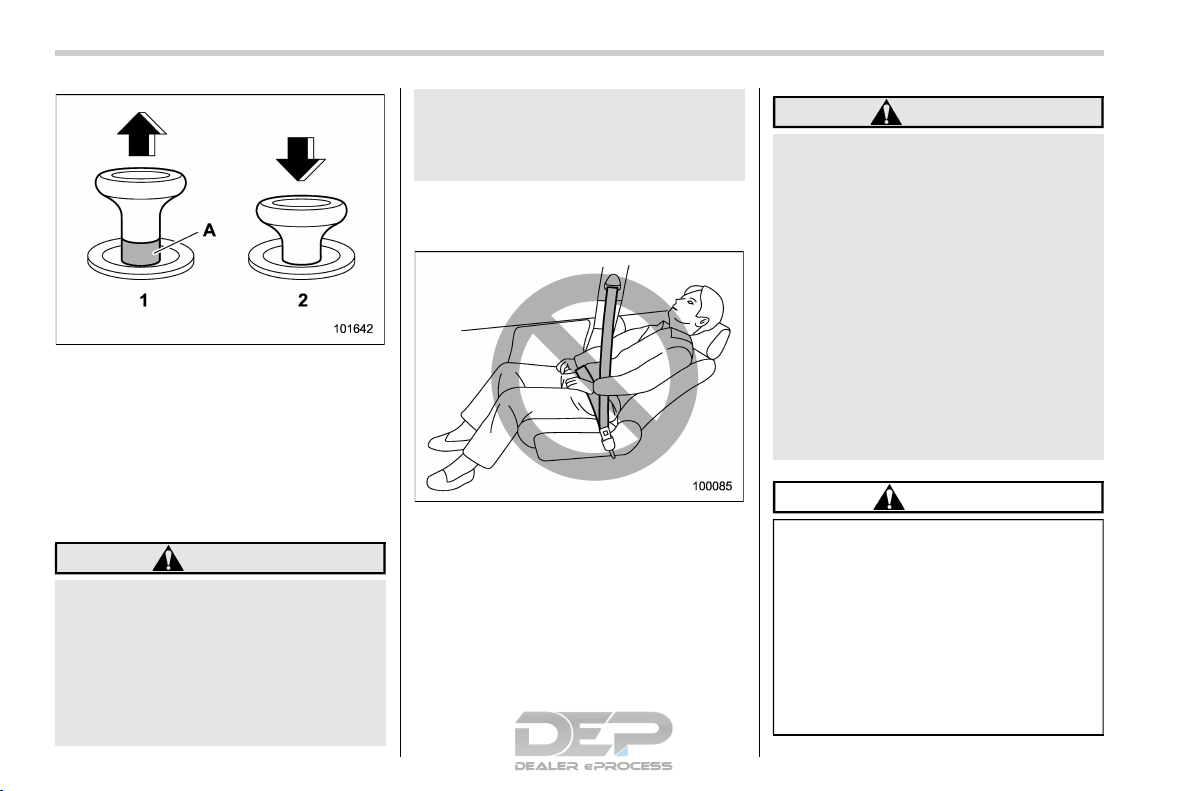
42
Rear seats
Lock release knob
1) Unlocked
2) Locked
A) Unlocking marker in red
To return the seatback to its original
position, raise the seatback until it locks
into place and make sure that the unlocking marker on the lock release knob is no
longer visible.
WARNING
When you return the seatback to its
original position, check that the
unlocking marker on the lock release knob is not visible. Also, shake
the seatback slightly to confirm that
it is securely fixed in place. If the
seatback is not securely fixed in
place, the seatback may suddenly
fold down in the event of sudden
braking, or objects may move out
from the cargo area, which could
cause serious injury or death.
& Reclining the seatback (if
equipped)
S01AC06
WARNING
To prevent the passenger from sliding under the seatbelt in the event of
a collision, observe the following
precautions:
. Keep the seatback in the upright
position while the vehicle is in
motion.
. Do not place objects such as
cushions between the passenger
and the seatback.
Otherwise, the risk of sliding under
the lap belt and of the lap belt sliding
up over the abdomen will increase,
and both can result in serious internal injury or death.
CAUTION
If your vehicle is equipped with a
cargo area cover, observe the following precautions.
. Be careful not to pinch your hand
between the head restraint and
the cargo area cover when you
recline the rear seat.
. Move the front cover of the cargo
area cover backward so that the
cover is not damaged by the
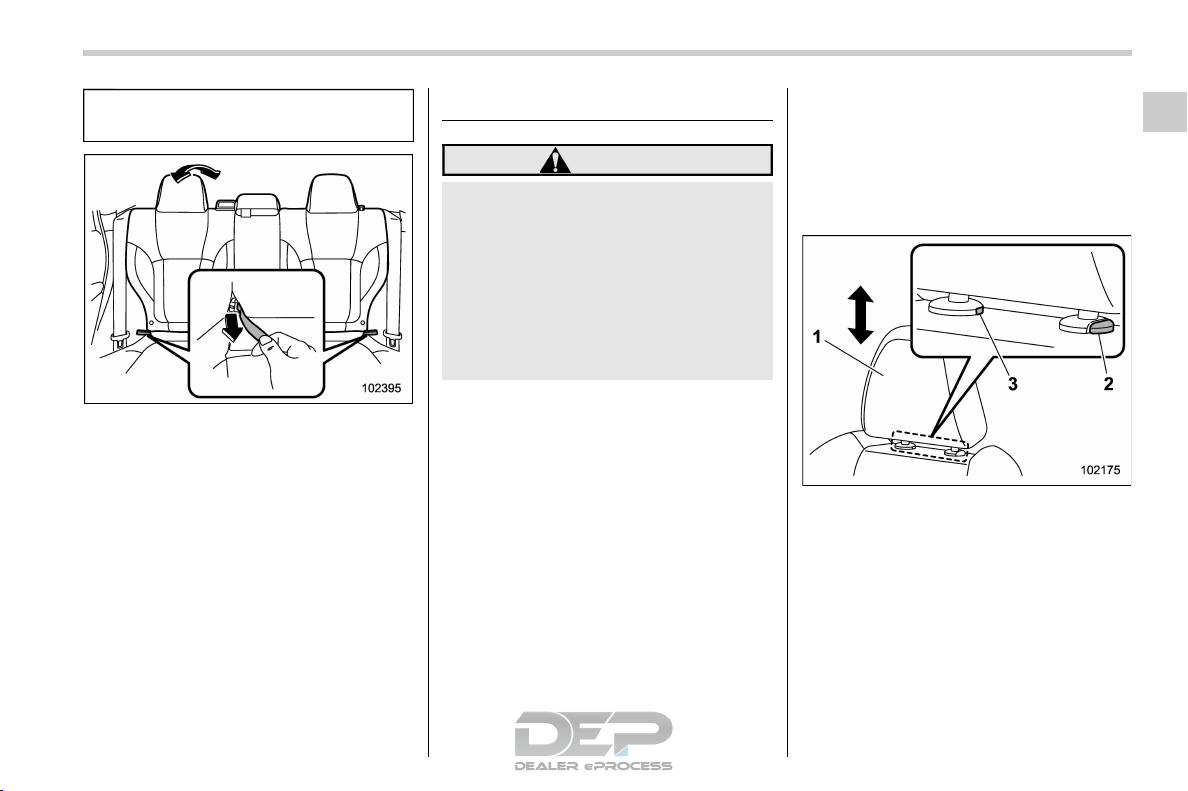
Head restraints
43
reclined seatback. Refer to “Cargo area cover” FP285.
Pull the strap and adjust the seatback to
the desired position.
Then release the strap and make sure the
seatback is securely locked into place.
1-3. Head restraints
S01AS
WARNING
The front seat head restraints are
designed to be installed into the
front seats only. The rear seat head
restraints are designed to be installed into the rear seats only. Do
not attempt to install the front seat
head restraints into the rear seats, or
the rear seat head restraints into the
front seats.
NOTE
It is possible to adjust the angle of the
front seat head restraints only. When
installing the front seat head restraints,
make sure that the angle of the head
restraints can be adjusted.
& Front seats
Both the driver’s seat and the front
S01AS01
passenger’s seat are equipped with head
restraints. Both head restraints are adjustable in the following ways.
! Height adjustment
1) Head restraint
2) Release button
3) Remove button
S01AS0101
To release:
. Lowermost to the 1st step
Pull the head restraint up to the 1st step.
To raise:
. 1st step to the 3rd step
Pull the head restraint up while pressing
the release button on the top of the
seatback.
– CONTINUED –
Seat, seatbelt and SRS airbags
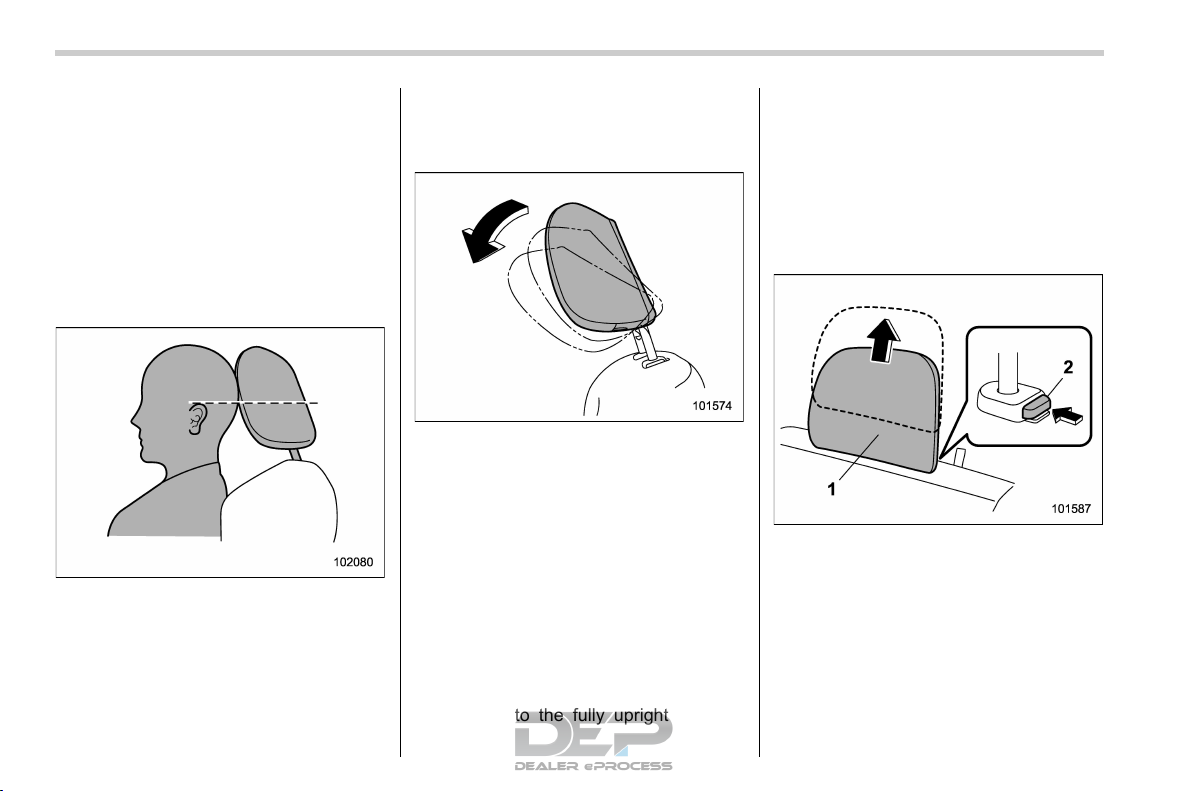
44
Head restraints
To lower:
Push the head restraint down while pressing the release button on the top of the
seatback.
To remove:
Use a key or other hard, pointed object to
press the remove button, then pull out the
head restraint.
To install:
Push the head restraint into the holes on
the top of the seatback until it locks.
Each head restraint should be adjusted so
that the center is closest to the top of the
occupant’s ears.
NOTE
When the head restraint cannot be
pulled out or installed due to insufficient clearance, tilt the seat and then
perform the installation and removal
tasks.
! Angle adjustment
S01AS0102
The angle of the head restraint can be
adjusted in several steps. While maintaining a suitable driving posture, adjust the
head restraint to a position where the back
of your head is as close to the head
restraint as possible.
To tilt:
Tilt the head restraint by hand to the
preferred position. A click will sound when
the head restraint is locked.
To return:
Tilt the head restraint as far forward as it
can go. The head restraint will automatically return to the fully upright position.
Then, adjust the head restraint to the
preferred angle.
& Rear seats
Head restraints are installed in all second-
S01AS02
row seats and can be adjusted as described below.
! Window side seating position
1) Head restraint
2) Release button
S01AS0201
To remove:
Press the release button, and pull out the
head restraint.
To install:
Push the head restraint into the holes on
the top of the seatback until it locks. Press
and hold the release button to lower the
head restraint.
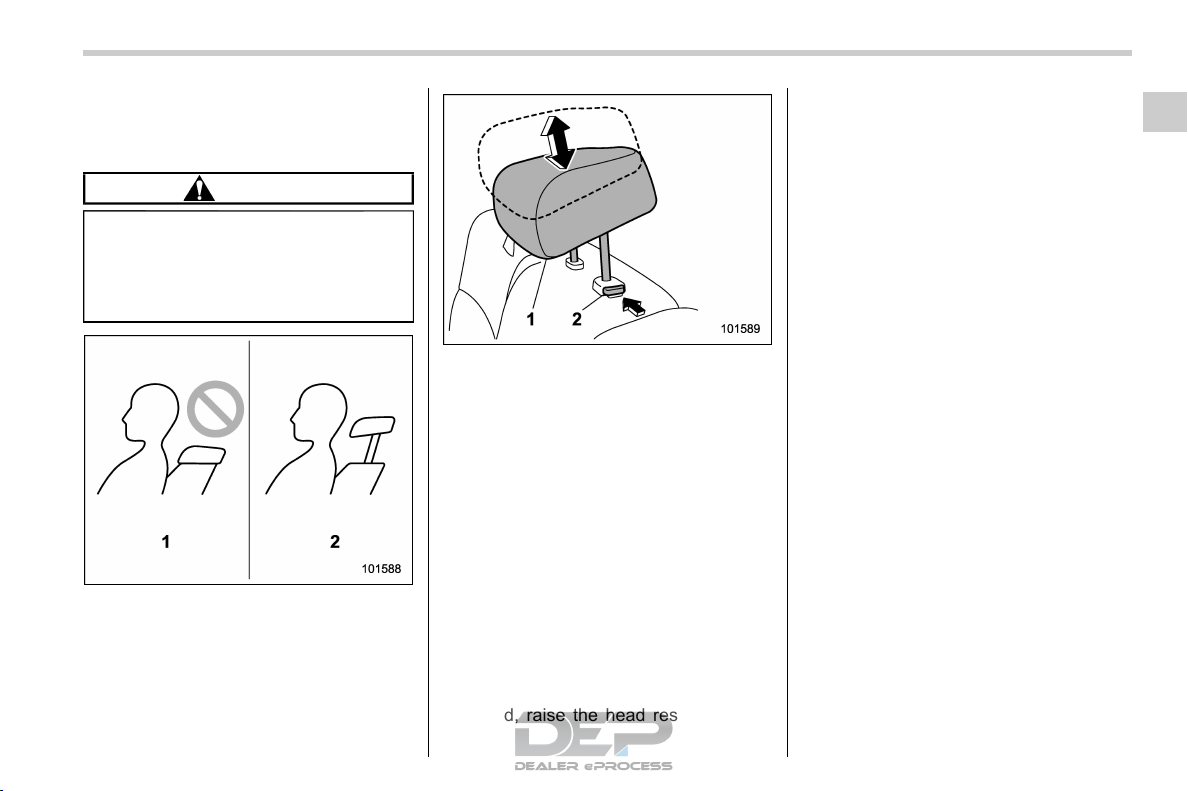
Head restraints
45
After installing the head restraint, make
sure it is securely locked.
! Center seating position
S01AS0202
CAUTION
The head restraint is not intended to
be used in the retracted position.
Before sitting in the seat, raise the
head restraint to the extended position.
1) Incorrect (retracted position)
2) Correct (extended position)
1) Head restraint
2) Release button
To raise:
Pull the head restraint up.
To lower:
Press the release button then push the
head restraint down.
To remove:
Press the release button, and pull out the
head restraint.
To install:
Push the head restraint into the holes on
the top of the seatback until it locks. Press
and hold the release button to lower the
head restraint.
When the rear center seating position is
occupied, raise the head restraint to the
extended position. When it is not occupied,
lower it to improve rearward visibility.
Seat, seatbelt and SRS airbags
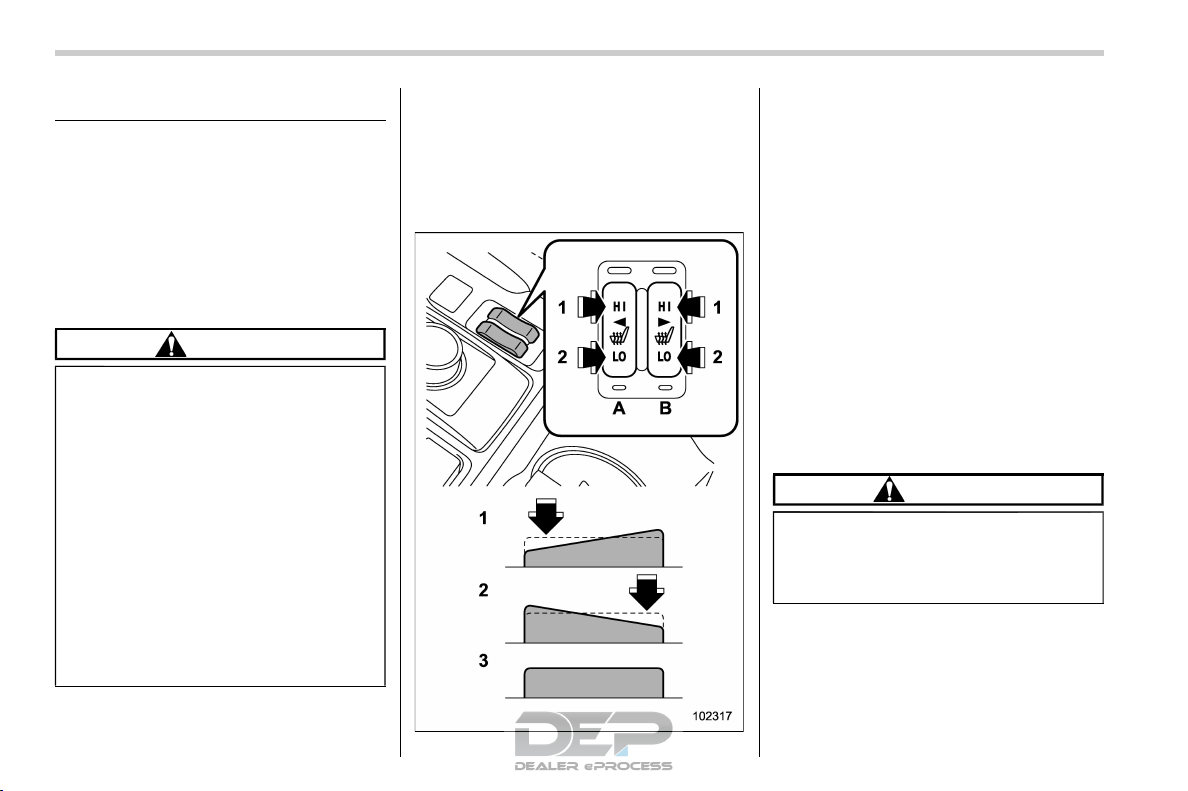
46
Seat heater
1-4. Seat heater (if equipped)
S01AB
The seat heater is equipped in the front
seats or rear seats (window side seating
position).
The seat heater operates when the ignition
switch is either in the “ACC” or “ON”
position.
& Safety precautions
CAUTION
. People with delicate skin may
suffer slight burns even at low
temperatures if they use the seat
heater for a long period of time.
When using the heater, always be
sure to warn the persons concerned.
. Do not put anything on the seat
which insulates against heat,
such as a blanket, cushion, or
similar items. This may cause the
seat heater to overheat.
. When the seat is warmed enough
or before you leave the vehicle,
be sure to turn off the seat heater.
S01AB03
NOTE
Use of the seat heater for a long period
of time while the engine is not running
can cause battery discharge.
& Front seat heater
S01AB05
Front seats
1) HI – Rapid heating
2) LO – Normal heating
3) Off
A) Left-hand side
B) Right-hand side
To turn on the seat heater, push the “LO” or
“HI” position on the switch, as desired,
depending on the temperature.
Selecting the “HI” position will cause the
seat to heat up quicker.
To turn off the seat heater, lightly press the
opposite side of the current position.
The indicator located on the switch illuminates when the seat heater is in operation.
& Rear seat heater (if equipped)
S01AB06
CAUTION
Do not open and close the center
console lid while operating the rear
seat heater switch. There is the risk
of fingers being caught in the lid.
The seat heater operates when the ignition
switch is in the “ON” position.
 Loading…
SUBARU FORESTER 2019 Owner’s Manuals and Service Manuals for online browsing and download. View SUBARU FORESTER Manuals online for free. CarManualsOnline.info is the largest free online database of SUBARU Owner’s Manuals and SUBARU Service Manuals.
SUBARU, Select Model Year:
All, 1989, 1993, 1995, 1996, 1997, 1999, 2000, 2001, 2002, 2003, 2004, 2005, 2006, 2007, 2008, 2009, 2010, 2011, 2012, 2013, 2014, 2015, 2016, 2017, 2018, 2019, 2020, 2021, 2022, 2023, 2024
SUBARU 2019, Select Model:
- SUBARU ASCENT 2019
- SUBARU BRZ 2019
- SUBARU CROSSTREK 2019
- SUBARU FORESTER 2019
- SUBARU IMPREZA 2019
- SUBARU LEGACY 2019
- SUBARU OUTBACK 2019
- SUBARU WRX 2019
List of SUBARU FORESTER 2019 Manuals:
Recent Searches in SUBARU Manuals
torque SUBARU TRIBECA 2014 1.G Owners Manual, jack points SUBARU IMPREZA WRX STI 2011 Owners Manual, service indicator SUBARU OUTBACK 2017 6.G Owners Manual, timing belt SUBARU LEGACY 1997 Service Repair Manual, steering wheel SUBARU FORESTER 2016 SJ / 4.G Quick Reference Guide, brake light SUBARU IMPREZA 2019 Quick Guide, ECU SUBARU IMPREZA 2016 5.G Owners Manual, brakes SUBARU IMPREZA WRX 2005 2.G Owners Manual, fuel consumption SUBARU LEGACY 2010 5.G Owners Manual