В настоящий момент товары недоступны для заказа на samsung.com/ru
В настоящий момент товары недоступны для заказа на samsung.com/ru
Выберите свое местоположение и язык.
-
Настройка
Что делать, если батарея на Samsung Galaxy быстро садитсяЧасто задаваемые вопросы о технике Мобильные устройства Samsung. Узнайте подробнее о ‘Что делать, если батарея на Samsung Galaxy быстро садится’ с помощью службы поддержки Samsung.
-
Использование
Как включить рукописный ввод для пера S Pen на Samsung GalaxyЧасто задаваемые вопросы о мобильных устройствах Samsung. Узнайте подробнее о ‘Как включить рукописный ввод для S Pen на Samsung Galaxy’ с помощью службы поддержки Samsung.
-
Использование
Где купить новое перо S PenЧасто задаваемые вопросы о мобильных устройствах Samsung. Узнайте подробнее о ‘Где купить новое перо S Pen’ с помощью службы поддержки Samsung.
-
Использование
Как решить проблемы с подключением S PenFAQ по использованию на мобильных устройствах. Узнайте подробнее о том, Как решить проблемы с подключением S Pen, в Samsung Support.
-
Использование
Почему дисплей Samsung Galaxy не реагирует на S PenЧасто задаваемые вопросы о мобильных устройствах Samsung. Узнайте подробнее о ‘Почему дисплей Samsung Galaxy не реагирует на S Pen’ с помощью службы поддержки Samsung.
-
Использование
Что делать, если S Pen заряжается не полностьюЧасто задаваемые вопросы о смартфонах Samsung. Узнайте подробнее о ‘Что делать, если S Pen заряжается не полностью’ с помощью службы поддержки Samsung.
-
Использование
Что делать, если S Pen часто теряет соединение с смартфоном GalaxyЧасто задаваемые вопросы о смартфонах Samsung. Узнайте подробнее о ‘Что делать, если S Pen часто теряет соединение с смартфоном Galaxy’ с помощью службы поддержки Samsung.
-
Использование
Что делать, если не определяется фирменный чехол для смартфона Samsung GalaxyЧасто задаваемые вопросы о мобильных устройствах Samsung. Узнайте подробнее о ‘Что делать, если не определяется фирменный чехол для смартфона Samsung Galaxy’ с помощью службы поддержки Samsung.
-
Bluetooth
Плохое качество звука в Galaxy Buds+Что делать, если качество звука на моем Galaxy Buds + плохое?
-
Использование
Как подключить ваше устройство Galaxy к другим устройствам с помощью приложения Подключенные устройстваFAQ для мобильных устройств. Узнайте подробнее, Как подключить ваше устройство Galaxy к другим устройствам с помощью приложения Подключенные устройства, в Samsung Support.
-
Питание / Зарядка
Galaxy Buds +: советы по зарядке и меры предосторожностиGalaxy Buds + советы по зарядке и меры предосторожности
-
Звук / Динамик / Микрофон
Galaxy Buds: можно ли использовать только один наушникМожно ли использовать только один наушник Galaxy Buds? Читайте рекомендации от производителя в этой статье.
-
Звук / Динамик / Микрофон
Galaxy Buds: какие улучшения у Galaxy Buds по сравнению с IconX 2018Какие улучшения у Galaxy Buds по сравнению с IconX 2018? Читайте в этой статье информацию от производителя
-
{{file.description}}
- Версия {{file.fileVersion}}
- {{file.fileSize}} MB
- {{file.fileModifiedDate}}
- {{file.osNames}}
Полезные ссылки
Другие программные инструменты и сервисы
Kies
Программа для создания резервных копий. Подойдет для всех смартфонов и планшетов Galaxy на Android от 2.3 до 4.3 и смартфонов Wave (Bada)
Читать дальше
Smart View
Приложение для просмотра мультимедийного контента с мобильного устройства или компьютера на телевизоре Samsung Smart TV
Читать дальше
Smart Switch
Программа для обновления прошивки и создания резервных копий. Подойдет для всех смартфонов и планшетов Galaxy на Android 4.3 и новее
Читать дальше
ДОПОЛНИТЕЛЬНАЯ ИНФОРМАЦИЯ
Информация о гарантии
Узнайте, что входит в гарантийные обязательства


Индивидуальная поддержка
Получите помощь от официальных центров поддержки


Новости и уведомления
Обьявления о важных продуктах и услугах


-
Contents
-
Table of Contents
-
Troubleshooting
-
Bookmarks
Quick Links
SM-C200
User Manual
English. 05/2016. Rev.1.0
www.samsung.com
Related Manuals for Samsung SM-C200 Gear 360
Summary of Contents for Samsung SM-C200 Gear 360
-
Page 1
SM-C200 User Manual English. 05/2016. Rev.1.0 www.samsung.com… -
Page 2: Table Of Contents
Troubleshooting Memory card Battery Mounting the Samsung Gear 360 onto the tripod Turning the Samsung Gear 360 on and Connecting the Samsung Gear 360 to a mobile device Using the Samsung Gear Using the Samsung Gear 360’s menus Connecting to a mobile device…
-
Page 3: Basics
You can access the full user manual for more information. Visit www.samsung.com to view device information, the user manual, and more. • B efore using other devices, make sure they are compatible with the Samsung Gear 360. Visit www.samsung.com to see a list of compatible mobile devices.
-
Page 4: About The Samsung Gear 360
VR, you can fully immerse yourself in the 360-degree content. When you connect the Samsung Gear 360 to your mobile device via Bluetooth or Wi-Fi Direct, you can capture videos and photos remotely from the mobile device. You can also view or…
-
Page 5: Package Contents
• T he items supplied with the Samsung Gear 360 and any available accessories may vary depending on the region or service provider. • T he supplied items are designed only for this Samsung Gear 360 and may not be compatible with other devices.
-
Page 6: Device Layout
Basics Device layout Camera status screen OK key NFC antenna Front camera Cover Microphone Battery slot Memory card slot Multipurpose jack Battery latch Menu key Rear camera status light Front camera status light Rear camera Microphone Indicator light Speaker…
-
Page 7
Tripod socket Keys Function • P ress and hold to turn the Samsung Gear 360 on or off. Power • P ress to return to the previous screen. • P ress repeatedly to move to the menu you want. -
Page 8: Indicator Light
Basics Indicator light The indicator light informs you of your Samsung Gear 360’s status. Indicator light Colour Status • P ower on Flashes blue three times • F ormatting a memory card or successfully resetting the Samsung Gear 360 •…
-
Page 9: Camera Status Screen
Basics Camera status screen Access options, such as camera modes and connection modes, and view the Samsung Gear 360’s status via messages and indicator icons on the camera status screen. Camera status screen Indicator icons Indicator icons appear on the camera status screen.
-
Page 10
Basics Icon Function Connected to a mobile device via Bluetooth Bluetooth pairing mode Bluetooth pairing mode ended Recording mode Recording a video Shooting mode Time lapse mode Take several photos at set intervals and save them as one video. Time lapse shooting interval Recording a time lapse video Looping video mode Record a video continuously by overwriting a set period of the previously… -
Page 11: Memory Card
• U se caution to insert the memory card right-side up. • M emory cards are sold separately. • I f you insert or remove a memory card while the Samsung Gear 360 is turned on, the power will turn off.
-
Page 12: Removing The Memory Card
Push the memory card into the slot until it locks in place. Push the rubber connector in and close the cover. Removing the memory card Push the memory card until it disengages from the Samsung Gear 360, and then pull it out.
-
Page 13: Formatting The Memory Card
A memory card formatted on a computer may not be compatible with the Samsung Gear 360. Format the memory card on the Samsung Gear 360 or on the Samsung Gear 360 app. Before formatting the memory card, remember to make backup copies of all important data stored in the memory card.
-
Page 14: Battery
Be careful not to damage your fingernails when you remove the cover. Insert the battery with the battery’s gold-coloured contacts properly aligned with the Samsung Gear 360’s contacts. Battery slot Push the battery into the slot until it locks in place.
-
Page 15: Charging The Battery
• W hile charging, the Samsung Gear 360 and the charger may heat up. This is normal and should not affect the Samsung Gear 360’s lifespan or performance. If the temperature rises above a certain level, battery charging will be stopped.
-
Page 16: Removing The Battery
Samsung Gear 360 and reconnect it. Removing the battery Press and slide the battery latch to release the battery. Battery latch Turn off the Samsung Gear 360 before removing the battery. If you do not, the Samsung Gear 360 may be damaged.
-
Page 17: Mounting The Samsung Gear 360 Onto The Tripod
Use a tripod to prevent camera shake. Insert the tripod into the Samsung Gear 360’s tripod socket and twist it until it is fixed to the Samsung Gear 360. If the Samsung Gear 360 is not securely fixed, it may accidentally separate from the…
-
Page 18: Turning The Samsung Gear 360 On And
To turn off the Samsung Gear 360, press and hold the Power key. • T he Samsung Gear 360 turns off if the device is not used for a specified period. By using the Auto power off after option, you can set the length of time the Samsung Gear 360 waits before it turns off.
-
Page 19
Basics Touch the NFC antenna area of the Samsung Gear 360 to the mobile device’s NFC antenna area. The app installation guide screen will appear. Follow the on-screen instructions on the mobile device to complete the installation. You can use this method without turning on the Samsung Gear 360. -
Page 20
To control the Samsung Gear 360 from your mobile device, the Samsung Gear 360 must be paired with the mobile device. After the Samsung Gear 360 has paired with the mobile device, the Samsung Gear 360 will try to connect to the mobile device every time you turn on the Samsung Gear 360. -
Page 21: A Mobile Device
Basics Method 2: Pairing with a mobile device using the Samsung Gear 360 app Samsung Gear 360 Turn on the Samsung Gear 360. It will enter Bluetooth pairing mode. To enter Bluetooth pairing mode manually, press and hold the Menu key until Gear 360 Manager appears, and then press the OK key to select it.
-
Page 22
After you unpair the Samsung Gear 360 from your mobile device, you can connect another Samsung Gear 360. On the Apps screen of your mobile device, tap Samsung Gear 360 → MORE → Connect to new Gear 360. Notices for using Bluetooth Bluetooth is a wireless technology standard that uses a 2.4 GHz frequency to connect to… -
Page 23
Basics • E nsure that there are no obstacles between the Samsung Gear 360 and a connected device, including human bodies, walls, corners, or fences. • D o not touch the Bluetooth antenna of a connected device. • B luetooth uses the same frequency as some industrial, scientific, medical, and low power products and interference may occur when making connections near these types of products. -
Page 24: Using The Samsung Gear 360
Using the Samsung Gear 360 Using the Samsung Gear 360’s menus Select and use menus that appear on the camera status screen by pressing the keys on the Samsung Gear 360. Accessing and selecting menus Press, or press and hold, the Menu key.
-
Page 25: Connecting To A Mobile Device Remotely
Using the Samsung Gear 360 Connecting to a mobile device remotely When the Samsung Gear 360 and your mobile device are remotely connected via Wi-Fi Direct, you can record videos and take photos from the mobile device. You can also view the videos and images captured by the Samsung Gear 360 on the mobile device.
-
Page 26: Recording Videos Or Taking Photos
• I f a mobile device connects to the Samsung Gear 360 via Wi-Fi Direct while it is connected to a Wi-Fi network, the mobile device’s screen may flicker due to the limited capability of the Wi-Fi network.
-
Page 27
Selecting a camera Select a camera to use. The selected camera’s status light will turn red. Using the mobile device Tap Samsung Gear 360 on the Apps screen of the mobile device. The viewfinder will appear. and select a camera. -
Page 28: Recording Videos
Samsung Gear 360 and its battery may heat up. If the temperature rises above a certain level, the Samsung Gear 360 will stop recording and turn off automatically to prevent damage. If the Samsung Gear 360 is turned off due to overheating, wait for it to cool down before resuming use.
-
Page 29
Spread two fingers apart on the screen to zoom in, and pinch them together to zoom out. to finish recording the video. The video will be saved in the memory card of the Samsung Gear 360. The available video recording time will be displayed on the camera status screen. -
Page 30
Press the OK key to finish recording the video. The video will be saved in the memory card of the Samsung Gear 360. The available video recording time will be displayed on the camera status screen. -
Page 31: Taking Photos
Point the camera at a subject and tap to take a photo. The photo will be saved in the memory card of the Samsung Gear 360. The available number of photos you can take will be shown on the camera status screen.
-
Page 32: Time Lapse
The video will be saved in the memory card of the Samsung Gear 360. Using the Samsung Gear 360 Press the Menu key until Time lapse appears, and then press the OK key to select it.
-
Page 33
You can make the most of the memory card’s capacity. Selecting the recording cycle Tap Samsung Gear 360 on the Apps screen of the mobile device. The viewfinder will appear. Tap MODE → Video looping. -
Page 34
The video will be saved in the memory card of the Samsung Gear 360. Using the Samsung Gear 360 Press the Menu key until Video looping appears, and then press the OK key to select it. -
Page 35
• : Change the exposure value. This determines how much light the camera’s sensor receives. For low-light situations, use a higher exposure. • : Select the length of the delay before the Samsung Gear 360 automatically takes a photo. -
Page 36
Menu key until the settings option you want to change appears, and then press the OK key to select it. On the Samsung Gear 360, you can configure settings, such as the photo size, video size, timer, and the auto power off option. -
Page 37: Viewing Videos Or Images
Viewing videos or images Viewing videos View the recorded videos on the remotely connected mobile device. Tap Samsung Gear 360 on the Apps screen of the mobile device. Tap GEAR 360 and then select a video. • : Videos recorded by a single lens •…
-
Page 38: Viewing Photos
Viewing photos View the taken images on the remotely connected mobile device. Tap Samsung Gear 360 on the Apps screen of the mobile device. Tap GEAR 360 and then select an image. If the image was taken by dual lenses, the icon will appear on the preview screen.
-
Page 39
Saving videos and images to the mobile device You can save videos and images captured by the Samsung Gear 360 to your mobile device. Tap GEAR 360, select videos and images to save, and then tap Save. The videos and images will be saved in the mobile device. -
Page 40: Editing Videos
Installing and signing in to the Oculus app To view videos and images captured by the Samsung Gear 360 on the Gear VR, install the Oculus app on the connected mobile device, and then sign in to your Oculus account.
-
Page 41
Save videos and images captured by the Samsung Gear 360 to the mobile device. • M ethod 1: On the mobile device’s Apps screen, tap Samsung Gear 360 → GEAR 360, select files to save, and then tap Save. -
Page 42: Using Gear 360 Actiondirector
For more information, refer to the Gear 360 ActionDirector’s help information. Entering the product key To install the Gear 360 ActionDirector program, you must enter the product key. The product key is on the sticker provided with the Samsung Gear 360. Product key input field If you lose the product key, the Gear 360 ActionDirector program cannot be used.
-
Page 43: Transferring Files To A Computer
Using the Samsung Gear 360 Transferring files to a computer You can transfer files from the Samsung Gear 360 to a computer using the Samsung Gear 360 as a removable disk for data transfer. Do not disconnect the USB cable from the device when you are transferring files.
-
Page 44: Updating The Software
Updating the software The Samsung Gear 360 and the Samsung Gear 360 app can be updated to the latest software. Updating the Samsung Gear 360 You can remotely update the Samsung Gear 360’s software using the Samsung Gear 360 app.
-
Page 45: Settings
Samsung Gear 360 while recording a video, you should deactivate this feature. • R esize/save pictures in app: Adjust an image resolution and save it to the Samsung Gear 360 app.
-
Page 46
Using the Samsung Gear 360 • A uto power off after: Set the length of time the Samsung Gear 360 waits before turning off. • B attery status: View the battery charging status. • S torage: Check the memory card’s used and available memory capacity. -
Page 47: Appendix
• E nsure there are no obstacles, such as walls or electrical equipment, between the devices. • E nsure that the latest version of the Samsung Gear 360 app is installed on the mobile device.
-
Page 48
• V isit a Samsung Service Centre and have the battery replaced. The battery depletes faster than when first purchased • W hen you expose the Samsung Gear 360 or the battery to very cold or very hot temperatures, the useful charge may be reduced. -
Page 49
Always make backup copies of all important data stored in the Samsung Gear 360. Otherwise, you cannot restore data if it is corrupted or lost. Samsung is not responsible for the loss of data stored in the Samsung Gear 360. -
Page 50
Samsung Electronics. Trademarks • S AMSUNG and the SAMSUNG logo are registered trademarks of Samsung Electronics. ® • B luetooth is a registered trademark of Bluetooth SIG, Inc. worldwide.
This manual is also suitable for:
Gear 360Sm-c200
2345
7 98 10
6
11
3 Tap CONNECT TO GEAR 360.
The mobile device will activate
the Bluetooth feature and search
the devices to pair with.
4 Follow the on-screen instructions
to complete the connection.
•
Connection methods may
vary depending on your
mobile device and software
version.
•
Depending on your
mobile device, it may not
be compatible with the
Samsung Gear 360 or may
not support some features.
Visit
www.samsung.com
to see a list of compatible
mobile devices.
3 Plug the small end of the charger
into the multipurpose jack of the
Samsung Gear 360, and plug the
large end of the charger into an
electric socket.
•
Chargers are sold separately.
•
The charger should remain
close to the electric socket
and easily accessible while
charging.
4 After fully charging, disconnect
the Samsung Gear 360 from the
charger. First unplug the charger
from the Samsung Gear 360, and
then unplug it from the electric
socket.
5 Close the cover.
If the mobile device supports
the NFC feature, touch the
NFC antenna area of the
Samsung Gear 360 to your
mobile device’s NFC antenna
area. Before using the NFC
feature, activate it on your
mobile device. On your mobile
device, follow the on-screen
instructions to complete the
setup.
Samsung Gear 360
1 Turn on the Samsung Gear 360.
Mobile device
2 Tap Samsung Gear 360 on the
Apps screen.
Connecting the Samsung
Gear 360 and a mobile
device
To connect your Samsung Gear
360 and mobile device, install the
Samsung Gear 360 app on the
mobile device.
Launch Galaxy Apps or Play
Store to download it. Or, visit
apps.samsung.com/gear360
to
download it.
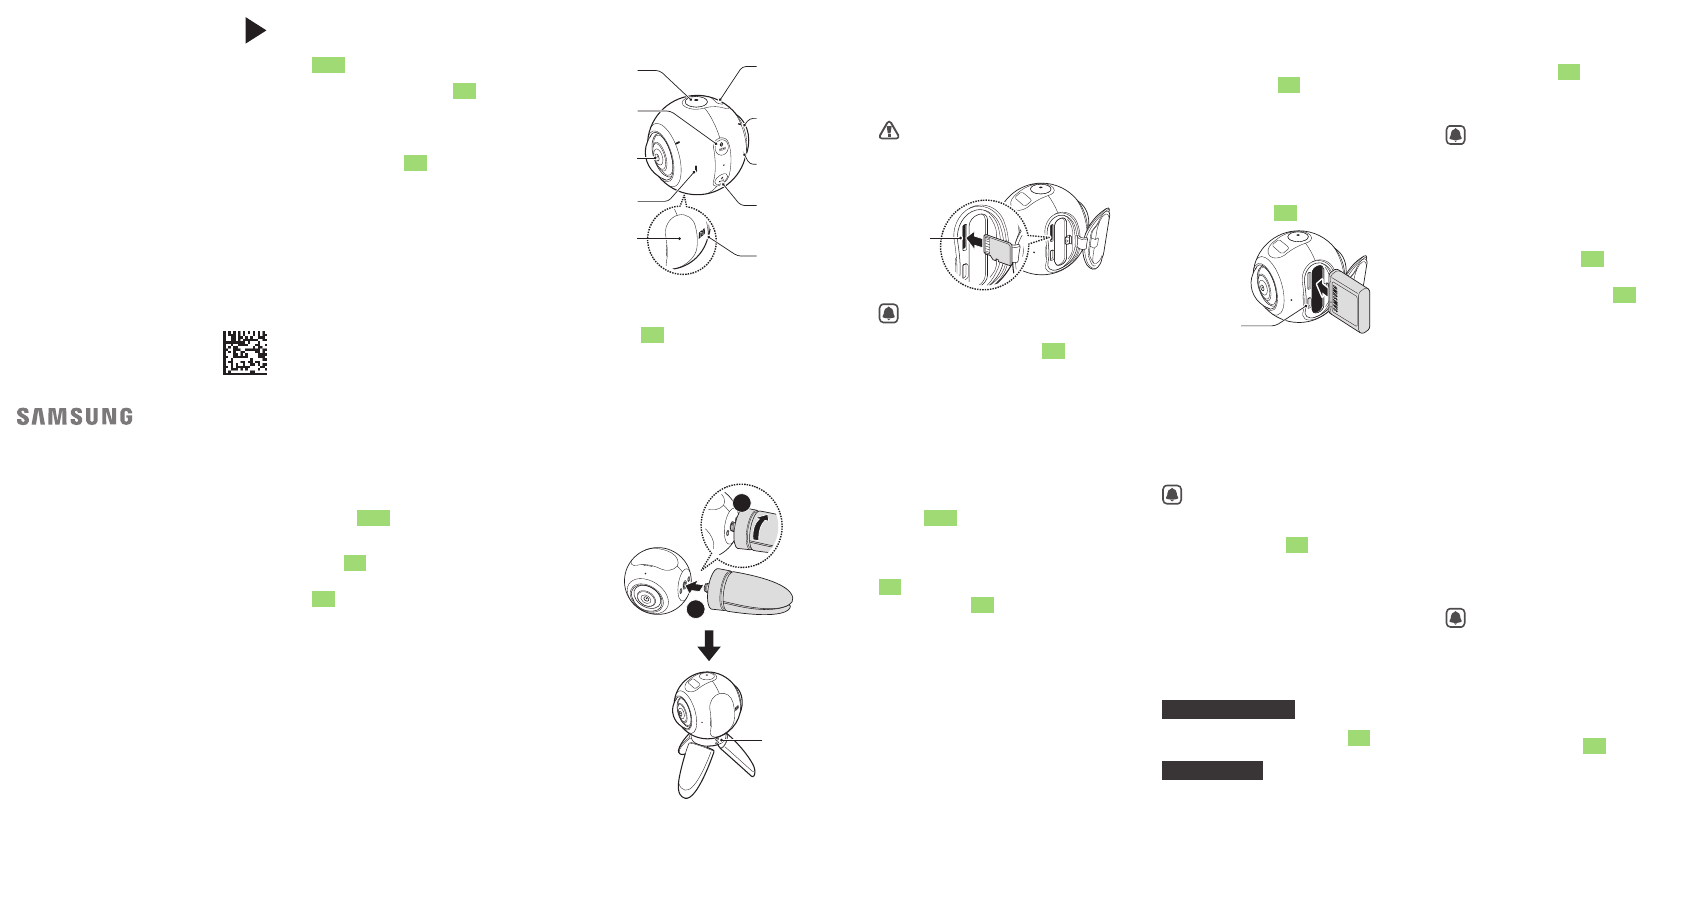
Eyelet for
strap
2
1
Mounting the Samsung
Gear 360 onto the tripod
Insert the tripod into the Samsung
Gear 360’s tripod socket and twist it
until it is fixed to the Samsung Gear
360.
Charging the battery
Fully charge the battery before using
the Samsung Gear 360 for the first
time.
1 Open the cover.
2 Insert the battery with the
battery’s gold-coloured contacts
properly aligned with the
Samsung Gear 360’s contacts.
Multipurpose
jack
Installing a memory card
A memory card must be inserted to
record videos or take photos. Open
the cover and insert a memory card.
Be careful not to damage your
fingernails when you remove
the cover.
Memory
card slot
•
Memory cards are sold
separately.
•
The Samsung Gear 360
accepts memory cards with
maximum capacities of
128 GB.
Device layout
Cover
NFC
antenna
area
OK key
Speaker
Rear
camera
Menu
key
Camera
status
screen
Power key
Front
camera
Microphone
•
To turn on or off the Samsung
Gear 360: Press and hold the
Power key.
About the Samsung Gear
360
Use the Samsung Gear 360 to record
360-degree panoramic videos and
take 360-degree panoramic photos.
Use your mobile device with the
Samsung Gear 360 to control it
remotely, view videos or images,
and more.
QUICK
START
GUIDE
SM-C200
Printed in Korea
GH68-45834A Rev.1.0
English (EU). 02/2016
• Some content may differ from your device
depending on the region, manufacturer, or
software version, and is subject to change
without prior notice.
• This product includes certain free/open
source software. The exact terms of the
licences, disclaimers, acknowledgements
and notices are available on the Samsung’s
website
opensource.samsung.com
.
Copyright © 2016 Samsung Electronics
12
18
13
19
14
20
15 16 17
21
Accessing more
information
For more information, open the Apps
screen of the mobile device, tap
Samsung Gear 360
→
MORE
→
Settings
→
User manual.
Visit
www.samsung.com
to view
device information, the user manual,
and more.
•
The method for accessing
the user manual from the
Samsung Gear 360 app may
vary depending on your
mobile device.
•
The user manual may not be
available depending on the
web browser.
Correct disposal
This marking on the product,
accessories or literature
indicates that the product and
its electronic accessories (e.g.
charger, headset, USB cable)
should not be disposed of
with other household waste.
This product is RoHS
compliant.
This marking on the battery,
manual or packaging
indicates that the batteries
in this product should not
be disposed of with other
household waste.
For information on Samsung’s
environmental commitments and
product-specific regulatory obligations,
e.g. REACH, WEEE, Batteries, visit
samsung.com/uk/aboutsamsung/
samsungelectronics/corporatecitizenship/
data_corner.html
• Keep your device dry.
• Do not use your device outdoor during a
thunderstorm.
• Comply with all safety warnings and
regulations regarding mobile device usage
while operating a vehicle.
• Do not touch the charger or the device
with wet hands while the device is
charging.
• If any part of the device is cracked or
broken, stop using the device immediately
and take it to a Samsung Service Centre.
Follow the warnings below to prevent
injury to people or damage to the device
• Do not allow children or animals to chew
or suck the device.
• Do not insert the device or supplied
accessories into the eyes, ears, or mouth.
• The device can be used in locations with
an ambient temperature of 0°C to 35°C.
You can store the device at an ambient
temperature of -20°C to 50°C. Using
or storing the device outside of the
recommended temperature ranges may
damage the device or reduce the battery’s
lifespan.
• Do not store your device near or in heaters,
microwaves, hot cooking equipment, or
high pressure containers.
Safety information
Read all safety information before using the
device to ensure safe and proper use. To
view the full safety information, refer to the
Samsung website.
To view more information about
device and battery disposal, open
the Apps screen of the mobile device,
tap Samsung Gear 360
→
MORE
→
Settings
→
User manual.
Follow the warning information
provided below to prevent incidents
such as fire or explosion
• If you are not using the device for an
extended period, remove the battery.
• Do not expose the device to physical
impact or damage.
• Use manufacturer-approved batteries,
accessories, and supplies.
• Prevent the multipurpose jack and battery
terminals from contacting conductive
elements, such as metal or liquids.
Sharing videos or images
You can share your videos or images
with others.
Tap Samsung Gear 360 on the Apps
screen of the mobile device.
Select the videos or images you want
to share, tap Share, and then select a
sharing method.
You can also share images
taken from the Google street
view app.
Editing videos or images
You can edit videos or images
using the Gear 360 ActionDirector
program on your computer.
For more information, refer to the
Gear 360 ActionDirector’s help
information.
•
You can download the Gear
360 ActionDirector program
from
www.samsung.com
.
•
The sticker provided with
the Samsung Gear 360
contains the product key
for installing the Gear 360
ActionDirector program.
•
If you lose the product key,
the Gear 360 ActionDirector
program cannot be used.
The product key can be
replaced for a fee.
Viewing videos or images
You can view videos or images on
your mobile device.
1 Tap Samsung Gear 360 on the
Apps screen of the mobile device.
2 Select a video or an image.
3 Tap or .
Drag your finger around on the
video or image to view it from
other angles.
You can view captured videos
or images in the Mobile
device tab or the Gear 360
tab.
2 Tap .
The viewfinder will appear.
3 Tap or to record a video or
take a photo.
To change shooting modes, tap
MODE.
Using the Samsung Gear 360
1 Press the Menu key to select
which mode you want to use and
press the OK key.
2 Press the OK key to record a video
or take a photo.
To stop recording a video, press
the OK key.
Recording videos and
taking photos
You can record videos and take
photos remotely using your mobile
device’s viewfinder.
Also, you can use the Samsung Gear
360 to record videos and take photos
without connecting to any other
devices.
Captured videos or images will
be saved to your memory card.
Using the mobile device
1 Tap Samsung Gear 360 on the
Apps screen of the mobile device.
Declaration of Conformity
Product details
For the following
Product :
Model(s) : SM-C200
Declaration & Applicable standards
We hereby declare, that the product above is in compliance with the essential requirements of the R&TTE Directive (1999/5/EC) by
application of:
SAFETY
SAR
EMC
RADIO
and the Directive (2011/65/EU) on the restriction of the use of certain hazardous substances in electrical and electronic equipment by
application of EN 50581:2012.
Representative in the EU
Samsung Electronics Euro QA Lab.
Blackbushe Business Park
Saxony Way, Yateley, Hampshire
GU46 6GG, UK*
2015.XX.XX Stephen Colclough / EU Representative
(Place and date of issue) (Name and signature of authorised person)
* This is not the address of Samsung Service Centre. For the address or the phone number of Samsung Service Centre, see the warranty card or contact
the retailer where you purchased your product.
FCC Warning Statement
FCC Part 15.19
This device complies with part 15 of the FCC Rules. Operation is subject to the following two conditions: (1) This device may not cause harmful
interference, and (2) this device must accept any interference received, including interference that may cause undesired operation.
FCC Part 15.21
Any changes or modifications (including the antennas) made to this device that are not expressly approved by the manufacturer may void the user’s
authority to operate the equipment.
Part 15.105 (B)
Note : This equipment has been tested and found to comply with the limits for a Class B digital device, pursuant to part 15 of the FCC Rules. These
limits are designed to provide reasonable protection against harmful interference in a residential installation This equipment generates, uses and
can radiate radio frequency energy and, if not installed and used in accordance with the instructions, may cause harmful interference to radio
communications, However, there is no guarantee that interference will not occur in a particular installation. If this equipment does cause harmful
interference to radio or television reception, which can be determined by turning the equipment off and on, the user is encouraged to try to correct
the interference by one or more of the following measures:
— Reorient or relocate the receiving antenna.
— Increase the separation between the equipment and receiver.
— Connect the equipment into an outlet on a circuit different from that to which the receiver is connected.
— Consult the dealer or an experienced radio/TV technician for help.
Modifications not expressly approved by the manufacturer could void the user’s authority to operated the equipment under FCC rules.
IC Warning Statement
This device complies with Industry Canada licence-exempt RSS standard(s).
Operation is subject to the following two conditions:(1) this device may not cause interference, and (2) this device must accept any interference,
including interference that may cause undesired operation of the device.
Le présent appareil est conforme aux CNR d’Industrie Canada applicables aux appareils radio exempts de licence.
L’exploitation est autorisée aux deux conditions suivantes :(1) l’appareil ne doit pas produire de brouillage, et (2) l’utilisateur de l’appareil doit
accepter tout brouillage radioélectrique subi, même si le brouillage est susceptible d’en compromettre le fonctionnement.
Download
Table of Contents
Add to my manuals
Share
URL of this page:
HTML Link:
Bookmark this page
Manual will be automatically added to «My Manuals»
Print this page
- Manuals
- Brands
- Samsung Manuals
- Camcorder
- SM-C200 Gear 360
- User manual
Spherical camera
Hide thumbs
1
Table Of Contents
2
3
4
5
6
7
8
9
10
11
12
13
14
15
16
17
18
19
20
21
22
23
24
25
26
27
28
29
30
31
32
33
34
35
36
37
38
39
40
41
42
43
44
45
46
47
48
49
50
-
page
of
50/
50 -
Contents
-
Table of Contents
-
Troubleshooting
-
Bookmarks
Table of Contents
Advertisement
Table of Contents
Basics
3
Read me first
4
About the Samsung Gear 360
5
Package contents
6
Device layout
8
Indicator light
9
Camera status screen
11
Memory card
14
Battery
17
Mounting the Samsung Gear 360 onto
the tripod
18
Turning the Samsung Gear 360 on and
off
18
Connecting the Samsung Gear 360 to
a mobile device
Using the Samsung Gear
360
24
Using the Samsung Gear 360’s menus
25
Connecting to a mobile device
remotely
26
Recording videos or taking photos
37
Viewing videos or images
42
Using Gear 360 ActionDirector
43
Transferring files to a computer
43
Connecting to the Google Street View
app
44
Updating the software
45
Settings
Appendix
47
Troubleshooting
2
Previous Page
Next Page
- 1
- 2
- 3
- 4
- 5
- 6
Show Quick Links
- Quick Links:
-
About the Samsung Gear 360
-
Device Layout
-
Connecting the Samsung Gear 360 to…
-
Connecting to a Mobile Device Remotely
-
Settings
Hide quick links:
Advertisement
Table of Contents
Related Manuals for Samsung SM-C200 Gear 360
-
Camcorder Samsung Gear 360 Safety Information Manual
(663 pages)
-

Digital Camera Samsung SM-R210 User Manual
(51 pages)
-

Camcorder Samsung SC-HMX20C User Manual
High definition digital camcorder (135 pages)
-

Camcorder Samsung SC-DX103 User Manual
Dvd camcorder (124 pages)
-

Camcorder Samsung W300 HD Sports Camcorder User Manual
(109 pages)
-
Camcorder Samsung SC-D103 Owner’s Instruction Book
Digital video camcorder (108 pages)
-

Camcorder Samsung SC-MX20 User Manual
Memory camcorder (125 pages)
-

Camcorder Samsung SCD103/D105 Owner’s Instruction Manual
Digital video camcorder (112 pages)
-
Camcorder Samsung VP-X105 Owner’s Instruction Book
Samsung digital camcorder owner’s instruction book (136 pages)
-

Camcorder Samsung SCL300 Service Manual
8mm camcorder (136 pages)
-
Camcorder Samsung SCD67/D70 Owner’s Instruction Book
Samsung digital video camcorder owner’s instruction book (82 pages)
-
Camcorder Samsung SCD103 Owner’s Instruction Book
(107 pages)
-
Camcorder Samsung SCD33 Owner’s Instruction Manual
Digital video camcorder (107 pages)
-

Camcorder Samsung SCW71/W73 Owner’s Instruction Manual
Video camcorder (60 pages)
-
Camcorder Samsung VP-L800U Owner’s Instruction Book
(71 pages)
-

Camcorder Samsung VP-A30 Service Manual
8mm camcorder (130 pages)
Related Content for Samsung SM-C200 Gear 360
-
Hi8 SCL700 Continuous Recording Time Table
Samsung Hi8 SCL700
-
Hi8 SCL870 Continuous Recording Time Table
Samsung Hi8 SCL870
-
Hi8 SCW71 Continuous Recording Time Table
Samsung Hi8 SCW71
-
Hi 8 VP-W61 Table Of Continuous Recording Time
Samsung Hi 8 VP-W61
-
8 SCL540 Continuous Recording Time Table
Samsung 8 SCL540
-
Hi 8 VP-L630 The Time Table Of Continuous Recording Time
Samsung Hi 8 VP-L630
-
Hi8 VP-L900 I The Time Table Of Continuous Recording Time
Samsung Hi8 VP-L900
-
8 VP-W60B Table Of Approximate Continuous Recording Time
Samsung 8 VP-W60B
-
Hi 8 VP-W80 Table Of Approximate Continuous Recording Time
Samsung Hi 8 VP-W80
-
8 VP-W60 Table Of Approximate Continuous Recording Time
Samsung 8 VP-W60
-
Hi 8 VP-L610 The Time Table Of Continuous Recording Time
Samsung Hi 8 VP-L610
-
VP-M2050B Recording Unscramble Contents From Other Digital Devices
Samsung VP-M2050B
-
Hi 8VP-W80 Table Of Approximate Continuous Recording Time
Samsung Hi 8VP-W80
-
8 VP-L700U The Time Table Of Continuous Recording Time
Samsung 8 VP-L700U
-
8 VP-W70U Table Of Approximate Continuous Recording Time
Samsung 8 VP-W70U
-
VP-A12 Table Of Contents
Samsung VP-A12
This manual is also suitable for:
Gear 360Sm-c200
Table of Contents
инструкцияSamsung Gear 360

www.samsung.comRussian. 07/2016. Rev.1.0
Руководство
пользователя
SM-C200
Посмотреть инструкция для Samsung Gear 360 бесплатно. Руководство относится к категории видеокамеры, 3 человек(а) дали ему среднюю оценку 8.2. Руководство доступно на следующих языках: русский. У вас есть вопрос о Samsung Gear 360 или вам нужна помощь? Задайте свой вопрос здесь

Главная
| Samsung | |
| Gear 360 | SM-C200NZWAATO | |
| видеокамера | |
| 8806088413662 | |
| русский | |
| Руководство пользователя (PDF), Инструкция по установке (PDF) |
Видео
| Максимальное разрешение видео | 3840 x 1920 пикселей |
| Тип HD | Full HD |
| Разрешение видео | 2560 x 1440 пикселей |
| Поддерживаемый видеоформат | H.265, MP4 |
| Поддерживаемые видеоформаты | 1440p |
| Максимальная частота кадров | 30 fps |
Качество изображения
| Тип сенсора | CMOS |
| Всего мегапикселей | 25.9 MP |
| Фоторежим | Да |
| Поддерживаемые форматы изображения | JPG |
Экран
| Встроенный экран | Да |
| Дисплей | PMOLED |
| Диагональ экрана | 0.5 « |
| Выдвижной экран | — |
Объектив
| Угол обзора | 360 ° |
| Фиксированная диафрагма | 2 mm |
Порты и интерфейсы
| Количество портов USB 2.0 | 1 |
Устройства хранения данных
| Носитель | Карта памяти |
| Совместимые карты памяти | MicroSD (TransFlash) |
| Максимальный объем флеш-карты | 200 GB |
Сеть
| GPS (спутниковый) | Нет |
| Bluetooth | Да |
| Технология NFC | Да |
| Wi-Fi | Да |
| Wi-Fi стандартов | 802.11a, Wi-Fi 5 (802.11ac), 802.11b, 802.11g, Wi-Fi 4 (802.11n) |
| Полоса частот | 2.4 / 5 GHz |
Дизайн
| Цвет товара | Белый |
| International Protection (IP) код | IP53 |
| Защитные возможности | Dust resistant, Splash proof |
Вес и размеры
| Вес | 152 g |
| Ширина | 66.7 mm |
| Глубина | 56.3 mm |
| Высота | 60.1 mm |
Системные требования
| Поддерживаемые операционные системы Windows | Windows 10 Education, Windows 10 Education x64, Windows 10 Enterprise, Windows 10 Enterprise x64, Windows 10 Home, Windows 10 Home x64, Windows 10 Pro, Windows 10 Pro x64, Windows 7 Enterprise, Windows 7 Enterprise x64, Windows 7 Home Basic, Windows 7 Home Basic x64, Windows 7 Home Premium, Windows 7 Home Premium x64, Windows 7 Professional, Windows 7 Professional x64, Windows 7 Starter, Windows 7 Starter x64, Windows 7 Ultimate, Windows 8, Windows 8 Enterprise, Windows 8 Enterprise x64, Windows 8 Pro x64, Windows 8 x64, Windows 8.1, Windows 8.1 Enterprise, Windows 8.1 Enterprise x64, Windows 8.1 Pro x64 |
| Поддерживаемые мобильные операционные системы | Android |
Энергопитание
| Технология батареи | — |
| Время работы батареи (макс) | 1350 h |
Аудио
показать больше
Не можете найти ответ на свой вопрос в руководстве? Вы можете найти ответ на свой вопрос ниже, в разделе часто задаваемых вопросов о Samsung Gear 360.
Что такое мегапиксель?
Количество мегапикселей обозначает количество пикселей в датчике. 1 мегапиксель равен 1 миллиону пикселей. Чем больше пикселей, тем выше потенциальное качество изображения.
Что означает аббревиатура MП?
МП обозначает «мегапиксели».
Какой вес Samsung Gear 360?
Samsung Gear 360 имеет вес 152 g.
Какой размер экрана Samsung Gear 360?
Размер экрана Samsung Gear 360 составляет 0.5 «.
Какая высота Samsung Gear 360?
Samsung Gear 360 имеет высоту 60.1 mm.
Какая ширина Samsung Gear 360?
Samsung Gear 360 имеет ширину 66.7 mm.
Какая толщина Samsung Gear 360?
Samsung Gear 360 имеет толщину 56.3 mm.
Инструкция Samsung Gear 360 доступно в русский?
Да, руководствоSamsung Gear 360 доступно врусский .
Не нашли свой вопрос? Задайте свой вопрос здесь