Если у Вас возникала необходимость сохранить результирующий набор данных, который вернул SQL запрос, то данная статья будет Вам интересна, так как в ней мы рассмотрим инструкцию SELECT INTO, с помощью которой в Microsoft SQL Server можно создать новую таблицу и заполнить ее результатом SQL запроса.
Начнем мы, конечно же, с описания самой инструкции SELECT INTO, а затем перейдем к примерам.
Содержание
- Инструкция SELECT INTO в Transact-SQL
- Важные моменты про инструкцию SELECT INTO
- Примеры использования SELECT INTO
- Исходные данные
- Пример 1 – Создание таблицы с помощью инструкции SELECT INTO с объединением данных
- Пример 2 – Создание временной таблицы с помощью инструкции SELECT INTO с группировкой данных
Инструкция SELECT INTO в Transact-SQL
SELECT INTO – инструкция в языке в T-SQL, которая создает новую таблицу и вставляет в нее результирующие строки из SQL запроса. Структура таблицы, т.е. количество и имена столбцов, а также типы данных и свойства допустимости значений NULL, будут на основе столбцов (выражений), указанных в списке выбора из источника в инструкции SELECT. Обычно инструкция SELECT INTO используется для объединения в одной таблице данных из нескольких таблиц, представлений, включая какие-то расчетные данные.
Для того чтобы использовать инструкцию SELECT INTO требуется разрешение CREATE TABLE в базе данных, в которой будет создана новая таблица.
Инструкция SELECT INTO имеет два аргумента:
- new_table — имя новой таблицы;
- filegroup – файловая группа. Если аргумент не указан, то используется файловая группа по умолчанию. Данная возможность доступна начиная с Microsoft SQL Server 2017.
Заметка! Начинающим рекомендую посмотреть мой видеокурс по T-SQL.
Важные моменты про инструкцию SELECT INTO
- Инструкцию можно использовать для создания таблицы на текущем сервере, на удаленном сервере создание таблицы не поддерживается;
- Заполнить данными новую таблицу можно как с текущей базы данных и текущего сервера, так и с другой базы данных или с удаленного сервера. Например, указывать полное имя базы данных в виде база_данных.схема.имя_таблицы или в случае с удаленным сервером, связанный_сервер.база_данных.схема.имя_таблицы;
- Столбец идентификаторов в новой таблице не наследует свойство IDENTITY, если: инструкция содержит объединение (JOIN, UNION), предложение GROUP BY, агрегатную функцию, также, если столбец идентификаторов является частью выражения, получен из удаленного источника данных или встречается более чем один раз в списке выбора. Во всех подобных случаях столбец идентификаторов не наследует свойство IDENTITY и создается как NOT NULL;
- С помощью инструкции SELECT INTO нельзя создать секционированную таблицу, даже если исходная таблица является секционированной;
- В качестве новой таблицы можно указать обычную таблицу, а также временную таблицу, однако нельзя указать табличную переменную или возвращающий табличное значение параметр;
- Вычисляемый столбец, если такой есть в списке выбора инструкции SELECT INTO, в новой таблице он становится обычным, т.е. не вычисляемым;
- SELECT INTO нельзя использовать вместе с предложением COMPUTE;
- С помощью SELECT INTO в новую таблицу не переносятся индексы, ограничения и триггеры, их нужно создавать дополнительно, после выполнения инструкции, если они нужны;
- Предложение ORDER BY не гарантирует, что строки в новой таблице будут вставлены в указанном порядке.
- В новую таблицу не переносится атрибут FILESTREAM. Объекты BLOB FILESTREAM в новой таблице будут как объекты BLOB типа varbinary(max) и имеют ограничение в 2 ГБ;
- Объем данных, записываемый в журнал транзакций во время выполнения операций SELECT INTO, зависит от модели восстановления. В базах данных, в которых используется модель восстановления с неполным протоколированием, и простая модель, массовые операции, к которым относится SELECT INTO, минимально протоколируются. За счет этого инструкция SELECT INTO может оказаться более эффективней, чем отдельные инструкции по созданию таблицы и инструкции INSERT по заполнение ее данными.
Все примеры я буду выполнять в СУБД Microsoft SQL Server 2016 Express.
Исходные данные
Для начала давайте создадим две таблицы и заполним их данными, эти таблицы мы и будем объединять в примерах.

CREATE TABLE TestTable(
[ProductId] [INT] IDENTITY(1,1) NOT NULL,
[CategoryId] [INT] NOT NULL,
[ProductName] [VARCHAR](100) NOT NULL,
[Price] [money] NULL
) ON [PRIMARY]
GO
CREATE TABLE TestTable2(
[CategoryId] [INT] IDENTITY(1,1) NOT NULL,
[CategoryName] [VARCHAR](100) NOT NULL
) ON [PRIMARY]
GO
INSERT INTO TestTable
VALUES (1,'Клавиатура', 100),
(1, 'Мышь', 50),
(2, 'Телефон', 300)
GO
INSERT INTO TestTable2
VALUES ('Комплектующие компьютера'),
('Мобильные устройства')
GO
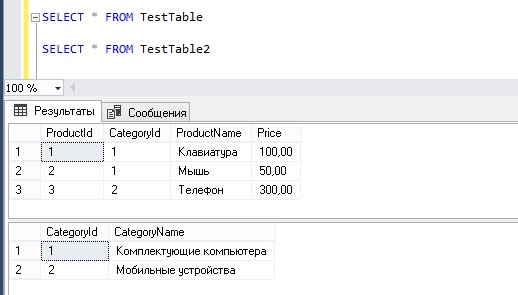
SELECT * FROM TestTable
SELECT * FROM TestTable2
Пример 1 – Создание таблицы с помощью инструкции SELECT INTO с объединением данных
Давайте представим, что нам необходимо объединить две таблицы и сохранить полученный результат в новую таблицу (например, нам нужно получить товары с названием категории, к которой они относятся).
   --Операция SELECT INTO
   SELECT T1.ProductId, T2.CategoryName, T1.ProductName, T1.Price
   INTO TestTable3
   FROM TestTable T1
   LEFT JOIN TestTable2 T2 ON T1.CategoryId = T2.CategoryId

   --Выборка данных из новой таблицы
   SELECT * FROM TestTable3
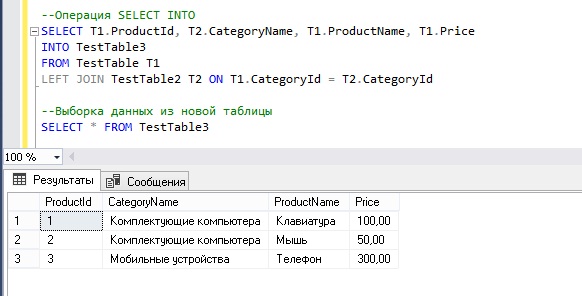
В итоге мы создали таблицу с названием TestTable3 и заполнили ее объединёнными данными.
Пример 2 – Создание временной таблицы с помощью инструкции SELECT INTO с группировкой данных
Сейчас давайте, допустим, что нам нужны сгруппированные данные, например, информация о количестве товаров в определенной категории, при этом эти данные нам нужно сохранить во временную таблицу, например, эту информацию мы будем использовать только в SQL инструкции, поэтому нам нет необходимости создавать полноценную таблицу.
   --Создаем временную таблицу (#TestTable) с помощью инструкции SELECT INTO
   SELECT T2.CategoryName, COUNT(T1.ProductId) AS CntProduct
   INTO #TestTable
   FROM TestTable T1
   LEFT JOIN TestTable2 T2 ON T1.CategoryId = T2.CategoryId
   GROUP BY T2.CategoryName

   --Выборка данных из временной таблицы
   SELECT * FROM #TestTable

Как видим, у нас получилось создать временную таблицу #TestTable и заполнить ее сгруппированными данными.
Вот мы с Вами и рассмотрели инструкцию SELECT INTO в языке T-SQL, всем тем, кто только начинает свое знакомство с языком SQL, рекомендую прочитать книгу «SQL код» – это самоучитель по языку SQL, которую написал я, и в которой я подробно, и в то же время простым языком, рассказываю о языке SQL, а у меня на этом все, пока!
Заметка! Для профессионального изучения языка T-SQL рекомендую посмотреть мои видеокурсы по T-SQL.
Инструкция SELECT INTO
Инструкция SELECT INTO копирует данные из одной таблицы в новую.
Синтаксис SELECT INTO
Скопируйте все столбцы в новую таблицу:
SELECT *
INTO newtable [IN externaldb]
FROM oldtable
WHERE condition;
Скопируйте только некоторые столбцы в новую таблицу:
SELECT column1, column2, column3, …
INTO newtable [IN externaldb]
FROM oldtable
WHERE condition;
Новая таблица будет создана с именами столбцов и типами, определенными в старой таблице. Вы можете создать новые имена столбцов, используя предложение AS.
Примеры SQL SELECT INTO
Следующая инструкция SQL создает резервную копию клиентов:
SELECT * INTO CustomersBackup2017
FROM Customers;
Следующая инструкция SQL использует предложение IN для копирования таблицы в новую таблицу в другой базе данных:
SELECT *
INTO CustomersBackup2017 IN ‘Backup.mdb’
FROM Customers;
Следующая инструкция SQL копирует только несколько столбцов в новую таблицу:
SELECT CustomerName, ContactName INTO CustomersBackup2017
FROM Customers;
Следующая инструкция SQL копирует только немецких клиентов в новую таблицу:
SELECT *
INTO CustomersGermany
FROM Customers
WHERE Country = ‘Germany’;
Следующая инструкция SQL копирует данные из нескольких таблиц в новую таблицу:
SELECT Customers.CustomerName, Orders.OrderID
INTO CustomersOrderBackup2017
FROM Customers
LEFT JOIN Orders
ON Customers.CustomerID = Orders.CustomerID;
Совет: SELECT INTO также можно использовать для создания новой пустой таблицы, используя схему другой таблицы.
Просто добавьте предложение WHERE, которое приводит к тому, что запрос не возвращает никаких данных:
SELECT * INTO newtable
FROM oldtable
WHERE 1 = 0;
The SQL SELECT INTO statement in SQL Server creates a new table from the existing table by copying the columns of the existing table. It is used for bulk data transfers.
The constraints such as not null, unique, etc. of the source table are not copied to the destination table. We can modify the SQL SELECT INTO statement to copy only a particular set of rows using the WHERE clause. Similarly, we can also select columns to be copied into the new table.
Syntax
The syntax for the SQL SELECT INTO statement in SQL Server is as follows:
The above query will copy N columns into the new_table from an existing table calledOld_table for all the rows where the condition in the where clause satisfies.
Parameters or Arguments
Let us look at all the parameters used and their meaning in the above SQL SELECT INTO Statement.
- column1, column2,…,columnN — It is the list of columns from the parent table (existing table) to be copied to the new table. We can also use * to copy all the columns of the old table.
- New_Table — It is the new table that is to be created by this query. Its name should be unique. It will contain all the columns specified by the query. This new table will not have constraints like not null, unique, etc. from the Old_table.
- Old_table — It is the parent table from which data is to be copied to the new table. We can also use the JOIN clause to join multiple existing tables.
- WHERE condition — It is an optional clause that can be used to select only particular records from the table. In case we only want rows that satisfy the given condition are only copied into the new table.
Data Types
In SQL Server, the data type of the column such as Varchar(), Integer, Date, etc remains the same in the new table as well.
When a primary key column (which is unique for each record, and can be used to uniquely identify the record) of the existing table is copied to the new table, the column inherits the primary key property as well. In the cases listed below, the primary key column doesn’t inherit this property:
- The SELECT statement contains more than one table using join.
- UNION is used to join multiple SELECT statements.
- The identity column is either part of an expression or is listed more than once in the select list.
Even if any one of the above conditions is true the column created is not the primary key instead it is set to NOT NULL.
Limitations and Restrictions
The SQL SELECT INTO statement has a few limitations which are important to be noted as stated below:
- A partitioned table cannot be created using SQL SELECT INTO. It is not useful even when the parent or existing table is partitioned table.
Note: Partitioned table is a large table that is divided into small tables so that it is easier to manage and query of the data.
- Indexes, constraints, and triggers are not transferred to the new table from the old table. We are required to define them manually after the SQL SELECT INTO statement.
- The ORDER BY clause used to sort the data in a particular order does not guarantee the specified order of the records in the new table. In other words, the order by clause is sometimes ineffective when using the SELECT INTO statement.
- We cannot complete a column while inserting it using select into statement. Even if we use an expression it inserts old values only.
Logging Behavior
Database logging is a method of keeping records of the changes made to the database or in a narrower vision, changes made to a particular table. They help in the recovery of the database from any kind of failure.
The amount of logging using the SQL SELECT INTO statement depends on the recovery model in the effect of the database. If the database is using a simple recovery model or bulk-logged recovery model, bulk operations are minimally logged. This makes the SELECT INTO Statement efficient. But the SELECT INTO statements are fully logged operations and thus make it inefficient. To make it minimally logged we can set the derived UserDataAccess property to 0.
Examples
Let us take a few examples to understand the working of the SQL SELECT INTO statement.
Example 1:
Let us create a Table Employee that stores employee details as EmpCode, EmpFullName, Job, Manager, HireDate, and DEPTCODE. Now, let us assume we wish to create another table that has EmpCode, EmpfullName, and DEPTCODE of all the software engineers only. To get this table from the Parent table Employee we will be using the SQL SELECT INTO statement.
Let us first create the EMPLOYEE table.
Output:
| EmpCode | EmpFullName | Job | Manager | HireDate | DEPTCODE |
|---|---|---|---|---|---|
| 9369 | TONY STARK | SOFTWARE ENGINEER | 7902 | 1980-12-17 | 20 |
| 9654 | SAM MILES | SALESMAN | 7698 | 1981-09-28 | 30 |
| 9782 | KEVIN HILL | MANAGER | 7839 | 1981-06-09 | 10 |
| 9788 | CONNIE SMITH | ANALYST | 7566 | 1982-12-09 | 20 |
| 9839 | ALFRED KINSLEY | PRESIDENT | 7566 | 1981-11-17 | 10 |
| 9698 | BELLA SWAN | MANAGER | 7839 | 1981-05-01 | 30 |
| 9777 | MADII HIMBURY | ANALYST | 7839 | 1981-05-01 | NULL |
| 9860 | ATHENA WILSON | ANALYST | 7839 | 1992-06-21 | 50 |
| 9499 | TIM ADOLF | SALESMAN | 7698 | 1981-02-20 | 30 |
| 9566 | KIM JARVIS | MANAGER | 7839 | 1981-04-02 | 20 |
| 9844 | PAUL TIMOTHY | SALESMAN | 7698 | 1981-09-08 | 30 |
| 9876 | JOHN ASGHAR | SOFTWARE ENGINEER | 7788 | 1983-01-12 | 20 |
| 9900 | ROSE SUMMERS | TECHNICAL LEAD | 7698 | 1981-12-03 | 20 |
| 9902 | ANDREW FAULKNER | ANAYLYST | 7566 | 1981-12-03 | 10 |
| 9934 | KAREN MATTHEWS | SOFTWARE ENGINEER | 7782 | 1982-01-23 | 20 |
| 9591 | WENDY SHAWN | SALESMAN | 7698 | 1981-02-22 | 30 |
| 9861 | JENNIFER HUETTE | ANALYST | 7839 | 1996-07-01 | 50 |
Output:
| EmpCode | EmpFullName | DEPTCODE |
|---|---|---|
| 9369 | TONY STARK | 20 |
| 9876 | JOHN ASGHAR | 20 |
| 9934 | KAREN MATTHEWS | 20 |
The above code copies specified rows and columns from the employee table to the Software_Engineers table.
Example 2
Let us take another example where we use join as well along with select into a statement. The first table will be CUSTOMERS and the other one will be ORDERS. We will combine these tables to get the order details and the address for delivery from the customer‘s table.
Creating Customers and Orders table
Output:
| customer_id | customer_name | address | city | state | zip_code |
|---|---|---|---|---|---|
| 156 | Lyndsey | 759 River Dr. | Buffalo | CA | 61422 |
| 585 | Pamelia | 472 Chestnut Ave. | NY | NA | 85401 |
| 487 | Kashka | 284 Pearl Lane | Uniondale | NY | 62697 |
| 219 | Daryl | 20 Brown St. | Fairport | NY | 18593 |
| 103 | Genoveva | 18 Vine Street | Campbell | CA | 96247 |
Output:
| ORDER_ID | CUSTOMER_ID | ORDER_AMT |
|---|---|---|
| 1001 | 585 | 9283.91 |
| 1038 | 103 | 5720.56 |
| 1089 | 487 | 6742.37 |
Output:
| customer_id | order_id | address | city | state | zip_code |
|---|---|---|---|---|---|
| 585 | 1001 | 472 Chestnut Ave. | NY | NA | 85401 |
| 487 | 1089 | 284 Pearl Lane | UnionDale | NY | 62697 |
| 103 | 1038 | 18 Vine Street | Campbell | CA | 96247 |
In the above example, we are performing a left join on two tables Order and Customer to generate a new table CurrentOrders using the SELECT INTO statement.
INSERT INTO SELECT vs SELECT INTO
-
INSERT INTO AND SELECT INTO both statements can be used to insert data from one table to another. But INSERT INTO can only be used if the new table exists in our database. SELECT INTO statement can be used even if the target table does not exist. It automatically creates a new table if it doesn’t exist.
Let us say I have only one table called patients and I want to create another table that has a list of dental patients. Here I can use the SELECT INTO statement but if I use the INSERT INTO statement it will cause an error.
Now, once I have both the tables and I wish to update existing table patients with entries from dental patients I can use the INSERT INTO statement.
-
Another difference between the two statements is inserted inserts data in the predefined table but SELECT INTO defines a table by itself which sometimes may not structure the table as expected.
To learn more about SQL visit SQL OPERATORS next.
Conclusion
- In SQL SELECT INTO statement is used to create a new table from one or more than one table in the database.
- We can modify columns as well as rows to be inserted into the new table from the old table.
- The constraints of the parent table are not inherited by the new table.
- It has a few limitations such as a partitioned table cannot be created simply using the SELECT INTO statement, the Order By clause is not efficient, and the computation of a column is not possible.
- Logging behavior depends on the recovery model, logging can be manually controlled using the UserDataAccess property.
- SELECT INTO AND INSERT INTO statements perform similar operations but the SELECT INTO statement is effective even if the new table doesn’t exist.
This article will cover the SQL SELECT INTO statement including syntax, parameters and use with multiple tables, filegroups and a WHERE condition
We regularly insert data into SQL Server tables either from an application or directly in SSMS. We can insert data using the INSERT INTO statement. To do this, we should have a table already in place to insert data into it as we cannot create a table using Insert into the statement.
We need to do the following tasks using INSERT INTO statement.
- Create a table structure with appropriate data types
- Insert data into it
But the good news is that we can do both the task together, elegantly, using the SQL SELECT INTO statement. It creates a table structure for the columns returned by Select statement.
Suppose we want to update many records in a table. We can use the SELECT INTO statement to create a backup table with the existing structure as of source table. Let us explore the SELECT INTO in this article.
|
SELECT column1,column2...ColumnN INTO New_table FROM tables [Where conditions]; |
Parameters in the SELECT INTO Statement
- Columns list: We need to specify column we want to retrieve and insert into a new table
- New_table: We can specify the new table name here. SQL Server creates a new table with columns mentioned in columns list. We cannot replace an existing table using this. Table name should be unique
- Tables: It contains a table from where we want to get records. We can have multiple tables defined here as well with proper Join clause
- WHERE conditions: We can filter records using Where clause. It is an optional clause
Let us explore the SQL SELECT INTO statement using examples.
Environment:
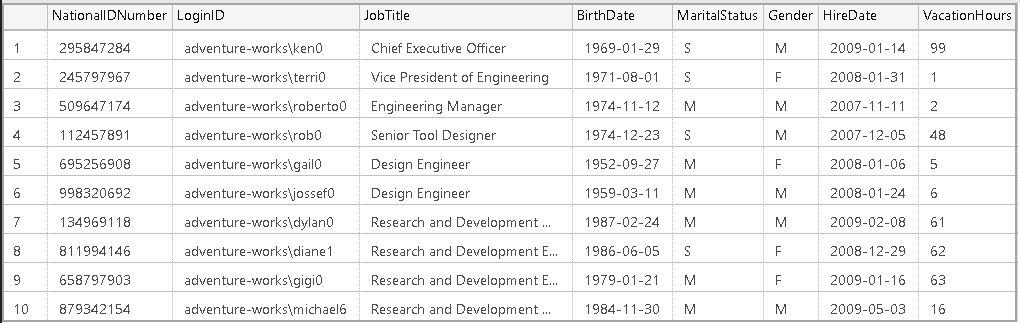
In this example, we are using sample database AdventureWorks2017. Suppose we want to select records from [Employee] table and creates new table [Employee_Demo] using the SELECT INTO statement. We do want selected columns only in the new table. Let us run a select statement on Employee table with the columns we want to have.
|
SELECT TOP (10) [NationalIDNumber] ,[LoginID] ,[JobTitle] ,[BirthDate] ,[MaritalStatus] ,[Gender] ,[HireDate] ,[VacationHours] FROM [AdventureWorks2017].[HumanResources].[Employee] |

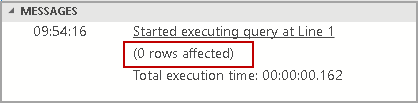
Before we execute the SQL SELECT INTO statement, we can verify that Employee_Demo table does not exist in AdventureWorks2017 database using sp_help command.
|
sp_help ‘[AdventureWorks2017].[HumanResources].[Employee_Demo]’ |
In the following screenshot, we can see that Employee_Demo table does not exist in my database.

Execute the following query to create new table [Employee_Demo] using the SELECT INTO statement.
|
SELECT TOP (10) [NationalIDNumber] ,[LoginID] ,[JobTitle] ,[BirthDate] ,[MaritalStatus] ,[Gender] ,[HireDate] , [VacationHours] INTO [AdventureWorks2017].[HumanResources].[Employee_Demo] FROM [AdventureWorks2017].[HumanResources].[Employee] |
We get the following output message in Azure Data Studio. You can note that the number of rows affected is 10. In the query, we selected top 10 records from an Employee table.

We can access data from newly created table Employee_Demo and verify that it contains same records as of our earlier select statement.
We did not specify any column properties in the SQL SELECT INTO statement. Let us compare the source and destination table columns and their properties.
We can run sp_help ‘tablename’ command on both Employee and Employee_Demo table. I copied the output of both tables in excel ( for selected columns). In the following screenshot, you can see that column datatype and their properties are similar.
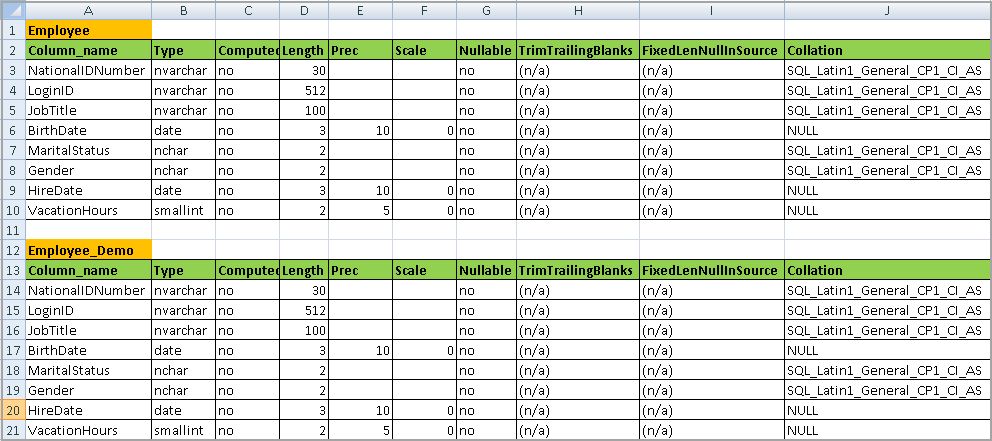
In the previous SQL SELECT INTO statement, we prepared a destination table (Employee_Demo) from a few columns in the source table (Employee).
Let us create another table with all columns in an Employee table with the following query.
|
SELECT * INTO [AdventureWorks2017].[HumanResources].[Employee_All] from [AdventureWorks2017].[HumanResources].[Employee] |
In the output, we can see it inserted 290 rows in Employee_All table.

We have verified that the SELECT INTO statement creates a new table with columns specified in the column list. It creates a similar data type as well in the destination table.
Suppose we have primary and foreign keys in the source table. Does it create a primary key and foreign key as well similar to the source table? No, the SQL SELECT INTO statement does not create any keys in the destination table. If we want, we can define keys on the destination table. Let us verify this in the following section.
In my earlier example, Employee table contains primary and foreign key defined on it. We can get a list of existing keys using the INFORMATION_SCHEMA view. Execute the following code, and it returns existing Primary and Foreign keys in Employee table.
|
SELECT DISTINCT Constraint_Name AS [Constraint], Table_Schema AS [Schema], Table_Name AS [TableName] FROM INFORMATION_SCHEMA.KEY_COLUMN_USAGE where Table_Name=‘Employee’ GO |
We can see, Employee table contains primary and foreign keys.

We copied all columns in Employee_All from Employee table. We need to check Primary and Foreign key on destination table now.
|
SELECT DISTINCT Constraint_Name AS [Constraint], Table_Schema AS [Schema], Table_Name AS [TableName] FROM INFORMATION_SCHEMA.KEY_COLUMN_USAGE where Table_Name=‘Employee_All’ GO |
We can see that it does not contain any key in destination table. It gives us flexibility to define keys on the destination table.
SQL SELECT INTO – Insert Data from Multiple Tables
In previous examples, we created a table using the SELECT INTO statement from a single table Employee. We can also join multiple tables and use the SELECT INTO statement to create a new table with data as well. In this section, we want to join multiple tables together. In the following query, we joined the following tables together in AdventureWorks2017.
- [HumanResources].[Employee]
- [Person].[Person]
- [Person].[BusinessEntityAddress]
- [Person].[Address]
- [Person].[StateProvince]
- [Person].[CountryRegion]
- [Person].[PersonPhone]
- [Person].[PhoneNumberType]
- [Person].[EmailAddress]
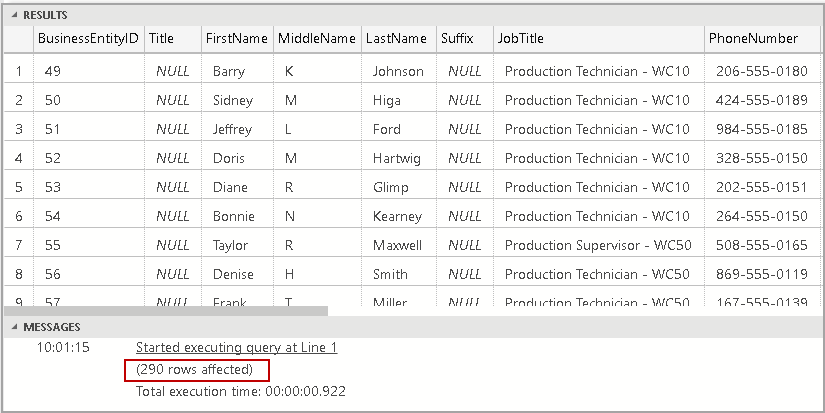
Execute the following query. It gives results from multiple tables based on join condition and columns mentioned.
|
1 2 3 4 5 6 7 8 9 10 11 12 13 14 15 16 17 18 19 20 21 22 23 24 25 26 27 28 29 30 31 32 33 34 35 36 37 |
SELECT e.[BusinessEntityID] ,p.[Title] ,p.[FirstName] ,p.[MiddleName] ,p.[LastName] ,p.[Suffix] ,e.[JobTitle] ,pp.[PhoneNumber] ,pnt.[Name] AS [PhoneNumberType] ,ea.[EmailAddress] ,p.[EmailPromotion] ,a.[AddressLine1] ,a.[AddressLine2] ,a.[City] ,sp.[Name] AS [StateProvinceName] ,a.[PostalCode] ,cr.[Name] AS [CountryRegionName] ,p.[AdditionalContactInfo] FROM [HumanResources].[Employee] e INNER JOIN [Person].[Person] p ON p.[BusinessEntityID] = e.[BusinessEntityID] INNER JOIN [Person].[BusinessEntityAddress] bea ON bea.[BusinessEntityID] = e.[BusinessEntityID] INNER JOIN [Person].[Address] a ON a.[AddressID] = bea.[AddressID] INNER JOIN [Person].[StateProvince] sp ON sp.[StateProvinceID] = a.[StateProvinceID] INNER JOIN [Person].[CountryRegion] cr ON cr.[CountryRegionCode] = sp.[CountryRegionCode] LEFT OUTER JOIN [Person].[PersonPhone] pp ON pp.BusinessEntityID = p.[BusinessEntityID] LEFT OUTER JOIN [Person].[PhoneNumberType] pnt ON pp.[PhoneNumberTypeID] = pnt.[PhoneNumberTypeID] LEFT OUTER JOIN [Person].[EmailAddress] ea ON p.[BusinessEntityID] = ea.[BusinessEntityID]; GO |
Execute a query, and we get following the output of the SQL SELECT INTO statement.
We want to create a table with data returned using the above table. Let’s execute the SQL SELECT INTO statement.
|
1 2 3 4 5 6 7 8 9 10 11 12 13 14 15 16 17 18 19 20 21 22 23 24 25 26 27 28 29 30 31 32 33 34 35 36 37 38 |
SELECT e.[BusinessEntityID] ,p.[Title] ,p.[FirstName] ,p.[MiddleName] ,p.[LastName] ,p.[Suffix] ,e.[JobTitle] ,pp.[PhoneNumber] ,pnt.[Name] AS [PhoneNumberType] ,ea.[EmailAddress] ,p.[EmailPromotion] ,a.[AddressLine1] ,a.[AddressLine2] ,a.[City] ,sp.[Name] AS [StateProvinceName] ,a.[PostalCode] ,cr.[Name] AS [CountryRegionName] ,p.[AdditionalContactInfo] INTO [HumanResources].[Employee_JoinTables] FROM [HumanResources].[Employee] e INNER JOIN [Person].[Person] p ON p.[BusinessEntityID] = e.[BusinessEntityID] INNER JOIN [Person].[BusinessEntityAddress] bea ON bea.[BusinessEntityID] = e.[BusinessEntityID] INNER JOIN [Person].[Address] a ON a.[AddressID] = bea.[AddressID] INNER JOIN [Person].[StateProvince] sp ON sp.[StateProvinceID] = a.[StateProvinceID] INNER JOIN [Person].[CountryRegion] cr ON cr.[CountryRegionCode] = sp.[CountryRegionCode] LEFT OUTER JOIN [Person].[PersonPhone] pp ON pp.BusinessEntityID = p.[BusinessEntityID] LEFT OUTER JOIN [Person].[PhoneNumberType] pnt ON pp.[PhoneNumberTypeID] = pnt.[PhoneNumberTypeID] LEFT OUTER JOIN [Person].[EmailAddress] ea ON p.[BusinessEntityID] = ea.[BusinessEntityID]; GO |
It creates [HumanResources].[Employee_JoinTables] table and insert data into it. We can verify records in this table by the select statement.
We can see you can join multiple tables together and creates output table using the SELECT INTO statement.
We do not need to take care of defining data types for destination table. If we want to create a table manually, we need to look at data type of each column and define datatype accordingly. If there is a mismatch between data types, you can get an error message like following.
Error 1: Due to a mismatch in data types
Msg 245, Level 16, State 1, Line 1
Conversion failed when converting the varchar value ‘GG’ to data type int.
Error 2: Msg 8152, Level 16, State 30, Line 2
String or binary data would be truncated.
We do not get these errors while inserting data using the SQL SELECT INTO statement. However, we cannot insert data into existing tables using this method.
SELECT INTO – Specify Filegroup
In previous sections, we explored that we can create a new table and insert data into it using the SQL SELECT INTO statement from existing tables. It creates a table in default Filegroup only. We cannot specify a particular Filegroup until SQL Server 2016. In SQL Server 2017, we can specify a particular Filegroup in which a new table should be created. SQL Server creates a new table in that particular Verify table Filegroup. If we do not specify any Filegroups in SQL Server 2017 and above, it creates a table in default Filegroup.
Note: We cannot specify Filegroups in the SQL SELECT INTO for SQL Server 2016 and before.
Let us add a new Filegroup in AdventureWorks2017 database. Right click on the database and go to Filegroups.
In this Filegroup page, click on Add FileGroup and specify a name for Filegroup.
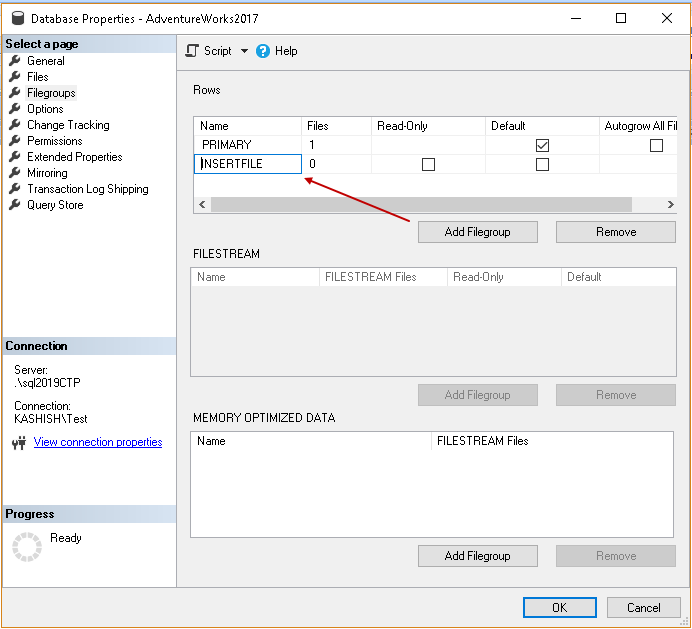
Now, click on Files and it lists out existing database files(data and log file), in this page, add a new datafile and specify FileGroup from the drop-down list. It should be FileGroup we created just now.
We want to create a SQL table in INSERTFILE Filegroup. We have not set this filegroup as default filegroup.
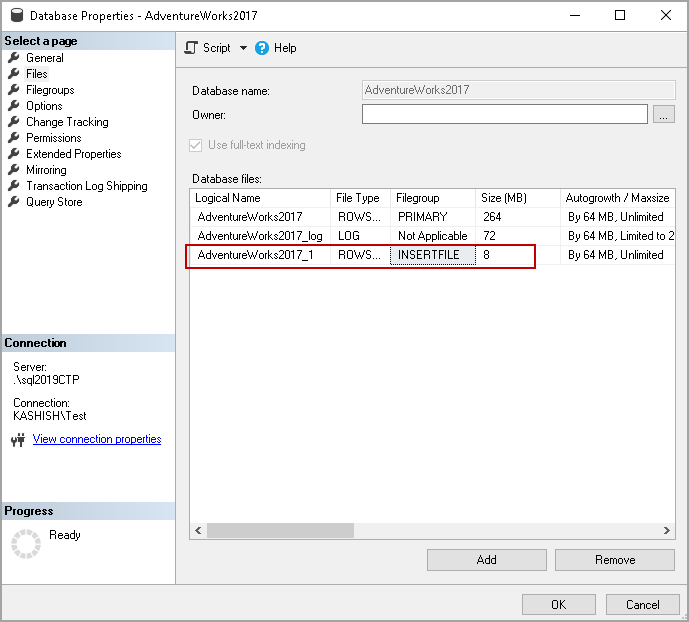
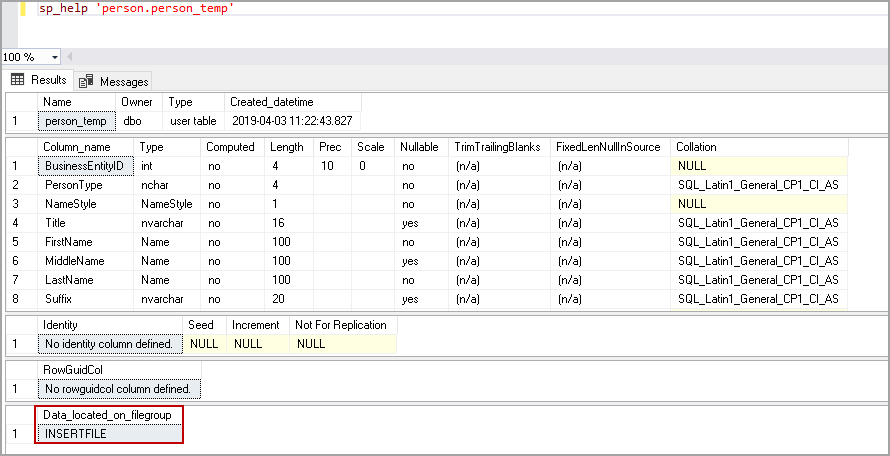
In the following query, you can see we specified filegroup name using ON clause. It works similar to a regular SQL SELECT INTO statement with a difference in a filegroup.
|
select * into person.person_temp ON INSERTFILE —FILEGROUP NAME from person.person |
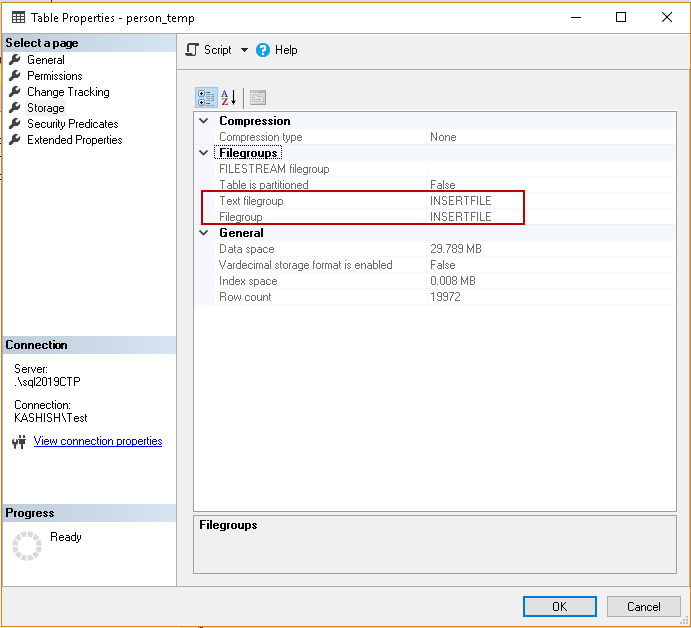
Once the table is created, execute a sp_help command on this newly created table. In the following screenshot, we can verify that the table is located on INSERTFILE FileGroup. It is the FileGroup we created earlier.
We can also verify this from table properties. Right-click on a table in SSMS. In the Storage section, we can see the desired FileGroup.
SELECT INTO with a Where condition
Suppose we want to create a table with a SQL SELECT INTO statement with few records in it. We can use a Where clause similar to a select statement. In the following query, we want to create a person.person_WC table for the person having last name is like %Duf%.
|
select * into person.person_WC ON INSERTFILE — Verify table Filegroup from person.person where Lastname like ‘%Duf%’ |
Conclusion
In this article, we explored the SQL SELECT INTO statement and its usage scenarios. It is a useful command to create a copy of a table without specifying data types.
- Author
- Recent Posts

Hi! I am Rajendra Gupta, Database Specialist and Architect, helping organizations implement Microsoft SQL Server, Azure, Couchbase, AWS solutions fast and efficiently, fix related issues, and Performance Tuning with over 14 years of experience.
I am the author of the book «DP-300 Administering Relational Database on Microsoft Azure». I published more than 650 technical articles on MSSQLTips, SQLShack, Quest, CodingSight, and SeveralNines.
I am the creator of one of the biggest free online collections of articles on a single topic, with his 50-part series on SQL Server Always On Availability Groups.
Based on my contribution to the SQL Server community, I have been recognized as the prestigious Best Author of the Year continuously in 2019, 2020, and 2021 (2nd Rank) at SQLShack and the MSSQLTIPS champions award in 2020.
Personal Blog: https://www.dbblogger.com
I am always interested in new challenges so if you need consulting help, reach me at rajendra.gupta16@gmail.com
View all posts by Rajendra Gupta
Summary: in this tutorial, you will learn how to use the SQL Server SELECT INTO statement to copy a table.
Introduction to SQL Server SELECT INTO statement
The SELECT INTO statement creates a new table and inserts rows from the query into it.
The following SELECT INTO statement creates the destination table and copies rows, which satisfy the WHERE condition, from the source table to the destination table:
SELECT
    select_list
INTO
    destination
FROM
    source
[WHERE condition]
Code language: SQL (Structured Query Language) (sql)
If you want to copy the partial data from the source table, you use the WHERE clause to specify which rows to copy. Similarly, you can specify which columns from the the source table to copy to the destination table by specifying them in the select list.
Note that SELECT INTO statement does not copy constraints such as primary key and indexes from the source table to the destination table.
Let’s take some examples of using the SELECT INTO statement.
A) Using SQL Server SELECT INTO to copy table within the same database example
First, create a new schema for storing the new table.
CREATE SCHEMA marketing;
GO
Code language: SQL (Structured Query Language) (sql)
Second, create the marketing.customers table like the sales.customers table and copy all rows from the sales.customers table to the marketing.customers table:
SELECT
*
INTO
marketing.customers
FROM
sales.customers;
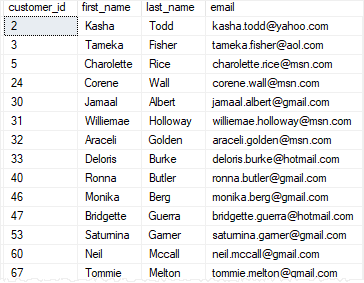
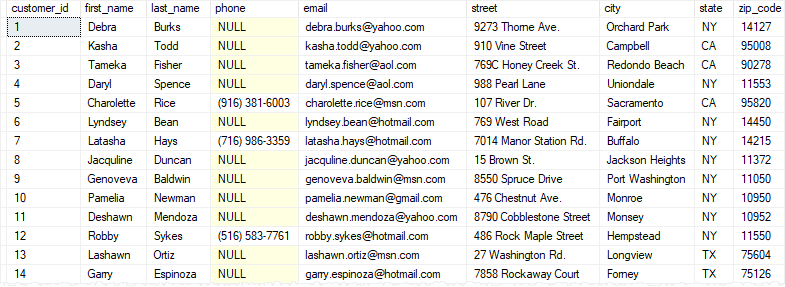
Code language: SQL (Structured Query Language) (sql)Third, query data from the the marketing.customers table to verify the copy:
SELECT
    *
FROM
    marketing.customers;
Code language: SQL (Structured Query Language) (sql)
The following picture shows the partial output:
Hi! I am Rajendra Gupta, Database Specialist and Architect, helping organizations implement Microsoft SQL Server, Azure, Couchbase, AWS solutions fast and efficiently, fix related issues, and Performance Tuning with over 14 years of experience.
I am the author of the book «DP-300 Administering Relational Database on Microsoft Azure». I published more than 650 technical articles on MSSQLTips, SQLShack, Quest, CodingSight, and SeveralNines.
I am the creator of one of the biggest free online collections of articles on a single topic, with his 50-part series on SQL Server Always On Availability Groups.
Based on my contribution to the SQL Server community, I have been recognized as the prestigious Best Author of the Year continuously in 2019, 2020, and 2021 (2nd Rank) at SQLShack and the MSSQLTIPS champions award in 2020.
Personal Blog: https://www.dbblogger.com
I am always interested in new challenges so if you need consulting help, reach me at rajendra.gupta16@gmail.com
View all posts by Rajendra Gupta