-
Contents
-
Table of Contents
-
Troubleshooting
-
Bookmarks
Quick Links
WV 50
English
Français
Español
59633640 07/09
2
8
14
Related Manuals for Kärcher WV 50
Summary of Contents for Kärcher WV 50
-
Page 1
WV 50 English Français Español 59633640 07/09… -
Page 2: Table Of Contents
All other informa- 600 mA tion can be found at: 1,5 lbs www.karcherresidential.com Li-Ion 3,6 V 120-127 V Call: 01-800-024-13-13 for help or visit our 60 Hz website: www.karcher.com.mx 1.633-109.0 Proper use Customer Support USA and Canada Customer Support Mexico…
-
Page 3: Important Safety Instructions
IMPORTANT SAFETY INSTRUCTIONS When using this product basic precautions should always be followed, including the following: 1 DO NOT LEAVE appliance unattended when plugged in. Unplug from outlet when not in use and before servicing. 2 DO NOT USE outdoors or on wet sur- faces.
-
Page 4: Start Up
Description of the Appliance When unpacking the product, make sure that no accessories are missing and that none of the package contents have been damaged. If you detect any transport dam- ages please contact your retailer. For household use only! English Start up 1 Charger with charging cable…
-
Page 5: Charge The Battery
Charge the battery Insert the charger delivered with the ap- pliance into a proper socket. Insert the charging cable plug to the back of the appliance. Note: During the charging process, the charge/operating display blinks. Once the battery is fully charged, it will be perma- nently illuminated.
-
Page 6: Finish Up Your Work / Clean Appliance
Finish up your work / clean appliance Turn off the appliance. First, release the attachment with the pull-off lips and remove it from the suc- tion head, then release the suction head and remove. Clean the suction head and the attach- ment with the pull-off lips under running water (do not wash in dishwater).
-
Page 7: Disposal Of Appliances
Disposal of Appliances This appliance includes a built-in battery pack; please remove this battery pack be- fore disposing of the old appliance. Remove battery pack and dispose The appliance may only be opened in order to dispose of the battery pack. Caution when opening the appliance avoid short circuits.
-
Page 8: Caractéristiques Techniques
100 ml teur en assume le risque. 20 min 12 W Pour enregistrer ce produit, veuillez visiter : 3,0 h www.karcher-register.com Pour l’assistance technique, aller à : www.karcher-help.com 600 mA Pour faire valoir une demande en garantie, appeler : 1-800-537-4129 0,7 kg Il vous faudra faxer votre reçu, ou l’envoyer…
-
Page 9: Consignes De Securite Importantes
CONSIGNES DE SECURITE IMPORTANTES En utilisant ce produit, toujours observer une certaine prudence élémentaire, in- cluant notamment: 1 NE PAS LAISSER l’appareil sans sur- veillance lorsqu’il est branché. Débran- cher l’appareil lorsqu’il n’est pas utilisé et avant de procéder à l’entretien. 2 NE PAS UTILISER en extérieur ou sur des surfaces humides.
-
Page 10: Mise En Service
Description de l’appareil Contrôler le matériel lors du déballage pour constater des accessoires manquants ou des dommages. Si des dégâts dus au transport sont constatés, il faut en informer le revendeur. A usage domestique seulement ! Français Mise en service 1 Appareil de charge avec câble de charge 2 Appareil de base 3 Prise de charge…
-
Page 11: Charger L’accumulateur
Charger l’accumulateur Brancher le chargeur dans une prise de courant réglementairement. Brancher le connecteur du câble de charge sur le côté arrière de l’appareil. Remarque : L’indicateur de charge / de service clignote pendant le processus de charge. Lorsque l’accumulateur est com- plètement chargé, l’indicateur est allumé…
-
Page 12: Terminer Le Travail / Nettoyer L’appareil
Terminer le travail / nettoyer l’appareil Mettre l’appareil hors tension. Déverrouiller en premier l’extension avec des lèvres extensibles et la retirer de la tête d’aspiration, puis déverrouiller la tête d’aspiration et l’enlever. Nettoyer la tête d’aspiration et l’exten- sion avec les lèvres extensibles à l’eau courante (pas adapté…
-
Page 13: Elimination De L’appareil Hors D’usage
Elimination de l’appareil hors d’usage Cet appareil contient une batterie intégrée qui doit être démontée avant l’élimination de l’appareil mis au rebut. Démonter la batterie et l’éliminer L’ouverture de l’appareil est autorisée exclusivement pour l’élimination de la batterie. Précaution, Eviter les courts-circuits à…
-
Page 14: Datos Técnicos
IP X4 único que correrá con este riesgo. 100 ml 20 min Para registrar este producto, visite: 12 W www.karcher-register.com 3,0 h Para ayuda técnica, visite: www.karcher-help.com Si necesita presentar un reclamación de la 600 mA garantía, llame a: 1-800-537-4129 0,7 kg Tendrá…
-
Page 15: Instrucciones De Seguridad Importantes
INSTRUCCIONES DE SEGURIDAD IMPORTANTES Al utilizar este producto, tome siempre las precauciones básicas, incluidas las si- guientes: 1 NO ABANDONAR la unidad mientras esté enchufada. Desenchufar cuando no esté en uso y antes de revisar. 2 NO USAR en exteriores o sobre super- ficies húmedas.
-
Page 16: Puesta En Marcha
Descripción del aparato Cuando desempaque el contenido del pa- quete, compruebe si faltan accesorios o si el aparato presenta daños. Informe a su distribuidor en caso de detectar daños oca- sionados durante el transporte. Sólo para uso doméstico. Español Puesta en marcha 1 Cargador con cable 2 Equipo básico 3 Clavija de carga…
-
Page 17: Cargar La Batería
Cargar la batería Introducir el cargador en el enchufe de forma correcta. Introducir el enchufe del cable de recar- ga en la parte posterior del aparato. Indicación: Durante el proceso de carga el indicador de carga / funcionamiento parpa- dea. Si la batería está completamente car- gada, luce continuamente.
-
Page 18: Terminar El Trabajo / Limpiar El Aparato
Terminar el trabajo / limpiar el aparato Desconexión del aparato Primero desbloquear accesorio adicio- nal con labios de extracción y retirar del cabezal de aspiración, después desblo- quear y retirar el cabezal de aspiración Limpiar el accesorio adicional y el cabe- zal de aspiración con los labios con agua corriente (no apto lavavajillas).
-
Page 19: Desecho Del Aparato Usado
Desecho del aparato usado Este aparato contiene una batería integra- da, debe desmontarse antes de eliminar el aparato usado. Desmontar y eliminar la batería El aparato solo debe abrirse para elimi- nar la batería. Abrircon cuidado el aparato, para evi- tar cortocircuitos al desmontar la ba- tería.
-
Page 20
59633640 (07/09)
Требуется руководство для вашей Kärcher WV 50 Электрический стеклоочиститель? Ниже вы можете просмотреть и загрузить бесплатно руководство в формате PDF. Кроме того, приведены часто задаваемые вопросы, рейтинг изделия и отзывы пользователей, что позволит оптимально использовать ваше изделие. Если это не то руководство, которое вы искали, – свяжитесь с нами.
Ваше устройство неисправно, и в руководстве отсутствует решение? Перейдите в Repair Café для получения бесплатных ремонтных услуг.
Руководство

Рейтинг
Сообщите нам, что вы думаете о Kärcher WV 50 Электрический стеклоочиститель, оставив оценку продукта. Хотите поделиться вашими впечатлениями от данного изделия или задать вопрос? Вы можете оставить комментарий в нижней части страницы.
Довольны ли вы данным изделием Kärcher?
Да Нет
5 голоса

– 3
Уважаемый покупатель!
Перед первым применением
вашего прибора прочитайте
эту оригинальную инструкцию по эксплу-
атации, после этого действуйте соответ-
ственно и сохраните ее для дальнейше-
го пользования или для следующего
владельца.
Прибор поставляется в двух вариантах
исполнения.
WV 50
WV 50 plus вместе с баллоном распыли-
теля с насадкой и концентрированным
средством для мойки окон
–
Используйте этот прибор с приво-
дом от аккумулятора исключитель-
но в личных целях, для чистки смо-
ченных гладких поверхностей, та-
ких как окна, зеркала или кафельная
плитка. Прибор не может всасы-
вать пыль.
–
Прибор непригоден для всасывания
большого количества жидкости с
горизонтальных поверхностей, на-
пример, жидкости, вылившейся из
опрокинутого стакана (максималь-
но 25 мл).
–
Используйте этот прибор только
вместе с обычными средствами
для чистки окон (не спирт и не пени-
стое моющее средство).
–
Мы рекомендуем: Концентриро-
ванное средство для чистки окон
фирмы KARCHER (см. главу «Специ-
альные принадлежности»).
–
Прибор надлежит применять толь-
ко с принадлежностями и запасны-
ми частями, допущенными для ис-
пользования фирмой KARCHER.
Любой другой вид использования прибо-
ра считается использованием не по на-
значению. Изготовитель прибора не
несет ответственности за вред, при-
чиненный вследствие такого исполь-
зования. Ответственность за подоб-
ное использование несет только поль-
зователь.
Данное устройство не предназна-
чено для использования людьми с
ограниченными физическими, сен-
сорными или умственными возмож-
ностями, а также лиц с отсутст-
вием опыта и/или отсутствием не-
обходимых знаний, за исключением
случаев, когда они находятся под
надзором ответственного за без-
опасность лица или получают от
него указания по применению
устройства, а также осознают вы-
текающие отсюда риски.
Допускается применение устрой-
ства детьми, достигшими 8-лет-
него возраста и находящимися под
присмотром лица, ответственно-
го за их безопасность, или получив-
шими инструкции о применении
устройства от такого лица, а так-
же осознающими вытекающие от-
сюда риски.
Не разрешайте детям играть с
устройством.
Следить за тем, чтобы дети не иг-
рали с устройством.
Оглавление
Использование по назначе-
нию. . . . . . . . . . . . . . . . . . . . . . RU . . .3
Указания по технике безопа-
сности . . . . . . . . . . . . . . . . . . . RU . . .3
Ввод в эксплуатацию . . . . . . . RU . . .5
Окончание работы / очистка
прибора . . . . . . . . . . . . . . . . . . RU . . .6
Помощь в случае неполадок . RU . . .7
Специальные принадлежно-
сти . . . . . . . . . . . . . . . . . . . . . . RU . . .7
Технические данные. . . . . . . . RU . . .8
Утилизация отслужившего
устройства и аккумулятора . . RU . . .8
Использование по
назначению
Указания по технике
безопасности
67
RU

Summary of Content for Karcher WV 50 Operator’s Manual PDF
English . . . . . 2 Franais . . . . . 8 Espaol . . . . 15
Subject to technical modifications!
Use this battery operated appliance only for personal use, for cleaning moist, smooth surfaces such as win- dows, mirrors or tiles. Not meant for the vacuum of dust.
The appliance is not intended to vacu- um up larger amounts of fluids from hor- izontal surfaces, such as from a tipped drinking glass (max. 0,8 oz.).
Only use this appliance with conven- tional window cleaners (no spirit, no foam cleaners).
Please use this appliance only with ac- cessories and spare parts approved by KRCHER.
Any use extending beyond what is listed above is not considered as proper use. The manufacturer is not liable for any losses re- sulting from improper use.
To register this product, please visit: www.karcher-register.com For technical support, go to: www.karcher-help.com If you need to file a warranty claim, please call: 1-800-537-4129 You will need to fax or email your receipt to a customer service agent. All other informa- tion can be found at: www.karcherresidential.com
Call: 01-800-024-13-13 for help or visit our website: www.karcher.com.mx
Window Cleaner OPERATOR MANUAL
IMPORTANT SAFETY INSTRUC- TIONS . . . . . . . . . . . . . . . . . . . . . 3 Start up . . . . . . . . . . . . . . . . . . . . 4 Finish up your work / clean appliance 6 Troubleshooting . . . . . . . . . . . . . 7 Disposal of Appliances . . . . . . . . 7
Specifications
Type of protection IP X4 Volume of dirt water reservoir 3,3 oz. Operating time with full charge
20 min
Rated power of appliance 12 W Charging current for empty battery
3 h
Rated charger voltage 5,5 V Nominal current of charger 600 mA Weight 1,5 lbs Battery type Li-Ion Nominal battery voltage 3,6 V Power Input 120-127 V
60 Hz Part No. 1.633-109.0
Proper use
Customer Support USA and Canada
Customer Support Mexico
When using this product basic precautions should always be followed, including the following:
Warning To reduce the risk of fire, electric shock, or injury: Do not leave appliance unattended
when plugged in. Unplug from outlet when not in use and before servicing.
Warning To reduce the risk of electric shock: Do not expose to rain. Store indoors. Do not allow to be used as a toy. Close
attention is necessary when used by or near children.
Use only as described in this manual. Use only manufacturers recommended attachments.
Do not use with damaged cord or plug. If appliance is not working as it should, has been dropped, damaged, left out- doors, or dropped into water, return it to a service center.
Do not pull or carry by the cord, do not use cord as a handle, do not close a door on the cord, or pull cord around sharp edges or corners. Do not run ap- pliance over cord. Keep cord away from heated surfaces.
Do not unplug by pulling cord. To un- plug, grasp plug.
Do not handle plug or appliance with wet hands.
Do not put any objects into openings. Do not use if openings are blocked; keep free of dust, lint, hair, and anything that may reduce air flow.
Keep hair, loose clothing, fingers, and all parts of the body away from open- ings and moving parts.
Use extra care when cleaning on stairs. Turn off all controls before unplugging.
Do not use to pick up flammable or combustible liquids, such as gasoline, or use in areas where they may be pre- sent.
Do not charge the unit outdoors. Use only the charger supplied by the
manufactures to recharge. Do not incinerate the appliance even if
it severely damaged. The batteries can explode in fire.
Information regarding the battery Short circuit hazard! Do not insert
conductive objects (such as screwdriv- ers or similar) into the charger plug.
You may recharge the battery using only the original charger provided with the appliance or a charger approved by KRCHER.
Tips for using the battery charger In case of visual damage, replace the
charger with original manufacturer sug- gested parts.
The voltage indicated on the type plate must correspond to the supply voltage.
Only use and store the charger in dry rooms, ambient temperature 41 — 104 F (5 — 40 C).
Never touch the mains plug with wet hands.
Information regarding the transport The battery has been tested as per the
relevant directives for international transport and can be transported/ shipped.
IMPORTANT SAFETY INSTRUCTIONS
When unpacking the product, make sure that no accessories are missing and that none of the package contents have been damaged. If you detect any transport dam- ages please contact your retailer.
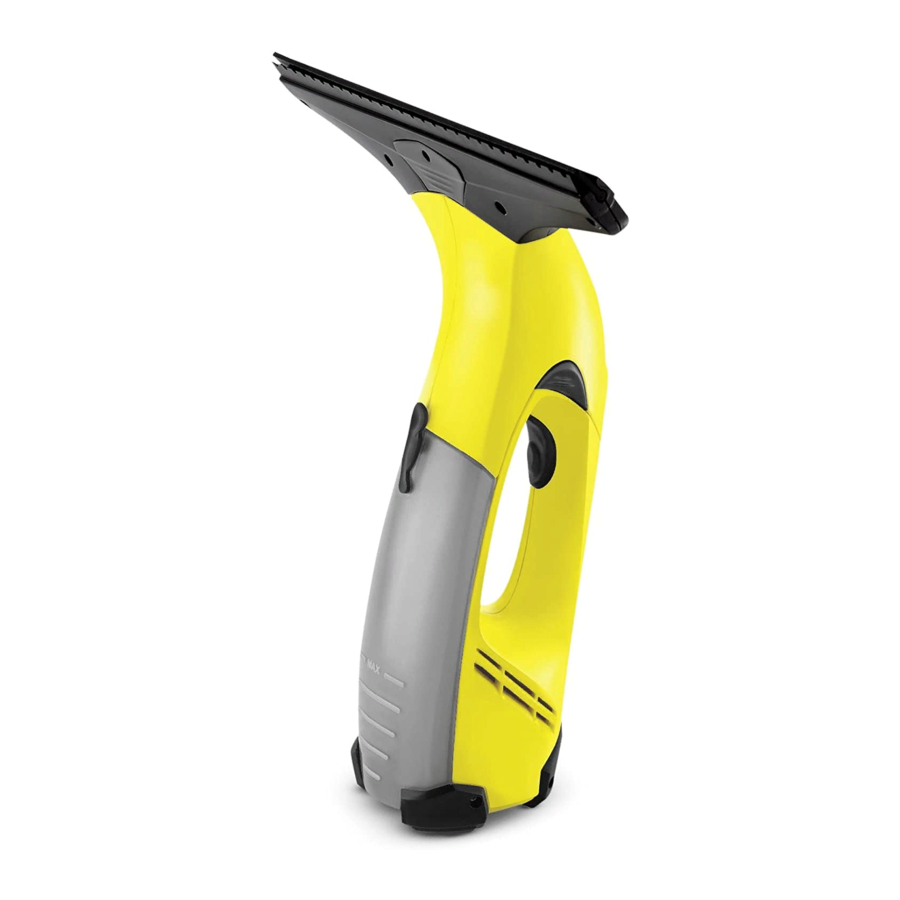
1 Charger with charging cable 2 Basic appliance 3 Charging box 4 Charge/operations display 5 Support leg 6 Handle 7 ON/OFF switch for appliance 8 Dirt water reservoir, removable 9 Lock, dirt water reservoir 10 Suction head 11 Release, suction head 12 Attachment with removable lips 13 Release, attachment
For household use only!
Start up
Description of the Appliance
Place the attachment on the suction head with the removable lips until you hear it lock in.
Insert the charger delivered with the ap- pliance into a proper socket.
Insert the charging cable plug to the back of the appliance.
Note: During the charging process, the charge/operating display blinks. Once the battery is fully charged, it will be perma- nently illuminated. Recharge the battery after finishing your work.
Apply conventional window cleaner to cleaning area.
Switch the appliance on, the charge/op- erations display will illuminate.
Pull the appliance from the top to the bottom to vacuum up the cleaning solu- tion residue.
Note: Hard to reach areas can be vacu- umed vertically or horizontally (limited are- as). Notes: If the battery is low, the charging / power in- dicator starts flashing slowly and the appli- ance switches off after a certain time. If this is the case, charge the battery. Switch the appliance off after each cleaned surface. This will increase your operating time per battery charge.
Set the appliance on the support leg (parking position) and switch it off.
Assemble the appliance
Charge the battery
Start working
Interrupting the work
Once the max. fill level (mark) of the dirt water reservoir is reached, please empty the tank. Turn off the appliance. Pull off the lock of the dirt water reser-
voir and empty the tank.
Close the dirt water reservoir.
Turn off the appliance. First, release the attachment with the
pull-off lips and remove it from the suc- tion head, then release the suction head and remove.
Clean the suction head and the attach- ment with the pull-off lips under running water (do not wash in dishwater).
Caution: The basic appliance contains electrical components. Do not clean this under running water! Remove the dirt water reservoir, rotate
the lock and pull out.
Empty the reservoir and rinse with clear water. Close the reservoir again.
Let the cleaned appliance dry prior to assembly.
Charge the battery.
Store the appliance upright in a dry room.
Emptying the reservoir during operation
Finish up your work / clean appliance
Storing the Appliance
Check the charge/operations display: No signal or slowly blinking signal:
Charge the battery. With a rapidly blinking signal: Inform
your dealer.
Clean the pull-off lip. Turn the upper pull-off lip around by
pulling it out to the side, turning it around and reinserting it.
Replace pull-off lip if required. Adjust the dosing of cleaning solution.
Empty the dirt water reservoir (max. 3,3 oz. content).
To purchase replacement parts please visit www.buykarcher.com
This appliance includes a built-in battery pack; please remove this battery pack be- fore disposing of the old appliance.
The appliance may only be opened in order to dispose of the battery pack. Caution when opening the appliance avoid short circuits.
Remove the battery pack and dispose of properly (at a collection site or the dealer).
Warning Do not open the battery, as there is a
risk of an electrical shock; also, irritating or caustic vapors can escape.
Do not expose the battery to direct sunlight, heat or fire, there is a risk of explosion.
Troubleshooting Machine does not start
Streaks while cleaning
Water is leaking from the air louvers
Replacement parts
Disposal of Appliances
Remove battery pack and dispose of
Sous rserve de modifications techniques !
Utiliser cette appareil fonctionnant avec accumulateur uniquement des fins prives, pour le nettoyage de surfaces humides et lisses comme les fentres, les miroirs ou le carrelage. L’appareil ne doit pas aspirer de poussires.
L’appareil n’est pas adapt pour l’aspi- ration de grandes quantits de liquides sur des surfaces horizontales, par ex. du liquide provenant d’un verre renver- s (max. 25 ml).
Utiliser cet appareil uniquement en liai- son avec des nettoyants vitre cou- rants dans le commerce (par d’essence, pas de dtergent mous- sant).
Seuls des accessoires et des pices de rechange dorigine autoriss par Krcher doivent tre utiliss.
Toute utilisation sortant du cadre donn est considre comme non conforme. Le constructeur dcline toute responsabilit pour des dommages en rsultant, seul l’uti- lisateur en assume le risque.
Pour enregistrer ce produit, veuillez visiter : www.karcher-register.com Pour l’assistance technique, aller : www.karcher-help.com Pour faire valoir une demande en garantie, appeler : 1-800-537-4129 Il vous faudra faxer votre reu, ou l’envoyer par courriel, un agent du service aprs- vente. Tous les autres informations sont disponibles sous : www.karcherresidential.com
Appeler : 01-800-024-13-13 pour obtenir de l’aide ou visitez notre site Web : www.karcher.com.mx
INSTRUCTIONS DE SERVICE Lave-vitre
CONSIGNES DE SECURITE IM- PORTANTES . . . . . . . . . . . . . . . 9 Mise en service . . . . . . . . . . . . . . 11 Terminer le travail / nettoyer l’appareil 13 Service de dpannage . . . . . . . . 14 Elimination de lappareil hors d’usage 14
Caractristiques techniques
Type de protection IP X4 Volume rservoir d’eau sale 3,3 oz. Dure de service avec charge d’accumulateur totale
20 min
Puissance nominale de l’ap- pareil
12 W
Temps de charge d’un accu- mulateur vide
3 h
Tension nominale chargeur 5,5 V Intensit nominale chargeur 600 mA Poids 1,5 lbs Type d’accumulateur Li-Ion Tension nominale accumula- teur
3,6 V
Alimentation lectrique 120-127 V 60 Hz
N de pice 1.633-109.0
Utilisation conforme
Service client USA et Canada
Assistance Mexique
En utilisant ce produit, toujours observer une certaine prudence lmentaire, in- cluant notamment :
Avertissement Afin de rduire les risques d’incendie, d’lectrocution et de blessures, prendre les prcautions suivantes : Ne pas laisser l’appareil sans surveil-
lance lorsqu’il est branch. Dbrancher l’appareil lorsqu’il n’est pas utilis et avant de procder l’entretien.
Avertissement Pour rduire les risques d’schok lectrique: Ne pas laisser lappareil sous la pluie.
Le stocker lintrieur. Ne pas permettre une utilisation comme
jouet. Ne jamais le laisser sans surveil- lance attentive lorsqu’il est utilis par ou proximit d’enfants.
Respecter imperativement les consignes d’utilisation de ce manuel. Utiliser uniquement les accessoires re- commands par le fabricant.
Ne pas mettre l’appareil en service en cas d’endommagement du cordon ou de la prise. Si l’appareil ne fonctionne pas correctement, s’il est tomb, sil a t endommag, sil est rest lext- rieur ou est tomb dans leau, le retour- ner un centre de service.
Ne pas tirer ou transporter lappareil par le cordon lectrique ou se servir de ce dernier comme dune poigne. Veiller ne pas coincer le cordon dans une porte et viter de le tirer sur des bords ou des coins tranchants. Ne pas laisser l’appareil rouler sur le cordon. Tenir le cordon l’cart des surfaces chaudes.
Ne pas tirer sur le cordon lectrique pour dbrancher l’appareil. Pour d- brancher, saisir la fiche lectrique.
Ne pas manipuler lappareil ou la fiche lectrique avec les mains mouilles.
Ne rien introduire dans les orifices. Ne pas utiliser lappareil si les orifices sont obstrus. Protger les orifices de la poussire, des peluches, des cheveux et autres matires susceptibles de r- duire le dbit d’air.
Veiller ne pas approcher les cheveux, vtements larges, doigts ou toute autre partie du corps des orifices et compo- sants mobiles de lappareil.
Faire particulierement attention lors du nettoyage d’escaliers.
Dsactiver toutes les commandes avant de dbrancher l’appareil.
Ne pas aspirer de liquides inflam- mables ou combustibles, tels que de lessence avec l’appareil. Ne pas utili- ser ce dernier dans des zones suscep- tibles de contenir de tels produits.
Ne pas charger l’appareil l’extrieur. Utiliser uniquement le chargeur fourni
par le fabricant pour recharger l’appa- reil.
Ne pas mettre le dispositif au feu, mme s’il est fortement endommag. Les piles peuvent exploser au feu.
CONSIGNES DE SECURITE IMPORTANTES
Remarques relatives l’accumulateur Risque de court-circuit ! Ne pas enfi-
cher d’objets conducteurs (par ex. tour- nevis ou quivalent) dans la douille de chargement.
Le chargement de l’accumulateur n’est permis que avec l’appareil de charge original ci-joint ou avec l’appareil de charge autoris par Krcher .
Remarques relatives au chargeur Remplacer le chargeur avec le cble de
chargement cas d’endommagement immdiatement par des pices d’ori- gine.
La tension indique sur la plaque signa- ltique doit correspondre la tension d’alimentation.
Utiliser et entreposer le chargeur uni- quement dans des locaux secs, une temprature ambiante comprise entre 5 et 40 C.
Ne jamais saisir le cble dalimentation avec des mains mouilles.
Instructions relatives au transport L’accu a t contrl dans le respect
des directives qui s’appliquent pour le transport international et peut tre transport / expdi.
Contrler le matriel lors du dballage pour constater des accessoires manquants ou des dommages. Si des dgts dus au transport sont constats, il faut en informer le revendeur.
1 Appareil de charge avec cble de charge
2 Appareil de base 3 Prise de charge 4 Affichage de charge / de service 5 Pied 6 Poigne 7 Interrupteur MARCHE/ARRET 8 Rservoir d’eau sale, amovible 9 Verrou, rservoir d’eau sale 10 Tte d’aspiration 11 Dverrouillage, tte d’aspiration 12 Extension avec lvres extensibles 13 Dverrouillage, extension
usage domestique seulement!
Mise en service
Description de lappareil
Enfoncer l’extension avec lvres exten- sibles sur la ventouse, jusqu’ ce qu’elle s’encliquette de faon audible.
Brancher le chargeur dans une prise de courant rglementairement.
Brancher le connecteur du cble de charge sur le ct arrire de l’appareil.
Remarque : L’indicateur de charge / de service clignote pendant le processus de charge. Lorsque l’accumulateur est com- pltement charg, l’indicateur est allum en continu. Recharger l’accumulateur aprs la fin du travail.
Appliquer le dtergent selon les indica- tions du fabricant de la manire habi- tuelle et dcoller la salet.
Mettre l’appareil en service, l’indicateur de charge / de service est allum en continu.
Pour aspirer le dtergent, tirer l’appareil du haut vers le bas.
Remarque : Les surfaces difficiles at- teindre peuvent tre aspires aussi bien de manire transversale que par la tte (quan- tit limite). Remarque : Lorsque l’accumulateur est faible, l’indica- teur de charge / de service commence cli- gnoter lentement et l’appareil se met au bout d’un certain temps hors service. Dans ce cas, charger l’accumulateur. Mettre l’appareil hors service aprs chaque surface nettoye, la dure de service par charge d’accumulateur augmente sensible- ment.
Ranger l’appareil sur son pied (position de rangement) et mettre hors service.
Montage de l’appareil
Charger l’accumulateur
Commencer le travail
Interrompre le travail
Si le niveau de remplissage maximal (re- pre) du rservoir d’eau sale est atteint, vi- der le rservoir. Mettre lappareil hors tension. Tirer le verrou du rservoir d’eau sale et
vider le rservoir.
Fermer le rservoir d’eau sale.
Mettre lappareil hors tension. Dverrouiller en premier l’extension
avec des lvres extensibles et la retirer de la tte d’aspiration, puis dverrouiller la tte d’aspiration et l’enlever.
Nettoyer la tte d’aspiration et l’exten- sion avec les lvres extensibles l’eau courante (pas adapt pour le lavage au lave-vaisselle).
Attention : l’appareil de base contient des composants lectriques, ne pas le nettoyer l’eau courante ! Retirer le rservoir d’eau sale, tourner
le verrou et le sortir.
Vidanger le rservoir et le rincer l’eau. Refermer le rservoir.
Laisser scher l’appareil nettoy avant de le remonter.
Charger l’accumulateur.
Entreposer lappareil dans des locaux secs.
Vider la cuve durant le travail Terminer le travail / nettoyer l’appareil
Ranger lappareil
Contrler l’affichage de charge / de service: Pas de signal ou signal clignotant lente-
ment : Charger l’accumulateur. Si le signal clignote rapidement :
Contacter le revendeur.
Nettoyer la lvre extensible Retourner la lvre extensible sup-
rieure, tirer pour cela la lvre en caout- chouc vers l’extrieur et la rinsrer.
Si ncessaire, remplacer la lvre exten- sible.
Contrler le dosage du dtergent.
Vider le rservoir d’eau sale (conte- nance max. 100 ml)
Pour acqurir des pices de rechange, veuillez visiter www.buykarcher.com
Cet appareil contient une batterie intgre qui doit tre dmonte avant l’limination de l’appareil mis au rebut.
L’ouverture de l’appareil est autorise exclusivement pour l’limination de la batterie. Prcaution, Eviter les courts-circuits l’ouverture de l’appareil.
Enlever la batterie et l’liminer dans le respect de l’environnement (points col- lecteurs ou revendeur).
Avertissement Ne pas ouvrir l’accumulateur, Risque
de court-circuit ! Il est en outre possible que des vapeurs irritantes ou des fluides agressifs s’en chappent.
Ne pas soumettre l’accumulateur un fort rayonnement du soleil, la chaleur ainsi qu’au feu, il existe un risque d’explosion.
Service de dpannage L’appareil ne dmarre pas
Stries pendant le nettoyage
De l’eau s’chappe des fentes d’aration
Accessoires en option
Elimination de lappareil hors d’usage
Dmonter la batterie et l’liminer
Reservado el derecho a realizar modifi- caciones tcnicas.
Utilice este aparato que funciona con batera exclusivamente para fines parti- culares, para limpiar superficies hme- das, lisas como ventanas, espejos o azulejos. Est prohibido aspirar polvo.
El aparato no es apto para aspirar can- tidades de lquido grandes de superfi- cies horizontales, p. ej. de un vaso de bebida que se haya cado (mx. 25 ml).
Utilice este aparato nicamente en combinacin con limpiaventanas con- vencionales (no usar alcohol ni limpia- dores en espuma).
Utilice este aparato slo con los acce- sorios y repuestos autorizados por KRCHER.
Cualquier uso diferente a stos se conside- rer un uso no previsto. El fabricante no se hace responsable de los daos causados por un uso no previsto; el usuario ser el nico que correr con este riesgo.
Para registrar este producto, visite: www.karcher-register.com Para ayuda tcnica, visite: www.karcher-help.com Si necesita presentar un reclamacin de la garanta, llame a: 1-800-537-4129 Tendr que enviar su recibo por fax o co- rreo electrnico a un agente de atencin al cliente. Encontrar toda la informacin en: www.karcherresidential.com
Llame al: 01-800-024-13-13 si necesita ayuda o visite nuestra pgina Web: www.karcher.com.mx
Limpiador de ventanas MANUAL DEL OPERARIO
INSTRUCCIONES DE SEGURIDAD IMPORTANTES . . . . . . . . . . . . . 16 Puesta en marcha. . . . . . . . . . . . 17 Terminar el trabajo / limpiar el apara- to . . . . . . . . . . . . . . . . . . . . . . . . . 19 Subsanacin de averas . . . . . . . 20 Desecho del aparato usado . . . . 20
Datos tcnicos
Categoria de proteccin IP X4 Volumen del depsito de agua sucia
3,3 oz.
Tiempo de servicio con la ba- tera totalmente cargada
20 min
Potencia nominal del aparato 12 W Tiempo de carga cuando la batera est vaca
3 h
Potencia nominal, cargador 5,5 V Corriente nominal, cargador 600 mA Peso 1,5 lbs Tipo de batera Li-Ion rea de tensin de la batera 3,6 V Entrada de energa 120-127 V
60 Hz N de pieza 1.633-109.0
Uso previsto
Ayuda a clientes EE.UU. y Canad
Soporte Mxico
Al utilizar este producto, tome siempre las precauciones bsicas, incluidas las si- guientes:
Advertencia Para reducir el riesgo de fuegos, descarga elctrico o lesiones: No abandonar la unidad mientras est
enchufada. Desenchufar cuando no est en uso y antes de revisar.
Advertencia Para evitar el peligro, descarga elctrica: No exponga la herramienta a la lluvia.
Gurdela en un luger seco. No permita que se use como juguete.
Prestar mucha atencin cuando sea usado por y cerca de nios.
Usar exclusivamente como se describe en este manual. Usar solamente con los complementos recomendados por el fabricante.
No usar con el cable o la clavija daa- dos. Si el aparato no funciona como de- bera, se ha cado al suelo, daado, dejado al aire libre, o cado al agua, de- vulvalo a servicio o a la centralita de atencin al cliente.
No tirar del cable ni transportar el apa- rato cogido por el cable, no cerrar una puerta sobre el cable, ni pasar el cable por bordes o esquinas afiladas. No pa- sar el aparato por el cable. Mantener el cable alejado de superficies calientes.
No tirar del cable para desenchufar el aparato. Para desenchufar, coger el en- chufe.
No manipular la clavija ni el aparato con las manos mojadas.
No introducir objetos en los orificios. No usar con cualquiera de los orificios blo- queados; mantener sin polvo, pelusa, pelo y cualquier otra cosa que pueda reducir el flujo de aire.
Mantener el cabello, la ropa floja, los dedos y todas las partes del cuerpo ale- jadas de los orificios y partes mviles.
Usar con especial cuidado cuando lim- pie escaleras.
Apagar los mandos de control antes de desenchufar.
No usar para recoger lquidos inflama- bles o combustible, como gasolina, ni utilizar el aparato en reas donde pue- dan estar presentes.
No cargar la unidad en exteriores. Usar exclusivamente el cargador sumi-
nistrado por el fabricante para recargar. No incinerar el dispositivo incluso si
est muy daado. Las bateras puede explotar con el fuego.
Indicaciones sobre la batera Puede provocar un cortocircuito! No
inserte ningn objeto conductor (p.ej. destornillador o similar) en clavija de carga.
Slo est permitido cargar la batera con el cargador original suministrado o con el cargador autorizado por KR- CHER.
Indicaciones sobre el cargador Sustituir inmediatamente el cargador
con el cable por una pieza original si se aprecia algn tipo de dao.
La tensin de alimentacin tiene que coincidir con la indicada en la placa de caractersticas.
Usar y almacenar el cargador solamen- te en lugar seco, temperatura ambiente 5 — 40 C.
No toque nunca la clavija con las ma- nos mojadas.
Indicaciones sobre transporte La batera ha sido sometida a ensayos
en conformidad con las disposiciones relevantes para transporte internacio- nal y puede ser transportada / enviada.
INSTRUCCIONES DE SEGURIDAD IMPORTANTES
Cuando desempaque el contenido del pa- quete, compruebe si faltan accesorios o si el aparato presenta daos. Informe a su distribuidor en caso de detectar daos oca- sionados durante el transporte.
1 Cargador con cable 2 Equipo bsico 3 Clavija de carga 4 Indicador de carga/funcionamiento 5 Base de apoyo 6 Mango 7 Interruptor del aparato (ON / OFF) 8 Depsito de agua sucia, extrable 9 Cierre, depsito de agua sucia 10 Cabezal de aspiracin 11 Desbloqueo, cabezal de aspiracin 12 Accesorio adicional con labios de ex-
traccin 13 Desbloqueo, accesorio adicional
Slo para uso domstico.
Puesta en marcha
Descripcin del aparato
Insertar el mdulo con labios de extrac- cin en el cabezal de aspiracin hasta que se oiga como encaja.
Introducir el cargador en el enchufe de forma correcta.
Introducir el enchufe del cable de recar- ga en la parte posterior del aparato.
Indicacin: Durante el proceso de carga el indicador de carga / funcionamiento parpa- dea. Si la batera est completamente car- gada, luce continuamente. Tras finalizar el trabajo recargar la bate- ra.
Administrar el detergente de modo con- vencional segn instrucciones del fabri- cante y eliminar la suciedad.
Conectar el aparato, indicador de carga / funcionamiento luce continuamente.
Para aspirar el lquido limpiador estirar el aparato de arriba hacia abajo.
Indicacin: Las superficies de difcil acce- so se puede aspirar en diagonal o boca abajo (cantidad limitada). Notas: Cuando la batera comienza a descargarse el indicador de carga / funcionamiento em- pieza a parpadear lentamente y el aparato se desconecta despus de cierto tiempo. En ese caso, cargar la batera. Desconectar el aparato despus de limpiar cada superficie, de este modo se eleva cla- ramente el tiempo de servicio por cada car- ga de batera.
Colocar el aparato en la base de apoyo (posicin de estacionamiento) y desco- nectar.
Montar aparato
Cargar la batera
Comenzar con el trabajo
Interrumpir el trabajo
Si se ha alcanzado el mximo nivel de lle- nado (marca) del depsito de agua sucia, vaciar el depsito. Desconexin del aparato Destapar el cierre del depsito de agua
sucia y vaciar el depsito.
Cerrar el depsito de agua sucia.
Desconexin del aparato Primero desbloquear accesorio adicio-
nal con labios de extraccin y retirar del cabezal de aspiracin, despus desblo- quear y retirar el cabezal de aspiracin
Limpiar el accesorio adicional y el cabe- zal de aspiracin con los labios con agua corriente (no apto lavavajillas).
Atencin: El equipo bsico contiene com- ponentes elctricos. No limpiar estos con agua corriente. Retirar depsito de agua sucia, girar
cierre y sacar.
Vaciar el depsito y enjuagar con agua. Cerrar de nuevo el depsito.
Dejar secar el aparato limpio antes de ensamblarlo.
Cargar la batera.
Almacenar el aparato de pie en un lugar seco.
Vaciar el recipiente durante el trabajo
Terminar el trabajo / limpiar el aparato
Almacenamiento del aparato
Comprobar indicador de carga/funciona- miento: No hay seal o seal con lenta intermi-
tencia: Cargar la batera. En caso de seal con rpida intermiten-
cia: Contactar al distribuidor.
Limpiar los labios de extraccin. Usar labio de extraccin superior, para
ello estirar el labio de goma lateralmen- te hacia afuera, dar la vuelta y volver a desplazar hacia dentro.
Renovar el labio de extraccin si es ne- cesario.
Comprobar la dosificacin del deter- gente.
Vaciar el depsito de agua sucia (mx. 100 ml contenido).
Para comprar piezas de repuesto, visite www.buykarcher.com
Este aparato contiene una batera integra- da, debe desmontarse antes de eliminar el aparato usado.
El aparato solo debe abrirse para elimi- nar la batera. Abrir con cuidado el aparato, para evi- tar cortocircuitos al desmontar la ba- tera.
Extraer la batera y eliminarla ecolgi- camente (en puntos de recogida o en el distribuidor).
Advertencia No abrir la batera, hay peligro de que
se produzca un cortocircuito, adicional- mente puede producirse la salida de vapores irritantes o lquidos corrosivos.
No exponer la batera a intensa ra- diacin solar, calor o fuego, hay peli- gro de explosin.
Subsanacin de averas El aparato no se pone en marcha
Franjas al limpiar
Sale agua de las ranuras de ventilacin
Accesorios especiales
Manualsnet FAQs
If you want to find out how the WV 50 Karcher works, you can view and download the Karcher WV 50 Operator’s Manual on the Manualsnet website.
Yes, we have the Operator’s Manual for Karcher WV 50 as well as other Karcher manuals. All you need to do is to use our search bar and find the user manual that you are looking for.
The Operator’s Manual should include all the details that are needed to use a Karcher WV 50. Full manuals and user guide PDFs can be downloaded from Manualsnet.com.
The best way to navigate the Karcher WV 50 Operator’s Manual is by checking the Table of Contents at the top of the page where available. This allows you to navigate a manual by jumping to the section you are looking for.
This Karcher WV 50 Operator’s Manual consists of sections like Table of Contents, to name a few. For easier navigation, use the Table of Contents in the upper left corner.
You can download Karcher WV 50 Operator’s Manual free of charge simply by clicking the “download” button in the upper right corner of any manuals page. This feature allows you to download any manual in a couple of seconds and is generally in PDF format. You can also save a manual for later by adding it to your saved documents in the user profile.
To be able to print Karcher WV 50 Operator’s Manual, simply download the document to your computer. Once downloaded, open the PDF file and print the Karcher WV 50 Operator’s Manual as you would any other document. This can usually be achieved by clicking on “File” and then “Print” from the menu bar.
![]()
WV 50 plus
English . . . . . 2 Français . . . . . 9 Español . . . . 17
59652510 (02/14)

Window Cleaner OPERATOR MANUAL
|
IMPORTANT SAFETY INSTRUC- |
3 |
|
TIONS . . . . . . . . . . . . . . . . . . . . . |
|
|
Start up . . . . . . . . . . . . . . . . . . . . |
4 |
|
Finish up your work / clean appliance |
7 |
|
Troubleshooting . . . . . . . . . . . . . |
7 |
|
Disposal of Appliances . . . . . . . . |
8 |
Specifications
|
Type of protection |
IP X4 |
||
|
Volume of dirt water reservoir |
3,3 |
oz. |
|
|
Operating time with full |
20 |
min |
|
|
charge |
|||
|
Rated power of appliance |
12 |
W |
|
|
Charging current for empty |
3 |
h |
|
|
battery |
|||
|
Rated charger voltage |
5,5 |
V |
|
|
Nominal current of charger |
600 |
mA |
|
|
Weight |
1,5 |
lbs |
|
|
Battery type |
Li-Ion |
||
|
Nominal battery voltage |
3,6 |
V |
|
|
Power Input |
120- |
127 V |
|
|
60 Hz |
|||
|
Part No. |
1.633-133.0 |
Subject to technical modifications!
Proper use
–Use this battery operated appliance only for personal use, for cleaning moist, smooth surfaces such as windows, mirrors or tiles. Not meant for the vacuum of dust.
–The appliance is not intended to vacuum up larger amounts of fluids from horizontal surfaces, such as from a tipped drinking glass (max. 0,8 oz.).
–Only use this appliance with conventional window cleaners (no spirit, no foam cleaners).
–Please use this appliance only with accessories and spare parts approved by
KÄRCHER.
Any use extending beyond what is listed above is not considered as proper use. The manufacturer is not liable for any losses resulting from improper use.
Customer Support
USA and Canada
To register this product, please visit: www.karcher-register.com
For technical support, go to: www.karcher-help.com
If you need to file a warranty claim, please call: 1-800-537-4129
You will need to fax or email your receipt to a customer service agent. All other information can be found at: www.karcherresidential.com
Customer Support
Mexico
Call: 01-800-024-13-13 for help or visit our website: www.karcher.com.mx
2 English

IMPORTANT SAFETY INSTRUCTIONS
When using this product basic precautions should always be followed, including the following:
Warning
To reduce the risk of fire, electric shock, or injury:
–Do not leave appliance unattended when plugged in. Unplug from outlet when not in use and before servicing.
Warning
To reduce the risk of electric shock:
–Do not expose to rain. Store indoors.
–Do not allow to be used as a toy. Close attention is necessary when used by or near children.
–Use only as described in this manual. Use only manufacturer’s recommended attachments.
–Do not use with damaged cord or plug. If appliance is not working as it should, has been dropped, damaged, left outdoors, or dropped into water, return it to a service center.
–Do not pull or carry by the cord, do not use cord as a handle, do not close a door on the cord, or pull cord around sharp edges or corners. Do not run appliance over cord. Keep cord away from heated surfaces.
–Do not unplug by pulling cord. To unplug, grasp plug.
–Do not handle plug or appliance with wet hands.
–Do not put any objects into openings. Do not use if openings are blocked; keep free of dust, lint, hair, and anything that may reduce air flow.
–Keep hair, loose clothing, fingers, and all parts of the body away from openings and moving parts.
–Use extra care when cleaning on stairs.
–Turn off all controls before unplugging.
–Do not use to pick up flammable or combustible liquids, such as gasoline, or use in areas where they may be present.
–Do not charge the unit outdoors.
–Use only the charger supplied by the manufactures to recharge.
–Do not incinerate the appliance even if it severely damaged. The batteries can explode in fire.
–Do not spray jet into eyes.
–Do not direct the spray jet directly on equipment containing electrical components, such as the interior of ovens.
–Prior to using this appliance on sensitive (high shine) surfaces, test the microfibre wiping pad at an inconspicuous location.
Information regarding the battery
Short circuit hazard! Do not insert conductive objects (such as screwdrivers or similar) into the charger plug.
You may recharge the battery using only the original charger provided with the appliance or a charger approved by KÄRCHER.
Tips for using the battery charger
In case of visual damage, replace the charger with original manufacturer suggested parts.
The voltage indicated on the type plate must correspond to the supply voltage.
Only use and store the charger in dry rooms, ambient temperature 41 — 104 °F (5 — 40 °C).
Never touch the mains plug with wet hands.
Information regarding the transport
The battery has been tested as per the relevant directives for international transport and can be transported/ shipped.
English 3

Start up
Description of the Appliance
When unpacking the product, make sure that no accessories are missing and that none of the package contents have been damaged. If you detect any transport damages please contact your retailer.
1Charger with charging cable
2Basic appliance
3Charging box
4Charge/operations display
5Support leg
6Handle
7ON/OFF switch for appliance
8Dirt water reservoir, removable
9Lock, dirt water reservoir
10Suction head
11Release, suction head
12Attachment with removable lips
13Release, attachment
14Spray bottle
15Spray lever
16Wiping attachment
17Fixating ring
18Micro-fibre wiping pad
19Window cleaner concentrate
For household use only!
4 English

Assemble the appliance
Place the attachment on the suction head with the removable lips until you hear it lock in.
Attach the spray bottle and wiper attachment and fill it with detergent
Note: Please note that after first activation of the spray head transport lock will loosen.
Attach the wiping attachment
Remove the spray head from the spray bottle.
Attach the wiper attachment to the spray head.
Secure the wiper attachment and the spray head with the fixating ring.
Attach the wiper pad to the wiper attachment and secure with Velcro.
Fill the spray bottle
Fill the included concentrate (1 x 20 ml) into the spray bottle and fill the bottle slowly with clear water (makes 250 ml of detergent solution).
Close the bottle.
Charge the battery
Insert the charger delivered with the appliance into a proper socket.
Insert the charging cable plug to the back of the appliance.
Note: During the charging process, the charge/operating display blinks. Once the battery is fully charged, it will be permanently illuminated.
Recharge the battery after finishing your work.
English 5

Start working
Cleaning with spray bottle and wiper attachment*
Press the spray lever on the bottle to apply the detergent and spray the surface evenly; after that, loosen the dirt using the wiping pad.
Note: Rinse pad under running water if needed!
Switch the appliance on, the charge/operations display will illuminate.
Pull the appliance from the top to the bottom to vacuum up the detergent.
Note: Hard to reach areas can be vacuumed vertically or horizontally (limited areas).
Notes:
If the battery is low, the charging / power indicator starts flashing slowly and the appliance switches off after a certain time. If this is the case, charge the battery.
Switch the appliance off after each cleaned surface. This will increase your operating time per battery charge.
Cleaning without the spray bottle
Apply the detergent as usual according to manufacturer’s instructions and loosen the dirt.
Further procedure same as the «Cleaning with spray bottle and wiper attachment».
Interrupting the work
Set the appliance on the support leg (parking position) and switch it off.
Emptying the reservoir during operation
Once the max. fill level (mark) of the dirt water reservoir is reached, please empty the tank.
Turn off the appliance.
Pull off the lock of the dirt water reservoir and empty the tank.
Close the dirt water reservoir.
6 English

Finish up your work / clean appliance
Turn off the appliance.
First, release the attachment with the pull-off lips and remove it from the suction head, then release the suction head and remove.
Clean the suction head and the attachment with the pull-off lips under running water (do not wash in dishwater).
Caution: The basic appliance contains electrical components. Do not clean this under running water!
Remove the dirt water reservoir, rotate the lock and pull out.
Empty the reservoir and rinse with clear water. Close the reservoir again.
Let the cleaned appliance dry prior to assembly.
Charge the battery.
Storing the Appliance
Store the appliance upright in a dry room.
Troubleshooting
Machine does not start
Check the charge/operations display:
No signal or slowly blinking signal: Charge the battery.
With a rapidly blinking signal: Inform your dealer.
Streaks while cleaning
Clean the pull-off lip.
Turn the upper pull-off lip around by pulling it out to the side, turning it around and reinserting it.
Replace pull-off lip if required.
Adjust the dosing of cleaning solution.
Water is leaking from the air louvers
Empty the dirt water reservoir (max. 3,3 oz. content).
Replacement parts
To purchase replacement parts please visit www.buykarcher.com
English 7

Disposal of Appliances
This appliance includes a built-in battery pack; please remove this battery pack before disposing of the old appliance.
Remove battery pack and dispose of
The appliance may only be opened in order to dispose of the battery pack. Caution when opening the appliance avoid short circuits.
Remove the battery pack and dispose of properly (at a collection site or the dealer).
Warning
Do not open the battery, as there is a risk of an electrical shock; also, irritating or caustic vapors can escape.
Do not expose the battery to direct sunlight, heat or fire, there is a risk of explosion.
8 English

INSTRUCTIONS DE SERVICE Lave-vitre
|
CONSIGNES DE SECURITE IM- |
10 |
|
PORTANTES . . . . . . . . . . . . . . . |
|
|
Mise en service . . . . . . . . . . . . . . |
12 |
|
Terminer le travail / nettoyer l’appareil |
15 |
|
Service de dépannage . . . . . . . . |
15 |
|
Elimination de l’appareil hors d’usage |
16 |
Caractéristiques techniques
|
Type de protection |
IP X4 |
||
|
Volume réservoir d’eau sale |
3,3 |
oz. |
|
|
Durée de service avec |
20 |
min |
|
|
charge d’accumulateur totale |
|||
|
Puissance nominale de l’ap- |
12 |
W |
|
|
pareil |
|||
|
Temps de charge d’un accu- |
3 |
h |
|
|
mulateur vide |
|||
|
Tension nominale chargeur |
5,5 |
V |
|
|
Intensité nominale chargeur |
600 |
mA |
|
|
Poids |
1,5 |
lbs |
|
|
Type d’accumulateur |
Li-Ion |
||
|
Tension nominale accumula- |
3,6 |
V |
|
|
teur |
|||
|
Alimentation électrique |
120- |
127 V |
|
|
60 Hz |
|||
|
N° de pièce |
1.633-133.0 |
Sous réserve de modifications techniques !
Utilisation conforme
–Utiliser cette appareil fonctionnant avec accumulateur uniquement à des fins privées, pour le nettoyage de surfaces humides et lisses comme les fenêtres, les miroirs ou le carrelage. L’appareil ne doit pas aspirer de poussières.
–L’appareil n’est pas adapté pour l’aspiration de grandes quantités de liquides sur des surfaces horizontales, par ex. du liquide provenant d’un verre renversé (max. 25 ml).
–Utiliser cet appareil uniquement en liaison avec des nettoyants à vitre courants dans le commerce (par d’essence, pas de détergent moussant).
–Seuls des accessoires et des pièces de rechange d’origine autorisés par
Kärcher ® doivent être utilisés.
Toute utilisation sortant du cadre donné est considérée comme non conforme. Le constructeur décline toute responsabilité pour des dommages en résultant, seul l’utilisateur en assume le risque.
Service client
USA et Canada
Pour enregistrer ce produit, veuillez visiter : www.karcher-register.com
Pour l’assistance technique, aller à : www.karcher-help.com
Pour faire valoir une demande en garantie, appeler : 1-800-537-4129
Il vous faudra faxer votre reçu, ou l’envoyer par courriel, à un agent du service aprèsvente. Tous les autres informations sont disponibles sous : www.karcherresidential.com
Assistance Mexique
Appeler : 01-800-024-13-13 pour obtenir de l’aide ou visitez notre site Web : www.karcher.com.mx
Français 9
 Loading…
You can only view or download manuals with
Sign Up and get 5 for free
Upload your files to the site. You get 1 for each file you add
Get 1 for every time someone downloads your manual
Buy as many as you need