- Manuals
- Brands
- ION Manuals
- Scanner
- PICS 2 SD
- User manual
-
Contents
-
Table of Contents
-
Troubleshooting
-
Bookmarks
Quick Links
PICS 2 SD
USER GUIDE
ENGLISH ( 1 – 5 )
GUÍA DEL USUARIO
ESPAÑOL ( 6 – 10 )
GUIDE D’UTILISATION
FRANÇAIS ( 11 – 15 )
GUIDA UTENTE
ITALIANO (16 – 20 )
BEDIENUNGSANLEITUNG
DEUTSCH ( 21 – 25 )
GEBRUIKERSHANDLEIDING
NEDERLANDS ( 26 – 30 )
Related Manuals for ION PICS 2 SD
Summary of Contents for ION PICS 2 SD
-
Page 1
PICS 2 SD USER GUIDE ENGLISH ( 1 – 5 ) GUÍA DEL USUARIO ESPAÑOL ( 6 – 10 ) GUIDE D’UTILISATION FRANÇAIS ( 11 – 15 ) GUIDA UTENTE ITALIANO (16 – 20 ) BEDIENUNGSANLEITUNG DEUTSCH ( 21 – 25 ) GEBRUIKERSHANDLEIDING NEDERLANDS ( 26 –… -
Page 2: Fcc Notice
Improper use creates the risk of serious accident. Do not try to open the case of PICS 2 SD or attempt to modify PICS 2 SD in any way. High-voltage internal components create the risk of electric shock when exposed. Maintenance and repairs should be performed only by authorized service providers.
-
Page 3: Box Contents
PICS 2 SD USB cable USB power adapter Slide holder Film holder Photo holders (3) Quickstart Guide Safety Instructions & Warranty Information Booklet PICS 2 SD FEATURES POWER BUTTON MODE BUTTON USB POWER ADAPTER DISPLAY ENTER BUTTON SLIDE HOLDER SCAN BUTTON…
-
Page 4
Insert your slide, negative, or photo into the appropriate holder. (See USING THE INCLUDED HOLDERS for more information.) Insert the holder into PICS 2 SD. If using a slide or negative holder, insert it into the slot on the right side. If using a photo holder, insert it into the slot on the top. -
Page 5: Viewing & Editing Images
• Home: Returns to the main menu. TRANSFERRING IMAGES FROM PICS 2 SD Connect PICS 2 SD to your computer with the included USB cable. Press the MODE BUTTON to enter the main menu. Use the LEFT / RIGHT BUTTONS to select «USB MSDC» and press the ENTER BUTTON.
-
Page 6: Specifications
Your computer must have a USB 2.0 to recognize the PICS 2 SD. into a high-speed USB communicate with your PICS 2 SD. Check to port. see if USB 2.0 is installed on your computer. If I get a Windows message you do not have a USB 2.0 installed on your…
-
Page 7
únicamente proveedores de servicio autorizados. Mantenga el PICS 2 SD lejos del agua y de otros líquidos. No use el PICS 2 SD con las manos mojadas. Nunca use PICS 2 SD en la lluvia o la nieve. La humedad crea el peligro de incendio y electrocución. -
Page 8: Contenido De La Caja
Adaptador de alimentación USB Soporte de diapositivas Soporte de película Soportes de fotografías (3) Guía de inicio rápido Folleto de instrucciones de seguridad e información sobre la garantía CARACTERÍSTICAS DEL PICS 2 SD BOTÓN DE BOTÓN ENTER SOPORTE DE ENCENDIDO DIAPOSITIVAS…
-
Page 9
Cuando escanea diapositivas, negativos o fotos con el PICS 2 SD, debe guardar las imágenes escaneadas en una tarjeta SD opcional o en la memoria interna del PICS 2 SD (hasta 14 MB). Para escanear y guardar sus imágenes, siga estos pasos: Con el cable USB incluido, conecte el PICS 2 SD ya sea a su computadora (si está… -
Page 10
• Inicio: Vuelve al menú principal. CÓMO TRANSFERIR IMÁGENES DESDE EL PIC 2 SD Conecte el PICS 2 SD a su computadora con el cable USB incluido. Pulse el BOTÓN DE MODO para abrir el menú principal. Use los BOTONES IZQUIERDA / DERECHA para seleccionar «USB MSDC»… -
Page 11: Especificaciones
Su computadora debe tener un puerto USB 2.0 para PICS 2 SD. puerto USB de alta velocidad. comunicarse con el PICS 2 SD. Verifique si está instalado USB 2.0 en su computadora. Si no lo tiene, Apareció un mensaje de Windows puede actualizar sus puertos USB.
-
Page 12
Une mauvaise utilisation risque de provoquer un accident grave. Ne pas essayer d’ouvrir le boîtier du PICS 2 SD ou d’altérer le PICS 2 SD de quelque façon que ce soit. Les composants haute tension internes créent le risque de décharge électrique lorsqu’ils sont exposés. -
Page 13: Contenu De La Boîte
PICS 2 SD Câble USB Adaptateur d’alimentation USB Porte-diapositive Porte-négatif Portes-photo (3) Guide d’utilisation simplifié Consignes de sécurité et informations concernant la garantie CARACTÉRISTIQUES DU PICS 2 SD TOUCHE TOUCHE MODE ADAPTATEUR D’ALIMENTATION D’ALIMENTATION TOUCHE ENTER ÉCRAN PORTE-DIAPOSITIVES EMPLACEMENT POUR PORTE- D’AFFICHAGE…
-
Page 14: Utilisation Des Supports
Lorsque vous numérisez vos diapositives, négatifs ou photos avec le PICS 2 SD, vous pouvez sauvegarder les images sur une carte mémoire flash ou sur la mémoire interne du PICS 2 SD (jusqu’à 14 Mo). Voici les étapes à suivre pour numériser et sauvegarder vous images : À…
-
Page 15: Transfert D’images
• Home : Permet de retourner au menu principal. TRANSFERT D’IMAGES Branchez le PICS 2 SD à votre ordinateur à l’aide du câble USB inclus. Appuyez sur la touche MODE pour afficher le menu principal. À l’aide des touches de déplacement gauche/droite, sélectionnez l’option «…
-
Page 16: Spécifications
Votre ordinateur doit avoir un USB 2.0 pour pas PICS 2 SD. branché dans un port USB communiquer avec votre PICS 2 SD. Vérifier pour haute vitesse voir si un USB 2.0 est installé sur votre ordinateur. Je reçois le message d’erreur Si vous ne possédez pas d’USB 2.0 installé…
-
Page 17
Conservare lo PICS 2 SD lontano da acqua e altri liquidi. Non servirsi dello PICS 2 SD con le mani bagnate. Mai utilizzare lo PICS 2 SD sotto la pioggia o la neve. L’umidità crea il pericolo di incendio e di scossa elettrica. -
Page 18: Contenuti Della Confezione
PICS 2 SD Cavo USB Adattatore di alimentazione USB Porta diapositive Porta pellicole Portafoto (3) Guida rapida Istruzioni di sicurezza e garanzia CARATTERISTICHE DEL PICS 2 SD TASTO DI TASTO MODE (MODALITÀ) CAVO USB ALIMENTAZIONE TASTO ENTER (INVIO) ADATTATORE DI DISPLAY…
-
Page 19
Collocare la diapositiva, il negativo o la foto nel supporto adeguato. (Per maggiori informazioni, si veda il paragrafo “UTILIZZO DEI SUPPORTI IN DOTAZIONE”.) Inserire il supporto nel PICS 2 SD. Se si utilizza un porta diapositive o un porta negativi, inserirli nello slot di destra. Se si utilizza un portafoto, inserirla nello slot in alto. -
Page 20
Servirsi dei tasti LEFT / RIGHT (sinistro / destro) per selezionare «USB MSDC» e premere il tasto ENTER (invio). A DISPLAY comparirà un simbolo USB, per indicare che il PICS 2 SD sta funzionando come periferica USB remota per essere letto dal computer. -
Page 21: Specifiche Tecniche
Il computer deve essere dotato di una porta USB 2.0 2 SD. ad una porta USB ad alta per comunicare con lo PICS 2 SD. Verificare che sul velocità. computer sia installata una porta USB 2.0. Se sul Ricevo un messaggio Windows computer non è…
-
Page 22
Geräte Beschränkungen unterliegt. Verwendung am falschen Ort birgt ein ernsthaftes Unfallrisiko. Versuchen Sie nicht, das Gehäuse des PICS 2 SD zu öffnen oder den PICS 2 SD auf andere Weise umzubauen. Hochspannungskomponenten im Inneren können zu einem elektrischen Schlag führen. -
Page 23
SCHACHTELINHALT PICS 2 SD USB-Kabel USB-Netzadapter Diahalter Filmhalter Fotohalter (3) Schnellanleitung Siherheitshinweise & Garantiebestimmungen PICS 2 SD — FUNKTIONSELEMENTE NETZSCHALTER EINGABETASTE USB-NETZADAPTER ANZEIGE SCHLITZ F. FILM / DIA DIAHALTER HALTER SCAN-TASTE FILMHALTER SCHLITZ F. SCANNER-MODUS FOTOHALTER FOTOHALTER SCHALTER 3,5″ x 5″ (8,9 cm x 12,7 cm) USB-ANSCHLUSS 4″… -
Page 24
Dia, Negativ oder Foto in den dafür vorgesehenen Halter einlegen. (Weitere Informationen hierzu im Abschnitt VERWENDUNG DER BEILIEGENDEN HALTER.) Halter in den PICS 2 SD einlegen. Wird der Dia- oder Negativ-Halter verwendet, diesen in den auf der rechten Seite befindlichen Schlitz einschieben. Bei Verwendung eines Fotohalters, diesen in den auf der Oberseite befindlichen Schlitz schieben. -
Page 25
Programm schneidet diese beim Scannen automatisch weg (vorausgesetzt die richtigen Schnittmaße wurden zuvor eingestellt, wie oben beschrieben). Um das Bild zu scannen, am PICS 2 SD die TASTE SCANNEN drücken. Nachdem der Scan durchgeführt ist, mit den TASTEN LINKS / RECHTS «Speichern»… -
Page 26: Technische Daten
MÖGLICHE URSACHE LÖSUNG Mein Computer erkennt PICS 2 SD ist nicht an einen Um mit Ihrem PICS 2 SD kommunizieren zu können, braucht PICS 2 SD nicht. Hochgeschwindigkeits-USB- Ihr Computer USB 2.0. Überprüfen Sie, ob USB 2.0 auf Port angeschlossen.
-
Page 27
Gebruik de PICS 2 SD niet in de buurt van water en andere vloeistoffen. Gebruik de PICS 2 SD niet wanneer uw handen nat zijn. Gebruik de PICS 2 SD nooit in regen of sneeuw. Vocht geeft een gevaar op brand en elektrische schok. -
Page 28: Inhoud Verpakking
INHOUD VERPAKKING PICS 2 SD USB-kabel USB-stroomadapter Diahouder Filmhouder Fotohouders (3) Snelstartgids Boekje met veiligheids- en garantie-informatie FUNCTIES PICS 2 SD STROOMKNOP MODUSKNOP USB-KABEL DISPLAY ENTER-KNOP USB-STROOMADAPTER SCANKNOP SLEUF VOOR DIAHOUDER FILM/DIAHOUDER SCHAKELAAR FILMHOUDER SCANNERMODUS SLEUF VOOR FOTOHOUDER FOTOHOUDERS KNOPPEN VOOR USB-POORT 3,5″…
-
Page 29
AFBEELDINGEN SCANNEN MET PICS 2 SD Bij het scannen van uw dia’s, negatieven of foto’s met PICS 2 SD kunt u de gescande afbeeldingen opslaan op een optionele SD-kaart of naar het interne geheugen van de PICS 2 SD (tot 14MB). Om te scannen en de… -
Page 30
• Home (home): Keert terug naar het hoofdmenu. OVERZETTEN AFBEELDINGEN VAN PICS 2 SD Sluit de PICS 2 SC aan op uw PC met de meegeleverde USB-kabel. Druk op de MODUSKNOP om naar het hoofdmenu te gaan. Gebruik de KNOPPEN VOOR LINKS / RECHTS om «USB MDC» te selecteren en druk op de ENTER-KNOP. -
Page 31
De PC dient over USB 2.0 te beschikken om met de door de PC een USB 2.0-poort PICS 2 SD te kunnen communiceren. Controleer of USB 2.0 op de PC is geïnstalleerd. Als dit niet het Er verschijnt een Windows-bericht geval is kunnen de USB-poorten van een upgrade «apparaat wordt niet herkend»… -
Page 32
www.ionaudio.com Made in China MANUAL VERSION 1.4…
Устройство:
ION PICS 2 SD
Производитель: ION
Размер: 0,2 MB
Добавлено: 2014-07-26
Количество страниц: 1
Как пользоваться?
Наша цель — обеспечить Вам самый быстрый доступ к руководству по эксплуатации устройства ION PICS 2 SD. Пользуясь просмотром онлайн Вы можете быстро просмотреть содержание и перейти на страницу, на которой найдете решение своей проблемы с ION PICS 2 SD.
Для Вашего удобства
Если просмотр руководства ION PICS 2 SD непосредственно на этой странице для Вас неудобен, Вы можете воспользоваться двумя возможными решениями:
- Полноэкранный просмотр -, Чтобы удобно просматривать инструкцию (без скачивания на компьютер) Вы можете использовать режим полноэкранного просмотра. Чтобы запустить просмотр инструкции ION PICS 2 SD на полном экране, используйте кнопку Полный экран.
- Скачивание на компьютер — Вы можете также скачать инструкцию ION PICS 2 SD на свой компьютер и сохранить ее в своем архиве. Если ты все же не хотите занимать место на своем устройстве, Вы всегда можете скачать ее из ManualsBase.
ION PICS 2 SD Руководство по эксплуатации — Online PDF
Ознакомьтесь с подробным руководством пользователя для замечательного творения ION, модель PICS 2 SD. Получите ценную информацию и инструкции, чтобы максимально использовать возможности вашего устройства и оптимизировать взаимодействие с пользователем. Раскройте весь потенциал своего устройства ION PICS 2 SD с помощью этого подробного руководства пользователя, в котором содержатся пошаговые инструкции и советы экспертов, которые сделают работу с ним легкой и приятной.
Печатная версия
Многие предпочитают читать документы не на экране, а в печатной версии. Опция распечатки инструкции также предусмотрена и Вы можете воспользоваться ею нажав на ссылку, находящуюся выше — Печатать инструкцию. Вам не обязательно печатать всю инструкцию ION PICS 2 SD а только некоторые страницы. Берегите бумагу.
Резюме
Ниже Вы найдете заявки которые находятся на очередных страницах инструкции для ION PICS 2 SD. Если Вы хотите быстро просмотреть содержимое страниц, которые находятся на очередных страницах инструкции, Вы воспользоваться ими.
- Главная
-
ION
-
Фотосканеры
-
PICS 2 SD
На этой странице вы найдёте полный список документов на Фотосканеры ION PICS 2 SD.
Выберите необходимый PDF файл.
-

Фотосканеры
ION PICS 2 SD Инструкция по эксплуатацииТип файла
PDFРазмер
194 KbКол-во страниц
1Просмотров
1698Download / Read online
- 1
Другие ION Фотосканеры
-
ION PICS 2 SD Инструкция по эксплуатации
PDF файлов
1Просмотров
2246 -
ION FILM 2 SD PRO Инструкция по эксплуатации
PDF файлов
1Просмотров
1764 -
ION PICS 2 PC Инструкция по эксплуатации
PDF файлов
1Просмотров
1719 -
ION DocuScan Инструкция по эксплуатации
PDF файлов
1Просмотров
1412 -
ION OMNI SCAN Инструкция по эксплуатации
PDF файлов
1Просмотров
1317 -
ION FILM 2 PC Инструкция по эксплуатации
PDF файлов
1Просмотров
1308
Другие устройства ION
-
Стереоресиверы
ION RX-V750 Инструкция по эксплуатацииPDF файлов
1Просмотров
7685 -
Стереоресиверы
ION DSP-AX750SE Инструкция по эксплуатацииPDF файлов
1Просмотров
6979 -
Экшн-камеры
ION Air Pro WiFi Инструкция по эксплуатацииPDF файлов
1Просмотров
6066 -
Экшн-камеры
ION Air Pro Инструкция по эксплуатацииPDF файлов
1Просмотров
5009 -
Виниловые проигрыватели
ION PROFILE PRO Инструкция по эксплуатацииPDF файлов
1Просмотров
4825 -
Экшн-камеры
ION Air Pro Plus Инструкция по эксплуатацииPDF файлов
1Просмотров
4660
Вопросы
-
слабая батарея
Ноутбуки
Acer
1310
Alex 12.02.2016 17:26
Ранее вы смотрели
Производители
Alpha Vision Tech
Antari Lighting and Effects
Apogee Electronics
Bacharach
Carver
China Household Electrical Appliance
Diamond Systems
Eicon Networks
Roland
Tornado
Типы устройств
Увлажнители воздуха
Микроскопы и увеличительные стекла
Моющие пылесосы
Техника для кухни
Двойные духовки
Кофемашины
Конвекторы
Открыватель цепного привода
Пневмоприводы
Устройства помощи больным астмой
Устройства
Applica Littermaid Kitty Kabana LMT255
Baxi Duo-tec Combi GA
Garmin FR70
Learning Resources , Inc. Table Top Game LER 1780
Nokia 2600 classic
Paxar Pathfinder Ultra Platinum 6039TM
Sony Net MD Walkman MZ-N10
Thermador PH54GS
Topcom TwinTalker 3300
freeuserguide.ru
About Us
Contacts
Disclamers
Privacy Policy
Эта страница полезна для вас? Поделитесь ссылкой:
Design and specifications are subject to change without notice.
For more information and product support, visit:
ionaudio.com
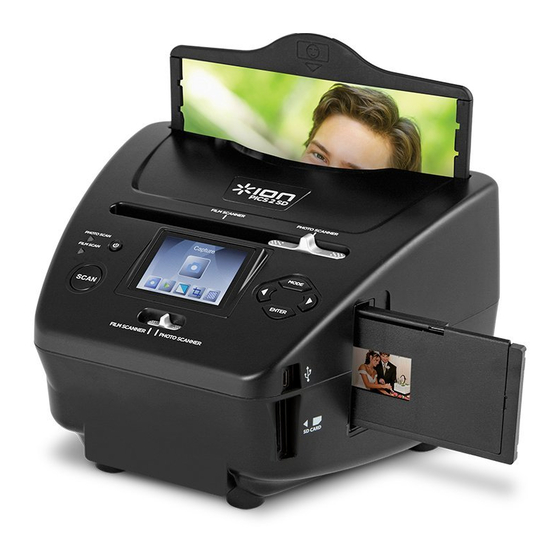
Rediscover your long-lost photo prints, slides, and
film negatives with PICS 2 SD. This high-quality
scanner transfers your images directly onto an SD
card so you can enjoy your old pictures with the
latest technology.
Thanks to PICS 2 SD’s large, full-color LCD screen,
you don’t even need a computer to make it work!
You can view your images on your digital picture
frame, your television if it has an SD card slot, your
mobile phone with a micro SD slot, computer, and
other portable devices.
Imagine all of your memories with you at home
or anywhere you go. Start rediscovering your old
pictures today with PICS 2 SD.
FEATURES
Standalone picture scanner does not require a
•
computer
Large color screen for viewing your pictures
•
Works with 35mm negatives and slides, and
•
3×5, 4×6, and 5×7-inch pictures
High-resolution 5.1 MP scanner with up to
•
3600 DPI
Works with virtually any computer for optional
•
transfer
PICS 2 SD
PHOTO, SLIDE & FILM SCANNER
Enjoy your old pictures on your digital picture frame.
![]()
PICS 2 SD
USER GUIDE
ENGLISH ( 1 – 5 )
GUÍA DEL USUARIO
ESPAÑOL ( 6 – 10 )
GUIDE D’UTILISATION
FRANÇAIS ( 11 – 15 )
GUIDA UTENTE
ITALIANO (16 – 20 )
BEDIENUNGSANLEITUNG
DEUTSCH ( 21 – 25 )
GEBRUIKERSHANDLEIDING
NEDERLANDS ( 26 – 30 )

WELCOME
Thank you for purchasing a PICS 2 SD film, slide and photo scanner. Please take a moment to read through this manual in order to get the most out of your PICS 2 SD.
PRECAUTIONS
Before using PICS 2 SD, please ensure that you read and understand the safety precautions described below. Always ensure that the PICS 2 SD is operated correctly:
Never operate PICS 2 SD inside of an aircraft or anywhere else where operation of such devices is restricted. Improper use creates the risk of serious accident.
Do not try to open the case of PICS 2 SD or attempt to modify PICS 2 SD in any way. High-voltage internal components create the risk of electric shock when exposed. Maintenance and repairs should be performed only by authorized service providers.
Keep PICS 2 SD away from water and other liquids. Do not use PICS 2 SD with wet hands. Never use PICS 2 SD in the rain or snow. Moisture creates the danger of fire and electric shock.
Keep PICS 2 SD and its accessories out of the reach of children and animals to prevent accidents or damage to the image copier.
If you notice smoke or a strange odor coming from PICS 2 SD, turn the power off immediately. Take PICS 2 SD to the nearest authorized service center for repair. Never attempt to repair PICS 2 SD on your own.
Use only the recommended power accessories. Use of power sources not expressly recommended for PICS 2 SD may lead to overheating, distortion of the equipment, fire, electrical shock or other hazards.
PICS 2 SD may become slightly warm during use. This does not indicate malfunction.
If the exterior of PICS 2 SD needs cleaning, wipe it with a soft, dry cloth.
FCC NOTICE
This equipment has been tested and found to comply with the limits for a Class B digital device, pursuant to Part 15 of the FCC Rules. These limits are designed to provide reasonable protection against harmful interference in a residential installation. This equipment generates, uses and can radiate radio frequency energy. If not installed and used in accordance with the instruction, it may cause harmful interference to radio communication. However, there is no guarantee that interference will not occur in a particular installation. If this equipment does cause harmful interference to radio or television reception, which can be determined by turning the equipment on the off, the user is encouraged to try to correct the interference by one or more the following suggestion:
Reorient or relocate the receiving antenna.
Increase the distance between the equipment and the receiver.
Connect the equipment to a different power outlet other than the one where the receiver is connected.
Consult an experienced television or radio technician for help.
CAUTION: To comply with the limits for a Class B digital device, pursuant to Part 15 of the FCC Rules, this device must only be installed on computer equipment certified to comply with the Class B limits.
1
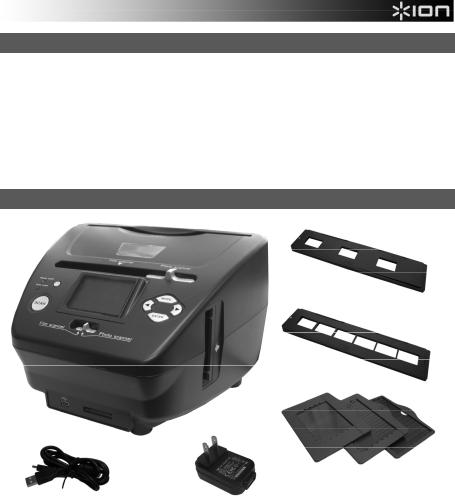
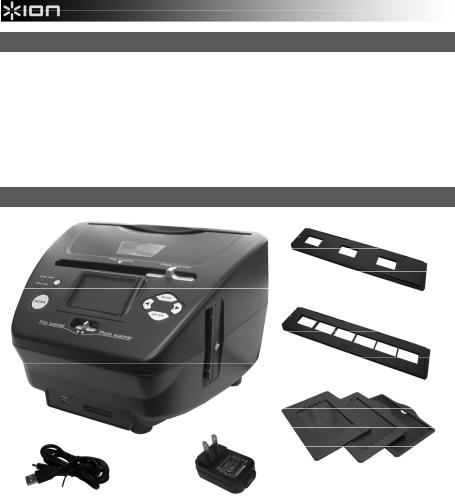
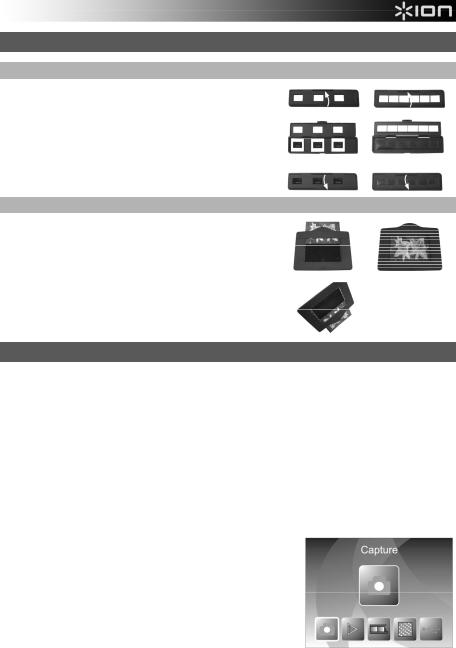
BOX CONTENTS
PICS 2 SD
USB cable
USB power adapter
Slide holder
Film holder
Photo holders (3)
Quickstart Guide
Safety Instructions & Warranty Information Booklet
PICS 2 SD FEATURES
|
9 |
|||||
|
1 |
4 |
||||
|
2 |
5 |
6 |
|||
|
3 |
5 |
||||
|
4 |
7 |
||||
|
8 |
|||||
|
10 |
11 |
||||
|
12 |
13 |
||||
|
1. |
POWER BUTTON |
6. |
MODE BUTTON |
||
|
2. |
DISPLAY |
7. |
ENTER BUTTON |
||
|
3. |
SCAN BUTTON |
8. |
FILM / SLIDE HOLDER SLOT |
||
|
4. |
SCANNER MODE |
9. |
PHOTO HOLDER SLOT |
||
|
SWITCH |
10. |
USB PORT |
|||
5.LEFT / RIGHT
|
BUTTONS |
11. |
SD CARD SLOT |
|
12. |
USB CABLE |
14
15
16
13.USB POWER ADAPTER
14.SLIDE HOLDER
15.FILM HOLDER
16.PHOTO HOLDERS
3″ x 5″ 4″ x 6″ 5″ x 7″
Note: Please make sure your film negatives/ mounted slides and cover trays are clean before inserting into the copier. Dust or dirt will affect the quality of your scanned images.
2
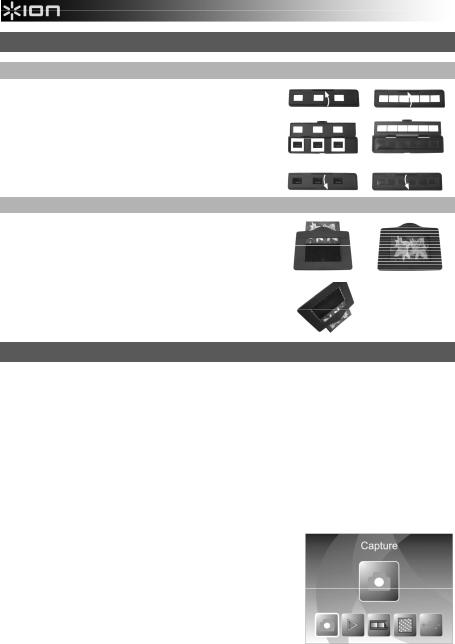
USING THE INCLUDED HOLDERS
SLIDE & NEGATIVE HOLDERS
1.Open the holder.
2.Put the slides / film into the holder.
3.Close the holder and please make sure the holder closes properly.
PHOTO HOLDERS
1.Slide your photo into the top slot of the appropriate holder (3″ x 5″, 4″ x 6″ or 5″ x 7″).
2.To remove the photo, simply turn the holder upside-down and let it slide out.
SCANNING IMAGES WITH PICS 2 SD
When scanning your slides, negatives or photos with PICS 2 SD, you can save your scanned images to an optional SD card or you can save it to PICS 2 SD’s internal memory (up to 14MB). To scan and save your images, follow these steps:
1.With the included USB cable, connect PICS 2 SD either to your computer (if it is on) or to wall power using the included USB power adapter.
2.Press the POWER BUTTON to turn PICS 2 SD on.
3.Insert your slide, negative, or photo into the appropriate holder. (See USING THE INCLUDED HOLDERS for more information.)
4.Insert the holder into PICS 2 SD. If using a slide or negative holder, insert it into the slot on the right side. If using a photo holder, insert it into the slot on the top.
5.Move the two switches to the appropriate position: «Film Scanner» (for slides and negatives) or «Photo Scanner» (for photos).
6.Before scanning, you will see the main menu. You can adjust your settings here.
Use the LEFT / RIGHT BUTTONS to navigate the available options and the press the ENTER BUTTON to select one. You can also press the MODE BUTTON to return to the main menu:
•If you are scanning a slide or negative, select «Film» to choose between «Negatives,» «Slides,» or «B&W» (black and white negatives).
•If you are scanning a photo, select «Effect» to choose between «Multicolor» (color photos) and «B&W» (black and white photos).
•If you are scanning a photo, select «Crop» and select the measurements of your photo: 5″ x 7″, 4″ x 6″ and 3″ x 5″.
•Select «Resolution» to choose between 5M and 10M (megapixels). The larger the resolution, the better quality your scanned image will be.
3

7.When you have adjusted your settings and are ready to scan your image(s), select «Capture» on the main screen. The image you are about to scan will appear in the DISPLAY. You can adjust the image in the following ways:
•You can adjust the exposure by pressing the ENTER BUTTON when your image is shown on the DISPLAY. Use the LEFT / RIGHT BUTTONS to adjust the EV (exposure value) and press the ENTER BUTTON to select it.
•You can change the orientation of the image by pressing the LEFT / RIGHT BUTTONS. The RIGHT BUTTON will flip the image vertically, and the LEFT BUTTON will flip the image horizontally.
Note: When scanning photos, if you selected 3″ x 5″ or 4″ x 6″, you will see the border of the photo holder, but the software will automatically crop this out when you scan it (if you selected the proper Crop settings as described above).
8.To scan the image, press PICS 2 SD’s SCAN BUTTON.
9.After the scan is complete, use the LEFT / RIGHT BUTTONS to select «Save» to save your scan, «Cancel» to delete your scan and try again or «Home» to return to the main menu.
10.When you are done scanning your image(s), you can transfer your images to your computer. See TRANSFERRING IMAGES FROM PICS 2 SD for more information.
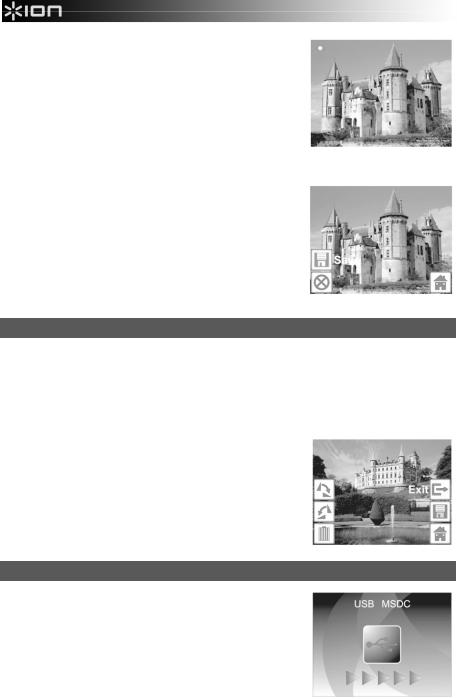
VIEWING & EDITING IMAGES
1.Press the MODE BUTTON to enter the main menu.
2.Use the LEFT / RIGHT BUTTONS to select «Playback» and press the ENTER BUTTON. You will see a slideshow of the images you have scanned.
3.When you see an image you want to edit, press the ENTER BUTTON. The slideshow will pause.
4.Press the ENTER BUTTON again. You will see several icons on the sides of the DISPLAY. Use the LEFT / RIGHT BUTTONS to navigate these and press the ENTER BUTTON to select it, if desired.
•Rotate +90°: Rotates the image 90 degrees clockwise.
•Rotate -90°: Rotates the image 90 degrees counterclockwise.
•Delete: Deletes the image.
•Exit: Returns to the slideshow.
•Save: Saves the image after you make any changes. (If you do not save the image, your changes will be lost if you return to the slideshow.)
•Home: Returns to the main menu.
TRANSFERRING IMAGES FROM PICS 2 SD
1.Connect PICS 2 SD to your computer with the included USB cable.
2.Press the MODE BUTTON to enter the main menu.
3.Use the LEFT / RIGHT BUTTONS to select «USB MSDC» and press the ENTER BUTTON. A USB symbol will appear on the DISPLAY, meaning PICS 2 SD is functioning as a remote USB device to be read by your computer.
4.You can now view or transfer your scanned images to your computer (just as you would from a remote USB drive or an SD card reader).
5.Press the MODE BUTTON to return to the main menu.
4

SPECIFICATIONS
|
Image Sensor |
5.1 megapixel CMOS sensor |
|
Lens Specification |
F= 4.83 |
|
Color Balance |
Automatic |
|
Exposure Control |
Automatic |
|
PC interface |
USB 2.0 |
|
Scan High Resolution |
3,600 DPI interpolation resolution |
|
Light Source Back Light |
3 white LED |
|
System Requirements |
Windows® XP / Windows Vista™ (32-bit or 64-bit) / Windows 7 |
|
Power |
From USB port |
|
Dimensions |
220 x 208 x 147 mm |
Specifications are subject to change without prior notice.
TROUBLESHOOTING
|
ISSUE |
POSSIBLE CAUSE |
RESOLUTION |
|||
|
My computer does not |
PICS 2 SD not plugged |
Your computer must have a USB 2.0 to |
|||
|
recognize the PICS 2 SD. |
into a high-speed USB |
communicate with your PICS 2 SD. Check to |
|||
|
port. |
see if USB 2.0 is installed on your computer. If |
||||
|
I get a Windows message |
you do not have a USB 2.0 installed on your |
||||
|
that reads «device not |
computer you can upgrade your USB ports. |
||||
|
recognized» |
This hardware is available at most electronic |
||||
|
stores. |
|||||
|
I have a USB 2.0 port on my |
All ports on your computer |
Even though you may have USB 2.0 installed, |
|||
|
computer, but my computer |
may not be high speed. |
all of your USB ports may not be USB 2.0 |
|||
|
still won’t recognize PICS 2 |
compatible. Check all your USB ports to find |
||||
|
SD. |
the 2.0 compatible ports. |
||||
|
Warning from Windows that |
This is normal. OK to |
Choose “Continue anyway”. |
|||
|
device “has not passed |
continue. |
PICS 2 SD will not harm your computer. |
|||
|
Microsoft logo testing”. |
(Windows certification is in process for this |
||||
|
software) |
|||||
|
My PICS 2 SD is working but |
Time for auto exposure |
The image copier self adjusts to your slide, |
|||
|
some of my slides, negatives |
varies according to your |
negative or photo exposure. Wait for the live |
|||
|
or photos look overexposed. |
computer configuration. |
view window to stop adjusting for exposure |
|||
|
and then press the Scan button. |
|||||
|
Check your slides, negatives or photos to see |
|||||
|
if they may have been overexposed when |
|||||
|
originally developed. Several photo adjusting |
|||||
|
software applications are available to “clean- |
|||||
|
up” your newly digitized picture. |
|||||
This symbol on the product or in the instructions means that your electrical and electronic equipment should be disposed at the end of its life separately from your household waste. There are separate collection systems for recycling in the EU. For more information, please contact the local authority or your retailer where you purchased the product.
5

BIENVENIDO
Gracias por adquirir un escáner de películas y diapositivas PICS 2 SD. Tómese un momento para leer este manual a fin de obtener lo máximo de su PICS 2 SD.
PRECAUCIONES
Antes de usar el PICS 2 SD, asegúrese de leer y entender las precauciones de seguridad descritas a continuación. Asegúrese siempre de operar correctamente el PICS 2 SD:
Nunca opere el PICS 2 SD dentro de una aeronave ni en ningún otro lugar donde la operación de tales dispositivos esté restringida. El uso incorrecto crea el riesgo de graves accidentes.
No trate de abrir la cubierta del PICS 2 SD ni intente modificarlo de ninguna manera. Los componentes internos de alta tensión crean el riesgo de electrocución cuando están expuestos. El mantenimiento y las reparaciones deben realizarlos únicamente proveedores de servicio autorizados.
Mantenga el PICS 2 SD lejos del agua y de otros líquidos. No use el PICS 2 SD con las manos mojadas. Nunca use PICS 2 SD en la lluvia o la nieve. La humedad crea el peligro de incendio y electrocución.
Mantenga el PICS 2 SD y sus accesorios fuera del alcance de los niños y los animales, a fin de prevenir accidentes o daños a la copiadora de imágenes.
Si nota que sale humo o un olor extraño del PICS 2 SD, apáguelo inmediatamente. Lleve el PICS 2 SD a centro de servicio autorizado más cercano para que lo reparen. Nunca intente reparar el PICS 2 SD usted mismo.
Use únicamente los accesorios de alimentación recomendados. El uso de fuentes de alimentación no recomendadas expresamente para el PICS 2 SD puede causar recalentamiento, deformación del equipo, incendio, electrocución u otros riesgos.
El PICS 2 SD puede calentarse ligeramente durante el uso. Esto no indica falla
Si el exterior del PICS 2 SD necesita limpieza, pásele un paño blando y seco.
AVISO DE LA FCC
Este equipo fue probado y se comprobó que cumple los límites correspondientes a un dispositivo digital clase B, según la Parte 15 de las reglamentaciones de la FCC. Estos límites están diseñados para proporcionar una razonable protección contra las interferencias perjudiciales en una instalación residencial. Este equipo genera, usa y puede irradiar energía de radiofrecuencia. Si no se instala y usa de acuerdo con las instrucciones, puede causar interferencias perjudiciales a las radiocomunicaciones. No obstante, no existe garantía de que no se produzcan interferencias en una instalación particular. Si este equipo causa interferencias perjudiciales a la recepción de radio o televisión, lo que puede comprobarse encendiendo y apagando el equipo, se recomienda al usuario intentar corregir la interferencia mediante una o más de las siguientes medidas:
Reorientar o cambiar de posición la antena receptora.
Aumentar la separación entre el equipo y el receptor.
Conectar el equipo a un tomacorriente diferente al que está conectado el receptor.
Consultar a un técnico experimentado de televisión o radio para solicitar asistencia.
PRECAUCIÓN: Para cumplir con los límites correspondientes a un dispositivo digital clase B, de acuerdo a la Parte 15 de las Reglas de la FCC, este dispositivo debe instalarse sólo en equipos de computación certificados en cuanto al cumplimiento de los límites de la clase B.
6
CONTENIDO DE LA CAJA
PICS 2 SD
Cable USB
Adaptador de alimentación USB
Soporte de diapositivas
Soporte de película
Soportes de fotografías (3)
Guía de inicio rápido
Folleto de instrucciones de seguridad e información sobre la garantía
CARACTERÍSTICAS DEL PICS 2 SD
|
9 |
14 |
|||
|
1 |
4 |
|||
|
2 |
5 |
6 |
||
|
3 |
5 |
15 |
||
|
4 |
7 |
|||
|
8 |
||||
|
10 |
11 |
16 |
||
|
12 |
13 |
1.BOTÓN DE ENCENDIDO
2.PANTALLA
3.BOTÓN DE ESCANEADO
4.CONMUTADOR DE MODO DEL ESCÁNER
5.BOTONES IZQUIERDA / DERECHA
6.BOTÓN DE MODO
7.BOTÓN ENTER
8.RANURA PARA EL SOPORTE DE PELÍCULA O DIAPOSITIVAS
9.RANURA PARA EL SOPORTE DE FOTOGRAFÍAS
10.PUERTO USB
11.RANURA PARA TARJETA SD
12.CABLE USB
13.ADAPTADOR DE ALIMENTACIÓN USB
14.SOPORTE DE DIAPOSITIVAS
15.SOPORTE DE PELÍCULA
16.SOPORTES DE FOTOGRAFÍAS
3” x 5” (7.5 x 13 cm) 4” x 6” (10 x 15 cm) 5” x 7” (13 x 17 cm)
Nota: Asegúrese de que sus negativos y diapositivas montadas y las bandejas estén limpias antes de insertarlas en la copiadora. El polvo o la suciedad afectan a la calidad de las imágenes escaneadas.
7
CÓMO USAR LOS SOPORTES INCLUIDOS
SOPORTES DE DIAPOSITIVAS Y NEGATIVOS
1.Abra el soporte.
2.Coloque las diapositivas o la película en el soporte.
3.Cierre el soporte asegurándose de que cierre correctamente.
SOPORTES DE FOTOGRAFÍAS
1.Deslice su fotografía en la ranura superior del soporte apropiado (3″ x 5″, 4″ x 6″ o 5″ x 7″).
2.Para retirar la foto, invierta simplemente el soporte y deje que se deslice hacia afuera.
CÓMO ESCANEAR IMÁGENES CON EL PICS 2 SD
Cuando escanea diapositivas, negativos o fotos con el PICS 2 SD, debe guardar las imágenes escaneadas en una tarjeta SD opcional o en la memoria interna del PICS 2 SD (hasta 14 MB). Para escanear y guardar sus imágenes, siga estos pasos:
1.Con el cable USB incluido, conecte el PICS 2 SD ya sea a su computadora (si está encendida) o al tomacorriente de pared usando el adaptador de alimentación USB incluido.
2.Pulse el BOTÓN DE ENCENDIDO para encender el PICS 2 SD.
3.Introduzca la diapositiva, el negativo o la foto en el soporte apropiado. (Para más información, consulte CÓMO USAR LOS SOPORTES INCLUIDOS.)
4.Inserte el soporte en el PICS 2 SD. Si está usando el soporte de diapositivas o negativos, introdúzcalo en la ranura del lado derecho. Si está usando el soporte de fotografías, introdúzcalo en la ranura de la parte superior.
5.Mueva los dos conmutadores a la posición apropiada: «Film Scanner» (para diapositivas y negativos) o «Photo Scanner» (para fotos).
6.Antes de escanear, verá el menú principal. Puede ajustar aquí sus parámetros.
Use los BOTONES IZQUIERDA / DERECHA para navegar por las opciones disponibles y pulse el BOTÓN ENTER para seleccionar una. Puede pulsar también el BOTÓN DE MODO para volver al menú principal:
•Si va a escanear una diapositiva o negativo, seleccione «Film» para elegir entre «Negatives» (Negativos), «Slides» (Diapositivas) o «B&W» (Negativos blanco y negro).
•Si va a escanear una foto, seleccione «Effect» (Efecto) para
elegir entre «Multicolor» (Fotografías color) y «B&W» (Fotografías blanco y negro).
•Si va a escanear una foto, seleccione «Crop» (Recortar) y elija las dimensiones de la misma: 5″ x 7″ (13 x 18 cm) , 4″ x 6″ (10 x 15 cm) o 3″ x 5″ (7.5 x 13 cm).
•Seleccione «Resolution» (Resolución) para elegir entre 5M y 10M (megapíxeles). Cuanto mayor es la resolución, mejor es la calidad de la imagen escaneada.
8
7.Cuando haya ajustado sus parámetros y esté listo para escanear sus imágenes, seleccione «Capture» (Capturar) en la pantalla principal. La imagen que va a escanear aparece en la PANTALLA. Puede ajustar la imagen de las siguientes maneras:
•Puede ajustar la exposición pulsando el BOTÓN ENTER cuando la imagen aparece en la PANTALLA. Use los BOTONES IZQUIERDA / DERECHA para ajustar el EV (Valor de exposición) y pulse el BOTÓN ENTER para seleccionarlo.
•Puede cambiar la orientación de la imagen pulsando los BOTONES IZQUIERDA / DERECHA. El BOTÓN DERECHA
invierte verticalmente la imagen y el BOTÓN IZQUIERDA horizontalmente.
Nota: Cuando escanea fotos, si seleccionó 3″ x 5″ o 4″ x 6″, verá el borde del soporte de fotografías, pero el software lo recorta automáticamente cuando escanea (si seleccionó
los parámetros Crop (Recorte) correctos como se explicó más arriba).Para escanear la imagen, pulse el BOTÓN SCAN del PICS 2 SD.
8.Después de terminar el escaneado, use los BOTONES IZQUIERDA / DERECHA para seleccionar «Save» a fin de guardar las imágenes, «Cancel» para cancelar lo que escaneó e intentar nuevamente o «Home» para volver al menú principal.
9.Cuando termine de escanear sus imágenes, puede transferirlas a la computadora. Para más información, consulte CÓMO TRANSFERIR IMÁGENES DESDE EL PICS 2 SD.
CÓMO VER Y EDITAR LAS IMÁGENES
1.Pulse el BOTÓN DE MODO para abrir el menú principal.
2.Use los BOTONES IZQUIERDA / DERECHA para seleccionar «Playback» (Reproducción) y pulse el BOTÓN ENTER. Aparece una presentación de diapositivas de las imágenes que escaneó.
3.Cuando vea la imagen que quiere editar, pulse el BOTÓN ENTER. La presentación se detiene.
4.Pulse el BOTÓN ENTER otra vez. Aparecen varios iconos a los costados de la PANTALLA. Use los BOTONES IZQUIERDA / DERECHA para navegar por los iconos y pulse el BOTÓN ENTER para seleccionarlo, si lo desea.
•Girar +90°: Gira la imagen 90 grados en sentido horario.
•Girar -90°: Gira la imagen 90 grados en sentido antihorario.
•Eliminar: Elimina la imagen.
•Salir: Vuelve a la presentación de diapositivas.
•Guardar: Guarda la imagen después de que haga los cambios. (Si no guarda la imagen, perderá los cambios cuando vuelva a la presentación de diapositivas.)
•Inicio: Vuelve al menú principal.
CÓMO TRANSFERIR IMÁGENES DESDE EL PIC 2 SD
1.Conecte el PICS 2 SD a su computadora con el cable USB incluido.
2.Pulse el BOTÓN DE MODO para abrir el menú principal.
3.Use los BOTONES IZQUIERDA / DERECHA para seleccionar «USB MSDC» y pulse el BOTÓN ENTER. Aparece en la PANTALLA el símbolo del USB, que significa que el PICS 2 SD está funcionando como dispositivo USB remoto a ser leído por la computadora.
4.Ahora puede ver o transferir las imágenes escaneadas a la computadora (tal como haría desde una unidad USB remota o un lector de tarjetas SD).
Pulse el BOTÓN DE MODO para volver al menú principal.
9
 Loading…