
ENGLISH
Р
УCCKИЙ
CD RECEIVER
РЕСИВЕР С ПРОИГРЫВАТЕЛЕМ КОМПАКТ-ДИСКОВ
KD-G617
For installation and
connections, refer to the
separate manual.
Указания по установке и
выполнению соединений
приводятся в отдельной
инструкции.
INSTRUCTIONS
ИНСТРУКЦИИ ПО ЭКСПЛУАТАЦИИ
GET0270-001A
[EE]
В соответствии с Законом Российской Федерации “О защите прав
потре бителей” срок службы (годности) данного товара “по истечении
которого он может представлять опасность для жизни, здоровья
потребителя, причинять вред его имуществу или окружающей среде”
составляет семь (7) лет со дня производства. Этот срок является
временем, в течение которого потребитель данного товара может
безопасно им пользоваться при условии соблюдения ин струк ции по
эксплуатации данного товара, проводя необходимое обслуживание,
включающее замену расходных материалов и/или соответствующее
ремонтное обеспечение в специализированном сервисном центре.
Дополнительные косметические материалы к данному товару,
поставляе мые вместе с ним, могут храниться в течение двух (2) лет со
дня его производства.
Срок службы (годности), кроме срока хранения дополнительных
космети ческих материалов, упомянутых в предыдущих двух пунктах,
не затрагивает никаких других прав потребителя, в частности,
гарантийного свидетельства JVC, которое он может получить в
соответствии с законом о правах потребителя или других законов,
связанных с ним.
For canceling the display demonstration, see page 8.
Информацию об отмене демонстрации функций дисплея см. на стр. 8.
Cover_KD-G617[EE]f.indd 2
Cover_KD-G617[EE]f.indd 2
1/11/05 5:26:26 PM
1/11/05 5:26:26 PM
ENGLISH
CD RECEIVER
РЕСИВЕР С ПРОИГРЫВАТЕЛЕМ КОМПАКТ-ДИСКОВ
РУCCKИЙ
KD-G617
В соответствии с Законом Российской Федерации “О защите прав
потре бителей” срок службы (годности) данного товара “по истечении
которого он может представлять опасность для жизни, здоровья
потребителя, причинять вред его имуществу или окружающей среде”
составляет семь (7) лет со дня производства. Этот срок является
временем, в течение которого потребитель данного товара может
безопасно им пользоваться при условии соблюдения ин струк ции по
эксплуатации данного товара, проводя необходимое обслуживание,
включающее замену расходных материалов и/или соответствующее
ремонтное обеспечение в специализированном сервисном центре.
Дополнительные косметические материалы к данному товару,
For installation and
поставляе мые вместе с ним, могут храниться в течение двух (2) лет со
дня его производства.
connections, refer to the
Срок службы (годности), кроме срока хранения дополнительных
separate manual.
космети ческих материалов, упомянутых в предыдущих двух пунктах,
Указания по установке и
не затрагивает никаких других прав потребителя, в частности,
выполнению соединений
гарантийного свидетельства JVC, которое он может получить в
соответствии с законом о правах потребителя или других законов,
приводятся в отдельной
связанных с ним.
инструкции.
For canceling the display demonstration, see page 8.
Информацию об отмене демонстрации функций дисплея см. на стр. 8.
INSTRUCTIONS
ИНСТРУКЦИИ ПО ЭКСПЛУАТАЦИИ
GET0270-001A
[EE]
Cover_KD—G617[EE]f.indd 2Cover_KD-G617[EE]f.indd 2 1/11/05 5:26:26 PM1/11/05 5:26:26 PM
Thank you for purchasing a JVC product.
Please read all instructions carefully before operation, to ensure your complete understanding and to
obtain the best possible performance from the unit.
ENGLISH
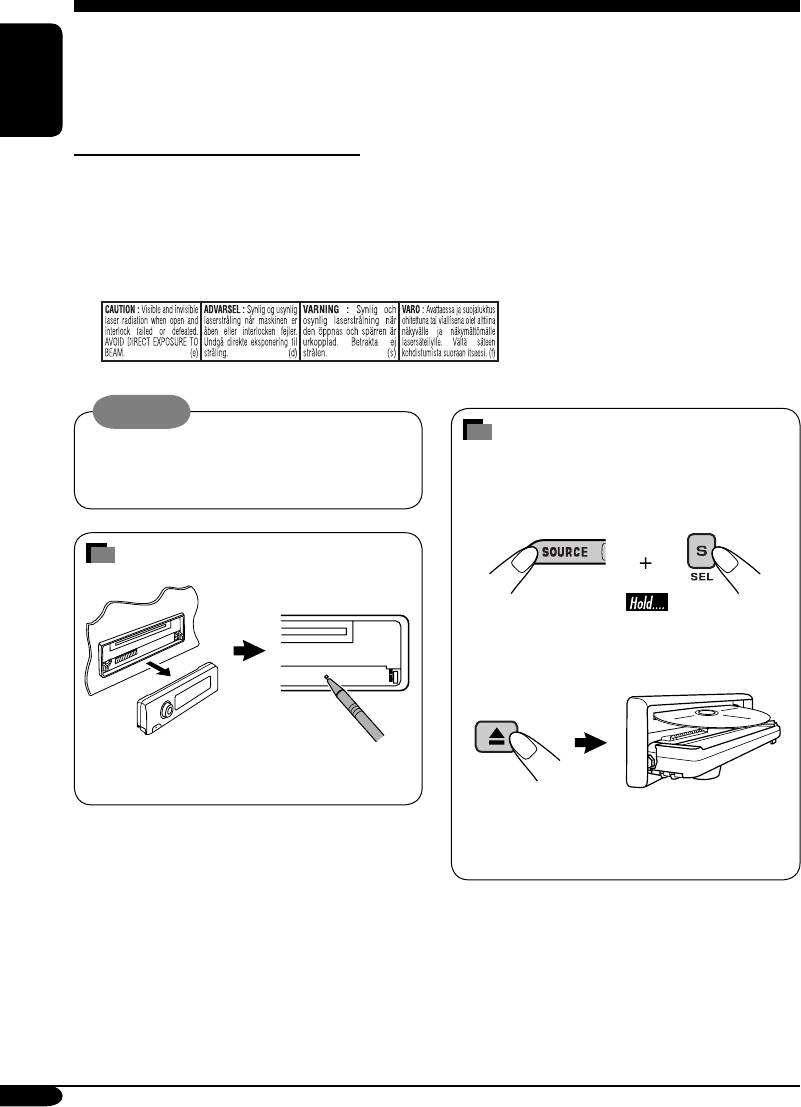
IMPORTANT FOR LASER PRODUCTS
1. CLASS 1 LASER PRODUCT
2. CAUTION: Do not open the top cover. There are no user serviceable parts inside the unit; leave
all servicing to qualified service personnel.
3. CAUTION: Visible and invisible laser radiation when open and interlock failed or defeated.
Avoid direct exposure to beam.
4. REPRODUCTION OF LABEL: CAUTION LABEL, PLACED OUTSIDE THE UNIT.
Warning:
How to forcibly eject a disc
If you need to operate the receiver while
driving, be sure to look ahead carefully or
If a disc cannot be recognized by the
you may be involved in a traffic accident.
receiver or cannot be ejected, ejects the disc
as follows.
How to reset your unit
“PLEASE” and “EJECT” appear alternately
on the display.
This will reset the microcomputer. Your
preset adjustments will also be erased.
• If this does not work, reset your receiver.
• Be careful not to drop the disc when it
ejects.
2
EN02—05_G617[EE]f.indd 2EN02-05_G617[EE]f.indd 2 1/11/05 5:26:38 PM1/11/05 5:26:38 PM

Contents
How to reset your unit ……………………… 2
Sound adjustments ……………. 20
How to forcibly eject a disc ………………. 2
Selecting preset sound modes
How to read this manual …………………… 4
(C-EQ: custom equalizer) ……………… 20
How to use the M MODE button ……….. 4
Adjusting the sound …………………………. 21
ENGLISH
Control panel —
KD-G617
……… 5
General settings — PSM ……… 22
Parts identification …………………………… 5
Basic procedure ………………………………. 22
Remote controller —
RM-RK50
… 6
Other main functions …………. 25
Main elements and features ………………. 6
Assigning titles to the sources …………… 25
Detaching the control panel ………………. 26
Getting started ………………….. 7
Basic operations ……………………………. 7
External component operations
… 27
Canceling the display demonstrations … 8
Playing an external component ………… 27
Setting the clock ……………………………… 8
DAB tuner operations
……………. 28
Radio operations ………………. 9
Listening to the DAB tuner ………………. 28
Listening to the radio ……………………… 9
Storing DAB services in memory ………. 29
Storing stations in memory ……………….. 10
Tuning in to a preset DAB service …….. 29
Listening to a preset station ………………. 10
Tracing the same programme
—Alternative Reception ……………….. 29
FM RDS operations …………….. 11
Searching for your favorite FM RDS
Maintenance …………………….. 30
programme
………………………………… 11
More about this receiver …….. 31
Storing your favorite programmes ……… 12
Using the standby receptions …………….. 12
Troubleshooting ………………… 34
Tracking the same programme
Specifications ……………………. 37
—Network-Tracking Reception …….. 13
Disc operations …………………. 14
Playing a disc in the receiver …………… 14
Playing discs in the CD changer ……….. 15
Other main functions ……………………….. 17
Changing the display information ……… 18
Selecting the playback modes ……………. 19
*For safety….
*Temperature inside the car….
• Do not raise the volume level too much, as
If you have parked the car for a long time in
this will block outside sounds, making driving
hot or cold weather, wait until the temperature
dangerous.
in the car becomes normal before operating the
• Stop the car before performing any
unit.
complicated operations.
3
EN02—05_G617[EE]f.indd 3EN02-05_G617[EE]f.indd 3 1/11/05 5:26:40 PM1/11/05 5:26:40 PM
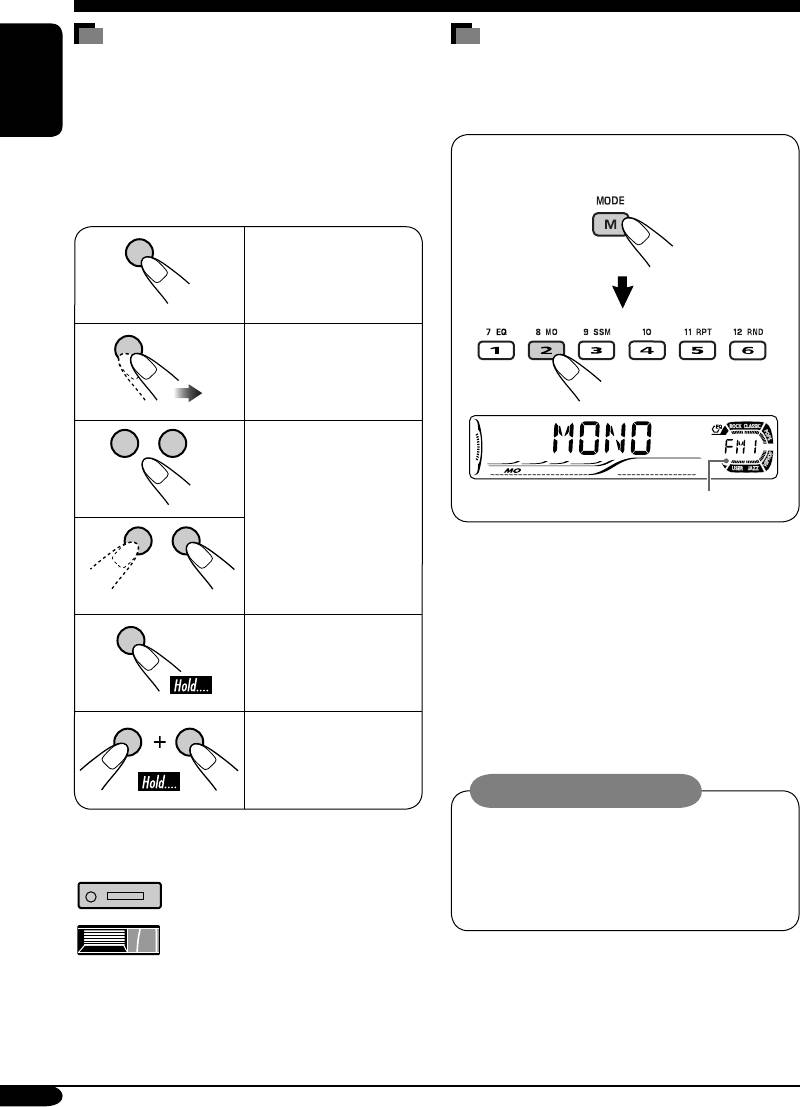
How to read this manual
How to use the M MODE button
The following methods are used to make the
If you press M MODE, the receiver goes into
explanations simple and easy-to-understand:
functions mode, then the number buttons and
• Some related tips and notes are explained in
5/∞ buttons work as different function buttons.
ENGLISH
“More about this receiver” (see pages
31 – 33).
Ex.: When number button 2 works as
• Button operations are mainly explained with
MO (monaural) button.
the illustrations as follows:
Press briefly.
Press repeatedly.
Time countdown indicator
Press either one.
To use these buttons for original functions
again after pressing M MODE, wait for
5 seconds without pressing any of these buttons
until the functions mode is cleared.
• Pressing M MODE again also clears the
Press and hold until
functions mode.
your desired response
begins.
Press and hold both
buttons at the same
time.
Caution on volume setting:
Discs produce very little noise compared
with other sources. Lower the volume
The following marks are used to indicate…
before playing a disc to avoid damaging
the speakers by the sudden increase of the
: Built-in CD player operations.
output level.
: External CD changer operations.
4
EN02—05_G617[EE]f.indd 4EN02-05_G617[EE]f.indd 4 1/11/05 5:26:40 PM1/11/05 5:26:40 PM
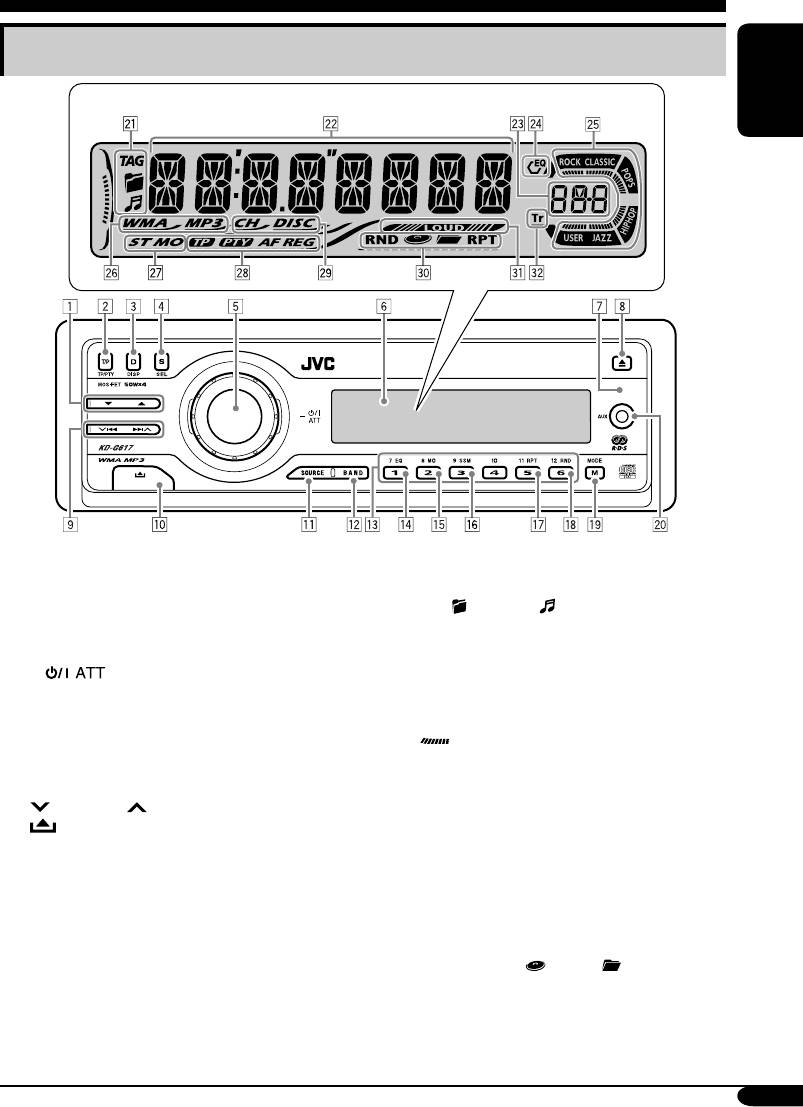
Control panel — KD-G617
Parts identification
Display window
ENGLISH
1 5 (up) / ∞ (down) buttons
Display window
2 T/P TP/PTY (traffic programme/programme
a Disc information indicators—TAG (ID3
type) button
Tag),
(folder), (track/file)
3 D DISP (display) button
s Main display
4 S SEL (select) button
d Source display / Volume level indicator
5 • Control dial
f EQ (equalizer) indicator
•
(standby/on attenuator) button
g Sound mode (C-EQ: custom equalizer)
6 Display window
indicators—ROCK, CLASSIC, POPS,
7 Remote sensor
HIP HOP, JAZZ, USER
• DO NOT expose the remote sensor to
•
also works as the time countdown
strong light (direct sunlight or artificial
indicator and level meter during play (see
lighting).
page 23).
8 0 (eject) button
h Disc type indicators—WMA, MP3
9
4/¢ buttons
j Tuner reception indicators—ST (stereo),
p
(control panel release) button
MO (monaural)
q SOURCE button
k RDS indicators—TP, PTY, AF, REG
w BAND button
l Playback source indicators—
e Number buttons
CH: Lights up only when CD-CH is selected
r EQ (equalizer) button
as the playback source.
t MO (monaural) button
DISC: Lights up for the built-in CD player.
y SSM (Strong-station Sequential Memory)
/ Playback mode / item indicators—
button
RND (random),
(disc), (folder),
u RPT (repeat) button
RPT (repeat)
i RND (random) button
z LOUD (loudness) indicator
o M MODE button
x Tr (track) indicator
;
AUX (auxiliary) input jack
• NOT compatible with digital signals.
5
EN02—05_G617[EE]f.indd 5EN02-05_G617[EE]f.indd 5 1/11/05 5:26:40 PM1/11/05 5:26:40 PM
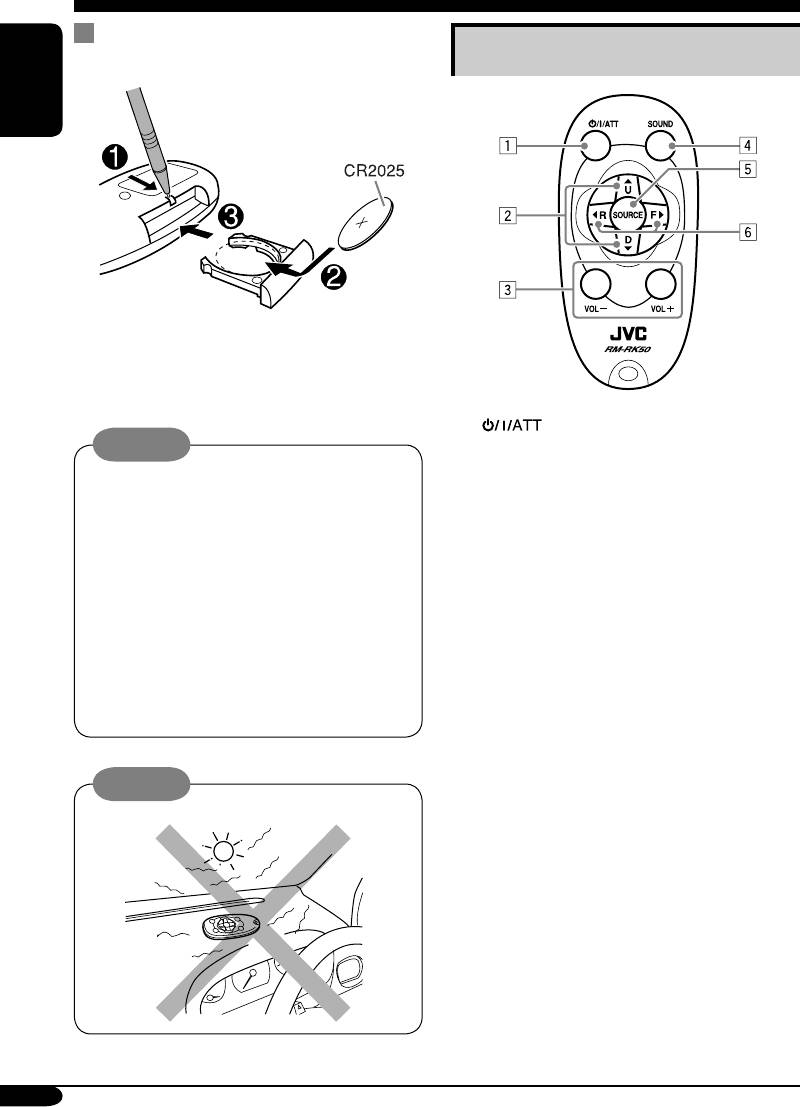
Remote controller — RM-RK50
Installing the lithium coin battery
Main elements and features
(CR2025)
ENGLISH
• When operating, aim the remote controller
directly at the remote sensor on the
receiver. Make sure there is no obstacle in
between.
1 (standby/on/attenuator) button
Warning:
• Turns on and off the power and also
attenuates the sound.
• Store the battery in a place where children
2 5 U (up) / D (down) ∞ buttons
cannot reach to avoid risk of accident.
• 5 U: Changes the FM/AM/DAB bands.
• To prevent the battery from over-heating,
• D ∞: Changes the preset stations (or
cracking, or starting a fire:
services).
– Do not recharge, short, disassemble, or
• Changes the folder of the MP3/WMA
heat the battery or dispose of it in a fire.
discs.
– Do not leave the battery with other
• While playing an MP3 disc on an
metallic materials.
MP3-compatible CD changer:
– Do not poke the battery with tweezers or
– Changes the disc if pressed briefly.
similar tools.
– Changes the folder if pressed and held.
– Wrap the battery with tape and insulate
3 VOL – / VOL + buttons
when throwing away or saving it.
• Adjusts the volume level.
4 SOUND button
• Selects the sound mode (C-EQ: custom
Caution:
equalizer).
5 SOURCE button
• Selects the source.
6 2 R (reverse) / F (forward) 3 buttons
• Searches for stations (or services) if
pressed briefly.
• Searches for ensembles if pressed and
held.
• Fast-forwards or reverses the track if
pressed and held.
• Changes the tracks of the disc.
6
EN06—11_G617[EE]f.indd 6EN06-11_G617[EE]f.indd 6 1/11/05 5:26:52 PM1/11/05 5:26:52 PM
- Manuals
- Brands
- JVC Manuals
- Car Receiver
- KD-G617
Manuals and User Guides for JVC KD-G617. We have 3 JVC KD-G617 manuals available for free PDF download: Instructions Manual, Service Manual, Schematic Diagrams
JVC KD-G617 Instructions Manual (74 pages)
JVC CD Receiver Instructions
Brand: JVC
|
Category: Car Receiver
|
Size: 3.25 MB
Table of Contents
-
English
3
-
How to Reset Your Unit
2
-
How to Forcibly Eject a Disc
2
-
Table of Contents
3
-
-
How to Read this Manual
4
-
How to Use the M MODE Button
4
-
Control Panel — KD-G617
5
-
Parts Identification
5
-
Display Window
5
-
-
Remote Controller
6
-
Rm-Rk50
6
-
Main Elements and Features
6
-
-
Getting Started
7
-
Basic Operations
7
-
Canceling the Display Demonstrations
8
-
Setting the Clock
8
-
-
Radio Operations
9
-
Listening to the Radio
9
-
Storing Stations in Memory
10
-
Listening to a Preset Station
10
-
-
FM RDS Operations
11
-
Searching for Your Favorite FM RDS Programme
11
-
Storing Your Favorite Programmes
12
-
Using the Standby Receptions
12
-
Tracking the same Programme-Network-Tracking Reception
13
-
-
Disc Operations
14
-
Playing a Disc in the Receiver
14
-
Playing Discs in the CD Changer
15
-
Other Main Functions
17
-
Changing the Display Information
18
-
Selecting the Playback Modes
19
-
-
Sound Adjustments
20
-
Selecting Preset Sound Modes (C-EQ: Custom Equalizer)
20
-
Adjusting the Sound
21
-
-
General Settings — PSM
22
-
Basic Procedure
22
-
-
Other Main Functions
25
-
Assigning Titles to the Sources
25
-
Detaching the Control Panel
26
-
-
External Component Operations
27
-
Playing an External Component
27
-
DAB Tuner Operations
28
-
Listening to the DAB Tuner
28
-
Storing DAB Services in Memory
29
-
Tuning in to a Preset DAB Service
29
-
Tracing the same Programme-Alternative Reception
29
-
-
Maintenance
30
-
More about this Receiver
31
-
Troubleshooting
34
-
Specifications
37
-
-
Русский
39
-
Панель Управления
41
-
Kd-G617
41
-
-
Пульт Дистанционного Управления
42
-
Rm-Rk50
42
-
-
Начало Работы
43
-
Основные Операции
43
-
-
Операции С Радиоприемником
45
-
Прослушивание Радио
45
-
-
Операции С FM RDS
47
-
Поиск Любимой Программы FM RDS
47
-
-
Операции С Дисками
50
-
Воспроизведение Диска В Приемнике
50
-
Воспроизведение Дисков С Помощью Устройства Автоматической Смены Компакт-Дисков
51
-
-
Настройки Звучания
56
-
Выбор Запрограммированных Режимов Звучания (C-EQ: Настраиваемый Эквалайзер)
56
-
-
Общие Настройки — PSM
58
-
Другие Основные Функции
61
-
Операции С Внешними Устройствами
63
-
Воспроизведение С Внешних Устройств
63
-
-
Операции С Тюнером DAB
64
-
Прослушивание Тюнера DAB
64
-
-
Обслуживание
66
-
Дополнительная Информация О Приемнике
67
-
Технические Характеристики
73
-
Advertisement

JVC KD-G617 Service Manual (32 pages)
Brand: JVC
|
Category: Car Receiver
|
Size: 0.93 MB
Table of Contents
-
Table of Contents
1
-
Precautions
3
-
Specific Service Instructions
6
-
Disassembly
7
-
Adjustment
26
-
Troubleshooting
27
JVC KD-G617 Schematic Diagrams (16 pages)
Brand: JVC
|
Category: Car Receiver
|
Size: 3.88 MB
Advertisement
Advertisement
Related Products
-
JVC KD-G611
-
JVC KD-G612
-
JVC KD-G614
-
JVC CD Receiver KD-G632
-
JVC KD-G645UN
-
JVC KD-G645TUH
-
JVC KD-G631E
-
JVC KD-G632EX
-
JVC KD-G635UN
-
JVC KD-G635UH
JVC Categories
Car Receiver
![]()
Camcorder
![]()
TV
![]()
VCR
![]()
Stereo System
More JVC Manuals
| Языки: |
Русский |
|---|---|
| Страницы: | 74 |
Стр.
из
результат(ов) по запросу ««
×
|
|
NoDevice
Loading…
-
« Назад
Ctrl + ←
-
Вперёд »
Ctrl + →
Мануал подходит для устройств
-
JVC KD-G617
Страницы и текст этой инструкции
 Инструкция сd-чейнджера JVC KD-G617
 Информация отображена на картинке
 Информация отображена на картинке
 Информация отображена на картинке
 Информация отображена на картинке
Как использовать наш сайт инструкций OnlineManuals.ru
Наша цель состоит в том, чтобы предоставить вам быстрый доступ к содержанию инструкции для сd-чейнджера JVC KD-G617.
С помощью онлайн просмотра, Вы можете быстро просмотреть содержимое инструкции и найти решение проблемы с сd-чейнджера JVC KD-G617.
Для Вашего удобства
Если листать руководство пользователя сd-чейнджера JVC KD-G617 прямо на сайте, не очень удобно для Вас, есть два возможных решения:
• Просмотр в полноэкранном режиме — легко просмотреть руководство пользователя (без загрузки его на свой компьютер), Вы можете использовать режим полноэкранного просмотра.
Для просмотра инструкции пользователя сd-чейнджера JVC KD-G617 на полном экране, используйте кнопку «Открыть в Pdf-viewer».
• Загрузка на компьютер — Вы можете также скачать Инструкция сd-чейнджера JVC KD-G617 на свой компьютер и сохранить его в файлах.
Многие люди предпочитают читать документы не на экране, а в печатной версии.
Возможность печати руководства пользователя также была предусмотрена на нашем сайте,
и вы можете использовать ее, нажав на иконку «печать» в Pdf-viewer.
Нет необходимости печатать все руководство сd-чейнджера JVC KD-G617, можно выбрать только нужные страницы инструкции.