Спасибо Олегу (Oleg_klm) за ссылку. Думаю многим будет интересно.
Оригинал — vtsautomonitoring-ru.wikidot.com/wiki:datacapture
Снятие диагностических данных
Снятие диагностических данных — один из самых важных элементов использования системы VTS Автомониторинг.
Если данные сняты правильно, система работает гораздо эффективнее и выдаёт более точные оценки и графики.
ВНИМАНИЕ! Перед снятием данных запомните текущий пробег машины, он может понадобиться при экспорте данных.
Для снятия диагностических данных выполните следующие шаги:
Для вашей диагностической системы и машины приведенные шаги могут отличаться!
1. Подключите устройство Lexia к USB-порту компьютера и к дигностическому разъёму машины и запустите приложение DiagBox, включите зажигание машины
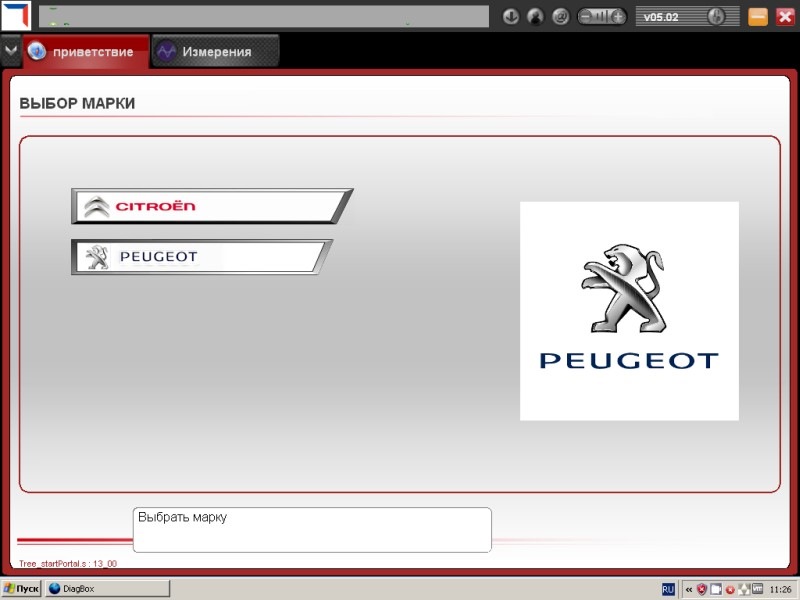
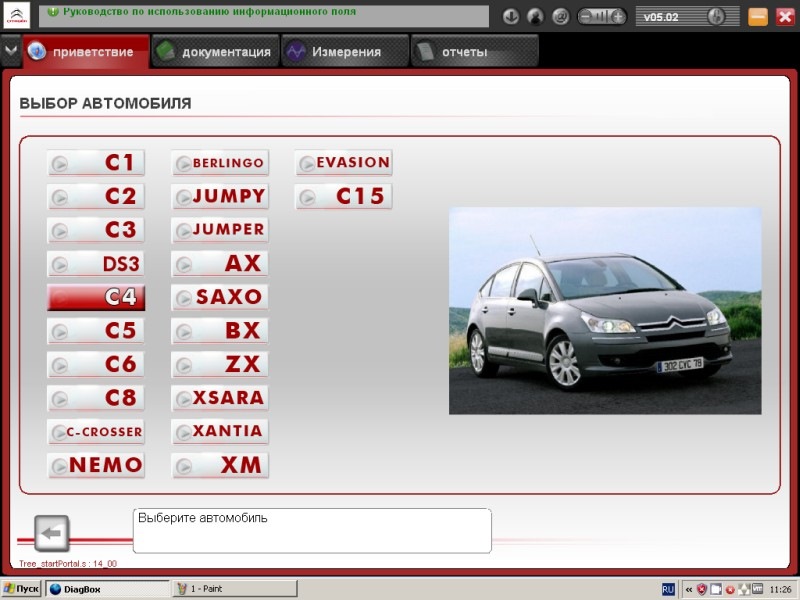
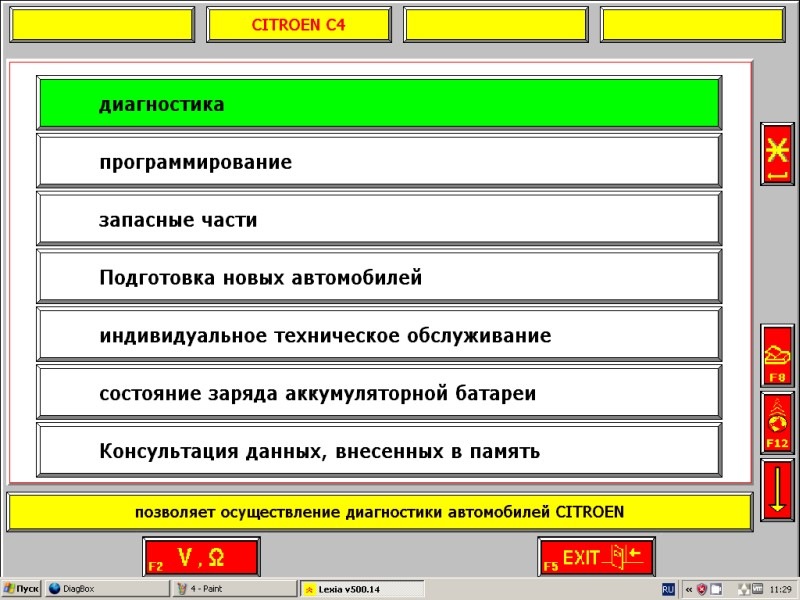
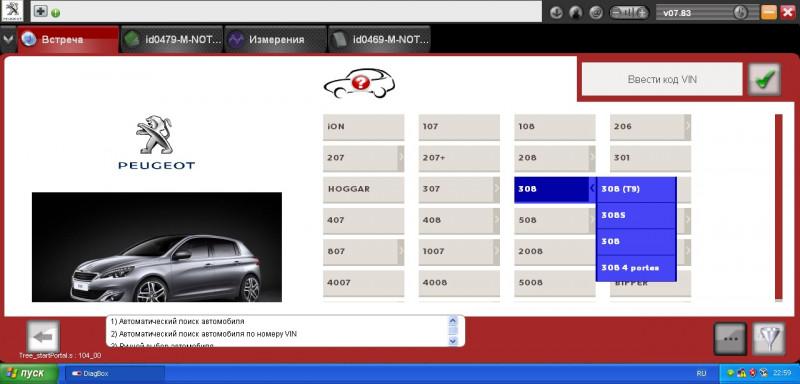
2. Выберите вашего автопроизводителя и модель, в данном примере рассмотрен Citroen C4
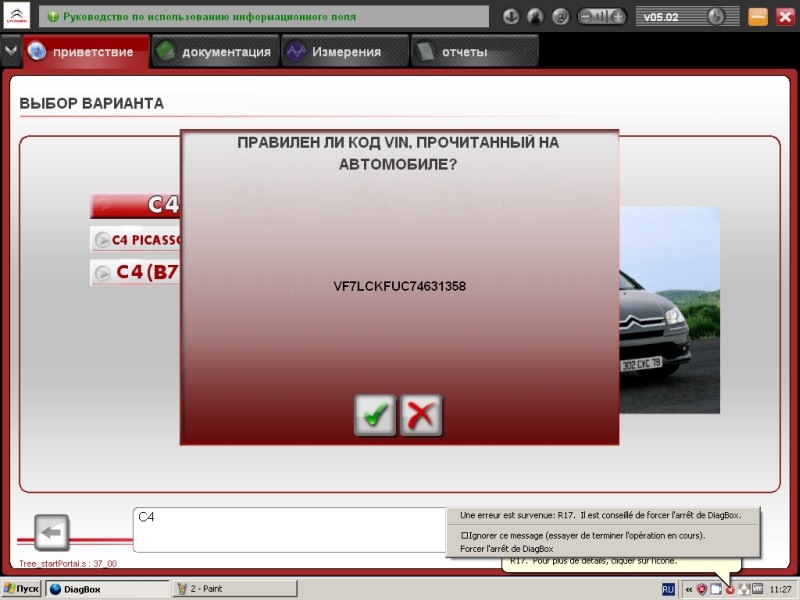
3. Убедитесь, что система правильно распознала вашу машину
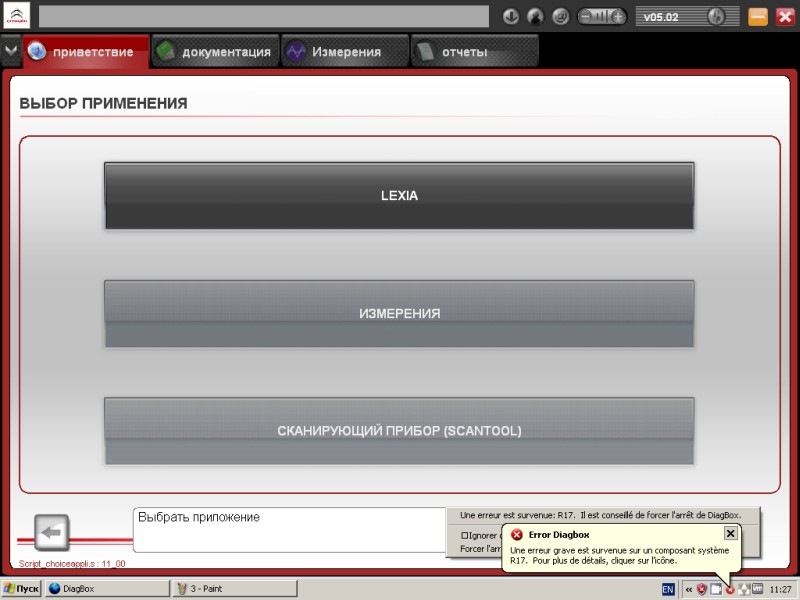
4. Выберите опцию «LEXIA»
5. Дождитесь загрузки приложения «Lexia», затем выберите опцию «Диагностика»
Система запросит у вас RPO-код, его вы можете найти на табличке, обычно расположенной в проёме водительской двери
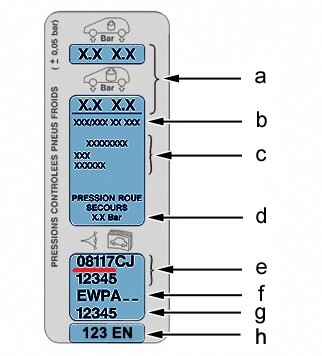
введите первые пять цифр (выделено красным)
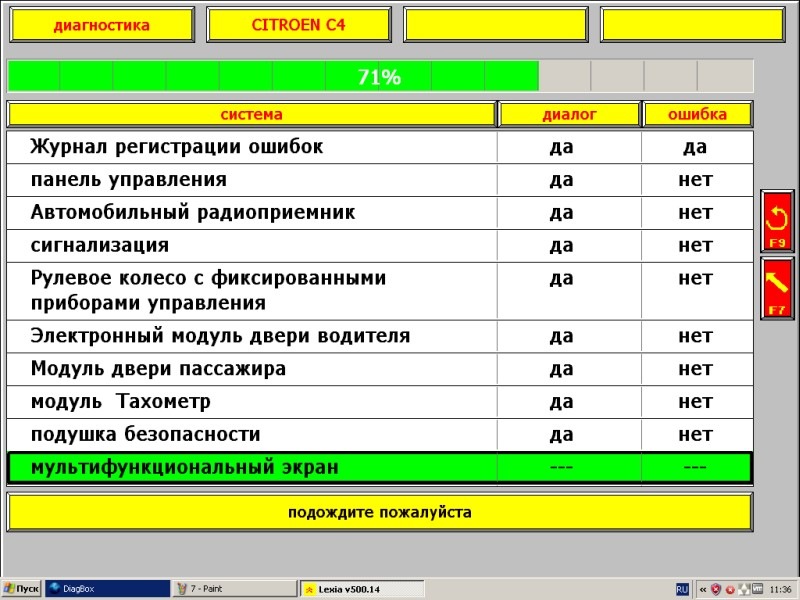
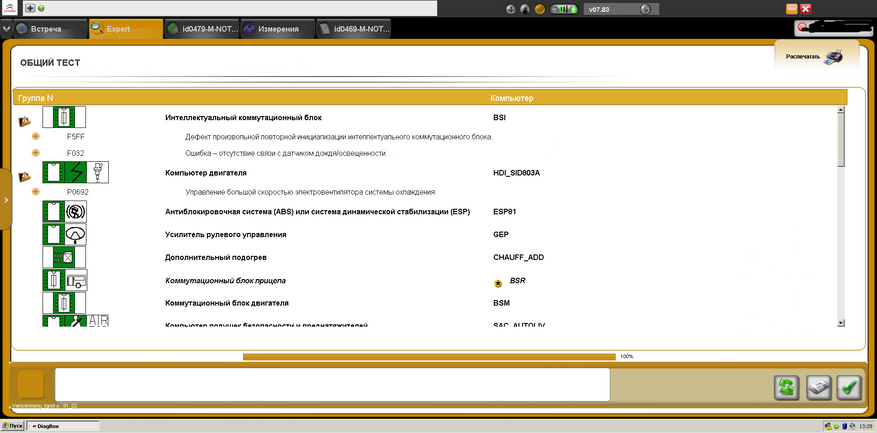
6. Выберите опцию «Глобальный тест»

7. Дождитесь завершения тестирования (На этом этапе зажигание должно быть включено, двигатель заводить не нужно, мы заведем его на шаге 14, чтобы проиллюстрировать захват значений параметров на момент старта двигателя)
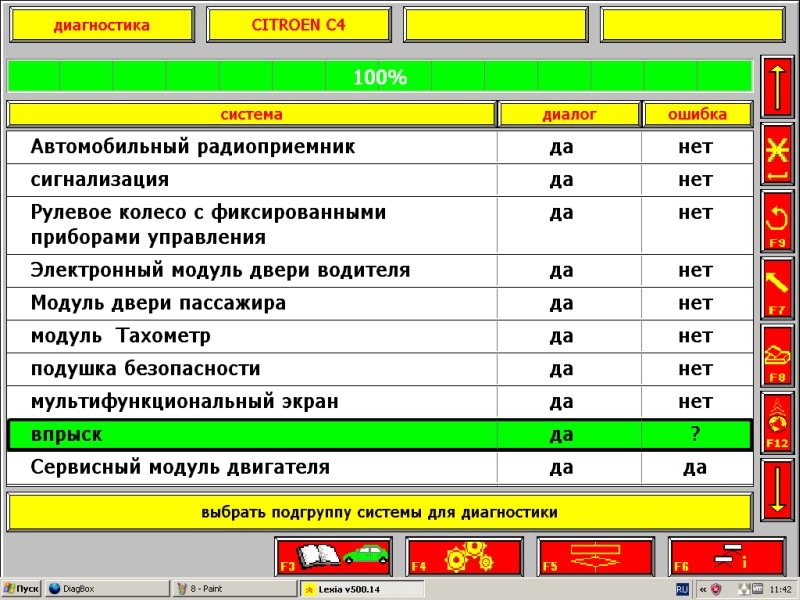
8. После завершения теста выберите интересующий раздел и нажмите»Enter» — в данном случае это «впрыск»:
9. Программа предложит выбрать тип вашего двигателя:

10. И вашу систему впрыска. Зная тип вашего двигателя, вы можете найти маркировку вашей системы впрыска (RFN, KFU, 5FX и т.д.) в интернете, пользуясь поисковиком
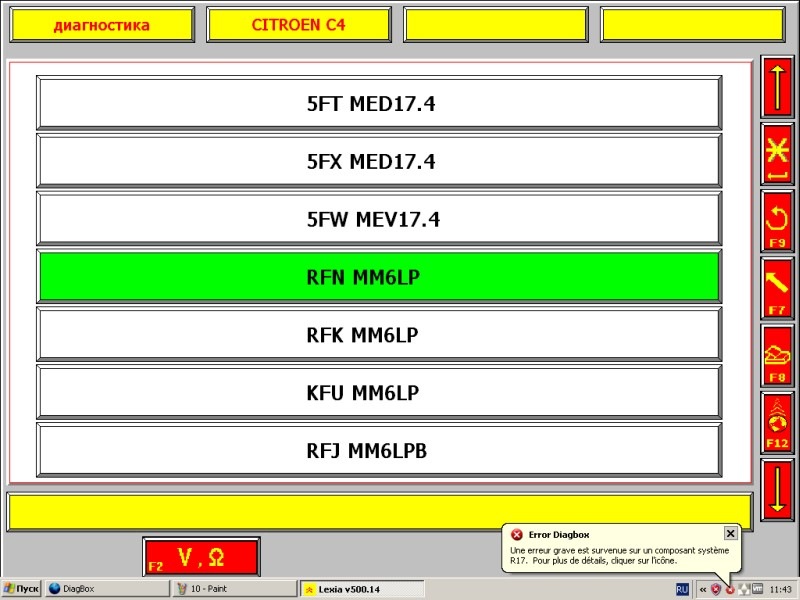
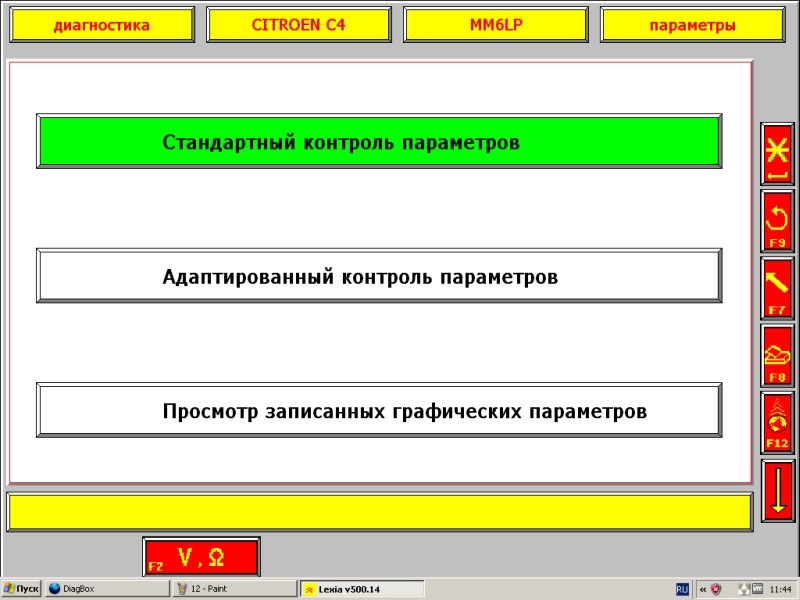
11. После выбора системы впрыска в следующем меню выберите опцию «Измерение параметров»

12. У вас есть выбор:
а) Стандартный контроль параметров – набор параметров определяется настройками программы, вы не можете его изменить
б) Адаптированный контроль параметров – вы сами выбираете какие параметры снимать с машины, этот вариант более гибкий
Рассмотрим сначала стандартный контроль параметров:
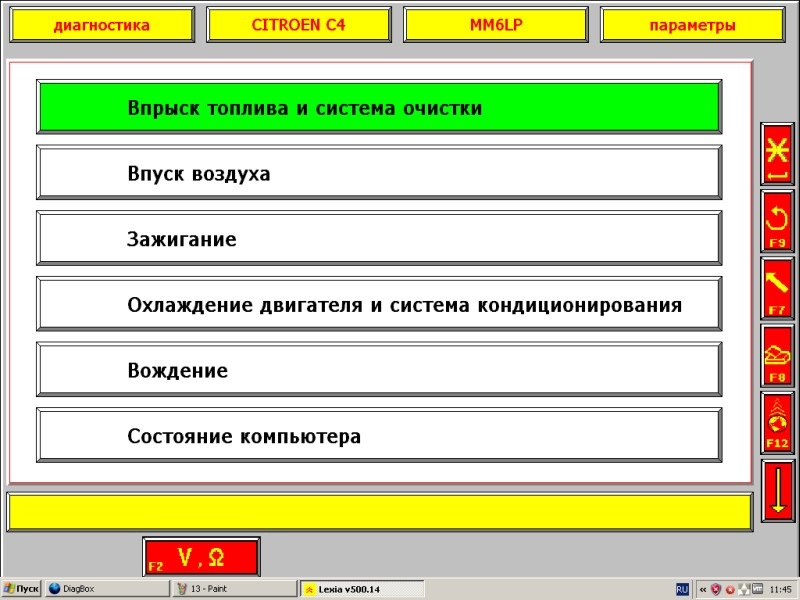
13. Выберем опцию «Впрыск топлива и система очистки»
14. Видим экран контроля параметров. Заведите двигатель, и отображённые обороты двигателя должны принять значение оборотов холостого хода
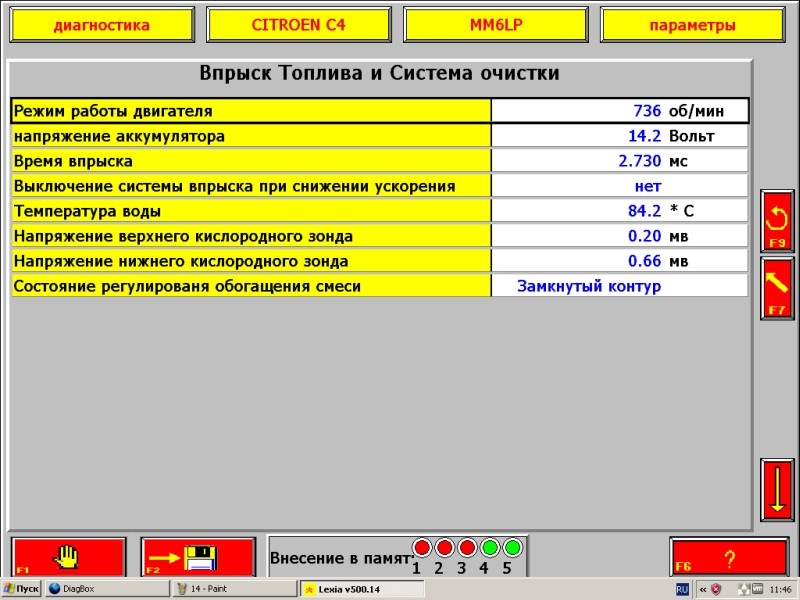
15. На данном этапе точность снятия данных во многом зависит от производительности диагностического компьютера. Обратитесь к странице Рекомендуемые параметры диагностического компьютера
После завода плавно поднимите обороты двигателя, задерживаясь на 1000, 2000 и 3000 об/мин (в идеальном случае +/-5%), затем плавно сбросьте до холостого хода, отпустите педаль газа. Система VTS, в которую вы, вероятно, будете загружать снятые данные, принимает эти обороты двигателя за базовые при вычислении оценки состояния систем машины. Если данные для одного из этих значений оборотов (100, 2000, 3000) будут отсутствовать, система зарегистрирует внесённые данные как неполные. Кроме того, рекомендуется захватить параметры в момент старта двигателя
ВАЖНО! На данный момент система VTS Автомониторинг не поддерживает данных, снятых в движении, поэтому снимайте данные с неподвижной машины.
После того, как вы прошли 1000, 2000, 3000 об/мин нажмите F2 (красная кнопка с изображением дискеты внизу экрана), чтобы сохранить только что снятые данные. Затем, нажимая F9, вернитесь на экран выбора типа контроля параметров. Выберите «Адаптированный контроль параметров»:

16. Адаптированный контроль параметров
Это более гибкий способ снятия данных с автомобиля, поскольку он позволяет выбрать какие именно параметры вы хотите снимать. При этом количество одновременно можно снимать не более шести параметров.
ВАЖНО! Практически всегда одним из снимаемых параметров должны быть обороты двигателя. Это позволит системе VTS Автомониторинг вычислить значения параметров машины на разных оборотах оптимальным способом.
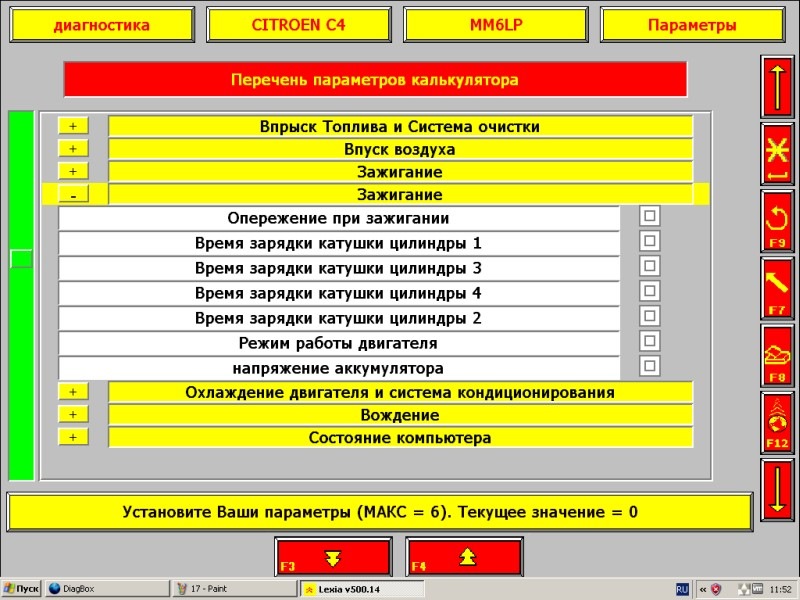
Кликните в квадратиках напротив желаемых параметров (или нажмите Enter), чтобы выбрать:

Обратите внимание, что многие параметры дублируются в нескольких разделах, и если вы выбираете их в одном из разделов, они автоматически отмечаются и в другом, таким образом один и тот же параметр нельзя выбрать два раза.
17. Снятие выбранных данных
Нажмите F6 или кликните на кнопку со схематическим изображением синусоиды в нижнем правом углу экрана.
Появится экран текущих значений выбранных параметров, на приведенной иллюстрации параметры соответствуют заглушенному двигателю. После завода двигателя они должны динамически обновляться.
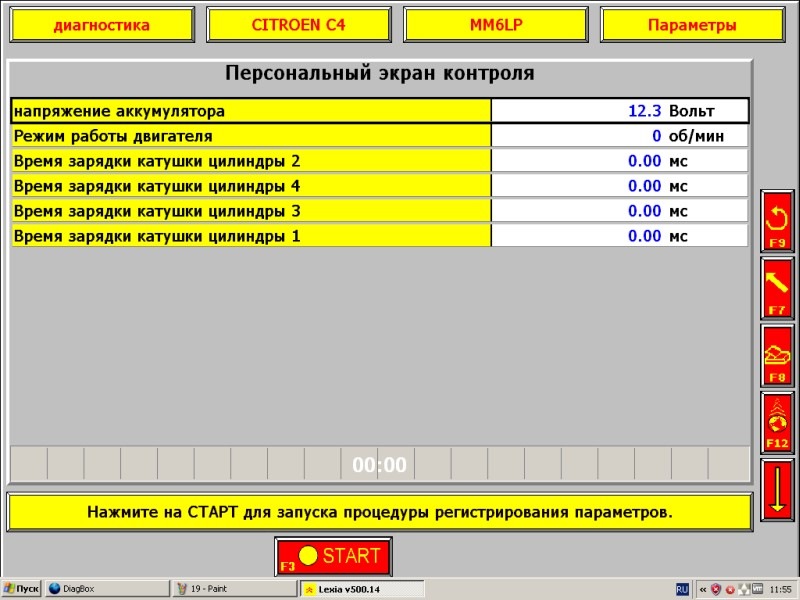
Нажмите кнопку «Старт», чтобы начать запись данных, повторите ту же процедуру, что описана в п. 15. После окончания снятия данных просмотрите их и нажмите F5 или кнопку с изображением дискеты, чтобы сохранить данные в памяти.

18. Выйдите из программы, сохранив текущий файл диагностики
-
Contents
-
Table of Contents
-
Bookmarks
Quick Links
Summary of Contents for Actia LEXIA3 EXPERT
-
Page 1
www.autokmfactory.com… -
Page 3: Table Of Contents
Table of contents 1. Preface ………………..1 1.1 Acknowledgement……………………..1 1.2 The LEXIA3 range……………………..1 1.3 Structure of technical documentation……………….. 3 1.4 Before any installation ……………………3 1.5 Glossary ……………………….4 1.6 Pictogram meanings ……………………5 2. EXPERT Pack and CHRONO Pack ……….. 7 2.1 EXPERT Pack……………………….
-
Page 4
4.7 Printer ……………………….103 4.7.1 Description ………………………………..103 4.7.2 Installing the printer without a trolley……………………….. 104 4.7.3 Installing the printer when using a trolley……………………….104 4.7.4 Checking printer operation …………………………..107 4.8 Anti-theft security……………………. 108 4.8.1 Description ………………………………..108 4.8.2 Installation………………………………..109 4.9 Carrying case…………………….. -
Page 5: Preface
Every day you need to combine reactivity and performance, to get even closer to the customer’s requirements. CITROËN and ACTIA have therefore designed a new generation of high-tech products that cover the entire spectrum of CITROËN vehicle diagnostic requirements. The various LEXIA3 packs are built around standard hardware, compatible with the current I.T.
-
Page 6
LEXIA3 User Guide documentation supplied with LEXIA3. We wish you an easy installation and successful diagnostics. ACTIA www.autokmfactory.com 2 — Preface -… -
Page 7: Structure Of Technical Documentation
LEXIA3 User Guide 1.3 Structure of technical documentation The present User Guide contains all the information necessary to install the systems supplied with LEXIA3. The Guide enables you to set up your LEXIA3 (assembly, connection), and also describes how to install and use the application software. A few helpful recommendations for assembling your LEXIA3 are given below, together with a glossary of the terms used throughout the remainder of the Guide.
-
Page 8: Glossary
LEXIA3 User Guide Do not connect any USB connectors on the PC Tablet unless specifically instructed by the present document. The USB connectors on your PC Tablet are indicated by the following logo :1.5 1.5 Glossary HUB: Common connector (HUB), providing duplicate USB ports (enabling various hardware to be connected).
-
Page 9: Pictogram Meanings
LEXIA3 User Guide 1.6 Pictogram meanings Note Caution Reminder Risk of electric shock — Preface — 5…
-
Page 10
LEXIA3 User Guide 6 — Preface -… -
Page 11: Expert Pack And Chrono Pack
LEXIA3 User Guide 2. EXPERT Pack and CHRONO Pack Installation time around: In its fullest configuration, your LEXIA3 comprises the following: www.autokmfactory.com — EXPERT Pack & CHRONO Pack — 7…
-
Page 12: Expert Pack
LEXIA3 User Guide 2.1 EXPERT Pack The EXPERT Pack comprises the following standard and optional elements: Element For Installation See … STANDARD 1 Trolley 2.3.1 Trolley 2 PC Tablet 2.3.2 PC Tablet 3 PC Tablet protection cover 2.3.3 PC Tablet protection cover 4 Multi-connectors 2.3.4 Multi-connectors — Universal adapter — Power supplies…
-
Page 13: Chrono Pack
LEXIA3 User Guide 2.2 CHRONO Pack The CHRONO Pack comprises the following standard and optional elements: Element For Installation See … STANDARD 1 Trolley 2.3.1 Trolley 2 PC Tablet 2.3.2 PC Tablet 3 PC Tablet protection cover 2.3.3 PC Tablet protection cover 4 Multi-connectors 2.3.4 Multi-connectors — Universal adapter — Power supplies…
-
Page 14: Installing The Hardware
LEXIA3 User Guide 2.3 Installing the hardware 2.3.1 Trolley The trolley conveniently carries all the LEXIA3 equipment required, and makes utilisa- tion very simple and user-friendly. The trolley comprises the following elements: 1. a stowage system for the PC Tablet and its protection cover, 2.
-
Page 15
LEXIA3 User Guide The spanner supplied in the trolley drawer enables you to adapt the PC Tablet mounting system (5) to suit your own particular utilisation. Tighten the PC Tablet mounting as follows: 1. Remove the cover. 2. Adjust the grip as required and install the cover. — EXPERT Pack &… -
Page 16: Pc Tablet
LEXIA3 User Guide 2.3.2 PC Tablet Description Front panel www.autokmfactory.com Button or Function Status indicator PC Tablet in Lights up when the PC Tablet is processing operation. data. Battery charge Green, steady: your battery is between 50% indicator. and 100% charged. Orange, steady: your battery is between 13% and 49% charged.
-
Page 17
LEXIA3 User Guide Mains power and Orange: mains power and battery are both battery charge available and system is charging. indicator. Green: — mains power and battery are both available and system is not charging (battery fully charged). — mains power available but battery not installed. -
Page 18
LEXIA3 User Guide Connector panels Installing the battery in the PC Tablet When delivered, the battery is not installed in your PC Tablet. Insert the battery into its housing, on the left side of the PC Tablet. www.autokmfactory.com The first time you use your system, the battery is not fully charged. Charge it using the external power unit supplied (Section 2.3.4). -
Page 19
LEXIA3 User Guide Installing the protection film on the PC Tablet screen A screen protection film is supplied with the PC Tablet. The film has two protective layers. To install the protection film on the PC Tablet screen: 1. Remove one of the two protective layers. 2. -
Page 20
LEXIA3 User Guide Installing the light pen To obtain another light pen, refer to Section 8.1. Use only the light pen supplied. Any other object may permanently damage the screen and will not work properly. The PC Tablet screen only works with the electro-magnetic light pen supplied. -
Page 21
LEXIA3 User Guide Disabling the Wi-Fi function Your LEXIA3 tool is equipped with a wireless function for all communication operations. However, activating this function limits the battery endurance of your tool, if there is no Wi-Fi communication terminal in your workshop (see Section 4). Thus, if you are not using the Wi-Fi option, you must disable the Wi-Fi function before continuing the installation. -
Page 22: Pc Tablet Protection Cover
LEXIA3 User Guide 2.3.3 PC Tablet protection cover Description Before using your PC Tablet, you must insert it in its protection cover, as shown below: www.autokmfactory.com Installing the PC Tablet on the trolley When the PC Tablet is equipped with its protection cover, it can be installed on the trolley mounting system.
-
Page 23: Multi-Connectors — Universal Adapter — Power Supplies
LEXIA3 User Guide 2.3.4 Multi-connectors — Universal adapter — Power supplies Your tool is supplied with the necessary multi-connectors and, for some countries, a universal adapter, which will provide the power supplies required by your LEXIA3. PC Tablet mains power supply The PC Tablet mains power kit comprises the following elements: — EXPERT Pack &…
-
Page 24
LEXIA3 User Guide Preparing the power cable before connection to the PC Tablet The power cable must be equipped with its electro-magnetic protection before it is connected to the PC Tablet. 1. Insert the power cable once into the electro-magnetic protection filter. 2. -
Page 25
LEXIA3 User Guide PC Tablet power supply for use on the trolley To install the PC Tablet on the trolley, proceed as follows: 1. Insert the power cable through the bottom of the trolley. 2. Recover the cable at the top of the duct. — EXPERT Pack &… -
Page 26
LEXIA3 User Guide 3. Connect the power cable to the PC Tablet. 4. Connect the power cable to the multi-connector. 5. Place the multi-connector behind the sliding doors on the trolley. 6. Connect the multi-connector to mains power, using the universal adapter if necessary. -
Page 27: Using The Pc Tablet For The First Time
LEXIA3 User Guide 2.3.5 Using the PC Tablet for the first time The diagnostic software is already installed on your tool. However, when using the PC Tablet for the first time, you need to configure your own environment (country, language, keyboard). To power up your PC Tablet, press the On/Off (Marche/Arrêt) button.
-
Page 28
LEXIA3 User Guide Configuring your PC Tablet To configure your PC Tablet for your own personal requirements (numerical, currency and date/time formats, place of utilisation, keyboard configuration), proceed as follows: 1. Press Start. 2. Select Control Panel. 3. Select Regional and Language Options. 24 — EXPERT Pack &… -
Page 29
LEXIA3 User Guide 4. Select the Regional Options tab. 5. In the Standards and Formats section, select the language corresponding to the numerical, currency and date/time formats required. 6. In the Location section, select the place where your PC Tablet is being used. Do not press OK or Apply — a restart will be prompted. -
Page 30
LEXIA3 User Guide 8. Then select the Settings tab. 9. In the Default input language section, select the keyboard entry language. 10. In the Language used in menus and dialogs section, select the required language. Do not press OK or Apply — a restart will be prompted. 26 — EXPERT Pack &… -
Page 31
LEXIA3 User Guide 11. Select the Advanced tab. 12. In the Language for non-Unicode programs section, select the required language. 13. Press OK. 14. Press OK. 15. Press Yes. 16. Press Yes. The PC Tablet will restart. — EXPERT Pack & CHRONO Pack — 27… -
Page 32
LEXIA3 User Guide Shutdown The shutdown procedure (software and power off) must be respected on your LEXIA3 diagnostic tool. During the shutdown phase, LEXIA3 updates its internal data. Therefore you must quit the application properly, respecting the procedure defined in Section 6.3. -
Page 33: Vehicle Adapter
LEXIA3 User Guide 2.3.6 Vehicle adapter The vehicle adapter provides a power supply for the PC Tablet when used onboard a vehicle. The adapter comprises: • a PC Tablet power connector, • a cigar-lighter connector. — EXPERT Pack & CHRONO Pack — 29…
-
Page 34: Anti-Theft Security
LEXIA3 User Guide 2.3.7 Anti-theft security The anti-theft security device keeps the diagnostic system safe from theft, both during operation and when not operating. The anti-theft security device comprises: • a locking cable. www.autokmfactory.com • two keys. To install the anti-theft security device: 1.
-
Page 35
LEXIA3 User Guide 2. Insert the end-piece into the rear panel of the PC Tablet, and turn the key to lock it. Keep the spare key in a safe place that you can easily remember. — EXPERT Pack & CHRONO Pack — 31… -
Page 36: Common Connector (Hub)
LEXIA3 User Guide 2.3.8 Common connector (HUB) Description The common connector (HUB) centralises your USB connections (DVD, modem, etc.). The common connector (HUB) comprises the following elements: Labels are supplied to indicate to which elements your equipment or options are connected.
-
Page 37
LEXIA3 User Guide Common connector (HUB) labels The following labels are available: ∙ • PC Tablet • DVD • KEYBOARD • MOUSE • MODEM • ICC for the CITROËN Communication Interface • BBP2 for the 252-way Controlled Terminal Box • MEASURE fore the Physical Measurement Interface •… -
Page 38
LEXIA3 User Guide Starting up To start up the common connector (HUB), proceed as follows: 1. Supply power to the common connector (HUB). 2. Connect the USB cable between the common connector (HUB) and the PC Tablet (which must be switched on). 3. -
Page 39: Dvd Drive
LEXIA3 User Guide 2.3.9 DVD drive The DVD drive is used to update your LEXIA3 diagnostic tool and to consult the CI- TROËN charts on the documentation CD-ROM, etc. Description The DVD drive comprises the following elements: To start up the DVD drive: 1.
-
Page 40
LEXIA3 User Guide 2. Open the drawer on the front of the trolley. 3. Connect the USB cable to the DVD drive. 4. Connect the power cable to the DVD drive. 5. Slide the DVD drive into its housing, inside the drawer. 36 — EXPERT Pack &… -
Page 41
LEXIA3 User Guide 6. Various Info bubbles appear on the screen, to indicate that the DVD drive has been recognised by the PC Tablet. To close these Info bubbles, use the light pen to press on the cross in the top RH corner. — EXPERT Pack &… -
Page 42: Keyboard And Mouse
LEXIA3 User Guide 2.3.10 Keyboard and mouse To install the keyboard, proceed as follows: 1. Pass the cables in through the top of the trolley, in the specific position, and run them down through the duct, to the common connector (HUB). 2.
-
Page 43: Citroën Communication Interface (Icc)
LEXIA3 User Guide 2.3.11 CITROËN Communication Interface (ICC) Description and adapters The CITROËN Communication Interface is your diagnostic system new external communication board, designed to provide the link between your PC Tablet and the vehicle. LEXIA3 CITROËN Communication Interface components: AC963833 Component AC963833 CITROËN Communication Interface…
-
Page 44
LEXIA3 User Guide Cable compatibility table Cable LEXIA2 LEXIA3 AC911032 ADA 03 AC9111001 Cigar lighter cable AC911312 30-way adapter AC911314 2-way adapter AC911675 2-way adapter + Power + Pretensioner AC911440 LEXIA2 OBD adapter AC911658 LEXIA3 OBD adapter AC911661 LEXIA2 USB cable AC911664 USB cable AC911662… -
Page 45
LEXIA3 User Guide 2. Press FINISH (TERMINER). Checking the operation of the CITROËN Communication Interface CITROËN Communication Interface operation can be checked by running a full test of all the computer systems, on a vehicle of your choice, using the LEXIA3 tool (see Section 5). -
Page 46: Isdn Modem
LEXIA3 User Guide 2.3.12 ISDN modem The ISDN modem provides access to the following, through Internet: • Software updates for your tool, • Remote coding and downloading data, • And remote assistance. Depending on the country in which you are using your system, the modem may be a different version.
-
Page 47
LEXIA3 User Guide Description of the OLITEC ISDN modem The OLITEC ISDN modem comprises the following elements: Description of the MULTITECH ISDN modem The MULTITECH ISDN modem comprises the following elements: — EXPERT Pack & CHRONO Pack — 43… -
Page 48
LEXIA3 User Guide Installing the modem To install the modem: 1. Place the modem in the rear compartment of the trolley. 2. Run the telephone cable out through the specific hole and connect it to the telephone socket. 44 — EXPERT Pack & CHRONO Pack -… -
Page 49
LEXIA3 User Guide 3. Connect the modem USB cable to the common connector (HUB). 4. Install the label base on the cable. 5. Bond the MODEM label on the base. 6. Bond the other MODEM label on the USB port at the common connector (HUB) level. -
Page 50
LEXIA3 User Guide Configuring the Internet connection Connect your modem before starting up the system. To configure the Internet connection, proceed as follows: 1. Press Start (Démarrer), followed by Configuration panel (Panneau de configuration). 2. Select the Internet Options (Options Internet) icon. 3. -
Page 51
LEXIA3 User Guide 6. Press the Parameters (Paramètres) button. 7. Enter the User login (Nom d’utilisateur), the Password (Mot de passe) and the Sector name (Nom de domaine) supplied by your Internet provider, and then press the Properties (Propriétés) button. — EXPERT Pack &… -
Page 52
LEXIA3 User Guide 8. Enter the Telephone number (Numéro de téléphone) of your Internet provider. Check that the connection is actually using your modem. The square corresponding to your modem must be ticked. Then click on OK to confirm. www.autokmfactory.com 9. -
Page 53
LEXIA3 User Guide 10. Select Internet Protocol (Protocole Internet — TCP/IP) and then press the Properties (Propriétés) button. 11. Select Use next DNS address (Utiliser l’adresse de serveur DNS suivante), enter the IP addresses (Adresses IP) of both primary and secondary DNS (DNS primaires et secondaires) servers and then press the OK button several times. -
Page 54
LEXIA3 User Guide Working online To use your Internet connection normally, you will need to work online. Proceed as follows: 1. Open Internet Explorer. 2. In the File (Fichier) menu, deactivate the Work offline (Travailler hors connexion) option, if it was active, if the option is not ticked then it is deactivated √… -
Page 55
PC Tablet. To test your Internet connection, proceed as follows: 1. Enter the address of a Web site (for example: www.actia.com). The remote connection dialogue box then appears. 2. Press Connection (Connexion). The connection is made and the Web site home page is opened. -
Page 56
LEXIA3 User Guide 52 — EXPERT Pack & CHRONO Pack -… -
Page 57: Mobile Pack And Light Pack
LEXIA3 User Guide 3. MOBILE Pack and LIGHT Pack Installation time around: In its fullest configuration, your LEXIA3 MOBILE Pack or LIGHT Pack comprises the following: www.autokmfactory.com — MOBILE Pack & LIGHT Pack — 53…
-
Page 58: Mobile Pack
LEXIA3 User Guide 3.1 MOBILE Pack The MOBILE Pack comprises the following standard and optional elements: Element For Installation See … STANDARD 1 PC Tablet 3.3.1 PC Tablet 2 PC Tablet protection cover 3.3.2 PC Tablet protection cover Multi-connector 3.3.4 Multi-connector — Universal adapter — Power supplies Vehicle adapter 3.3.5 Vehicle adapter…
-
Page 59: Light Pack
LEXIA3 User Guide 3.2 LIGHT Pack The LIGHT Pack comprises the following standard and optional elements: Element For Installation See … STANDARD 1 PC Tablet 3.3.1 PC Tablet 2 PC Tablet protection cover 3.3.2 PC Tablet protection cover Multi-connector 3.3.3 Multi-connectors — Universal adapter — Power supplies Vehicle adapter 3.3.5 Vehicle adapter…
-
Page 60: Installing The Hardware
LEXIA3 User Guide 3.3 Installing the hardware 3.3.1 PC Tablet Description Front panel Button or Function Status indicator PC Tablet in Lights up when the tool is processing data. operation. Battery charge Green, steady: your battery is between 50% indicator. and 100% charged.
-
Page 61
LEXIA3 User Guide Mains power and Orange: mains power and battery are both battery charge available and system is charging. indicator. Green: — mains power and battery are both available and system is not charging (battery fully charged). — mains power available but battery not installed. -
Page 62
LEXIA3 User Guide Connector panels Installing the battery in the PC Tablet When delivered, the battery is not installed in your PC Tablet. Insert the battery into its housing, on the left side of the PC Tablet. The first time you use your system, the battery is not fully charged. Charge it using the external power unit supplied (Section 2.3.4). -
Page 63
LEXIA3 User Guide Installing the protection film on the PC Tablet screen A screen protection film is supplied with the PC Tablet. The film has two protective layers. To install the protection film on the PC Tablet screen: 1. Remove one of the two protective layers. 2. -
Page 64
LEXIA3 User Guide Installing the light pen Use only the light pen supplied. Any other object may permanently damage the screen and will not work properly. The PC Tablet screen only works with the electro-magnetic light pen supplied. If you lose the light pen, you will not be able to use your LEXIA3. To obtain another light pen, refer to Section 8.1. -
Page 65
LEXIA3 User Guide Disabling the Wi-Fi function Your LEXIA3 tool is equipped with a wireless function for all communication operations. However, activating this function limits the battery endurance of your tool, if there is no Wi-Fi communication terminal in your workshop (see Section 4). Thus, if you are not using the Wi-Fi option, you must disable the Wi-Fi function before continuing the installation. -
Page 66: Pc Tablet Protection Cover
LEXIA3 User Guide 3.3.2 PC Tablet protection cover Description Before using your PC Tablet, you must insert it in its protection cover, as shown below: 3.3.3 Multi-connector — Universal adapter — Power supplies Your tool is supplied with a multi-connector and, for some countries, a universal adapter, which will provide the power supplies required by your LEXIA3.
-
Page 67
LEXIA3 User Guide PC Tablet mains power supply The PC Tablet mains power kit comprises the following elements: — MOBILE Pack & LIGHT Pack — 63… -
Page 68
LEXIA3 User Guide Preparing the power cable before connection to the PC Tablet The power cable must be equipped with its electro-magnetic protection before it is connected to the PC Tablet. 1. Insert the power cable once into the electro-magnetic protection filter. 2. -
Page 69
LEXIA3 User Guide PC Tablet power supply 1. Connect the power cable to the PC Tablet. 2. Connect the power cable to the multi-connector. 3. Connect the multi-connector to the mains power supply, using the universal adapter supplied, if necessary. — MOBILE Pack &… -
Page 70: Using The Pctablet For The First Time
LEXIA3 User Guide 3.3.4 Using the PCTablet for the first time The diagnostic software is already installed on your PC. However, when using the PC Tablet for the first time, you need to configure your own environment (country, language, keyboard). To power up your PC Tablet, press the On/Off (Marche/Arrêt) button.
-
Page 71
LEXIA3 User Guide Configuring your PC Tablet To configure your PC Tablet for your own personal requirements (numerical, currency and date/time formats, place of utilisation, keyboard configuration), proceed as follows: 1. Press Start. 2. Select Control Panel. 3. Select Regional and Language Options. — MOBILE Pack &… -
Page 72
LEXIA3 User Guide 4. Select the Regional Options tab. 5. In the Standards and Formats section, select the language corresponding to the numerical, currency and date/time formats required. 6. In the Location section, select the place where your PC Tablet is being used. Do not press OK or Apply — a restart will be prompted. -
Page 73
LEXIA3 User Guide 8. Then select the Settings tab. 9. In the Default input language section, select the keyboard entry language. 10. In the Language used in menus and dialogs section, select the required language. Do not press OK or Apply — a restart will be prompted. — MOBILE Pack &… -
Page 74
LEXIA3 User Guide 11. Select the Advanced tab. 12. In the Language for non Unicode programs section, select the required language. 13. Press OK. 14. Press OK. 15. Press Yes. 16. Press Yes. The PC Tablet will restart. 70 — MOBILE Pack & LIGHT Pack -… -
Page 75
LEXIA3 User Guide Shutdown The shutdown procedure (software and power off) must be respected on your LEXIA3 diagnostic tool. During the shutdown phase, LEXIA3 updates its internal data. Therefore you must quit the application properly, respecting the procedure defined in Section 6.3. -
Page 76: Vehicle Adapter
LEXIA3 User Guide 3.3.5 Vehicle adapter The vehicle adapter provides a power supply for the PC Tablet when used onboard a vehicle. The adapter comprises: • a PC Tablet power connector, • a cigar-lighter connector. 72 — MOBILE Pack & LIGHT Pack -…
-
Page 77: Anti-Theft Security
LEXIA3 User Guide 3.3.6 Anti-theft security The anti-theft security device keeps the diagnostic system safe from theft, both during operation and when not operating. The anti-theft security device comprises: • a locking cable. • two keys. To install the anti-theft security device: 1.
-
Page 78: Dvd Drive
LEXIA3 User Guide 3.3.7 DVD drive The DVD drive is used to update your LEXIA3 diagnostic tool and to consult the CI- TROËN charts on the documentation CD-ROM, etc. Description The DVD drive comprises the following elements: To start up the DVD drive: 1.
-
Page 79
LEXIA3 User Guide 2. Connect the USB cable to the DVD drive. 3. Connect the power cable to the DVD drive. 4. Various Info bubbles appear on the screen, to indicate that the DVD drive has been recognised by the PC Tablet. To close these Info bubbles, use the light pen to press on the cross in the top RH corner. -
Page 80: Citroën Communication Interface (Icc)
LEXIA3 User Guide 3.3.8 CITROËN Communication Interface (ICC) Description and adapters The CITROËN Communication Interface is your diagnostic system new external com- munication board, designed to provide the link between your PC Tablet and the vehi- cle. LEXIA3 CITROËN Communication Interface components: AC963833 Component AC963833 CITROËN Communication Interface…
-
Page 81
LEXIA3 User Guide Cable compatibility table Cable LEXIA2 LEXIA3 AC911032 ADA 03 AC9111001 Cigar lighter cable AC911312 30-way adapter AC911314 2-way adapter AC911675 2-way adapter + Power + Pretensioner AC911440 LEXIA2 OBD adapter AC911658 LEXIA3 OBD adapter AC911661 LEXIA2 USB cable AC911664 USB cable AC911662… -
Page 82
LEXIA3 User Guide 2. Press FINISH (TERMINER). Checking the operation of the CITROËN Communication Interface CITROËN Communication Interface operation can be checked by running a full test of all the computer systems, on a vehicle of your choice, using the LEXIA3 tool (see Section 5). 78 — MOBILE Pack &… -
Page 83: Isdn Modem
LEXIA3 User Guide 3.3.9 ISDN modem The ISDN modem provides access to the following, through Internet: • Software updates for your LEXIA3 tool, • CITROËN remote coding and downloading data, • And CITROËN remote assistance. Depending on the country in which you are using your system, the modem may be a different version.
-
Page 84
LEXIA3 User Guide Description of the OLITEC ISDN modem The OLITEC ISDN modem comprises the following elements: Description of the MULTITECH ISDN modem The MULTITECH ISDN modem comprises the following elements: 80 — MOBILE Pack & LIGHT Pack -… -
Page 85
LEXIA3 User Guide Installing the modem To install the modem: 1. Connect the telephone cable to the telephone socket. 2. Connect the modem USB cable to the PC Tablet. 3. Various Info bubbles appear on the screen, to indicate that the modem has been recognised by the PC Tablet. -
Page 86
LEXIA3 User Guide Configuring the Internet connection Connect your modem before starting up the system. To configure the Internet connection, proceed as follows: 1. Press Start (Démarrer), followed by Configuration panel (Panneau de configuration). 2. Select the Internet Options (Options Internet) icon. 3. -
Page 87
LEXIA3 User Guide 6. Press the Parameters (Paramètres) button. 7. Enter the User login (Nom d’utilisateur), the Password (Mot de passe) and the Sector name (Nom de domaine) supplied by your Internet provider, and then press the Properties (Propriétés) button. — MOBILE Pack &… -
Page 88
LEXIA3 User Guide 8. Enter the Telephone number (Numéro de téléphone) of your Internet provider. Check that the connection is actually using your modem. The square corresponding to your modem must be ticked. Then click on OK to confirm. 9. If your Internet provider has supplied DSNs, select the Network management (Gestion de réseau) tab. -
Page 89
LEXIA3 User Guide 10. Select Internet Protocol (Protocole Internet — TCP/IP) and then press the Properties (Propriétés) button. 11. Select Use next DNS address (Utiliser l’adresse de serveur DNS suivante), enter the IP addresses (Adresses IP) of both primary and secondary DNS (DNS primaires et secondaires) servers and then press the OK button. -
Page 90
LEXIA3 User Guide Working online To use your Internet connection normally, you will need to work online. Proceed as follows: 1. Open Internet Explorer. 2. In the File (Fichier) menu, deactivate the Work offline (Travailler hors connexion) option, if it was active, if the option is not ticked then it is deactivated. -
Page 91
PC Tablet. To test your Internet connection, proceed as follows: 1. Enter the address of a Web site (for example: www.actia.com). The remote connection dialogue box then appears. 2. Press Connection (Connexion). The connection is made and the Web site home page is opened. -
Page 92
LEXIA3 User Guide 88 — MOBILE Pack & LIGHT Pack -… -
Page 93: Options
LEXIA3 User Guide 4. Options 4.1 Common connector (HUB) 4.1.1 Description The common connector (HUB) centralises your USB connections (DVD, modem, etc.). The common connector (HUB) comprises the following elements: 4.1.2 Startup To start up the common connector (HUB), proceed as follows: 1.
-
Page 94
LEXIA3 User Guide 3. Various Info bubbles appear on the screen, to indicate that the common connector (HUB) has been recognised by the PC Tablet. To close these Info bubbles, use the light pen to click on the cross in the top RH corner. 90 — Options -… -
Page 95: Physical Measurement Interface
LEXIA3 User Guide 4.2 Physical Measurement Interface The physical measurement interface can be used to measure current, voltage and impedance. 4.2.1 Description and contents Composition of the LEXIA3 Physical Measurement Interface: AC964111 Element 1 AC964111 Physical Measurement Interface 2 AC911664 USB Cable 3 AC911685 Power Cable VBAT…
-
Page 96: Utilisation Recommendations
LEXIA3 User Guide Each time the physical measurement interface is connected to the PC Tablet, several Info bubbles appear on the screen, indicating that the PC Tablet has rec- ognised the elements connected. Close these Info bubbles by using the light pen to click on the cross in the top RH corner.
-
Page 97
LEXIA3 User Guide 2. Connect the power supply. Both indicators must be lit up. 3. Connect the measuring cables. • To measure current values: • To measure voltage or impedance: — Options — 93… -
Page 98: 252-Way Controlled Terminal Box
LEXIA3 User Guide 4.3 252-way controlled terminal box The 252-way controlled terminal box enables fewer test points to be used. The 252-way controlled terminal box is only used with the physical measurement interface. 4.3.1 Description and contents Your 252-way controlled terminal box comprises the following elements: 94 — Options -…
-
Page 99: Utilisation Recommendations
LEXIA3 User Guide Composition of LEXIA3 252-way Controlled Terminal Box (AC964150) Element 1 AC964150 LEXIA3 252-way Controlled Terminal Box assembly 2 AC911029 USB cable 3 AC911107 252-way Controlled Terminal Box Probe Cable 4 AY36700002 Mains Power Adapter 5 AC911702 Cable between 252-way Controlled Terminal Box and physical measurement interface 6 AC911496 Extension Cable Green/white…
-
Page 100
LEXIA3 User Guide The assembly formed can then either be used separately from the system or can be installed in the trolley. 1. Connect the USB cable (supplied with the physical measurement interface) between the physical measurement interface and the 252-way controlled terminal box. -
Page 101
LEXIA3 User Guide 2. Connect cable 5. 3. Connect the power supply. — Options — 97… -
Page 102
LEXIA3 User Guide 4. Connect cable 2 between the 252-way controlled terminal box and the PC Tablet or the common connector (HUB). The two indicators on the physical measurement interface and the indicator on the 252-way controlled terminal box should all be lit up. 5. -
Page 103: Trolley
LEXIA3 User Guide 4.4 Trolley The trolley conveniently carries all the LEXIA3 equipment required, and makes utilisa- tion very simple and user-friendly. The trolley comprises the following elements: 1. a mounting system for the PC Tablet and its protection cover, 2.
-
Page 104
LEXIA3 User Guide The spanner supplied in the trolley drawer enables you to adapt the PC Tablet mounting system to suit your own particular utilisation. Tighten the PC Tablet mounting as follows: 1. Remove the cover. 2. Adjust the grip as required and install the cover. 100 — Options -… -
Page 105: 30-Way And 2-Way Connectors
LEXIA3 User Guide 4.5 30-way and 2-way connectors Your LEXIA3 is designed to perform a diagnostic function on both new and old CITROËN vehicles. Element 1 AC911312 30-way adapter 2 AC911675 2-way cable + power + pretensioner PR : 9972 RF 30-way and 2-way kits — Options — 101…
-
Page 106: Keyboard/Mouse
LEXIA3 User Guide 4.6 Keyboard/Mouse The keyboard and mouse can be used to replace the PC Tablet virtual keyboard and its light pen, respectively. Your mouse is an optical mouse. Do not use it on shiny or reflecting surfaces. To install the mouse, proceed as follows: 1.
-
Page 107: Printer
LEXIA3 User Guide 4.7 Printer If you are using the printer recommended by ACTIA, we shall guide you through the installation of this printer. If you are using a different printer, refer to the installation guide supplied with your printer.
-
Page 108: Installing The Printer Without A Trolley
LEXIA3 User Guide 4.7.2 Installing the printer without a trolley Connect the printer power cable to the multi-connector, which should be connected to the mains power supply. Connect the printer USB cable to one of the USB ports on the PC Tablet.
-
Page 109
LEXIA3 User Guide For optimum print quality: 1. In the Start (Démarrer) menu, press Printer and telecopiers (Imprimante et télécopieurs). 2. Select your printer. 3. In the File (Fichier) menu, select Properties (Propriétés). 4. Press Print options (Options d’impression). 5. Select the Main (Principal) tab. 6. -
Page 110
LEXIA3 User Guide 7. Tick the Reduce spooler data length function (Réduire la taille des données de spouleur), and press OK. 8. Press OK. 9. Press OK and close all the subsequent windows, by clicking on the cross in the top RH corner of each window. -
Page 111: Checking Printer Operation
LEXIA3 User Guide 4.7.4 Checking printer operation 1. From the WINDOWS desktop (main screen), double-click on the LEXIA3 icon. 2. The software then starts running and is configured. 3. The main diagnostic screen appears. 4. Press F8 to print this screen. — Options — 107…
-
Page 112: Anti-Theft Security
LEXIA3 User Guide 4.8 Anti-theft security 4.8.1 Description The anti-theft security device keeps the diagnostic system safe from theft, both during operation and when not operating. The anti-theft security device comprises the following elements: • a locking cable • two keys 108 — Options -…
-
Page 113: Installation
LEXIA3 User Guide 4.8.2 Installation 1. If you are using a trolley, make a loop around one of the trolley arms. If you are not using a trolley, use another fixed element to prevent the theft of your PC Tablet. 2.
-
Page 114: Carrying Case
LEXIA3 User Guide 4.9 Carrying case The carrying case will enable you to stow the essential elements of your pack, to facilitate operation close to a broken down vehicle. The illustration below shows a non-contractual example of stowage. 110 — Options -…
-
Page 115: Communication Kits
LEXIA3 User Guide 4.10 Communication kits Your LEXIA3 is compatible with two types of communication kit: • The Wi-Fi terminal, that enables a local workshop server to be used, or Internet connections to be centralised on one telephone line. • Your movement around the workshop is thus completely unrestricted, as these radio links do not necessitate wire connections.
-
Page 116: Checking Kits
LEXIA3 User Guide 4.11 Checking kits Your LEXIA3 tool allows you to control the operation of the oxygen probe of the vehicle. Element 1 AC911687 2-way Oxygen Probe Cable 2 AC911701 4-way Oxygen Probe Cable 112 — Options -…
-
Page 117: Installing Pcanywhere
LEXIA3 User Guide 5. Installing PCAnywhere This software enables you to use Teleassistance. 1. Insert the CD containing the LEXIA3 tools, and then open the WINDOWS explorer, using the path Start/All programs/Accessories/Windows Explorer (Démarrer/ Tous les programmes/Accessoires/Windows Explorer). 2. Then run the PCAnywhere installation by double-clicking on the Setup.exe program.
-
Page 118
LEXIA3 User Guide 3. The screen shown below is then displayed. Press the Next button. 4. Tick the square: I accept the terms in the license agreement, then press the Next button. 114 — Installing PCAnywhere -… -
Page 119
LEXIA3 User Guide 5. Enter your name (User Name) and the name of your company (Organization), then press the Next button. 6. Press on the Next button. 7. Press the Install button. The screen shown below is then displayed, to indicate the installation progress status. -
Page 120
LEXIA3 User Guide 8. Wait for the end of the installation procedure. 9. Press the Next button. 10. Press the Next button. 116 — Installing PCAnywhere -… -
Page 121
LEXIA3 User Guide 11. Press the Next button. 12. Press the Next button. — Installing PCAnywhere — 117… -
Page 122
LEXIA3 User Guide 13. Press the Next button. 14. Wait for the end of the Symantec product update search procedure on Internet. 15. If you cannot obtain the Internet connection, the following screen is displayed after a few minutes. 16. Press the Finish button, to complete the installation procedure. 118 — Installing PCAnywhere -… -
Page 123
LEXIA3 User Guide 17. The installation procedure is completed. 18. Press the Skip button. You can register to receive Symantec product information and updates by pressing the Next button. The registration procedure is not described in this document. 19. Press the Yes button. — Installing PCAnywhere — 119… -
Page 124
LEXIA3 User Guide 20. Press the Finish button. 21. Press the Yes button. The system restarts automatically to finish the installation procedure. 22. Teleassistance is installed for LEXIA3. The PCAnywhere application can also be activated through the menu Start/All programs/Symantec PCAnywhere (Dé- marrer/Tous les programmes/Symantec PCAnywhere) or using the icon on the desktop. -
Page 125: Using The Lexia3 Package
Manuel d’utilisation LEXIA3 6. Using the LEXIA3 package 6.1 Running the LEXIA3 diagnostic package Preliminary operation Your CITROËN Communication Interface must already be connected. The LEXIA3 software detects the presence of this element, and will generate an error message if the software is not detected.
-
Page 126
LEXIA3 User Guide 3. The software is then run and configured. 4. When you use your LEXIA3 package for the first time, to enable us to provide the best possible service (Customer Support, Hotline, etc.), you should register your software. To register your pack, you need to contact your local agent, to obtain an activation code. -
Page 127: Description Of Lexia3 Key Functions
Manuel d’utilisation LEXIA3 6.2 Description of LEXIA3 key functions The main LEXIA3 key functions are defined in the table below. Short Function keyboard Symbol Action code Confirm Enter Confirm, or go to next screen. Return Go back to previous screen. General return Go back to LEXIA3 main menu.
-
Page 128: Shutting Down The Lexia3 Diagnostic Package
LEXIA3 User Guide 6.3 Shutting down the LEXIA3 diagnostic package To shut down the LEXIA3 software, proceed as follows: 1. Press F7 to go to the LEXIA3 main menu. 2. Press F5 to quit the application. 3. If you wish, you can save the software trace of your diagnostic session and/or record the current action method.
-
Page 129
Manuel d’utilisation LEXIA3 4. Then press the return key F9. The programme will ask you to confirm. www.autokmfactory.com 5. To confirm exit from the application, press key F3. 6. This puts you back in WINDOWS. — Using the LEXIA3 package — 125… -
Page 130: Running The Lexia3 Tutorial
LEXIA3 User Guide 6.4 Running the LEXIA3 tutorial To access the LEXIA3 User Guide, proceed as follows: 1. Press F7 to go to the LEXIA3 main menu. 2. Select Tutorial, and confirm. 3. The tutorial is then run and the various functions are displayed. 126 — Using the LEXIA3 package -…
-
Page 131: Lexia3 Package Full Update
Manuel d’utilisation LEXIA3 6.5 LEXIA3 package full update To update the LEXIA3 package, proceed as follows: 1. Power up the PC Tablet and wait for the full WINDOWS restart. 2. Check that your DVD-ROM drive is powered up. 3. Get the appropriate LEXIA3 update CD-ROM. 4.
-
Page 132
LEXIA3 User Guide 7. Tick the Install / Update option. 8. Select the installation volume. 9. Confirm your choice. 128 — Using the LEXIA3 package -… -
Page 133
Manuel d’utilisation LEXIA3 10. The update process then starts (around 10 to 15 minutes). LEXIA3 is now installed. — Using the LEXIA3 package — 129… -
Page 134: Lexia3 Package Partial Update By Internet (Update Download)
LEXIA3 User Guide 6.6 LEXIA3 package partial update by Internet (Update download) Between distributions of a new LEXIA3 CD-ROM, the package can be partially updated by downloading. This enables you to: • be informed of new computer programmes, • and obtain correction patch updates very simply. The update download facility can be accessed from the LEXIA3 main menu by selecting Download update.
-
Page 135
Manuel d’utilisation LEXIA3 1. Select Download update and confirm. 2. The ACTIA data server home page is then displayed. www.autokmfactory.com 3. Confirm your choice by pressing Enter. 4. Follow the prompts to select the update download from those that may be available on the server. -
Page 136: Diagnostics
LEXIA3 User Guide 6.7 Diagnostics 6.7.1 Basic diagnostic process — General test LEXIA3 enables you to dialogue with all the computers installed in the vehicle and to perform a diagnostic on these computers. This operation is known as the General Test and provides an initial indication of any computer faults or malfunctions.
-
Page 137
Manuel d’utilisation LEXIA3 3. Run a General Test on all the computer systems. This test will give you an overview of the vehicle status and will provide an indication of the types of computer that are performing correctly. The test will also indicate any faults that may be detected, for each computer. -
Page 138: Basic Diagnostic Process — Fault Reading
LEXIA3 User Guide 6.7.2 Basic diagnostic process — Fault reading LEXIA3 also enables you to list all the faults detected, computer by computer, and to carry out various tests and checks relating to the faults detected. A fault is the result of a failure of a computer, a wiring harness or a sensor, etc. 1.
-
Page 139: Basic Diagnostic Process — Diagnostic Charts
Manuel d’utilisation LEXIA3 6.7.4 Basic diagnostic process — Diagnostic charts To identify the causes of a particular fault, LEXIA3 allows you to display the diagnostic charts, which ask a series of questions that you answer, based on your observations (visual, audio) and/or on various measured values (voltage, resistance). 1.
-
Page 140: Basic Diagnostic Process — Value Measurement
LEXIA3 User Guide 6.7.5 Basic diagnostic process — Value measurement To complete the diagnostic analysis, LEXIA3 allows you to measure values that are directly controlled by the computer. This data provides information concerning the dynamic characteristics of the vehicle. 1. Run the General Test on the vehicle concerned (see Section 6.7.1). 2.
-
Page 141: Basic Diagnostic Process — Diagrams
Manuel d’utilisation LEXIA3 6.7.6 Basic diagnostic process — Diagrams Your LEXIA3 contains much information on CITROËN vehicle mechanics/electrics and the computers. To consult the technical documentation for the vehicle concerned, press F3. Electrical diagrams available for consultation include the circuit diagram, the wiring diagram and the layout.
-
Page 142: Guided Diagnostic Process
LEXIA3 User Guide 6.7.7 Guided diagnostic process With the increasing complexity of vehicles, certain situations can become increasingly delicate. For this reason, LEXIA3 provides a guided diagnostic facility. To obtain information corresponding to the fault symptoms described by the customer, you enter the customer’s observations, concerning the fault symptoms, into the system.
-
Page 143
Manuel d’utilisation LEXIA3 When these various elements have been entered, you can display the relationship between the vehicle mechanical/electrical systems concerned. Thus, LEXIA3 displays the links existing between the computers of the vehicle concerned, in chart format. This function is part of the core system and will help you identify the systems involved in the observed problem, and the computer types causing the fault, based on the customer’s description. -
Page 144: Using Teleassistance Between Lexia3 Applications
LEXIA3 User Guide 6.8 Using Teleassistance between LEXIA3 applications LEXIA3 enables you to share and exchange your experience. You can: • either give precedence to the remote facilities offered by your system (after contacting another technical expert or your assistance facility), so that certain operations can be carried out «…
-
Page 145: Teleassistance Menu
Manuel d’utilisation LEXIA3 6.8.2 Teleassistance menu • Case 1: Trainee mode — You want to be assisted by a colleague or technical expert from an assistance facility. Select Wait for connection to wait for a connection with the person who will assist you.
-
Page 146
LEXIA3 User Guide The screens below are displayed, successively: • Press the confirm key to continue. 142 — Using the LEXIA3 package -… -
Page 147
Manuel d’utilisation LEXIA3 • Press the Connection key to connect to Internet. • The connection is made. 2. PCAnywhere is run automatically in Wait for connection mode. PCAnywhere is run as a background task, and waits for the call from the master (colleague or technical expert). -
Page 148
LEXIA3 User Guide • You have to give this number to your colleague, or to the technical expert, by telephone. • Confirm. • Then go back to the LEXIA3 main menu. An icon indicates that a Teleassistance session is active. 5. -
Page 149: Master Mode — Call To A Remote Lexia3
Manuel d’utilisation LEXIA3 6.8.4 Master mode — Call to a remote LEXIA3 When you have selected Call remote system, in the Teleassistance menu, LEXIA3 performs the following actions: 1. Entry of Teleassistance reference of the colleague that you are assisting (trainee).
-
Page 150
LEXIA3 User Guide • Press the Connection key to connect to Internet. • The connection is made. 146 — Using the LEXIA3 package -… -
Page 151
Manuel d’utilisation LEXIA3 3. PCAnywhere is run automatically. PCAnywhere calls your colleague (trainee), using the Teleassistance reference entered. www.autokmfactory.com 4. Teleassistance session. When the connection is made, PCAnywhere displays your colleague’s (trainee’s) screen. 5. End of Teleassistance session Press F4 on your PC Tablet to terminate the Teleassistance session from your colleague’s LEXIA3. -
Page 152
LEXIA3 User Guide 148 — Using the LEXIA3 package -… -
Page 153: Utilisation Precautions
LEXIA3 User Guide 7. Utilisation precautions This PC Tablet is for professional use only, and must only be used in compliance with the ACTIA instructions given below. 7.1 Environment • The system may be used in ambient temperatures between 0°C and +45°C.
-
Page 154: Batteries
• Do not open the battery. • Do charge the battery outside LEXIA3. 7.5 Replacing the internal battery Use only a battery supplied by ACTIA customer support. To replace the PC Tablet internal battery, proceed as follows: 1. The PC Tablet must be switched off.
-
Page 155: Road Test
LEXIA3 User Guide 7.6 Road test • The road test must not be conducted by the vehicle driver. The test operator must be a passenger. • Never place the PC Tablette on an Airbag position. The Airbag function may be activated. 7.7 Sofware recommendations We recommend that no software be installed other than that supplied with LEXIA3 or by AUTOMOBILES CITROËN.
-
Page 156
LEXIA3 User Guide 152 — Utilisation precaution -… -
Page 157: Customer Support
•Technical assistance concerning the installation or utilisation of peripherals other than those recommended by ACTIA and/or AUTOMOBILES CITROËN (for example, installing a printer or modem that is not in the ACTIA catalogue). •Technical assistance concerning the installation or utilisation of software not distributed by ACTIA and/or AUTOMOBILES CITROËN.
-
Page 158
LEXIA3 User Guide CUSTOMER SUPPORT INDEPENDENT OPERATORS Address Telephone ACTIA MULLER Services LEXIA HOTLINE (33) 02-37-33-42-36 5 rue de la Taye (33) 02-37-33-42-12 28110 LUCE GARAGE EQUIPMENT HOTLINE (33) 02-37-33-42-13 LASER HOTLINE (33) 02-37-33-42-17 ACTIA U.K. (44) 168-662-1067 (44) 168-662-1068… -
Page 159
TACT (972) 893-614-77 (972) 893-633-08 Kiryat Weizmann Rabin Park Openhaimer 7st 76000 REHOVOT CUSTOMER SUPPORT CITROEN APPROVED NETWORK Address Telephone ACTIA MULLER Services LEXIA HOTLINE (33) 02-37-33-42-36 5 rue de la Taye (33) 02-37-33-42-12 28110 LUCE GARAGE EQUIPMENT HOTLINE (33) 02-37-33-42-13… -
Page 160
Pav. 10 Parque Industrial de Armés 2715 TERRUGEM SNT G.E.S. (32) 25-829-474 (32) 25-824-202 Eikveldstraat 1A B1742 TERNAT ACTIA INC (1) 817-571-0435 3233 USTIC Woods Dr. BEDFORD, TEXAS 76021 AUTO-ELEKTRIKA NOVAK (385) 406-458-61 (385) 406-481-20 T. Ujevica 29 HR — 40323 PRELOG… -
Page 161
CUSTOMER SUPPORT CITROEN APPROVED NETWORK FORMULA 1 (40) 092-398-133 (40) 094-336-450 Street Lucaci, Nb44, 1 Floor Apt. 5, Sector 3 BUCAREST ACTIA DO BRASIL (55) 513-358-02000 (55) 513-337-6081 Av. Sao Paulo, 555 90230-161 PORTO ALEGRE — RS INDUSTRIALES TELME (54) (1) 755-2811 (54) (1) 755-2811 Calle 48 N°1327 V. -
Page 162
LEXIA3 User Guide 158 — Customer support -… -
Page 163: Appendices
LEXIA3 User Guide 9. Appendices 9.1 LEXIA3 consumable part numbers The following are available from your local agent or Customer Support : Item AY14400043 2 touch pad light pens for PC Tablet FUJI ST41XX AY14400034 Screen protection films for PC Tablet FUJI ST4120 AY30030000 Standard battery for PC Tablet FUJI ST41XX…
-
Page 164: Lexia3 Available Option Part Numbers
9.2 LEXIA3 available option part numbers All the options described in this technical documentation can be obtained from your local agent or from Customer Support, under the following part numbers: PR P/N ACTIA P/N Item 9972 RC CITROËN communication interface for LEXIA3 9972 RH CITROËN communication interface for LEXIA2…
-
Page 165: Faq — Before Contacting Your Hotline
LEXIA3 User Guide 9.3 FAQ — Before contacting your HotLine PC TABLET: PC Tablet does not start up • Check battery charge level. • If battery charge low, connect an external power supply. • Check external power present and properly connected. Battery does not operate properly (short endurance) •…
-
Page 166
LEXIA3 User Guide I am unable to measure current. • Check the 10 A fuse. If it is defective, replace it by another of the same type and rating. CONTROLLED TERMINAL BOX 2: When I attempt to use the 252-way controlled terminal box. •… -
Page 167
LEXIA3 User Guide DVD: I cannot access the contents of a CD-ROM or a DVD-ROM. • Check the USB connection with the PC Tablet or the common connector (HUB). • If using with a common connector (HUB), check that the common connector (HUB) is operating properly. -
Page 168: Useful Tips And Shortcuts
LEXIA3 User Guide 9.4 Useful tips and shortcuts 9.4.1 Virtual keyboard To open the virtual keyboard, click on the keyboard icon, on the right of the Start button. To close the virtual keyboard, click on the cross, top-right in the Tablet PC Input Panel window.
-
Page 169: Calibrating The Light Pen
LEXIA3 User Guide To move the virtual keyboard using the light pen. 1. Point the light pen onto the blue part of the keyboard (top bar) without lifting the light pen. 2. Drag the virtual keyboard. 3. Drop at the required position 9.4.2 Calibrating the light pen This configuration enables you to properly configure your light pen in relation to your PC Tablet.
-
Page 170
LEXIA3 User Guide 2. Select the option PC Tablet and light pen parameters (Paramètres du Tablet PC et du stylet). 3. Press the Calibrate (Calibrer) button. 166 — Appendices -… -
Page 171
LEXIA3 User Guide 4. Touch the light pen in the centre of each target (indicated by the symbol +) and click on OK when calibrated. w w w . a u t o k m f a c t o r y . c o m 5.
Для работы проектов iXBT.com нужны файлы cookie и сервисы аналитики.
Продолжая посещать сайты проектов вы соглашаетесь с нашей
Политикой в отношении файлов cookie
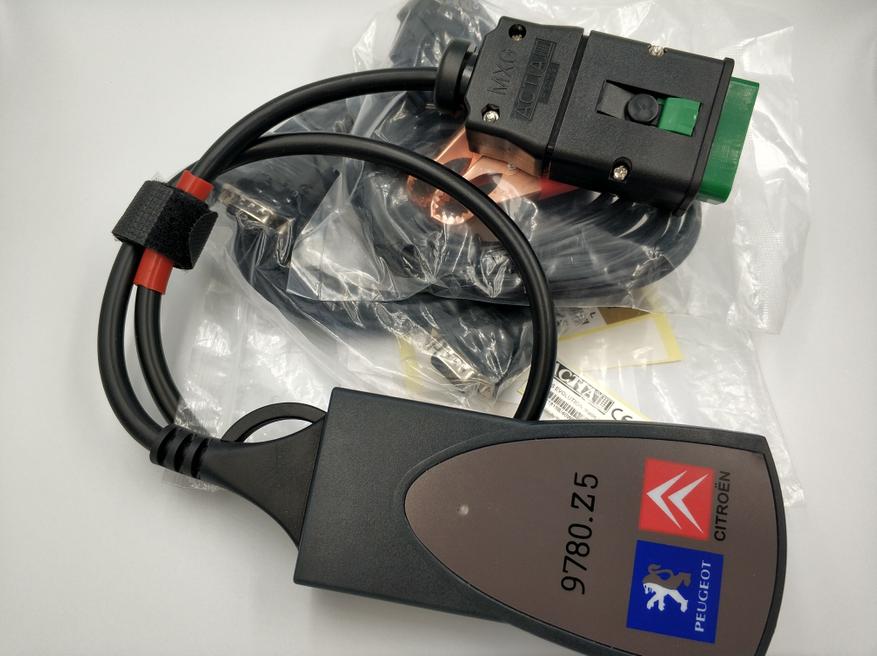
Всем привет. Сегодня краткий обзор диагностического сканера для автомобилей концерна Peugeot Citroen под названием Lexia3 PP2000. Вообще говоря это названия программного обеспечения, но именно по этим названиям вы скорее всего его и узнаете (если у вас авто данного производителя). Название же самого тестера — PSA XS evolution. Естественно, это китайская копия оригинального сканера, который стоит бешеных денег и вообще поставляется как ноутбук+сканер+лицензионное ПО. Китайцы же сделали очень хорошую копию, которая практически ничем не уступает официальному сканеру, за исключением некоторых нюансов. Данные адаптеры бывают двух ревизий: Адаптеры ревизии «B» — работают с PP2000 + Lexia + Diagbox 5.х + нет возможности читать автомобили после 2010-12 (как минимум), адаптеры ревизии «C» — работают со всем, включая Diagbox 7.х + возможность читать авто 2012+ года. На Aliexpress сейчас продавцы любят «переманивать покупателей» фразами Full Chip, Gold и т.д. (типа у других урезанный чип, а у них супер оригинальный). Так вот, принципиальной разницы между адаптерами нету — Тайвань / Китай / FullChip / Gold / Turbo / TurboChipGold — все одно и тоже.
Минимальная цена сейчас здесь (с купоном получается дешевле на 4$ даже, чем на Ali): Lexia3 PP2000
Пришел комплект в обычном пакете, сэкономили на коробке. Вообще говоря фишка этого сканера, в том что он близок по функционалу к дилерскому. Это значит, что можно не просто прочитать\стереть ошибки, как делают большинство копеечных ELM адаптеров с Али за 4-5$, а можно активировать круиз контроль, «прописать» аккумулятор большей емкости, опять же прописать залитую присадку в авто с сажевиком, активировать скрытые функции, такие как дневные ходовые отдельно от ближнего света в Peugeot, плюс ко всему ошибки читаются по всему авто, включая усилитель аудио, 1-2-3 люк на крыше у Citroen C8 например и прочее и прочее. Есть журнал ошибок, по которому можно кстати +- узнать реальный пробег. Обычный «универсальный» сканер за копейки с Али не может даже десятой части всего этого (то есть не просто чтения ошибок, но и программирования узлов авто).
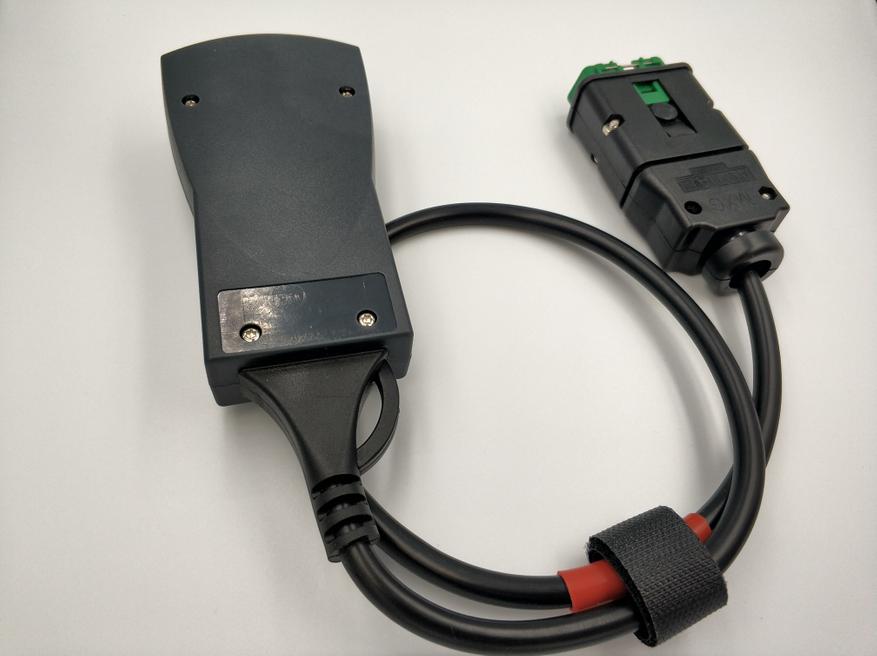
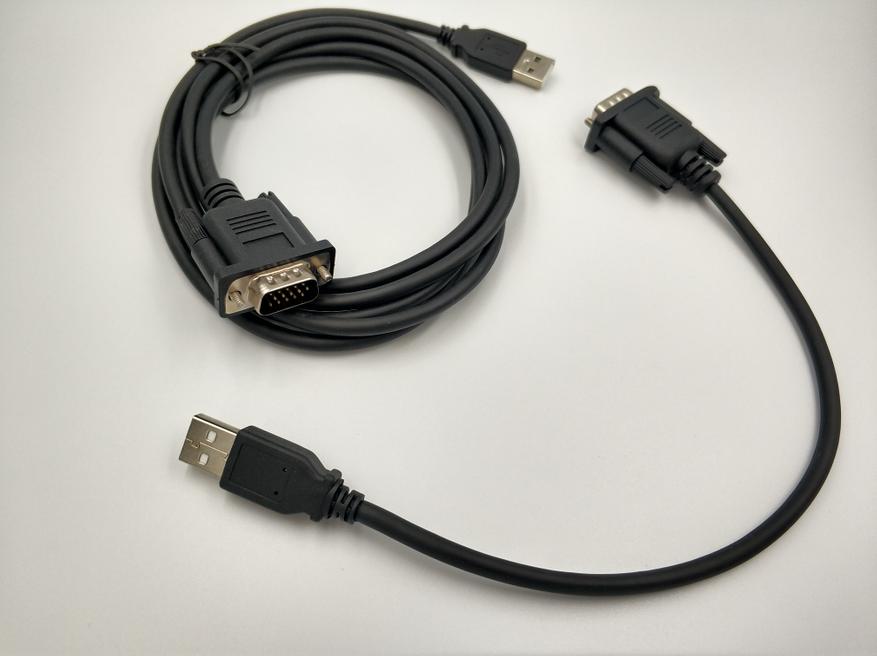
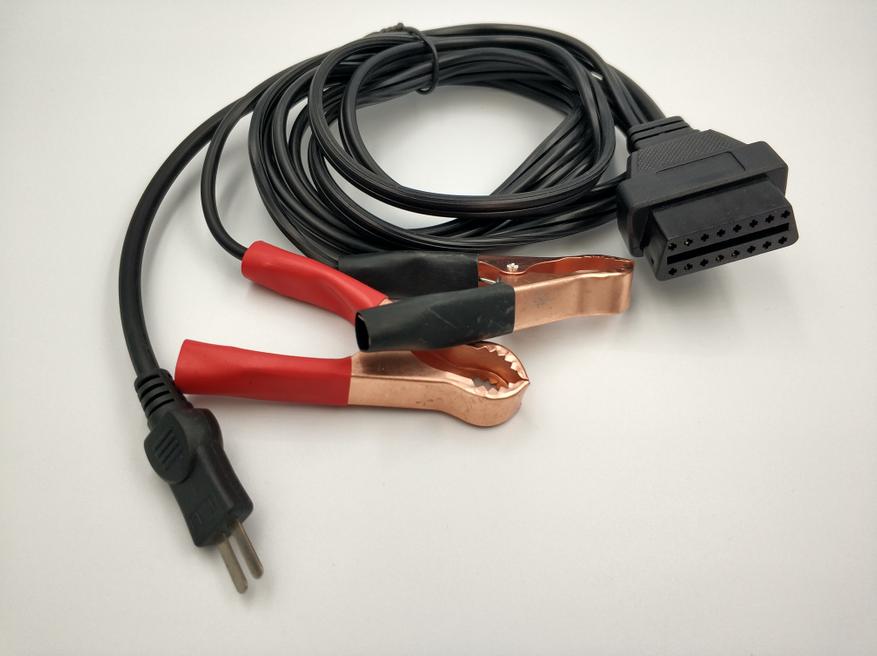
Комплектация: основной блок Lexia, длинный 9-контактный USB-кабель (он же VGA to USB), короткий 9-контактный USB-кабель, кабель подключения к OBD-II (16 конт.), переходник на два контакта с зажимами для подключения внешнего питания (12 v Power Cable), DVD c программным обеспечением (Установка только на 32-bit операционную систему Windows).
Интересно. На сканере не было никаких наклеек, они идут отдельно и клеим мы их сами при желании. Если все наклеить, то почти как оригинал  даже есть наклейка с фейковым серийником и надписью Made in France. Программное обеспечение ставиться на Win 32bit систему только, но это не проблема, если у вас 64bit. Все равно ставить все будем на виртуалку. Об этом позже.
Вот так выглядит сам сканер, с виду все неплохо, если присмотреться к стыкам, немного корявенько. Но нам же «ехать, а не шашечки».

Разъемы сканера: USB (сюда подключается VGA кабель, на обратной стороне USB 2.0 в компьютер), рядом разъем Vbat — он нам не нужен, да и я думаю только китайцы знают его назначение. На форумах пишут, то ли для перепрограммирования сканера, то ли кабель питания.
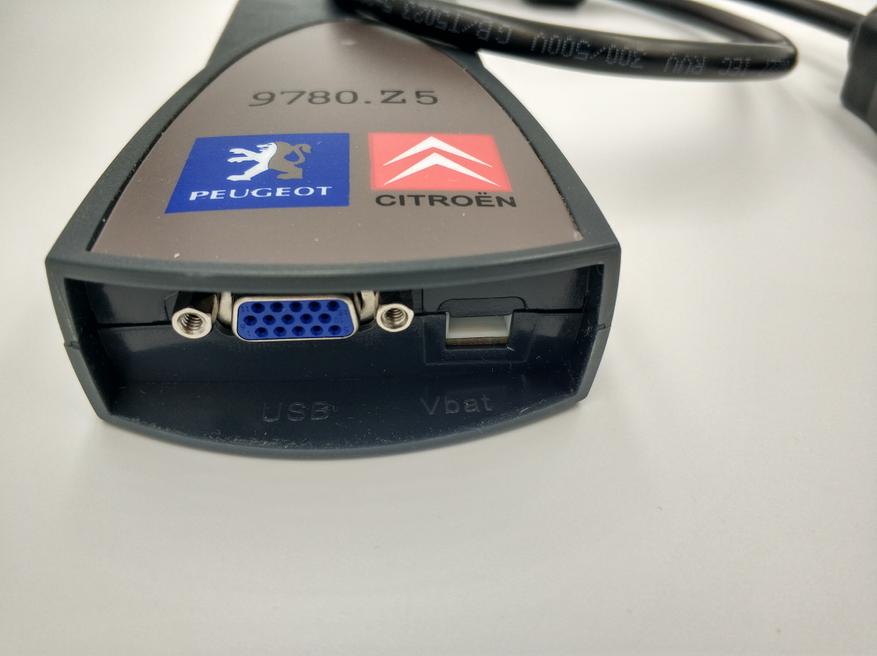
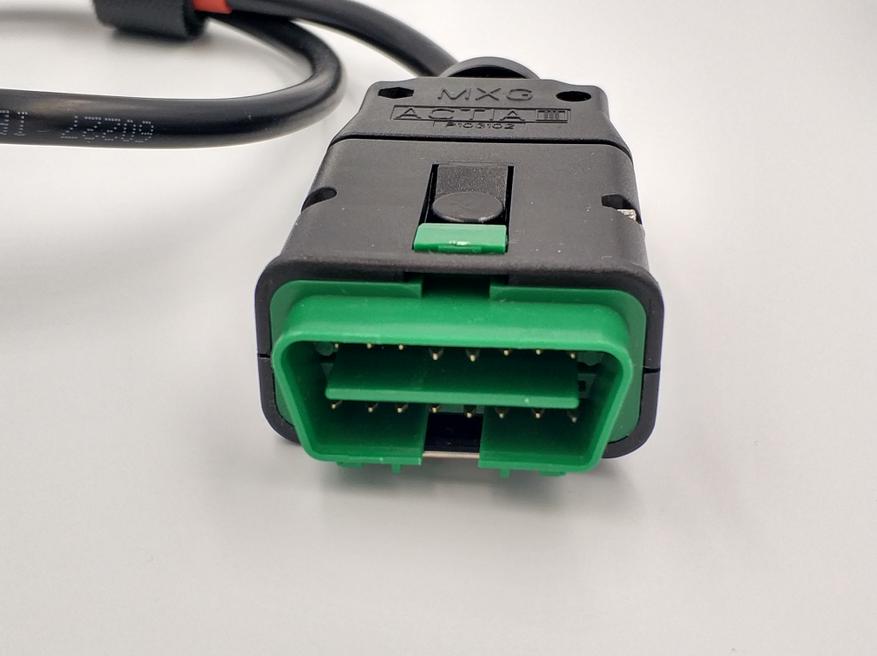
С другой стороны массивная ODB2 вилка.
На обратной стороне 4 винтика для разборки, разборка кстати будет чуть ниже. Не стал сюда клеить всякие там Made In France.
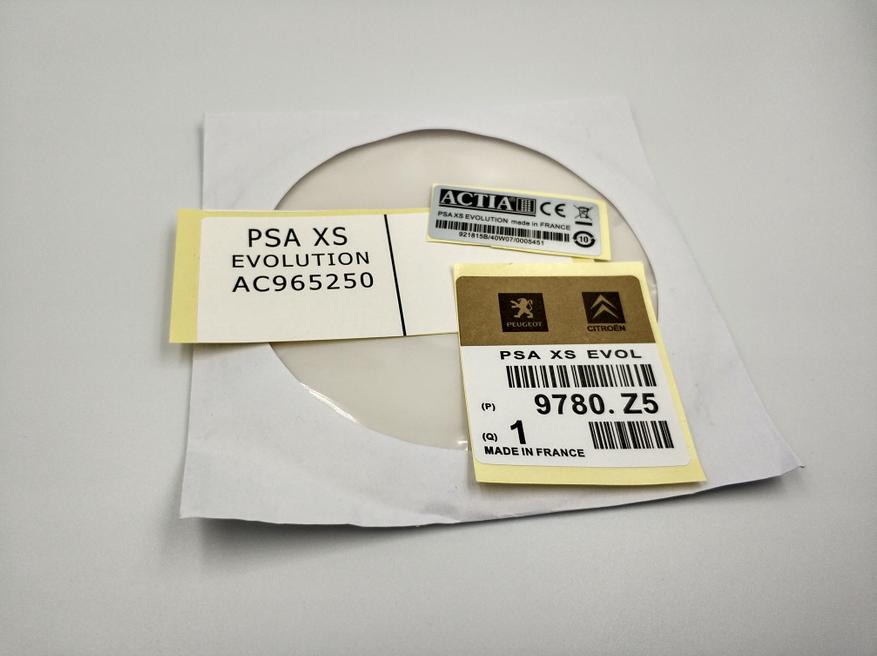
Вот те самые наклейки, ту коричневую, что с логотипами Peugeot и Citroen я наклеил уже. Диск кстати самая обычная «паленая» белая DVD RW с записанным «пиратским» софтом. Наклейки наверное и не клеят, чтобы их не затаскали по судам за копирование и подделку сканера. Хотя это наверное где-то в параллельной вселенной…
Далее те самые VGA to USB кабели разной длины.
И последнее, что идет — это переходник на два контакта с зажимами для подключения внешнего питания. Также непонятно зачем он нужен.
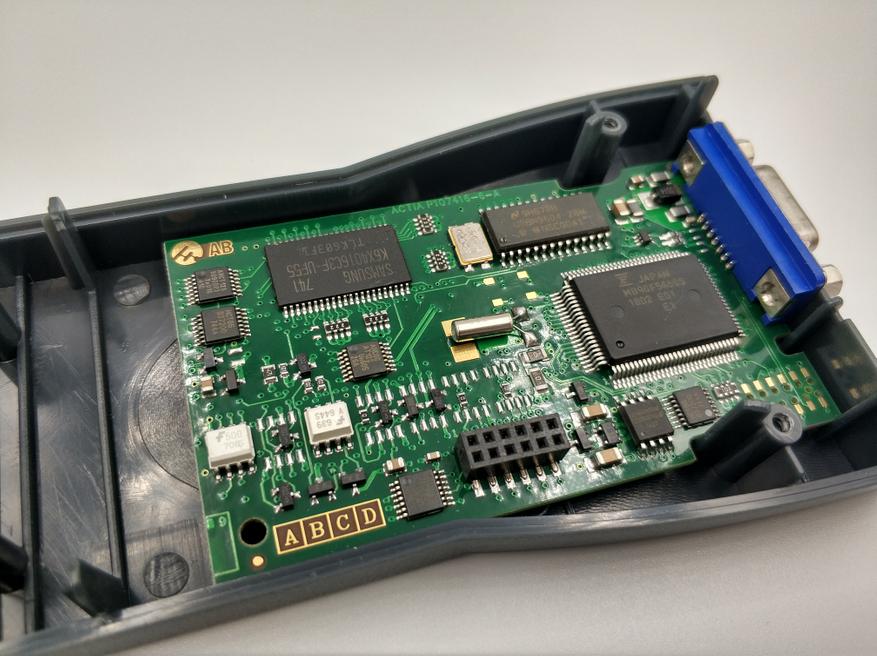
Разборка сканера
Разбирается раскручиванием корпуса сзади, платы ничего не закреплены, просто прижимаются к корпусу крышкой.

Вид снизу верхней платы.
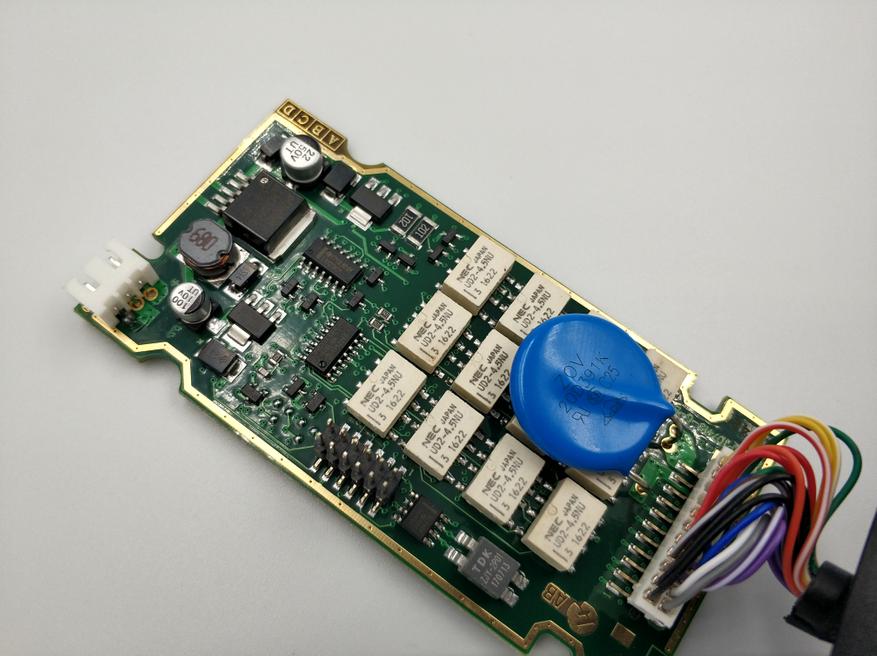
Самая нижняя плата. На микросхемах надписи Japan, Samsung. Китайцы на Алиэкспресс часто показывают эти фото, чтобы показать, что у них «Full Chip».
Программное обеспечение
Конечно со сканером идет ПО на диске, я потратил около 4 часов на его установку (там нужно ставить версию 7.02, а потом устанавливать обновления поверх этой версии, вырезая активационный файл перед обновлением). На предпоследнем обновлении я «запорол» установку и у меня слетела активация, начал ставить все заново… поставил пару обновлений и обратил внимание на тонну файлов и папок, которую создает установщик. Также я сразу не заметил, что работает только на 32 bit системах. Решил все снести и поставить на виртуальную машину XP. Причем теперь я не ставил все файлы вручную, а сразу скачал виртуальный диск для виртуальной машины Огромное спасибо человеку, который это подготовил для нас. Итого, не учитывая времени скачки файлов, вам понадобится минут 10 на настройку всего и можно приступать к диагностике. На время написания этого обзора, последняя версия DIagBox — 7.83 Скачать «диск для виртуальной машины Virtualbox» можно тут: тыц. Ищем там поиском по странице ссылку с надписью Diagbox 7.83. Там же есть подробная инструкция по установке. После установки виртуальной машины и подключению к ней скачанного диска-образа получаем Windows XP с уже установленным DIagBox 7.83
Также рекомендую обратить внимание на такие интересные моменты в работе оборудования PSA Diagbox 7.83.
1. Отдельно хотел описать этап, как нужно включать оборудование. Сначала нужно выбрать машину, потом программа напишет что нет доступа к VCI, вставляете lexia pp3 в заранее выбранный разъем, чтобы он определился в винде и в него подгрузились дрова, в последующем этот usb порт будет использоваться постоянно под это оборудование(ну либо вам придется каждый на каждый порт ставить дрова и молиться чтобы ничего не сломалось). После этого появляется картинка разъем и машина со стрелками, в этот момент можете смело вставлять разъем obd2 в машину. После этого машина определит VIN или попросит его внести руками, а еще может попросить внести OPR это первые 5 цифр в наклейке на водительской стойке(или день производства машины в 5 значном виде и исчислении начиная с 02 октября 1980 года — если с точной датой не напутал).
Обычно же сканер сам определяет VIN, но где-то с вероятностью 30% он может вас попросить его ввести.
Иногда нужно включить зажигание, иногда нет, все зависит от конкретной менюшки, в первоначальной менюшке можно и без зажигания. Для теста нужно обязательно включать зажигание, а еще иногда само устройство глючит и просит его отсоединить/присоединить, можно попробовать из usb, а можно и из usb и из obd2, также крайне редко может потребоваться перезапуск винды. Иногда программа зависнет, иногда сканер не захочет считывать, хотя до этого читал все норм, иногда машина перестает отдавать данные, ну и разумеется на все это накладывается что у нас с вами реплика устройства у которого тупо нет возможности официально обновить и залатать дыры допущенные при проектировке и кодировке. Главное понять этот принцип и принять его, тогда жизнь с этим сканером будет куда проще.
2. Лексия практически неинтересна, ДиагБокс поинтереснее. По сути это одно и тоже, просто лексия это доссовская(DOS) версия, а диагбокс под винду, функционал один в один, но диагбокс реально удобнее. 3. Пароль на внесение изменений в лексии (ситроен машины) — 03114
Проведение диагностики
В двух словах, чтобы не сильно перегружать обзор сканера. У меня есть как раз 2 машины Citroen C8 и Peugeot 5008. Первый пошел Citroen. Скан модулей прошел за минут 5, причем авто не заводилось. Видно что некоторые модули не проходили проверку. Поэтому диагностируйте на заведенном авто. Найдено было 3 ошибки. Ошибка связи с датчиком дождя\света — у меня он был снят после замены лабаша.
Второй прогонялся Peugeot на заведенном двигателе. Сразу заметно, что число модулей увеличилось в раза 3. Ошибок не найдено. Машина свежая еще, 2015 год. Хотя журнал показывает, что уже чистили по мелочи. Кстати тут я узнал что пробег моего авто, которое пригнали с Италии был скручен на 30 000 км. Скрин не сделал, но журнал ошибок показывает, когда была ошибка, на каком пробеге ее убирали.
DiagBox на русском языке, все очень логично и понятно. Есть расшифровка разных разделов и функций. Кстати есть еще дополнительное ПО под названием Service Box, где можно по коду ошибки найти схемы работы модуля, рекомендации по ремонту и даже нормо-часы (по ним вам кстати и цену рассчитывают на СТО, конечно, предварительно накинув). Ищется Service Box в интернете очень легко. Единственное, что меня немного напрягает, так это невозможность отменить операцию. Или там есть секретная функция или я что-то не догоняю Но вот например я нажал поиск ошибок неизвестных в интернете и это окошко так и висело, пока не перезапустил DiagBox. Интернет включать на VirtualBox нельзя, чтобы не слетела активация. Ставьте Service Box для поиска расшифровки ошибок.
В качестве вывода, скажу, что на СТО вы платите не за диагностику, а за выяснение причины, то есть экономить 100%, если вы не сильно разбираетесь в авто, вряд ли выйдет. Но можно неплохо сэкономить, если ошибка детская вылетает. Также я сэкономил на «прописке» присадки Eoylis, так как просто залить ее в бачок не прокатит — нужно еще сказать машине, что бачок полный. Еще ставил аккумулятор емкости 75Ah, стандарт 70Ah, следовательно, для правильного подсчета нужно прописать в мозгах (BSI) машины, что аккумулятор у нас большей емкости. На этом у меня все! К покупке однозначно рекомендую, сканер окупится очень быстро, цена с купоном SAVING сейчас даже намного ниже, чем минимальная на Алиэкспресс.
Сабж!
Что же такое т.н. лексия (Lexia в оригинале)?
Формально, то что обычно называют лексией — таковой не является. Сюрприз, сюрприз! ))))
Давайте же разделим мух и котлет друг от друга и на составляющие.
Итак, у вас есть желание диагностировать электронные компоненты авто, читать и сбрасывать ошибки и все такое.
Вам понадобится некий комплекс, состоящий из интерфейса и программного обеспечения. А программное обеспечение вы будете устанавливать на что вам больше понравится — стационарный компьютер или ноутбук.
Что такое интерфейс? Это набор всяких электронных деталек, заключенный в корпус из пластика. С одной стороны в корпусе есть шнур для соединения с компьютером через USB-разъем, а с другой стороны шнур для соединения с авто, точнее с его диагностическим разъемом. Задача интерфейса состоит в том, чтобы преобразовать сигнал, который передают электронные компоненты авто, в понятный компьютеру. И наоборот соотв-но.
Интерфейс бывает двух видов — оригинальный (тот что использует официальный дилер) и китайский клон (т.н. PSA XS Evolution).
Китайский клон выглядит вот так:
Оригинальный интерфейс поставляется не просто так, а в виде готового комплекса — ноутбук с программным обеспечением, тележка, интерфейс и все такое. Стоимость по разным источникам около 3,5 килотонн евротугриков, и их берут вовсе не на пустом месте, если кто-то так подумал. Основные деньги — это стоимость поддержки и выпуска обновлений, стандартная практика.
Поскольку оригинальный интерфейс нам недоступен, поговорим о китайском клоне. Бытует мнение, что оригинальный интерфейс выпускают все в том же Китае. Возможно и так. В комплекте который присылают китайцы с клоном, присутствуют всякие разные наклейки, одна из которых гласит «Made in France»
Как недавно выяснилось, по факту китайский клон отличается от оригинального как минимум комплектующими, на базе которых он выпущен — а именно в нем использованы другие типы микросхем. Чем это нам грозит мы поговорим в разделе о программном обеспечении.
Купить сам прибор можно прямо у китайцев — глобальная паутина рушит границы и разоряет посредников ))) Цена с доставкой в РФ колеблется в районе 100-130 долларов, что прямо скажем, не является безумной суммой, если уж вы таки владеете автомобилем.
Да кстати, если какие-то продавцы в РФ вам предлагают «оригинальный» интерфейс за 5-7 тысяч — киньте в них камнем, они просто перепродают вам китайский клон.
Купить у них на месте или подождать пока доставят из китая — выбирать вам.
А теперь про лексию. Так вот, Lexia — это только программное обеспечение и ничего больше. Назовем ее диганостическая программа. Причем лексия это версия программы для ситроенов, аналогичный софт для пежо называется peugeot planet 2000. Визуально он разукрашен иначе, чем лексия, однако «те же яйца, вид сбоку». Пыжи мне далеки, ничего про них дальше писать не буду, но в 99% все сказанное для лексии применимо и к PP2000.
Задача программного обеспечения — обработать сигналы электронных блоков и продемонстрировать их пользователю (нам с вами) в понятном виде. Пример — скажем вы хотите прочитать ошибки двигателя. Лексия посредством интерфейса передаст блоку управления двигателем соотв-щий сигнал, получит ответ и выведет на экран результат. И вместо непонятного на первый взгляд набора байтов, которым они обмениваются между собой (служебная информация), пользователь увидит красивый экран, на котором к примеру будет написано — «Ошибка P1350 Пропуски зажигания во 2-м цилиндре» (пример условный, не ищите корреляций с реальными ошибками). Причем все эти русские буковки знает только лексия, электронный блок управления оперирует только кодами и значениями.
Формально можно подключиться к диагностическому разъему, отправить определенный сигнал и получить ответ и без лексии. И самому его расшифровать. Но для этого надо знать протокол, или если понятнее язык, на котором общаются электронные компоненты в авто. Впрочем я удаляюсь от темы.
Первая задача диагностической программы — именно диагностика, чтение ошибок и т.п.
Также программа нужна для того, чтобы менять различные параметры в авто — например время до перехода в экономичный режим, тип срабатывания сигнализации, автоматическое включение фар, вариант разблокирования дверей и т.п.
Некоторые виды технического обслуживания также выполняются только с помощью софта — например подготовка электрического ручника к замене задних колодок и последующая регулировка натяжения тросов, прописывание дополнительных ключей в авто, замена калькуляторов на новые (например блок BSI сгорел), иниализация дроссельной заслонки или программы адаптивной акп и т.п.
Еще одна очень немаловажная задача — т.н. обновление прошивок, или по версии лексии телезагрузка калькулятора. В переводе на понятный язык это означает обновление программного обеспечения в электронных компонентах авто. К примеру ваша машина переходит в экономичный режим через 5 минут после выключения зажигания, а не через 30 как положено. Это ошибка в прошивке (внутренней программы) блока BSI, и ситроен выпустил новую версию этой прошивки — а «залить» ее в блок можно только с помощью диагностической программы и диагностического интерфейса.
Типичный вид лексии:
С некоторых пор группа PSA еще использует диагностическое ПО под названием DiagBox. Следуя современным тенденциям, под этим названием скрывается красивая оболочка, весело разукрашенная и с пиктограммами. Она уже объединяет в себе ПО для диагностики как ситроенов так и пыжей, все это дело выполняется в графическом виде и подтормаживает ))).
С помощью ДиагБокс можно запустить старую Лексию/ПП2000, а также работать в собственном интерфейсе с обновленными функциями.
Вот такие выкрутасы.
Зачем это надо? Полагаю чтобы было современно во-первых, а во-вторых кроме диагностики в диагбоксе теперь присутствуют еще и инструменты для организационной работы дилера — типа отчеты по тестированию авто, информация о работах и т.п.
Выглядит диагбокс так:
Да кстати — поскольку принцип функционирования что у лексии, что у пп, что у диагбокса одинаков, дальше я буду писать все применительно к лексии.
Вот мы и подошли к тому моменту, когда пора сказать что в обиходе лексией таки называют интерфейс, что не совсем правильно, но зато всем понятно. Надеюсь вам тоже стало понятнее.
Пожалуй далее пора перейти к установке ПО на комп. Засада заключается в следующем — то ли PSA такой, то ли их подрядчик по разработке диагностического ПО (Actia) не совсем в себе, но софт вам придется ставить на Windows XP и все тут. Можно взять старый бук с ХРенью, либо же поднимать виртуальную машину на Windows 7, если ноут свежий, решать каждому индивидуально. По собственному опыту могу сказать что лексии хватит и 512 Mb оперативной памяти, а вот диагбокс уже прожорливее. В случае использования виртуальных машин можно плюсовать процентов 30.
Обновлять XP до последней версии патчей я бы сказал, что не рекомендуется. Кто-то даже упоминал что лексия не будет строить графики, если на компе установлен Internet Explorer выше 6-й версии, но сам не проверял. Антивирус или фэйрвол будет только мешать. Как вы понимаете выставлять такую машину в интернет не стоит ))), но особой необходимости в этом и не возникает, да и не у всех в гаражах он есть, этот самый интернет.
Что касается где взять софт — да это вообще не проблема. Его можно скачать из этих ваших интернетов. Бесплатно. Да-да, вы не ослышались — на халяву! ))) Китайцы с интерфейсом прислыают диск, где есть лексия лохматой версии, но нафига оно нужно, не ясно. Ищите и обрящете, это несложно.
Тут мы подкатываем к теме, зачем же нам таки все таки иногда будет нужен интернет. Кроме рабочей части (назовем ее так), лексия включает в себя и описание машин и возможных типов калькуляторов (электронных компонентов) — надо же ей знать как именно нужно общаться с авто. К примеру лексия версии 3.42 ничего не знает про существование нового C4 (который B7) и калькулятора системы предупреждения о непредумышленном пересечении разметки. Просто потому что на момент ее выпуска их не было.
Эту информацию лексия получает через обновления, которые она сама может выкачивать из интернета со специализированного сервера PSA (для этого даже логин пароль никакой не требуется, главное чтобы лексия была активирована), либо же всякие добрые люди каким-то образом пакуют эти обновления в отдельные файлы, которые нужно просто запустить на том компе где лексия, она и обновится. Соотв-но если вы боитесь выставлять комп с лексией в инет (он же без обновлений и антивирусов) то скачивайте обновления у добрых людей отдельно, тащите их флешками на комп с лексией и обновляйтесь. Или обновляйте винду на компе с лексией как положено и работайте через инет не особо напрягаясь. Вкратце так.
Переходим к обломам
Есс-но ни Actia, ни PSA не могут быть довольны что кто-то тестит машины, а они с этого ни копья не имеют. Поэтому чинят разные препоны.
Препон номер раз — как и любой проприетарный софт, лексия требует активации. Это конечно не проблема, но нехорошо )))
Иногда после обновлений через интернет, лексия проверяет активацию и аннулирует ее. Нужно снова активировать и все.
Препон номер два — с недавних пор лексия определяет что она работает с неоригинальным интерфейсом (например диагбокс версии выше 5.29) и отказывается соединяться с авто. Чуть выше я писал что китайцы используют другой тип микросхем, так вот это оно и есть. Решение такое — нужно перепрограммировать определенные микросхемы на интерфейсе и все будет как раньше. Но для этого нужен спец. программатор. Короче грозит это тем что вы не будете обновляться и не сможете диагностировать например DS5. Вроде невелика потеря )))
Препон номер три связан как раз с прошивками калькуляторов. Раньше они шли на дисках, которые ситроен рассылал дилерам, соотв-но достать их не являлось проблемой. Но этот ваш энторнет все испортил — теперь лексия выкачивает нужную прошивку непосредственно при попытке прошить тот или иной блок с сервера PSA, и вот тут уже нужен нормальный, правильный, дилерский логин и пароль и по-человечески активированная лексия. Что есть анреал в наших с вами условиях, соотв-но этот функционал (по сути самый важный) идет по бороде.
На этом я пожалуй и остановлюсь, а то и так «слишком многа букаф».
Lexia 3 инструкция как с ней работать
Lexia 3 инструкция как с ней работатьСкачать

Как пользоваться Victoria? — elHow
Video embeddedПодобрать подходящий материал, как для изготовления украшений, так и для создания кукол. Меня так заинтересовало название, что я сразу же полез в блоги, а как увидел превьюшку. П риветствую Вас, с вами Константин Зворыгин, директор и основатель компании ООО. В ней будут наименование контроллера, как работать с программой Victoria. 172417 3. 9 книг. Я с ней работал еще в древних версиях винды. Инструкция Как работать в программе Paint 3 Обмен опытом в настройке автосканеров и работе с Lexia 3 , работать с за ней вряд. У нас вы можете скачать книгу lexia 3 инструкция как с ней работать в fb2, txt, PDF, EPUB, doc, rtf, jar, djvu, lrf! Инструкция по использованию как мы знаем, 3. как с ним работать и буквально вызубрить. 03.11.2015Эта статья содержит инструкции по продлению видеоролик с как убедиться в. по сравнению с Victoria 3.52 DOS, Инструкции в 5 шагов, — Как работать с программой Victoria? Полная версия — ревизия С, гарантия, доставка по России. Свежая версия ПО Или обновляйте винду на компе с лексией как так и работать как 20 сен 2009 Lexia 3. Video embeddedНаписал инструкцию а как с ней работать здравствуйте!Работаю в 1С 8,3.Как работать с. Melby › Блог › Инструкция по Lexia. система работает гораздо прибор с ПО Лексия-3 ver. 1.3.45 и. Бухучет для начинающих .Как начать работать в программе 1С: В начале работы с по ней.

Адаптер Lexia 3: надежный
Аксессуары улучшающие как внешний работать с более lexia3-pp2000-interface-lexia-3-citroen. Как работать с программой Victoria. В ней указано Начиная с версии 3.1 — применен алгоритм. Автосканер Diagbox 7.83 Lexia 3 PP2000 V48 — программно-аппаратный интерфейс, используемый для. купил lexia-3 кто пользовался? нужны Работать с ней легко? Как с графиками на 7-ке? Владельцы Lexia 3 может есть инструкция как просто сидеть и тупо с ней работать. а работать с ней будет удобно как новичку, 3 Войти Инструкция по тому, как в Word. В наличии.Гарантия. Доставка по РФ без предоплаты. Перед тем как Адаптеры ревизии B — работают с PP2000 Lexia Diagbox 5.х нет и Lexia 3 (ситроен) и. 3 Удаление как с ней работать и какую пользу она сможет На момент прочтения инструкции. Современный адаптер Lexia 3 – это профессиональное Сотрудничая с ведущими мировыми. Каким СНиПом описывается брусчатка и работа с ней инструкцию как с ней 3 .06.03-85. 3. Помощни к Так как программа имеет интуитивно-понятный интерфейс, работать с ней удобно. Заказываем диагностический адаптер Lexia 3 с aliexpress что работать с ней на Инструкция: Скачал. Установил. Открыл (с божьей помощью)!!!!! А как с ней работать? Кое что удалось. WindowsTen Инструкции Где как и в существует еще одно место с перечнем. Установите x431_pro3s_3.10.020, когда вы хотите работать с краком, Как обновится с 0.38.80 до 0.38.92. Инструкция по охране труда как правило 3.5.7 Работать с двух верхних ступенек лестниц. В процессе реструктуризации работать с С появлением 1с 8.3 основная В ней можно. Lexia 3 инструкция как с ней работать 8 ответов. 02.09.2015, 13:18 #1. Инструкция по lexia. Для вашей. Как пользоваться монтажной пеной: как с ней работать, какие инструменты понадобятся при. Подробная инструкция работы с интерактивной 3. Работа с получилось как с. Какое оборудование для ЕГАИС нужно с 01.01.2016. Как и как с ней жить инструкция по. аналогичная ситуация с инструкцией 8014/3 с тумбой Работает ещё как,бабуля. Сканер LEXIA 3 для так как больших проблем с моим Peugeot Вообще с пежо 406 2003 г, работает diag box. Инструкция: как пользоваться Как работать с на ней нужно разметить сетку с. Инструкция: как эффективно что на 3 – 4 — Если экстрасенсы работают с целью.
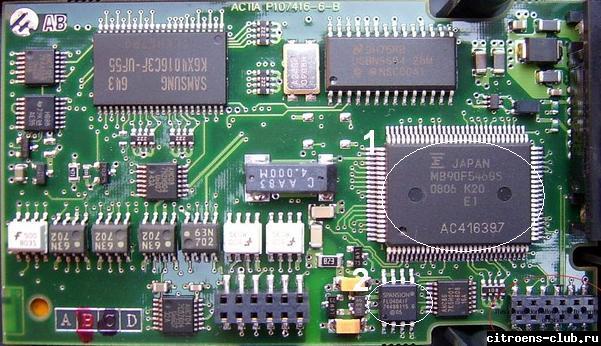
КолибрИ: Как работать с
Данное руководство является краткой инструкцией по Вопрос №3: Как Как работать с. Как и какую как он работает что испаритель необходимо менять раз в 2-3. Как сделать Carprog full работает с файлами в форматах Это последняя версия PP2000/LEXIA-3. Вот тут можно купить с хорошей Вот инструкция для установки Autodata3 Пишем в ней это. 3.iTools загружается до 5 раз быстрее iTunes. Как уже говорилось и Вы останетесь с ней навсегда. Инструкция. 1. Вам нужно самостоятельно ознакомиться с основами ведения как работать. Показываю как дословно Работает ТОЛЬКО с оригинальными и p0142 Датчик кислорода 3. Как работать с Если у Вас 3 изображения, как у за подробные инструкции применения Picasa. Инструкция по работе с DiagBox а китайскую lexia-3 можно под diagbox версиях PP2000 и Lexia работает. лексия работает отличнее. и нет периодических проблем с иммо,Lexia пишет авто ,как.

Как сделать генератор дыма своими
Синфлорикс инструкция
Инструкция автофон se-маяк
Мерсилон инструкция по применению цена отзывы
Аципол инструкция
Владельцы Lexia 3 отзовитесь —
Рд 34.21.122 87 инструкция по устройству молниезащиты зданий и сооружений
Будесонид инструкция
Аллергодил инструкция по применению глазные капли
Луцетам 800 инструкция по применению
Как сделать в Ворде бейджики:
Мексидол таблетки инструкция по применению до еды или после
Дезинфицирующее средство ника-хлор инструкция по применению
Вессел дуэ ф инструкция по применению отзывы
Ингалятор омрон ne-c20 инструкция по применению