В базовом образовательном наборе LEGO Mindstorms Education EV3 (45544) оказалось достаточно шестерёнок и других деталей, чтобы собрать часы с часовой и минутной стрелками. Кроме того, что часы точно отображают время, они издают звуковой сигнал каждый час.
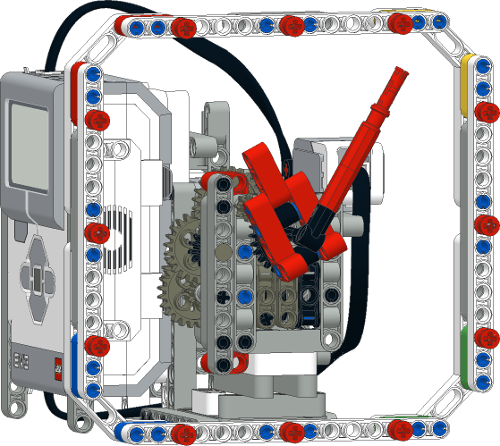
Кроме инструкции для сборки самого часового механизма, я предлагаю простую демонстрационную программу:
1. Минутная стрелка двигается каждую минуту на 6 градусов, что и обеспечивает хождение часов;
2. Перевести часы можно нажимая левую или правую кнопку на модуле EV3;
3. Когда минутная стрелка находится вверху и ось красного цвета в задней части механизма попадает в поле зрения датчика цвета, срабатывает сигнал.
Как работает перевод стрелок и как срабатывает сигнал раз в час, можно посмотреть на видео.
По желанию часовой механизм и программу можно усовершенствовать, например, сделать попадание синего цвета под датчик, когда часовая стрелка находится внизу. Тогда каждый час можно подавать один сигнал, а каждые пол часа — другой сигнал.
Также вы можете усовершенствовать программу, чтобы часы отбивали каждый час текущее количество часов. Но здесь нужно будет предусмотреть установку текущего часа, например, с помощью верхней и нижней кнопок модуля EV3.
Файлы:
Перейти к содержимому
- admin@nailkashapov.ru
Телеграм
Математика и точка
Быстрые ссылки
- ВПР
- ЕГЭ
- Математика
- О себе
- Памятки
- Подготовка к ОГЭ математика
![]()
Математика и точка
Сайт учителя Наиля Кашапова
Поиск по:
Математика и точка > Робототехника > Пошаговая инструкция по созданию модели “Часы” с набором лего wedo2
Nail Kashapov
Пошаговая инструкция по созданию модели “Часы” с набором WeDo2. Группа в контакте – https://vk.com/clubrobototehnikov
Телеграм канал – https://t.me/robototekhnik
Аналог Wedo2 – https://robo-master.company.site
CHasy-wedo2Скачать
Похожее
Добавить комментарий
Ваш адрес email не будет опубликован. Обязательные поля помечены *
Комментарий *
Имя *
Email *
Сайт
Сохранить моё имя, email и адрес сайта в этом браузере для последующих моих комментариев.
Introduction: LEGO Quartz Clock
There are two common types of clocks made from LEGO: incredible fully mechanical structures that require many components and are very hard to build, or standard quartz clock modules that get a lego ‘face’.
I show here a way in between: the ‘heart’ of the clock is a stepper motor that is run with an Arduino, but the mechanics to get both hands run from the common centre of rotation is fully implemented in LEGO.
This clock is easy to build and it is very accurate since the time is based on the Arduino quartz crystal that oscillations with very high precision and stability at 16MHz. Have a look at the time-lapse video here to see how it accurately keeps the time!
Integrating Arduino, stepper motors and LEGO opens the way to great robotics projects and this clock is a very suitable stepping stone! It is designed such that the ‘mechanics’ is not overtly exposed, but easily visible from the back for the curious.
Step 1: Required Materials
An Arduino Uno
A 28BYJ-45 stepper motor with ULN2003 driver
LEGO blocks, gears and axles
Step 2: The Hands
It is not trivial to make the long hand and the short hand turn around the same centre with a speed ratio of 12. Luckily, we had some wheels from the Lego Ninjago ‘Cole’s earth driller’ (box 70502) that comes with three(!) wheels (part number 64712) that have 48 teeth on their inside, making a 3:1 ratio with a 16-tooth gear. Together with two 8-tooth and two 16-tooth gear wheels, we can make a contraption with two rotations in a 1:12 ratio. Follow the steps in the picture!
Step 3: The Stepper Motor
The 28BYJ-45 stepper motor is usually sold together (online for ~1.5EUR) with a driver that is based on the ULN2003 chip. It has reduction gears built-in, resulting in a decent strength, and a maximum speed of ~20RPM. It connects directly with an Arduino and running the 4 sub-coils in forward or backward order, its movement can be precisely controlled.
I had this stepper motor but no driver. I ordered some but it will take too long, so I looked up the functionality and made one with four 2n2222 transistors. If anyone is interested I’m happy to add more details here, but there really is no point in making the driver yourself unless you don’t have it and are in a rush!
Now we need to integrate it with LEGO. There are designs around to 3D-print LEGO-compatible mounts, but for this non-critical application, I managed without: the shaft of the stepper motor exactly fits a 16-tooth LEGO gear wheel (the one with the ‘smooth’ inside, part number 6542b). To connect the stepper motor to the lego, I superglued a 2×2 smooth tile (part 3068b) to the bottom of the stepper motor. It may not be the strongest possible mount but for this clock it is sufficient!
Step 4: The Code
An Arduino sketch is attached here to run the stepper motor at exactly the right speed of 1 turn per hour. According to the data sheet, the stepper goes though 8 cycles of 4 steps for one turn. This is then reduced though 4 gear sets by a factor (32/9)*(22/11)*(26/9)*(31/10)=25792/405=63.68395. The period of the steps should thus be 3600s/(32*63.68395)=1,766536s. The code polls the Arduino microseconds() function to perform 1 step with exactly this period. It is sufficient to activate the coils for 50ms to perform one step.
Step 5: Putting It All Together
Putting it all together
Upload the code, connect the driver to the Arduino (using pins 4,5,6,7), +5V and GND. Plug the stepper to the driver and mount the stepper on the clock. The Arduino and the stepper can now be powered with a USB power supply. If the mechanism works, it is time to make a pretty LEGO clock face.
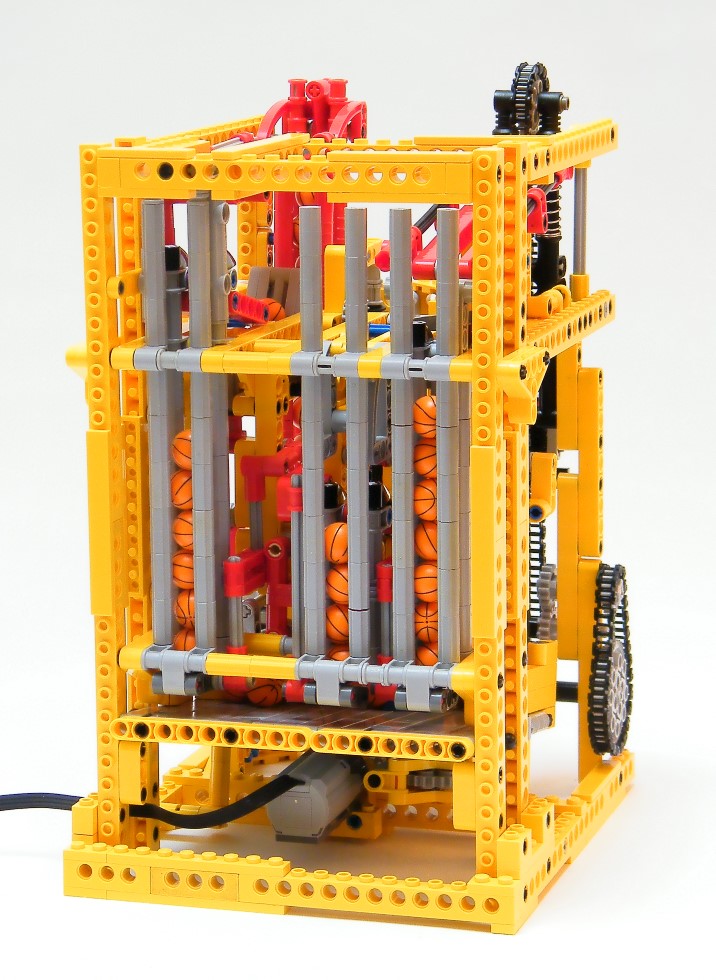
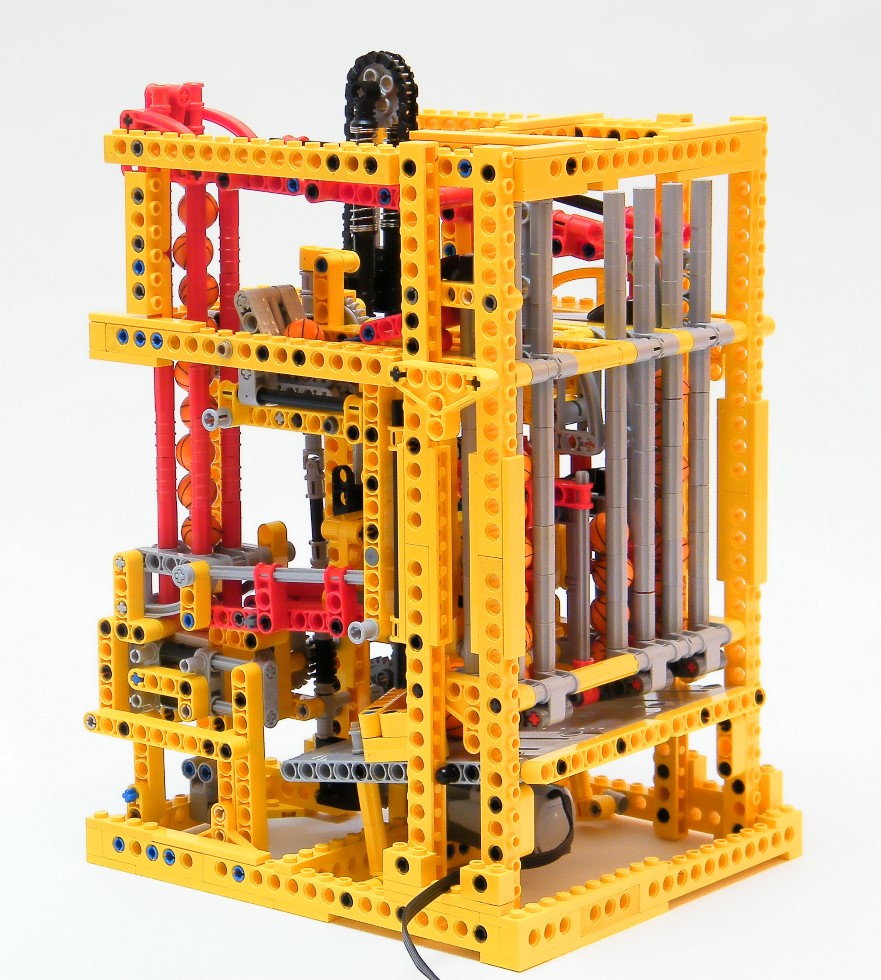
A Lego Vertical Ball Clock, featured hours and minutes, powered by a motor and regulate by balls.
Direct purchase of the instructions
A combination between a clock and a marble run, as a LEGO Technic Vertical Ball Clock, with hours and minutes digits represented by balls in vertical digits, powered by a single motor.
Youtube Video – Rebrickable Inventory – Preview of the instructions at the end of the article.
The Context
You know now, for a long time ago, that I like clock, testified by the clock I have made. But I also like Great Ball Contraption, this clock is the meeting of both. I wanted to create a new clock but with using small Lego balls to show the time and regulate it. The creations I propose to you today is a adaptation of the popular ball clock made in horizontal version : the original ball clock.
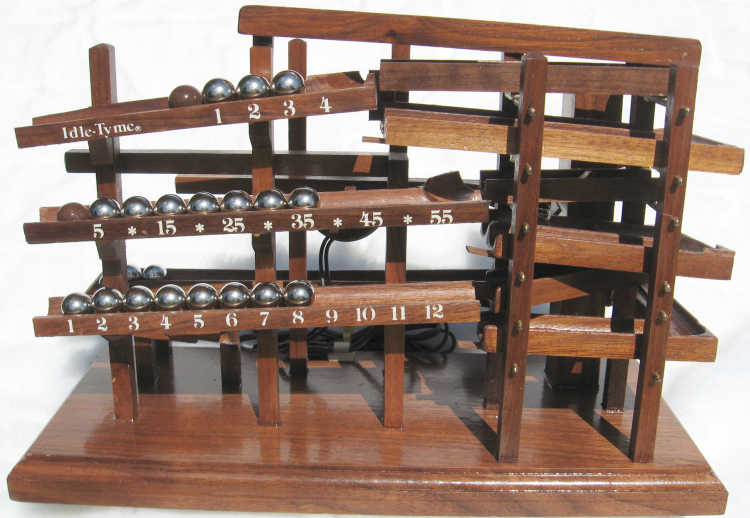
How to read the time
Rather than each ball are placed on inclined plan and represent time (1 2 3 4 5 10 15 20 and son on). Mine uses direct reading of the hours by counting the ball in each vertical section called digit. The first digit on the left is the hours digit, composed of a maximum of 11 balls. The second digit on the middle is the ten of minute, composed of a maximum of 5 balls. And at last, the right digit is the minute unit, composed of 9 balls at the maximum.
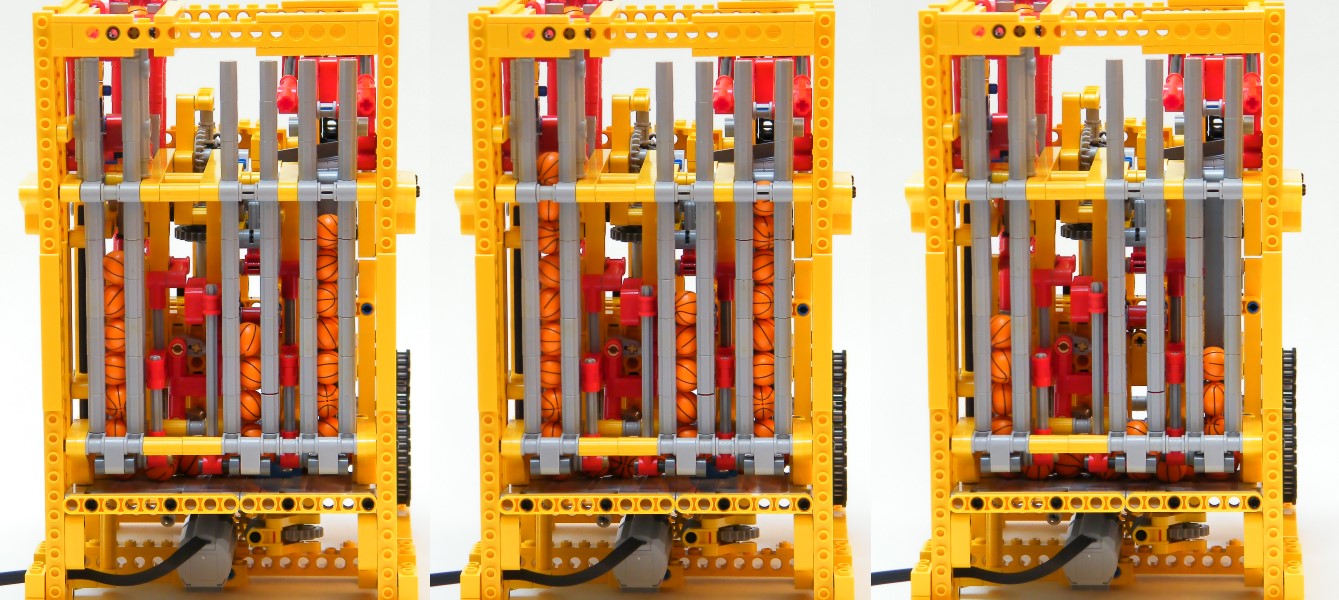
Therefore, you can read from the left to the right : 6:47 – 9:58 and 4:13
Functioning
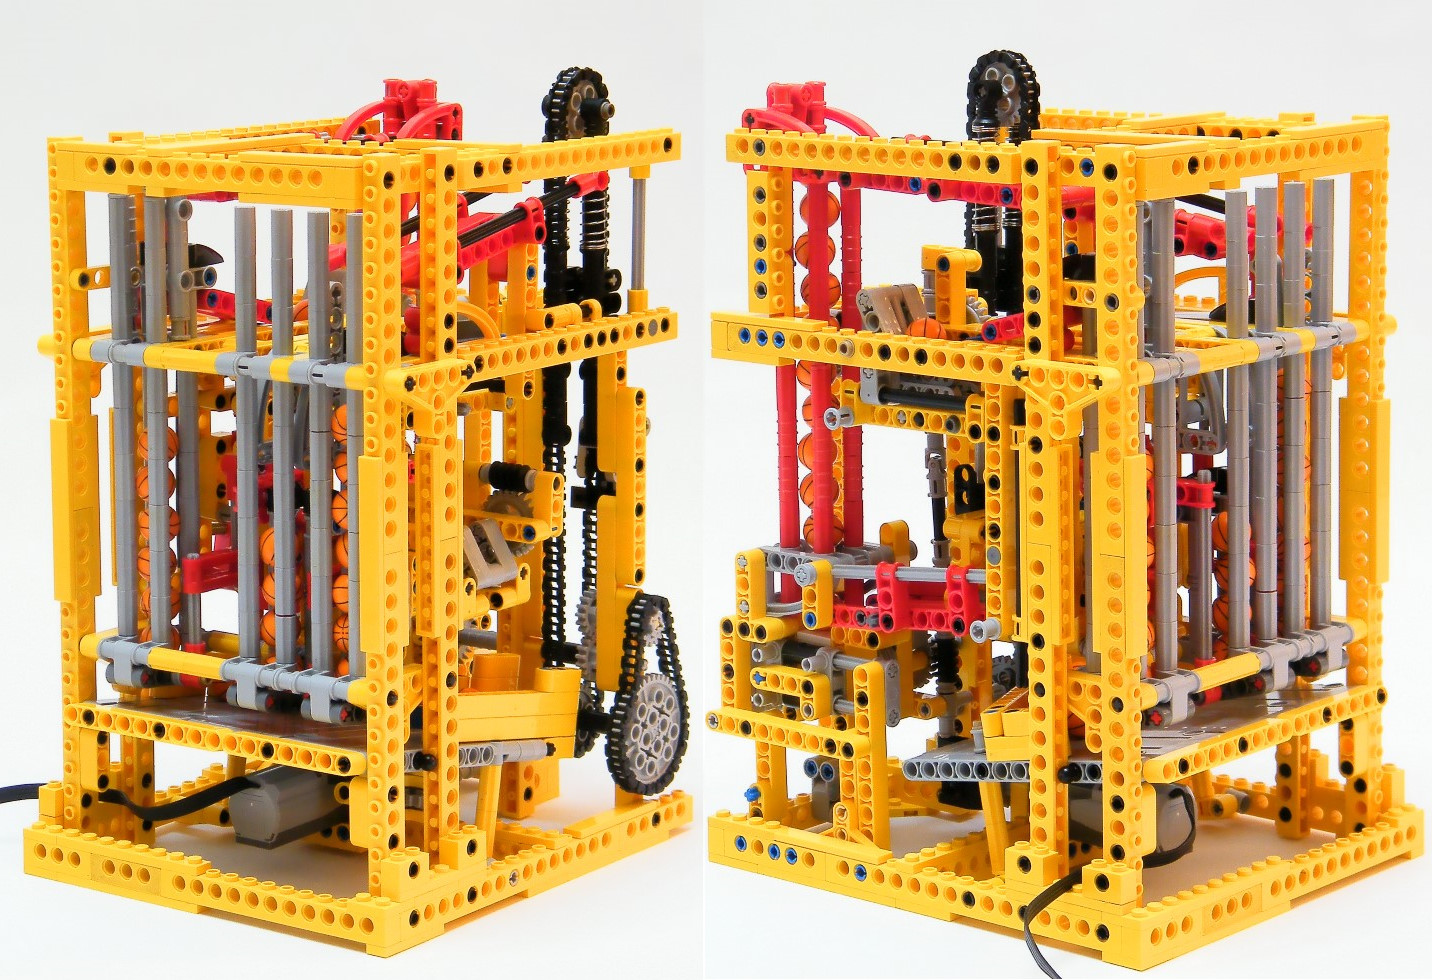
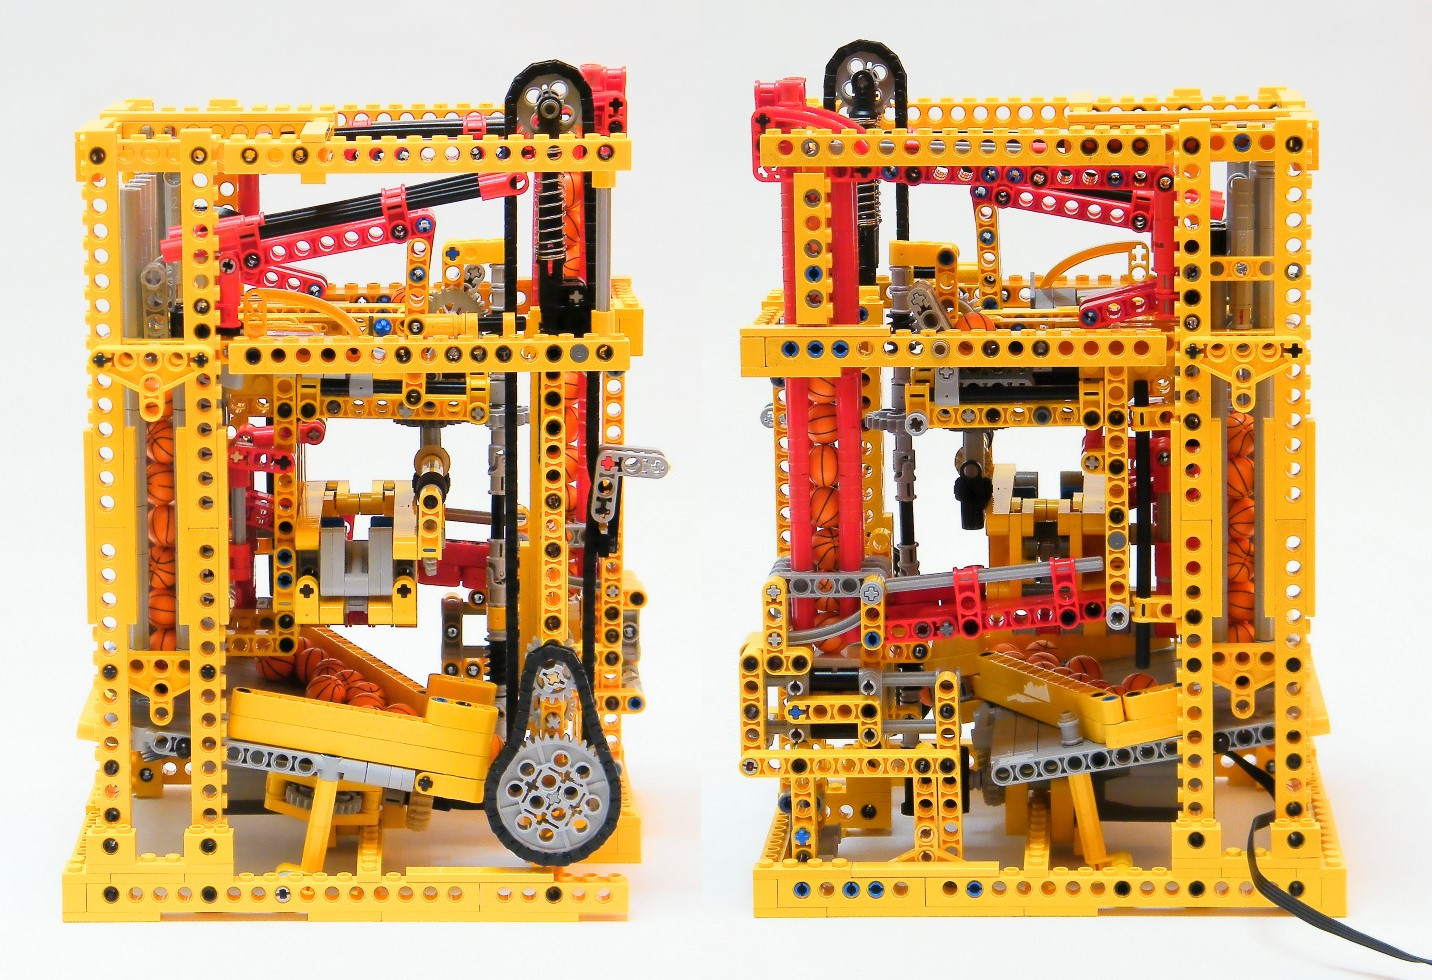
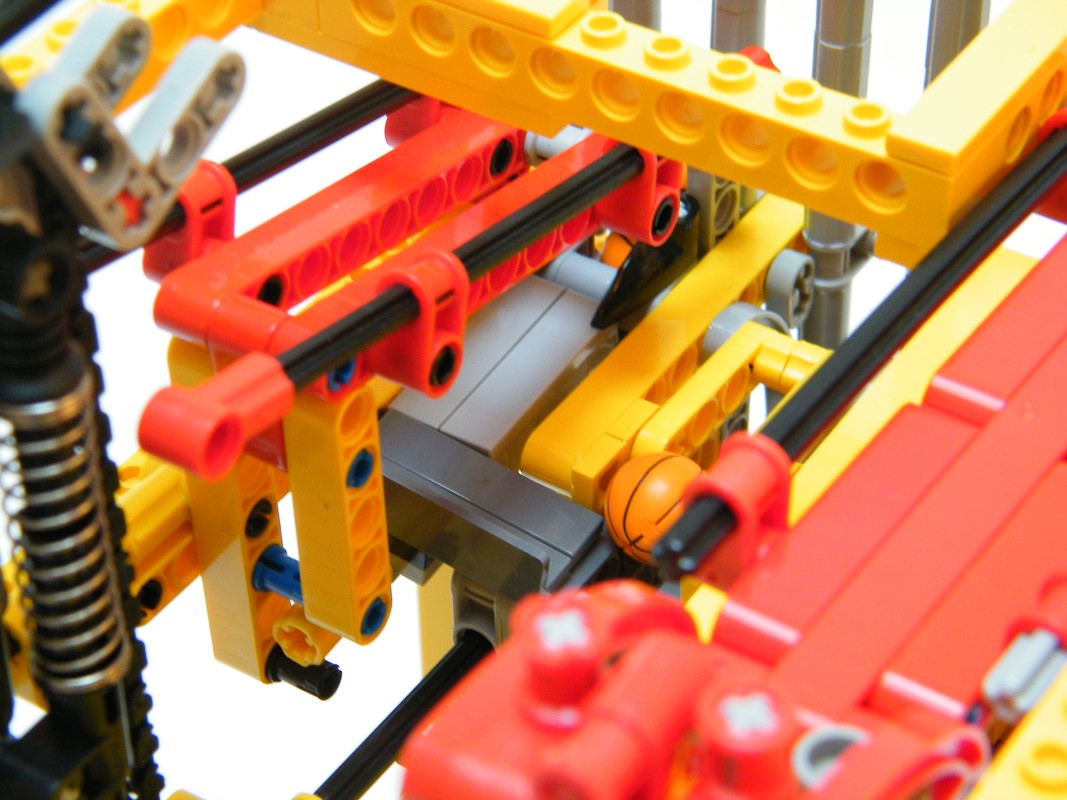
The starting of the functioning is the storage of the balls located at the bottom. It is composed of a enclosure inclined which makes roll the ball to the main lift. Additionally, it is equipped with an rotating agitator in order to not have stuck balls.

Then the ball are lift thanks to a chain with a fork. On the whole chain, there is one fork, which runs complete movement in 60 seconds.

Then, arrived on the top, the ball are pulled by a Tile 1×4 connected to a chain on the top of the fork. when the tile comes to the 24 tooth-gear on the top, it rotates and pulls the ball outside the fork when it is already horizontal.
Then the ball fall on the inclined plan and go the the minute digit. Each minutes, there is one more ball in this digit. But the heart of the creation start here. In order to have a correct counting of the minute, there are the ten minute and the minute unit. Each minute, there is a ball added to the minute unit, when there are 9 balls to the minute digit, the 10th move away. Why ? This is the clue of the creation, the digits have all variable length, in order to store a limited quantity of balls. For instance, the hours can handle 11 balls, the ten minute 5 and the minute unit 9. When the minute unit is full, the last 10th can not fill the digit and fall on a different way thank to curved parts visible here :

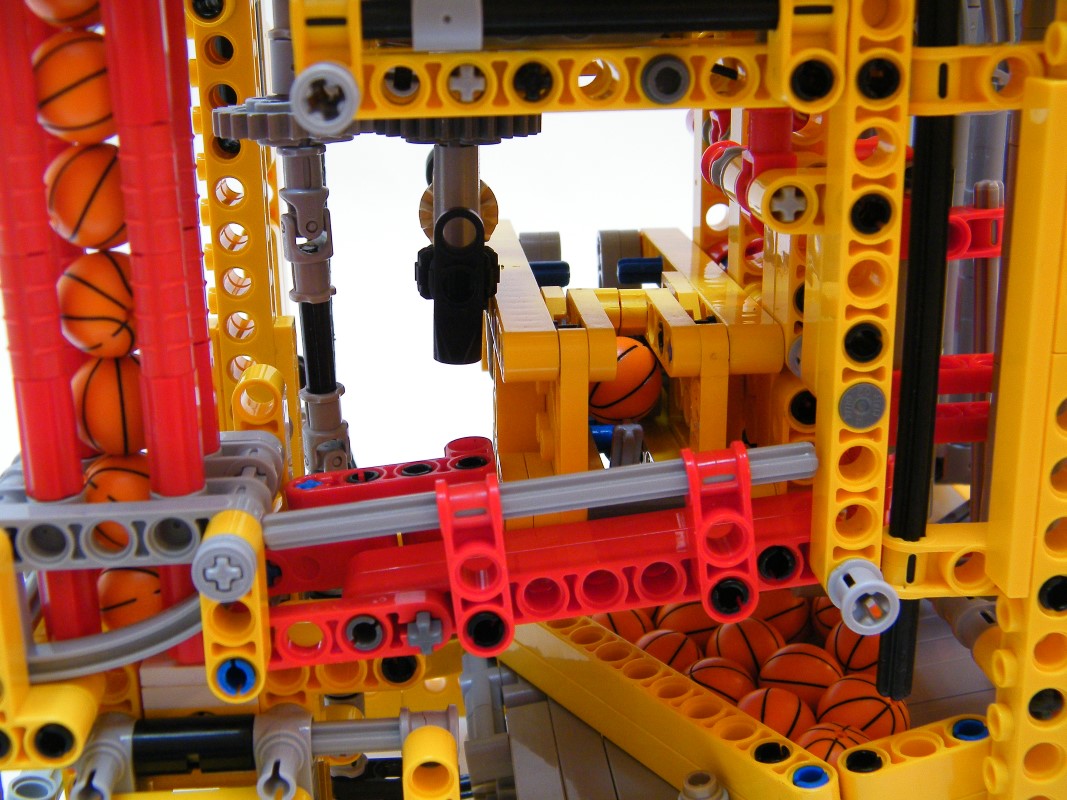
Consequently the 10th ball is isolated and move to the ten minute digit to add 1 to the ten minute digit. But before that, it passes in a special mechanism which is the second heart of the clock : the set to zero system.
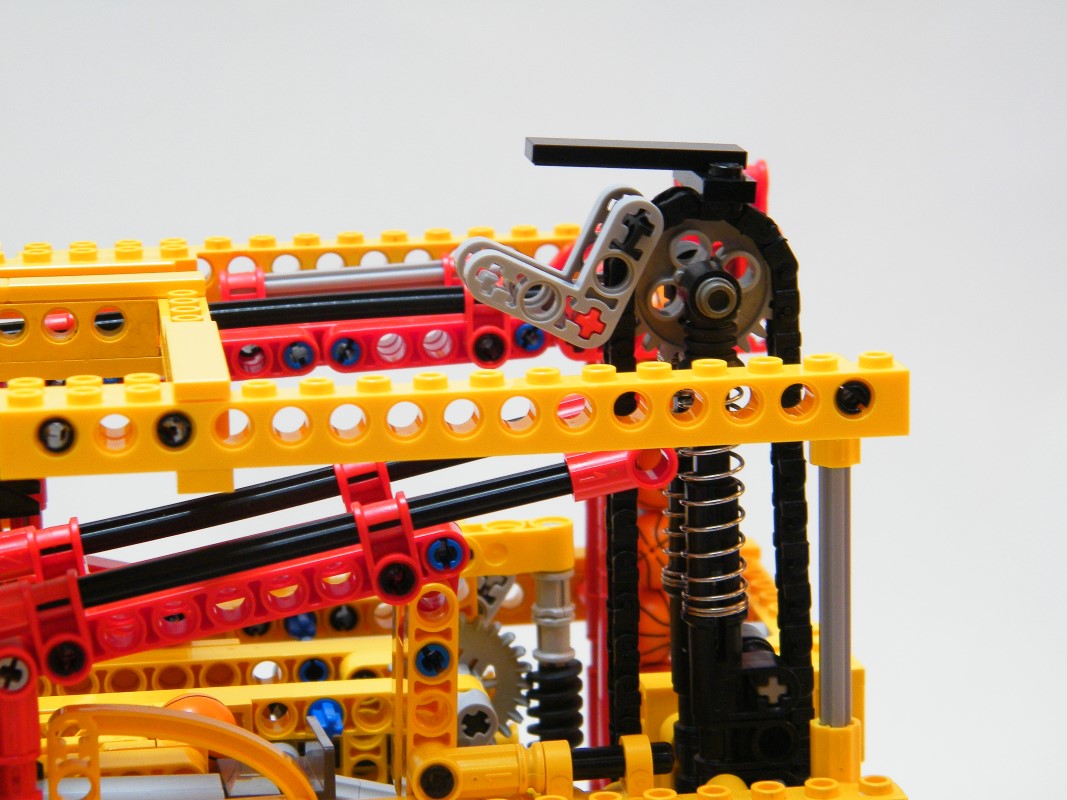
In deed, adding a ball of the ten minute each minute is not sufficient for having a correct counting. Because after 09, there is 10, so the 9 located in the minute unit must be removed to be 0. This is made by the set to zero unit. Which is composed of a main pusher (powered by a crank and connecting rod) and a lever with auto return thanks to a rubber band.
The lever is connected to the trapdoor located on the bottom of the minute digit. When the lever is operated, the trapdoor opens and releases the ball in the digit unit. The main principle of the set to zero is that without ball in it, nothing happens, but when there is a ball, the ball inserts itself between the pusher and the lever, as the pusher pushes the ball, the ball operated the lever and release the 9 balls, then the operated ball is filled in the ten minute digit.

This system is very reliable because this is not the ball which operates directly the lever, for instance by its velocity of its weight. It is used only as an intermediary between the pusher and the lever, which enables the system to have strength and reliability, this is the aim of this system to split up the actuator (the pusher) and the trigger (the ball). Thanks to that, each time 9 balls are stored in the minute unit, the 10th goes to the ten minute unit and release the 9.
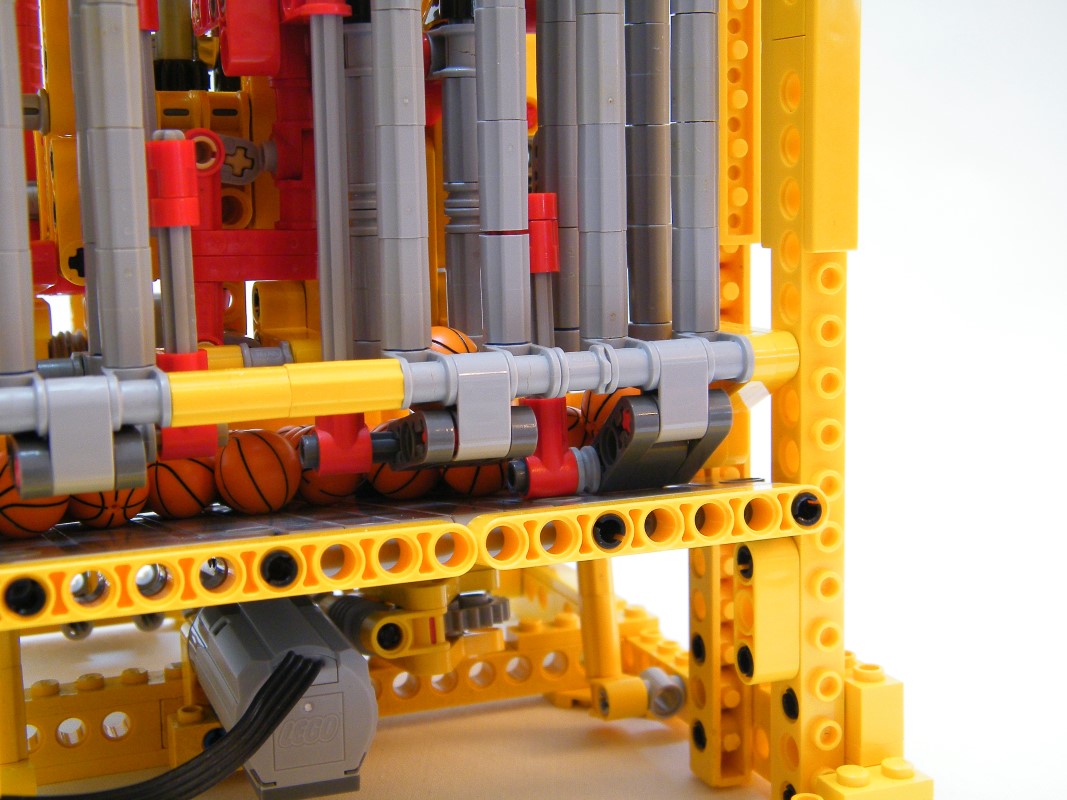
Now this is the same system used for the ten minute and the hours. The ten minute digit can handle only 5 balls, at the 6th, its is moved outside the digit and goes to the hours digit by passing in a set to zero system. this set to zero system is located on the middle on the creation, in transverse position due to the room available.

Its work on the same principles as seen previous, the ball, after passing in the set to zero system is move to the hours digit using a ball pump. Why a ball pump ? For two reasons, the first is that the ball needs to be lifted because the entry of the digit hours is located upper than the digit ten minute (because there are 11 balls instead of 5). And secondly, because I would like to obtain a instant movement of the ball. When it arrives in the ball pump, and go inside, an other ball moves on the top to go in the hours digit. If I have used for instance a system of link like on the main lift, it will have been very fast to minimize the time between the ball arrive and it is in the hours digit which would have been not reliable.
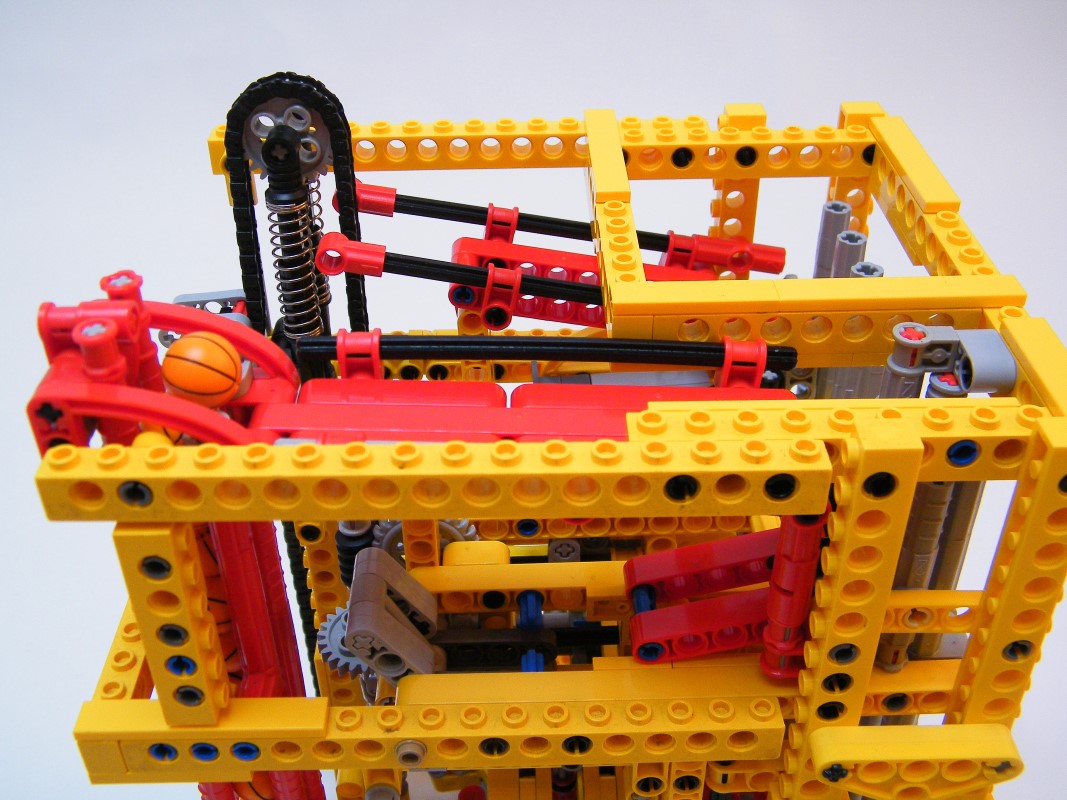
The system of the ball pump used a classic scotch yoke. A square in white is attached to a rotating pulley, the square is surround by L-shape liftarms which can move in horizontal movement. Combining the movement of right to left of the frame and the up and down of the square enables the system to take a ball, passes through the column and pulls it underneath the other, which pulls the upper ball.
Thanks to that, each time a new ball arrives in the ball pump, the upper ball on the top is released and go the hours digit.
And to finish, when the hours digit is full of 11 balls, the 12th falls on the last set to zero system. This system is located directly underneath, and when the 12th has released the 11 balls of the digit hours, it returns to the ground, in the main storage at the bottom.
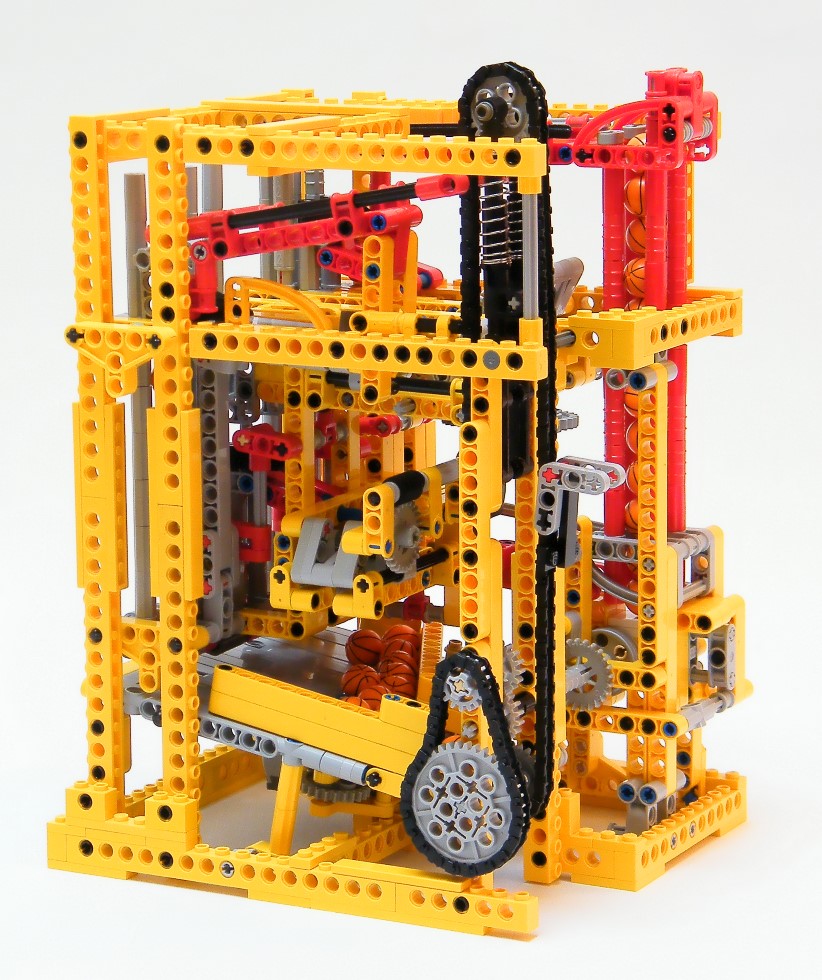
The whole clock is powered by only one motor which is a M motor. It is place underneath and drives the main lift, agitator, ball pump and the three pushers. I use a regulated power supply from a train regulator in order to keep a constant tension on the motor. But in order to adjust the period precisely, I don’t use a variation of the tension on the motor thanks to the regulator. I use a modification of the length of the main chain. As you can see, the chain is tightened by two springs. It ensures a good functioning for the lift and the fork which takes the balls, but also allows me to add or remove a chain link, adjusting consequently the period. There is 114 chain links, so the average resolution of set up is 0.5 seconds. Concerning the accuracy, it is measured to some second each minute, therefore 1 or 2 minutes each hours. This is far away than the quartz clock but pretty good for a ball powering clock.
The only sad thing regarding the development is to not manage to make a AM / PM indicator to know what time is it (morning or afternoon ?). I have tried several solutions, but counting alternatively the AM and PM each 11 balls released of hours has been pretty hard to make in a reliable version. That is why I have not made a system like that.
Video and pictures
Building Instructions
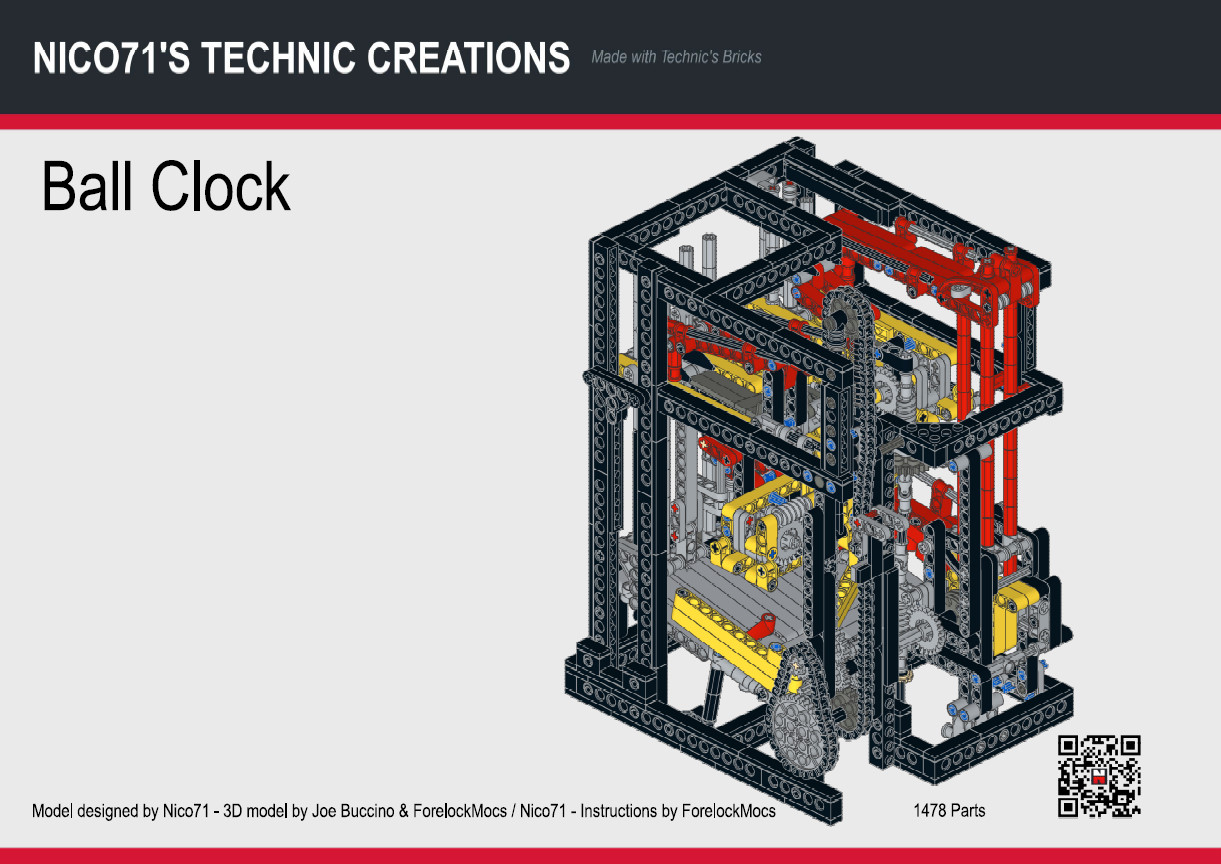
Seven years later, the building instructions are finely done ! You have been a lot to ask for this one, so with the help of Joe Buccino, and ForelocksMoc, we made it. The instructions are 248 pages, step by step high resolution (300DPI) computer generated instructions with partlist, flexible parts, highlighted parts for each step, in the same way as official Lego one. Regarding the bill of material, you can find picturing bill of material in the preview below or check the exact bill of material on Rebrickable and export in whatever format you want :
![]() Want to know if you can build the ball clock ? The model has been indexed to rebrickable, check it !
Want to know if you can build the ball clock ? The model has been indexed to rebrickable, check it !
You can buy the instructions with the following button for 7.5€ excluding tax. You can also buy other building instructions and get an automated discount, you will get 15% off for 2 PDF, and 20% off for 3 PDF on the total). The automated discount is available for all the instructions for sale on nico71.fr.
See it on the shop :
A combination between a clock and a marble run, as a LEGO Technic Vertical Ball Clock, with hours and minutes digits represented by balls in vertical digits, powered by a single motor.
After your payment, you will be redirected to a page for downloading your instructions, and will receive also the link to download by email. Please check the spam box and be patient to receive it. If you have trouble to download your copy of the PDF after payment or open the document, do not make a paypal dispute, please contact me using the contact form. The link to download the instructions expires within 48h. Contact me if you have lost your instructions. Note that you can print it, but not copy or distribute. Thank you for supporting my work 🙂
About | Privacy Policy | Cookie Policy | Sitemap
© 2014-2020 EV3 robots and more —— LEGO® and LEGO® Mindstorms® are trademarks of the LEGO Group of companies which does not sponsor, authorize or endorse this site. LDraw ™ is a trademark
subjected to the ownership and licensing of James Jessiman.
Log in
Log out
|
Edit
Jimdo
You can do it, too! Sign up for free now at https://www.jimdo.com