Huion KAMVAS 13 — Drawing Pen Display Manual

Precautions
- Please read this manual carefully before using, and keep it well for future reference.
- Before cleaning the display please unplug the USB cable and wipe with a soft damp cloth, do not use any kind of detergents.
- Please don’t place the display near water sources such as bathtub, washbasin, sinks, washing machine, damp basement, swimming pool, etc.
- Do not place the display on where is unstable or a height for children reaching easily in order to avoid danger.
- Do not place the display and digital pen close to the magnetic field.
- The grooves and holes on the back case is designed for ventilation to prevent the monitor from overheating. Please don’t place the display on beds, sofas, carpets or in embedded device.
- Only power supplies shown on the nameplate can be used for the display. If you have questions about the power supply which you are using, please consult the distributor of your display.
- To protect your display, please switch off the power when it is not in use. During blackouts or not using for long time, please unplug the display from the socket.
- Don’t overload the socket or lengthen the power wire, which may lead to electric shocks.
- Make sure no foreign bodies get inside the monitor through grooves and prevent liquid from splashing on the display as to prevent short-circuit or fire.
- If the display has a breakdown, do not open the main case and try to repair it by yourself. Please ask for a service for proper repair and maintenance.
- When the following situations occur, please unplug the power adapter and you may need a service for full repair and maintenance:
- The power wire or plug is damaged or worn out;
- There is liquid splashed inside of the display;
- The display has fallen or the LCD is broken;
- When obvious abnormalities occur to the display
- While getting the components replaced, you are supposed to guarantee that the repairman is using the substitute components specified by the manufacturer. Unauthorized component replacement might cause fire, electric shocks or other dangers.
Product Overview
Display Introduction
Thanks for choosing HUION® KAMVAS® 13 Pen display. This is a new generation of portable desktop-level professional drawing display, which can greatly improve your work efficiency of painting and creation, and full of fun. You can freely painting and writing, depicting different lines and colors, just as the pen writes on the paper, which brings you a real shock experience.
To give you a better understanding and using of your KAMVAS display, please read this user manual carefully. The user manual only shows the information under Windows, unless otherwise specified, this information applies to both Windows and Macintosh systems.
Product and Accessories
Product Overview

3-in-1 Connection Cable
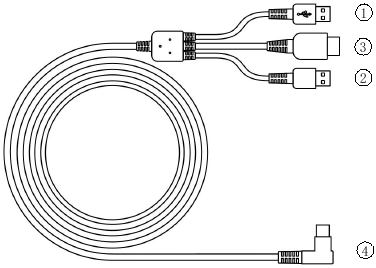
- USB
- HDMI
- Power (Red USB Port)
- Type-C
Display Stand (Optional)
We designed this standspecially for your KAMVAS display, you can adjust the angle of the display according to your usage habit, and make you feel more comfortable in painting and creating.
")
Other Accessories

Digital Pen

Pen Holder

Pen Nibs

Nib Clip

USB Extension Cable

3-in-1 Cable
")
Stand(Optional)

Cleaning Cloth

Glove

Quick Start Guide
Connected to Computer
Connected with 3-in-1 Cable

Notice:
Generally the device can be powered on when the black USB-A cable is connected to your computer. A flashing screen of the device may indicate a low battery, in which case you are suggested to connect the red colored USB-A cable to another USB interface on your computer or the power adaptor. The power adaptor is not included in the package and requires extra cost. Power adaptor of your mobile phone is also compatible.
Connected with USB-C to USB-C Cable

* USB-C to USB-C cable is not included in the package and requires extra cost. Please purchase the cable through official channels as it is customized and cables from unknown sources may not be usable with the device.
Driver Installation
OS Support
Windows 7 or later, macOS 10.12 or later
Install via Download
Please download the driver from our website: www.huion.com/download
After finishing installation, you can find the driver icon ![]() in the system tray area, which means the driver was installed successfully; when you connect the tablet to computer, the icon will change to color
in the system tray area, which means the driver was installed successfully; when you connect the tablet to computer, the icon will change to color ![]() , which means the driver has already recognized the tablet and you can start using it now.
, which means the driver has already recognized the tablet and you can start using it now.
Notice:
- Before installing, you need to uninstall other driver of similar products, includingthe old driver of this product.
- Before installing, please close all graphics software and anti-virus software toavoid unnecessary mistake.
Connected to Android Phone/Tablet
As shown in the figure above, connecting your Android phone and pen display with USB-C to USB-C USB 3.1 Gen1 cable and connecting the pen display and the power adapter or power bank with USB-C to USB-A cable.

Note:
- USB-C to USB-C cable and USB-C to USB-A cable is not included in the package and requires extra cost. Please purchase the cable through official channels as it is customized and cables from unknown sources may not be usable with the device.
- The power adaptor is not included in the package and requires extra cost. Poweradaptor of your mobile phone is also compatible.
- Please make sure your smart android phone support Dex or PC mode.
Pen Nib Replacement
The nib will be wear out after using for long time, then you need to replace a new nib.

Product Basic Operation
Using The Pen
Hold the pen
Hold the pen as you hold a normal pen or pencil. Adjust your grip so that you can toggle the side switch easily with your thumb or forefinger. Be careful not to accidentally press the switch while drawing or positioning with the pen.

Notice: When not in use, place the pen in the pen case or on the desk. Do not place the pen on the surface of screen, which may interfere with the use of other screen cursor positioning equipment, it may also cause your computer unable to enter the sleep mode.
Position the cursor
Move the pen slightly above the active area without touching the screen surface, the cursor will move to the new position accordingly.
Press the pen tip on the screen to make a selection. Tap the screen once with the pen tip, or touch it to the screen with enough pressure to register a click.


Click
Use the pen tip to tap on the screen once to produce a click. Tap to highlight or select an item on the screen and double-click to open it.

Move
Select the object, then slide the pen tip across the screen to move it.

Use the side buttons
The side buttons of the pen can be set to two different customizable functions. You can use the buttons whenever the pen tip is within 10mm of the display active area.
You do not have to touch the pen tip to the display in order to use the switch.

Using the Display
Power Button
The power button was placed on the left side of the digital screen, you need to turn on the power switch before using.
Press Keys
There are 8 press keys on the top left side of the display, which you can modify the functions according to your own habits, thus will help to improve your work efficiency.
OSD Function

Enter OSD Menu:
- Press K4 & K5 for around three seconds until the OSD menu appears and meanwhilethe indicator will flash green. The function of K2 K3 K6 K7 will become OSD function.
- In the menu, the function of K2 K3 K6 K7 will become as the following:
K2 AUTO: Before entering menu, its function is auto adjustment.
After entering menu, its function is back to previous menu.
K3 MENU: Press to call up the menu, after entering menu, its function is confirm.
K7- : After entering menu, its function is down/left/decrease.
K6 + : After entering menu, its function is up/right/increase.
Exit OSD Menu: - Press K4 & K5 again for around three seconds until the OSD menu disappears, thefunction of K2 K3 K6 K7 will become shortcuts function again.
Function Setting
Device Connection Prompt
- Device disconnected: The display hasn’t connected to your computer.
- Device connected: The display has already connected to your computer.

Working Area Setting
Using Multiple Monitors
When the KAMVAS Display and other monitors are used in the same system, the movement of the screen cursor on the standard display depends on the system configuration. If the secondary display is a mirrored mode connection, this display and another monitor will display exactly the same image and screen cursor movement. If you are in the extended display mode, you need to set the display on the driver that which portion of the display screen your KAMVAS will map to.

Working Area Setting
Define the display area that will be mapped to the screen area.
- Full Area: the entire active area of the Display. This is the default setting.
- Same Ratio with LCD.
- Customize Area: 1.> Enter coordinate values. or2>. Drag the corners of theforeground graphic to select the screen area.

Rotate Working Area
By changing the direction of the display to adapt to the left and right hand operation. We provide four directions of choice.

Press Keys Function Setting
Default Setting: Place the cursor on the button or click the button icon to see the default values for the press keys
Customized press Keys: Select the function to be achieved on the pop-up dialog box, then click APPLY or OK to take effect.
Touch Bar: you can slide up and down to achieve zoom function.
Enable/Disable Press Key: Check/Uncheck»Enable Press key»

Pen Button Setting
Select the function to be achieved on the pop-up dialog box, then click APPLY or OK to take effect.

Pressure Sensitivity Setting
The pressure sensitivity will be changed by dragging the slider up and down, the smaller the value, the more sensitive the pressure.

Pen Pressure Testing
You can gradually apply pressure to the stylus on the screen to test the pressure level. Click «Clear» button to clear all the ink.

Calibration
Screen Calibration: Click the red point of the cross center appearing on the screen to complete the calibration.
Restore Factory Settings: Click «Restore Default» to restore to the factory settings.
Cancel Calibration: Click»Cancel calibration» or press ESC on the keyboard to cancel the calibration.

Enable the Windows Ink feature
Microsoft Windows provides extensive support for pen input. Pen features are supported in such as Microsoft Office, Windows Journal, Adobe Photoshop CC, SketchBook 6 and so on.

Data Export and Import
The driver supports exporting and importing your customized configuration data of the product, which is convenient for you to use different software and avoid the trouble of repeated settings.

Specifications
| Model | GS1331 | |
| Screen | Panel Size | 13.3 inch |
| Resolution | 1920 x 1080(16:9) | |
| LCD Type | IPS LCD | |
| Active Area | 293.76 × 165.24 mm | |
| Contrast Ratio | 1000:1 | |
| Brightness | 220 cd/m 2 | |
| Response Time | 25 ms | |
| View Angle | 89°/89°(H)/89°/89°(V) (Typ.)(CR>10) | |
| Gamut | 120% sRGB | |
| Display Color | 16.7 M(8bit) | |
| Touch | Touch Type | Passive Electromagnetic Resonance |
| Resolution | 5080 LPI | |
| Pressure Level | 8192 | |
| Accuracy | ±0.5 mm(Center), ±3 mm(Corner) | |
| Sensing Height | 10 mm | |
| Report Rate | 266 PPS | |
| Pen | Model | PW517 |
| Dimension | 163.7 x Φ14.3 mm | |
| Buttons | Two Customized Press Key | |
| General | Output Voltage | 5V 2A |
| Video Interface | USB-C(3-in-1 Cable) & USB-C (USB 3.1) | |
| Press Key | 8 Customized Press Key | |
| Dimension | 366.5 x 217.4 x 11.8mm | |
| Net Weight | 0.98 kg(without stand) | |
| Adjustable Stand | Two Levels Stand(Optional) | |
| OS Support | Windows 7 or later, macOS 10.12 or later |
Troubleshooting
| Abnormal Phenomena | Possible Solutions |
| Power indicator does not flash | *Make sure power is on *Check the socket and power cable |
| No display on the screen |
|
| Images are blurred | Please set the display resolution with 1920 x 1080. |
| Lack of colors | Check the pins of the signal wire are not bent or fractured. |
| There is chromatic aberration | As the regional color temperature is different, so minor chromatic aberration is a normal phenomenon. |
| Images jitter or ripple images appear | It is likely that there is electric equipment nearby that brings about electronic interference. |
| Abnormal Phenomena | Possible Solutions |
| Pen doesn’t work and no pressure in the graphics software |
|
| Cursor movement is abnormal | Try re-inserting the USB cable or restarting your computer. |
| The side button of the pen doesn’t work | When pressing the side button, please make sure that the nib didn’t touch the glass surface and the distance between the nib and surface is within 10mm |
| There is a deviation between the tip and the cursor | Try calibration |

www.huion.com
Videos
Huion Kamvas 13 Review Video
Documents / Resources
References
Download manual
Here you can download full pdf version of manual, it may contain additional safety instructions, warranty information, FCC rules, etc.
Download Huion KAMVAS 13 — Drawing Pen Display Manual
 in the system tray area, which means the driver was installed successfully; when you connect the tablet to computer, the icon will change to color
  , which means the driver has already recognized the tablet and you can start using it now.
Notice:
- Before installing, you need to uninstall other driver of similar products, includingthe old driver of this product.
- Before installing, please close all graphics software and anti-virus software toavoid unnecessary mistake.
Connected to Android Phone/Tablet
As shown in the figure above, connecting your Android phone and pen display with USB-C to USB-C USB 3.1 Gen1 cable and connecting the pen display and the power adapter or power bank with USB-C to USB-A cable.
Note:
- USB-C to USB-C cable and USB-C to USB-A cable is not included in the package and requires extra cost. Please purchase the cable through official channels as it is customized and cables from unknown sources may not be usable with the device.
- The power adaptor is not included in the package and requires extra cost. Poweradaptor of your mobile phone is also compatible.
- Please make sure your smart android phone support Dex or PC mode.
Pen Nib Replacement
The nib will be wear out after using for long time, then you need to replace a new nib.
Product Basic Operation
Using The Pen
Hold the pen
Hold the pen as you hold a normal pen or pencil. Adjust your grip so that you can toggle the side switch easily with your thumb or forefinger. Be careful not to accidentally press the switch while drawing or positioning with the pen.
Notice: When not in use, place the pen in the pen case or on the desk. Do not place the pen on the surface of screen, which may interfere with the use of other screen cursor positioning equipment, it may also cause your computer unable to enter the sleep mode.
Position the cursor
Move the pen slightly above the active area without touching the screen surface, the cursor will move to the new position accordingly.
Press the pen tip on the screen to make a selection. Tap the screen once with the pen tip, or touch it to the screen with enough pressure to register a click.
Click
Use the pen tip to tap on the screen once to produce a click. Tap to highlight or select an item on the screen and double-click to open it.
Move
Select the object, then slide the pen tip across the screen to move it.
Use the side buttons
The side buttons of the pen can be set to two different customizable functions. You can use the buttons whenever the pen tip is within 10mm of the display active area.
You do not have to touch the pen tip to the display in order to use the switch.
Using the Display
Power Button
The power button was placed on the left side of the digital screen, you need to turn on the power switch before using.
Press Keys
There are 8 press keys on the top left side of the display, which you can modify the functions according to your own habits, thus will help to improve your work efficiency.
OSD Function
Enter OSD Menu:
- Press K4 & K5 for around three seconds until the OSD menu appears and meanwhilethe indicator will flash green. The function of K2 K3 K6 K7 will become OSD function.
- In the menu, the function of K2 K3 K6 K7 will become as the following:
K2 AUTO: Before entering menu, its function is auto adjustment.
After entering menu, its function is back to previous menu.
K3 MENU: Press to call up the menu, after entering menu, its function is confirm.
K7- : After entering menu, its function is down/left/decrease.
K6 + : After entering menu, its function is up/right/increase.
Exit OSD Menu: - Press K4 & K5 again for around three seconds until the OSD menu disappears, thefunction of K2 K3 K6 K7 will become shortcuts function again.
Function Setting
Device Connection Prompt
- Device disconnected: The display hasn’t connected to your computer.
- Device connected: The display has already connected to your computer.
Working Area Setting
Using Multiple Monitors
When the KAMVAS Display and other monitors are used in the same system, the movement of the screen cursor on the standard display depends on the system configuration. If the secondary display is a mirrored mode connection, this display and another monitor will display exactly the same image and screen cursor movement. If you are in the extended display mode, you need to set the display on the driver that which portion of the display screen your KAMVAS will map to.
Working Area Setting
Define the display area that will be mapped to the screen area.
- Full Area: the entire active area of the Display. This is the default setting.
- Same Ratio with LCD.
- Customize Area: 1.> Enter coordinate values. or2>. Drag the corners of theforeground graphic to select the screen area.
Rotate Working Area
By changing the direction of the display to adapt to the left and right hand operation. We provide four directions of choice.
Press Keys Function Setting
Default Setting: Place the cursor on the button or click the button icon to see the default values for the press keys
Customized press Keys: Select the function to be achieved on the pop-up dialog box, then click APPLY or OK to take effect.
Touch Bar: you can slide up and down to achieve zoom function.
Enable/Disable Press Key: Check/Uncheck»Enable Press key»
Pen Button Setting
Select the function to be achieved on the pop-up dialog box, then click APPLY or OK to take effect.
Pressure Sensitivity Setting
The pressure sensitivity will be changed by dragging the slider up and down, the smaller the value, the more sensitive the pressure.
Pen Pressure Testing
You can gradually apply pressure to the stylus on the screen to test the pressure level. Click «Clear» button to clear all the ink.
Calibration
Screen Calibration: Click the red point of the cross center appearing on the screen to complete the calibration.
Restore Factory Settings: Click «Restore Default» to restore to the factory settings.
Cancel Calibration: Click»Cancel calibration» or press ESC on the keyboard to cancel the calibration.
Enable the Windows Ink feature
Microsoft Windows provides extensive support for pen input. Pen features are supported in such as Microsoft Office, Windows Journal, Adobe Photoshop CC, SketchBook 6 and so on.
Data Export and Import
The driver supports exporting and importing your customized configuration data of the product, which is convenient for you to use different software and avoid the trouble of repeated settings.
Specifications
| Model | GS1331 | |
| Screen | Panel Size | 13.3 inch |
| Resolution | 1920 x 1080(16:9) | |
| LCD Type | IPS LCD | |
| Active Area | 293.76 × 165.24 mm | |
| Contrast Ratio | 1000:1 | |
| Brightness | 220 cd/m 2 | |
| Response Time | 25 ms | |
| View Angle | 89°/89°(H)/89°/89°(V) (Typ.)(CR>10) | |
| Gamut | 120% sRGB | |
| Display Color | 16.7 M(8bit) | |
| Touch | Touch Type | Passive Electromagnetic Resonance |
| Resolution | 5080 LPI | |
| Pressure Level | 8192 | |
| Accuracy | ±0.5 mm(Center), ±3 mm(Corner) | |
| Sensing Height | 10 mm | |
| Report Rate | 266 PPS | |
| Pen | Model | PW517 |
| Dimension | 163.7 x Φ14.3 mm | |
| Buttons | Two Customized Press Key | |
| General | Output Voltage | 5V 2A |
| Video Interface | USB-C(3-in-1 Cable) & USB-C (USB 3.1) | |
| Press Key | 8 Customized Press Key | |
| Dimension | 366.5 x 217.4 x 11.8mm | |
| Net Weight | 0.98 kg(without stand) | |
| Adjustable Stand | Two Levels Stand(Optional) | |
| OS Support | Windows 7 or later, macOS 10.12 or later |
Troubleshooting
| Abnormal Phenomena | Possible Solutions |
| Power indicator does not flash | *Make sure power is on *Check the socket and power cable |
| No display on the screen |
|
| Images are blurred | Please set the display resolution with 1920 x 1080. |
| Lack of colors | Check the pins of the signal wire are not bent or fractured. |
| There is chromatic aberration | As the regional color temperature is different, so minor chromatic aberration is a normal phenomenon. |
| Images jitter or ripple images appear | It is likely that there is electric equipment nearby that brings about electronic interference. |
| Abnormal Phenomena | Possible Solutions |
| Pen doesn’t work and no pressure in the graphics software |
|
| Cursor movement is abnormal | Try re-inserting the USB cable or restarting your computer. |
| The side button of the pen doesn’t work | When pressing the side button, please make sure that the nib didn’t touch the glass surface and the distance between the nib and surface is within 10mm |
| There is a deviation between the tip and the cursor | Try calibration |
www.huion.com
Videos
Huion Kamvas 13 Review Video
Documents / Resources
References
Download manual
Here you can download full pdf version of manual, it may contain additional safety instructions, warranty information, FCC rules, etc.
Download Huion KAMVAS 13 — Drawing Pen Display Manual
HUION GS1331 Камвас 13 Космо Черный

Меры предосторожности
- Пожалуйста, внимательно прочтите это руководство перед использованием и сохраните его для использования в будущем.
- Перед очисткой дисплея отключите USB-кабель и протрите мягкой тканью.amp ткань, не используйте какие-либо моющие средства.
- Не размещайте дисплей рядом с такими источниками воды, как ванна, умывальник, раковины, стиральная машина и т. Д.amp подвал, бассейн и др.
- Во избежание опасности не размещайте дисплей на неустойчивой поверхности или на высоте, доступной для детей.
- Не помещайте дисплей и цифровое перо близко к магнитному полю.
- Пазы и отверстия на задней панели предназначены для вентиляции и предотвращения перегрева монитора. Не размещайте дисплей на кроватях, диванах, коврах или во встроенных устройствах.
- Для дисплея можно использовать только источники питания, указанные на паспортной табличке. Если у вас есть вопросы об источнике питания, который вы используете, проконсультируйтесь с дистрибьютором вашего дисплея.
- Для защиты дисплея выключайте питание, когда он не используется. Во время отключения электроэнергии или длительного неиспользования отключите дисплей от розетки.
- Не перегружайте розетку и не удлиняйте шнур питания, это может привести к поражению электрическим током.
- Следите за тем, чтобы инородные тела не попали внутрь монитора через канавки и не допускайте попадания жидкости на дисплей, чтобы предотвратить короткое замыкание или возгорание.
- Если дисплей вышел из строя, не открывайте основной корпус и попробуйте отремонтировать его самостоятельно. Обратитесь в сервисную службу для надлежащего ремонта и обслуживания.
- В следующих ситуациях отключите адаптер питания, и вам может потребоваться сервис для полного ремонта и обслуживания:
- Шнур питания или вилка повреждены или изношены;
- Внутри дисплея попала жидкость;
- Упал дисплей или разбился ЖК-дисплей;
- Когда на дисплее возникают очевидные отклонения.
- При замене компонентов вы должны гарантировать, что ремонтник использует заменяющие компоненты, указанные производителем. Несанкционированная замена компонентов может привести к возгоранию, поражению электрическим током или другим опасностям.
Продукт закончилсяview
Дисплей Введение
Спасибо, что выбрали перьевой дисплей HUION® KAMVAS® 13. Это портативный профессиональный дисплей для рисования нового поколения настольного уровня, который может значительно повысить эффективность вашей работы при рисовании и творчестве, а также доставить удовольствие. Вы можете свободно рисовать и писать, изображая разные линии и цвета, так же, как перо пишет на бумаге, что приносит вам настоящий шок.
Чтобы лучше понять и использовать дисплей KAMVAS, пожалуйста, внимательно прочитайте это руководство пользователя. В руководстве пользователя приведена информация только для Windows, если не указано иное, эта информация относится как к системам Windows, так и к системам Macintosh.
Продукт и аксессуары
Продукт закончилсяview

Соединительный кабель 3-в-1

- USB
- HDMI
- Питание (красный порт USB)
- Type-C
Подставка для дисплея (опционально)
Мы разработали эту подставку специально для вашего дисплея KAMVAS, вы можете отрегулировать угол наклона дисплея в соответствии с вашими привычками и сделать так, чтобы вы чувствовали себя более комфортно при рисовании и творчестве.

Прочие аксессуары

Подключен к компьютеру
Подключен кабелем 3-в-1

Обратите внимание:
Как правило, устройство можно включить, когда черный кабель USB-A подключен к вашему компьютеру. Мигающий экран устройства может указывать на низкий заряд батареи, и в этом случае вам предлагается подключить красный кабель USB-A к другому USB-кабелю. интерфейса на вашем компьютере или адаптере питания. Адаптер питания не входит в комплект и требует дополнительной оплаты.
Адаптер питания вашего мобильного телефона также совместим.
Подключен с помощью кабеля USB-C к USB-C

* Кабель USB-C — USB-C не входит в комплект и требует дополнительных затрат. Приобретайте кабель по официальным каналам, так как он настроен индивидуально, а кабели из неизвестных источников могут быть непригодны для использования с устройством.
Установка драйвера
Поддерживаемые ОС
Windows 7 или новее , macOS 10.12 или новее
Установить через Скачать
Загрузите драйвер с нашего webсайт: www.huion.com/download
После завершения установки вы можете найти значок драйвера в области панели задач, что означает, что драйвер был успешно установлен; при подключении планшета к компьютеру значок изменит свой цвет на , это означает, что драйвер уже распознал планшет, и вы можете начать его использовать.
Уведомление
- Перед установкой необходимо удалить другие драйверы аналогичных продуктов, включая старый драйвер этого продукта.
- Перед установкой закройте все графические программы и антивирусные программы, чтобы избежать ненужной ошибки.
Подключено к телефону/планшету Android
Как показано на рисунке выше, подключите телефон и перьевой дисплей Android с помощью кабеля USB-C к USB-C USB 3.1 Gen1 и подключите перьевой дисплей и адаптер питания или блок питания с помощью кабеля USB-C к USB-A.

Примечание:
- Кабель USB-C — USB-C и кабель USB-C — USB-A не входят в комплект и требуют дополнительной оплаты. Пожалуйста, приобретите кабель через официальные каналы, так как он настроен индивидуально, и кабели из неизвестных источников могут быть непригодны для использования с устройством.
- Адаптер питания не входит в комплект и требует дополнительной оплаты. Адаптер питания вашего мобильного телефона также совместим.
- Убедитесь, что ваш смартфон с Android поддерживает режим Dex или ПК.
Замена наконечника пера
Перо изнашивается после длительного использования, поэтому вам необходимо заменить перо на новое.

Основные операции продукта
Использование пера
Держи ручку
Держите ручку, как обычную ручку или карандаш. Отрегулируйте захват так, чтобы вы могли легко переключать боковой переключатель большим или указательным пальцами. Будьте осторожны, чтобы случайно не нажать переключатель во время рисования или позиционирования пером.

Обратите внимание: Когда перо не используется, кладите его в футляр для пера или на стол. Не кладите перо на поверхность экрана, это может помешать использованию другого оборудования для позиционирования экранного курсора, это также может привести к тому, что ваш компьютер не сможет перейти в спящий режим.
Поместите курсор
Переместите перо немного выше активной области, не касаясь поверхности экрана, курсор соответственно переместится в новое положение.
Нажмите кончиком пера на экране, чтобы сделать выбор. Коснитесь экрана кончиком пера один раз или прикоснитесь им к экрану с достаточным усилием, чтобы зарегистрировать щелчок.


Нажмите
Кончиком пера коснитесь экрана один раз, чтобы произвести щелчок. Коснитесь, чтобы выделить или выбрать элемент на экране, и дважды щелкните его, чтобы открыть.

Двигаемся
Выберите объект, затем проведите кончиком пера по экрану, чтобы переместить его.

Используйте боковые кнопки
Боковые кнопки пера можно настроить на две различные настраиваемые функции. Вы можете использовать кнопки, когда кончик пера находится в пределах 10 мм от активной области дисплея.
Вам не нужно прикасаться кончиком пера к дисплею, чтобы использовать переключатель.

Использование дисплея
Кнопка Питания
Кнопка питания была размещена в левой части цифрового экрана, вам необходимо включить выключатель питания перед использованием.
Нажмите клавиши
В верхнем левом углу дисплея есть 8 нажимных клавиш, с помощью которых вы можете изменять функции в соответствии с вашими собственными привычками, что поможет повысить эффективность вашей работы.
Функция экранного меню

Войдите в экранное меню
- Нажимайте K4 и K5 примерно на три секунды, пока не появится экранное меню, а индикатор замигает зеленым. Функция K2 K3 K6 K7 станет функцией экранного меню.
- В меню функции K2 K3 K6 K7 будут выглядеть следующим образом:
K2 AUTO: Перед входом в меню его функцией является автоматическая настройка.
После входа в меню его функция возвращается к предыдущему меню.
K3 MENU: Нажмите, чтобы вызвать меню, после входа в меню его функция подтверждается.
K7 -: после входа в меню его функции — вниз / влево / вниз.
K6 +: после входа в меню его функции — вверх / вправо / вверх.
Выход из экранного меню: - Снова нажмите K4 и K5 примерно на три секунды, пока экранное меню не исчезнет, функция K2 K3 K6 K7 снова станет функцией ярлыков.
Настройка функции
Подсказка о подключении устройства
- Устройство отключено: дисплей не подключен к вашему компьютеру.
- Устройство подключено: дисплей уже подключен к вашему компьютеру.

Настройка рабочей зоны
Использование нескольких мониторов
Когда дисплей KAMVAS и другие мониторы используются в одной системе, перемещение экранного курсора на стандартном дисплее зависит от конфигурации системы. Если дополнительный дисплей является подключением в зеркальном режиме, этот дисплей и другой монитор будут отображать точно такое же изображение и движение экранного курсора. Если вы находитесь в режиме расширенного отображения, вам необходимо настроить отображение в драйвере той части экрана, на которую будет отображаться ваш KAMVAS.

Настройка рабочей зоны
Определите область отображения, которая будет сопоставлена с областью экрана.
- Полная область: вся активная область дисплея. Это значение по умолчанию.
- Такое же соотношение с ЖК-дисплеем.
- Настройка области: 1.> Введите значения координат. или2>. Перетащите углы изображения переднего плана, чтобы выбрать область экрана.

Повернуть рабочую область
Изменяя направление дисплея, чтобы приспособиться к работе левой и правой рукой. Мы предлагаем четыре направления на выбор.

Настройка функций кнопок
Настройка по умолчанию: поместите курсор на кнопку или щелкните значок кнопки, чтобы увидеть значения по умолчанию для нажатия клавиш.
Индивидуальные нажатия клавиш: выберите функцию, которую необходимо выполнить, во всплывающем диалоговом окне, затем нажмите ПРИМЕНИТЬ или ОК, чтобы применить ее.
Сенсорная панель: вы можете скользить вверх и вниз, чтобы активировать функцию масштабирования.
Включить/отключить нажатие клавиши: установите/снимите флажок «Включить нажатие клавиши»

Настройка кнопки пера
Выберите функцию, которую необходимо выполнить, во всплывающем диалоговом окне, затем нажмите ПРИМЕНИТЬ или ОК, чтобы вступить в силу.

Настройка чувствительности к давлению
Чувствительность к давлению будет изменяться перетаскиванием ползунка вверх и вниз, чем меньше значение, тем чувствительнее давление.

Проверка давления пера
Вы можете постепенно нажимать на стилус на экране, чтобы проверить уровень давления. Нажмите кнопку «Очистить», чтобы очистить все чернила.

Калибровка
Калибровка экрана: щелкните красную точку в центре экрана, чтобы завершить калибровку.
Восстановить заводские настройки: Нажмите «Восстановить по умолчанию», чтобы восстановить заводские настройки. Отменить калибровку: Нажмите «Отменить калибровку» или нажмите ESC на клавиатуре, чтобы отменить калибровку.

Включите функцию Windows Ink
Microsoft Windows обеспечивает расширенную поддержку перьевого ввода. Функции пера поддерживаются, например, в Microsoft Office, Windows Journal, Adobe Photoshop CC, SketchBook 6 и т. Д.

Экспорт и импорт данных
Драйвер поддерживает экспорт и импорт ваших индивидуальных данных конфигурации продукта, что позволяет вам использовать другое программное обеспечение и избежать проблем, связанных с повторными настройками.

Характеристики
| Модель | GS1331 | |
|
экран |
Размер панели | 13.3 дюйма |
| Постановления | 1920 х 1080 (16: 9) | |
| Тип ЖК-матрицы | IPS LCD | |
| Активная область | мм × 293.76 165.24 | |
| Контрастность | 1000:1 | |
| яркость | 220 cd / m2 | |
| Время отклика | 25 мс | |
| View Угол | 89°/89°(Г)/89°/89°(В)
(Тип.)(CR>10) |
|
| гамма | 120% SRGB | |
| Цвет дисплея | 16.7 Мб (8 бит) | |
|
трогать |
Сенсорный тип | Пассивный электромагнитный резонанс |
| Постановления | 5080 линий на дюйм | |
| Уровень давления | 8192 | |
| точность | ±0.5 мм (центр), ±3 мм (угол) | |
| Высота восприятия | 10 мм | |
| Скорость передачи | 266 PPS | |
|
Пен |
Модель | PW517 |
| Размеры | 163.7 x Φ14.3 мм | |
| Кнопки | Две настраиваемые клавиши для прессы | |
|
Общие |
Выход Voltage | 5V 2A |
| Видеоинтерфейс | USB-C (кабель 3-в-1) и USB-C (USB 3.1) | |
| Нажмите кнопку | 8 Индивидуальная клавиша нажатия | |
| Размеры | 366.5 х 217.4 х 11.8mm | |
| вес нетто | 0.98 кг (без подставки) | |
| Регулируемая подставка | Двухуровневая подставка (опционально) | |
| Поддерживаемые ОС | Windows 7 или более поздняя версия, macOS 10.12 или более поздняя версия |
Поиск неисправностей
Возможные поломки, связанные с ДИСПЛЕЕМ
| Аномальные явления | Возможные решения |
|
Индикатор питания не мигает |
*Убедитесь, что питание включено *Проверьте розетку и кабель питания |
|
Нет отображения на экране |
1. Убедитесь, что питание включено.
2. Правильно подключите кабель 3-в-1. 3. Если вы подключаете дисплей к ноутбуку, убедитесь, что дисплей находится в правильном режиме отображения: режим расширения или дублирования. 4. Убедитесь, что боковой индикатор горит зеленым, если нет, это означает отсутствие сигнала. Перезагрузите компьютер или снова подключите кабель. 5. Сигнальный провод оборван или согнут? В этом случае замените сигнальный провод. |
|
Изображения размыты |
Установите разрешение дисплея 1920 x 1080. |
|
Отсутствие красок |
Убедитесь, что контакты сигнального провода не погнуты и не сломаны. |
|
Есть хроматическая аберрация |
Поскольку региональная цветовая температура отличается, незначительные хроматические аберрации являются нормальным явлением. |
|
Изображение дрожит или появляется рябь. |
Вероятно, поблизости находится электрическое оборудование, которое создает электронные помехи. |
Возможные поломки, связанные с ФУНКЦИЯМИ
| Аномальные явления | Возможные решения |
|
Перо не работает, и в графическом программном обеспечении нет давления |
1. Если драйвер поврежден или установлен неправильно, удалите его и переустановите.
2. Попробуйте перезагрузить компьютер. 3. Попробуйте снова вставить USB-кабель. |
| Движение курсора ненормальное | Попробуйте снова вставить кабель USB или перезагрузить компьютер. |
| Боковая кнопка пера не работает | При нажатии боковой кнопки убедитесь, что перо не касается стеклянной поверхности, а расстояние между
наконечник и поверхность находятся в пределах 10 мм |
| Имеется отклонение между
подсказка и курсор |
Попробуйте калибровку |
Послепродажное обслуживание
SHENZHEN HUION ANIMATION TECHNOLOGY CO., LTD.
Здание 28, квартал 4, промышленный парк ХуайДекуйган, улица Фуйонг, район Баоань,
Шэньчжэнь, 518106, Китай
Примечание. Информация в данном руководстве может быть изменена без предварительного уведомления.
Для получения дополнительной информации, пожалуйста, свяжитесь с нами по электронной почте: service@huion.com
Или зайдите в наш webсайт (www.huion.com), чтобы получить последнюю версию драйвера и руководства пользователя.
Документы / Ресурсы
Рекомендации
Посмотреть инструкция для Huion Kamvas 13 бесплатно. Руководство относится к категории графические планшеты, 5 человек(а) дали ему среднюю оценку 8.5. Руководство доступно на следующих языках: английский. У вас есть вопрос о Huion Kamvas 13 или вам нужна помощь? Задайте свой вопрос здесь
Не можете найти ответ на свой вопрос в руководстве? Вы можете найти ответ на свой вопрос ниже, в разделе часто задаваемых вопросов о Huion Kamvas 13.
Какой размер экрана Huion Kamvas 13?
Размер экрана Huion Kamvas 13 составляет 13.3 «.
Какое разрешение экрана дисплея Huion Kamvas 13?
Разрешение экрана Huion Kamvas 13 следующее 1920 x 1080 пикселей.
Инструкция Huion Kamvas 13 доступно в русский?
К сожалению, у нас нет руководства для Huion Kamvas 13, доступного в русский. Это руководство доступно в английский.
Не нашли свой вопрос? Задайте свой вопрос здесь
Kamvas Pro 13
1 /
22
www.huion.com
Меры предосторожности
1. Пожалуйста перед использованием тщательно прочтите данное руководство и
сохраните его для дальнейшего использования.
2. Перед тем, как почистить дисплей (монитор), пожалуйста отсоедините кабель USB и
протрите мягкой влажной тканью, не используйте никаких моющих средств.
3. Пожалуйста не оставляйте дисплей (монитор) около источников воды таких как ванна,
умывальник, раковины, стиральная машина, влажное подвальное помещение,
плавательный бассейн и т.д
4. Не оставляйте дисплей (монитор) в неустойчивом положении или на высоте доступной
для детей, чтобы избежать риска.
5. Не размещайте дисплей (монитор) и цифровое перо рядом с магнитным полем.
6. Пазы и отверстия на задней крышке предназначены для вентиляции, с целью
предотвратить перегрев монитора. Пожалуйста не оставляйте дисплей (монитор) на
кроватях, софах, коврах или во встроенном устройстве.
7. Для дисплея можно использовать только те источники питания, которые указаны в
паспорте устройства. Если у вас есть вопросы по используемому источнику питания,
пожалуйста обратитесь к дистрибьютору дисплея.
8. Чтобы защитить ваш дисплей (монитор), когда он не используется, пожалуйста,
отключите питание. Во время отключений электроэнергии или не использования в
течение длительного времени, пожалуйста, отключите дисплей (монитор) от сети.
9. Не перегружайте розетку и не удлиняйте провод питания, это может привести к
поражению электрическим током.
10. Убедитесь, что никакие инородные тела через пазы не попадают внутрь монитора и
не допускайте попадания жидкости на дисплей (монитор) во избежание короткого
замыкания или пожара.
11. Если дисплей (монитор) имеет поломку, не открывайте основной корпус и не
пробуйте отремонтировать его самостоятельно. Пожалуйста, обратитесь в сервисное
обслуживание по соответствующему ремонту.
12. При возникновении следующих ситуаций, пожалуйста отключите силовой адаптер,
вам может понадобиться сервисное обслуживание для полного ремонта:
A. Провод питания или вилка повреждены или изношены;
B. Во внутрь дисплея попала жидкость
C. Дисплей (монитор) упал или ЖК-экран разбит;
D. Когда неисправность дисплея очевидна.
13. При замене компонентов вы должны убедиться в гарантии того, что мастер
использует заменяемые компоненты, указанные производителем. Несанкционированная