CASIO STANDARD AE1500 — 10 Bar WR Watch Manual

About This Manual
- Depending on the model of your watch, display text appears either as dark figures on a light background, or light figures on a dark background. All sample displays in this manual are shown using dark figures on a light background.
- Button operations are indicated using the letters shown in the illustration.

- Each section of this manual provides you with the information you need to perform operations in each mode. Further details and technical information can be found in the «Reference» section. To ensure that this watch provides you with the years
General Guide
Timekeeping

Use the Timekeeping Mode to set and view the current time and date. To set the time and date
- In the Timekeeping Mode, hold down
 until the seconds start to flash, which indicates the setting screen.
 - Press
 to move the flashing in the sequence shown below to select other settings.
 - When the setting you want to change is flashing, press
 to change it as described below.
- Pressing while the seconds are in the range of 30 to 59 resets them to 00 and adds 1 to the minutes. In the range of 00 to 29, the minutes are unchanged.
- Press to exit the setting screen.
- The day of the week is automatically displayed in accordance with the date (year, month, and day) settings.
- The year can be set in the range of 2000 to 2099.
- The watch’s built-in full automatic calendar automatically makes allowances for different month lengths and leap years. Once you set the date, there should be no reason to change it except after you have the watch’s battery replaced.
To toggle between 12-hour and 24-hour timekeeping
In the Timekeeping Mode, press ![]() to toggle between 12-hour timekeeping and 24-hour timekeeping.
to toggle between 12-hour timekeeping and 24-hour timekeeping.
- With the 12-hour format, the P (PM) indicator appears to the left of the hour digits for times in the range of noon to 11:59 p.m. and no indicator appears to the left of the hour digits for times in the range of midnight to 11:59 a.m.
- With the 24-hour format, times are displayed in the range of 0:00 to 23:59, without any indicator.
- The 12-hour/24-hour timekeeping format you select in the Timekeeping Mode is applied in all other modes.
Alarms

You can set up to five independent multi-function alarms with hour, minutes, month, and day. When an alarm is turned on, the alarm tone sounds when the alarm time is reached. One of the alarms has a snooze feature.
You can also turn on an Hourly Time Signal that causes the watch to beep every hour on the hour.
- There are five alarms numbered 1 through 5. The Hourly Time Signal screen is indicated by:00.
- All of the operations in this section are performed in the Alarm Mode, which you enter by pressing .
Alarm Types
The alarm type is determined by the settings you make, as described below.
- Daily alarm
Set the hour and minutes for the alarm time. This type of setting causes the alarm to sound everyday at the time you set. - Date alarm
Set the month, day, hour and minutes for the alarm time. This type of setting causes the alarm to sound at the specific time, on the specific date you set. - 1-Month alarm
Set the month, hour and minutes for the alarm time. This type of setting causes the alarm to sound everyday at time you set, only during the month you set. - Monthly alarm
Set the day, hour and minutes for the alarm time. This type of setting causes the alarm to sound every month at time you set, on the day you set.
To set an alarm time
- In the Alarm Mode, use to scroll through the alarm screens until the one whose time you want to set is displayed.

- Alarm 1 has a snooze feature.
- The snooze alarm operation repeats every five minutes.
- After you select an alarm, hold down until the hour setting of the alarm time starts to flash, which indicates the setting screen.
- This operation automatically turns on the alarm.
- Press to move the flashing in the sequence shown below to select other settings.

- While a setting is flashing, press to increase it.
- Press to exit the setting screen.
Alarm Operation
The alarm tone sounds at the preset time for 10 seconds, regardless of the mode the watch is in. In the case of the snooze alarm, the alarm operation is performed a total of seven times, every five minutes, until you turn the alarm off or change it to a one-time alarm.
- To stop the alarm tone after it starts to sound, press any button.
- Performing any one of the following operations during a 5-minute interval between snooze alarms cancels the current snooze alarm operation.
Displaying the Timekeeping Mode setting screen
Displaying the alarm 1 setting screen
To test the alarm
- In the Alarm Mode, hold down to sound the alarm.
To turn Alarms 2 through 5 and the Hourly Time Signal on and off
- In the Alarm Mode, use to select alarm number 2 through 5, or the Hourly Time Signal (:00).
- Press to toggle it on and off.
- The on/off status of Alarms 2 through 5 and the Hourly Time Signal is shown by indicators.
- The alarm on indicators and Hourly time Signal on indicator are displayed in all modes.
- While an alarm is sounding, the applicable alarm on indicator flashes on the display.
To select the operation of Alarm 1
- In the Alarm Mode, use to select Alarm 1.
- Press to cycle through the available settings in the sequence shown below.

- The snooze on indicator (SNZ) and Alarm 1 on indicator are displayed in all modes.
- The snooze on indicator (SNZ) flashes during the 5-minute intervals between alarms.
- The alarm indicator (Alarm 1 on and/or snooze on) flashes while the alarm is sounding.
Countdown Timer
The countdown timer can be set within a range of one minute to 24 hours. An alarm sounds when the countdown reaches zero.
- You can also select auto-repeat, which automatically restarts the countdown from the original value you set whenever zero is reached.
- All of the operations in this section are performed in the Countdown Timer Mode, which you enter by pressing .
To use the countdown timer
Press ![]() while in the Countdown Timer Mode to start the countdown timer.
while in the Countdown Timer Mode to start the countdown timer.
To set the countdown start time

- In the Countdown Timer Mode, hold down until the hours setting of the countdown start time starts to flash, which indicates the setting screen.
- Press to move the flashing between the hours and minutes settings.
- While a setting is flashing, use to increase it. To set the starting value of the countdown time to 24 hours, set 0:00.
- Press to exit the setting screen.
To turn auto-repeat on and off

- In the Countdown Timer Mode, hold down until the hours setting of the countdown start time starts to flash, which indicates the setting screen.
- Press
 to toggle auto-repeat on (A.RPT displayed) and off (A.RPT not displayed).
Stopwatch

The stopwatch lets you measure elapsed time, split times, and two finishes.
- The display range of the stopwatch is 23 hours, 59 minutes, 59.99 seconds.
- The stopwatch continues to run, restarting from zero after it reaches its limit, until you stop it.
- An ongoing elapsed time measurement operation will continue internally even if you change to another mode. However, if you exit the Stopwatch Mode while a split time is displayed, the split time will not be displayed when you return to the Stopwatch Mode.
- All of the operations in this section are performed in the Stopwatch Mode, which you enter by pressing .
To measure times with the stopwatch

Elapsed time

Split Time

Two Finishes
Dual Time
The Dual Time Mode lets you keep track of time in a different time zone.
- In the Dual Time Mode, the seconds count is synchronized with the seconds count of the Timekeeping Mode.
To set the Dual Time
- Press to enter the Dual Time Mode.
- In the Dual Time Mode, hold down until the hour setting starts to flash, which indicates the setting screen.
- Press to change the selection in the following sequence.

- Press to increase the setting.
- Press to exit the setting screen.
Backlight

The backlight uses an LED (light-emitting diode) and a light guide panel that cause the entire display to glow for easy reading in the dark.
- See «Backlight Precautions» for other important information about using the backlight.
To turn on the backlight
In any mode, press ![]() to illuminate the display for about one second.
to illuminate the display for about one second.
Reference
This section contains more detailed and technical information about watch operation. It also contains important precautions and notes about the various features and functions of this watch.
Auto return features
If you leave a screen with flashing digits for two or three minutes without performing any operation, the watch automatically saves any settings you have made up to that point and exits the setting screen.
Data and Setting Scrolling
The ![]() button is used to scroll through setting screen data on the display. Holding down this button during a scroll operation scrolls through the data at high speed.
button is used to scroll through setting screen data on the display. Holding down this button during a scroll operation scrolls through the data at high speed.
Backlight Precautions
- The illumination provided by the backlight may be hard to see when viewed under direct sunlight.
- The backlight automatically stops illuminating whenever an alarm sounds.
- Frequent use of the backlight shortens the battery life.
Specifications
Accuracy at normal temperature: ±30 seconds a month
Timekeeping: Hour, minutes, seconds, p.m. (P), month, day, day of the week
Time system: Switchable between 12-hour and 24-hour formats
Calendar system: Full Auto-calendar pre-programmed from the year 2000 to 2099
Alarms: 5 Multi-function* alarms (1 with snooze feature);
Hourly Time Signal
* Alarm type: Daily alarm, Date alarm, 1-month alarm, Monthly alarm
Countdown Timer
Measuring unit: 1 second
Input range: 1 minute to 24 hours (1-minute increments and 1-hour increments)
Other: Auto-repeat function
Stopwatch
Measuring unit: 1/100 of a second
Measuring capacity: 23:59’59.99″
Measuring modes: Elapsed time, split time, two finishes
Dual Time: Hour, minutes, seconds, p.m. (P)
Other: LED (light-emitting diode) backlight
Battery: One lithium battery (Type: CR2032)
Approximately 10 years on type CR2032 (assuming alarm operation 10 sec./day, and one backlight operation 1.5 sec./day)
Specifications are subject to change without notice.

Documents / Resources
Download manual
Here you can download full pdf version of manual, it may contain additional safety instructions, warranty information, FCC rules, etc.
Download CASIO STANDARD AE1500 — 10 Bar WR Watch Manual
![]()
General Guide
Timekeeping
Use the Timekeeping Mode to set and view the current time and date. To set the time and date
- In the Timekeeping Mode, hold down until the seconds start to flash, which indicates the setting screen.
- Press to move the flashing in the sequence shown below to select other settings.
- When the setting you want to change is flashing, press to change it as described below.
- Pressing while the seconds are in the range of 30 to 59 resets them to 00 and adds 1 to the minutes. In the range of 00 to 29, the minutes are unchanged.
- Press to exit the setting screen.
- The day of the week is automatically displayed in accordance with the date (year, month, and day) settings.
- The year can be set in the range of 2000 to 2099.
- The watch’s built-in full automatic calendar automatically makes allowances for different month lengths and leap years. Once you set the date, there should be no reason to change it except after you have the watch’s battery replaced.
To toggle between 12-hour and 24-hour timekeeping
In the Timekeeping Mode, press ![]() to toggle between 12-hour timekeeping and 24-hour timekeeping.
to toggle between 12-hour timekeeping and 24-hour timekeeping.
- With the 12-hour format, the P (PM) indicator appears to the left of the hour digits for times in the range of noon to 11:59 p.m. and no indicator appears to the left of the hour digits for times in the range of midnight to 11:59 a.m.
- With the 24-hour format, times are displayed in the range of 0:00 to 23:59, without any indicator.
- The 12-hour/24-hour timekeeping format you select in the Timekeeping Mode is applied in all other modes.
Alarms
You can set up to five independent multi-function alarms with hour, minutes, month, and day. When an alarm is turned on, the alarm tone sounds when the alarm time is reached. One of the alarms has a snooze feature.
You can also turn on an Hourly Time Signal that causes the watch to beep every hour on the hour.
- There are five alarms numbered 1 through 5. The Hourly Time Signal screen is indicated by:00.
- All of the operations in this section are performed in the Alarm Mode, which you enter by pressing .
Alarm Types
The alarm type is determined by the settings you make, as described below.
- Daily alarm
Set the hour and minutes for the alarm time. This type of setting causes the alarm to sound everyday at the time you set. - Date alarm
Set the month, day, hour and minutes for the alarm time. This type of setting causes the alarm to sound at the specific time, on the specific date you set. - 1-Month alarm
Set the month, hour and minutes for the alarm time. This type of setting causes the alarm to sound everyday at time you set, only during the month you set. - Monthly alarm
Set the day, hour and minutes for the alarm time. This type of setting causes the alarm to sound every month at time you set, on the day you set.
To set an alarm time
- In the Alarm Mode, use to scroll through the alarm screens until the one whose time you want to set is displayed.
- Alarm 1 has a snooze feature.
- The snooze alarm operation repeats every five minutes.
- After you select an alarm, hold down until the hour setting of the alarm time starts to flash, which indicates the setting screen.
- This operation automatically turns on the alarm.
- Press to move the flashing in the sequence shown below to select other settings.
- While a setting is flashing, press to increase it.
- Press to exit the setting screen.
Alarm Operation
The alarm tone sounds at the preset time for 10 seconds, regardless of the mode the watch is in. In the case of the snooze alarm, the alarm operation is performed a total of seven times, every five minutes, until you turn the alarm off or change it to a one-time alarm.
- To stop the alarm tone after it starts to sound, press any button.
- Performing any one of the following operations during a 5-minute interval between snooze alarms cancels the current snooze alarm operation.
Displaying the Timekeeping Mode setting screen
Displaying the alarm 1 setting screen
To test the alarm
- In the Alarm Mode, hold down to sound the alarm.
To turn Alarms 2 through 5 and the Hourly Time Signal on and off
- In the Alarm Mode, use to select alarm number 2 through 5, or the Hourly Time Signal (:00).
- Press to toggle it on and off.
- The on/off status of Alarms 2 through 5 and the Hourly Time Signal is shown by indicators.
- The alarm on indicators and Hourly time Signal on indicator are displayed in all modes.
- While an alarm is sounding, the applicable alarm on indicator flashes on the display.
To select the operation of Alarm 1
- In the Alarm Mode, use to select Alarm 1.
- Press to cycle through the available settings in the sequence shown below.
- The snooze on indicator (SNZ) and Alarm 1 on indicator are displayed in all modes.
- The snooze on indicator (SNZ) flashes during the 5-minute intervals between alarms.
- The alarm indicator (Alarm 1 on and/or snooze on) flashes while the alarm is sounding.
Countdown Timer
The countdown timer can be set within a range of one minute to 24 hours. An alarm sounds when the countdown reaches zero.
- You can also select auto-repeat, which automatically restarts the countdown from the original value you set whenever zero is reached.
- All of the operations in this section are performed in the Countdown Timer Mode, which you enter by pressing .
To use the countdown timer
Press ![]() while in the Countdown Timer Mode to start the countdown timer.
while in the Countdown Timer Mode to start the countdown timer.
To set the countdown start time
- In the Countdown Timer Mode, hold down until the hours setting of the countdown start time starts to flash, which indicates the setting screen.
- Press to move the flashing between the hours and minutes settings.
- While a setting is flashing, use to increase it. To set the starting value of the countdown time to 24 hours, set 0:00.
- Press to exit the setting screen.
To turn auto-repeat on and off
- In the Countdown Timer Mode, hold down until the hours setting of the countdown start time starts to flash, which indicates the setting screen.
- Press to toggle auto-repeat on (A.RPT displayed) and off (A.RPT not displayed).
Stopwatch
The stopwatch lets you measure elapsed time, split times, and two finishes.
- The display range of the stopwatch is 23 hours, 59 minutes, 59.99 seconds.
- The stopwatch continues to run, restarting from zero after it reaches its limit, until you stop it.
- An ongoing elapsed time measurement operation will continue internally even if you change to another mode. However, if you exit the Stopwatch Mode while a split time is displayed, the split time will not be displayed when you return to the Stopwatch Mode.
- All of the operations in this section are performed in the Stopwatch Mode, which you enter by pressing .
To measure times with the stopwatch
Elapsed time
Split Time
Two Finishes
Dual Time
The Dual Time Mode lets you keep track of time in a different time zone.
- In the Dual Time Mode, the seconds count is synchronized with the seconds count of the Timekeeping Mode.
To set the Dual Time
- Press to enter the Dual Time Mode.
- In the Dual Time Mode, hold down until the hour setting starts to flash, which indicates the setting screen.
- Press to change the selection in the following sequence.
- Press to increase the setting.
- Press to exit the setting screen.
Backlight
The backlight uses an LED (light-emitting diode) and a light guide panel that cause the entire display to glow for easy reading in the dark.
- See «Backlight Precautions» for other important information about using the backlight.
To turn on the backlight
In any mode, press ![]() to illuminate the display for about one second.
to illuminate the display for about one second.
Reference
This section contains more detailed and technical information about watch operation. It also contains important precautions and notes about the various features and functions of this watch.
Auto return features
If you leave a screen with flashing digits for two or three minutes without performing any operation, the watch automatically saves any settings you have made up to that point and exits the setting screen.
Data and Setting Scrolling
The ![]() button is used to scroll through setting screen data on the display. Holding down this button during a scroll operation scrolls through the data at high speed.
button is used to scroll through setting screen data on the display. Holding down this button during a scroll operation scrolls through the data at high speed.
Backlight Precautions
- The illumination provided by the backlight may be hard to see when viewed under direct sunlight.
- The backlight automatically stops illuminating whenever an alarm sounds.
- Frequent use of the backlight shortens the battery life.
Specifications
Accuracy at normal temperature: ±30 seconds a month
Timekeeping: Hour, minutes, seconds, p.m. (P), month, day, day of the week
Time system: Switchable between 12-hour and 24-hour formats
Calendar system: Full Auto-calendar pre-programmed from the year 2000 to 2099
Alarms: 5 Multi-function* alarms (1 with snooze feature);
Hourly Time Signal
* Alarm type: Daily alarm, Date alarm, 1-month alarm, Monthly alarm
Countdown Timer
Measuring unit: 1 second
Input range: 1 minute to 24 hours (1-minute increments and 1-hour increments)
Other: Auto-repeat function
Stopwatch
Measuring unit: 1/100 of a second
Measuring capacity: 23:59’59.99″
Measuring modes: Elapsed time, split time, two finishes
Dual Time: Hour, minutes, seconds, p.m. (P)
Other: LED (light-emitting diode) backlight
Battery: One lithium battery (Type: CR2032)
Approximately 10 years on type CR2032 (assuming alarm operation 10 sec./day, and one backlight operation 1.5 sec./day)
Specifications are subject to change without notice.
Documents / Resources
Download manual
Here you can download full pdf version of manual, it may contain additional safety instructions, warranty information, FCC rules, etc.
Download CASIO STANDARD AE1500 — 10 Bar WR Watch Manual
![]()
MA2008-EA
© 2021 CASIO COMPUTER CO., LTD.
Руководство по эксплуатации 3502
Об этом руководстве
- В зависимости от модели ваших часов текст на дисплее отображается либо в виде темных фигур на светлом фоне, либо в виде светлых фигур на темном фоне. Все сampВ данном руководстве все дисплеи показаны темными цифрами на светлом фоне.
- Операции с кнопками обозначаются буквами, показанными на рисунке.
- Каждый раздел этого руководства предоставляет вам информацию, необходимую для выполнения операций в каждом режиме. Более подробную информацию и техническую информацию можно найти в разделе «Справочная информация».
Поиск процедуры
Ниже приводится удобный справочный список всех операционных процедур, содержащихся в этом руководстве.
Общее руководство
- Нажмите C, чтобы перейти из режима в режим.
- В любом режиме нажмите B, чтобы подсветить дисплей.
- В любом режиме удерживайте C около одной секунды, чтобы вернуться в режим Текущего времени.

Хронометраж
Используйте режим Текущего времени для установки и view текущее время и дата.
Чтобы установить время и дату
- В режиме Текущего времени нажмите и удерживайте A, пока секунды не начнут мигать, что указывает на экран настроек.
- Нажмите ©, чтобы переместить мигание в показанной ниже последовательности для выбора других настроек.
- Когда параметр, который вы хотите изменить, мигает, нажмите D, чтобы изменить его, как описано ниже.
Для переключения между 12-часовым и 24-часовым форматом времени
В режиме Текущего времени нажмите D для переключения между 12-часовым и 24-часовым хронометражом.
- В 12-часовом формате индикатор P (PM) появляется слева от цифр часа для времени в диапазоне от полудня до 11:59, и индикатор не появляется слева от цифр часа для времени в диапазоне с полуночи до 11:59
- В 24-часовом формате время отображается в диапазоне от 0:00 до 23:59 без какого-либо индикатора.
- 12-часовой / 24-часовой формат хронометража, который вы выбираете в режиме Текущего времени, применяется во всех других режимах.
| Чтобы изменить этот параметр | Выполните эту операцию с помощью кнопки |
| Секунд | Нажмите D сбросить на 00 |
| Час, Минуты, Год, Месяц, День | Нажмите D для увеличения настройки. |
- Прессование D, в то время как секунды находятся в диапазоне от 30 до 59, сбрасывает их на 00 и добавляет 1 к минутам. В диапазоне от 00 до 29 минуты не меняются.
4. Нажмите A для выхода из экрана настроек. - День недели автоматически отображается в соответствии с датой.
(год, месяц и день) настройки. - Год можно установить в диапазоне от 2000 до 2099.
- Встроенный полностью автоматический календарь часов автоматически делает поправки на различную продолжительность месяца и високосный год. После того, как вы установили дату, не должно быть причин для ее изменения, кроме как после замены батареи часов.
Сигнализация
Вы можете настроить пять независимых многофункциональных будильников с часами, минутами, месяцем и днем. Когда будильник включен, сигнал будильника раздается по достижении времени будильника. Один из будильников имеет функцию повтора сигнала. Вы также можете включить Хоurly Сигнал времени, который заставляет часы подавать звуковой сигнал каждый час в течение часа.
- Есть пять будильников, пронумерованных от 1 до 5. Hourly Экран сигнала времени обозначается: 00.
- Все операции в этом разделе выполняются в режиме будильника, в который вы входите, нажимая C (стр. E-4).

Типы тревог
Тип сигнала тревоги определяется выполненными вами настройками, как описано ниже.
- Ежедневный будильник
Установите часы и минуты для будильника. Этот тип настройки заставляет будильник звучать каждый день в то время, которое вы его установили. - Дата будильника
Установите месяц, день, час и минуты для будильника. Этот тип настройки вызывает срабатывание будильника в определенное время, в определенную дату, которую вы установили. - 1-месячный будильник
Установите месяц, час и минуты для будильника. Этот тип настройки заставляет будильник звучать каждый день в установленное вами время, но только в течение установленного вами месяца. - Ежемесячный будильник
Установите день, час и минуты для будильника. При этом типе настройки будильник срабатывает каждый месяц в установленное вами время, в установленный вами день.
- В режиме будильника используйте D для прокрутки экранов будильника, пока не отобразится тот, время которого вы хотите установить.
 • Аварийная сигнализация 1 есть функция повтора сигнала.
• Повтор сигнала будильника повторяется каждые пять минут. - После выбора будильника нажмите и удерживайте A до тех пор, пока часовые настройки времени будильника не начнут мигать, что указывает на экран настроек. x Эта операция автоматически включает будильник.
- Нажмите C, чтобы переместить мигание в показанной ниже последовательности для выбора других настроек.

- Пока параметр мигает, нажмите D чтобы увеличить его.
• Чтобы установить будильник, который не включает месяц (Ежедневный будильник, Ежемесячный будильник), установите на месяц. Нажимайте D, пока не появится метка (от 12 до 1), пока мигает настройка месяца.
• Чтобы установить будильник, который не включает день (Ежедневный будильник, 1-месячный будильник), установите на день. Нажимайте D, пока не появится метка (между концом месяца и 1), пока мигает настройка дня.
• При установке времени будильника в 12-часовом формате убедитесь, что время правильно установлено как am или pm (индикатор P). - Нажмите A для выхода из экрана настроек.
Работа по тревоге
Сигнал будильника звучит в заданное время в течение 10 секунд, независимо от режима, в котором находятся часы. В случае отложенного будильника срабатывание будильника выполнялось в общей сложности семь раз каждые пять минут, пока вы не включили будильник. выключите или измените его на одноразовый будильник (стр. R-14).
- Чтобы отключить сигнал будильника после того, как он начнет звучать, нажмите любую кнопку.
- Выполнение любой из следующих операций в течение 5-минутного интервала между сигналами повторения сигнала будильника отменяет текущую операцию повторения сигнала будильника. Отображение экрана настройки режима Текущего времени (стр. E-6) Отображение экрана установки будильника 1 (стр. E-11)
Чтобы проверить будильник - В режиме будильника нажмите и удерживайте D, чтобы подать сигнал будильника.
Чтобы включить будильники 2–5 и Hourly Сигнал времени вкл. и выкл.
- В режиме будильника используйте D для выбора номера будильника 2 через 5, или Хоurly Сигнал времени (: 00).
- Нажмите A, чтобы включить или выключить его.
- Состояние включения / выключения сигналов тревоги 2 через 5 и Хоurly Сигнал времени отображается индикаторами.
- Тревога по индикаторам и Hourly Индикатор включения сигнала времени отображается во всех режимах. Индикатор включения будильника
- Пока звучит будильник, на дисплее мигает соответствующий индикатор включения будильника.

Чтобы выбрать работу будильника 1
- В режиме будильника с помощью D выберите будильник. 1.
- Нажмите A, чтобы просмотреть доступные настройки в последовательности, показанной ниже.
Индикатор повтора сигнала (SNZ) и будильник 1 на индикаторе
- Индикатор отложенного сигнала (SNZ) и индикатор включения будильника 1 отображаются во всех режимах.
- Индикатор отложенного сигнала (SNZ) мигает в течение 5-минутных интервалов между сигналами будильника.
- Индикатор будильника (будильник 1 включен и / или отложен) мигает, пока звучит будильник.
Таймер обратного отсчета времени
Таймер обратного отсчета можно установить в диапазоне от одной минуты до 24 часов. Когда обратный отсчет достигает нуля, раздается звуковой сигнал.
- Вы также можете выбрать автоповтор, который автоматически перезапускает обратный отсчет с исходного значения, которое вы установили при достижении нуля.
- Все операции в этом разделе выполняются в режиме таймера обратного отсчета, в который вы входите, нажимая C (стр. E-5).
Использование таймера обратного отсчета Нажмите D в режиме таймера обратного отсчета, чтобы запустить таймер обратного отсчета. - По достижении конца обратного отсчета и отключении автоповтора звуковой сигнал звучит в течение 10 секунд или до тех пор, пока вы не остановите его нажатием любой кнопки. Время обратного отсчета автоматически сбрасывается до начального значения после прекращения подачи сигнала тревоги.

- Операция измерения таймера обратного отсчета продолжается, даже если вы выйдете из режима таймера обратного отсчета.
- Нажмите D пока идет обратный отсчет, чтобы приостановить его. Нажмите D снова, чтобы возобновить обратный отсчет.
- Чтобы полностью остановить обратный отсчет, сначала приостановите его (нажав D), а затем нажмите A. Это вернет время обратного отсчета к его начальному значению.
Чтобы установить время начала обратного отсчета
- В режиме таймера обратного отсчета нажмите и удерживайте A до тех пор, пока часы, установленные для времени начала обратного отсчета, не начнут мигать, что указывает на экран настроек.
- Нажмите ©, чтобы переключить мигание между настройками часов и минут.
- Пока параметр мигает, используйте D чтобы увеличить его. x Чтобы установить начальное значение времени обратного отсчета на 24 часа, установите 0:00.
- Нажмите A, чтобы выйти из экрана настроек.
Включение и выключение автоповтора
- В режиме таймера обратного отсчета нажмите и удерживайте A, пока часы, установленные для времени начала обратного отсчета, не начнут мигать, что указывает на экран настроек.
- Нажмите B включить автоповтор (А.РПТ отображается) и выключен (А.РПТ не отображается).
- Обратите внимание, что нажатие B в вышеуказанной операции также включается подсветка.
- По достижении конца обратного отсчета при включенном индикаторе автоповтора раздается звуковой сигнал, но обратный отсчет возобновляется с самого начала без остановки. Вы можете остановить обратный отсчет, нажав D и вручную установите время начала, нажав A.
- Индикатор автоповтора появляется только в режиме таймера обратного отсчета.
Секундомер
Секундомер позволяет измерять прошедшее время, промежуточное время и два финиша.
- Диапазон отображения секундомера составляет 23 часа 59 минут 59.99 секунды.
- Секундомер продолжает работать, перезагружаясь с нуля после достижения предела, пока вы его не остановите.
- Продолжающаяся операция измерения прошедшего времени будет продолжена внутри, даже если вы переключитесь в другой режим. Однако, если вы выйдете из режима секундомера, когда отображается промежуточное время, промежуточное время не будет отображаться, когда вы вернетесь в режим секундомера.
- Все операции в этом разделе выполняются в режиме секундомера, в который вы входите, нажимая C (стр. E-5).
Для измерения времени с помощью секундомера Истекшее время

Двойное время
Режим двойного времени позволяет отслеживать время в другом часовом поясе.
- В режиме двойного времени второй отсчет синхронизируется со вторым отсчетом в режиме Текущего времени.
Чтобы установить двойное время
- Нажмите ©, чтобы войти в режим двойного времени (стр. E-5).
- В режиме двойного времени удерживайте A до тех пор, пока значение часа не начнет мигать, что указывает на экран настройки.
- Нажмите ©, чтобы изменить выбор в следующей последовательности.


- Нажмите D для увеличения настройки. 5. Нажмите A, чтобы выйти из экрана настроек.
Справка
В этом разделе содержится более подробная и техническая информация о работе часов. Он также содержит важные меры предосторожности и примечания о различных характеристиках и функциях этих часов.
Функции автоматического возврата
Если вы оставите экран с мигающими цифрами в течение двух или трех минут без выполнения каких-либо действий, часы автоматически сохранят все настройки, которые вы сделали до этого момента, и закроют экран настроек.
Прокрутка данных и настроек
Кнопка D используется для прокрутки данных экрана настроек на дисплее. Удерживая эту кнопку во время прокрутки, вы прокручиваете данные с высокой скоростью.
Меры предосторожности при использовании подсветки
- Освещение, обеспечиваемое подсветкой, может быть трудноразличимым, когда viewпод прямыми солнечными лучами.
- Подсветка автоматически перестает светиться при срабатывании будильника.
- Частое использование подсветки сокращает срок службы батареи.
Характеристики
Точность при нормальной температуре: ± 30 секунд в месяц
Хронометраж: часы, минуты, секунды, вечера (P), месяц, день, день недели Система времени: возможность переключения между 12-часовым и 24-часовым форматами Календарная система: полностью автоматический календарь, предварительно запрограммированный с 2000 по 2099 год. Сигналы тревоги: 5 Многофункциональная календарная система: полностью автоматическая. -календарь запрограммирован с 2000 по 2099 год
Сигнализация: 5 многофункциональных * будильников (1 с функцией повтора сигнала), Hourly Сигнал времени * Тип сигнала: Ежедневный сигнал, будильник по дате, месячный будильник, ежемесячный будильник
Таймер обратного отсчета времени
Единица измерения: 1 секунда
Диапазон ввода: от 1 минуты до 24 часов (с шагом 1 минута и 1 час).
Другое: функция автоповтора
Секундомер
Единица измерения: 1/100 секунды
Пределы измерения: 23: 59’59.99 ″
Режимы измерения: прошедшее время, промежуточное время, два конца
Двойное время: Часы, минуты, секунды, вечера (P)
Другое: LED (светодиодная) подсветка
Батарея: Одна литиевая батарея (тип: CR2032)
Примерно 10 лет на тип CR2032 (при условии, что будильник работает 10 секунд в день, а одна операция подсветки — 1.5 секунды в день)
Технические характеристики могут быть изменены без предварительного уведомления.
Документы / Ресурсы

Operation Guide 3502
E-9
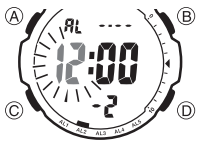
Alarms
You can set up to five independent multi-function alarms
with hour, minutes, month, and day. When an alarm is
turned on, the alarm tone sounds when the alarm time is
reached. One of the alarms has a snooze feature.
You can also turn on an Hourly Time Signal that causes
the watch to beep every hour on the hour.
x There are five alarms numbered 1 through 5. The
Hourly Time Signal screen is indicated by :00.
x All of the operations in this section are performed
in the Alarm Mode, which you enter by pressing C
(page E-4).
Alarm date
(Month – Day)
Alarm time
(Hour : Minutes)
Alarm number
E-8
To toggle between 12-hour and 24-hour timekeeping
In the Timekeeping Mode, press D to toggle between 12-hour timekeeping and
24-hour timekeeping.
x With the 12-hour format, the P (PM) indicator appears to the left of the hour
digits for times in the range of noon to 11:59 p.m. and no indicator appears to
the left of the hour digits for times in the range of midnight to 11:59 a.m.
x With the 24-hour format, times are displayed in the range of 0:00 to 23:59,
without any indicator.
x The 12-hour/24-hour timekeeping format you select in the Timekeeping Mode is
applied in all other modes.
E-7
3. When the setting you want to change is flashing, press D to change it as
described below.
To change this setting Perform this button operation
Seconds
Press D to reset to 00.
Hour, Minutes, Year, Month, Day
Press D to increase the setting.
x Pressing D while the seconds are in the range of 30 to 59 resets them to 00
and adds 1 to the minutes. In the range of 00 to 29, the minutes are unchanged.
4. Press A to exit the setting screen.
x The day of the week is automatically displayed in accordance with the date
(year, month, and day) settings.
x The year can be set in the range of 2000 to 2099.
x The watch’s built-in full automatic calendar automatically makes allowances for
different month lengths and leap years. Once you set the date, there should be
no reason to change it except after you have the watch’s battery replaced.
E-6
Timekeeping
Use the Timekeeping Mode to set and view the current
time and date.
To set the time and date
1. In the Timekeeping Mode, hold down A until the
seconds start to flash, which indicates the setting
screen.
2. Press C to move the flashing in the sequence shown
below to select other settings.
CC
C
Seconds Hour Minutes
Day YearMonth
CC
C
Hour : Minutes
Seconds
Month – Day
Day of week
PM indicator
E-5
Countdown Timer
Mode
CC
C
Stopwatch Mode Dual Time Mode
x In any mode, hold down C for about one second to return to the Timekeeping
Mode.
E-4
General Guide
x Press C to change from mode to mode.
x In any mode, press B to illuminate the display.
Timekeeping Mode Alarm Mode
C
C
E-3
To set the Dual Time …………………………………………………………………………………E-21
To turn on the backlight ……………………………………………………………………………E-22
E-2
Procedure Lookup
The following is a handy reference list of all the operational procedures contained in
this manual.
To set the time and date …………………………………………………………………………….. E-6
To toggle between 12-hour and 24-hour timekeeping ………………………………….E-8
To set an alarm time …………………………………………………………………………………E-11
To test the alarm ………………………………………………………………………………………E-13
To turn Alarms 2 through 5 and the Hourly Time Signal on and off ……………..E-14
To select the operation of Alarm 1 …………………………………………………………….E-15
To use the countdown timer …………………………………………………………………….. E-16
To set the countdown start time ……………………………………………………………….E-17
To turn auto-repeat on and off ………………………………………………………………….E-18
To measure times with the stopwatch ……………………………………………………….E-20
E-1
Contents
General Guide ……………………………………………………………………………………………. E-4
Timekeeping ………………………………………………………………………………………………E-6
Alarms………………………………………………………………………………………………………..E-9
Countdown Timer …………………………………………………………………………………….. E-16
Stopwatch ……………………………………………………………………………………………….. E-19
Dual Time …………………………………………………………………………………………………E-21
Backlight ………………………………………………………………………………………………….E-22
Reference ………………………………………………………………………………………………… E-23
Specifications …………………………………………………………………………………………..E-25
Operating Precautions ……………………………………………………………………………… E-27
User Maintenance …………………………………………………………………………………….E-37
E
About This Manual
x Depending on the model of your watch, display text
appears either as dark figures on a light background, or
light figures on a dark background. All sample displays
in this manual are shown using dark figures on a light
background.
x Button operations are indicated using the letters shown
in the illustration.
x Each section of this manual provides you with the
information you need to perform operations in each
mode. Further details and technical information can be
found in the “Reference” section.
x To ensure that this watch provides you with the years
of service for which it is designed, carefully read and
follow the instructions under “Operating Precautions”
and “User Maintenance”.
x Be sure to keep all user documentation handy for future
reference.
MA2008-EA
© 2021 CASIO COMPUTER CO., LTD.
Need a manual for your Casio Collection AE-1500WH-8BVEF Watch? Below you can view and download the PDF manual for free. There are also frequently asked questions, a product rating and feedback from users to enable you to optimally use your product. If this is not the manual you want, please contact us.
Is your product defective and the manual offers no solution? Go to a Repair Café for free repair services.
Manual

Rating
Let us know what you think about the Casio Collection AE-1500WH-8BVEF Watch by leaving a product rating. Want to share your experiences with this product or ask a question? Please leave a comment at the bottom of the page.
Are you satisfied with this Casio product?
Yes No
5 votes
Frequently Asked Questions
Our support team searches for useful product information and answers to frequently asked questions. If you find an inaccuracy in our frequently asked questions, please let us know by using our contact form.
My mechanical watch runs fast, what can I do? Verified
This might be caused by exposure to a magnetic field. It can be solved by a demagnetisation process performed by a professional watchmaker.
This was helpful (612)
A battery in my device is oxidized, can I still safely use it? Verified
Ja, the device can still be safely used. Firstly, remove the oxidizd battery. Never use bare hands to do this. Then clean the battery compartment with a cotton swab dipped in vinegar or lemon juice. Let it dry and insert new batteries.
This was helpful (583)
What do AM and PM stand for? Verified
AM stands for Ante Meridiem and indicates that the time is before midday. PM stands for Post Meridiem and indicates that the time is past midday.
This was helpful (540)
What is a ‘Chronograph’? Verified
A ‘Chronograph’ is literally a ‘writer of time’. The term is used to describe clocks and watches that tell the time of day as well as measure a certain period of time, like a stopwatch.
This was helpful (473)
What is a quartz movement? Verified
Watches and clocks with a quartz movement are driven by a battery. This sends an electric current through quartz crystals that will vibrate. These vibrations are passed on to the movement. Because the vibrations have a fixed frequency, watches and clocks with a quartz movement are extremely precise.
This was helpful (319)
What is GMT? Verified
GMT stands for Greenwich Mean Time (sometimes called UTC, standing for Coordinated Universal Time). It is the time for the longitude 0, that passes through Greenwich near London.
This was helpful (318)
There is moisture on the inside of the glass of my Casio watch, what should I do? Verified
Casio states that if the moisture appeared after an extreme change in temperature and disappears relatively quickly afterwards, there is probably nothing wrong. If the moisture does not disappear, you should have your watch repaired as soon as possible.
This was helpful (41)

Operation Guide 3502
E-9
Alarms
You can set up to five independent multi-function alarms
with hour, minutes, month, and day. When an alarm is
turned on, the alarm tone sounds when the alarm time is
reached. One of the alarms has a snooze feature.
You can also turn on an Hourly Time Signal that causes
the watch to beep every hour on the hour.
x There are five alarms numbered 1 through 5. The
Hourly Time Signal screen is indicated by :00.
x All of the operations in this section are performed
in the Alarm Mode, which you enter by pressing C
(page E-4).
Alarm date
(Month – Day)
Alarm time
(Hour : Minutes)
Alarm number
E-8
To toggle between 12-hour and 24-hour timekeeping
In the Timekeeping Mode, press D to toggle between 12-hour timekeeping and
24-hour timekeeping.
x With the 12-hour format, the P (PM) indicator appears to the left of the hour
digits for times in the range of noon to 11:59 p.m. and no indicator appears to
the left of the hour digits for times in the range of midnight to 11:59 a.m.
x With the 24-hour format, times are displayed in the range of 0:00 to 23:59,
without any indicator.
x The 12-hour/24-hour timekeeping format you select in the Timekeeping Mode is
applied in all other modes.
E-7
3. When the setting you want to change is flashing, press D to change it as
described below.
To change this setting Perform this button operation
Seconds
Press D to reset to 00.
Hour, Minutes, Year, Month, Day
Press D to increase the setting.
x Pressing D while the seconds are in the range of 30 to 59 resets them to 00
and adds 1 to the minutes. In the range of 00 to 29, the minutes are unchanged.
4. Press A to exit the setting screen.
x The day of the week is automatically displayed in accordance with the date
(year, month, and day) settings.
x The year can be set in the range of 2000 to 2099.
x The watch’s built-in full automatic calendar automatically makes allowances for
different month lengths and leap years. Once you set the date, there should be
no reason to change it except after you have the watch’s battery replaced.
E-6
Timekeeping
Use the Timekeeping Mode to set and view the current
time and date.
To set the time and date
1. In the Timekeeping Mode, hold down A until the
seconds start to flash, which indicates the setting
screen.
2. Press C to move the flashing in the sequence shown
below to select other settings.
CC
C
Seconds Hour Minutes
Day YearMonth
CC
C
Hour : Minutes
Seconds
Month – Day
Day of week
PM indicator
E-5
Countdown Timer
Mode
CC
C
Stopwatch Mode Dual Time Mode
x In any mode, hold down C for about one second to return to the Timekeeping
Mode.
E-4
General Guide
x Press C to change from mode to mode.
x In any mode, press B to illuminate the display.
Timekeeping Mode Alarm Mode
C
C
E-3
To set the Dual Time …………………………………………………………………………………E-21
To turn on the backlight ……………………………………………………………………………E-22
E-2
Procedure Lookup
The following is a handy reference list of all the operational procedures contained in
this manual.
To set the time and date …………………………………………………………………………….. E-6
To toggle between 12-hour and 24-hour timekeeping ………………………………….E-8
To set an alarm time …………………………………………………………………………………E-11
To test the alarm ………………………………………………………………………………………E-13
To turn Alarms 2 through 5 and the Hourly Time Signal on and off ……………..E-14
To select the operation of Alarm 1 …………………………………………………………….E-15
To use the countdown timer …………………………………………………………………….. E-16
To set the countdown start time ……………………………………………………………….E-17
To turn auto-repeat on and off ………………………………………………………………….E-18
To measure times with the stopwatch ……………………………………………………….E-20
E-1
Contents
General Guide ……………………………………………………………………………………………. E-4
Timekeeping ………………………………………………………………………………………………E-6
Alarms………………………………………………………………………………………………………..E-9
Countdown Timer …………………………………………………………………………………….. E-16
Stopwatch ……………………………………………………………………………………………….. E-19
Dual Time …………………………………………………………………………………………………E-21
Backlight ………………………………………………………………………………………………….E-22
Reference ………………………………………………………………………………………………… E-23
Specifications …………………………………………………………………………………………..E-25
Operating Precautions ……………………………………………………………………………… E-27
User Maintenance …………………………………………………………………………………….E-37
E
About This Manual
x Depending on the model of your watch, display text
appears either as dark figures on a light background, or
light figures on a dark background. All sample displays
in this manual are shown using dark figures on a light
background.
x Button operations are indicated using the letters shown
in the illustration.
x Each section of this manual provides you with the
information you need to perform operations in each
mode. Further details and technical information can be
found in the “Reference” section.
x To ensure that this watch provides you with the years
of service for which it is designed, carefully read and
follow the instructions under “Operating Precautions”
and “User Maintenance”.
x Be sure to keep all user documentation handy for future
reference.
MA2008-EA
© 2021 CASIO COMPUTER CO., LTD.
- Светодиодная подсветка
Для подсветки дисплея используется светодиод. - Функция секундомера- 1/100 сек. — 24 часа
Прошедшее время измеряется с точностью в 1/100 секунды. Пределы измерения достигают 24 часов. - Таймер — 1/1 мин. — 24 часа (с автоматическим повтором)
Для поклонников точности: таймеры обратного отсчета напомнят Вам о текущих или особенных событиях, издав звуковой сигнал в установленное время. Время можно предварительно настроить от 1 минуты и до 24 часов. Часы могут затем автоматически начать отсчет в обратного времени в установленное время. Идеальное решение для людей, которым необходимо ежедневно принимать лекарства или выполнять промежуточные упражнения (тренировки). - Будильник с пятью многофункциональными звуковыми сигналами
Эта модель оснащена пятью многофункциональными будильниками. Один из будильников имеет функцию повтора. Эти часы оснащены будильниками, которые индеально подходят для напоминания о любом типе важных событий. Модель оснащена четырьмя повторяющимися звуковыми сигналами: 1. Ежедневный будильник, звучит в одно и тоже время каждый день, 2. Датированный будильник, то есть сигнал, помогающий Вам вспомнить, например, о своем дне рождения, 3. Ежемесячный будильник, звучит в один и тот же день, в одно и то же время каждый месяц, 4. Будильник для каждого дня определенного месяца. - Функция повтора будильника
Каждый раз, когда Вы выключаете звуковой сигнал, он прозвучит повторно спустя несколько минут. - Автоматический календарь
После настройки автоматический календарь всегда отображает точную дату. - 12/24-часовое отображение времени
Отображение времени можно в 12-часовом или 24-часовом формате. - акриловое стекло
Акриловый легко и относительно нерушимой. - Корпус из полимерного пластика
Корпус смолы является идеальным компаньоном каждого дня. Это прочное, легкое и относительно нечувствительно к холоду, жаре или другим внешним воздействиям. - Ремешок из полимерного материала.
Натуральный полимерный материал является идеальным для изготовления ремешка благодаря своей чрезвычайной прочности и гибкости. - пряжка
Браслет оснащен застежкой. - Продолжительное время работы аккумулятора
Десять лет — один аккумулятор. Новые разработки в электронике обеспечивают значительно более низкое потребление энергии. - Водонепроницаемость (10 Бар)
Идеально подходит для плавания с маской и трубкой: часы являются водонепроницаемыми до 10 Бар (ISO 2281). - Габариты (Ш x В x Г)
54,4мм x 51,21мм x 15,73мм - Вес
Примерно 57 гр
Возможны технические изменения и ошибки.
Размеры изображения не соответствуют натуральной величине. Цвета могут отличаться от цветов оригинала.