
Casio PRG-270 / линейка ProTrek / модуль 3415 / год 2013
Инструкция к модулю Casio 3415
- Смотреть онлайн → (без скачивания, удобно на мобильных и планшетах);
- Скачать русскую инструкцию → (типичная “как у всех”, не всегда понятные картинки);
- Скачать английскую инструкцию → (детальная, много фото, более понятная).
Сложно настроить? Спрашивай на форуме ProTrek →
Читайте новости о любимых часах PRG-270 на блоге
[display-posts tag=”PRG-270″ posts_per_page=”4″]
Все новости о PRG-270 →
Побывайте на заводе Casio, изучайте последние новинки ProTrek на Casioblog.RU


CASIO PRO TREK PRG-270 Manual
Applications
The built-in sensors of this watch measure direction, barometric pressure, temperature and altitude. Measured values are then shown on the display. Such features make this watch useful when hiking, mountain climbing, or when engaging in other such outdoor activities.
- The measurement functions built into this watch are not intended for taking measurements that require professional or industrial precision. Values produced by this watch should be considered as reasonable representations only.
- When engaging in mountain climbing or other activities in which losing your way can create a dangerous or life-threatening situation, always use a second compass to confi rm direction readings.
- Note that CASIO COMPUTER CO., LTD. assumes no responsibility for any damage or loss suffered by you or any third party arising through the use of this product or its malfunction.
- Your watch’s Altimeter Mode calculates relative altitude based on changes in barometric pressure measurement by its pressure sensor.
- Immediately before embarking or otherwise taking altitude readings, be sure to specify a reference altitude. If you don’t the readings produced by the watch probably will not be very accurate. For more information, see «To specify a reference altitude value».
- To ensure correct direction readings by this watch, be sure to perform bidirectional calibration before using it. The watch may produce incorrect direction readings if you do not perform bidirectional calibration. For more information, see «To perform bidirectional calibration».
About This Manual
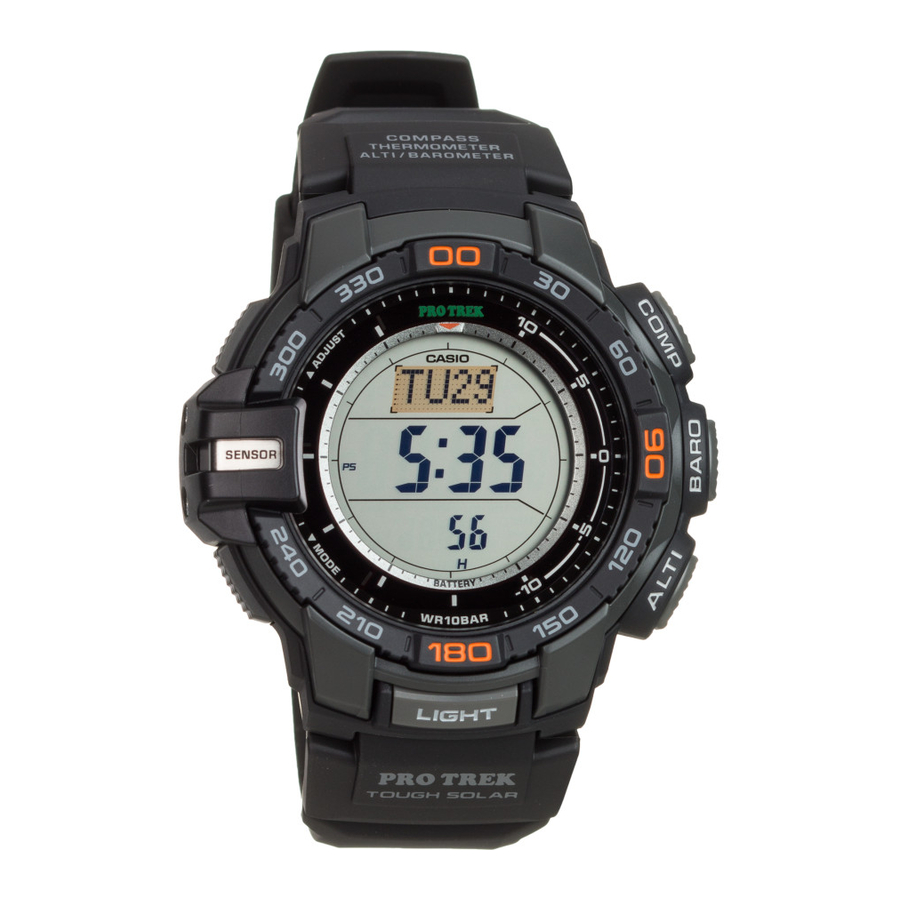
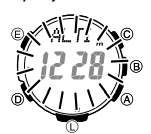
- Depending on the model of your watch, digital display text appears either as dark figures on a light background, or light figures on a dark background. All examples in this manual are shown using dark figures on a light background.
- Button operations are indicated using the letters shown in the illustration.
- Note that the product illustrations in this manual are intended for reference only, and so the actual product may appear somewhat different than depicted by an illustration.
Things to check before using the watch
Check the battery power level

Check the Home City and the daylight saving time (DST) setting
Use the procedure under «To configure Home City and summer time settings» to configure your Home City and daylight saving time settings.
- World Time Mode and Sunrise/Sunset Mode data depend on correct Home City, time, and date settings in the Timekeeping Mode. Make sure you configure these settings correctly.
The watch is now ready for use.
Charging the Watch
The face of the watch is a solar panel that generates power from light. The generated power charges a built-in rechargeable battery, which powers watch operations. The watch charges whenever it is exposed to light.
Charging Guide
Whenever you are not wearing the watch, leave it in a location where it is exposed to light.
- Best charging performance is achieved by exposing the watch to the strongest light available.

When wearing the watch, make sure that its face is not blocked from light by the sleeve of your clothing.
- The watch may enter a sleep state if its face is blocked by your sleeve even only partially.

Leaving the watch in bright light for charging can cause it to become quite hot.
Take care when handling the watch to avoid burn injury. The watch can become particularly hot when exposed to the following conditions for long periods.
- On the dashboard of a car parked in direct sunlight
- Too close to an incandescent lamp
- Under direct sunlight
- Allowing the watch to become very hot can cause its liquid crystal display to black out. The appearance of the LCD should become normal again when the watch returns to a lower temperature.
- Turn on the watch’s Power Saving function and keep it in an area normally exposed to bright light when storing it for long periods. This helps to ensure that power does not run down.
- Storing the watch for long periods in an area where there is no light or wearing it in such a way that it is blocked from exposure to light can cause power to run down. Expose the watch to bright light whenever possible.
Power Levels
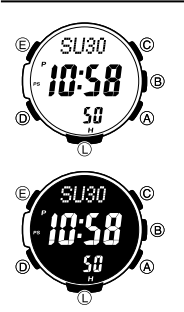
You can get an idea of the watch’s power level by observing the battery power indicator on the display.
| Level | Battery Power Indicator | Function Status |
| 1 (H) |  |
All functions enabled. |
| 2 (M) |  |
All functions enabled. |
| 3 (L) |  |
Illumination, beeper, and sensor operation disabled. |
| 4 (CHG) |  |
Except for the current time and the CHG (change) indicator, all functions and display indicators disabled. |
| 5 | – – – | All functions disabled. |
- The flashing LOW indicator at Level 3 (L) tells you that battery power is very low, and that exposure to bright light for charging is required as soon as possible.
- At Level 5, all functions are disabled and settings return to their initial factory defaults. Once the battery reaches Level 2 (M) after falling to Level 5, reconfigure the current time, date, and other settings.
- Display indicators reappear as soon as the battery is charged from Level 5 to Level 2 (M).
- Leaving the watch exposed to direct sunlight or some other very strong light source can cause the battery power indicator to show a reading temporarily that is higher than the actual battery level. The correct battery level should be indicated after a few minutes.
- All data stored in memory is deleted, and the current time and all other settings return to their initial factory defaults whenever battery power drops to Level 5 and when you have the battery replaced.
Power Recovery Mode
- Performing multiple sensor, illumination, or beeper operations during a short period may cause all of the battery power indicators (H, M, and L) to start flashing on the display. This indicates that the watch is in the power recovery mode. Illumination, alarm, countdown timer alarm, hourly time signal, and sensor operations will be disabled until battery power recovers.
- Battery power will recover in about 15 minutes. At this time, the battery power indicators (H, M, L) will stop flashing. This indicates that the functions listed above are enabled again.
- If all of the battery power indicators (H, M, L) are flashing and the CHG (charge) indicator also is flashing, it means the battery level is very low. Expose the watch to bright light as soon as possible.
- Even if battery power is at Level 1 (H) or Level 2 (M), the Digital Compass Mode, Barometer/ Thermometer Mode, or Altimeter Mode sensor may be disabled if there is not enough voltage available to power it sufficiently. This is indicated when all of the battery power indicators (H, M, L) are flashing.
- Frequent flashing of all of the battery power indicators (H, M, L) probably means that remaining battery power is low. Leave the watch in bright light to allow it to charge.
Charging Times
*1 Approximate amount of exposure time required each day to generate enough power for normal daily operation.
*2 Approximate amount of exposure time (in hours) required to take power from one level to the next.
- The above exposure times all are for reference only. Actual exposure times depend on lighting conditions.
- For details about the operating time and daily operating conditions, see the «Power Supply» section of the Specifications.
Power Saving
When turned on, Power Saving enters a sleep state automatically whenever the watch is left for a certain period in an area where it is dark. The table below shows how watch functions are affected by Power Saving.
- For information about enabling and disabling power saving, see «To turn Power Saving on and off».
- There actually are two sleep state levels: «display sleep» and «function sleep».
| Elapsed Time in Dark | Display | Operation |
| 60 to 70 minutes (display sleep) | Blank, with PS flashing | Display is off, but all functions are enabled. |
| 6 or 7 days (function sleep) | Blank, with PS not flashing | All functions are disabled, but timekeeping is maintained. |
- The watch will not enter a sleep state between 6:00 AM and 9:59 PM. If the watch is already in a sleep state when 6:00 AM arrives, however, it will remain in the sleep state.
- The watch will not enter a sleep state while it is in the Stopwatch Mode or Countdown Timer Mode.
To recover from the sleep state
Move the watch to a well-lit area, press any button, or angle the watch towards your face for reading.
Mode Reference Guide
Your watch has 10 «modes». The mode you should select depends on what you want to do.
| To do this: | Enter this mode: |
|
Timekeeping Mode |
| Determine your current bearing or the direction from your current location to a destination | Digital Compass Mode |
|
Barometer/Thermometer Mode |
|
Altimeter Mode |
| View the sunrise and sunset times for a specifi c date | Sunrise/Sunset Mode |
| Recall records created in the Altimeter Mode | Data Recall Mode |
| Use the stopwatch to measure elapsed time | Stopwatch Mode |
| Use the countdown timer | Countdown Timer Mode |
| Set an alarm time | Alarm Mode |
| View the current time in one of 48 cities (31 time zones) around the globe | World Time Mode |
Selecting a Mode
- The illustration below shows which buttons you need to press to navigate between modes.
- To return to the Timekeeping Mode from any other mode, hold down D for about two seconds.
- You can use buttons A, B, and C to enter a sensor mode directly from the Timekeeping Mode or from another sensor mode. To enter a sensor mode from the Sunrise/Sunset, Data Recall, Alarm, Stopwatch, Countdown Timer or World Time, first enter the Timekeeping Mode and then press the applicable button.

General Functions (All Modes)
The functions and operations described in this section can be used in all of the modes.
Direct Timekeeping Mode Access
- To enter the Timekeeping Mode from any other mode, hold down D for about two seconds.
Auto Return Features
- The watch will automatically return to the Timekeeping Mode if you do not perform any button operation for a particular amount of time in each mode.
| Mode Name | Approximate Elapsed Time |
| Sunrise/Sunset, Data Recall, Alarm, Digital Compass | 3 minutes |
| Altimeter | 1 hour minimum 12 hours maximum |
| Barometer/Thermometer | 1 hour |
| Setting screen (digital setting flashing) | 3 minutes |
- If you leave a screen with flashing digits on the display for two or three minutes without performing any operation, the watch exits the setting screen automatically.
Initial Screens
When you enter the Data Recall, Alarm, World Time, or Digital Compass Mode, the data you were viewing when you last exited the mode appears first.
Scrolling
The A and C buttons are used on the setting screen to scroll through data on the display. In most cases, holding down these buttons during a scroll operation scrolls through the data at high speed.
Timekeeping
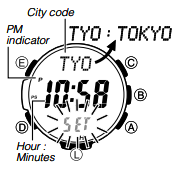
Use the Timekeeping Mode (TIME) to set and view the current time and date. Each press of E in the Timekeeping Mode will change screen contents as shown below.

Configuring Home City Settings
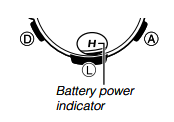
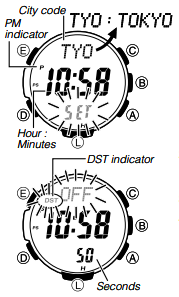
There are two Home City settings: actually selecting the Home City and selecting either standard time or daylight saving time (DST).
To configure Home City and summer time settings
- In the Timekeeping Mode, hold down E for at least two seconds. First, SET Hold will flash on the display, and CITY will be displayed in the upper display. After that, the currently selected city code and city name will scroll across the upper display. Keep E depressed until the scrolling starts.
- The watch will exit the setting mode automatically if you do not perform any operation for about two or three minutes.
- For details about city codes, see the «City Code Table» at the back of this manual.
- Use A (East) and C (West) to scroll through the available city codes.
- Keep scrolling until the city code you want to select as your Home City is displayed.
- Press D to display the DST setting screen.
- Press A to toggle the DST setting between Daylight Saving Time (ON) and standard time (OFF).
- Note that you cannot switch between standard time and daylight saving time (DST) while UTC is selected as your Home City.
Note
- After you specify a city code, the watch will use UTC* offsets in the World Time Mode to calculate the current time for other time zones based on the current time in your Home City. * Coordinated Universal Time, the world-wide scientifi c standard of timekeeping. The reference point for UTC is Greenwich, England.
Configuring Current Time and Date Settings
You can use the procedure below to adjust the Timekeeping Mode time and date settings if they are off.
To change the current time and date settings
- In the Timekeeping Mode, hold down E for at least two seconds. First, SET Hold will flash on the display, and CITY will be displayed in the upper display. After that, the currently selected city code and city name will scroll across the upper display. Keep E depressed until the scrolling starts.
- Press D to move the flashing in the sequence shown below to select the other settings.

- The following steps explain how to configure timekeeping settings only.
- When the timekeeping setting you want to change is flashing, use A and/or C to change it as described below.
| Screen | To do this: | Do this: |
 |
Change the city code | Use A (East) and C (West). |
 |
Toggle between Daylight Saving Time (ON) and Standard Time (OFF). | Press A. |
 |
Toggle between 12-hour (12H) and 24-hour (24H) timekeeping. | Press A. |
 |
Reset the seconds to 00 (If the current seconds count is between 30 and 59, one is added to the minute count). | Press A. |
 |
Change the hour or minutes | Use A (+) and C (–). |
 |
Change the year, month, or day |
- After all of the settings are the way you want, press E twice to exit the setting screen.
Note
- For information about selecting a Home City and Configuring the DST setting, see «Configuring Home City Settings».
- While the 12-hour format is selected for timekeeping, a P (PM) indicator will appear for times from noon to 11:59 p.m. No indicator appears for times from midnight to 11:59 a.m. With 24-hour format, time is displayed from 0:00 to 23:59, without any P (PM) indicator.
- The watch’s built-in full automatic calendar makes allowances for different month lengths and leap years. Once you set the date, there should be no reason to change it except after you have the watch’s rechargeable battery replaced or after power drops to Level 5.
- The day of the week changes automatically when the date changes.
- Refer to the pages shown below for more information on Timekeeping Mode settings.
- Button operation tone on/off: «To turn the button operation tone on and off»
- Illumination duration setting: «To change the illumination duration»
- Enabling and disabling power saving: «To turn Power Saving on and off»
- Changing the temperature, barometric pressure, and altitude display units (for a city code other than TYO): «To specify temperature, barometric pressure, and altitude display units»
Taking Direction Readings
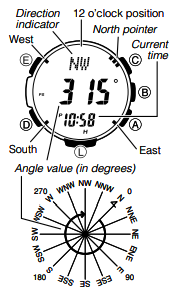
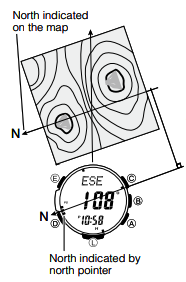
The Digital Compass Mode uses a built-in direction sensor to take direction readings and display the results. North is indicated by three graphic segments ( ). The watch also displays literal indications of direction that its 12 o’clock position is currently pointed.
- For information about what you can do to improve digital compass reading accuracy, see «Calibrating the Bearing Sensor» and «Digital Compass Precautions».
- Make sure the watch is in the Timekeeping Mode or any one of the sensor modes.
- The sensor modes are: Digital Compass Mode, Barometer/ Thermometer Mode, and Altimeter Mode.
- Place the watch on a fl at surface. If you are wearing the watch, make sure that your wrist is horizontal (in relation to the horizon).
- Point the 12 o’clock position of the watch in the direction whose reading you want to take.
- Press C to start.
- COMP will appear in the upper display to indicate that a digital compass operation is in progress.
- About one second after you press C, pointers (three graphic segments for north, one graphic segment each for south, east, and west) will appear on the display to indicate north, south, east, and west. Direction will also be indicated by literal direction indicators and by a direction angle.
Note
- If the four pointers (north, south, east, west) and the direction indicating letters do not appear on the display when you press C, it could mean that the watch is displaying bearing memory information. If this happens, press E to delete the current bearing memory contents. For more information, see «Using Bearing Memory».
- To return to the Timekeeping Mode, press D. Pressing D will return to the Timekeeping Mode even is a reading operation is in progress.
Digital Compass Readings
- When you press C to start digital compass reading operation, COMP will initially appear on the display to indicate that a digital compass operation is in progress.
- After the first reading is obtained, the watch will continue to take digital compass readings automatically each second for up to 60 seconds. After that, the reading operation will stop automatically.
- The direction indicator and angle value will show — — — to indicate that digital compass readings are complete.
- The auto light switch is disabled during the 60 seconds that digital compass readings are being taken.
- The following table shows the meanings of each of the direction abbreviations that appear on the display.
| Direction | Meaning | Direction | Meaning | Direction | Meaning | Direction | Meaning |
| N | North | NNE | Northnortheast | NE | Northeast | ENE | Eastnortheast |
| E | East | ESE | Eastsoutheast | SE | Southeast | SSE | Southsoutheast |
| S | South | SSW | Southsouthwest | SW | Southwest | WSW | Westsouthwest |
| W | West | WNW | Westnorthwest | NW | Northwest | NNW | Northnorthwest |
- The margin of error for the angle value and the direction indicator is ±11 degrees while the watch is horizontal (in relation to the horizon). If the indicated direction is northwest (NW) and 315 degrees, for example, the actual direction can be anywhere from 304 to 326 degrees.
- Note that taking a direction reading while the watch is not horizontal (in relation to the horizon) can result in large direction reading error.
- You can calibrate the bearing sensor if you suspect the direction reading is incorrect.
- Any ongoing direction reading operation is paused temporarily while the watch is performing an alert operation (daily alarm, Hourly Time Signal, countdown timer alarm) or while illumination is turned on (by pressing L). The direction reading operation resumes for its remaining duration after the operation that caused it to pause is finished.
- See «Digital Compass Precautions» for important information about taking direction readings.
Calibrating the Bearing Sensor
You should calibrate the bearing sensor whenever you feel that the direction readings being produced by the watch are off. You can use any one of two different bearing sensor calibration methods: bidirectional calibration or magnetic declination correction.
- Bidirectional Calibration
Bidirectional calibration calibrates the bearing sensor in relation to magnetic north. Use bidirectional calibration when you want to take readings within an area exposed to magnetic force. This type of calibration should be used if the watch becomes magnetized for any reason. - To ensure correct direction readings by this watch, be sure to perform bidirectional calibration before using it. The watch may produce incorrect direction readings if you do not perform bidirectional calibration.
- Magnetic Declination Correction
With magnetic declination correction, you input a magnetic declination angle (difference between magnetic north and true north), which allows the watch to indicate true north. You can perform this procedure when the magnetic declination angle is indicated on the map you are using. Note that you can input the declination angle in whole degree units only, so you may need to round off the value specifi ed on the map. If your map indicates the declination angle as 7.4°, you should input 7°. In the case of 7.6° input 8°, for 7.5° you can input 7° or 8°.
Precautions about bidirectional calibration
- You can use any two opposing directions for bidirectional calibration. You must, however, make sure that they are 180 degrees opposite each other. Remember that if you perform the procedure incorrectly, you will get wrong bearing sensor readings.
- Do not move the watch while calibration of either direction is in progress.
- You should perform bidirectional calibration in an environment that is the same as that where you plan to be taking direction readings. If you plan to take direction readings in an open field, for example, calibrate in an open field.
To perform bidirectional calibration
- In the Digital Compass Mode, hold down E for at least two seconds. First, SET Hold will flash on the display. After that, CALIBRATION will scroll across the upper display. Keep E depressed until CALIBRATION starts scrolling.
- At this time, the north pointer flashes at the 12 o’clock position and the display will show -1- to indicate that the watch is ready to calibrate the first direction.
- Place the watch on a level surface facing any direction you want, and press C to calibrate the first direction.
- — — is shown on the display while calibration is being performed. When calibration is successful, Turn 180° will appear on the display and three graphic segments (
 ) will flash at 6 o’clock. After about one second, CALIBRATION -2— will scroll across the upper display.
 - If ERR-1 appears on the display, press C again to restart the direction reading operation.
- Rotate the watch 180 degrees.
- Press C again to calibrate the second direction.
- — — is shown on the display while calibration is being performed. When calibration is successful, the display will show OK and then change to the Digital Compass Mode screen.

To perform magnetic declination correction
- In the Digital Compass Mode, hold down E for at least two seconds. First, SET Hold will flash on the display. After that, CALIBRATION will scroll across the upper display. Keep E depressed until CALIBRATION starts scrolling.
- Press D.
- DEC 0° will appear on the display and then the current magnetic declination angle setting will flash on the display.
- Use A (East) and C (West) to change the settings.
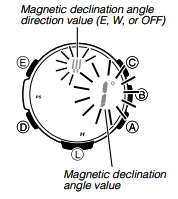
- The following explains magnetic declination angle direction settings.
OFF: No magnetic declination correction performed. The magnetic declination angle with this setting is 0°.
E: When magnetic north is to the east (east declination)
W: When magnetic north is to the west (west declination) - You can select a value within the range of W 90° to E 90° with these settings.
- You can turn off (OFF) magnetic declination correction by pressing A and C at the same time.
- The illustration, for example, shows the value you should input and the direction setting you should select when the map shows a magnetic declination of 1° West.
- When the setting is the way you want, press E to exit the setting screen.
Using Bearing Memory
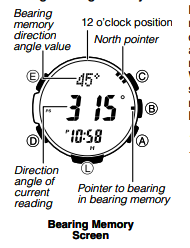
Bearing Memory lets you temporarily store and display a direction reading so you can use it as a reference as you take subsequent digital compass readings. The Bearing Memory screen displays the direction angle for the stored reading, along with a pointer that indicates the stored reading.
When you take digital compass readings while the Bearing Memory screen is displayed, the direction angle of the current digital compass reading (as read from the 12 o’clock position of the watch) and the stored Bearing Memory direction reading will both be shown.
To store a direction angle reading in Bearing Memory
- Press C to start a digital compass reading operation.
- This will take an initial reading and then take readings every second for 60 seconds.
- If a bearing memory direction angle value is already displayed, it means that there is a reading already stored in Bearing Memory. If this happens, press E to clear the Bearing Memory reading and exit the bearing memory screen before performing the above step.
-
During the 60 seconds that digital compass readings are being taken, press E to store the current reading in Bearing Memory
- The Bearing Memory direction angle flashes for about one second as it is stored in Bearing Memory. After that, the Bearing Memory screen (which shows the bearing memory direction angle and pointer) will appear, and a new 60-second direction reading operation will start.
- You can press C at any time while the Bearing Memory screen is displayed, to start a new 60-second direction reading operation. Doing so will display the direction angle for the direction that the 12 o’clock position of the watch is pointed. The direction angle of the current reading will disappear from the display after the 60-second direction reading operation is complete.
- During the first 60 seconds after you display the Bearing Memory screen or during a 60-second direction reading operation you triggered by pressing C while the Bearing Memory screen is on the display, the direction stored in memory is indicated by a Bearing Memory pointer.
- Pressing E while the Bearing Memory screen is displayed will clear the reading currently in Bearing Memory and start a new 60-second direction reading operation.
Using the Digital Compass While Mountain Climbing or Hiking
This section provides three practical applications for using the watch’s built-in digital compass.
- Setting a map and finding your current location Having an idea of your current location is important when mountain climbing or hiking. To do this, you need to «set the map», which means to align the map so the directions indicated on it are aligned with the actual directions of your location. Basically what you are doing is aligning north on the map with north as indicated by the watch.
- Finding the bearing to an objective
- Determining the direction angle to an objective on a map and heading in that direction
To set a map and find your current location
- With the watch on your wrist, position it so the face is horizontal.
- While in the Timekeeping Mode or in any of the sensor modes, press C to take a compass reading.
- The reading will appear on the display after about one second.
-
Rotate the map without moving the watch so the northerly direction indicated on the map matches north as indicated by the watch.
- If the watch is configured to indicate magnetic north, align the map’s magnetic north with the watch indication. If the watch has been configured with a declination to correct to true north, align the map’s true north with the watch indication. For details, see «Calibrating the Bearing Sensor».
- This will position the map in accordance with your current location.
-
Determine your location as you check the geographic contours around you.
To find the bearing to an objective
- With the watch on your wrist, position it so the face is horizontal.
- Set the map so its northerly indication is aligned with north as indicated by the watch, and determine your current location.
- See «To set a map and find your current location» for information about how to perform the above step.
- Next, set the map so the direction you want to travel on the map is pointed straight in front of you.
- While in the Timekeeping Mode or in any of the sensor modes, press C to take a compass reading.

- The reading will appear on the display after about one second.
-
Still holding the map in front of you, turn your body until north as indicated by the watch and the northerly direction on the map are aligned.
- This will position the map in accordance with your current location, so the bearing to your objective is straight ahead of you.
-
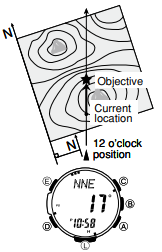
To determine the direction angle to an objective on a map and head in that direction (Bearing Memory)
- Set the map so its northerly indication is aligned with north as indicated by the watch, and determine your current location.
- See «To set a map and find your current location» for information about how to perform the above step.
-
As shown in the illustration to the left, change your position so you (and the 12 o’clock position of the watch) are pointed in the direction of objective, while keeping the northerly direction indicated on the map aligned with north as indicated by the watch.
- If you find it difficult to perform the above step while keeping everything aligned, first move into the correct position (12 o’clock position of the watch pointed at the objective) without worrying about the orientation of the map. Next, perform step 1 again to set the map.
- While in the Timekeeping Mode or in any of the sensor modes, press C to take a compass reading.
- While direction angle readings are in progress, press E to record the currently displayed direction in Bearing Memory.

- The direction angle value and pointer stored in Bearing Memory will remain on the display for about 60 seconds.
- To re-display the Bearing Memory direction angle value and Bearing Memory pointer, press C.
- See «Using Bearing Memory» for more information.
-
Now you can advance while monitoring the Bearing Memory pointer to ensure that it remains in the 12 o’clock position.
- Pressing E while the Bearing Memory direction angle value and Bearing Memory pointer are on the display will clear the Bearing Memory data you saved in step 3 and save the current direction reading in Bearing Memory.
-
Note
- When mountain climbing or hiking, conditions or geographic contours may make it impossible for you to advance in a straight line. If this happens, return to step 1 and save a new direction to the objective.
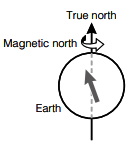
Digital Compass Precautions Magnetic North and True North
The northerly direction can be expressed either as magnetic north or true north, which are different from each other. Also, it is important to keep in mind that magnetic north moves over time.
- Magnetic north is the north that is indicated by the needle of a compass.
- True north, which is the location of the North Pole of the Earth’s axis, is the north that is normally indicated on maps.
- The difference between magnetic north and true north is called the «declination». The closer you get to the North Pole, the greater the declination angle.
Location
- Taking a direction reading when you are near a source of strong magnetism can cause large errors in readings. Because of this, you should avoid taking direction readings while in the vicinity of the following types of objects: permanent magnets (magnetic necklaces, etc.), concentrations of metal (metal doors, lockers, etc.), high tension wires, aerial wires, household appliances (TVs, personal computers, washing machines, freezers, etc.).
- Accurate direction readings are impossible while in a train, boat, air plane, etc.
- Accurate readings are also impossible indoors, especially inside ferroconcrete structures. This is because the metal framework of such structures picks up magnetism from appliances, etc.
Storage
- The precision of the bearing sensor may deteriorate if the watch becomes magnetized. Because of this, you should store the watch away from magnets or any other sources of strong magnetism, including: permanent magnets (magnetic necklaces, etc.) and household appliances (TVs, personal computers, washing machines, freezers, etc.).
- Whenever you suspect that the watch may have become magnetized, perform the procedure under «To perform bidirectional calibration».
Specifying Temperature, Barometric Pressure, and Altitude Display Units
Use the procedure below to specify the temperature, barometric pressure, and altitude display units to be used in the Barometer/Thermometer Mode and the Altimeter Mode.
- When TYO (Tokyo) is selected as the Home City, the altitude unit is set automatically to meters (m), the barometric pressure unit to hectopascals (hPa), and the temperature unit to Celsius (°C). These settings cannot be changed.
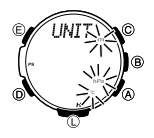
To specify temperature, barometric pressure, and altitude display units
- In the Timekeeping Mode, hold down E for at least two seconds. First, SET Hold will flash on the display, and CITY will be displayed in the upper display. After that, the currently selected city code and city name will scroll across the upper display. Keep E depressed until the scrolling starts.
- Press D as many times as necessary until UNIT appears on the display.
- See the sequence in step 2 of the procedure under «To change the current time and date settings» for information about how to scroll through setting screens.
-
Perform the operations below to specify the display units you want.
| To specify this unit: | Press this key: | To toggle between these settings: |
| Altitude | A | m (meters) and ft (feet) |
| Barometric Pressure | B | hPa (hectopascals) and inHg (inches of mercury) |
| Temperature | C | °C (Celsius) and °F (Fahrenheit) |
- After all of the settings are the way you want, press E twice to exit the setting screen.
Taking Barometric Pressure and Temperature Readings
This watch uses a pressure sensor to measure air pressure (barometric pressure) and a temperature sensor to measure temperature.
To take barometric pressure and temperature readings
While in the Timekeeping Mode or in any of the sensor modes, press B to take barometric pressure and temperature readings.
- BARO will appear on the display, indicating that barometric pressure and temperature reading are in progress. The results will appear on the display after about one second.
- After you press B, the watch will take readings every five seconds for the first three minutes, and then every two minutes after that.
Note
- Press D to return to the Timekeeping Mode.
- The watch will return to the Timekeeping Mode automatically if you do not perform any operation for about 1 hour after entering the Barometer/Thermometer Mode.
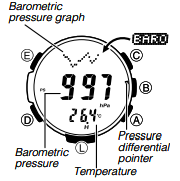
Barometric Pressure
- Barometric pressure is displayed in units of 1 hPa (or 0.05 inHg).
- The displayed barometric pressure value changes to — — — if a measured barometric pressure falls outside the range of 260 hPa to 1,100 hPa (7.65 inHg to 32.45 inHg). The barometric pressure value will reappear as soon as the measured barometric pressure is within the allowable range.
Temperature
- Temperature is displayed in units of 0.1°C (or 0.2°F).
- The displayed temperature value changes to — — — °C (or °F) if a measured temperature falls outside the range of –10.0°C to 60.0°C (14.0°F to 140.0°F). The temperature value will reappear as soon as the measured temperature is within the allowable range.
Display Units
You can select either hectopascals (hPa) or inchesHg (inHg) as the display unit for the measured barometric pressure, and Celsius (°C) or Fahrenheit (°F) as the display unit for the measured temperature value. See «To specify temperature, barometric pressure, and altitude display units».
Barometric Pressure Graph
Barometric pressure indicates changes in the atmosphere. By monitoring these changes you can predict the weather with reasonable accuracy. This watch takes barometric pressure reading automatically every two hours. Readings are used to produce barometric pressure graph and barometric pressure differential pointer readings.
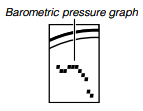
Reading the Barometric Pressure Graph
The barometric pressure graph shows a chronological history of pressure readings.
- When display of the barometric change indicator is disabled, the graph shows the results of up to 21 barometric pressure readings (42 hours).
- When display of the barometric change indicator is enabled, the graph shows the results of up to 11 barometric pressure readings (22 hours).
- The horizontal axis of the graph represents time, with each dot standing for two hours. The rightmost dot represents the most recent reading.
- The vertical axis of the graph represents barometric pressure, with each dot standing for the relative difference between its reading and that of the dots next to it. Each dot represents 1 hPa.
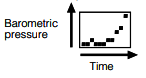
The following shows how to interpret the data that appears on the barometric pressure graph.

Rising barometric pressure indicates that upcoming weather will improve. Falling barometric pressure indicates that upcoming weather will deteriorate.
Note
- If there are sudden changes in weather or temperature, the graph line of past reading may run off the top or bottom of the display. The entire graph will become visible once barometric conditions stabilize.
- The following conditions cause the barometric pressure reading to be skipped, with the corresponding point on the barometric pressure graph being left blank.
- Barometric reading that is out of range (260 hPa to 1,100 hPa or 7.65 inHg to 32.45 inHg)
- Sensor malfunction

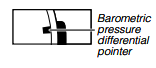
Barometric Pressure Differential Pointer
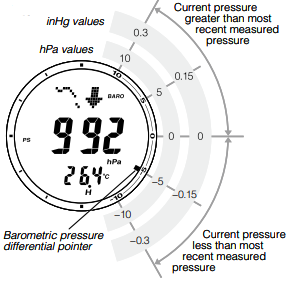
This pointer indicates the relative difference between the most recent barometric pressure reading indicated on the barometric pressure graph, and the current barometric pressure value displayed in the Barometer/Thermometer Mode.
Reading Barometric Pressure Differential Pointer
Pressure differential is indicated in the range of ±10 hPa, in 1-hPa units.
- The nearby screen shot, for example, shows what the pointer would indicate when the calculated pressure differential is approximately – 5 hPa (approximately – 0.15 inHg).
- Barometric pressure is calculated and displayed using hPa as the standard. The barometric pressure differential also can be read in inHg units as shown in the illustration (1 hPa 0.03 inHg).
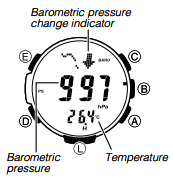
Barometric Pressure Change Indications
Your watch analyzes past barometric pressure readings and uses a barometric pressure change indicator to inform you about changes in pressure. If it determines there has been a significant change in pressure, it will beep and all of the graphic segments ( ) around the periphery of the face will flash as a barometric pressure change alert. This means you could start taking barometric pressure readings after reaching a lodge or camp area, and then check the watch the next morning for changes in pressure, and plan you day’s activities accordingly. Note that you can enable or disable display of the barometric pressure change indicator as desired.
Reading the Barometric Pressure Change Indicator
- The barometric pressure change indicator is not displayed if there has been no noteworthy change in barometric pressure.
- To ensure proper results, take barometric readings under conditions where the altitude remains constant.
Example
- In a lodge or campground
- On the ocean
- A change in altitude causes a change in barometric pressure. Because of this, correct readings are impossible. Do not take readings while ascending or descending a mountain, etc.
Enabling or Disabling Display of the Barometric Pressure Change Indicator
You can enable or disable display of the barometric pressure change indicator as desired. When display of the indicator is enabled, the watch will take a barometric pressure reading every two minutes, regardless of the mode it is in.
- When BARO is shown on the display, it means that barometric pressure change indicator display is enabled.
- When BARO is not on the display, it means that barometric pressure change indicator display is disabled.
To enable or disable the barometric pressure change alert
In the Barometer/Thermometer Mode, hold down B for at least two seconds. Keep B depressed until the current setting (INFO Hold ON or INFO Hold OFF) starts to flash on the display.
- If barometric pressure change indicator display is currently enabled, BARO will also appear in the upper display. BARO will not appear if display is currently disabled.
- Note that barometric pressure change indicator display will turn off automatically 24 hours after you turn it on or battery power goes low.
- Note that barometric pressure change indicator display cannot be enabled while the watch’s battery is low.
Pressure Sensor and Temperature Sensor Calibration
The pressure sensor and temperature sensor built into the watch are calibrated at the factory and normally require no further adjustment. If you notice serious errors in the pressure readings and temperature readings produced by the watch, you can calibrate the sensor to correct the errors.
- Incorrectly calibrating the barometric pressure sensor can result in incorrect readings. Before performing the calibration procedure, compare the readings produced by the watch with those of another reliable and accurate barometer.
- Incorrectly calibrating the temperature sensor can result in incorrect readings. Carefully read the following before doing anything.
- Compare the readings produced by the watch with those of another reliable and accurate thermometer.
- If adjustment is required, remove the watch from your wrist and wait for 20 or 30 minutes to give the temperature of the watch time to stabilize.
To calibrate the pressure sensor and the temperature sensor
- Take a reading with another measurement device to determine the exact current barometric pressure or temperature.
- With the watch in the Timekeeping Mode or in any of the sensor modes, press B to enter the Barometer/Thermometer Mode.
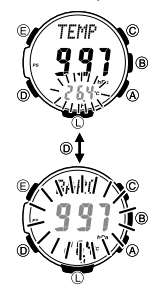
- Hold down E for at least two seconds. SET Hold will flash on the display and then TEMP will appear in the upper display. Keep E depressed until TEMP appears.
- The current temperature calibration setting will flash in the lower display at this time.
- Press D to move the flashing between the temperature value and barometric pressure value, to select the one you want to calibrate.
- Use A (+) and C (–) to select the temperature and barometric pressure value display units as shown below. Temperature 0.1°C (0.2°F) Barometric Pressure 1 hPa (0.05 inHg)
- To return the currently flashing value to its initial factory default setting, press A and C at the same time. OFF will appear at the flashing location for about one second, followed by the initial default value.
- Press E to return to the Barometer/Thermometer Mode screen.
Barometer and Thermometer Precautions
- The pressure sensor built into this watch measures changes in air pressure, which you can then apply to your own weather predictions. It is not intended for use as a precision instrument in offi cial weather prediction or reporting applications.
- Sudden temperature changes can affect pressure sensor readings. Because of this, there may be some error in the readings produced by the watch.
- Temperature reading are affected by your body temperature, direct sunlight, and moisture. To achieve a more accurate temperature reading, remove the watch from your wrist, place it in a well ventilated location out of direct sunlight, and wipe all moisture from the case. It takes approximately 20 to 30 minutes for the case of the watch to reach the surrounding temperature.
Using the Altimeter Mode
The watch takes altitude readings and displays results based on air pressure measurements taken by a built-in pressure sensor. It also saves various types of altitude records and data.
Getting Ready
Before actually taking an altitude reading you need to select an altitude screen format and select an altitude reading interval.
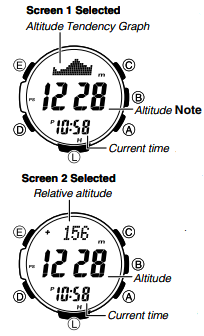
Selecting the Altitude Screen Format
You can select either of two screen formats for the Altimeter Mode.

- Altitude tendency graph contents are updated each time you take an altitude reading.
- To take readings of the difference between the altitude at your current location and the altitude at a reference point, select Screen 2. See «Using an Altitude Differential Value» for more information.
To select the altitude screen format
- In the Altimeter Mode, hold down E for at least two seconds.
- SET Hold will flash on the display and then ALTI will appear in the upper display. Keep E depressed until ALTI appears.
- The current altitude value will appear at this time.
- Press D twice.
- DISP will appear, and then the current screen setting will appear in the upper display.
- Use A to toggle the setting between the two screens.

- Press E to exit the setting screen.
Selecting the Altitude Auto Reading Interval
You can select either of the following two altitude auto reading interval.
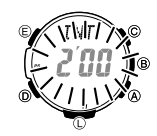
0’05: Readings at one-second intervals for the first three minutes, and then every five seconds for approximately the next hour
2’00: Readings at one-second intervals for the first three minutes, and then every two minutes for approximately the next 12 hours
Note
- If you do not perform any button operation while in the Altimeter Mode, the watch will return to the Timekeeping Mode automatically after 12 hours (altitude auto reading interval: 2’00) or after one hour (altitude auto reading interval: 0’05).
- If trek log operation is in progress with 0’05 selected as the altitude auto measurement method, exiting the Altimeter Mode to another mode will automatically cause the auto reading interval to change to 2’00.
To select the altitude auto reading interval
- In the Altimeter Mode, hold down E for at least two seconds. SET Hold will flash on the display and then ALTI will appear in the upper display. Keep E depressed until ALTI appears.
- The current altitude reading value will appear at this time.
- Press D to display the current altitude auto reading interval setting.
- This will cause INTERVAL to scroll across the top display. The current altitude auto reading interval setting (0’05 or 2’00) will be flashing in the center display.
- Press A to toggle the altitude auto measurement interval setting between 0’05 and 2’00.
- Press E to exit the setting screen.
Taking Altitude Readings
Use the procedure below to take basic altitude readings.
- See «Using Reference Altitude Values» for information about how to make altimeter readings more accurate.
- See «How does the altimeter work?» for information about how the watch measures altitude.
To take altitude readings
- Make sure the watch is in the Timekeeping Mode or any one of the sensor modes.
- The sensor modes are: Digital Compass Mode, Barometer/ Thermometer Mode, and Altimeter Mode.
- Press A to start auto altimeter readings.
- The current altitude value is displayed in units of 1 meter (5 feet).
- For information about the measurement interval.
Note
- After you are finished, press D to return to the Timekeeping Mode and stop auto altimeter readings.
- The watch will return to the Timekeeping Mode automatically if you do not perform any operation.
- The measurement range for altitude is –700 to 10,000 meters (–2,300 to 32,800 feet).
- The displayed altitude value changes to — — — — if an altitude reading falls outside the measurement range. An altitude value will reappear as soon as the altitude reading is within the allowable range.
- Normally, displayed altitude values are based on the watch’s preset conversion values. You also can specify a reference altitude value, if you want. See «Using Reference Altitude Values».
- You can change the unit for displayed altitude values to either meters (m) or feet (ft). See «To specify temperature, barometric pressure, and altitude display units».
Advanced Altimeter Mode Operations
Use the information in this section to obtain more accurate altimeter readings, especially while mountain climbing or trekking.
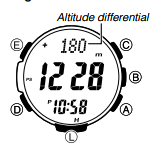
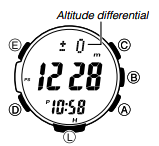
Using an Altitude Differential Value
The Altimeter Mode screen has an altitude differential value that shows the change in altitude from a reference point you specify. The altitude differential value is updated each time the watch takes an altitude reading.
- The range of the altitude differential value is –3,000 meters (–9,995 feet) to 3,000 meters (9,995 feet).
- — — — is displayed in place of the altitude differential value whenever the measured value is outside the allowable range.
- See «Using the Altitude Differential Value While Mountain Climbing or Hiking» for some real-life examples of how to use this feature.
To specify the altitude differential start point
- In the Altimeter Mode, select Screen 2 as the Altimeter Mode display.
- Press E.
- The watch will take an altitude reading and register the result as the altitude differential value start point. The altitude differential value will be reset to zero at this time.
Using the Altitude Differential Value While Mountain Climbing or Hiking
After you specify the altitude differential start point while mountain climbing or hiking, you can easily measure the change in the altitude between that point and other points along the way.
To use the altitude differential value
- In the Altimeter Mode, check to make sure that an altitude reading is on the display.
- If an altitude reading is not displayed, press A to take one. See «To take altitude readings» for details.
- Use the contour lines on your map to determine the difference in altitude between your current location and your destination.
- In the Altimeter Mode, press E to specify your current location as the altitude differential start point.
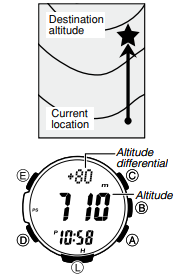
- The watch will take an altitude reading and register the result as the altitude differential value start point. The altitude differential value will be reset to zero at this time.
- While comparing the altitude difference you determined on the map and the watch’s altitude differential value, advance towards your destination.
- If the map shows that the difference in altitude between your location and your destination is +80 meters for example, you know you will be nearing your destination when the displayed altitude differential value shows +80 meters.
Using Reference Altitude Values
To minimize the chance of reading error, you should update the reference altitude value before setting off on a trek or any other activity where you plan to take altitude readings. During a trek, keep checking the readings produced by the watch against altitude information provided by markers and other information, and update the reference altitude value as required.
- Reading error can be caused by changes in barometric pressure, atmospheric conditions, and elevation.
- Before performing the procedure below, look up the altitude of your current location on a map, the Internet, etc.
To specify a reference altitude value
- In the Altimeter Mode, hold down E for at least two seconds. SET Hold will flash on the display and then ALTI will appear in the upper display. Keep E depressed until ALTI appears.
- The current altitude reading value will appear at this time.
- Use A (+) or C (–) to change the current reference altitude value in 1-meter (5-foot) increments.
- Change the reference altitude value to an accurate altitude reading that you get from a map or other source.
- You can set the reference altitude value within the range of –10,000 to 10,000 meters (–32,800 to 32,800 feet).
- Pressing A and C at the same time returns to OFF (no reference altitude value), so the watch performs air pressure to altitude conversions based on preset data only.
- Press E to exit the setting screen.
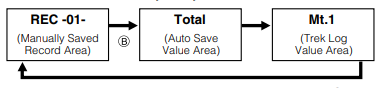
Types of Altitude Data
Your watch can record three types of altitude data in its memory: manually saved data, auto save values, and trek log values.
- Use the Data Recall Mode to view data stored in memory. See «Viewing Altitude Records» for details.
Manually Saved Records
Any time you perform the procedure below in the Altimeter Mode, the watch will create and store a record with the currently displayed altitude reading, along with the date and time the reading was taken. There is enough memory to store up to 30 manually saved records, which are numbered from REC 1 through REC 30.
To save a reading manually
- In the Altimeter Mode, check to make sure that an altitude reading is on the display.
- If an altitude reading is not displayed, press A to take one. See «To take altitude readings» for details.
- Hold down A. First, REC Hold will flash on the display. After that, REC and the current time will appear in the lower display. Release A as soon as REC and the current time appear.
- This will save the currently displayed altitude reading in a manually saved record, along with the time and date of the reading.
- The watch will return to the Altimeter Mode screen automatically after the save operation is complete.
- Holding down A for too long will advance to trek log update start/stop.
- There is enough memory to store up to 30 manually saved records. If there are already 30 manually saved records in memory, the above operation will cause the oldest record to be deleted automatically to make room for the new one.
Auto Save Values
Auto save values are one type of data stored in the memory of your watch.
Auto Save Values
High Altitude (MAX)
Low Altitude (MIN)
Total Ascent (ASC)
Total Descent (DSC)
- These values are checked and updated automatically by the watch as altitude auto measurements are taken.
- Auto save is performed only while the watch is in the Altimeter Mode.
- Cumulative ascent and cumulative descent values are updated whenever there is a difference of at least ±15 meters (±49 feet) from one reading to the next.
- Auto save values also include the date and time each value was recorded.
Trek Log Values
While trek log updating is enabled, altitude values (high altitude/low altitude, cumulative ascent/descent) for a particular trek are automatically checked and updated at regular intervals, even if you exit the Altimeter Mode. Values include the date and time each is updated. Up to 14 records of trek log values can be maintained in memory, and each record is assigned a number from Mt.1 through Mt.14 in the sequence they are stored.
Trek Log Values in Each Record
High Altitude (MAX)
Low Altitude (MIN)
Total Ascent (ASC)
Total Descent (DSC)
- For up to 12 hours after trek log value updating is enabled, the values are updated automatically even if you exit the Altimeter Mode. A segment (
 ) in the graphic around the periphery of the display flashes to show the time elapsed since trek log value updating was enabled. Each graphic segment represents 12 minutes, and one revolution around the display represents 12 hours.
 - You can select the altitude reading interval you want. For more information, see «To select the altitude auto reading interval».
- Trek log value updating stops automatically whenever the battery charge goes low.
Note
- Even if you exit the Altimeter Mode while trekking, updating of the trek log high altitude, low altitude, and cumulative ascent and descent values continues.
- Your watch has enough memory for 14 trek log records, which means you can maintain values for up to 14 treks.
To start trek log value updating
In the Altimeter Mode, hold down A for at least five seconds. First, Trek Hold will flash on the display. After that, Hold will disappear and a pointer ( ) indicating elapsed reading time will appear at 12 o’clock. Release A when Hold disappears.
- This indicates that updating of trek log values (high altitude/low altitude, cumulative ascent/descent) is being performed.
To stop trek log value updating
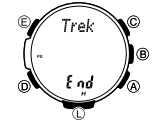
In the Altimeter Mode, hold down A for at least five seconds. First, Trek Hold End and the elapsed time pointer ( ) will flash. After that, Hold will disappear. Release A when Hold disappears.
- This indicates that updating of trek log values (high altitude/low altitude, cumulative ascent/descent) has been stopped.
Note
- To start a new trek log record while there are already 14 trek log records in memory, you will need to delete existing records. For more information, see «To delete data in a specific memory area».
How High and Low Altitude Values are Updated
With each auto save or trek log reading, the watch compares the current reading against the MAX (high altitude) and MIN (low altitude) values. It will replace the MAX value if the current reading is at least 15 meters (±49 feet) greater than MAX, or the MIN value if the current reading is at least 15 meters (±49 feet) less than MIN.
How Cumulative Ascent and Cumulative Descent Values Are Updated

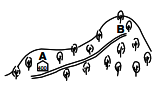
The total ascent and total descent values produced by an Altimeter Mode reading operation session during the example climb illustrated above are calculated as follows.
Total Ascent: (300 m) + (620 m) = 920 m
Total Descent: (320 m) + (500 m) = 820 m
- Entering the Altimeter Mode starts a new altitude auto reading session, but it does not reset the current ASC and DSC values or change them in any way. This means that the starting ASC and DSC values for a new Altimeter Mode auto reading session are the values that currently are in memory. Each time you complete an altitude auto reading session by exiting the Altimeter Mode, the total ascent value of the current session (920 meters in the above example) is added to the session’s starting ASC value. Also, the total descent value of the current auto reading session (–820 meters in the above example) is added to the session’s starting DSC value.
- Logging of trek log data continues even if you exit the Altimeter Mode.
Note
- The high altitude, low altitude, total ascent, and total descent values are retained in memory when you exit the Altimeter Mode. To clear values, perform the procedure under «To delete data in a specifi c memory area».
How does the altimeter work?
Generally, air pressure decrease as altitude increases. This watch bases its altitude reading on International Standard Atmosphere (ISA) values stipulated by the International Civil Aviation Organization (ICAO). These values defi ne relationships between altitude and air pressure.

- Note that the following conditions will prevent you from obtaining accurate readings: When air pressure changes because of changes in the weather Extreme temperature changes When the watch itself is subjected to strong impact
There are two standard methods of expressing altitude: absolute altitude, which expresses an absolute height above sea level, and relative altitude, which expresses the difference between the altitudes of two different places. This watch expresses altitudes as relative altitude.

How the Altimeter Measures Altitude
The altimeter can measure altitude based on its own preset values (initial default method) or using a reference altitude specifi ed by you.
When you measure altitude based on preset values
Data produced by the watch’s barometric pressure sensor is converted to approximate altitude based on ISA (International Standard Atmosphere) conversion values stored in watch memory.
When you measure altitude using a reference altitude specified by you
After you specify a reference altitude, the watch uses that value to convert barometric pressure readings to altitude.
- When mountain climbing, you can specify a reference altitude value in accordance with a marker along the way or altitude information from a map. After that, the altitude readings produced by the watch will be more accurate than they would without a reference altitude value.
Altimeter Precautions
- This watch estimates altitude based on air pressure. This means that altitude readings for the same location may vary if air pressure changes.
- Do not rely upon this watch for altitude reading or perform button operations while sky diving, hang gliding, or paragliding, while riding a gyrocopter, glider, or any other aircraft, or while engaging in any other activity where there is the chance of sudden altitude changes.
- Do not use this watch for measuring altitude in applications that demand professional or industrial level precision.
- Remember that the air inside of a commercial aircraft is pressurized. Because of this, the readings produced by this watch will not match the altitude readings announced or indicated by the fl ight crew.
Precautions Concerning Simultaneous Altitude and Temperature Readings
For the more accurate altitude readings, leaving the watch on your wrist is recommended in order to maintain the watch at a constant temperature.
- When taking temperature readings, keep the watch at as stable a temperature as possible. Changes in temperature can affect temperature readings. See product specifications for sensor accuracy information.
Viewing Altitude Records
You can use the Data Recall Mode to view manually saved record data, auto save values, and trek log values.
To view altitude records
- Use D to select the Data Recall Mode (REC).
- About one second after REC appears on the display, the display will change to show the first record of the memory area you were viewing when you last exited the Data Recall Mode.
- Use B to select the memory area you want.
- After you select the Trek Log Value Area screen, use the B button to select the trek whose values you want to view. Treks are numbered from 1 (Mt.1) through 14 (Mt.14).
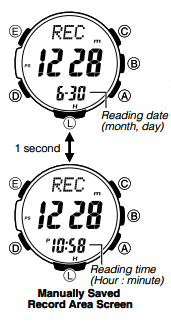
- After you select the Manually Saved Record Area screen, the date (month and day) and time of the record will alternate on the display in the lower display at one-second intervals.
- Use A and C to scroll through the screens for an area and display the one you want.


- Manually saved records (REC01 to REC30), auto save MAX and MIN values, and trek log values all include the date (month and day) and time (hour and minute) that the data was recorded.
- Records of the ASC and DSC include altitude values along with the date (month, day) and year that the data was recorded.
- For details about auto save values, see «Auto Save Values». For details about trek log values, see «Trek Log Values».
- — will be displayed if MAX/MIN data has been deleted or if there is no corresponding MAX/MIN data due to error, etc. In such cases, total ascent (ASC) and total descent (DSC) values will show zero.
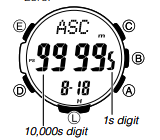
- When the total ascent (ASC) or total descent (DSC) exceeds 99,999 meters (or 327,997 feet), the applicable value will restart from zero. Note that the watch can display up to five digits only. When using feet as the altitude display units, altitude values are displayed only up to the rightmost five digits.
- When the total ascent (ASC) or total descent (DSC) value becomes five digits long, the rightmost (ones) digit is shown in the lower right of the display. The nearby illustration shows the display when the value of ASC is 99995 meters.
Trek Log Values (Mt.1 to Mt.14)
")
*1: Month and day the displayed value was recorded.
*2: Month and day cumulation started.
- Holding down A or C scrolls at high speed.
- On the high altitude value (MAX) and low altitude value (MIN) screens, the lower display area alternates between the date (month and day) and time at one-second intervals.
- On the cumulative ascent and cumulative descent screens, the lower display area alternates between the month and day, and the year at one-second intervals.
To delete all manually saved data
Memory contents cannot be deleted while trek log values are being recorded.
- Use D to enter the Data Recall Mode.
- Use B to display the Manually Saved Record Area.
- Hold down E for at least three seconds. First, Clear Hold ALL will flash in the display. After that, Hold will disappear. Release E when Hold disappears.
To delete data in a specific memory area
Memory contents cannot be deleted while trek log values are being recorded.
- This will cause — — — — to appear in the lower display.
- This indicates that all manually saved data is cleared.
- Use D to enter the Data Recall Mode.
- Use B to display the memory area (Manually Saved Record Area, Auto Save Value Area, or Trek Log Value Area) that contains the data you want to delete.
- What you should do next depends on which memory area you displayed in step 2, above.
- If you displayed the Manually Saved Record Area, use A and C to display the number of the record (REC-01— through REC-30-) you want to delete.
- If you displayed the Auto Save Value Area, all of its values will be deleted, so you do not need to select anything.
- If you displayed the Trek Log Value Area, use B to display the trek (mountain) number of the record (Mt.1 through Mt.14) you want to delete.
- A delete operation cannot be undone! Make sure you do not need data before you delete it.
-
Hold down E for at least two seconds. First, Clear Hold will flash in the display. After that, Hold will disappear. Release E when Hold disappears.
- If you are deleting a Manually Saved Record Area record, holding down E too long (after Hold disappears) will cause all manually saved records to be deleted.
- Deleting a record in either the Manually Saved Record Area or Trek Log Value Area will cause all records following it to be shifted upwards and renumbered accordingly. If the record you delete is the last one currently in the memory area where you deleted it, — — — — will be displayed in the display in place of the record number.
- After you delete Auto Save Values, the MAX (high altitude) and MIN (low altitude) values will show — — — -, while the ASC (cumulative ascent) and DSC (cumulative descent) values will show zero.
Looking up Sunrise and Sunset Times
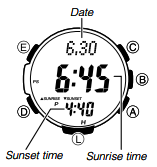
You can use the Sunrise/Sunset Mode to look up the sunrise and sunset times for a particular date (year, month, day) and location.
To enter the Sunrise/Sunset Mode
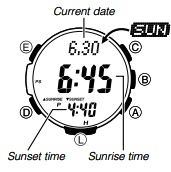
While in the Timekeeping Mode, press D to enter the Sunrise/Sunset Mode.
- This will display the sunrise and sunset times for the current date based the currently specifi ed city code, latitude, and longitude.
- Sunrise/sunset times will not be displayed when battery power is low.
- Before trying to use the Sunrise/Sunset Mode, you need to configure settings for the city code, longitude, and latitude for the location whose sunrise and sunset times you want to view.
- The factory default confi guration of the location is: City Code: TYO (Tokyo); Latitude: North 35.7 degrees; Longitude: East 139.7 degrees.
To view the sunrise/sunset time for a particular date
- Enter the Sunrise/Sunset Mode.
- This will display the sunrise and sunset times for the current date at the location specifi ed by the city code, latitude, and longitude.
-
While the sunrise/sunset time are on the display, use A (+) and C (–) to scroll through the dates.
- Pressing one of the above buttons causes the month and day to appear in the upper display area, and the year to appear in the lower display area.
- When you release the button, the sunrise time of the selected day will be shown in the middle display, while the sunset time will be shown in the lower display.
- You can select any date between January 1, 2000 and December 31, 2099.
Note
- If you think that the sunrise and/or sunset times are not correct for some reason, check the watch’s city code, longitude and latitude settings.
- The sunrise and sunset times displayed by this watch are times at sea level. Sunrise and sunset times are different at altitudes other than sea level.
To look up the sunrise and sunset times for a specific location
- You do not need to perform this procedure to look up the sunrise and sunset times in your currently selected Home City.
- If you select a different city code to look up the sunrise and sunset times there, return to the city code of your Home City (your current location) when you are finished. Otherwise, the time shown in the Timekeeping Mode will not be correct.
- For information about the Home City setting, see «Configuring Home City Settings».
- In the Timekeeping Mode, hold down E for at least two seconds. First, SET Hold will flash on the display, and CITY will be displayed in the upper display. After that, the currently selected city code and city name will scroll across the upper display. Keep E depressed until the scrolling starts.
- Use A (East) and C (West) to select the city code whose sunrise and sunset times you want to view.
- For details about city codes, see the «City Code Table» at the back of this manual.
- If this display shows the information you need, you can exit this procedure at this point by pressing E twice. If you want to specify a latitude and longitude for a more exact reading, advance to step 3, below.
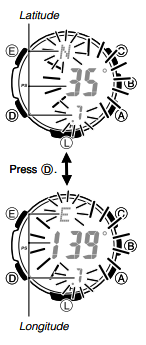
- Press E to display the longitude/latitude setting screen, with the latitude setting flashing.
- Use D to move the flashing between the latitude and the longitude setting.
- Use A (+) and C (–) to change the flashing setting.
- You can configure the longitude and latitude setting within following ranges. Latitude Range: 65.0°S (South 65.0 degrees) to 0°N to 65.0°N (North 65.0 degrees) Longitude Range: 179.9°W (West 179.9 degrees) to 0°E to 180.0°E (East 180.0 degrees)
- Latitude and longitude values are rounded off to the nearest degree.
- Press E to return to the Timekeeping Mode.
- In the Timekeeping Mode, press D.
- Display the location whose sunrise and sunset times you want to view.
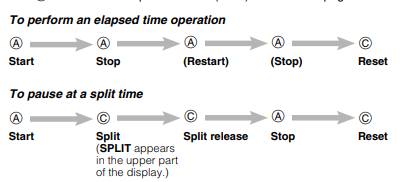
Using the Stopwatch
The stopwatch measures elapsed time, split times, and two finishes.
To enter the Stopwatch Mode
Use D to select the Stopwatch Mode (STW).

To measure two finishes
Note
- The Stopwatch Mode can indicate elapsed time up to 999 hours, 59 minutes, 59.9 seconds.
- Once started, stopwatch timing continues until you press A to stop it, even if you exit the Stopwatch Mode to another mode and even if timing reaches the stopwatch limit defi ned above. A paused timing operation will remain paused until you press A to restart it or C to reset.
- Exiting the Stopwatch Mode while a split time is frozen on the display clears the split time and returns to elapsed time measurement.
- While SPLIT is shown in the upper display, it alternates with the hour digits of the split time at one-second intervals.
Using the Countdown Timer
The countdown timer can be configured to start at a preset time, and sound an alarm when the end of the countdown is reached.
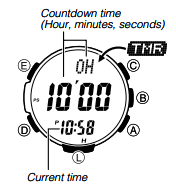
To enter the Countdown Timer Mode
Use D to select the Countdown Timer Mode (TMR).
- About one second after TMR appears on the display, the display will change to show the countdown time hours.
To specify the countdown start time
- Enter the Countdown Timer Mode.
- If a countdown is in progress (indicated by the seconds counting down), press A to stop it and then press C to reset to the current countdown start time.
- If a countdown is paused, press C to reset to the current countdown start time.
-
Hold down E for at least two seconds.
- SET Hold will flash on the display and then the current start time setting will start to flash. Keep E depressed until the start time setting starts to flash.
- Press D to move the flashing between the hour and minute settings.
- Use A (+) and C (–) to change the flashing item.
- To set the starting value of the countdown time to 24 hours, set 0H 00’00.
-
Press E to exit the setting screen.
-
To perform a countdown timer operation 
- Before starting a countdown timer operation, check to make sure that a countdown operation is not in progress (indicated by the seconds counting down). If it is, press A to stop it and then C to reset to the countdown start time.
- An alarm sounds for ten seconds when the end of the countdown is reached. This alarm will sound in all modes. The countdown time is reset to its starting value automatically when the alarm sounds.
To stop the alarm
Press any button.
Using the Alarm
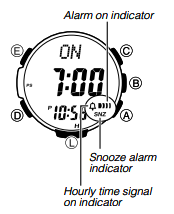
You can set five independent daily alarms. When an alarm is turned on, an alarm will sound for about 10 seconds each day when the time in the Timekeeping Mode reaches the preset alarm time. This is true even if the watch is not in the Timekeeping Mode. One of the daily alarms is a snooze alarm. The other four are one-time alarms. The snooze alarm will sound every five minutes up to seven times or until it is turned off.
You can also turn on an Hourly Time Signal, which will cause the watch to beep twice every hour on the hour.
To enter the Alarm Mode
Use D to select the Alarm Mode (ALM).
- About one second after ALM appears on the display, the display will change to show an alarm name (AL-1 to AL-4, or SNZ) or the SIG indicator. The alarm name indicates an alarm screen. SIG is shown when the Hourly Time Signal screen is on the display.
- When you enter the Alarm Mode, the data you were viewing when you last exited the mode appears first.
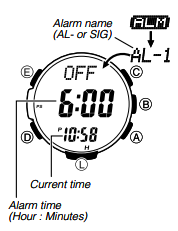
To set an alarm time
- In the Alarm Mode, use A and C to scroll through the alarm screens until the one whose time you want to set is displayed.

* There is no time setting for the hourly time signal.
- Hold down E until SET Hold appears on the display and then the current settings start to flash.
-
This is the setting screen.
-
Press D to move the flashing between the hour and minute settings.
-
While a setting is flashing, use A (+) and C (–) to change it.
-
When setting the alarm time using the 12-hour format, take care to set the time correctly as a.m. (no indicator) or p.m. (P indicator).
-
Press E to exit the setting screen.
-
Setting an alarm time causes that alarm to turn on automatically.
-
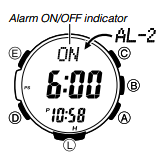
To turn an alarm and the Hourly Time Signal on and off
- In the Alarm Mode, use A and C to select an alarm or the Hourly Time Signal.
- When the alarm or the Hourly Time Signal you want is selected, press B to turn it on and off.
- The alarm on indicator (when any alarm is on), snooze alarm indicator (when the snooze alarm is on), and the Hourly Time Signal on indicator (when the Hourly Time Signal is on) are shown on the display in all modes.
To stop the alarm Press any button.
Note
- The snooze alarm sounds up to seven times at intervals of about five minutes.
- After the snooze alarm first sounds, SNZ will flash on the display until the snooze alarm sounds all seven times or until it is canceled.
- The snooze alarm will be canceled when any of the following occurs while the SNZ indicator is flashing on the display.
- If you turn off the snooze alarm
- If you display the snooze alarm setting screen
- If you display the Timekeeping Mode setting screen
- If your Home City and World Time City are the same city, and you use the World Time Mode to change the summer time setting of your Home City
Checking the Current Time in a Different Time Zone
You can use the World Time Mode to view the current time in one of 31 time zones (48 cities) around the globe. The city that is currently selected in the World Time Mode is called the «World Time City».
To enter the World Time Mode
Use D to select the World Time Mode (WT).
- One second after WT appears on the display, the city code of the currently selected World Time City will scroll once in the upper display. After that, the World Time City’s city code will be displayed in the upper display.
To view the time in another time zone
In the World Time Mode, use A (East) and C (West) to scroll through city codes.
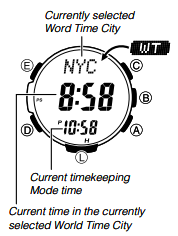
To specify standard time or daylight saving time (DST) for a city
- In the World Time Mode, use A (East) and C (West) to scroll through the available city codes.
- Keep scrolling until the city code whose Standard Time/Daylight Saving Time setting you want to change is displayed.
-
Hold down E for at least two seconds.
- Keep E depressed until the current setting (DST Hold ON or DST Hold OFF) starts to flash on the display.
- DST Hold ON means that summer time is enabled, and that the current time is advanced accordingly. DST Hold OFF means that summer time is disabled, and that the current time shows standard time.
- This toggles the city code you selected in step 1 between Daylight Saving Time (DST indicator displayed) and standard time (DST indicator not displayed).
- Using the World Time Mode to change the DST setting of the city code that is selected as your Home City also will change the Timekeeping Mode time DST setting.
- Note that you cannot switch between standard time/daylight saving time (DST) while UTC is selected as the World Time City.
- Note that the standard time/daylight saving time (DST) setting affects only the currently selected time zone. Other time zones are not affected.
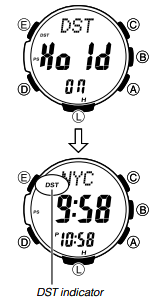
Illumination
The display of the watch is illuminated for easy reading in the dark. The watch’s auto light switch turns on illumination automatically when you angle the watch towards your face.
- The auto light switch must be turned on for it to operate.
To turn on illumination manually
Press L in any mode to illuminate the display.
- You can use the procedure below to select either 1.5 seconds or three seconds as the illumination duration. When you press L, the display will remain illuminated for about 1.5 seconds or three seconds, depending on the current illumination duration setting.
- The above operation turns on illumination regardless of the current auto light switch setting.
- Illumination is disabled while Configuring sensor measurement mode settings, and during bearing sensor calibration.
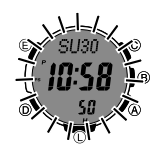
To change the illumination duration
- In the Timekeeping Mode, hold down E for at least two seconds. First, SET Hold will flash on the display, and CITY will be displayed in the upper display. After that, the currently selected city code and city name will scroll across the upper display. Keep E depressed until the scrolling starts.
- Use D to cycle through the setting screens until LIGHT appears in the upper display.
- The current illumination duration setting (1 or 3) will be flashing in the middle display.
- See the sequence in step 2 of the procedure under «To change the current time and date settings» for information about how to scroll through setting screens.
- Press A to toggle the illumination duration between three seconds (3 displayed) and 1.5 seconds (1 displayed).
- After all of the settings are the way you want, press E twice to exit the setting screen. About the Auto Light Switch Turning on the auto light switch causes illumination to turn on, whenever you position your wrist as described below in any mode. Moving the watch to a position that is parallel to the ground and then tilting it towards you more than 40 degrees causes illumination to turn on.
About the Auto Light Switch
Turning on the auto light switch causes illumination to turn on, whenever you position your wrist as described below in any mode.
Moving the watch to a position that is parallel to the ground and then tilting it towards you more than 40 degrees causes illumination to turn on.
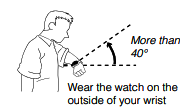
- Always make sure you are in a safe place whenever you are reading the display of the watch using the auto light switch. Be especially careful when running or engaged in any other activity that can result in accident or injury. Also take care that sudden illumination by the auto light switch does not startle or distract others around you.
- When you are wearing the watch, make sure that its auto light switch is turned off before riding on a bicycle or operating a motorcycle or any other motor vehicle. Sudden and unintended operation of the auto light switch can create a distraction, which can result in a traffi c accident and serious personal injury.
Note
- This watch features a «Full Auto Light», so the auto light switch operates only when available light is below a certain level. It does not illuminate the display under bright light.
- The auto light switch is always disabled, regardless of its on/off setting, when any one of the following conditions exists. While an alarm is sounding While a bearing sensor calibration operation is being performed in the Digital Compass Mode While a sunrise or sunset time is being calculated While in a sensor mode, an auto light switch operation is performed after a sensor reading
To turn the auto light switch on and off
In the Timekeeping Mode, hold down L for at least three seconds to toggle the auto light switch on (LT displayed) and off (LT not displayed).- The auto light switch on indicator (LT) is on the display in all modes while the auto light switch is turned on.
- The auto light switch turns off automatically whenever battery power drops to Level 4.
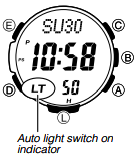
Illumination Precautions
- The LED that provides illumination loses power after very long use.
- Illumination may be hard to see when viewed under direct sunlight.
- Illumination turns off automatically whenever an alarm sounds.
- Frequent use of illumination runs down the battery.
Auto light switch precautions
- Wearing the watch on the inside of your wrist, movement of your arm, or vibration of your arm can cause frequent activation of the auto light switch and illumination of the display. To avoid running down the battery, turn off the auto light switch whenever engaging in activities that might cause frequent illumination of the display.
- Note that wearing the watch under your sleeve while the auto light switch is turned on can cause frequent illumination of the display and can run down the battery.
- Illumination may not turn on if the face of the watch is more than 15 degrees above or below parallel. Make sure that the back of your hand is parallel to the ground.
- Illumination turns off after the preset illumination duration, even if you keep the watch pointed towards your face.
- Static electricity or magnetic force can interfere with proper operation of the auto light switch. If illumination does not turn on, try moving the watch back to the starting position (parallel with the ground) and then tilt it back towards your face again. If this does not work, drop your arm all the way down so it hangs at your side, and then bring it back up again.
- You may notice a very faint clicking sound coming from the watch when it is shaken back and forth. This sound is caused by mechanical operation of the auto light switch, and does not indicate a problem with the watch.
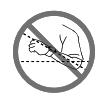
Other Settings
The button operation tone sounds any time you press one of the watch’s buttons. You can turn the button operation tone on or off as desired.
-
Even if you turn off the button operation tone, the alarm, Hourly Time Signal, barometric pressure change alert, and Countdown Timer Mode alarm all operate normally.
To turn the button operation tone on and off
- In the Timekeeping Mode, hold down E for at least two seconds. First, SET Hold will flash on the display, and CITY will be displayed in the upper display. After that, the currently selected city code and city name will scroll across the upper display. Keep E depressed until the scrolling starts.
- Use D to cycle through settings on the display until the current button operation tone (MUTE or key
 ) is displayed.
- See the sequence in step 2 of the procedure under «To change the current time and date settings» for information about how to scroll through setting screens.
- Press A to toggle the button operation tone on (key ) and off (MUTE).
- After all of the settings are the way you want, press E twice to exit the setting screen.
- Press A to toggle the button operation tone on (key
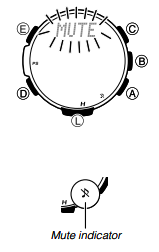
Note
- The mute indicator is displayed in all modes when the button operation tone is turned off.
To turn Power Saving on or off
- In the Timekeeping Mode, hold down E for at least two seconds. First, SET Hold will flash on the display, and CITY will be displayed in the upper display. After that, the currently selected city code and city name will scroll across the upper display. Keep E depressed until the scrolling starts.
- Use D to cycle through the setting screens until the current power saving setting (On or OFF) is displayed.
- POWER SAVING will scroll across the upper display at this time.
- See the sequence in step 2 of the procedure under «To change the current time and date settings» for information about how to scroll through setting screens.
- Press A to toggle Power Saving on (On) and off (OFF).
- After all of the settings are the way you want, press E twice to exit the setting screen.
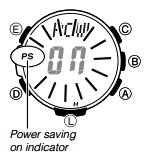
Note
- The Power Saving on indicator (PS) is on the display in all modes while Power Saving is turned on.
Troubleshooting
Time Setting
- The current time setting is off by hours.
Your Home City setting may be wrong. Check your Home City setting and correct it, if necessary.
Sensor modes
- I can’t change the temperature, barometric pressure, and altitude display units.
When TYO (Tokyo) is selected as the Home City, the altitude unit is set automatically to meters (m), the barometric pressure unit to hectopascals (hPa), and the temperature unit to Celsius (°C). These settings cannot be changed.
«ERR» appears on the display while I am using a sensor.
Subjecting the watch to strong impact can cause sensor malfunction or improper contact of internal circuitry. When this happens, ERR (error) will appear on the display and sensor operations will be disabled.
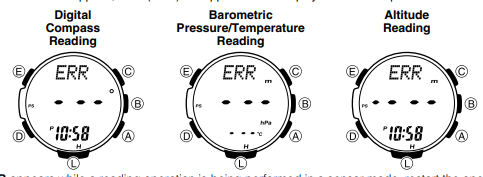
- If ERR appears while a reading operation is being performed in a sensor mode, restart the operation. If ERR appears on the display again, it can mean there is something wrong with the sensor.
- Even if battery power is at Level 1 (H) or Level 2 (M), the Digital Compass Mode, Barometer/ Thermometer Mode, or Altimeter Mode sensor may be disabled if there is not enough voltage available to power it suffi ciently. In this case, ERR will appear on the display. This does not indicate malfunction, and sensor operation should resume once battery voltage returns to its normal level.
- If ERR keeps appearing during a reading operation, it could mean there is a problem with the applicable sensor.
ERR appears on the display after I perform bidirectional calibration.
If — — — appears and then changes to ERR (error) on the calibration screen, it means that there is something wrong with the sensor.
- If ERR disappears after about one second, try performing the calibration again.
- If ERR keeps appearing, contact your original dealer or nearest authorized CASIO distributor to have the watch checked.
Whenever you have a sensor malfunction, take the watch to your original dealer or nearest authorized CASIO distributor as soon as possible.
- What causes incorrect direction readings?
- Incorrect bidirectional calibration. Perform bidirectional calibration.
- Nearby source of strong magnetism, such as a household appliance, a large steel bridge, a steel beam, overhead wires, etc., or an attempt to take direction readings on a train, boat, etc. Move away from large metal objects and try again. Note that digital compass operation cannot be performed inside a train, boat, etc.
- What causes different direction readings to produce different results at the same location?
Magnetism generated by nearby high-tension wires is interfering with detection of terrestrial magnetism. Move away from the high-tension wires and try again. - Why am I having problems taking direction readings indoors?
A TV, personal computer, speakers, or some other object is interfering with terrestrial magnetism readings. Move away from the object causing the interference or take the direction reading outdoors. Indoor direction readings are particularly diffi cult inside ferro-concrete structures. Remember that you will not be able to take direction readings inside of trains, airplanes, etc. - The barometric pressure differential pointer does not appear on the display when I enter the Barometer/Thermometer Mode.
- This could indicate sensor error. Try pressing B again.
- The barometric pressure differential pointer is not displayed when the displayed current barometric value is outside of the allowable measurement range (260 to 1,100 hPa).
- Correct altitude readings are not possible.
Relative altitude is calculated based on changes in barometric pressure measurement by its pressure sensor. To minimize the chance of reading error due to changes in barometric pressure, you should update the reference altitude value before setting off on a trek or any other activity where you plan to take altitude readings. For more information, see «To specify a reference altitude value».
World Time Mode
-
The time for my World Time City is off in the World Time Mode. This could be due to incorrect switching between standard time and daylight saving time. See «To specify standard time or daylight saving time (DST) for a city» for more information.
Charging
- The watch does not resume operation after I expose it to light. This can happen after the power level drops to Level 5. Continue exposing the watch to light until the battery power indicator shows «H» or «M».
Specifications
Accuracy at normal temperature: ±15 seconds a month
Timekeeping: Hour, minutes, seconds, p.m. (P), year, month, day, day of the week
Time format: 12-hour and 24-hour
Calendar system: Full Auto-calendar pre-programmed from the year 2000 to 2099
Other: Three display formats (day of the week/day screen, month/day screen, barometric pressure graph screen); Home City code (can be assigned one of 48 city codes); Standard Time / Daylight
Saving Time (summer time) Year display on setting screen only.
Digital Compass: 60 seconds continuous reading; 16 directions; Angle value 0° to 359°; Four direction pointers; Calibration (bidirectional); Magnetic declination correction; Bearing Memory
Barometer:
Measurement and display range:
260 to 1,100 hPa (or 7.65 to 32.45 inHg)
Display unit: 1 hPa (or 0.05 inHg)
Reading timing: Daily from midnight, at two hour intervals (12 times per day); Every five seconds in the Barometer/Thermometer Mode
Other: Calibration; Manual reading (button operation); Barometric pressure graph; Barometric pressure differential pointer; Barometric pressure change indicator
Thermometer:
Measurement and display range: –10.0 to 60.0°C (or 14.0 to 140.0°F) Display unit: 0.1°C (or 0.2°F)
Reading timing: Every five seconds in the Barometer/Thermometer Mode
Other: Calibration; Manual reading (button operation)
Altimeter:
Measurement range: –700 to 10,000 m (or –2,300 to 32,800 ft.) without reference altitude
Display range: –10,000 to 10,000 m (or –32,800 to 32,800 ft.)
Negative values can be caused by readings produced based on a reference altitude or due to atmospheric conditions.
Display unit: 1 m (or 5 ft.) Current Altitude Data: Every second for the first 3 minutes, followed by every 5 seconds for approximately 1 hour (0’05); every second for the first 3 minutes, followed by every 2 minutes for approximately 12 hours (2’00)
Altitude Memory Data: Manually saved records: 30 (altitude, date, time)
Auto saved values: One set of high altitude and its reading date and time, low altitude and its reading date and time, total ascent and its save start date and time, total descent and its save start date and time
Trek log data: High altitude, low altitude, cumulative ascent, cumulative descent for up to 14 treks
Other: Reference altitude setting; Altitude differential; Altitude auto measurement interval (0’05 or 2’00)
Bearing Sensor Precision:
Direction: Within ±10°
Values are guaranteed for a temperature range of –10°C to 60°C (14°F to 140°F).
North pointer: Within ±2 digital segments
Pressure Sensor Precision:
Measurement accuracy: Within ±3hPa (0.1 inHg) (Altimeter accuracy: Within ± 75m (246 ft.))
-
Values are guaranteed for a temperature range of –10°C to 40°C (14°F to 104°F).
-
Precision is lessened by strong impact to either the watch or the sensor, and by temperature extremes.
Temperature Sensor Precision:
±2°C (±3.6°F) in range of –10°C to 60°C (14.0°F to 140.0°F)
Sunrise/sunset:
Sunrise/sunset time display; selectable date
Stopwatch:
Measuring unit: 1/10 second
Measuring capacity: 999:59′ 59.9″
Measuring accuracy: ±0.0006%
Measuring modes: Elapsed time, split time, two finishes
Countdown Timer:
Measuring unit: 1 second
Countdown range: 24 hours
Setting unit: 1 minute
Alarms: 5 Daily alarms (four one-time alarms; one snooze alarm); Hourly time signal
World Time: 48 cities (31 time zones)
Other: Daylight Saving Time/Standard Time
Illumination: LED light; Selectable illumination duration (approximately 1.5 seconds or 3 seconds); Auto Light Switch (Full Auto Light operates only in the dark)
Other: Battery power indicator; Power Saving; Low-temperature resistance (–10°C/14°F); Button operation tone on/off
Power Supply: Solar panel and one rechargeable battery
Approximate battery operating time: 9 months (from full charge to Level 4) under the following conditions:
-
Light: 1.5 seconds/day
-
Beeper: 10 seconds/day
-
Direction readings: 20 times/month
-
Climbs: Once (approximately 1 hour of altitude readings)/month
-
Barometric pressure change indicator readings: Approximately 24 hours/month
-
Barometric pressure graph: Readings every 2 hours
-
Display: 18 hours/day
Frequent use of illumination runs down the battery. Particular care is required when using the auto light switch.
City Code Table


* As of December 2012, the offi cial UTC offset for Moscow, Russia (MOW) was changed from +3 to +4, but this watch still uses an offset of +3 (the old offset) for MOW. Because of this, you should leave the summer time setting turned on (which advances the time by one hour) for the MOW time.
-
The rules governing global times (GMT differential and UTC offset) and summer time are determined by each individual country.

Documents / Resources
Download manual
Here you can download full pdf version of manual, it may contain additional safety instructions, warranty information, FCC rules, etc.
Download CASIO PRO TREK PRG-270 Manual
Перейти к контенту
![]()
Русские электронные инструкции по эксплуатации
Постоянно обновляемый большой каталог документации по эксплуатации и использованию современных устройств и оборудования на русском языке. Бесплатное скачивание файлов.
Поиск:
Главная
♥ В закладки
Просмотр инструкции в pdf


- The following steps explain how to configure timekeeping settings only.
- When the timekeeping setting you want to change is flashing, use A and/or C to change it as described below.
| Screen | To do this: | Do this: |
| |
Change the city code | Use A (East) and C (West). |
| |
Toggle between Daylight Saving Time (ON) and Standard Time (OFF). | Press A. |
| |
Toggle between 12-hour (12H) and 24-hour (24H) timekeeping. | Press A. |
|
Reset the seconds to 00 (If the current seconds count is between 30 and 59, one is added to the minute count). | Press A. |
| |
Change the hour or minutes | Use A (+) and C (–). |
| |
Change the year, month, or day |
- After all of the settings are the way you want, press E twice to exit the setting screen.
Note
- For information about selecting a Home City and Configuring the DST setting, see «Configuring Home City Settings».
- While the 12-hour format is selected for timekeeping, a P (PM) indicator will appear for times from noon to 11:59 p.m. No indicator appears for times from midnight to 11:59 a.m. With 24-hour format, time is displayed from 0:00 to 23:59, without any P (PM) indicator.
- The watch’s built-in full automatic calendar makes allowances for different month lengths and leap years. Once you set the date, there should be no reason to change it except after you have the watch’s rechargeable battery replaced or after power drops to Level 5.
- The day of the week changes automatically when the date changes.
- Refer to the pages shown below for more information on Timekeeping Mode settings.
- Button operation tone on/off: «To turn the button operation tone on and off»
- Illumination duration setting: «To change the illumination duration»
- Enabling and disabling power saving: «To turn Power Saving on and off»
- Changing the temperature, barometric pressure, and altitude display units (for a city code other than TYO): «To specify temperature, barometric pressure, and altitude display units»
Taking Direction Readings
The Digital Compass Mode uses a built-in direction sensor to take direction readings and display the results. North is indicated by three graphic segments ( ). The watch also displays literal indications of direction that its 12 o’clock position is currently pointed.
- For information about what you can do to improve digital compass reading accuracy, see «Calibrating the Bearing Sensor» and «Digital Compass Precautions».
- Make sure the watch is in the Timekeeping Mode or any one of the sensor modes.
- The sensor modes are: Digital Compass Mode, Barometer/ Thermometer Mode, and Altimeter Mode.
- Place the watch on a fl at surface. If you are wearing the watch, make sure that your wrist is horizontal (in relation to the horizon).
- Point the 12 o’clock position of the watch in the direction whose reading you want to take.
- Press C to start.
- COMP will appear in the upper display to indicate that a digital compass operation is in progress.
- About one second after you press C, pointers (three graphic segments for north, one graphic segment each for south, east, and west) will appear on the display to indicate north, south, east, and west. Direction will also be indicated by literal direction indicators and by a direction angle.
Note
- If the four pointers (north, south, east, west) and the direction indicating letters do not appear on the display when you press C, it could mean that the watch is displaying bearing memory information. If this happens, press E to delete the current bearing memory contents. For more information, see «Using Bearing Memory».
- To return to the Timekeeping Mode, press D. Pressing D will return to the Timekeeping Mode even is a reading operation is in progress.
Digital Compass Readings
- When you press C to start digital compass reading operation, COMP will initially appear on the display to indicate that a digital compass operation is in progress.
- After the first reading is obtained, the watch will continue to take digital compass readings automatically each second for up to 60 seconds. After that, the reading operation will stop automatically.
- The direction indicator and angle value will show — — — to indicate that digital compass readings are complete.
- The auto light switch is disabled during the 60 seconds that digital compass readings are being taken.
- The following table shows the meanings of each of the direction abbreviations that appear on the display.
| Direction | Meaning | Direction | Meaning | Direction | Meaning | Direction | Meaning |
| N | North | NNE | Northnortheast | NE | Northeast | ENE | Eastnortheast |
| E | East | ESE | Eastsoutheast | SE | Southeast | SSE | Southsoutheast |
| S | South | SSW | Southsouthwest | SW | Southwest | WSW | Westsouthwest |
| W | West | WNW | Westnorthwest | NW | Northwest | NNW | Northnorthwest |
- The margin of error for the angle value and the direction indicator is ±11 degrees while the watch is horizontal (in relation to the horizon). If the indicated direction is northwest (NW) and 315 degrees, for example, the actual direction can be anywhere from 304 to 326 degrees.
- Note that taking a direction reading while the watch is not horizontal (in relation to the horizon) can result in large direction reading error.
- You can calibrate the bearing sensor if you suspect the direction reading is incorrect.
- Any ongoing direction reading operation is paused temporarily while the watch is performing an alert operation (daily alarm, Hourly Time Signal, countdown timer alarm) or while illumination is turned on (by pressing L). The direction reading operation resumes for its remaining duration after the operation that caused it to pause is finished.
- See «Digital Compass Precautions» for important information about taking direction readings.
Calibrating the Bearing Sensor
You should calibrate the bearing sensor whenever you feel that the direction readings being produced by the watch are off. You can use any one of two different bearing sensor calibration methods: bidirectional calibration or magnetic declination correction.
- Bidirectional Calibration
Bidirectional calibration calibrates the bearing sensor in relation to magnetic north. Use bidirectional calibration when you want to take readings within an area exposed to magnetic force. This type of calibration should be used if the watch becomes magnetized for any reason. - To ensure correct direction readings by this watch, be sure to perform bidirectional calibration before using it. The watch may produce incorrect direction readings if you do not perform bidirectional calibration.
- Magnetic Declination Correction
With magnetic declination correction, you input a magnetic declination angle (difference between magnetic north and true north), which allows the watch to indicate true north. You can perform this procedure when the magnetic declination angle is indicated on the map you are using. Note that you can input the declination angle in whole degree units only, so you may need to round off the value specifi ed on the map. If your map indicates the declination angle as 7.4°, you should input 7°. In the case of 7.6° input 8°, for 7.5° you can input 7° or 8°.
Precautions about bidirectional calibration
- You can use any two opposing directions for bidirectional calibration. You must, however, make sure that they are 180 degrees opposite each other. Remember that if you perform the procedure incorrectly, you will get wrong bearing sensor readings.
- Do not move the watch while calibration of either direction is in progress.
- You should perform bidirectional calibration in an environment that is the same as that where you plan to be taking direction readings. If you plan to take direction readings in an open field, for example, calibrate in an open field.
To perform bidirectional calibration
- In the Digital Compass Mode, hold down E for at least two seconds. First, SET Hold will flash on the display. After that, CALIBRATION will scroll across the upper display. Keep E depressed until CALIBRATION starts scrolling.
- At this time, the north pointer flashes at the 12 o’clock position and the display will show -1- to indicate that the watch is ready to calibrate the first direction.
- Place the watch on a level surface facing any direction you want, and press C to calibrate the first direction.
- — — is shown on the display while calibration is being performed. When calibration is successful, Turn 180° will appear on the display and three graphic segments ( ) will flash at 6 o’clock. After about one second, CALIBRATION -2— will scroll across the upper display.
- If ERR-1 appears on the display, press C again to restart the direction reading operation.
- Rotate the watch 180 degrees.
- Press C again to calibrate the second direction.
- — — is shown on the display while calibration is being performed. When calibration is successful, the display will show OK and then change to the Digital Compass Mode screen.
To perform magnetic declination correction
- In the Digital Compass Mode, hold down E for at least two seconds. First, SET Hold will flash on the display. After that, CALIBRATION will scroll across the upper display. Keep E depressed until CALIBRATION starts scrolling.
- Press D.
- DEC 0° will appear on the display and then the current magnetic declination angle setting will flash on the display.
- Use A (East) and C (West) to change the settings.
- The following explains magnetic declination angle direction settings.
OFF: No magnetic declination correction performed. The magnetic declination angle with this setting is 0°.
E: When magnetic north is to the east (east declination)
W: When magnetic north is to the west (west declination) - You can select a value within the range of W 90° to E 90° with these settings.
- You can turn off (OFF) magnetic declination correction by pressing A and C at the same time.
- The illustration, for example, shows the value you should input and the direction setting you should select when the map shows a magnetic declination of 1° West.
- When the setting is the way you want, press E to exit the setting screen.
Using Bearing Memory
Bearing Memory lets you temporarily store and display a direction reading so you can use it as a reference as you take subsequent digital compass readings. The Bearing Memory screen displays the direction angle for the stored reading, along with a pointer that indicates the stored reading.
When you take digital compass readings while the Bearing Memory screen is displayed, the direction angle of the current digital compass reading (as read from the 12 o’clock position of the watch) and the stored Bearing Memory direction reading will both be shown.
To store a direction angle reading in Bearing Memory
- Press C to start a digital compass reading operation.
- This will take an initial reading and then take readings every second for 60 seconds.
- If a bearing memory direction angle value is already displayed, it means that there is a reading already stored in Bearing Memory. If this happens, press E to clear the Bearing Memory reading and exit the bearing memory screen before performing the above step.
-
During the 60 seconds that digital compass readings are being taken, press E to store the current reading in Bearing Memory
- The Bearing Memory direction angle flashes for about one second as it is stored in Bearing Memory. After that, the Bearing Memory screen (which shows the bearing memory direction angle and pointer) will appear, and a new 60-second direction reading operation will start.
- You can press C at any time while the Bearing Memory screen is displayed, to start a new 60-second direction reading operation. Doing so will display the direction angle for the direction that the 12 o’clock position of the watch is pointed. The direction angle of the current reading will disappear from the display after the 60-second direction reading operation is complete.
- During the first 60 seconds after you display the Bearing Memory screen or during a 60-second direction reading operation you triggered by pressing C while the Bearing Memory screen is on the display, the direction stored in memory is indicated by a Bearing Memory pointer.
- Pressing E while the Bearing Memory screen is displayed will clear the reading currently in Bearing Memory and start a new 60-second direction reading operation.
Using the Digital Compass While Mountain Climbing or Hiking
This section provides three practical applications for using the watch’s built-in digital compass.
- Setting a map and finding your current location Having an idea of your current location is important when mountain climbing or hiking. To do this, you need to «set the map», which means to align the map so the directions indicated on it are aligned with the actual directions of your location. Basically what you are doing is aligning north on the map with north as indicated by the watch.
- Finding the bearing to an objective
- Determining the direction angle to an objective on a map and heading in that direction
To set a map and find your current location
- With the watch on your wrist, position it so the face is horizontal.
- While in the Timekeeping Mode or in any of the sensor modes, press C to take a compass reading.
- The reading will appear on the display after about one second.
-
Rotate the map without moving the watch so the northerly direction indicated on the map matches north as indicated by the watch.
- If the watch is configured to indicate magnetic north, align the map’s magnetic north with the watch indication. If the watch has been configured with a declination to correct to true north, align the map’s true north with the watch indication. For details, see «Calibrating the Bearing Sensor».
- This will position the map in accordance with your current location.
-
Determine your location as you check the geographic contours around you.
To find the bearing to an objective
- With the watch on your wrist, position it so the face is horizontal.
- Set the map so its northerly indication is aligned with north as indicated by the watch, and determine your current location.
- See «To set a map and find your current location» for information about how to perform the above step.
- Next, set the map so the direction you want to travel on the map is pointed straight in front of you.
- While in the Timekeeping Mode or in any of the sensor modes, press C to take a compass reading.
- The reading will appear on the display after about one second.
-
Still holding the map in front of you, turn your body until north as indicated by the watch and the northerly direction on the map are aligned.
- This will position the map in accordance with your current location, so the bearing to your objective is straight ahead of you.
-
To determine the direction angle to an objective on a map and head in that direction (Bearing Memory)
- Set the map so its northerly indication is aligned with north as indicated by the watch, and determine your current location.
- See «To set a map and find your current location» for information about how to perform the above step.
-
As shown in the illustration to the left, change your position so you (and the 12 o’clock position of the watch) are pointed in the direction of objective, while keeping the northerly direction indicated on the map aligned with north as indicated by the watch.
- If you find it difficult to perform the above step while keeping everything aligned, first move into the correct position (12 o’clock position of the watch pointed at the objective) without worrying about the orientation of the map. Next, perform step 1 again to set the map.
- While in the Timekeeping Mode or in any of the sensor modes, press C to take a compass reading.
- While direction angle readings are in progress, press E to record the currently displayed direction in Bearing Memory.
- The direction angle value and pointer stored in Bearing Memory will remain on the display for about 60 seconds.
- To re-display the Bearing Memory direction angle value and Bearing Memory pointer, press C.
- See «Using Bearing Memory» for more information.
-
Now you can advance while monitoring the Bearing Memory pointer to ensure that it remains in the 12 o’clock position.
- Pressing E while the Bearing Memory direction angle value and Bearing Memory pointer are on the display will clear the Bearing Memory data you saved in step 3 and save the current direction reading in Bearing Memory.
-
Note
- When mountain climbing or hiking, conditions or geographic contours may make it impossible for you to advance in a straight line. If this happens, return to step 1 and save a new direction to the objective.
Digital Compass Precautions Magnetic North and True North
The northerly direction can be expressed either as magnetic north or true north, which are different from each other. Also, it is important to keep in mind that magnetic north moves over time.
- Magnetic north is the north that is indicated by the needle of a compass.
- True north, which is the location of the North Pole of the Earth’s axis, is the north that is normally indicated on maps.
- The difference between magnetic north and true north is called the «declination». The closer you get to the North Pole, the greater the declination angle.
Location
- Taking a direction reading when you are near a source of strong magnetism can cause large errors in readings. Because of this, you should avoid taking direction readings while in the vicinity of the following types of objects: permanent magnets (magnetic necklaces, etc.), concentrations of metal (metal doors, lockers, etc.), high tension wires, aerial wires, household appliances (TVs, personal computers, washing machines, freezers, etc.).
- Accurate direction readings are impossible while in a train, boat, air plane, etc.
- Accurate readings are also impossible indoors, especially inside ferroconcrete structures. This is because the metal framework of such structures picks up magnetism from appliances, etc.
Storage
- The precision of the bearing sensor may deteriorate if the watch becomes magnetized. Because of this, you should store the watch away from magnets or any other sources of strong magnetism, including: permanent magnets (magnetic necklaces, etc.) and household appliances (TVs, personal computers, washing machines, freezers, etc.).
- Whenever you suspect that the watch may have become magnetized, perform the procedure under «To perform bidirectional calibration».
Specifying Temperature, Barometric Pressure, and Altitude Display Units
Use the procedure below to specify the temperature, barometric pressure, and altitude display units to be used in the Barometer/Thermometer Mode and the Altimeter Mode.
- When TYO (Tokyo) is selected as the Home City, the altitude unit is set automatically to meters (m), the barometric pressure unit to hectopascals (hPa), and the temperature unit to Celsius (°C). These settings cannot be changed.
To specify temperature, barometric pressure, and altitude display units
- In the Timekeeping Mode, hold down E for at least two seconds. First, SET Hold will flash on the display, and CITY will be displayed in the upper display. After that, the currently selected city code and city name will scroll across the upper display. Keep E depressed until the scrolling starts.
- Press D as many times as necessary until UNIT appears on the display.
- See the sequence in step 2 of the procedure under «To change the current time and date settings» for information about how to scroll through setting screens.
-
Perform the operations below to specify the display units you want.
| To specify this unit: | Press this key: | To toggle between these settings: |
| Altitude | A | m (meters) and ft (feet) |
| Barometric Pressure | B | hPa (hectopascals) and inHg (inches of mercury) |
| Temperature | C | °C (Celsius) and °F (Fahrenheit) |
- After all of the settings are the way you want, press E twice to exit the setting screen.
Taking Barometric Pressure and Temperature Readings
This watch uses a pressure sensor to measure air pressure (barometric pressure) and a temperature sensor to measure temperature.
To take barometric pressure and temperature readings
While in the Timekeeping Mode or in any of the sensor modes, press B to take barometric pressure and temperature readings.
- BARO will appear on the display, indicating that barometric pressure and temperature reading are in progress. The results will appear on the display after about one second.
- After you press B, the watch will take readings every five seconds for the first three minutes, and then every two minutes after that.
Note
- Press D to return to the Timekeeping Mode.
- The watch will return to the Timekeeping Mode automatically if you do not perform any operation for about 1 hour after entering the Barometer/Thermometer Mode.
Barometric Pressure
- Barometric pressure is displayed in units of 1 hPa (or 0.05 inHg).
- The displayed barometric pressure value changes to — — — if a measured barometric pressure falls outside the range of 260 hPa to 1,100 hPa (7.65 inHg to 32.45 inHg). The barometric pressure value will reappear as soon as the measured barometric pressure is within the allowable range.
Temperature
- Temperature is displayed in units of 0.1°C (or 0.2°F).
- The displayed temperature value changes to — — — °C (or °F) if a measured temperature falls outside the range of –10.0°C to 60.0°C (14.0°F to 140.0°F). The temperature value will reappear as soon as the measured temperature is within the allowable range.
Display Units
You can select either hectopascals (hPa) or inchesHg (inHg) as the display unit for the measured barometric pressure, and Celsius (°C) or Fahrenheit (°F) as the display unit for the measured temperature value. See «To specify temperature, barometric pressure, and altitude display units».
Barometric Pressure Graph
Barometric pressure indicates changes in the atmosphere. By monitoring these changes you can predict the weather with reasonable accuracy. This watch takes barometric pressure reading automatically every two hours. Readings are used to produce barometric pressure graph and barometric pressure differential pointer readings.
Reading the Barometric Pressure Graph
The barometric pressure graph shows a chronological history of pressure readings.
- When display of the barometric change indicator is disabled, the graph shows the results of up to 21 barometric pressure readings (42 hours).
- When display of the barometric change indicator is enabled, the graph shows the results of up to 11 barometric pressure readings (22 hours).
- The horizontal axis of the graph represents time, with each dot standing for two hours. The rightmost dot represents the most recent reading.
- The vertical axis of the graph represents barometric pressure, with each dot standing for the relative difference between its reading and that of the dots next to it. Each dot represents 1 hPa.
The following shows how to interpret the data that appears on the barometric pressure graph.
Rising barometric pressure indicates that upcoming weather will improve. Falling barometric pressure indicates that upcoming weather will deteriorate.
Note
- If there are sudden changes in weather or temperature, the graph line of past reading may run off the top or bottom of the display. The entire graph will become visible once barometric conditions stabilize.
- The following conditions cause the barometric pressure reading to be skipped, with the corresponding point on the barometric pressure graph being left blank.
- Barometric reading that is out of range (260 hPa to 1,100 hPa or 7.65 inHg to 32.45 inHg)
- Sensor malfunction
Barometric Pressure Differential Pointer
This pointer indicates the relative difference between the most recent barometric pressure reading indicated on the barometric pressure graph, and the current barometric pressure value displayed in the Barometer/Thermometer Mode.
Reading Barometric Pressure Differential Pointer
Pressure differential is indicated in the range of ±10 hPa, in 1-hPa units.
- The nearby screen shot, for example, shows what the pointer would indicate when the calculated pressure differential is approximately – 5 hPa (approximately – 0.15 inHg).
- Barometric pressure is calculated and displayed using hPa as the standard. The barometric pressure differential also can be read in inHg units as shown in the illustration (1 hPa 0.03 inHg).
Barometric Pressure Change Indications
Your watch analyzes past barometric pressure readings and uses a barometric pressure change indicator to inform you about changes in pressure. If it determines there has been a significant change in pressure, it will beep and all of the graphic segments ( ) around the periphery of the face will flash as a barometric pressure change alert. This means you could start taking barometric pressure readings after reaching a lodge or camp area, and then check the watch the next morning for changes in pressure, and plan you day’s activities accordingly. Note that you can enable or disable display of the barometric pressure change indicator as desired.
Reading the Barometric Pressure Change Indicator
- The barometric pressure change indicator is not displayed if there has been no noteworthy change in barometric pressure.
- To ensure proper results, take barometric readings under conditions where the altitude remains constant.
Example
- In a lodge or campground
- On the ocean
- A change in altitude causes a change in barometric pressure. Because of this, correct readings are impossible. Do not take readings while ascending or descending a mountain, etc.
Enabling or Disabling Display of the Barometric Pressure Change Indicator
You can enable or disable display of the barometric pressure change indicator as desired. When display of the indicator is enabled, the watch will take a barometric pressure reading every two minutes, regardless of the mode it is in.
- When BARO is shown on the display, it means that barometric pressure change indicator display is enabled.
- When BARO is not on the display, it means that barometric pressure change indicator display is disabled.
To enable or disable the barometric pressure change alert
In the Barometer/Thermometer Mode, hold down B for at least two seconds. Keep B depressed until the current setting (INFO Hold ON or INFO Hold OFF) starts to flash on the display.
- If barometric pressure change indicator display is currently enabled, BARO will also appear in the upper display. BARO will not appear if display is currently disabled.
- Note that barometric pressure change indicator display will turn off automatically 24 hours after you turn it on or battery power goes low.
- Note that barometric pressure change indicator display cannot be enabled while the watch’s battery is low.
Pressure Sensor and Temperature Sensor Calibration
The pressure sensor and temperature sensor built into the watch are calibrated at the factory and normally require no further adjustment. If you notice serious errors in the pressure readings and temperature readings produced by the watch, you can calibrate the sensor to correct the errors.
- Incorrectly calibrating the barometric pressure sensor can result in incorrect readings. Before performing the calibration procedure, compare the readings produced by the watch with those of another reliable and accurate barometer.
- Incorrectly calibrating the temperature sensor can result in incorrect readings. Carefully read the following before doing anything.
- Compare the readings produced by the watch with those of another reliable and accurate thermometer.
- If adjustment is required, remove the watch from your wrist and wait for 20 or 30 minutes to give the temperature of the watch time to stabilize.
To calibrate the pressure sensor and the temperature sensor
- Take a reading with another measurement device to determine the exact current barometric pressure or temperature.
- With the watch in the Timekeeping Mode or in any of the sensor modes, press B to enter the Barometer/Thermometer Mode.
- Hold down E for at least two seconds. SET Hold will flash on the display and then TEMP will appear in the upper display. Keep E depressed until TEMP appears.
- The current temperature calibration setting will flash in the lower display at this time.
- Press D to move the flashing between the temperature value and barometric pressure value, to select the one you want to calibrate.
- Use A (+) and C (–) to select the temperature and barometric pressure value display units as shown below. Temperature 0.1°C (0.2°F) Barometric Pressure 1 hPa (0.05 inHg)
- To return the currently flashing value to its initial factory default setting, press A and C at the same time. OFF will appear at the flashing location for about one second, followed by the initial default value.
- Press E to return to the Barometer/Thermometer Mode screen.
Barometer and Thermometer Precautions
- The pressure sensor built into this watch measures changes in air pressure, which you can then apply to your own weather predictions. It is not intended for use as a precision instrument in offi cial weather prediction or reporting applications.
- Sudden temperature changes can affect pressure sensor readings. Because of this, there may be some error in the readings produced by the watch.
- Temperature reading are affected by your body temperature, direct sunlight, and moisture. To achieve a more accurate temperature reading, remove the watch from your wrist, place it in a well ventilated location out of direct sunlight, and wipe all moisture from the case. It takes approximately 20 to 30 minutes for the case of the watch to reach the surrounding temperature.
Using the Altimeter Mode
The watch takes altitude readings and displays results based on air pressure measurements taken by a built-in pressure sensor. It also saves various types of altitude records and data.
Getting Ready
Before actually taking an altitude reading you need to select an altitude screen format and select an altitude reading interval.
Selecting the Altitude Screen Format
You can select either of two screen formats for the Altimeter Mode.
- Altitude tendency graph contents are updated each time you take an altitude reading.
- To take readings of the difference between the altitude at your current location and the altitude at a reference point, select Screen 2. See «Using an Altitude Differential Value» for more information.
To select the altitude screen format
- In the Altimeter Mode, hold down E for at least two seconds.
- SET Hold will flash on the display and then ALTI will appear in the upper display. Keep E depressed until ALTI appears.
- The current altitude value will appear at this time.
- Press D twice.
- DISP will appear, and then the current screen setting will appear in the upper display.
- Use A to toggle the setting between the two screens.
- Press E to exit the setting screen.
Selecting the Altitude Auto Reading Interval
You can select either of the following two altitude auto reading interval.
0’05: Readings at one-second intervals for the first three minutes, and then every five seconds for approximately the next hour
2’00: Readings at one-second intervals for the first three minutes, and then every two minutes for approximately the next 12 hours
Note
- If you do not perform any button operation while in the Altimeter Mode, the watch will return to the Timekeeping Mode automatically after 12 hours (altitude auto reading interval: 2’00) or after one hour (altitude auto reading interval: 0’05).
- If trek log operation is in progress with 0’05 selected as the altitude auto measurement method, exiting the Altimeter Mode to another mode will automatically cause the auto reading interval to change to 2’00.
To select the altitude auto reading interval
- In the Altimeter Mode, hold down E for at least two seconds. SET Hold will flash on the display and then ALTI will appear in the upper display. Keep E depressed until ALTI appears.
- The current altitude reading value will appear at this time.
- Press D to display the current altitude auto reading interval setting.
- This will cause INTERVAL to scroll across the top display. The current altitude auto reading interval setting (0’05 or 2’00) will be flashing in the center display.
- Press A to toggle the altitude auto measurement interval setting between 0’05 and 2’00.
- Press E to exit the setting screen.
Taking Altitude Readings
Use the procedure below to take basic altitude readings.
- See «Using Reference Altitude Values» for information about how to make altimeter readings more accurate.
- See «How does the altimeter work?» for information about how the watch measures altitude.
To take altitude readings
- Make sure the watch is in the Timekeeping Mode or any one of the sensor modes.
- The sensor modes are: Digital Compass Mode, Barometer/ Thermometer Mode, and Altimeter Mode.
- Press A to start auto altimeter readings.
- The current altitude value is displayed in units of 1 meter (5 feet).
- For information about the measurement interval.
Note
- After you are finished, press D to return to the Timekeeping Mode and stop auto altimeter readings.
- The watch will return to the Timekeeping Mode automatically if you do not perform any operation.
- The measurement range for altitude is –700 to 10,000 meters (–2,300 to 32,800 feet).
- The displayed altitude value changes to — — — — if an altitude reading falls outside the measurement range. An altitude value will reappear as soon as the altitude reading is within the allowable range.
- Normally, displayed altitude values are based on the watch’s preset conversion values. You also can specify a reference altitude value, if you want. See «Using Reference Altitude Values».
- You can change the unit for displayed altitude values to either meters (m) or feet (ft). See «To specify temperature, barometric pressure, and altitude display units».
Advanced Altimeter Mode Operations
Use the information in this section to obtain more accurate altimeter readings, especially while mountain climbing or trekking.
Using an Altitude Differential Value
The Altimeter Mode screen has an altitude differential value that shows the change in altitude from a reference point you specify. The altitude differential value is updated each time the watch takes an altitude reading.
- The range of the altitude differential value is –3,000 meters (–9,995 feet) to 3,000 meters (9,995 feet).
- — — — is displayed in place of the altitude differential value whenever the measured value is outside the allowable range.
- See «Using the Altitude Differential Value While Mountain Climbing or Hiking» for some real-life examples of how to use this feature.
To specify the altitude differential start point
- In the Altimeter Mode, select Screen 2 as the Altimeter Mode display.
- Press E.
- The watch will take an altitude reading and register the result as the altitude differential value start point. The altitude differential value will be reset to zero at this time.
Using the Altitude Differential Value While Mountain Climbing or Hiking
After you specify the altitude differential start point while mountain climbing or hiking, you can easily measure the change in the altitude between that point and other points along the way.
To use the altitude differential value
- In the Altimeter Mode, check to make sure that an altitude reading is on the display.
- If an altitude reading is not displayed, press A to take one. See «To take altitude readings» for details.
- Use the contour lines on your map to determine the difference in altitude between your current location and your destination.
- In the Altimeter Mode, press E to specify your current location as the altitude differential start point.
- The watch will take an altitude reading and register the result as the altitude differential value start point. The altitude differential value will be reset to zero at this time.
- While comparing the altitude difference you determined on the map and the watch’s altitude differential value, advance towards your destination.
- If the map shows that the difference in altitude between your location and your destination is +80 meters for example, you know you will be nearing your destination when the displayed altitude differential value shows +80 meters.
Using Reference Altitude Values
To minimize the chance of reading error, you should update the reference altitude value before setting off on a trek or any other activity where you plan to take altitude readings. During a trek, keep checking the readings produced by the watch against altitude information provided by markers and other information, and update the reference altitude value as required.
- Reading error can be caused by changes in barometric pressure, atmospheric conditions, and elevation.
- Before performing the procedure below, look up the altitude of your current location on a map, the Internet, etc.
To specify a reference altitude value
- In the Altimeter Mode, hold down E for at least two seconds. SET Hold will flash on the display and then ALTI will appear in the upper display. Keep E depressed until ALTI appears.
- The current altitude reading value will appear at this time.
- Use A (+) or C (–) to change the current reference altitude value in 1-meter (5-foot) increments.
- Change the reference altitude value to an accurate altitude reading that you get from a map or other source.
- You can set the reference altitude value within the range of –10,000 to 10,000 meters (–32,800 to 32,800 feet).
- Pressing A and C at the same time returns to OFF (no reference altitude value), so the watch performs air pressure to altitude conversions based on preset data only.
- Press E to exit the setting screen.
Types of Altitude Data
Your watch can record three types of altitude data in its memory: manually saved data, auto save values, and trek log values.
- Use the Data Recall Mode to view data stored in memory. See «Viewing Altitude Records» for details.
Manually Saved Records
Any time you perform the procedure below in the Altimeter Mode, the watch will create and store a record with the currently displayed altitude reading, along with the date and time the reading was taken. There is enough memory to store up to 30 manually saved records, which are numbered from REC 1 through REC 30.
To save a reading manually
- In the Altimeter Mode, check to make sure that an altitude reading is on the display.
- If an altitude reading is not displayed, press A to take one. See «To take altitude readings» for details.
- Hold down A. First, REC Hold will flash on the display. After that, REC and the current time will appear in the lower display. Release A as soon as REC and the current time appear.
- This will save the currently displayed altitude reading in a manually saved record, along with the time and date of the reading.
- The watch will return to the Altimeter Mode screen automatically after the save operation is complete.
- Holding down A for too long will advance to trek log update start/stop.
- There is enough memory to store up to 30 manually saved records. If there are already 30 manually saved records in memory, the above operation will cause the oldest record to be deleted automatically to make room for the new one.
Auto Save Values
Auto save values are one type of data stored in the memory of your watch.
Auto Save Values
High Altitude (MAX)
Low Altitude (MIN)
Total Ascent (ASC)
Total Descent (DSC)
- These values are checked and updated automatically by the watch as altitude auto measurements are taken.
- Auto save is performed only while the watch is in the Altimeter Mode.
- Cumulative ascent and cumulative descent values are updated whenever there is a difference of at least ±15 meters (±49 feet) from one reading to the next.
- Auto save values also include the date and time each value was recorded.
Trek Log Values
While trek log updating is enabled, altitude values (high altitude/low altitude, cumulative ascent/descent) for a particular trek are automatically checked and updated at regular intervals, even if you exit the Altimeter Mode. Values include the date and time each is updated. Up to 14 records of trek log values can be maintained in memory, and each record is assigned a number from Mt.1 through Mt.14 in the sequence they are stored.
Trek Log Values in Each Record
High Altitude (MAX)
Low Altitude (MIN)
Total Ascent (ASC)
Total Descent (DSC)
- For up to 12 hours after trek log value updating is enabled, the values are updated automatically even if you exit the Altimeter Mode. A segment ( ) in the graphic around the periphery of the display flashes to show the time elapsed since trek log value updating was enabled. Each graphic segment represents 12 minutes, and one revolution around the display represents 12 hours.
- You can select the altitude reading interval you want. For more information, see «To select the altitude auto reading interval».
- Trek log value updating stops automatically whenever the battery charge goes low.
Note
- Even if you exit the Altimeter Mode while trekking, updating of the trek log high altitude, low altitude, and cumulative ascent and descent values continues.
- Your watch has enough memory for 14 trek log records, which means you can maintain values for up to 14 treks.
To start trek log value updating
In the Altimeter Mode, hold down A for at least five seconds. First, Trek Hold will flash on the display. After that, Hold will disappear and a pointer ( ) indicating elapsed reading time will appear at 12 o’clock. Release A when Hold disappears.
- This indicates that updating of trek log values (high altitude/low altitude, cumulative ascent/descent) is being performed.
To stop trek log value updating
In the Altimeter Mode, hold down A for at least five seconds. First, Trek Hold End and the elapsed time pointer ( ) will flash. After that, Hold will disappear. Release A when Hold disappears.
- This indicates that updating of trek log values (high altitude/low altitude, cumulative ascent/descent) has been stopped.
Note
- To start a new trek log record while there are already 14 trek log records in memory, you will need to delete existing records. For more information, see «To delete data in a specific memory area».
How High and Low Altitude Values are Updated
With each auto save or trek log reading, the watch compares the current reading against the MAX (high altitude) and MIN (low altitude) values. It will replace the MAX value if the current reading is at least 15 meters (±49 feet) greater than MAX, or the MIN value if the current reading is at least 15 meters (±49 feet) less than MIN.
How Cumulative Ascent and Cumulative Descent Values Are Updated
The total ascent and total descent values produced by an Altimeter Mode reading operation session during the example climb illustrated above are calculated as follows.
Total Ascent: (300 m) + (620 m) = 920 m
Total Descent: (320 m) + (500 m) = 820 m
- Entering the Altimeter Mode starts a new altitude auto reading session, but it does not reset the current ASC and DSC values or change them in any way. This means that the starting ASC and DSC values for a new Altimeter Mode auto reading session are the values that currently are in memory. Each time you complete an altitude auto reading session by exiting the Altimeter Mode, the total ascent value of the current session (920 meters in the above example) is added to the session’s starting ASC value. Also, the total descent value of the current auto reading session (–820 meters in the above example) is added to the session’s starting DSC value.
- Logging of trek log data continues even if you exit the Altimeter Mode.
Note
- The high altitude, low altitude, total ascent, and total descent values are retained in memory when you exit the Altimeter Mode. To clear values, perform the procedure under «To delete data in a specifi c memory area».
How does the altimeter work?
Generally, air pressure decrease as altitude increases. This watch bases its altitude reading on International Standard Atmosphere (ISA) values stipulated by the International Civil Aviation Organization (ICAO). These values defi ne relationships between altitude and air pressure.
- Note that the following conditions will prevent you from obtaining accurate readings: When air pressure changes because of changes in the weather Extreme temperature changes When the watch itself is subjected to strong impact
There are two standard methods of expressing altitude: absolute altitude, which expresses an absolute height above sea level, and relative altitude, which expresses the difference between the altitudes of two different places. This watch expresses altitudes as relative altitude.
How the Altimeter Measures Altitude
The altimeter can measure altitude based on its own preset values (initial default method) or using a reference altitude specifi ed by you.
When you measure altitude based on preset values
Data produced by the watch’s barometric pressure sensor is converted to approximate altitude based on ISA (International Standard Atmosphere) conversion values stored in watch memory.
When you measure altitude using a reference altitude specified by you
After you specify a reference altitude, the watch uses that value to convert barometric pressure readings to altitude.
- When mountain climbing, you can specify a reference altitude value in accordance with a marker along the way or altitude information from a map. After that, the altitude readings produced by the watch will be more accurate than they would without a reference altitude value.
Altimeter Precautions
- This watch estimates altitude based on air pressure. This means that altitude readings for the same location may vary if air pressure changes.
- Do not rely upon this watch for altitude reading or perform button operations while sky diving, hang gliding, or paragliding, while riding a gyrocopter, glider, or any other aircraft, or while engaging in any other activity where there is the chance of sudden altitude changes.
- Do not use this watch for measuring altitude in applications that demand professional or industrial level precision.
- Remember that the air inside of a commercial aircraft is pressurized. Because of this, the readings produced by this watch will not match the altitude readings announced or indicated by the fl ight crew.
Precautions Concerning Simultaneous Altitude and Temperature Readings
For the more accurate altitude readings, leaving the watch on your wrist is recommended in order to maintain the watch at a constant temperature.
- When taking temperature readings, keep the watch at as stable a temperature as possible. Changes in temperature can affect temperature readings. See product specifications for sensor accuracy information.
Viewing Altitude Records
You can use the Data Recall Mode to view manually saved record data, auto save values, and trek log values.
To view altitude records
- Use D to select the Data Recall Mode (REC).
- About one second after REC appears on the display, the display will change to show the first record of the memory area you were viewing when you last exited the Data Recall Mode.
- Use B to select the memory area you want.
- After you select the Trek Log Value Area screen, use the B button to select the trek whose values you want to view. Treks are numbered from 1 (Mt.1) through 14 (Mt.14).
- After you select the Manually Saved Record Area screen, the date (month and day) and time of the record will alternate on the display in the lower display at one-second intervals.
- Use A and C to scroll through the screens for an area and display the one you want.
- Manually saved records (REC01 to REC30), auto save MAX and MIN values, and trek log values all include the date (month and day) and time (hour and minute) that the data was recorded.
- Records of the ASC and DSC include altitude values along with the date (month, day) and year that the data was recorded.
- For details about auto save values, see «Auto Save Values». For details about trek log values, see «Trek Log Values».
- — will be displayed if MAX/MIN data has been deleted or if there is no corresponding MAX/MIN data due to error, etc. In such cases, total ascent (ASC) and total descent (DSC) values will show zero.
- When the total ascent (ASC) or total descent (DSC) exceeds 99,999 meters (or 327,997 feet), the applicable value will restart from zero. Note that the watch can display up to five digits only. When using feet as the altitude display units, altitude values are displayed only up to the rightmost five digits.
- When the total ascent (ASC) or total descent (DSC) value becomes five digits long, the rightmost (ones) digit is shown in the lower right of the display. The nearby illustration shows the display when the value of ASC is 99995 meters.
Trek Log Values (Mt.1 to Mt.14)
*1: Month and day the displayed value was recorded.
*2: Month and day cumulation started.
- Holding down A or C scrolls at high speed.
- On the high altitude value (MAX) and low altitude value (MIN) screens, the lower display area alternates between the date (month and day) and time at one-second intervals.
- On the cumulative ascent and cumulative descent screens, the lower display area alternates between the month and day, and the year at one-second intervals.
To delete all manually saved data
Memory contents cannot be deleted while trek log values are being recorded.
- Use D to enter the Data Recall Mode.
- Use B to display the Manually Saved Record Area.
- Hold down E for at least three seconds. First, Clear Hold ALL will flash in the display. After that, Hold will disappear. Release E when Hold disappears.
To delete data in a specific memory area
Memory contents cannot be deleted while trek log values are being recorded.
- This will cause — — — — to appear in the lower display.
- This indicates that all manually saved data is cleared.
- Use D to enter the Data Recall Mode.
- Use B to display the memory area (Manually Saved Record Area, Auto Save Value Area, or Trek Log Value Area) that contains the data you want to delete.
- What you should do next depends on which memory area you displayed in step 2, above.
- If you displayed the Manually Saved Record Area, use A and C to display the number of the record (REC-01— through REC-30-) you want to delete.
- If you displayed the Auto Save Value Area, all of its values will be deleted, so you do not need to select anything.
- If you displayed the Trek Log Value Area, use B to display the trek (mountain) number of the record (Mt.1 through Mt.14) you want to delete.
- A delete operation cannot be undone! Make sure you do not need data before you delete it.
-
Hold down E for at least two seconds. First, Clear Hold will flash in the display. After that, Hold will disappear. Release E when Hold disappears.
- If you are deleting a Manually Saved Record Area record, holding down E too long (after Hold disappears) will cause all manually saved records to be deleted.
- Deleting a record in either the Manually Saved Record Area or Trek Log Value Area will cause all records following it to be shifted upwards and renumbered accordingly. If the record you delete is the last one currently in the memory area where you deleted it, — — — — will be displayed in the display in place of the record number.
- After you delete Auto Save Values, the MAX (high altitude) and MIN (low altitude) values will show — — — -, while the ASC (cumulative ascent) and DSC (cumulative descent) values will show zero.
Looking up Sunrise and Sunset Times
You can use the Sunrise/Sunset Mode to look up the sunrise and sunset times for a particular date (year, month, day) and location.
To enter the Sunrise/Sunset Mode
While in the Timekeeping Mode, press D to enter the Sunrise/Sunset Mode.
- This will display the sunrise and sunset times for the current date based the currently specifi ed city code, latitude, and longitude.
- Sunrise/sunset times will not be displayed when battery power is low.
- Before trying to use the Sunrise/Sunset Mode, you need to configure settings for the city code, longitude, and latitude for the location whose sunrise and sunset times you want to view.
- The factory default confi guration of the location is: City Code: TYO (Tokyo); Latitude: North 35.7 degrees; Longitude: East 139.7 degrees.
To view the sunrise/sunset time for a particular date
- Enter the Sunrise/Sunset Mode.
- This will display the sunrise and sunset times for the current date at the location specifi ed by the city code, latitude, and longitude.
-
While the sunrise/sunset time are on the display, use A (+) and C (–) to scroll through the dates.
- Pressing one of the above buttons causes the month and day to appear in the upper display area, and the year to appear in the lower display area.
- When you release the button, the sunrise time of the selected day will be shown in the middle display, while the sunset time will be shown in the lower display.
- You can select any date between January 1, 2000 and December 31, 2099.
Note
- If you think that the sunrise and/or sunset times are not correct for some reason, check the watch’s city code, longitude and latitude settings.
- The sunrise and sunset times displayed by this watch are times at sea level. Sunrise and sunset times are different at altitudes other than sea level.
To look up the sunrise and sunset times for a specific location
- You do not need to perform this procedure to look up the sunrise and sunset times in your currently selected Home City.
- If you select a different city code to look up the sunrise and sunset times there, return to the city code of your Home City (your current location) when you are finished. Otherwise, the time shown in the Timekeeping Mode will not be correct.
- For information about the Home City setting, see «Configuring Home City Settings».
- In the Timekeeping Mode, hold down E for at least two seconds. First, SET Hold will flash on the display, and CITY will be displayed in the upper display. After that, the currently selected city code and city name will scroll across the upper display. Keep E depressed until the scrolling starts.
- Use A (East) and C (West) to select the city code whose sunrise and sunset times you want to view.
- For details about city codes, see the «City Code Table» at the back of this manual.
- If this display shows the information you need, you can exit this procedure at this point by pressing E twice. If you want to specify a latitude and longitude for a more exact reading, advance to step 3, below.
- Press E to display the longitude/latitude setting screen, with the latitude setting flashing.
- Use D to move the flashing between the latitude and the longitude setting.
- Use A (+) and C (–) to change the flashing setting.
- You can configure the longitude and latitude setting within following ranges. Latitude Range: 65.0°S (South 65.0 degrees) to 0°N to 65.0°N (North 65.0 degrees) Longitude Range: 179.9°W (West 179.9 degrees) to 0°E to 180.0°E (East 180.0 degrees)
- Latitude and longitude values are rounded off to the nearest degree.
- Press E to return to the Timekeeping Mode.
- In the Timekeeping Mode, press D.
- Display the location whose sunrise and sunset times you want to view.
Using the Stopwatch
The stopwatch measures elapsed time, split times, and two finishes.
To enter the Stopwatch Mode
Use D to select the Stopwatch Mode (STW).
To measure two finishes
Note
- The Stopwatch Mode can indicate elapsed time up to 999 hours, 59 minutes, 59.9 seconds.
- Once started, stopwatch timing continues until you press A to stop it, even if you exit the Stopwatch Mode to another mode and even if timing reaches the stopwatch limit defi ned above. A paused timing operation will remain paused until you press A to restart it or C to reset.
- Exiting the Stopwatch Mode while a split time is frozen on the display clears the split time and returns to elapsed time measurement.
- While SPLIT is shown in the upper display, it alternates with the hour digits of the split time at one-second intervals.
Using the Countdown Timer
The countdown timer can be configured to start at a preset time, and sound an alarm when the end of the countdown is reached.
To enter the Countdown Timer Mode
Use D to select the Countdown Timer Mode (TMR).
- About one second after TMR appears on the display, the display will change to show the countdown time hours.
To specify the countdown start time
- Enter the Countdown Timer Mode.
- If a countdown is in progress (indicated by the seconds counting down), press A to stop it and then press C to reset to the current countdown start time.
- If a countdown is paused, press C to reset to the current countdown start time.
-
Hold down E for at least two seconds.
- SET Hold will flash on the display and then the current start time setting will start to flash. Keep E depressed until the start time setting starts to flash.
- Press D to move the flashing between the hour and minute settings.
- Use A (+) and C (–) to change the flashing item.
- To set the starting value of the countdown time to 24 hours, set 0H 00’00.
-
Press E to exit the setting screen.
-
To perform a countdown timer operation
- Before starting a countdown timer operation, check to make sure that a countdown operation is not in progress (indicated by the seconds counting down). If it is, press A to stop it and then C to reset to the countdown start time.
- An alarm sounds for ten seconds when the end of the countdown is reached. This alarm will sound in all modes. The countdown time is reset to its starting value automatically when the alarm sounds.
To stop the alarm
Press any button.
Using the Alarm
You can set five independent daily alarms. When an alarm is turned on, an alarm will sound for about 10 seconds each day when the time in the Timekeeping Mode reaches the preset alarm time. This is true even if the watch is not in the Timekeeping Mode. One of the daily alarms is a snooze alarm. The other four are one-time alarms. The snooze alarm will sound every five minutes up to seven times or until it is turned off.
You can also turn on an Hourly Time Signal, which will cause the watch to beep twice every hour on the hour.
To enter the Alarm Mode
Use D to select the Alarm Mode (ALM).
- About one second after ALM appears on the display, the display will change to show an alarm name (AL-1 to AL-4, or SNZ) or the SIG indicator. The alarm name indicates an alarm screen. SIG is shown when the Hourly Time Signal screen is on the display.
- When you enter the Alarm Mode, the data you were viewing when you last exited the mode appears first.
To set an alarm time
- In the Alarm Mode, use A and C to scroll through the alarm screens until the one whose time you want to set is displayed.
* There is no time setting for the hourly time signal.
- Hold down E until SET Hold appears on the display and then the current settings start to flash.
-
This is the setting screen.
-
Press D to move the flashing between the hour and minute settings.
-
While a setting is flashing, use A (+) and C (–) to change it.
-
When setting the alarm time using the 12-hour format, take care to set the time correctly as a.m. (no indicator) or p.m. (P indicator).
-
Press E to exit the setting screen.
-
Setting an alarm time causes that alarm to turn on automatically.
-
To turn an alarm and the Hourly Time Signal on and off
- In the Alarm Mode, use A and C to select an alarm or the Hourly Time Signal.
- When the alarm or the Hourly Time Signal you want is selected, press B to turn it on and off.
- The alarm on indicator (when any alarm is on), snooze alarm indicator (when the snooze alarm is on), and the Hourly Time Signal on indicator (when the Hourly Time Signal is on) are shown on the display in all modes.
To stop the alarm Press any button.
Note
- The snooze alarm sounds up to seven times at intervals of about five minutes.
- After the snooze alarm first sounds, SNZ will flash on the display until the snooze alarm sounds all seven times or until it is canceled.
- The snooze alarm will be canceled when any of the following occurs while the SNZ indicator is flashing on the display.
- If you turn off the snooze alarm
- If you display the snooze alarm setting screen
- If you display the Timekeeping Mode setting screen
- If your Home City and World Time City are the same city, and you use the World Time Mode to change the summer time setting of your Home City
Checking the Current Time in a Different Time Zone
You can use the World Time Mode to view the current time in one of 31 time zones (48 cities) around the globe. The city that is currently selected in the World Time Mode is called the «World Time City».
To enter the World Time Mode
Use D to select the World Time Mode (WT).
- One second after WT appears on the display, the city code of the currently selected World Time City will scroll once in the upper display. After that, the World Time City’s city code will be displayed in the upper display.
To view the time in another time zone
In the World Time Mode, use A (East) and C (West) to scroll through city codes.
To specify standard time or daylight saving time (DST) for a city
- In the World Time Mode, use A (East) and C (West) to scroll through the available city codes.
- Keep scrolling until the city code whose Standard Time/Daylight Saving Time setting you want to change is displayed.
-
Hold down E for at least two seconds.
- Keep E depressed until the current setting (DST Hold ON or DST Hold OFF) starts to flash on the display.
- DST Hold ON means that summer time is enabled, and that the current time is advanced accordingly. DST Hold OFF means that summer time is disabled, and that the current time shows standard time.
- This toggles the city code you selected in step 1 between Daylight Saving Time (DST indicator displayed) and standard time (DST indicator not displayed).
- Using the World Time Mode to change the DST setting of the city code that is selected as your Home City also will change the Timekeeping Mode time DST setting.
- Note that you cannot switch between standard time/daylight saving time (DST) while UTC is selected as the World Time City.
- Note that the standard time/daylight saving time (DST) setting affects only the currently selected time zone. Other time zones are not affected.
Illumination
The display of the watch is illuminated for easy reading in the dark. The watch’s auto light switch turns on illumination automatically when you angle the watch towards your face.
- The auto light switch must be turned on for it to operate.
To turn on illumination manually
Press L in any mode to illuminate the display.
- You can use the procedure below to select either 1.5 seconds or three seconds as the illumination duration. When you press L, the display will remain illuminated for about 1.5 seconds or three seconds, depending on the current illumination duration setting.
- The above operation turns on illumination regardless of the current auto light switch setting.
- Illumination is disabled while Configuring sensor measurement mode settings, and during bearing sensor calibration.
To change the illumination duration
- In the Timekeeping Mode, hold down E for at least two seconds. First, SET Hold will flash on the display, and CITY will be displayed in the upper display. After that, the currently selected city code and city name will scroll across the upper display. Keep E depressed until the scrolling starts.
- Use D to cycle through the setting screens until LIGHT appears in the upper display.
- The current illumination duration setting (1 or 3) will be flashing in the middle display.
- See the sequence in step 2 of the procedure under «To change the current time and date settings» for information about how to scroll through setting screens.
- Press A to toggle the illumination duration between three seconds (3 displayed) and 1.5 seconds (1 displayed).
- After all of the settings are the way you want, press E twice to exit the setting screen. About the Auto Light Switch Turning on the auto light switch causes illumination to turn on, whenever you position your wrist as described below in any mode. Moving the watch to a position that is parallel to the ground and then tilting it towards you more than 40 degrees causes illumination to turn on.
About the Auto Light Switch
Turning on the auto light switch causes illumination to turn on, whenever you position your wrist as described below in any mode.
Moving the watch to a position that is parallel to the ground and then tilting it towards you more than 40 degrees causes illumination to turn on.
- Always make sure you are in a safe place whenever you are reading the display of the watch using the auto light switch. Be especially careful when running or engaged in any other activity that can result in accident or injury. Also take care that sudden illumination by the auto light switch does not startle or distract others around you.
- When you are wearing the watch, make sure that its auto light switch is turned off before riding on a bicycle or operating a motorcycle or any other motor vehicle. Sudden and unintended operation of the auto light switch can create a distraction, which can result in a traffi c accident and serious personal injury.
Note
- This watch features a «Full Auto Light», so the auto light switch operates only when available light is below a certain level. It does not illuminate the display under bright light.
- The auto light switch is always disabled, regardless of its on/off setting, when any one of the following conditions exists. While an alarm is sounding While a bearing sensor calibration operation is being performed in the Digital Compass Mode While a sunrise or sunset time is being calculated While in a sensor mode, an auto light switch operation is performed after a sensor reading
To turn the auto light switch on and off
In the Timekeeping Mode, hold down L for at least three seconds to toggle the auto light switch on (LT displayed) and off (LT not displayed).- The auto light switch on indicator (LT) is on the display in all modes while the auto light switch is turned on.
- The auto light switch turns off automatically whenever battery power drops to Level 4.
Illumination Precautions
- The LED that provides illumination loses power after very long use.
- Illumination may be hard to see when viewed under direct sunlight.
- Illumination turns off automatically whenever an alarm sounds.
- Frequent use of illumination runs down the battery.
Auto light switch precautions
- Wearing the watch on the inside of your wrist, movement of your arm, or vibration of your arm can cause frequent activation of the auto light switch and illumination of the display. To avoid running down the battery, turn off the auto light switch whenever engaging in activities that might cause frequent illumination of the display.
- Note that wearing the watch under your sleeve while the auto light switch is turned on can cause frequent illumination of the display and can run down the battery.
- Illumination may not turn on if the face of the watch is more than 15 degrees above or below parallel. Make sure that the back of your hand is parallel to the ground.
- Illumination turns off after the preset illumination duration, even if you keep the watch pointed towards your face.
- Static electricity or magnetic force can interfere with proper operation of the auto light switch. If illumination does not turn on, try moving the watch back to the starting position (parallel with the ground) and then tilt it back towards your face again. If this does not work, drop your arm all the way down so it hangs at your side, and then bring it back up again.
- You may notice a very faint clicking sound coming from the watch when it is shaken back and forth. This sound is caused by mechanical operation of the auto light switch, and does not indicate a problem with the watch.
Other Settings
The button operation tone sounds any time you press one of the watch’s buttons. You can turn the button operation tone on or off as desired.
-
Even if you turn off the button operation tone, the alarm, Hourly Time Signal, barometric pressure change alert, and Countdown Timer Mode alarm all operate normally.
To turn the button operation tone on and off
- In the Timekeeping Mode, hold down E for at least two seconds. First, SET Hold will flash on the display, and CITY will be displayed in the upper display. After that, the currently selected city code and city name will scroll across the upper display. Keep E depressed until the scrolling starts.
- Use D to cycle through settings on the display until the current button operation tone (MUTE or key ) is displayed.
- See the sequence in step 2 of the procedure under «To change the current time and date settings» for information about how to scroll through setting screens.
- Press A to toggle the button operation tone on (key ) and off (MUTE).
- After all of the settings are the way you want, press E twice to exit the setting screen.
- Press A to toggle the button operation tone on (key
Note
- The mute indicator is displayed in all modes when the button operation tone is turned off.
To turn Power Saving on or off
- In the Timekeeping Mode, hold down E for at least two seconds. First, SET Hold will flash on the display, and CITY will be displayed in the upper display. After that, the currently selected city code and city name will scroll across the upper display. Keep E depressed until the scrolling starts.
- Use D to cycle through the setting screens until the current power saving setting (On or OFF) is displayed.
- POWER SAVING will scroll across the upper display at this time.
- See the sequence in step 2 of the procedure under «To change the current time and date settings» for information about how to scroll through setting screens.
- Press A to toggle Power Saving on (On) and off (OFF).
- After all of the settings are the way you want, press E twice to exit the setting screen.
Note
- The Power Saving on indicator (PS) is on the display in all modes while Power Saving is turned on.
Troubleshooting
Time Setting
- The current time setting is off by hours.
Your Home City setting may be wrong. Check your Home City setting and correct it, if necessary.
Sensor modes
- I can’t change the temperature, barometric pressure, and altitude display units.
When TYO (Tokyo) is selected as the Home City, the altitude unit is set automatically to meters (m), the barometric pressure unit to hectopascals (hPa), and the temperature unit to Celsius (°C). These settings cannot be changed.
«ERR» appears on the display while I am using a sensor.
Subjecting the watch to strong impact can cause sensor malfunction or improper contact of internal circuitry. When this happens, ERR (error) will appear on the display and sensor operations will be disabled.
- If ERR appears while a reading operation is being performed in a sensor mode, restart the operation. If ERR appears on the display again, it can mean there is something wrong with the sensor.
- Even if battery power is at Level 1 (H) or Level 2 (M), the Digital Compass Mode, Barometer/ Thermometer Mode, or Altimeter Mode sensor may be disabled if there is not enough voltage available to power it suffi ciently. In this case, ERR will appear on the display. This does not indicate malfunction, and sensor operation should resume once battery voltage returns to its normal level.
- If ERR keeps appearing during a reading operation, it could mean there is a problem with the applicable sensor.
ERR appears on the display after I perform bidirectional calibration.
If — — — appears and then changes to ERR (error) on the calibration screen, it means that there is something wrong with the sensor.
- If ERR disappears after about one second, try performing the calibration again.
- If ERR keeps appearing, contact your original dealer or nearest authorized CASIO distributor to have the watch checked.
Whenever you have a sensor malfunction, take the watch to your original dealer or nearest authorized CASIO distributor as soon as possible.
- What causes incorrect direction readings?
- Incorrect bidirectional calibration. Perform bidirectional calibration.
- Nearby source of strong magnetism, such as a household appliance, a large steel bridge, a steel beam, overhead wires, etc., or an attempt to take direction readings on a train, boat, etc. Move away from large metal objects and try again. Note that digital compass operation cannot be performed inside a train, boat, etc.
- What causes different direction readings to produce different results at the same location?
Magnetism generated by nearby high-tension wires is interfering with detection of terrestrial magnetism. Move away from the high-tension wires and try again. - Why am I having problems taking direction readings indoors?
A TV, personal computer, speakers, or some other object is interfering with terrestrial magnetism readings. Move away from the object causing the interference or take the direction reading outdoors. Indoor direction readings are particularly diffi cult inside ferro-concrete structures. Remember that you will not be able to take direction readings inside of trains, airplanes, etc. - The barometric pressure differential pointer does not appear on the display when I enter the Barometer/Thermometer Mode.
- This could indicate sensor error. Try pressing B again.
- The barometric pressure differential pointer is not displayed when the displayed current barometric value is outside of the allowable measurement range (260 to 1,100 hPa).
- Correct altitude readings are not possible.
Relative altitude is calculated based on changes in barometric pressure measurement by its pressure sensor. To minimize the chance of reading error due to changes in barometric pressure, you should update the reference altitude value before setting off on a trek or any other activity where you plan to take altitude readings. For more information, see «To specify a reference altitude value».
World Time Mode
-
The time for my World Time City is off in the World Time Mode. This could be due to incorrect switching between standard time and daylight saving time. See «To specify standard time or daylight saving time (DST) for a city» for more information.
Charging
- The watch does not resume operation after I expose it to light. This can happen after the power level drops to Level 5. Continue exposing the watch to light until the battery power indicator shows «H» or «M».
Specifications
Accuracy at normal temperature: ±15 seconds a month
Timekeeping: Hour, minutes, seconds, p.m. (P), year, month, day, day of the week
Time format: 12-hour and 24-hour
Calendar system: Full Auto-calendar pre-programmed from the year 2000 to 2099
Other: Three display formats (day of the week/day screen, month/day screen, barometric pressure graph screen); Home City code (can be assigned one of 48 city codes); Standard Time / Daylight
Saving Time (summer time) Year display on setting screen only.
Digital Compass: 60 seconds continuous reading; 16 directions; Angle value 0° to 359°; Four direction pointers; Calibration (bidirectional); Magnetic declination correction; Bearing Memory
Barometer:
Measurement and display range:
260 to 1,100 hPa (or 7.65 to 32.45 inHg)
Display unit: 1 hPa (or 0.05 inHg)
Reading timing: Daily from midnight, at two hour intervals (12 times per day); Every five seconds in the Barometer/Thermometer Mode
Other: Calibration; Manual reading (button operation); Barometric pressure graph; Barometric pressure differential pointer; Barometric pressure change indicator
Thermometer:
Measurement and display range: –10.0 to 60.0°C (or 14.0 to 140.0°F) Display unit: 0.1°C (or 0.2°F)
Reading timing: Every five seconds in the Barometer/Thermometer Mode
Other: Calibration; Manual reading (button operation)
Altimeter:
Measurement range: –700 to 10,000 m (or –2,300 to 32,800 ft.) without reference altitude
Display range: –10,000 to 10,000 m (or –32,800 to 32,800 ft.)
Negative values can be caused by readings produced based on a reference altitude or due to atmospheric conditions.
Display unit: 1 m (or 5 ft.) Current Altitude Data: Every second for the first 3 minutes, followed by every 5 seconds for approximately 1 hour (0’05); every second for the first 3 minutes, followed by every 2 minutes for approximately 12 hours (2’00)
Altitude Memory Data: Manually saved records: 30 (altitude, date, time)
Auto saved values: One set of high altitude and its reading date and time, low altitude and its reading date and time, total ascent and its save start date and time, total descent and its save start date and time
Trek log data: High altitude, low altitude, cumulative ascent, cumulative descent for up to 14 treks
Other: Reference altitude setting; Altitude differential; Altitude auto measurement interval (0’05 or 2’00)
Bearing Sensor Precision:
Direction: Within ±10°
Values are guaranteed for a temperature range of –10°C to 60°C (14°F to 140°F).
North pointer: Within ±2 digital segments
Pressure Sensor Precision:
Measurement accuracy: Within ±3hPa (0.1 inHg) (Altimeter accuracy: Within ± 75m (246 ft.))
-
Values are guaranteed for a temperature range of –10°C to 40°C (14°F to 104°F).
-
Precision is lessened by strong impact to either the watch or the sensor, and by temperature extremes.
Temperature Sensor Precision:
±2°C (±3.6°F) in range of –10°C to 60°C (14.0°F to 140.0°F)
Sunrise/sunset:
Sunrise/sunset time display; selectable date
Stopwatch:
Measuring unit: 1/10 second
Measuring capacity: 999:59′ 59.9″
Measuring accuracy: ±0.0006%
Measuring modes: Elapsed time, split time, two finishes
Countdown Timer:
Measuring unit: 1 second
Countdown range: 24 hours
Setting unit: 1 minute
Alarms: 5 Daily alarms (four one-time alarms; one snooze alarm); Hourly time signal
World Time: 48 cities (31 time zones)
Other: Daylight Saving Time/Standard Time
Illumination: LED light; Selectable illumination duration (approximately 1.5 seconds or 3 seconds); Auto Light Switch (Full Auto Light operates only in the dark)
Other: Battery power indicator; Power Saving; Low-temperature resistance (–10°C/14°F); Button operation tone on/off
Power Supply: Solar panel and one rechargeable battery
Approximate battery operating time: 9 months (from full charge to Level 4) under the following conditions:
-
Light: 1.5 seconds/day
-
Beeper: 10 seconds/day
-
Direction readings: 20 times/month
-
Climbs: Once (approximately 1 hour of altitude readings)/month
-
Barometric pressure change indicator readings: Approximately 24 hours/month
-
Barometric pressure graph: Readings every 2 hours
-
Display: 18 hours/day
Frequent use of illumination runs down the battery. Particular care is required when using the auto light switch.
City Code Table
* As of December 2012, the offi cial UTC offset for Moscow, Russia (MOW) was changed from +3 to +4, but this watch still uses an offset of +3 (the old offset) for MOW. Because of this, you should leave the summer time setting turned on (which advances the time by one hour) for the MOW time.
-
The rules governing global times (GMT differential and UTC offset) and summer time are determined by each individual country.
Documents / Resources
Download manual
Here you can download full pdf version of manual, it may contain additional safety instructions, warranty information, FCC rules, etc.
Download CASIO PRO TREK PRG-270 Manual
Перейти к контенту
![]()
Русские электронные инструкции по эксплуатации
Постоянно обновляемый большой каталог документации по эксплуатации и использованию современных устройств и оборудования на русском языке. Бесплатное скачивание файлов.
Поиск:
Главная
♥ В закладки
Просмотр инструкции в pdf
Инструкция по эксплуатации наручных часов Casio Pro Trek PRG-270-1E.
Скачать инструкцию к наручным часам Casio Pro Trek PRG-270-1E (9,90 МБ)

Инструкции наручных часов Casio
« Инструкция к наручным часам Casio MTP-1314PL-8A
» Инструкция к наручным часам Casio G-SHOCK G-2900F-1V
Вам также может быть интересно

Инструкция к наручным часам Casio W-96H-1A

Инструкция к наручным часам Casio W-734-1A

Инструкция к наручным часам Casio LTP-2069D-4A

Инструкция к наручным часам Casio MTP-1314PL-8A

Инструкция к наручным часам Casio AW-49H-1B

Инструкция к наручным часам Casio A-168WG-9

Инструкция к наручным часам Casio AW-49H-7B

Инструкция к наручным часам Casio W-800HG-9A
Добавить комментарий
Имя *
Email *
Сайт
Комментарий


![]()


Сохранить моё имя, email и адрес сайта в этом браузере для последующих моих комментариев.
- Добавить инструкцию
- Заказать инструкцию
- Политика конфиденциальности
![]()
ПРЕЖДЕ ВСЕГО ПРОЧТИТЕ ЭТУ ВАЖНУЮ ИНФОРМАЦИЮ
Батарейка
•Батарейка, установленная в часы на заводе, разряжается во время их доставки и хранения. При первых признаках недостаточности питания (нечеткость изображения) необходимо заменить батарейку в ближайшем к вам авторизованном сервисном центре «CASIO», либо у дистрибьютора фирмы «CASIO».
Защита от воды
Для всех категорий часов запрещается:
•нажимать кнопки под водой;
•переводить стрелки под водой;
•отвинчивать переводную головку под водой;
Если часы подверглись воздействию соленой воды, то тщательно промойте их и вытрите насухо. Не надевайте часы на кожаном ремешке во время плавания. Избегайте длительного контакта кожаного ремешка с водой.
1
•Часы классифицируются по разрядам (с I по V разряд) в соответствии со степенью их защищенности от воды. Уточните разряд ваших часов с помощью приведенной ниже таблицы, чтобы определить правильность их использования.
|
* Раз- |
Брызги, |
Плавание, |
Подводное |
Ныряние |
||
|
Маркировка корпуса |
дождь и |
мытье маши- |
плавание, |
с аква- |
||
|
ряд |
||||||
|
т.п. |
ны и т.п. |
ныряние и т.п. |
лангом |
|||
|
I |
— |
Нет |
Нет |
Нет |
Нет |
|
|
II |
WATER RESISTANT |
Да |
Нет |
Нет |
Нет |
|
|
III |
50 М WATER RESISTANT |
Да |
Да |
Нет |
Нет |
|
|
IV |
100 М WATER RESISTANT |
Да |
Да |
Да |
Нет |
|
|
V |
200 M WATER RESISTANT |
Да |
Да |
Да |
Да |
|
|
300 M WATER RESISTANT |
||||||
|
• Примечания |
||||||
|
I Часы не защищены от воды. Избегайте попадания любой влаги; |
2
IIWR (Water Resistant) означает, что модель водонепроницаема согласно ISO 2281. Кратковременный контакт с водой не вызовет никаких проблем;
IIIС водозащитой в 5 Бар (50 метров) часы способны выдержать давление воды обозначенной величины и, соответственно, могут быть использованы во время принятия душа и кратко-
временного купания;
IV Водозащита в 10 Бар (100 метров) означает, что часы могут быть использованы во время обычного плавания и ныряния под водой с трубкой;
VВодозащита в 20 Бар (200 метров) означает, что часы могут быть использованы при погружении с аквалангом (за исключением таких глубин, при которых требуется гелиево-кислородная смесь).
Уход за вашими часами
•Никогда не пытайтесь самостоятельно открывать корпус и снимать заднюю крышку.
•Замена резиновой прокладки, защищающей часы от попадания воды и пыли, должна осуществляться через каждые 2 — 3 года.
•Если во внутреннюю часть часов попадет влага, то немедленно проверьте их у ближайшего к вам дилера, либо у дистрибьютора фирмы «CASIO».
3
•Не подвергайте часы воздействию предельных температур.
•Хотя часы и предназначены для активного повседневного использования, тем не менее нужно носить их аккуратно и избегать падений.
•Не застегивайте ремешок слишком сильно. У вас должен проходить палец между вашим запястьем и ремешком.
•Для очистки часов и ремешка используйте сухую мягкую ткань, либо мягкую ткань, смоченную в водном растворе мягкого нейтрального моющего средства. Никогда не пользуйтесь легко испаряющимися средствами (например, такими, как бензин, растворители, распыляемые чистящие средства и т.п.).
•Когда вы не пользуетесь вашими часами, храните их в сухом месте.
•Избегайте попадания на часы бензина, чистящих растворителей, аэрозолей из распылителей, клеящих веществ, краски и т.п. Химические реакции, вызываемые этими материалами, приводят к разрушению прокладок, корпуса и полировки часов.
•Особенностью некоторых моделей часов является наличие на их ремешке изображений, выполненных шелкографией. Будьте осторожны при чистке таких ремешков, чтобы не ис-
портить эти рисунки.
4
Для часов с пластмассовыми ремешками…
•Вы можете обнаружить белесое порошкообразное вещество на ремешке. Это вещество не вредно для вашей кожи или одежды и может быть легко удалено путем простого протирания куском ткани.
•Попадание на пластмассовый ремешок пота или влаги, а также хранение его в условиях высокой влажности может привести к повреждению, разрыву или растрескиванию ремешка. Для того чтобы обеспечить длительный срок службы пластмассового ремешка, при первой возможности
протирайте его от грязи и воды с помощью мягкой ткани.
Для часов с флуоресцентными корпусами и ремешками…
•Длительное облучение прямым солнечным светом может привести к постепенному исчезновению флуоресцентной окраски.
•Длительный контакт с влагой может вызвать постепенное исчезновение флуоресцентной окраски. В случае попадания на поверхность часов любой влаги, как можно скорее сотрите ее.
•Длительный контакт с любой другой влажной поверхностью может привести к обесцвечиванию флуоресцентной окраски. Проверьте, удалена ли влага с флуоресцентной поверхности и из-
бегайте ее контакта с другими поверхностями. 5

•Сильное трение поверхности, имеющей нанесенную флуоресцентную краску, о другую поверхность может привести к переносу флуоресцентной краски на эту поверхность.
При использовании изделия в условиях резких перепадов температур допускается незначительное образование конденсата на внутренней стороне стекла. Данное явление обусловлено законами физики и не является дефектом.
Фирма «CASIO COMPUTER CO., LTD» не несет ответственности за какой бы то ни было ущерб, который может возникнуть при использовании этих часов, и не принимает никаких претензий со стороны третьих лиц.
6

Поздравляем вас с приобретением часов CASIO!
Датчики, встроенные в эти часы, позволяют провести измерения направления, атмосферного давления, температуры и высоты. Эти функции будут полезны для альпинистов, туристов, а также для людей, ведущих активный образ жизни.
Внимание!
•Измерительные функции, встроенные в данные часы, не предназначены для проведения измерений, требующих профессиональной или промышленной точности. Значения, получаемые с помощью часов, следует воспринимать как умеренно точные.
•Пользуйтесь специальными устройствами для получения точных данных во время восхождений или других активных видах деятельности, связанных с риском для жизни.
7
Важно!
•Значение высоты в режиме Альтиметра вычисляется на основе показаний атмосферного давления, полученного с помощью датчика барометра.
•Перед тем, как приступить к определению высоты, необходимо скорректировать показания альтиметра, указав точное значение высоты. Если эту корректировку не выполнить, полученные показания могут оказаться неточными. Более подробную информацию см. в разделе «Корректировка значения высоты».
•Перед тем, как пользоваться компасом, необходимо выполнить двунаправленную калибровку. Если вы ее не проведете, полученные показания могут оказаться неточными. Более подробную информацию о двунаправленной калибровке, см. в разделе «Выполнение двунаправленной калибровки».
8

ОБ ЭТОМ РУКОВОДСТВЕ
•В зависимости от моделей часов, изображение на дисплее может быть представлено или в виде темных знаков на светлом фоне или в виде светлых знаков на темном фоне. В этом руководстве все примеры экранов часов изображены в виде темных знаков на светлом фоне.
•Кнопки часов на иллюстрациях обозначены буквами (см. рис.). Эти же обозначения используются при описании функций часов.
•Будьте внимательны – иллюстрации данного руководства приведены в качестве примера и могут незначительно отличаться от внешнего вида часов.
9
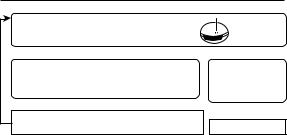
ПЕРЕД ТЕМ, КАК НАЧАТЬ ПОЛЬЗОВАТЬСЯ ЧАСАМИ
1. Проверьте уровень заряда аккумуляторной батарейки.
Индикатор уровня заряда аккумуляторной батарейки Н или М?
 НЕТ Верно одно из утверждений?
•Индикатор уровня заряда аккумуляторной батарейки L и мигает индикатор LOW.
•Мигает индикатор CHG.
•На экране часов нет информации (экран темный).
 ДА
ДА
Уровень заряда аккумуляторной батарейки низкий. Поместите часы в хорошо освещенное место для подзарядки. Более подробную информацию см. в разделе «Подзарядка часов».
 Индикатор уровня заряда батарейки
 ДА
ДА
Аккумуляторная батарейка заряжена достаточно. Более подробную информацию см. в разделе «Подзарядка часов».
 ДАЛЕЕ
ДАЛЕЕ
Перейдите к п. 2
10
2.Проверьте настройки кода города текущего местонахождения и летнего времени (DST). Более подробную информацию см. в разделе «Настройка кода города текущего местонахож-
дения и летнего времени».
Внимание!
Настройка кода города текущего местонахождения, даты и времени в режиме Текущего времени влияет на правильное отображение времени в режиме Мирового времени и на отображение информации в режиме Восхода/Заката. Позаботьтесь о том, чтобы эти параметры были настроены правильно.
3.Настройте текущее время.
См. раздел «Настройка текущего времени и даты».
После проведения вышеописанных настроек – часы готовы к эксплуатации.
Подзарядка часов
В этих часах источником питания служит светочувствительная панель и аккумуляторная батарейка, подзаряжаемая от солнечных элементов. При хранении или ношении часов в условиях, когда ис-
11

точник света не доступен, приведет к снижению уровня заряда батарейки. Старайтесь как можно чаще помещать часы в зону доступа источника света для их подзарядки.
•Когда вы не пользуетесь часами, оставляйте их в доступном для источника света месте.
•Подзарядка часов происходит быстрее, если часы поместить в месте с наилучшей освещенностью.
•Помните, что эффективность подзарядки снижается, когда любая часть солнечного элемента прикрыта одеждой.
•Старайтесь держать часы, не прикрывая их одеждой, как можно дольше. Время зарядки существенно увеличивается, если лицевая поверхность часов частично закрыта.
12
Внимание!
Если оставить часы для подзарядки батарейки на ярком свету, то они могут нагреться. Берите часы осторожнее, чтобы избежать ожога. В следующих ситуациях часы также могут сильно нагреться:
•На приборной панели автомобиля, припаркованного на солнце
•При близком расположении к лампе накаливания
•Под прямыми лучами солнца
Внимание!
•Длительный нагрев поверхности часов может привести к затемнению ЖК-экрана. Изображение на экране появится снова, когда поверхность часов будет охлаждена.
•Если в часах включена функция экономии энергии, и вы не пользуетесь часами длительное время, старайтесь хранить их в доступном для источника света месте. Это поможет вам сохранить заряд аккумуляторной батарейки.
13
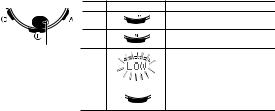
Уровень заряда аккумуляторной батарейки
Индикатор уровня заряда аккумуляторной батарейки отображается на экране. В таблице ниже приведена информация о работе функций часов в зависимости от уровня заряда батарейки.
Индикатор уровня заряда аккумуляторной батарейки
Уровень Индикатор уровня
1
(H)
2
(M)
3
(L)
|
LL |
|||
|
L |
L |
||
|
L |
L |
||
|
LL |
|||
|
L |
L |
||
Функции
Все функции работают
Все функции работают
Не работают следующие функции: прием сигнала радио-калибровки времени, подсветка, звуковые сигналы. Также не работают встроенные датчики
14

Уровень Индикатор уровня Функции
На экране часов отображается только
4
текущее время и мигающий индикатор
(CHG) 


 CHG (выполните подзарядку). Все функции часов не работают.
|
5 |
– – – |
Все функции не работают |
•Мигающий индикатор LOW уровня 3 (L) означает, что заряд аккумуляторной батарейки низкий, и часы необходимо, как можно скорее, положить на яркий свет для подзарядки.
•При уровне 5 заряда аккумуляторной батарейки не работают все функции часов, настройки возвращаются к значениям по умолчанию. После того, как после 5 уровня заряда аккумуляторной батарейки, она подзаряжается до уровня 2 (М), необходимо заново выполнить настройку текущего времени, даты и других функций.
•Индикаторы на экране отображаются снова, когда заряд аккумуляторной батарейки достигает уровня 2 (М).
15
•Воздействие прямых солнечных лучей или другого яркого источника света может привести
ктому, что индикатор уровня заряда аккумуляторной батарейки на некоторое время будет отображать более высокий уровень. Правильный уровень заряда отобразится на экране через несколько минут после того, как вы уберете часы от источника света.
•Если заряд аккумуляторной батарейки падает до 5 уровня, или вы производите замену аккумуляторной батарейки, все хранящиеся в памяти данные удаляются, настройки возвращаются
кзначениям по умолчанию.
Восстановление заряда аккумуляторной батарейки
•Частое проведение измерений, включение подсветки или звуковых сигналов в течение короткого промежутка времени может привести к тому, что начнут мигать все индикаторы уровня заряда аккумуляторной батарейки (H, M, L). Это означает, что часы находятся в режиме восстановления энергии. До тех пор, пока заряд аккумуляторной батарейки не будет восстановлен, подсветка, звуковые сигналы и работа датчиков будут недоступны.
•Для восстановления заряда аккумуляторной батарейки часам требуется около 15 минут. После того, как заряд аккумуляторной батарейки будет восстановлен, мигание индикаторов (H, M, L)
16
будет прекращено, нормальное функционирование часов будет возобновлено.
•Если мигают все индикаторы уровня заряда аккумуляторной батарейки (H, M, L) и индикатор CHG (выполните подзарядку), это означает, что уровень заряда аккумуляторной батарейки низкий. Необходимо поместить часы к источнику яркого света для подзарядки.
•Даже если заряд аккумуляторной батарейки находится на уровне 1 (Н) или 2 (М), функции цифрового компаса, барометра/термометра, альтиметра могут быть недоступны. Это означает, что не хватает мощности заряда для работы этих функций. При этом во время выполнения каких-либо действий в режимах Цифрового компаса, Барометра/Термометра, Альтиметра будут мигать все индикаторы уровня заряда аккумуляторной батарейки (H, M, L). Необходимо поместить часы к источнику яркого света для подзарядки.
•Если часы часто переходят в режим восстановления заряда аккумуляторной батарейки, когда мигают все индикаторы уровня заряда аккумуляторной батарейки (H, M, L), это означает, что уровень заряда аккумуляторной батарейки низкий. Необходимо поместить часы к источнику яркого света для подзарядки.
17

Время восстановления заряда аккумуляторной батарейки
|
Интенсивность (яркость) света |
Время |
Восстановление заряда** |
||||||||||
|
ежедневной |
Уро- |
Уро- |
Уро- |
Уро- |
Уро- |
|||||||
|
подзарядки* |
вень 5 |
вень 4 |
вень 3 |
вень 2 |
вень1 |
|||||||
|
Прямой солнечный свет (50 000 лк) |
5 мин. |
2 часа |
18 |
5 |
||||||||
|
часов |
часов |
|||||||||||
|
Солнечный свет через окно (10 000 лк) |
24 мин. |
7 часов |
88 |
24 |
||||||||
|
часов |
часа |
|||||||||||
|
Дневной свет через окно в пасмурный |
48 мин. |
14 часов |
179 |
48 |
||||||||
|
день (5 000 лк) |
часов |
часов |
||||||||||
|
Флуоресцентное освещение (500 лк) |
8 часов |
221 час |
— — — |
— — — |
* Время ежедневной подзарядки аккумуляторной батарейки для обеспечения нормальной работы часов.
18
** Время, необходимое для восстановления заряда аккумуляторной батарейки.
•Указанное выше время приведено для справки. Время заряда зависит от освещения.
•Для получения более подробной информации о времени работы аккумуляторной батарейки и ежедневных рабочих условиях, см. подраздел «Питание» в разделе Технические характеристики.
Режим экономии энергии
При включенной функции экономии энергии, часы автоматически входят в режим «сна», когда они остаются в неподвижном состоянии в течение длительного времени. В таблице ниже показано, какие функции часов доступны во время нахождения в режиме экономии энергии.
|
Время «про- |
Экран |
Функции |
|
стоя» часов |
||
|
60–70 минут |
Экран темный, мигает индикатор PS |
Все функции включены, но информация |
|
на экране не отображается |
||
|
6–7 дней |
Экран темный, индикатор PS не |
Все функции, за исключением внутренне- |
|
мигает |
го отсчета текущего времени, выключены |
19
•Часы не входят в режим экономии энергии с 6:00 утра до 9:59 вечера. Если часы в 6:00 утра уже находятся в режиме экономии энергии, они так и будут оставаться в этом режиме.
•Часы не переходят в режим экономии энергии, если они находятся в режимах Таймера обратного отсчета или Секундомера.
Вывод часов из режима экономии энергии
Для вывода часов из режима экономии энергии выполните одну из следующих операций.
•Поместите часы в хорошо освещенное место.
•Нажмите любую кнопку.
•Поверните часы под удобным для вас углом для считывания данных.
20
![]()
КРАТКОЕ ОПИСАНИЕ РЕЖИМОВ
В ваших часах 11 режимов. Выбор режима зависит от того, что вы хотите сделать.
|
Режим |
Основные функции |
См. стр. |
|
Текущего |
• Просмотр текущей даты |
28 |
|
времени |
• Настройка города текущего местонахождения, летнего времени (DST) |
|
|
• Настройка времени и даты вручную |
||
|
Цифрового |
Определение азимута, определение направления движения от текущего |
35 |
|
компаса |
местонахождения до пункта назначения |
|
|
Барометра/ |
• Отображение текущего атмосферного давления и температуры |
58 |
|
Термометра |
• Построение графика атмосферного давления |
|
|
Альтиметра |
• Определение текущей высоты |
71 |
|
• Определение разницы высот между двумя точками (заданной и |
||
|
текущим местонахождением) |
||
|
• Сохранение показаний высоты с указанием времени и даты измерения |
21
|
Режим |
Основные функции |
См. стр. |
|
Восхода/ |
Просмотр времени восхода и заката на указанную дату |
106 |
|
Заката |
||
|
Просмотра |
Просмотр данных, записанных в режиме альтиметра |
96 |
|
данных |
||
|
Секундомера |
Измерение прошедшего времени |
111 |
|
Обратного |
Использование таймера обратного отсчета |
113 |
|
отсчета |
||
|
времени |
||
|
Будильника |
Настройка времени будильника |
116 |
|
Мирового |
Просмотр текущего времени в одном из 48 предустановленных городов |
121 |
|
времени |
(31 часовом поясе) по всему миру |
22
Выбор режима
•На рисунке показано, какую кнопку необходимо нажать для выбора нужного режима.
•Для возврата в режим Текущего времени из любого другого режима нажмите и удерживайте кнопку D около 2 секунд.
•Для перехода в режим одного из датчиков из режима Текущего времени или из режима другого датчика, нажмите одну из кнопок А, В или С, как показано на рисунке. Для перехода к датчикам из режимов Восхода/Заката, Просмотра данных, Секундомера, Таймера обратного отсчета, Будильника и Мирового времени, необходимо сначала перейти в режим Текущего времени, затем нажать кнопку, соответствующую режиму нужного датчика.
23

Режим Текущего времени
|
Режим Секундомера |
Режим Просмотра |
Режим Восхода/ |
||
|
данных |
Заката |
|||
|
Режим Таймера |
Режим |
Режим Мирового |
|
обратного отсчета |
Будильника |
времени |
24

|
РежимыSENSORдатчиковMODES |
||
|
Режим |
Режим |
Режим |
|
Цифрового компаса |
Барометра/Термометра |
Альтиметра |
|
25 |
Общие функции (все режимы)
Функции и действия, описанные в этом разделе, доступны во всех режимах.
Возврат в режим Текущего времени
•Для возврата в режим Текущего времени из любого другого режима нажмите и удерживайте кнопку D около 2 секунд.
Автовозврат
•Если не выполняете какие-либо операции в течение некоторого времени, когда часы находятся в режимах, указанных в таблице, часы автоматически перейдут в режим Текущего времени.
|
Режим |
Время автовозврата |
|
Восхода/Заката, Просмотра данных, Будильника, Цифрового компаса |
3 минуты |
|
Альтиметра |
1–12 часов |
|
Барометра/Термометра |
1 час |
|
Настройки параметров (мигает индикатор выбранного параметра) |
3 минуты |
26
•Если в режимах настройки параметров на экране мигает индикатор выбранного параметра, и вы не выполняете какие-либо операции с часами в течение 2-3 минут, они автоматически вернутся к предыдущему экрану.
Начальные экраны
Когда вы переходите в один из режимов – Просмотра данных, Мирового времени, Будильника, Цифрового компаса, на экране отобразятся данные, которые вы просматривали перед тем, как выйти из режима.
Ускоренный просмотр параметров
С помощью кнопок А и С в разных режимах выполняется просмотр и выбор данных. Если удерживать нажатой одну из кнопок во время выбора параметра, это приведет к ускоренному просмотру параметров.
27
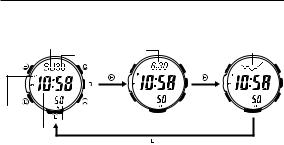
РЕЖИМ ТЕКУЩЕГО ВРЕМЕНИ
В режиме Текущего времени (TIME) вы можете выполнить настройку и увидеть текущее время и дату. Каждое нажатие на кнопку Е приведет к переключению информации на экране, как отображено на рисунке.
|
День недели/День |
Месяц/День |
График атмосферного |
|
|
День недели |
давления |
||
|
Месяц.День |
График атмосферного давления |
||
|
День |
|||
|
Индикатор |
|||
|
времени |
|||
|
после полудня |
Секунды |
||
|
Часы : Минуты |
28

Код города Индикатор времени после полудня
Часы : Минуты
Настройка кода города текущего местонахождения
Во время выбора кода города текущего местонахождения необходимо выполнить настройку 2 параметров: кода города текущего местонахождения и стандартного/летнего времени (DST).
1. В режиме Текущего времени нажмите и удерживайте кнопку Е около 2 секунд. Это действие приведет к
тому, что сначала на экране отобразится мигающий индикатор SET Hold и в верхней части экрана – ин-
дикатор CITY. После этого в верхней части экрана отобразится в виде бегущей строки индикатор кода города текущего местонахождения и его название. После этого вы можете отпустить кнопку Е.
• Часы автоматически выйдут из режима настройки, если вы не будете выполнять каких-либо действий 2–3 минуты.
• Более подробную информацию о кодах городов см. в разделе «Таблица кодов городов».
29

2.Нажмите кнопку А (восточнее) или С (западнее) для выбора кода города текущего местонахождения.
•Для ускоренного просмотра списка кодов городов, удерживайте одну из этих кнопок нажатой.
3.Нажмите кнопку D для перехода к режиму настройки летнего времени.
4.С помощью кнопки А включите (на экране отображается
индикатор ON) или выключите (на экране отображается индикатор OFF) переход на летнее время.
•Обратите внимание: для кода города UTC нельзя выполнить настройку летнего времени.
 Индикатор летнего времени DST
Секунды
5.Для выхода из режима настройки и возврата в режим Текущего времени нажмите кнопку Е 2 раза.
• Индикатор DST будет отображаться на экране, когда летнее время включено.
30
![]()
Примечание
•После выбора кода города в режиме Текущего времени, время для других кодов городов (часовых поясов) будет автоматически вычисляться на основе UTC*.
*UTC – всемирное координированное время – всемирный научный стандарт измерения времени. Точкой отсчета для UTC является Гринвич, Англия.
Настройка текущего времени и даты
В режиме Текущего времени выполните следующие действия для настройки текущего времени и даты.
1.В режиме Текущего времени нажмите и удерживайте кнопку Е около 2 секунд. Это действие приведет к тому, что сначала на экране отобразится мигающий индикатор SET Hold и в верхней части экрана – индикатор CITY. После этого в верхней части экрана отобразится в виде бегущей строки индикатор кода города текущего
31

местонахождения и его название. После этого вы можете отпустить кнопку Е.
2.С помощью кнопки D выберите параметр, настройку которого необходимо выполнить, в указанной ниже последовательности:
|
Код |
Летнее |
12/24-часовой формат |
Секунды |
Часы |
Минуты |
Год |
|||||||||||||||||||||||||
|
города |
время |
отображения времени |
|||||||||||||||||||||||||||||
|
Единица измерения |
Вкл/Выкл режи- |
Продолжи- |
Звуковой сиг- |
День |
Месяц |
||||||||||||||||||||||||||
|
температуры, атм. |
ма экономии |
тельность |
нал нажатия |
||||||||||||||||||||||||||||
|
давления, высоты |
энергии |
подсветки |
кнопок |
||||||||||||||||||||||||||||
|
На экране |
Настройка |
Как выполнить? |
|||||||||||||||||||||||||||||
|
Код города текущего местонахождения |
Нажмите кнопку А (восточ- |
||||||||||||||||||||||||||||||
|
нее) или С (западнее) |
|||||||||||||||||||||||||||||||
|
Летнее время – выключено (OFF), включено (ON) |
Нажмите кнопку А |
||||||||||||||||||||||||||||||
|
12-часовой формат отображения времени (12Н), |
Нажмите кнопку А |
||||||||||||||||||||||||||||||
|
24-часовой формат отображения времени (24Н) |
|||||||||||||||||||||||||||||||
32

|
На экране |
Настройка |
Как выполнить? |
Сброс секунд до 00 (если текущее значение секунд находится в интервале от 30 до 59, к значению Нажмите кнопку А минут добавится 1)
Часы или минуты
Нажмите кнопку А (+) или С (–)
Год, месяц или день
• Далее приведены только настройки параметров текущего времени.
3.Когда начинает мигать индикатор нужного параметра, с помощью кнопок А и/или С выполните его настройку в соответствии с тем, как показано в таблице.
4.Для выхода из режима настройки нажмите кнопку Е 2 раза.
Примечание
•Более подробную информацию о настройках кода города текущего местонахождения и летнего времени, см. в разделе «Настройка кода города текущего местонахождения».
33
•При 12-часовом формате отображения времени, индикатор P отображается на экране в промежуток времени от полудня до 11:59 вечера и не отображается в промежутке от полуночи до 11:59. При 24-часовом формате отображения времени, значение времени изменяется от 0:00 до 23:59, индикатор Р на экране не отображается.
•В часы встроен автоматический календарь, который также учитывает даты для високосного года. После того как вы установите дату, у вас не должно быть никаких причин для ее корректировки, за исключением случаев, когда вы меняете аккумуляторную батарейку или заряд аккумуляторной батарейки снижается до 5 уровня.
•День недели изменяется автоматически после настройки даты.
•Информацию о выполнении настроек других параметров в режиме Текущего времени, см. разделы:
«Включение и выключение звукового сигнала при нажатии на кнопки»; «Изменение продолжительности подсветки»; «Включение и выключение режима экономии энергии»;
«Настройка единицы измерения температуры, атмосферного давления и высоты».
34

РЕЖИМ ЦИФРОВОГО КОМПАСА
Встроенный в часы магнитный датчик, позволяет принимать показания цифровому компасу. Направление магнитного севера отображается с помощью индикатора . Также на экране после получения показаний отображаются значения угловой величины и направления.
•Для корректировки точности показаний, полученных с помощью цифрового компаса, выполните действия, описанные в разделе «Калибровка датчика азимута» и «Цифровой компас. Предостережения».
Определение показаний компаса
1.Убедитесь в том, что часы находятся в режиме Текущего времени или в режимах датчиков.
• Режимы датчиков: режим Цифрового компаса, режим Барометра/Термометра, режим Альтиметра.
2.Поместите часы на горизонтальную поверхность. Если часы одеты на руку, убедитесь в том, что циферблат расположен горизонтально.
3.Поверните часы 12-часовой отметкой в направлении, показания которого вы хотите получить.
35

4. Нажмите кнопку С для получения показаний.
•Это действие приведет к тому, что в верхней части экрана отобразится индикатор COMP, часы начнут определять направление.
•После того, как часы закончат считывать показания, на экране отобразятся индикаторы направлений – севера (3 сегмента), юга, востока и запада (1 сегмент), вверху экрана отобразится индикатор буквенного обозначения направления, в центре экране – значение угловой величины. Более подробную информацию о показаниях компаса, см. в разделе «Показания цифрового компаса».
Примечание
Если на экране не отображаются индикаторы направлений, буквенного обозначения направления и угловой величины, это означает, что часы находятся в режиме просмотра данных
36
|
12-часовая отметка |
||||
|
Направление |
Направление |
|||
|
Запад |
севера |
|||
|
Текущее |
||||
|
время |
||||
|
Юг |
Восток |
|||
|
Угловая величина (в градусах) |
||||
|
WNW |
NW |
NNW |
||
|
270 |
0 |
|||
|
W |
N |
|||
|
WSW |
NNE |
|||
|
SW |
NE |
|||
|
SSW |
ENE |
|||
|
S |
E |
|||
|
180 |
SSE |
SE |
ESE |
90 |
записной книжки цифрового компаса. Для выхода из записной книжки и удаления сохраненных в ней данных, нажмите кнопку Е. Более подробную информацию см. в разделе «Записная книжка цифрового компаса».
5.Для возврата в режим Текущего времени, нажмите кнопку D. Возврат в режим Текущего времени произойдет даже если выполняется операция приема показаний.
Показания цифрового компаса
•Нажмите кнопку С для запуска цифрового компаса. Это действие приведет к тому, что в верхней части экрана отобразится индикатор COMP, часы начнут определять направление.
•После того, как была получена первая информация о направлении, показания цифрового компаса будут приниматься автоматически каждую секунду в течение 60 секунд. После этого прием информации автоматически будет прекращен.
•Когда вместо значений направления и угловой величины на экране отобразятся индикаторы «– – –», это означает, что прием показаний цифрового компаса завершен.
•Во время приема показаний цифрового компаса автоподсветка не работает.
•В таблице указаны значения направлений, отображающихся на экране во время работы компаса.
37
|
Направ- |
Значе- |
Направ- |
Значение |
Направ- |
Значение |
Направ- |
Значение |
|
ление |
ние |
ление |
ление |
ление |
|||
|
N |
Север |
NNE |
Северо-Севе- |
NE |
Северо- |
ENE |
Востоко-Севе- |
|
ро-Восток |
Восток |
ро-Восток |
|||||
|
E |
Восток |
ESE |
Востоко-Юго- |
SE |
Юго-Вос- |
SSE |
Юго-Юго- |
|
Восток |
ток |
Восток |
|||||
|
S |
Юг |
SSW |
Юго-Юго- |
SW |
Юго-За- |
WSW |
Западо-Юго- |
|
Запад |
пад |
Запад |
|||||
|
W |
Запад |
WNW |
Западо-Севе- |
NW |
Северо- |
NNW |
Северо-Севе- |
|
ро-Запад |
Запад |
ро-Запад |
•Погрешность показаний направления и угловой величины ±11° относительно горизонта. Например, при получении значения направления NW (северо-запад) и угловой величины 315°, истинное значение может находиться в интервале от 304° до 326°.
•Обратите внимание, что если часы расположены не горизонтально, погрешность может быть больше.
38
•Если вы заметили, что показания цифрового компаса неверны, необходимо выполнить калибровку датчика азимута.
•Во время получения показаний цифровым компасом, не будут срабатывать следующие сигналы: ежедневный сигнал будильника, сигнал начала часа, сигнал таймера обратного отсчета. Также не будет включаться подсветка экрана часов (при нажатии на кнопку L). После окончания работы с цифровым компасом работа этих сигналов и функций будет возобновлена.
•Более подробную информацию о мерах предосторожности при использовании цифрового компаса, см. в разделе «Цифровой компас. Предостережения».
Калибровка датчика азимута
В этом разделе указано, как выполнить калибровку датчика азимута для корректировки точности показаний, полученных с помощью цифрового компаса. Калибровку датчика азимута необходимо выполнить, если вы заметили, что показания цифрового компаса неверны. Вы можете выполнить калибровку датчика азимута, используя один из способов: двунаправленная калибровка и коррекция угла магнитного склонения.
39
Двунаправленная калибровка
Двунаправленная калибровка – калибровка точности датчика азимута по отношению к магнитному северу. Двунаправленная калибровка используется при снятии показаний там, где действуют магнитные силы. Ее нужно применять, если часы по какой-то причине намагнитились и их показания отличаются от показаний, полученных другими компасами.
Важно!
Чем более точно выполнена двунаправленная калибровка, тем точнее показания датчика азимута. Ее необходимо выполнять при смене среды, где используется датчик азимута, и в тех случаях, когда показания датчика кажутся неправильными.
Коррекция угла магнитного склонения
При коррекции угла магнитного склонения нужно ввести угол магнитного склонения (разницу между магнитным и истинным севером), позволяющий часам указывать на географический или истинный север. Эту операцию можно выполнить, если на карте, которую вы используете, указан угол магнитного склонения. Обратите внимание: ввести угол склонения можно только в целых
40
градусах, т.е. указанное на карте значение угла необходимо округлить. Если на карте указан угол 7,4°, введите 7°, если 7,6° – введите 8°, если 7,5° – введите 7° или 8°.
Двунаправленная калибровка. Предостережения
•Для двунаправленной калибровки нужно использовать два противоположных направления. Но убедитесь в том, что их положение различается на 180°. Помните, что при неправильной калибровке, показания компаса также будут неправильными.
•Не передвигайте часы при калибровке любого направления.
•Двунаправленную калибровку необходимо проводить в той местности, где вы планируете использовать показания компаса. Например, если вы планируете использовать показания компаса в открытом поле, калибровку нужно проводить также в открытом поле.
Выполнение двунаправленной калибровки
1.В режиме Цифрового компаса нажмите и удерживайте кнопку Е около 2 секунд. Это действие приведет к тому, что на экране отобразится мигающий индикатор SET Hold, в верхней части экрана в виде бегущей строки – индикатор CALIBRATION. Это означает, что часы перешли в
41

режим выполнения двунаправленной калибровки. После этого вы можете отпустить кнопку Е.
•Вверху экрана на месте 12-часовой отметки отобразится
мигающий индикатор  , в центре экрана – индикатор -1-. Это означает, что вы можете приступить к калибровке первого направления.
2.Положите часы на плоскую поверхность и нажмите кнопку С для начала калибровки первого направления.
•На экране отобразится индикатор – – –, означающий, что выполняется калибровка. После окончания калибровки на экране отобразится индикатор Turn 180°, внизу экрана на месте 6-часовой
отметки – мигающий индикатор . Примерно через 1 секунду в верхней части экрана в виде бегущей строки отобразится индикатор CALIBRATION -2-, означающий, что вы можете приступить к калибровке второго направления.
42
•Если на экране отобразится индикатор ERR-1, это означает, что калибровка не была выполнена. Нажмите кнопку С для повторного проведения калибровки.
3.Поверните часы на 180°.
4.Нажмите кнопку С еще раз для калибровки во втором направлении.
•На экране отобразится индикатор – – –, означающий, что выполняется калибровка. После окончания калибровки на экране отобразится индикатор ОК, и часы вернутся в режим Цифрового компаса.
Коррекция угла магнитного склонения
1.В режиме Цифрового компаса нажмите и удерживайте кнопку Е около 2 секунд. Это действие приведет к тому, что на экране отобразится мигающий индикатор SET Hold, в верхней части экрана в виде бегущей строки – индикатор CALIBRATION. Это означает, что часы перешли в режим выполнения двунаправленной калибровки. После этого вы можете отпустить кнопку Е.
2.Нажмите кнопку D для перехода к режиму выполнения коррекции угла магнитного склонения.
• На экране отобразится индикатор DEC 0°, затем на экране отобразятся мигающие индикаторы текущего направления и значения угла магнитного склонения.
43

Направление угла магнитного склонения (E, W или 0˚)
Угловая величина магнитного склонения
3. С помощью кнопок А (восток) и С (запад) измените значение параметров.
• Настройки направления угла магнитного склонения:
OFF: Коррекция не выполняется. Угол магнитного склонения равен 0°.
E: Магнитный полюс расположен восточнее (восточное склонение) W: Магнитный полюс расположен западнее (западное склонение)
• При настройке параметров вы можете ввести значения в диапазоне от W 90° до E 90°.
• Для возврата к заводским настройкам угла магнитного склонения, одновременно нажмите кнопки А и С.
• На рисунке приведен пример ввода значений угла магнитного склонения, если на карте указано западное магнитное склонение 1° (1° West).
4. Для выхода из режима настройки, нажмите кнопку Е.
44

Записная книжка цифрового компаса
Записная книжка цифрового компаса предназначена для временного хранения и отображения полученной с помощью цифрового компаса информации о направлении и угловой величине. Вы можете использовать эту информацию для сравнения с последующими принятыми показаниями цифрового компаса. Индикатор отклонения и указатель отклонения от значения угловой величины, хранящейся в памяти записной книжки цифрового компаса, отображается на экране во время выполнения текущих измерений.
Если вы находитесь в режиме записной книжки цифрового компаса и одновременно опреде-
Отклонение от значения 12-часовая отметка
|
угловой величины, |
Направление |
|||||
|
сохраненной в памяти |
||||||
|
севера |
||||||
|
записной книжки |
||||||
Текущее значение
угловой величины
Указатель отклонения от значения угловой величины, сохраненной
в памяти записной книжки
45
 Loading…
 Loading…
You can download PDF manual for free on this page. This instruction is suitable for models: PRG-270-1ADR, PRG-270-2ER, PRG-270-4ADR, PRG-270-4ER, PRG-270-6ADR, PRG-270B-1, PRG-270B-2DR, PRG-270D-7DR
Watches module number: 3415
Casio ProTrek PRG-270 PDF Manual (English)
FAQ
How to change the current time and date settings in Casio ProTrek PRG-270
- In the timekeeping mode press Adjust button and hold it for at least two seconds. Once you enter the settings, SET will flash on the display and CITY will be displayed in the upper display. Press Comp or Alti buttons to change City Code (timezone)
- Press Mode button to go through different values
DST – Press Alti to toggle between Daylight Saving Time (ON) and Standard Time (OFF). *Daylight Saving Time is turned on when the DST indicator is on the display
12H – 24H – Press Alti to toggle between 12-hour (12H) and 24-hour (24H) timekeeping.
50 – Press Alti to reset the seconds
10:59 – Press Alti (+) or Compas (-) to change the hour or minutes
2022 6.30 – Press Alti (+) or Compas (-) to change the year, month, or day
Press Adjust button twice to exit the setting screen.
Casio ProTrek PRG-270 battery
Part Number: CTL1616
Brand: Panasonic
Battery: Cell Composition Lithium
Voltage: 2.3 Volts
Casio PRG-270 original watch strap specifications
Lug width strap: 16 mm
Band width: 21 -27 mm

If you want to wear Casio ProTrek PRG-270 with NATO strap, you need to use lug adapter from 16mm to 20-22mm
All ProTrek PRG-270 Watch series