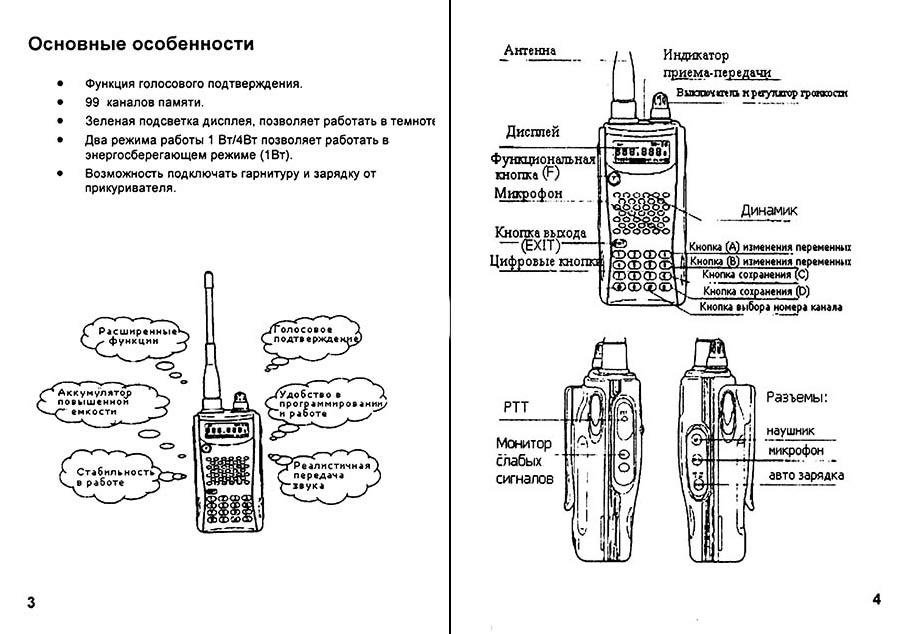
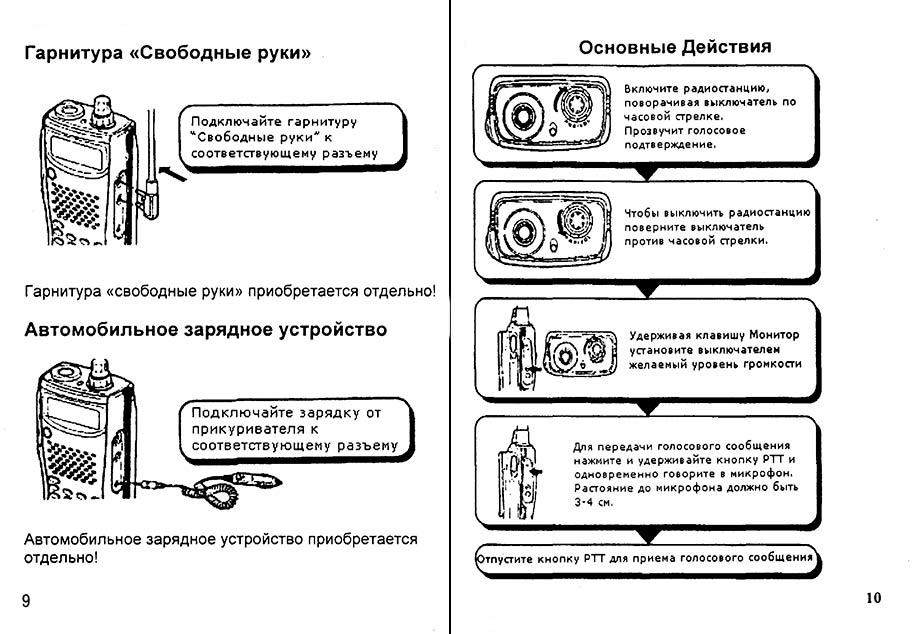
Инструкция рации TH-K4AT, русский качественный перевод


Основные действия

Настройка каналов рации th-k4at


Инструкция по эксплуатации рации Kenwood TH-K4AT, TH-K2AT, TK-F4AT, TK-F2AT
———————————————————————————————————————————————————

———————————————————————————————————————————————————
———————————————————————————————————————————————————

———————————————————————————————————————————————————
———————————————————————————————————————————————————
———————————————————————————————————————————————————

———————————————————————————————————————————————————
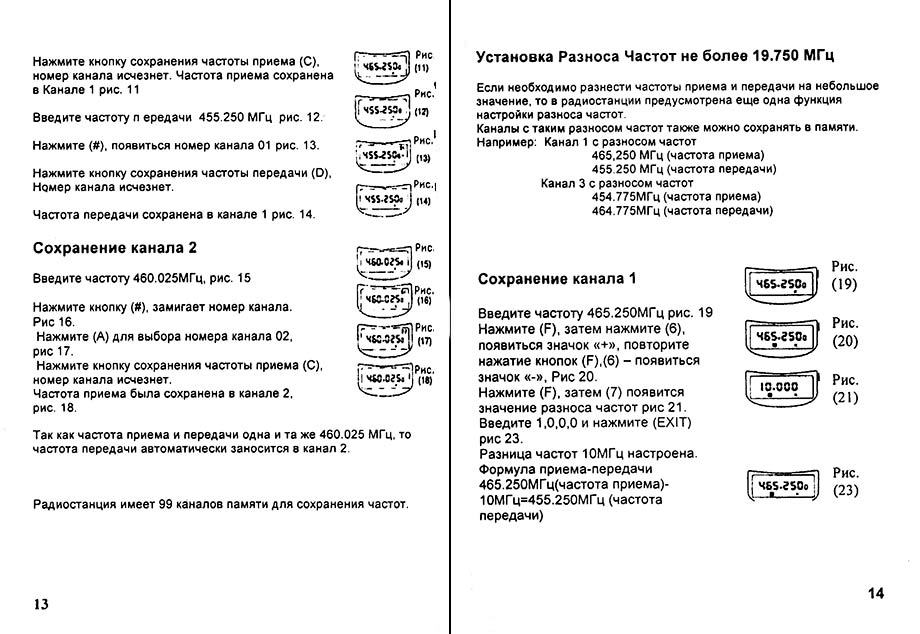
———————————————————————————————————————————————————
———————————————————————————————————————————————————
———————————————————————————————————————————————————
———————————————————————————————————————————————————

———————————————————————————————————————————————————
———————————————————————————————————————————————————

———————————————————————————————————————————————————
———————————————————————————————————————————————————
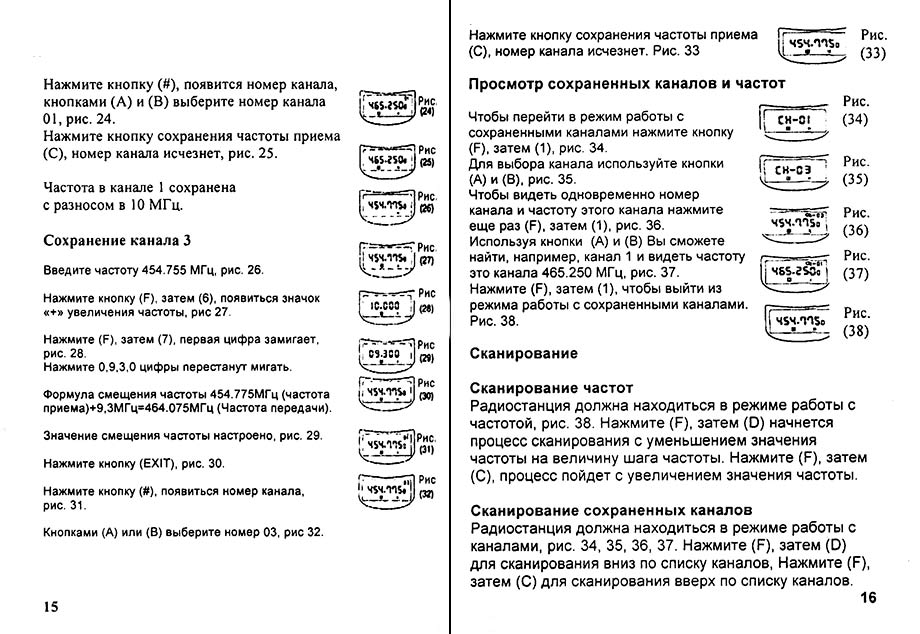
———————————————————————————————————————————————————
———————————————————————————————————————————————————
———————————————————————————————————————————————————
———————————————————————————————————————————————————
———————————————————————————————————————————————————
———————————————————————————————————————————————————
———————————————————————————————————————————————————
———————————————————————————————————————————————————
———————————————————————————————————————————————————
———————————————————————————————————————————————————
Новая модель рации KENWOOD TH-K4AT пришла взамен старой модели TK-K4AT. В новой модели добавлена функция VOX, расширены возможности CTCSS (QT, DQT), аккумулятор стал 1300мАч вместо 1100, в комплект добавилась гарнитура.
Подробные отличия KENWOOD TH-K4AT от TK-K4AT ![]()
KENWOOD TH-K4AT — Технические характеристики |
|
| Диапазон частот | 400-470 МГц Включает весь LPD диапазон 433-434МГц! |
| Мощность | Два режима: 1 или более 5 Ват |
| Чувствительность приемника | Менее 0.2µV |
| VOX | Включение рации на передачу голосом с гарнитуры. |
| СTCSS коды | Дают возможность совмещения с любой LPD радиостанцией. |
| Шаг сетки частот | 5, 10, 12.5, 25 кГц |
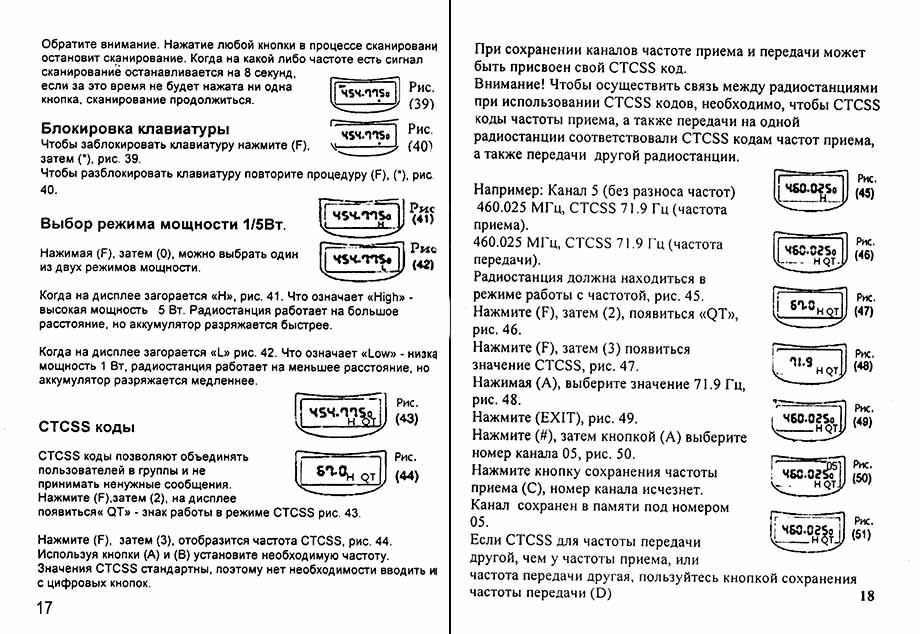
| Подсветка |
LCD дисплея и клавиатуры. |
| Другие функции | Режим сохранения энергии. Блокировка клавиатуры. Голосовое подтверждение при нажатии кнопок. |
| Напр. питания |
7,2 В постоянного тока |
| Диапазон температур |
-10°С ~ +55°С |
| Размеры и вес |
80•50•28 мм (В•Ш•Г). Вес 300г. |
| Комплект поставки радиостанции KENWOOD TH-K4AT: | ||
| 1 | Радиостанция Kenwood TH-K4AT | 1шт. |
| 2 | Блок аккумуляторных батарей Ni-MH 1300мАч. | 1шт. |
| 3 | Зарядный стакан | 1шт. |
| 4 | Антенна | 1шт. |
| 5 | Зажим для крепления на пояс | 1шт. |
| 6 | Руководство пользователя | 1шт. |
- Купленные у нас рации TH-K4AT качественные, поставляются в заводских картонных коробках.
К некачественным рациям в блистерах (прозрачный пластик) мы отношения не имеем. Все многочисленные рекламации к нашей продукции не относятся. - При заказе более двух комплектов — бесплатная доставка по Москве в день заказа.
Русская инструкция KENWOOD TH-K4AT

![]() Русская инструкция KENWOOD TK-K4AT
Русская инструкция KENWOOD TK-K4AT ![]()
-
Руководства по ремонту
2
-
Инструкции по эксплуатации
2
Языки:

Kenwood TH-K4AT инструкция по эксплуатации
(154 страницы)
- Языки:Английский, Русский
-
Тип:
PDF -
Размер:
1.2 MB -
Описание:
Рация
Просмотр

Kenwood TH-K4AT инструкция по эксплуатации
(154 страницы)
- Языки:Английский
-
Тип:
PDF -
Размер:
1.23 MB
Просмотр
На NoDevice можно скачать инструкцию по эксплуатации для Kenwood TH-K4AT. Руководство пользователя необходимо для ознакомления с правилами установки и эксплуатации Kenwood TH-K4AT. Инструкции по использованию помогут правильно настроить Kenwood TH-K4AT, исправить ошибки и выявить неполадки.
Основные действия
Настройка каналов рации th-k4at
Инструкция по эксплуатации рации Kenwood TH-K4AT, TH-K2AT, TK-F4AT, TK-F2AT
———————————————————————————————————————————————————
———————————————————————————————————————————————————
———————————————————————————————————————————————————
———————————————————————————————————————————————————
———————————————————————————————————————————————————
———————————————————————————————————————————————————
———————————————————————————————————————————————————
———————————————————————————————————————————————————
———————————————————————————————————————————————————
———————————————————————————————————————————————————
———————————————————————————————————————————————————
———————————————————————————————————————————————————
———————————————————————————————————————————————————
INSTRUCTION MANUAL
144MHz FM TRANSCEIVER
TH-K2AT
TH-K2E
TH-K2ET
430MHz FM TRANSCEIVER
TH-K4AT
TH-K4E
© B62-1696-00 (K, K2, E, E3, M, M2)
09 08 07 06 05 04 03 02 01 00
-
Руководства по ремонту
2
-
Инструкции по эксплуатации
2
Языки:
Kenwood TH-K4AT инструкция по эксплуатации
(154 страницы)
- Языки:Английский, Русский
-
Тип:
PDF -
Размер:
1.2 MB -
Описание:
Рация
Просмотр
Kenwood TH-K4AT инструкция по эксплуатации
(154 страницы)
- Языки:Английский
-
Тип:
PDF -
Размер:
1.23 MB
Просмотр
На NoDevice можно скачать инструкцию по эксплуатации для Kenwood TH-K4AT. Руководство пользователя необходимо для ознакомления с правилами установки и эксплуатации Kenwood TH-K4AT. Инструкции по использованию помогут правильно настроить Kenwood TH-K4AT, исправить ошибки и выявить неполадки.
(скачивание инструкции бесплатно)
Формат файла: PDF
Доступность: Бесплатно как и все руководства на сайте. Без регистрации и SMS.
Дополнительно: Чтение инструкции онлайн

———————————————————————————————————————————————————
———————————————————————————————————————————————————
———————————————————————————————————————————————————
———————————————————————————————————————————————————
———————————————————————————————————————————————————
———————————————————————————————————————————————————
———————————————————————————————————————————————————
———————————————————————————————————————————————————
———————————————————————————————————————————————————
———————————————————————————————————————————————————
———————————————————————————————————————————————————
———————————————————————————————————————————————————
INSTRUCTION MANUAL
144MHz FM TRANSCEIVER
TH-K2AT
TH-K2E
TH-K2ET
430MHz FM TRANSCEIVER
TH-K4AT
TH-K4E
© B62-1696-00 (K, K2, E, E3, M, M2)
09 08 07 06 05 04 03 02 01 00
-
Руководства по ремонту
2
-
Инструкции по эксплуатации
2
Языки:
Kenwood TH-K4AT инструкция по эксплуатации
(154 страницы)
- Языки:Английский, Русский
-
Тип:
PDF -
Размер:
1.2 MB -
Описание:
Рация
Просмотр
Kenwood TH-K4AT инструкция по эксплуатации
(154 страницы)
- Языки:Английский
-
Тип:
PDF -
Размер:
1.23 MB
Просмотр
На NoDevice можно скачать инструкцию по эксплуатации для Kenwood TH-K4AT. Руководство пользователя необходимо для ознакомления с правилами установки и эксплуатации Kenwood TH-K4AT. Инструкции по использованию помогут правильно настроить Kenwood TH-K4AT, исправить ошибки и выявить неполадки.
(скачивание инструкции бесплатно)
Формат файла: PDF
Доступность: Бесплатно как и все руководства на сайте. Без регистрации и SMS.
Дополнительно: Чтение инструкции онлайн
INSTRUCTION MANUAL
144MHz FM TRANSCEIVER
TH-K2AT
TH-K2E
TH-K2ET
430MHz FM TRANSCEIVER
TH-K4AT
TH-K4E
© B62-1696-00 (K, K2, E, E3, M, M2)
09 08 07 06 05 04 03 02 01 00
Страница:
(1 из 154)
навигация

1

2

3

4

5

6

7

8

9

10

11

12

13

14

15

16

17

18

19

20

21

22

23

24

25

26

27

28

29

30

31

32

33

34

35

36

37

38

39

40

41

42

43

44

45

46

47

48

49

50

51

52

53

54

55

56

57

58

59

60

61

62

63

64

65

66

67

68

69

70

71

72

73

74

75

76

77

78

79

80

81

82

83

84

85

86

87

88

89

90

91

92

93

94

95

96

97

98

99

100

101

102

103

104

105

106

107

108

109

110

111

112

113

114

115

116

117

118

119

120

121

122

123

124

125

126

127

128

129

130

131

132

133

134

135

136

137

138

139

140

141

142

143

144

145

146

147

148

149

150

151

152

153

154
Оглавление инструкции
- Страница 1 из 155
INSTRUCTION MANUAL 144MHz FM TRANSCEIVER TH-K2AT TH-K2E TH-K2ET 430MHz FM TRANSCEIVER TH-K4AT TH-K4E © B62-1696-00 (K, K2, E, E3, M, M2) 09 08 07 06 05 04 03 02 01 00 - Страница 2 из 155
NOTICE TO THE USER One or more of the following statements may be applicable for this equipment. FCC WARNING This equipment generates or uses radio frequency energy. Changes or modifications to this equipment may cause harmful interference unless the modifications are expressly approved in the - Страница 3 из 155
MODELS COVERED BY THIS MANUAL The models listed below are covered by this manual. TH-K2AT, TH-K2E, TH-K2ET TH-K4AT, TH-K4E MARKET CODES Kn: The Americas En: Europe Mn: General (Where n represents a variation number.) The market code is printed on the bar-code label of the carton box. Refer to the - Страница 4 из 155
PRECAUTIONS Please observe the following precautions to prevent fire, personal injury, or transceiver damage: • • • • • • • Do not transmit with high output power for extended periods. The transceiver may overheat. Do not modify this transceiver unless instructed by this manual or by KENWOOD - Страница 5 из 155
CONTENTS NOTICE TO THE USER MODELS COVERED BY THIS MANUAL MARKET CODES PRECAUTIONS CONTENTS …………………………………………………………. i THANK YOU ………………………………………………………….. vi FEATURES - Страница 6 из 155
MENU SETUP ……………………………………………………. 24 WHAT IS A MENU? ……………………………………………… 24 MENU ACCESS ………………………………………………….. 24 MENU FUNCTION LIST …………………………………………… 26 - Страница 7 из 155
Enabling a Weather Alert ………………………………. 56 CHANNEL DISPLAY ………………………………………………. 57 SCAN …………………………………………………………….. 59 NORMAL SCAN ………………………………………………….. 60 - Страница 8 из 155
OPERATOR CONVENIENCES …………………………………….. 82 APO (AUTO POWER OFF) ………………………………………. 82 BATTERY LIFE …………………………………………………… 83 REMAINING BATTERY CAPACITY ……………………………………. 83 BATTERY - Страница 9 из 155
MICROPROCESSOR RESET ………………………………………. Initial Settings ………………………………………… Full Reset …………………………………………….. VFO Reset …………………………………………….. Performing Reset - Страница 10 из 155
THANK YOU Thank you for choosing this KENWOOD TH-K2AT/ E/ ET, TH-K4AT/ E transceiver. It has been developed by a team of engineers determined to continue the tradition of excellence and innovation in KENWOOD transceivers. Don’t let the size fool you! This small FM portable transceiver features a - Страница 11 из 155
SUPPLIED ACCESSORIES After carefully unpacking the transceiver, identify the items listed in the table below. We recommend you keep the box and packings for the shipping. Quantity Accessory Part Number Belt hook (w/ screws) Antenna Strap Battery case Ni-MH battery Charger Instruction Manual - Страница 12 из 155
Quantity Accessory Part Number Belt hook (w/ screws) Antenna Strap Battery case Ni-MH battery Charger Instruction Manual Warranty card viii E S G C I F D TH-K2E TH-K2ET E E3 J29-0709-XX 1 1 T90-1018-XX J69-0342-XX A02-3817-XX W09-0991-XX W08-0959-XX W08-0960-XX B62-1696-XX B62-1697-XX B62-1699-XX - Страница 13 из 155
Quantity Accessory Part Number Belt hook (w/ screws) Antenna Strap Battery case Ni-MH battery Charger Instruction Manual Warranty card E S G C I F D TH-K4AT TH-K4E M2 E3 J29-0709-XX 1 1 T90-1019-XX J69-0342-XX A02-3817-XX W09-0991-XX W08-0959-XX W08-0960-XX B62-1696-XX B62-1697-XX B62-1699-XX - Страница 14 из 155
WRITING CONVENTIONS FOLLOWED The writing conventions described below have been followed to simplify instructions and avoid unnecessary repetition. Instruction Press [KEY]. What to Do Press and release KEY. Press Press KEY1 momentarily, release [KEY1], [KEY2]. KEY1, then press KEY2. Press [KEY] (1 - Страница 15 из 155
PREPARATION INSTALLING THE PB-43N Ni-MH BATTERY PACK Note: Because the battery pack is provided uncharged, you must charge the battery pack before using it with the transceiver. To charge the battery pack, refer to “CHARGING THE PB-43N Ni-MH BATTERY PACK (Other than TH-K2AT K2/ M2, TH-K4AT M2)” - Страница 16 из 155
4 To remove the battery pack, lift the safety catch, then press the release latch to unlock the battery pack. Lift the battery pack away from the transceiver. INSTALLING ALKALINE BATTERIES 1 To open the BT-14 battery case lid, insert your thumb or finger into the hole on the top of the battery - Страница 17 из 155
2 Insert (or remove) six AA (LR6) Alkaline batteries. • Be sure to match the battery polarities with those marked in the bottom of the battery case. 3 Align the two tabs at the bottom of battery case, then close the cover until the locking tabs on top click. 4 To install the battery case onto (or - Страница 18 из 155
INSTALLING THE ANTENNA Hold the supplied antenna by its base, then screw it into the connector on the top panel of the transceiver until secure. ATTACHING THE HAND STRAP (OTHER THAN TH-K2AT K/ K2) If desired, you can attach the supplied hand strap to the transceiver. Strap 4 - Страница 19 из 155
INSTALLING THE BELT CLIP If desired, you can install the supplied belt clip to the transceiver. 1 Loosely insert the two supplied screws into the holes on the back panel of the transceiver. 2 Slide the belt hook into position, under the screws. 3 Tighten the screws until secure. Note: When the belt - Страница 20 из 155
CHARGING THE PB-43N Ni-MH BATTERY PACK (OTHER THAN TH-K2AT K2/ M2, TH-K4AT M2) The Ni-MH battery pack can be charged after it has been installed onto the transceiver. (The battery pack is provided uncharged for safety purposes.) 1 Confirm that the transceiver power is OFF. • While charging the - Страница 21 из 155
Note: ◆ Never leave the battery pack in direct sunlight. ◆ The transceiver becomes warm while charging the battery pack. ◆ While the battery pack is charged, the ambient temperature must be within 0°C ~ 40°C (32°F ~ 104°F). Otherwise, charging does not start. If the transceiver senses that the - Страница 22 из 155
CONNECTING TO A CIGARETTE LIGHTER SOCKET To connect the transceiver to the cigarette lighter socket in your vehicle, use an optional PG-3J Cigarette Lighter cable. When the PG-3J is connected to the cigarette lighter plug, the transceiver automatically starts charging the PB-43N Ni-MH battery pack. - Страница 23 из 155
CONNECTING TO A REGULATED POWER SUPPLY To connect the transceiver to an appropriate regulated DC power supply, use an optional PG-2W DC cable. 1 Confirm that the power of both the transceiver and the DC power supply is OFF. 2 Connect the optional PG-2W DC cable to the DC power supply; the red lead - Страница 24 из 155
YOUR FIRST QSO FIRST QSO Are you ready to give your transceiver a quick try? Reading this chapter should get your voice on the air right away. The instructions below are intended only for a quick guide. If you encounter problems or there is something you would like to know more, read the detailed - Страница 25 из 155
• • A high pitched double beep sounds and a Power-ON message appears momentarily. The various indicators and the current operating frequency appear on the LCD. The transceiver stores the current parameters when it is turned OFF and automatically recalls these parameters the next time you turn the - Страница 26 из 155
GETTING ACQUAINTED KEYS AND CONTROLS Tuning control VOL control Antenna connector LED (TX:Red RX:Green) PTT switch Display (LCD) SP/MIC jack Power Switch LAMP key DC IN jack MONI/SQL key Keypad MENU key TH-K2AT/ ET/ K4AT 12 - Страница 27 из 155
Tuning control VOL control Antenna connector LED (TX:Red RX:Green) PTT switch Display (LCD) SP/MIC jack Power Switch LAMP key DC IN jack MONI/SQL key Keypad MENU key TH-K2E/ K4E 13 - Страница 28 из 155
DISPLAY q !8 !7 w e r !6 t y u i o !0 !1 !5 !4 !3 !2 q Appears when the CTCSS function is activated {page 69}. w Appears when the Tone function is activated {page 34}. e Appears when the DCS function is activated {page 73}. r Appears when the repeater shift function is activated {pages 31 ~ 34, - Страница 29 из 155
u Appears when a Priority Scan function is activated {page 65}. i Displays the frequencies, Menu settings, Memory name and other information. o Appears when the Weather Alert function is activated {page 55}. !0 Appears when narrow FM Mode is selected {page 91}. !1 Displays the Menu No., memory - Страница 30 из 155
!7 Appears when the function key is pressed. !8 appears when high power transmission is selected, appears when medium power is selected, and appears when low power is selected {page 95}. 16 - Страница 31 из 155
BASIC OPERATION Switching the Power ON/OFF 1 Press [ ] (POWER) briefly to switch the transceiver power ON. • A high pitched double beep sounds and a Power-ON message {page 92} appears briefly, followed by the frequency and other indicators. 2 To switch the transceiver OFF, press [ again. • • ] - Страница 32 из 155
Adjusting the Squelch The purpose of Squelch is to mute the speaker when no signals are present. With the squelch level correctly set, you will hear sound only while actually receiving signals. The higher the selected squelch level, the stronger the signals must be to receive. The appropriate - Страница 33 из 155
Transmitting 1 To transmit, hold the transceiver approximately 5 cm (2 inches) from your mouth, then press and hold [PTT] and speak into the microphone in your normal tone of voice. • • The LED lights red and the bar-graph meter appears. If you press [PTT] while you are outside of the transmission - Страница 34 из 155
Selecting a Frequency ■ VFO Mode This is the basic mode for changing the operating frequency. Turn the Tuning control clockwise to increase the frequency and counterclockwise to decrease the frequency. ■ MHz Mode If the desired operating frequency is far away from the current frequency, it is - Страница 35 из 155
■ Direct Frequency Entry (TH-K2AT/ ET/ K4AT only) In addition to turning the Tuning control, there is another way to select the frequency. When the desired frequency is far away from the current frequency, you can directly enter a frequency using the numeric keypad. 1 Press [VFO]. • You must be in - Страница 36 из 155
Example 2 To enter 145.000 MHz: Key in Display [#] ––– ––– [1], [4], [5] 1 4 5. – – – [#] 1 4 5. 0 0 0 Example 3 (Short cut) To enter 145.000 MHz: Key in Display 1 4 4. 6 2 5 [#] ––– ––– [5] 5 – –. – – – [ ] 1 4 5. – – – [#] 1 4 5. 0 0 0 Example 4 To change 144.650 MHz to 145.650 MHz: Key in - Страница 37 из 155
Example 5 (Short cut) To change 144.650 MHz to 145.650 MHz: Key in Display 1 4 4. 6 5 0 [#] ––– ––– [5] 5–– ––– [ ] 1 4 5. – – – [VFO] 1 4 5. 6 5 0 Example 6 To change 145.200 MHz to 145.750 MHz: Key in Display 1 4 5. 2 0 0 [#] ––– ––– 1 4 5. – – – [ ] [7], [5], [0] 1 4 5. 7 5 0 Note: ◆ ◆ ◆ If the - Страница 38 из 155
MENU SETUP WHAT IS A MENU? Many functions on this transceiver are selected or configured via a software-controlled Menu rather than through the physical controls of the transceiver. Once you become familiar with the Menu system, you will appreciate its versatility. You can customize the various - Страница 39 из 155
3 Press [MENU] to configure the parameter of the currently selected Menu No. 4 Turn the Tuning control to select your desired parameter. 5 Press [MENU] to store the new setting. Otherwise, press any key other than [LAMP], [MONI/SQL] or [ ] (POWER) to cancel. Note: ◆ The [LAMP] and [MONI/SQL] keys - Страница 40 из 155
MENU FUNCTION LIST On the Menu Display No. Function Selections Default Ref. Page 5/ 6.25/ 10/ Frequency step 5/ 12.5/ 12.5/ 15/ 20/ 25/ 86 size 25 30/ 50/ 100 kHz 34, Tone/ CTCSS/ OFF/ TONE/ OFF 69, 73 DCS selection CTCSS/ DCS STP1 1 T.CT.DCS 2 T 3 Tone frequency 67.0 ~ 254.1 Hz 88.5 35 CT 4 CTCSS - Страница 41 из 155
On the Menu Display No. M.NAME Function Selections Default Ref. Page – 48 MN 49 1.0 84 30 82 14 Memory name 6 characters MDF 15 Memory name/ Frequency display MN/ FRQ SAV 16 Battery saver APO 17 Automatic Power-OFF OFF/ 0.2/ 0.4/ 0.6/ 0.8/ 1.0/ 2.0/ 3.0/ 4.0/ 5.0 OFF/ 30/ 60/ 90/ 120/ 180 min. CK1 - Страница 42 из 155
On the Menu Display No. Function Selections ON/ OFF Default Ref. Page OFF 107 – 77 FA 80 PC 31 PC control DTMF.MR 32 Automatic dialer Up to 16 digits SPD 33 DTMF TX speed FA/ SL DT.H3 34 DTMF TX hold ON/ OFF OFF 77 500 80 PA 35 DTMF pause period 100/ 250/ 500/ 750/ 1000/ 1500/ 2000 ms DT.L 36 DTMF - Страница 43 из 155
ALPHABETICAL FUNCTION LIST On the Menu Display No. APO ARO 17 2 Selections OFF/ 30/ 60/ 90/ 120/ 180 min. Default Ref. Page 30 82 9 ON/ OFF ON 37 BCL 24 ON/ OFF OFF 86 BP 27 ON/ OFF ON 85 BS 28 ON/ OFF OFF 85 CALL/ 1750 36, 64 CK 1 18 CALL/ 1750 CT 4 67.0 ~ 254.1 Hz 88.5 70 DCS 5 023 ~ 754 023 74 - Страница 44 из 155
On the Menu Display No. Selections PRI 10 ON/ OFF P.VFO 7 136 ~ 174 MHz (TH-K2AT) 144 ~ 146 MHz (TH-K2E/ ET) 400 ~ 470 MHz (TH-K4AT) 430 ~ 440 MHz (TH-K4E) RESET 99 VFO/ FULL SAV 16 OFF/ 0.2/ 0.4/ 0.6/ 0.8/ 1.0/ 2.0/ 3.0/ 4.0/ 5.0 Default Ref. Page OFF 66 93 VFO 111 1.0 84 SCAN 11 TO/ CO/ SE SF T 1 - Страница 45 из 155
OPERATING THROUGH REPEATERS Repeaters, which are often installed and maintained by radio clubs, are usually located on mountain tops or other elevated locations. They generally operate at higher ERP (Effective Radiated Power) than a typical station. This combination of elevation and high ERP allows - Страница 46 из 155
OFFSET PROGRAMMING FLOW q Select a receive frequency. w Select an offset direction. e Select an offset frequency (only when programming odd-split repeater frequencies). r Activate the Tone function (if necessary). t Select a tone frequency (if necessary). If you store all the above data in a memory - Страница 47 из 155
1 Press [MENU]. 2 Turn the Tuning control to select Menu No. 6 (SFT). 3 Press [MENU]. 4 Turn the Tuning control to select “+” or “–”. • To program a –7.6 MHz offset (TH-K4E only), select “–7.6” instead. 5 Press [MENU] to store the setting or [PTT] to cancel. • “+” or “–” (or “ ”) appears above the - Страница 48 из 155
1 Press [MENU]. 2 Turn the Tuning control to select Menu No. 8 (OFFSET). 3 Press [MENU]. 4 Turn the Tuning control to select the appropriate offset frequency. • The selectable range is from 0.000 MHz to 69.950 MHz in steps of 50 kHz. 5 Press [MENU] to store the setting or [PTT] to cancel. 6 Press - Страница 49 из 155
3 Press [MENU]. 4 Turn the Tuning control to select “TONE”. 5 Press [MENU] to store the setting or [PTT] to cancel. 6 Press any key other than [LAMP], [MONI/SQL], and [MENU] to exit Menu Mode. • “T” appears when the Tone function is ON. Note: You cannot use the Tone and CTCSS/ DCS functions at the - Страница 50 из 155
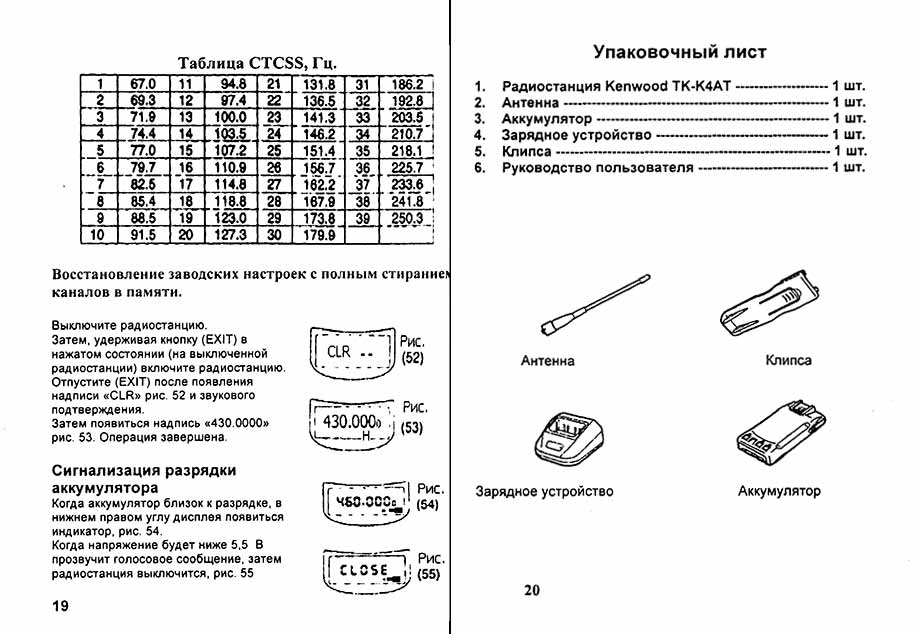
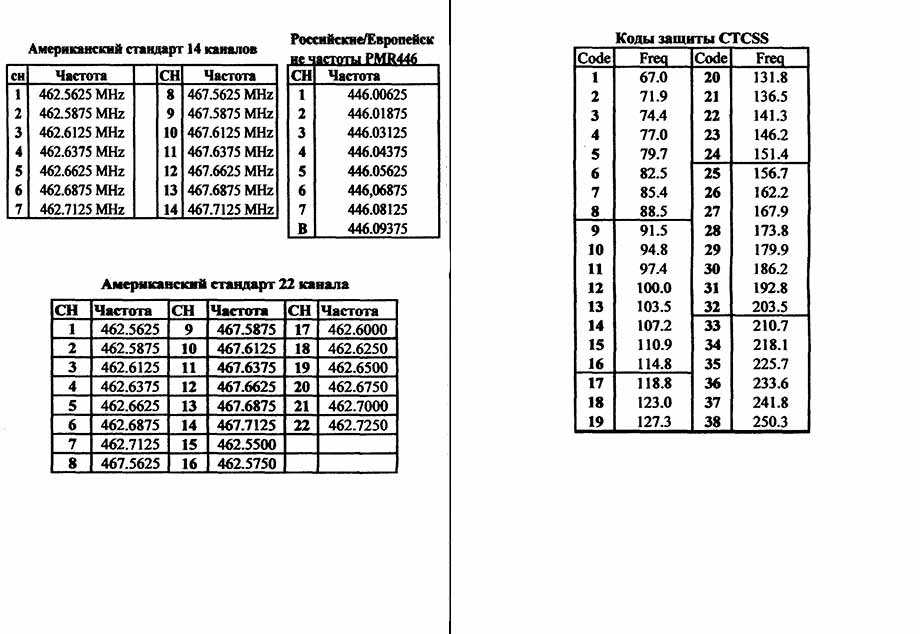
Available Tone Frequencies Tone Frequency (Hz) 67.0 82.5 100.0 123.0 151.4 186.2 225.7 69.3 85.4 103.5 127.3 156.7 192.8 229.1 71.9 88.5 107.2 131.8 162.2 203.5 233.6 74.4 91.5 110.9 136.5 167.9 206.5 241.8 77.0 94.8 114.8 141.3 173.8 210.7 250.3 79.7 97.4 118.8 146.2 179.9 218.1 254.1 Note: 42 - Страница 51 из 155
AUTOMATIC REPEATER OFFSET (TH-K2AT/ E/ ET ONLY) This function automatically selects an offset direction, according to the frequency on the 2 m band. The transceiver is programmed for offset direction as shown below. To obtain an up-to-date band plan for repeater offset direction, contact your - Страница 52 из 155
REVERSE FUNCTION The Reverse function exchanges a separate reception and transmission frequency. So, while using a repeater, you can manually check the strength of a signal that you receive directly from the other station. If the station’s signal is strong, both stations should move to a simplex - Страница 53 из 155
Press [F], [MENU] (1 s) to switch the function ON (or OFF). • • “ ” appears when the function is ON. While direct contact is possible, “ ” blinks. Note: ◆ ◆ ◆ ◆ ◆ ◆ ◆ Pressing [PTT] switch causes the “ ” icon to quit blinking. ASC can be activated while operating in Simplex mode. However, it does - Страница 54 из 155
3 Press [MENU] (1 s). • • • • • When the transceiver receives a signal, scan starts. The decimal point blinks during scan. While the transceiver is receiving a signal during Tone Freq. ID Scan, the signal is emitted from the speaker. To reverse the scan direction, turn the Tuning control. To quit - Страница 55 из 155
MEMORY CHANNELS In memory channels, you can store frequencies and related data that you frequently use so that you do not need to reprogram that data every time. You can quickly recall a programmed channel through simple operation. A total of 100 memory channels (50 when using the Memory Name - Страница 56 из 155
Note: ◆ If you change the memory channel capacity from 100 channels to 50 channels after having stored data in channels 50 to 99, all memory channel data in channels 50 to 99 will be erased. ◆ If you change the memory channel capacity from 50 channels to 100 channels after storing Memory names in - Страница 57 из 155
The data listed below can be stored in each memory channel: Parameter Reception frequency Transmission frequency Simplex & Repeater Yes Odd-Split Yes Yes Tone frequency Yes Yes Tone ON Yes Yes CTCSS frequency Yes Yes CTCSS ON Yes Yes DCS code Yes Yes DCS ON Yes Yes Offset direction Yes N/A Offset - Страница 58 из 155
Storing Simplex Frequencies or Standard Repeater Frequencies 1 Press [VFO]. 2 Turn the Tuning control to select your desired frequency. • You can also directly enter a desired frequency using the keypad (TH-K2AT/ ET/ K4AT only) {page 21}. 3 If storing a standard repeater frequency, select the - Страница 59 из 155
Storing Odd-Split Repeater Frequencies Some repeaters use a pair of reception and transmission frequencies with a non-standard offset. If you store two separate frequencies in a memory channel, you can operate on those repeaters without programming the offset frequency and direction. 1 Store the - Страница 60 из 155
Recalling a Memory Channel ■ Using the Tuning Control 1 Press [MR] to enter Memory Recall Mode. • The memory channel last used is recalled. 2 Turn the Tuning control to select your desired memory channel. • • You cannot recall an empty memory channel. To restore VFO Mode, press [VFO]. ■ Using a - Страница 61 из 155
Note: ◆ ◆ ◆ ◆ You cannot recall an empty memory channel. An error beep sounds. You cannot recall the Program Scan memory channels (L0/U0 ~ L2/U2), Priority Channel (Pr) and Weather Alert (AL) (TH-K2AT K/ K2 only) using the numeric keypad. When you recall an odd-split memory channel, “+” and “–” - Страница 62 из 155
Note: Call Channel data cannot be cleared. You can also clear the Priority Channel, L0/U0 ~ L2/U2 and Weather Alert data. While the trasceiver is in Channel Display Mode or Lock function is activated, you cannot clear the channel data. To clear all memory channels contents at once, perform Full - Страница 63 из 155
• • You can enter the following alphanumeric characters: 0 ~ 9, A ~ Z, – (hyphen), / (slash), and a space. Press [MONI/SQL] to delete the character at the current cursor position. 6 Press [MENU]. • The cursor moves to the next digit. 7 Repeat steps 5 and 6 to enter up to 6 digits. • • • To complete - Страница 64 из 155
MEMORY CHANNEL TRANSFER Memory VFO Transfer After retrieving frequencies and associated data from Memory Recall Mode, you can copy the data to the VFO. This function is useful, for example, when the frequency you want to monitor is near the frequency stored in a memory channel. 1 Press [MR], then - Страница 65 из 155
3 Select the memory channel where you would like the data copied, using the Tuning control. 4 Press [MR]. The tables below illustrate how data is transferred between memory channels. Channel 0 ~ 99 a Channel 0 ~ 99 Reception frequency a Reception frequency Transmission frequency a Transmission - Страница 66 из 155
1 2 Channel 0 ~ 99 a L0/U0 ~ L2/U2, Pr, AL1 Reception frequency a Reception frequency Transmission frequency a Transmission frequency Tone frequency a Tone frequency Offset direction a Offset direction CTCSS frequency a CTCSS frequency DCS code Tone/ CTCSS/ DCS ON/ OFF status Offset frequency a a - Страница 67 из 155
CALL CHANNEL The Call Channel can be recalled instantly no matter what frequency the transceiver is operating on. For instance, you may use the Call Channel as an emergency channel within your group. In this case, Call Scan {page 64} will be useful. The default Call Channel frequencies are 144.000 - Страница 68 из 155
Reprogramming the Call Channel 1 Select your desired frequency and related data (Tone, CTCSS, DCS, or offset direction, etc.). • When you program the Call Channel as an odd-split channel, select a reception frequency first. 2 Press [F], [CALL]. • The selected frequency and related data are stored - Страница 69 из 155
WEATHER ALERT (TH-K2AT K/ K2 ONLY) One of the NOAA Weather Radio channels can be programmed to the AL memory channel of the TH-K2AT. The transceiver can be configured to check the NOAA Weather Alert tone (1050 Hz) and will automatically alert you by recalling and monitoring the Weather Radio - Страница 70 из 155
Note: When you perform Full Reset {page 111}, the Weather Radio frequency recovers the factory default frequency (162.550 MHz). When you clear the Weather Radio channel {page 47}, the factory default frequency (162.550 MHz) will not be recovered. You can also transfer the AL memory channel data to - Страница 71 из 155
If you want to monitor another frequency while monitoring the Weather Radio in the background: 1 Perform step 1 ~ 4 above. 2 Press [VFO] or [MR] and turn the Tuning control to select another frequency or memory channel. • “WX” remains on the LCD. 3 When the Weather Alert tone is broadcasted, the - Страница 72 из 155
While in Channel Display Mode, only the following keys can be operated. [KEY] PTT MR 1 LAMP CALL MONI/SQL Tuning control F #1 MENU F TH-K2AT/ ET/ K4AT only [F] then PTT 1 LAMP1 MONI/SQL The light stays ON until [F], [LAMP] is pressed again {page 88}. [KEY] (1 s) F MR CALL While transmitting: LAMP 1 - Страница 73 из 155
SCAN Scan is a useful function for hands-off monitoring of your favorite frequencies. By becoming comfortable with all types of scan, you will increase your operating efficiency. This transceiver provides the following types of scans. Scan Type Band Scan Normal Scan Program Scan Purpose Scans the - Страница 74 из 155
Note: ◆ ◆ ◆ ◆ ◆ ◆ When the CTCSS or DCS function is activated, the transceiver stops at a busy frequency and decodes the CTCSS tone or DCS code. If the tone or code matches, the transceiver unmutes. Otherwise, it resumes scanning. Press and hold [MONI/SQL] to pause scan in order to monitor the - Страница 75 из 155
3 Press [VFO] (1 s) to start Band Scan. 4 To stop Band Scan, press [VFO] or [PTT]. Note: ◆ ◆ ◆ ◆ While scanning, you can change the scan frequency direction by turning the Tuning control. The transceiver scans the frequency range that is stored in Menu No. 7 (P.VFO) {page 93}. If you select a - Страница 76 из 155
4 Press [MR] to store the start frequency in the memory channel. 5 Turn the Tuning control to select your desired end frequency. 6 Press [F], [MR] then turn the Tuning control to select a channel from U0 ~ U2, corresponding to the channel selected in step 4. • For example, if you selected L0 in - Страница 77 из 155
◆ To perform Program Scan, the “L” channel must be lower than the “U” channel. Otherwise, Band Scan starts {page 60}. MEMORY SCAN Memory Scan monitors memory channels in which you have stored frequencies. All-Channel Scan The transceiver scans all of the memory channels in which you have stored - Страница 78 из 155
CALL SCAN You can alternate between monitoring the Call Channel and the current operating frequency. 1 Select the frequency (in VFO or Memory Recall Mode) you want to monitor. • In VFO Mode, turn the Tuning control to select the desired frequency. In Memory Recall Mode, turn the Tuning control to - Страница 79 из 155
PRIORITY SCAN You may sometimes want to check your favorite frequency activities while monitoring other frequencies. In this case, use the Priority Scan function. Priority Scan checks the activities of the Priority Channel every 3 seconds. If the transceiver detects a signal on the Priority - Страница 80 из 155
Using Priority Scan 1 Press [MENU] and turn the Tuning control to select Menu No. 10 (PRI). 2 Press [MENU] and turn the Tuning control to select “ON”. 3 Press [MENU] to store the setting. • “PRI” appears. 4 Press any key other than [PTT], [LAMP], and [MONI/SQL] to exit Menu Mode. • The transceiver - Страница 81 из 155
MEMORY CHANNEL LOCKOUT You can lock out memory channels that you prefer not to monitor during All-Channel Memory Scan {page 63}. 1 Press [MR] to enter Memory Recall Mode. 2 Turn the Tuning control to select the memory channel to be locked out. 3 Press [MENU]. 4 Turn the Tuning control and select - Страница 82 из 155
SCAN RESUME METHOD The transceiver stops scanning at the frequency (or memory channel) where a signal is detected. It then continues or stops scanning according to which Resume Mode you have selected. • • • Time-Operated Mode (default) The transceiver remains on a busy frequency (or memory channel) - Страница 83 из 155
SELECTIVE CALL CTCSS AND DCS You may sometimes want to hear calls from only specific persons or groups. In this case, use the Selective Call. This transceiver is equipped with CTCSS (Continuous Tone Coded Squelch System) and DCS (Digital Coded Squelch). These Selective Calls allow you to ignore - Страница 84 из 155
• As you turn the Tuning control, the selection cycles as follows: “OFF” ➞ “TONE” ➞ “CTCSS” ➞ “DCS” ➞ “OFF”. 3 Press [MENU]. • “CT” appears on the upper part of display, indicating that the CTCSS function is activated. 4 Press any key other than [MENU], [MONI/SQL], and [LAMP] to exit Menu Mode. - Страница 85 из 155
3 Press [MENU] to store the new setting or [PTT] to cancel. Note: To use the selected CTCSS tone, you must turn the CTCSS function ON {page 69}. Available CTCSS Tone Frequencies Tone Frequency (Hz) 67.0 82.5 100.0 123.0 151.4 186.2 225.7 69.3 85.4 103.5 127.3 156.7 192.8 229.1 71.9 88.5 107.2 131.8 - Страница 86 из 155
CTCSS Freq. ID Scan This function scans through all CTCSS frequencies to identify the incoming CTCSS frequency on the received signal. You may find this useful when you cannot recall the CTCSS frequency that the other persons in your group are using. 1 Press [MENU] and turn the Tuning control to - Страница 87 из 155
DCS DCS is similar to CTCSS. However, instead of using an analog audio tone, it uses a continuous sub-audible digital waveform that represents a 3-digit octal number. You can select a DCS code from among the 104 DCS codes listed in the table on the next page. Using DCS 1 Press [MENU] and turn the - Страница 88 из 155
Selecting a DCS Code 1 While in DCS Mode, press [MENU] and turn the Tuning control to select Menu No. 5 (DCS). • The current DCS code appears. 2 Press [MENU] and turn the Tuning control to select your desired DCS code. • The available DCS codes are shown in the following table. 023 025 026 031 032 - Страница 89 из 155
DCS Code ID Scan This function scans through all DCS codes to identify the incoming DCS code on the received signal. You may find this useful when you cannot recall the DCS code that the other persons in your group are using. 1 Press [MENU] and turn the Tuning control to select Menu No. 5 (DCS). 2 - Страница 90 из 155
DTMF FUNCTIONS This transceiver provides you with 10 dedicated DTMF memory channels. You can store a DTMF number (16 digits max.) in each of these channel to recall later for speed dialing. Many repeaters in the U.S.A. and Canada offer a service called Autopatch. You can access the public telephone - Страница 91 из 155
• When DTMF TX Hold is activated {page 77}, you do not need to continuously press [PTT] to remain in Transmission Mode. However, Transmission Mode is retained for only 2 seconds after pressing a key, so if the next key is not pressed within this time limit, the transceiver stops transmitting. DTMF - Страница 92 из 155
5 Press [MENU]. • The DTMF code entry display appears and the last digit blinks. 6 Turn the Tuning control to select a DTMF code. • • • Press [MONI/SQL] to delete the character at the current cursor position. On the transceiver display, DTMF code “ ” is represented by “E” and “#” is represented by - Страница 93 из 155
Transmitting a Stored DTMF Number 1 While pressing and holding [PTT], press [MENU]. 2 Release [MENU] (continue pressing [PTT]), then turn the Tuning control to select the desired DTMF memory channel number. 3 While still holding [PTT], press [MENU] again to transmit the selected DTMF tones. • • The - Страница 94 из 155
Adjusting the DTMF Tone Transmission Speed This transceiver allows you to configure the DTMF number transmission speed between Fast (default) and Slow. If a repeater cannot respond to the fast speed, adjust this parameter. 1 Press [MENU] to enter Menu Mode. 2 Turn the Tuning control to select Menu - Страница 95 из 155
DTMF KEY LOCK Assuming you have a transceiver with the optional speaker microphone installed and you are carrying it in the holder or bag, you sometimes may want to disable the keypad to avoid accidental DTMF transmission. In this case, turn the DTMF Key Lock function ON. 1 Press [MENU] to enter - Страница 96 из 155
OPERATOR CONVENIENCES APO (AUTO POWER OFF) The transceiver switches OFF automatically if no keys or controls are pressed or adjusted for 30 minutes (default). One minute before the transceiver switches OFF, warning beeps sound for a few seconds and “APO” blinks. You can select the APO time from OFF - Страница 97 из 155
BATTERY LIFE Before you operate the transceiver outside using a battery pack, it is important to know how long the battery pack will last. The operating times listed in the table below are measured under the following cyclic conditions: TX: 6 seconds, RX: 6 seconds, Stand-by: 48 seconds We - Страница 98 из 155
No display : : : : High battery power Medium battery power Low battery power Recharge or replace the batteries. 3 Release [PTT] to exit. Note: You may not be able to transmit at high power (“ ” position) if the battery remaining indicator shows low battery power. BATTERY SAVER The Battery Saver - Страница 99 из 155
◆ ◆ While the transceiver is communicating in PC Mode {page107}, the Battery Saver does not function. Battery Saver does not function while scanning. BEAT SHIFT Since the transceiver uses a microprocessor to control various functions of the transceiver, the CPU clock oscillator’s harmonics or image - Страница 100 из 155
5 Press [MENU] to store the setting or [PTT] to cancel. The transceiver generates the following warning beeps even if the beep function is turned OFF. • • • • APO warning beeps {page 82} DC voltage error beep {page 115} Weather Alert beep {page 55} Time-Out Timer warning beep {page 94} Note: The - Страница 101 из 155
5 kHz, 6.25 kHz, 10 kHz, 12.5 kHz, 15 kHz, 20 kHz, 25 kHz, 30 kHz, 50 kHz, 100 kHz. To change the frequency step size: 1 Press [MENU] and turn the Tuning control to select Menu No. 1 (STP). • The current frequency step size appears. 2 Press [MENU] and turn the Tuning control to select your desired - Страница 102 из 155
LAMP To illuminate the display and keys: Press [LAMP]. • • • If no other key is pressed, the light turns OFF approximately 5 seconds after releasing [LAMP]. Press any key (including [PTT]) other than [LAMP] while the display and keys are lit to restart the 5-second timer. Press [LAMP] while the - Страница 103 из 155
Note: ◆ ◆ ◆ The Tuning control is also locked. To unlock the Tuning control while the Lock function is ON, access Menu No. 30 (ENC) {below} and select “ON”. You cannot perform the Microprocessor Reset {page 111} while the Lock function is ON. Microphone PF keys {below} operate normally even if the - Страница 104 из 155
Note: Turn the transceiver OFF before connecting the optional speaker microphone. While Menu No. 31 (PC) is ”ON“ {page 107} or the Lock function is ON {page 88}, you cannot program PF keys. If the LOCK switch on the rear of the microphone is ON, you must move the switch to the OFF position to - Страница 105 из 155
MONITOR When you are receiving while the squelch function is ON, weak signals may become intermittent. If the CTCSS or DCS function is ON, you may want to disable the squelch function temporarily to monitor the current channel activities. In both of these cases, use the Monitor function to - Страница 106 из 155
When narrow band FM operation is ON, “N” appears in the top right of the LCD. Note: You can store the narrow band FM operation status to the memory channels {page 41}. POWER-ON MESSAGE You can change the Power-ON Message (a maximum of 6 characters) when the transceiver is turned ON. 1 Press [MENU]. - Страница 107 из 155
• • Press [MONI/SQL] to delete the character at the current cursor position. If no Power-ON Message is programmed, “TH-K2” or “TH-K4” appears as the Power-ON Message. 7 To complete the entry, press [MENU] without selecting a character. Otherwise press [PTT] to cancel the entry. PROGRAMMABLE VFO If - Страница 108 из 155
• The upper limit frequency blinks. 7 Turn the Tuning control to select the upper limit frequency in MHz. 8 Press [MENU] to store the upper limit frequency or [PTT] to cancel. Note: ◆ ◆ You cannot program the 100 kHz or lower digits. The upper limit frequency cannot be set lower than the selected - Страница 109 из 155
Note: A warning beep sounds even if you select Menu No. 27 (BP) OFF {page 85}. TX INHIBIT You can inhibit the transmission to prevent unauthorized individuals from transmitting, or to eliminate accidental transmissions while carrying the transceiver. 1 2 3 4 5 Press [MENU]. Turn the Tuning control - Страница 110 из 155
Battery Type BT-14 (9.0 V) PB-43N (7.2 V) DC IN (13.8 V) Output Power Selection H M L H M L H M L Output Power (Approx.) 3.5 W 1.2 W 0.3 W 5.0 W 1.5 W 0.5 W 5.0 W 1.5 W 0.5 W Note: If the DC IN voltage exceeds 14.5 V DC and “ ” (High Power) is selected, the “ ” icon blinks and the output power is - Страница 111 из 155
1 Press [MENU] then turn the Tuning control to select Menu No. 20 (VOX). 2 Press [MENU] and turn the Tuning control to select the desired VOX gain level from 1 (least sensitive) to 9 (most sensitive). • To turn OFF the VOX function, select “OFF” in step 2. Note: ◆ ◆ ◆ ◆ While in Menu Mode {page - Страница 112 из 155
• If the transmission does not begin, you must readjust the VOX Gain so that transeiver transmits while you are speaking. To readjust the gain, press and hold [PTT] then turn the Tuning control to select a more sensitive gain level. • While readjusting the gain, you can release [PTT]. The - Страница 113 из 155
VOX Delay Time If the transceiver returns to Reception Mode too quickly after you stop speaking, the end of your transmission may not be sent. To avoid this, select an appropriate delay time that allows your entire transmission to be sent, before Transmission Mode ends. However, do not make the - Страница 114 из 155
VOX on Busy You can configure the transceiver to force VOX transmission even if the transceiver is receiving a signal. 1 Press [MENU]. 2 Turn the Tuning control to select Menu No. 21 (VXB). 3 Press [MENU]. 4 Turn the Tuning control to select “ON”. • To suppress the VOX transmission when the - Страница 115 из 155
OPTIONAL ACCESSORIES BC-21 Battery Charger BT-14 Battery Case (6 AA/ LR6) EMC-3 Clip Microphone with Earphone HMC-3 Headset (with VOX/ PTT) KHS-21 Headset KSC-24 Rapid Charger 101 - Страница 116 из 155
MCP-1A Memory Channel Control Software PB-43N Ni-MH Battery Pack (7.2 V/ 1100 mAh) Refer to pages 105 and 107. PG-2W DC Power Cable PG-3J Cigarette Lighter Power Cable PG-4Y PC Interface Cable SMC-32 Speaker Microphone 102 - Страница 117 из 155
SMC-33 Speaker Microphone (with PF keys) SMC-34 Speaker Microphone (with PF keys and VOL control) 103 - Страница 118 из 155
INTERFACING TO PERIPHERALS SP/MIC JACK The SP/MIC jack on the transceiver can be configured to interface to various kind of peripherals available for the transceiver, such as a speaker microphone (SMC-32/ 33/ 34) and PC interface cable (PG-4Y). Access Menu No. 31 (PC) and select “ON” or “OFF”. - Страница 119 из 155
Note 1: Voltage is developed across a 100Ω resistor on the 5 V line in the transceiver. When 2 mA flows, approximately 4.8 V is developed. Note 2: A 10 µF capacitor is not required in the following cases: • When other equipment has DC blocking capacitors. • When a 2-terminal electret condenser - Страница 120 из 155
■ Using the PG-4Y PC Interface Cable Use the PG-4Y PC interface cable to connect between the transceiver and PC. Plug the Speaker/ Microphone connector to the SP/MIC jack and DB-9 connector to one of the COM (serial) ports on your PC. PC 106 - Страница 121 из 155
■ Using the MCP-1A Software When the transceiver is connected to a PC in order to use the MCP-1A (Memory Channel Control Program) software, you must configure the SP/MIC jack function prior to using the software. 1 Press [MENU]. 2 Turn the Tuning control to select Menu No. 31 (PC). 3 Press [MENU]. - Страница 122 из 155
TROUBLESHOOTING GENERAL INFORMATION Your transceiver has been factory aligned and tested to specification before shipment. Under normal circumstances, the transceiver will operate in accordance with these operating instructions. All adjustable trimmers, coils and resistors in the transceiver were - Страница 123 из 155
center. A copy of the service report will be returned with the transceiver. Please do not send subassemblies or printed circuit boards; send the complete transceiver. Tag all returned items with your name and call sign for identification. Please mention the model and serial number of the - Страница 124 из 155
Cleaning The keys, controls, and case of the transceiver are likely to become soiled after extended use. Remove the controls from the transceiver and clean them with a neutral detergent and warm water. Use a neutral detergent (no strong chemicals) and a damp cloth to clean the case. BACKUP BATTERY - Страница 125 из 155
MICROPROCESSOR RESET If your transceiver seems to be malfunctioning, resetting the microprocessor may solve the problem. The following 2 reset Modes are available. When performing the reset, you may lose memory data and stored information. Back up or write down important data before performing the - Страница 126 из 155
Performing Reset There are 2 ways to enter the Reset Mode selection. However, the transceiver’s Lock function must be turned OFF {page 88}. When the transceiver is turned OFF: ■ Full reset 1 Press [F]+[ • ] (POWER). All indicators are lit. 2 Release [F]. • The full reset confirmation message, - Страница 127 из 155
■ VFO reset 1 Press [VFO]+[ ] (POWER). 2 Release [VFO]. • The VFO reset confirmation message, “VF.RST?”, appears. 3 Press [VFO] to proceed. • • “SURE ?” appears. Press any key other than [VFO], [LAMP] and [MONI/SQL] to exit the Reset Mode. 4 Press [VFO] to reset the transceiver. 113 - Страница 128 из 155
Reset using the Menu 1 Press [MENU]. 2 Turn the Tuning control to select Menu No. 99 (RESET). 3 Press [MENU]. 4 Turn the Tuning control to select the Reset Mode, “FULL” or “VFO”. 5 Press [MENU] to select the Reset Mode. • “SURE ?” appears. • Press any key other than [MENU], [LAMP] and [MONI/SQL] to - Страница 129 из 155
OPERATION NOTICES The transceiver has been designed and engineered to avoid possible hardware glitches. However, you may notice the following symptoms when you operate the transceiver. These symptoms are not malfunctions. Operating Voltage As stated in “SPECIFICATIONS” {page 122}, this transceiver - Страница 130 из 155
Transmission If you continuously transmit for more than 8 minutes at high power (5 W), the transceiver becomes warm. If you continue or repeat the transmission before the transceiver cools down, the thermal protector gradually decreases the output power down to 1.5 W. “ ” also blinks at the same - Страница 131 из 155
TROUBLESHOOTING The problems described in the following tables are commonly encountered operational malfunctions. These types of difficulties are usually caused by improper hook-up, accidental incorrect control settings, or operator error due to incomplete programming. These problems are usually - Страница 132 из 155
Problem Solution Ref. Page 87 You cannot select the exact • The current frequency step desired frequency using the size does not allow the Tuning control. frequency to be selected. Select an appropriate frequency step size in Menu No. 1 (STP). • Programmable VFO frequency 93 range is too narrow. - Страница 133 из 155
Problem You cannot transmit by pressing [PTT]. Repeater cannot be accessed. DTMF tone cannot be transmitted. Ref. Page Solution 20 • You selected a frequency outside the allowable range. Select a frequency within the allowable transmit frequency range. 33 • You selected a transmit offset that - Страница 134 из 155
Problem Repeater does not accept your DTMF tones. Solution • DTMF tone transmission duration is too short. Access Menu No. 33 (SPD) and select “SL” (SLOW). Transceiver transmits • VOX function is ON. Access without pressing [PTT]. Menu No. 20 (VOX) and select “OFF”. The transceiver switches • The - Страница 135 из 155
INTERNAL BEATS FREQUENCY LIST TH-K2AT/ E/ ET 140.800 MHz, 153.600 MHz, 166.400 MHz, 168.350 MHz TH-K4AT/ E 453.250 MHz 121 - Страница 136 из 155
SPECIFICATIONS General TH-K2AT Market code K, K2 M, M2 Number of memory channels 100 (50) + 9 special function memories 100 (50) + 8 special function memories Antenna impedance (Connector type) 50Ω (SMA) DC IN jack DC 12.0 ~ 16.0 V (13.8 V nominal) Operating Voltage Battery terminal DC 6.0 ~ 9.0 V - Страница 137 из 155
General Market code Current TH-K2AT K, K2 M, M2 Receive (no signal) 100 mA or less Battery Saver ON (Average) 30 mA or less Usable temperature range –20°C ~ 60°C (–4°F ~ 140°F) –10°C ~ 60°C (+14°F ~ 140°F) with PB-43N Frequency stability Within ±5ppm (–20°C ~ 60°C) Dimensions (W x H x D including - Страница 138 из 155
Transmitter TH-K2AT Market code K, K2 Transmission Mode F3E (FM)/ F2D (FM) Frequency range 144 ~ 148 MHz Output Power M, M2 136 ~ 174 MHz DC IN jack (13.8 V) H: 5.0 W (approx.) M: 1.5 W (approx.) L: 0.5 W (approx.) PB-43N (7.2 V) H: 5.0 W (approx.) M: 1.5 W (approx.) L: 0.5 W (approx.) BT-14 (9.0 - Страница 139 из 155
Receiver TH-K2AT Market code K, K2 Reception Mode F3E (FM)/ F2D (FM) Frequency range 136 ~ 174 MHz Intermediate Frequency (IF) 1st IF: 38.85 MHz 2nd IF: 450 kHz Circuit type Double super-heterodyne Sensitivity FM (12 dB SINAD) 2 m amateur radio band: 0.18 µV or less Squelch sensitivity 0.13 µV or - Страница 140 из 155
General TH-K2E TH-K2ET Market code E E3 Number of memory channels 100 (50) + 8 special function memories Antenna impedance (Connector type) 50Ω (SMA) DC 12.0 ~ 16.0 V (13.8 V nominal) DC IN jack Operating Voltage Battery terminal DC 6.0 ~ 9.0 V (7.2 V nominal) Grounding method Negative ground - Страница 141 из 155
General Market code Current TH-K2E E Receive (no signal) Battery Saver ON (Average) TH-K2ET E3 100 mA or less 30 mA or less Usable temperature range –20°C ~ 60°C (–4°F ~ 140°F) –10°C ~ 60°C (+14°F ~ 140°F) with PB-43N Frequency stability Within ±5ppm (–20°C ~ 60°C) Dimensions (W x H x D including - Страница 142 из 155
Transmitter TH-K2E TH-K2ET Market code E Transmission Mode F3E (FM)/ F2D (FM) Frequency range 144 ~ 146 MHz Output Power E3 DC IN jack (13.8 V) H: 5.0 W (approx.) M: 1.5 W (approx.) L: 0.5 W (approx.) PB-43N (7.2 V) H: 5.0 W (approx.) M: 1.5 W (approx.) L: 0.5 W (approx.) BT-14 (9.0 V) H: 3.5 W - Страница 143 из 155
Receiver TH-K2E TH-K2ET Market code E Reception Mode F3E (FM)/ F2D (FM) Frequency range 144 ~ 146 MHz Intermediate Frequency (IF) 1st IF: 38.85 MHz 2nd IF: 450 kHz Circuit type Double super-heterodyne Sensitivity FM (12 dB SINAD) 2 m amateur radio band: 0.18 µV or less Squelch sensitivity 0.13 µV - Страница 144 из 155
General TH-K4AT TH-K4E Market code M2 Number of memory channels 100 (50) + 8 special function memories Antenna impedance (Connector type) 50Ω (SMA) DC IN jack E DC 12.0 ~ 16.0 V (13.8 V nominal) Operating Voltage Battery terminal DC 6.0 ~ 9.0 V (7.2 V nominal) Grounding method Negative ground - Страница 145 из 155
General Market code Current TH-K4AT M2 TH-K4E M Receive (no signal) 100 mA or less Battery Saver ON (Average) 30 mA or less Usable temperature range –20°C ~ 60°C (–4°F ~ 140°F) –10°C ~ 60°C (+14°F ~ 140°F) with PB-43N Frequency stability Within ±5ppm (–20°C ~ 60°C) Dimensions (W x H x D including - Страница 146 из 155
Transmitter TH-K4AT TH-K4E Market code M2 Transmission Mode F3E (FM)/ F2D (FM) Frequency range 400 ~ 470 MHz Output Power E 430 ~ 440 MHz DC IN jack (13.8 V) H: 5.0 W (approx.) M: 1.5 W (approx.) L: 0.5 W (approx.) PB-43N (7.2 V) H: 5.0 W (approx.) M: 1.5 W (approx.) L: 0.5 W (approx.) BT-14 (9.0 - Страница 147 из 155
Receiver TH-K4AT TH-K4E Market code M2 Reception Mode F3E (FM)/ F2D (FM) Frequency range 400 ~ 470 MHz Intermediate Frequency (IF) 1st IF: 38.85 MHz 2nd IF: 450 kHz Circuit type Double super-heterodyne Sensitivity FM (12 dB SINAD) within 70 cm band: 0.18 µV or less Squelch sensitivity 0.13 µV or - Страница 148 из 155
INDEX A All-Channel Scan ………………………………………………… 63 Alkaline Batteries, Installing …………………………………….. 2 APO (Menu No. 17) …………………………………………….. 82 ARO (Menu No. 9) - Страница 149 из 155
Clearing Memory Channel ……………………………………………. 47 COM Port…………………………………………………………. 106 CT (Menu No. 4) …………………………………………………. 70 CTCSS Freq. ID Scan - Страница 150 из 155
Frequency Step Size ……………………………………………. 86 Full Reset …………………………………………………………. 111 H HLD (Menu No. 19) ……………………………………………… 36 I Installing the Alkaline Batteries - Страница 151 из 155
M.NAME (Menu No. 14) ……………………………………….. 48 N Narrow Band FM Operation ………………………………….. 91 Normal Scan ………………………………………………………. 60 O Odd-split Frequency …………………………………………….. - Страница 152 из 155
Regulated Power Supply ………………………………………… 9 Repeater Offset, Automatic …………………………………… 37 Repeater Operation …………………………………………….. 31 Reprogramming the Call Channel - Страница 153 из 155
Time-Operated Mode …………………………………………… 68 Time-out Timer ……………………………………………………. 94 Tone Activating, Function …………………………………………. 34 Freq. ID Scan - Страница 154 из 155
- Страница 155 из 155