-
Contents
-
Table of Contents
-
Bookmarks
Quick Links
Kia, THE COMPANY
Thank you for becoming the owner of a new Kia vehicle.
As a global vehicle manufacturer focused on building high-qual-
ity, value for money prices, Kia Motors is dedicated to provid-
ing you with a customer service experience that exceeds your
expectations.
All information contained in this Owner’s Manual is accurate at
the time of publication. However, Kia reserves the right to make
changes at any time so that our policy of continual product
improvement can be carried out.
This manual applies to all Kia models and includes descriptions
and explanations of optional as well as standard equipment. As
a result, you may encounter material in this manual that is not
applicable to your specific Kia vehicle.
Drive safely and enjoy your Kia!
Chapters
Summary of Contents for Kia Sorento 2014
Наслаждайтесь вашим автомобилем и «семейной» заботой от Kia!
Поздравляем вас с приобретением нового автомобиля Kia.
Являясь признанным в мире производителем автомобилей, известных
своим высоким качеством и справедливой ценой, компания Kia Motors
считает своим долгом предоставлять клиентам услуги на уровне выше их
ожиданий и полностью удовлетворяющем их потребности.
В дилерской сети Kia вас ожидает “семейное” отношение, которое создает
ощущение тепла, гостеприимства и доверия – ощущения, что за тобой
ухаживают заботливые люди.
Вся информация, содержащаяся в этом руководстве пользователя, является
точной на момент ее опубликования. Тем не менее, Kia оставляет за собой
право в любое время вносить изменения, потому что таким образом
реализуется наша политика непрерывного усовершенствования продукции.
Данное руководство относится ко всем моделям этого автомобиля и
включает в себя описания и пояснения дополнительного и стандартного
оборудования. В результате этого в руководстве могут встречаться
материалы, которые не соответствуют вашей конкретной модели
автомобиля Kia.
Автосервис АвтоМиг в Коптево
Автосервис САО — МЦД Красный Балтиец:
Ближайшие для подъезда улицы – Космонавта Волкова, Приорова, Новая Ипатовка, Большая Академическая.
Автосервис АвтоМиг в Лефортово
Автосервис ЮВАО, ВАО — метро Авиамоторная:
Ближайшие станции метро — Авиамоторная, Площадь Ильича, Шоссе Энтузиастов, Чкаловская, Бауманская, Семеновская. Ближайшие для подъезда улицы — третье транспортное кольцо (ТТК), проезд завода Серп и Молот, Лефортовский вал, Красноказарменная улица.
Автосервис АвтоМиг в Щукино
Автосервис СЗАО, САО — метро Октябрьское поле, станция Зорге МЦК (район Щукино, Хорошёво—Мнёвники)
Ближайшие станции метро — Октябрьское поле, Полежаевская. Станция Московского Центрального Кольца — Зорге. Ближайшие для подъезда улицы — Маршала Бирюзова, Берзарина, Народного ополчения, Зорге, Куусинена, Расплетина.
Автосервис АвтоМиг в Измайлово
Автосервис ВАО — метро Соколиная гора (район Измайлово)
Ближайшие станции метро — Соколиная гора, Партизанская, Измайлово, Шоссе Энтузиастов, Черкизовская. Ближайшие для подъезда улицы — Вернисажная, Шоссе Энтузиастов, проспект Будённого, Северо-Восточная хорда, Щербаковская улица, Большая Черкизовская улица.
Автосервис АвтоМиг в Гольяново
Автосервис ВАО — метро Щелковская (район Гольяново)
Ближайшие станции метро — Щелковская, Черкизовская, Бульвар Рокоссовского, Первомайская, Партизанская, Измайловская. Ближайшие для подъезда улицы — Щелковское шоссе, Амурская, Сиреневый бульвар, Монтажная улица, Байкальская улица, Открытое шоссе.
AUTO-TEXCENTER.RU
Франшиза автосервиса, Вакансии автосервиса, Инструкции к корейским авто, Инструкции к китайским авто
Ремонт (сервис) корейских автомобилей. Специализированный техцентр (автосервис) в Москве. Copyright © 2000-2023. Все права сохранены. Обращаем Ваше внимание на то, что данный сайт носит исключительно информационный характер и ни при каких условиях не является публичной офертой, определяемой положениями Статьи 437 (2) Гражданского кодекса Российской Федерации.
Компания «АвтоМиг» является НЕОФИЦИАЛЬНЫМ техническим центром по обслуживанию и ремонту автомобилей марок KIA и HYUNDAI. Никакого отношения ни к официальным представителям (дилерам), ни к самим производителям транспортных средств автосервис не имеет! Все упоминания торговых знаков (марок автомобилей) на данном сайте носят исключительно ИДЕНТИФИЦИРУЮЩИЙ характер (используются не в качестве средства индивидуализации), указывают, какие именно автомобили обслуживает техцентр (в соответствии со ст. 1474, 1487 Гражданского Кодекса РФ).

Kia, THE COMPANY
Thank you for becoming the owner of a new Kia vehicle.
As a global vehicle manufacturer focused on building high-qual-
ity, value for money prices, Kia Motors is dedicated to provid-
ing you with a customer service experience that exceeds your
expectations.
All information contained in this Owner’s Manual is accurate at
the time of publication. However, Kia reserves the right to make
changes at any time so that our policy of continual product
improvement can be carried out.
This manual applies to all Kia models and includes descriptions
and explanations of optional as well as standard equipment. As
a result, you may encounter material in this manual that is not
applicable to your specific Kia vehicle.
Drive safely and enjoy your Kia!

i
Thank you for choosing a Kia vehicle.
When you require service, remember that your Kia Dealer knows your vehicle best. Your dealer has factory-trained
technicians, recommended special tools, genuine Kia replacement parts and is dedicated to your complete satisfac-
tion. Because subsequent owners require this important information as well, this publication should remain with the
vehicle if it is sold. This manual will familiarize you with operational, maintenance and safety information about
your new vehicle. It is supplemented by a Warranty and Consumer Information manual that provides important infor-
mation on all warranties regarding your vehicle. We urge you to read these publications carefully and follow the rec-
ommendations to help assure enjoyable and safe operation of your new vehicle.
Kia offers a great variety of options, components and features for its various models. Therefore, some of the equip-
ment described in this manual, along with the various illustrations, may not be applicable to your particular vehicle.
The information and specifications provided in this manual were accurate at the time of printing. Kia reserves the
right to discontinue or change specifications or design at any time without notice and without incurring any obliga-
tion. If you have questions, always check with your Kia dealer.
We assure you of our continuing interest in your motoring pleasure and satisfaction in your Kia vehicle.
© 2013 Kia Canada Inc.
All rights reserved. Reproduction by any means, electronic or mechanical, including photocopying, recording, or by
any information storage and retrieval system or translation in whole or part is not permitted without written author-
ization from Kia Canada Inc.
Printed in U. S. A.
FFoorreewwoorrdd
ii
1
2
3
4
5
6
7
8
I
Introduction
How to use this manual / Fuel requirements / Vehicle break-in process / Vehicle handling instructions /
Vehicle data collection and event data recorders
Your vehicle at a glance
Exterior overview / Interior overview / Instrument panel overview / Engine compartment
Safety features of your vehicle
Seats / Seat belts / Child restraint system / Air bag
Features of your vehicle
Keys / Door locks / Tailgate / Windows / Hood / Fuel filler lid / Panoramic sunroof / Steering wheel / Mirrors
/ Instrument cluster / Lighting / Wipers & Washers / Climate control system / Multimedia system / Etc.
Driving your vehicle
Before driving / Engine start/stop button / Transaxle / All Wheel Drive (AWD) / Brake system /
Cruise control system / Active ECO system / Winter driving / Vehicle load limit / Etc.
What to do in an emergency
Road warning / Emergency while driving / Emergency starting / Engine overheat / Flat tire / Towing / Etc.
Maintenance
Engine compartment / Maintenance service / Engine oil / Engine coolant / Brake fluid / Washer fluid /
Parking brake / Air cleaner / Wiper blades / Battery / Tire and wheels / Fuses / Etc.
Specifications & Consumer information
Index
table of contents

1
Introduction
How to use this manual . . . . . . . . . . . . . . . . . . . . . . 1-2
Fuel requirements . . . . . . . . . . . . . . . . . . . . . . . . . . 1-3
• Gasoline containing alcohol and methanol. . . . . . . . . 1-3
• Do not use methanol . . . . . . . . . . . . . . . . . . . . . . . . . . . 1-4
• Fuel Additives . . . . . . . . . . . . . . . . . . . . . . . . . . . . . . . . 1-4
• Operation in foreign countries. . . . . . . . . . . . . . . . . . . 1-4
Vehicle handling instructions . . . . . . . . . . . . . . . . . 1-5
Vehicle break-in process . . . . . . . . . . . . . . . . . . . . . 1-5
Introduction
21
HOW T O USE THIS MANUAL
We want to help you get the greatest
possible driving pleasure from your
vehicle. Your Owner’s Manual can
assist you in many ways.We strong-
ly recommend that you read the
entire manual. In order to minimize
the chance of death or injury, you
must read the WARNING and CAU-
TION sections in the manual.
Illustrations complement the words
in this manual to best explain how to
enjoy your vehicle. By reading your
manual, you will learn about fea-
tures, important safety information,
and driving tips under various road
conditions.
The general layout of the manual is
provided in the Table of Contents.
Use the index when looking for a
specific area or subject; it has an
alphabetical listing of all information
in your manual.
Sections:This manual has eight sec-
tions plus an index. Each section
begins with a brief list of contents so
you can tell at a glance if that section
has the information you want.
You will find various WARNINGs,
CAUTIONs, and NOTICEs in this
manual.These WARNINGs were pre-
pared to enhance your personal safe-
ty.You should carefully read and follow
ALL procedures and recommenda-
tions provided in these WARNINGs,
CAUTIONs and NOTICEs.
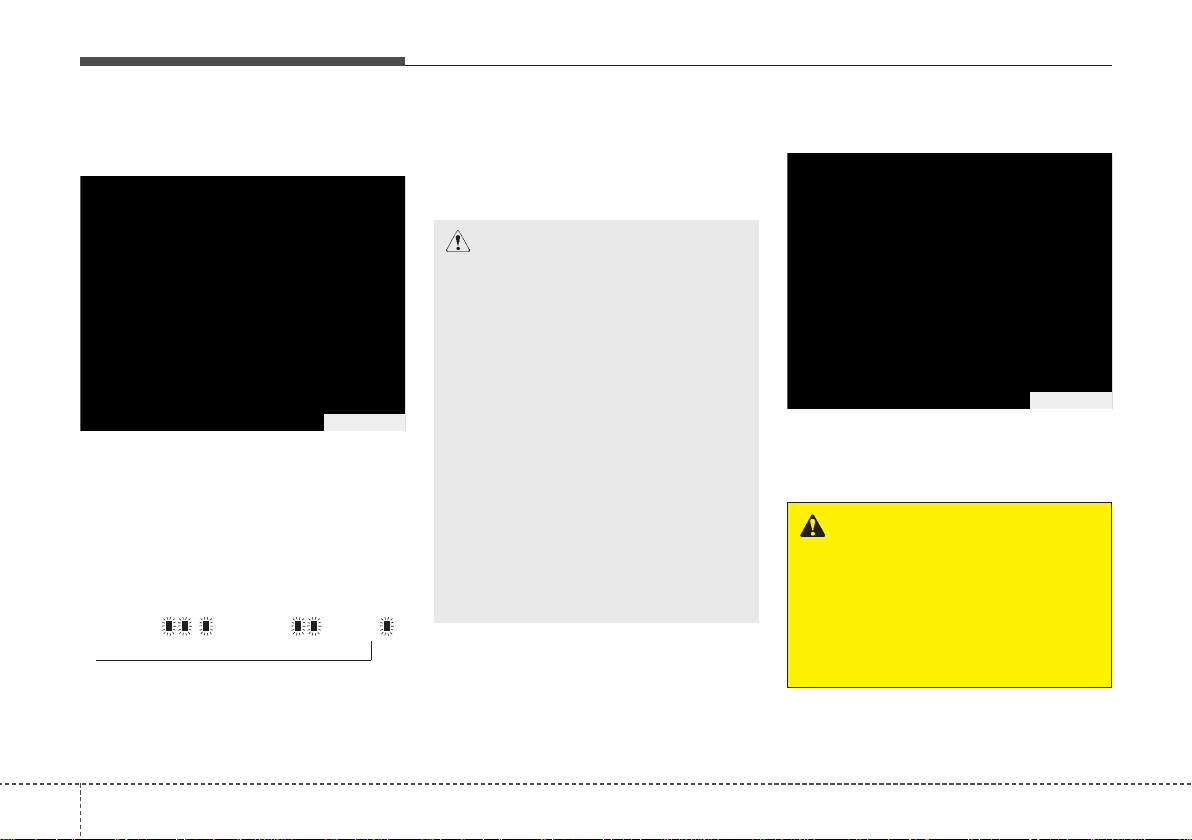
✽✽
NOTICE
A NOTICE indicates interesting or
helpful information is being provided.
WARNING
A WARNING indicates a situa-
tion in which harm,serious bod-
ily injury or death could result if
the warning is ignored.
CAUTION
A CAUTION indicates a situation
in which damage to your vehicle
could result if the caution is
ignored.
13
Introduction
Your new vehicle is designed to use
only unleaded fuel having a pump
octane number ((R+M)/2) of 87
(Research Octane Number 91) or
higher.
Your new vehicle is designed to
obtain maximum performance with
UNLEADED FUEL, as well as mini-
mize exhaust emissions and spark
plug fouling.
Gasoline containing alcohol and
methanol
Gasohol, a mixture of gasoline and
ethanol (also known as grain alco-
hol), and gasoline or gasohol con-
taining methanol (also known as
wood alcohol) are being marketed
along with or instead of leaded or
unleaded gasoline.
Pursuant to EPA regulations, ethanol
may be used in your vehicle.
Do not use gasohol containing more
than 10% ethanol, and do not use
gasoline or gasohol containing any
methanol. Ethanol provides less
energy than gasoline and it attracts
water, and it is thus likely to reduce
your fuel efficiency and could lower
your MPG results.
Methanol may cause drivability prob-
lems and damage to the fuel system.
Discontinue using gasohol of any
kind if drivability problems occur.
Vehicle damage or drivability prob-
lems may not be covered by the
manufacturer’s warranty if they result
from the use of:
1. Gasoline or gasohol containing
methanol.
2. Leaded fuel or leaded gasohol.
FUEL REQUIREMENTS
CAUTION
Never add any fuel system
cleaning agents to the fuel tank
other than what has been speci-
fied. (Consult an authorized Kia
dealer for details.)
WARNING
• Do not «top off» after the noz-
zle automatically shuts off
when refueling.
• Tighten the cap until it clicks
one time, otherwise the Check
Engine light will illumi-
nate.
• Always check that the fuel cap
is installed securely to pre-
vent fuel spillage, especially
in the event of an accident.
Introduction
41
«E85» fuel is an alternative fuel com-
prised of 85 percent ethanol and 15
percent gasoline, and is manufac-
tured exclusively for use in Flexible
Fuel Vehicles. “E85” is not compati-
ble with your vehicle. Use of “E85”
may result in poor engine perform-
ance and damage to your vehicle’s
engine and fuel system. Kia recom-
mends that customers do not use
fuel with an ethanol content exceed-
ing 15%.
Use of MTBE
Kia recommends avoiding fuels con-
taining MTBE (Methyl Tertiary Butyl
Ether) over 15.0% vol. (Oxygen
Content 2.7% weight) in your vehicle .
Fuel containing MTBE over 15.0%
vol. (Oxygen Content 2.7% weight)
may reduce vehicle perf ormance and
produce vapor lock or hard starting.
Do not use methanol
Fuels containing methanol (wood
alcohol) should not be used in your
vehicle.This type of fuel can reduce
vehicle performance and damage
components of the fuel system.
Fuel Additives
Kia recommends that you use good
quality gasolines treated with deter-
gent additives such as TOP TIER
Detergent Gasoline, which help pre-
vent deposit formation in the engine.
These gasolines will help the engine
run cleaner and enhance perform-
ance of the Emission Control
System. For more information on
TOP TIER Detergent Gasoline,
please go to the website (www.top-
tiergas.com)
For customers who do not use TOP
TIER Detergent Gasoline regularly,
and have problems starting or the
engine does not run smoothly, addi-
tives that you can buy separately
may be added to the gasoline.
If TOP TIER Detergent Gasoline is
not available, one bottle of additive
should be added to the fuel tank at
every 7,500miles or every engine oil
change is recommended. Additives
are available from your authorized
Kia dealer along with information on
how to use them. Do not mix other
additives.
CAUTION
Never use gasohol which con-
tains methanol. Discontinue use
of any gasohol product which
impairs drivability.
CAUTION
Your New Vehicle Limited
Warranty does not cover dam-
age to the fuel system or any
performance problems caused
by the use of “E85” fuel.
CAUTION
Your New Vehicle Limited
Warranty may not co ver damage
to the fuel system and any per-
formance problems that are
caused by the use of fuels con-
taining methanol or fuels con-
taining MTBE (Methyl Tertiary
Butyl Ether) over 15.0% vol.
(Oxygen Content 2.7% weight.)

15
Introduction
Operation in foreign countries
If you are going to drive your vehicle
in another country, be sure to:
• Observe all regulations regarding
registration and insurance.
• Determine that acceptable fuel is
available.
As with other vehicles of this type,
failure to operate this vehicle correct-
ly may result in loss of control, an
accident or vehicle rollover.
Specific design characteristics (high-
er ground clearance, track, etc.) give
this vehicle a higher center of gravity
than other types of vehicles. In other
words they are not designed for cor-
nering at the same speeds as con-
ventional 2-wheel drive vehicles.
Avoid sharp turns or abrupt maneu-
vers. Again, failure to operate this
vehicle correctly may result in loss of
control, an accident or vehicle
rollover. Be sure to read the
“Reducing the risk of a rollover”
driving guidelines, in section 5 of
this manual.
No special break-in period is need-
ed.By following a fe w simple precau-
tions for the first 1,000 km (600
miles) you may add to the perform-
ance, economy and life of your vehi-
cle.
• Do not race the engine.
• While driving, keep your engine
speed (rpm, or revolutions per
minute) between 2,000 rpm and
4,000 rpm.
• Do not maintain a single speed for
long periods of time, either fast or
slow. Varying engine speed is
needed to properly break-in the
engine.
• Avoid hard stops, except in emer-
gencies, to allow the brakes to seat
properly.
• Don’t let the engine idle longer
than 3 minutes at one time.
• Don’t tow a trailer during the first
2,000 km (1,200 miles) of opera-
tion.
VEHICLE BREAK-IN
PROCESS
VEHICLE HANDLING
INSTRUCTIONS

Exterior overview I . . . . . . . . . . . . . . . . . . . . . . . . . 2-2
Exterior overview II. . . . . . . . . . . . . . . . . . . . . . . . . 2-3
Interior overview . . . . . . . . . . . . . . . . . . . . . . . . . . . 2-4
Instrument panel overview . . . . . . . . . . . . . . . . . . . 2-5
Engine compartment . . . . . . . . . . . . . . . . . . . . . . . . 2-6
2
Your vehicle at a glance
Exterior overview. . . . . . . . . . . . . . . . . . . . . . . . . . . 2-2
Interior overview . . . . . . . . . . . . . . . . . . . . . . . . . . . 2-4
Instrument panel overview . . . . . . . . . . . . . . . . . . . 2-5
Engine compartment . . . . . . . . . . . . . . . . . . . . . . . . 2-6
2
Your vehicle at a glance
22
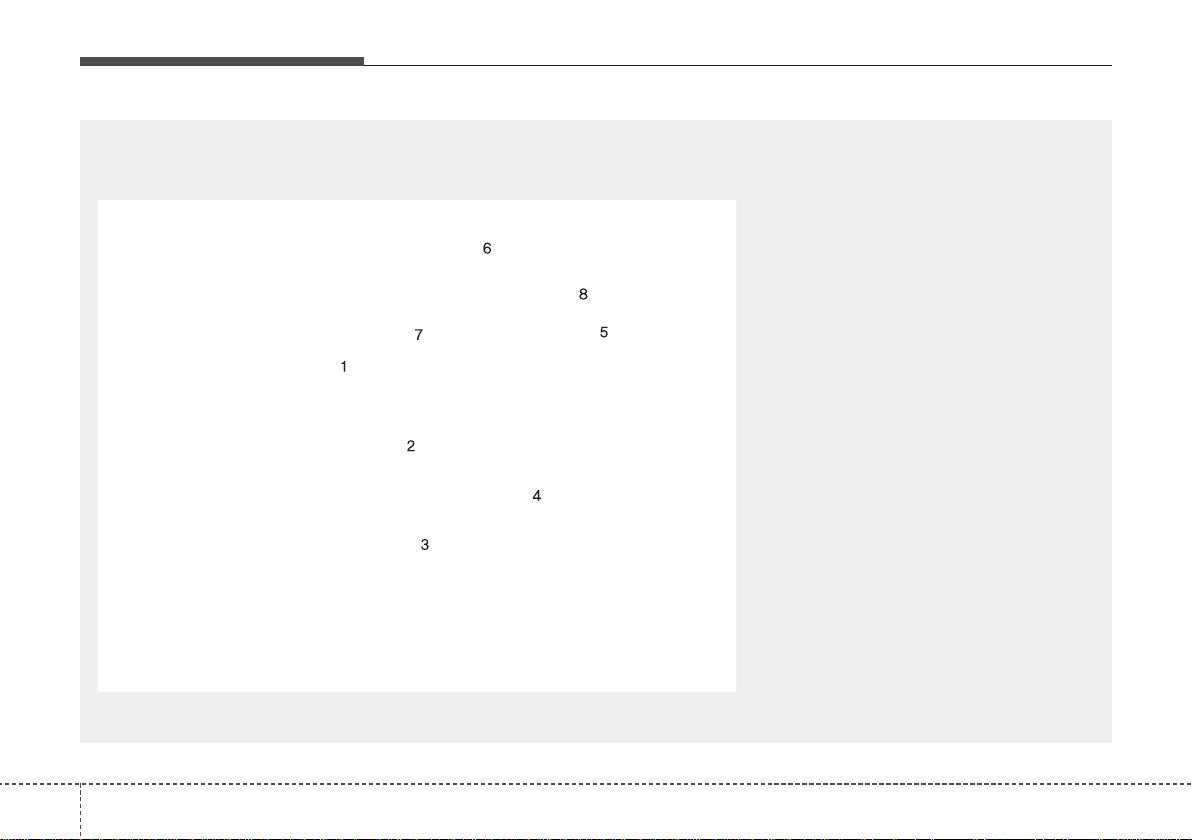
EXTERIOR OVERVIEW
1. Hood………………………………………………4-38
2. Head lamp…………………………………….4-108
3. Fog lamp ………………………………………4-112
4.Wheel and tire…………………………………7-50
5. Outside rearview mirror …………………….4-64
6. Panorama sunroof……………………………4-44
7. Front windshield wiper blades……………7-44
8.Windows…………………………………………4-33
OXMA013001
■ Front view
❈ The actual shape may differ from the illustration.

23
Your vehicle at a glance
9. Door locks ………………………………………4-21
10. Fuel filler lid…………………………………..4-40
11. Rear combination lamp
12. High mounted stop lamp
13. Rear window wiper blade………………..7-45
14.Tailgate …………………………………………4-25
15. Antenna………………………………………4-159
16. Rearview camera …………………………4-106
17. Parking assist system …………………..4-102
OXM013002L
■ Rear view
❈ The actual shape may differ from the illustration.
Your vehicle at a glance
42
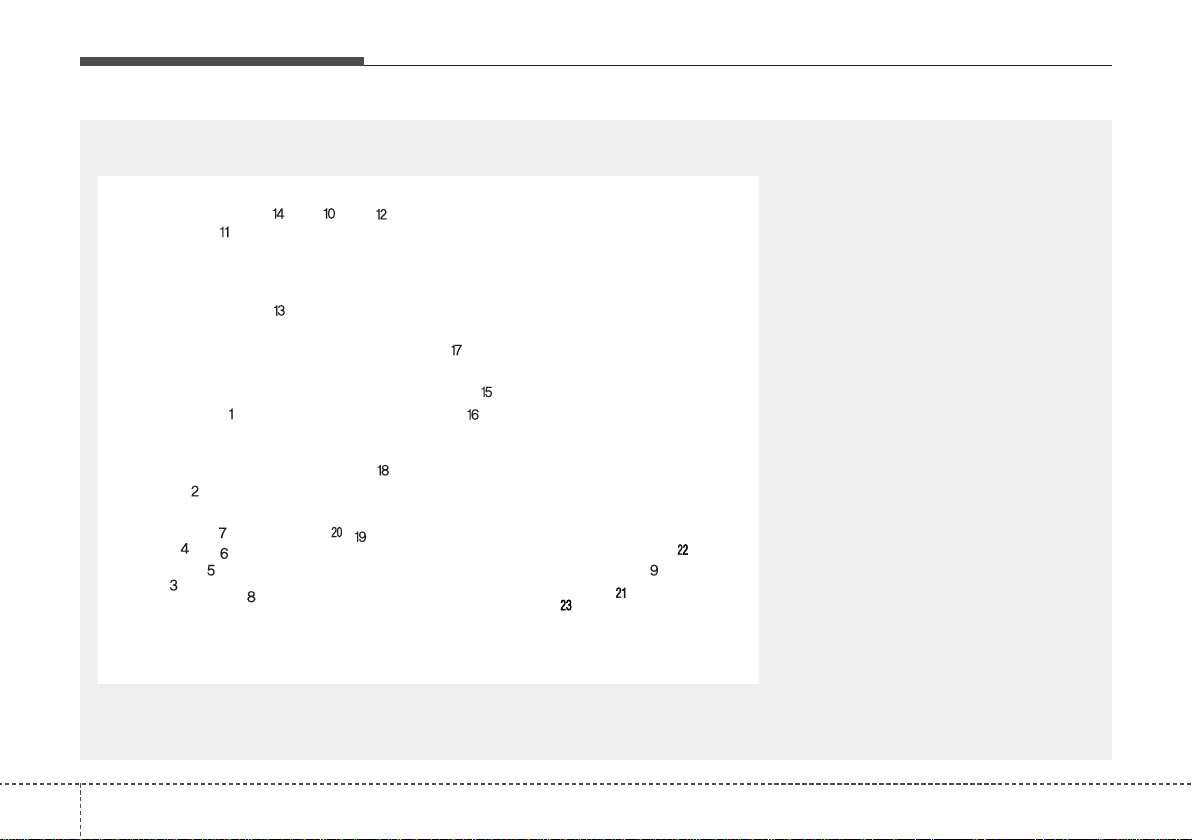
INTERIOR OVERVIEW
1. Driver position memory system button …..3-8
2. Inside door handle……………………………..4-22
3. Power window switch………………………….4-33
4. Central door lock switch……………………..4-23
5. Power window lock button…………………..4-36
6. Outside rearview mirror control……………4-65
7. Outside rearview mirror folding……………4-66
8. Fuel filler lid open switch…………………….4-40
9. Parking assist system On/Off button…..4-102
10. AWD Lock button ……………………………..5-23
11. ESC Off button ………………………………..5-36
12. Instrument panel illumination
control switch…………………………………..4-69
13. BSD On/OFF button…………………………5-49
14. Steering wheel…………………………………4-49
15. Steering wheel warmer On/Off Button..4-51
16.Tilt and telescopic steering
control lever…………………………………..4-50
17. Lighting control lever……………………….4-109
18. Inner panel fuse panel………………………7-65
19. Parking brake pedal………………………….5-32
20. Hood release lever……………………………4-38
21. AC inverter…………………………………….4-152
22. Active ECO …………………………………….5-54
23. Seat………………………………………………….3-2
OXMA013003N
❈ The actual interior in the vehicle may differ from the illustration

25
Your vehicle at a glance
INSTRUMENT PANEL OVERVIEW
1. Audio remote control buttons…………4-160
2. Driver’s front air bag ……………………….3-60
3. Horn……………………………………………..4-51
4. Instrument cluster …………………………..4-68
5.Wiper and washer control lever ………4-113
6. Ignition switch or
Engine start/stop button……………..5-5, 5-8
7. Cruise control button………………………5-44
8. Digital clock…………………………………4-154
9. Audio ………………………………………….4-159
10. Hazard warning flasher …………………..6-2
11. Climate control system………4-121, 4-131
12. Front seat warmer /
Seat cooler………………………….3-12, 3-14
13. Power outlet……………………………….4-151
14. Cup holder …………………………………4-149
15. Center console storage box…………4-146
16. Rear seat warmer…………………………3-21
17. Glove box………………………………….4-146
18. Passenger’s front air bag………………3-60
OXM013004L
❈ The actual instrument panel in the vehicle may differ from the illustration

Your vehicle at a glance
62
ENGINE COMPARTMENT
ODMEMC2001/ONCEIN2007
■■
Gasoline Engine (Theta II 2.4L) — GDI
❈ The actual engine compartment in the vehicle may differ from the illustration.
■■
Gasoline Engine (Lambda II 3.3L) — GDI
1. Engine coolant reservoir……………….7-34
2. Engine oil filler cap ………………………7-31
3. Brake/clutch fluid reservoir ……………7-36
4. Air cleaner…………………………………..7-39
5. Fuse box…………………………………….7-64
6. Negative battery terminal………………7-47
7. Positive battery terminal ……………….7-47
8. Radiator cap ……………………………….7-35
9. Engine oil dipstick………………………..7-31
10.Windshield washer fluid reservoir …7-37

Safety features of your vehicle
Seats. . . . . . . . . . . . . . . . . . . . . . . . . . . . . . . . . . . . . . 3-2
• Front seat adjustment — Manual . . . . . . . . . . . . . . . . . 3-5
• Front seat adjustment — Power. . . . . . . . . . . . . . . . . . . 3-6
• Seat warmer. . . . . . . . . . . . . . . . . . . . . . . . . . . . . . . . . 3-12
• Seat cooler . . . . . . . . . . . . . . . . . . . . . . . . . . . . . . . . . . 3-14
• Rear seat adjustment . . . . . . . . . . . . . . . . . . . . . . . . . 3-15
Seat belts . . . . . . . . . . . . . . . . . . . . . . . . . . . . . . . . . 3-25
• Seat belt restraint system . . . . . . . . . . . . . . . . . . . . . . 3-25
• Pre-tensioner seat belt. . . . . . . . . . . . . . . . . . . . . . . . . 3-31
• Seat belt precautions. . . . . . . . . . . . . . . . . . . . . . . . . . 3-34
• Care of seat belts. . . . . . . . . . . . . . . . . . . . . . . . . . . . . 3-37
Child restraint system . . . . . . . . . . . . . . . . . . . . . . 3-38
• Using a child restraint system . . . . . . . . . . . . . . . . . . 3-40
• Tether Anchor system . . . . . . . . . . . . . . . . . . . . . . . . . 3-43
• Securing a child restraint seat with
child seat lower anchor system . . . . . . . . . . . . . . . . 3-44
Air bag — supplemental restraint system . . . . . . . 3-47
• How does the air bag system operate . . . . . . . . . . . . 3-48
• Do not Installing a child restraint on a front
passenger’s seat . . . . . . . . . . . . . . . . . . . . . . . . . . . . . 3-50
• Air bag warning light . . . . . . . . . . . . . . . . . . . . . . . . . 3-50
• SRS components and functions . . . . . . . . . . . . . . . . . 3-51
• Occupant classification system. . . . . . . . . . . . . . . . . . 3-54
• Main components of occupant detection system . . . 3-55
• Driver’s and passenger’s front air bag . . . . . . . . . . . 3-60
• Side air bag . . . . . . . . . . . . . . . . . . . . . . . . . . . . . . . . . 3-66
• Curtain air bag . . . . . . . . . . . . . . . . . . . . . . . . . . . . . . 3-67
• Inflation and non-inflation conditions of
the air bag . . . . . . . . . . . . . . . . . . . . . . . . . . . . . . . 3-70, 3-72
• SRS Care . . . . . . . . . . . . . . . . . . . . . . . . . . . . . . . . . . . 3-74
• Additional safety precautions. . . . . . . . . . . . . . . . . . . 3-75
• Air bag warning label . . . . . . . . . . . . . . . . . . . . . . . . . 3-77
3
Safety features of your vehicle
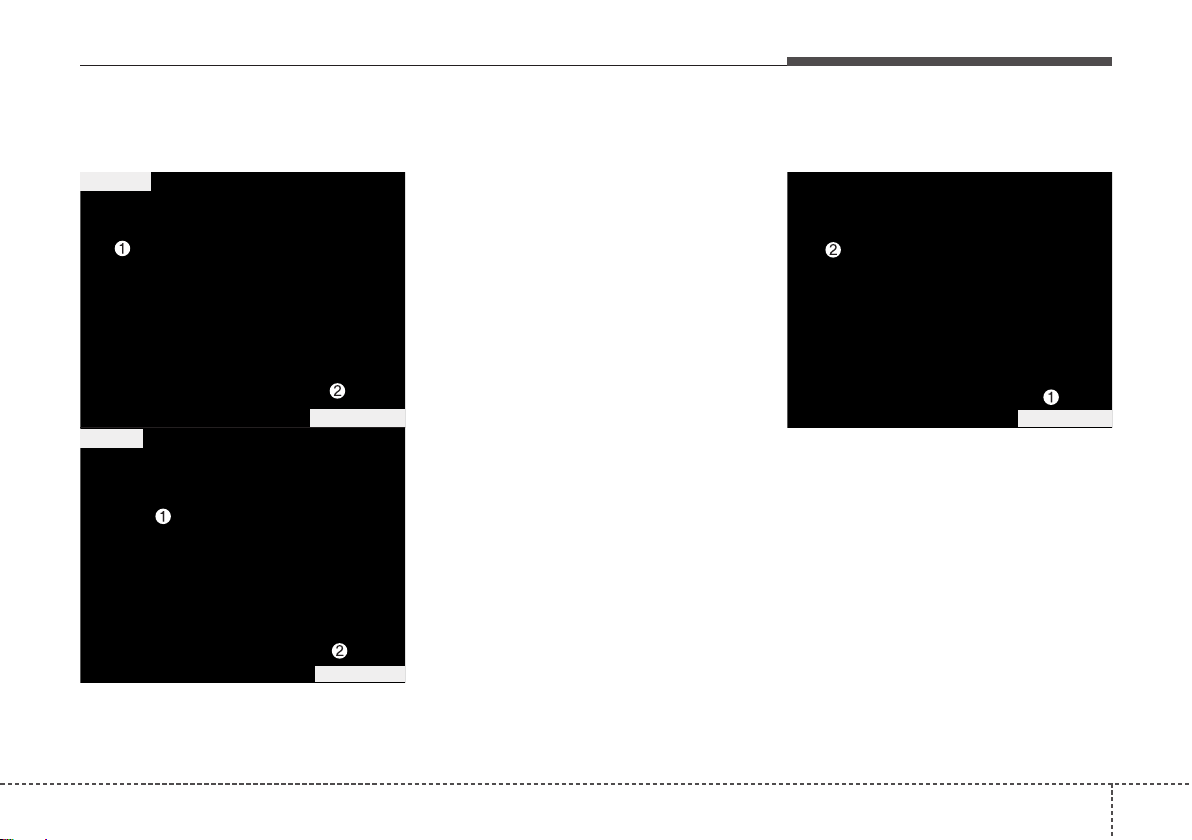
23
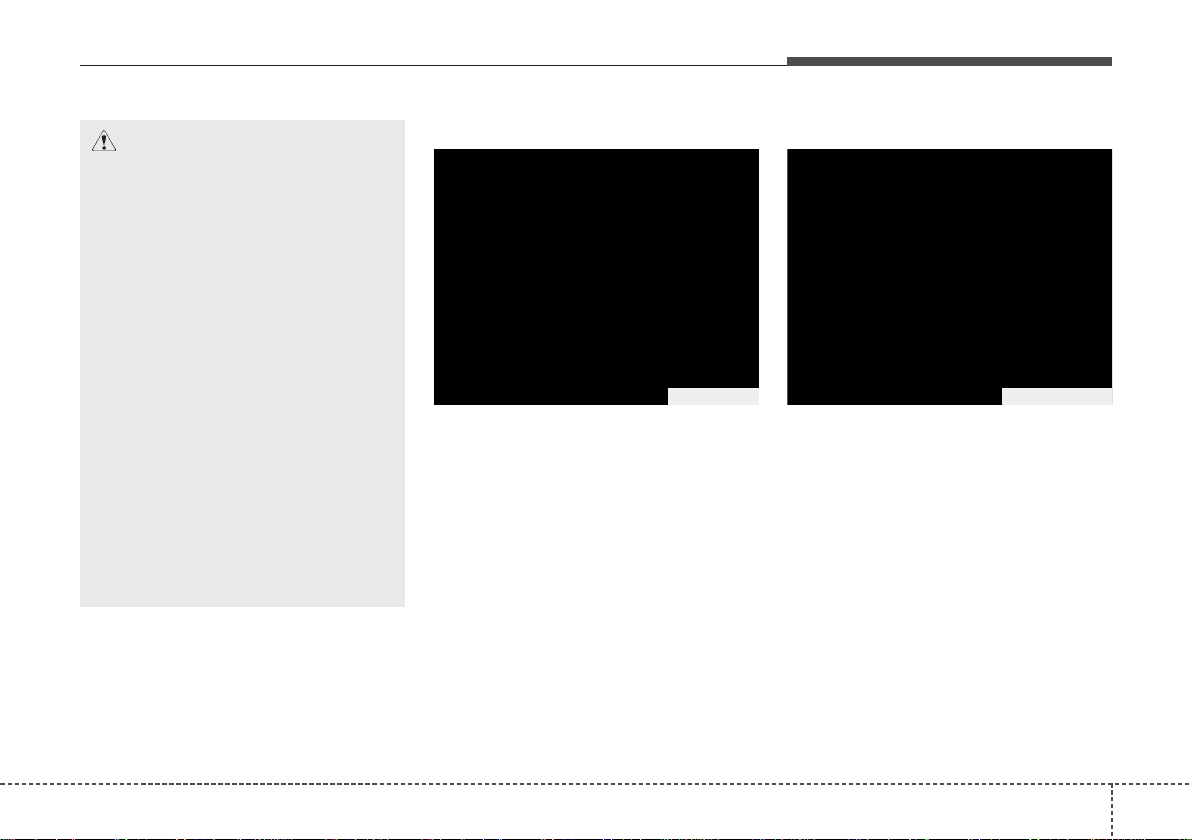
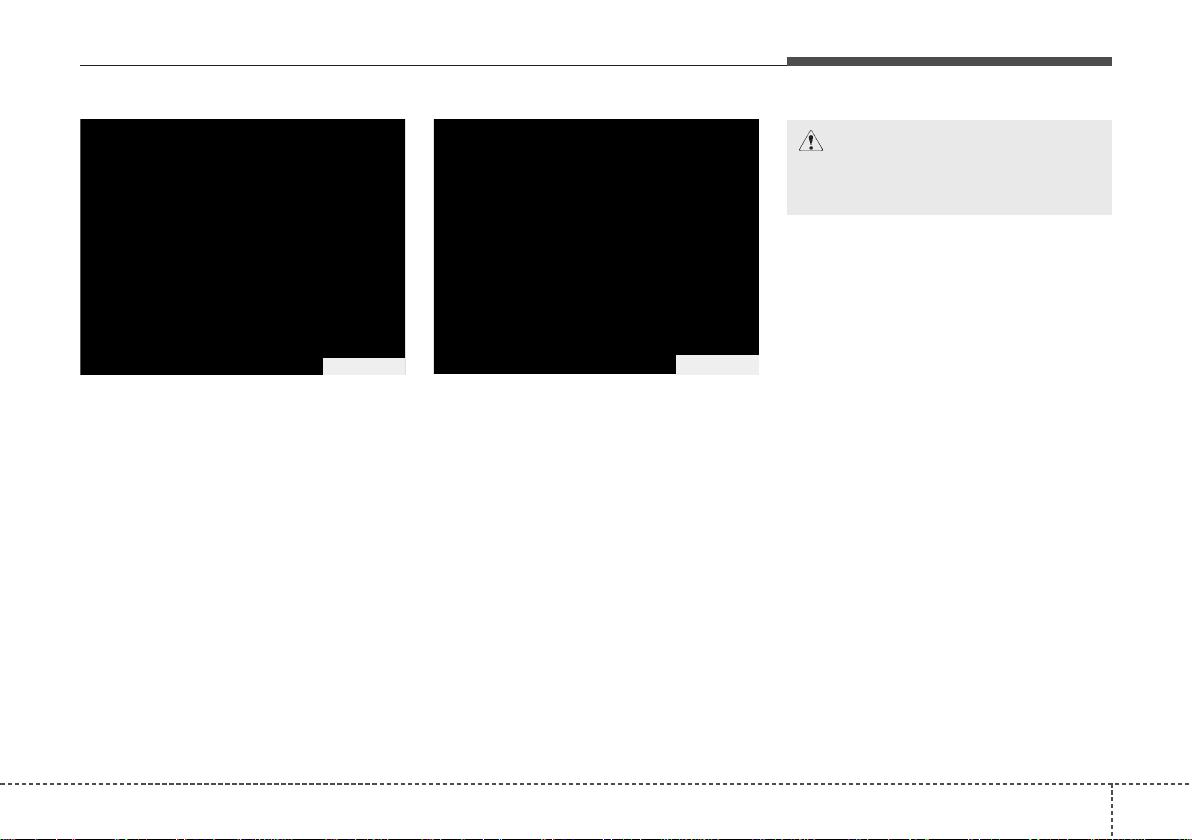
Front seat
(1) Forward and backward
(2) Seatback angle
(3) Seat cushion height
(Driver’s seat)
(4) Lumbar support (Driver’s seat)*
(5) Seat warmer* /
Seat cooler (Air ventilation seat)*
(6) Headrest
2nd row seat
(7) Forward and backward*
(8) Seatback angle and folding
(9) Headrest
(10) Armrest
(11) Seat warmer*
3rd row seat*
(12) Seatback folding
(13) Headrest
* if equipped
SEATS
OXMA033001
Manual seat
Manual seat
Power seat
Power seat
33
Safety features of your vehicle
WARNING — Driver’s seat
• Never attempt to adjust the
seat while the vehicle is mov-
ing. This could result in loss
of control, and an accident
causing death, serious injur y,
or property damage.
• Do not allow anything to inter-
fere with the normal position
of the seatback. Storing items
against a seatback or in any
other way interfering with
proper locking of a seatback
could result in serious or fatal
injury in a sudden stop or col-
lision.
• Always drive and ride with
your seatback upright and the
lap portion of the seat belt
snug and low across the hips.
This is the best position to
protect you in case of an acci-
dent.
(Continued)
WARNING — Uprighting
seat
When you return the seatback
to its upright position, hold the
seatback and return it slowly
and be sure there are no other
passengers around the seat. If
the seatback is returned with-
out being held and controlled,
the back of the seat could
spring forward resulting in acci-
dental injury to a person struck
by the seatback.
WARNING — Loose
objects
Loose objects in the driver’s
foot area could interfere with
the operation of the foot pedals,
possibly causing an accident.
Do not place anything under the
front seats.
WARNING — Driver
responsibility for front seat
passenger
Riding in a vehicle with a front
seatback reclined could lead to
serious or fatal injury in an acci-
dent. If a front seat is reclined
during an accident, the occu-
pant’s hips may slide under the
lap portion of the seat belt, apply-
ing great force to the unprotect-
ed abdomen. Serious or fatal
internal injuries could result.The
driver must advise the front pas-
senger to keep the seatback in
an upright position whenever the
vehicle is in motion.
WARNING
Do not use a sitting cushion that
reduces friction between the seat
and passenger.The passenger’s
hips may slide under the lap por-
tion of the seat belt during an
accident or a sudden stop.
Serious or fatal internal injuries
could result because the seat
belt cannot operate normally.
Safety features of your vehicle
43
(Continued)
• When resetting the seatback to
the upright position, make sure
it is securely latched by push-
ing it forward and backwards.
• To avoid the possibility of
burns, do not remove the car-
pet in the cargo area. Emission
control devices beneath this
floor generate high tempera-
tures.
WARNING
After adjusting the seat, always
check that it is securely locked
into place by attempting to
move the seat forward or back-
ward without using the lock
release lever. Sudden or unex-
pected movement of the dri-
ver’s seat could cause you to
lose control of the vehicle
resulting in an accident.
(Continued)
• In order to avoid unnecessary
and perhaps severe air bag
injuries, always sit as far back
as possible from the steering
wheel while maintaining com-
fortable control of the vehicle.
We recommend that your c hest
be at least 25 cm (10 inches)
away from the steering wheel.
W ARNING— Rear seat-
backs
• The rear seatback must be
securely latched. If not, pas-
sengers and objects could be
thrown forward resulting in
serious injury or death in the
event of a sudden stop or col-
lision.
• Luggage and other cargo
should be laid flat in the cargo
area. If objects are large, heavy,
or must be piled, they must be
secured. Under no circum-
stances should cargo be piled
higher than the seatbacks.
Failure to follow these warnings
could result in serious injury or
death in the event of a sudden
stop, collision or rollover.
• No passenger should ride in
the cargo area or sit or lie on
folded seatbacks while the
vehicle is moving. All passen-
gers must be properly seated
in seats and restrained proper-
ly while riding.
(Continued)
35
Safety features of your vehicle
Front seat adjustment — manual
Forward and backward
To move the seat forward or back-
ward:
1.Pull the seat slide adjustment
lever up and hold it.
2. Slide the seat to the position you
desire.
3. Release the lever and make sure
the seat is locked in place.
Adjust the seat before driving, and
make sure the seat is locked securely
by trying to move forward and back-
ward without using the lever. If the
seat moves, it is not locked properly.
Seatback angle
To recline the seatback:
1. Lean forward slightly and lift up the
seatback recline lever.
2. Carefully lean back on the seat
and adjust the seatback of the
seat to the position you desire.
3. Release the lever and make sure
the seatback is locked in place.
(The lever MUST return to its orig-
inal position for the seatback to
lock.)
OXM039002
OXM039003
WARNING
• Do not adjust the seat while
wearing seat belts. Moving the
seat cushion forward may
cause strong pressure on the
abdomen.
• Use extreme caution so that
hands or other objects are not
caught in the seat mechanisms
while the seat is moving.
• Do not put a cigarette lighter
on the floor or seat.When you
operate the seat, gas may
gush out of the lighter and
cause fire.
Safety features of your vehicle
63
Seat height (for driver’s seat)
To change the height of the seat,
push the lever upwards or down-
wards.
• To lo wer the seat cushion, push the
lever down several times.
• To raise the seat cushion, pull the
lever up several times.
Lumbar support (if equipped)
The lumbar support can be adjusted
by pressing the lumbar support
switch on the side of the seat.
1.Press the front portion of the
switch to increase support, or the
rear portion of the switch, to
decrease support.
2. Release the switch once it reach-
es the desired position.
Front seat adjustment — power
(if equipped)
The front seat can be adjusted by
using the control switches located on
the outside of the seat cushion.
Before driving, adjust the seat to the
proper position so you can easily
control the steering wheel, pedals
and switches on the instrument
panel.
WARNING
The power seat is operable with
the ignition OFF.
Therefore, children should
never be left unattended in the
vehicle.
OXM033018
OXM039004
37
Safety features of your vehicle
Forward and backward
Push the control switch forward or
backward to move the seat to the
desired position. Release the switch
once the seat reaches the desired
position.
Seatback angle
Push the control switch forward or
backward to move the seatback to
the desired angle. Release the
switch once the seat reaches the
desired position.
CAUTION
• The power seat is driven by an
electric motor. Stop operating
once the adjustment is com-
pleted. Excessive operation
may damage the electrical
equipment.
• When in operation, the power
seat consumes a large
amount of electrical power. To
prevent unnecessary charging
system drain, don’t adjust the
power seat longer than neces-
sary while the engine is not
running.
• Do not operate two or more
power seat control switches at
the same time. Doing so may
result in power seat motor or
electrical component malfunc-
tion.
OXM039006 OXM039007

Safety features of your vehicle
83
Seat height (for driver’s seat)
Pull the front portion of the control
switch up to raise or press down to
lower the front part of the seat cush-
ion. Pull the rear por tion of the con-
trol switch up to raise or press down
to lower the rear part of the seat
cushion.Release the switch once the
seat reaches the desired position.
Lumbar support (for driver’s seat)
The lumbar support can be adjusted
by pressing the button.
Driver position memory system
(if equipped, for power seat)
A driver position memory system is
provided to store and recall the driv-
er seat and outside rearview mirror
position with a simple button opera-
tion. By saving the desired position
into the system memory, different
drivers can reposition the driver seat
based upon their driving preference.
If the battery is disconnected, the
desired seat position memory will
need to be re-saved.
OXM039008 OXM039009
OXM033002
39
Safety features of your vehicle
Storing positions into memory
using the buttons on the door
Storing driver’s seat positions
1. Shift the shift lever into P (for
Automatic transaxle) while the
engine start/stop button is ON or
ignition switch ON.
2. Adjust the driver’s seat and out-
side rearview mirror comfortable
for the driver.
3. Press SET button on the control
panel.The system will beep once.
4. Press one of the memor y buttons
(1 or 2) within 5 seconds after
pressing the SET button.The sys-
tem will beep twice when memory
has been successfully stored.
Recalling positions from memory
1. Shift the shift lever into P (for
Automatic transaxle) while the
engine start/stop button is ON or
ignition switch ON.
2.To recall the position in the memo-
ry, press the desired memory but-
ton (1 or 2). The system will beep
once, then the driver’s seat will
automatically adjust to the stored
position.
Adjusting the control switch for the
driver’s seat while the system is
recalling the stored position will
cause the movement to stop and
move in the direction that the control
switch is moved.
WARNING
Use caution when recalling the
adjustment memory while sit-
ting in the vehicle. Push the seat
position control switch to the
desired position immediately if
the seat moves too far in any
direction.
WARNING
Never attempt to operate the
driver position memory system
while the vehicle is moving.
This could result in loss of con-
trol, and an accident causing
death, serious injury,or property
damage.
Safety features of your vehicle
103
Easy access function
(if equipped)
The system will move the driver’s
seat automatically as follows:
• Without smart key system
— It will move the driver’s seat rear-
ward when the ignition key is
removed.
— It will move the driver’s seat for-
ward when the ignition key is
inserted.
• With smart key system
— It will move the driver’s seat rear-
ward when the engine start/stop
button is changed to the OFF
position.
— It will move the driver’s seat for-
ward when the engine start/stop
button is changed to the ACC or
START position.
You can activate or deactivate this
feature. Refer to «User settings» in
chapter 4.
Headrest (for front seat)
The driver’s and front passenger’s
seats are equipped with a headrest
for the occupant’s safety and comf ort.
The headrest not only provides com-
fort for the driver and front passenger ,
but also helps protect the head and
neck in the event of a rear collision.
OHM038048N
WARNING
• For maximum effectiveness in
case of an accident, the head-
rest should be adjusted so the
middle of the headrest is at
the same height of the center
of gravity of an occupant’s
head. Generally, the center of
gravity of most people’s head
is similar with the height of
the top of their eyes. Also,
adjust the headrest as close
to your head as possible. For
this reason, the use of a cush-
ion that holds the body away
from the seatback is not rec-
ommended.
• Do not operate the vehicle
with the headrests removed.
Severe injury to the occu-
pants may occur in the event
of an accident. Headrests may
provide protection against
neck injuries when properly
adjusted.
• Do not adjust the headrest
position of the driver’s seat
while the vehicle is in motion.
311
Safety features of your vehicle
Adjusting the height up and down
To raise the headrest, pull it up to the
desired position (1). To lower the
headrest, push and hold the release
button (2) on the headrest support
and lower the headrest to the desired
position (3).
Adjusting the angle (if equipped)
The headrest angle may be adjusted
by pulling or pushing the lower part of
the headrest.
Adjust the headrest so that it properly
supports the head and neck.
OXM039011
OXM039010
CAUTION
Excessive pulling or pushing
may damage the headrest.

Safety features of your vehicle
123
Active headrest
The active headrest is designed to
move forward and upward during a
rear impact. This helps prevent the
driver’s and front passenger’s heads
from moving backward and thus
helps minimize neck injuries.
For your safety, the active headrest
can’t be removed. If there is any
problem with the active headrest,
take your vehicle to an authorized
Kia dealer and have the system
checked.
Seat warmer (if equipped)
The seat warmer is provided to warm
the front seats during cold weather.
With the ignition switch in the ON
position, push either of the switches
to warm the driver’s seat or the front
passenger’s seat.
WARNING
A gap between the seat and the
headrest release button may
appear when sitting on the seat
or when you push or pull the
seat. Be careful not to g et your
finger, etc. caught in the gap.
OXM033005
OXM033004
■ Type A
■ Type B
HNF2041-1
313
Safety features of your vehicle
During mild weather or under condi-
tions where the operation of the seat
warmer is not needed, keep the
switches in the «OFF» position.
• Each time you press the switch,
the temperature setting of the seat
will change as follows :
• The seat warmer defaults to the
OFF position whenever the ignition
switch is turned on.
✽✽
NOTICE
With the seat warmer switch in the
ON position, the heating system in
the seat turns off or on automatical-
ly depending on the seat tempera-
ture.
OFF→HIGH( )→MIDDLE( )→LOW( )
→
CAUTION
• When cleaning the seats, do
not use an organic solvent
such as paint thinner, ben-
zene, alcohol and gasoline.
Doing so may damage the sur-
face of the heater or seats.
• To prevent overheating the
seat warmer,do not place any-
thing on the seats that insu-
lates against heat, such as
blankets, cushions or seat
covers while the seat warmer
is in operation.
• Do not place heavy or sharp
objects on seats equipped
with seat warmers. Damage to
the seat warming components
could occur.
• Be careful not to spill liquid
such as water or beverages on
the seat. If you spill some liq-
uid, wipe the seat with a dry
towel. Before using the seat
warmer, dry the seat com-
pletely.
WARNING — Seat warmer
burns
Passengers should use extreme
caution when using seat warm-
ers due to the possibility of
excess heating or burns. The
seat warmer may cause burns
even at low temperatures, espe-
cially if used for long periods of
time. In particular, the driver
must exercise extreme care for
the following types of passen-
gers:
1. Infants, children, elderly or
handicapped persons, or
hospital outpatients
2. Persons with sensitive skin
or those that burn easily
3. Fatigued individuals
4. Intoxicated individuals
5. Individuals taking medication
that can cause drowsiness or
sleepiness (sleeping pills,
cold tablets, etc.)
Safety features of your vehicle
143
Seat cooler (Air ventilation seat)
(if equipped)
The temperature setting of the seat
changes according to the switch
position.
• If you want to cool your seat cush-
ion, press the switch (blue color).
• Each time you press the button,
the airflow will change as follows:
• The seat war mer (with air ventila-
tion) defaults to the OFF position
whenever the ignition switch is
turned on.
Seatback pocket
The seatback pocket is provided on
the back of the front passenger’ s and
driver’s seatbacks.
OXM033003
OFF→HIGH( )→MIDDLE( )→LOW( )
→
ORP032013
WARNING — Seatback
pockets
Do not put heavy or sharp
objects in the seatback pockets.
In an accident they could come
loose from the pocket and
injure vehicle occupants.
CAUTION — Seat damage
• When cleaning the seats, do
not use an organic solvent
such as paint thinner, ben-
zene, alcohol and gasoline.
Doing so may damage the air
ventilation seat.
• Do not place heavy or sharp
objects on the seat. Those
things may damage the air
ventilation seat.
• Be careful not to spill liquid
such as water or beverages on
the seat.If you spill some liquid,
wipe the seat with a dry towel.
Before using the air ventilation
seat, dry the seat completely.
315
Safety features of your vehicle
Rear seat adjustment
Forward and backward
(2nd row seat)
To move the seat forward or back-
ward:
1. Pull the seat slide adjustment lever
up and hold it.
2. Slide the seat to the position you
desire.
3. Release the lever and make sure
the seat is locked in place.
Adjust the seat before driving, and
make sure the seat is locked securely
by trying to move forward and back-
ward without using the lever. If the
seat moves, it is not locked properly.
Seatback angle (2nd row seat)
To recline the seatback:
1. Pull up the seatback recline lever.
2. Hold the lever and adjust the seat-
back of the seat to the position you
desire.
3. Release the lever and make sure
the seatback is locked in place.
(The lever MUST return to its orig-
inal position for the seatback to
lock.)
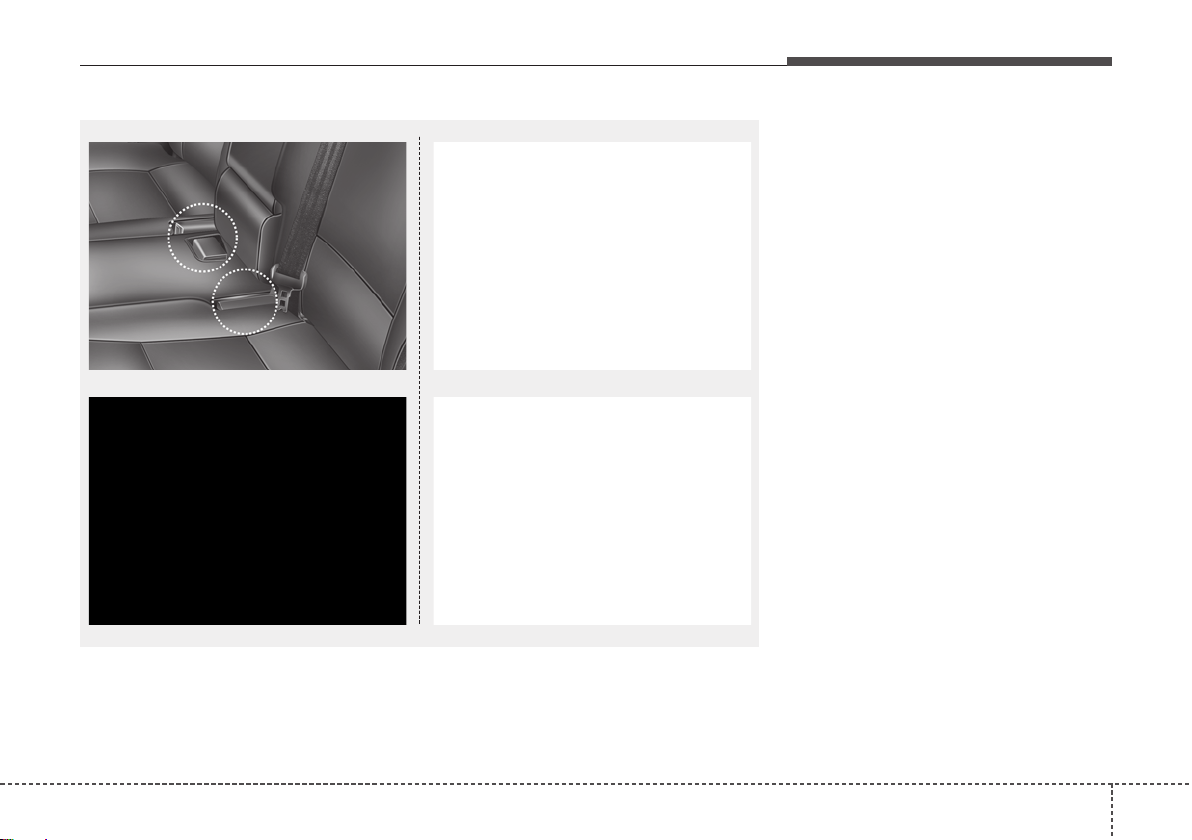
Walk-in seat
(2nd row seat, if equipped)
To get in or out of the 3rd row seat,
1.Route the seat belt webbing
through the rear seat belt guide clip.
After inserting the seat belt, tighten
the belt webbing by pulling it up.
2. Pull up the walk-in lever (1) on the
2nd row seatback.
OXMA033103
OXMA033104
OXM039031
OXMA033105

Safety features of your vehicle
163
3. Fold the 2nd row seatback and
push the seat to the farthest for-
ward position.
After getting in or out, slide the 2nd
row seat to the farthest rearward
position and pull the seatback firm-
ly backward until it clicks into
place. Make sure that the seat is
locked in place.
Folding the rear seat
The rear seatbacks can be folded to
facilitate carrying long items or to
increase the luggage capacity of the
vehicle.
OXMA033106
WARNING
Never attempt to adjust the 2nd
row seat while the vehicle is
moving or the seat is occupied
as the seat may suddenly move
and cause the passenger on the
seat to be injured.
WARNING
The purpose of the fold-down
rear seatbacks is to allow you to
carry longer objects that could
not be accommodated in the
cargo area.
Never allow passengers to sit
on top of the folded down seat-
back while the vehicle is mov-
ing.This is not a proper seating
position and no seat belts are
available for use. This could
result in serious injury or death
in case of an accident or sud-
den stop. Objects carried on the
folded down seatback should
not extend higher than the top
of the front seatbacks. This
could allow cargo to slide for-
ward and cause injury or dam-
age during sudden stops.
317
Safety features of your vehicle
To fold down the rear seatback
1. Inser t the rear seat belt buckle in
the pocket between the rear seat-
back and cushion, and insert the
rear seat belt webbing in the guide
to prevent the seat belt from being
damaged.
2.Set the front seatback to the
upright position and if necessary,
slide the front seat forward.
3. Lower the rear headrests to the
lowest position.
■ 2nd row seat
■ 3rd row seat (if equipped)
ODM032034/OXM039030/OXM039031/OXM039032

Safety features of your vehicle
183
4.Pull on the seatback folding lever
or strap, then fold the seat toward
the front of the vehicle. When you
return the seatback to its upright
position, always be sure it has
locked into position by pushing on
the top of the seatback.
5.To use the rear seat, lift and pull
the seatback backward by pulling
on the folding lever or strap.
Pull the seatback firmly until it
clicks into place.
Make sure the seatback is locked
in place.
6.Return the rear seat belt to the
proper position.
■ 3rd row seat (if equipped)
ODM032028/OXM039022/ODM032030/OXM039025
■ 2nd row seat
319
Safety features of your vehicle
To fold down the rear center seat-
back (for 2nd row seat)
1. Lower the rear headrests to the
lowest position.
2. Push the center seatback folding
lever up, then fold the seat toward
the front of the vehicle.
When you return the seatback to its
upright position, always be sure it
has locked into position by pushing
on the top of the seatback.
ODM032033
WARNING — 2nd row cen-
ter seat folding
• Do not fold the 2nd row center
seat, if there are occupants in
the 3rd row seats, as this may
result in injury to occupants if
the seat moves during a colli-
sion. If occupants in the 3rd
row seats,fix the 2nd row cen-
ter seat in its upright and
locked position.
• The 2nd row center seat back
does not lock into position
when it is folded toward the
front of the vehicle. If you use
the 2nd row center seat back
folding function to carry long
objects, you should fix the
long object to prevent it from
being thrown about the vehi-
cle in a collision and causing
injury to vehicle occupants.
WARNING — Uprighting
seat
When you return the seatback
to its upright position, hold the
seatback and return it slowly. If
the seatback is returned with-
out holding it, the back of the
seat could spring forward
resulting in injury caused by
being struck by the seatback.
CAUTION — Damaging
rear seat belt buckles
When you fold the rear (2nd
and/or 3rd row) seatback, insert
the buckle in the pocket between
the rear seatback and cushion.
Doing so can prevent the buckle
from being damaged by the rear
seatback.
Safety features of your vehicle
203
CAUTION — Rear seat belts
When returning the rear (2nd
and/or 3rd row) seatbacks to the
upright position, remember to
return the rear shoulder belts to
their proper position. Routing the
seat belt webbing through the
rear seat belt guides will help
keep the belts from being trapped
behind or under the seats.
OUN026140
WARNING — 3rd row seat
3rd row occupants should
always remain in the center of
the seat cushion so the occu-
pants head is protected by the
headrest.
If not, the tailgate may hit the
occupant’s head, which could
cause injury.
WARNING — Cargo
Cargo should always be
secured to prevent it from being
thrown about the vehicle in a
collision and causing injury to
the vehicle occupants. Do not
place objects in the rear (2nd
and/or 3rd row) seats,since they
cannot be properly secured and
may hit the front seat occupants
in a collision.
WARNING — Cargo loading
Make sure the engine is off, the
automatic transaxle is in P (Park)
or the manual transaxle is in R
(Reverse) or 1st, and the parking
brake is securely applied when-
ever loading or unloading cargo.
Failure to take these steps may
allow the vehicle to move if the
shift lever is inadvertently
moved to another position.
321
Safety features of your vehicle
Rear seat warmer (if equipped)
The seat warmer is provided to warm
the rear seats during cold weather.
With the ignition switch in the ON
position, push either of the switches
to warm rear seats.
During mild weather or under condi-
tions where the operation of the seat
warmer is not needed, keep the
switches in the «OFF» position.
The seat warmer defaults to the OFF
position whenever the ignition switch
is turned on.
✽✽
NOTICE
With the seat warmer switch in ON
position, the heating system in the
seat turns off or on automatically
depending on the seat temperature.
CAUTION
• When cleaning the seats, do
not use an organic solvent
such as thinner, benzene, alco-
hol and gasoline. Doing so may
damage the surface of the
heater or seats.
• To prevent overheating the seat
warmer, do not place anything
on the seats that insulates
against heat, such as blankets,
cushions or seat covers while
the seat warmer is in operation.
• Do not place heavy or sharp
objects on seats equipped
with seat warmers. Damage to
the seat warming components
could occur.
• Be careful not to spill liquid
such as water or beverages on
the seat.If you spill some liquid,
wipe the seat with a dry towel.
Before using the seat warmer,
dry the seat completely.
WARNING — Seat warmer
burns
Passengers should use extreme
caution when using seat warm-
ers due to the possibility of
excess heating or burns. The
seat warmer may cause burns
even at low temperatures, espe-
cially if used for long periods of
time. In particular, the driver
must exercise extreme care for
the following types of passen-
gers:
1. Infants, children, elderly or
handicapped persons, or
hospital outpatients
2. Persons with sensitive skin
or those that burn easily
3. Fatigued individuals
4. Intoxicated individuals
5. Individuals taking medication
that can cause drowsiness or
sleepiness (sleeping pills,
cold tablets, etc.)
OXMA033015
Safety features of your vehicle
223
Headrest
The rear seat(s) is equipped with
headrests in all the seating positions
for the occupant’s safety and com-
fort.
The headrest not only provides com-
fort for passengers, but also helps
protect the head and neck in the
event of a collision.
OHM038049N
*
*
* if equipped
WARNING — Headrest
adjustment
• For maximum effectiveness in
case of an accident, the head-
rest should be adjusted so the
middle of the headrest is at the
same height as the center of
gravity of an occupant’s head.
Generally, the center of gravi-
ty of most people’s head is
similar with the height of the
top of their eyes.
Also adjust the headrest as
close to your head as possi-
ble. For this reason, the use of
a cushion that holds the body
away from the seatback is not
recommended.
(Continued)
(Continued)
• Do not operate the vehicle
with the headrests removed.
Severe injury to an occupant
may occur in the event of an
accident. Headrests may pro-
vide protection against severe
neck injuries when properly
adjusted.
• Do not adjust the headrest
height while the vehicle is in
motion.
323
Safety features of your vehicle
Adjusting the height up and down
(for 2nd row seats)
To raise the headrest :
1. Pull it up to the desired position (1).
To lower the headrest :
1. Push and hold the release button
(2) on the headrest support
2. Lower the headrest to the desired
position (3).
Removal and installation
(for 2nd row seats)
To remove the headrest :
1. Raise it as far as it can go then
press the release button (1) while
pulling the headrest up (2).
To reinstall the headrest :
1. Put the headrest poles (3) into the
holes while pressing the release
button (1).
2. Adjust it to the appropr iate height.
OXMA033107
OXMA033108
■ Outside
■ Center
OXMA033018
Safety features of your vehicle
243
3rd row headrest (if equipped)
The headrest will fold down automat-
ically when the seatback folding.
Always be sure the headrest has
locked into position after you return
the seatback.
Armrest (2nd row seat)
To use the armrest, pull it forward
from the seatback.
WARNING
• Make sure the headrest locks
in position after adjusting it to
properly protect the occu-
pants.
• After installing the headrest,
make sure that it is installed
in the right direction.
A headrest installed reversely
could increase whiplash
injury during rear impact.
OXM039061N
OXMA043215
325
Safety features of your vehicle
SEAT BELTS
Seat belt restraint system
WARNING
• For maximum restraint sys-
tem protection, the seat belts
must always be used whenev-
er the vehicle is moving.
• Seat belts are most effective
when seatbacks are in the
upright position.
• Children age 12 and under
must always be properly
restrained in the rear seat.
Never allow children to ride in
the front passenger seat. If a
child over 12 must be seated
in the front seat, he/she must
be properly belted and the
seat should be moved as far
back as possible.
(Continued)
(Continued)
• Never wear the shoulder belt
under your arm or behind
your back. An improperly
positioned shoulder belt can
cause serious injuries in a
crash. The shoulder belt
should be positioned midway
over your shoulder across
your collarbone.
• Avoid wearing twisted seat
belts. A twisted belt can’t do
its job well. In a collision, it
could even cut into you. Be
sure the belt webbing is
straight and not twisted.
• Be careful not to damage the
belt webbing or hardware. If
the belt webbing or hardware
is damaged, replace it.
WARNING
Seat belts are designed to bear
upon the bony structure of the
body, and should be worn low
across the front of the pelvis or
the pelvis, chest and shoulders,
as applicable; wearing the lap
section of the belt across the
abdominal area must be avoided.
Seat belts should be adjusted as
firmly as possible, consistent
with comfort, to provide the pro-
tection for which they have been
designed.
A slack belt will greatly reduce
the protection afforded to the
wearer.
Care should be taken to avoid
contamination of the webbing
with polishes,oils and chemicals,
and particularly battery acid.
Cleaning may safely be carried
out using mild soap and water.
The belt should be replaced if
webbing becomes frayed, con-
taminated or damaged.
(Continued)
Safety features of your vehicle
263
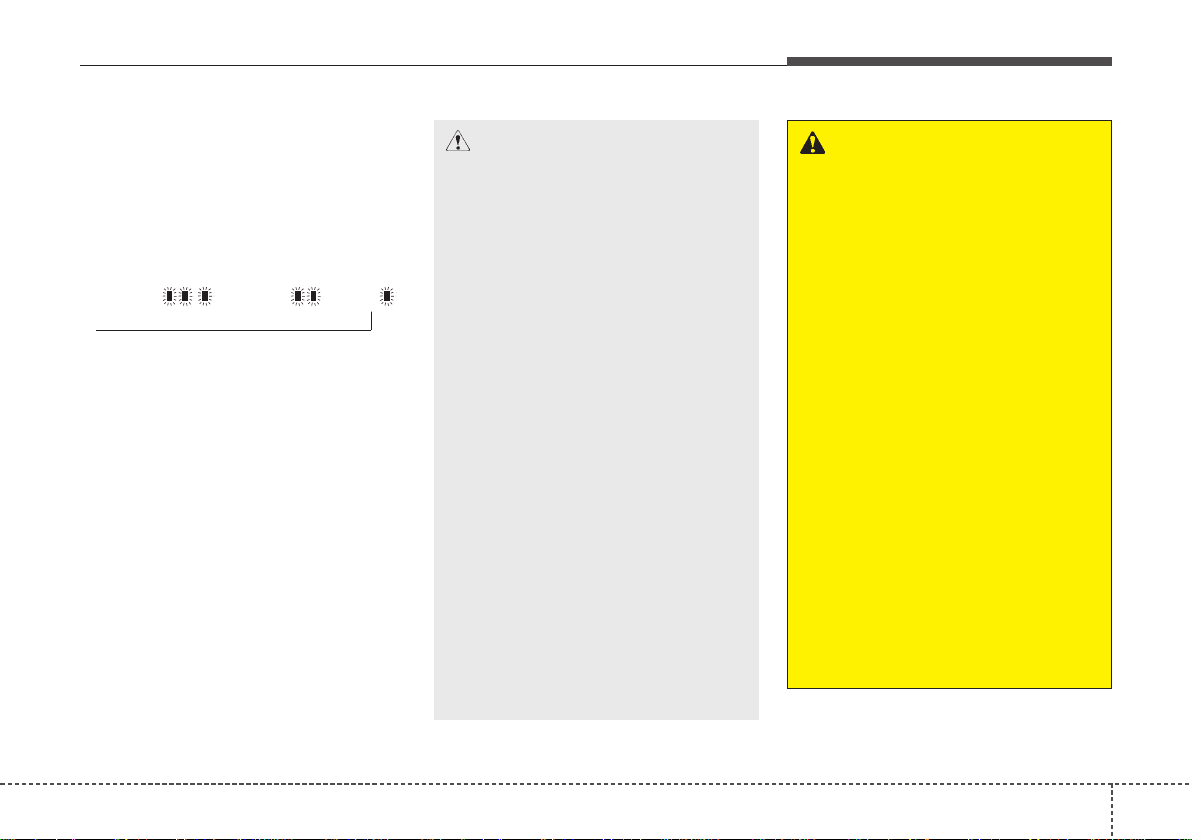
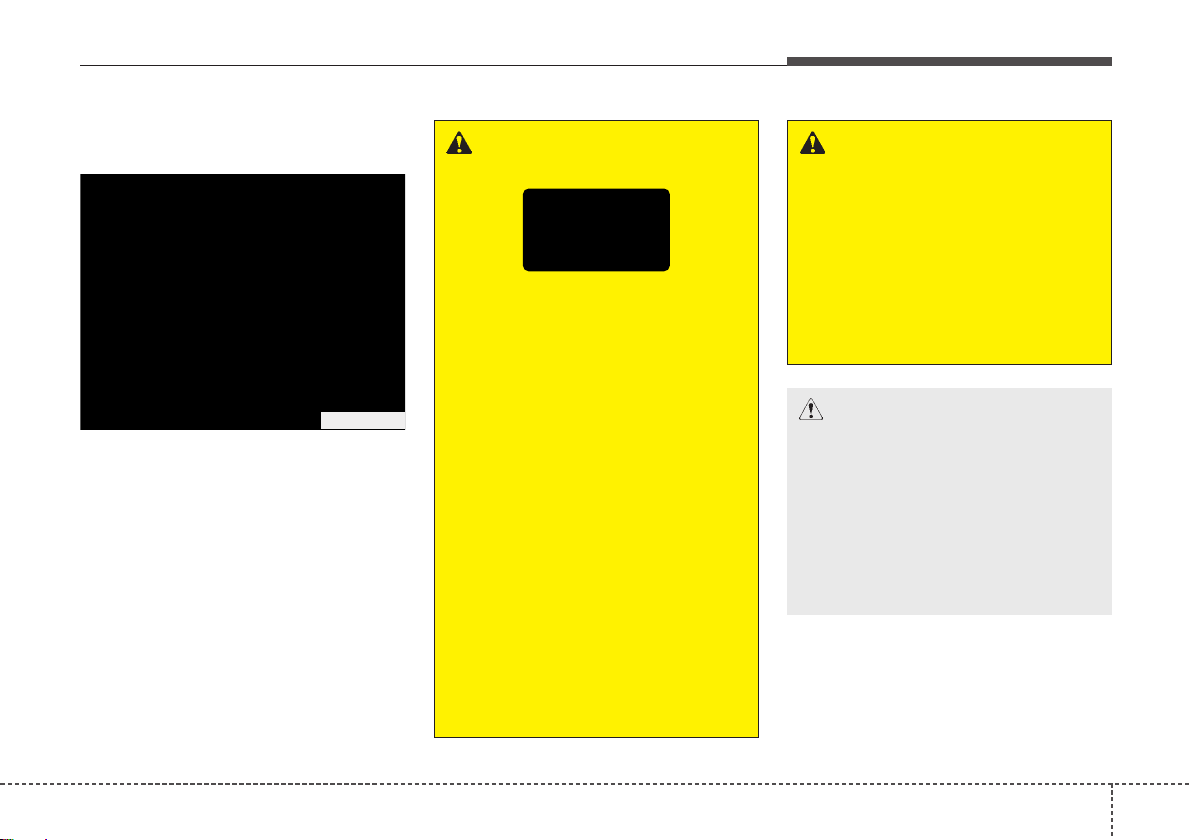
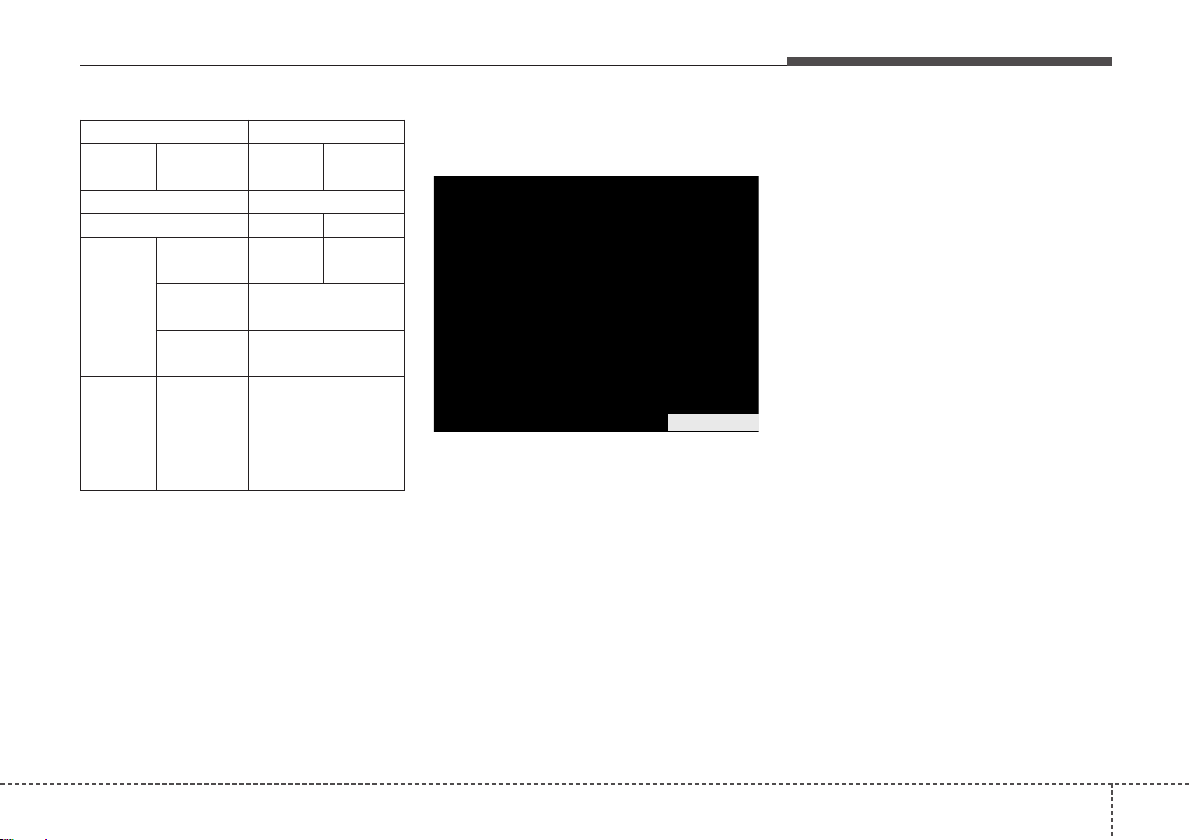
Seat belt warning (for driver’s seat)
The driver’s seat belt warning light
and chime will activate pursuant to
the following table when the ignition
switch is in «ON» position.
1GQA2083
(Continued)
It is essential to replace the
entire assembly after it has been
worn in a severe impact even if
damage to the assembly is not
obvious.
Belts should not be worn with
straps twisted. Each belt assem-
bly must only be used by one
occupant; it is dangerous to put
a belt around a child being car-
ried on the occupant’s lap.
WARNING
• No modifications or additions
should be made by the user
which will either prevent the
seat belt adjusting devices
from operating to remove
slack, or prevent the seat belt
assembly from being adjusted
to remove slack.
• When you fasten the seat belt,
be careful not to latch the seat
belt in buckles of other seat.It’s
very dangerous and you may
not be protected by the seat
belt properly.
• Do not unfasten the seat belt
and do not fasten and unfasten
the seat belt repeatedly while
driving. This could result in
loss of control,and an accident
causing death, serious injury,
or property damage.
• When fastening the seat belt,
make sure that the seat belt
does not pass over objects that
are hard or can break easily.
• Make sure there is nothing in
the buckle. The seat belt may
not be fastened securely.
327
Safety features of your vehicle
*
1
Warning pattern repeats 11 times
with an interval of 24 seconds. If
the driver’s seat belt is buckled, the
light will stop within 6 seconds and
chime will stop immediately.
*
2
The light will stop within 6 seconds
and chime will stop immediately.
Seat belt — Driver’s 3-point system
with emergency locking retractor
To fasten your seat belt:
To fasten your seat belt, pull it out of
the retractor and insert the metal tab
(1) into the buckle (2). There will be
an audible «click» when the tab locks
into the buckle.
The seat belt automatically adjusts to
the proper length only after the lap
belt portion is adjusted manually so
that it fits snugly around your hips. If
you lean forward in a slow, easy
motion, the belt will extend and let
you move around. If there is a sud-
den stop or impact, however, the belt
will lock into position. It will also lock
if you try to lean forward too quickly.
✽✽
NOTICE
If you are not able to pull out the
seat belt from the retractor, firmly
pull the belt out and release it. Then
you will be able to pull the belt out
smoothly.
B180A01NF-1
Conditions Warning Pattern
Seat Belt
Vehicle
Speed
Light-Blink
Chime-
Sound
Unbuckled 6 seconds
Buckled 6 seconds None
Buckled →
Unbuckled
Below 5 km/h
(3 mph)
6 seconds None
5 km/h~
10 km/h
6 seconds
Above 10 km/h
(6 mph)
6 sec. on / 24 sec. off
(11 times)
Unbuckled
Above 10 km/h
(6 mph)
↓
Below 5 km/h
(3 mph)
6 seconds *
1
↓
Stop *
2
Safety features of your vehicle
283
Height adjustment
You can adjust the height of the shoul-
der belt anchor to one of the 4 posi-
tions for maximum comf ort and safety.
The height of the adjusting seat belt
should not be too close to your neck.
The shoulder portion should be
adjusted so that it lies across your
chest and midway over your shoulder
near the door and not your neck.
To adjust the height of the seat belt
anchor, lower or raise the height
adjuster into an appropriate position.
To raise the height adjuster, pull it up
(1).To lower it, push it down (3) while
pressing the height adjuster button
(2).
Release the button to lock the
anchor into position. Try sliding the
height adjuster to make sure that it
has locked into position.
B200A02NF
WARNING
You should place the lap belt
portion as low as possible and
snugly across your hips, not on
your waist.If the lap belt is locat-
ed too high on your waist, it may
increase the chance of injury in
the event of a collision. Both
arms should not be under or
over the belt. Rather, one should
be over and the other under, as
shown in the illustration.
Never wear the seat belt under
the arm that is near the door.
WARNING
• Verify that the shoulder belt
anchor is locked into position
at the appropriate height.
Never position the shoulder
belt across your neck or face.
Improperly positioned seat
belts can cause serious
injuries in an accident.
• Failure to replace seat belts
after an accident could leave
you with damaged seat belts
that will not provide protec-
tion in the event of another
collision leading to personal
injury or death. Replace your
seat belts after being in an
accident as soon as possible.
OXM039026
Front seat
329
Safety features of your vehicle
Seat belts — Front passenger and
rear seat 3-point system with
combination locking retractor
To fasten your seat belt:
Combination retractor type seat belts
are installed in the rear seat posi-
tions to help accommodate the
installation of child restraint systems.
Although a combination retractor is
also installed in the front passenger
seat position, it is strongly recom-
mended that children always be
seated in the rear seat. NEVER
place any infant restraint system in
the front seat of the vehicle.
This type of seat belt combines the
features of both an emergency lock-
ing retractor seat belt and an auto-
matic locking retractor seat belt. To
fasten your seat belt, pull it out of the
retractor and insert the metal tab into
the buckle. There will be an audible
«click» when the tab locks into the
buckle. When not securing a child
restraint, the seat belt operates in the
same way as the driver’s seat belt
(Emergency Locking Retractor Type).
It automatically adjusts to the proper
length only after the lap belt portion
of the seat belt is adjusted manually
so that it fits snugly around your hips.
When the seat belt is fully extended
from the retractor to allow the instal-
lation of a child restraint system, the
seat belt operation changes to allow
the belt to retract, but not to extend
(Automatic Locking Retractor Type).
Refer to “Using a child restraint sys-
tem” in this section.
✽✽
NOTICE
Although the combination retractor
provides the same level of protection
for seated passengers in either emer-
gency or automatic locking modes,
have the seated passengers use the
emergency locking feature for
improved convenience. The auto-
matic locking function is intended to
facilitate child restraint installation.
To convert from the automatic lock-
ing feature to the emergency locking
operation mode, allow the unbuck-
led seat belt to fully retract.
CAUTION
Do NOT fold down the left por-
tion of the rear seat back when
the rear center seat belt is buck-
led. ALWAYS UNBUCKLE the
rear center seat belt before fold-
ing down the left portion of the
rear seat back. If the rear center
seat belt is buckled when the
left portion of the rear seat back
is folded down, distortion and
damage to the top portion of the
seat back and seat belt garnish
may result, causing the seat
back to lock into the folded
down position.
Safety features of your vehicle
303
When using the rear center seat belt,
the buckle with the “CENTER” mark
must be used.
To release the seat belt:
The seat belt is released by pressing
the release button (1) on the locking
buckle. When it is released, the belt
should automatically draw back into
the retractor.
If this does not happen, check the
belt to be sure it is not twisted, then
try again.
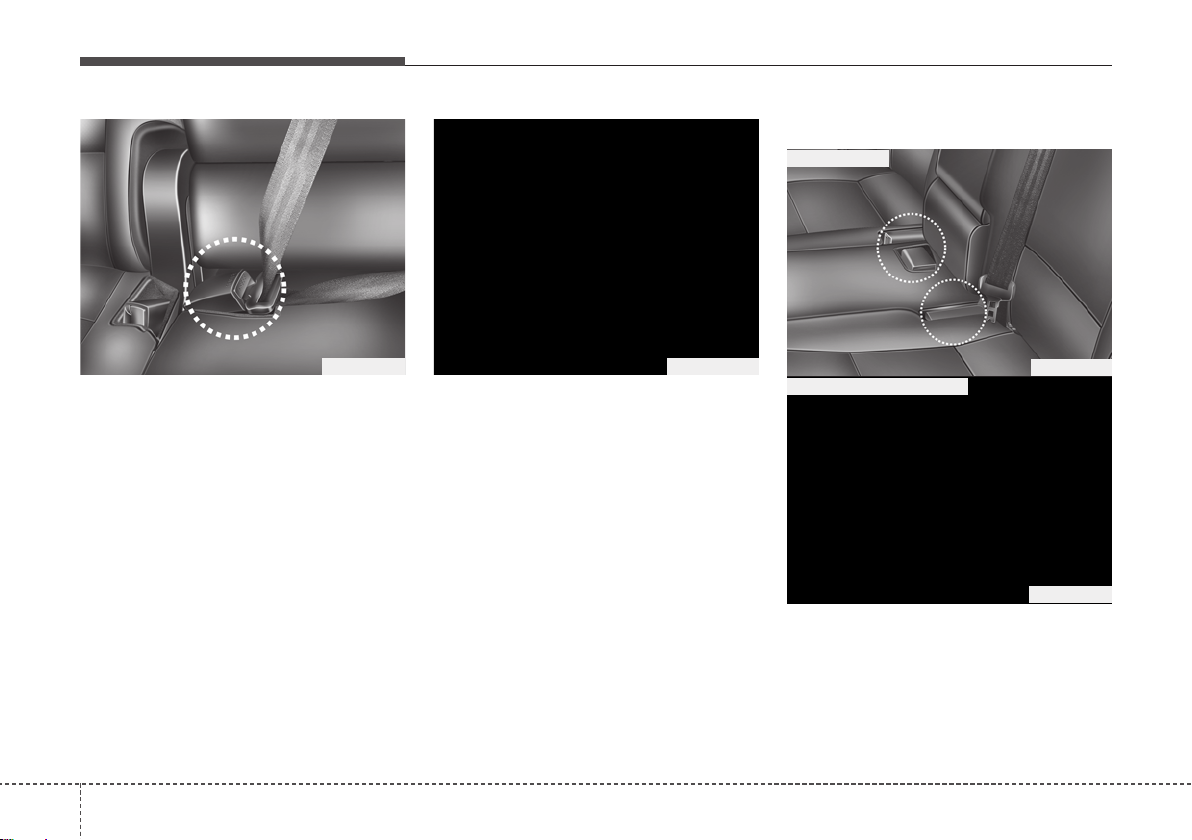
Stowing the rear seat belt
The rear seat belt buckles can be
stowed in the pocket between the
rear seatback and cushion when not
in use.
ODM032051
B210A01NF-1
ODM032034
OXM039030
■ 2nd row seat
■ 3rd row seat (if equipped)
331
Safety features of your vehicle
Routing the seat belt webbing
through the rear seat belt guides will
help keep the belts from being
trapped behind or under the seats.
After inserting the seat belt, tighten
the belt webbing by pulling it up.
Pre-tensioner seat belt
Your vehicle is equipped with driver’s
and front passenger’s pre-tensioner
seat belts (retractor pretensioner and
EFD (Emergency Fastening Device)).
The pre-tensioner seat belts may be
activated, when a frontal collision is
severe enough, together with the air
bags.
When the vehicle stops suddenly, or
if the occupant tries to lean forward
too quickly, the seat belt retractor
may lock into position. In certain
frontal collisions, the pre-tensioner
will activate and pull the seat belt into
tighter contact against the occu-
pant’s body.
CAUTION
Remove the seat belt from the
guides before using. If you pull
on the seat belt when it is stored
in the guides, it may damage the
guides and/or belt webbing.
OXM039031
OXM039032
■ 2nd row seat
■ 3rd row seat (if equipped)
OXMA033101
Safety features of your vehicle
323
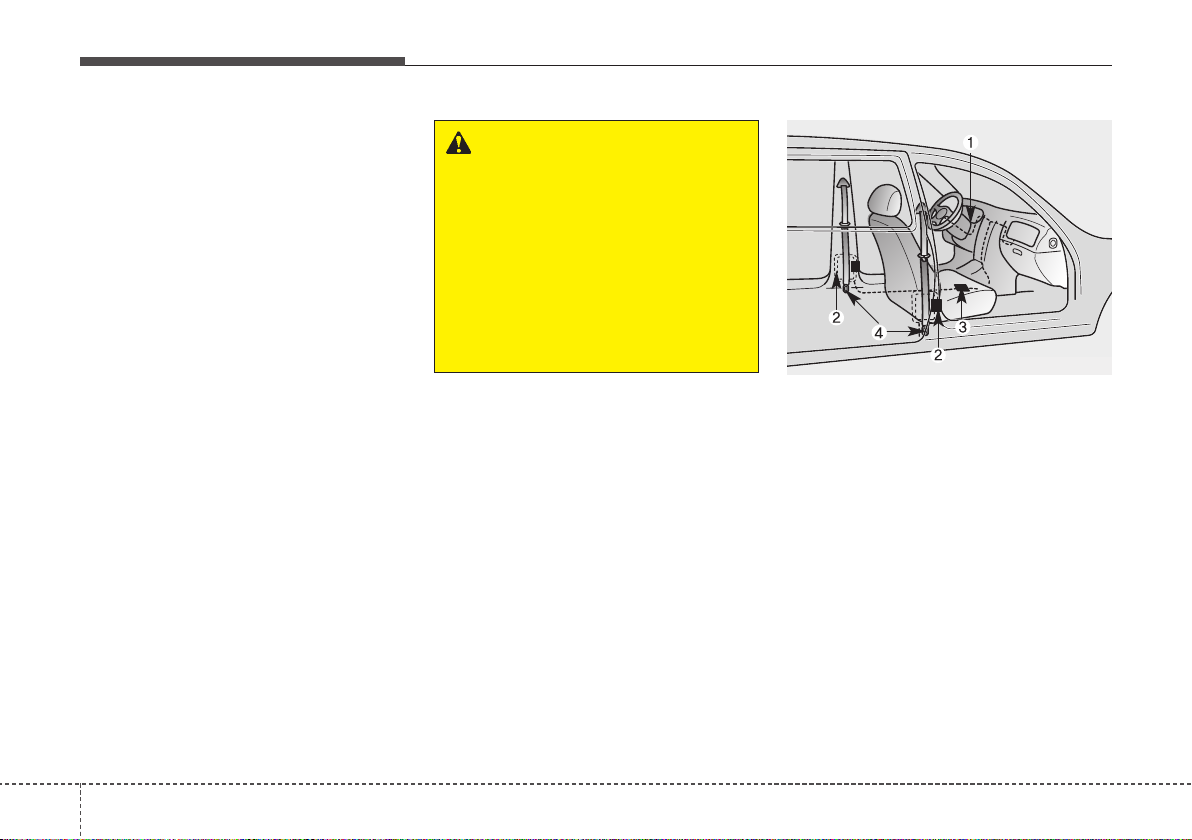
(1) Retractor Pretensioner
The purpose of the retractor pre-
tensioner is to make sure that the
shoulder belts fit in tightly against
the occupant’s upper body in cer-
tain frontal collisions.
(2) EFD (Emergency Fastening Device)
The purpose of the EFD is to
make sure that the pelvis belts fit
in tightly against the occupant’s
lower body in certain frontal colli-
sions.
If the system senses excessive ten-
sion on the driver or passenger’s
seat belt when the pre-tensioner sys-
tem activates, the load limiter inside
the retractor pre-tensioner will release
some of the pressure on the affected
seat belt.
The seat belt pre-tensioner system
consists mainly of the following com-
ponents.Their locations are shown in
the illustration:
1. SRS air bag war ning light
2. Retractor pre-tensioner assembly
3. SRS control module
4.Emergency fastening device (EFD)
WARNING
• Do not put anything near the
buckle. Placing objects near
the buckle may increase the
risk of personal injury in the
event of a collision.
• For your safety, be sure that
the belt webbing is not loose
or twisted and always sit
properly on your seat.
ODMESA2024
333
Safety features of your vehicle
WARNING
To obtain maximum benefit
from a pre-tensioner seat belt:
1.The seat belt must be worn
correctly and adjusted to the
proper position. Please read
and follow all of the important
information and precautions
about your vehicle’s occupant
safety features – including
seat belts and air bags – that
are provided in this manual.
2. Be sure you and your passen-
gers always wear seat belts
properly.
✽✽
NOTICE
• Both the driver’s and front pas-
senger’s seat belt pre-tensioner
system may be activated not only
in certain frontal collision but also
in certain side collision or rollover,
if the vehicle is equipped with a
side or curtain air bag.
• When the pre-tensioner seat belts
are activated, a loud noise may be
heard and fine dust, which may
appear to be smoke, may be visible
in the passenger compartment.
These are normal operating condi-
tions and are not hazardous.
• Although it is harmless, the fine
dust may cause skin irritation and
should not be breathed for pro-
longed periods. Wash all exposed
skin areas thoroughly after an
accident in which the pre-tension-
er seat belts were activated.
• Because the sensor that activates
the SRS air bag is connected with
the pre-tensioner seat belt, the
SRS air bag warning light on
the instrument panel will illumi-
nate for approximately 6 seconds
after the ignition switch has been
turned to the ON position, and
then it should turn off.
CAUTION
If the pre-tensioner seat belt
system are not working proper-
ly, this warning light will illumi-
nate even if there is no malfunc-
tion of the SRS air bag. If the
SRS air bag warning light does
not illuminate when the ignition
switch is turned ON, or if it
remains illuminated after illumi-
nating for approximately 6 sec-
onds, or if it illuminates while
the vehicle is being driven, have
an authorized Kia dealer inspect
the pre-tensioner seat belt and
SRS air bag system as soon as
possible.
Safety features of your vehicle
343
Seat belt precautions
WARNING
• Pre-tensioners are designed
to operate only one time. After
activation, pre-tensioner seat
belts must be replaced. All
seat belts, of any type, should
always be replaced after they
have been worn during a colli-
sion.
• The pre-tensioner seat belt
assembly mechanisms become
hot during activation. Do not
touch the pre-tensioner seat
belt assemblies for several min-
utes after they have been acti-
vated.
• Do not attempt to inspect or
replace the pre-tensioner seat
belts yourself. This must be
done by an authorized Kia
dealer.
• Do not strike the pre-tension-
er seat belt assemblies.
• Do not attempt to service or
repair the pre-tensioner seat
belt system in any manner.
(Continued)
(Continued)
• Improper handling of the pre-
tensioner seat belt assem-
blies, and failure to heed the
warnings not to strike, modify,
inspect, replace, service or
repair the pre-tensioner seat
belt assemblies may lead to
improper operation or inad-
vertent activation and serious
injury.
• Always wear the seat belts
when driving or riding in a
motor vehicle.
• If the vehicle or pre-tensioner
seat belt must be discarded,
contact an authorized Kia
dealer.
WARNING
All occupants of the vehicle
must wear their seat belts at all
times. Seat belts and child
restraints reduce the risk of
serious or fatal injuries for all
occupants in the event of a col-
lision or sudden stop.Without a
seat belt, occupants could be
shifted too close to a deploying
air bag, strike the interior struc-
ture or be thrown from the vehi-
cle. Properly worn seat belts
greatly reduce these hazards.
Even with advanced air bags,
unbelted occupants can be
severely injured by a deploying
air bag.
Always follow the precautions
about seat belts, air bags and
occupant seating contained in
this manual.
335
Safety features of your vehicle
Infant or small child
You should be aware of the specific
requirements in your state. Child
and/or infant seats must be properly
placed and installed in the rear coun-
try. For more information about the
use of these restraints, refer to “Child
restraint system” in this section.
✽✽
NOTICE
Small children are best protected
from injury in an accident when
properly restrained in the rear seat
by a child restraint system that
meets the requirements of the safety
standards of your country. Before
buying any child restraint system,
make sure that it has a label certify-
ing that it meets safety standards of
your country. The restraint must be
appropriate for your child’s height
and weight. Check the label on the
child restraint for this information.
Refer to “Child restraint system” in
this section.
Larger children
Children who are too large for child
restraint systems should always
occupy the rear seat and use the
available lap/shoulder belts. The lap
portion should be fastened and
snugged on the hips and as low as
possible.Check if the belt fits period-
ically. A child’s squirming could put
the belt out of position. Children are
given the most safety in the event of
an accident when they are restrained
by a proper restraint system in the
rear seat. If a larger child (over age
12) must be seated in the front seat,
the child should be securely
restrained by the available lap/shoul-
der belt and the seat should be
placed in the rearmost position.
Children age 12 and under should be
restrained securely in the rear seat.
NEVER place a child age 12 and
under in the front seat.NEVER place
a rear facing child seat in the front
seat of a vehicle.
WARNING
Every person in your vehicle
needs to be properly restrained
at all times, including infants
and children. Never hold a child
in your arms or lap when riding
in a vehicle. The violent forces
created during a crash will tear
the child from your arms and
throw the child against the inte-
rior.Always use a c hild restraint
appropriate for your child’s
height and weight.
Safety features of your vehicle
363
If the shoulder belt portion slightly
touches the child’s neck or face, try
placing the child closer to the center of
the vehicle. If the shoulder belt still
touches their face or neck the y need to
be returned to a child restraint system.
Restraint of pregnant women
Pregnant women should wear
lap/shoulder belt assemblies when-
ever possible according to specific
recommendations by their doctors.
The lap portion of the belt should be
worn AS SECURELY AND LOW AS
POSSIBLE.
Injured person
A seat belt should be used when an
injured person is being transported.
When this is necessary, you should
consult a physician for recommenda-
tions.
One person per belt
Two people (including children)
should never attempt to use a single
seat belt. This could increase the
severity of injuries in case of an acci-
dent.
Do not lie down
To reduce the chance of injuries in
the event of an accident and to
achieve maximum effectiveness of
the restraint system, all passengers
should be sitting up and the front and
rear seats should be in an upright
position when the vehicle is moving.
A seat belt cannot provide proper
protection if the person is lying down
in the rear seat or if the front and rear
seats are in a reclined position.
WARNING — Pregnant
women
Pregnant women must never
place the lap portion of the
safety belt over the area of the
abdomen where the fetus is
located or above the abdomen
where the belt could crush the
fetus during an impact.
WARNING — Shoulder
belts on small children
• Do not allow small children to
ride in the vehicle without an
appropriate child restrain sys-
tem.
• Never allow a shoulder belt to
be in contact with a child’s
neck or face while the vehicle
is in motion.
• If seat belts are not properly
worn and adjusted on chil-
dren,there is a risk of death or
serious injury.
 Loading…
Скачать инструкцию Инструкция по эксплуатации
Описание инструкции
Подголовник активного типа предназначен для того, чтобы сместиться вперед и вверх при получении сигнала об ударе в автомобиль сзади. Это предотвращает резкое откидывание назад головы водителя и пассажира, находящегося на переднем сиденье, что помогает защищать их от получения травм шеи. В целях безопасности активный подголовник сделан несъемным. В случае возникновения проблем с активным подголовником, рекомендуем обратиться к уполномоченному дилеру Kia для проверки системы. Никогда не размещайте плечевой ремень безопасности под рукой или за спиной. Неправильное положение плечевого ремня безопасности может привести к получению серьезных травм при столкновении. Плечевой ремень безопасности должен лежать на плече так, чтобы пересекать ключицу в ее средней точке. • Недопустимо накидывать ремень безопасности поверх хрупких предметов. В случае резкого торможения или столкновения они могут быть повреждены ремнем. • Избегайте перекручивания ремней безопасности при их застегивании. Эффективность перекрученного ремня безопасности невысока. При столкновении он может даже врезаться в тело человека. Убедитесь в том, что ремень безопасности не перекручен и лежит прямо.