Автосервис АвтоМиг в Коптево
Автосервис САО — МЦД Красный Балтиец:
Ближайшие для подъезда улицы – Космонавта Волкова, Приорова, Новая Ипатовка, Большая Академическая.
Автосервис АвтоМиг в Лефортово
Автосервис ЮВАО, ВАО — метро Авиамоторная:
Ближайшие станции метро — Авиамоторная, Площадь Ильича, Шоссе Энтузиастов, Чкаловская, Бауманская, Семеновская. Ближайшие для подъезда улицы — третье транспортное кольцо (ТТК), проезд завода Серп и Молот, Лефортовский вал, Красноказарменная улица.
Автосервис АвтоМиг в Щукино
Автосервис СЗАО, САО — метро Октябрьское поле, станция Зорге МЦК (район Щукино, Хорошёво—Мнёвники)
Ближайшие станции метро — Октябрьское поле, Полежаевская. Станция Московского Центрального Кольца — Зорге. Ближайшие для подъезда улицы — Маршала Бирюзова, Берзарина, Народного ополчения, Зорге, Куусинена, Расплетина.
Автосервис АвтоМиг в Измайлово
Автосервис ВАО — метро Соколиная гора (район Измайлово)
Ближайшие станции метро — Соколиная гора, Партизанская, Измайлово, Шоссе Энтузиастов, Черкизовская. Ближайшие для подъезда улицы — Вернисажная, Шоссе Энтузиастов, проспект Будённого, Северо-Восточная хорда, Щербаковская улица, Большая Черкизовская улица.
Автосервис АвтоМиг в Гольяново
Автосервис ВАО — метро Щелковская (район Гольяново)
Ближайшие станции метро — Щелковская, Черкизовская, Бульвар Рокоссовского, Первомайская, Партизанская, Измайловская. Ближайшие для подъезда улицы — Щелковское шоссе, Амурская, Сиреневый бульвар, Монтажная улица, Байкальская улица, Открытое шоссе.
AUTO-TEXCENTER.RU
Франшиза автосервиса, Вакансии автосервиса, Инструкции к корейским авто, Инструкции к китайским авто
Ремонт (сервис) корейских автомобилей. Специализированный техцентр (автосервис) в Москве. Copyright © 2000-2023. Все права сохранены. Обращаем Ваше внимание на то, что данный сайт носит исключительно информационный характер и ни при каких условиях не является публичной офертой, определяемой положениями Статьи 437 (2) Гражданского кодекса Российской Федерации.
Компания «АвтоМиг» является НЕОФИЦИАЛЬНЫМ техническим центром по обслуживанию и ремонту автомобилей марок KIA и HYUNDAI. Никакого отношения ни к официальным представителям (дилерам), ни к самим производителям транспортных средств автосервис не имеет! Все упоминания торговых знаков (марок автомобилей) на данном сайте носят исключительно ИДЕНТИФИЦИРУЮЩИЙ характер (используются не в качестве средства индивидуализации), указывают, какие именно автомобили обслуживает техцентр (в соответствии со ст. 1474, 1487 Гражданского Кодекса РФ).
-
Contents
-
Table of Contents
-
Bookmarks
Quick Links
features & functions
GUIDE
SPECTRA
Related Manuals for Kia 2007 Spectra
Summary of Contents for Kia 2007 Spectra
-
Page 1
features & functions GUIDE SPECTRA… -
Page 2
Congratulations On Your New Kia! Your new Kia vehicle has been designed, engineered and manufactured to provide you with years of comfortable, safe and dependable driving. Kia is committed to quality, innovation, safety and – above all – your satisfaction. Using This Guide The information contained in this guide will help you become familiar with the operation and features of your new Kia vehicle. -
Page 3: Table Of Contents
Headlights Control & • Turn Signals • Windshield Wiper & Washer Controls • Cruise Control * If equipped. Always check the Owner’s Manual for complete operating information and safety warnings. KIA DELIVERY FIRST – THE PRIORIT Y THAT DELIVERS MORE…
-
Page 4: Driver’s Controls Exterior
Fuel Cap/Check Engine Light Tighten cap at least 3 clicks or more, otherwise the ‘Check Engine’ light in the instrument cluster may illuminate, requiring you to securely tighten the cap. KIA DELIVERY FIRST – THE PRIORIT Y THAT DELIVERS MORE…
-
Page 5: Power Windows
L or R position for the left or right mirror and use the mirror adjusting control to select the desired position. * If equipped. Always check the Owner’s Manual for complete operating information and safety warnings. KIA DELIVERY FIRST – THE PRIORIT Y THAT DELIVERS MORE…
-
Page 6: Instrument Cluster
– ABS Warning: Indicates a potential problem with the Anti-lock Brake System. Brake pads may occasionally – Low Fuel: There are approximately 2.25 gallons of squeak, that is normal. fuel remaining. KIA DELIVERY FIRST – THE PRIORIT Y THAT DELIVERS MORE…
-
Page 7: Tire Pressure Monitoring System (Tpms)
*If equipped. Always check the Owner’s Manual for complete operating information and safety warnings. KIA DELIVERY FIRST – THE PRIORIT Y THAT DELIVERS MORE…
-
Page 8: Steering Wheel/Panel/Stalk Controls
When the parking lights or headlights are on, rotate the control knob to adjust the instrument panel display brightness to the desired level. KIA DELIVERY FIRST – THE PRIORIT Y THAT DELIVERS MORE…
-
Page 9: Headlights Control & Turn Signals
“ON” position. Use the fog lights for improved visibility in inclement weather. AUTO * If equipped. Always check the Owner’s Manual for complete operating information and safety warnings. KIA DELIVERY FIRST – THE PRIORIT Y THAT DELIVERS MORE…
-
Page 10: Windshield Wiper & Washer Controls
Sprays washer fl uid with 1-2 cycles. OFF: Wiper is not in operation. INT: Wiper operates intermittently at the same wiping intervals. Continuous wiper speed. ROTATE Bottom Sprays washer fl uid and wipes. KIA DELIVERY FIRST – THE PRIORIT Y THAT DELIVERS MORE…
-
Page 11: Cruise Control
2. Hold the SET/COAST switch, your speed will decrease gradually. Let go of the button when you reach your desired speed. * If equipped. Always check the Owner’s Manual for complete operating information and safety warnings. KIA DELIVERY FIRST – THE PRIORIT Y THAT DELIVERS MORE…
-
Page 12: Center Panel Controls
The tripmeter can record individual TRIP trip distances for up to two different trips (A or B). To reset the the meter to “0” press for longer than 1 second. KIA DELIVERY FIRST – THE PRIORIT Y THAT DELIVERS MORE…
-
Page 13: Audio System
OFF modes for the desired tone quality. NOTICE: Forcing the CD into the slot may damage the player. * If equipped. Always check the Owner’s Manual for complete operating information and safety warnings. KIA DELIVERY FIRST – THE PRIORIT Y THAT DELIVERS MORE…
-
Page 14
FADER and BALANCE listening modes, then rotate the Volume Knob to adjust each accordingly. Press to turn the system On or Off, rotate the knob clockwise to increase or counterclockwise to decrease the volume. KIA DELIVERY FIRST – THE PRIORIT Y THAT DELIVERS MORE… -
Page 15: Auxiliary Audio Input Jack
NOTE: This Auxiliary Audio Input Jack is located to the left of the Gear Shift Selector. * If equipped. Always check the Owner’s Manual for complete operating information and safety warnings. KIA DELIVERY FIRST – THE PRIORIT Y THAT DELIVERS MORE…
-
Page 16: Climate Control
NOTE: When defrost is selected, outside fresh air and window fogging. air conditioning are activated automatically, this will further reduce window fogging. KIA DELIVERY FIRST – THE PRIORIT Y THAT DELIVERS MORE…
-
Page 17: Manual Gear Shift
2. Press the clutch pedal down fully while shifting, release it slowly. 3. Return the gear shift lever to the neutral position before shifting into reverse. Always check the Owner’s Manual for complete operating information and safety warnings. KIA DELIVERY FIRST – THE PRIORIT Y THAT DELIVERS MORE…
-
Page 18: Roof Panel Controls
In the DOOR position, dome light will come on when a door is opened and go off when all doors and hatch (Spectra5 SX) DOOR are shut. KIA DELIVERY FIRST – THE PRIORIT Y THAT DELIVERS MORE…
-
Page 19: Seating
WARNING: Adjusting the driver seat with the vehicle in motion could cause loss of control and a serious accident. * If equipped. Always check the Owner’s Manual for complete operating information and safety warnings. KIA DELIVERY FIRST – THE PRIORIT Y THAT DELIVERS MORE…
-
Page 20: Manual Adjustable Passenger’s Seat
1. Lean forward slightly and pull up on the seatback recline lever 2. Lean back on the seat until the desired position is attained. 3. Release the seatback recline lever and make sure the seat is locked in place. KIA DELIVERY FIRST – THE PRIORIT Y THAT DELIVERS MORE…
-
Page 21: 60/40-Split Folding Rear Seats (4-Door)
2. Lift the seatback up and fi rmly lock it into place. 3. Return the rear seat belts to their proper positions. Always check the Owner’s Manual for complete operating information and safety warnings. KIA DELIVERY FIRST – THE PRIORIT Y THAT DELIVERS MORE…
-
Page 22: 60/40-Split Folding
2. Lift and fi rmly push the seatback toward the rear of the vehicle until it clicks into place. 3. Reposition the rear seatbelts so they’re clear of the seatbacks 4. Reinsert the headrests into the seatbacks. KIA DELIVERY FIRST – THE PRIORIT Y THAT DELIVERS MORE…
-
Page 23: Safety
PASSENGER AIR BAG OFF Please refer to your Owner’s Manual and the separate brochure entitled “Your Safety is Important to Kia” for more detailed information regarding your vehicle’s air bags. WARNING: Always properly restrain children in the rear seat of your vehicle.
-
Page 24
Check tire pressure monthly. Replace air conditioner air filter every 10,000 miles. 90,000 miles Warranty may be voided if maintenance schedule is not followed. See your local Kia retailer for factory trained technicians and genuine Kia parts. 97,500 miles See your Owner’s Manual for more details and complete maintenance information, including severe maintenance schedule.
This manual is also suitable for:
Spectra
«Киа Спектра» является семейным корейским автомобилем и здесь вы найдете информацию по его ремонту, техническому обслуживанию и эксплуатации. Производился этот автомобиль с 2000 года по 2009 год. В этом руководстве по ремонту описываются четырехцилиндровые двигатели объемом 1,6 литра мощностью 101 л.с. с двумя распределительными валами (DOHC) и шестнадцатью клапанами. Также вы найдете пошаговые инструкции для ремонта кузовных элементов, ходовой части, трансмиссии, тормозной системы, рулевого управления и электрооборудования «Kia Spectra» (включая электрические схемы).
Ссылка в разных форматах на этот раздел
TextHTMLBB Code
- Руководства по ремонту
- Kia Spectra 2000-2011
Общая информация об автомобиле.
Автомобиль Kia Spectra был разработан для истинных ценителей комфорта и стиля, что прекрасно сочетается с безопасностью.
Под капотом находится 1,6-литровый бензиновый двигатель, способный развивать мощность до 101,5 л.с.
При проектировании подвески были вовлечены все самые новые технологии, способны создавать комфорт и полный контроль при вождении по неровным дорожным участкам.
В плане безопасности разработчики так же потрудились на славу, создав все необходимые для этого условия: большая площадь тормозных колодок в сочетании с усиленными суппортами значительно сокращают тормозной путь и увеличивают уровень безопасности на дороге.
Дизайн Киа Спектра также был разработан с комфортом – обтекаемость кузова как бы говорит о плавном и уверенном движении. Гладкие формы пар и задних фонарей лишь подчеркивают силуэт автомобиля. В салоне Спектры все сделано с удобством для пассажиров и водителя. Установлен кондиционер и обогреватель, управление которыми производится при помощи специальных рукояток. Сидения сделаны из качественных материалов, а расстояние между ними подобрано так, чтобы для пассажиров было достаточно свободного места. Ими будет ощущаться высокий уровень комфорта даже во время длительных поездок.
К тому же, салон оснащен различными приятными мелочами, вроде солнцезащитных козырьков и держателей для стаканов – это сделает пребывание в автомобиле еще более приятным.
Ремонт Kia Spectra проводится в специализированных автомастерских, хотя это можно провести и своими руками. Для качественного ремонта вы можете воспользоваться онлайн руководством, а также скачать его.
Оценивая модель Spectra можно с уверенностью сказать, что она сочетает в себе все те качества, которые должны быть в комфортном семейном автомобиле. Начиная от просторного кузова и вместительного багажника, а заканчивая надежным и экономичным двигателем.
Существует также новая модификация «Спектры» – SX, которая находится на порядок выше своих предшественников. Обновление интерьера и подвески придают ей спортивного вида.
↓ Комментарии ↓
Раздел 1. Устройство автомобиля
Общие сведения об автомобиле
Паспортные данные
Ключи автомобиля
Органы управления
Отопление (кондиционирование) и вентиляция салона
Двери
Ремни безопасности, подушки безопасности и детские сиденья
Сиденья
Регулировка положения рулевого колеса
Зеркала заднего вида
Освещение салона
Противосолнечные козырьки
Капот
Крышка багажника
Рычаг управления коробкой передач
Раздел 2. Рекомендации по эксплуатации
Правила техники безопасности и рекомендации
Что нужно иметь в автомобиле
Обкатка автомобиля
Эксплуатация автомобиля в гарантийный период
Подготовка автомобиля к выезду
Заправка автомобиля бензином
Пользование домкратом
Буксировка автомобиля
Раздел 3. Неисправности в пути
Двигатель не заводится
Неисправности системы впрыска топлива
Пропал холостой ход
Перебои в работе двигателя
Автомобиль движется рывками
Автомобиль плохо разгоняется
Двигатель заглох во время движения
Упало давление масла
Перегрев двигателя
Аккумуляторная батарея не подзаряжается
Неисправности электрооборудования
Появились посторонние стуки
Проблемы с тормозами
Проверка тормозной системы
Прокол колеса
Раздел 4. Техническое обслуживание
Общие положения
Ежедневное обслуживание (ЕО)
Первое техническое обслуживание (ТО-1)
Второе техническое обслуживание (ТО-2)
Раздел 5. Двигатель
Особенности конструкции
Возможные неисправности двигателя, их причины и способы устранения
Полезные советы
Проверка компрессии в цилиндрах
Снятие и установка декоративного кожуха двигателя
Снятие и установка брызговиков двигателя
Замена опор подвески силового агрегата
Замена защитного бруса
Установка поршня первого цилиндра в положение ВМТ такта сжатия
Замена ремня привода газораспределительного механизма
Замена натяжного и опорного роликов ремня привода газораспределительного механизма
Снятие, дефектовка и установка маховика
Замена деталей уплотнения двигателя
Головка блока цилиндров двигателя
Снятие и установка двигателя
Система смазки
Система охлаждения двигателя
Cистема выпуска отработавших газов двигателя
Система питания двигателя
Раздел 6. Трансмиссия
Сцепление
Коробка передач
Приводы передних колес
Раздел 7. Ходовая часть
Передняя подвеска
Задняя подвеска
Раздел 8. Рулевое управление
Особенности конструкции
Возможные неисправности рулевого управления с гидроусилителем, их причины и способы устранения
Рулевая колонка
Рулевые тяги
Раздел 9. Тормозная система
Особенности конструкции
Возможные неисправности тормозной системы, их причины и способы устранения
Прокачка гидропривода тормозной системы
Главный тормозной цилиндр
Вакуумный усилитель тормозов
Замена шлангов и трубок гидропривода тормозов
Тормозные механизмы передних колес
Тормозные механизмы задних колес
Стояночный тормоз
Раздел 10. Электрооборудование
Особенности конструкции
Диагностика неисправностей бортового электрооборудования
Монтажные блоки
Аккумуляторная батарея
Генератор
Стартер
Выключатель (замок) зажигания
Система зажигания
Система управления двигателем
Освещение, световая и звуковая сигнализация
Очиститель ветрового стекла
Снятие и установка омывателя ветрового стекла
Снятие и установка электродвигателя вентилятора радиатора системы охлаждения двигателя
Вентилятор отопителя
Электрообогрев заднего стекла
Снятие и установка патрона прикуривателя
Комбинация приборов
Замена контрольных ламп и ламп подсветки комбинации приборов
Замена блока управления наружными зеркалами заднего вида и регулятора электрокорректора света фар
Замена выключателей панели приборов
Замена ламп подсветки выключателей панели приборов
Снятие и установка часов
Снятие и установка блока ETWIS
Автомобильная аудиосистема
Замена датчиков и выключателей
Противоугонная система блокировки пуска двигателя
Раздел 11. Кузов
Особенности конструкции
Замена бамперов
Снятие и установка брызговика и подкрылка переднего колеса
Снятие и установка брызговика заднего колеса
Снятие и установка переднего крыла
Снятие и установка капота
Двери
Крышка багажника
Снятие и установка облицовок багажника
Крышка люка топливного бака
Сиденья
Дополнительная система пассивной безопасности
Зеркала заднего вида
Панель приборов
Снятие и установка панели приборов
Отопитель и кондиционер
Арматура салона
Замена ветрового стекла
Уход за кузовом
Раздел 12. Уход за автомобилем
Антикоррозионная защита кузова
Подготовка и антикоррозионная обработка скрытых полостей кузова
Герметизация кузова
Мойка двигателя
Мойка автомобиля
Раздел 13. Покупка запасных частей
Моторное масло
Пластичные смазки
Охлаждающие жидкости
Тормозная жидкость
Топливный фильтр тонкой очистки
Масляный фильтр системы смазки двигателя
Свечи зажигания
Раздел 14. Поездка на СТО
Раздел 15. Зимняя эксплуатация автомобиля
Как подготовить автомобиль к зиме
Рекомендации по пуску двигателя в сильный мороз
Что полезно купить к зиме
Полезные зимние советы
Раздел 16. Подготовка к техосмотру
Рекомендации
Перечень неисправностей и условий, при которых запрещается эксплуатация транспортных средств
Изменения к государственным стандартам, регламентирующим предельно допустимое содержание вредных веществ в отработавших газах автотранспортных средств
Приложения
Приложение 1. Моменты затяжки резьбовых соединений, Н·м
Приложение 2. Горюче-смазочные материалы и эксплуатационные жидкости
Приложение 3. Лампы, применяемые на автомобиле
Приложение 4. Основные данные для регулировки и контроля
Схемы электрооборудования
Схема 1. Соединения фар головного света
Схема 2. Соединения фар головного света и передних противотуманных фар
Схема 3. Соединения системы управления электровентиляторами радиатора системы охлаждения и конденсора системы кондиционирования
Схема 4. Соединения системы ETWIS и ламп освещения салона
Схема 5. Соединения задних фонарей
Схема 6. Соединения системы DRL
Схема 7. Соединения электрокорректора фар и фонарей заднего противотуманного света
Схема 8. Соединения указателей поворота и аварийной сигнализации
Схема 9. Соединения звукового сигнала, стоп-сигнала и света заднего хода
Схема 10. Соединения диагностических колодок (автомобили, оснащенные механической коробкой передач)
Схема 11. Соединения диагностических колодок с автоматической коробкой передач
Схема 12. Система пуска и генераторной установки
Схема 13. Стеклоочиститель и омыватель стекла ветрового окна и стекла двери задка (автомобили с кузовом хэтчбек)
Схема 14а. Система отопления и кондиционирования
Схема 14б. Система отопления и кондиционирования
Схема 15. Соединения системы ECAT
Схема 16. Соединения системы ECAT и системы управления автоматической коробки передач
Схема 17. Соединения антиблокировочной системы тормозов (ABS)
Схема 18а. Соединения системы управления двигателем
Схема 18б. Соединения системы управления двигателем
Схема 18в. Соединения системы управления двигателем
Схема 18г. Соединения системы управления двигателем
Схема 18д. Соединения системы управления двигателем
Схема 18е. Соединения системы управления двигателем
Ремонт Kia Spectra : Схема 19. Соединения системы пассивной безопасности (SRS)
Схема 20. Соединения системы подогрева передних сидений
Схема 21. Соединения электропривода люка крыши
Схема 22. Соединения системы центральной блокировки замков дверей
Схема 23. Соединения электростеклоподъемников
Схема 24. Соединения аудиосистемы и часов
Схема 25а. Соединения освещения салона
Схема 25б. Соединения освещения салона
Схема 26. Соединения цепей блока ETWIS, прикуривателя, обогрева заднего стекла и боковых зеркал заднего вида
![]()
kia, the company
Congratulations! Your selection of a Kia was a wise investment. It will give you years of driving pleasure. Now that you are the owner of a Kia vehicle, you’ll probably be asked a lot of questions about your vehicle and the company like “What is a Kia?”, “Who is Kia?”, “What does ‘Kia’ mean?”.
Here are some answers. First, Kia is the oldest car company in Korea. It is a company that has thousands of employees focused on building high-quality vehicles at affordable prices.
The first syllable,inKithe word “Kia” means “to arise from to
the world” or “to come up out of to the world.” The second syllable, means “Asia.” So, the word, meansKia “to arise from”
or “to come up out of Asia to the world.”
Drive safely and enjoy your Kia! 

Foreword
Thank you for choosing a Kia vehicle.
When you require service, remember that your dealer knows your vehicle best. Your dealer has factory-trained technicians, recommended special tools, genuine Kia replacement parts and is dedicated to your complete satisfaction.
Because subsequent owners require this important information as well, this publication should remain with the vehicle if it is sold.
This manual will familiarize you with operational, maintenance and safety information about your new vehicle. It is supplemented by a Warranty and Consumer Information manual that provides important information on all warranties regarding your vehicle. We urge you to read these publications carefully and follow the recommendations to help assure enjoyable and safe operation of your new vehicle.
Kia offers a great variety of options, components and features for its various models.
Therefore, the equipment described in this manual, along with the various illustrations, may not all be applicable to your particular vehicle.
The information and specifications provided in this manual were accurate at the time of printing. Kia reserves the right to discontinue or change specifications or design at any time without notice and without incurring any obligation. If you have questions, always check with your Kia Dealer.
We assure you of our continuing interest in your motoring pleasure and satisfaction in your Kia vehicle.
© 2007 Kia Motors Corp.
All rights reserved. Reproduction by any means, electronic or mechanical, including photocopying, recording, or by any information storage and retrieval system or translation in whole or part is not permitted without written authorization from Kia Motors Corporation.
Printed in Korea
i

|
Introduction |
1 |
||||
|
Your vehicle at a glance |
2 |
||||
|
Knowing your vehicle |
3 |
||||
|
Driving your vehicle |
4 |
||||
|
table of contents |
Driving tips |
5 |
|||
|
In case of an emergency |
6 |
||||
|
Maintenance |
7 |
||||
|
Specifications |
8 |
||||
|
Index |
9 |
||||
ii

How to use this manual / 1-2 Vehicle break-in process / 1-3

|
Introduction |
||||
|
HOW TO USE THIS MANUAL |
||||
|
We want to help you get the greatest |
||||
|
possible driving pleasure from your |
||||
|
vehicle. Your Owner’s Manual can |
||||
|
1 |
||||
|
assist you in many ways. We strong- |
||||
|
ly recommend that you read the |
||||
|
entire manual. At the very least, you |
||||
|
2 |
||||
|
must read the WARNING and CAU- |
||||
|
TION sections spread throughout the |
||||
|
3 |
manual, which are easily recognized |
|||
|
by their special markings. These sec- |
||||
|
tions have precautions that must be |
||||
|
4 |
||||
|
followed to prevent personal injury or |
||||
|
death. |
||||
|
Illustrations complement the words |
||||
|
5 |
||||
|
in this manual to best explain how to |
||||
|
enjoy your vehicle. By reading your |
||||
|
6 |
||||
|
manual, you learn about features, |
||||
|
important safety information, and |
||||
|
driving tips under various road condi- |
||||
|
7 |
||||
|
tions. |
||||
|
8 |
||||
|
9 |
||||
The general layout of the manual is provided in the Table of Contents. A good place to start is the index; it has an alphabetical listing of all information in your manual.
Sections: This manual has eight sections plus an index. Each section begins with a brief list of contents so you can tell at a glance if that section has the information you want.
You’ll find various WARNING’s, CAUTION’s, and NOTICE’s in this manual. These WARNING’s, CAUTION’s and NOTICE’s were prepared to enhance your personal safety and continued satisfaction with Kia vehicle. You should carefully read and follow ALL procedures and recommendations provided in these WARNING’s, CAUTION’s and NOTICE’s.
WARNING
A WARNING indicates a situation in which harm, serious bodily injury or death could result if the warning is ignored.
CAUTION
A CAUTION indicates a situation in which damage to your vehicle could result if the caution is ignored.
NOTICE
A NOTICE indicates interesting or helpful information is being provided.
1 2

VEHICLE BREAK-IN PROCESS
No special break-in period is needed. By following a few simple precautions for the first 1,000 km (600 miles) you may add to the performance, economy and life of your vehicle.
•Do not race the engine.
•Do not maintain a single speed for long periods of time, either fast or slow. Varying engine speed is needed to properly break-in the engine.
•Avoid hard stops, except in emergencies, to allow the brakes to seat properly.
•Avoid full-throttle starts.
Introduction
1
2
3
4
5
6
7
8
9
1 3

Your vehicle at a glance
Interior overview / 2-2
Instrument panel overview / 2-3
Engine compartment / 2-4
Your vehicle at a glance
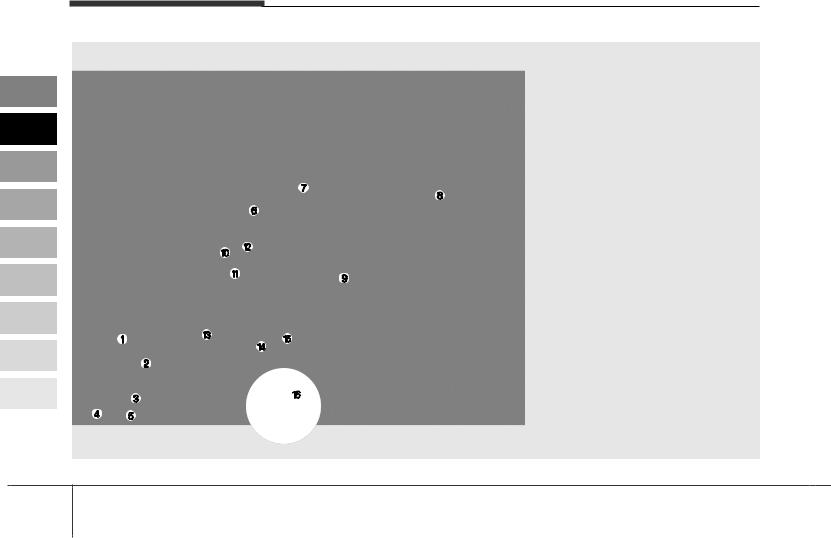
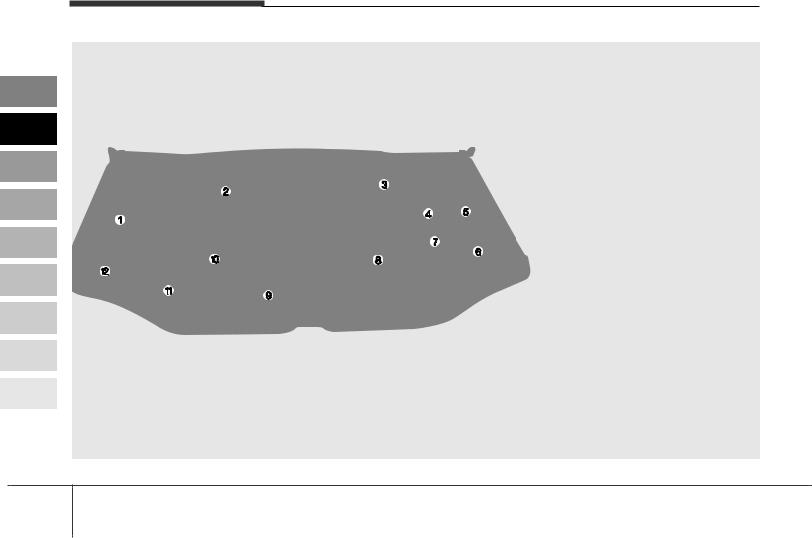
INTERIOR OVERVIEW
1
2
3
4
5
6
7
8
9
1.Door lock/unlock button
2.Outside rearview mirror control switch*
3.Power window switches*
4.Master power door lock control*
5.Master power window control lock*
6.Vent controls
7.Instrument cluster
8.Steering wheel
9.Steering wheel tilt*
10.Trunk release button
11.Instrument panel illumination*
12.TCS button*
13.Hood release lever
14.Brake pedal
15.Accelerator pedal
16.Fuel filler lid release lever
* : if equipped
OLD006002N
2 2
Your vehicle at a glance
INSTRUMENT PANEL OVERVIEW
1. Driver’s Air bag*
2. Light control / Turn signals
3. Instrument cluster
4. Wiper/Washer
5. Ignition switch
6. Aux
7. Hazard
8. Climate control system
9. Shift lever*
10. Passenger’s air bag*
11. Glove box
12. Audio controls*
13. Auto cruise controls*
* : if equipped
OLD006003N
2 3
Your vehicle at a glance
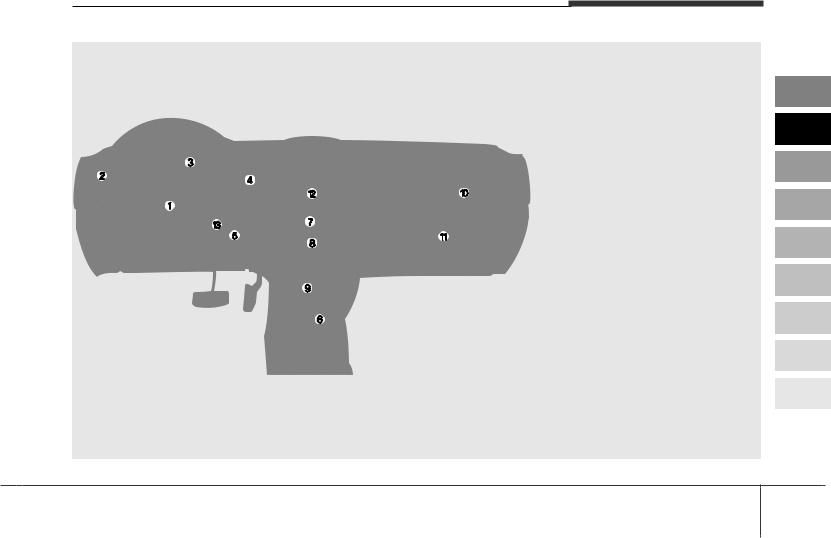
ENGINE COMPARTMENT
1
2
3
4
5
6
7
8
9
1.Power steering fluid reservoir
2.Engine oil filler cap
3.Brake fluid reservoir
4.Air cleaner
5.Fuse box
6.Negative battery terminal
7.Positive battery terminal
8.Auto transaxle oil dipstick*
9.Radiator cap
10.Engine oil dipstick
11.Engine coolant reservoir
12.Windshield washer fluid reservoir
* : if equipped
OLD056002
2 4
![]()
|
Keys / 3-2 |
1 |
|
|
Remote keyless entry / 3-3 |
||
|
Immobilizer system / 3-6 |
||
|
2 |
||
|
Door locks / 3-8 |
||
|
Knowing your vehicle |
3 |
|||
|
Windows / 3-13 |
4 |
|||
|
Seat / 3-16 |
||||
|
Safety belts / 3-27 |
||||
|
Air bag — Advanced supplemental restraint |
5 |
|||
|
system / 3-50 |
||||
|
Trunk / 3-76 |
||||
|
Hood / 3-78 |
6 |
|||
|
Fuel filler lid / 3-80 |
||||
|
Mirrors / 3-83 |
||||
|
7 |
||||
|
Interior lights / 3-87 |
||||
|
Storage compartment / 3-88 |
||||
|
Interior features / 3-90 |
||||
|
8 |
||||
|
Sunroof / 3-94 |
||||
|
Luggage net / 3-97 |
||||
|
Antenna / 3-98 |
9 |
|||
|
Audio system / 3-99 |
||||

Knowing your vehicle
KEYS
1
2
3
|
4 |
OUN046100L |
|
|
The key code number is stamped on |
||
|
5 |
||
|
the plate attached to the key set. |
||
|
Should you lose your keys, this num- |
||
|
ber will enable an authorized Kia |
||
|
6 |
||
|
Dealer to duplicate the keys easily. |
||
|
Remove the plate and store it in a |
||
|
7 |
safe place. Also, record the code |
|
|
number and keep it in a safe and |
handy place, but not in the vehicle.
8
9
OUN026060
Key operations
Master key
Used to start the engine, lock and unlock the doors, and open the trunk (if equipped).
WARNING — Ignition key
Leaving children unattended in a vehicle with the ignition key is dangerous even if the key is not in the ignition. Children copy adults and they could place the key in the ignition. The ignition key would enable children to operate power windows or other controls, or even make the vehicle move, which could result in serious bodily injury or even death. Never leave the keys in your vehicle with unsupervised children.
WARNING
Use only Kia original parts for the ignition key in your vehicle. If an aftermarket key is used, the ignition switch may not return to ON after START. If this happens, the starter will continue to operate causing damage to the starter motor and possible fire due to excessive current in the wiring.
3 2

REMOTE KEYLESS ENTRY (IF EQUIPPED)
|
Type A |
Lock (1) |
|
All doors are locked and the hazard |
|
|
lamp flash once if the lock button is |
|
|
pressed. |
|
Unlock (2) |
|
|
Driver’s door is unlocked and the |
|
|
hazard lamp will flash twice if the |
|
|
unlock button is pressed once. All |
|
|
OLD026001 |
doors are unlocked if the unlock but- |
|
Type B |
ton is pressed twice within 4 sec- |
|
onds. |
|
|
After depressing this button, the |
|
|
doors will be locked automatically |
|
|
unless you open them within 30 sec- |
|
|
onds. |
OLD026002
(1)Lock button
(2)Unlock button
(3)Panic button
(4)Trunk lid open button
Knowing your vehicle
Panic (3) (if equipped)
The horn sounds and hazard lamp will flash for about 27 seconds if this button is pressed for more than 0.5 seconds.
To stop the panic operation, press any button except panic on the transmitter.
Trunk lid open (4) (if equipped)
The trunk lid opens if this button is pressed for more than 0.5 seconds.
3 3

Knowing your vehicle
NOTICE
The transmitter will not work if any of following occur:
—The ignition key is in ignition switch.
—You exceed the operating distance limit (about 30 m [100 feet]).
—The battery in the transmitter is weak.
—Other vehicles or objects may be blocking the signal.
—The weather is extremely cold.
—The transmitter is close to a radio transmitter such as a radio station or an airport which can interfere with normal operation of the transmitter.
When the transmitter does not work correctly, open and close the door with the ignition key. If you have a problem with the transmitter, contact an authorized Kia Dealer.
CAUTION
Keep the transmitter away from water or any liquid. If the keyless entry system is inoperative due to exposure to water or liquids, it will not be covered by your manufacturer vehicle warranty.
Operational distance may vary depending upon the area the transmitter is used in. For example, if the vehicle is parked near police stations, government and public offices, broadcasting stations, military installations, airports, or transmitting towers, etc.
This device complies with Industry Canada Standard RSS210. Operation is subject to the following two conditions:
1.This device may not cause harmful interference, and
2.This device must accept any interference received, including interference that may cause undesired operation.
WARNING
Changes or modifications not expressly approved by the party responsible for compliance could void the user’s authority to operate the equipment.
3 4

Knowing your vehicle
OMG035137
Battery replacement
Transmitter uses a 3 volt lithium battery which will normally last for several years. When replacement is necessary, use the following procedure.
1.Insert a slim tool into the slot and gently pry open the transmitter center cover.
HNF2005
2.Replace the battery with new one. When replacing the battery, make sure the battery positive “+” symbol faces up as indicated in the illustration.
3.Install the battery in the reverse order of removal.
CAUTION
The keyless entry system transmitter is designed to give you years of troublefree use, however it can malfunction if exposed to moisture or static electricity. If you are unsure how to use your transmitter or replace the battery, contact an authorized Kia dealer.
For replacement transmitters, see an Authorized Kia Dealer for reprogramming.
CAUTION
•Using the wrong battery can cause the transmitter to malfunction. Be sure to use the correct battery.
•To avoid damaging the transmitter, don’t drop it, get it wet, or expose it to heat or sunlight.
3 5

Knowing your vehicle
IMMOBILIZER SYSTEM (IF EQUIPPED)
1
2
3
|
4 |
OHD046100 |
|
|
Your vehicle is equipped with an |
||
|
5 |
||
|
electronic engine immobilizer system |
||
|
to reduce the risk of unauthorized |
||
|
vehicle use. |
||
|
6 |
||
|
Your immobilizer system is com- |
||
|
prised of a small transponder in the |
||
|
7 |
ignition key, and antenna coil in the |
|
|
key cylinder and Immobilizer unit in |
||
|
the instrument panel. |
||
|
8 |
||
|
With this system, whenever you |
||
|
insert your ignition key into the igni- |
||
|
9 |
tion switch and turn it to ON, the |
|
|
antenna coil in the ignition switch |
receives a signal from the transponder in the ignition key and then sends the signal to the Immobilizer unit.
The Immobilizer unit checks the signal and determines whether the ignition key is valid.
If the key is determined to be valid, the engine will start.
If the key is determined to be invalid, the engine will not start.
To deactivate the immobilizer system:
Insert the ignition key into the key cylinder and turn it to the ON position.
To activate the immobilizer system:
Turn the ignition key to the OFF position. The immobilizer system activates automatically. Without a valid ignition key for your vehicle, the engine will not start.
NOTICE
When starting the engine, do not use the key with other immobilizer keys around. Otherwise the engine may not start or may stop soon after it starts. Keep each key separately not to have any malfunction after you receive your new vehicle.
This device complies with Industry Canada Standard RSS210. Operation is subject to the following two conditions:
1.This device may not cause interference, and
2.This device must accept any interference, including interference that may cause undesired operation of the device.
WARNING
Changes or modifications not expressly approved by the party responsible for compliance could void the user’s authority to operate the equipment.
3 6

Limp home (override) procedure
When you turn the ignition key to the ON position, if the IMMO indicator remains on continuously after blinking 6 times, your transponder equipped in the ignition key is out of order. You cannot start the engine without the lime home procedure. To start the engine, you have to input your password by using the ignition switch.
The following procedure is how to input your password of “2345” as an example.
1.Turn the ignition key to the ON position. The IMMO indicator (  ) will blink 6 times and remain on indicating the beginning of the limp home procedure.
2.Turn the ignition key to the ACC position.
3.To enter the first digit (in this example “2”), turn the ignition key to the ON and ACC position twice. Perform the same procedure for the next digits between 3 seconds and 10 seconds (for example, for “3”, turn the ignition ON and ACC 3 times).
4.If all of the digits have been input successfully, you have to start the engine within 10 seconds. If you attempt to start the engine after 10 seconds, the engine will not start and you will have to input your password again.
After performing the limp home procedure, you have to see an authorized Kia dealer immediately to inspect and repair your ignition key or immobilizer system.
CAUTION
If you cannot start your engine in spite of limp home procedure, have your vehicle towed by an authorized Kia dealer for inspection and necessary repairs.
Knowing your vehicle
CAUTION
The transponder in your ignition key is an important part of the immobilizer system. It is designed to give years of trouble free service, however you should avoid exposure to moisture, static electricity and rough handling. Immobilizer system malfunction could occur.
CAUTION
Do not change, alter or adjust the immobilizer system because it could cause the immobilizer system to malfunction and should only be serviced by an authorized Kia dealer.
Malfunctions caused by improper alterations, adjustments or modifications to the immobilizer system are not covered by your vehicle manufacturer warranty.
3 7

Knowing your vehicle
DOOR LOCKS
|
1 |
Lock |
Unlock |
||||
|
2 |
||||||
|
3 |
||||||
|
4 |
||||||
|
1LDA2004 |
Operating door locks from
5outside the vehicle
•Turn the key toward rear of vehicle
6to unlock and toward front of vehicle to lock.
•Turn the key to the right once to
7unlock the driver’s door and to the
|
right twice within 4 seconds to |
|
|
8 |
unlock all doors. (if equipped) |
|
• Turn the key to the left once to |
|
|
9 |
unlock the passenger’s door and to |
|
the left twice within 4 seconds to |
unlock all doors. (if equipped)
• Doors can also be locked and unlocked with the transmitter key.
•Once the doors are unlocked, they may be opened by pulling the door handle.
•When closing the door, push the door by the hand. Make sure that doors are closed securely.
OLD036900N
To lock a door without the key, push the inside door lock button (1) or door lock switch (2, if equipped) to the “LOCK” position and close the door (3).
WARNING
Always remove the ignition key, engage the parking brake, close all windows and lock all doors when leaving your vehicle unattended.
3 8

NOTICE
If the door is locked/unlocked multiple times in rapid succession with either the vehicle key or door lock switch, the system may stop operating temporarily in order to protect the circuit and prevent damage to system components.
1LDA2006
Operating door locks from inside the vehicle
With the door lock button
•To unlock a door, push the door lock button (1) to the “Unlock” position. The red mark (2) on button will be visible.
•To lock a door, push the door lock button (1) to the “Lock” position. If the door is locked properly, the red mark (2) on the door lock button will not be visible.
•To open a door, pull the door handle (3) outward.
Knowing your vehicle
•If the inner door handle of driver’s (front passenger’s, if equipped) door is pulled when the door lock button is in lock position, the button is unlocked and door opens.
•Front doors cannot be locked if the ignition key is in the ignition switch and door is open.
•If you lock the front door with door lock button, all vehicle doors will lock automatically. (if equipped)
3 9

Knowing your vehicle
Driver’s side
1LDA2007
Passenger’s side (if equipped)
1LDN2007
With central door lock switch (if equipped)
It is operated by depressing the door lock switch. If any door is open when the switch is depressed, the door will remain locked when closed.
•When pushing down on the front portion (1) of the central door lock switch, all vehicle doors will lock.
•When pushing down on the rear portion (2) of the switch, all vehicle doors will unlock.
•However, if the key is in the ignition switch and any front door is open, the doors will not lock when the front portion of central door lock switch is pressed.
WARNING
•The doors should always be fully closed and locked while the vehicle is in motion to prevent accidental opening of the door. Locked doors will also discourage potential intruders when the vehicle stops or slows.
•Be careful when opening doors and watch for vehicles, motorcycles, bicycles or pedestrians approaching the vehicle in the path of the door. Opening a door when something is approaching can cause damage or injury.
3 10
![]()
WARNING — Unlocked vehicle
Leaving your vehicle unlocked can invite theft or possible harm to you or others from someone hiding in your vehicle while you are gone. Always remove the ignition key, engage the parking brake, close all windows and lock all doors when leaving your vehicle unattended.
WARNING — Unattended children
An enclosed vehicle can become extremely hot, causing death or severe injury to unattended children or animals who cannot escape the vehicle. Furthermore, children might operate features of the vehicle that could injure them, or they could encounter other harm, possibly from someone gaining entry to the vehicle. Never leave children or animals unattended in your vehicle.
Knowing your vehicle
|
1 |
||||
|
2 |
||||
|
3 |
||||
|
4 |
||||
|
1LDA2008 |
||||
|
Rear door child safety lock |
||||
|
5 |
||||
|
The child safety lock is provided to |
||||
|
help prevent children from acciden- |
||||
|
tally opening the rear doors from |
6 |
|||
|
inside the vehicle. The rear door |
|
safety locks should be used whenev- |
||
|
7 |
||
|
er children are in the vehicle. |
||
|
8 |
||
|
9 |
||
3 11
Knowing your vehicle
1. Open the rear door.
|
2. |
Push the child safety lock located |
|
|
on the rear edge of the door to the |
||
|
1 |
||
|
“lock” position. When the child |
||
|
safety lock is in the “lock ( )” |
||
|
2 |
position, rear door will not open |
|
|
when the inner door handle is |
||
|
3 |
pulled inside the vehicle. |
|
|
3. |
Close the rear door. |
4. To open the rear door, pull the out-
|
Even though the doors may be |
||
|
5 |
unlocked, the rear door will not open |
|
|
by pulling the inner door handle (1) |
||
|
until rear door child safety lock is |
||
|
6 |
unlocked ( |
). |
7
8
9
WARNING — Rear door locks
If children accidentally open the rear doors while the vehicle is in motion, they could fall out and be severely injured or killed. To prevent children from opening the rear doors from the inside, the rear door safety locks should be used whenever children are in the vehicle.
Lock Unlock
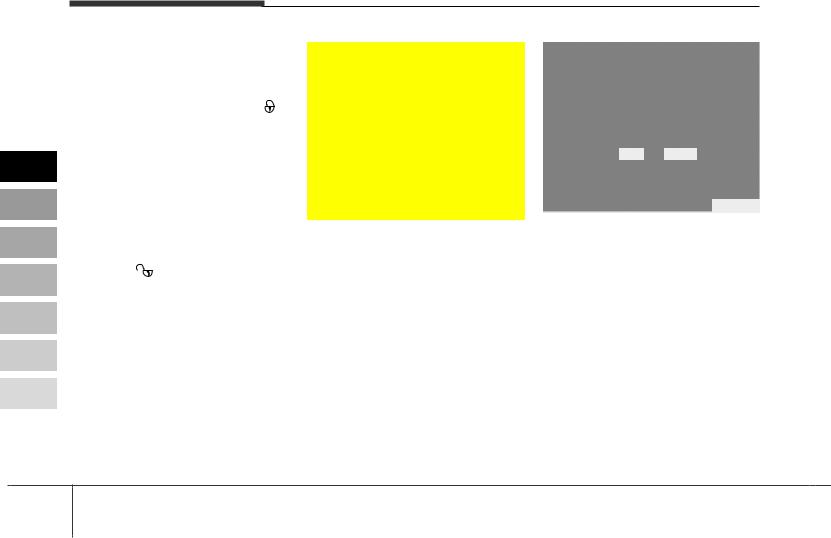
Rear hatch (if equipped)
Opening the rear hatch
•Rear hatch is locked or unlocked with a key.
•To open the rear hatch, insert the key into the lock, turn it to the unlock position (1) and pull up the rear hatch by pressing the handle
(2).
•You can also lock/unlock the latch (but not release it) with the central door lock system (if equipped).
•If unlocked, the rear hatch can be opened by pressing the handle (2) and pulling the hatch up.
3 12

Knowing your vehicle
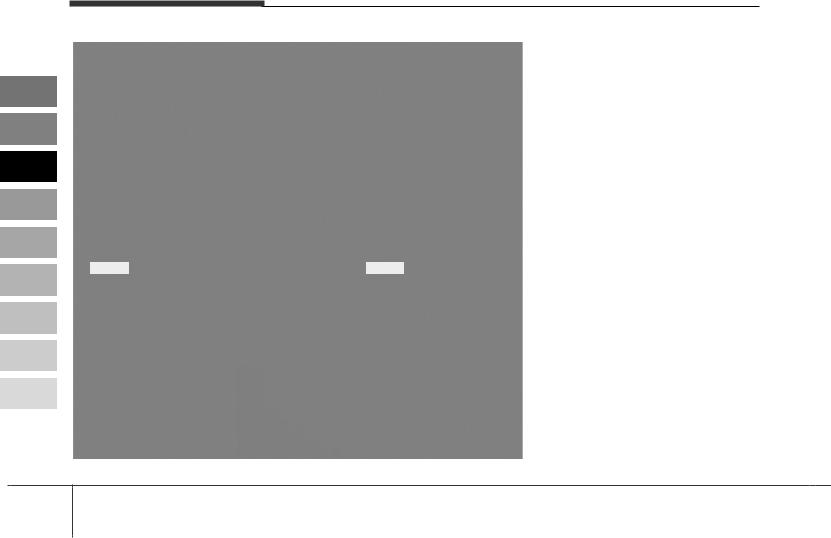
WINDOWS
Power windows (if equipped)
(1) Driver’s door power window switch
(2) Front passenger’s door power window switch
(3) Rear door (left) power window switch
(4) Rear door (right) power window switch
(5) Window opening and closing
(6) Automatic power window down* (Driver’s window)
(7) Power window lock switch
*: if equipped
OLD026010
3 13

Knowing your vehicle
|
The ignition switch must be in the ON |
||
|
position for power windows to oper- |
||
|
ate. Each door has a power window |
||
|
1 |
||
|
switch that controls the door’s win- |
||
|
dow. However, the driver has a power |
||
|
window lock switch which can block |
||
|
2 |
||
|
the operation of passenger windows. |
||
|
The power windows can be operated |
||
|
3 |
||
|
for approximately 30 seconds after |
||
|
the ignition key is removed or turned |
||
|
to the ACC or LOCK position. |
||
|
4 |
||
|
However, if the front doors are |
||
|
opened, the power windows cannot |
||
|
5 |
be operated even within the 30 sec- |
|
|
onds after the ignition key removal. |
||
|
While driving, if you notice buffeting |
||
|
6 |
||
|
and pulsation (wind shock) with |
||
|
either side window open, you should |
||
|
open the opposite window slightly to |
||
|
7 |
||
|
reduce the condition. |
||
|
8 |
||
|
9 |
||
OUN026012
Window opening and closing
The driver’s door has a master power window switch that controls all the windows in the vehicle.
To open or close a window, press down or pull up the front portion of the corresponding switch to the first detent position (5).
OUN026011
Auto down window (if equipped) (Driver’s window)
Depressing the power window switch momentarily to the second detent position (6) completely lowers the driver’s window even when the switch is released. To stop the window at the desired position while the window is in operation, pull up the switch momentarily to the opposite direction of the window movement.
If the power window is not operated correctly, the automatic power window system must be reset as follows:
1.Turn the ignition switch to the ON position.
3 14

2.Close driver’s window and continue pulling up on driver’s power window switch for at least 1 second after the window is completely closed.
OLD026013
Power window lock switch
•The driver can disable the power window switches on a passenger door by depressing the power window lock switch located on the driver’s door to LOCK (pressed).
•When the power window lock switch is ON, the driver’s master control cannot operate the passenger door power windows either.
Knowing your vehicle
CAUTION
To prevent the power window system from the possibility of damage, do not open or close two windows at the same time. This will also ensure the longevity of the fuse.
WARNING
•Make sure heads and hands are safely out of the way before closing a window.
•Do not allow children to play with the power windows. Keep the driver’s door power window lock switch in the LOCK position (depressed). Serious injury can result from unintentional window operation by the child.
•Do not extend face or arms outside through the window opening while driving.
•Always double check to make sure all arms, hands and other obstructions are safely out of the way before closing a window.
3FDA2015
Manual windows (if equipped)
Use the window crank to open and close each window.
3 15
Knowing your vehicle
SEAT
Driver’s seat
(1) Seat adjustment, forward / backward
(2) Seatback recliner
(3) Seat adjustment, height
(4) Headrest adjustment
Front passenger seat
(5) Seat adjustment, forward / backward
(6) Seatback recliner
(7) Headrest adjustment
Rear seat
(8) Split folding rear seat*
(9) Headrest adjustment * : if equipped
1LDN2026
3 16

WARNING — Objects on floor
Loose objects in the driver’s foot area could interfere with the operation of the foot pedals, possibly causing an accident. Do not place anything under the front seats.
WARNING — Seating position
•Never attempt to adjust seat while the vehicle is moving. This could result in loss of control, and an accident causing death or serious injury.
•Do not allow anything to interfere with the normal position of the seatback. Storing items against a seatback or in any other way interfering with proper locking of a seatback could result in serious or fatal injury in a sudden stop or collision.
(Continued)
Knowing your vehicle
|
(Continued) |
||
|
• Always drive and ride with |
||
|
your seatback upright and the |
1 |
|
|
lap portion of the safety belt, |
||
|
is snug and low across the |
||
|
2 |
||
|
hips. This puts your safety |
||
|
belts in the best position to |
||
|
protect you in case of an acci- |
||
|
3 |
||
|
dent. |
||
|
• In order to avoid unnecessary |
||
|
4 |
||
|
airbag injuries including the |
||
|
possibility of severe injury or |
||
|
death, always sit as far back |
||
|
5 |
||
|
as possible from the steering |
||
|
wheel so that your chest is |
||
|
away at least 250 mm (10 inch- |
6 |
|
|
es) away from the steering |
wheel.
7
8
9
3 17

Knowing your vehicle
1
2
3
|
4 |
|||
|
1LDA2027 |
|||
|
Driver’s seat adjustment |
|||
|
5 |
|||
|
Adjusting the seat forward and |
|||
|
backward |
|||
|
6 |
To move the seat forward or back- |
||
|
ward: |
|||
|
7 |
1. Pull the seat slide adjustment |
||
|
lever under the front edge of the |
|||
|
seat cushion up and hold it. |
|||
|
8 |
|||
|
2. Slide the seat to the position you |
|||
|
desire. |
|||
|
9 |
3. Release the lever and make sure |
||
|
the seat is locked in place. |
Adjust the seat before driving, and make sure the seat is locked securely by trying to move forward and backward without using the lever. If the seat moves, it is not locked properly.
1LDA2028
Adjusting height of driver seat cushion (if equipped)
Pivoting the lever upward to raise the seat cushion.
Pivoting the lever downward to lower the seat cushion.
3 18

1LDA2029
Adjusting the driver’s seatback recliner
To recline the seatback:
1.Lean forward slightly and lift up on the seatback recline lever located on the outside of the seat, toward the rear.
2.Carefully lean back on the seat and adjust the back of the seat to the position you desire.
3.Release the lever and make sure the seatback is locked in place. (The lever MUST return to its original position for the seatback to lock.)
Knowing your vehicle
WARNING
|
Driving or riding in a vehicle |
|||
|
1 |
|||
|
with a front seatback reclined |
|||
|
could lead to serious or fatal |
|||
|
injury in an accident. If a front |
2 |
||
|
seat is reclined during an acci- |
|||
|
dent, the occupant’s hips may |
|||
|
3 |
|||
|
slide under the lap portion of |
|||
|
the safety belt applying great |
|||
|
force to |
the unprotected |
||
|
4 |
|||
|
abdomen. Serious or fatal inter- |
|||
|
nal injuries could result. The |
|||
|
driver must advise the front pas- |
|||
|
5 |
|||
|
senger to keep the seatbacks in |
|||
|
comfortably |
upright position |
||
|
whenever the vehicle is in |
6 |
||
|
motion. |
|||
|
7 |
|||
|
8 |
|||
|
9 |
|||
3 19

Knowing your vehicle
1
2
3
|
4 |
|||
|
1LDA2033 |
|||
|
Headrest adjustment |
|||
|
5 |
|||
|
Adjusting the height up and down |
|||
|
The headrest not only provides com- |
|||
|
6 |
fort for the driver and passengers, |
||
|
but also helps to protect the head |
|||
|
and neck in the event of a collision. |
|||
|
7 |
|||
|
To raise the headrest, pull it up to the |
|||
|
desired position (1). To lower the |
|||
|
8 |
headrest, push and hold the release |
||
|
button (2) on the headrest support |
|||
|
and lower the headrest to the desired |
|||
|
9 |
|||
|
position (3). For best protection, |
|||
|
adjust the headrest so its center is as |
high as your ears.
1LDA2034
Removal
To remove the headrest, raise it as far as it can go then press the release button (1) while pulling upward (2).
WARNING
To reduce the risk of head and neck injuries, do not drive the vehicle with the headrest removed or improperly positioned.
Do not adjust the driver’s headrest while driving.
HNF2041-1
Active headrest (if equipped)
The active headrest is designed to move forward and upward during a rear impact. This helps to prevent the driver’s and front passenger’s head from moving backward and thus helps prevent neck injuries.
3 20
![]()
Knowing your vehicle
1LDA2035
Adjusting the front passenger seat
Forward/backward position adjustment
To move the seat forward or backward:
1.Pull the seat slide adjustment lever under the front edge of the seat cushion up and hold it.
2.Slide the seat to the position you desire.
3.Release the lever and make sure the seat is locked in place.
Adjust the seat before driving, and make sure the seat is locked securely by trying to move forward and backward without using the lever. If the seat moves, it is not locked properly.
WARNING
In order to avoid unnecessary air bag injuries including the possibility of severe injury or death, always sit as far back as possible by moving the seat far back, while still maintaining good vehicle control. Serious injury or death may be caused due to the deployment of the passenger’s air bag.
1LDA2036
Adjusting seatback recliner
To recline the seatback:
1.Lean forward slightly and lift up on the seatback recline lever located on the outside of the seat, toward the rear.
2.Carefully lean back on the seat and adjust the back of the seat to the position you desire.
3.Release the lever and make sure the seatback is locked in place. (The lever MUST return to its original position for the seatback to lock.)
3 21

Knowing your vehicle
WARNING — Driver responsibility for front seat
1 passenger
|
Driving or riding in a vehicle |
||
|
2 |
with a front seatback reclined |
|
|
could lead to serious or fatal |
||
|
injury in an accident. If a front |
||
|
3 |
||
|
seat is reclined, the occupant’s |
||
|
hips may slide under the lap |
||
|
portion of the safety belt apply- |
||
|
4 |
||
|
ing great force to the unprotect- |
||
|
ed abdomen. Serious or fatal |
||
|
5 |
internal injuries could result. |
|
|
Keep the seatbacks in a com- |
fortably upright position when-
|
6 |
ever the vehicle is in motion. |
|
7 |
|
|
8 |
|
|
9 |
1LDA2033A
Headrest adjustment
Adjusting the height up and down
The headrest not only provides comfort for the driver and passengers, but also helps to protect the head and neck in the event of a collision.
To raise the headrest, pull it up to the desired position (1). To lower the headrest, push and hold the release button (2) on the headrest support and lower the headrest to the desired position (3). For best protection, adjust the headrest so its center is as high as your ears.
1LDA2034A
Removal
To remove the headrest, raise it as far as it can go then press the release button (1) while pulling upward (2).
WARNING
To reduce the risk of head and neck injuries, do not drive the vehicle with the headrest removed or improperly positioned.
3 22

Knowing your vehicle
HNF2041-1
Active headrest (if equipped)
The active headrest is designed to move forward and upward during a rear impact. This helps to prevent the driver’s and front passenger’s head from moving backward and thus helps prevent neck injuries.
Rear seat
Split folding rear seat (if equipped)
The rear seatbacks fold forward to provide additional cargo space and to provide access to the cargo area.
•To fold the rear seatback(s) down, pull the lock release lever, then fold the seatback forward and down.
•To raise the seatback, lift and push it firmly until it clicks into place.
•When you return the seatback to its upright position, reposition the rear safety belts so that they can be used by rear seat passengers.
1LDN2038
1LDN3025
4 Door (if equipped)
1.Pull the lock release lever.
2.Move the rear three-point seat belts to the outside (1) so that they don’t interfere with the seatback when lowering.
3.Fold the seatback forward and down firmly (2).
3 23

Knowing your vehicle
|
1 |
|||
|
2 |
|||
|
3 |
|||
|
1LDA2239/1LDA2239A |
|||
|
4 |
|||
|
5 |
|||
|
6 |
|||
|
1LDA2240 |
|||
|
7 |
5 Door (if equipped) |
|
|
1. Lift the front of seat cushion (1) up. |
||
|
8 |
||
|
2. Lift the rear of seat cushion up (2). |
||
|
9 |
||
1LDA2241
1LDA2242
3 Move the seat cushion firmly until it clicks (3).
4.Remove the headrest and put the headrest poles into the holes on the rear of the seat cushion (4).
1LDA2243
1LDA2244
5.Pull the lock release lever (5).
6.Fold the seatback forward and down firmly (6).
3 24

1LDN3026B
NOTICE
When you fold the rear seatback or put luggage on the rear seat cushion, insert the buckle in the pocket between the rear seatback and cushion. Doing so can prevent the buckle from being damaged by the rear seatback or luggage.
1LDN3026A
To unfold the rear seat:
1.Move the rear center shoulder belt
(1)to the side so that it is clear of the seatback.
2.Lift and push the seatback backward firmly until it clicks into place
Move and push the seat cushion downward firmly to the proper position (5 Door, if equipped).
3.Replace the rear safty belt to the proper position.
Knowing your vehicle
NOTICE
If the seat belt is locked during the seatback folding, pull out and retract the seat belt to release it.
CAUTION
•When returning the rear seatbacks to the upright position, remember to return the rear shoulder belts to their proper position.
•Do not remove the floor carpet in your vehicle. Emission control system components cause high exhaust temperatures under the floor.
WARNING — Cargo danger
Cargo should always be secured to prevent it from shifting and causing injury to the vehicle occupants.
3 25

Knowing your vehicle
|
CAUTION — Loading pro- |
||
|
cedure |
||
|
1 |
||
|
Make sure the engine is off, the |
||
|
transaxle is in P and the parking |
||
|
2 |
brake is applied whenever load- |
|
|
ing or unloading cargo. Vehicle |
|
may move if shift lever is inad- |
||
|
3 |
||
|
vertently moved to another |
||
|
position. |
||
|
4 |
||
|
5 |
||
|
6 |
||
|
7 |
||
|
8 |
||
|
9 |
||
1LDA2042
Headrest adjustment
Adjusting the height up and down
The headrest not only provides comfort for the driver and passengers, but also helps to protect the head and neck in the event of a collision.
To raise the headrest, pull it up to the desired position (1). To lower the headrest, push and hold the release button (2) on the headrest support and lower the headrest to the desired position (3). For best protection, adjust the headrest so its center is as high as your ears.
1LDA2043
Removal
To remove the headrest, raise it as far as it can go then press the release button (1) while pulling upward (2).
WARNING
To reduce the risk of head and neck injuries, do not drive the vehicle with the headrest removed or improperly positioned.
3 26

SAFETY BELTS
2GHB3002
Pre-tensioner seat belt
Your vehicle is equipped with driver’s and front passenger’s pre-tensioner seat belts. The purpose of the pretensioner is to make sure that the seat belts fit tightly against the occupant’s body in certain frontal collisions. The pre-tensioner seat belts can be activated together with the air bags, where the frontal collision is severe enough.
The pre-tensioner seat belt is installed at the front seats, and the sensor is equipped inside the buckle, where presence of passenger is sensed by the fastening of the seat belts. Therefore, pre-tensioner will not activate if the passenger is not fastened with the seat belts. Likewise, it will activate if buckled even without a passenger in the seat. Pre-tensioner seat belt is designed to activate when the seatbelt is in use. To ensure the pretensioner seatbelts activate in event of a possible seatbelt buckle switch malfunction, the system is designed to activate regardless of whether a seat belt is in use or if no seat belt use is detected within 6 seconds of turning the ignition switch ON.
Knowing your vehicle
1
2GHB3001
The seat belt pre-tensioner system consists mainly of the following components. Their locations are shown in the illustration.
(1)SRS airbag warning light
(2)Seatbelt pre-tensioner assembly
(3)SRS airbag control module
3 27

Knowing your vehicle
|
WARNING |
|
|
1 |
To obtain maximum benefit from |
|
a pre-tensioner seat belt: |
• The seat belt must be worn
|
2 |
correctly. |
|
|
• The seat belt must be adjusted |
||
|
to the correct position. |
||
|
3 |
||
|
4 |
||
|
5 |
||
|
6 |
||
|
7 |
||
|
8 |
||
|
9 |
||
CAUTION
When the pre-tensioner seat belts are activated, a loud noise may be heard and fine dust, which may appear to be smoke, may be visible in the passenger compartment and are not toxic.
Although, it is harmless, the fine dust may cause skin irritation and should not be breathed for prolonged periods. Wash your hands and face thoroughly after an accident in which the air bags and/or pre-tensioner seat belts were activated.
CAUTION
•Because the sensor that activates the SRS air bag is connected with pre-tensioner seat belt, the SRS air bag warning light on the instrument panel will blink or illuminate for approximately 6 seconds after the ignition key has been turned to the “ON” position, then the light should go off.
•If the pre-tensioner seat belt is not working properly, this warning light will illuminate even if there is no malfunction of SRS air bag system. If the SRS air bag warning light does not illuminate when the ignition key is turned to “ON”, or if it remains illuminated after blinking or illuminating for approximately 6 seconds, or if it illuminates while the vehicle is being driven, please have an authorized Kia dealer inspect the pre-tensioner seat belt or SRS air bag system as soon as possible.
3 28

CAUTION
The pre-tensioner seat belt assembly mechanisms become hot during activation. Do not touch the pre-tensioner seat belt assembly for several minutes after they have been activated.
WARNING
•Pre-tensioners are designed to operate once. After activation, pre-tensioner seat belts must be replaced. All seat belts, of any type, should always be replaced after they have been worn during a collision.
•Do not attempt to inspect or replace the pre-tensioner seat belts yourself. This must be done by an authorized Kia dealer.
Knowing your vehicle
WARNING
|
• Do not strike the pre-tensioner |
||||
|
1 |
||||
|
seat belt assemblies. |
||||
|
• Do not attempt to service or |
||||
|
repair the pre-tensioner seat |
2 |
|||
|
belt system in any manner. |
||||
|
• Improper handling of the pre- |
||||
|
3 |
||||
|
tensioner seat belt assem- |
||||
|
blies, and failure to heed the |
||||
|
warnings not to strike, modify, |
4 |
|||
|
inspect, |
place, |
service or |
||
|
repair the pre-tensioner seat |
||||
|
5 |
||||
|
belt assemblies may lead to |
||||
|
improper operation or inad- |
||||
|
vertent |
activation causing |
|||
|
6 |
||||
|
serious injury. |
||||
|
Always |
wear the |
seat belts |
||
|
when driving or riding in a |
7 |
|
motor vehicle. |
|
|
8 |
|
|
9 |
|
3 29

Knowing your vehicle
Safety belt restraint system
|
WARNING — Safety belts |
||||||
|
1 |
||||||
|
To minimize the risk of serious |
||||||
|
or fatal injury in an accident, the |
||||||
|
2 |
||||||
|
driver |
and |
all |
passengers |
|||
|
should |
use |
the |
appropriate |
|||
|
safety restraints for their age |
||||||
|
3 |
||||||
|
and size. The presence of air |
||||||
|
bags does not change the need |
||||||
|
4 |
to be properly restrained by a |
|||||
|
safety belt or size-appropriate |
||||||
|
child restraint. In fact, air bags |
||||||
|
5 |
||||||
|
are designed to work the best |
||||||
|
when passengers are correctly |
||||||
|
restrained in the vehicle. Be |
||||||
|
6 |
||||||
|
sure you are familiar with the |
||||||
|
information |
in |
this section, |
||||
|
7 |
including the |
information on |
||||
|
infant and child restraints. Read |
the safety warnings on the sun
|
8 |
visors of your vehicle also. |
|
9 |
We strongly recommend that the driver and all passengers be properly restrained at all times by using the safety belts provided with the vehicle. Proper use of the safety belts decreases the risk of severe injury or death in accidents or sudden stops. In most states, and in Canada, the law requires their use.
All seats have lap/shoulder belts. Inertial locks in the safety belt retractors allow all of the lap/shoulder safety belts to remain unlocked during normal vehicle operation. This allows the occupants some freedom of movement and increased comfort while using the safety belts. If a force is applied to the vehicle, such as a strong stop, a sharp turn, or a collision, the safety belt retractors will automatically lock the safety belts.
Since the inertial locks do not require a collision in order to lock up, you may become aware of the safety belts locking while braking or going around sharp corners.
Always use the rear seat position(s) to install your child restraint(s).
Never install a child restraint system in the front passenger position, as an inflating air bag could cause serious or fatal injury to a child in that position.
3 30
![]()
The rear safety belts use a special auto-lock feature designed to allow a child restraint to be used in these positions without an added locking clip. They normally lock only under extreme or emergency conditions (emergency lock mode). However they can be adjusted so that they remain in fixed and locked when a child restraint system is placed in these positions. (Use this auto-lock mode only to secure a child restraint, never for passengers restrained by the safety belts.) Page 3-44 gives instructions on placing the safety belt in the auto lock mode.
The drivers safety belt can only operate in the emergency lock mode.
Safety belts provide the best restraint when:
•The seatback is upright.
•The occupant is sitting upright (not slouched).
•The lap belt is snug across the hips.
•The shoulder belt is snug across the chest.
•The knees are straight forward.
To help you remember to fasten your safety belt, a warning light will come on and a chime will sound. See Safety Belt Warning Light and Chime on page 3-33.
WARNING — After a collision
•Lap/shoulder belt assemblies may be stretched or damaged when subjected to the stress and forces of a collision.
•The entire restraint system should be inspected following any collision. All belts, retractors, anchors and hardware damaged by a collision should be replaced before the vehicle is operated again.
Knowing your vehicle
|
WARNING — Cargo area |
||||
|
(if equipped) |
||||
|
1 |
||||
|
Passengers should never be |
||||
|
allowed to ride in the cargo area |
||||
|
of a vehicle. No safety belts are |
2 |
|||
|
provided for the cargo area. |
||||
|
Persons riding in the vehicle |
||||
|
3 |
||||
|
without a fastened safety belt |
||||
|
are much more likely to suffer |
||||
|
serious bodily injury or death |
||||
|
4 |
||||
|
during an accident. |
||||
|
5 |
||||
|
WARNING — Twisted belts |
||||
|
A twisted or jammed safety belt |
||||
|
6 |
||||
|
cannot restrain you properly. If |
||||
|
you cannot untwist or unjam the |
||||
|
safety belt, have an authorized |
7 |
|||
|
Kia dealer it immediately. Never |
||||
|
drive or ride with a twisted or |
||||
|
8 |
||||
|
jammed safety belt. |
||||
|
9 |
||||
3 31

Knowing your vehicle
|
WARNING — Belt use |
|||||
|
Safety belts must be used cor- |
|||||
|
1 |
|||||
|
rectly to work properly in an |
|||||
|
accident. Each seating position |
|||||
|
2 |
in your vehicle has a specific |
||||
|
safety |
belt assembly |
that |
|||
|
includes |
a buckle and tongue |
||||
|
3 |
|||||
|
designed to be used together. |
|||||
|
For greatest effectiveness, fol- |
|||||
|
low these guidelines in using |
|||||
|
4 |
|||||
|
safety belts: |
|||||
|
• Use the shoulder portion of |
|||||
|
5 |
|||||
|
the safety belt on the outside |
|||||
|
shoulder only. Never wear the |
|||||
|
shoulder portion under |
the |
||||
|
6 |
|||||
|
arm. |
|||||
|
• Never swing the safety belt |
|||||
|
7 |
|||||
|
around your neck to fit over |
|||||
|
the inside shoulder. |
|||||
|
• Never wear the shoulder por- |
|||||
|
8 |
|||||
|
tion of the safety belt across |
|||||
|
the neck or face. |
|||||
|
9 |
(Continued) |
||||
(Continued)
•Wear the lap portion as low as possible. Be sure that the lap belt fits snugly around the hips. Never wear a lap portion of a lap/shoulder belt over your waist; it should always go over the stronger area of your hips.
•Never use a single safety belt for more than one person.
•The front seatbacks should always remain in a comfortable, upright position when the vehicle is moving.
WARNING — Safety belt care
•A damaged belt may not give you the protection you need in an accident.
(Continued)
(Continued)
•Inspect your safety belts periodically for excessive wear or damage. Pull out each belt fully and look for fraying, cuts, burns or other damage. Pull the safety belt out and let it retract a number of times. Make sure that the lap/shoulder belts return smoothly and easily into the retractor.
•Check the latches to make sure they latch and release without interference or delay.
•Never close the doors on any part of the lap or shoulder belt.
•Any belt not in good condition or in good working order should be promptly replaced.
CAUTION
Never close the doors on any part of the lap or shoulder belt. It can damage the safety belt or buckle which could increase the risk of injury in case of an accident.
3 32

Knowing your vehicle
1GQA2083
Safety belt warning light and chime
If the driver’s lap/shoulder belt is not fastened when the ignition switch is turned ON, the safety belt warning light and chime will activate for about 6 seconds. And if the lap/shoulder belt is fastened when the ignition switch is turned ON, the safety belt warning light will blink for about 6 seconds.
If the lap/shoulder belt is unfastened while the lap/shoulder belt is fastened with the ignition switch ON, the safety belt warning light will blink for about 6 seconds and if the vehicle speed exceeds 10 km/h (6 mph) the safety belt warning light and chime will activate until it is fastened.
B180A01NF-1
Lap/shoulder belt
To fasten the lap/shoulder belt:
1.Grasp the buckle and tongue plate.
2.Slowly pull the lap/shoulder belt out from the retractor.
3.Insert the tongue plate (1) into the open end of the buckle (2) until an audible “click” is heard, indicating the belt is locked in the buckle.
3 33

Knowing your vehicle
1
2
3
|
4 |
|||
|
B200A02NF |
|||
|
4. Position the lap portion of the belt |
|||
|
5 |
|||
|
across your lap as LOW ON THE |
|||
|
HIPS as possible to reduce the |
|||
|
risk of sliding under it during an |
|||
|
6 |
|||
|
accident. Adjust the belt to a |
|||
|
SNUG FIT by pulling up on the |
|||
|
7 |
shoulder portion of the safety belt. |
||
|
The belt retractor is designed to |
|||
|
take up excess webbing automati- |
|||
|
8 |
cally and to maintain tension on |
||
|
the belt. For your safety, do not put |
|||
|
any excess slack into the safety |
|||
|
9 |
|||
|
belt at any location. |
|||
OUN026100
5.Adjust the shoulder anchor position to your size. To raise the anchor position, push the anchor up (1). To lower the anchor position, press (2) the button and slide the anchor down (3). After adjustment, make sure the anchor is locked in position.
If the height of the adjusting seat belt is too near your neck, you will not be getting the most effective protection. The shoulder portion should be adjusted so that it lies across your chest and midway over your shoulder nearest the door and not your neck.
WARNING — Beld adjust
•The height adjuster must be in the locked position when the vehicle is moving.
•The misadjustment of height of the shoulder belt could reduce the effectiveness of the seat belt in a crash.
3 34

Knowing your vehicle
B210A01NF
To unfasten the lap/shoulder belt:
Press the release button on the buckle and allow the belt to slowly retract.
1LDN2045
When using the rear center seat belt, the buckle with the “CENTER” mark must be used.
1LDN3207
3 Point rear center belt (if equipped)
To fasten the rear center belt
1.Extract the tongue plates from the holes on the belt assembly cover and slowly pull the tongue plates out from the retractor.
3 35

Knowing your vehicle
1
2
3
|
4 |
||||||
|
1LDN3208A |
1LDN3209 |
|||||
|
2. Insert the tongue plate (A) into the |
3. Pull the tongue plate (B) and |
|||||
|
5 |
||||||
|
open end of the buckle (C) until an |
insert the tongue plate into the |
|||||
|
audible “click» is heard, indicating |
open end of the buckle (D) until an |
|||||
|
6 |
the latch is locked. Make sure the |
audible “click” is heard, indicating |
||||
|
belt is not twisted. |
the latch is locked. Make sure the |
belt is not twisted.
7
8
9
There will be an audible “click” when the tab locks in the buckle. The seat belt automatically adjusts to the proper length only after the lap belt is adjusted manually so that it fits snugly around your hips, if you lean forward in a slow, easy motion, the belt will extend and let you move around. If there is a sudden stop or impact, the belt will lock into position. It will also lock if you try to lean forward too quickly.
WARNING
When using the rear seat center belt, you must lock all tongue plates and buckle/anchor connector. If any tongue plate or buckle/anchor connector is not locked, it will increase the chance of injury or death in the event of collision.
3 36

Knowing your vehicle
1LDN3210
To unfasten the rear center belt
1.Press the release button on the buckle (D) and remove the tongue plate (B) from the buckle (D).
1LDN3211A
2.To retract the rear center seatbelt, insert the key or similar small rigid device into the web release button
(C) on the anchor connector. Pull up on the seat belt web (A) and allow the webbing to retract automatically. (5 Door, if equipped)
1LDN3215
3.Insert the tongue plates into the holes and hang the tongue plates on the hooks on the belt assembly cover.
3 37

Knowing your vehicle
|
Proper use and care of the |
||
|
safety belt system |
||
|
To ensure that the safety belts pro- |
||
|
1 |
||
|
vide the maximum protection, please |
||
|
follow these instructions: |
||
|
2 |
||
|
• Use the belts at all times — even on |
||
|
short trips. |
||
|
3 |
• If the safety belt is twisted, straight- |
|
|
en it prior to use. |
•Keep sharp edges and damaging 4 objects away from the belts.
•Periodically inspect belt webbing, 5 anchors, buckles and all other parts for signs of wear and dam-
age. Replace damaged, excessive- 6 ly worn or questionable parts
immediately.
7
8
9
•To clean the belt webbing, use a mild soap solution recommended for cleaning upholstery or carpets. Follow the instructions provided with the soap.
•Do not make modifications or additions to the safety belt.
•After wearing a safety belt, make sure it fully retracts to the stowed position. Do not allow the belt to get caught in the door when you close it.
WARNING
Do not bleach or dye the webbing because this may weaken the webbing fibers and allow them to fail when loaded in a collision.
Restraint of pregnant women
Pregnant women should wear lap/shoulder belt assemblies whenever possible according to specific recommendations by their doctors. The lap portion of the belt should be worn AS SNUGLY AND LOW AS POSSIBLE.
WARNING — Pregnant women
Pregnant women must never place the lap portion of the safety belt over the area of the abdomen where the fetus is located or above the abdomen where the belt could injure the fetus during an impact.
3 38

Restraint of infants and small children
To increase their safety, infants and young children should always be restrained by a restraint system approved for their age and size.
Never allow a child to stand or kneel on the seat of a moving vehicle. Never allow a safety belt to be placed around both a child and an adult or around two children at the same time.
It is best for children to be seated in the rear seats.
WARNING — Children on laps
Never hold a child on your lap or in your arms in a moving vehicle.
Even a very strong person cannot hold onto a child in the event of even a minor collision.
Many companies manufacture child restraint systems (often called child seats) for infants and small children. An acceptable child restraint system must always satisfy the Safety Standards of your country. Make sure that any child-restraint system you use in your vehicle is labelled as complying with those safety standards.
The child-restraint system should be chosen to fit both the size of the child and the size of the vehicle seat. Be sure to follow any instructions provided by the child-restraint system manufacturer when installing the childrestraint system.
Knowing your vehicle
|
WARNING — Infants and |
||
|
young children |
||
|
1 |
||
|
• Infants and young children are |
||
|
at much greater risk of serious |
||
|
injury or death in an accident |
2 |
|
|
or sudden stop if they are unre- |
||
|
strained or restrained improp- |
||
|
3 |
||
|
erly. Follow all instructions in |
||
|
this section of your Kia manual |
||
|
and the instructions that came |
||
|
4 |
||
|
on and with an improved child |
||
|
safety restraint system. The |
||
|
child restraint must be correct- |
5 |
|
|
ly installed in the vehicle, and |
||
|
the child must be correctly |
||
|
installed in the child restraint. |
6 |
|
|
• All children under 12 are |
||
|
safest in the back seat. |
||
|
7 |
||
|
• Never install a child or infant |
||
|
seat in the front passenger |
||
|
8 |
||
|
position. The baby will be |
||
|
injured or killed by the air bag |
||
|
if it deploys in an accident. |
9 |
|
|
• Never allow a child to stand or |
kneel on the seat of a moving vehicle. Insist the child sit down in an approved restraint system.
3 39

Knowing your vehicle
|
WARNING — Hot metal |
|||
|
parts |
|||
|
1 |
|||
|
Safety belts and seats can |
|||
|
become hot in a vehicle that has |
|||
|
2 |
been closed during |
warm/hot |
|
|
weather; they could |
burn a |
|
child. Check seat covers and |
||
|
3 |
||
|
buckles before you place a child |
||
|
anywhere near them. |
||
|
4 |
||
|
5 |
||
|
6 |
||
|
7 |
||
|
8 |
||
|
9 |
||
Restraint of larger children
As children grow, they may need to use new child-restraint systems, including larger child seats or booster seats, which are appropriate for their increased size.
A child who has outgrown available child-restraint systems should use the belts provided in the vehicle. When seated in the rear outboard seats, the child should be restrained by the lap/shoulder belt.
If the shoulder belt portion slightly touches the child’s neck or face, try placing the child closer to the center of the vehicle. If the shoulder belt still touches their face or neck they may need to be returned to a child restraint system. In addition, aftermarket devices are available from independent manufacturers which help pull the shoulder belt down and away from the child’s face or neck.
Larger children should use one of the seat belts provided.
WARNING — Shoulder belts on small children
•Never allow a shoulder belt to be in contact with a child’s neck or face while the vehicle is in motion.
•If safety belts are not properly worn and adjusted, there is a risk of death or serious injury to such a child.
3 40
 Loading…