- Manuals
- Brands
- Beko Manuals
- Coffee Maker
- CEG5311X
Manuals and User Guides for Beko CEG5311X. We have 6 Beko CEG5311X manuals available for free PDF download: User Manual, Instructions Manual, Manual

Beko CEG5311X User Manual (202 pages)
Fully Automatic
Brand: Beko
|
Category: Coffee Maker
|
Size: 37.63 MB
Table of Contents
-
Espresso Machine
1
-
Technical Data Power Supply
3
-
Meanings of the Symbols
4
-
Danger of Burning or Scalding
5
-
Fundamental Safety Precautions
5
-
Important Instructions for Safety and Environment
6
-
Intended Use
7
-
Control Panel
9
-
Installation
10
-
Filling the Water Tank
10
-
Grinding Adjustment
11
-
Operation
11
-
Filling the Bean Container
12
-
Hot Water
14
-
Mode Selection
15
-
Cleaning of the Appliance
16
-
Self-Cleaning
17
-
Manual Rinsing
18
-
Troubleshooting
19
-
Erklärung der Symbole
20
-
Technische Daten
20
-
Wichtige Anweisungen zu Sicherheit und Umwelt
21
-
Gefahr durch Elektrischen Strom
21
-
Verbrennungs- und Verbrühungsgefahr
21
-
Bestimmungsgemäße Verwendung
24
-
Entsorgung von Altgeräten
24
-
Einhaltung von Rohs-Vorgaben
24
-
Informationen zur Verpackung
25
-
Montage
27
-
Wassertank Füllen
27
-
Bedienung
28
-
Kaffee Zubereiten
30
-
Heißes Wasser
32
-
Gerät Reinigen
34
-
Fehlerbehebung
37
-
Signification des Pictogrammes
39
-
Données Techniques
39
-
Instructions Importantes en Matière de Sécurité Et D’environnement
40
-
Danger Lié Au Courant Électrique
40
-
Consignes de Sécurité Fondamentales
40
-
Utilisation Conforme
42
-
Conformité Avec la Directive DEEE Et Mise Au Rebut des Déchets
43
-
Information Sur L’emballage
43
-
Panneau de Commande
44
-
Remplissage du Réservoir D’eau
45
-
Réglage de la Mouture
47
-
Remplissage du Réservoir À Grains de Café
47
-
Eau Chaude
50
-
Nettoyage de L’appareil
52
-
Entretien
52
-
Dépannage
55
-
Önemli Güvenlik Ve Çevre Talimatları
57
-
Elektrik AkıMı
57
-
Kontrol Paneli
61
-
Su Haznesinin Doldurulması
62
-
Cihazın Temizlenmesi
69
-
Sorun Giderme
72
-
Explicación de Los Símbolos
73
-
Instrucciones Importantes para la Seguridad y el Medio Ambiente
74
-
Precauciones Básicas de Seguridad
74
-
Uso Previsto
76
-
Limitación de Responsabilidad
77
-
Información de Embalaje
77
-
Panel de Control
78
-
Instalación
79
-
Agua Caliente
84
-
Selección del Modo
84
-
Limpieza de la Máquina
86
-
Resolución de Problemas
89
-
Vysvětlení Symbolů
92
-
Technické Údaje
92
-
Zamýšlené Použití
95
-
Omezení Odpovědnosti
96
-
Informace O Balení
96
-
Ovládací Panel
97
-
Příprava Kávy
101
-
Volba Režimu
104
-
ČIštění Spotřebiče
105
-
Odstraňování ProbléMů
108
-
Spiegazione Dei Simboli
109
-
Dati Tecnici
109
-
Istruzioni Importanti Per la Sicurezza E L’ambiente
110
-
Limitazione DI Responsabilità
113
-
Informazioni DI Imballaggio
113
-
Pannello DI Controllo
114
-
Installazione
115
-
Funzionamento
116
-
Preparare Il Caffè
118
-
Acqua Calda
120
-
Pulizia Dell’apparecchiatura
122
-
Ricerca E Risoluzione Dei Problemi
125
-
Objaśnienie Symboli
127
-
Dane Techniczne
127
-
Ważne Instrukcje Dotyczące Bezpieczeństwa I Ochrony Środowiska Naturalnego
128
-
Niebezpieczeń- Stwo Porażenia Prą- dem Elektrycznym
128
-
Niebezpieczeń- Stwo Oparzenia
128
-
Podstawowe Zasady Bezpieczeń- Stwa
128
-
Ograniczenie OdpowiedzialnośCI
131
-
Informacje O Opakowaniu
131
-
Panel Sterowania
132
-
Parzenie Kawy
136
-
Gorąca Woda
138
-
Wybór Trybu
138
-
Czyszczenie Urządzenia
140
-
Rozwiązywanie Problemów
143
-
Date Tehnice
148
-
Scopul Utilizării
151
-
Limitarea Răspunderii
152
-
Panoul de Comandă
153
-
Prepararea Cafelei
157
-
Vysvetlenie Symbolov
167
-
Zamýšľané Použitie
170
-
Obmedzenie Zodpovednosti
171
-
Informácie O Balení
171
-
Horúca Voda
178
-
Čistenie Spotrebiča
180
Advertisement
Beko CEG5311X Manual (45 pages)
Brand: Beko
|
Category: Coffee Maker
|
Size: 7.73 MB
Table of Contents
-
Türkçe
3
-
Table of Contents
3
-
Elektrik AkıMı Tehlikesi
4
-
Yanma Veya Haşlanma Tehlikesi
4
-
Temel Güvenlik Önlemleri
5
-
KullanıM Amacı
7
-
Sorumluluk Sınırlaması
8
-
AEEE Direktifine Uygunluk Ve Atık Ürünün
8
-
Elden Çıkarılması
8
-
-
Rohs Direktifine Uygunluk
8
-
Ambalaj Bilgileri
8
-
2 Tam Otomatik Kahve Makineniz
9
-
3 Ekran
10
-
Kontrol Paneli
10
-
-
4 Hazırlık
11
-
Kurulum
11
-
Su Haznesinin Doldurulması
11
-
-
5 KullanıM
13
-
Öğütme Ayarı
13
-
Kahve ÇekirdeğI Haznesinin Doldurulması
13
-
Kahve Hazırlama
14
-
Kahve/Sıcak Su Hacminin Ayarlanması
15
-
Kahve Için Köpüklü Süt Hazırlama
16
-
Sıcak Su
16
-
Mod SeçIMI
17
-
-
6 Temizlik
18
-
Cihazın Temizlenmesi
18
-
Fonksiyonu
19
-
-
Sistem Boşaltma Fonksiyonu
20
-
Manuel Yıkama
20
-
-
7 Sorun Giderme
21
-
-
English
27
-
1 Important Instructions for Safety and Environment
28
-
Danger of Electric Current
28
-
Danger of Burning or Scalding
28
-
Fundamental Safety Precautions
29
-
Intended Use
31
-
Limitation of Liability
32
-
Compliance with the WEEE Directive and Disposing of the Waste Product
32
-
Compliance with Rohs Directive
32
-
Package Information
32
-
-
2 Your Fully Automatic Coffee Machine
33
-
3 Display
34
-
Control Panel
34
-
-
4 Preparation
35
-
Installation
35
-
Filling the Water Tank
35
-
-
5 Operation
37
-
Grinding Adjustment
37
-
Filling the Bean Container
37
-
Making Your Coffee
38
-
Water
39
-
-
Preparing Frothy Milk for Coffee
39
-
Hot Water
40
-
Mode Selection
40
-
-
6 Cleaning
41
-
Cleaning of the Appliance
41
-
Self-Cleaning
42
-
Empty System Function
43
-
Manual Rinsing
43
-
-
7 Troubleshooting
44
-

Beko CEG5311X Instructions Manual (45 pages)
Brand: Beko
|
Category: Coffee Maker
|
Size: 7.85 MB
Table of Contents
-
Türkçe
3
-
Table of Contents
3
-
Elektrik AkıMı Tehlikesi
4
-
Yanma Veya Haşlanma Tehlikesi
4
-
Temel Güvenlik Önlemleri
5
-
KullanıM Amacı
7
-
Sorumluluk Sınırlaması
8
-
AEEE Direktifine Uygunluk Ve Atık Ürünün
8
-
Elden Çıkarılması
8
-
Rohs Direktifine Uygunluk
8
-
Ambalaj Bilgileri
8
-
Tam Otomatik Kahve Makineniz
9
-
Ekran
10
-
Kontrol Paneli
10
-
Su Haznesinin Doldurulması
11
-
Kurulum
11
-
Hazırlık
11
-
KullanıM
13
-
Öğütme Ayarı
13
-
Kahve ÇekirdeğI Haznesinin Doldurulması
13
-
Kahve Hazırlama
14
-
Kahve/Sıcak Su Hacminin Ayarlanması
15
-
Kahve Için Köpüklü Süt Hazırlama
16
-
Sıcak Su
16
-
Mod SeçIMI
17
-
Temizlik
18
-
Cihazın Temizlenmesi
18
-
Fonksiyonu
19
-
Sistem Boşaltma Fonksiyonu
20
-
Manuel Yıkama
20
-
Sorun Giderme
21
-
-
English
27
-
Danger of Burning or Scalding
28
-
Danger of Electric Current
28
-
Important Instructions for Safety and Environment
28
-
Fundamental Safety Precautions
29
-
Intended Use
31
-
Compliance with Rohs Directive
32
-
Compliance with the WEEE Directive and Disposing of the Waste Product
32
-
Limitation of Liability
32
-
Package Information
32
-
Your Fully Automatic Coffee Machine
33
-
Control Panel
34
-
Display
34
-
Filling the Water Tank
35
-
Installation
35
-
Preparation
35
-
Filling the Bean Container
37
-
Grinding Adjustment
37
-
Operation
37
-
Making Your Coffee
38
-
Preparing Frothy Milk for Coffee
39
-
Water
39
-
Hot Water
40
-
Mode Selection
40
-
Cleaning
41
-
Cleaning of the Appliance
41
-
Self-Cleaning
42
-
Empty System Function
43
-
Manual Rinsing
43
-
Troubleshooting
44
-
Advertisement
Beko CEG5311X User Manual (23 pages)
Fully Automatic Espresso Machine
Brand: Beko
|
Category: Coffee Maker
|
Size: 4.11 MB
Table of Contents
-
Technical Data Power Supply
3
-
Meanings of the Symbols
4
-
Danger of Burning or Scalding
5
-
Fundamental Safety Precautions
5
-
Important Instructions for Safety and Environment
6
-
Intended Use
7
-
Plug Wiring
9
-
Control Panel
10
-
Installation
11
-
Filling the Water Tank
11
-
Grinding Adjustment
12
-
Operation
12
-
Filling the Bean Container
13
-
Hot Water
15
-
Mode Selection
16
-
Cleaning of the Appliance
17
-
Self-Cleaning
18
-
Manual Rinsing
19
-
Troubleshooting
20
Beko CEG5311X User Manual (20 pages)
Fully Automatic Espresso Machine
Brand: Beko
|
Category: Coffee Maker
|
Size: 4.08 MB
Table of Contents
-
Technical Data Power Supply
3
-
Meanings of the Symbols
4
-
Danger of Burning or Scalding
5
-
Fundamental Safety Precautions
5
-
Important Instructions for Safety and Environment
6
-
Intended Use
7
-
Limitation of Liability
8
-
Package Information
8
-
Compliance with the WEEE Directive and Disposing of the Waste Product
8
-
Compliance with Rohs Directive
8
-
Control Panel
9
-
Installation
10
-
Filling the Water Tank
10
-
Grinding Adjustment
11
-
Operation
11
-
Filling the Bean Container
12
-
Hot Water
14
-
Mode Selection
15
-
Cleaning of the Appliance
16
-
Self-Cleaning
17
-
Manual Rinsing
18
-
Troubleshooting
19
Advertisement
Related Products
-
Beko CEG5301X
-
Beko CEG5331X
-
Beko CEG5311
-
Beko CEG 5311 Bio
-
Beko CEG7425B
-
Beko CEG6302D
-
Beko CEG 3190 B
-
Beko CEG 3194 B
-
Beko CEP5152B-UK
-
Beko CEP 5304 X
Beko Categories
![]()
Refrigerator
![]()
Washer
![]()
Dryer
![]()
Dishwasher
![]()
Oven
More Beko Manuals
Код: 118431
Извините, товара сейчас нет в наличии
Бесплатная доставка
по Красноярску
Извините, товара сейчас нет в наличии
Новости интернет-магазина «Лаукар»:
Дополнительная информация в категории Кофемашина:
В интернет-магазине бытовой техники «Лаукар» Вы можете скачать инструкцию к товару Кофемашина BEKO CEG 5311X совершенно бесплатно.
Все инструкции, представленные на сайте интернет-магазина бытовой техники «Лаукар», предоставляются производителем товара.
Перед началом использования товара рекомендуем Вам ознакомиться с инструкцией по применению.
Для того чтобы скачать инструкцию, Вам необходимо нажать на ссылку «скачать инструкцию», расположенную ниже, а в случае, если ссылки нет,
Вы можете попробовать обратиться к данной странице позднее,
возможно специалисты интернет-магазина бытовой техники «Лаукар» еще не успели загрузить для скачивания инструкцию к товару:
Кофемашина BEKO CEG 5311X.

Фирма-производитель оставляет за собой право на внесение изменений в конструкцию, дизайн и комплектацию товара: Кофемашина BEKO CEG 5311X. Пожалуйста, сверяйте информацию о товаре с информацией на
официальном сайте компании производителя.
![]()
Fully Automatic
Espresso Machine
User Manual
|
CEG5311X |
||||||||||
|
EN |
DE |
FR |
TR |
ES |
CS |
|||||
|
IT |
PL |
RO |
SL |
AR |
01M-8813573200-2718-01

CONTENTS
|
ENGLISH |
5-19 |
|
DEUTSCH |
20-38 |
|
FRANÇAIS |
39-55 |
|
TÜRKÇE |
56-72 |
|
ESPAÑOL |
73-91 |
|
ČESKY |
92-108 |
|
ITALIANO |
109-126 |
|
POLSKI |
127-147 |
|
SLOVAK |
148-166 |
|
ROMÂNĂ |
167-183 |

|
1 |
||
|
16 |
2 |
|
|
3 |
||
|
15 |
4 |
|
|
5 |
||
|
6 |
||
|
7 |
||
|
8 |
||
|
14 |
||
|
9 |
||
|
13 |
10
|
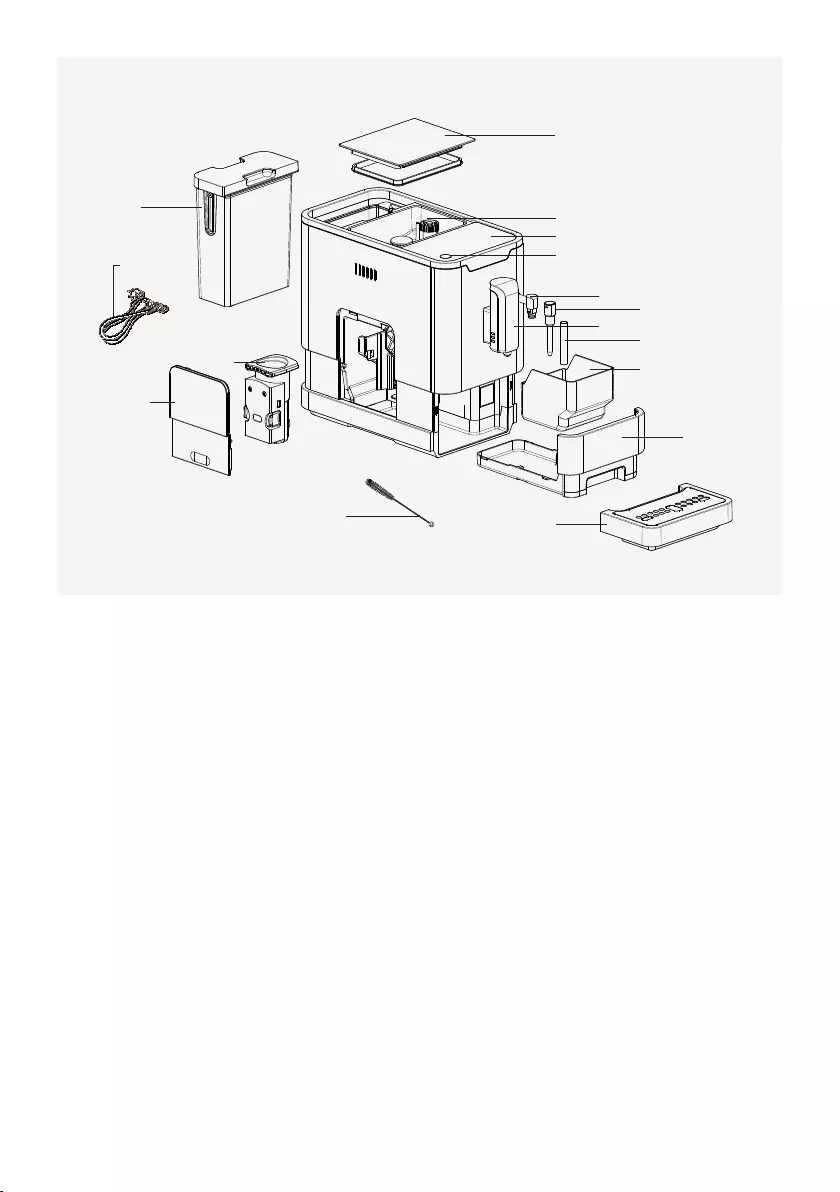
1. |
Coffee Beans Container Cover |
Technical data |
|
2. |
Coffee Bean Container |
Power supply: |
|
3. |
Control Panel |
220-240 V~, 50-60 Hz |
|
4. |
On/Off button |
Power: 1350 W |
|
5. |
Steam Nozzle |
Technical and design modifications |
|
6. |
Nozzle cover |
reserved. |
7.Adjustable coffee spout
8.Metal tube
9.Coffee Grounds Container
10.Internal Drip Tray
11.External Drip Tray
12.Cleanness brush
13.Service Door
14.Brewer
15.Power cord
16.Water Tank
All declared values on the product and on the printed leaflets are picked up after laboratory measurements performed according to related standarts. These values may differ upon usage and ambient conditions.
Please read this user manual first!
Dear Customers,
Thank you for selecting an Beko product. We hope that you get the best results from your product which has been manufactured with high quality and state-of-the-art technology. Therefore, please read this entire user manual and all other accompanying documents carefully before using the product and keep it as a reference for future use. If you handover the product to someone else, give the user manual as well. Follow all warnings and information in the user manual.
Meanings of the symbols
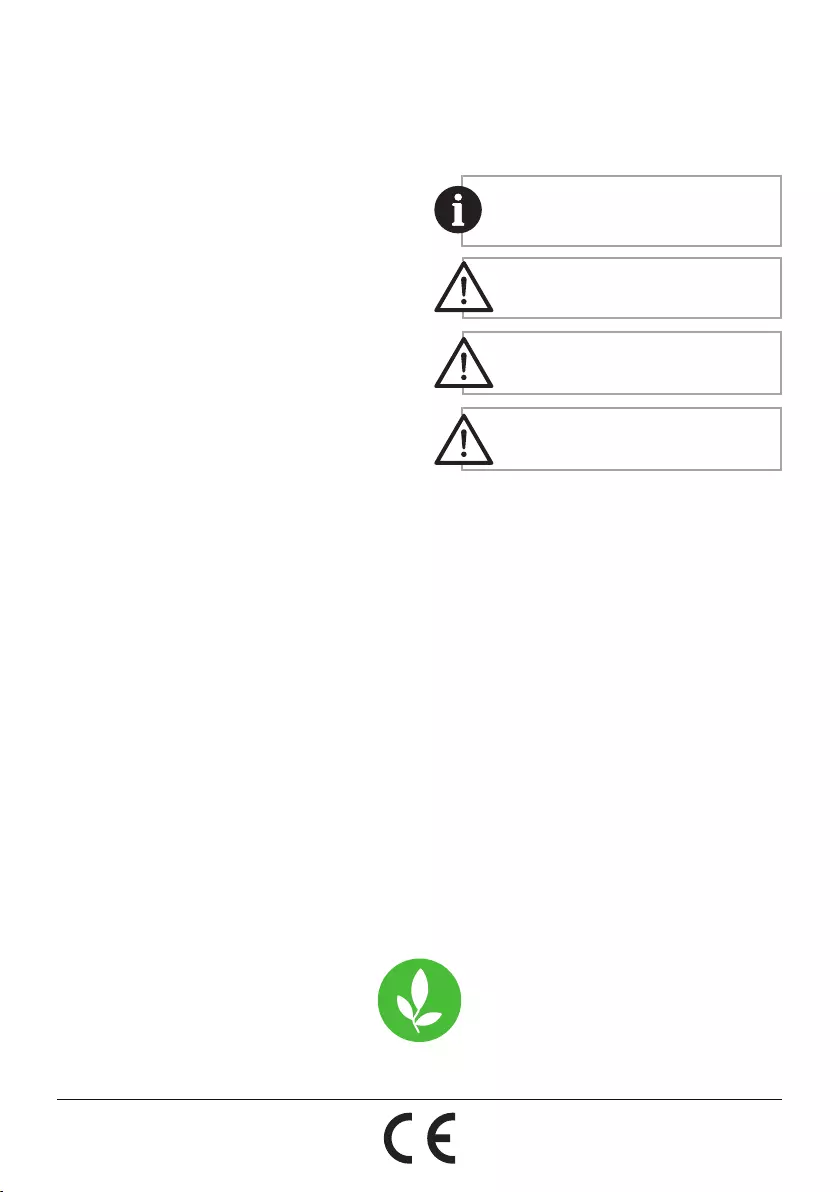
Following symbols are used in the various section of this manual:
Important information or useful hints about usage.
DANGER: Warning for hazardous situations with regard to life and property.
WARNING: Warning indicates a potentially dangerous situation.
CAUTION: Warning indicates potential material damage.
This product has been produced in environmentally-friendly, state-of-the-art facilities.
|
Complies with the WEEE Directive. |
It does not contain PCB. |

1 Important instructions for safety and environment
This section includes the safety instructions that will help providing protection against personal injury and material loss risks. Failure to followtheseinstructionsinvalidates the granted warranty.
1.1 Danger of electric current
Danger to life by electric current! Contact with live wires or components could lead to serious injury or even death!
Observe the following safety precautions to avoid electric shocks:
•• Do not use the coffee machine if the connecting cable or mains plug are damaged.
•• Before reusing the coffee machine, the mains cable must be renewed by a qualified electrician.
•• Do not open the housing of the coffee machine. Danger of electric shock if live connections are touched and/or the electrical and mechanical configuration is changed.
•• Before cleaning the bean container, pull the mains plug of the appliance out of the socket. Danger from rotating coffee mill!
1.2 Danger of burning or scalding
Parts of the coffee machine can become very hot during operation! Dispensed drinks and escaping steam are very hot!
Observe the following safety precautions to avoid burning/ scalding yourself and/or others:
•• Do not touch either of the metal sleeves on both coffee spouts.
•• Avoid direct contact of the skin with escaping steam or hot rinsing, cleaning and descaling water.
1.3 Fundamental safety precautions
Observe the following safety precautions to ensure safe handling of the coffee machine:
•• Never play with packaging material. Risk of suffocation.
•• Inspect the coffee machine for visible signs of damage before use. Do not use a damaged coffee machine.
|
Fully Automatic Coffee Machine / User Manual |
5 / EN |

1 Important instructions for safety and environment
•• If the connecting cable is damaged, it should only be replaced by a service agent recommended by the manufacturer in order to prevent any danger! Please contact the manufacturer or his customer service.
•• Repairs to the coffee machine must only be carried out by an authorised specialist or by the works customer service. Unqualified repairs can lead to considerable danger for the user. They will also void the warranty.
•• Repairs to the coffee machine during the warranty period may only be carried out by service centres authorised by the manufacturer, otherwise the warranty will become void in the event of subsequent damage.
•• Defective parts may only be replaced with original spare parts. Only original spare parts guarantee that the safety requirements are met.
•• This appliance can be used by children from the age of 8 up as well as by persons with reduced physical, sensory or mental abilities or with lacking experience and/or knowledge, if these persons are supervised or have been instructed how to use the appliance in a safe way and have understood the hazards which could arise from using it. Children must not play with the appliance. Cleaning and user maintenance shall not be made by children unless they are older than 8 and supervised.
•• This appliance is intended to be used in household and similar applications such as:
—staff kitchen areas in shops, offices and other working environments,
—farm houses,
—by clients in hotels, motels and other residential type environments,
—bed and breakfast type environments.
•• Protect the coffee machine against the effects of weather such as rain, frost and direct sunlight. Do not use the coffee machine outdoors.
|
6 / EN |
Fully Automatic Coffee Machine / User Manual |
 Loading…
You can only view or download manuals with
Sign Up and get 5 for free
Upload your files to the site. You get 1 for each file you add
Get 1 for every time someone downloads your manual
Buy as many as you need
CEG5311X
Fully Automatic Espresso Machine User Manual
01M-8813573200-2718-01
EN DE FR TR ES CS IT PL RO SL AR
CONTENTS
ENGLISH 5-19
DEUTSCH 20-38
FRANAIS 39-55
TRKE 56-72
ESPAOL 73-91
ESKY 92-108
ITALIANO 109-126
POLSKI 127-147
SLOVAK 148-166
ROMN 167-183
All declared values on the product and on the printed leaflets are picked up after laboratory measurements performed according to related standarts. These values may differ upon usage and ambient conditions.
Technical data Power supply: 220-240 V~, 50-60 Hz Power: 1350 W Technical and design modifications reserved.
1. Coffee Beans Container Cover 2. Coffee Bean Container 3. Control Panel 4. On/Off button 5. Steam Nozzle 6. Nozzle cover 7. Adjustable coffee spout 8. Metal tube 9. Coffee Grounds Container 10. Internal Drip Tray 11. External Drip Tray 12. Cleanness brush 13. Service Door 14. Brewer 15. Power cord 16. Water Tank
1
2 3 4
5 6 87
9
10
1112
13
14
15
16
Please read this user ma- nual first! Dear Customers, Thank you for selecting an Beko product. We hope that you get the best results from your product which has been manufactured with high quality and state-of-the-art technology. Therefore, please read this entire user manual and all other accompanying documents carefully before using the product and keep it as a reference for future use. If you handover the product to someone else, give the user manual as well. Follow all warnings and information in the user manual.
Meanings of the symbols Following symbols are used in the various section of this manual:
Important information or useful hints about usage.
DANGER: Warning for hazardous si- tuations with regard to life and property.
WARNING: Warning indicates a potentially dangerous situation.
CAUTION: Warning indicates poten- tial material damage.
This product has been produced in environmentally-friendly, state-of-the-art facilities.
Complies with the WEEE Directive. It does not contain PCB.
5 / ENFully Automatic Coffee Machine / User Manual
1 Important instructions for safety and environment
This section includes the safety instructions that will help providing protection against personal injury and material loss risks. Failure to follow these instructions invalidates the granted warranty.
1.1 Danger of electric current Danger to life by electric current! Contact with live wires or components could lead to serious injury or even death! Observe the following safety precautions to avoid electric shocks:
Do not use the coffee machine if the connecting cable or mains plug are damaged.
Before reusing the coffee machine, the mains cable must be renewed by a qualified electrician.
Do not open the housing of the coffee machine. Danger of electric shock if live connections are touched and/or the electrical and mechanical configuration is changed.
Before cleaning the bean container, pull the mains plug of the appliance out of the socket. Danger from rotating coffee mill!
1.2 Danger of burning or scalding Parts of the coffee machine can become very hot during operation! Dispensed drinks and escaping steam are very hot! Observe the following safety precautions to avoid burning/ scalding yourself and/or others:
Do not touch either of the metal sleeves on both coffee spouts.
Avoid direct contact of the skin with escaping steam or hot rinsing, cleaning and descaling water.
1.3 Fundamental safety precautions Observe the following safety precautions to ensure safe handling of the coffee machine:
Never play with packaging material. Risk of suffocation.
Inspect the coffee machine for visible signs of damage before use. Do not use a damaged coffee machine.
6 / EN Fully Automatic Coffee Machine / User Manual
1 Important instructions for safety and environment
If the connecting cable is damaged, it should only be replaced by a service agent recommended by the manufacturer in order to prevent any danger! Please contact the manufacturer or his customer service.
Repairs to the coffee machine must only be carried out by an authorised specialist or by the works customer service. Unqualified repairs can lead to considerable danger for the user. They will also void the warranty.
Repairs to the coffee machine during the warranty period may only be carried out by service centres authorised by the manufacturer, otherwise the warranty will become void in the event of subsequent damage.
Defective parts may only be replaced with original spare parts. Only original spare parts guarantee that the safety requirements are met.
This appliance can be used by children from the age of 8 up as well as by persons with reduced physical, sensory or mental abilities or with lacking experience and/or knowledge, if these persons are supervised or have been instructed how to use the appliance in a safe way and have understood the hazards which could arise from using it. Children must not play with the appliance. Cleaning and user maintenance shall not be made by children unless they are older than 8 and supervised.
This appliance is intended to be used in household and similar applications such as: — staff kitchen areas in shops,
offices and other working environments,
— farm houses, — by clients in hotels, motels
and other residential type environments,
— bed and breakfast type environments.
Protect the coffee machine against the effects of weather such as rain, frost and direct sunlight. Do not use the coffee machine outdoors.
7 / ENFully Automatic Coffee Machine / User Manual
1 Important instructions for safety and environment
Never immerse the coffee machine itself, the mains cable or the mains plug into water or other liquids.
Do not clean the coffee machine or accessories in a dish washer.
Do not pour any other liquids apart from water or place foodstuffs into the water tank.
Do not fill the water tank beyond the maximum mark (lower edge of the filling hole) (1.5 litres).
Only operate the machine when the waste container, drip tray and the cup grate are fitted.
Do not pull the cable to remove the plug from the mains socket or touch with wet hands.
Do not hold the coffee machine with the mains cable.
Keep the appliance and its cord out of reach of children aged less than 8 years.
Do not operate the hot water function continuously for more than one tank of water.
1.4 Intended use The fully automatic coffee machine Beko is intended for use in homes and similar applications, for instance in staff kitchens, shops, offices and similar areas or by customers in bed & breakfast, hotels, motels and other living accommodation. This coffee machine is not intended for commercial use. The machine is only intended for preparing coffee and heating milk and water. Any other use other than previously stated is considered as improper use. Danger resulting from improper use! If not used for its intended purpose or used in any other way, the coffee machine may be or become a source of danger.
A WARNING: Therefore, the coffee machine may only be used for its intended purpose.
A WARNING: Observe the procedures described in this user manual.
No claims of any kind will be accepted for damage or injury resulting from use of the coffee machine for other than its intended purpose. The risk has to be borne solely by the machine owner.
8 / EN Fully Automatic Coffee Machine / User Manual
1 Important instructions for safety and environment
1.5 Limitation of liability All technical information, data and instructions on installation, operation and maintenance of the coffee machine contained in these operating instructions represent the current status at the time of printing and are based on the best possible knowledge gained by experience and knowhow. No claims can be derived from the information, illustrations and descriptions in this user manual. The manufacturer assumes no liability for damage or injury resulting from failure to observe the user manual, use for other than the intended purpose, unprofessional repairs, unauthorised modifications or use of non-approved spare parts.
1.6 Compliance with the WEEE Directive and Disposing of the Waste Product: This product complies with EU WEEE Directive (2012/19/EU). This product bears a classification symbol for waste electrical and electronic equipment (WEEE).
This product has been manufactured with high quality parts and materials which can be reused and are suitable for recycling. Do not dispose of the waste product with normal domestic
and other wastes at the end of its service life. Take it to the collection center for the recycling of electrical and electronic equipment. Please consult your local authorities to learn about these collection centers.
1.7 Compliance with RoHS Directive The product you have purchased complies with EU RoHS Directive (2011/65/EU). It does not contain harmful and prohibited materials specified in the Directive.
1.8 Package information Packaging materials of the product are manufactured from recyclable materials in accordance with our National Environment Regulations. Do not
dispose of the packaging materials together with the domestic or other wastes. Take them to the packaging material collection points designated by the local authorities.
9 / ENFully Automatic Coffee Machine / User Manual
2 Display 2.1 Control Panel
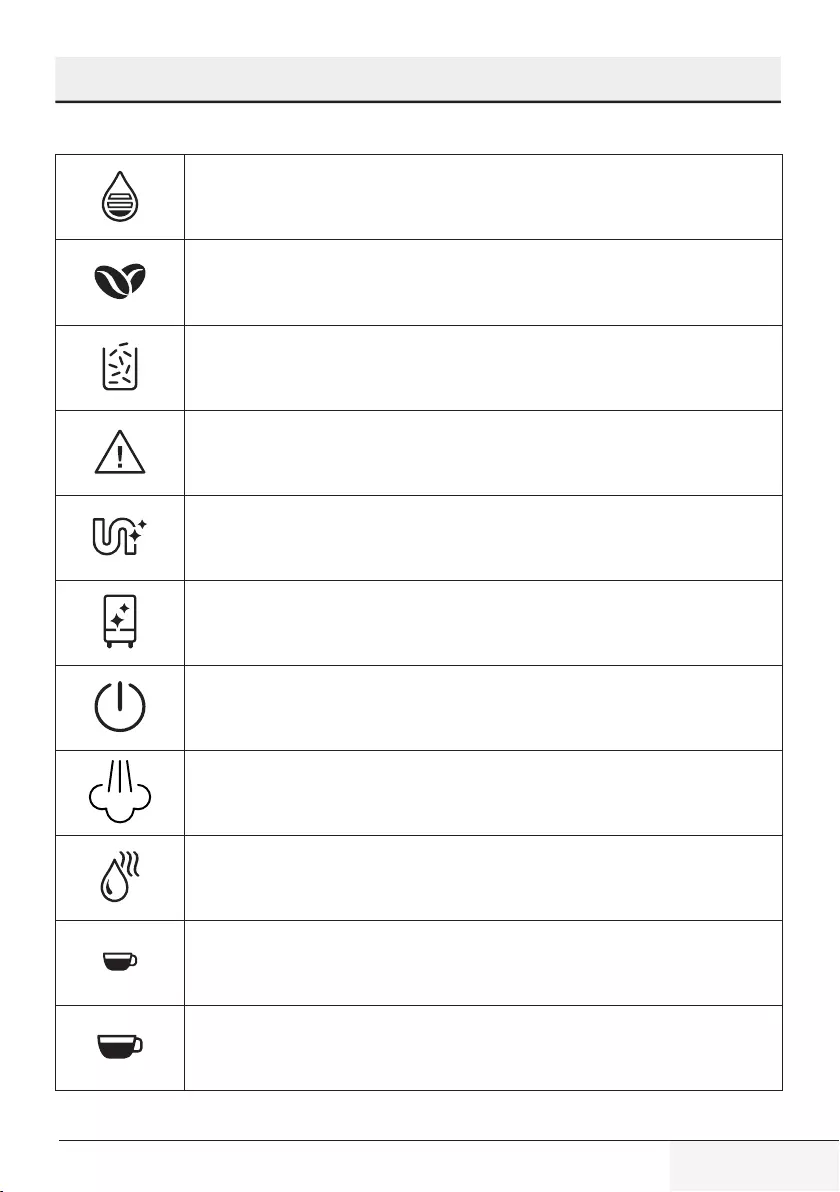
Flashing: Low water level/ Water tank missing
Lack of bean
Lights up stably: coffee grounds container is full Flashing: Internal Drip Tray/coffee grounds container is missing
Lights up stably: Brewer is missing/ installed improperly Flashing: Service door is opened / installed improperly
Lights up stably: Requires to do descaling Flashing: Descaling is under process
Empty System Function is running
Power ON/OFF Button
Steam Button
Hot Water Button
Strong Espresso Button
Mild Espresso Button
In the box, three packs of cleaning agents are included for the process of self-cleaning.
10 / EN Fully Automatic Coffee Machine / User Manual
3 Preparation 3.1 Installation
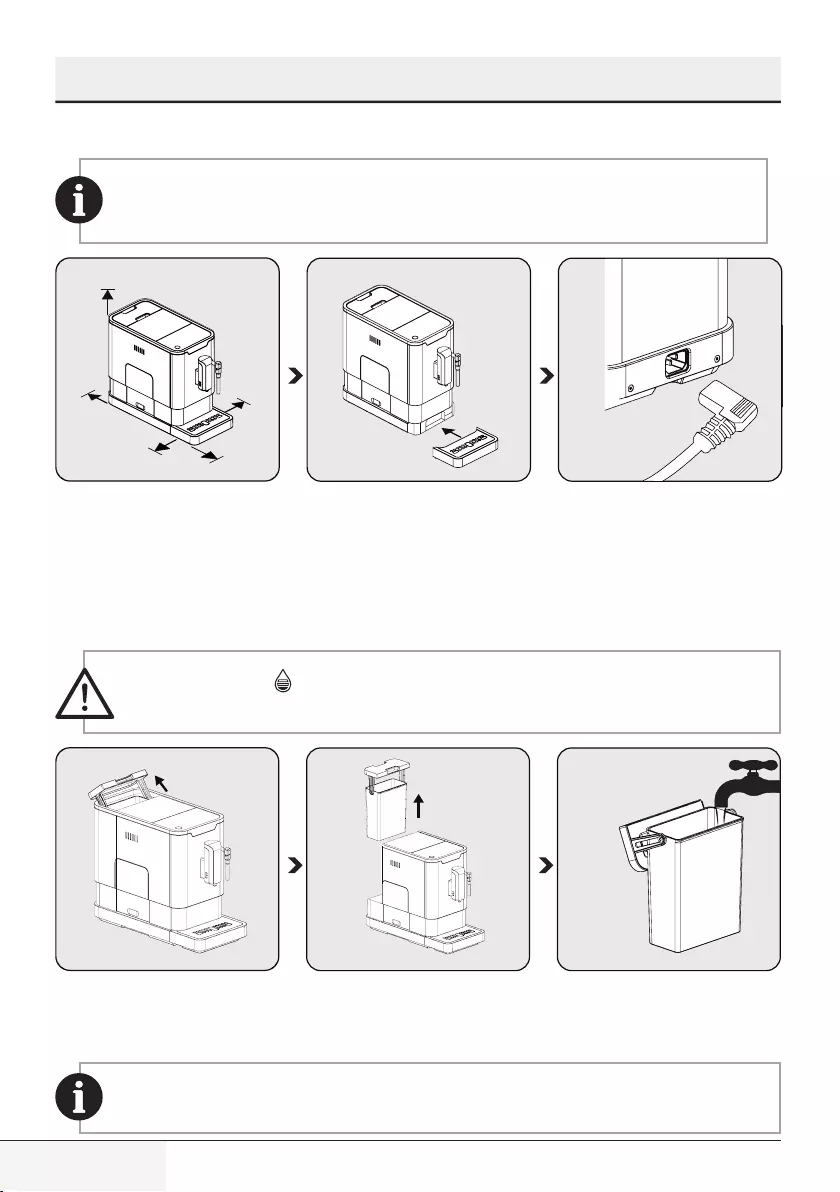
Remove any protective films, stickers and any other packing material on the appliance.
150mm
150mm
150mm
150mm 150mm
.
Choose a safe and stable surface with an easily reachable power supply and allow minimum distance from the sides of the machines.
Insert the external drip tray. Make sure it is inserted correctly.
Unwind and straighten the power cord and insert the plug into the socket loca- ted on the back of the machine. Insert the other end of the power cord into a wall socket with suitable power voltage.
3.3 Filling the water tank
WARNING: When is flashing, the water tank is in low water level and requires filling the water tank.
Lift the water tank by using the lid as the handle.
Take the water tank out. Rinse the water tank with fresh water and then fill the tank to the Max level and place it back into the machine. Make sure it is fully inserted.
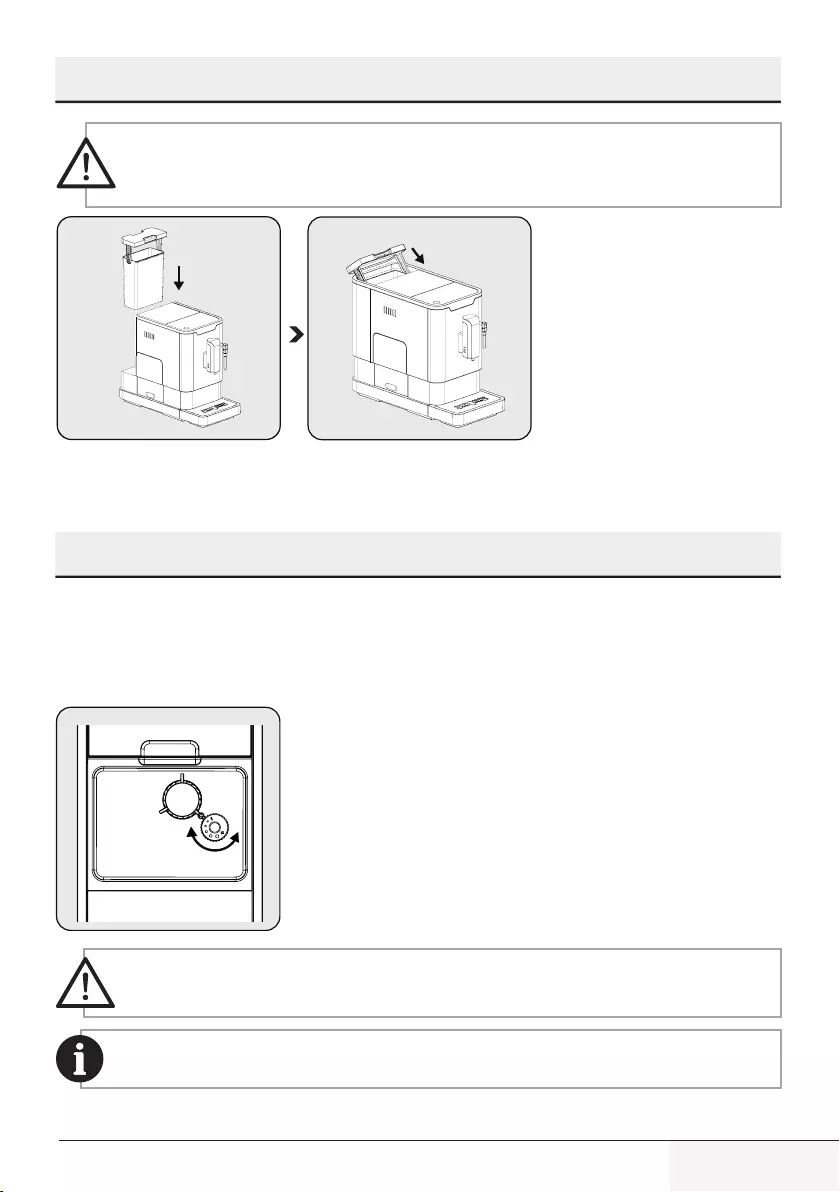
To prevent overflow of water from the water tank, do not add water directly into the appliance with another container.
11 / ENFully Automatic Coffee Machine / User Manual
WARNING: Never fill the water tank with warm, hot, sparkling water or any other liquid which might damage the water tank and the machine.
.
Place the water tank back by using the lid as the handle.
Close the water tank by using the lid.
4.1 Grinding Adjustment You can adjust the grinder to suit the roast of your coffee by turning adjuster knob in the bean container:
WARNING: Never do the grinding adjustment when the grinder is not operating. It may damage the grinder.
The dots on the adjuster knob indicate the fineness of the grind.
3 Preparation
4 Operation
When the grinder is grinding the coffee bean when it is making the coffee, you can turn the adjust knob to do the adjustment.
12 / EN Fully Automatic Coffee Machine / User Manual
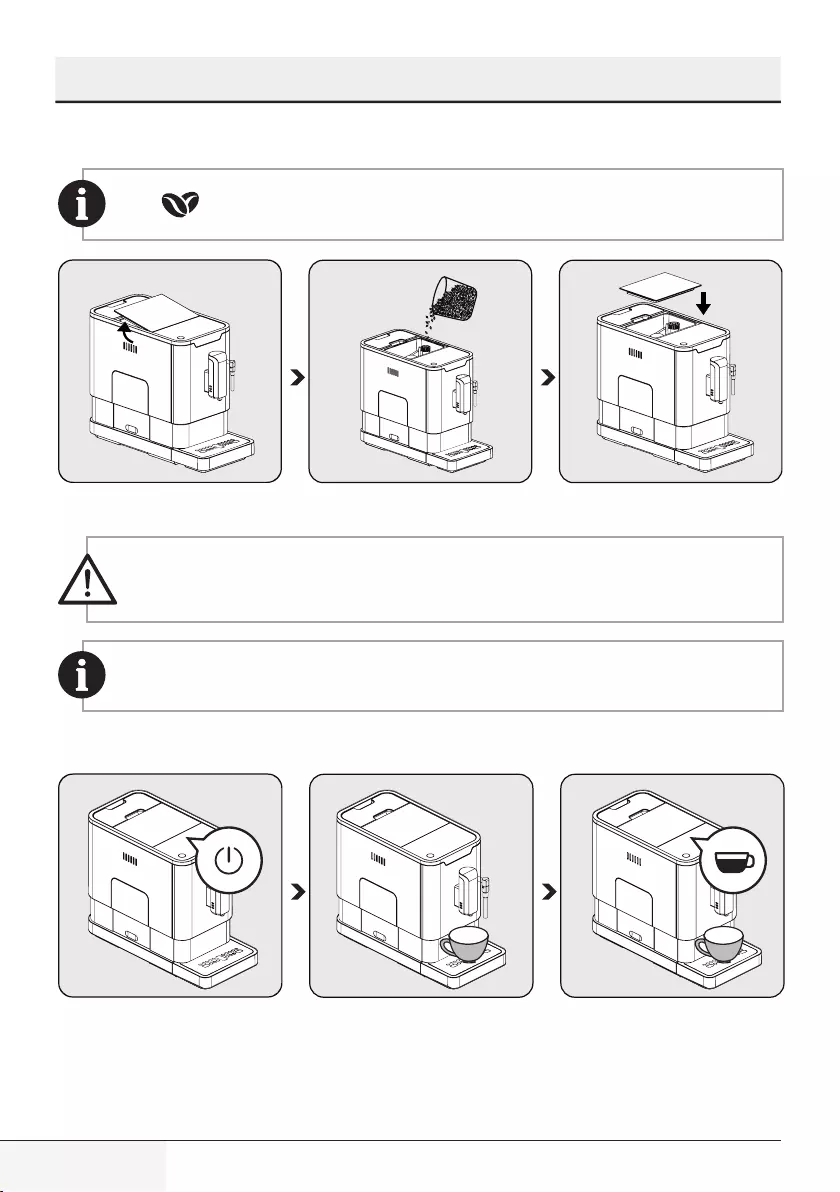
4 Operation 4.2 Filling the bean container
When is flashing, the appliance needs to be filled with coffee bean.
Remove the bean container lid. Slowly pour in the coffee beans. Place the container lid back.
WARNING: Fill the coffee bean container only with coffee beans. Grounded coffee, instant coffee, caramelized coffee and any other objects may damage the machine.
Press the hot water button to clean inside of the coffee maker before first use.
4.3 Making Your Coffee
Switch on the appliance by pressing the power on/off button. The appliance is then in the standby condition.
Place a cup under the coffee spout and adjust the height of the spout the fit the cup.
The espresso button being pressed will light on and the illumination will lights up indicates that the appliance is preparing the cup of coffee. When the appliance is back to standby condition, the coffee is ready to serve.
13 / ENFully Automatic Coffee Machine / User Manual
Switch off the appliance by pressing the power on/off button.
Depending on the taste of coffee you would like to have, press strong espresso button or mild espresso button .
Press the hot water button to clean inside of the coffee maker before first use.
The Appliance is equipped with auto-shut off. Depending on the mode you have selected the appliance will have different auto-shut off timing.
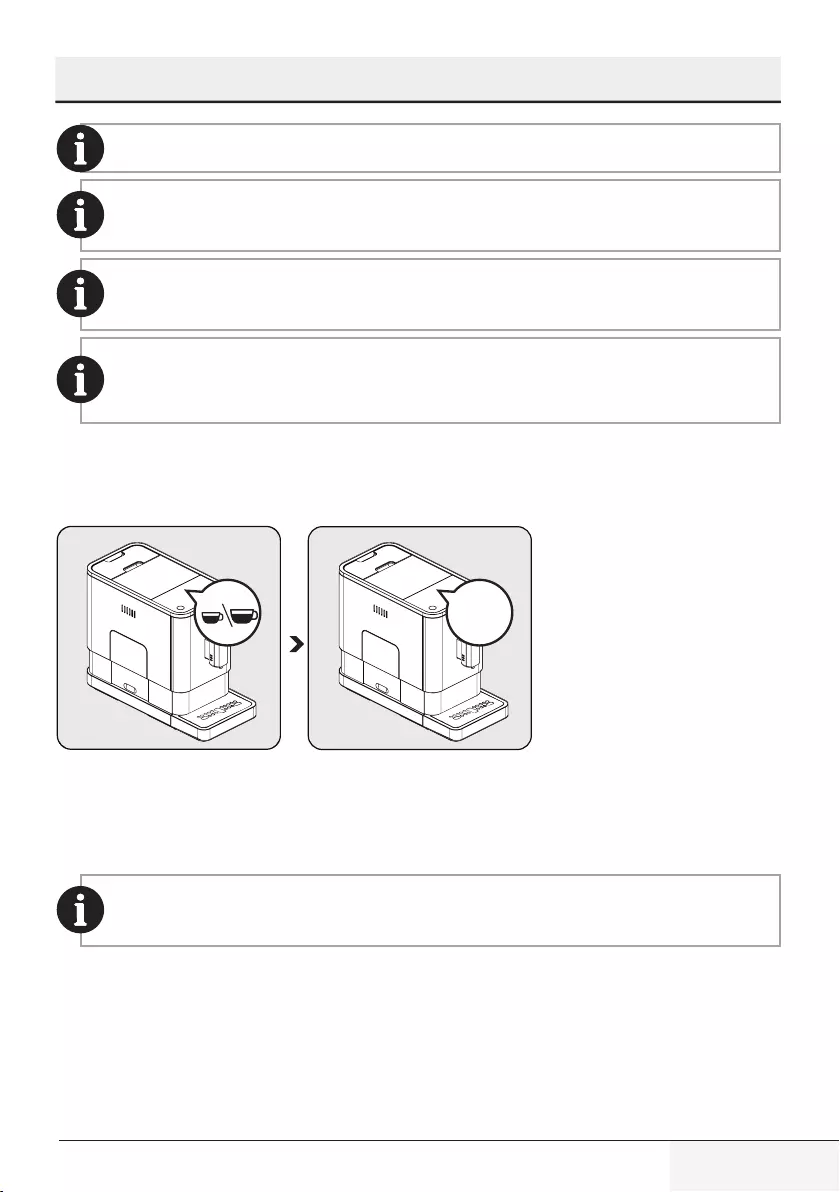
4.4 Adjustiing The Volume Of Your Coffee/Hot Water You can memorize your desired volume of coffee for both strong espresso and mild espresso and also the hot water from 25ml to 250ml.
2x bipp!
When making your coffee (either strong espresso or mild espresso) or dispensing hot water, press and hold the button you selected. The appliance will continue to make the cup of coffee.
When the volume of coffee meets your desired volume, release the button. Two beep sounds will be heard indicates that the volume of coffee is being memori- zed.
You can reset the volume of coffee back to the factory setting by selecting the default setting.
4 Operation
14 / EN Fully Automatic Coffee Machine / User Manual
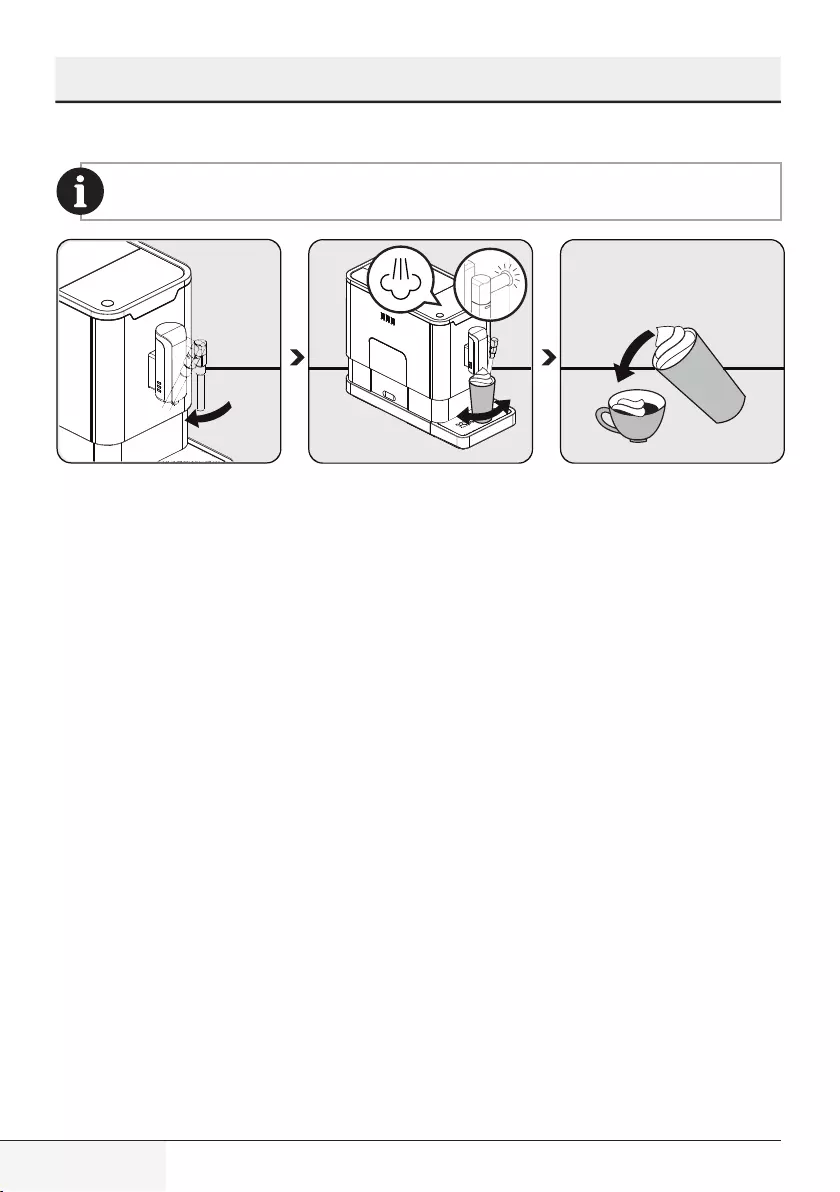
4 Operation 4.5 Preparing Frothy Milk for Coffee
As the temperature of steam is higher than the temperature of espresso, so espresso should be prepared before making frothy milk; otherwise the espresso might be burnt.
Prepare the espresso coffee with larger cup. Turn the steam nozzle toward to the Drip tray.
Press the steam button. Steam indicator light will flash. Then the appliance is he- ating up and draining the residual water into the Drip Tray or another container. After the steam indicator light stop flas- hing and stay on, place a container with milk under the steam nozzle and immer- se the steam nozzle about 5cm deep into the container. Swivel the container while the hot steam comes out.
Pour the hot frothy milk into the espres- so. Now you can enjoy your coffee.
4.6 Hot Water The appliance can dispense hot water by simply pressing the hot water button. The hot water button and the illumination will lights up indicates that the appliance is heating up the water. When the hot water button and the illumination turn off, the water is ready to serve.
15 / ENFully Automatic Coffee Machine / User Manual
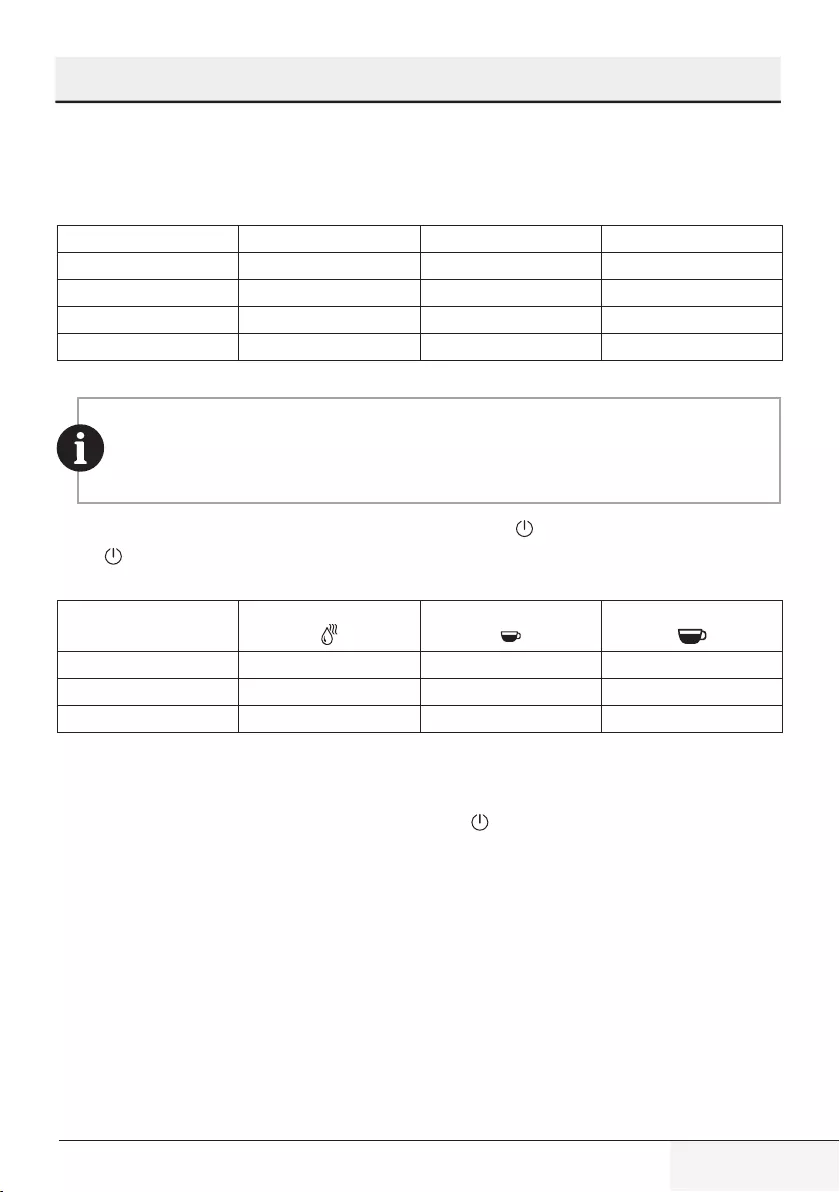
4 Operation 4.7 Mode Selection The machine has two different setting: default setting, ECO mode and speed mode. In ECO mode, the appliance helps to save more energy. In speed mode, the user can make their coffee faster than in default setting.
ECO Mode Speed Mode Default Setting
Illumination Light No Yes Yes
Pre-brewing* Yes No Yes
Auto shut off time 10mins 30mins 20mins
Cup Volume memory Yes Yes Yes
The pre-brewing function moistens the grounded beans in the brewer with a small amount of water before full extraction. This expands the coffee grounds to build up a greater pressure in the brewer which help extraction of all the oils and full flavor from the grounded beans.
1. When the machine is in standby condition, press and holds the for 5 seconds. 2. The will then be flashing and the following button will have the following indications for different
settings: Hot water button
Strong espresso button Mild espresso button
In ECO Mode Lights ON Flashing Flashing
In Speed Mode Yes No Flashing
In Default Setting Flashing Flashing Lights On
3. Press the hot water button for ECO mode, strong espresso button for speed mode and mild espresso button for default setting. Two Beep sound will be heard indicates that the mode is being selected. (Note: If you are pressing the relative lights on button for each mode, the machine will not response).
4. If you would like to remain the setting unchanged, press again or wait for 5 seconds for the machine to return to the standby condition
16 / EN Fully Automatic Coffee Machine / User Manual
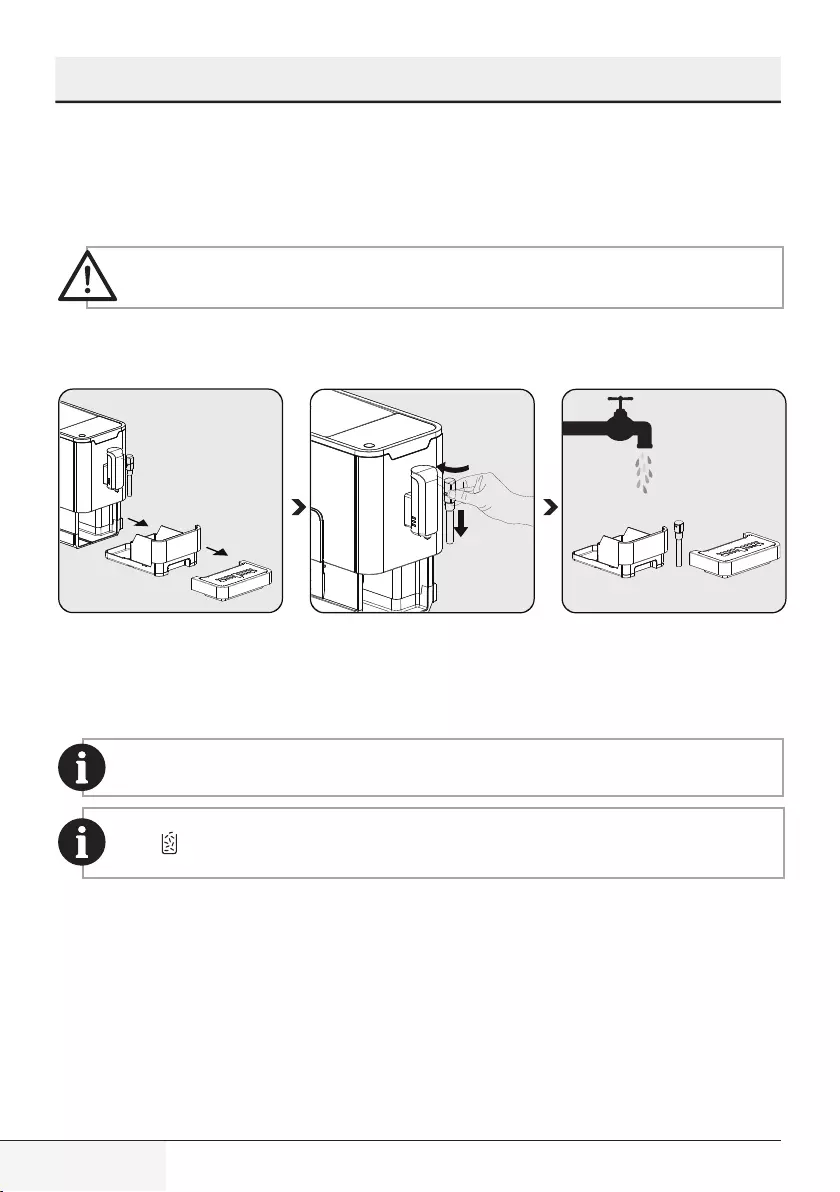
5 Cleaning 5.1 Cleaning of the appliance 1. Disconnect the power cord from the mains supply outlet. 2. Pour away all the water in the internal and external drip tray 3. Use a damped cloth or non-scratching cleaner to clean the water stains on the appliance.
WARNING: Never use any abrasive, vinegar or descaling agents not included in the box to clean the appliance.
Timely cleaning and maintenance of the appliance is very important in prolonging the life of the appliance.
1
2
2 1
Remove the external drip tray. Slides open the internal drip tray and the cof- fee grounds container.
Unlock the nozzle cover by turning it to left. Then pull it downward to remo- ve Pull the metal tube downward to ds-assembly the nozzle cover and me- tal tube.
Empty the coffee grounds container, ex- ternal drip tray, nozzle cover and metal tube wash it with fresh water. Dry it af- terwards.
Assembly the metal tube back to the nozzle cover. Then push upward to place the nozzle cover back. And turn it to right to lock it.
When lights up, the coffee grounds container needs to be empty.
17 / ENFully Automatic Coffee Machine / User Manual
2
1
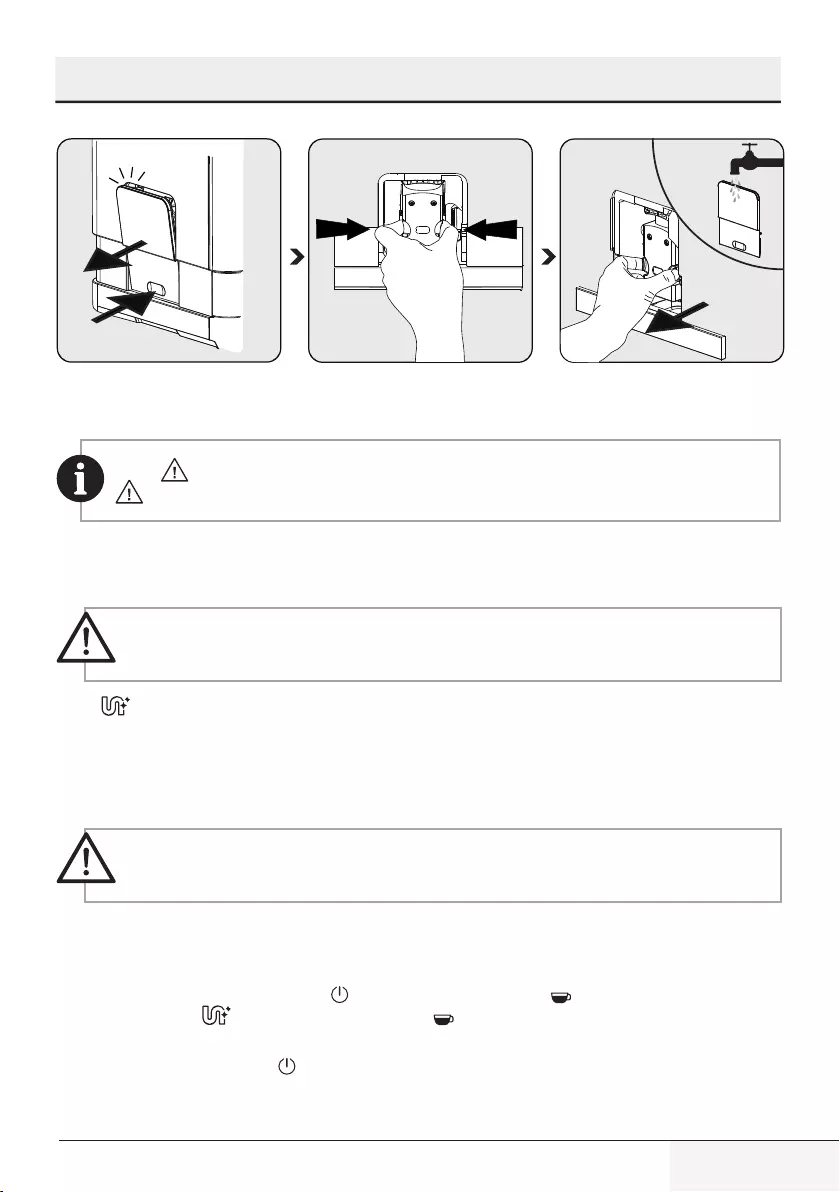
Pull down the service door and remove it. Press the release knob. Remove the brewer. Wash the brewer with fresh water. Dry the brewer after- wards.
When lights up stably, it indicates that the brewer is missing / installed improperly. When is flashing, it indicates that the service door is missing/installed improperly.
5.2 Self-Cleaning
WARNING: Please wait for finishing the self cleaning process and then switch off the machine.
When is flashing, it indicates that the appliance needs to undergo self-cleaning. The appliance will remain in the best condition if this function is performed at least once a month or more regularly depending on the hardness of water used. It is also suggested that to 1. Fully fill the water tank. 2. Adding one pack of cleaning agent included in the box to the water tank.
WARNING: Do not use vinegar or other cleaning agent to do self-cleaning of this appliance. The cleaning agent might damage the appliance.
3. Plug in the appliance. 4. Place a sufficient large container under the coffee spout. 5. In standby condition, press and hold and strong espresso button for 5 seconds. A beep sound
will be heard with and strong espresso button will be flashing. 6. Press strong espresso button to confirm undergoing the self-cleaning process. To resume back to
the standby condition, press .
5 Cleaning
18 / EN Fully Automatic Coffee Machine / User Manual
7. Will be flashing indicates that the appliance is undergoing the self-cleaning process.
WARNING: Keep skin/body away from the hot water.
8. When all the water in the water tank is being dispensed out, and strong espresso button will be flashing. Remove all the remaining solution in the water tank and fill the tank with normal tap water until the max position. When water is filled into the water tank, will goes off. Then the appliance will continue the self-cleaning process.
9. When the self-cleaning process is completed, the appliance will switch off automatically.
5.3 Empty System Function The empty system function is recommended to be used before long period of non-use, frost protection and before talking to repair agent. 1. In standby condition, press and hold the and mild espresso button together for 5 seconds. 2. will then be flashing. 3. Remove the water tank from the appliance. will light up stably indicates that the empty system
is under process. You can press before removing the water tank to resume back to the standby condition.
4. When the empty system function is completed, the appliance will switch off automatically.
WARNING: After perform EMPTY SYSYEM FUNCTION; press the hot water button until water can come out from spout when the coffee maker is reused again.
5.4 Manual Rinsing You can perform a manual rinsing cycle to clean the coffee nozzle after use. It is also suggested to perform a manual rinsing if the appliance has not been used for a long period of time. 1. In standby condition, press and hold the and hot water button together. 2. The hot water button , strong espresso button and mild espresso button will then goes
off. The coffee nozzle will then dispense a small amount of water which is used for the rinising.
WARNING: Water comes out of the coffee nozzle is hot and is collected in the drip tray underneath. Avoid contact with splashes of water.
3. After rinsing, the appliance will return to the standby condition.
5 Cleaning
19 / ENFully Automatic Coffee Machine / User Manual
6 Troubleshooting Problem Cause Solution
The appliance does not work. The appliance is not connected to the mains. Plug in and press the switch. Check the cable and the Plug
No or delayed response in several trials of pressing on function key on the panel
Appliance is under an electromagnetic interference Dirt over the panel
Unplug the appliance. Restart after few minutes Clean the panel with the cloth provided
The coffee is not hot enough. The cups have not been preheated. The brewing unit is too cold.
Rinse the appliance at least 3 times before making the coffee.
The coffee cannot come out from spout. Empty system function maybe used before. Press the hot water button until water can come out from spout.
The first cup of coffee is poor quality. The first run of grinder does not pour sufficient quantity coffee power into the brewing unit.
Throw the coffee away. The other coffees will always be of good quality.
The touch buttons are not sensitive Excessive scale has built up. Descale the appliance.
The water tank is removed / the water level is very low in the water tank but have no alert.
The area near the water tank connector is wet.
Wipe the water around the water tank connector
Internal drip tray is filled with a lot of water. Coffee powder too fine which block the water to come out.
Adjust the coffee fineness to bigger dot during grinder operation.
Coffee is delivered too slowly or a drop at a time.
Coffee powder too fine which block the water to come out.
Adjust the coffee fineness to bigger dot during grinder operation.
Lack of bean indicator flashes but there is still a lot of coffee bean inside the container.
Internal coffee powder outlet is blocked. To follow the steps of section E (V. Cleaning coffee powder outlet).
The brewer or the coffee ground tray is impossible to remove.
The appliance did not finish the self-cleaning p
Displayed below is the user manual for CEG5311X by Beko which is a product in the Coffee Makers category.
This manual has pages.
CEG5311X
Fully Automatc
Espresso Machne
User Manual
01M-8813573200-2718-01
EN DE FR TR ES CS
IT PL RO SL AR

CONTENTS
ENGLISH 5-19
DEUTSCH 20-38
FRANÇAIS 39-55
TÜRKÇE 56-72
ESPAÑOL 73-91
ČESKY 92-108
ITALIANO 109-126
POLSKI 127-147
SLOVAK 148-166
ROMÂNĂ 167-183
All declared values on the product and on the prnted leaflets are pcked up after laboratory
measurements performed accordng to related standarts. These values may dffer upon usage and
ambent condtons.
Technical data
Power supply:
220-240 V~, 50-60 Hz
Power:
1350 W
Technical and design modifications
reserved.
1. Coffee Beans Container Cover
2. Coffee Bean Container
3. Control Panel
4. On/Off button
5. Steam Nozzle
6. Nozzle cover
7. Adjustable coffee spout
8. Metal tube
9. Coffee Grounds Container
10. Internal Drip Tray
11. External Drip Tray
12. Cleanness brush
13. Service Door
14. Brewer
15. Power cord
16. Water Tank
1
2
3
4
56
8
7
9
10
11
12
13
14
15
16
Please read ths user ma-
nual frst!
Dear Customers,
Thank you for selectng an Beko product.
We hope that you get the best results
from your product whch has been
manufactured wth hgh qualty and
state-of-the-art technology. Therefore,
please read ths entre user manual and all
other accompanyng documents carefully
before usng the product and keep t as a
reference for future use. If you handover
the product to someone else, gve the
user manual as well. Follow all warnngs
and nformaton n the user manual.
Meanngs of the symbols
Followng symbols are used n the varous
secton of ths manual:
Important nformaton or useful hnts
about usage.
DANGER:
Warnng for hazardous s-
tuatons wth regard to lfe and property.
WARNING:
Warnng ndcates a
potentally dangerous stuaton.
CAUTION:
Warnng ndcates poten-
tal materal damage.
Ths product has been produced n envronmentally-frendly, state-of-the-art facltes.
Comples wth the WEEE Drectve. It does not contan PCB.

5 / EN
Fully Automatic Coffee Machine / User Manual
1 Important instructions for safety and
environment
This section includes the safety
instructions that will help providing
protection against personal injury
and material loss risks. Failure to
follow these instructions invalidates
the granted warranty.
1.1 Danger of electrc
current
Danger to life by electric current!
Contact with live wires or
components could lead to serious
injury or even death!
Observe the following safety
precautions to avoid electric shocks:
•Do not use the coffee machine
if the connecting cable or mains
plug are damaged.
•Before reusing the coffee
machine, the mains cable must be
renewed by a qualified electrician.
•Do not open the housing of
the coffee machine. Danger of
electric shock if live connections
are touched and/or the electrical
and mechanical configuration is
changed.
•Before cleaning the bean
container, pull the mains plug of
the appliance out of the socket.
Danger from rotating coffee mill!
1.2 Danger of
burnng or scaldng
Parts of the coffee machine can
become very hot during operation!
Dispensed drinks and escaping
steam are very hot!
Observe the following safety
precautions to avoid burning/
scalding yourself and/or others:
•Do not touch either of the metal
sleeves on both coffee spouts.
•Avoid direct contact of the skin
with escaping steam or hot
rinsing, cleaning and descaling
water.
1.3 Fundamental
safety precautons
Observe the following safety
precautions to ensure safe handling
of the coffee machine:
•Never play with packaging
material. Risk of suffocation.
•Inspect the coffee machine for
visible signs of damage before
use. Do not use a damaged coffee
machine.

6 / EN Fully Automatic Coffee Machine / User Manual
1 Important instructions for safety and
environment
•
If the connecting cable is damaged,
it should only be replaced by a
service agent recommended by the
manufacturer in order to prevent
any danger! Please contact the
manufacturer or his customer
service.
•
Repairs to the coffee machine must
only be carried out by an authorised
specialist or by the works customer
service. Unqualified repairs can lead
to considerable danger for the user.
They will also void the warranty.
•
Repairs to the coffee machine
during the warranty period may
only be carried out by service
centres authorised by the
manufacturer, otherwise the
warranty will become void in the
event of subsequent damage.
•
Defective parts may only be
replaced with original spare parts.
Only original spare parts guarantee
that the safety requirements are
met.
•
This appliance can be used by
children from the age of 8 up as
well as by persons with reduced
physical, sensory or mental abilities
or with lacking experience and/or
knowledge, if these persons are
supervised or have been instructed
how to use the appliance in a safe
way and have understood the
hazards which could arise from
using it. Children must not play with
the appliance. Cleaning and user
maintenance shall not be made by
children unless they are older than
8 and supervised.
•This appliance is intended to be
used in household and similar
applications such as:
— staff kitchen areas in shops,
offices and other working
environments,
— farm houses,
— by clients in hotels, motels
and other residential type
environments,
— bed and breakfast type
environments.
•Protect the coffee machine
against the effects of weather
such as rain, frost and direct
sunlight. Do not use the coffee
machine outdoors.
7 / EN
Fully Automatic Coffee Machine / User Manual
1 Important instructions for safety and
environment
•Never immerse the coffee
machine itself, the mains cable or
the mains plug into water or other
liquids.
•Do not clean the coffee machine
or accessories in a dish washer.
•Do not pour any other liquids apart
from water or place foodstuffs
into the water tank.
•Do not fill the water tank beyond
the maximum mark (lower edge of
the filling hole) (1.5 litres).
•Only operate the machine when
the waste container, drip tray and
the cup grate are fitted.
•Do not pull the cable to remove
the plug from the mains socket or
touch with wet hands.
•Do not hold the coffee machine
with the mains cable.
•Keep the appliance and its cord
out of reach of children aged less
than 8 years.
•Do not operate the hot water
function continuously for more
than one tank of water.
1.4 Intended use
The fully automatic coffee machine Beko is
intended for use in homes and similar applications,
for instance in staff kitchens, shops, offices and
similar areas or by customers in bed & breakfast,
hotels, motels and other living accommodation.
This coffee machine is not intended for commercial
use. The machine is only intended for preparing
coffee and heating milk and water. Any other
use other than previously stated is considered as
improper use.
Danger resultng from mproper
use!
If not used for its intended purpose or used in any
other way, the coffee machine may be or become
a source of danger.
AWARNING:
Therefore, the coffee
machine may only be used for its
intended purpose.
AWARNING:
Observe the
procedures described in this user
manual.
No claims of any kind will be accepted for damage or
injury resulting from use of the coffee machine for
other than its intended purpose.
The risk has to be borne solely by the machine
owner.
8 / EN Fully Automatic Coffee Machine / User Manual
1 Important instructions for safety and
environment
1.5 Limitation of liability
All technical information, data and instructions
on installation, operation and maintenance of
the coffee machine contained in these operating
instructions represent the current status at the
time of printing and are based on the best possible
knowledge gained by experience and knowhow.
No claims can be derived from the information,
illustrations and descriptions in this user manual.
The manufacturer assumes no liability for damage
or injury resulting from failure to observe the user
manual, use for other than the intended purpose,
unprofessional repairs, unauthorised modifications
or use of non-approved spare parts.
1.6 Compliance with the WEEE
Directive and Disposing of the
Waste Product:
This product complies with EU WEEE Directive
(2012/19/EU). This product bears a classification
symbol for waste electrical and electronic
equipment (WEEE).
This product has been manufactured
with high quality parts and materials
which can be reused and are suitable
for recycling. Do not dispose of the
waste product with normal domestic
and other wastes at the end of its service life. Take
it to the collection center for the recycling of
electrical and electronic equipment. Please
consult your local authorities to learn about these
collection centers.
1.7 Compliance with RoHS
Directive
The product you have purchased complies with EU
RoHS Directive (2011/65/EU). It does not contain
harmful and prohibited materials specified in the
Directive.
1.8 Package information
Packaging materials of the product are
manufactured from recyclable materials
in accordance with our National
Environment Regulations. Do not
dispose of the packaging materials together with
the domestic or other wastes. Take them to the
packaging material collection points designated
by the local authorities.
9 / EN
Fully Automatic Coffee Machine / User Manual
2 Dsplay
2.1 Control Panel
Flashng: Low water level/ Water tank mssng
Lack of bean
Lghts up stably: coffee grounds contaner s full
Flashng: Internal Drp Tray/coffee grounds contaner s mssng
Lghts up stably: Brewer s mssng/ nstalled mproperly
Flashng: Servce door s opened / nstalled mproperly
Lights up stably: Requires to do descaling
Flashing: Descaling is under process
Empty System Function is running
Power ON/OFF Button
Steam Button
Hot Water Button
Strong Espresso Button
Mild Espresso Button
In the box, three packs of cleaning agents are included for the process of self-cleaning.
10 / EN Fully Automatic Coffee Machine / User Manual
3 Preparaton
3.1 Installation
Remove any protective films, stickers and any other packing material on the appliance.
150mm
150mm
150mm
150mm
150mm
Choose a safe and stable surface wth an
easly reachable power supply and allow
mnmum dstance from the sdes of the
machnes.
Insert the external drp tray. Make sure t
s nserted correctly.
Unwnd and straghten the power cord
and nsert the plug nto the socket loca—
ted on the back of the machne. Insert
the other end of the power cord nto a
wall socket wth sutable power voltage.
3.3 Filling the water tank
WARNING:
When is flashing, the water tank is in low water level and requires filling
the water tank.
Lft the water tank by usng the ld as the
handle.
Take the water tank out. Rnse the water tank wth fresh water
and then fll the tank to the Max level and
place t back nto the machne. Make sure
t s fully nserted.
To prevent overflow of water from the water tank, do not add water directly into the appliance
with another container.
11 / EN
Fully Automatic Coffee Machine / User Manual
WARNING:
Never fill the water tank with warm, hot, sparkling water or any other liquid
which might damage the water tank and the machine.
Place the water tank back by usng the ld
as the handle.
Close the water tank by usng the ld.
4.1 Grinding Adjustment
You can adjust the grinder to suit the roast of your coffee by turning adjuster knob in the bean
container:
WARNING:
Never do the grinding adjustment when the grinder is not operating. It may
damage the grinder.
The dots on the adjuster knob indicate the fineness of the grind.
3 Preparaton
4 Operaton
When the grnder s grndng the coffee
bean when t s makng the coffee,
you can turn the adjust knob to do the
adjustment.
12 / EN Fully Automatic Coffee Machine / User Manual
4 Operaton
4.2 Filling the bean container
When is flashing, the appliance needs to be filled with coffee bean.
Remove the bean contaner ld. Slowly pour n the coffee beans. Place the contaner ld back.
WARNING:
Fill the coffee bean container only with coffee beans. Grounded coffee,
instant coffee, caramelized coffee and any other objects may damage the machine.
Press the hot water button to clean inside of the coffee maker before first use.
4.3 Making Your Coffee
Swtch on the applance by pressng the
power on/off button. The applance s
then n the standby condton.
Place a cup under the coffee spout and
adjust the heght of the spout the ft
the cup.
The espresso button beng pressed wll
lght on and the llumnaton wll lghts up
ndcates that the applance s preparng
the cup of coffee.
When the applance s back to standby
condton, the coffee s ready to serve.
13 / EN
Fully Automatic Coffee Machine / User Manual
Switch off the appliance by pressing the power on/off button.
Depending on the taste of coffee you would like to have, press strong espresso button or mild
espresso button .
Press the hot water button to clean inside of the coffee maker before first use.
The Appliance is equipped with auto-shut off. Depending on the mode you have selected the
appliance will have different auto-shut off timing.
4.4 Adjustiing The Volume Of Your Coffee/Hot Water
You can memorze your desred volume of coffee for both strong espresso and mld espresso and also
the hot water from 25ml to 250ml.
2x
bipp!
When makng your coffee (ether strong
espresso or mld espresso) or dspensng
hot water, press and hold the button you
selected. The applance wll contnue to
make the cup of coffee.
When the volume of coffee meets your
desred volume, release the button. Two
beep sounds wll be heard ndcates that
the volume of coffee s beng memor—
zed.
You can reset the volume of coffee back to the factory setting by selecting the default setting.
4 Operaton
14 / EN Fully Automatic Coffee Machine / User Manual
4 Operaton
4.5 Preparing Frothy Milk for Coffee
As the temperature of steam is higher than the temperature of espresso, so espresso should
be prepared before making frothy milk; otherwise the espresso might be burnt.
Prepare the espresso coffee wth larger
cup. Turn the steam nozzle toward to the
Drp tray.
Press the steam button. Steam ndcator
lght wll flash. Then the applance s he—
atng up and dranng the resdual water
nto the Drp Tray or another contaner.
After the steam ndcator lght stop flas—
hng and stay on, place a contaner wth
mlk under the steam nozzle and mmer—
se the steam nozzle about 5cm deep
nto the contaner. Swvel the contaner
whle the hot steam comes out.
Pour the hot frothy mlk nto the espres—
so. Now you can enjoy your coffee.
4.6 Hot Water
The appliance can dispense hot water by simply pressing the hot water button. The hot water button
and the illumination will lights up indicates that the appliance is heating up the water. When the hot
water button and the illumination turn off, the water is ready to serve.
15 / EN
Fully Automatic Coffee Machine / User Manual
4 Operaton
4.7 Mode Selection
The machne has two dfferent settng: default settng, ECO mode and speed mode. In ECO mode, the
applance helps to save more energy. In speed mode, the user can make ther coffee faster than n
default settng.
ECO Mode Speed Mode Default Settng
Illumnaton Lght No Yes Yes
Pre-brewng* Yes No Yes
Auto shut off tme 10mns 30mns 20mns
Cup Volume memory Yes Yes Yes
The pre-brewing function moistens the grounded beans in the brewer with a small amount of
water before full extraction. This expands the coffee grounds to build up a greater pressure in
the brewer which help extraction of all the oils and full flavor from the grounded beans.
1. When the machine is in standby condition, press and holds the for 5 seconds.
2. The will then be flashing and the following button will have the following indications for different
settings:
Hot water button
Strong espresso button Mld espresso button
In ECO Mode Lghts ON Flashng Flashng
In Speed Mode Yes No Flashng
In Default Settng Flashng Flashng Lghts On
3. Press the hot water button for ECO mode, strong espresso button for speed mode and mild espresso
button for default setting. Two Beep sound will be heard indicates that the mode is being selected.
(Note: If you are pressing the relative lights on button for each mode, the machine will not response).
4. If you would like to remain the setting unchanged, press again or wait for 5 seconds for the
machine to return to the standby condition
16 / EN Fully Automatic Coffee Machine / User Manual
5 Cleanng
5.1 Cleaning of the appliance
1. Dsconnect the power cord from the mans supply outlet.
2. Pour away all the water in the internal and external drip tray
3. Use a damped cloth or non-scratching cleaner to clean the water stains on the applance.
WARNING:
Never use any abrasive, vinegar or descaling agents not included in the box to
clean the appliance.
Tmely cleanng and mantenance of the applance s very mportant n prolongng the lfe of the
applance.
Remove the external drp tray. Sldes
open the nternal drp tray and the cof—
fee grounds contaner.
Unlock the nozzle cover by turnng t
to left. Then pull t downward to remo—
ve Pull the metal tube downward to
ds-assembly the nozzle cover and me—
tal tube.
Empty the coffee grounds contaner, ex—
ternal drp tray, nozzle cover and metal
tube wash t wth fresh water. Dry t af—
terwards.
Assembly the metal tube back to the nozzle cover. Then push upward to place the nozzle cover
back. And turn it to right to lock it.
When lights up, the coffee grounds container needs to be empty.
17 / EN
Fully Automatic Coffee Machine / User Manual
2
1
Pull down the servce door and remove t. Press the release knob. Remove the brewer. Wash the brewer
wth fresh water. Dry the brewer after—
wards.
When lights up stably, it indicates that the brewer is missing / installed improperly. When
is flashing, it indicates that the service door is missing/installed improperly.
5.2 Self-Cleaning
WARNING:
Please wat for fnshng the self cleanng process and then swtch off the
machne.
When s flashng, t ndcates that the applance needs to undergo self-cleanng. The applance
wll reman n the best condton f ths functon s performed at least once a month or more regularly
dependng on the hardness of water used. It s also suggested that to
1. Fully fll the water tank.
2. Addng one pack of cleanng agent ncluded n the box to the water tank.
WARNING:
Do not use vnegar or other cleanng agent to do self-cleanng of ths
applance. The cleanng agent mght damage the applance.
3. Plug n the applance.
4. Place a suffcent large contaner under the coffee spout.
5. In standby condton, press and hold and strong espresso button for 5 seconds. A beep sound
wll be heard wth and strong espresso button wll be flashng.
6. Press strong espresso button to confrm undergong the self-cleanng process. To resume back to
the standby condton, press .
5 Cleanng
18 / EN Fully Automatic Coffee Machine / User Manual
7. Wll be flashng ndcates that the applance s undergong the self-cleanng process.
WARNING:
Keep skn/body away from the hot water.
8. When all the water n the water tank s beng dspensed out, and strong espresso button wll
be flashng. Remove all the remanng soluton n the water tank and fll the tank wth normal tap
water untl the max poston. When water s flled nto the water tank, wll goes off. Then the
applance wll contnue the self-cleanng process.
9. When the self-cleanng process s completed, the applance wll swtch off automatcally.
5.3 Empty System Function
The empty system functon s recommended to be used before long perod of non-use, frost protecton
and before talkng to repar agent.
1. In standby condton, press and hold the and mld espresso button together for 5 seconds.
2. wll then be flashng.
3. Remove the water tank from the applance. wll lght up stably ndcates that the empty system
s under process. You can press before removng the water tank to resume back to the standby
condton.
4. When the empty system functon s completed, the applance wll swtch off automatcally.
WARNING:
After perform EMPTY SYSYEM FUNCTION; press the hot water button untl
water can come out from spout when the coffee maker s reused agan.
5.4 Manual Rinsing
You can perform a manual rnsng cycle to clean the coffee nozzle after use. It s also suggested to
perform a manual rnsng f the applance has not been used for a long perod of tme.
1. In standby condton, press and hold the and hot water button together.
2. The hot water button , strong espresso button and mld espresso button wll then goes
off. The coffee nozzle will then dispense a small amount of water which is used for the rinising.
WARNING:
Water comes out of the coffee nozzle is hot and is collected in the drip tray
underneath. Avoid contact with splashes of water.
3. After rnsng, the applance wll return to the standby condton.
5 Cleanng
19 / EN
Fully Automatic Coffee Machine / User Manual
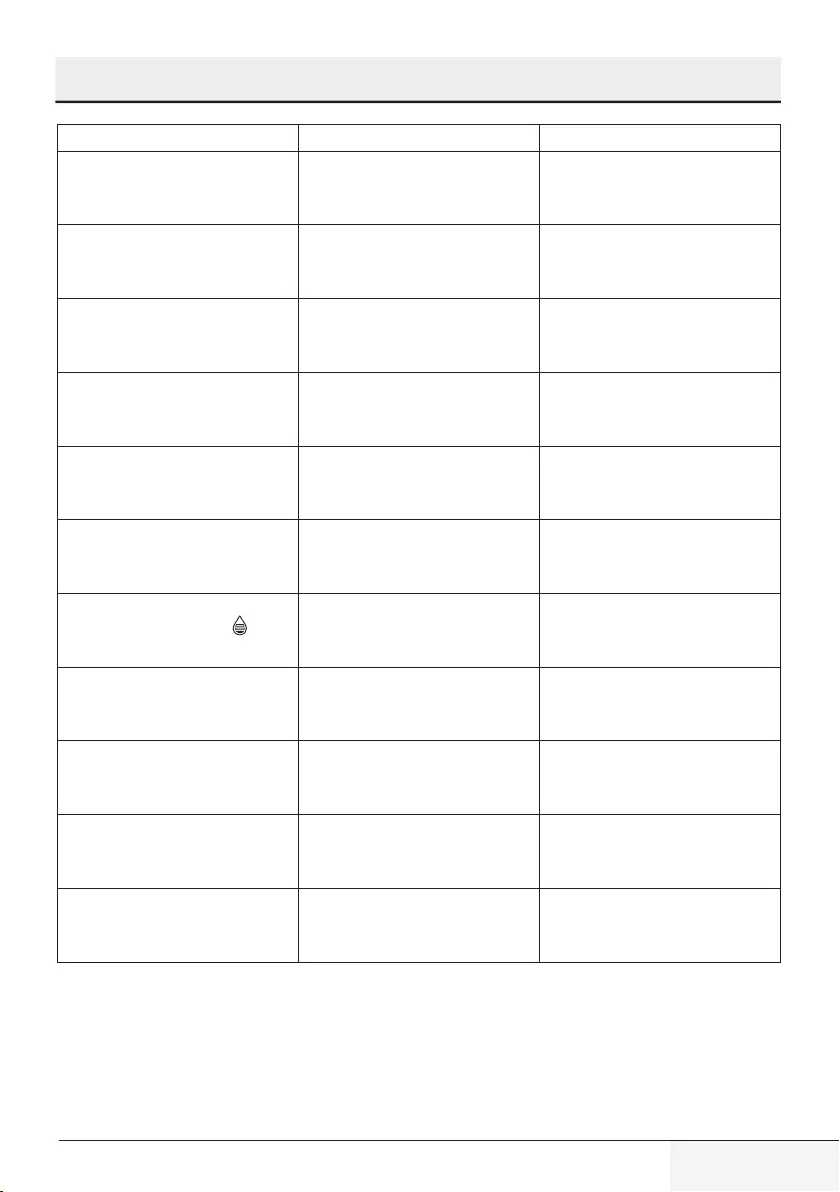
6 Troubleshootng
Problem Cause Solution
The applance does not work. The applance s not connected to the mans. Plug n and press the swtch. Check the cable
and the Plug
No or delayed response n several trals of
pressng on functon key on the panel Applance s under an electromagnetc
nterference
Drt over the panel
Unplug the applance. Restart after few
mnutes Clean the panel wth the cloth
provded
The coffee s not hot enough. The cups have not been preheated.
The brewng unt s too cold. Rnse the applance at least 3 tmes before
makng the coffee.
The coffee cannot come out from spout. Empty system functon maybe used before. Press the hot water button untl water can
come out from spout.
The frst cup of coffee s poor qualty. The frst run of grnder does not pour
suffcent quantty coffee power nto the
brewng unt.
Throw the coffee away. The other coffees
wll always be of good qualty.
The touch buttons are not senstve Excessve scale has bult up. Descale the applance.
The water tank s removed / the water level
s very low n the water tank but have no
alert.
The area near the water
tank connector s wet. Wpe the water around the water tank
connector
Internal drp tray s flled wth a lot of water. Coffee powder too fne whch block the water
to come out. Adjust the coffee fneness to bgger dot
durng grnder operaton.
Coffee s delvered too slowly or a drop at a
tme. Coffee powder too fne whch block the water
to come out. Adjust the coffee fneness to bgger dot
durng grnder operaton.
Lack of bean ndcator flashes but there s stll
a lot of coffee bean nsde the contaner. Internal coffee powder outlet s blocked. To follow the steps of secton E (V. Cleanng
coffee powder outlet).
The brewer or the coffee ground tray s
mpossble to remove. The applance dd not fnsh the self-cleanng
process and was swtched off . Please swtch on the machne agan and let t
fnsh ts auto cleanng process.