-
Contents
-
Table of Contents
-
Bookmarks
Quick Links
Operation Instruction
SR81
Intelligent Controller
for Split Pressurized Solar Hot Water System
Please read this instruction carefully!
Related Manuals for SUNFLOWER SR81
Summary of Contents for SUNFLOWER SR81
-
Page 1
Operation Instruction SR81 Intelligent Controller for Split Pressurized Solar Hot Water System Please read this instruction carefully! -
Page 2: Table Of Contents
Instruction of SR81 Split Pressurized Solar Hot Water System Contents 1.Safety information ………………….3 1.1 Installation and commissioning ………………3 1.2 About this manual ………………….3 1.3 Liability waiver ……………………. 3 1.4 Important information………………….. 4 1.5 Signal description ………………….4 1.6 Button and HMI description …………………
-
Page 3
Instruction of SR81 Split Pressurized Solar Hot Water System 8.6 MAN Manual operation ………………..36 8.7 BLPR Blocking protection ………………..37 8.8 OTDI Thermal Sterilization Function …………….38 8.9 FS Flow rate monitoring and pump dry-running protection ……….39 8.10 UNIT C-F Switch ………………….41 8.11 RET Reset …………………… -
Page 4: Safety Information
Instruction of SR81 Split Pressurized Solar Hot Water System 1. Safety information 1.1 Installation and commissioning When laying wires, please ensure that no damage occurs to any of the constructional fire safety measures presented in the building. The controller must not be installed in rooms where easily inflammable gas mixtures are present or may occur.
-
Page 5: Important Information
Instruction of SR81 Split Pressurized Solar Hot Water System data or installation and operation instructions without prior notice. As soon as it becomes evident that safe operation is no longer possible (e.g. visible damage). Please immediate take the device out of operation. Note: ensure that the device can’t be accidentally placed into operation.
-
Page 6: Overview
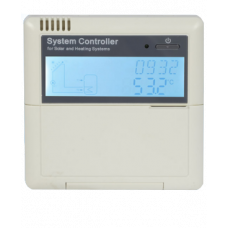
Instruction of SR81 Split Pressurized Solar Hot Water System Button Power indication lamp “On/Off” “Clock” “Holiday” “Manual Heating” “Manual Circuit” “Eco Mode” “Exit” “Adjust” Upwards adjust “+” Downwards adjust “-” LCD Display screen Status Description Code Lighting Blinking Exceed the maximum temperature…
-
Page 7: Delivery List
Instruction of SR81 Split Pressurized Solar Hot Water System Protection type: IP40 1500W or 3000W/4000W of electrical heater should be remarked in the purchased order Dimension of display: 120*120*18mm Dimension of controller board with 1500W output: 200*140*43mm …
-
Page 8: Mounting The Board Of Controller
Instruction of SR81 Split Pressurized Solar Hot Water System 3.2 Mounting the board of controller Follow the below steps to mount the controller on the wall. ► Select the proper place to install main board of controller ► Put the hung housing plate on the wall and mark the upper fastening point.
-
Page 9: Terminal Connection
Instruction of SR81 Split Pressurized Solar Hot Water System 3.5 Terminal connection Note: before opening the housing! Always disconnect the controller from power supply and obey the local electrical supply regulation. 3.5.1 Terminal allocation of controller for electrical heater of 1500W …
-
Page 10: Terminal Allocation Of Controller For Electrical Heater Of 3000W/4000W
Instruction of SR81 Split Pressurized Solar Hot Water System 1500W Output ports Input Ports L, N: for power connection, L: live wire, N: zero wire, protective wire, with 10A power plug. Output R1: Electromagnetic relays, Max. Current: 2A …
-
Page 11: System Description (Standard Solar System With 1 Tank, 1 Collector Field)
Instruction of SR81 Split Pressurized Solar Hot Water System @110VAC, for 2000W electrical heater) Advice regarding the installation of temperature sensors: Only original factory equipped Pt1000 temperature sensors are approved for using with the controller, it is equipped with 1.5m silicon cable and suitable for all weather…
-
Page 12: Time Setup
Instruction of SR81 Split Pressurized Solar Hot Water System Sensor Relay Description Description ports outputs Collector temperature For solar circuit pump sensor PT1000 Temperature sensor on the 1. for DHW circuit function (CIRC) bottom part tank. NTC10K 2.OHDP ( Thermal energy…
-
Page 13: Function’s Parameters And Options
Instruction of SR81 Split Pressurized Solar Hot Water System 6. Function’s parameters and options 6.1 Overview of menu structure Digital flow Timing heating Cool Function DHW Circuit Aux. Function C-F Unit Reset Password Manual Mode Tank loading Block protect Password setup…
-
Page 14: Value Checking And Function Checking
Instruction of SR81 Split Pressurized Solar Hot Water System ►Press “+/-” button to select submenu, ►Press “SET” button to enter the value adjust interface ►Press “+/-” to adjust value ►Press “SET” or “ESC” to confirm the value you set ►Press “ESC”, exit the submenu.
-
Page 15
Instruction of SR81 Split Pressurized Solar Hot Water System the switch-on temperature of heating is 40 C,switch-off temperature is 50 C。 The second time section: default at 10:00 to start heating, and at 10:00 to stop heating, The Third time section: default at 17:00 to start heating, and at 22:00 to stop heating, and the switch-on temperature of heating is 50 C,switch-off temperature is 55… -
Page 16
Instruction of SR81 Split Pressurized Solar Hot Water System 2. Please remark the power of electrical heater and the voltage used. Menu Structure Step Main Subm Factory Adjustable Description menu range adjust THET Timing heating function Select desired sensor of heated THTS S2. -
Page 17
Instruction of SR81 Split Pressurized Solar Hot Water System ►Press “SET” button, “S3” blinks ►Press “+/-” button to select desired sensor ►Press “SET” or “ESC” button to save the setting. ► Press “+” button to access submenu of the intelligent heating, “SMT OFF” displays on the screen ►Press “SET”… -
Page 18: Circ Dhw Circulation Pump Controlled By Temperature And Time
Instruction of SR81 Split Pressurized Solar Hot Water System Within the preset time section, if timing heating is working, heating sign blinks on the screen. Out of the preset time section, heating sign doesn’t display on the screen. 7.2 CIRC DHW circulation pump controlled by temperature and time…
-
Page 19
Instruction of SR81 Split Pressurized Solar Hot Water System Temperature controlled DHW pump within the preset 3 time sections within a time section, when the DHW circulation pump is controlled by temperature, as default set, pump is triggered when return temperature T4 is below 40… -
Page 20
Instruction of SR81 Split Pressurized Solar Hot Water System Menu Structure Main Subme Subm Factory Adjustable Step per Description menu nu 1 enu 2 range adjust CIRC DHW circuit function TCYC ON/OFF Activate / deactivate the DHW circuit function TEMP… -
Page 21
Instruction of SR81 Split Pressurized Solar Hot Water System t C2O 11:00 00:00-23:59 Switch-on time for the second time section t C2F 13:00 00:00-23:59 Switch-off time for the second time section t C3O 17:00 / 00:00-23:59 / Switch-on time for the… -
Page 22
Instruction of SR81 Split Pressurized Solar Hot Water System as example) ► Press “SET”, “40 C” blinks ► Press “+/-” button to adjust the switch-on temperature (adjustable range 0 C ~ (OFF-2 ► Press “SET” or “ESC” button to save the setting. -
Page 23: Function Operation And Parameter Setup (Engineer)
Instruction of SR81 Split Pressurized Solar Hot Water System 8. Function operation and parameter setup (engineer) 8.1 PWD Password Menu Structure Access main menu, select “PWD 0000” to enter password ► Press “SET” button, the left digital blinks, enter password, factory set is “0000”…
-
Page 24
Instruction of SR81 Split Pressurized Solar Hot Water System temperature difference. The set temperature difference must be at least 0.5 K higher than the switch-on temperature difference. SMX Maximum tank temperature protection set If the tank temperature reaches the adjusted maximum temperature, the tank will no longer be loaded in order to avoid damage caused by overheating. -
Page 25: Col Collector Function
Instruction of SR81 Split Pressurized Solar Hot Water System ► Press “SET”, “6K” blinks ► Press” +/-”, to adjust the switch-on temperature of the solar circuit pump ► Press “SET” or “ESC” to save the setting ► Press “+”, “DTF 4K” displays on the screen ►…
-
Page 26
Instruction of SR81 Split Pressurized Solar Hot Water System OCCO Collector cooling The collector cooling function keeps the collector temperature rising within the operating range by heating the tank. If the tank temperature reaches 95° C the function will be switched off for safety reasons. -
Page 27
Instruction of SR81 Split Pressurized Solar Hot Water System Menu structure Main Subme Subme Factory Adjust Step per Description menu nu 1 nu 2 able adjust range Collector function OCEM Collector emergency shutdown function on/ff 80-200 Temperature of collector 130℃… -
Page 28
Instruction of SR81 Split Pressurized Solar Hot Water System Function setting: OCEM (Collector emergency shutdown function) setup ►Select “COL” function menu ►Press “SET”, “OCEM” displays on the screen ►Press “SET” again, “OCEM ON” displays on the screen ►Press “SET”, “ON” blinks on the screen (If it is necessary to shut down this function, press “+/-“to deactivate it) -
Page 29: Cool Collector Function
Instruction of SR81 Split Pressurized Solar Hot Water System OCFR (Antifreeze function) setup ►Select OCFR submenu, “OCFR” displays on the screen ►Press “SET”, “OCFR OFF” displays on the screen ►Press “SET”, “OFF” blinks on the screen ►Press “+/-”, to activate this function, “OCFR ON” displays on the screen ►Press “+”, “CFRO 4…
-
Page 30
Instruction of SR81 Split Pressurized Solar Hot Water System coil); the purpose is to keep the collector’s or tank’s temperature within the operating range. For this function, an extra output should be added (R2 or R3 as option) Heat transferring by external radiator function can control either an additional pump or a valve (OTPM ON = pump logic, OTPM OFF = valve logic). -
Page 31
Instruction of SR81 Split Pressurized Solar Hot Water System Menu structure Main Subm Subm Facto Adjustable Step Description enu 1 range adjust Cooling function OSTC ON/OFF Tank cooling function DTCO 1-30K 0.5K Switch-on temperature difference of cooling function DTCF 0.5-29.5K 0.5K… -
Page 32: Aux Auxiliary Function
Instruction of SR81 Split Pressurized Solar Hot Water System ►Press “SET”, “OFF” blinks on the screen ►Press “+/-”, to activate this function ►Press “+”, “DTCO 20K” displays on the screen ►Press “SET”, “20K” blinks on the screen ►Press “+/-”, to adjust the switch-on temperature difference of tank cooling function ►Press “SET”…
-
Page 33
Instruction of SR81 Split Pressurized Solar Hot Water System Timer function can trigger controller’s output port at the preset time; therefore, an available output (R3) is needed. AH Thermostat function The thermostat function works independently from the solar operation and can be used for using surplus energy to reduce tank temperature or for using after heating to rise tank temperature. -
Page 34
Instruction of SR81 Split Pressurized Solar Hot Water System Menu Structure Subm Facto Adjustab Step Description enu 1 le range adjust Auxiliary functions Timer function TIME ON/OFF Start time of the first time section t 1O 00:00 00:00-23: Close time of the first time section… -
Page 35
Instruction of SR81 Split Pressurized Solar Hot Water System Switch-on temperature 40℃ 0.0-95℃ 0.5℃ Switch-off temperature 45℃ 0.0-94.5 0.5℃ ℃ Start time of the first time section t A1O 00:00 00:00-23: Close time of the first time section t A1F… -
Page 36
Instruction of SR81 Split Pressurized Solar Hot Water System ►Press “SET”, minute “00” blinks ►Press “+/-” to adjust the minute of the close time of the first time section ►Press “SET” or “ESC” to save the setting ►Press “+”, access the setting of the second time section, repeat above steps to set time of second and third sections. -
Page 37: Man Manual Operation
Instruction of SR81 Split Pressurized Solar Hot Water System ►Press “SET”, “23” blinks ► Press “+/-”, to adjust the hour of close time of the first time section ►Press “SET”, “59” blinks ► Press “+/-”, to adjust the minute of close time of the first time section ►Press “SET”…
-
Page 38: Blpr Blocking Protection
Instruction of SR81 Split Pressurized Solar Hot Water System Main Subm Factory Adjustabl Description Menu e range Manual mode ON/OFF R1 on and off ON/OFF R2 on and off ON/OFF R3 on and off ON/OFF HR on and off Function setup ►Select “MAN”…
-
Page 39: Otdi Thermal Sterilization Function
Instruction of SR81 Split Pressurized Solar Hot Water System ►Press “+/-”, to activate this function, “BLPR ON” displays on the screen ►Press “SET” or “ESC” to save the setting 8.8 OTDI Thermal Sterilization Function Function description: This function helps to prevent the spread of Legionella in DHW tanks by systematically activating the after-heating.
-
Page 40: Fs Flow Rate Monitoring And Pump Dry-Running Protection
Instruction of SR81 Split Pressurized Solar Hot Water System Function setting ►Select OTDI main menu ►Press “SET”, “OTDI OFF” display ►Press “SET”, “OFF” blinks ►Press “+/-”, to activate this function, “OTDI ON” displays ►Press “SET” or “ESC” to save the setting ►Press “+”, “PDIS 7”…
-
Page 41
Instruction of SR81 Split Pressurized Solar Hot Water System button for 3 seconds to switch-off FS function, and after the fault is removed, then monitoring function is activated again. Flow monitoring function is designed to detect whether flow exists in the solar system and therefore to switch-off the corresponding pump in case of no flow, If “OFF”… -
Page 42: Unit C-F Switch
Instruction of SR81 Split Pressurized Solar Hot Water System ►Press “SET”, “OFF” blinks ►Press “+/-”, to activate this function, “FS ON” displays ►Press “SET” or “ESC” to save the setting 8.10 UNIT C-F Switch Under this menu, below unit can be set:…
-
Page 43: Pass Password Set
Instruction of SR81 Split Pressurized Solar Hot Water System ►Press “SET”, “YES” blinks ►Press “SET” for 3 seconds, beeper sounds “di” 3 times, “YES” lighting, and it indicates system is recovered to factory set. ►Press “ESC” return to the submenu ►Press “ESC”…
-
Page 44: Manual Heating
Instruction of SR81 Split Pressurized Solar Hot Water System Switch-off the power to controller Hold down “ESC” button Reconnect the power supply, when beeper sounds 3 di di di, and then release “ESC” button, Controller recovers to the factory set password (factory set possword is 0000), 8.13 Manual heating…
-
Page 45: Dhw Circuit Pump Triggered Manually
Instruction of SR81 Split Pressurized Solar Hot Water System indicates Eco mode is on. ►Press “ECO Mode” button again, sign closed, it indicates the ECO mode is off. 8.15 DHW circuit pump triggered manually Note: Only when function of DHW circuit pump CIRC is activated, it is just possible to trigger the output R2 manually for running the DHW circuit pump.
-
Page 46: Manual Circuit Function
Instruction of SR81 Split Pressurized Solar Hot Water System 8.18 Manual circuit function ►Press “Manual Circuit” button, circuit pump R1 is triggered and runs for 1 hour. ►Press “Manual Circuit” button, to switch- off the circuit pump During the running of circuit pump R1, if you don’t press “Manual circuit” button, then R1 will run for 1 hour, then it is stopped automatically.
-
Page 47
Instruction of SR81 Split Pressurized Solar Hot Water System On the screen, sensor sign and warning sign blinks Sensor failure, press “ ▲/▼” button, an error code instead of temperature displays on the corresponding sensor place —- -88.8 Wire is broken, Check wire… -
Page 48: Quality Guarantee
Instruction of SR81 Split Pressurized Solar Hot Water System 11. Quality Guarantee Manufacturer provides following quality responsibilities to end-users: within the period of quality responsibilities, manufacturer will exclude the failure caused by production and material selection. A correct installation will not lead to failure. When a user takes incorrect handling way, incorrect installation, improper or crude handling, and wrong connection of Warm water outflow upwards, we don’t take the responsibilities caused by before mentioned…
-
Page 1
Operation Instruction SR81 Intelligent Controller for Split Pressurized Solar Hot Water System Please read this instruction carefully! -
Page 2: Table Of Contents
Instruction of SR81 Split Pressurized Solar Hot Water System Contents 1.Safety information ………………….3 1.1 Installation and commissioning ………………3 1.2 About this manual ………………….3 1.3 Liability waiver ……………………. 3 1.4 Important information………………….. 4 1.5 Signal description ………………….4 1.6 Button and HMI description …………………
-
Page 3
Instruction of SR81 Split Pressurized Solar Hot Water System 8.6 MAN Manual operation ………………..36 8.7 BLPR Blocking protection ………………..37 8.8 OTDI Thermal Sterilization Function …………….38 8.9 FS Flow rate monitoring and pump dry-running protection ……….39 8.10 UNIT C-F Switch ………………….41 8.11 RET Reset …………………… -
Page 4: Safety Information
Instruction of SR81 Split Pressurized Solar Hot Water System 1. Safety information 1.1 Installation and commissioning When laying wires, please ensure that no damage occurs to any of the constructional fire safety measures presented in the building. The controller must not be installed in rooms where easily inflammable gas mixtures are present or may occur.
-
Page 5: Important Information
Instruction of SR81 Split Pressurized Solar Hot Water System data or installation and operation instructions without prior notice. As soon as it becomes evident that safe operation is no longer possible (e.g. visible damage). Please immediate take the device out of operation. Note: ensure that the device can’t be accidentally placed into operation.
-
Page 6: Overview
Instruction of SR81 Split Pressurized Solar Hot Water System Button Power indication lamp “On/Off” “Clock” “Holiday” “Manual Heating” “Manual Circuit” “Eco Mode” “Exit” “Adjust” Upwards adjust “+” Downwards adjust “-” LCD Display screen Status Description Code Lighting Blinking Exceed the maximum temperature…
-
Page 7: Delivery List
Instruction of SR81 Split Pressurized Solar Hot Water System Protection type: IP40 1500W or 3000W/4000W of electrical heater should be remarked in the purchased order Dimension of display: 120*120*18mm Dimension of controller board with 1500W output: 200*140*43mm …
-
Page 8: Mounting The Board Of Controller
Instruction of SR81 Split Pressurized Solar Hot Water System 3.2 Mounting the board of controller Follow the below steps to mount the controller on the wall. ► Select the proper place to install main board of controller ► Put the hung housing plate on the wall and mark the upper fastening point.
-
Page 9: Terminal Connection
Instruction of SR81 Split Pressurized Solar Hot Water System 3.5 Terminal connection Note: before opening the housing! Always disconnect the controller from power supply and obey the local electrical supply regulation. 3.5.1 Terminal allocation of controller for electrical heater of 1500W …
-
Page 10: Terminal Allocation Of Controller For Electrical Heater Of 3000W/4000W
Instruction of SR81 Split Pressurized Solar Hot Water System 1500W Output ports Input Ports L, N: for power connection, L: live wire, N: zero wire, protective wire, with 10A power plug. Output R1: Electromagnetic relays, Max. Current: 2A …
-
Page 11: System Description (Standard Solar System With 1 Tank, 1 Collector Field)
Instruction of SR81 Split Pressurized Solar Hot Water System @110VAC, for 2000W electrical heater) Advice regarding the installation of temperature sensors: Only original factory equipped Pt1000 temperature sensors are approved for using with the controller, it is equipped with 1.5m silicon cable and suitable for all weather…
-
Page 12: Time Setup
Instruction of SR81 Split Pressurized Solar Hot Water System Sensor Relay Description Description ports outputs Collector temperature For solar circuit pump sensor PT1000 Temperature sensor on the 1. for DHW circuit function (CIRC) bottom part tank. NTC10K 2.OHDP ( Thermal energy…
-
Page 13: Function’s Parameters And Options
Instruction of SR81 Split Pressurized Solar Hot Water System 6. Function’s parameters and options 6.1 Overview of menu structure Digital flow Timing heating Cool Function DHW Circuit Aux. Function C-F Unit Reset Password Manual Mode Tank loading Block protect Password setup…
-
Page 14: Value Checking And Function Checking
Instruction of SR81 Split Pressurized Solar Hot Water System ►Press “+/-” button to select submenu, ►Press “SET” button to enter the value adjust interface ►Press “+/-” to adjust value ►Press “SET” or “ESC” to confirm the value you set ►Press “ESC”, exit the submenu.
-
Page 15
Instruction of SR81 Split Pressurized Solar Hot Water System the switch-on temperature of heating is 40 C,switch-off temperature is 50 C。 The second time section: default at 10:00 to start heating, and at 10:00 to stop heating, The Third time section: default at 17:00 to start heating, and at 22:00 to stop heating, and the switch-on temperature of heating is 50 C,switch-off temperature is 55… -
Page 16
Instruction of SR81 Split Pressurized Solar Hot Water System 2. Please remark the power of electrical heater and the voltage used. Menu Structure Step Main Subm Factory Adjustable Description menu range adjust THET Timing heating function Select desired sensor of heated THTS S2. -
Page 17
Instruction of SR81 Split Pressurized Solar Hot Water System ►Press “SET” button, “S3” blinks ►Press “+/-” button to select desired sensor ►Press “SET” or “ESC” button to save the setting. ► Press “+” button to access submenu of the intelligent heating, “SMT OFF” displays on the screen ►Press “SET”… -
Page 18: Circ Dhw Circulation Pump Controlled By Temperature And Time
Instruction of SR81 Split Pressurized Solar Hot Water System Within the preset time section, if timing heating is working, heating sign blinks on the screen. Out of the preset time section, heating sign doesn’t display on the screen. 7.2 CIRC DHW circulation pump controlled by temperature and time…
-
Page 19
Instruction of SR81 Split Pressurized Solar Hot Water System Temperature controlled DHW pump within the preset 3 time sections within a time section, when the DHW circulation pump is controlled by temperature, as default set, pump is triggered when return temperature T4 is below 40… -
Page 20
Instruction of SR81 Split Pressurized Solar Hot Water System Menu Structure Main Subme Subm Factory Adjustable Step per Description menu nu 1 enu 2 range adjust CIRC DHW circuit function TCYC ON/OFF Activate / deactivate the DHW circuit function TEMP… -
Page 21
Instruction of SR81 Split Pressurized Solar Hot Water System t C2O 11:00 00:00-23:59 Switch-on time for the second time section t C2F 13:00 00:00-23:59 Switch-off time for the second time section t C3O 17:00 / 00:00-23:59 / Switch-on time for the… -
Page 22
Instruction of SR81 Split Pressurized Solar Hot Water System as example) ► Press “SET”, “40 C” blinks ► Press “+/-” button to adjust the switch-on temperature (adjustable range 0 C ~ (OFF-2 ► Press “SET” or “ESC” button to save the setting. -
Page 23: Function Operation And Parameter Setup (Engineer)
Instruction of SR81 Split Pressurized Solar Hot Water System 8. Function operation and parameter setup (engineer) 8.1 PWD Password Menu Structure Access main menu, select “PWD 0000” to enter password ► Press “SET” button, the left digital blinks, enter password, factory set is “0000”…
-
Page 24
Instruction of SR81 Split Pressurized Solar Hot Water System temperature difference. The set temperature difference must be at least 0.5 K higher than the switch-on temperature difference. SMX Maximum tank temperature protection set If the tank temperature reaches the adjusted maximum temperature, the tank will no longer be loaded in order to avoid damage caused by overheating. -
Page 25: Col Collector Function
Instruction of SR81 Split Pressurized Solar Hot Water System ► Press “SET”, “6K” blinks ► Press” +/-”, to adjust the switch-on temperature of the solar circuit pump ► Press “SET” or “ESC” to save the setting ► Press “+”, “DTF 4K” displays on the screen ►…
-
Page 26
Instruction of SR81 Split Pressurized Solar Hot Water System OCCO Collector cooling The collector cooling function keeps the collector temperature rising within the operating range by heating the tank. If the tank temperature reaches 95° C the function will be switched off for safety reasons. -
Page 27
Instruction of SR81 Split Pressurized Solar Hot Water System Menu structure Main Subme Subme Factory Adjust Step per Description menu nu 1 nu 2 able adjust range Collector function OCEM Collector emergency shutdown function on/ff 80-200 Temperature of collector 130℃… -
Page 28
Instruction of SR81 Split Pressurized Solar Hot Water System Function setting: OCEM (Collector emergency shutdown function) setup ►Select “COL” function menu ►Press “SET”, “OCEM” displays on the screen ►Press “SET” again, “OCEM ON” displays on the screen ►Press “SET”, “ON” blinks on the screen (If it is necessary to shut down this function, press “+/-“to deactivate it) -
Page 29: Cool Collector Function
Instruction of SR81 Split Pressurized Solar Hot Water System OCFR (Antifreeze function) setup ►Select OCFR submenu, “OCFR” displays on the screen ►Press “SET”, “OCFR OFF” displays on the screen ►Press “SET”, “OFF” blinks on the screen ►Press “+/-”, to activate this function, “OCFR ON” displays on the screen ►Press “+”, “CFRO 4…
-
Page 30
Instruction of SR81 Split Pressurized Solar Hot Water System coil); the purpose is to keep the collector’s or tank’s temperature within the operating range. For this function, an extra output should be added (R2 or R3 as option) Heat transferring by external radiator function can control either an additional pump or a valve (OTPM ON = pump logic, OTPM OFF = valve logic). -
Page 31
Instruction of SR81 Split Pressurized Solar Hot Water System Menu structure Main Subm Subm Facto Adjustable Step Description enu 1 range adjust Cooling function OSTC ON/OFF Tank cooling function DTCO 1-30K 0.5K Switch-on temperature difference of cooling function DTCF 0.5-29.5K 0.5K… -
Page 32: Aux Auxiliary Function
Instruction of SR81 Split Pressurized Solar Hot Water System ►Press “SET”, “OFF” blinks on the screen ►Press “+/-”, to activate this function ►Press “+”, “DTCO 20K” displays on the screen ►Press “SET”, “20K” blinks on the screen ►Press “+/-”, to adjust the switch-on temperature difference of tank cooling function ►Press “SET”…
-
Page 33
Instruction of SR81 Split Pressurized Solar Hot Water System Timer function can trigger controller’s output port at the preset time; therefore, an available output (R3) is needed. AH Thermostat function The thermostat function works independently from the solar operation and can be used for using surplus energy to reduce tank temperature or for using after heating to rise tank temperature. -
Page 34
Instruction of SR81 Split Pressurized Solar Hot Water System Menu Structure Subm Facto Adjustab Step Description enu 1 le range adjust Auxiliary functions Timer function TIME ON/OFF Start time of the first time section t 1O 00:00 00:00-23: Close time of the first time section… -
Page 35
Instruction of SR81 Split Pressurized Solar Hot Water System Switch-on temperature 40℃ 0.0-95℃ 0.5℃ Switch-off temperature 45℃ 0.0-94.5 0.5℃ ℃ Start time of the first time section t A1O 00:00 00:00-23: Close time of the first time section t A1F… -
Page 36
Instruction of SR81 Split Pressurized Solar Hot Water System ►Press “SET”, minute “00” blinks ►Press “+/-” to adjust the minute of the close time of the first time section ►Press “SET” or “ESC” to save the setting ►Press “+”, access the setting of the second time section, repeat above steps to set time of second and third sections. -
Page 37: Man Manual Operation
Instruction of SR81 Split Pressurized Solar Hot Water System ►Press “SET”, “23” blinks ► Press “+/-”, to adjust the hour of close time of the first time section ►Press “SET”, “59” blinks ► Press “+/-”, to adjust the minute of close time of the first time section ►Press “SET”…
-
Page 38: Blpr Blocking Protection
Instruction of SR81 Split Pressurized Solar Hot Water System Main Subm Factory Adjustabl Description Menu e range Manual mode ON/OFF R1 on and off ON/OFF R2 on and off ON/OFF R3 on and off ON/OFF HR on and off Function setup ►Select “MAN”…
-
Page 39: Otdi Thermal Sterilization Function
Instruction of SR81 Split Pressurized Solar Hot Water System ►Press “+/-”, to activate this function, “BLPR ON” displays on the screen ►Press “SET” or “ESC” to save the setting 8.8 OTDI Thermal Sterilization Function Function description: This function helps to prevent the spread of Legionella in DHW tanks by systematically activating the after-heating.
-
Page 40: Fs Flow Rate Monitoring And Pump Dry-Running Protection
Instruction of SR81 Split Pressurized Solar Hot Water System Function setting ►Select OTDI main menu ►Press “SET”, “OTDI OFF” display ►Press “SET”, “OFF” blinks ►Press “+/-”, to activate this function, “OTDI ON” displays ►Press “SET” or “ESC” to save the setting ►Press “+”, “PDIS 7”…
-
Page 41
Instruction of SR81 Split Pressurized Solar Hot Water System button for 3 seconds to switch-off FS function, and after the fault is removed, then monitoring function is activated again. Flow monitoring function is designed to detect whether flow exists in the solar system and therefore to switch-off the corresponding pump in case of no flow, If “OFF”… -
Page 42: Unit C-F Switch
Instruction of SR81 Split Pressurized Solar Hot Water System ►Press “SET”, “OFF” blinks ►Press “+/-”, to activate this function, “FS ON” displays ►Press “SET” or “ESC” to save the setting 8.10 UNIT C-F Switch Under this menu, below unit can be set:…
-
Page 43: Pass Password Set
Instruction of SR81 Split Pressurized Solar Hot Water System ►Press “SET”, “YES” blinks ►Press “SET” for 3 seconds, beeper sounds “di” 3 times, “YES” lighting, and it indicates system is recovered to factory set. ►Press “ESC” return to the submenu ►Press “ESC”…
-
Page 44: Manual Heating
Instruction of SR81 Split Pressurized Solar Hot Water System Switch-off the power to controller Hold down “ESC” button Reconnect the power supply, when beeper sounds 3 di di di, and then release “ESC” button, Controller recovers to the factory set password (factory set possword is 0000), 8.13 Manual heating…
-
Page 45: Dhw Circuit Pump Triggered Manually
Instruction of SR81 Split Pressurized Solar Hot Water System indicates Eco mode is on. ►Press “ECO Mode” button again, sign closed, it indicates the ECO mode is off. 8.15 DHW circuit pump triggered manually Note: Only when function of DHW circuit pump CIRC is activated, it is just possible to trigger the output R2 manually for running the DHW circuit pump.
-
Page 46: Manual Circuit Function
Instruction of SR81 Split Pressurized Solar Hot Water System 8.18 Manual circuit function ►Press “Manual Circuit” button, circuit pump R1 is triggered and runs for 1 hour. ►Press “Manual Circuit” button, to switch- off the circuit pump During the running of circuit pump R1, if you don’t press “Manual circuit” button, then R1 will run for 1 hour, then it is stopped automatically.
-
Page 47
Instruction of SR81 Split Pressurized Solar Hot Water System On the screen, sensor sign and warning sign blinks Sensor failure, press “ ▲/▼” button, an error code instead of temperature displays on the corresponding sensor place —- -88.8 Wire is broken, Check wire… -
Page 48: Quality Guarantee
Instruction of SR81 Split Pressurized Solar Hot Water System 11. Quality Guarantee Manufacturer provides following quality responsibilities to end-users: within the period of quality responsibilities, manufacturer will exclude the failure caused by production and material selection. A correct installation will not lead to failure. When a user takes incorrect handling way, incorrect installation, improper or crude handling, and wrong connection of Warm water outflow upwards, we don’t take the responsibilities caused by before mentioned…
| Технические характеристики | |
| Размеры контроллера, мм: | 187 х 128 х 46 |
| Напряжение питания | AC 230 В ±10%, 50 Гц |
| Потребляемая мощность: | < 2,5 Вт |
| Погрешность в измерении температуры: | ± 0,1 С |
| Диапазон измерения температуры: | -10 — + 220 С |
| Мощность электрического нагревателя воды (ТЭН): | ≤ 1500 Вт |
| Вход: | Т – датчик температуры воды в баке |
| Выход: | H – реле для подключения тэна |
| Температура окружающей среды: | -10 C … +50 С |
| Класс защиты: | IP41 |
Условия предоставления гарантии
1. Срок гарантии на оборудование начинается со дня получения Покупателем товара и составляет 1 год.
2. Продавец не предоставляет гарантию на совместимость приобретаемого оборудования с иным оборудованием, имеющимся у Покупателя, с которым осуществляется коммуникация.
3. В случае выхода из строя инвертора не по вине Покупателя, в период гарантийного срока, продавец обязуется произвести ремонт или заменить дефектное оборудование (в зависимости от сложности ремонта) без дополнительной платы со стороны Покупателя.
4. Продавец снимает с себя гарантийные обязательства если:
- На оборудовании имеются механические, химические, термические или иные повреждения оборудования.
- Обнаружены следы вскрытия, ремонта, модернизации без согласования с продавцом.
- Выход из строя по причине несоблюдения правил установки и эксплуатации согласно требований завода-изготовителя оборудования.
- Неисправности возникли в результате: короткого замыкания, встречного напряжения, превышения допустимых параметров электросети и мощности нагрузки; попадания внутрь прибора посторонних предметов, жидкости, пыли, насекомых; избыточного нагрева; нарушения вентиляции и прочих причин, находящихся вне контроля продавца и производителя товара;
5. Услуги по консультациям для разрешения вопросов, связанных с некорректной работой оборудования в связи с произведенными Покупателем ошибками при проектировании/монтаже/коммутации приобретенного оборудования, оказываются продавцом на возмездной основе.
6. Упущенная прибыль и иные расходы Покупателя возникшие в связи с неисправностью оборудования, не подлежат возмещению.
7. Гарантия не распространяется на расходные материалы и другие узлы, имеющие естественный ограниченный период эксплуатации.
8. На период гарантийного ремонта, аналогичное исправное оборудование не выдаётся.
9. Гарантия распространяется только на первоначального покупателя и не подлежит передаче другому лицу.
Информация о доставке:
Наш интернет-магазин предлагает несколько вариантов получения товара:
-
Самовывоз с нашего склада
-
Доставка надежными транспортными компаниями ТК «Деловые линии», ТК «Энергия», ТК «Кит», ТК «Мэйджик-Транс».
Наша доставка до терминала ТК заказов на сумму более 40000 руб. — бесплатна, менее 40000 руб. — всего 500 руб.
Межтерминальная доставка оплачивается покупателем.
-
Прямая доставка нашим автотранспортом (условия просим уточнять у менеджеров)
Важные условия доставки:
- Заявки на доставку принятые до 14:00 текущего дня, осуществляются на следующий рабочий день.
- После 14:00 — в течение 2 рабочих дней после оформления покупки.
Важно: памятка покупателю по правилам получения товара
Информация об оплате:
-
Вы можете оплатить Ваш заказ как наличными, так и по безналичному расчету (условия необходимо уточнять у менеджеров)
Всего отзывов — 0
Оплачивайте покупки удобным способом.
В нашем интернет-магазине доступно несколько вариантов оплаты:
- Безналичный расчёт для юридических лиц (без НДС), оплата по счёту;
- Безналичный расчет физических лиц при оформлении в интернет-магазине: карты МИР, Visa и MasterCard. Чтобы оплатить покупку, система перенаправит вас на сервер системы ASSIST. Здесь нужно ввести номер карты, срок действия и имя держателя. Обратите внимание, при данном методе может взыматься дополнительная комиссия до 5%;
- Оплата по QR доступна для дебетовых карт любого банка. Удобный способ оплаты с минимальной комиссией. Обратите внимание, комиссия при данном методе может достигать 2.7%;
- Перевод на карту, самый доступный и выгодный способ оплаты, за который не взымаются комиссии банка за эквайринг. Обратите внимание, на некоторые группы товаров при оплате данным способом предоставляется скидка, которая применяется автоматически при выборе метода оплаты при оформлении полного заказа в нашем интернет-магазине.
Обратите внимание, что отгрузка оборудования производится только после полной оплаты. Отсрочка или оплата при получении доступна только постоянный покупателям, которые так же являются участниками нашего сообщества.
Наш интернет-магазин ГРИНЛАЙК предлагает несколько вариантов доставки:
- самовывоз со склада (при наличии товара в регионе на складе);
- самовывоз из отделения транспортной компании;
- доставка транспортной компанией до покупателя.
Срок доставки: зависит от веса и габаритов оборудования.
В среднем доставка малогабаритного груза в регионы РФ занимает от 2 дней.
В обычном случаи 7 дней или 14-25 дней, если вес оборудования превышает 100 кг.
Контрольные сроки доставки и стоимость устанавливаются в соответствии с выбранной Вами транспортной компанией.
В случае, если при заказе покупателем не была указана желаемая транспортная компания, выбор ТК производится на усмотрение продавца.
Доставка до терминала транспортной компании и сдача груза осуществляется бесплатно. После передачи груза в транспортную компанию, в течении 1-3 рабочих дней, Вам сообщается номер отправления, для возможности дальнейшего отслеживания статуса доставки оборудования в Ваш регион.
Так же, обращаем Ваше внимание на тот факт, что фактическим собственником груза после передачи его в транспортную компанию, является конечный получатель!
Все грузоотправления подлежат обязательному страхованию. Для отказа от страхования груза, покупателю необходимо написать соответствующее заявление до момента передачи Вашего оборудования в транспортную компанию. То же касается жесткой обрешетки, по Вашему заявлению услуга жесткой обрешетки в транспортной компании не применяется. Страхование и жесткая обрешетка грузоотправления, являются дополнительными услугами, которые оплачиваются дополнительно по тарифам выбранной транспортной компании. Все заявления принимаются на электронную почту, указанную в контактных данных.
Доставку в регионы мы осуществляем транспортными компаниями: «Деловые Линии», «ПЭК», «Энергия», «СДЭК» или любой другой, которая есть в Вашем населенном пункте. Стоимость доставки в Ваш город рассчитывается ТК и зависит от тарифов транспортной компании и выбранного Вами способа доставки. Все транспортные расходы оплачиваются в полной мере покупателем. Подробную информацию о возможности специальных условий доставки уточняйте у менеджера по телефону.
Терминология, указанная на любой из страниц нашего интернет-ресурса расположенного в сети интернет по адресу greenlike.biz — «Бесплатная доставка», в том числе «Бесплатная доставка в любой регион РФ» или «Бесплатная доставка в любой регион России» может означать частичную или полную компенсацию за счёт продавца стоимость услуг грузоперевозки транспортными компаниями оборудования в Ваш регион, но не подразумевает собой обязательную полную компенсацию стоимости доставки в отдаленные регионы России, в которых отсутствуют терминалы (пункты выдачи) основных транспортных компаний. Так же, мы не компенсируем страхование, жесткую обрешетку и другие дополнительные услуги, предоставляемые транспортной компанией, связанные с перевозкой оборудования до Вашего региона.
Так же возможна экспресс доставка. Срок доставки в любой регион РФ от 2 дней.
Оборудование до 10 кг. Отправляется по умолчанию курьерской службой СДЭК с минимальными сроками доставки в регионы РФ.
Экспресс доставка оборудования свыше 10 кг. согласуется отдельно и оплачивается по тарифам авиаперевозки.
Подробнее уточняйте по телефону у Вашего менеджера!
Пункты (терминалы) выдачи грузов в транспортной компании, Вы можете найти на официальном сайте, интересующей вас ТК.
Заполняя любую форму, связанную с оформлением заказа, Вы не осуществляете прямую покупку, а изъявляете своё желание посредством сети интернет приобрести выбранный на нашем интернет-ресурсе товар или оборудование, которое соответствует описанию на странице оформления заявки. При этом отправляя такую заявку, Вы полностью и безоговорочно соглашаетесь со всеми условиями оплаты и доставки выбранного оборудования.
Характеристики контроллера управления:
| Напряжение питания, В: | AC 230 В ±10%, 50 Гц |
| Потребляемая мощность, Вт: | < 2,5 |
| Погрешность в измерении температуры, С: | +/- 0,1°С |
| Диапазон измерения температуры, С: | -10 — + 220 °С |
| Мощность электрического нагревателя воды (ТЭН), Вт: | < 1500 Вт |
| Вход : | Т – датчик температуры воды в баке |
| Выход : | H – реле для подключения тэна |
| Размеры контроллера, мм: | 187х128х46 |
| Температура окружающей среды, С: | -10 C … +50 °С |
| Показать все характеристики |
- Описание
- Характеристики
- Отзывы (0)
Контроллер управления для солнечного коллектора Controller SR81
Контроллер SR81 разработан специально для систем солнечных коллекторов. Модель SR81 — это усовершенствованная версия контроллера SR 868 C8. Жидкокристаллический дисплей показывает уровень и температуру воды, режим работы электро-нагревателя, а также другие показатели. Он предназначен для работы с одним контуром гелеосистемы.
Основные функции:
— Напряжение питания: ~220 В ± 10%
— Потребляемая мощность: <2,5 Вт
— Точность измерения температуры: ±0,1°C
— Диапазон измерения температуры коллектора: -10~220°C
— Мощность подключаемых насосов: могут быть подключены два насоса, мощность каждого <600 Вт
— Мощность подключаемых клапанов: может быть подключен 1 клапан потребляемая мощность <600 Вт
— Мощность подключаемого стандартного электрического обогревателя 1500 Вт
Входы (5 датчиков):
1 датчик Pt1000 (≤500°C) для коллектора (кремниевый кабель=280°C),
4 датчика NTC10K, B3950 (≤135°C) для бака, (ПВХ кабель ≤105°C),
Примечание: датчик для насоса горячей воды поставляется отдельно.
Выходы:
4 реле, один для электрического нагревателя , 2 для циркуляционного насоса, 1 для клапана
-Диапазон рабочих температур: -10°C ~ 50°C
-Класс защиты: IP41
— Размер клавиатуры: 120 мм х 120 мм х 18 мм
— Размер контроллера: 187мм x128мм x46мм
| Питание: | AC 230 В ±10%, 50 Гц |
| Потребляемая мощность: | <2,5 Вт |
| Погрешность в измерении температуры: | +/- 0,1°С |
| Диапазон измерения температуры: | -10 — + 220 °С |
| Мощность электрического нагревателя воды (ТЭН): | ≤ 1500 Вт |
| Вход: | Т – датчик температуры воды в баке |
| Выход: | H – реле для подключения тэна |
| Температура окружающей среды: | -10 C … +50 °С |
| Класс защиты: | IP41 |
| Размеры контроллера: | 187 мм х 128 мм х 46 мм |
Купить Контроллер управления солнечного коллектора SR81 в Сочи
В интернет-магазине Amper-shop вы можете купить Контроллер управления солнечного коллектора SR81 в Сочи. Наша компания реализует электротехническое оборудование высокого качества с гарантией. Мы напрямую сотрудничаем с проверенными производителями, поэтому уверены в надежности и отличных эксплуатационных качествах всей представленной в каталоге продукции. Всем покупателям предлагаем качественный и удобный сервис.
Если вам требуется помощь в выборе оборудования или консультация менеджера, вы можете позвонить нам напрямую или задать вопрос через форму обратной связи на сайте.