- Manuals
- Brands
- Rhino Winch Manuals
- Winches
- 3000lb
Manuals and User Guides for Rhino Winch 3000lb. We have 2 Rhino Winch 3000lb manuals available for free PDF download: Operation Manual, Manual
Rhino Winch 3000lb Operation Manual (83 pages)
Brand: Rhino Winch
|
Category: Winches
|
Size: 6.39 MB
Table of Contents
-
English
2
-
Table of Contents
2
-
Quick Start Guide
3
-
Wireless Remotes
3
-
Freespool Operation
3
-
-
Wiring Diagram — 3000Lb
4
-
Wiring Diagram — 4500Lb
5
-
Health and Safety Symbol Index
6
-
Health and Safety Precautions
7
-
Detailed Specifications — 3000Lb
11
-
Detailed Specifications — 4500Lb
12
-
Maintenance
13
-
Troubleshooting
13
-
-
Disposal
14
-
CE Certificate of Conformity
15
-
Français
16
-
-
-
Français
17
-
Guide de Démarrage Rapide
18
-
Montage
18
-
Télécommandes Sans Fil
18
-
Opération de Décrabotage
18
-
-
Schéma de Câblage 3000Lb
19
-
Symbole de Sûreté Et de Sécurité Index
21
-
Précautions de Sûreté Et de Sécurité
22
-
Spécifications Détaillées — 3000Lb
26
-
Spécifications Détaillées — 4500Lb
28
-
Entretien
30
-
Elimination
31
-
Certificat de Conformité CE
32
-
-
Español
68
-
Controles Remotos Inalámbricos
69
-
Operación Freespool
69
-
Diagrama de Cableado — 3000Lb
70
-
Diagrama de Cableado — 4500Lb
71
-
Índice de Símbolos de Seguridad y Salud
72
-
Precauciones de Seguridad y Salud
73
-
Mantenimiento
81
-
Solución de Problemas
81
-
-
Eliminación
82
-
Certificado de Conformidad CE
83
-
Advertisement
Rhino Winch 3000lb Manual (17 pages)
Brand: Rhino Winch
|
Category: Winches
|
Size: 2.86 MB
Table of Contents
-
Table of Contents
2
-
2 — Contents
3
-
3 Quick Start Guide
3
-
Mounting
3
-
Wireless Remotes
4
-
Freespool Operation
4
-
Wiring Diagram
5
-
-
6 Health and Safety Symbol Index
6
-
7 Health and Safety Precautions
7
-
11 Detailed Specifications — 13500Lb
11
-
12 Detailed Specifications — 17500Lb
12
-
13 Detailed Specifications — 20000Lb
13
-
14 Wireless Remotes Wiring Diagram
14
-
15 Maintenance
15
-
Troubleshooting
15
-
-
16 Disposal
16
-
17 CE Certificate of Conformity
17
Advertisement
Related Products
-
Rhino Winch 13500lb
-
Rhino Winch 17500lb
-
Rhino Winch 20000lb
-
Rhino Winch 4500lb
Rhino Winch Categories
Winches
Construction Equipment
Chain Hoists
More Rhino Winch Manuals
 |
[Page 1] Rhino Winch 3000lb This manual provides important safety information and instructions on how to install your winch. Every winching situation has the potential for personal injury. In order to minimize that risk, it’s important to read this manual carefully. This m… |
 |
[Page 2] Rhino Winch 3000lb 3000lb — 4500lb © Rhino Winch Co 2 © Rhino Winch Co English 02 — Contents 03 — Quick start guide Mounting Wireless remotes Freespool operation 04 — Wiring diagram — 3000lb 05 — Wiring diagram — 4500lb 06 — Health and safety symbol inde… |
 |
[Page 3] Rhino Winch 3000lb 3000lb — 4500lb © Rhino Winch Co 3 © Rhino Winch Co English Quick start guide CAUTION: To prevent serious injury due to accidental activation, complete the winch installation before wiring. WARNING: Always choose a mounting location that is suf�… |
 |
[Page 4] Rhino Winch 3000lb 3000lb — 4500lb © Rhino Winch Co 4 © Rhino Winch Co English Wiring diagram — 3000lb M+ M- B- B+ M+ M- Red Positive Cable to Motor Black Negative Cable to Motor Red Positive Cable to Battery Black Negative Cable to Battery Connection to Handleba… |
 |
[Page 5] Rhino Winch 3000lb 3000lb — 4500lb © Rhino Winch Co 5 © Rhino Winch Co English Wiring diagram — 4500lb B+ B — Blue Cable to Motor Yellow Cable to Motor Red Positive Cable to Battery Black Negative Cable to Battery Connection to Handlebar Controller 1. Connect th… |
 |
[Page 6] Rhino Winch 3000lb 3000lb — 4500lb © Rhino Winch Co 6 © Rhino Winch Co English Health and safety symbol index Symbol Explanation Always wear leather gloves Always wear hearing and eye protection Never use winch as a hoist Properly seat load in hook Wind rope on th… |
 |
[Page 7] Rhino Winch 3000lb 3000lb — 4500lb © Rhino Winch Co 7 © Rhino Winch Co English Health and safety precautions FCC Regulations This device complies with Part 15 of the FCC Rules. Operation is subject to the following two conditions: • This device may not cause har… |
 |
[Page 8] Rhino Winch 3000lb 3000lb — 4500lb © Rhino Winch Co 8 © Rhino Winch Co English WARNING CHEMICAL AND FIRE HAZARD • Always remove jewelry and wear eye protection. • Never route electrical cables across sharp edges. • Never route electrical cables near par… |
 |
[Page 9] Rhino Winch 3000lb 3000lb — 4500lb © Rhino Winch Co 9 © Rhino Winch Co English WARNING MOVING PARTS ENTANGLEMENT HAZARD Winching Safety: • Never exceed the winch or winch rope rated capacity. If required, double line using a snatch block to reduce the load on… |
 |
[Page 10] Rhino Winch 3000lb 3000lb — 4500lb © Rhino Winch Co 10 © Rhino Winch Co English WARNING MOVING PARTS ENTANGLEMENT HAZARD • Always ensure the hook latch is closed correctly. • Never apply a load to the hook tip or latch. Apply the load only to the center of … |
 |
[Page 11] Rhino Winch 3000lb 3000lb — 4500lb © Rhino Winch Co 11 © Rhino Winch Co English Detailed specications — 3000lb Motor: 12V DC 3.0HP / 2.24KW Permanent Magnet Controls: 1 x Handlebar & 2 x Wireless Gear Train: 1-Stage Planetary Gear Ratio: 136:1 Drum Dimension… |
 |
[Page 12] Rhino Winch 3000lb 3000lb — 4500lb © Rhino Winch Co 12 © Rhino Winch Co English Detailed specications — 4500lb Motor: 12V DC 3.9HP / 2.9KW Permanent Magnet Controls: 1 x Handlebar & 2 x Wireless Gear Train: 3-Stage Planetary Gear Ratio: 271:1 Drum Dimensions… |
 |
[Page 13] Rhino Winch 3000lb 3000lb — 4500lb © Rhino Winch Co 13 © Rhino Winch Co English Maintenance Check Before rst use After each use Every 90 days Check connections to make sure they are tight. Replace damaged connectors. √ √ Ensure there is no exposed or damage… |
 |
[Page 14] Rhino Winch 3000lb 3000lb — 4500lb © Rhino Winch Co 14 © Rhino Winch Co English Disposal Batteries should not be disposed of in general household waste. Observe the local waste disposal regulations, details of which can be obtained from your local authority. All e… |
 |
[Page 15] Rhino Winch 3000lb 3000lb — 4500lb © Rhino Winch Co 15 © Rhino Winch Co English CE Certicate of conformity We hereby declare that the machine described below complies with the relevant basic safety and health requirements of the EU Directives, both in its basic… |
 |
[Page 16] Rhino Winch 3000lb 3000lb — 4500lb © Rhino Winch Co 16 © Rhino Winch Co Français Ce manuel fournit des informations importantes sur la sécurité et des instructions concernant l’installation de votre treuil. Chaque utilisation du treuil peut entraîner des ble… |
 |
[Page 17] Rhino Winch 3000lb 3000lb — 4500lb © Rhino Winch Co 17 © Rhino Winch Co Français Table des matières 17 — Table des matières 18 — Guide de démarrage rapide Montage Télécommandes sans l Opération de décrabotage 19 — Schéma de câblage — 3 000 lb 20 … |
 |
[Page 18] Rhino Winch 3000lb 3000lb — 4500lb © Rhino Winch Co 18 © Rhino Winch Co Français Guide de démarrage rapide ATTENTION: Pour éviter toute blessure grave causée par une activation accidentelle, veuillez terminer l’installation du treuil avant le câblage. MISE … |
 |
[Page 19] Rhino Winch 3000lb 3000lb — 4500lb © Rhino Winch Co 19 © Rhino Winch Co Français 1. Connectez le câble positif rouge au terminal positif rouge du treuil. 2. Connectez le câble négatif noir au terminal négatif noir du treuil. 3. Connectez le câble positif r… |
 |
[Page 20] Rhino Winch 3000lb 3000lb — 4500lb © Rhino Winch Co 20 © Rhino Winch Co Français Wiring diagram — 4500lb 1. Connectez le câble positif rouge au terminal positif noir du treuil. 2. Connectez le câble négatif noir au terminal négatif noir du treuil. 3. Connec… |
 |
[Page 21] Rhino Winch 3000lb 3000lb — 4500lb © Rhino Winch Co 21 © Rhino Winch Co Français Symbole de sûreté et de sécurité index Lors de la lecture de ces instructions, plusieurs informations relatives à la sécurité et au bon usage de votre treuil seront visibles. … |
 |
[Page 22] Rhino Winch 3000lb 3000lb — 4500lb © Rhino Winch Co 22 © Rhino Winch Co Français Précautions de sûreté et de sécurité Réglementations de la FCC cet appareil est conforme à la section 15 de la réglementation de la fcc. son fonctionnement est soumis aux deu… |
 |
[Page 23] Rhino Winch 3000lb 3000lb — 4500lb © Rhino Winch Co 23 © Rhino Winch Co Français ATTENTION DANGERS CHIMIQUES ET D’INCENDIE • Toujours enlevez les bijoux et portez des lunettes de protection. • Ne faites jamais passer les câbles électriques sur des cô… |
 |
[Page 24] Rhino Winch 3000lb 3000lb — 4500lb © Rhino Winch Co 24 © Rhino Winch Co Français ATTENTION RISQUE DE COINCEMENT AVEC LES PIÈCES MOBILES Sécurité de treuillage: • Ne jamais dépasser la capacité nominale du treuil ou du câble. Si nécessaire, doubler la l… |
 |
[Page 25] Rhino Winch 3000lb 3000lb — 4500lb © Rhino Winch Co 25 © Rhino Winch Co Français ATTENTION RISQUE DE COINCEMENT AVEC LES PIÈCES MOBILES • Assurez-vous que le loquet du crochet soit toujours correctement fermé. • N’attachez jamais de charge sur l’ext… |
 |
[Page 26] Rhino Winch 3000lb 3000lb — 4500lb © Rhino Winch Co 26 © Rhino Winch Co Français Spécications détaillées — 3000lb Moteur: 12V CC, 3.0HP / 2,24KW à aimant permanent Contrôles: 1 x guidon et 2 x sans l Train d’engrenage: planétaire à 1 étape Rapport … |
 |
[Page 27] Rhino Winch 3000lb 3000lb — 4500lb © Rhino Winch Co 27 © Rhino Winch Co Français 2-Ø8.5 50 80 297 118 107 |
 |
[Page 28] Rhino Winch 3000lb 3000lb — 4500lb © Rhino Winch Co 28 © Rhino Winch Co Français Spécications détaillées — 4500lb Motor: 12V DC 3.9HP / 2.9KW Permanent Magnet Controls: 1 x Handlebar & 2 x Wireless Gear Train: 3-Stage Planetary Gear Ratio: 271:1 Drum Dim… |
 |
[Page 29] Rhino Winch 3000lb 3000lb — 4500lb © Rhino Winch Co 29 © Rhino Winch Co Français 350 165 165 63 Ø10.50 78 76 76 4-M8 120 115 |
 |
[Page 30] Rhino Winch 3000lb 3000lb — 4500lb © Rhino Winch Co 30 © Rhino Winch Co Français Entretien Dépannage Vérications Avant la première utilisation Après chaque utilisation Tous les 3 mois Vériez les connexions pour vous assurer qu’elles sont bien serré… |
 |
[Page 31] Rhino Winch 3000lb 3000lb — 4500lb © Rhino Winch Co 31 © Rhino Winch Co Français Elimination Les piles ne doivent pas être jetées avec les ordures ménagères. Respectez les réglementations locales en matière d’élimination des déchets, que vous pouvez obt… |
 |
[Page 32] Rhino Winch 3000lb © Rhino Winch Co © Rhino Winch Co 3000lb — 4500lb © Rhino Winch Co 32 © Rhino Winch Co Français Nous déclarons par la présente que la machine décrite ci-dessous est conforme aux exigences de base de sécurité et de santé des directives d… |
 |
[Page 33] Rhino Winch 3000lb 3000lb — 4500lb © Rhino Winch Co 33 © Rhino Winch Co Deutsch © Rhino Winch Co © Rhino Winch Co Dieses Handbuch enthält wichtige Sicherheitsinformationen und Anweisungen zur Installation Ihrer Seilwinde. Jedes Benutzen der Seilwinde kann zu Ve… |
 |
[Page 34] Rhino Winch 3000lb 3000lb — 4500lb © Rhino Winch Co 34 © Rhino Winch Co Deutsch Inhalt 34 — Inhalt 35 — Kurzanleitung Montage von Funkfernbedienungen Freespool-Betrieb 36 — Schaltplan — 3000lb 37 — Schaltplan — 4500lb 38 — Sicherheits- und Gesundheitsschutzsym… |
 |
[Page 35] Rhino Winch 3000lb 3000lb — 4500lb © Rhino Winch Co 35 © Rhino Winch Co Deutsch Schnellstartanleitung VORSICHT: Um schwere Verletzungen durch versehentliche Aktivierung zu vermeiden, schließen Sie die Installation der Seilwinde vor der Verkabelung ab. WARNUNG: … |
 |
[Page 36] Rhino Winch 3000lb 3000lb — 4500lb © Rhino Winch Co 36 © Rhino Winch Co Deutsch 1. Schließen Sie das rote Pluskabel an den roten Pluspol der Seilwinde an. 2. Schließen Sie das schwarze Minuskabel an den schwarzen Minuspol der Seilwinde an. 3. Schließen Sie da… |
 |
[Page 37] Rhino Winch 3000lb 3000lb — 4500lb © Rhino Winch Co 37 © Rhino Winch Co Deutsch Schaltplan — 4500lb 1. Schließen Sie das rote Pluskabel an den roten Pluspol der Seilwinde an. 2. Schließen Sie das schwarze Minuskabel an den schwarzen Minuspol der Seilwinde an. … |
 |
[Page 38] Rhino Winch 3000lb 3000lb — 4500lb © Rhino Winch Co 38 © Rhino Winch Co Deutsch Sicherheits- und Gesundheitssymbole Wenn Sie diese Anleitung lesen, erhalten Sie verschiedene Informationen zur Sicherheit und zum korrekten Gebrauch Ihrer Seilwinde. Diese wichtigen … |
 |
[Page 39] Rhino Winch 3000lb 3000lb — 4500lb © Rhino Winch Co 39 © Rhino Winch Co Deutsch Gesundheits- und Sicherheitsvorkehrungen FCC-Bestimmungen Dieses Gerät entspricht Teil 15 der FCC-Regelung. Der Betrieb unterliegt den folgenden zwei Bedingungen: • Dieses Gerät … |
 |
[Page 40] Rhino Winch 3000lb 3000lb — 4500lb © Rhino Winch Co 40 © Rhino Winch Co Deutsch ATTENTION CHEMISCHE UND BRANDGEFAHR • Immer Schmuck ablegen und Augenschutz tragen. • Verlegen Sie elektrische Kabel niemals über scharfe Kanten. • Verlegen Sie elektris… |
 |
[Page 41] Rhino Winch 3000lb 3000lb — 4500lb © Rhino Winch Co 41 © Rhino Winch Co Deutsch ATTENTION VERWIRRUNGSGEFAHR DURCH BEWEGLICHE TEILE Sicherheit beim Winden: • Überschreiten Sie niemals die Nennkapazität der Winde oder des Windenseils. Falls erforderlich, dopp… |
 |
[Page 42] Rhino Winch 3000lb 3000lb — 4500lb © Rhino Winch Co 42 © Rhino Winch Co Deutsch HINWEIS VERMEIDEN VON WINDEN- UND GERÄTESCHÄDEN • Vermeiden Sie immer seitliche Zugkräfte, die das Seil an einem Ende der Trommel zusammenziehen können. Das kann das Seil oder … |
 |
[Page 43] Rhino Winch 3000lb 3000lb — 4500lb © Rhino Winch Co 43 © Rhino Winch Co Deutsch Ausführliche Spezikationen — 3000lb No. Qty Qty QtyNo. No.Name Name Name Motorbaugruppe Trommel Drahtseil Planetengetriebe Freilauager Haken Kupplungsgetriebe M5 Flanschmutter K… |
 |
[Page 44] Rhino Winch 3000lb 3000lb — 4500lb © Rhino Winch Co 44 © Rhino Winch Co Deutsch 2-Ø8.5 50 80 297 118 107 |
 |
[Page 45] Rhino Winch 3000lb 3000lb — 4500lb © Rhino Winch Co 45 © Rhino Winch Co Deutsch Ausführliche Spezikationen — 4500lb Motor: 12V DC 3,9PS / 2,9KW Permanentmagnet Bedienelemente: 1 x Griff & 2 x Funk Getriebezug: 3-stuges Planetengetriebe Übersetzungsve… |
 |
[Page 46] Rhino Winch 3000lb 3000lb — 4500lb © Rhino Winch Co 46 © Rhino Winch Co Deutsch 350 165 165 63 Ø10.50 78 76 76 4-M8 120 115 |
 |
[Page 47] Rhino Winch 3000lb 3000lb — 4500lb © Rhino Winch Co 47 © Rhino Winch Co Deutsch Wartung/Pege Problembehandlung Überprüfen Vor der ersten Inbetriebnahme Nach jeder Verwendung Alle 90 Tage Überprüfen Sie die Anschlüsse auf festen Sitz. Ersetzen Sie besc… |
 |
[Page 48] Rhino Winch 3000lb 3000lb — 4500lb © Rhino Winch Co 48 © Rhino Winch Co Deutsch Entsorgung Batterien gehören nicht in den Hausmüll. Beachten Sie die örtlichen Entsorgungsvorschriften, die Sie bei Ihrer örtlichen Behörde erfragen können. Alle elektrischen und… |
 |
[Page 49] Rhino Winch 3000lb 3000lb — 4500lb © Rhino Winch Co 49 © Rhino Winch Co Deutsch CE-Konformitätserklärung Wir erklären hiermit, dass die nachfolgend beschriebene Maschine sowohl in ihrer grundsätzlichen Ausführung als auch in der von uns in Verkehr gebrachten … |
 |
[Page 50] Rhino Winch 3000lb 3000lb — 4500lb © Rhino Winch Co 50 © Rhino Winch Co Italiano Questo manuale fornisce importanti informazioni di sicurezza e istruzioni per l’installazione del verricello. In ogni situazione in cui si usa un verricello potrebbero verificarsi l… |
 |
[Page 51] Rhino Winch 3000lb 3000lb — 4500lb © Rhino Winch Co 51 © Rhino Winch Co Italiano 51 — Indice 52 — Guida Rapida Montaggio Telecomandi Wireless Funzionamento Freespool 53 — Schema di Cablaggio — 3000lb 54 — Schema di Cablaggio — 4500lb 55 — Indice dei Simboli di… |
 |
[Page 52] Rhino Winch 3000lb 3000lb — 4500lb © Rhino Winch Co 52 © Rhino Winch Co Italiano Guida Rapida ATTENZIONE: per evitare gravi lesioni dovute ad un’attivazione accidentale, completare l’installazione del verricello prima del cablaggio. ATTENZIONE: Per montare la … |
 |
[Page 53] Rhino Winch 3000lb 3000lb — 4500lb © Rhino Winch Co 53 © Rhino Winch Co Italiano 1. Collegare il Cavo Rosso Positivo al Terminale Rosso Positivo del verricello. 2. Collegare il Cavo Nero Negativo al Terminale Nero Negativo verricello. 3. Collegare il Cavo Rosso … |
 |
[Page 54] Rhino Winch 3000lb 3000lb — 4500lb © Rhino Winch Co 54 © Rhino Winch Co Italiano Schema di Cablaggio — 4500lb 1. Collegare il Cavo Rosso Positivo al Terminale Rosso Positivo del verricello. 2. Collegare il Cavo Nero Negativo al Terminale Nero Negativo verricello…. |
 |
[Page 55] Rhino Winch 3000lb 3000lb — 4500lb © Rhino Winch Co 55 © Rhino Winch Co Italiano Indice dei Simboli di Sicurezza Leggendo le presenti istruzioni per l’uso del verricello, troverete diverse informazioni relative alla sicurezza e al corretto utilizzo del vostro ve… |
 |
[Page 56] Rhino Winch 3000lb 3000lb — 4500lb © Rhino Winch Co 56 © Rhino Winch Co Italiano Precauzioni di Sicurezza Normative FCC Questo dispositivo è conforme alla Sezione 15 delle Normative FCC. Il funzionamento è soggetto alle due seguenti condizioni: • Questo dispo… |
 |
[Page 57] Rhino Winch 3000lb 3000lb — 4500lb © Rhino Winch Co 57 © Rhino Winch Co Italiano AVVERTENZA PERICOLO SOSTANZE CHIMICHE E INCENDIO • Rimuovere sempre i gioielli e indossare una protezione per gli occhi. • Non posare mai i cavi elettrici su spigoli vivi. •… |
 |
[Page 58] Rhino Winch 3000lb 3000lb — 4500lb © Rhino Winch Co 58 © Rhino Winch Co Italiano AVVERTENZA PERICOLO DI IMPIGLIAMENTO DELLE PARTI MOBILI Sicurezza del Verricello: • Non superare mai la potenza nominale della fune del verricello o del verricello. Se necessari… |
 |
[Page 59] Rhino Winch 3000lb 3000lb — 4500lb © Rhino Winch Co 59 © Rhino Winch Co Italiano AVVISO EVITARE DANNI AL VERRICELLO E ALLE ATTREZZATURE • Evitare sempre i traini laterali che possono far impigliare la fune ad un’estremità del tamburo. Si potrebbe danneggiar… |
 |
[Page 60] Rhino Winch 3000lb 3000lb — 4500lb © Rhino Winch Co 60 © Rhino Winch Co Italiano Speciche Dettagliate — 3000lb No. Qty Qty QtyNo. No.Nome Nome Nome Asemblaggio Motore Tamburo Assemblaggio fune Ingranaggio epicicloidale Cuscinetto ruote libere Gancio Ingranaggio … |
 |
[Page 61] Rhino Winch 3000lb 3000lb — 4500lb © Rhino Winch Co 61 © Rhino Winch Co Italiano 2-Ø8.5 50 80 297 118 107 |
 |
[Page 62] Rhino Winch 3000lb 3000lb — 4500lb © Rhino Winch Co 62 © Rhino Winch Co Italiano Speciche dettagliate — 4500lb No. Qty Qty QtyNo. No.Nome Nome Nome Vite esagonale M6*16 Epicicloidale a 1 stadio Vite esagonale M8*25 Assemblaggio Motore Ingranaggio interno Rondell… |
 |
[Page 63] Rhino Winch 3000lb 3000lb — 4500lb © Rhino Winch Co 63 © Rhino Winch Co Italiano 350 165 165 63 Ø10.50 78 76 76 4-M8 120 115 |
 |
[Page 64] Rhino Winch 3000lb 3000lb — 4500lb © Rhino Winch Co 64 © Rhino Winch Co Italiano Manutenzione Risoluzione dei problemi Controllare Primo uso Dopo ogni uso Ogni 90 giorni Controllare che i connettori siano ben saldi. Sostituire i connettori danneggiati Acce… |
 |
[Page 65] Rhino Winch 3000lb 3000lb — 4500lb © Rhino Winch Co 65 © Rhino Winch Co Italiano Smaltimento Le batterie non devono essere smaltite nei riuti domestici generici. Osservare le norme locali per lo smaltimento dei riuti, per informazioni dettagliate rivolgersi … |
 |
[Page 66] Rhino Winch 3000lb © Rhino Winch Co © Rhino Winch Co 3000lb — 4500lb © Rhino Winch Co 66 © Rhino Winch Co Italiano Certicato di Conformità CE Con la presente dichiarazione si attesta che la macchina di seguito descritta è conforme ai requisiti fondamenta… |
 |
[Page 67] Rhino Winch 3000lb 3000lb — 4500lb © Rhino Winch Co 67 © Rhino Winch Co Español © Rhino Winch Co © Rhino Winch Co Este manual proporciona información de seguridad importante e instrucciones sobre cómo instalar su cabrestante. Cada vez que se usa el cabrestant… |
 |
[Page 68] Rhino Winch 3000lb 3000lb — 4500lb © Rhino Winch Co 68 © Rhino Winch Co Español Contenidos 68 — Contenidos 69 — Manual de inicio rápido Montaje Controles remotos inalámbricos Operación Freespool 70 — Diagrama de cableado — 3000lb 71 — Diagrama de cableado… |
 |
[Page 69] Rhino Winch 3000lb 3000lb — 4500lb © Rhino Winch Co 69 © Rhino Winch Co Español Guía de inicio rápido PRECAUCIÓN: Para evitar lesiones graves debido a la activación accidental, completar la instalación del cabrestante antes del cableado. ADVERTENCIA: Elegir… |
 |
[Page 70] Rhino Winch 3000lb 3000lb — 4500lb © Rhino Winch Co 70 © Rhino Winch Co Español 1. Conectar el cable rojo positivo al terminal rojo positivo del cabrestante. 2. Conectar el cable negro negativo al terminal negro negativo del cabrestante. 3. Conectar el cable po… |
 |
[Page 71] Rhino Winch 3000lb 3000lb — 4500lb © Rhino Winch Co 71 © Rhino Winch Co Español Diagrama de cableado — 4500 lb 1. Conectar el cable rojo positivo al terminal rojo positivo del cabrestante. 2. Conectar el cable negro negativo al terminal negro negativo del ca… |
 |
[Page 72] Rhino Winch 3000lb 3000lb — 4500lb © Rhino Winch Co 72 © Rhino Winch Co Español Índice de símbolos de Seguridad y Salud A medida que vaya leyendo estas instrucciones, usted verá información diversa relacionada con la seguridad y el uso correcto de su cabresta… |
 |
[Page 73] Rhino Winch 3000lb 3000lb — 4500lb © Rhino Winch Co 73 © Rhino Winch Co Español Precauciones de Seguridad y Salud Normativas FCC Este dispositivo cumple con el apartado 15 de la normativa FCC. Su funcionamiento está sujeto a las dos condiciones siguientes: • … |
 |
[Page 74] Rhino Winch 3000lb 3000lb — 4500lb © Rhino Winch Co 74 © Rhino Winch Co Español ADVERTENCIA PELIGRO QUÍMICO Y DE INCENDIO • Quitarse siempre cualquier joya que se use y utilizar protección para los ojos. • Nunca se debe pasar cables eléctricos a travé… |
 |
[Page 75] Rhino Winch 3000lb 3000lb — 4500lb © Rhino Winch Co 75 © Rhino Winch Co Español ADVERTENCIA PELIGRO DE ENREDO DE PIEZAS MÓVILES Seguridad del cabrestante: • No se debe exceder nunca la capacidad nominal del cabrestante o la cuerda del cabrestante. Si es nec… |
 |
[Page 76] Rhino Winch 3000lb 3000lb — 4500lb © Rhino Winch Co 76 © Rhino Winch Co Español AVISO EVITAR DAÑOS AL EQUIPO Y EL CABRESTANTE • Siempre evitar los tirones laterales que pueden amontonar la cuerda en un extremo del tambor. Esto puede dañar la cuerda o el cab… |
 |
[Page 77] Rhino Winch 3000lb 3000lb — 4500lb © Rhino Winch Co 77 © Rhino Winch Co Español N.º Cant Cant CantN.º N.ºNombre Nombre Nombre Ensamble del motor Tambor Ensamblaje de cable Engranaje planetario Cojinete Gancho Engranaje de embrague Tuerca de brida M5 Control rem… |
 |
[Page 78] Rhino Winch 3000lb 3000lb — 4500lb © Rhino Winch Co 78 © Rhino Winch Co Español 2-Ø8.5 50 80 297 118 107 |
 |
[Page 79] Rhino Winch 3000lb 3000lb — 4500lb © Rhino Winch Co 79 © Rhino Winch Co Español Spécications détaillées — 4500lb N.º Cant Cant CantN.º N.ºNombre Nombre Nombre Perno hexagonal M6 * 16 Engranaje planetario de primera etapa Tornillo hexagonal M8 * 25 En… |
 |
[Page 80] Rhino Winch 3000lb 3000lb — 4500lb © Rhino Winch Co 80 © Rhino Winch Co Español 350 165 165 63 Ø10.50 78 76 76 4-M8 120 115 |
 |
[Page 81] Rhino Winch 3000lb 3000lb — 4500lb © Rhino Winch Co 81 © Rhino Winch Co Español Mantenimiento Solución de problemas Revisar Antes de la primera utilización Después de cada uso Cada 90 días Vericar las conexiones para asegurarse de que estén apretadas…. |
 |
[Page 82] Rhino Winch 3000lb 3000lb — 4500lb © Rhino Winch Co 82 © Rhino Winch Co Español Eliminación Las baterías no deben desecharse en la basura doméstica general. Observar las regulaciones locales de eliminación de residuos, cuyos detalles se pueden obtener de su a… |
 |
[Page 83] Rhino Winch 3000lb 3000lb — 4500lb © Rhino Winch Co 83 © Rhino Winch Co Español Certicado de conformidad CE Por la presente declaramos que la máquina que se describe a continuación cumple con los requisitos básicos de seguridad y salud de las Directivas de… |
Спасибо что выбрали автомобильную лебедку Electric Winch. Данная инструкция содержит информацию о правилах использования и обслуживание лебедки Electric Winch. Вся информация, используемая в данной инструкции основана на всей имеющейся в наличии информации от производителя на момент печати данной инструкции. В связи с постоянным усовершенствованием изделия за нами остается право вносить изменения в конструкцию лебедки без дополнительного уведомления.
Данная инструкция разработана с целью обеспечения безопасного использования и обслуживания лебедки Electric Winch в период эксплуатации. Внимательно прочитайте и поймите данную инструкцию перед установкой и использованием лебедки. Неправильное использование лебедки может привести к поломке изделия и серьезным травмам. Для получения информации или замене частей, вы должны иметь следующую информацию:
1. Модель лебедки
2. Напряжение бортовой сети автомобиля
3. Дату покупки
Внимательно прочтите инструкцию перед началом пользования лебедкой и сохраните данное описание на протяжении всей эксплуатации.
I. МЕРЫ БЕЗОПАСНОСТИ
ВНИМАНИЕ!
Запрещается пользоваться лебедкой в состоянии алкогольного опьянения, усталости, сонливости и т.д.
Любое отклонение от настоящих правил может привести к несчастному случаю!
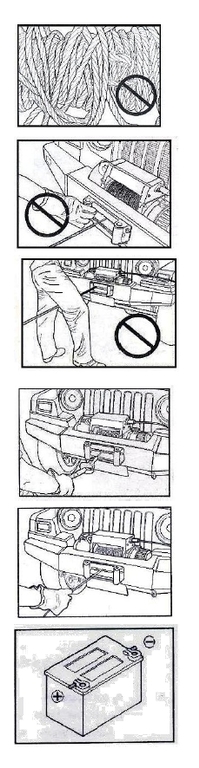
1. Одежда не должна быть слишком свободной, при работе с лебедкой не рекомендуется надевать ювелирные украшения. Длинные полы одежды и неровные края украшений могут попасть (зацепиться) в движущие части механизма лебедки или в трос.
2. Работайте с лебедкой только в кожаных перчатках. Исключите работу с лебедкой голыми руками и в матерчатых (тканевых) или плетеных одноразовых перчатках.
Нарушение может привести к повреждению и травмам.
3. Желательно иметь не скользкую обувь.
4. При работе с лебедкой необходимо принять меры для исключения попадания длинных волос под трос (покройте голову завязанным платком или шапкой).
5. Перед началом работы с лебедкой убедитесь, что все окружающие стоят набезопасном расстоянии. Оно равно 1,5 длины троса между лебедкой и буксируемым предметом. Ослабление натяжения или внезапный рывок с обрывом троса могут стать причиной серьезных увечий.
6. Находиться под тросом запрещено.
7. Никогда не разматывайте трос из барабана рывками или полностью. Для недо-
пущения срыва троса с барабана при винчивании, на барабане должно оставаться не
менее 5 витков троса.
8. Храните трос в сухом месте, избегайте попадания посторонних предметов, а также масла, грязи, металлических и острых вещей на барабан при намотке троса, следите за отсутствием расплетёностей и петель на тросе — это снизит срок службы троса, уменьшит его механическую прочность и повысит опасность работы с лебедкой. Берегите трос от коррозии. Не работайте с тросом, если явно видна коррозия или обрыв в плетении.
9. Если мотор лебедки во время работы сильно нагрелся, необходимо остановить работу лебедки и дать мотору охладиться. Работа мотора при высоких температурах может разрушить внутреннюю изоляцию обмоток и привести к замыканию.
10. Если мотор остановился и не слушается команд с пульта, — не пытайтесь его искусственно заставить работать, найдите причину остановки. Попытки включения лебедки в обход существующей схемы опасны!
11. Для сохранения работоспособности лебедки на длительный срок не превышайте уровень нагрузки, указанный в паспорте.
12. Избегайте произвольных включений / выключений лебедки.
13. Если вы не пользуетесь лебедкой, то она и пульт управления должны быть отключены.
14. Не доверяйте управление и пользование лебедкой детям.
15. Не оставляйте без присмотра пульт управления лебедкой.
16. Перед началом работы с лебедкой на сматывание троса проверьте включение тормоза на обратный ход троса. Для этого размотанный трос слегка натяните рукой. Должно возникнуть жесткое сопротивление — это говорит о том, что тормоз работает.
ЭКСПЛУАТАЦИЯ ЛЕБЕДОК С НЕРАБОТАЮЩИМ ТОРМОЗОМ ЗАПРЕЩЕНА!
17. Если после пользования лебедкой вам пришлось поставить случайные неоригинальные запасные части или материалы, а также произошла поломка какой-либо детали, следует все детали заменить, а лебедку отремонтировать.
18. При ремонте необходимо использовать только оригинальные запасные части — это залог безотказной работы, и, что немаловажно, вашей безопасности. Для замены запасных частей и при необходимом ремонте рекомендуется обращаться к продавцу.
19. Перед сматыванием троса необходимо надеть на руки кожаные перчатки.
20. Для правильной укладки троса на барабан, трос должен быть слегка нагружен (натянут).
21. При сматывании троса вам необходимо одной рукой удерживать его, а другой рукой работать с дистанционным пультом. При сматывании троса на лебедку все ваше внимание должно быть сосредоточено только на этой работе.
22. Не используйте трос как опору при сматывании, не оказывайте сопротивление работе лебедки при сматывании троса, не подходите ближе одного метра к работающей на сматывание лебедке, не прикасайтесь к вращающимся узлам работающей лебедки. Это крайне опасно для вашей жизни!
23. При сматывании троса витки необходимо укладывать на барабан один к одному, без зазоров. Если витки пересеклись, лебедку необходимо отключить, разблокировать тормоз и смотать (вытянуть) вручную трос из барабана до возникшего пересечения. Затем операцию сматывания повторить.
24. Во время использования лебедки под нагрузкой трос может наматываться неравномерно. По окончании работы размотайте трос и смотайте заново виток к витку, ряд за рядом и без просветов.
25. Держите дистанционный пульт управления лебедкой внутри автомашины. Это обезопасит вас от его потери или порчи.
26. Дистанционный пульт включает вращение барабана лебедки только при включенной блокировке обратного тормоза. Никогда не включайте/выключайте рычаг блокировки тормоза при работающем моторе лебедки. Никогда не меняйте направление вращения мотора до его полной остановки.
27. Никогда не зацепляйте крюк троса на сам трос в обратную сторону «на удавку». Это может повредить трос и место обвязки крюка.
28. Наблюдайте за работой лебедки на безопасном (по возможности) расстоянии. Следите за правильностью укладки троса без петель и пересечений. Попеременно останавливайте лебедку, для того чтобы убедиться в отсутствии защемлений троса между витками предыдущего ряда. Это может привести к поломке лебедки.
29. Исключите наматывание троса только на боковые стороны барабана лебедки. Это может стать причиной поломки боковин барабана либо его направляющих стяжек.
30. Никогда не цепляйте крюк троса за детали самой лебедки. Используйте для таких целей буксирные проушины на автомашине.
31. Для увеличения тягового усилия лебедки почти вдвое необходимо использование одношкивного блока. При этом нагрузка на самой лебедке останется прежней, а скорость движения троса уменьшится вдвое. Важно при этом способе работы с лебедкой использовать только оригинальные блоки — это ваша безопасность!
32. Для обеспечения надежного и безопасного крепления троса, блока, коррозащитных и буксирных строп используйте специальные «D»-изогнутые каленые скобы-шаклы.
33. При разматывании троса с барабана следите за тем, чтобы хотя бы пять витков троса оставалось на барабане. Трос является очень упругим и при выскакивании из барабана может сильно распрямиться и нанести увечья.
34. Так как максимальная тяговая сила лебедки достигается при наименьшем количестве троса на барабане, для перемещения тяжелых грузов желательно размотать трос на максимально возможную длину (не забывайте про пять витков на барабане). Если это невозможно, то необходимо использовать систему блока.
35. При перемещении очень тяжелых предметов, как с применением блоков, так и без них, для исключения возможных травм после обрыва троса, необходимо набросить на натянутый трос что-либо тяжелое: тент, сложенную в несколько раз стропу, рабочую куртку и т.п.
36. Для исключения спутывания троса постоянно следите за работой лебедки, не оставляете её без внимания.
37. Желательно включить возможно низкую передачу в трансмиссии автомобиля, “помогать” вращением колес одновременно с усилием лебедки.
38. Аккумулятор:
— удостоверьтесь, что батарея заряжена. Избегайте попадания кислоты аккумулятора на кожу рук и одежду;
— для защиты глаз всегда надевайте защитные очки;
— для избежание разрядки аккумулятора при работающей лебедке держите двигатель работающим.
39. Трос лебедки:
— убедитесь что трос лебедки в рабочем состоянии и закреплен правильно;
— не используйте лебедку, если трос потерт или на нем явные следы коррозии;
— не меняйте имеющийся трос на трос с меньшей нагрузочной характеристикой;
— замену троса проводите в специализированных сервисах или у дилера;
— не пытайтесь превысить тяговые возможности лебедки;
— не помогайте лебедке буксировочными действиями при вытаскивании другого автомобиля. Это может привести к обрыву троса, его защемлению на барабане, повреждению самого барабана и крепления лебедки;
— правильно разматывайте трос, при резких натяжениях троса возникают ударные нагрузки на лебедки. Это опасно для лебедки.
40. При выборе и установке необходимо верно определить модель лебедки и поставленные перед ней задачи. Под каждый вид работ существуют определенные лебедки. Категорически нельзя использовать любительские лебедки в промышленных целях.
41. Лебедки не предназначены для работы под постоянной тяговой нагрузкой — растяжки, фиксированное крепление на наклонных и отвесных плоскостях.
42. Долгая и безопасная работа лебедки во многом зависит от соблюдения правил эксплуатации и своевременного технического обслуживания.
II . УСТАНОВКА И ПОДКЛЮЧЕНИЕ ЛЕБЕДКИ
УТАНОВКА ЛЕБЕДКИ
1.Выберите подходящую для вашей лебедки площадку. Во первых, убедитесь, что мотор, барабан и редуктор будут находится на одной прямой после установки. Во вторых убедитесь, что площадка достаточно мощная для выдерживания усилия выбранной Вами лебедки.
2.Закрепите площадку. Площадка должна быть закреплена на неподвижной части шасси в таком месте, где установленная на нее лебедка не будет соприкасаться и взаимодействовать с движущими механизмами автомобиля такими как воздуховоды, маслопроводы, приводные ремни.
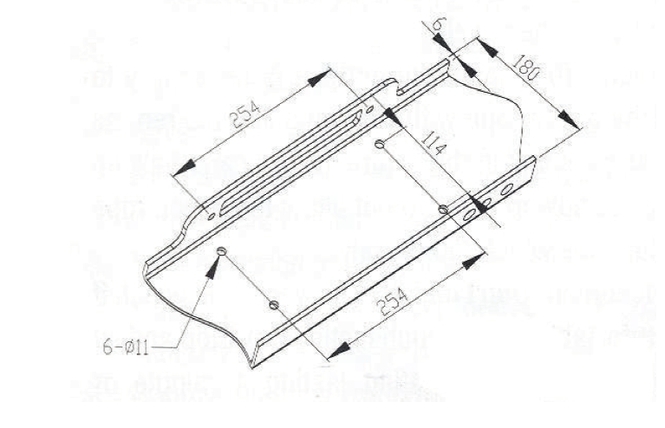
Рисунок 1.
4. Проверьте направление после установки. Трос должен наматываться через нижнюю часть барабана (рисунок 2).
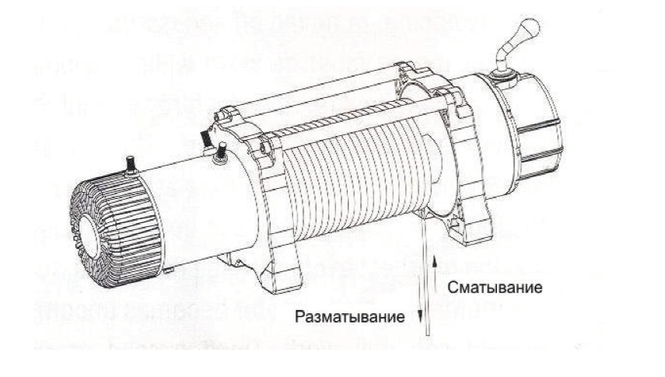
Рисунок 2.
5. Закрепите на площадке губки, переведите ручку свободной размотки с положения «свободная размотка», протяните трос через губки, наденьте крюк.
УСТАНОВКА И ПОДКЛЮЧЕНИЕ БЛОКА УПРАВЛЕНИЯ
Блок управления должен быть расположении рядом с мотором лебедки для удобства использования.
1. Соединение блока управления, мотора и аккумулятора:
1.1 Прикрепите короткий красный кабель к красному разъему на моторе;
1.2 Прикрепите короткий черный кабель с желтой обшивкой к желтому разъему на моторе;
1.3 Прикрепите короткий черный кабель с черной обшивкой к черному разъему на моторе;
1.4 Длинный красный кабель присоедините к плюсовой клемме аккумулятора;
1.5 Длинный черный кабель одним концом должен соединить нижний разъем мотора и минусовую клемму аккумулятора;
1.6 Тонкий черный провод присоединить к нижнему разъему мотора.
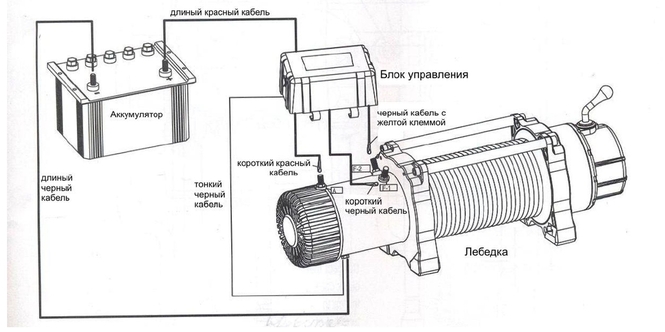
Рисунок 3
ВНИМАНИЕ:
1.Кабели не должны пересекать никакие поверхности, могущие их повредить;
2.Подключите аккумулятор и протяните все гайки на разъемах во избежании утечки тока;
3.Подключите блок управления после установки для работы лебедки в обоих направлениях.
2. Соединение моноблока, мотора, беспроводного пульта управления (на выбор), средства защиты от перегрева (на выбор), разъема для подключения проводного пульта (на выбор).
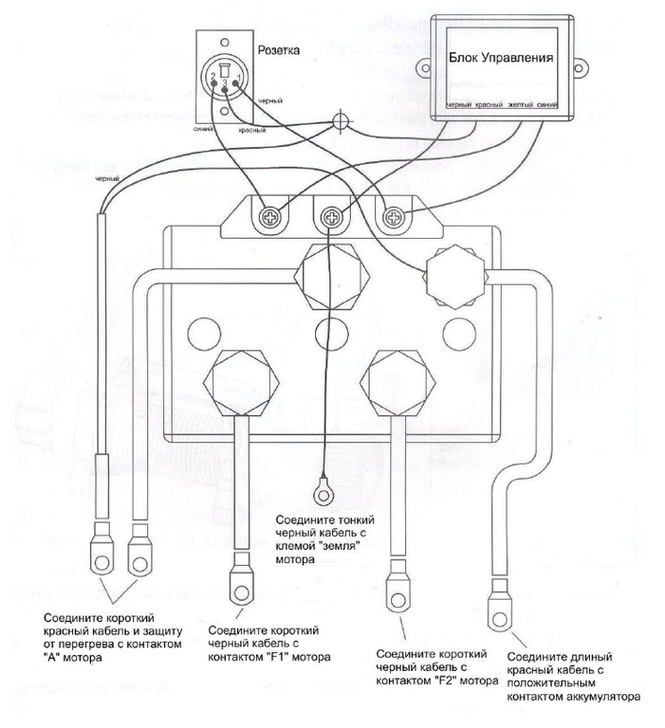
Рисунок 4
3. Соединение блок соленоидов, мотора, беспроводного пульта управления (на выбор), средства защиты от перегрева (на выбор), разъема для подключения проводного пульта (на выбор)
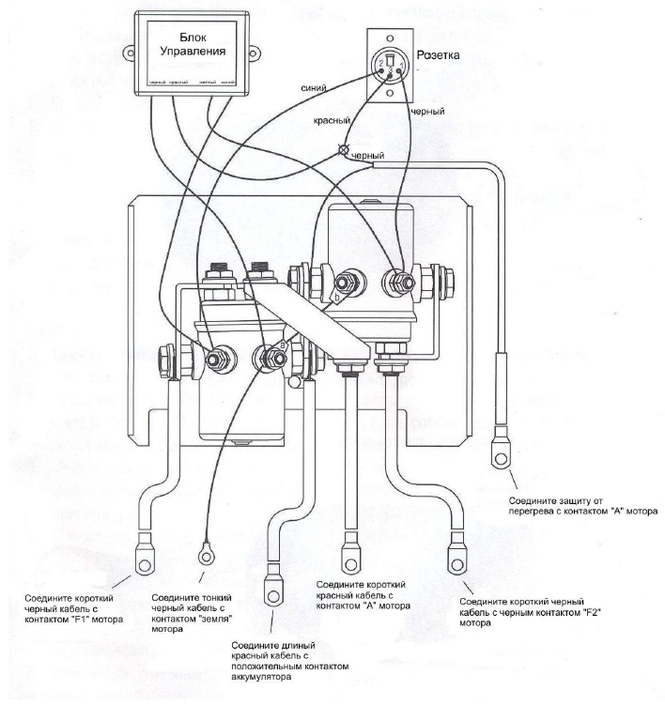
Рисунок 5
III. ПРОЦЕСС ВИНЧЕВАНИЯ (ЛЕБЕЖЕНИЯ)
ПРЕДВАРИТЕЛЬНЫЕ ОПЕРАЦИИ
1. Присоедините пульт управления.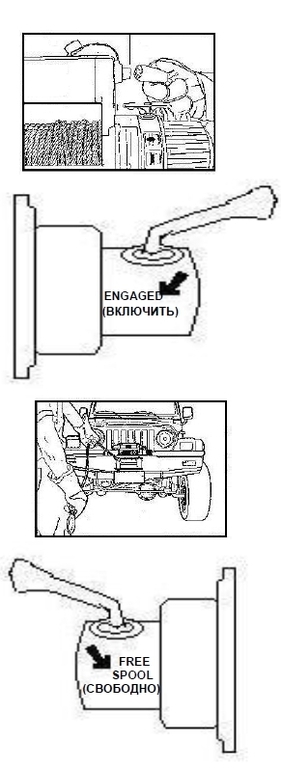
В нерабочем состоянии пульт должен быть отсоединен. Держите пуль управления подальше от лебедки, троса, направляющих роликов.
2. Положения рычага включения редуктора.
Поверните рычаг включения редуктора на 180 градусов в направлении, указанном стрелкой «FREE SPOOL» (СВОБОДНО). В этом положении трос будет свободно разматываться с барабана. ВНИМАНИЕ: Никогда не поворачивайте рычаг включения редуктора, когда лебедка находится под нагрузкой.
ENGAGED
(ВКЛЮЧИТЬ)
3. Перемещение троса в стороны места винчевания.
Оденьте кожаные перчатки, когда возьметесь за трос. Вытяните с барабана троса в количестве, достаточном, чтобы дотянуться до места винчевания. Будьте осторожны, когда трос будет под нагрузкой.
4. Для фиксации троса на барабане поверните рычаг включения редуктора на 180 градусов по направлению «ENGAGED» (ВКЛЮЧИТЬ). ВНИМАНИЕ: Никогда не поворачивайте рычаг блокировки тормоза, если барабан вращается.
FREE
SPOOL
(СВОБОДНО)
Выберите надежное и устойчивое место для винчевания. Обычно это дерево или груда скал, но если необходимо использовать лебедку для преодоления препятствия, в качестве места винчевания может использоваться другой автомобиль. Выбранное место винчевания должно быть достаточно прочным, чтобы выдержать вес автомобиля, причем угол отклонения от прямолинейной намотки троса не более 15 градусов. Охраняйте деревья, никогда не цепляйте крюк прямо за трос. Применяйте корзащитную стропу между тросом и деревом.
ВИНЧЕВАНИЕ (ЛЕБЕЖЕНИЕ)
1. Проверьте трос
Перед началом винчевания проверьте, чтобы трос был ровно накручен на барабан. Если трос накручен не ровно с перехлестами – перемотайте, что бы трос был накручен ровно на барабан.
2. Набросьте тряпку или куртку на трос ближе к крюку. Если трос нагрузкой порвется, одежда или тряпка сработают как демпфер и предотвратят отбрасывание троса.
3. Защита места винчавания. Очень важно чтобы место винчевания было достаточно прочным чтобы выдержать нагрузку во время винчевания. Не оборачивайте трос вокруг места винчевания и не прицепляйте за самого себя. Во избежании запутывания троса, применяйте для закрепления вокруг места винчевания корзащитную стропу.
4. Применение шаклов и крюка.
Соедините шаклом оба конца корзащитной стропы и затем прицепите к нему трос с крюком.
5. Начало винчевания.
Дайте нагрузку на трос, для того чтобы он равномерно накручивался на барабан. Для вытаскивания автомобиля продолжайте работать под нагрузкой до тех пор, пока не извлечете автомобиль.
6. Безопасность автомобиля
После того, как трос равномерно накручен на барабан, прочно закрепите крюк.
7. Отсоединение пульта управления.
Вытащите пульт управления из разъема и уберите в надежное место.
ПРЕДОСТОРОЖНОСТИ ПРИ ВИНЧЕВАНИИ
1. Обращайте внимание, что трос должен накручиваться на барабан равномерно. Перекручивание троса на барабане приведет к образованию узлов, «закусов», «разлохмачиванию» троса, что в свою очередь выведет лебедку из строя и может даже привести к травмам.
2. Держитесь как можно дальше от лебедки, троса, крюка и губок во время винчевания.
3. Зона винчевания должна быть свободной. Не разрешайте людям находится в зоне во время винчевания.
4. При намотке троса никогда не направляйте трос на барабан руками, обязательно используйте перчатки.
5. Если пульт управления подсоединен к лебедке, не дотрагивайтесь до троса.
6. Работа лебедки требует больших энергозатрат, поэтому держите свой аккумулятор всегда в зараженном состоянии.
IV. ОБСЛУЖИВАНИЕ ЛЕБЕДКИ.
1. Вне зависимости от интенсивности использования, лебедку необходимо обслуживать не реже одного раза в 6 месяцев. При обслуживании необходимо смазать механическую часть и очистить электромотор от воздействий внешней среды. Если Вы не обладаете необходимыми для данных операций навыками или ваша лебедка находится на гарантии, для обслуживания обратитесь в сервисный центр.
2. Лебедка не герметична. Если при эксплуатации лебедка попала вводу необходимо провести ее техническое обслуживание самостоятельно или обратиться в сервисный центр.
3. Вне зависимости от интенсивности использования железный трос необходимо регулярно смазывать машинным маслом для предотвращения его коррозии.
4. Если вы не долго используете лебедку, снимите ее с транспортного средства и храните ее в сухом и теплом месте, подальше от детей.
V. ВОЗМОЖНЫЕ НЕИСПРАВНОСТИ
| № | Неисправность | Причина | Устранение |
| 1 | Лебедка не работает |
Неправильно присоединен пульт Не правильно подсоединены электрические кабели Не исправен мотор Не работает пульт управления |
Присоедините пульт правильно Присоедините электрические кабели правильно Поменяйте мотор Поменяйте пульт управления |
| 2 | Мотор лебедки работает, но трос не наматывается | Ручка свободного хода лебедки находится в положении свободной размотки | Поверните ручку свободного на 180 градусов |
| 3 | Лебедка не развивает заявленную мощность | Низкий уровень зарядки аккумулятора Электрические кабели неправильно присоединены |
Поменяйте аккумулятор Подсоедините правильно электрические кабели |
| 4 | Очень горячий мотор | Очень долго лебедка работала под нагрузкой | Дайте лебедке остыть |
| 5 | Лебедка работает только в одном направлении | Неисправен моноблок (блок соленоидов) Неисправен пульт управления |
Поменяйте моноблок (соленоид) Поменяйте пульт управления |
Owner’s Manual for CHAMPION models including: CHAMPION, 13005, Winch ATV, UTV Winch Kit
ATV/UTV Winch Kit — Tractor Supply Co.
Save this manual for future reference. Winch. (1). Remote Control – Rocker switch with handlebar mount for powering the rope in.
OWNERÕS MANUAL 12039 Smith Ave. Santa Fe Springs CA 90670 USA / 1-877-338-0999 www.championpowerequipment.com SAVE THESE INSTRUCTIONS Important Safety Instructions
ATV/UTV Winch Kit
- PDF Viewer
- Universal Document Viewer
- Google Docs View
- Google Drive View
- Download Document [pdf]
- Download Document [Optimized]
- Document:
- Text
- References
Not Your Device? Search For Manuals / Datasheets:
File Info : application/pdf, 19 Pages, 1.49MB
Document13005-om-english
OWNER'S MANUAL 3000 lb. Winch ATV/UTV Winch Kit SAVE THESE INSTRUCTIONS Important Safety Instructions are included in this manual. MODEL NUMBER 13005 MADE IN CHINA REV 13005-20180803 12039 Smith Ave. Santa Fe Springs CA 90670 USA / 1-877-338-0999 www.championpowerequipment.com Have questions or need assistance? Do not return this product to the store! WE ARE HERE TO HELP! Visit our website: www.championpowerequipment.com for more info: · Product Info & Updates · Frequently Asked Questions · Tech Bulletins · Product Registration or Call our Customer Care Team Toll-Free at: 1-877-338-0999 Parts Ordering: Mon Fri 8:30 AM 5:00 PM (PST/PDT) Toll Free: 1-877-338-0999 WARNING: Cancer and Reproductive Harm www.P65Warnings.ca.gov *We are always working to improve our products. Therefore, the enclosed product may differ slightly from the image on the cover. 13005 3000 lb. Winch ATV/UTV Winch Kit TABLE OF CONTENTS Introduction. . . . . . . . . . . . . . . . . . . . 1 Introduction. . . . . . . . . . . . . . . . . . 1 Manual Conventions . . . . . . . . . . . . . . . 2 Safety Rules . . . . . . . . . . . . . . . . . . . 3 Controls and Features . . . . . . . . . . . . . . 5 Winch . . . . . . . . . . . . . . . . . . . . . 5 Assembly . . . . . . . . . . . . . . . . . . . . . 6 Assembling the Winch . . . . . . . . . . . . 6 Mounting the Remote Control . . . . . . . . 6 Winch Wiring . . . . . . . . . . . . . . . . . 7 Wiring Diagram . . . . . . . . . . . . . . . . 8 Operation . . . . . . . . . . . . . . . . . . . . . 9 General Tips for Safe Operation. . . . . . . 9 Self Recovery . . . . . . . . . . . . . . . . . 9 Winching Techniques A-Z . . . . . . . . . 10 Maintenance . . . . . . . . . . . . . . . . . . 11 Lubrication . . . . . . . . . . . . . . . . . 11 Cable Assembly Replacement . . . . . . . 11 Specifications. . . . . . . . . . . . . . . . . . 12 Performance Specifications . . . . . . . . 12 Parts Diagram . . . . . . . . . . . . . . . 13 Parts List . . . . . . . . . . . . . . . . . . 14 Troubleshooting. . . . . . . . . . . . . . . . . 15 INTRODUCTION ENGLISH 13005 Introduction Congratulations on your purchase of a Champion Power Equipment product. Champion Power Equipment and Champion Engine Technology designs, builds, and supports all of our products to strict specifications and guidelines. With proper product knowledge, safe use, and regular maintenance, this product should bring years of satisfying service. Every effort has been made to ensure the accuracy and completeness of the information in this manual, and we reserve the right to change, alter and/or improve the product and this document at any time without prior notice. Since CPE/CET highly value how our products are designed, manufactured, operated and are serviced, and also highly value your safety and the safety of others, we would like you to take the time to review this product manual and other product materials thoroughly and be fully aware and knowledgeable of the assembly, operation, dangers and maintenance of the product before use. Fully familiarize yourself, and make sure others who plan on operating the product fully familiarize themselves too, with the proper safety and operation procedures before each use. Please always exercise common sense and always error on the side of caution when operating the product to ensure no accidents, property damage, or injury occurs. We want you to continue to use and be satisfied with your CPE/CET product for years to come. Record the model and serial numbers as well as date and place of purchase for future reference. Have this information available when ordering parts and when making technical or warranty inquiries. Champion Power Equipment Support 1-877-338-0999 Model Number 13005 Serial Number Date of Purchase Purchase Location 1 13005 ENGLISH MANUAL CONVENTIONS This manual uses the following symbols to help differentiate between different kinds of information. The safety symbol is used with a key word to alert you to potential hazards in operating and owning power equipment. Follow all safety messages to avoid or reduce the risk of serious injury or death. DANGER DANGER indicates an imminently hazardous situation which, if not avoided, will result in death or serious injury. WARNING WARNING indicates a potentially hazardous situation which, if not avoided, could result in death or serious injury. CAUTION CAUTION used without the safety alert symbol indicates a potentially hazardous situation which, if not avoided, may result in property damage. NOTE If you have questions regarding your winch, we can help. Please call our help line at 1-877-338-0999 CAUTION CAUTION indicates a potentially hazardous situation which, if not avoided, may result in minor or moderate injury. 2 SAFETY RULES ENGLISH 13005 WARNING Read this manual thoroughly before operating your winch. Failure to follow instructions could result in serious injury or death. WARNING Do not exceed the rated capacity. DANGER Do not use this winch for lifting or moving people or animals. DANGER Keep yourself and others a safe distance to the side of the cable when under tension. DANGER Never step over a cable or near a cable under load. WARNING The wire rope may break before the motor stalls. For heavy loads at or near rated capacity, use a pulley block/snatch block to reduce the load on the wire rope. WARNING Do not move the vehicle to pull a load (towing) on the winch cable. This could result in cable breakage. WARNING Pull only on areas of the vehicle as specified by the vehicle manufacturer. WARNING Do not use the winch to secure or hold a vehicle for a long period of time. Do not use the winch to secure a vehicle for transport. WARNING Disconnect the remote control and battery leads when not in use. WARNING Avoid "shock loads" by using the control switch intermittently to take up the slack in the wire rope. "Shock loads" can far exceed the rate capacity for the wire rope and drum. Do not accelerate your vehicle while winching. Loss of traction can cause a shock load on the cable. WARNING Batteries contain acid and produce explosive gases. Keep sparks, flames and cigarettes away from batteries at all times. Wear safety glasses and protect the eyes at all times. Do not lean over the batteries during operation. 3 13005 ENGLISH SAFETY RULES WARNING When re-spooling the cable, ensure that the cable spools in the under-wind position with the cable entering the drum from the bottom, not the top. To re-spool correctly, and while wearing gloves, keep a slight load on the cable while pushing the remote button to draw in the cable. Walk toward the winch not allowing the cable to slide through your hands. Do not let your hands get within 12 ft. of the winch while re-spooling. Turn off the winch and repeat the procedure until a few feet of cable are left. Disconnect the remote control and finish spooling by rotating the drum by hand with the clutch disengaged. Keep hands clear of the fairlead and drum while the winch is under power. WARNING Do not use as a hoist. Do not use for overhead lifting. CAUTION Use gloves to protect hands when handling the cable. Never let the cable slide through your hands. CAUTION Do not wrap the cable around any object and hook it back onto itself. CAUTION Apply blocks to the wheels of the vehicle when on an incline. CAUTION Duration of winching pulls should be kept as short as possible. If the motor becomes uncomfortably hot to the touch, stop winching immediately and let it cool down for a few minutes. Do not pull for more than one minute at or near the rated load. CAUTION If the motor stalls, do not maintain power to the winch. Electric winches are designed and made for intermittent use and should not be used in constant duty applications. CAUTION Never release the free-spool clutch when there is a load on the winch. CAUTION Use hook strap when handling the hook for spooling or unspooling the wire rope. 4 CONTROLS AND FEATURES ENGLISH 13005 Read this owner's manual before operating your winch. Familiarize yourself with the location and function of the controls and features. Save this manual for future reference. Winch 34 5 6 2 7 1 8 11 9 10 (1) Remote Control Rocker switch with handlebar mount for powering the rope in or out of your winch drum. (2) Motor 1.3 HP/1.0 KW 12V DC motor provides power to the planetary gear mechanism. the remote winch switch. (6) Free spooling Clutch The clutch allows the operator to manually disengage "Out" the spooling drum from the gear train, free spool. Engaging the clutch "In" locks the winch into the gear system. (3) Planetary Gear System The reduction (7) Roller Fairlead When using the winch at gears convert the winch motor power into an angle the roller fairlead acts to guide extreme pulling forces. This system allows the wire rope onto the drum and minimizes high torque while maintaining compact damage to the wire rope from abrasion on size and light weight. the winch mount or bumper. (4) Braking System Braking action is automatically applied to the winch drum (8) Wire Rope 3/16 in. x 45.9 ft. galvanized aircraft cable designed specifically for load capacity of 3000 lb.(1361 kg.). when the winch motor is stopped and there is a load on the wire rope. (9) Clevis Hook Provides a means for connecting the looped ends of cables to (5) Winch Drum The winch drum is the an anchor. cylinder on which the wire rope is stored. It can feed or wind the rope depending on (10) Strap Used to assist cable feed. (11) Mount Assembly Flatbed mounting channel. 5 13005 ENGLISH ASSEMBLY Assembling the Winch This CPE 3000 lb. (1361 kg.) winch is designed with a bolt pattern that is standard in this class of winch. Many winch mounting kits are available that utilize this bolt pattern for the most popular UTVs and ATVs. If you cannot find a kit locally, contact CPE and we will provide you with the name of a dealer. Assembling the Winch Cont'd. CAUTION If utilizing a mounting plate, ensure that the three major sections (motor, drum and gear housing) are properly aligned. Proper alignment of the winch will allow for even distribution of the full rated load. CAUTION Mounting bolts must be SAE grade 5 or better and torque to 34 ft. lbs. 1. Insert M8x20 bolts through the mounting channel hole and attach the roller fairlead to the mounting channel with the M8 flat washer, M8 lock washer, and M8 nut provided. 2. To attach the winch and the mounting channel to a flat surface; insert M8x35 bolt through the winch base plate, then through the mounting channel, then through a flat mounting surface. Secure the winch and mounting channel with the M8 flat washer, M8 lock washer, and M8 nut provided. 3. Disengage the clutch by rotating the clutch knob to the "Out" position. Release the wire rope and pull through the roller fairlead. 4. Attach the clevis hook to the cable, and then hand strap to the clevis hook. NOTE The type of vehicle to which the winch and mounting channel will be applied, will dictate the type of mounting kit that should be used (Speed MountTM Hitch Adapter, Standard Mounting Channel, or Specialty Mounting Kit). Mounting the Remote control 1. The remote control is usually installed on the left handlebar. 2. Use a piece of electrical tape around the handlebar to help prevent rotation of the mount on the handlebar. Do NOT tighten over any hoses or cables. 3. Once the remote control is mounted you can route the wires back to the battery and winch. 4. Make sure the handlebars have full range of motion and then secure the remote control's cable. 6 ASSEMBLY ENGLISH 13005 Winch Wiring CAUTION Never route electrical cables across any sharp edges, through or near moving parts, or near parts that become hot. Winch Wiring Cont'd. With some applications the motor leads may need to be rotated to avoid interference with other components. 1. Mount the winch to your vehicle. 2. FOR WINCH TO FULLY FUNCTION CONNECT ALL LEADS CORRECTLY. 3. Connect the battery leads: Connect the red (+) lead to the positive (+) terminal of the vehicle's 12 volt battery. Connect the black () lead to the negative () terminal of the vehicle's 12 volt battery. (see wiring diagram) 4. Connect the winch leads: Connect red (+) lead of the winch connection cables to the positive (+) terminal of the winch motor. Connect the black () lead of the winch connection cables to the negative () terminal of the winch motor. (see wiring diagram) 5. Check for proper drum rotation. Pull and turn the clutch knob to the "out" position (Free spooling). Pull out some cable from the drum, and then turn the clutch knob to the "In" position to engage the gears. Press the cable out button on the handlebar switch. If the drum is turning and releasing more cable then your connections are accurate. If the drum is turning and collecting more cable then reverse the leads on the motor. Repeat and check rotation. Leads default position. Leads rotated 90º CAUTION Battery cables should not be drawn taut. Leave some slack for cable movement. 7 13005 ENGLISH Wiring Diagram Black Red ASSEMBLY Negative () Positive (+) Black Negative () Positive (+) Remote Red Control 8 OPERATION ENGLISH 13005 General Tips for Safe Operation Your 13005 winch is rated at a 3000 lb. (1361 kg.) capacity in first layer (max) when spooling the first rope layer on the drum. Overloads can damage the winch, motor and/or wire rope. For loads over 1500 lb. (680 kg.) we recommend the use of the pulley block/snatch block to double the wire rope line. This will aid in two ways: (a) reduce the number or rope layers on the drum, as well as, (b) reduce the load on the wire rope by as much as 50%. When doubling the line back to the vehicle, attach to the tow hook, frame or other load bearing part. The vehicle engine should be kept running during operation of the winch to minimize battery drain and maximize power and speed of the winch. If the winch is used for a considerable time with the engine off the battery may be drained and too weak to restart the engine. Get to know your winch before you actually need to use it. We recommend that you set up a few test runs to familiarize yourself with rigging techniques, the sounds your winch makes under various loads, the way the cable spools on the drum, etc. Inspect the wire rope and equipment before each use. A frayed or damaged rope shall be replaced immediately. Use only manufacturer's identical replacement rope with the exact specifications. Inspect the winch installation and bolts to ensure that all bolts are tight before each operation. Store the remote control inside your vehicle in a place that it will not be damaged. Any winch that appears to be damaged in any way, is found to be worn, or operates abnormally MUST BE REMOVED FROM SERVICE UNTIL REPAIRED. It is recommended that the necessary repairs be made by a manufacturer's authorized repair facility. Pull only on areas of the vehicle as specified by the vehicle manufacturer. Only attachments and/ or adapters supplied by the manufacturer are to be used. 9 Self Recovery Locate a suitable anchor such as a strong tree trunk or boulder. Always use a sling as an anchor point. A roller fairlead (included) will help guide the wire rope and to reduce binding on short side pulls. Do not winch from an acute angle as the wire rope will pile up on one side of the drum causing damage to wire rope and the winch. RIGHT WRONG Short pulls from an angle can be used to straighten the vehicle. Long pulls should be done with the wire rope at a 90° angle to the winch/vehicle. When pulling a heavy load, place a blanket or jacket over the wire rope five or six feet from the hook. In the event of a broken cable it will dampen the snap back. For additional protection open the hood of the vehicle. For pulls over 1500 lb. (680 kg.), we recommend the use of the snatch block/ pulley block to double line the wire rope. SINGLE LINE DOUBLE LINE This reduces the load on the winch and the strain on the rope by approximately 50%. 13005 ENGLISH OPERATION Winching Techniques A-Z (a) Take time to assess your situation and plan your pull. (b) Put on gloves to protect your hands. (c) Disengage the clutch to allow free- spooling and also save battery power. (d) Attach the hook strap to the clevis hook. (e) Pull out the wire rope to your desired anchor point using the hook strap. (f) Secure the clevis hook to the anchor point: Sling, chain or snatch block. Do not attach the hook back onto the wire rope. (g) Engage the clutch. (h) Connect the remote control to the winch. If you are going to control the winch from inside your vehicle then pass the remote through an open window to avoid the wires being pinched in the door. (i) Start your engine to ensure power is being replenished to the battery. (j) Power in the wire rope guiding the wire under tension to draw up the slack in the wire. Once the wire is under tension, stand clear. Never step over the wire rope. (k) Double check your anchors and make sure all connections are secure. (l) Inspect the wire rope. Make sure there are at least 5 wraps of wire rope around the winch drum. (m) Drape a blanket or jacket over the wire rope approximately 5 to 6 feet from the hook. Open the hood for added protection. (n) Clear the area. Make sure all spectators stand clear and that no one is directly in front or behind the vehicle or anchor point. (o) Begin winching. Be sure that the wire rope is winding evenly and tightly around the drum. The vehicle that is being winched can be slowly driven to add assistance to the winching process. Avoid shock loads; keep the wire rope under tension. Winching Techniques A-Z Cont'd. (p) The vehicle to be winched should be placed in neutral and the emergency brake released. Only release the brake pedal when under full tension. Avoid shock loads to the winch. This can damage the winch, rope and vehicle. (q) The winch is meant for intermittent use. Under full load with a single line rig do not power in for more than a minute without letting the motor cool down for a few minutes and then resume the winching operation. (r) The winching operation is complete once the vehicle is on stable ground and is able to drive under its own power. (s) Secure the vehicle. Be sure to set the brakes and place the vehicle in park. (t) Release the tension on the wire rope. The winch is not meant to hold the vehicle for long periods of time. (u) Disconnect the wire rope from the anchor. (v) Rewind the wire rope. Make sure that any wire already on the drum has spooled tightly and neatly. If not, draw out the wire and re-spool from the point where the rope is tight. (w) Keep your hands clear of the winch drum and fairlead as the wire rope is being drawn in. (x) Secure the hook and hook strap. (y) Disconnect the remote control and store in a clean, dry place. (z) Clean and inspect connections and mounting hardware for next winching operation. 10 MAINTENANCE ENGLISH 13005 The owner/operator is responsible for all periodic maintenance. WARNING Never operate a damaged or defective winch. WARNING Improper maintenance will void your warranty. Complete all scheduled maintenance in a timely manner. Correct any issue before operating the winch. NOTE For service or parts assistance, contact our help line at 1-877-338-0999 Lubrication All moving parts within the Electric Winch having been Lubricated using high temperature lithium grease at the factory. No internal lubrication is required. Lubricate Cable Assembly periodically using a light penetrating oil. Cable Assembly Replacement It is recommended that any modifications be performed by a manufacturer's authorized repair facility, and that only manufacturer-supplied parts be used. 1. Move the clutch to the "Out" position. 2. Extend Cable Assembly to its full length. Note how the existing cable is connected to the inside of the drum. 3. Remove old Cable Assembly and attach new one. 4. Retract Cable Assembly onto drum being careful not to allow kinking. 11 13005 ENGLISH SPECIFICATIONS Performance Specifications Rated Pull . . . . . . . . . . . . . . . . . . . . . . . . . . . . . . . . . . . . . 3000 lb. (1361 kg.) Gear Reduction Ratio . . . . . . . . . . . . . . . . . . . . . . . . . . . . . . . . . . . . . . . 153:1 Motor . . . . . . . . . . . . . . . . . . . . . . . . . . . . Permanent Magnet 1.3 HP/1 kW (12V DC) Drum Size. . . . . . . . . . . . . . . . . . . . .1.2 in. (D) x 2.9 in. (L) [31.5 mm (D) x 73 mm (L)] Cable . . . . . . . . . . . . . . . . . . . . . . . 3/16 in. (D) x 45.9 ft. (L) [4.8 mm (D) x 14 m (L)] Gross Weight . . . . . . . . . . . . . . . . . . . . . . . . . . . . . . . . . . . . . . . . 22 lb. (10 kg) Net Weight . . . . . . . . . . . . . . . . . . . . . . . . . . . . . . . . . . . . . . . . 19.8 lb. (9 kg) Height. . . . . . . . . . . . . . . . . . . . . . . . . . . . . . . . . . . . . . . . . . 4.3 in. (10.8 cm) Width . . . . . . . . . . . . . . . . . . . . . . . . . . . . . . . . . . . . . . . . . . . 4.3 in. (11 cm) Length . . . . . . . . . . . . . . . . . . . . . . . . . . . . . . . . . . . . . . . . . 12 in. (30.4 cm) Bolt Pattern. . . . . . . . . . . . . . . . . . . . . . . . . . . . . . . . . . . . . . .3.1 in. (79.5 mm) Line Speed and Motor Current (First Layer) Line Pull LB 0 1000 2000 KG 0 454 907 Line Speed (12V DC) FPM 11.2 8.8 7.2 MPM 3.4 2.7 2.2 Motor Current (12V DC) A 15 80 120 Running Time Minutes 1 1 1 Cooling Time Minutes 5 5 5 3000 1361 3.9 1.2 150 1 5 *If the motor becomes uncomfortably hot to the touch, stop winching immediately and let it cool down for 5 minutes. Do not pull for more than one minute at or near the rated load. **Electric winches are designed and made for intermittent use and should not be used in constant duty applications. Line of Cable Rated Line Pull Cable Capacity Line Pull and Cable Capacity Per Layer 1 2 3 4 LB 3000 2373 1962 1673 KG 1361 1077 891 759 FT 5.6 12.1 19.7 27.9 M 1.7 3.7 6.0 8.5 5 1470 667 37.1 11.3 6 1290 585 45.9 14.0 12 SPECIFICATIONS Parts Diagram ENGLISH 13005 13 13005 ENGLISH # Part Number 1 300100-N-BF 2 300200-N-BF 3 300025-N 4 300300-N 5 300001-N 6 300002-BF 7 300003 8 300004 9 300005-N 10 300400-C 11 300006 12 300007-N 13 300008 14 300010-N 15 300012 16 300013-N-BF 17 300500-C 18 300016 19 300018 20 300019 21 300020 22 300021 Description Qty Motor - Black Flat 1 Stationary Gear Housing Assembly - 1 Black Flat Support Ring 1 Gear Carrier Assembly 1 T-Series Rotator Gear 1 Drum Support Plate Black Flat 1 Lock Washer Ø5 4 Hexagon Socket Head Screw M5 x 12 4 Drum Support Bushing 1 Clutch Assembly 1 Spring 1 Drum Assembly 1 Screw M5 x 8 1 T-Series Bushing 1 Tie Bar 2 T-Series Base Plate Black Flat 1 T-Series F/W Knob Assembly 1 Hexagon Socket Countersunk Head 2 Screw M6 x 16 Hexagon Head Bolt M8 x 35 2 Flat Washer Ø8 4 Lock Washer Ø8 4 Lock Nut M8 4 # Part Number 23 300024 24 300700 25 C20002 26 410022 27 300023-BF 28 301000-BF 29 300600A 30 300037-BF 31 400025 32 400026-BF 33 400024 34 400023 35 400022 36 301600 37 250083 Parts List Description Qty Hexagon Head Bolt M8 x 20 2 Cable Assembly 1 1/4 in. Clevis Hook 1 Yellow Strap 1 Mounting Channel Black Flat 1 Roller Fairlead - Black Flat 1 Control Switch - Black 1 Control Switch Mounting Plate - 1 Black Flat Nut M5 2 Handlebar Switch Clamp - Black Flat 2 Lock Washer Ø5 2 Flat Washer Ø5 2 Hexagon Socket Head Screw M5 x 25 2 Switch Assembly 1 Cross Recess Pan Head Screw M5 x 8 1 14 TROUBLESHOOTING ENGLISH 13005 Problem Cause Solution Motor does not turn on Switch Assembly not connected Insert Switch Assembly all the way into the connector. properly Loose battery cable connections Tighten nuts on all cable connections Contactor malfunctioning Tap contactor to loosen contacts. Apply 12 volts to coil terminals directly. A clicking indicates proper activation Defective Switch Assembly Replace Switch Assembly. Defective motor Check for voltage at armature port with Switch pressed. If voltage is present, Replace motor Water has entered motor Allow to drain and dry. Run in short bursts without load until completely dry Motor runs but Cable drum does not turn Clutch (Cam Ring) not engaged Move Cam Ring to the "In" position. If problem persists, a qualified technician needs to check and repair Motor runs slowly or Insufficient current or voltage without normal power The battery is weak, recharge. Run winch with vehicle motor running (Battery should have a strong charge) Loose or corroded battery cable Clean, Tighten, or replace connections. Motor overheating winch running time too long Allow winch to cool down periodically Motor runs in one direction only Defective or stuck Contactor Tap Contactor to loosen contacts Repair or Replace contactor Defective Switch Assembly Replace Switch Assembly For further technical support: Technical Service Mon Fri 8:30 AM 5:00 PM (PST/PDT) Toll Free: 1-877-338-0999 tech @ championpowerequipment.com 15 WARRANTY CHAMPION POWER EQUIPMENT 2 YEAR LIMITED WARRANTY Warranty Qualifications To register your product for warranty and FREE lifetime call center technical support please visit: ht tps : / / w w w.championpowerequipment.com / register To complete registration you will need to include a copy of the purchase receipt as proof of original purchase. Proof of purchase is required for warranty service. Please register within ten (10) days from date of purchase. Repair/Replacement Warranty CPE warrants to the original purchaser that the mechanical and electrical components will be free of defects in material and workmanship for a period of two years (parts and labor) from the original date of purchase and 180 days (parts and labor) for commercial and industrial use. Transportation charges on product submitted for repair or replacement under this warranty are the sole responsibility of the purchaser. This warranty only applies to the original purchaser and is not transferable. Do Not Return The Unit To The Place Of Purchase Contact CPE's Technical Service and CPE will troubleshoot any issue via phone or e-mail. If the problem is not corrected by this method, CPE will, at its option, authorize evaluation, repair or replacement of the defective part or component at a CPE Service Center. CPE will provide you with a case number for warranty service. Please keep it for future reference. Repairs or replacements without prior authorization, or at an unauthorized repair facility, will not be covered by this warranty. Warranty Exclusions This warranty does not cover the following repairs and equipment: Normal Wear Products with mechanical and electrical components need periodic parts and service to perform well. This warranty does not cover repair when normal use has exhausted the life of a part or the equipment as a whole. Installation, Use and Maintenance This warranty will not apply to parts and/or labor if the product is deemed to have been misused, neglected, involved in an accident, abused, loaded beyond the product's limits, modified, installed improperly or connected incorrectly to any electrical component. Normal maintenance is not covered by this warranty and is not required to be performed at a facility or by a person authorized by CPE. Other Exclusions This warranty excludes: Cosmetic defects such as paint, decals, etc. Wear items such as winch cable, etc. Accessory parts such as storage covers. Failures due to acts of God and other force majeure events beyond the manufacturer's control. Problems caused by parts that are not original Champion Power Equipment parts. Limits of Implied Warranty and Consequential Damage Champion Power Equipment disclaims any obligation to cover any loss of time, use of this product, freight, or any incidental or consequential claim by anyone from using this product. THIS WARRANTY IS IN LIEU OF ALL OTHER WARRANTIES, EXPRESS OR IMPLIED, INCLUDING WARRANTIES OF MERCHANTABILITY OR FITNESS FOR A PARTICULAR PURPOSE. A unit provided as an exchange will be subject to the warranty of the original unit. The length of the warranty governing the exchanged unit will remain calculated by reference to the purchase date of the original unit. This warranty gives you certain legal rights which may change from state to state or province to province. Your state or province may also have other rights you may be entitled to that are not listed within this warranty. Contact Information Address Champion Power Equipment, Inc. Customer Service 12039 Smith Ave. Santa Fe Springs, CA 90670 USA www.championpowerequipment.com Customer Service Mon Fri 8:30 AM 5:00 PM (PST/PDT) Toll Free: 1-877-338-0999 info @ championpowerequipment.com Fax no.: 1-562-236-9429 Technical Service Mon Fri 8:30 AM 5:00 PM (PST/PDT) Toll Free: 1-877-338-0999 tech @ championpowerequipment.com 24/7 Tech Support: 1-562-204-1188
References
 P65Warnings.ca.gov
Adobe PDF Library 15.0 Adobe InDesign CC 13.1 (Macintosh)
-
Contents
-
Table of Contents
-
Troubleshooting
-
Bookmarks
Quick Links
OPERATION MANUAL
3000lb / 4500lb
This manual provides important safety information and instructions on how to install your winch.
Every winching situation has the potential for personal injury. In order to minimize that risk, it’s
important to read this manual carefully.
This manual features a quick start guide. This can be used to aid the setup of your winch but it’s
important to read and understand this manual fully prior to setting up the winch.
Keep this manual in a safe place, review it frequently and ensure that all users have read it to ensure
safe operation.
English Français Deutsch Italiano Español
V 3.1
Chapters
Summary of Contents for Rhino Winch 3000lb
This manual is also suitable for:
4500lb