
Lenovo G480/G485/
G580/G585/G780
Перед использованием компьютер ознакомьтесь
с указаниями по технике безопасности и важными
советами в прилагаемых руководствах.
Руководство пользователя
V3.0
-
Страница 1
Lenovo G480/G485/ G580/G585/G780 Read the safety notices and important tips in the included manuals before using your computer . ©Lenovo China 2012 User Guide User Guide V3.0 V3.0 V3.0_en-US[…]
-
Страница 2
Third Edition (June 2012) © Copyright Lenovo 2012. Before using the product, be sure to read Lenovo Safety and General Information Guide first. The features described in this guide are common to most models. Some features may not be available on your computer and/or your computer may include features that are not described in this user guide. Some[…]
-
Страница 3
i Chapter 1. Getting to know your computer …………………………………… 1 Top view ………… ………….. ………….. ………….. …………… ………….. ………….. ………….. …….. 1 Left-side view ………….. …………… ………….. ………….. ………….. ………….. ………….. ..[…]
-
Страница 4
[…]
-
Страница 5
1 Chapter 1. Getting to know your computer Top view — — — — — — — — — — — — — — — — — — — — — — — — — — — — — — — — — — — — — — — — — — — — — — — — — — — — — — — — — — — — — — — — — — — — — — — — — — — — — — — — — — — — — — — — — — — — — — — — — — — G480/G485 1 2 3 5 4 7 8 a 2 b[…]
-
Страница 6
2 Chapter 1. Gettin g to know your computer G580/G585 1 3 5 4 7 8 2 a 2 b[…]
-
Страница 7
Chapter 1. Getting to kno w your computer 3 G780 Attention: • The dashed part is invisi ble. • Do NOT open the display panel beyond 130 degrees. When closing the displa y panel, be careful NOT to leave pens or any other objects in between the display panel and the keyboard. Otherwise, the di splay panel may be damaged. 1 3 6 5 4 7 8 2 a 2 b[…]
-
Страница 8
4 Chapter 1. Gettin g to know your computer Integrated camera Use the camera for video co mmunication. Wireless module antennas (on select model s) The built-in antennas ensure optimal r eception of wireless radio. Note: Select models may have only one wireless module anten na, which can be found at location 2b in the illustration. Please r efer to[…]
-
Страница 9
Chapter 1. Getting to kno w your computer 5 Left-side view — — — — — — — — — — — — — — — — — — — — — — — — — — — — — — — — — — — — — — — — — — — — — — — — — — — — — — — — — — — — — — — — — — — — — — — — — — — — — — — — — — — — — — G480/G485/G580/G5 85 G780 Kensington slot Attach a security lock (not suppli ed) her e. Note: For details, see […]
-
Страница 10
6 Chapter 1. Gettin g to know your computer RJ-45 port This port connects the computer to an Ethernet network. Note: For details, see “W ired connection” on page 31. HDMI port (on select models) Connects to devices with HDMI input such as a TV or a display . Note: Select G480/G485/G58 0/G585 models may n ot include an HDMI port. Ple ase refer t[…]
-
Страница 11
Chapter 1. Getting to kno w your computer 7 Right-side view — — — — — — — — — — — — — — — — — — — — — — — — — — — — — — — — — — — — — — — — — — — — — — — — — — — — — — — — — — — — — — — — — — — — — — — — — — — — — — — — — — G480/G485/G580/G5 85 G780 Headphone jack Connects to external headphones. Microphone jack Connects to external microph[…]
-
Страница 12
8 Chapter 1. Gettin g to know your computer USB port (on select models) Conne cts to USB devices. Note: • The blue ports ar e USB 3.0 ports. The black ports are USB 2.0 ports. • Select G780 models may not include any USB 2. 0 ports on the righ t-side. Pl ease ref er to the actual product. • For details, see “Connecting a univers al serial b[…]
-
Страница 13
Chapter 1. Getting to kno w your computer 9 Front view — — — — — — — — — — — — — — — — — — — — — — — — — — — — — — — — — — — — — — — — — — — — — — — — — — — — — — — — — — — — — — — — — — — — — — — — — — — — — — — — — — — — — — — — — — — — — — — G480/G485/G580/G5 85 G780 Memory card slot Insert memory car ds (not supplied) her e. Note: • S[…]
-
Страница 14
10 Chapter 1. Gettin g to know your computer Bottom view — — — — — — — — — — — — — — — — — — — — — — — — — — — — — — — — — — — — — — — — — — — — — — — — — — — — — — — — — — — — — — — — — — — — — — — — — — — — — — — — — — — — — — — — — — G480/G485 1 2 3 4 5 5[…]
-
Страница 15
Chapter 1. Getting to kno w your computer 11 1 2 3 4 5 5[…]
-
Страница 16
12 Chapter 1. Gettin g to know your computer G580/G585 1 2 3 4 5 5[…]
-
Страница 17
Chapter 1. Getting to kno w your computer 13 1 2 3 4 5 5[…]
-
Страница 18
14 Chapter 1. Gettin g to know your computer G780 1 2 3 4 5 5[…]
-
Страница 19
Chapter 1. Getting to kno w your computer 15 Battery la tch — manual The manual battery latch is us ed to keep the battery pack secured in place. Battery pack Battery la tch — spring loaded The spring-loaded battery latch keeps the battery pack secured in place. Hard disk drive (HDD)/Memory/ CPU (Central processing unit)/ Mini PCI Express Card slot[…]
-
Страница 20
16 Chapter 2. Learning the basics Configuring the operating s ystem for the first time — — — — — — — — — — — — — Y ou may need to configur e the operating system when it is first used. The configuration process may include th e pr oced ur es below: • Accepting the end user lice nse agreement • Configuring the Internet connection • Creating a […]
-
Страница 21
Chapter 2. Learning the basics 17 The Charms — — — — — — — — — — — — — — — — — — — — — — — — — — — — — — — — — — — — — — — — — — — — — — — — — — — — — — — — — — — — — — — — — — — — — — — — — — — — — — — — — — — — — — — — — — — — — — — The five Charms provide new and faster ways to perform many basic tasks, and are always available r egardless of wh[…]
-
Страница 22
18 Chapter 2. Learning the bas ics Share charm The Share c harm lets you send links, photos, and more to your friends and social networks without leavi ng the app you are in. Start charm The Start charm is a fast way to go to the Start screen. Devices charm The Devices charm allows you to connect or send files to any external devices, such as digit[…]
-
Страница 23
Chapter 2. Learning the basics 19 Putting the computer to sleep or shutting it down — — — — — — — — — — — — — — — When you have finish ed working with your computer , you can put i t to sleep or shut it down. Putting your computer to sleep I f y ou w il l be a wa y fro m yo u r c o mp u te r for a short time, put the computer to sleep. When the[…]
-
Страница 24
20 Chapter 2. Learning the bas ics Shutting down the computer If you are not going to use your computer for a long time, shut it down. T o shut down your computer: 1 Open the Charms, and the n Settings . 2 Select Power → Shutdown . 1 2[…]
-
Страница 25
Chapter 2. Learning the basics 21 Using the touchpad — — — — — — — — — — — — — — — — — — — — — — — — — — — — — — — — — — — — — — — — — — — — — — — — — — — — — — — — — — — — — — — — — — — — — — — — — — — — — — — Touchpad T o move the cursor on the scr een, slide your fingertip over the pad in the dir ection in which you want the cursor to move. Left[…]
-
Страница 26
22 Chapter 2. Learning the bas ics Function key combinations — — — — — — — — — — — — — — — — — — — — — — — — — — — — — — — — — — — — — — — — — — — — — — — — — — — — — — — — — — — — — — — Through the use of the function ke ys, you can change operational feat ur es instantly . T o use this function, pr ess and hold Fn ; then pre ss one of the functio[…]
-
Страница 27
Chapter 2. Learning the basics 23 The following describe s the feature s of each function key . Fn + F1: Enter sleep mode. Fn + F2: T urn on/of f the backlight of the LCD scr een. Fn + F3: Open the interfa ce for the display device switch to select this note book or an external display . Fn + F5: Enable/Disable Airpl ane mode. Fn + F6: Enable/Disab[…]
-
Страница 28
24 Chapter 2. Learning the bas ics Connecting external devices — — — — — — — — — — — — — — — — — — — — — — — — — — — — — — — — — — — — — — — — — — — — — — — — — — — — — — — — — — — — Y our computer has a wide range of built-in features and connection capabilities. Using memory cards (no t supplied) Y our computer supports the following type s o[…]
-
Страница 29
Chapter 2. Learning the basics 25 Connecting a universal serial bus (USB) de vice Y our computer comes with thr ee or four USB ports compatible with USB devices. Connecting a Bluetooth de vice (on select models) If your computer has an integrated Bluetooth adapter , it can connect to and transfer data wir elessly to other Bluetooth enabled […]
-
Страница 30
26 Chapter 2. Learning the bas ics Special keys and buttons — — — — — — — — — — — — — — — — — — — — — — — — — — — — — — — — — — — — — — — — — — — — — — — — — — — — — — — — — — — — — — — — — — — Novo button When the computer is off, press t his button to st art the Lenovo Re covery system or the BIOS setup utility , or to enter the boot menu . 1[…]
-
Страница 31
Chapter 2. Learning the basics 27 System status indicators — — — — — — — — — — — — — — — — — — — — — — — — — — — — — — — — — — — — — — — — — — — — — — — — — — — — — — — — — — — — — — — — — — — — These indicators inform you of the computer status. G480/G485/G580/G585 G780 3 4 1 3 1 4 5 6 2[…]
-
Страница 32
28 Chapter 2. Learning the bas ics Caps lock indicator Num lock indicator Power status indi cator Battery st atus indicator Wireless communicat ion indicat or Hard disk drive indicat or a b c d e f[…]
-
Страница 33
Chapter 2. Learning the basics 29 Securing your computer — — — — — — — — — — — — — — — — — — — — — — — — — — — — — — — — — — — — — — — — — — — — — — — — — — — — — — — — — — — — — — — — — — — — — This section pr ovides information about how to help protect your computer from theft and unauthorized use. Attaching a security lock (not supplied) Y […]
-
Страница 34
30 Chapter 2. Learning the bas ics About NVIDIA ® Optimus TM (on select models) — — — — — — — — — — — — — — — — — — — — — — — Optimus is a GPU switching mecha nism which automatically switches the active GPU to perform image-renderin g tasks. If no graphics-intensive programs are r unning, the integrated GPU will be selected as the active GPU to p[…]
-
Страница 35
31 Chapter 3. Connecting to the Internet As a global network, the Internet connects computers worldwide, pr oviding services such as e-mailing, in formation searching , electronic commer ce, W eb browsing and ente rtainment. Y ou can connect the computer to the Inte rnet in the following ways: W i red connectio n: use physical wiring to connect. W […]
-
Страница 36
32 Chapter 3. Connecting to the Internet Wireless connect ion — — — — — — — — — — — — — — — — — — — — — — — — — — — — — — — — — — — — — — — — — — — — — — — — — — — — — — — — — — — — — — — — — — — — — — — — — — — — W ireless connections pr ovide mobile access to the Internet, allowing you to stay online anywher e the wir eless signal covers. Divided[…]
-
Страница 37
Chapter 3. C onnecting to the Internet 33 Using Wi-Fi/WiMAX (on select models) Enabling wireless connection T o enable wir eless functions, do one of the following: • Pre ss Fn+F5 to disable Airplane mode. • Open the Charms and s elect Settings → to open the Network configuration page, and then toggle the Airplane mode switch to Off . Har[…]
-
Страница 38
34 Chapter 4. Lenovo OneKey Recovery system The Lenovo OneKey Recovery s ystem is softwar e designed to back up and restor e your computer . Y ou can use it to restor e the system partition to it s original status in cas e of a system failur e. Y ou can also cr eate user backups for easy restoration as r equir ed. Backing up the system partitio[…]
-
Страница 39
35 Chapter 5. Troubleshooting Frequently a sked questions — — — — — — — — — — — — — — — — — — — — — — — — — — — — — — — — — — — — — — — — — — — — — — — — — — — — — — — — — — — — — This section lists fr equently asked questions by category . Finding information What safety precautions should I follow when using my computer? The Lenovo Safety and[…]
-
Страница 40
36 Chapter 5. Troubleshooting What can I do if the back-up process fails? If you can start the backup but it fails during the back-u p process, try the following steps : 1 Close all open pr ograms, and then r estart the back-up process. 2 Check to see if the destination media is da maged. If it is, r eplace the damaged media. Otherwise, se lect ano[…]
-
Страница 41
Chapter 5. Troublesho oting 37 Troubleshooting — — — — — — — — — — — — — — — — — — — — — — — — — — — — — — — — — — — — — — — — — — — — — — — — — — — — — — — — — — — — — — — — — — — — — — — — — — — — — — — — — — — — — — Display prob lems When I turn on the computer, nothing appears on the screen. • If the screen is blank, m ake sure that: — The ba[…]
-
Страница 42
38 Chapter 5. Troubleshooting Sleep problems The critical low-battery error message appears, and the computer immediately turns off. • The battery power is getting low . Connect the AC adapter to the computer , or replace the b attery with a fully char ged one. The computer enters sleep mode immediately after Power- on self-test (POST). • Make […]
-
Страница 43
Chapter 5. Troublesho oting 39 Sound problems No sound can be heard from the speaker even when the volume is turned up. • Make sure that: — The Mute function is of f. — The head phone jack is not used. — Speakers ar e selected as the playback device. Battery proble ms Your computer shuts down before the battery status indicator shows empty. -or- […]
-
Страница 44
40 Chapter 5. Troubleshooting Other problems Your computer does not respond. • T o turn off your computer , press and hold the power button for 4 seconds or more. If the co mputer still does not respond, remove the AC adapter and the battery . • Y our computer might lock when it enters sleep mode during a communication operation. Disable the sl[…]
-
Страница 45
41 Appendix A. CRU instructions Replacing the battery — — — — — — — — — — — — — — — — — — — — — — — — — — — — — — — — — — — — — — — — — — — — — — — — — — — — — — — — — — — — — — — — — — — T o r eplace the battery , do the following: 1 T urn of f the computer . Disconnect the AC adapter and all cables from the computer . 2 Close the computer display[…]
-
Страница 46
42 Appendix A. CRU instructions G780 4 Install a fully charged battery . 5 Slide the manual ba ttery latch to th e locked position. 6 T urn the computer over again. Connect the AC adapter and the cables to the computer again. 3 1 2[…]
-
Страница 47
Appendix A. CRU instructions 43 Replacing the hard disk drive — — — — — — — — — — — — — — — — — — — — — — — — — — — — — — — — — — — — — — — — — — — — — — — Y ou can incr ease the storage capacity of your computer by replacing the hard disk drive with one of gr eater capaci ty . Y ou can purchase a new har d disk drive fr om your re seller or Lenovo[…]
-
Страница 48
44 Appendix A. CRU instructions T o re place the har d disk drive, do the following: 1 T urn off the computer; then disconnect the AC adapter and all cables from the computer . 2 Close the computer display , and then turn the computer over . 3 Remove the battery pack. 4 Remove the Har d disk drive (HDD)/Memory/CPU (Central processing unit)/Mini PCI[…]
-
Страница 49
Appendix A. CRU instructions 45 G580/G585 G780 1 1 2 1 ‘ 1 ‘ 1 ‘ 1 ‘ 2 1 1[…]
-
Страница 50
46 Appendix A. CRU instructions 5 Remove the frame fixing scr ews . G480/G485/G580/G585 G780 c 3 3 3 3[…]
-
Страница 51
Appendix A. CRU instructions 47 6 Pull the HDD bracket in the dir ection shown by arr ow . G480/G485/G580/G585 G780 d 4 4[…]
-
Страница 52
48 Appendix A. CRU instructions 7 T ake out the har d disk drive secur ed in a metal frame . G480/G485/G580/G585 G780 8 Remove the scr ews and detach the metal frame fr om the hard disk drive. 9 Attach the metal frame to a new har d disk drive and tighten the screws. 0 Put the hard disk drive gently into the hard disk drive bay with the tab facing […]
-
Страница 53
Appendix A. CRU instructions 49 A Reinstall the frame fixing scre ws. B After aligning the attachme nt clips with their matching gaps, reinstall the compartment cover . C Reinstall and tighten the scre ws. D Reinstall the battery pack. E T urn the computer over again. Connect the AC adapter and the cables to the computer again.[…]
-
Страница 54
50 Appendix A. CRU instructions Replacing memory — — — — — — — — — — — — — — — — — — — — — — — — — — — — — — — — — — — — — — — — — — — — — — — — — — — — — — — — — — — — — — — — — — — — — — — — — — Y ou can incr ease the amount of memory in your computer by installing a double-data-rate thr ee synchr onous dy namic random acce ss memory (DDR3 SDRAM)[…]
-
Страница 55
Appendix A. CRU instructions 51 G480/G485 G580/G585 1 1 2 1 1 2[…]
-
Страница 56
52 Appendix A. CRU instructions G780 6 If two DDR3 SDRAMs are alr eady inst alled in the memory slot, remove one of them to make room for the new one by pressing out on the latches on both edges of the socket at the same time. Be sure to save the old DDR3 SDRAM for future use. 7 Align the notch of the DDR3 SDRAM with the protrusion of the socket an[…]
-
Страница 57
Appendix A. CRU instructions 53 8 Push the DDR3 SDRAM inward toward the socket until the latches on both edges of the socket are pushed into the closed position. 9 After aligning the attachment clips wi th their matching gaps, r einstall the compartment cover . 0 Reinstall and tighten the scre ws. A Reinstall the battery . B T urn the computer over[…]
-
Страница 58
54 Appendix A. CRU instructions Replacing the wireless LAN card — — — — — — — — — — — — — — — — — — — — — — — — — — — — — — — — — — — — — — — T o repl ace th e wi rel ess LAN ca rd, d o th e f oll owi ng : 1 T urn off the compu ter; then disconnect the AC adapter and all cables from the computer . 2 Close the computer display , and then turn the co[…]
-
Страница 59
Appendix A. CRU instructions 55 7 T ake out the wireless LAN car d . 8 Install the new wir eless LAN card. 9 Reinstall and tighten the scre w . 0 Reconnect the two wireless LAN cables (one black, one white). A Reinstall the compartment co ver and tighten the screws. B Reinstall the battery pack. C T urn the computer over again. Connect the AC adapt[…]
-
Страница 60
56 Appendix A. CRU instructions Removing the optical drive — — — — — — — — — — — — — — — — — — — — — — — — — — — — — — — — — — — — — — — — — — — — — — — — — — — — — T o remove the optical drive, do the following: G480/G485/G580/G585 1 Remove the Har d disk drive/Memory /Central pr ocessing unit/Mini PCI Express Car d slot compartment cover . 2 Remo[…]
-
Страница 61
Appendix A. CRU instructions 57 G780 1 Remove the screw shown in the illustration . 2 Gently pull the opt ical drive out . The following table pr ovides a list of CRUs (Customer Replaceable Units) for your computer , and informs you of wher e to find r eplacement instructions. Setup Poster User Guide AC adapter O Power cord for AC adapter O Battery[…]
-
Страница 62
58 Trademarks Lenovo is trademark or re g i s t e r e d t r a d e m a r k o f L e n o v o i n t h e U n i t e d S t a t e s , other countries, or both. NVIDIA and Optimus are trademarks and/or registered trademarks of NVIDIA Corporation in the United States and other countries. AMD and PowerXpress are trademarks of Advanced Micro Devices, Inc. Othe[…]
-
Страница 63
Second Edition (June 2012) © Copyright Lenovo 2012. Before using the product, be sure to read Lenovo Safety and General Information Guide first. The features described in this guide are common to most models. Some features may not be available on your computer and/or your computer may include features that are not described in this user guide. Som[…]
-
Страница 64
Lenovo G480/G485/ G580/G585/G780 Read the safety notices and important tips in the included manuals before using your computer . ©Lenovo China 2012 User Guide User Guide V3.0 V3.0 V3.0_en-US[…]
![]()
Lenovo G480/G485/ G580/G585/G780
Руководство пользователя V3.0
Перед использованием компьютер ознакомьтесь
с указаниями по технике безопасности и важными
советами в прилагаемых руководствах.

Примечание.
•Перед использованием изделия обязательно прочитайте Руководство по технике безопасности и общей информации Lenovo.
•Некоторые инструкции в настоящем руководстве подразумевают, что используется система Windows® 8. При использовании другой операционной системы Windows некоторые операции могут немного отличаться. При использовании других операционных систем некоторые операции, возможно, к вам не относятся.
•Функции, описанные в настоящем руководстве, одинаковы для большинства моделей. Некоторые функции могут быть недоступны на данном компьютер и (или) данный компьютер может обладать функциями, не описанными в настоящем Руководство пользователя.
•Иллюстрации, используемые в этом руководстве, относятся к модели Lenovo G580, если не указано иное.
•Вид изделия может отличаться от иллюстраций, приведенных в данном документе. См. описание для определенного продукта.
•Для получения дополнительных сведений о приложениях Lenovo
посетите сайт: http://www.lenovo.com.
Третье издание (Июнь 2012 г.) © Copyright Lenovo 2012.
|
Содержание |
|
|
Глава 1. Общий обзор компьютера …………………………………………… |
1 |
|
Вид сверху …………………………………………………………………………………………………….. |
1 |
|
Вид слева……………………………………………………………………………………………………….. |
5 |
|
Вид справа …………………………………………………………………………………………………….. |
7 |
|
Вид спереди…………………………………………………………………………………………………… |
9 |
|
Вид снизу…………………………………………………………………………………………………….. |
10 |
|
Глава 2. Изучение основ………………………………………………………….. |
16 |
|
Первичная настройка операционной системы……………………………………………….. |
16 |
|
Интерфейсы операционной системы…………………………………………………………….. |
16 |
|
Панель Charms……………………………………………………………………………………………… |
17 |
|
Перевод в спящий режим или выключение компьютера………………………………… |
19 |
|
Использование сенсорной панели…………………………………………………………………. |
21 |
|
Сочетания функциональных клавиш…………………………………………………………….. |
22 |
|
Подключение внешних устройств…………………………………………………………………. |
24 |
|
Специальные клавиши и кнопки…………………………………………………………………… |
26 |
|
Индикаторы состояния системы……………………………………………………………………. |
27 |
|
Защита компьютера ……………………………………………………………………………………… |
29 |
|
Информация о технологии NVIDIA® OptimusTM (в некоторых моделях)……….. |
30 |
|
Глава 3. Подключение к Интернету …………………………………………. |
31 |
|
Проводное подключение………………………………………………………………………………. |
31 |
|
Беспроводное подключение………………………………………………………………………….. |
32 |
|
Глава 4. Lenovo OneKey Recovery system ……………………………….. |
34 |
|
Глава 5. Устранение неполадок……………………………………………….. |
36 |
|
Часто задаваемые вопросы……………………………………………………………………………. |
36 |
|
Устранение неполадок………………………………………………………………………………….. |
39 |
|
Приложение A. Инструкции CRU ……………………………………………… |
43 |
|
Замена батареи …………………………………………………………………………………………….. |
43 |
|
Замена жесткий диск ……………………………………………………………………………………. |
45 |
|
Замена памяти ……………………………………………………………………………………………… |
52 |
|
Замена платы беспроводной локальной сети (ЛВС) ………………………………………. |
56 |
|
Извлечение дисковода оптический привод……………………………………………………. |
58 |
|
Товарные знаки……………………………………………………………………….. |
60 |
i

Глава 1. Общий обзор компьютера
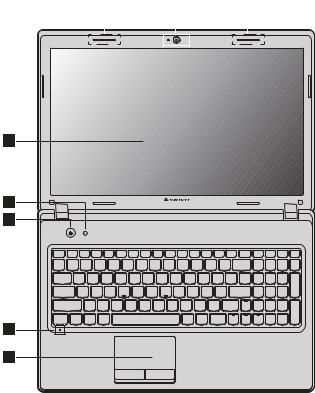
 Вид сверху ——————————————————————————————-
G480/G485
|
2 |
a |
2 |
b |
|||||||
|
1 |
||||||||||
3
7
8
1
Глава 1. Общий обзор компьютера
G580/G585
|
2 |
a |
2 |
b |
|||||||
|
1 |
||||||||||
3
7
8
2
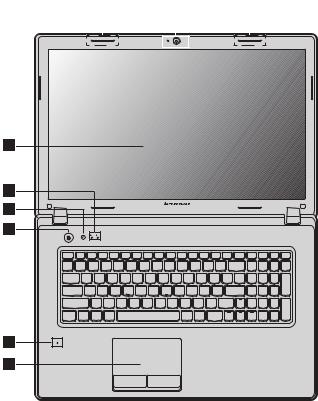
Глава 1. Общий обзор компьютера
G780
|
2 |
a |
2 |
b |
|||||||
|
1 |
||||||||||
3
7
8
Внимание!
•Штрихованная часть невидима.
•НЕ раскрывайте панель дисплея больше чем на 130 градусов. При закрытии панели дисплея будьте внимательны, чтобы НЕ оставить ручки или другие предметы между панелью дисплея и клавиатурой. В противном случае это может привести к повреждению панели дисплея.
3

Глава 1. Общий обзор компьютера
|
a Встроенная |
Используйте камеру для видеосвязи. |
|
камера |
|
|
b Антеннымодуля |
Встроенные антенны обеспечивают оптимальный прием |
|
беспроводной |
радиосигнала беспроводной связи. |
|
связи (в |
|
|
некоторых |
|
|
моделях) |
Примечание. Некоторые модели компьютера оснащены только одной антенной модуля беспроводной связи, установленной в точке 2b на рисунке. См. описание для определенного продукта.
|
c Дисплей |
ЖК-дисплей с подсветкой LED обеспечивает яркое |
|
компьютера |
изображение. |
dКнопка питания Нажмите эту кнопку, чтобы включить компьютер.
eКнопка Novo Для запуска системы Lenovo Recovery, программы
настройки BIOS или для входа в меню Boot (Загрузка), нажмите эту кнопку, когда компьютер выключен.
Примечание. Для получения дополнительной информации см. раздел “Lenovo OneKey Recovery system” на стр. 34.
fИндикаторы
состояния
системы
gВстроенный
микрофон
hСенсорная
панель
Для получения дополнительной информации см. раздел “Индикаторы состояния системы” на стр. 27.
Встроенныймикрофонсфункциейшумоподавленияможно использовать для проведения видеоконференций, записи голосовых сообщений или выполнения несложных аудиозаписей.
Функции сенсорной панели, как у обычной мыши.
Примечание. Для получения дополнительной информации см. раздел “Использование сенсорной панели” на стр. 21.
4

Глава 1. Общий обзор компьютера
 Вид слева ———————————————————————————————-
G480/G485/G580/G585
|
1 |
2 |
3 |
4 |
5 |
6 |
G780
|
1 |
2 |
3 |
4 |
5 |
6 |
aГнездо для замка К этому гнезду подсоединяется защитный замок (не Kensington прилагается).
Примечание. Для получения дополнительной информации см. раздел“Установка защитного замка (не прилагается)” на стр. 29.
bВентиляционные Используются для вывода тепла, образующегося внутри отверстия компьютера.
Примечание. Убедитесь, что вентиляционные отверстия компьютера не заблокированы, в противном случае может произойти перегрев.
|
c Порт VGA |
Используется для подключения внешних устройств |
|
отображения. |
5

Глава 1. Общий обзор компьютера
|
d Порт RJ-45 |
Этот порт используется для подключения компьютера к |
|
сети Ethernet. |
Примечание. Для получения дополнительной информации см. раздел “Проводное подключение” на стр. 31.
|
e Порт HDMI (в |
Используется для подключения к устройствам с входом |
|
некоторых |
HDMI, например телевизору или дисплею. |
|
моделях) |
Примечание. Некоторые компьютеры моделей G480/G485/G580/G585 могут быть не оснащены портом HDMI. См. описание для определенного продукта.
|
f Порт USB (в |
Используется для подключения устройств USB. |
|
некоторых |
|
|
моделях) |
Примечание.
•Синим выделены порты USB 3.0. Черным выделены порты USB 2.0.
•Для получения дополнительной информации см. раздел “Подключение устройства USB (Universal Serial Bus)” на стр. 25.
6
![]()
Глава 1. Общий обзор компьютера
 Вид справа ——————————————————————————————-
G480/G485/G580/G585
6
G780
1 2
aГнездо для наушники
bГнездо для микрофон
cОптический привод (в некоторых моделях)
|
3 |
4 |
5 |
|
3 |
4 |
5 |
Используется для подключения внешних наушников.
Используется для подключения внешних микрофонов.
Чтение/запись оптических дисков.
7

Глава 1. Общий обзор компьютера
|
d |
Порт USB (в |
Используется для подключения устройств USB. |
|
некоторых |
||
|
моделях) |
Примечание.
•Синим выделены порты USB 3.0. Черным выделены порты USB 2.0.
•Некоторые компьютеры модели G780 могут быть не оснащены портом USB 2.0 с правой стороны. См. описание для определенного продукта.
•Для получения дополнительной информации см. раздел “Подключение устройства USB (Universal Serial Bus)” на стр. 25.
|
e |
Гнездо для |
Используется для подключения адаптера питания. |
|
адаптера блока |
||
|
питания |
fКомбинированн ое аудио-гнездо
8
Глава 1. Общий обзор компьютера
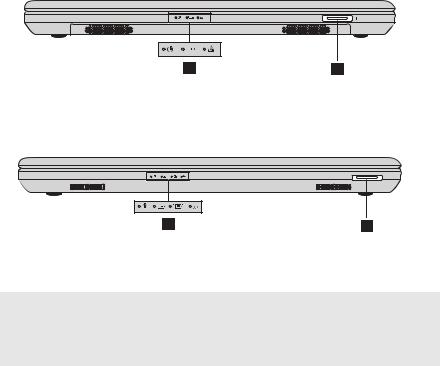
 Вид спереди —————————————————————————————-
|
|
G480/G485/G580/G585 |
|
|
2 |
1 |
|
|
|
G780 |
|
a памятиРазъем карта |
Установите карту памяти (не прилагается) в этот разъем. |
Примечание.
•В некоторых моделях компьютеров отсутствует карта-заглушка. См. описание для определенного продукта.
•Для получения дополнительной информации см. раздел “Использование карт памяти (не прилагаются)” на стр. 24.
|
b Индикаторы |
Для получения дополнительной информации см. раздел |
|
состояния |
“Индикаторы состояния системы” на стр. 27. |
|
системы |
9
Глава 1. Общий обзор компьютера
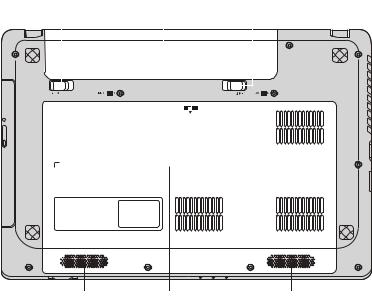
 Вид снизу ————————————————————————————————
G480/G485
|
1 |
2 |
3 |
||||||
|
5 |
4 |
5 |
10

Глава 1. Общий обзор компьютера
|
1 |
2 |
3 |
||||||
|
5 |
4 |
5 |
11

Глава 1. Общий обзор компьютера
G580/G585
|
1 |
2 |
3 |
||||||
|
5 |
4 |
5 |
12

Глава 1. Общий обзор компьютера
|
1 |
2 |
3 |
||||||
|
5 |
4 |
5 |
13

Глава 1. Общий обзор компьютера
G780
|
1 |
2 |
3 |
|||||||||||||||||||||||||||||
|
5 |
4 |
5 |
14

Глава 1. Общий обзор компьютера
|
a Неавтоматическ |
Неавтоматическая защелка батареи предназначена для |
|
ая защелка |
закрепления батарейного блока. |
|
батареи |
bБатарейный блок
cПодпружиненна Подпружиненная защелка батареи предназначена для
|
я защелка |
закрепления батарейного блока. |
|
батареи |
dОтсек для жесткий диск/ памяти/ центрального процессора/
платы Mini PCI Express Card
eДинамики (в Стереодинамики позволяют создать мощный насыщенный
некоторых звук.
моделях)
Примечание. Набор звуковых эффектов и расположение динамиков могут отличаться в зависимости от модели продукта.
15
Глава 2. Изучение основ
 Первичная настройка операционной системы——————
При первом использовании операционной системы необходимо выполнить ее настройку. Процесс настройки может включать следующие этапы:
•Принятие лицензионного соглашения с конечным пользователем
•Настройка подключения к Интернет
•Создание учетной записи пользователя
 Интерфейсы операционной системы————————————-
ОС Windows 8 включает в себя два основных пользовательских интерфейса: Стартовый экран и рабочий стол Windows.
Чтобы переключиться со Стартового экрана на рабочий стол Windows, выполните одно из следующих действий:
•На Стартовом экране выберите tile(иконку) рабочего стола Windows.
•Нажмите клавишу Windows + D.
Чтобы переключиться срабочего стола на Стартовый экран, выполните одно из следующих действий:
•На панели Charms выберите Пуск  .
.
•Переместите указатель в нижний левый угол, а затем выберите отобразившийся эскиз экрана “Пуск”.
|
Стартовый экран |
Рабочий стол |
16
 Loading…