BASS PODXT
U L T I M A T E T O N E F O R B A S S
BASS PODXT
PRO
ULTIMATE TONE FOR BASS + DIG I/O
Pilot’s Handbook
An in-depth exploration of the revolutionary technologies and bum-shaking tonal pleasures of Bass PODXT and Bass PODXT Pro.
Electrophonic Limited Edition available at www.line6.com. Revision C.

CONTROLS REFERENCE
|
1 |
21 |
19 |
20 |
23 |
15 |
9 |
10 |
26 |
|||||||||||||
|
AMP MODELS |
DRIVE |
BASS |
LO MID |
HI MID |
TREBLE |
||||||||||||||||
|
STO |
MP |
MOD |
DELAY/ |
||||||||||||||||||
|
E Q |
VERB |
C |
|||||||||||||||||||
|
A |
|||||||||||||||||||||
|
B |
|||||||||||||||||||||
|
A / |
|||||||||||||||||||||
|
POWER |
AVE |
.I.R. |
|||||||||||||||||||
|
S |
NE |
||||||||||||||||||||
|
TU |
|||||||||||||||||||||
|
S YSTEM |
|||||||||||||||||||||
|
28 |
CLIP |
0 |
10 |
0 |
10 |
0 |
10 |
0 |
10 |
0 |
10 |
I/O & DIG |
|||||||||
|
SELECT |
|||||||||||||||||||||
|
16 |
17 |
14 |
XT |
||||||||||||||||||
|
PHONES |
CHAN VOL |
COMPRESS |
OUTPUT |
BASS IN |
D+ I G I /O |
PRO |
|||||||||||||||
|
27 |
U LT I M AT E T O N E F O R B A S S |
||||||||||||||||||||
|
SIGNAL |
|||||||||||||||||||||
|
INPUT LEVEL |
|||||||||||||||||||||
|
EDIT |
TAP |
NORMAL PAD |
|||||||||||||||||||
|
0 |
10 |
0 |
10 |
0 |
10 |
||||||||||||||||
|
EFFECTS |
|||||||||||||||||||||
|
22 |
18 |
24 |
13 |
3 |
11 |
12 |
4 |
2 |
25 |
|
29 |
30 |
|||||||||||||||||
|
Balanced: Tip = + / Ring = — |
WARNING/AVIS: |
CAUTION |
||||||||||||||||
|
ANALOG REAMPING INPUT/OUTPUT |
SHOCK HAZARD – DO NOT OPEN. RISQUE DE CHOC ÉLECTRIQUE – NE PAS |
THIS DEVICE COMPLIES WITH PART 15 OF THE FCC RULES. |
SHOCK |
ELECTRICOF RISK |
||||||||||||||
|
OUVRIR. TO REDUCE THE RISK OF FIRE OR ELECTRIC SHOCK DO NOT |
OPERATION IS SUBJECT TO THE FOLLOWING TWO |
OPENNOTDO |
||||||||||||||||
|
EXPOSE THIS EQUIPMENT TO RAIN OR MOISTURE. TO REDUCE THE RISK |
CONDITIONS: (1) THIS DEVICE MAY NOT CAUSE HARMFUL |
POWER REQUIREMENTS |
||||||||||||||||
|
OF ELECTRIC SHOCK DO NOT REMOVE COVER. NO USER SERVICEABLE |
INTERFERENCE, AND (2) THIS DEVICE MUST ACCEPT ANY |
|||||||||||||||||
|
Line Level |
Unprocessed |
PARTS INSIDE. REFER SERVICING TO QUALIFIED SERVICE PERSONNEL. |
INTERFERENCE RECEIVED, INCLUDING INTERFERENCE THAT |
~ |
100 — 120V |
|||||||||||||
|
MAY CAUSE UNDESIRED OPERATION. |
||||||||||||||||||
|
Input |
Out Bass |
50 — 60Hz |
||||||||||||||||
|
UNBAL ANALOG OUT |
BALANCED ANALOG OUT |
AES/EBU |
S/PDIF |
100 W Max. |
||||||||||||||
|
EFFECTS SEND |
EFFECTS RETURN |
Low |
Biamp |
High |
PEDAL |
USB |
MIDI |
|||||||||||
|
Mode |
IN |
|||||||||||||||||
|
Unbalanced |
||||||||||||||||||
|
GROUND |
OUT |
|||||||||||||||||
|
D.I. |
MODEL |
D.I. |
MODEL |
D.I. |
MODEL |
D.I. |
MODEL |
GROUND LIFT |
IN |
OUT |
IN |
OUT/THRU |
||||||
|
N222 |
||||||||||||||||||
|
FEED TOLIVE:ONSTAGE/ |
AMP |
RECORDINGSTUDIO:OUTPUT |
STUDIO: +4 dBu |
FBV Class Foot Controller only |
||||||||||||||
|
LIVE: -10 dBV |
(not compatible with Floor Board or FB4) |
|||||||||||||||||
|
31 |
32 |
33 |
34 |
35 |
6 |
7 |
36 |
8 |

|
5 |
6 |
7 |
8 |
|||
|
T |
PEDAL |
USB |
MIDI |
|||
|
TPU |
OUT |
|||||
|
D.I.OU |
|
T |
||||||||
|
PU |
||||||||
|
T |
||||||||
|
U |
||||||||
|
O |
||||||||
|
L |
||||||||
|
E |
||||||||
|
D |
||||||||
|
O |
||||||||
|
M |
|
10 |
|||
|
0BASS10 |
|||
|
9 |
|||
|
0 |
10 |
21 |
SAVE |
|
DRIVE |
|
10 |
10 |
|||
|
0 |
10 |
0 |
10 |
|
|
LO MID |
HI MID |
|||
|
BASS PODXT |
||||
|
U L T I M A T E |
TONE FOR BASS |
|||
|
20 |
||||
|
P |
MOD |
DELAY/ |
||
|
STOM |
VERB |
CA |
||
|
EQ |
A.I.R. |
|||
19
|
SELECT |
EFFECT |
||||||
|
16 |
17 |
VALUE |
14 |
||||
|
PAGE |
TWEAK |
||||||
|
4 |
|||||||
|
22 |
EDIT |
18 |
TAP |
24 |
|||
|
0 |
10 |
||||||
|
OUTPUT |
MIDI IN
1
11
0 10
CHAN VOL

 12
12

0 10
COMPRESS
NAVIGATION REFERENCE
|
• |
With EDIT, SAVE or TUNER lit, “SELECT” |
|
SELECT |
selects pages |
|
PAGE |
Otherwise, “SELECT” chooses from the |
|
• |
|
|
Channel Memories |
EQ
STOMP
MOD
DELAY/ VERB
CAB /  A.I.R.
•EQ, Stomp, Mod, and Delay effects are on when lit.
•CAB/A.I.R. is lit when you are using a cab simulation.
•Double press one of these buttons for its EDIT pages.
 EDIT
EDIT
EDIT PAGES
•Amp Settings
•A.I.R. Settings
•EQ Settings
•EQ Settings (page 2)
•Stomp Select and Settings
•Modulation Select and Settings
•Modulation Settings (page 2)
•Delay Select and Settings
•Delay Settings (page 2)
•Mod and Delay/Verb X-Overs
•Wah and Volume Settings
•FX Tweak and Tempo Settings
•Gate and D.I. Settings
SAVE 
SAVE PAGES
TUNE
SYSTEM
TUNER PAGES
•Save Sound to Channel Memory
•Custom Save Amp Model
•Custom Save Effects Setup
•Single Factory Channel recall
•Factory Recall
•MIDI Dump
•Tuner
•Input/Digital Out (Bass PODxt Pro Only)
•What are you connecting to?
•Bi-Amp Setup
•Display contrast
•MIDI
•Bass PODxt Software Version

AMP MODELS
|
# |
AMP MODEL |
MODEL BASED ON |
# |
AMP MODEL |
MODEL BASED ON |
|
|
……0 |
……………………..BYPASS |
(Bypasses the Amp Model) |
15 |
….TWEED B-MAN …………….. |
FENDER BASSMAN COMBO |
|
|
1 …… |
TUBE PREAMP……………… |
LINE 6 ORIGINAL |
16 …. |
SILVERFACE BASS…………. |
FENDER BASSMAN HEAD |
|
|
2 …… |
L6 |
CLASSIC JAZZ ………….. |
LINE 6 ORIGINAL |
17 …. |
DOUBLE SHOW ……………. |
FENDER DUAL SHOWMAN |
|
3 …… |
L6 |
BRIT INVADER………….. |
LINE 6 ORIGINAL |
18 …. |
EIGHTIES……………………. |
GK 800 RB |
|
4 …… |
L6 |
SUPER THOR …………… |
LINE 6 ORIGINAL |
19 …. |
HIWAY 100 ………………… |
HIWATT DR-103 |
|
5 …… |
L6 |
FRANKENSTEIN ………… |
LINE 6 ORIGINAL |
20 …. |
HIWAY 200 ………………… |
HIWATT 200DR |
|
6 …… |
L6 |
EBONY LUX…………….. |
LINE 6 ORIGINAL |
21 …. |
BRITISH MAJOR……………. |
MARSHALL MAJOR |
|
7 …… |
L6 |
DOPPELGANGER ……….. |
LINE 6 ORIGINAL |
22 …. |
BRITISH BASS……………… |
MARSHALL SUPER BASS |
|
8 …… |
SUB DUB …………………… |
LINE 6 ORIGINAL |
23 …. |
CALIFORNIA ………………… |
MESA BOOGIE BASS 400+ |
|
|
9 …… |
AMP 360 …………………… |
ACOUSTIC 360 |
24 …. |
JAZZ TONE………………….. |
POLYTONE MINIBRUTE |
|
|
10 …. |
JAGUAR……………………… |
AGUILAR DB750 |
25 …. |
STADIUM……………………. |
SUNN COLISEUM |
|
|
11 …. |
ALCHEMIST…………………. |
ALEMBIC F-2B |
26 …. |
STUDIO TONE ……………… |
SWR SM-500 |
|
|
12 …. |
ROCK CLASSIC …………….. |
AMPEG SVT |
27 …. |
MOTOR CITY……………….. |
VERSATONE PAN-O-FLEX |
|
|
13 …. |
FLIP TOP ……………………. |
AMPEG B-15 |
28 …. |
BRIT CLASS A100…………. |
VOX AC-100 |
|
|
14 …. |
ADAM AND EVE ……………. |
EDEN TRAVELLER |
CABINET MODELS
|
# |
CAB MODEL |
MODEL BASED ON |
# |
AMP MODEL |
MODEL BASED ON |
# |
AMP MODEL |
MODEL BASED ON |
||||
|
0 |
……NO CAB……………………… |
N/A |
8 …… |
1X18+12 STADIUM………. |
SUNN COLISEUM |
16 |
….4X10 |
SILVERCONE |
………..HARTKE 410 |
|||
|
1 …… |
1X12 |
BOUTIQUE ………….. |
EUPHONICS CXL-112L |
9 …… |
2X10 |
MODERN UK ……….. |
ASHDOWN ABM 210T |
17 …. |
4X10 |
SESSION ……………. |
+HORN SWR GOLIATH |
|
|
2 …… |
1X12 |
MOTOR CITY ……….. |
VERSATONE PAN-O-FLEX |
10 …. |
2X15 |
DOUBLESHOW …….. |
FENDER DUAL SHOWMAN D130F |
18 …. |
4X12 |
HIWAY ………………. |
HIWATT BASS CAB |
|
|
3 …… |
1X15 |
FLIP TOP ……………. |
AMPEG B-15 |
11 …. |
2X15 |
CALIFORNIA ………… |
MESA BOOGIE |
19 …. |
4X12 |
GREEN 20’S ……….. |
’67 MARSHALL BASKETWEAVE |
|
|
4 …… |
1X15 |
JAZZ TONE………….. |
POLYTONE MINIBRUTE |
12 …. |
2X15 |
CLASS A …………….. |
VOX AC-100 |
20 …. |
4X12 |
GREEN 25’S ……….. |
’68 MARSHALL BASKETWEAVE |
|
|
5 …… |
1X18 |
SESSION ……………. |
SWR BIG BEN |
13 …. |
4X10 |
LINE 6 ………………. |
LINE 6 ORIGINAL |
21 …. |
4X15 |
BIG BOY…………….. |
MARSHALL MAJOR |
|
|
6 …… |
1X18 |
AMP 360 …………… |
ACOUSTIC 360 |
14 …. |
4X10 |
TWEED………………. |
FENDER BASSMAN COMBO |
22 …. |
8X10 |
CLASSIC …………….. |
AMPEG SVT |
|
|
7 …… |
1X18 |
CALIFORNIA ………… |
MESA BOOGIE |
15 …. |
4X10 |
ADAM EVE ………….. |
DAVID EDEN |
|||||
EFFECT MODELS
|
STOMPS |
MODEL BASED ON |
MODULATIONS |
MODEL BASED ON |
DELAYS |
MODEL BASED ON |
||||
|
BASS OVERDRIVE ……………. |
LINE 6 ORIGINAL |
DELUXE CHORUS |
……………..LINE 6 ORIGINAL |
ANALOG DELAY ……………….. |
BOSS DM-2 |
||||
|
SCREAMER ……………………. |
IBANEZ TS 808 |
ANALOG CHORUS…………….. |
BOSS CE-1 CHORUS |
ANALOG W/ MOD……………. |
EH MEMORYMAN |
||||
|
CLASSIC DIST…………………. |
PRO CO RAT |
DELUXE FLANGER…………….. |
LINE 6 ORIGINAL |
TUBE ECHO ……………………. |
EP-1 ECHOPLEX |
||||
|
FACIAL FUZZ ………………….. |
ARBITER FUZZ FACE |
JET FLANGER ………………….. |
ADA FLANGER |
MULTI-HEAD …………………… |
ROLAND SPACE ECHO |
||||
|
FUZZ PI ………………………… |
BIG MUFF PI |
PHASER………………………… |
MXR PHASE 90 |
SWEEP ECHO …………………. |
LINE 6 ORIGINAL |
||||
|
OCTAVE FUZZ …………………. |
TYCOBRAH OCTAVIA |
U-VIBE………………………….. |
UNI VIBE |
DIGITAL DELAY ………………… |
LINE 6 ORIGINAL |
||||
|
BRONZE MASTER …………….. |
LINE 6 ORIGINAL |
OPTO TREM……………………. |
FENDER OPTO |
REVERSE ………………………. |
LINE 6 ORIGINAL |
||||
|
BLUE COMP …………………… |
BOSS CS-1 |
BIAS TREM…………………….. |
VOX BIAS |
||||||
|
RED COMP …………………….. |
MXR DYNA COMP |
ROTARY DRUM ……………….. |
FENDER VIBRATONE |
||||||
|
VETTA COMP ………………….. |
LINE 6 ORIGINAL |
HI-TALK ………………………… |
LINE 6 ORIGINAL |
||||||
|
AUTO WAH…………………….. |
MUTRON III |
LINE 6 ROTOR ………………… |
LINE 6 ORIGINAL |
||||||
|
DINGO-TRON ………………….. |
LINE 6 ORIGINAL |
RANDOM S H …………………. |
LINE 6 ORIGINAL |
||||||
|
BUZZ WAVE …………………… |
LINE 6 ORIGINAL |
TAPE EATER……………………. |
LINE 6 ORIGINAL |
||||||
|
SEISMIK SYNTH ……………… |
LINE 6 ORIGINAL |
||||||||
|
REZ SYNTH ……………………. |
LINE 6 ORIGINAL |
||||||||
|
SATURN 5 RING MOD……….. |
LINE 6 ORIGINAL |
REVERBS |
|||||||
|
SYNTH ANALOG |
LINE 6 ORIGINAL |
||||||||
|
LUX SPRING |
SMALL ROOM |
DARK HALL |
RICH CHAMBER |
SLAP PLATE |
|||||
|
SYNTH FX |
LINE 6 ORIGINAL |
||||||||
|
STD SPRING |
TILED ROOM |
MEDIUM HALL |
CHAMBER |
VINTAGE PLATE |
|||||
|
SYNTH HARMONY |
LINE 6 ORIGINAL |
||||||||
|
KING SPRING |
BRITE ROOM |
LARGE HALL |
CAVERNOUS |
LARGE PLATE |
|||||
|
SYNTH LEAD |
LINE 6 ORIGINAL |
||||||||
|
SYNTH STRING……………….. |
LINE 6 ORIGINAL |
||||||||
|
SUB OCTAVES ………………… |
LINE 6 ORIGINAL |
All amp, cab and effect product names are trademarks of their respective owners, which are in no way associated or affiliated with Line 6. These product names and descriptions are provided for the sole purpose of identifying the specific products that were studied during Line 6’s sound model development.
FBV SERIES REFERENCE
|
13 |
|||||
|
3 |
11 |
||||
|
FBV SHORTBOARD |
WAH |
||||
|
1 |
FX LOOP |
||||
|
4 |
8 |
9 |
7 |
VOLUME |
|
|
STOMP |
MODULATION |
DELAY |
REVERB |
||
|
12 |
|||||
|
CHANNEL A |
CHANNEL B |
CHANNEL C |
CHANNEL D |
TAP |
|
|
HOLD FOR TUNER |
|||||
|
2 |
10 |
|
3 |
4 |
5 |
6 |
11 |
|||||
|
FX LOOP |
STOMP BOX 1 |
STOMP BOX 2 |
STOMP BOX 3 |
WAH |
PEDAL 1 |
VOLUME |
PEDAL 2 |
||
|
CUSTOM FOOT CONTROLLER |
|||||||||
|
7 |
8 |
9 |
10 |
||||||
|
AMP 1 |
AMP 2 |
REVERB |
TREMOLO |
MODULATION |
DELAY |
TAP TEMPO |
12 |
||
|
HOLD FOR TUNER |
|||||||||
|
BANK DOWN |
BANK UP |
CHANNEL A |
CHANNEL B |
CHANNEL C |
CHANNEL D |
FAVORITE CHANNEL |
|||
|
FACTORY/USER |
|||||||||
|
1 |
2 |
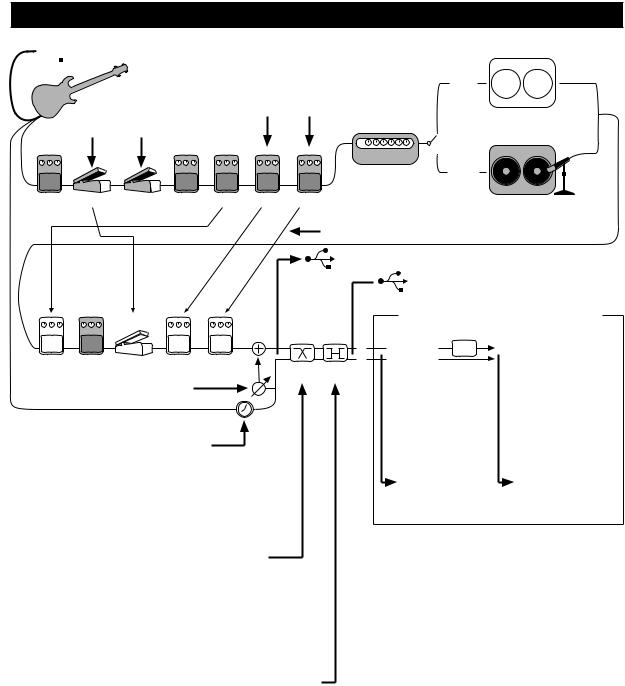
SIGNAL FLOW & EFFECTS ROUTING OPTIONS

 USB SEND/RETURN: Unprocessed Bass can be sent to/from Computer via USB
Wah & Volume can be
controlled by FBV or MIDI
MODEL
Mod and Delay/Verb X-OVER:
Hi Pass filters available in wet paths of these FX to prevent muddy tone
|
AMP |
STUDIO |
|||||
|
MODE |
||||||
|
GATE |
VOLUME |
WAH |
STOMP |
EQ |
MOD DELAY/VERB |
CAB MODEL + A.I.R. II VIRTUAL MIC/ROOM |
|
D.I. |
||||||
|
PRE/POST: Volume, EQ, Mod and Delay/Verb can run Pre or Post |
||||||
|
USB SEND: Model & D.I signals can both be sent to the computer together. |
||||||
|
USB RETURN: Sound from the computer can be heard. |
|
EQ |
COMP |
VOLUME |
MOD |
DELAY/VERB |
DI>MDL: mixes D.I. signal into Model out
DI DLY: delays D.I. signal, throwing it out of phase versus the Model signal, for tone variation when the two signals are mixed together.
BI-AMP: When Bi-Amp Mode is activated on the «Bi-Amp Setup» TUNER/SYSTEM page , the 1/4-inch outs are both sent a frequency-split version of the Model signal. The effect loop is also fed the frequency-split signal in the Bass PODxt, so you can effect each frequency range separately. The XLR outs take their signal just after the DI>MDL mix, before the frequency-split and loop send, so their signal is normal (no frequency spilt, Model and D.I. signals are both available at their jacks as usual), except that the effect loop is not applied to the XLR outs in this mode.
BI-AMP AUTO MODE MERGE
|
LOOP |
LOOP |
A.I.R. |
|
SEND |
RETURN |
LIVE MODE
VIRTUAL ROOM
LIVE MODE 1/4-INCH OUTPUTS
(Effects Return is summed in analog domain)
 In Live Mode, virtual room is added to Model signal for XLR & Digital outputs, while D.I. outputs and 1/4-inch outputs to onstage poweramp are sent without virtual room.
STUDIO MODE 1/4-INCH OUTPUTS, STUDIO/LIVE DIGITAL OUTPUTS, STUDIO/LIVE XLR OUTPUTS
(Effects Return is summed in digital domain)
AUTO-MERGE: When headphones or USB are connected, only the Model signal path is output, sent to both Model & D.I. output jacks as well the headphone jack and both effects send jacks. When a cable is connected to one 1/4-inch output (Model or D.I.) of the Bass PODxt Pro and not the other, both effect send outputs will be sent the signal for the connected jack.
LIVE & STUDIO MODES: Select your mode on «What are you connecting to?» TUNER/SYSTEM page. Studio Direct mode has virtual mic appropriate for recording. Live mode is appropriate for feeding onstage amp/speaker setup. Bass PODxt Pro XLR Model output has virtual room in Live Mode for feeding house sound system.
The serial number is on the underside of your Bass PODXT, or back panel of your Bass PODXT Pro. It’s the number that begins with “(21)”. Please note it here for future reference:
SERIAL NO:
WARNING: To reduce the risk of fire or electric shock, do not expose this appliance to rain or moisture.
CAUTION: To reduce the risk of fire or electric shock, do not remove screws. No user-serviceable parts inside. Refer servicing to qualified service personnel.
CAUTION: This equipment has been tested and found to comply with the limits for a Class B digital device pursuant to Part 15 of FCC Rules. Operation is subject to the following two conditions: (1) This device may not cause harmful interference, and (2) this device must accept any interference received, including interference that may cause undesired operation.
The lightning symbol within a triangle means “electrical caution!” It indicates the presence of information about operating voltage and potential risks of electrical shock.
The exclamation point within a triangle means “caution!” Please read the information next to all caution signs.
YOU SHOULD READ THESE IMPORTANT SAFETY INSTRUCTIONS
KEEP THESE INSTRUCTIONS IN A SAFE PLACE
Before using your Bass PODXT, carefully read the applicable items of these operating instructions and safety suggestions:
1.Obey all warnings on the Bass PODXT and in this Pilot’s Handbook.
2.Do not place near heat sources, such as radiators, heat registers, or appliances which produce heat.
3.Guard against objects or liquids entering the enclosure.
4a. Bass PODXT: Connect only to AC power outlets rated 100-120V or 230V 47-63Hz (depending on the voltage range of the included power supply).
4b. Bass PODXT Pro: Connect only to AC power outlets rated 100-120V or 220-240V 47-63Hz (depending on the voltage range of the unit).
5.Do not step on power cords. Do not place items on top of power cords so that they are pinched or leaned on. Pay particular attention to the cord at the plug end and the point where it connects to the Bass PODXT.
6.Unplug your Bass PODXT when not in use for extended periods of time.
7.Do not perform service operations beyond those described in the Bass PODXT Pilot’s Handbook. In the following circumstances, repairs should be performed only by qualified service personnel:
•liquid is spilled into the unit
•an object falls into the unit
•the unit does not operate normally or changes in performance in a significant way
•the unit is dropped or the enclosure is damaged
8.Prolonged listening at high volume levels may cause irreparable hearing loss and/or damage. Always be sure to practice “safe listening.”
Bass PODXT Pilot’s Handbook © 2003, Line 6, Inc.
Please Note:
Line 6, Vetta, Amp Farm, POD, Bass POD, PODxt, Bass PODxt, PODxt Pro and Bass PODxt Pro are trademarks of Line 6, Inc. All other product names, trademarks, and artists’ names are the property of their respective owners, which are in no way associated or affiliated with Line 6. Product names, images, and artists’ names are used solely to identify the products whose tones and sounds were studied during Line 6’s sound model development for this product. The use of these products, trademarks, images, and artists’ names does not imply any cooperation or endorsement.
|
Quick Start Guide …………………………………………………………………….. |
1•1 |
|
Register Now ……………………………………………………………………………………………………………………… |
1•2 |
|
Get On-Line…………………………………………………………………………………………………………………………. |
1•2 |
|
Line 6 Tone Transfer and Discussion Forums ……………………………………………………. |
1•2 |
|
Introduction ………………………………………………………………………………………………………………………….. |
1•3 |
|
Welcome to Bass PODxt ………………………………………………………………………………………….. |
1•3 |
|
Who is Line 6? ……………………………………………………………………………………………………………….. |
1•3 |
|
Modeling …………………………………………………………………………………………………………………………… |
1•4 |
|
Amp, Cab and Effect Models ……………………………………………………………………………………. |
1•4 |
|
There’s Magic in the A.I.R. …………………………………………………………………………………………. |
1•5 |
|
And Away We Go ………………………………………………………………………………………………………… |
1•7 |
|
Controls and Connections…………………………………………………………. |
2•1 |
|
Getting Set Up………………………………………………………………………….. |
3•1 |
|
All Purpose Basics ………………………………………………………………………………………………………………. |
3•1 |
|
Bass PODXT – In The Studio…………………………………………………………………………………………. |
3•2 |
|
What are you connecting to? …………………………………………………………………………………… |
3•2 |
|
The Ins and Outs of Great Tone …………………………………………………………………………….. |
3•2 |
|
Setting Levels ………………………………………………………………………………………………………………….. |
3•3 |
|
Radiation Alert ………………………………………………………………………………………………………………… |
3•3 |
|
Pedal Power …………………………………………………………………………………………………………………….. |
3•4 |
|
Midi Mania ………………………………………………………………………………………………………………………… |
3•4 |
|
Bass PODXT – Playing Live……………………………………………………………………………………………… |
3•5 |
|
Mount Up………………………………………………………………………………………………………………………….. |
3•5 |
|
Keeping Your Options Open …………………………………………………………………………………….. |
3•5 |
|
What are you connecting to? ……………………………………………………………………………………. |
3•5 |
|
Getting The Right Tone With An Amp …………………………………………………………………. |
3•6 |
|
External Stomp Boxes and PODXT…………………………………………………………………………. |
3•7 |
|
Bi-Amp Mode ………………………………………………………………………………………………………………….. |
3•7 |
|
Bass PODXT Pro – Configurations & Connections………………………………………………. |
3•9 |
|
Selecting An Input ………………………………………………………………………………………………………….. |
3•9 |
|
Input & digital Out Options………………………………………………………………………………………… |
3•10 |
|
FORMAT: Sample rate, word length (bit depth), and clock source…………….. |
3•10 |
|
MODE: Normal or Dry Guitar………………………………………………………………………………….. |
3•11 |
|
GAIN: Extra gain on the digital outs………………………………………………………………………… |
3•11 |
|
What are you connecting to? …………………………………………………………………………………….. |
3•12 |
|
continued on next page |
|
Getting Set Up continued |
|
|
FX Loop …………………………………………………………………………………………………………………………….. |
3•13 |
|
AES/EBU or S/PDIF Data Format? ……………………………………………………………………………….. |
3•14 |
|
Bi-Amp Mode ………………………………………………………………………………………………………………….. |
3•14 |
|
Radiation Alert ………………………………………………………………………………………………………………… |
3•15 |
|
Pedal Power……………………………………………………………………………………………………………………… |
3•16 |
|
MIDI Mania ……………………………………………………………………………………………………………………….. |
3•16 |
|
Re-Amping with Bass PODXT Pro……………………………………………………………………………….. |
3•17 |
|
Analog Re-amping………………………………………………………………………………………………………….. |
3•17 |
|
Digital Re-amping……………………………………………………………………………………………………………. |
3•18 |
|
Creating & Storing Sounds………………………………………………………… |
4•1 |
|
Recalling Channel Memories ………………………………………………………………………………………… |
4•1 |
|
Recalling Effect Setups …………………………………………………………………………………………………….. |
4•1 |
|
Stompbox-style Control …………………………………………………………………………………………………. |
4•2 |
|
Editing Basics ……………………………………………………………………………………………………………………….. |
4•2 |
|
Double Press for Easy Access ………………………………………………………………………………….. |
4•3 |
|
Inside the Edit Menu ………………………………………………………………………………………………………… |
4•3 |
|
Amp Knob settings ………………………………………………………………………………………………………… |
4•3 |
|
Cabinet and Mic settings (There’s magic in the A.I.R.!) …………………………………….. |
4•4 |
|
Effects Editing…………………………………………………………………………………………………………………… |
4•4 |
|
Setting your Tone to Tempo ………………………………………………………………………………………… |
4•7 |
|
Mod and Delay/Verb X-Overs …………………………………………………………………………………….. |
4•7 |
|
Wah and Volume……………………………………………………………………………………………………………….. |
4•8 |
|
FX Tweak Knob Assign / Tempo Assign ……………………………………………………………………. |
4•8 |
|
Gate Settings………………………………………………………………………………………………………………………… |
4•9 |
|
D.I. Settings …………………………………………………………………………………………………………………………… |
4•10 |
|
Gate Settings………………………………………………………………………………………………………………………… |
4•9 |
|
Saving Yourself…………………………………………………………………………………………………………………….. |
4•11 |
|
Saving Channel Memory ……………………………………………………………………………………………… |
4•11 |
|
Custom Save Amp Model…………………………………………………………………………………………… |
4•12 |
|
Custom Save Effect Setup…………………………………………………………………………………………… |
4•13 |
|
Single Channel Recall ……………………………………………………………………………………………………. |
4•14 |
|
Complete Factory Recall……………………………………………………………………………………………… |
4•14 |
|
MIDI Dumps…………………………………………………………………………………………………………………….. |
4•15 |
|
Modeled Amps & Cabs………………………………………………………………. |
5•1 |
|
Which Amps and Cabs Are Modeled? ……………………………………………………………………… |
5•1 |
|
Cabinet Models ………………………………………………………………………………………………………………….. |
5•18 |
|
Stompboxes & Effects ……………………………………………………………….. |
6•1 |
|
Effect Junkies Welcome……………………………………………………………………………………………………. |
6•1 |
|
Stomp Models……………………………………………………………………………………………………………………… |
6•1 |
|
Distortions and Overdrives………………………………………………………………………………………… |
6•1 |
|
Compressors……………………………………………………………………………………………………………………. |
6•6 |
|
Modulation Models ……………………………………………………………………………………………………………. |
6•8 |
|
Synth and Filter Effects ……………………………………………………………………………………………………… |
6•13 |
|
Basic Synth/Filter Editing………………………………………………………………………………………………. |
6•14 |
|
Synth Models……………………………………………………………………………………………………………………. |
6•15 |
|
Filter Models…………………………………………………………………………………………………………………….. |
6•17 |
|
Delay Models……………………………………………………………………………………………………………………….. |
6•19 |
|
Reverb …………………………………………………………………………………………………………………………………… |
6•22 |
|
Springs………………………………………………………………………………………………………………………………… |
6•22 |
|
Rooms………………………………………………………………………………………………………………………………… |
6•23 |
|
Halls…………………………………………………………………………………………………………………………………….. |
6•23 |
|
Chambers………………………………………………………………………………………………………………………….. |
6•24 |
|
Plates…………………………………………………………………………………………………………………………………… |
6•24 |
|
Deep Editing & MIDI Control…………………………………………………….. |
7•1 |
|
MIDI Basics ………………………………………………………………………………………………………………………….. |
7•1 |
|
What’s MIDI?……………………………………………………………………………………………………………………. |
7•1 |
|
In/Out…………………………………………………………………………………………………………………………………. |
7•1 |
|
MIDI Channel…………………………………………………………………………………………………………………… |
7•2 |
|
MIDI Messages ……………………………………………………………………………………………………………………. |
7•3 |
|
Backing Up Bass PODXT Programs to Other Devices ………………………………………… |
7•4 |
|
Other Things You Can Do with MIDI ………………………………………………………………………. |
7•6 |
|
Changing Bass PODXT Channels with MIDI Program Changes…………………….. |
7•6 |
|
Tweaking Bass PODXT Tones with MIDI Controllers………………………………………. |
7•6 |
|
Full MIDI Automation of Bass PODXT …………………………………………………………………… |
7•6 |
|
MIDI Setup Trouble-shooting ……………………………………………………………………………………….. |
7•7 |
|
Putting Your Feet to Work ………………………………………………………. |
8•1 |
|
Meet the FBV Shortboard ……………………………………………………………………………………………… |
8•1 |
|
Hooking up the Shortboard……………………………………………………………………………………….. |
8•1 |
|
Pushing Your Buttons………………………………………………………………………………………………………… |
8•1 |
|
Saving and Naming with the FBV Shortboard………………………………………………………….. |
8•3 |
|
Using an EX-1………………………………………………………………………………………………………………………. |
8•4 |
|
Appendices ……………………………………………………………………………….. |
A•1 |
|
Amp Models ……………………………………………………………………………………………………………………….. |
A•1 |
|
MIDI Program Changes ……………………………………………………………………………………………………. |
A•3 |
|
Bass PODxt MIDI Controls…………………………………………………………………………………………….. |
A•4 |
|
FBV Shortboard MIDI Controls …………………………………………………………………………………….. |
A•9 |
|
Line 6 Contact …………………………………………………………………………………………………………………….. |
A•10 |
|
Warranty Info ………………………………………………………………………………………………………………………. |
A•11 |

QUICK START GUIDE • “Manual? I don’t need no stinking manual!”
or:
“MANUAL? I DON’T NEED NO STINKING MANUAL!”
Bass PODxt Pro owners, if you’re going to use anything beyond the standard bass input and analog outputs, we can’t cover all your options on this brief page. See Chapter 2 to learn about controls, and then get deep with the inputs and outputs in the Bass PODxt Pro — Configurations & Connections section that starts on page 3•9.
1.Turn the OUTPUT LEVEL control all the way down to zero.
2.Connect D.I. and MODEL outputs to your recorder or mixer’s inputs, or plug the MODEL output into your bass amp’s input. Or connect headphones to the PHONES jack for silent jamming.
3.Connect the included power pack or power cable to your Bass PODxt, and plug the other end into a power jack.
4.Connect a bass to Bass PODxt’s INPUT (Bass PODxt’s Pro BASS IN).
5.Flip the POWER switch to fire up.
6.Bass PODxt comes ready to rock for direct connection to your recording setup. If you’re connecting to a bass amp, it’s essential to let your Bass PODxt know so it gives you the best tone. Do this by pressing TUNE/ SYSTEM, then turning the SELECT knob one step clockwise. Press the button below DEST (Destination), then turn the EFFECT TWEAK knob to tell your Bass PODxt what type of amp you’re connecting to. Bass PODxt will automatically override this setting when you plug in headphones, so great headphone sound is automatic.
7.Select an Amp Model using the AMP MODEL knob. Set the CHAN VOL to max and the DRIVE, BASS, LO MID, HI MID and TREBLE to your heart’s desire. OUTPUT sets the, uh, output level.
8.Turn the EFFECTS knob to load an Effects Setup, then twist the COMPRESS and EFFECT TWEAK knobs so you’re happy with the sound. The TAP tempo button can set the speed for Delay or Mod effects.
9.Browse pre-programmed tones using the SELECT knob or by pressing any of the four buttons below the display. You can press any one of those buttons twice for a “Manual Override” that gives you where-the-knobs- are-is-how-it-sounds operation.
10.Now before you run off, please give the page a quick flip and….

QUICK START GUIDE • Register now!
1 • 2 Register now!
Included in this manual is a handy, postage-paid card for you to send back to us to register your purchase. It’s very important that you fill that registration card out right now and drop it in the mail or jump on the Internet and register at the Line 6 Support Center — www.line6.com. Registering insures that you’re dialed in for warranty service (warranty info is at the end of this manual) and insures we can contact you if new software versions or other cool enhancements are offered — cutting edge technology and such.
Get on-line and get good free stuff!
Here at Line 6, our mission is to help you be more creative by bringing you powerful new technologies. As part of that mission, we focus great effort on making the Internet a valuable resource for every one of our customers. The Line 6 web site is one of the most effective ways for us to deliver you what you need to make you and your Bass PODxt ever more powerful.
Connect to www.line6.com and download free USB driver software free for your Bass PODxt. Learn tips & tricks, trade advice, generally hang out and get POD-a- licious in our online forums. Use FAQTRAQ to contact our product support experts and get answers to your technical questions. Or grab electronic versions of this book and other documentation, learn what your favorite artists are doing with Line 6 gear, and see the latest products we’re introducing for you.
Not on the Internet yet? It may be time to make the big jump, and thereby ensure that you will get all the great resources we can offer for you and your Bass PODxt.

|
QUICK START GUIDE • Introduction |
|
Introduction |
1 • 3 |
Welcome To Bass PODxt…
Thank you for inviting Bass PODxt into your life. Whether you use your Bass PODxt as a direct recording miracle, a powerhouse preamp, a practice partner, or as a creative digital signal processing tool (and heck, why should it be just one of these?) — we think you’ll agree that Bass PODxt is about the most amazing thing to happen to the bass guitar since, well, since the bass amplifier itself! Bass PODxt delivers the incredible tones of the acclaimed Line 6 Point-to-Point Interactive modeling technology and fuses it with the wonderfully portable and easy to use POD’s, which has been the recording and live sound choice for savvy guitarists and bassists for years. So you’ve got the tonal heritage of the past century of bass amplifier and stomp box design, plus nocompromise recording and direct sound excellence — all ready to roll when you are.
Who is Line 6?
As you may know, Line 6 first came on the scene several years back with a new kind of guitar amplifier — the first to put digital software modeling technology to work in a combo amp for guitarists. We also knew then that guitarists (and bassists) need great amp tone when recording, but generally don’t have the room to crank up that classic stack, or the money to hire a team of ace engineers to get it to tape. So we squished our patented modeling technology down into a small, kidney-bean-shaped wonder called POD, and forever changed the world of guitar recording. And then we introduced Bass POD, to bring the bassists in on the benefits of all this goodness.
Once we’d gotten this whole modeling amp and POD thing started, it was time to see what we could do if we really cranked up the horsepower and took our modeling to the next level. I mean, once you’ve climbed to the top of the mountain, it’s on to the next mountain, right? So, eyes glowing like power tubes, we stocked up on the Pepsi, gathered our genius engineers into a secret lab, fired up our extensive collection of amplifiers and stomp boxes… and spirited their treasured tones into a newlysupercharged modeling technology we dubbed Point-to-Point modeling. It first hit the streets in the award-winning Vetta amp, whose superb tone and unparalleled selection of dream amps, cabinets and effects make it a pretty good contender for the world heavyweight amp title. After that, we poured the same magic elixir into the classic PODs and—ta-dah!—PODxt and Bass PODxt were born.
How does Bass PODxt help you create a bass tone that is out of this world, and then get that tone wherever you need it? Easy! It’s…

QUICK START GUIDE • Introduction
|
1 • 4 |
Modeling |
|
|
Modeling: just what is it, and why is it so important? |
||
|
Well, my friend, Line 6’s team of crack engineer-musicians has spent years |
||
|
understanding pretty much everything there is to know about guitar, bass, recording |
||
|
and amplification gear, including exactly how different types of tubes and other |
||
|
electronics respond under various conditions typical of guitar and bass amplifier and |
||
|
effect design. How signals are colored and shaped, at what point they begin to distort |
||
|
or get otherwise altered, the quality and characteristic of the distortion, what happens |
||
|
when the signal gets to other parts of the system — complicated stuff, but all |
||
|
analyzable as electronic data. A guitar or bass pickup output, after all, is an electronic |
||
|
signal, and tubes and all the rest are really just a complex form of signal processing. |
||
|
Having sussed it all out, the Line 6 engineers translated all this arcane knowledge |
||
|
into software that simulates the signal processing of amps’ tubes and other electronics, |
||
|
entirely within the digital domain. Cool, huh? The Line 6 crew also directed their |
||
|
caffeine-enhanced modeling attention to a study of speaker cabinets and the |
||
|
important part they play in communicating great tone. And the great variety of |
||
|
stomp box and rack effects that guitarists and bassists use to juice things up. They |
||
|
translated it all into yet more powerful software, and it’s this revolutionary DSP |
||
|
(Digital Signal Processing) software-based modeling technology that gives Line 6 the |
||
|
power to create super silicon-based life forms like Bass PODxt. |
||
Amp, Cab and Effect Models |
||
|
The tone and technology know-how of Line 6 thus comes to you as Amp, Cab and |
||
|
Effect Models based on a collection of gear recognized by guitarists and bassists the |
||
|
world over as true “tone classics.” These models were tweaked through careful, |
||
|
scientific A/B comparisons to the gear that inspired them, with an ear open for the |
||
|
effects of different volume levels and settings of the originals’ tone and gain controls. |
||
|
The gain and equalization characteristics of the modeled gear were carefully measured |
||
|
so that changes to knobs on the models would mirror the effects of these changes on |
||
|
the originals as closely as possible. We’re talkin’ major attention to detail here. Tone |
||
|
control center frequencies, slopes, and cut/boost range were painstakingly analyzed, |
||
|
in addition to a whole host of factors unique to each piece of gear. Not only that, but |
||
|
since many classic amps and effects have highly interactive circuits, we paid careful |
||
|
attention to the way that the setting of one knob changes the way that another knob |
||
|
may behave. All in an effort to make our Models as much like the amps, cabs and |
||
|
effects in our collection as possible. The resulting Amp, Cab and Effect Models are |
||
|
the foundation of Bass PODxt. |

QUICK START GUIDE • Introduction
Now, then — here are a couple of things we want to be completely crystal clear on:
1 • 5
1.The Line 6 modeling process is a patented, 100% digital softwarebased technology exclusive to Line 6.
2.Line 6 Modeling is not sampling, nor is it solid state; no special bass, pickup, or cabling is needed.
There’s Magic in the A.I.R.
Bass PODxt delivers its modeling tones through another innovation: Line 6’s A.I.R. direct recording output. The A.I.R. (acoustically integrated recording) technology is the result of intensive research and careful study of the tonal characteristics produced by the interaction of amplifiers, cabinets, speakers, microphones and the recording room during the recording process.
The direct output of many preamps, amplifiers and direct box-style amp replacements available today offer some limited form of cabinet simulation or speaker emulation. Those that happen to be more than simple high end roll-offs have little or no control options. Generic cabinet simulations cannot reproduce the markedly different tones resulting from the choice of speakers, wood, and other details of a great real-life speaker cabinet. Other equipment also fails to reproduce the significant tonal contribution of microphone selection and placement, and do nothing to reproduce the subtle ambience of the recording space.
Bass PODxt’s combination of Amp Models and A.I.R. technology provides superior direct tones by recreating all the elements contributing to a great recorded bass sound, and giving you that tone with the same feel as playing through a real amp and speaker cabinet:
•The effect of the bass amplifier circuit is emulated by the Amp Model you choose. Each model was developed from extensive study of a classic amplifier treasured as a tone classic, or is a Line 6 original inspired our knowledge of these classics.
•In a bass amp, once the bass signal passes through the electronics, it is output to one or more speakers in a speaker cabinet. The specific design of the speakers, how many there are, and how they are arranged contributes significantly to your bass tone, as does the construction and resulting tone of the wood box itself. An

QUICK START GUIDE • Introduction
|
1 • 6 |
Eden head driving a pair of 10-inch speakers in an open-back cabinet, for instance, |
|
|
will sound dramatically different from the same head driving a 4×10 closed-back |
||
|
cabinet with a horn. Line 6 has carefully constructed virtual software speaker |
||
|
cabinets that emulate the contribution made by real speaker cabinets to get great |
||
|
bass sound. |
•Once the sound makes it out of the speaker cabinet, the next important link in the recording system is the microphone that receives that sound. Bass recordists select different microphones, and arrange them in different placements, to get particular sounds. A microphone pointing directly into the cone of a speaker will hear something different than one positioned off-axis. Line 6 carefully analyzed the coloring that various microphones add to the bass sound, as well as the effects of different mic placement techniques, and gave you control of these details in your Bass PODxt.
•The bass amp, cabinet, and microphone don’t just sit in empty space. The room that they are in contributes importantly to the bass sound you will record. Reverb can be used to capture the basic character of the space, simulating the effect of the sound reflecting off the room’s walls, floors and ceiling. But there are other subtle details that have more to do with the “spread” of the sound as it passes through the air between the speaker and microphone. This final component is the key to the sense that the listener is in one position in the room, and the bass sound is in another position, and that the two are separated by a mass of air that sound spreads through to reach the listener.
All of these important sound-shaping components are accounted for in your Bass PODxt. Turn the Amp Model knob to call up the amplifier emulation you want. Bass PODxt automatically matches that amplifier with an appropriate cabinet and microphone setup, and gives you the sound of that setup coming through the air of a recording space so you can start recording incredible mic’d up sound. Press a button and twiddle a knob or two, and you can switch cabinets, change out mics and their placement, and adjust the “spread” of the sound in your virtual room as well.
The A.I.R. direct recording output is exclusive to Line 6. In combination with the Line 6 Amp, Cab and Effect Models, it is the key to Bass PODxt’s phenomenally satisfying direct recording sound.

QUICK START GUIDE • And Away We Go….
|
D.I. |
1 • 7 |
|
|
Of course, we also realize that many great recorded bass tracks and live bass sounds |
||
|
are achieved by going direct with a D.I., or using a blend of amped and D.I. |
||
|
together. And that’s why your Bass PODxt includes, along with its Model output, a |
||
|
D.I. output that gives you an unprocessed direct bass signal line level output that is |
||
|
exactly timeand phase-aligned with the amp-cab-mic-and-effects sound pumping |
||
|
out the Model output. |
And Away We Go….
So, now that you know what’s in store, it’s time to experience Bass PODxt for yourself. Grab your favorite axe, plug in, and flip back to the handy Quick Start Guide on the first page of this chapter if you haven’t already been through that. Then fold out the back cover and follow me, my friend, for the Bass PODxt Grand Tour….
![]()
Controls & Connections
CONTROLS & CONNECTIONS
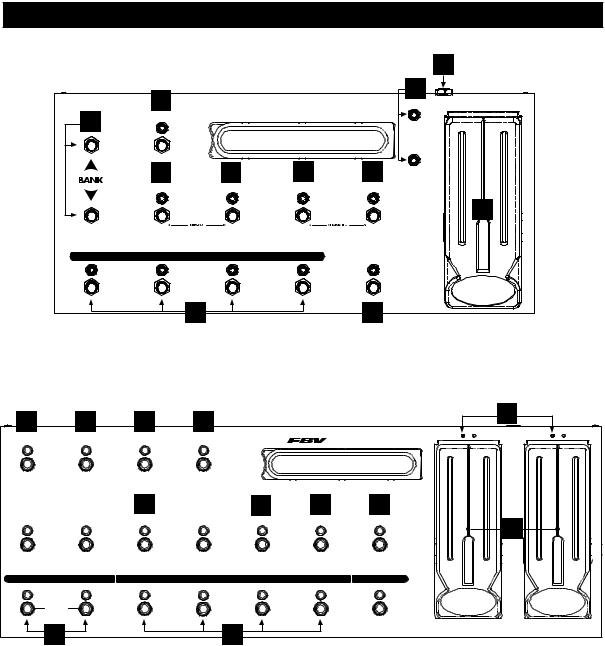
Now would be a good time to turn to the nifty back cover of this manual and notice
that it folds out. Ooh, pretty pictures! The idea is to have this essential pictorial 2• 1 reference always opened out while you’re thumbing through the manual. It’s also got all
the essential details for quickly getting around on your Bass PODxt. The boxed numbers that pop up throughout this manual correspond to the numbers on the foldout’s illustrations. The back side of the cover’s got handy pictures for the FBV and FBV Shortboard foot controllers, plus signal flow and connection guides.
1 Power Switch — Flip this to bring your Bass PODxt to life. Bass PODxt Pro includes a standard IEC grounded power cable. For Bass PODxt, use only the included PX-2 power pack.
2 Input/Bass In — Plug your bass in here. (You techies will want to know this is a mono, un-balanced connection).
3 Phones — Plug your headphones in here for silent concertos. The volume is set by the OUTPUT knob. Any time you use headphones, it important to be sure they’re not set for ridiculous volume before your slap them on your ears. Try an OUTPUT knob setting of about 10 o’clock when first putting the headphones on, them turn up from there if you need more volume.
So that you hear appropriate sound through the headphones, Bass PODxt automatically switches to Studio Mode whenever headphones are connected (for more on Studio Mode, see “What are you connecting to?” on page 3•2).

Controls & Connections
4 Output — This controls the overall output level of Bass PODxt and also sets the
|
headphone level. Changing the OUTPUT level does not change your tone, so you can |
||
|
get the tone you want at any volume level. This setting is not saved when you store |
||
|
2• 2 |
settings into one of the Bass PODxt’s memory locations. |
|
|
Bass PODxt Pro users, note that this does not affect the level of the XLR Outputs in Live |
||
|
Mode (for more on Live Mode, see “What are you connecting to?” on page 3•5). |
||
|
Bass PODxt will give the best signal-to-noise performance when you have the |
||
|
OUTPUT control at max. With the OUTPUT control turned down low, you may get |
||
|
extra hiss—which obviously ain’t what you want—if you turn up your mixer or |
||
|
recorder’s output to compensate. In order to allow you to set the OUTPUT as high as |
||
|
possible when connecting to recording, mixing, and other studio gear, be sure you |
||
|
are plugging Bass PODxt’s outputs into line level, not microphone or |
||
|
instrument level inputs. Line level inputs should allow you to turn Bass PODxt’s |
||
|
OUTPUT up all the way (or close to it) and thereby get the best sound possible. If your |
||
|
gear has inputs that function as mic/line level inputs, try to set the trim for those inputs |
||
|
to the minimum level, and Bass PODxt’s OUTPUT to maximum, when setting levels. |
||
|
D.I. & Model Output — (See numbers 33 and 34 for Bass PODxt Pro’s |
||
|
5 |
||
|
outputs.) These balanced 1/4-inch TRS (tip/ring/sleeve) connectors are ready to rock |
||
|
with pro +4dBu balanced equipment. They will also work happily with unbalanced – |
||
|
10dBV equipment and standard bass cables. |
||
|
Pedal — Looks like a telephone connector on steroids. Connect optional Line 6 |
||
|
6 |
||
|
FBV, FBV Shortboard or FBV4 foot controller here. Bass PODxt’s do not work with the |
||
|
Line 6 Floor Board and FB4. |
||
|
USB — Bass PODxt’s USB jack lets you connect it directly to most computers, |
||
|
7 |
||
|
and |
record your Bass PODxt directly to a wide variety of popular recording software. |
|
|
We’ve included a USB cable for use with Bass PODxt driver software. That software— |
||
|
along with directions for using it—is free for you to download at www.line6.com. |

Controls & Connections
8 MIDI In & Out — Connect Bass PODxt to your MIDI equipment to select Channel Memories (via Program Change messages), or automate Bass PODxt settings (via controllers and/or SySex). You can also back up Bass PODxt’s memory to your
computer by using free software—check www.line6.com for details. The Bass PODxt
2• 3
MIDI OUT connects to another device’s MIDI IN; its MIDI IN goes to another device’s MIDI OUT. Please also see Chapter 7, Deep Editing and MIDI Control, to setup your MIDI gear with Bass PODxt and find out what MIDI can do for Bass PODxt and you.
9 Drive — This knob controls how hard you’re driving the input of the chosen Amp Model. Like the input volume control on a non-master volume bass amp, higher settings give you more “dirt.”
10 Tone Controls — BASS, LO MID, HI MID, TREBLE. Just like any bass amp, only when you change Amp Models, the response and interactivity of the controls changes, too — so they act like the tone controls of the original amp that inspired the Amp Model you’ve selected.
11 Chan Vol — This knob controls the relative volume level of the “channel” you are playing through — thus, CHANNEL VOLUME. Use this to balance levels between the sounds you store in two different Bass PODxt Channel Memories (say between your clean and distorted tones). In general, you want to set the CHAN VOL as high as possible to get the best signal-to-noise ratio performance — but back off on this control if you’re seeing CLIP in Bass PODxt’s display. Here’s an important tip:
TIP:You probably want to have all of your favorite sounds as loud as possible, while also having the right difference in volume between your standard and lead sounds, clean and dirty sounds, etc. Right? OK, then, to get this happy balance, start with your favorite ‘clean’ sounds.Turn up their Chan Vol as high as you can without getting the CLIP indicator in Bass PODxt’s display when you play hard and save them that way.Then switch amongst them to see if some are too loud, and turn them down a bit to match well with the others. Next, its time to move on to select your ‘dirtier’ distorted and lead tones, comparing them to the clean sounds and saving them with lower Chan Vol settings to match well with those clean sounds. Now, each time you use your Bass PODxt, you just have to

Controls & Connections
set an Output volume level you like, and you can switch amongst your various sounds without unhappy volume differences.
2• 4
12 Compress — Bass PODxt’s include a model based on of the LA-2A classic tube studio compressor. Turn this knob to get more or less compression. Higher settings will smooth out the volume differences between notes that you play harder and ones that you play more lightly. Lower settings will leave your playing dynamics unaltered. Compressors work by reducing the volume of the louder notes feeding into them, so that those sounds are at a level closer to the quieter notes. Bringing down the loud notes this way would tend to give you a lower overall volume if it weren’t for the automatic gain compensation that’s also built into Bass PODxt’s compressor. Thanks to this feature, your overall average output volume will actually remain consistent as you dial in more compression.
13 Effects — This knob selects from Bass PODxt’s Effect Setups — which set up a combination of effects for you (all the details on effects are in Chapter 6, Stompboxes & Effects). Think of each Effect Setup as a virtual pedal board or outboard gear rack that you can match with any Amp Model. When you turn the EFFECTS knob, Bass PODxt shows the name of the Effect Setup that is loaded and you’ll hear the effects change instantly. The effect buttons light to show which effects are on. There are 64 of these effect “rigs” pre-programmed and ready for you to use.
14 Effect Tweak — This knob varies some aspect of the effect you’ve chosen. Turn it up and the effect will generally go deeper, louder, faster, longer or just plain more. You’ll know what you’re tweakin’ because a window will pop up on Bass PODxt’s display to show you. The TAP button usually sets Delay time. For the inside scoop, including how you can customize the EFFECT TWEAK knob, see Chapter 4, Creating & Storing Sounds. If the effect that EFFECT TWEAK is “targeting” is off, then, big surprise, EFFECT TWEAK won’t change anything. While the EDIT or TUNE/SYSTEM button is lit, the EFFECT TWEAK knob adjusts parameter values instead.
15 Amp Models — When you spin this knob, it’s essentially like changing what electronic “circuitry” is running inside Bass PODxt to make your amp sound. (See the groovy details in Chapter 5, Modeled Amps and Cabs.) You’ll see the Amp Model names change in Bass PODxt’s display. When you choose an Amp Model, Cabinet and

Controls & Connections
Microphone Models are also loaded automatically. For instance, when you choose the Tweed B-Man model an appropriate Cabinet Model will be loaded with it. You can also choose a different cabinet/mic setup by pressing the CAB/A.I.R. button (below).
2• 5
In fact, Amp Models automatically load with all the amp-related settings pre-set for a ready to go tone. Drive, Bass, Lo Mid, Hi Mid, Treble, Cab/A.I.R., etc. will all be determined by the Amp Model you choose — giving you a ready-to-rock sound with the turn of just this one knob. Once you get familiar with Bass PODxt, you can change these amp-associated defaults to customize the settings of each of the Amp Models to fit your tastes. Note that when you’re in Manual Mode, Drive, Bass, Lo Mid, Mi Mid, Treble, Channel Volume and Compress are set by the physical knob positions instead of being automatically set with the amp selection. Complete details are in Chapter 5.
16 Select — The Bass PODxt has 64 Channel Memories that store a huge variety of complete amp-and-effect selections pre-programmed by the tone mavens at Line 6. They are arranged in 16 banks of four channels each. (The four are called A, B, C, and D.) You can think of each bank as a sort of virtual four-channel bass amp — and you’ll find that the same layout is used on the optional Line 6 foot controllers for Bass PODxt (the FBV and FBV Shortboard) which are discussed later in Chapter 8.
You load Bass PODxt channels by turning the SELECT knob. You can press one of the four “soft buttons” under the display to load one of the other channels of the current bank. When recalling a channel, you may have left the physical BASS knob at minimum, whereas the just-recalled channel has this control set to max. To change BASS (or anything else), just grab the knob you want and tweak. To leave the Channel Memory world and enter Manual operation, press any of the buttons under Bass PODxt’s display twice. The display will read Manual Mode to let you know you’ve got WYSIWYG (what-you-see-is-what-you-get) operation, and all the physical knob positions are being used to determine your sound. More on all this later.
When the EDIT, SAVE or TUNE/SYSTEM button is lit, the SELECT knob selects from the available display pages. When you press EDIT, it selects pages of effect and channel parameters; when you press TUNE/SYSTEM, it takes you through all of the Tuner and system-wide settings; when SAVE is lit, you’ll find amp and effect customization features as well as MIDI dump operations. The vertical “scroll bar” on the left side of each display page shows you where you are in that group of pages.

Controls & Connections
17 Display — Bass PODxt’s LCD (liquid crystal display) is your window into every
|
parameter and setting available. Here’s how to get around: |
|||
|
2• 6 |
1. When the SAVE, EDIT or TUNE/SYSTEM button is lit, a scroll bar on the left side |
||
|
of Bass PODxt’s display shows you where you are in the available display “pages.” |
|||
|
Press one of these buttons to see the scroll bar now. For those that really need to get |
|||
|
all the nerdy details, each dot in that bar represents a page. As you turn the |
|||
|
SELECT knob, you move through the pages and so does the little square. When |
|||
|
you’re on the first page, the little square is at the top. When you get to the last |
|||
|
page, the square’s at the bottom. Square goes up, square goes down. Square goes up, |
|||
|
square goes down. Fun for the whole family! |
|||
|
2. Each page typically has words that appear in the bottom of the display. These words |
|||
|
label things you can adjust. Press the button below the thing you want to adjust, |
|||
|
then turn the EFFECT TWEAK knob to do your adjusting. |
|||
|
Soft Buttons — These four buttons operate differently depending on what |
|||
|
18 |
|||
|
you’re doing. Generally, these allow you to instantly load one of 4 channels in a bank, |
|||
|
or get you in and out of Manual mode when you double-press (see SELECT above). If |
|||
|
the EDIT, SAVE, or TUNE/SYSTEM button is lit, you can press a Soft Button to select |
|||
|
the item displayed above it so it can be adjusted with the EFFECT TWEAK knob. |
19 Effect On/Off Buttons — These four buttons allow you to quickly turn any of the four effects on or off (the effects are on when the buttons are lit).
•The EQ button turns on/off the 6-Band Semi-Parametric EQ
•The STOMP button turns on/off the loaded Stomp-Box effect
•The MOD button turns on/off the loaded Modulation effect
•The DELAY/VERB button turns on/off the loaded Delay or Reverb effect.
Double-press one of these buttons to adjust the loaded effect or load a different one. For example, just press the EQ button two times quickly and you’re instantly taken to the EQ EDIT page. Double-pressing the STOMP button will quickly take you to the first Stomp Box EDIT page. Double-press the same button again (or press the EDIT button) to leave Edit Mode.

Controls & Connections
20 CAB/A.I.R. — Press the CAB/A.I.R. button once to pick a Cab Model to pair with your amplifier, select the microphone used on the cabinet and even set the amount of “room” that the mic captures. Unlike the EFFECT ON/OFF buttons, this
button is not an on/off type control. A single press of this button simply lets you change
2• 7
cabs and mics quickly. When the Cabinets are off, this button’s light will be off as well.
21 Save — When you want to store your own tweaked-up sounds in your Bass PODxt, this button is the key. Exactly how it works is detailed in Chapter 4, Creating & Storing Sounds. But you’re probably impatient, so here are the basics:
When using a pre-programmed sound, Bass PODxt will display the bank number, channel letter and channel name at the top of the display. If you turn one of the knobs or change a parameter in the EDIT mode pages, you’ll notice an asterisk appears to the left of the bank number. This is a reminder to you that you have tweaked the memorized channel, and that you should save it if you want your Bass PODxt to remember the tweak.
To save the changes you’ve made to a Channel Memory, press the SAVE button. The button will start to flash. Just press SAVE again if you want to overwrite the currently loaded Channel, using the same name. Or, if you’d like to change the name first, use the middle two Soft Buttons to select a character, then press the right soft button and turn the EFFECT TWEAK knob to change the character. Press the soft button under DEST, turn the EFFECT TWEAK knob, and you will see that you are switching through memory locations A, B, C, and D in each of the sixteen numbered banks. Pick one to store your sound in, and press that SAVE button a second time. The button’s light will stop flashing, a progress bar will shown on the display, and the sound is stored at the location you chose, replacing the sound that was there before.
After the sound is stored, you can bring it back any old time by simply turning the SELECT knob to call up the location where you stored it. (See Chapter 8 to learn how to do all this with your feet on the optional foot controllers).
If you aren’t using one of the Bass PODxt Channel Memories — you’re in Manual mode, and you’re just getting the sound of where the knobs are set — you can store that state into a memory location the same way. Press SAVE, then DEST, then use EFFECT TWEAK to choose a place to save to, and press SAVE again.

Controls & Connections
If you decide you don’t want to store the sound after you’ve started saving, press any other button to cancel the save. (The save will also be canceled if you don’t touch anything for 15 seconds after pressing SAVE.) If you accidentally save over a factory
2• 8 sound you liked, the SAVE button’s additional pages let you recall the factory preset version of a Channel Memory any time. See Chapter 4 for details on this feature.
The SAVE button also lets you customize any of the Amp Models and Effect Setups to your own taste, so your favorite version of the amp or effect comes up instantly when you turn AMP MODELS or EFFECTS. See Chapter 4 for the details on that.
22 Edit — A deep-dive into tone central is available at the press of the EDIT button. While EDIT is lit, the SELECT knob selects pages of everything that makes up a Channel Memory. From here, you set all the effect parameters, select cabinets and microphones, and assign a parameter to the EFFECT TWEAK knob. To learn more about deep editing, please see Chapter 4.
23 Tune/System — Press that puppy and — shazam! Instant digital chromatic tuner. All Amp Model and effects processing are bypassed so you can hear those questionably-tuned strings clearly, should you choose to do so.
Play a note on your bass and Bass PODxt will show you what it is on that handy display; all notes are displayed as flats, so you’ll see A instead of G
 . Play that string you’re trying to tune again, spin its tuning key so it goes sharp and flat, and the little ball will move to the right if it’s sharp and back down to the left when the note’s flat. The little ball will sit right in the middle when you’ve got it just right. Give Bass PODxt’s TUNE/ SYSTEM button a push and the tuner disappears just as swiftly as it came, taking you right back to normal operation.
Tuner Bypass/Volume — Normally, the audio will be muted while you’re tuning, but if you prefer to hear yourself tune, press the button labeled Mute, and turn EFFECT TWEAK counter-clockwise to select Bypass.
Tuner Reference — Want a different reference than A=440Hz? When you’re in the tuner mode, press the button labeled 440 Hz and turn the EFFECT TWEAK knob on Bass PODxt while watching the display. This control lets you set the reference frequency anywhere from 430-450 Hz. This setting is stored so you don’t have to reset

Controls & Connections
it every time you turn on Bass PODxt if you decide you want to be different (or if that piano in your rehearsal room has decided to be different).
2• 9
24 Tap — Bass PODxt allows you to control the time and speed of your Mod and Delay effects by simply tapping on this button. To use the TAP control, just tap the button at the tempo you want and the effects that are set to “lock” to that tempo will change to match what you tapped. There’s also a Tempo parameter near the end of the EDIT pages, so you’ll see exactly what Tempo you’ve Tapped. This is especially useful if you are trying to nudge your TAP setting to just the right value. See Chapter 4 to learn how to set up effects to follow the tempo that you’ve tapped.
Controls & Connections Bass PODxt Pro
Bass PODxt Pro
The following controls and connections are found on the Bass PODxt Pro only.
2• 10
25 Input Level — The NORMAL setting of this switch is appropriate for most basses with non-active pickups. If you see the CLIP light 28 coming on, that means you’re overloading Bass PODxt Pro’s input. If that happens frequently, try the PAD setting here. This switches in input circuitry that’s appropriate for hotter signals output by some basses with active pickups, or from keyboards and other sources. For those nonbass sources you may also want to try the rear panel Line Level Input 29, which is a balanced TRS connection. A separate CLIP indicator shows in the display if you are clipping in the internal DSP.
26 I/O & Dig Select — Press this to tell your Bass PODxt Pro what it’s connected to so it gives the best sound, and to choose digital audio and other options.
•Press it once to select where you’re going to connect your input source to the Bass PODxt Pro, and exactly what you want to come out of the digital outputs.
• Press it a second time to tell Bass PODxt Pro whether you’re using it in the studio or live, how you have connected your effects loop and what kind of digital gear you have connected to Bass PODxt Pro.
•Press it a third time to access the options for Bass PODxt Pro’s Bi-Amp mode.
•A fourth press will dismiss the pages and take you back to whatever was in the display before you pressed the button.
27 Signal Light — This lights to say, “Yep, I’m hearing some input.” If you’ve got something feeding audio to your Bass PODxt Pro but you can’t hear it and don’t see it here, press the I/O & DIG SELECT button 26 and be sure you’ve got the right input selected. (This light doesn’t show input from USB, by the way.)
![]()
Controls & Connections Bass PODxt Pro
28 Clip Light — This lights to say, “Whoa, Nelly! That’s too much input!” (And, again, it doesn’t show the status of USB audio.) Reduce the output level of the bass or
|
other device that’s feeding your Bass PODxt Pro, or try the Pad setting of the handy |
||||||||||||
|
Input Level |
25 |
switch. For non-bass sources, you may instead want to use the… |
2• |
11 |
||||||||
|
Line Level Input — Here’s a balanced connector for non-bass sources (or |
||||||||||||
|
29 |
||||||||||||
|
the |
line level output of a wireless bass system). It’s also perfect for “re-amping”— |
|||||||||||
|
feeding an already-recorded bass into Bass PODxt Pro for further processing. To use it, |
||||||||||||
|
you’ll also need to press the I/O & DIG SELECT button |
26 |
and select the Line |
||||||||||
|
Input. The front panel’s Signal light |
27 |
shows you when |
||||||||||
|
you’ve got some signal |
||||||||||||
|
coming, and the CLIP |
28 |
|||||||||||
|
light shows |
you when you’re overdoing it and need to |
|||||||||||
|
reduce the level you’re |
feeding to Bass PODxt Pro. |
30 Unprocessed Bass Out — This connector actually has at least a couple of potential uses. If you’ve got a separate rack-mount tuner, you can feed it with this signal for instance. But the real reason it’s here is to let you do the kind of after the fact adjustments to your bass tone that Pro Tools users with our Amp Farm plug-in software have come to rely on.
The idea is this: you record this unprocessed bass out signal to your recording system. Then, you play it back through the Line Level Input 29 of your Bass PODxt Pro when you’re mixing, and you can change amps, effects and every other aspect of your bass tone with complete flexibility.
’Course, it would be pretty hard to record a good bass take without hearing the amp and effects sound that you were planning to use, right? The answer is that you don’t listen to this unprocessed signal while recording—instead, you monitor your Bass PODxt Pro’s processed output during the recording process. You can even record both the unprocessed bass out and the Model and D.I. outputs at the same time, so you’re ready for complete flexibility in later tone adjustments, or you can just stick with what you had. Page 3•17 has details.
Bass PODxt Pro’s digital outputs can also send unprocessed signal, if you prefer to capture this signal digitally. You can set them to do this from the display pages of the
I/O & DIG SELECT button 26.

Controls & Connections Bass PODxt Pro
31 32 Effect Send & Return — The effects loop is designed for line level devices, like rackmount effect processors, not for stomp boxes (which you can run happily in front of your Bass PODxt Pro). You can choose to run the loop series or
2• 12 parallel from the display pages of the I/O & DIG SELECT button 26. If you have the loop set to series, but nothing plugged into the loop return, Bass PODxt Pro is smart enough to see this and disable the loop so you still get sound. See page 3•13 for more details. If you want to use the loop on the D.I. only, you must still plug a cable into the Model Send. Otherwise the D.I. loop will be sent Model + D.I. signal.
33 Unbalanced Analog Out — The display pages of the I/O & DIG
SELECT button 26 configure these outputs for Studio or Live Use, and also allow you to enable Bi-Amp Mode.
• In Studio Mode, these jacks are ready to plug into a recorder with –10 dBV unbalanced inputs.
• In Live Mode, they don’t have speaker simulation, and are ready for connection to an onstage power amp.
• When Bi-Amp Mode is enabled, the low frequency portion of your signal is sent out the D.I. jack, while the high frequency portion goes out the Model jack, so each jack can be connected to a separate power amp and speaker cabinet(s) to separately amplify your lows versus your highs.
Whichever options you choose, the front panel Output knob 4 determines how much signal you’ll get at these jacks.
34 Balanced Analog Out — The I/O & DIG SELECT button 26 display
“pages” configure these outputs for Studio or Live Use. In Studio Mode, they’re ready to plug into a recorder with balanced +4 dBu inputs. In Live Mode, they’re ready to send great sounding –10dBV signals to the house sound system or P.A. The front panel Output knob 4 does not affect the volume at these jacks in Live Mode. This lets you make onstage adjustments to your volume without affecting the P.A.’s levels.

Controls & Connections Bass PODxt Pro
35 Ground — This switch lets you lift the grounds of Bass PODxt Pro’s XLR Balanced Analog Outs. This can be handy if you get an audible hum caused by a ground loop when connecting to other grounded equipment.
2• 13
36 AES/EBU & S/PDIF Inputs & Outputs — These jacks send and
receive digital audio signals. The display pages of the I/O & DIG SELECT button 26 choose which of these connections to use, along with sample rate, word length (“bits”) and other details. You can use digital input at the same time as analog output, or analog output as the same time as digital input, or any combination. You can even send digital audio into Bass PODxt Pro with one rate and word length, and choose a different rate and word length for output.
Bass PODxt Pro does not include a separate clock connector, but it can clock to the digital audio being received at either of its digital inputs, even if you are using an analog input to get audio into your Bass PODxt Pro. You can, for instance, connect a digital output from your digital mixer Bass PODxt Pro’s S/PDIF input, press the I/O & DIG SELECT button 26, set the FORMAT to MATCH SPDIF, and Bass PODxt Pro will clock to your mixer. Bass PODxt Pro will also format the digital audio it outputs to match the incoming format.

GETTING SET UP • All Purpose Basics
GETTING SET UP
The numbers in black boxes below and throughout the chapter refer to the back cover foldout’s illustrations
Bass PODxt is ready to give you world-class tone, no matter what you’re plugging
into. It’s as happy to live on stage as it is working alongside the most elite of world- 3 • 1 class recording systems. (And who wouldn’t be?) To tell you what you need for
where you’re going, this chapter’s got three sections:
Bass PODxt — In the Studio
Bass PODxt — Playing Live
Bass PODxt Pro — Connection & Configuration
But first, it’s the…
All Purpose Basics
1.Plug the power supply or cable into the wall, and connect it to the power connector on your Bass PODxt.
2.Connect your bass to Bass PODxt’s INPUT (Bass PODxt Pro’s BASS IN) 2 .
3.Bass PODxt: Connect Bass PODxt to whatever you’re going to be playing it into. The OUTPUT connectors 5 are balanced 1/4-inch TRS (tip/ring/sleeve) connectors, ready to rock with pro +4dBu balanced equipment. They will also work quite happily with unbalanced -10dBV equipment and standard bass cables.
Bass PODxt Pro: Use either pair of rear panel outputs, and see the details in the third section of this chapter. Press the I/O & DIG SELECT button 26 to select Bass (or whatever else you want) as your input.

GETTING SET UP • Bass PODxt — In The Studio
Bass PODxt — In The Studio
|
Bass PODxt Pro users, fast forward to the Bass PODXT Pro – Configurations & |
||
|
Connections section at the end of this chapter. |
||
|
3 • 2 |
To use the USB connector, visit www.line6.com to download Bass PODxt USB Driver |
|
|
Software which includes instructions for use. |
||
What are you connecting to?
Your Bass PODxt needs to adjust itself to deliver the best possible sound depending on what you’re connecting to. Press the TUNE/SYSTEM 23 button and turn the SELECT 16 knob clockwise until the display asks, “What are you connecting to?”
Press the Soft Button below DEST and turn the EFFECT TWEAK knob 14 to select STUDIO: DIRECT mode. In this mode, Line 6’s exclusive A.I.R. II DSP is active, and you are treated to a virtual speaker-cabinet-air-microphone experience that’s so good you may never use a regular bass amplifier and microphone set up again.
The DEST setting you select will be remembered by your Bass PODxt, so you don’t have to re-set it every time you power up. If you change it to a different setting for a special situation you come across, don’t forget to change it back again to the setting you normally use once you get back to your standard setup. When you plug your headphones into Bass PODxt, DEST will be automatically set to STUDIO: DIRECT, giving you the best tone for private jamming.
The Ins and Outs of Great Tone
If you’re hooking your Bass PODxt up to a recorder, mixer, or other equipment, be sure you are plugging its outputs into line level inputs on your other gear, as opposed to microphone level or bass level inputs. This will ensure that you get the best signal-to- noise ratio (lots of juicy bass tone, not too much hiss) with Bass PODxt. Some equipment only gives you a single input for both mic & line level sources, allowing you to trim low level signals (like mics) up to a high level at the inputs. If you are plugging

GETTING SET UP • Bass PODxt — In The Studio
your Bass PODxt into one of these inputs, try setting the trim to minimum, and twisting Bass PODxt’s OUTPUT 4 and CHANNEL VOLUME 11 knobs up to maximum. If your equipment has a couple of open line-level only inputs, you’ll probably get better performance by plugging into these, rather than the wide-ranging mic-to-line level trimmed inputs.
Setting Levels |
3 • |
3 |
|||
|
Start by setting Bass PODxt to the sound you intend to use, play hard, and set |
|||||
|
CHANNEL VOLUME |
11 |
as close to max as you can without getting the CLIP indicator |
|||
|
in Bass PODxt’s display. Now play with the Bass PODxt OUTPUT knob and any input |
|||||
|
volume control on your system so you can get the maximum sound level out of your |
|||||
|
Bass PODxt without going so far that you overdrive the input on your system and cause |
|||||
|
unwanted distortion. |
|||||
|
TIP:You probably want to have all of your favorite sounds as loud as |
|||||
|
possible, while also having the right difference in volume between your |
|||||
|
standard sounds, and other sounds, etc. Right? OK, then, to get this happy |
|||||
|
balance, start with your favorite ‘clean’ sounds.Turn up their Chan Vol as |
|||||
|
high as you can without getting the CLIP indicator in Bass PODxt’s display |
|||||
|
when you strum play and save them that way.Then switch amongst them |
|||||
|
to see if some are too loud, and turn them down a bit to match well with |
|||||
|
the others. Next, its time to move on to select your ‘dirtier’ distorted or |
|||||
|
synth tones, comparing them to the clean sounds and saving them with |
|||||
|
lower Chan Vol settings to match well with those standard sounds. Now, |
|||||
|
each time you use your Bass PODxt, you just have to set an Output |
|||||
|
volume level you like, and you can switch amongst your various sounds |
|||||
|
without unhappy volume differences. |
|||||
Radiation Alert |
|||||
|
You’re also likely to find, especially if you are using a bass with single coil pickups, that |
|||||
|
it is quite easy to pick up some serious noise from any computer CRT (which stands for |
|||||
|
cathode ray tube) display you might have in your studio. CRT displays are, after all, just |
|||||
|
special purpose ray guns that shoot photons at you all day long. Your bass pickups |
|||||
|
receive and amplify the electro-magnetic fields that your display radiates, and you hear |
|||||
|
this in your audio signal as buzz and hum. Moving farther from the CRT, and turning |
|||||
|
your bass so it does not directly face the computer’s display, will minimize this problem. |
|||||
|
But if you find yourself in a tight studio setup, needing to lay down some quick tracks, |
|||||
|
and being pestered by CRT-induced buzz, you may find it helpful to do as we have |

GETTING SET UP • Bass PODxt — In The Studio
sometimes done: set up your track to record and start your pre-roll; reach up and flick your computer monitor’s power switch off; record your bass part; stop your recording, flick the monitor back on, and check out the buzz-free playback. Flatscreen LCD monitors generally don’t cause hum and buzz.
|
3 |
• 4 |
Pedal Power |
|||
|
Bass PODxt has a couple of foot control options that make getting great bass tracks |
|||||
|
even easier: the LINE 6 FBV and FBV Shortboard. While we’ll go into all the details |
|||||
|
in a later chapter, it’s good to know that both allow you to select Bass PODxt channels, |
|||||
|
tap in your effect speeds/times/tempos, and kick in the tuner, plus both give you Wah |
|||||
|
and Volume pedal control. Whichever of these two Line 6 foot controllers you choose, |
|||||
|
it will plug into the Bass PODxt |
6 |
Pedal jack. Remember that the older Line 6 Floor |
|||
|
Board and FB4 pedals will not work with your Bass PODxt. |
|||||
MIDI Mania |
|||||
|
Those of you with MIDI-capable studios will find that your Bass PODxt lets you control |
|||||
|
everything via MIDI. Using MIDI, you can select any Bass PODxt Channel and |
|||||
|
automate any Bass PODxt parameter. You are truly lord of your domain. Pretty neat, |
|||||
|
huh? Read the Deep Editing & MIDI Control chapter if you plan to venture into |
|||||
|
this realm. |

GETTING SET UP • Bass PODxt — Playing Live
Bass PODxt — Playing Live
Bass PODXT Pro users, fast forward to the Bass PODXT Pro – Configurations & Connections section at the end of this chapter.
3 • 5
Mount Up
If you perform live, you’ll probably want to have the Bass PODxt in a handy spot on stage. One of the easiest ways to get it there is with the optional Bass PODxt mic stand/ amp top adaptor you can get from Line 6 — it’s described on the Line 6 web site (where it can also be purchased). We know this is another shameless plug to get you to buy more gear, but what the heck — this really is a handy little item to get the Bass PODxt’s deliciously curved aluminum chassis wherever you need it for mid-show tweaking. And that custom PODxt carry bag is simply smashing…. But let’s get back to educational stuff:
Keeping Your Options Open
When you’re playing live with Bass PODxt, you’ve got a choice of setups. You can plug straight out of the Bass PODxt’s outputs into the house system for awesome tone without the hassle of mics and cabinets and all that other stage setup. You can also choose to run Bass PODxt’s MODEL OUPUT 5 into a power amp and speaker cabinets, using it as the ultimate preamp. Or, you can plug your Bass PODxt in between your bass and a bass amplifier so Bass PODxt acts as a tone shaping front end for the amp. Whichever setup you choose, you’re gonna have to tell your Bass PODxt about it first. Read along and we’ll get’cha dialed in like a pro.
What are you connecting to?
You can supply your Bass PODxt with one of three answers to this question, and thereby ensure that your little pal gives you the best possible tones in any setup. To start the dialogue, press the TUNE/SYSTEM 24 button and then turn the SELECT 16
knob until the display asks, “What are you connecting to?”

GETTING SET UP • Bass PODxt — Playing Live
The options here are:
STUDIO DIRECT—When plugging Bass PODxt straight into a P.A., or using in-ear monitoring systems, press the Soft Button below DEST and turn the EFFECT TWEAK knob 14 to select STUDIO DIRECT for amazing tone, night after night. Line 6
exclusive A.I.R. processing serves up a virtual speaker-cabinet-air-microphone
3 • 6 experience so good you may never use a regular bass amplifier and microphone on stage again. You’re as powerful as the entire P.A.—and guaranteed to be in the mix!
LIVE W HORN & LIVE NO HORN—Choose one of these settings when plugging into a combo amp, head and bass cabinets, or power amp and bass cabinets. Choose NO HORN if your system doesn’t have a horn or high frequency driver, or you’ve chosen to turn them off on your speaker cabinet. Choose the W HORN option if your system includes a horn or other high frequency driver. The Mic component of A.I.R. is turned off, and the Cabinet Models are revoiced to sound their best coming through the kind of setup you choose.
Bass PODxt remembers the DEST setting you choose, so you don’t have to re-set it every time you power up. If you change to a different setting when using a different setup, don’t forget to change back to your standard setting once you get back to your regular setup.
Getting The Right Tone With An Amp
When you’re playing Bass PODxt into the front of a combo amplifier, it’s a good idea to start off with your combo amp in neutral. What is “neutral,” you ask? Well, if you only have one volume control on your amp, set it low enough to get a “clean” tone; that ensures Bass PODxt’s sounds come through as purely as possible. If you have a master volume in addition to a volume control on the input, set them both so that the first volume doesn’t overdrive the master volume (so you’re getting a clean tone). This will vary from amp to amp, but usually the input volume is going to be less than the master volume to get a clean, non-distorted sound. If you have passive tone controls, try setting your mid control at max, and your treble and bass controls at zero (this is actually “flat” equalization-wise on most amps). Active tone controls may vary, but just be sure you’re not overdriving the amp so the Bass PODxt tone comes through without extra coloration. Once you get going, you can tweak the amplifier settings to suit your tastes. Try to set the Bass PODxt’s OUTPUT so you’re not overdriving the input of the amp.
![]()
SYSTEM 24
GETTING SET UP • Bass PODxt — Playing Live
If you have a bass amp with an effect return or a jack that lets you connect directly to the input to the power amp, you can plug Bass PODxt’s output right into that connection and that will generally bypass the tone controls of the amp and avoid their coloring of Bass PODxt’s tones. When plugging into the effect return or amp directly this way, you want to choose LIVE NO HORN or LIVE W HORN on the “What Are You Connecting To?” page.
3 • 7
External Stomp Boxes and Bass PODxt
If you’ve been playing bass for a while, you probably have some favorite pedals that you dig. And even though Bass PODxt has now graced your life with some pretty hip stomp box and rack effects models, you probably still want to have the option of keeping those old pedals in your arsenal. No problem! Just remember that if you’re going to use Bass PODxt with those other effects boxes in front, they’re going to act differently based on the Amp Model you’ve selected on your Bass PODxt. It’s just like you’d expect — different combinations will produce a veritable feast of tone! Some distortion boxes may sound overly harsh if you max their output volume into your Bass PODxt. Try lowering the distortion box’s volume, and you can always add more gain with Bass PODxt’s DRIVE knob or its own STOMP effects.
Bi-Amp Mode
Bass PODxt includes a Bi-Amp Mode. Bi-Amping is the technique of using a crossover to split a signal into its higher frequency and lower frequency portions, and sending each frequency range to a different amplification system. Lows would typically be sent to a power amp setup with lots of wattage and large diameter speakers, while highs would be sent to smaller diameter speakers and/or horns. Bass PODxt’s Bi-Amp Mode includes selectable slope and frequency.
To activate Bass PODxt’s Bi-Amp mode and adjust its options, press the TUNE/

 button and then turn the SELECT 16 knob until you see the page with
the heading “Bi-Amp Setup”:
 Loading…

Line 6 POD XT Live – это несложная, подготовленная для живых выступлений “машина”; компактная и адаптированная к различным условиям работы на сцене и в студии. POD XT Live может быть использован как мультиэффект педаль в петле эффектов любого гитарного усилителя, как полноценное решение при прямом включении в системы усиления звука или как гитарный процессор высокого уровня для записи в студии.
Внутри POD XT Live находится невероятная коллекция более 80 обязательных для каждого гитариста моделей педалей эффектов и студийных приборов. Эта коллекция, основанная на отмеченными многочисленными наградами POD XT, Stompbox Modelers и Vetta™ II, дает Вам доступ к прецизионно воссозданным тонам при помощи одного касания ножного переключателя. Эффекты могут быть виртуально расположены перед или после моделей усилителя и кабинетов, предоставляя Вам органичные и динамичные тона, обычно доступные только в супер дорогих сценических гитарных комплектах.
Основанные на наиболее популярных и известных моделях усилителей в истории, 36 моделей POD XT покрывают весь спектр – от классики до современного модерна. Для обеспечения широчайшей тональной палитры для любого типа живых выступлений или студийной работы к Вашим услугам 24 модели кабинетов и 4 модели классических микрофонов. Эту замечательную коллекцию можно услышать на огромном количестве концертов и мультиплатиновых записях музыкантов по всему миру. Теперь они Вашем распоряжении!
POD XT Live имеет 128 пресетных ячеек памяти для быстрого вызова настроек при помощи больших переключателей ножного управления. Процессор оснащен 64-мя заводскими, предустановленными ячейками, созданными для быстрого подключения в усилитель или напрямую в пульт или устройство записи.
Другими важными особенностями является наличие большого дисплея, переключателей включения моделирования педали эффектов, комбинированная педаль экспресии (wah/volume/tweak), переключатель синхронизации темпа/тюнера, вход для дополнительной педали экспресии, аналоговые стерео 1/4″ Jack выходы, выход для наушников, вспомогательный вход для CD/MP3 плеера или драм машины, MIDI, и USB интерфейс для подключения к ПК.
POD XT Live конечно же имеет стандартный аналоговый инструментальный вход с функцией PAD – дискретного понижения чувствительности для оптимального согласования как с активными, так и пассивными звукоснимателями. Также предусмотрен специальный вход для цифровой коммутации электрогитар Variax. С его помощью вся виртуальная коллекция гитар Variax может управляться с консоли POD XT Live.
POD — это мировой стандарт гитарного звучания в самых престижных студиях по всему миру. И теперь с помощью POD XT Live, Вы имеете полный контроль над огромным количеством классических гитарных тонов.
ЭФФЕКТЫ
POD XT Live переполнен коллекцией моделей самых популярных гитарных эффектов от POD XT: педалей и студийных приборов. Но это еще не все. Вы также бесплатно получаете один из платных пакетов расширения: FX Junkie Model Pack. Эта коллекция из более чем 80 моделей эффектов от флагмана-усилителя Vetta™ II процессоров Stompbox Modelers дает Вам свободу выбора эффектов, от мягкого лампового драйва до сумасшествия синтезаторных фильтров.
Но что за удовольствие от эффектов, которые не возможно коммутировать в абсолютно любом порядке К счастью, с POD XT Live это возможно. Гибкая маршрутизация сигнала позволяет использовать до 8 эффектов одновременно. И при использовании моделирования усилителей, эффекты можно располагать как перед усилителем, так и после него.
Модели эффектов Line 6 POD XT Live основаны на:
LA-2A Compressor
Noise Gate
Fuzz Face
Big Muff Pi
Tubescreamer
ProCo Rat
Octavia
CS-1 Comp/Sustainer
Dynacomp
Vetta™ Comp
Auto Swell
Mutron III
Line 6 Sine Chorus
Line 6 Flanger
A/DA Flanger
MXR Phase 90
Uni-Vibe
Opto Tremolo model from the 1965 Fender Deluxe Reverb
Bias Tremolo model from 1960 Vox AC-15
Leslie 145
Vibratone
Auto-pan
Boss DM-2
Deluxe Memory Man
EP-1 Tube Echoplex
Roland RE-101 Space Echo
Sweep Echo
Line 6 Digital Delay
Line 6 Stereo Delay
Ping Pong Delay
Reverse Delay
Fender Deluxe Spring Reverb
Fender Twin Spring Reverb
King Spring Reverb
Small Room Reverb
Tiled Room Reverb
Brite Room Reverb
Dark Hall Reverb
Medium Hall Reverb
Large Hall Reverb
Rich Chamber Reverb
Chamber Reverb
Cavernous Reverb
Slap Plate Reverb
Vintage Plate Reverb
Large Plate Reverb
Wah modeled after the Vox Wah
Volume (Pre- or Post-Amp Routing options)
Post-EQ
Vox V847 Wah
Custom Vox V847 Wah
Colorsound Wah-Fuzz
Maestro Boomerang Wah
Jen Electronics Cry Baby Super Wah
RMC Real McCoy 1 Wah
Arbiter Cry Baby Wah
Sub Octaves Synth Effect
Digitech Whammy Pitch Effect
Maestro Bass Brassmaster
Sans Amp Tube Driver
Плюс пакет FX JUNKIE:
Line 6 Killer Z
Chandler Tube Driver
Vetta™ Juice
Line 6 Gain Boost
Boss CS-1 w/ treble switch on
Mutron III Down
Line 6 Clean Sweep
Line 6 Seizmik Synth
Line 6 Double Bass
Line 6 Buzz Wave
Line 6 Rez Synth
Line 6 Ring Modulator
Line 6 Synth Analog
Line 6 Synth FX
Line 6 Synth Harmony
Moog Lead
ARP Solina/Elka Strings
Square CE-1 Chorus
Line 6 Stereo Chorus
Line 6 Random Chorus
Line 6 Stereo Flange
Line 6 Exponential Flange
Line 6 Lumpy Phase
Line 6 Hi Talk
Line 6 Sweeper
Line 6 POD™ Purple X
Line 6 Sample and Hold
Line 6 Tape Eater
Line 6 Warble-Matic
Binson EchoRec
Maestro EP-3 Echoplex
Line 6 Low Rez Delay
Line 6 Phaze Eko
Line 6 Bubble Echo
ХРОМАТИЧЕСКИЙ ТЮНЕР И СИНХРОНИЗАЦИЯ ЭФФЕКТОВ
Кнопка Tap (при удержании – включение тюнера) – POD XT Live позволяет контролировать время и скорость эффекта при помощи этой клавиши. Для использования TAP, просто нажмите минимум дважды на педаль с интервалом, который Вы считаете нужным для скорости эффекта.
Нажав и удерживая кнопку 2 секунды Вы получите доступ к хроматическому тюнеру. На большом дисплее будут видны ноты и шкала строя с индикацией точной подстройки. Тюнер также может работать в тихом режиме, чтобы очень удобно на репетиции или выступлении. Привязка частот также может быть изменена плюс минус 10 Гц от стандартных 440 Гц.
POD XT Live имеет невероятную коллекцию моделей усилителей и кабинетов, используемых на бесчисленном количестве записей и концертов по всему миру. Основанные на наиболее успешных усилителях в истории гитарного усиления, 36 моделей усилителей и модели 24 кабинетов покрывают весь диапазон звучаний и стилей, от классики и бутиковых моделей до новомодных хай-гейн монстров.
PODXT Live имеет технологию моделирования кабинетов/микрофонов A.I.R. II, которая позволяет выбирать приемные характеристики 4-х классических моделей микрофонов и даже менять их виртуальное расположение относительно кабинета.
Модели усилителей в процессоре Line 6 POD XT Live основаны на:
Line 6 Clean
Line 6 JTS-45
Line 6 Class A
Line 6 Mood
Line 6 Spinal Puppet
Line 6 Chemical X
Line 6 Insane
Line 6 Piezacoustic 2
Line 6 Agro
Line 6 Lunatic
Line 6 Treadplate
Line 6 Variax Acoustic
Budda 2001 Twinmaster
Fender 1953 Deluxe Reverb
Fender 1958 Bassman
Fender 1961 Champ
Fender 1964 Deluxe Reverb
Fender 1965 Twin Reverb
Gretsch 1960 6156
Hiwatt 1973 Custom 100
Marshall 1966 JTM-45
Marshall 1968 Super Lead
Marshall 1968 Jump Channel
Marshall 1968 Variac Plexi
Marshall 1987 JCM 800
Marshall 1996 JMP-1
Matchless 1996 Chieftain
Matchless 1993 DC-30
Mesa/Boogie 2001 Dual Rectifier
Mesa/Boogie Mark IIc+
Roland Jazz Chorus 120
Soldano 1993 SLO-100
Supro 1960’s S6616
Vox 1961 AC-15
Vox 1967 AC-30TB
Marshall 1974X (18W Reissue)
Marshall JCM 2000 w/ Germ Pedal
Orange AD30TC
Vox Fawn Non-Top Boost AC30
Dumble Clean (from POD 2.0)
Soldano SP88 (from POD 2.0)
Модели кабинетов Line 6 POD XT Live основаны на:
1×6 Supro S6616
1×8 1961 Fender Tweed Champ
1×10 Gibson
1×10 Gretsch 6156
1×12 Line 6
1×12 1953 Fender Tweed Deluxe Reverb
1×12 1964 Fender Blackface Deluxe Reverb
1×12 1960 Vox AC-15
1X15 1962 Supro Thunderbolt
2×2 Fender Mini Twin Reverb
2×12 Line 6
2×12 1965 Fender Blackface Twin Reverb
2×12 1995 Matchless Chieftain
2×12 Roland JC-120
2×12 1967 Vox AC-30
2X12 1967 Silvertone Twin Twelve
4×10 Line 6
4×10 1959 Fender Bassman
4×12 Line 6
4×12 1967 Marshall Basketweave with Greenbacks
4×12 1968 Marshall Basketweave with Greenbacks
4×12 1978 Marshall with stock 70s
4×12 1996 Marshall with Vintage 30s
4×12 Mesa/Boogie
Модели микрофонов основаны на:
Shure SM-57 On Axis
Shure SM-57 Off Axis
Sennheiser MD-421
Neumann U-67
ИНТЕРФЕЙСЫ и УПРАВЛЕНИЕ
POD XT Live имеет простой и дружелюбный интерфейс, который легко может быть адаптирован к различным задачам в студии и на сцене. Не зависимо от того как Вы подключаете прибор (в усилитель, в петлю эффектов усилителя или напрямую в пульт), POD XT Live самым наилучшим образом обеспечивает контроль над Вашим звукообразованием на концерте.
USB – этот разъем в POD XT Live позволяет подключить его а персональному компьютеру и осуществлять полный контроль его параметров, передачу цифровых аудио данных и обновление прибора через онлайн сервис Line 6.
Variax – подключите к этому разъему моделирующую гитару Line 6 Variax, и Вы откроете для себя новый спектр возможностей. Кроме прямой цифровой передачи аудио данных Вы можете контролировать пресеты Variax, сохраняя определенные типы гитар в ячейки с настройками эффектов POD XT Live.
MIDI In & Out – подключите POD XT Live к Вашему MIDI оборудованию для переключения ячеек памяти или автоматизации параметров PODXT Live (через контроллеры и/или SySex). Вы также можете использовать MIDI (или USB) для работы с ПО Line 6 Edit, которое можно загрузить с сайта line6.
Phones – Разъем для подключения наушников. При их подключении POD XT Live автоматически переключается в режим Studio Mode. О нем – несколько позже.
Output To Amp/Line – Несимметричные разъемы 1/4″ Jack позволяют подключить POD XT Live к гитарному усилителю, устройству записи, микшерному пульту или ПА системам. Переключатель AMP/LINE помогает согласовать соединение для различных типов подключения (в усилитель или “в линию”). Регулировка уровня LEVEL (на задней панели) также помогает установить оптимальный выходной уровень без ущерба тональным характеристикам сигнала.
Aux Input – вспомогательный вход для подключения CD плеера, MP3 плеера, драм машины. Сигнал c вспомогательного входа будет слышен в наушниках и основных стерео выходах. Очень удобно для джемования с любимой группой!
Input – Сюда подключается ваша гитара. Переключатель входной чувствительности входа позволяет использовать как пассивные, так и активные звукосниматели (или педали эффектов с высоким выходным уровнем).
Pedal 2 – вход для подключения дополнительной педали экспрессии Line 6 EX-1. Она может выполнять функции Wah, Громкости, и изменения параметров.
РАБОТА В СТУДИИ
Режим STUDIO DIRECT:
В этом режиме, эксклюзивная технология Line 6 A.I.R. II позволяет моделировать звучание виртуальной связки громкоговоритель-кабинет-воздушное пространство-микрофон. Многие музыканты используют этот режим вместо реальных усилителей и кабинетов, настолько он хорош!
Когда Вы подключаете наушники к POD XT Live, режим автоматически устанавливается на STUDIO DIRECT.
НА СЦЕНЕ
Для работы на сцене с POD XT Live, Вам доступны несколько вариантов подключения.
1. Вы можете включить POD XT Live между Вашей гитарой и усилителем, позволяя процессору быть универсальным набором моделирующих педалей эффектов.
2. Вы можете подключить POD XT Live к домашней стерео системе или микшерному пульту без проблем с кабинетами и микрофонами.
3. Вы можете подключить POD XT Live к гитарному усилителю с кабинетом напрямую или в разрыв петли эффектов, используя процессор как предварительный усилитель.
2X12 FRONT, 2X12 PWRAMP, 4X12 FRONT & 4X12 PWRAMP – Выбирайте один из этих режимов, если Вы подключаете POD XT Live к гитарному усилителю или “голове” с отдельным кабинетом. Когда Вы используете моделирование усилителей в этих режимах коммутации, компоненты Mic и Room алгоритмов A.I.R. II не активны, а моделирование кабинетов перенастроено для оптимального звучания в большинство гитарных систем. Режимы “Pwramp” предназначены для использования при подключении POD XT Live в гитарный усилитель мощности или возврат петли эффектов (effect return), так что предварительная секция усиления минуется. Выбирайте “Front” если Вы подключаете процессор напрямую во вход гитарного усилителя, тем самым сигнал также проходит через предварительную секцию усиления гитарного усилителя. Два режима “Front” предоставляют возможность тональной коррекции.
Что такое «Тональная коррекция»
Основная задача тональной коррекции состоит в оптимизации звучания POD XT Live в разных типах гитарных усилителей, в частности компенсации звучания в предварительной секции усиления. Часто необходимо снизить интенсивность звучания в низкочастотном и высокочастотном диапазонах POD XT Live для получения наилучшего результата в данном типе включения, или сместить фокус в среднечастотном диапазоне, для чего эти регулировки и предназначены.
Плюс…
BOSE PS1 – выбирайте этот режим при подключении к цилиндрической акустической системе Bose PS1 Cylindrical Radiator™. Line 6 специально создали этот режим для получения наилучшего звучания в инновационной акустической системе фирмы Bose.
VARIAX
Электрогитары Variax — это уникальные инструменты, благодаря технологиям моделирования Line 6, позволяющим создать огромную коллекцию гитарных звучаний в одном инструменте. Если Вы являетесь счастливым владельцем Variax, Вы непременно оцените все преимущества цифрового интерфейса для Variax в POD XT Live, расположенного на задней панели.
POD XT Live может при помощи цифрового интерфейса не только передавать звучание, но и полностью контролировать параметры Variax. То есть любая из виртуальных гитар может быть присвоена к выбранной Вами ячейке памяти с эффектами.
И это еще не все! Аналоговый вход для обычных электрогитар и цифровой вход для Variax могут быть активными одновременно. То есть Вы можете иметь две гитары, одновременно подключенные к POD XT Live. Достаточно убрать громкость на одной и поднять громкость на второй (и наоборот), чтобы переключиться между ними.
ЧТО ТАКОЕ “MODEL PACKS”
Model Packs впечатляюще расширяют тональный арсенал Вашего POD XT Live. Каждый Model Pack – это программный пакет, который увеличивает количество моделей усилителей или эффектов. Так что полностью “запакованый” POD XT имеет 72 модели усилителей и 84 модели эффектов, включая полный арсенал моделей от усилителей Vetta™ II и HD147.
Доступны 2 пакета: Metal Shop (включающий в себя усилители о металлического монстра HD147), Collector Classics (еще усилители от Flextone III и Vetta II).
ЧТО ТАКОЕ “CUSTOM TONE”
CustomTone.com – это онлайн библиотека тонов, созданная эксклюзивно для продуктов Line 6. Line 6 создали уникальный ресурс, профессионально создав тысячи тонов на основе произведений легендарных гитаристов и групп. И все это совершенно бесплатно доступно для скачивания пользователями на CustomTone.com. И POD XT, конечно же, совместим с Custom Tone. Существует также пользовательская библиотека, где Вы можете разместить Ваши настройки звучаний и скачать созданные другими такими же как Вы пользователями настройки. Все что необходимо для установки настроек в Ваш прибор – это бесплатная программа Line 6 Edit.
ЧТО ТАКОЕ “Line 6 Edit”
Line 6 Edit™ — это бесплатное программное обеспечение для Windows или Mac OSX от Line 6, которое позволяет внедрить функции редактирования для для POD XT, POD XT Pro, POD XT Live, Vetta™ II, HD 147, Flextone™ III и POD 2.0. Приложение может быть запущено отдельно или в тандеме с CustomTone для передачи тонов из онлайн библиотеки в конкретный прибор.
Line 6 Edit общается с Вашим POD XT по MIDI, через USB кабель или MIDI порты. Line 6 Edit позволяет в реальном времени увидеть как меняются параметры тонов и создавать их в количестве, ограниченно только размерами памяти Вашего ПК. Вы с легкостью можете создать тысячи тонов для разных задач (выступлений, репетиций, записи) и хранить их на жестком диске ПК. Using Line 6 Edit, you can easily rename, move, copy, backup, store, and create killer tones as fast as you think them up.
ОБЕЗЬЯНКА MONKEY
Line 6 Monkey — бесплатная программа-помощник – это самый простой способ получить самое свежее обновление (флеш-памяти, драйверов, программ) для Вашего PODXT.
• Программы: 128 пользовательских пресетов
• Входы: Input (переключатель пассивный/активный вход) Variax цифровой вход вход для CD/MP3 Expression Pedal Input (EX-1)
• Выходы: Аналоговый выход: стерео-пара на балансных 1/4″ TRS джеках, с регулировкой уров Выход на наушники — 1/4″ TRS стерео джек
• Максимум эффектов одновременно: 6
• MIDI: полная поддержка MIDI
• Цифровой выход: USB
• Точность настойки: 430-450 Hz
• LCD
• Встроенный хроматический тюнер
• Встроенная педаль экспрессии
• Моделирование: 36 моделей усилителей Количество моделей кабинетов 24 + 4 модели микрофонов более 80 моделей эффектов
• Регулировки: Stompbox On/Off Switches Combination Wah/Volume/Tweak Pedal Tap Tempo/Tuner Switch
• В комплекте: GuitarPort 2.0 software
• Вес: 7 кг
Обзор №1
Процессор Line 6 POD XT Live – несложный в управлении, отличный по качеству и полностью подготовленный для игры дома, записи на студии и живых выступлений. Это удобная, и компактная машина которая включает в себя великое множество функциональных возможностей. POD XT Live может использоваться как педаль мультиэффектов в петле эффектов любого гитарного усилителя, так же и как достойное решение при подключении в системы усиления напрямую или как гитарный процессор высокого класса для работы в студийных условиях.
Line 6 POD XT Live собрал в себе невероятно большую коллекцию студийных приборов и моделей эффектов. Данная коллекция необходима для каждого гитариста. Все эффекты могут менять своё виртуальное местоположение, например, после или перед моделью кабинета. Так же процессор предоставляет динамические и органичные тона, которые обычно доступны только в очень дорогих сценических комплектах.
36 моделей усилителей, которые находятся в данном процессоре предоставляют весь спектр, от классического звука, до современного модерна. Так же процессор содержит в себе 128 ячеек претесной памяти и 64 заводских предустановленных ячеек, для быстрого подключения к усилителю или устройству записи.
Звук
Звук процессора Line 6 POD XT Live просто мега крутой. При подключении напрямую в линию звук просто изумительный, ощущение один в один как будто играешь через дорогущий Marshall JCM 2000, из списка кабинетов можно выбрать любой другой и они тоже не подведут вас. Отличная педаль экспрессии с вахвах эффектом, она просто превосходно работает.
Качество сборки и надёжность.
Внешне процессор Line 6 POD XT Live внушает доверие. Дисплей, кнопки переключения пресетов и эффектов огорожены парой металлических барьеров. Сам процессор тоже имеет металлический корпус, онзащитит все функционально важные детали от случайных ударов и падений.
Удобство эксплуатации
Банки накручивать придется привыкать… Плюс процессора в том что не придется много листать, параметр редактирования, например как модель кабинетов или какой либо эффект, выбирается джойстиком. После чего можно преступить к редактированию именно этого параметра. Задержки при пресетов и банков нет вообще.
Подводим итоги. Процессор уникален, так скажем три в одном. Гитарный, басовый и вокальный процессор. При этом два из них может работать единовременно, но по разным каналам выхода. Line 6 pod xt live вызывает только положительные эмоции. И на все 100% оправдывает свою цену.
Содержание
- Line 6 pod x3 live подключение к компьютеру
- Line 6 POD XT Live и способы его подключения к внешним акустическим системам (1 онлайн
- KrutoyBobr
- sudden
- Инструкция для Line 6 POD X3, POD X3 Pro, POD X3 Live
- Оглавление инструкции

Для запуска Х3 в безопасном режиме нужно держать клавишу «вправо».
Для изменения контраста:
1)включить
2)нажать и держать в течении нескольких секунд OUTPUTS
3)дважды нажать ВНИЗ
4)покрутить крайнюю левую крутилку под экраном туда-сюда для изменения контраста.

Щас поищу, но можешь на всякий случай ссылку скинуть на эту тему?
Блин, я уже подумал, что у меня глюки..)) Просто раньше поэтапно не было расписано действий )) Хорошо, я попробую..о результатах сообщу сразу же.
Кстати, в безопасный режим зайти я не могу. То есть кнопки перестают реагировать на нажатия, но на дисплее так ничего и не появляется.

Выяснилось, что при продаже я не заметил пункта, где было оговорено, что он с этим дефектом. Поэтому он мне и обошелся в 15 рубликов. Поэтому, ребят, это моя вина. Сейчас попробую договориться о возврате, а если нет, то отправлю в сервис-центр в Москву. Видимо, его продавали по принципу «Есть проц, но кое-что не работает. Подшаманите немного и будет вам проц»..в английском это называлось AS IS (то есть «как есть»). А я этого не понял. Поэтому бесполезно теперь колдовать над ним.
Звук из него не выходит, поэтому гейрбокс тут мне ничем не поможет.
Источник
Line 6 POD XT Live и способы его подключения к внешним акустическим системам (1 онлайн
KrutoyBobr
New Member
Доброго времени суток!
После покупки сего девайса столкнулся с рядом сложностей, связанных с коммутацией процессора. Данный прибор, как многие знают, можно подключать несколькими способами:
1) просто в линию, используя имитированную связку усилитель-кабинет-микрофон
2) в качестве преампа, при подключении «в разрыв» и отключением тем самым имитации кабинета
3) подключение напрямую в голову или комбо, используя «родной» перегруз, а девайс как набор эффектов( ну или как грелку, например)
С первым вариантом все ясно, но вот по поводу других возникают проблемы.
Если я подключаю процессор в разрыв усилителя, то звук становится до безобразия тихим, даже при максимальном уровне выхода. Отсюда вопрос: Это как-то лечится, или же только подзвучка стека спасет от тихой громкости?=)
Далее совсем мне непонятное обстоятельство. Когда подключаю процессор напрямую в голову, даже в режиме бай пас, когда все эффекты, модуляции, усилители отключены, теряется сигнал от самого усилителя, что на чистом, что на перегруженном канале, как будто девайс забирает его. Из-за этого ламповый перегруз звучит максимум как овердрайв, при гейне 80%, хотя без проца данная Mesa довольно-таки некисло рычит.
Понятно, что надо что-то крутить и смотреть, только вот что.
Кто в курсе, подскажите, пожалуйста.
Заранее благодарен всем!:drinks:

sudden
Active Member
Доброго времени суток!
После покупки сего девайса столкнулся с рядом сложностей, связанных с коммутацией процессора. Данный прибор, как многие знают, можно подключать несколькими способами:
1) просто в линию, используя имитированную связку усилитель-кабинет-микрофон
2) в качестве преампа, при подключении «в разрыв» и отключением тем самым имитации кабинета
3) подключение напрямую в голову или комбо, используя «родной» перегруз, а девайс как набор эффектов( ну или как грелку, например)
С первым вариантом все ясно, но вот по поводу других возникают проблемы.
Если я подключаю процессор в разрыв усилителя, то звук становится до безобразия тихим, даже при максимальном уровне выхода. Отсюда вопрос: Это как-то лечится, или же только подзвучка стека спасет от тихой громкости?=)
Далее совсем мне непонятное обстоятельство. Когда подключаю процессор напрямую в голову, даже в режиме бай пас, когда все эффекты, модуляции, усилители отключены, теряется сигнал от самого усилителя, что на чистом, что на перегруженном канале, как будто девайс забирает его. Из-за этого ламповый перегруз звучит максимум как овердрайв, при гейне 80%, хотя без проца данная Mesa довольно-таки некисло рычит.
Понятно, что надо что-то крутить и смотреть, только вот что.
Кто в курсе, подскажите, пожалуйста.
Заранее благодарен всем!:drinks:
Насколько я помню, на Live выходной уровень регулируется маленькой ручкой с торца, кроме того, есть переключатели входного уровня и выходного.
Переключатель Line/Amp регулирует выходной уровень, Line громче.
Ну и под этим переключателем есть маленькая ручка Level, которая регулирует общий выходной уровень.
Источник
Инструкция для Line 6 POD X3, POD X3 Pro, POD X3 Live

Manuel de pilotage
An in-depth exploration of the advanced technologies and
pulsing tonal pleasures of POD X3, POD X3 Live & POD X3 Pro.
Electrophonic Limited Edition available @ www.line6.com/manuals
Оглавление инструкции
® POD X3 Family Pilot’s Handbook Manuel de pilotage Pilotenhandbuch Pilotenhandboek Manual del Piloto An in-depth exploration of the advanced technologies and pulsing tonal pleasures of POD X3, POD X3 Live & POD X3 Pro. 40-00-0120 Electrophonic Limited Edition available @ www.line6.com/manuals Rev
Important Safety Instructions C A UT I O N RISK OF ELECTRIC SHOCK DO NOT OPEN WARNING : TO REDUCE THE RISK OF ELECTRIC SHOCK, DO NOT REMOVE COVER (OR BACK). NO USER-SERVICEABLE PARTS INSIDE. REFER SERVICING TO QUALIFIED SERVICE PERSONNEL. WARNING : TO REDUCE THE RISK OF FIRE OR ELECTRIC SHOCK, DO
You should read these Important Safety Instructions Keep these instructions in a safe place • • • • • • • • Read these instructions. Keep these instructions. Heed all warnings. Follow all instructions. Do not use this apparatus near water. Clean only with dry cloth. Do not block any ventilation
Please Note: Line 6, POD, POD X3, POD X3 Live, POD X3 Pro. PODxt, Vetta, FBV, FBV Shortboard, FBV Express, and FBV4 are trademarks of Line 6, Inc. All other product names, trademarks, and artists’ names are the property of their respective owners, which are in no way associated or affiliated with
Table of Contents Tutorial: POD X3 Live for Guitar. 1•1 Tutorial: POD X3 & POD X3 Pro for Guitar. 2•1 Controls & Connections. 3•1 POD
EQ. 5•14 Wah. 5•15 Volume
Tutorials Tutorial: POD X3 Live for 1•1 1. Plug your guitar into Guitar In. 2. Turn on POD X3 Live. 3. Recall User Preset “32D: Tutorial1”. Press to get to User Bank 32 Guitar Press to load preset D.
Tutorials 4. The Home Page shows with the Amp+Cab block selected. 1•2 5. Pick an Amp Model. Double-press to show AMP+CAB settings. Turn to pick an Amp Model. 6. Tweak the Amp Tone Controls. TYPE selects from Guitar, Bass and Pre-Amp Models.
Tutorials 7. Pick a Stomp Model and tweak it. 1•3 Double Press Turn to select DISTORTION: KILLER Z Press down to select lower row. Turn to tweak upper row settings. Turn to tweak lower row settings.
Tutorials 8. Show the Delay settings. 1•4 Double Press 9. Set the Delay tempo, and set it to run post (after the Amp Model). Press down to select lower row. Tap is set to quarter note. Tap delay temo. Set CONFIG to POST.
Tutorials 10. Select the EQ. 1•5 Press to show the Home Page. Press up/down/left/ right to select EQ. Press to turn EQ on/off. 11. Tweak the EQ. Press up/down to select upper/lower row. There is no model select for EQ. Double-press to show EQ settings.
Tutorials 12. Turn both Tones on at once. 1•6 HOLD FOR 2 SECONDS 13. Load preset to Tone 2 Only.
Tutorials 14. Select and Tweak Tone 1/Tone 2. 1•7 Tone 1 is selected above. Tone 2 is selected above. PRESS BRIEFLY 15. These knobs and footswitches control only one Tone at a time:
Tutorials 16. Tweak combined volume of Tone 1 + Tone 2. 1•8 17. Save. PRESS Press to finish save. Choose a User location to save to. Choose to edit name for Tone 1 or Tone 2. Move cursor. Change character.
Tutorials 4. Turn on the Amp Model. PRESS 2•2 AMP+CAB is off (outlined). AMP+CAB is on (black). 5. Pick an Amp Model. PRESS Double-press Turn to pick an Amp Model. TYPE selects from Guitar, Bass and Pre-Amp Models. 6. Tweak the Amp Tone Controls.
Tutorials 7. Pick a Stomp Model and tweak it. 2•3 Double-press Turn to select DISTORTION: KILLER Z Press down to select lower row. Turn to tweak upper row settings. Turn to tweak lower row settings. 8. Show the Delay settings. DOUBLE-PRESS TO ADJUST Double-press
Tutorials 9. Set the Delay tempo, and set it to run post (after the Amp Model). 2•4 Tap delay tempo Press down to select lower row. Tap is set to quarter note. Set CONFIG to post. 10. Select the EQ. Press to show the Home Page. Press up/down/left/ right to select EQ. Press to turn EQ on/off. 11.
Tutorials 15. These knobs and buttons control only one Tone at a time: DRIVE BASS MIDDLE TREBLE PRESENCE REVERB 2•6 TONE VOLUME PRESS ON/OFF • DOUBLE-PRESS TO ADJUST 16. Tweak the combined volume of Tone 1 + Tone 2. 17. Save. PRESS Press to finish save. Choose a User location to save to. Choose to
Controls & Connections Controls & Connections POD X3 3•1 1 Display – the LCD (liquid crystal display) is your window into the power of POD X3. You’ll see (2) types of “pages” in the display: Home Page – the “Tone Path” Home Page shows you all the digital processing “blocks” that are working to
Controls & Connections Tone Path Home Page 3•2 2 Select Knob page you’re on. – Big User Home Page (available for User Presets only) Edit Page turning this knob will do different things depending on what Home Page – turn to select presets. See Chapter 4 for all the details. Edit Page – turn to pick
Controls & Connections Press the Home button to leave the Edit page and return to the Home Page. Chapter 5 gives you details on all the Edit pages available. 7 Outputs / Hold for System – press to enter the Outputs setup page, where you can set up POD X3 for whatever you’re connecting it to. This
Controls & Connections setting to just the right value. See Chapter 5 to learn how to set up effects to follow the tempo that you’ve tapped. Press and hold the Tap button for 2 seconds to activate the tuner. You can also add footswitch tuner activation with an optional FBV foot controller. 10 Drive
Controls & Connections Volume to maximum, when setting levels. 15 Clip Light – this lights when clipping is detected, which generally means unpleasantly distorted, bad sound. Try reducing the output level of the device that’s feeding your POD X3, or reducing the Tone Volume for Tone 1 or Tone 2, or
Controls & Connections 20 S/PDIF Out – this jack sends out 24-bit digital versions of the Left & Right Outputs. The System setup page lets you choose the sample rate and adjust the level. See Chapter 6 for the scoop. 21 USB 2.0 – POD X3’s USB 2.0 jack lets you connect directly to a USB 2.0-equipped
Controls & Connections Join the Club! Visit www.line6.com/club to register online and join the All Access club, the place to get: • Free iTunes and MP3 Jam Tracks. • Free loops for GarageBand, Acid, Reason and more. • Free guitar lessons from LA session pros. • Free chord and scale practice tools.
Controls & Connections POD X3 Live HOME HOLD FOR COMMANDS ON/OFF DOUBLE-CLICK TO EDIT PRESS TO SAVE INPUTS OUTPUTS HOLD FOR SYSTEM 3•8 1 Display – the LCD (liquid crystal display) is your window into the power of POD X3 Live. You’ll see (2) types of “pages” in the display: Home Page – the “Tone
Controls & Connections 2 Select Knob page you’re on. – turning this knob will do different things depending on what Home Page – turn to select presets. See Chapter 4 for all the detail. Edit Page – turn to pick a different Model. This works for the Amp, Stomp, Mod, Delay, Reverb, and Wah edit
Controls & Connections 8 Multi-function Knobs – turn any one of these knobs to adjust the corresponding parameter in the display. 3•10 See Chapter 4 to learn about Home Page functions for these knobs. 9 Footswitches – these allow you to do the following: Tone 2 / Hold for Dual – press to toggle
Controls & Connections Tap / Hold for Tuner – POD X3 Live allows you to control the time and speed of your Delay and/or Mod effects by simply tapping on this footswitch. Tap a few times here, and the effects that are set to “lock” to that tempo will change to match what you tapped. There’s also a
Controls & Connections or guitar level inputs. Line level inputs should allow you to turn POD X3 Live’s Master Volume up all the way (or close to it) and thereby get the best sound possible. If your gear has inputs that function as mic/line level inputs, try to set the trim for those inputs to the
Controls & Connections 21 Guitar In – plug your guitar or bass in here. You techies will want to know this is a mono, unbalanced connection. The Guitar In Pad switch sets the sensitivity of this jack. The Inputs page is where you assign whether this input feeds Tone 1, Tone 2 or both. See Chapter 6
Controls & Connections 28 Effects Loop – the Effects Loop provides a mono FX Send and a stereo FX Return, operating at approximately 19.5 Volts peak-to-peak, making it optimal for line level devices. The loop can also be used with most stomp boxes by adjusting the send and return levels. Use the
Controls & Connections • 7 is the sum of the inputs you’ve chosen for Tone 1. • 8 is the sum of the inputs you’ve chosen for Tone 2. You can also connect your headphones or powered speakers directly to POD X3 to hear your computer-generated audio, along with POD X3’s real-time processing. See
Controls & Connections POD X3 Pro ® 3•16 1 Display – the LCD (liquid crystal display) is your window into the power of POD X3 Pro. You’ll see (2) types of “pages” in the display: Home Page – the “Tone Path” Home Page shows you all the digital processing “blocks” that are working to deliver your
Controls & Connections 2 Select Knob page you’re on. – turning this knob will do different things depending on what Select Knob Home Page – turn to select presets. See Chapter 4 for all the details. Edit Page – turn to pick a different Model. This works for the Amp, Stomp, Mod, Delay, Reverb, and
Controls & Connections 8 Multi-function Knobs – turn any one of these knobs to adjust the corresponding parameter in the display. 3•18 See Chapter 4 to learn about Home Page functions for these knobs. 9 Keypad – these buttons allow you to do the following: Tone 2 / Hold for Dual – press to toggle
Controls & Connections This knob, along with the Tone Controls, Reverb, and Tone Volume knobs, adjusts the Tone that is currently selected – Tone 1 or Tone 2. See Chapter 4 for more info on Dual Tone and how this all works. 11 Tone Controls – Bass, Middle, Treble, Presence. Just like any guitar
Controls & Connections 17a Guitar In Pad – engage this Pad to tame hotter signals at the Guitar In jack when you use guitars with active pickups or other high output sources. 18 Low Cut Filter – push this button in to engage the Low Cut Filter for the Mic Input. It cuts 75Hz and below, which is
Controls & Connections 25 S/PDIF I/O – the S/PDIF Out jack sends out 24-bit digital versions of the Direct Out signals. The System setup screen lets you choose the sample rate and adjust the level. See Chapter 6 for details. The S/PDIF In jack receives 24-bit digital audio. 26 Studio/Direct Out –
Controls & Connections 33 USB 2.0 – POD X3 Pro’s USB 2.0 jack lets you connect directly to a USB 2.0-equipped computer, and take advantage of many computer-powered features: • Line 6 Monkey software makes it easy to install software and get updates. Install driver software with Line 6 Monkey, and
Controls & Connections 36 Line Inputs – these two unbalanced 1/4-inch inputs can be used for a second guitar or just about any other instrument or line inputs. The Inputs page is where you assign whether these inputs feed Tone 1, Tone 2 or both. See Chapter 6 for more info. Join the Club! Visit
Getting Around,Tones & Tuner Getting Around, Tones & Tuner POD X3, POD X3 Live and POD X3 Pro allow you to completely tweak your tone, giving you the ability to dial-in just about any sound you can imagine. More importantly, we’ve come up with an amazingly straight-forward way for you to take total
Getting Around,Tones & Tuner • Amp+Cab • Loop (POD X3 Live & Pro) • Gate • Mod • Wah • Dly • Stomp • Rev • EQ • Vol (always on) • Comp 4•2 Each block in the path can be selected, turned on or off (except Volume), and tweaked to your liking. To select a block from the Home Page, use the 4-way Nav
Getting Around,Tones & Tuner If there are multiple rows or multiple pages of parameters in an Edit Page, you can use the Up and Down buttons to get to them all. Press up/down to select upper/lower row for tweaking. Turn to tweak upper row settings. Turn to tweak lower row settings. 4•3 From any
Getting Around,Tones & Tuner The Dual Tone Concept One of the most powerful features of POD X3, POD X3 Live and POD X3 Pro is Dual Tone capability. What is Dual Tone, you ask? There are actually two (2) completely independent Tone paths available in POD X3, POD X3 Live and POD X3 Pro! This allows
Getting Around,Tones & Tuner Dual tone on HOLD Dual tone off 3. Tweak your Tones. From the Home Page, briefly pressing the Tone 2 button (POD X3 & POD X3 Pro) or stepping on the Tone 2 footswitch (POD X3 Live) will toggle between controlling Tone 1 and Tone 2. When you’re on the one you want, you
Getting Around,Tones & Tuner Tone Volume Controls • The Tone Volume knob adjusts the volume of the Tone that is currently selected. Use this control to set the correct balance between Tone 1 and Tone 2. • From the Home Page, the rightmost Multi-function knob lets you adjust the volume of Tone 1 +
Getting Around,Tones & Tuner Preset Folders POD X3, POD X3 Live and POD X3 Pro include over 350 presets to cover a wide range of styles. These presets store complete amp-and-effect selections and settings that you can call up at the touch of a button. Of these presets, there are 128 User locations
Getting Around,Tones & Tuner Locking Tone 2 From the Home Page, you can lock Tone 2 to prevent it from getting overwritten when loading new presets. This is handy when you’re using Tone 2 for vocals and you want to make sure it doesn’t change when you recall guitar presets on Tone 1. Tone 2
Getting Around,Tones & Tuner Tuner Press and hold the Tap button or footswitch for 2 seconds to enter tuner mode — shazam! Instant digital chromatic tuner for Tone 1. The display will change to the following: TUNER 50 440HZ REF 50 E BYPASS AUDIO All Amp Model and effects processing are bypassed so
Reference:Tweaking Tones Reference: Tweaking Tones Amp + Cab Type – turn this knob to select Guitar Amp Models, Bass Amp Models or Pre-Amp type Models. Select Knob – once the Type has been selected, turn the Select Knob to pick an Amp Model. The Model names will appear at the top of the display.
Reference:Tweaking Tones Tone Controls 5•2 Tone Controls adjust the overall tone of the currently-loaded Amp Model. You should know that these controls are individually crafted for each Amp Model, so their response and interactivity will change depending on the Amp Model that is selected. For
Reference:Tweaking Tones Bass Amp Model Tone Controls: Bass – bass tone control. Lo Mid – low-mid tone control. Hi Mid – high-mid tone control. Treble – treble tone control. Drive – controls how hard you’re driving the input of the chosen Amp Model, and just like the input volume control on a
Reference:Tweaking Tones Stomp Boxes 5•4 What guitarist doesn’t like Stompboxes? POD X3, POD X3 Live and POD X3 Pro include an arsenal of amazing-sounding Distortion, Dynamics, and Filter Stomp Box Models, lovingly crafted after a whole carpet-full of the greatest effects of guitar history. Quick
Reference:Tweaking Tones Dynamics Stomp Boxes Sust – varies the compression threshold. Level – adjusts the overall level. Sens – varies the effect’s response to your playing. Amount – on Vetta Juice, varies the ratio of compression. Ramp – for Swell effects, sets the time it takes for your sound to
Reference:Tweaking Tones Attack – controls how long it takes for the effect to happen. Pos – represents the current angle of that pedal, with 0% meaning the pedal is fully heel down, and 100% meaning it’s fully toe down. If you don’t have a pedal connected, you can still adjust Pos to get a “parked
Reference:Tweaking Tones Modulation Effects Modulation effects are things that swoosh, pulse and warble—from phase shifters to flangers to choruses. Why are they called modulation effects? Well, if we consult a dictionary, we discover that ‘modulate’ in the electronic world means to “alter the
Reference:Tweaking Tones (before the amp model), or Post (after the amp model). Fdbk – adjusts how much of the effected signal is fed back to the input of the effect. Manual – on Jet Flanger, controls the length of the very short delay that’s applied to the sweep to make the flanging effect happen.
Reference:Tweaking Tones Delay Select Knob – turn to pick a Delay model. Time – for mono delays, sets the time for the delay line; for stereo delays, sets the time for the left side delay line. Tap – set this to OFF to have this effect ignore tempo, or pick a note value that you’d like your speed
Reference:Tweaking Tones Drive – for Tape Delay models, adds some tube warmth. Flut – for Tape Delay models, adjusts wow-and-flutter, that unique sound of a slipping, dirty capstan. Heads – for some Tape Delays, enables you to choose from the available combinations of the model’s virtual tape
Reference:Tweaking Tones Reverb When we set out to create POD X3, POD X3 Live and POD X3 Pro, we devoted our fanatical modeling technology and energy for innovation to developing no-compromise reverb effects. The collection of reverb models emulate physical environments (rooms and halls), plate
Reference:Tweaking Tones Gate 5•12 The Gate effect helps eliminate unwanted noise when you’re not playing, and can be especially valuable when using high gain sounds. Like a security gate, it’s supposed to quickly open to pass the things that you want, and then swing closed to keep out the things
Reference:Tweaking Tones EQ 5•14 Here’s some good, old-fashioned EQ to make your tone sparkle, rattle the neighbor’s windows, and everything in-between. You’ve got (2) bands of shelving EQ and (2) bands of semi-parametric “peaking” EQ to choose from. Lo Fq – sets the corner frequency of the
Reference:Tweaking Tones Wah The Wah effect is generally expected to be controlled by the pedal built into POD X3 Live or an optional Line 6 FBV foot controller or third-party MIDI controller. Select Knob – turn to pick a Wah pedal. Your choices are Vetta Wah, Fassel, Weeper, Chrome, Chrome Custom,
Reference:Tweaking Tones Volume Pedal 5•16 The Volume effect is generally expected to be controlled by the pedal built into POD X3 Live or an optional Line 6 FBV foot controller or third-party MIDI controller. Min – determines how much volume you’ll hear when the volume pedal is at its minimum
Reference: Configuration & Setup Reference: Configuration & Setup Inputs Press the Inputs button to get to the Inputs page: INPUTS GUITAR TONE 1 SAME TONE 2 DISABLE GLOBAL S/PDIF CONTROL DIGITAL VARIAX Here, you can route your hardware inputs to Tone 1 and Tone 2. Tone1 – pick an input to get
Reference: Configuration & Setup • Analog Input Restriction: POD X3 Pro does not allow simultaneous input from more than one analog input per Channel Strip. For example, if Gtr 1 is selected as input for Tone 1, no combination of a Tone 1 analog input such as Gtr 1, Mic 1, Line 1, Gtr 1+Gtr 2, Gtr
Reference: Configuration & Setup the second Outputs page. • Studio/Direct Tone 1 – the 1/4-inch jacks output Tone 1 only, panned center, with Studio Mode processing. • Studio/Direct Tone 2 – the 1/4-inch jacks output Tone 2 only, panned center, with Studio Mode processing. “Live” Modes (for feeding
Reference: Configuration & Setup Outputs Page 2: Studio/Direct Mix STUDIO/DIRECT MIX ON TONE 1 MATCH STUDIO/ DIRECT DIGITAL PAN 48kHz RATE ON TONE 2 PAN +12dB S/PDIF LE VEL FORMAT • This mix provides POD’s legendary direct recording sound, ideal for connecting direct to a mixer, recorder, PA, or
Reference: Configuration & Setup to increase the digital output level of sounds that don’t have a lot of Amp Model or stompbox distortion or other settings that are driving their levels up. Format – selects the digital output’s format, either S/PDIF or AES/EBU for POD X3 Pro, S/PDIF for POD X3 and
Reference: Configuration & Setup • 1-Wah/Vol 2-Tweak – Pedal 1 controls Wah and Volume with the toe switch toggling between the two. Pedal 2, if present, controls whatever is assigned to Tweak. Mstvol (POD X3 Live & POD X3 Pro only) – choose whether the Master Volume knob will control 1/4-Live
Reference: Configuration & Setup Commands Press and hold the Home / Hold for Commands button for 2 seconds to get to the Commands page: Turn the Select knob to choose a Command, then press the Save button to execute the Command. Press the Home button to exit without executing a command. Swap Tone 1
Example Setups Example Setups Need quick instructions for a particular setup? Just follow these easy steps. And like any good recipe, once you’ve got the hang of things, feel free to add your own tweaks on these recommended settings to spice it up. Mono or Stereo Recording or Direct to Mixer/PA
Example Setups Recording Tone 1 & 2 to Separate Mono Tracks 1. Connect outputs to your recorder: • POD X3: connect the 1/4-inch outs. • POD X3 Live & POD X3 Pro: the XLR outputs are recommended for live sound systems, to provide a level that approximately matches a mic’ed up amp. You can also use
Example Setups 3. Set the first OUTPUTS page (1/4-inch jacks Outputs): • Mode: Studio/Direct Tone 1 Feed One Guitar Amp 1. Connect 1/4-inch output(s) to your amp or speaker system. 2. Set the first OUTPUTS page (1/4-inch Outputs): • Mode: Combo Front, Combo Pwramp, Stack Front, or Stack PwrAmp. •
Example Setups • Tone 1 Pan: Full Left • Tone 2: On • Tone 2 Pan: Full Right 3. Check your Master Volume. • Select the loudest preset/settings you intend to use. • Play your instrument and turn Master Volume as high as you can without clipping the amp/speakers you’re feeding. Feed Two Guitar Amps,
Example Setups • From the Home Page, turn the second knob below the display, and begin loading Tone 2 settings. • Selecting Tone 1 from the preset you just saved (you’ve copied Tone 1 to Tone 2). • Set Tone 2’s Tone Volume low. • Add more effects to Tone 2, cranking up the effect mixes, so you hear
Example Setups • Select the loudest preset/settings you intend to use. • Play your instrument and turn Master Volume as high as you can without clipping the amp/speakers you’re feeding. Electric Guitar to On-Stage Amp and Direct Out + Vocals/ Acoustic/etc. to Direct Out Only 1. Connect your
Example Setups 8. Check your Master Volume. • Select the loudest preset/settings you intend to use. • Play your instrument and turn Master Volume as high as you can without clipping the amp/speakers you’re feeding. 7•7
USB & Computer Software USB & Computer Software Updating POD X3, POD X3 Live or POD X3 Pro’s Firmware Here are step-by-step instructions for making sure your POD X3, POD X3 Live or POD X3 Pro has the latest firmware installed. 1. From www.line6.com/monkey, download and install the latest version of
USB & Computer Software POD X3 Live or POD X3 Pro and complete its startup. 6. On the Updates tab, look to see if your USB Firmware and Flash Memory are up to date. • If either one doesn’t show a green circle with a checkmark, highlight Device Firmware and click the Update button to the right.
USB & Computer Software 5. The 7 and 8 inputs are perfect as raw sources for plug-in processing. • See www.line6.com/gearbox_plugin for info on our POD X3-equivalent plugin. 6. Connect your headphones or powered speakers directly to your POD X3, POD X3 Live or POD X3 Pro to hear your
PRESS TO HOLD FOR SYSTEM OUTPUTS DOUBLE-CLICK TO EDIT ON/OFF TONE 2 ON TONE 1 MODE WAH STOMP WAH STOMP PAN ON TONE 2 1/4-INCH OUTPUTS PAN STUDIO/DIRECT MIC/ROOM/SPEAKER SIMULATION COMBO OR STACK FRONT OR PWRAMP VOL (PRE) GATE VOL (PRE) GATE TONE 1 TONE 2 SAVE TONE 1 OR STUDIO/ DIRECT TONE 1 MODE
PRESS TO LOOP: TONE 1 OR TONE 2 (NOT BOTH) HOLD FOR SYSTEM OUTPUTS DOUBLE-CLICK TO EDIT ON/OFF TONE 2 TONE 1 WAH STOMP ON TONE 1 MODE PAN ON TONE 2 1/4-INCH OUTPUTS COMBO OR STACK FRONT OR PWRAMP PAN STUDIO/DIRECT MIC/ROOM/SPEAKER SIMULATION LOOP (PRE) VOL (PRE) GATE WAH STOMP LOOP (PRE) VOL (PRE)
PRESS TO GATE LOOP: TONE 1 OR TONE 2 (NOT BOTH) TAPPED FROM CHANNEL STRIP INPUTS HOLD FOR SYSTEM OUTPUTS DOUBLE-CLICK TO EDIT ON/OFF TONE 2 TONE 1 WAH STOMP TONE 1 MODE PAN TONE 2 1/4-INCH OUTPUTS COMBO OR STACK FRONT OR PWRAMP PAN STUDIO/DIRECT MIC/ROOM/SPEAKER SIMULATION LOOP (PRE) VOL (PRE) GATE
Источник
Table of Contents for Line 6 Bass PODxt Live:
-
Modeled Amps & Cabs 5•28 Tube Preamp Not even close to being a guitar amp, but once we got started, we just couldn’t stop ourselves. The thinking went like this: ‘Once people get this PODxt Live, they’re gonna wish they could use it for everything — warming up keyboards, crunching up drums, fuzz- ing up vocals. We’ve gotta give ’em something to do that!’ So we did. The Tube Preamp Model lets you warm
-
Modeled Amps & Cabs 5•18 Brit JM Pre — Based on* a Marshall ® JMP-1 Marshall ® ’s entry into the rackmount preamp world, the JMP-1, has been a favorite of ‘big-hair’ metal guitarists as well as many others looking for a tight, highly saturated tone without the compression of poweramp ‘sag.’ It was also one of the first MIDI-controllable preamps. The overdrive flavor of the JMP is somewhat “Boogie ® -esque” and many people saw the JMP as Marshall ® ’s answer
-
Effect Model Details 6•36 Reverse Delay !seltaeB eht dna xirdneH imiJ ekil tsuJ — Take a step back in time with your cool new reverse delay. Whatever you play in comes back out at you backwards, delayed by the time you set (up to 2 seconds). To use this little wonder most effectively, try playing a legato lick, ignoring the reverse playback as well as you can. Longer licks can translate into very cool reverse phrases. We’ve seen Tom Petty guitarist Mi
-
Effect Model Details 6•11 Vetta Comp A Line 6 original, Vetta Comp has a fixed ratio (2.35:1, in case you’re asking) with the threshold (that would be your sens knob) adjustable from -9dB to -56dB and up to 12dB of gain available at the level knOB. In other words, turn the sens knob til you like the way your signal’s compressed, then set the volume with LeveL. Auto Swell This effect is an envelope generator, similar to the Boss ® SG-1 Slow Gear and other pedals. Each note or chord that
-
Effect Model Details 6•1 effect Model details This symbol indicates Models from the FX Junkie Pack, included free with PODxt Live. visit www.line6.com/modelpacks to learn about other available Model Packs. What guitarist doesn’t like stomp boxes and effects? PODxt’s got a bunch of great stomp box and effect models adapted from Line 6’s DM4 Distortion Modeler, MM4 Modula- tion Modeler, and DL4 Delay Modeler pedals, and some brand spankin’ new models that come straight from our flagship combo, Vetta. You’ll also find the ol’ standby’s like Ping Pon
-
Modeled Amps & Cabs 5•26 Class A-15 — Based on* a 1960 Vox ® AC 15 Here’s another Vox ® -inspired Amp Model. This model is based on Channel 1 of a won- derful 1960 AC 15. The sound is similar to the more famous Vox ® AC 30, but this is a smaller amp (one, instead of two, 12-inch speakers) with a warmer, more “woody” sound. Once again, the original amp had only a single tone control—a treble cut. We faithfully modeled that and then slipped in some post-Amp Model Bass and Mid conto
-
Creating & Storing Sounds 4•8 Reverb settings Our next stop on our little trip through the edit wonderland is the Reverb page. (To get there, turn the Select knob one click clockwise from deLay’s last edit page: Here you’ve got the ability to change the reverb model (PODxt Live’s got plenty of them), as well as the associated parameters necessary to get that really groovy verb going on. Wah Settings From the
-
Effect Model Details 6•29 Hi Talk The Line 6 tone chefs managed to combine a moog-like filter and a rotary speaker in a touch-sensitive, tap-tempo package. As a result, the Hi Talk can make heads spin with its high-passed filtered frequencies. Try this one to dress up some mean distortion! Sweeper Imagine having 2 wah pedals on steroids separated in a stereo field that are pulsating in opposite positions and you’re close to what you’ll hear here. Use the q and freq to set the character of the sweep and adjust yo
-
Modeled Amps & Cabs 5•2 Line 6’s OriginaLs We’ll start the introductions with the original Amp Models that Line 6 created to give you even more tonal options than you could get from vintage gear alone: Line 6 Clean To create this Amp Model, we essentially grafted the preamp and tone stack of our model based on* a JC-120 (Roland ® ’s popular “Jazz Chorus” solid state combo) onto the poweramp and transformer of our model based
-
Modeled Amps & Cabs 5•11 Two-Tone — Based on* a Gretsch ® 6156 Another amp made by Valco/Supro, this is the Gretsch ® 6156. One of its curiosities is that the output transformer is actually mounted on its single 10-inch speaker, rather than on the amp chassis. It also has a lovely wraparound grill cloth, for a real futuristic look (or what passed
-
Effect Model Details 6•8 Bass Overdrive This model was inspired by our look at the Tech 21 Bass Sans Amp, plus a few extra liberties taken by the Line 6 sound design team. The Sans Amp is famous for delivering a very quiet and crisp signal under all circumstances, while also serving up a very distinct distortion. Is pleasingly metallic quality makes it a favorite with the Post-Metal crowd and Industrial bands, and producers in all genres of music have come to favor the Bass Sans Amp for crunching up loops. The Bass Overdrive covers the same sort of ter
Questions, Opinions and Exploitation Impressions:
You can ask a question, express your opinion or share our experience of Line 6 Bass PODxt Live device using right now.
Download or browse on-line these Pilot’s Handbook Manual for Line 6 Bass PODxt Live Guitar, Musical Instrument.
Summary of Contents:
 |
[Page 1] Line 6 Bass PODxt Live … |
 |
[Page 2] Line 6 Bass PODxt Live … |
 |
[Page 3] Line 6 Bass PODxt Live … |
 |
[Page 4] Line 6 Bass PODxt Live PRO BASS TONE ON THE FLOOR POD LIVE XT BA SS An in-depth exploration of the revolutionary technologies and pulsing tonal pleasures that lurk within Bass POD XT Live. Electrophonic Limited Edition. Also available at www.line6.com. Revision B… |
 |
[Page 5] Line 6 Bass PODxt Live SERIAL NO: Y OU SHOULD READ THESE I MPORTANT S AFETY I NSTRUCTIONS K EEP THESE INSTRUCTIONS IN A SAFE PLACE The serial number can be found on the left side of the rear … |
 |
[Page 6] Line 6 Bass PODxt Live Please Note: Line 6, POD, POD XT , POD XT Live, Bass POD XT Live, POD XT Pro, FBV, FBV Shortboard, FBV4, FBV2, Amp Farm, Line 6 Monkey and Variax are trademarks of Line 6, Inc. All other product names, trademarks, and artists’ n… |
 |
[Page 7] Line 6 Bass PODxt Live Quick Start Guide ……………………………………………………………………..1•1 Register Now! ………………………………………………………………………………………………………………….. |
 |
[Page 8] Line 6 Bass PODxt Live Creating & Storing Sounds…………………………………………………………4•1 Recalling Channel Memories …………………………………………………………………………………………4•1 Editing Ba… |
 |
[Page 9] Line 6 Bass PODxt Live Stomp Models: Auto Wah……………………………………………………………………………………………….6•9 The Modulation Models………………………………………………………………………………… |
 |
[Page 10] Line 6 Bass PODxt Live Q UICK S TART G UIDE • “Manual? I don’t need no stinking manual!” 1 • 1 Q UICK S TART G UIDE or: “M ANUAL ? I DON ’ T NEED NO STINKING MANUAL !” 1. On… |
 |
[Page 11] Line 6 Bass PODxt Live Q UICK S TART G UIDE • Register now! 1 • 2 Register now! Included in this manual is a handy, postage-paid card for you to send back to us to register your purchase. It’s very important that you fill that regi… |
 |
[Page 12] Line 6 Bass PODxt Live QUICK START GUIDE • Introduction 1 • 3 Introduction Welcome To Bass PODXT Live… Thank you for inviting Bass PODXT Live into your life. Whether you use it as the ultimate multi-effect pedal, a direct recording miracle, a powerhouse preamp, a pr… |
 |
[Page 13] Line 6 Bass PODxt Live QUICK START GUIDE • Introduction 1 • 4 guitar amp title. After that, we poured the same magic elixir into the classic POD and—ta-dah!—POD XT and Bass PODXT were born. It’s now available in the original bean shape, a rack mount, and the fl… |
 |
[Page 14] Line 6 Bass PODxt Live QUICK START GUIDE • Introduction 1 • 5 Amp, Cab and Effect Models The tone and technology know-how of Line 6 thus comes to you as Amp, Cab and Effect Models based on a collection of gear recognized by guitarists and bassists the world over as t… |
 |
[Page 15] Line 6 Bass PODxt Live QUICK START GUIDE • Introduction 1 • 6 markedly different tones resulting from the choice of speakers, wood, and other details of a great real-life speaker cabinet. Other equipment also fails to reproduce the significant tonal contribution of m… |
 |
[Page 16] Line 6 Bass PODxt Live QUICK START GUIDE • Introduction 1 • 7 •The guitar or bass amp, cabinet, and microphone don’t just sit in empty space. The room that they are in contributes importantly to the guitar sound you will record. Reverb can be used to capture the … |
 |
[Page 17] Line 6 Bass PODxt Live QUICK START GUIDE • And Away We Go…. 1 • 8 And Away We Go…. So, now that you know what’s in store, it’s time to experience Bass PODXT Live for yourself. Grab your favorite axe, plug in, and flip back to the handy Quick Start Guide on th… |
 |
[Page 18] Line 6 Bass PODxt Live Controls & Connections 2• 1 C ONTROLS & C ONNECTIONS Now would be a good time to turn to the nifty back cover of this manual and notice that it folds out. Ooh, pretty pictures! The idea is to have this essential pictorial… |
 |
[Page 19] Line 6 Bass PODxt Live Controls & Connections 2• 2 MIDI In & Out — Connect Bass POD XT Live to your MIDI equipment to select Channel Memories (via Program Change messages), or automate Bass POD XT Live settings (via controllers and/or Sy… |
 |
[Page 20] Line 6 Bass PODxt Live Controls & Connections 2• 3 that your amp adds. You just want to make sure that you’re not getting extra distortion degrading your sound and preventing you from achieving the tones you want with your Bass POD XT -Live-and-amp-s… |
 |
[Page 21] Line 6 Bass PODxt Live Controls & Connections 2• 4 Select — Bass PODXT Live has 64 Channel Memories. They are arranged in 16 banks of four channels each. (The four are called A, B, C, and D.) You can think of each bank as a sort of virtual four-channel bas… |
 |
[Page 22] Line 6 Bass PODxt Live Controls & Connections 2• 5 Displays — The left of these displays always shows the bank number and channel letter of the currently selected Channel Memory. The right of these displays, Bass POD XT Live’s LCD (liquid crystal display), is yo… |
 |
[Page 23] Line 6 Bass PODxt Live Controls & Connections 2• 6 Amp Tone Controls — DRIVE, BASS, LO MID, HI MID, TREBLE. These control the tone of the Amp Modeling that you have selected. (The A MP footswitch determines whether the Amp Modeling is on or off; if it’s off, y… |
 |
[Page 24] Line 6 Bass PODxt Live Controls & Connections 2• 7 balance the volumes between any two Channel Memories regardless of whether they happen to use Amp Modeling or not. Save — When you want to store your own tweaked-up sounds in your Bass POD XT Live, this button is… |
 |
[Page 25] Line 6 Bass PODxt Live Controls & Connections 2• 8 The S AVE button also lets you customize any of the Amp Models to your own taste so your favorite settings for that amp comes up instantly when you load the A MP MODEL. See page 4•15 for the details on that. E… |
 |
[Page 26] Line 6 Bass PODxt Live Controls & Connections 2• 9 Amp, Stomp, Mod, Dly/Vrb — These footswitches show you which of these “blocks” of sound processing is currently running. Light on means that item is active. Light off means it’s bypassed. Step on a switch to… |
 |
[Page 27] Line 6 Bass PODxt Live Controls & Connections 2• 10 down to the left when the note’s flat. The little ball will sit right in the middle when you’ve got it just right. Give Bass POD XT Live’s TUNE/SYSTEM button a push and the tuner disappears just as swiftly … |
 |
[Page 28] Line 6 Bass PODxt Live G ETTING S ET U P • All Purpose Basics 3 • 1 G ETTING S ET U P The numbers in black boxes below and throughout the chapter refer to the back cover foldout’s illustrations Bass POD XT Live is read… |
 |
[Page 29] Line 6 Bass PODxt Live G ETTING S ET U P • Variax 3 • 2 Variax The Variax line of guitars and basses is unique, thanks to Line 6 modeling technology that gives you a whole collection of guitars or basses in one single instrument. (You can … |
 |
[Page 30] Line 6 Bass PODxt Live G ETTING S ET U P • On Stage 3 • 3 On Stage Keeping Your Options Open When you’re playing live with Bass POD XT Live, you’ve got a choice of setups. You can plug your Bass POD XT Live in between your … |
 |
[Page 31] Line 6 Bass PODxt Live G ETTING S ET U P • On Stage 3 • 4 the Cabinet Models are revoiced to sound their best coming through the kind of setup you choose. The two “with EQ” modes also give you some Tone Correction controls, as shown her… |
 |
[Page 32] Line 6 Bass PODxt Live GETTING SET UP • On Stage 3 • 5 To activate Bass POD XT Live’s Bi-Amp mode and adjust its options, press the TUNE/ S YSTEM button and then turn the SELECT knob until you see this page: Press the far-left Soft Button below SLOPE and select fro… |
 |
[Page 33] Line 6 Bass PODxt Live GETTING SET UP • On Stage 3 • 6 Getting The Right Tone With An Amp The first thing to consider when running Bass PODXT Live in front of an amp is what you want to achieve. If you want to use your amp for its tone, with Bass PODxt Live supplying… |
 |
[Page 34] Line 6 Bass PODxt Live GETTING SET UP • On Stage 3 • 7 External Stomp Boxes and PODXT LIVE If you’ve been playing bass for awhile, you probably have some favorite pedals that you dig. And even though Bass POD XT Live has now graced your life with some pretty hip st… |
 |
[Page 35] Line 6 Bass PODxt Live GETTING SET UP • In The Studio 3 • 8 In The Studio To use the USB connector, visit www.line6.com/monkey and use it to grab Bass PODXT Live USB Driver software. What are you connecting to? Your Bass PODXT Live needs to adjust itself to deliver t… |
 |
[Page 36] Line 6 Bass PODxt Live GETTING SET UP • In The Studio 3 • 9 C HANNEL VOLUME knobs up to maximum. If your equipment has a couple of open line-level only inputs, you’ll probably get better performance by plugging into these, rather than the wide-ranging mic-to-lin… |
 |
[Page 37] Line 6 Bass PODxt Live GETTING SET UP • In The Studio 3 • 10 free playback. Flatscreen LCD monitors generally don’t cause hum and buzz. And just in case you’re looking for an excuse to buy one… Line 6 Variax basses and guitars are immune to this sort of radiat… |
 |
[Page 38] Line 6 Bass PODxt Live Creating & Storing Sounds • Recalling Channel Memories 4 • 1 C REATING & S TORING S OUNDS This chapter gives you the inside scoop on editing your new Bass POD XT Live. Here, we’ll take you through everyth… |
 |
[Page 39] Line 6 Bass PODxt Live Creating & Storing Sounds • Inside the Edit Menu 4 • 2 To begin your editing adventure, all you have to do is press the E DIT button to light it up. Now turn the S ELECT knob. Well lookey here, everything yo… |
 |
[Page 40] Line 6 Bass PODxt Live Creating & Storing Sounds • Inside the Edit Menu 4 • 3 Look carefully now… do you see the little ‘dots’ by the knobs? These tell you where the knobs were last saved. Reach up and spin the Drive knob. Notice that the knob mo… |
 |
[Page 41] Line 6 Bass PODxt Live Creating & Storing Sounds • Inside the Edit Menu 4 • 4 These settings allow you to completely customize the sound of the virtual recording environment we call A.I.R. — all without leaving the privacy of your own mind! Comp/Gate settings Fr… |
 |
[Page 42] Line 6 Bass PODxt Live Creating & Storing Sounds • Inside the Edit Menu 4 • 5 Pressing the two left Soft Buttons simultaneously will set the EQ “flat,” so all bands have a gain setting of 0 and a default setting for frequency. Press the third Soft Button fr… |
 |
[Page 43] Line 6 Bass PODxt Live Creating & Storing Sounds • Inside the Edit Menu 4 • 6 Mod and Delay/Reverb settings Turn the SELECT knob one click clockwise from the STOMP page(s) to see the Mod settings pages. Turn S ELECT another couple clicks clockwise to see the Dly/R… |
 |
[Page 44] Line 6 Bass PODxt Live Creating & Storing Sounds • Inside the Edit Menu 4 • 7 And this is what the full signal flow looks like inside your Bass POD XT Live, including the pre and post options for Mod, Delay/Reverb and the Volume pedal: Setting your Tone to Tempo M… |
 |
[Page 45] Line 6 Bass PODxt Live Creating & Storing Sounds • Inside the Edit Menu 4 • 8 Mod and Delay/Reverb X-Overs While effects are great, they can sometimes cause a lack of tonal definition. The biggest problem is often what they do to the bass frequencies, where things… |
 |
[Page 46] Line 6 Bass PODxt Live Creating & Storing Sounds • Inside the Edit Menu 4 • 9 Wah and Volume Settings From the last Reverb edit page, spin the SELECT knob one click clockwise and you’ll find the wah and volume pedal parameters. The display now looks something li… |
 |
[Page 47] Line 6 Bass PODxt Live Creating & Storing Sounds • Inside the Edit Menu 4 • 10 Assigning the Pedal and Tweak Knob and Dialing in Tempo Light up the Edit button and spin the Select knob clockwise to the last page and you’ll get this page: Press the Soft Button … |
 |
[Page 48] Line 6 Bass PODxt Live Creating & Storing Sounds • Inside the Edit Menu 4 • 11 Variax The Variax line of basses and guitars is unique, thanks to Line 6 modeling technology that gives you a whole collection of guitars or basses in one single instrument. (You can l… |
 |
[Page 49] Line 6 Bass PODxt Live Creating & Storing Sounds • Inside the Edit Menu 4 • 12 fully customized with Variax Workbench. All Line 6 provided sounds will be programmed to use these Factory versions of your Variax Models. You should also restrict yourself to these Mo… |
 |
[Page 50] Line 6 Bass PODxt Live Creating & Storing Sounds • Inside the Edit Menu 4 • 13 D.I. Settings Spin the SELECT knob fully clockwise to see the edit page with D.I. settings: The two parameters on the left side of the page let you adjust the D.I. signal for mixing wit… |
 |
[Page 51] Line 6 Bass PODxt Live Creating & Storing Sounds • Saving Yourself 4 • 14 Saving Yourself Bass PODXT Live lets you save as many as 64 tones that you create as described earlier in this chapter. And even though we ship it to you chock full of some of our favorites,… |
 |
[Page 52] Line 6 Bass PODxt Live Creating & Storing Sounds • Saving Yourself 4 • 15 Custom Saving Amp Models Using this powerful feature, you can pack your Bass PODXT Live with all the special amp-tweaking genius that only you possess. This brilliance will then be availabl… |
 |
[Page 53] Line 6 Bass PODxt Live Creating & Storing Sounds • Saving Yourself 4 • 16 Single Channel Recall Imagine this: you’re in the middle of massive inspiration, moving at the speed of light, and before you know it… you just saved an edit over one of your favorite fa… |
 |
[Page 54] Line 6 Bass PODxt Live Creating & Storing Sounds • Saving Yourself 4 • 17 MIDI Dumps If you want to transfer one or more tones directly from one Bass PODXT Live to another Bass POD XT Live, or between Bass PODXT Live and a MIDI data recorder, workstation, compute… |
 |
[Page 55] Line 6 Bass PODxt Live Creating & Storing Sounds • Saving Yourself 4 • 18 Transferring Only Some Channels — To transfer only one or more individual Channel Memories, Effects Setups or Amp Models from one Bass POD XT Live to another, do this: Press S AVE once, an… |
 |
[Page 56] Line 6 Bass PODxt Live Modeled Amps & Cabs • Which Amps and Cabs Are Modeled? 5 • 1 M ODELED A MPS & C ABS Which Amps and Cabs Are Modeled? General Notes About the Models As you may have guessed, we’re tone fanatics here at Line … |
 |
[Page 57] Line 6 Bass PODxt Live Modeled Amps & Cabs • Amp 360: Based on* an Acoustic 360 5 • 2 Amp 360: Based on* an Acoustic 360 This amp was modeled after an Acoustic 360, as used by Larry Graham, John Paul Jones, and Jaco Pastorius. We modeled an earl… |
 |
[Page 58] Line 6 Bass PODxt Live Modeled Amps & Cabs • Alchemist: Based on* an Alembic F-2B 5 • 3 Alchemist: Based on* an Alembic F-2B Back in the mid and late ‘60’s, the San Francisco Bay Area was quite a cultural hot spot. And as the “San Francisc… |
 |
[Page 59] Line 6 Bass PODxt Live Modeled Amps & Cabs • Rock Classic: Based on* an Ampeg ® SVT ® 5 • 4 Rock Classic: Based on* an Ampeg ® SVT ® For 30 years now, we’ve heard the tone and felt the power of the mighty Ampeg ® SVT. … |
 |
[Page 60] Line 6 Bass PODxt Live Modeled Amps & Cabs • Adam and Eve: Based on* an Eden Traveller WT-300 5 • 5 amp on those records is as fresh and exciting today as it was 35 years ago. And if he’s not enough to convince you, how about “Duck” Dunn? Don�… |
 |
[Page 61] Line 6 Bass PODxt Live Modeled Amps & Cabs • Silverface Bass: Based on* a Fender ® Bassman ® Head 5 • 6 you’ll find that the Hi Mid control might give you more bright than you really want. On the other hand, when you turn the Lo Mid kn… |
 |
[Page 62] Line 6 Bass PODxt Live Modeled Amps & Cabs • Double Show: Based on* a Fender® Dual Showman® 5 • 7 Double Show: Based on* a Fender ® Dual Showman ® Have you ever wanted a Fender ® Bassman ® that wouldn’t distort once you turned it up loud enough to hear… |
 |
[Page 63] Line 6 Bass PODxt Live Modeled Amps & Cabs • Hiway 100: Based on* a Hiwatt® DR-103 5 • 8 Hiway 100: Based on* a Hiwatt ® DR-103 Long before instrument amp designers copped to the fact that you need a ton of wattage for “real” bass, we bassists were stuck w… |
 |
[Page 64] Line 6 Bass PODxt Live Modeled Amps & Cabs • Hiway 200: Based on* a Hiwatt® 200 DR 5 • 9 Hiway 200: Based on* a Hiwatt ® 200 DR Imagine a brighter SVT ® with a little more attack and you’ve got an accurate aural image of this 200-watt, 75 pound tone monste… |
 |
[Page 65] Line 6 Bass PODxt Live Modeled Amps & Cabs • British Major: Based on* a Marshall® Major 5 • 10 British Major: Based on* a Marshall ® Major For this model, we studied our 1969 Marshall ® Major. While doing the initial research, we discovered our amp had the w… |
 |
[Page 66] Line 6 Bass PODxt Live Modeled Amps & Cabs • British Bass: Based on* a Marshall® Super Plexi 5 • 11 British Bass: Based on* a Marshall ® Super Plexi This is modeled after a 1968 Marshall ® Super Bass “plexi” with vintage EL-34 tubes. In general, the Supe… |
 |
[Page 67] Line 6 Bass PODxt Live Modeled Amps & Cabs • California: Based on* a Mesa/Boogie® Bass 400+ 5 • 12 California: Based on* a Mesa/Boogie ® Bass 400+ Introduced in the late Eighties, the Bass 400+ features 500 watts of Class A/B operation, with twelve(!) 5881 Out… |
 |
[Page 68] Line 6 Bass PODxt Live Modeled Amps & Cabs • Stadium: Based on* a Sunn® Coliseum 5 • 13 Stadium: Based on* a Sunn ® Coliseum This model is based on the Sunn ® Coliseum 300—the amplifier that spawned the explosion of power line-ups throughout the 60’s an… |
 |
[Page 69] Line 6 Bass PODxt Live Modeled Amps & Cabs • Motor City: Based on* a Versatone Pan-O-Flex 5 • 14 Motor City: Based on* a Versatone Pan-O-Flex While researching the legends of great bass gear, we discovered a true lost gem: the Versatone Pan- O-Flex! This single 12… |
 |
[Page 70] Line 6 Bass PODxt Live Modeled Amps & Cabs • Brit Class A100: Based on* a Vox® AC100 5 • 15 Brit Class A100: Based on* a Vox ® AC100 The Brit Class A100 model in your Bass POD XT Live is modeled after a Vox ® AC-100, the rig Paul McCartney began using in 196… |
 |
[Page 71] Line 6 Bass PODxt Live Modeled Amps & Cabs • Line 6’s Original Models 5 • 16 Line 6’s Original Models Long ago, in a land that time forgot, electric basses existed and bass amps didn’t! That’s right—bass players had to plug into anything they could find … |
 |
[Page 72] Line 6 Bass PODxt Live Modeled Amps & Cabs • Line 6’s Original Models 5 • 17 L6 Super Thor If you were in a roomful of vintage gear, an open back, little ol’ combo amp is probably the last thing you’d choose to play your bass through, right? Well, its one of… |
 |
[Page 73] Line 6 Bass PODxt Live Modeled Amps & Cabs • Line 6’s Original Models 5 • 18 finicky singer/songwriters who don’t want anything getting in the way of their precious guitar or dainty piano! L6 Doppelganger Loosely based on a Fender Twin, this original Line 6 cr… |
 |
[Page 74] Line 6 Bass PODxt Live Modeled Amps & Cabs • Line 6’s Original Models 5 • 19 do that with!’ So we did. Tube Preamp lets you warm up any sound source the way producers and engineers often do in the studio with vintage tube gear. For more “edge” on vocals, … |
 |
[Page 75] Line 6 Bass PODxt Live Modeled Amps & Cabs • Line 6’s Original Models 5 • 20 Cabinet Models The following Cabinet Models are available on Bass PODXT Live, and are accessed by pressing the C AB/A.I.R. button, then turning the EFFECT TWEAK knob: Cabinet Model Base… |
 |
[Page 76] Line 6 Bass PODxt Live Stomp, Mod & Delay/Verb Models • Effect Junkies Welcome 6 • 1 S TOMP , M OD & D ELAY /V ERB M ODELS Effect Junkies Welcome What bassist doesn’t like effects? Bass POD XT Live’s got a bunch of g… |
 |
[Page 77] Line 6 Bass PODxt Live Stomp, Mod & Delay/Verb Models • Gate 6 • 2 Gate The Gate effect helps eliminate unwanted noise when you’re not playing, and can be especially valuable when using high gain sounds. Like a security gate, it’s supposed to qu… |
 |
[Page 78] Line 6 Bass PODxt Live Stomp, Mod & Delay/Verb Models • Stomp Models 6 • 3 Stomp Models Bass POD XT Live’s Stomp effect slot give you a whole line-up of delicious stompbox effects. There are several types of effects here: (1) Distortion and Ov… |
 |
[Page 79] Line 6 Bass PODxt Live Stomp, Mod & Delay/Verb Models • Stomp Models 6 • 4 distortion that a distortion box would create when boosting input level to your amp). We’ve provided you with a number of stompbox compression options in Bass POD XT Liv… |
 |
[Page 80] Line 6 Bass PODxt Live Stomp, Mod & Delay/Verb Models • Stomp Models 6 • 5 Screamer From Stevie Ray Vaughan to Michael Landau, the simple Ibanez® Tubescreamer ® is the overdrive heard ’round the world. This medium-gain pedal was introduced… |
 |
[Page 81] Line 6 Bass PODxt Live Stomp, Mod & Delay/Verb Models • Stomp Models 6 • 6 Facial Fuzz Sometime in late 1966, an infamous circular stompbox hit the London music scene. Designed and built by Arbiter ® Music, the Fuzz Face would soon begin its … |
 |
[Page 82] Line 6 Bass PODxt Live Stomp, Mod & Delay/Verb Models • Stomp Models 6 • 7 Octave Fuzz What was that? If it sounded like a phantom guitar or bass possessed by The Ghost of Great Guitarists Past, then it probably was a Tycobrahe Octavia. The Octavia… |
 |
[Page 83] Line 6 Bass PODxt Live Stomp, Mod & Delay/Verb Models • Stomp Compressors 6 • 8 Stomp Compressors Compression is supposed to be the bassist’s best friend. By including more than just one compressor in the Bass POD XT Live, we hope to give you,… |
 |
[Page 84] Line 6 Bass PODxt Live Stomp, Mod & Delay/Verb Models • Stomp Compressors 6 • 9 Red Comp Back in the ’70’s, this was one of the most popular stomp boxes for bassists. Quite often, it was a bassist’s first purchase because it offered affordable, world-cla… |
 |
[Page 85] Line 6 Bass PODxt Live Stomp, Mod & Delay/Verb Models • Auto Wah 6 • 10 Auto Wah Do you want the Funk? Do you need the Funk? Well, we’ve got the Funk, right here for you! What self-respecting, bass-playing filter-junkie would be without a Mu-Tron III envelope f… |
 |
[Page 86] Line 6 Bass PODxt Live Stomp, Mod & Delay/Verb Models • Modulation Models 6 • 11 modulating wave, which usually determines just how intense the effect will be. There’s always a MIX control, and sometimes there are also other controls. Refer to the individual e… |
 |
[Page 87] Line 6 Bass PODxt Live Stomp, Mod & Delay/Verb Models • Modulation Models 6 • 12 Analog Chorus After the CE-1 came onto the music scene in 1977 and made waves with its big, warm and groovy chorus tones. One of the first bassists to incorporate chorus effects int… |
 |
[Page 88] Line 6 Bass PODxt Live Stomp, Mod & Delay/Verb Models • Modulation Models 6 • 13 Jet Flanger This is our model of the A/DA “studio quiet” Flanger. Mars Cowlong, who made lots of waves as Pat Travers’ bassist in the ‘70’s and 80’s made great use of thi… |
 |
[Page 89] Line 6 Bass PODxt Live Stomp, Mod & Delay/Verb Models • Modulation Models 6 • 14 U-Vibe The now-legendary Uni-Vibe was put on the map in 1969 by Jimi Hendrix. Essentially a four-stage phase shifter, the Uni-Vibe is best known for its watery texture and sultry to… |
 |
[Page 90] Line 6 Bass PODxt Live Stomp, Mod & Delay/Verb Models • Modulation Models 6 • 15 Bias Trem One of our long time favorite pieces of ‘Rube Goldberg’ engineering, the old Vox ® tremolo (and a similar circuit in some blonde and brown Fender ® amps) got its pul… |
 |
[Page 91] Line 6 Bass PODxt Live Stomp, Mod & Delay/Verb Models • Synth and Filter Effects 6 • 16 Synth and Filter Effects A lot of strange things can happen when you spend long, intimate hours in a room with your basses, synths, filters and modern software development tool… |
 |
[Page 92] Line 6 Bass PODxt Live Stomp, Mod & Delay/Verb Models • Synth and Filter Effects 6 • 17 3. Your synth effects are in the STOMP section of your Bass PODXT Live. The filter effects are right next door in the MOD section. This allows you to open up not only your br… |
 |
[Page 93] Line 6 Bass PODxt Live Stomp, Mod & Delay/Verb Models • Synth Models 6 • 18 Synth Models Dingo Tron This is similar to the sound made by a Mutron III when you flip the “down” switch. It’s kind of like a reverse auto wah. Play with a hard attack to get the mo… |
 |
[Page 94] Line 6 Bass PODxt Live Stomp, Mod & Delay/Verb Models • Synth Models 6 • 19 constant. This meant that up until the advent of Bass POD XT Live bassists had to play only in the key of that pitch to be musical. The Saturn 5 RM “tracks” the pitch of your bass sig… |
 |
[Page 95] Line 6 Bass PODxt Live Stomp, Mod & Delay/Verb Models • Filter Models 6 • 20 Synth String This emulates classic synth string sounds like those found in the ARP Solina String Ensemble. Try exploring Waves 3 and 7 with radically opposing Filter and Attack levels, i… |
 |
[Page 96] Line 6 Bass PODxt Live Stomp, Mod & Delay/Verb Models • Filter Models 6 • 21 Line 6 Rotor Select this baby and watch the sparks fly! To our ears, our Line6 tone chefs have managed to combine a moog-like filter and a rotary speaker in a touch-sensitive, tap- tempo … |
 |
[Page 97] Line 6 Bass PODxt Live Stomp, Mod & Delay/Verb Models • Delay Models 6 • 22 Delay Models When you’re looking to add some space to your sound, the Delay/Verb button of your Bass POD XT Live gives you instant access to a mouth-watering line up of delays, echoes a… |
 |
[Page 98] Line 6 Bass PODxt Live Stomp, Mod & Delay/Verb Models • Delay Models 6 • 23 just the push of a button, we bassists can select Analog w/ Mod, add it to our bass rigs for a little “edge” ourselves. Try it after your fave distortion in the Stomp family. Tube Echo… |
 |
[Page 99] Line 6 Bass PODxt Live Stomp, Mod & Delay/Verb Models • Delay Models 6 • 24 really fatten up the low end. One of our Beta testers used to use one between two Ampeg ® SVT ® ’s! That’s 180 pounds more weight than your Bass PODXT Live… my how times have cha… |
 |
[Page 100] Line 6 Bass PODxt Live Stomp, Mod & Delay/Verb Models • Reverb Models 6 • 25 Reverse Delay, then tap in your tempo with your delay time set to lock to a 1/4 note. Set 0% feedback and 65% mix, and you’ve now got a bow-like effect that works great on parts with s… |