Предложите, как улучшить StudyLib
(Для жалоб на нарушения авторских прав, используйте
другую форму
)
Ваш е-мэйл
Заполните, если хотите получить ответ
Оцените наш проект
1
2
3
4
5
-
Bookmarks
Quick Links
IP Phone — Linksys 921
Installation, Set-up and User Guide
June 2008
1
Related Manuals for Linksys 921
Summary of Contents for Linksys 921
-
Page 1
IP Phone — Linksys 921 Installation, Set-up and User Guide June 2008… -
Page 2: Installation
Installation Phone will arrive via FedEx after placing order from your online account. The phone is pre-provisioned at our shipping office. Installation is easy: 1. Plug long straightened end of the coiled phone cord into back of phone. Plug short straightened end into the handset (not shown).
-
Page 3
5060 port number to another available port [examples: 5062, 5064, 5090…). This will mainly happen with older routers, but some newer models may still be affected as well and require a different port for each IP Phone/ATA Adapter. -
Page 4
Installation Tip for Best Voice Quality: A good internet connection is needed to maintain good voice quality. We recommend a high speed DSL, cable or fiber connection with an upload speed of 90kbps or greater. We provision DigitalLine service at the «High/ Automatic» bandwidth setting for better sound quality. -
Page 5
Set-Up After installation, the phone will be automatically listed in the assigned extension’s Forwarded Numbers list. Check the Active box and inbound calls will ring on this device. (404) 555-3245… -
Page 6
Set-Up To change phone’s name, extension assignment, or other provisioning actions, log into your online account, click Preferences, then DigitalLines. Click the View link: (404) 555-3245 (404) 555-3245… -
Page 7
Set-Up Enable to activate the red light at top of the phone when new message arrives. Bottom half of the view panel: 4045553245… -
Page 8
Answering a call to your Local RingCentral number on the IP Phone saves you money! Andy, a Plus Plan customer, has two RingCentral numbers: Phone Number Main: (888) 555-5462 (248) 555-2386 1 minute inbound call, under three scenarios: Subject to Fair Use Policy… -
Page 9
User Guide… -
Page 10
Press the headset button and the green light behind the button will illuminate. For information on the exact models of headsets that are supported, see the IP phone information on http://www.linksys.com Switching Between the Handset/Headset/Speakerphone During a Call Any of the audio devices can be used during a call. -
Page 11
IP Phone User Guide – Mailbox, Mute and Hold Buttons Accessing the Voice Mailbox Access the voice mailbox by pressing the mailbox button and entering your password when prompted. New Message Alert: RingCentral can activate the red light at top of the phone if Mailbox Button you have an new message. -
Page 12: Directory Listing
IP Phone User Guide – Directory listing Dialing a Telephone Number Activate a dial-tone prompt one of three ways: • Lifting the handset, or • Connect the headset and press the headset button, or • Press the speaker button. Enter the telephone number using the phone keypad. You will see Called person Ringing and Connected in sequence as the call is being connected.
-
Page 13
IP Phone User Guide – Redial, Ending a Call and DND Dialing From the Redial List • To redial the last number called, press the soft button below redial twice, or • Press the soft button under redial to see the phone’s history of recent calls you have made. -
Page 14
IP Phone User Guide – Instead of using the phone softkeys, you can click ## while on a call, taking you to the RingCentral server Transfer menu: Put Caller on Hold Press ## Caller will hear hold music you have selected from your online account. -
Page 15
IP Phone User Guide – Three Way Conference Calls To initiate a conference call, press the soft button under conf during an active call. • The first call is placed on hold, and you will hear a dial tone. • Dial the second person’s telephone number. You will be talking privately to the second party when he picks up (first call remains on hold). -
Page 16: Setup — Directory
IP Phone User Guide – Customize the phone using the Setup options by pressing the Setup button 1. Directory (Setup button, 1) To view your phone’s directory options, press the Setup button, then 1, then the soft button under select. Using the navigation button, move up or down to highlight a New Entry or Personal Directory.
-
Page 17: Setup — Speed Dial
IP Phone User Guide – 2. Speed Dial (Setup button, 2) Enter up to 8 speed dial numbers. Each one can be a phone number, IP address or URL. • To setup or edit Speed Dial, press the Setup button, then 2.
-
Page 18
IP Phone User Guide – 3. Call History (Setup button, 3) You can view lists of recently received (up to 60) incoming calls in Call History. Choose from Redial List, Answered Calls or Missed Calls. • To view the phone’s Call History lists, press the Setup button, then 3.
Linksys SPA921
Для начала необходимо войти в веб-интерфейс телефона. Для этого нужно ввести IP-адрес устройства в адресную строку браузера. Узнать его можно нажав кнопку “Меню” (иконка листа), затем “Network” и “CurrentIP”.
Сразу же в правом верхнем углу переключите режим работы на “Advanced”.
Linksys PAP2
Вся настройка производится через веб-интерфейс. Для входа в него необходимо ввести IP-адрес шлюза в адресную строку браузера.
Узнать адрес можно подключив телефон к шлюзу и набрав на нем ****110#.
После чего в правом верхнем углу необходимо перейти в режим “Advanced”.
Linksys SPA8000
Вся настройка производится через веб-интерфейс. Для входа в него необходимо ввести IP-адрес шлюза в адресную строку браузера.
Узнать адрес можно подключив телефон к шлюзу и набрав на нем ****110#.
После чего в правом верхнем углу необходимо перейти в режим “Advanced”.
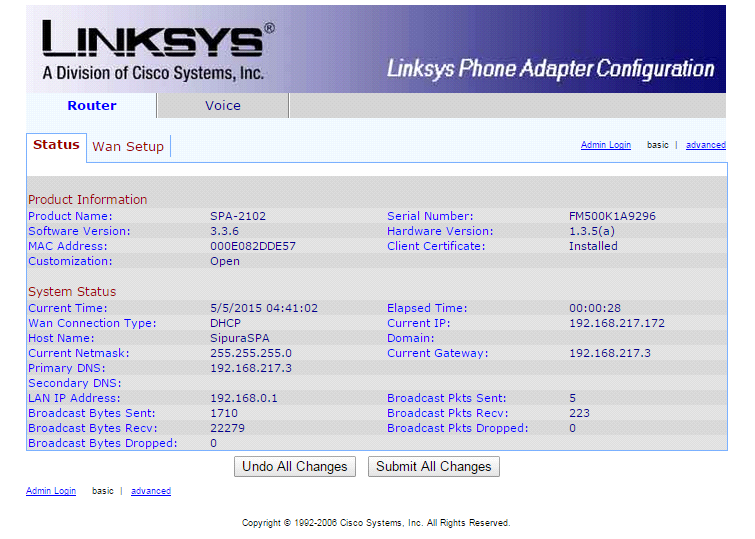
1. Подключаем адаптер к сети. Телефон подключаем в адаптер.
2. Поднимаем трубку на телефоне и вбиваем 110# чтобы узнать IP адрес адаптера. Вбиваем полученный адрес в браузер.
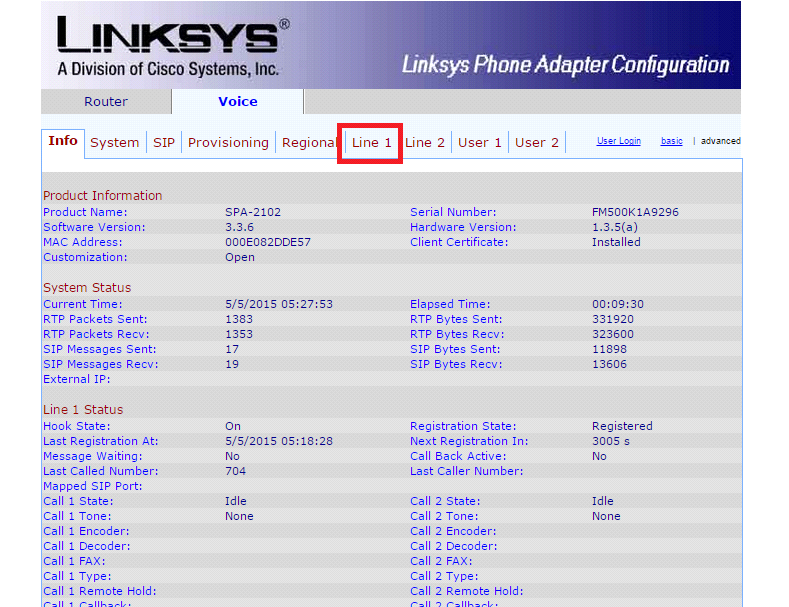
3. Далее выбираем Voice, в правом углу Admin Login и advanced

4. Перед вами появляется окно, в горизонтальном меню выбираете Line 1
5. И вписываете следующие настройки в выделенных пунктах
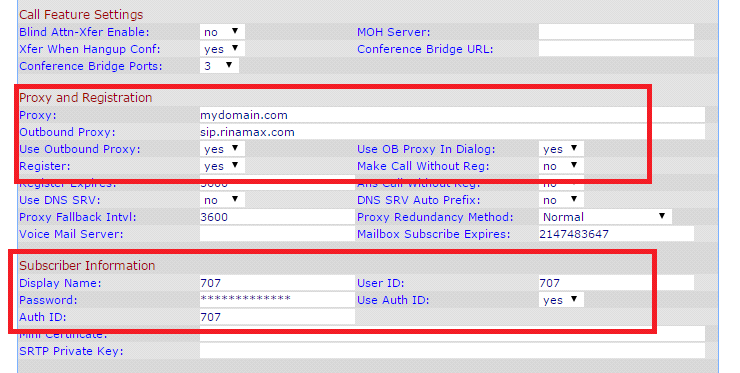
6. Нажимаете Submit All Changes, устройство перезагружается и можно разговаривать.