Проблемы с выбором строительного инструмента зачастую упираются в невозможность совмещения сразу нескольких потребительских качеств, выгодных с точки зрения эксплуатации. Например, повышение надежности технической начинки идет в минус эргономике, а расширение функционала сказывается на снижении ремонтопригодности. В итоге профессионалы все больше ценят в технической оснастке не новизну включенных опций, а сбалансированность основных эксплуатационных свойств. Этим и привлекателен лобзик электрический Makita 4329, в котором оптимально сошлись и характеристики силовой начинки, и долговечность элементной базы с удобным исполнением корпуса.
Общие сведения о лобзике
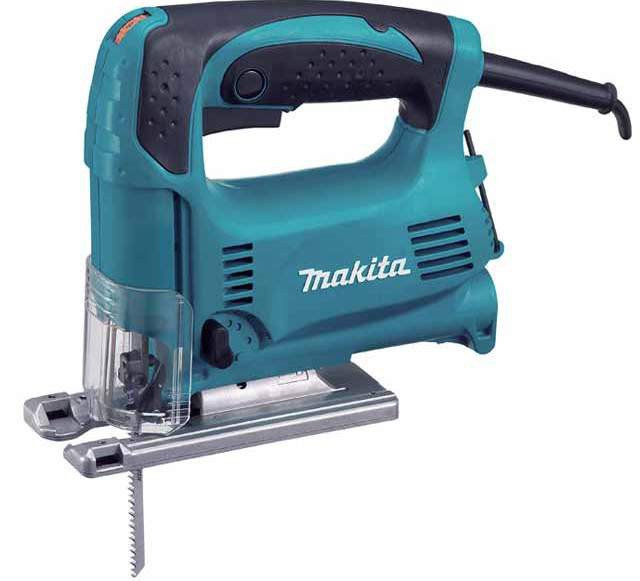
Аппарат предназначен для работы с пластиком, древесиной и металлом. Его мощности достаточно для выполнения распиловки любой сложности – конечно, в рамках допустимого для инструментов этого класса. В распоряжении пользователя оказывается несколько скоростных режимов, поэтому качество обработки материалов остается одинаковым независимо от характеристик заготовки – главное, соответствующим образом отрегулировать рабочие параметры. Однако глубина пропила будет меняться в зависимости от материала. Если планируется использовать электролобзик по дереву, то следует готовиться к 65 мм, а для стального листа инструмент сможет выполнить 6-миллиметровый пропил. Такие показатели могут удовлетворить и потребности профессионала, и тем более запросы домашнего мастера. Даже новички смогут проявить свои способности в работе с данным инструментом – дружелюбность конструкции и широкий набор полезных эргономических дополнений облегчают процесс эксплуатации лобзика.
Технические характеристики
Технически эта модель реализована как традиционный сетевой электроинструмент. То есть в рабочем процессе не задействуется аккумулятор, и все операции придется выполнять с привязкой к электросети. Это неудобно, если требуется обеспечение пропила в удаленных условиях, но избавление от дополнительного блока в виде батареи сделало лобзик Makita 4329 легким, маневренным и удобным. Технические данные, представленные ниже, это подтверждают:
- Масса – 1,9 кг.
- Ширина инструмента – 9,4 см.
- Длина – 22,4 см.
- Высота – 33 см.
- Форма рукоятки – скобовидная.
- Мощность – 450 Вт.
- Ход лобзика – 18 мм.
- Диапазон рабочих частот – от 500 до 3100 уд/мин.
- Длина сетевого шнура – 2 м.
Комплектация инструмента
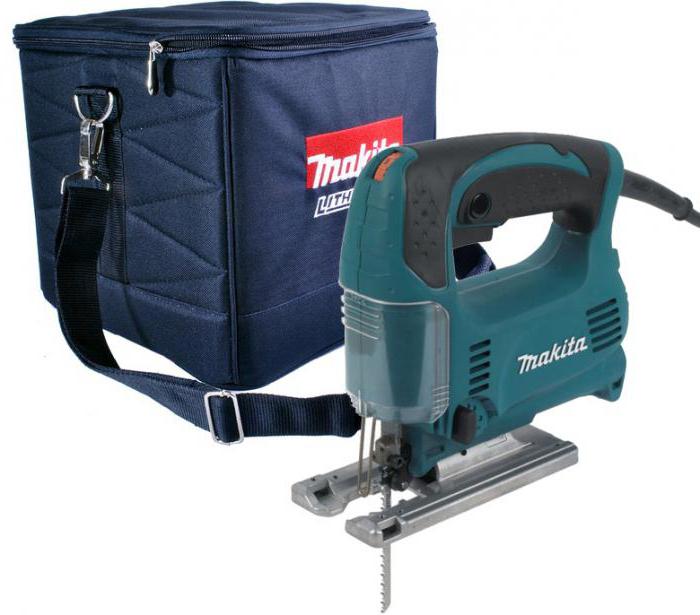
Производители уровня Makita последние годы все реже снабжают инструмент широкими наборами комплектации. Во многом это связано со стремлением к экономии, хотя менее известные компании, напротив, привлекают к своей продукции внимание именно за счет дополнительных аксессуаров в основном наборе поставки. Так или иначе, в данном случае говорить об экономии на комплектации не приходится. Покупатель кроме основного инструмента получает кейс для лобзика, шестигранный ключ и пилку. Этого набора уже достаточно для выполнения основных операций резки, транспортировки и технического обслуживания аппарата. Другое дело, что для специалиста могут потребоваться дополнительные расходные материалы, которые заслуживают отдельного внимания.
Расходные материалы
Лобзик можно оснащать пилками, предназначенными для конкретного материала, или же универсальными элементами. Так, для древесины предлагаются комплекты для криволинейного и прямолинейного распила цельных досок и древесно-стружечных плит. При этом каждая пилка в наборе имеет свои характеристики шлифовки, параметры шага и направления зубчатой сцепки. С таким обеспечением можно рассчитывать практически на весь спектр операций для дерева, которые в принципе способен выполнять лобзик Makita 4329. Набор пилок для металла также рассчитан на произведение криволинейных и прямолинейных разрезов. Пользователь может работать с металлической арматурой, стальными листами, слоеными сплавами, полимерами и т. д. Важно только не забывать, что максимальная глубина пропила в случае с металлом ограничена 6 мм.
Расходные материалы для лобзика касаются не только рабочих элементов, но и оснащения силовой установки. Это касается угольных щеток, которые входят в комплект расходных частей электродвигателя. Необходимо своевременно обеспечивать лобзик Makita 4329 сменной щеткой по мере износа, чтобы коллектор не вышел из строя раньше времени.
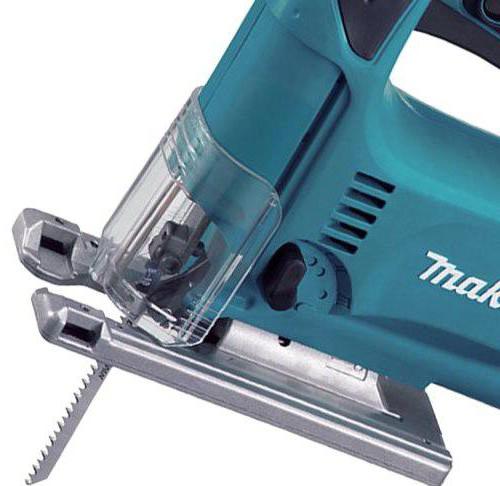
Особенности модели
Одной из важнейших технологических особенностей этого аппарата является возможность регулировки скорости пиления. Данная опция позволяет оператору подбирать оптимальные режимы работы для конкретного материала. Здесь же стоит упомянуть электронную начинку с автоматическими стабилизаторами. Благодаря этой системе лобзик Makita 4329 контролирует ход пилки, оказывая сбалансированное рабочее усилие. Есть и приятные дополнения по части обеспечения безопасности. За нее отвечает пластиковый щиток и система охлаждения. В первом случае речь идет о физической защите оператора от частиц и абразивов, выделение которых неизбежно в процессе пиления. Что касается воздушного охлаждения, то оно реализовано за счет вентиляционных отверстий и предназначено для предотвращения температурных перегрузок инструмента. Для неопытных пользователей будет особенно ценно наличие кнопки блокировки для пуска. Она избавляет оператора от необходимости удержания активной клавиши в процессе работы. В итоге процесс резки меньше утомляет кисть, повышая качество пропила.
Инструкция по эксплуатации

Расходные материалы для лобзика касаются не только рабочих элементов, но и оснащения силовой установки. Это касается угольных щеток, которые входят в комплект расходных частей электродвигателя. Необходимо своевременно обеспечивать лобзик Makita 4329 сменной щеткой по мере износа, чтобы коллектор не вышел из строя раньше времени.
Особенности модели
Одной из важнейших технологических особенностей этого аппарата является возможность регулировки скорости пиления. Данная опция позволяет оператору подбирать оптимальные режимы работы для конкретного материала. Здесь же стоит упомянуть электронную начинку с автоматическими стабилизаторами. Благодаря этой системе лобзик Makita 4329 контролирует ход пилки, оказывая сбалансированное рабочее усилие. Есть и приятные дополнения по части обеспечения безопасности. За нее отвечает пластиковый щиток и система охлаждения. В первом случае речь идет о физической защите оператора от частиц и абразивов, выделение которых неизбежно в процессе пиления. Что касается воздушного охлаждения, то оно реализовано за счет вентиляционных отверстий и предназначено для предотвращения температурных перегрузок инструмента. Для неопытных пользователей будет особенно ценно наличие кнопки блокировки для пуска. Она избавляет оператора от необходимости удержания активной клавиши в процессе работы. В итоге процесс резки меньше утомляет кисть, повышая качество пропила.
Инструкция по эксплуатации
Инструмент можно использовать в разных рабочих режимах, настройку которых следует производить до выполнения конкретной операции. Базовые регулировки позволяют ориентировать параметры лобзика под осуществление прямолинейных и круговых пропилов. Однако предусмотрены и промежуточные режимы, выбор которых также зависит от характеристик материала. Когда соответствующие настройки будут произведены, можно начинать непосредственное выпиливание лобзиком заготовки. Как показывает практика, главная проблема пропилов – это образование неровных кромок. Бороться с ними можно разными способами как в процессе выполнения операции, так и после нее. Например, в ходе работы с древесиной желательно обеспечивать медленный, но уверенный ход пилки – это позволит сформировать гладкую поверхность по краям. После работы довести кромки до оптимального состояния можно посредством абразивных материалов и соответствующего оборудования.
Инструкция по техобслуживанию
Регулярный осмотр инструмента позволит продлить его рабочий ресурс и сделать эффективнее выполнение распила. Профилактика неполадок позволяет в дальнейшем облегчить и ремонт электролобзика, так как обнаружение ранних износов и деформаций исключает риск поломок других частей аппарата. Например, благодаря своевременной замене угольной щетки можно повысить качество функции силовой установки.
Обязательной мерой технического обслуживания должна стать смазка функциональных элементов внутренней начинки, а также оценка состояния втулок и крепежных элементов. Обычно ремонт электролобзика сводится к восстановлению двигателя, но и основная элементная база корпуса со временем утрачивает эксплуатационный ресурс, требуя обновления.
Сколько стоит?
Продукция японской компании стоит недешево. Это относится не только к инструментам, что вполне логично – Makita славится высоким качеством своих товаров. В данном случае речь идет о модели отнюдь не начального уровня. Для ручного инструмента с электронной начинкой ценники в диапазоне 5-7 тыс. руб. — явление довольно распространенное даже в линейках малоизвестных брендов. И в этом плане особенно привлекательно смотрится лобзик Makita 4329, цена которого варьируется от 4,5 до 5 тыс. Конечно, сам по себе инструмент такого типа ничего особенного не представляет как по силовой начинке, так и по функциональности. Но разработчики этой модели все же предложили неплохое сочетание базовых технико-эксплуатационных возможностей, которые органично сочетаются с надежным корпусом. Поэтому ценник более чем оправдывает покупку этой модели.
Положительные отзывы о лобзике
Инструмент удобен в применении, качественно выполняет распилы и не требует особых усилий со стороны пользователя в процессе работы. Это основные достоинства, на которые обращают внимание владельцы электролобзика. Отдельно отмечается работоспособность аппарата в сложных условиях и при выполнении фигурных резов. Многие отмечают, что модель хорошо справляется даже с толстыми древесно-стружечными плитами, у которых многослойная структура. Но и это не все сильные стороны, которыми обладает лобзик Makita 4329. Отзывы высоко оценивают его эргономические качества – например, отсутствие вибраций, малошумность, удобную ручку и легкость конструкции. Если добавить к этому и электронную стабилизацию, то будут вполне понятны причины, по которым лобзик точно и аккуратно справляется с резкой любой сложности.
Негативные отзывы
По части работы лобзика критика практически не встречается. Негативные мнения в основном относятся к небольшим нюансам. Так, многие отмечают быстрое стирание черного лакокрасочного покрытия на литой подошве аппарата. Также есть мнение, что маятниковый ход этой модификации и вовсе не нужен. Обычно выпиливание лобзиком производится без подключения этой функции, и разве что профессионалы в некоторых сферах без нее не обходятся. В остальном отрицательные отзывы относятся уже к самому типу конструкции, в том числе раскрывают и недостатки сетевого способа питания.
Заключение

Данная модель подтверждает, что за небольшие деньги сегодня можно приобрести качественный и производительный инструмент. Японский лобзик с электродвигателем хорош не только высокой мощностью и, как следствие, способностью выполнять пропилы даже в стальных листах. Комфортность и безопасность – мне менее важные характеристики работы этого инструмента. Поскольку лобзик Makita 4329 ориентирован на широкий спектр операций, производитель подготовил и соответствующий набор расходных материалов. Ведь именно от функциональных элементов зачастую зависит качество, с которым выполняется пропил. Аппарат можно дополнить пилками разного типа и даже под конкретные стройматериалы – правильный выбор оснастки гарантирует соответствующее качество реза.

SPECIFICATIONS
| Model | 4326 | 4327 | 4328 | 4329 | |
| Length of stroke | 18 mm | 18 mm | 18 mm | 18 mm | |
| Blade type | B type | ||||
| Max. cutting capacities | Wood | 65 mm | 65 mm | 65 mm | 65 mm |
| Mild steel | 6 mm | 6 mm | 6 mm | 6 mm | |
| Strokes per minute (min-1 ) | 3,100 | 500 — 3,100 | 500 — 3,100 | 500 — 3,100 | |
| Overall length | 217 mm (Steel base type) 223 mm (Aluminum base type) |
217 mm (Steel base type) 223 mm (Aluminum base type) |
217 mm | 223 mm | |
| Net weight | 1.8 kg (Steel base type) | 1.8 kg (Steel base type) | 1.8 kg | 1.9 kg | |
| 1.9 kg (Aluminum base type) | 1.9 kg (Aluminum base type) | ||||
| Safety class |  /II /II |
/II |
/II |
/II |
- Due to our continuing program of research and development, the specifications herein are subject to change without notice.
- Specifications may differ from country to country.
- Weight according to EPTA-Procedure 01/2003
Symbols
The following show the symbols used for the equipment.
Be sure that you understand their meaning before use.
Intended use
The tool is intended for the sawing of wood, plastic and metal materials. As a result of the extensive accessory and saw blade program, the tool can be used for many purposes and is very well suited for curved or circular cuts.
Power supply
The tool should be connected only to a power supply of the same voltage as indicated on the nameplate, and can only be operated on single-phase AC supply. They are double-insulated and can, therefore, also be used from sockets without earth wire.
Noise
The typical A-weighted noise level determined according to EN60745:
Model 4326,4327
Sound pressure level (LpA): 86 dB (A)
Sound power level (LWA): 97 dB (A)
Uncertainty (K): 3 dB (A)
Model 4328,4329
Sound pressure level (LpA): 83 dB (A)
Sound power level (LWA): 94 dB (A)
Uncertainty (K): 3 dB (A)
Wear ear protection
Vibration
The vibration total value (tri-axial vector sum) determined according to EN60745:
Model 4326,4327
Work mode: cutting boards
Vibration emission (ah, B): 5.5 m/s2
Uncertainty (K): 1.5 m/s2
Work mode: cutting sheet metal
Vibration emission (ah, M): 5.5 m/s2
Uncertainty (K): 1.5 m/s2
Model 4328,4329
Work mode: cutting boards
Vibration emission (ah, B): 7.0 m/s2
Uncertainty (K): 1.5 m/s2
Work mode: cutting sheet metal
Vibration emission (ah, M): 5.0 m/s2
Uncertainty (K): 1.5 m/s2
ENG901-1 • The declared vibration emission value has been measured in accordance with the standard test method and may be used for comparing one tool with another.
- The declared vibration emission value has been measured in accordance with the standard test method and may be used for comparing one tool with another.
- The declared vibration emission value may also be used in a preliminary assessment of exposure.
- The vibration emission during actual use of the power tool can differ from the declared emission value depending on the ways in which the tool is used.
- Be sure to identify safety measures to protect the operator that are based on an estimation of exposure in the actual conditions of use (taking account of all parts of the operating cycle such as the times when the tool is switched off and when it is running idle in addition to the trigger time).
For European countries only
EC Declaration of Conformity
Makita declares that the following Machine(s):
Designation of Machine: Jig Saw
Model No./ Type: 4326, 4327, 4328, 4329
Conforms to the following European Directives: 2006/42/EC
They are manufactured in accordance with the following standard or standardized documents: EN60745
The technical file in accordance with 2006/42/EC is available from:
Makita, Jan-Baptist Vinkstraat 2, 3070, Belgium
31.12.2013
Yasushi Fukaya
Director
Makita, Jan-Baptist Vinkstraat 2, 3070, Belgium
General Power Tool Safety Warnings
Read all safety warnings and all instructions. Failure to follow the warnings and instructions may result in electric shock, fire and/or serious injury.
Save all warnings and instructions for future reference.
The term «power tool» in the warnings refers to your mains-operated (corded) power tool or battery-operated (cordless) power tool.
Work area safety
- Keep work area clean and well lit. Cluttered or dark areas invite accidents.
- Do not operate power tools in explosive atmospheres, such as in the presence of flammable liquids, gases or dust. Power tools create sparks which may ignite the dust or fumes.
- Keep children and bystanders away while operating a power tool. Distractions can cause you to lose control.
Electrical safety
- Power tool plugs must match the outlet. Never modify the plug in any way. Do not use any adapter plugs with earthed (grounded) power tools. Unmodified plugs and matching outlets will reduce risk of electric shock.
- Avoid body contact with earthed or grounded surfaces such as pipes, radiators, ranges and refrigerators. There is an increased risk of electric shock if your body is earthed or grounded.
- Do not expose power tools to rain or wet conditions. Water entering a power tool will increase the risk of electric shock.
- Do not abuse the cord. Never use the cord for carrying, pulling or unplugging the power tool. Keep cord away from heat, oil, sharp edges or moving parts. Damaged or entangled cords increase the risk of electric shock.
- When operating a power tool outdoors, use an extension cord suitable for outdoor use. Use of a cord suitable for outdoor use reduces the risk of electric shock.
- If operating a power tool in a damp location is unavoidable, use a residual current device (RCD) protected supply. Use of an RCD reduces the risk of electric shock.
- Use of power supply via a RCD with a rated residual current of 30mA or less is always recommended.
Personal safety
- Stay alert, watch what you are doing and use common sense when operating a power tool. Do not use a power tool while you are tired or under the influence of drugs, alcohol or medication. A moment of inattention while operating power tools may result in serious personal injury.
- Use personal protective equipment. Always wear eye protection. Protective equipment such as dust mask, non-skid safety shoes, hard hat, or hearing protection used for appropriate conditions will reduce personal injuries.
- Prevent unintentional starting. Ensure the switch is in the off-position before connecting to power source and/or battery pack, picking up or carrying the tool. Carrying power tools with your finger on the switch or energising power tools that have the switch on invites accidents.
- Remove any adjusting key or wrench before turning the power tool on. A wrench or a key left attached to a rotating part of the power tool may result in personal injury.
- Do not overreach. Keep proper footing and balance at all times. This enables better control of the power tool in unexpected situations.
- Dress properly. Do not wear loose clothing or jewellery. Keep your hair, clothing, and gloves away from moving parts. Loose clothes, jewellery or long hair can be caught in moving parts.
- If devices are provided for the connection of dust extraction and collection facilities, ensure these are connected and properly used. Use of dust collection can reduce dust-related hazards.
Power tool use and care
- Do not force the power tool. Use the correct power tool for your application. The correct power tool will do the job better and safer at the rate for which it was designed.
- Do not use the power tool if the switch does not turn it on and off. Any power tool that cannot be controlled with the switch is dangerous and must be repaired.
- Disconnect the plug from the power source and/or the battery pack from the power tool before making any adjustments, changing accessories, or storing power tools. Such preventive safety measures reduce the risk of starting the power tool accidentally.
- Store idle power tools out of the reach of children and do not allow persons unfamiliar with the power tool or these instructions to operate the power tool. Power tools are dangerous in the hands of untrained users.
- Maintain power tools. Check for misalignment or binding of moving parts, breakage of parts and any other condition that may affect the power tool’s operation. If damaged, have the power tool repaired before use. Many accidents are caused by poorly maintained power tools.
- Keep cutting tools sharp and clean. Properly maintained cutting tools with sharp cutting edges are less likely to bind and are easier to control.
- Use the power tool, accessories and tool bits etc. in accordance with these instructions, taking into account the working conditions and the work to be performed. Use of the power tool for operations different from those intended could result in a hazardous situation.
Service
- Have your power tool serviced by a qualified repair person using only identical replacement parts. This will ensure that the safety of the power tool is maintained.
- Follow instruction for lubricating and changing accessories.
- Keep handles dry, clean and free from oil and grease.
JIG SAW SAFETY WARNINGS
- Hold power tool by insulated gripping surfaces, when performing an operation where the cutting accessory may contact hidden wiring or its own cord. Cutting accessory contacting a «live» wire may make exposed metal parts of the power tool «live» and could give the operator an electric shock.
- Use clamps or another practical way to secure and support the workpiece to a stable platform. Holding the work by hand or against your body leaves it unstable and may lead to loss of control.
- Always use safety glasses or goggles. Ordinary eye or sun glasses are NOT safety glasses.
- Avoid cutting nails. Inspect workpiece for any nails and remove them before operation.
- Do not cut oversize workpiece.
- Check for the proper clearance beyond the workpiece before cutting so that the blade will not strike the floor, workbench, etc.
- Hold the tool firmly.
- Make sure the blade is not contacting the workpiece before the switch is turned on.
- Keep hands away from moving parts.
- Do not leave the tool running. Operate the tool only when hand-held.
- Always switch off and wait for the blade to come to a complete stop before removing the blade from the workpiece.
- Do not touch the blade or the workpiece immediately after operation; they may be extremely hot and could burn your skin.
- Do not operate the tool at no-load unnecessarily.
- Some material contains chemicals which may be toxic. Take caution to prevent dust inhalation and skin contact. Follow material supplier safety data.
- Always use the correct dust mask/respirator for the material and application you are working with.
SAVE THESE INSTRUCTIONS.
DO NOT let comfort or familiarity with product (gained from repeated use) replace strict adherence to safety rules for the subject product. MISUSE or failure to follow the safety rules stated in this instruction manual may cause serious personal injury.
FUNCTIONAL DESCRIPTION
- Always be sure that the tool is switched off and unplugged before adjusting or checking function on the tool.
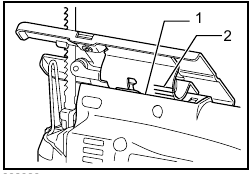
Selecting the cutting action
(For models 4328/4329)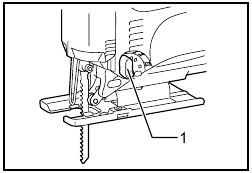
- Cutting action changing lever
This tool can be operated with an orbital or a straight line (up and down) cutting action. The orbital cutting action thrusts the blade forward on the cutting stroke and greatly increases cutting speed.
To change the cutting action, just turn the cutting action changing lever to the desired cutting action position. Refer to the table to select the appropriate cutting action.
| Position | Cutting action | Applications |
| 0 | Straight line cutting action | For cutting mild steel, stainless steel and plastics. |
| For clean cuts in wood and plywood. | ||
 |
Small orbit cutting action | For cutting mild steel, aluminum and hard wood. |
 |
Medium orbit cutting action | For cutting wood and plywood. |
| For fast cutting in aluminum and mild steel. | ||
 |
Large orbit cutting action | For fast cutting in wood and plywood. |
Switch action
- Switch trigger
- Lock button
- Before plugging in the tool, always check to see that the switch trigger actuates properly and returns to the «OFF» position when released.
For continuous operation, pull the switch trigger and then push in the lock button.
To stop the tool from the locked position, pull the switch trigger fully, then release it.
Speed adjusting dial
(For models 4327/4328/4329)
- Speed adjusting dial
The tool speed can be infinitely adjusted between 500 and 3,100 strokes per minute by turning the adjusting dial. Higher speed is obtained when the dial is turned in the direction of number 6; lower speed is obtained when it is turned in the direction of number 1.
Refer to the table to select the proper speed for the workpiece to be cut. However, the appropriate speed may differ with the type or thickness of the workpiece. In general, higher speeds will allow you to cut workpieces faster but the service life of the blade will be reduced.
| Workpiece to be cut | Number on adjusting dial |
| Wood | 5 — 6 |
| Mild steel | 3 — 6 |
| Stainless steel | 3 — 4 |
| Aluminum | 3 — 6 |
| Plastics | 1 — 4 |
- If the tool is operated continuously at low speeds for a long time, the motor will get overloaded and heated up.
- The speed adjusting dial can be turned only as far as 6 and back to 1. Do not force it past 6 or 1, or the speed adjusting function may no longer work.
ASSEMBLY
- Always be sure that the tool is switched off and unplugged before carrying out any work on the tool.
Installing or removing saw blade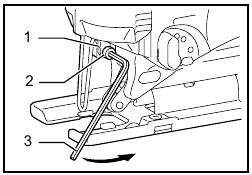
- Blade holder
- Bolt
- Hex wrench
- Always clean out all chips or foreign matter adhering to the blade and/or blade holder. Failure to do so may cause insufficient tightening of the blade, resulting in a serious personal injury.
- Do not touch the blade or the workpiece immediately after operation; they may be extremely hot and could burn your skin.
- Always secure the blade firmly. Insufficient tightening of the blade may cause blade breakage or serious personal injury.
- Use only B type blades. Using blades other than B type blades causes insufficient tightening of the blade, resulting in a serious personal injury.
To install the blade, loosen the bolt counterclockwise on the blade holder with the hex wrench. With the blade teeth facing forward, insert the blade into the blade holder as far as it will go. Make sure that the back edge of the blade fits into the roller. Then tighten the bolt clockwise to secure the blade.

- Bolt
- Blade
- Roller
To remove the blade, follow the installation procedure in reverse.
NOTE:
- Occasionally lubricate the roller.
Hex wrench storage
- Hook
- Hex wrench
When not in use, store the hex wrench as shown in the figure to keep it from being lost.
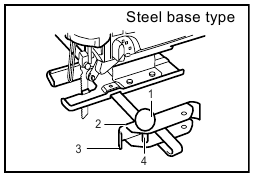
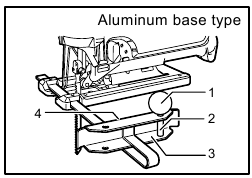
Adjusting roller (For models 4326/4327)
- Blade
- Roller
- Retainer
- Hex wrench
- Bolt
- Base
Loosen the bolt on the back of the base with the hex wrench. Move the retainer so that the roller contacts the blade lightly. Then tighten the bolt to secure the base and the retainer.
NOTE:
- Occasionally lubricate the roller.
Dust cover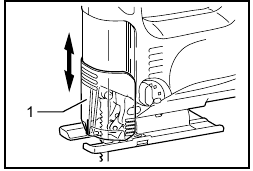
- Dust cover
- Always wear safety goggles even when operating the tool with the dust cover lowered. Lower the dust cover to prevent chips from flying. However, when making bevel cuts, raise it all the way.
OPERATION
- Always hold the base flush with the workpiece. Failure to do so may cause blade breakage, resulting in a serious injury.
- Advance the tool very slowly when cutting curves or scrolling. Forcing the tool may cause a slanted cutting surface and blade breakage.
Turn the tool on without the blade making any contact and wait until the blade attains full speed. Then rest the base flat on the workpiece and gently move the tool forward along the previously marked cutting line.
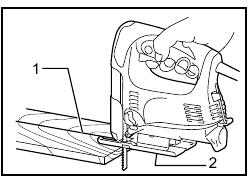
- Cutting line
- Base
Bevel cutting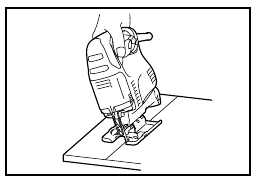
- Always be sure that the tool is switched off and unplugged before tilting the base.
- Raise the dust cover all the way before making bevel cuts.
With the base tilted, you can make bevel cuts at any angle between 0° and 45° (left or right).
Loosen the bolt on the back of the base with the hex wrench. Move the base so that the bolt is positioned in the center of the cross-shaped slot in the base.
- Hex wrench
- Bolt
- Base
Tilt the base until the desired bevel angle is obtained. The edge of the motor housing indicates the bevel angle by graduations. Then tighten the bolt to secure the base.
- Edge
- Graduation
Front flush cuts
- Hex wrench
- Bolt
- Base
Loosen the bolt on the back of the base with the hex wrench and slide the base all the way back. Then tighten the bolt to secure the base.
Cutouts
Cutouts can be made with either of two methods A or B.
- Boring a starting hole

- Starting hole
For internal cutouts without a lead-in cut from an edge, pre-drill a starting hole 12 mm or more in diameter. Insert the blade into this hole to start your cut.
- Starting hole
- Plunge cutting

You need not bore a starting hole or make a leadin cut if you carefully do as follows.- Tilt the tool up on the front edge of the base with the blade point positioned just above the workpiece surface.
- Apply pressure to the tool so that the front edge of the base will not move when you switch on the tool and gently lower the back end of the tool slowly.
- As the blade pierces the workpiece, slowly lower the base of the tool down onto the workpiece surface.
- Complete the cut in the normal manner.
Finishing edges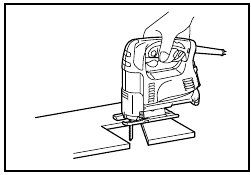
To trim edges or make dimensional adjustments, run the blade lightly along the cut edges.
Metal cutting
Always use a suitable coolant (cutting oil) when cutting metal. Failure to do so will cause significant blade wear. The underside of the workpiece can be greased instead of using a coolant.
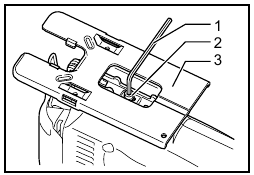
Dust extraction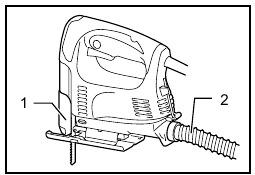
- Dust cover
- Hose
Clean cutting operations can be performed by connecting this tool to a Makita vacuum cleaner. Insert the hose of the vacuum cleaner into the hole at the rear of the tool. Lower the dust cover before operation.
NOTE:
- Dust extraction cannot be performed when making bevel cuts.
Rip fence (optional accessory)
- Always be sure that the tool is switched off and unplugged before installing or removing accessories.
- Straight cuts
- Rip fence (Guide rule)
When repeatedly cutting widths of 160 mm or less, use of the rip fence will assure fast, clean, straight cuts.
- Rip fence (Guide rule)
- Rip fence (Guide rule)
To install, insert the rip fence into the rectangular hole on the side of the base with the fence guide facing down. Slide the rip fence to the desired cutting width position, then tighten the bolt to secure it.

- Hex wrench
- Bolt
- Rip fence (Guide rule)
- Guide facing
- Bolt
- Fence guide
- Hex wrench
- Rip fence (Guide rule)
- Circular cuts
- Treaded knob
- Guide facing
- Rip fence (Guide rule)
- Pin
- Threaded knob
- Pin
- Rip fence (Guide rule)
- Fence guide

- Rip fence (Guide rule)

- Rip fence (Guide rule)
When cutting circles or arcs of 170 mm or less in radius, install the rip fence as follows. Insert the rip fence into the rectangular hole on the side of the base with the fence guide facing up.
Insert the circular guide pin through either of the two holes on the fence guide. Screw the threaded knob onto the pin to secure the pin. Now slide the rip fence to the desired cutting radius, and tighten the bolt to secure it in place. Then move the base all the way forward.
NOTE:
- Always use blades No. B-17, B-18, B-26 or B-27 when cutting circles or arcs.
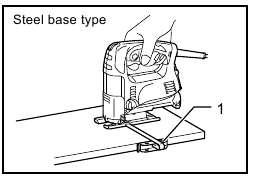
Anti-splintering device for steel base (optional accessory)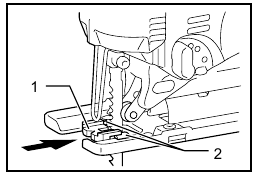
- Anti-splintering device
- Protrusions
For splinter-free cuts, the anti-splintering device can be used. To install the anti-splintering device, move the base all the way forward and insert it between the two protrusions of the base.
NOTE:
- The anti-splintering device cannot be used when making bevel cuts.
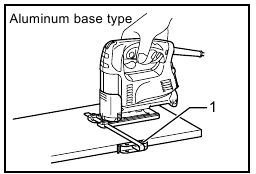
Anti-splintering device for aluminum base (Optional accessory)
- Anti-splintering device
- Aluminum base
For splinter-free cuts, the anti-splintering device can be used. To install the anti-splintering device, move the tool base all the way forward and fit it from the back of tool base. When you use the cover plate, install the antisplintering device onto the cover plate.
- The anti-splintering device cannot be used when making bevel cuts.
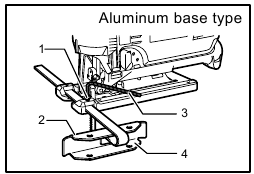
Cover plate for aluminum base (Optional accessory)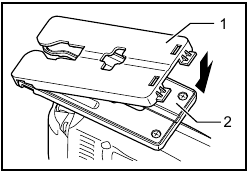
- Cover plate
- Aluminum base
Use the cover plate when cutting decorative veneers, plastics, etc. It protects sensitive or delicate surfaces from damage. Fit it on the back of the tool base.
MAINTENANCE
- Always be sure that the tool is switched off and unplugged before attempting to perform inspection or maintenance.
- Never use gasoline, benzine, thinner, alcohol or the like. Discoloration, deformation or cracks may result.
To maintain product SAFETY and RELIABILITY, repairs, carbon brush inspection and replacement, any other maintenance or adjustment should be performed by Makita Authorized Service Centers, always using Makita replacement parts.
OPTIONAL ACCESSORIES
- These accessories or attachments are recommended for use with your Makita tool specified in this manual. The use of any other accessories or attachments might present a risk of injury to persons. Only use accessory or attachment for its stated purpose.
If you need any assistance for more details regarding these accessories, ask your local Makita Service Center.
- Jig saw blades
- Hex wrench 3
- Rip fence (guide rule) set
- Anti-splintering device
- Hose (For vacuum cleaner)
- Cover plate (For aluminum base type)
NOTE:
- Some items in the list may be included in the tool package as standard accessories. They may differ from country to country.

Here you can download full pdf version of manual, it may contain additional safety instructions, warranty information, FCC rules, etc.
Требуется руководство для вашей Makita 4329 Электрический лобзик? Ниже вы можете просмотреть и загрузить бесплатно руководство в формате PDF. Кроме того, приведены часто задаваемые вопросы, рейтинг изделия и отзывы пользователей, что позволит оптимально использовать ваше изделие. Если это не то руководство, которое вы искали, – свяжитесь с нами.
Ваше устройство неисправно, и в руководстве отсутствует решение? Перейдите в Repair Café для получения бесплатных ремонтных услуг.
Руководство

Рейтинг
Сообщите нам, что вы думаете о Makita 4329 Электрический лобзик, оставив оценку продукта. Хотите поделиться вашими впечатлениями от данного изделия или задать вопрос? Вы можете оставить комментарий в нижней части страницы.
Довольны ли вы данным изделием Makita?
Да Нет
4 голоса
Часто задаваемые вопросы
Наша служба поддержки выполняет поиск полезной информации по изделиям и отвечает на часто задаваемые вопросы. Если вы заметили неточность в наших часто задаваемых вопросах, сообщите нам об этом с помощью нашей контактной формы.
Для каких материалов используется электролобзик? Проверенный
Благодаря сменным пильным полотнам, лобзик можно использовать практически для любых материалов. Электролобзики удобны для выпиливания скруглений и углов.
Это было полезно (315)
Нужно ли мне надевать защитные очки при работе с лобзиком? Проверенный
Да. При распиловке могут взлетать мелкие частицы. Попадая в глаз, они могут вызвать необратимое повреждение глаз. Вот почему всегда необходимо носить защитные очки.
Это было полезно (122)