
Цена: по запросу
Наличие:уточняйте
заказать по телефону
8 800 350 02 06
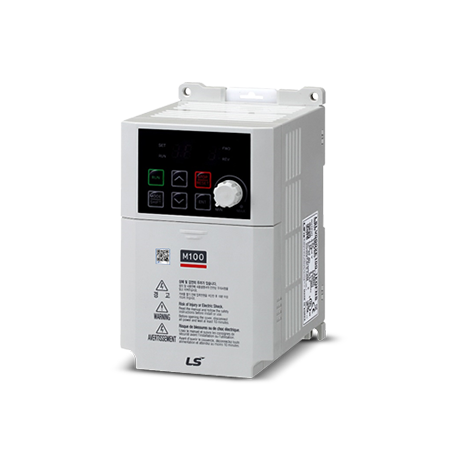
Оптимальная компактная серия преобразователей частоты M100 идеальна для небольших насосов, вентиляторов, конвейерных установок.
Отличительные особенности:
- Встроенный фильтр ЭМС (C2)
- Встроенный потенциометр
- Компактные размеры
- Встроенный тормозной ключ для 1,5 — 2,2 кВт
- Встроенный интерфейс RS485
- Монтаж на DIN-рейку, установка бок о бок (2 мм между преобразователями)
Дополнительная информация:
 Переход в раздел технической документации
Запросить дополнительную информацию и цены
Однофазный частотный преобразователь LSLV0008M100-1EOFNA широко применяется в вентиляции, насосах, при тяжелых нагрузках, во всём общепроме за счет ряда отличительных особенностей:
- Встроенный потенциометр
- Компактные размеры с возможностью установки бок о бок. Зазор — 2мм
- Встроенный интерфейс RS485 (Есть возможность заказать более дешевый вариант исполнения без интерфейса RS485 — LSLV0008M100-1EOFNS)
- Монтаж на Din-рейку
- Встроенный ЭМС фильтр
Серия M100 пришла на смену другой серии IC5, в частности модели SV008iC5-1F.
Характеристики частотного преобразователя LSLV0008M100-1EOFNA:
- Производитель: LS Industrial Systems (LSIS)
- Страна производителя: Южная Корея
- Напряжение питания: 1 фаза 220В
- Выходное напряжение: 3 фазы 220В
- Мощность: 0,75 кВт
- Ток при полной нагрузке: 4,2 А
- Выходная частота: 0-400 Гц
- Рабочая температура: -10..+50 °С
- Количество входов: 7
- Количество аналоговых выходов: 1
- Габариты: Ширина — 85 мм/ Высота — 153 мм/ Глубина — 123 мм
- Вес: 1 кг
Посмотреть техническую документацию
![]() www.lsis.com
www.lsis.com
Преобразователь частоты переменного тока LSLV-M100
Инструкция по эксплуатации
Правильный выбор для максимального урожая!
LSIS стремится максимизировать вашу прибыль в благодарность за то, что вы выбрали нас в качестве своего партнера.
0.1-2.2 кВт [однофазный 200 В]
Преобразователь частоты переменного тока
ЛСЛВ-М100
![]() Инструкции по технике безопасности
Инструкции по технике безопасности
- Внимательно прочтите данное руководство перед установкой, вводом в эксплуатацию, эксплуатацией, обслуживанием или проверкой данного оборудования.
- Храните это руководство в легкодоступном месте для быстрой справки.

http://qr.lsis.com/e100/
Отсканируйте QR-код и получите информацию об использовании ключа! (Имеется также на передней обложке продукта.)
Настоящее руководство по эксплуатации предназначено для пользователей, обладающих базовыми знаниями в области электричества и электрических устройств.
LSLV-M 100 — это официальное название инверторов серии M 100.
Посетите наш webсайт www.lsis.com для полного руководства пользователя.
Информация по технике безопасности
1 1 Символы безопасности в данном руководстве
1.2 Информация по безопасности![]() Опасность
Опасность
- Не открывайте крышку оборудования, когда оно включено или работает. Аналогично, не используйте
инвертор при открытой крышке. Воздействие высокого объемаtage клеммы или место зарядки к внешнему
окружающей среды может привести к поражению электрическим током. Не снимайте крышки и не прикасайтесь к внутренней цепи.
платы (печатные платы) или электрические контакты на изделии при включенном питании или во время работы. Делает
это может привести к серьезной травме, смерти или серьезному материальному ущербу. - Не открывайте крышку оборудования, даже если питание инвертора отключено.
выключен, если только это не требуется для технического обслуживания или регулярного осмотра. Открытие крышки может привести к
поражения электрическим током даже при отключенном питании. - Оборудование может сохранять заряд в течение длительного времени после отключения питания. С помощью мультиметра убедитесь, что нетtage перед работой с инвертором, двигателем или кабелем двигателя.
 Предупреждение
 - Это оборудование должно быть заземлено для безопасной и правильной работы.
- Не подавайте питание на неисправный инвертор. Если вы обнаружите, что инвертор неисправен, отключите питание и отдайте инвертор на профессиональный ремонт.
- Инвертор нагревается во время работы. Не прикасайтесь к инвертору, пока он не остынет, чтобы не обжечься.
- Не допускайте попадания внутрь инвертора посторонних предметов, таких как винты, металлическая стружка, мусор, вода или масло. Попадание внутрь инвертора посторонних предметов может привести к его неисправности или возгоранию.
- Не работайте с инвертором мокрыми руками. Это может привести к поражению электрическим током.
- Проверьте степень защиты цепей и оборудования, используемого в инверторе, степень защиты цепей и степень защиты оборудования. Следующие соединительные клеммы и компоненты относятся к устройствам класса электрической защиты O. Цепь защищена основной изоляцией, и при неправильной изоляции может произойти поражение электрическим током. Те же самые меры защиты для электрических кабелей должны быть предприняты при использовании или установке следующих компонентов или при подключении кабеля к следующим клеммам или компонентам. – Многофункциональные клеммы: P1-P3, P4 (Расширенный 1/0), PS (Расширенный 1/0), CM — Входы и выходы аналоговых клемм: VR, V1, 12 (Расширенный 1/0), AO, CM — Другие разъемы клеммной колодки: Q1 (стандарт 1/0), EG (стандарт / O), 24, A 1, B1, C1, A2 (расширенный 1/0), C2 (расширенный 1/0)
-Охлаждающий вентилятор - Этот инвертор относится к классу защиты 1.
 Предупреждение
 - Не модифицируйте внутреннюю работу инвертора. Это приведет к аннулированию гарантии.
- Инвертор рассчитан на работу с 3-фазным двигателем. Не используйте инвертор для управления однофазным двигателем.
- Не кладите тяжелые предметы на электрические кабели. Это может привести к повреждению кабеля и поражению электрическим током.
Примечание/ Замечание
- Максимально допустимый предполагаемый ток короткого замыкания на входе питания определен в IEC 60439-1 как 100 кА. В зависимости от выбранного MCCB серия LSLV-M10O подходит для использования в цепях, способных выдавать среднеквадратичное значение симметричного тока до 100 кА. amperes при максимальном номинальном объеме приводаtagе. В следующей таблице показаны рекомендуемые автоматические выключатели для среднеквадратичных симметричных ampэрес.
| Рабочий объемtage | УТЭ100(Э/С) | УТС150(Н/Х/Л) | АБС33с | АБС53с | АБС63с | АБС103с |
| 240 В (50/60 Гц) | 50/65 кА | 65/100/150 кА | 30kA | 35kA | 35kA | 85kA |
Подготовка к установке
2.1 Идентификация продукта
| LSLV 0022 M100 — 1E0ENS | ||||||
| Мощность двигателя | 0001-0.1kW | 0002-02kW | 0004-0.4kW | 0008-0.75kW | 0015- 1.5кВт | 0022-2.2kW |
| Название серии | M100 | |||||
| Входная громкостьtage | 1- Одна фаза 200В – 240В | |||||
| Клавиатура | Е – светодиодная клавиатура | |||||
| ULType | 0 – Открытый тип UL | |||||
| ЭМС изменить | F — Встроенный фильтр ЭМС (C2) | |||||
| Реактор | N — Нереактор | |||||
| VO | С – стандарт | A-Расширенный |
2.2 Рекомендации по установке
| пункты | Описание |
| Температура окружающей среды¹ | 14-122 ° F (-10-50 ° C) |
| Влажность окружающей среды | относительная влажность 95 % (без конденсата) |
| Температура хранения | -4-149 ° F (-20-65 ° C) |
| Факторы окружающей среды | Окружающая среда, свободная от агрессивных или легковоспламеняющихся газов, остатков масла или пыли. |
| Высота/вибрация | Ниже 3,280 футов (1,000 м) над уровнем моря без любви, чем 1G (9.8 м / с) |
| Давление воздуха | 70106 кПа |
1) Температура окружающей среды — это температура, измеренная в точке на расстоянии 2″ (5 см) от поверхности инвертора.![]() Предупреждение
Предупреждение
• Не допускайте, чтобы температура окружающей среды превышала допустимый диапазон во время работы инвертора.
2.3 Выбор и подготовка места для установки
- Инвертор должен быть установлен на стене, которая может выдержать вес инвертора.
- Место должно быть без вибрации. Вибрация может отрицательно сказаться на работе инвертора.
- Инвертор может сильно нагреваться во время работы. Устанавливайте инвертор на огнеупорную или огнестойкую поверхность, а также оставляйте вокруг инвертора достаточное пространство для циркуляции воздуха. На рисунках ниже показаны необходимые зазоры для установки.
- Обеспечьте достаточную циркуляцию воздуха вокруг инвертора, когда он установлен. Если инвертор должен быть установлен внутри панели, эндосомы или стойки шкафа, тщательно продумайте положение охлаждающего вентилятора инвертора и вентиляционной решетки. Охлаждающий вентилятор должен быть расположен так, чтобы эффективно отводить тепло, выделяемое при работе инвертора.
- Если вы устанавливаете несколько инверторов в одном месте, разместите их рядом и снимите с них верхние крышки (необязательно). Верхние крышки НЕОБХОДИМО снимать для установки рядом друг с другом. Используйте отвертку с плоской головкой, чтобы снять верхние крышки.
- Если вы устанавливаете несколько инверторов разной мощности, обеспечьте достаточный зазор, соответствующий спецификациям зазоров для более крупного инвертора.
Внимание
- Количество и размеры монтажных кронштейнов зависят от размера рамы.Предупреждение
- Не перемещайте инвертор, поднимая его за крышки инвертора или пластиковые поверхности. Инвертор может опрокинуться, если крышка сломается, что может привести к травмам или повреждению изделия. При перемещении инвертора всегда поддерживайте его за металлические рамы.
- Используйте подходящий способ транспортировки, соответствующий весу.
- Не устанавливайте инвертор на пол и не устанавливайте его боком к стене. Инвертор ДОЛЖЕН быть установлен вертикально, на стене или внутри панели, задней стороной к монтажной поверхности.
2.4 Выбор кабеля и разводка кабеля
■ Технические характеристики кабеля заземления и силового кабеля
|
Нагрузка (кВт) |
земля | Ввод / вывод питания | |||||
|
mm² |
AWG |
mm² |
AWG |
||||
|
Р/С/Т |
У/В/В |
Р/С/Т |
У/В/В |
||||
| отдельная фаза 200V |
0.1, 0.2, 0.4,0.75 |
3.5 |
12 |
2 |
2 |
14 |
14 |
| 1.5,2.2 |
3.5 |
12 |
3.5 |
3.5 |
12 |
12 |
Внимание
- Требуется заземление класса 3. Сопротивление заземления должно быть < 1000.Предупреждение
- Установите заземляющие соединения для инвертора и двигателя, следуя правильным спецификациям, чтобы обеспечить безопасную и точную работу. Использование инвертора и двигателя без указанных соединений заземления может привести к поражению электрическим током.Предупреждение
- Затяните винты клемм до указанного момента затяжки. Ослабленные винты клемм могут привести к отсоединению кабелей и вызвать короткое замыкание или отказ инвертора. Чрезмерная затяжка винтов клемм может повредить клеммы и вызвать короткое замыкание и неисправности.
- Используйте медные кабели, рассчитанные на 600 В, 75°C, для проводки клемм питания.
- Используйте медные кабели, рассчитанные на 300 В, 75 ° C, для проводки клемм управления.
- При подключении проводов к клеммам питания не выполняйте двухпроводное подключение к одной клемме.
- Кабели питания должны быть подключены к клеммам R и . Подключение силовых кабелей к клеммам U, V и W приведет к внутреннему повреждению инвертора. Подключите двигатели к клеммам U, V и W. Порядок чередования фаз не требуется.
■ Технические характеристики сигнального (управляющего) кабеля
|
Терминал |
Сигнальный кабель |
|||
| Без обжимных клеммных соединителей (оголенный провод) | С обжимными соединителями (феррула Bootlace) | |||
|
mm² |
AWG | mm² |
AWG |
|
|
P1-P5/CMVRN1/I2/AO/ Q1/EG/24¹ |
0.75 |
18 | 0.5 |
20 |
|
A1/B1/C1/A2/C2¹ |
1.0 |
17 | 1.5 |
15 |
1) На стандартном ВО нет терминалов P4, PS, 12,A2., и C2, а на Advanced 1/0 есть NoSQL и Терминалы.
![]() Предупреждение
Предупреждение
- По возможности используйте кабели с наибольшей площадью поперечного сечения для силовой проводки, чтобы обеспечитьtagпадение не превышает 2%.
- Используйте медные кабели, рассчитанные на 600 В, 75°C, для проводки клемм питания.
- Используйте медные кабели, рассчитанные на 300 В, 75 ° C, для проводки клемм управления.
Кабельная проводка
- установите заземление, как указано. Завершите кабельные соединения, подключив кабель соответствующего номинала к клеммам на клеммных колодках питания и управления.
![]() Предупреждение
Предупреждение
- Установите инвертор перед выполнением проводных соединений.
- Убедитесь, что внутри инвертора не осталось мелких металлических предметов, таких как обрезки проводов. Металлический мусор в инверторе может привести к отказу инвертора.
- Затяните винты клемм до указанного момента затяжки. Ослабленные винты клеммной колодки могут привести к отсоединению кабелей и вызвать короткое замыкание или отказ инвертора.
- Не кладите тяжелые предметы на электрические кабели. Тяжелые предметы могут повредить кабель и привести к поражению электрическим током.
- Питание инвертора подается через систему заземления. Системы TT, TN, IT и угловые заземленные системы не подходят для этого инвертора.
- Инвертор может генерировать постоянный ток на кабель защитного заземления инвертора. Могут быть установлены только устройства защитного отключения (RCD) или устройства контроля защитного отключения (RCM) типа B.
- Используйте кабели с наибольшей площадью поперечного сечения, подходящие для проводки клемм питания, чтобы обеспечитьtagпадение не превышает 2%.
- Используйте медные кабели, рассчитанные на 600 В, 75 ° C, для подключения силовых клемм.
- Используйте медные кабели, рассчитанные на 300 В, 75°C, для проводки клемм управления.
- Клеммы управления подключайте отдельно от проводки силовых клемм или цепи высокого напряжения (цепь последовательности реле 200 В).
- Убедитесь в отсутствии короткого замыкания клемм управления или неправильной проводки. Короткое замыкание клемм управления или неправильная проводка могут повредить инвертор или вызвать неисправность.
- Используйте экранированный кабель при подключении проводки к терминалу управления. Неэкранированные кабели могут привести к неисправности инвертора из-за помех. Используйте кабель STP, если необходимо установить заземление.
- Если вам необходимо переподключить клеммы из-за неисправности, связанной с проводкой, убедитесь, что дисплей клавиатуры инвертора выключен, а заряд lamp под передней крышкой выключен перед работой с проводными соединениями. Инвертор может держать высокий уровеньtage электрический заряд в течение долгого времени после отключения питания.
2.5 Спецификация клеммных винтов
■ Спецификация винтовых клемм ввода/вывода
| Продукт (кВт) |
Клеммный винт Размер |
Крутящий момент винта (кг.см/Нм) | ||||||
| E | R | T | B1 | B2 | U | V | W | М3-М3.5 (2.1~5.0/0.2–0.5) M4 (2.1~8.0/0.2–0.8) |
| Однофазный 200V | 0.1 / 0.2 / 0.4 / 0.75 |
M3 |
||||||
| 1.5/2.2 | M4 | M3.5 |
■ Спецификация винта клеммы цепи управления
|
Терминал |
Размер клеммного винта |
Крутящий момент винта (кгс.см/Нм |
|
P1∼P5/CMNRN1 /12/A0/Q1 /EG/242) |
M2.6 | 4.0/0.4 |
|
A1/B1/C1/A2/C2 ² |
2) Клеммы P4, P5, 12, A2 и C2 недоступны при использовании стандартного 1/0. Терминалы Qi и EG недоступны при использовании расширенного VO.
![]() Предупреждение
Предупреждение
• Приложите номинальные крутящие моменты к клеммным винтам. Ослабление винтов может привести к короткому замыканию и неисправностям. Слишком сильное затягивание винта может привести к повреждению клемм и вызвать короткое замыкание и неисправности.
Установка инвертора
3.1 Схема базовой конфигурации

![]() Предупреждение
Предупреждение
- Рисунки в данном руководстве показаны со снятыми крышками или автоматическими выключателями для более подробного представления. view монтажных мероприятий. Перед эксплуатацией инвертора установите крышки и автоматические выключатели. Эксплуатируйте изделие в соответствии с инструкциями, приведенными в данном руководстве.
- Не запускайте и не останавливайте инвертор с помощью магнитного контактора, установленного на вводе питания.
- Если инвертор поврежден и теряет управление, машина может создать опасную ситуацию. Установите дополнительное предохранительное устройство, например, аварийный тормоз, чтобы предотвратить подобные ситуации.
- Высокие уровни потребления тока во время включения могут повлиять на систему. Убедитесь, что установлены автоматические выключатели с правильным номиналом для безопасной работы при включении питания.
- Реакторы могут быть установлены для улучшения коэффициента мощности. Обратите внимание, что реакторы могут быть установлены в пределах 30 футов (9.14 м) от источника питания, если входная мощность в 10 раз превышает мощность инвертора.
3.2 Периферийные устройства
■ Модели совместимых автоматических выключателей, автоматических выключателей, магнитных контакторов и автоматических выключателей двигателей (MMS) (производства LSIS)
■ Технические характеристики предохранителя и дросселя

![]() Предупреждение
Предупреждение
- Используйте только входной предохранитель класса Hour RKS, внесенный в список UL, и автоматический выключатель, внесенный в список UL. См. таблицу выше.tage и Номинальный ток предохранителя и выключателя.
Спецификация тормозного резистора
| Продукт (кВт) | Сопротивление(Q) | Номинальная мощность (Вт) |
| 1.5 | 60 | 300 |
| 2.2 | 50 | 400 |
•Стандартный тормозной момент составляет 150%, а рабочая скорость (%ED) составляет 5%. Если рабочая скорость составляет 10 %, номинальная способность тормозного сопротивления должна быть рассчитана как удвоенная стандартная.
3.3 Этикетки и описания клемм питания
| Этикетки клемм | Имя и фамилия | Описание |
| R / T | Входной разъем питания переменного тока | Подключение к сети переменного тока. |
| B1/B2(1.5кВт-2.2кВт) | Клеммы тормозного резистора | Соединения тормозного резистора. |
| ООН/Вт | Выходные клеммы двигателя | Соединения проводки трехфазного асинхронного двигателя. |
Внимание
- Для подключения удаленного двигателя к инвертору используйте кабели STP (экранированная витая пара). Не используйте трехжильные кабели.
- Убедитесь, что общая длина кабеля не превышает 165 футов (50 м).
- Длинные кабели могут привести к снижению крутящего момента двигателя в низкочастотных приложениях из-заtagе падение. Длинные кабели также повышают восприимчивость цепи к паразитным емкостям и могут вызвать срабатывание устройств защиты от перегрузки по току или привести к неисправности оборудования, подключенного к инвертору.
- VoltagПадение рассчитывается по следующей формуле:
Voltage Падение (В) = [83 х сопротивление кабеля (мм/м) х длина кабеля (м) х сила тока (А)]/ 1000 - Используйте кабели с максимально возможной площадью поперечного сечения, чтобы обеспечитьtagПадение сведено к минимуму при использовании длинных кабелей. Понижение несущей частоты и установка микрофильтра перенапряжения также могут помочь уменьшить громкость.tagе падение.
| Расстояние | <165 футов (50 м) | <330 футов (100 м) | ≻330 футов (100 м) |
| Допустимая несущая частота | <15 кГц | <5 кГц | <2.5 кГц |
![]() предупреждение
предупреждение
- Не подключайте питание к инвертору до тех пор, пока установка не будет полностью завершена и инвертор не будет готов к работе. Это может привести к поражению электрическим током Предупреждение
- Кабели питания должны быть подключены к клеммам R и T. Подключение силовых кабелей к другим клеммам приведет к повреждению инвертора.
- Используйте изолированные кольцевые наконечники при подключении кабелей к клеммам /T и U/NW.
- Соединения силовых клемм инвертора могут вызывать гармоники, которые могут мешать другим устройствам связи, расположенным рядом с инвертором. Для уменьшения помех может потребоваться установка фильтров помех или сетевых фильтров.
- Во избежание разрыва цепи или повреждения подключенного оборудования не устанавливайте конденсаторы с фазовым опережением, защиту от перенапряжения или электронные фильтры помех на выходной стороне инвертора.
- Во избежание разрыва цепи или повреждения подключенного оборудования не устанавливайте магнитные контакторы на выходной стороне инвертора.
3.4 Этикетки и описания клемм управления
- Метки клемм одинаковы для стандартных /O и расширенных /O.
- Если указанный терминал доступен только в стандарте /O, он будет обозначен как (Стандарт /o)
- Если указанный терминал доступен только в Advanced /O, он будет обозначен как (Advanced VO).
Переключатели платы управления
| Коммутатор | Описание |
| SW1 | Переключатель выбора режима NPNPNP |
| SW2 (расширенный ввод-вывод) | Аналоговый объемtagКлемма e/токового входа (12) переключатель выбора |
| SW3 (расширенный ввод-вывод) | Переключатель выбора согласующего резистора |
Соединители
| соединитель | Описание |
| RJ45Порт | Подключение удаленной клавиатуры, Smart Copier или связь через RS 485 (Расширенный ввод-вывод) |
Метки и описания входных клемм
| Функция | этикетка | Имя и фамилия | Описание |
| Многофункциональный терминал конфигурация |
ПИ-П5 | Многофункциональный Ввод 1-5 |
Конфигурируется для многофункциональных входных клемм. Заводские клеммы и настройки по умолчанию следующие: • P1:Фх • P2:Прием • P3: Аварийный останов. • P4: Сброс ошибки (СБРОС) • P5: Команда толчкового режима (JOG) (Клеммы P1~P3 доступны только в случае стандартного VO.) |
| CM | Общий <Sequence |
Общая клемма для аналоговых входов и выходов. | |
| Аналоговый вход конфигурация |
VR | Потенциометр частота эталонный вход |
Используется для установки или изменения опорной частоты через аналоговый регулятор громкости.tage или токовый вход. • Максимальная громкостьtagе Выход: 12 В • Максимальный выходной ток 100 мА, • Потенциометр. 1-5кОм |
| V1 | Voltagе ввод для входа опорной частоты |
Используется для установки или изменения опорной частоты через аналоговый регулятор громкости.tagе входной терминал. • Однополярный. 0-10 В (макс. 12 В) |
| 12 (Дополнительно о.о.) |
Voltage / current вход для частоты эталонный вход |
Используется для установки или изменения опорной частоты через аналоговый регулятор громкости.tage или токовые входные клеммы. Переключение между громкостьюtage (V2) и токовый (I2) режимы с помощью переключателя платы управления (SW2}. Режим: однополярный. 0-10 В (макс. 12 В) Режим: конопляный ток: 4-20 м4 |
Метки и описания выходных/коммуникационных клемм
| Функция | этикетка | Имя и фамилия | Описание |
| Аналоговый вывод | AO | Voltage Выход | Используется для отправки выходной информации инвертора на внешние устройства: выходная частота, выходной ток, выходная громкость.tage или DC voltage. • Выходной объемtagе: 0-10 В • Максимальный выходной объемtagэ/ток: 10 В, 10 мА • Выход по умолчанию: выходная частота |
| Цифровой выход | 01 (Стандартный голос) |
Многофункциональный (открытый коллектор) |
26 В пост. тока, 100 мА или менее |
| EG (Стандартный голос) |
Общий | Общий заземляющий контакт для открытого коллектора (с внешним источником питания) | |
| 24 | Внешний 24В источник питания |
Максимальный выходной ток: 50 мА | |
| А/IC1/БТ | Выход сигнала неисправности | Посылает сигналы тревоги, когда инвертор функции безопасности активированы (AC250V <1A, DC30V <1A) .Неисправность: контакты A1 и C1 замкнуты (разомкнуты контакты B1 и C1) • Нормальная работа: контакты B1 и C1 соединены (разомкнутое соединение Al и Cl) |
|
| A2 / C2 (Дополнительно 1 / 0) |
Выход сигнала неисправности | Отправляет аварийные сигналы, когда активируются функции безопасности инвертора (250 В переменного тока <1 А, 30 В постоянного тока < 1 А) • Состояние неисправности: контакты A2 и C2 подключены • Нормальная работа: контакты A2 и C2 разомкнуты. |
|
| Коммуникация | RJ45 | Сигнальная линия удаленной клавиатуры | Используется для отправки или получения сигналов удаленной клавиатуры (дополнительно). |
| Сигнальная линия RS-485 (Дополнительно/O) | Используется для отправки или приема сигналов RS-485. |
3.5 Отключение помех EMC для источников питания с асимметричным заземлением
• Перед использованием инвертора проверьте систему заземления источника питания. Отключите фильтр ЭМС, если источник питания имеет асимметричное заземление. Проверьте расположение фильтра ЭМС или винта и прикрепите пластиковую шайбу к винту под клеммной колодкой управления.

Обучение выполнению основных операций
4.1 клавиш управления
- В следующей таблице перечислены названия и функции клавиш управления на клавиатуре.
| Основные | Имя и фамилия | Описание |
 |
[ВЫПОЛНИТЬ] клавиша | Используется для запуска инвертора (вводит команду RUN). |
 |
Клавиша [СТОП/СБРОС] | $TOP: останавливает инвертор. СБРОС: сбрасывает инвертор после ошибки или отказа. |
 |
Клавиша [▲], клавиша [▼] | Переключайтесь между кодами или увеличивайте или уменьшайте значения параметров. |
 |
Клавиша [РЕЖИМ/SHIFT] | Переключение между группами или перемещение курсора во время настройки или изменения параметра. |
 |
(Введите ключ | Используется для входа в режим настройки параметров, применения заданного параметра и входа на экран рабочей информации с экрана уведомления о неисправности при возникновении неисправности. |
 |
Клавиша [Громкость] | Используется для установки рабочей частоты. |
4.2 Меню управления
• В меню управления инвертором M100 используются следующие группы.
| группы | Монитор | Описание |
| Эксплуатация | – | Конфигурирует основные параметры для работы инвертора. |
| Диск | Настраивает параметры для основных операций. К ним относятся толчковый режим, повышение крутящего момента и другие параметры. | |
| Базовый | Конфигурирует основные параметры, включая параметры, относящиеся к двигателю, и многоступенчатые частоты. | |
| Расширенный поиск | Настройте шаблоны ускорения или замедления и установите пределы частоты. | |
| Control | Настраивает такие функции, как поиск несущей частоты или скорости. | |
| Входной разъем (Ввод) |
Настраивает функции, связанные с входными клеммами, включая цифровые многофункциональные входы и аналоговые входы. | |
| Выходной терминал | Настраивает функции, связанные с выходными клеммами, такие как реле и аналоговые выходы. | |
| Коммуникация | Настраивает функции связи для RS-485 или других вариантов связи. Доступно только для моделей, оснащенных расширенным вводом-выводом. | |
| Protection | Настраивает последовательности и операции, связанные с ПИД-регулятором. | |
| Protection | Настраивает функции защиты двигателя или инвертора. | |
| Вторичный двигатель | Настраивает функции, связанные с вторичным двигателем. Группа вторичного двигателя (M2) появляется на клавиатуре только тогда, когда одна из многофункциональных входных клемм (стандартная модель VO: In65-67, расширенная модель /O: in65-69) установлена на 12 (Вторичный двигатель). |
|
| Конфигурация | Конфигурирует различные функции, такие как настройка параметров. |
43 Таблица функций в рабочей группе
- Группы, за исключением группы Operation, не отображаются в списке групп и недоступны по умолчанию, чтобы предотвратить ошибку ввода параметра. Чтобы отобразить и получить доступ ко всем группам, перейдите к коду 0Gr в группе Operation и установите для параметра значение 1 .
| Отображать | Комм. Адрес |
Имя и фамилия | Диапазон настройки | Начальный ценностное |
Папен* | |
| 0.00 | Ол ФОО | Командная частота | 0.00-Максимальная частота [Гц] | 0.00 | 0 | |
| ACC | Ол F01 | Время разгона | 0.0-6000.0 [с]’) | 5.0 | 0 | |
| декабрь | OhlF02 | Время торможения | 10.0 | 0 | ||
| сухим | OhlF03 | Источник команды | 0 | Клавиатура | 1 | X |
| 1 | Исправить/Rx-1 | |||||
| 2 | Исправить/Rx-2 | |||||
| 3 | Связь RS-485 | |||||
| частота | Ол F04 | Метод настройки частоты | 0 | Клавиатура 1 | 0 | X |
| 1 | Клавиатура 2 | |||||
| 2 | V0:0-5 [В] | |||||
| 3 | V1:0-10 [В] | |||||
| 4 | 12(1): 0-20 [mA]4 | |||||
| 5 | 12(В):0-10[В]2 | |||||
| 6 | V0+12(1)4 | |||||
| 7 | V0+12 (В)2) | |||||
| 8 | ВО + В1 | |||||
| 9 | Связь RS-485′) | |||||
| 10 | Операция вверх-вниз | |||||
| Скошенный | О1F05 | Выбор двигателя | 0.1 — 0.1 кВт | 0.2 — 0.2 кВт | – | X |
| 0.4- Осакве | 0.75 — 0.75 кВт | |||||
| 1.5- 1.5кВт | 22- 2.2кВт | |||||
| Более) | Ол F06 | Номинальный ток двигателя | 0.1–150.0 [А] | – | X | |
| Мифф | О1F07 | Базовая частота | 30.00–400.00 [Гц] | 60.00 | X | |
| Форма | Ол F08 | максимальная частота |
40.00–400.00[Гц] | 60.00 | X | |
| 10v | Ол F09 | Выходная громкостьtage установка | 0, 170-264[В] | 0 | X | |
| фтб | Ол ФОА | Ускорение вперед | 0.0-20.01Тол | 4.0 | X | |
| RTB | О 1 ФОБ | Обратный буст | 0.0-20.0[%] | 4.0 | X | |
| узда | Oh1FOC | Выходной ток | – | – | – |
| об/мин | Ол ЗПП | Обороты двигателя | – | – | – | |
| лощина | Ол чужой | Инвертор DC voltage | – | – | – | |
| полевка, PG, ТОР,В1М, 12М’” |
Ол ФОФ | Сигнал выбора пользователя | объем | Выходная громкостьtage | объем | – |
| К | Выходная мощность | |||||
| тОр | Выходной крутящий момент | |||||
| v1 М | Аналоговый вход клеммы V1 | |||||
| 12M | Аналоговый 12-контактный вход | |||||
| нвкл | OhlF10 | В настоящее время не работает | – | – | – | |
| Огр | Ол Ф 1 1 | Открыть скрытые группы | 0 | Скрыть группы, кроме рабочей группы | ||
| 1 | Включить все группы |
- Диапазон настройки зависит от установленного значения кода bA 8.
- Доступно только для моделей, оснащенных усовершенствованным VO.
- Начальное значение варьируется в зависимости от установленной мощности двигателя (MkW), и значение устанавливается на основе двигателя 220/440 HGEN при поставке.
- Отображаемая информация может быть выбрана в dr81 (настройка элемента монитора). Настройки можно изменить во время работы инвертора.
Техническая спецификация
5.1 Спецификация ввода и вывода
| Модель LSLV ■ ❑ ■ ■ M100-1EOFN ■ | 1 | 2 | 4 | 8 | ||||
| Прикладной двигатель | Тяжелый загрузка |
HP | 0.125 | 0.25 | 0.5 | 1.0 | 2.0 | 3.0 |
| kW | 0.1 | 0.2 | 0.4 | 0.75 | 2. | 2. | ||
| Номинальная мощность | Номинальная мощность (кВА) | 0.3 | 0.6 | 0.95 | 2. | 3.0 | 5. | |
| Номинальный ток (А) | 0.8 | 1. | 2. | 4. | 75 | 10.0 | ||
| Выходная частота | 0-400Hz | |||||||
| Выходная громкостьtagе (В) | 3 фазы 200-240В | |||||||
| Номинальный вход | Рабочий объемtagе (В) | Одна фаза 200-240 В переменного тока (15%-+10%) | ||||||
| Входная частота | 50-60 Гц (±-5%) | |||||||
| Номинальный ток (А) | 1.0 | 2. | 4. | 7. | 14 | Я 18.7 | ||
| Вес (фунт/кг) | 1.46/0.66 | 22/1 | 3.2/1.45 |
5.2 Внешние размеры
■ 0.1–2.2 кВт (однофазный)

| пункты | W1 | W2 | H1 | H2 | H3 | 1 первое полугодие | D1 | A | B | 0 |
| 0001М100-1, | 85 | 75 | 135 | 1355 | 145 | 5 | 100 | 5 | 45 | 5. |
| 0002M100-1 | (3.) | (3.) | (5.) | (5.) | (6.) | (0.) | (4.) | (0.) | (0.) | (0.) |
| 0004М100-1, | 85 | 75 | 153 | 1535 | 163 | 5 | 123 | 5 | 45 | 5. |
| 0008M100-1 | (334) | (3.) | (6.) | (6.) | (6.) | (0.) | (5.) | (0.) | (0.) | (0.) |
| 0015М100-1, | 100 | 90 | 180 | 1805 | 190 | 5 | 140 | 5 | 45 | 45 |
| 0022М100-1, | (4.) | (4.) | (7.) | (7.) | (748) | (0.) | (6.) | (0.) | (0.) | (0.) |
Единица измерения: мм (дюймы)
| ГЛАВНЫЙ ОФИС Адрес: LS Tower, 127, LS-or, Dongan-gu, Anyang-is, Gye0nggi-D0, 431-848, Корея + Зарубежные дочерние компании 1SIS(Dalian) Co., Ltd. Далянь, Китай Адрес. № 15, Алексея 3-Дорожная, Хозяйственная и Зона технического развития, Далянь 116600, Китай Tel 86-411-8730-7510/Fax 86-411-8730-7560 · 1$IS/(Wuxi) Co., Ltd. Wii, Китай Адрес: № 1, Laxing Road, Wu National High & New. Зона технологического промышленного развития, Wu214028, Jiang5u, PIChina Tel 86-510-8534-6666-8005/ Fax 86-510-8534-4078 LS Hulked Electric (Hubel) Co., Ltd. Хубэй, Китай Адрес: № 100, улица Таниша, район Тяньцзинь. Ичан, провинция Хубэй, 443004, Китай Tel 86-717-667-7339/Fax 86-717-667-7559 1$ VINA Industrial Systems Co. Ltd. Маниок, Вьетнам Адрес: Нгуен Кхел, Донг Ань, Ханой, Вьетнам Tel 84-46275-8055/ Fax 84-4-3882-0220 LSIS(ME) FE_ Дубай, ОАЭ Адрес. 108 19-205, ДЖАФЗА View Башня, Свободная Зона Джебет Али, Jebel Ali Free Zone, Dubai, United Arab Emirates Tel 971-4-886-5360/ Fax 971-4-886-5361 LSIS Europe BV _Нидерланды Адрес: St. Floor, Tupolevlaan 48, 1119NZ.Schiphol-Rijk, Нидерланды Tel 31-20-654-1420/Fax 31-20-654-1429 · 15Is Japan Co. Ltd. Токио, Япония Адрес: Tokyo Club Building 13F, 2-6 Kasumigaseki 3-chome, Тиёда-ку, Толли0, 100-0013 Тел.: 81-3-6268-8241 / Факс: 81-3-6268-8240 1SIS USA Inc._ Чикаго, США Адрес: 980 Woodlands Pewee, Vernon Hills, IL 60061 USA4. Тел.: 800-891-2941 / Факс: 800-891-2941 + Зарубежные филиалы · 15Офис в Шанхае, Китай Адрес: 32-й этаж, Международный корпоративный городок, № 3000 NorthZhongshan Road, Putout District, Шанхай, Китай, 200063 Tel:86-21-5237-9977/Fax :86-21-5237-7189 |
Офис LSIS в Пекине, Китай Адрес Комната 2306, Корпус B Landen Center, No.24 Middle Road Восточная 3-я кольцевая дорога, район Ча0ян, Пекин, КНР Tel:86-10-5761-3127/ Fax 86-10-5761-3128 Офис LSIS в Гуанчжоу, Китай Адрес. Комната 1818-1820, Xin yuan Building.NO.898 Tianhe North Road, Tianhe District Гуанчжоу, КНР Тел.: 86-20-8326-6784 / Факс 86-20-8326-6287 Офис ИГИЛ в Циндао, Китай Адрес Комната 200L Galaxy Building 29 Shan0ong Road, район Синан Qin9Dao, Shan0ong PR China Тел. 86-532-8501-6058 / Факс. 86-532-8501-6057 Офис LSIS в Чэнду, Китай Адрес. Комната 1710, 17/F Hummin Empire Plaza NO.I Fu8in Road, Чэнду, КНР Tel 86-28.8670-3200/ Fax 86-28-8670-3203 Офис 1SIS в Шэньяне, Китай Адрес: Комната 803, здание Хун Юань. 52 Южная Нанкин-роуд, Район Надежды, Шэньян, Пр. Китай Tel.86-24-2321-9050 / Fax 86-24-8386-7210 Офис ИГИЛ в Цзинане, Китай Адрес. Комната 317, Центр Чуанран, № 201, Шанда-роуд, район Ливия. Цзинань, Шаньдун, Китай Tel.86-531-8699-7826 / Fax: 86-531-8697-7628 LSIS Co., Ltd. Офис в Токио, Япония Адрес Tokyo Club Building 13F, 2-6, Kasumigaseki 3-chome Тиёда-ку, Токио, 100-0013 Tel 81-3-6268-8241 /Fax .81-3-6268-8240 Представительство 1SIS Co.. Ltd., Вьетнам Адрес. Green Power — EVNHCMC, 14 этаж, 35 Ton Duc Thang Район 1, Хошимин, Вьетнам Тел 84.28. 3823.7890/ Факс. 84 28. 3823.0996 Московский офис ISIS, Россия Адрес: 123610, г. Краснопресненская, наб. 12, стр. Л офис N10OS, Москва, Россия Tel.7-495-258-1466/1467 / Fax 7-495-258-1466/1467 • Офис ISIS в Джакарте, Индонезия Адрес. APL TOWER переулок 10 блок 3, JI. Летем С. Парма ка. 28 11470, Джакарта Барат, Индонезия Тел. 62-21-293-7614 |
· Отказ от ответственности
LSIS повторноviewотредактировал информацию в этой публикации, чтобы обеспечить совместимость с описанным аппаратным и программным обеспечением. Однако LSIS не может гарантировать полную согласованность и не несет ответственности за какой-либо ущерб или компенсацию, поскольку невозможно полностью исключить расхождения. Перед использованием продукта проверьте еще раз версию этой публикации.

![]() www.lsis.com
www.lsis.com
@LSIS Co., Ltd 2017 Все права защищены.
Документы / Ресурсы
Частотные преобразователи LS ELECTRIC М100
Оптимальная компактная
серия преобразователей частоты
Оптимальная компактная серия преобразователей частоты M100 подходит для небольших насосов, вентиляторов, конвейерных установок.
Серия M100 имеет встроенный фильтр ЭМС (C2 Класса), встроенный тормозной прерыватель, возможность установки на DIN-рейку и потенциометр.


Преобразователь имеет быстрый доступ к большинству программ через внешнюю панель управления, функцию быстрого подключения к удаленным устройствам, возможность копирования параметров на соседние устройства и внешний пульт управления.

Благодаря возможности контактной установки (2 мм между преобразователями), подходит для решения задач в ограниченном пространстве.

Преобразователи M100 серии имеют международный стандарт использования.

|
|
|
|
|
|
|
|
|
|
Мощность двигателя, л.с. |
0.125 |
0.25 |
0.5 |
1.0 |
2.0 |
3.0 |
|
|
Мощность двигателя, кВт: |
0.1 |
0.2 |
0.4 |
0.75 |
1.5 |
2.2 |
|
|
Номинальная мощность на выходе: |
Номинальный мощность, кВА: |
0.3 |
0.6 |
0.95 |
1.9 |
3.0 |
4.5 |
|
Номинальный ток, А: |
0.8 |
1.4 |
2.4 |
4.2 |
7.5 |
10.0 |
|
|
Частота, Гц |
0~400 |
||||||
|
Напряжение, В: |
3 фазы 200-240 В |
||||||
|
Номинальная мощность на входе: |
Напряжение, В: |
1 фаза 200-240 В переменного тока (от -15% до +10%) |
|||||
|
Частота, Гц |
50~60 Гц (± 5%) |
||||||
|
Номинальный ток, А: |
1.0 |
1.8 |
3.7 |
7.1 |
13.6 |
18.7 |
|
|
Тип охлаждения: |
Естественное |
Принудительное |
|||||
|
Вес, кг: |
0.66 |
1 |
1.45 |


Нажимая на кнопку, вы даете согласие на обработку персональных данных и соглашаетесь c политикой конфиденциальности
![]()
© All Rights Reserved. LS ELECTRIC Co. Ltd.
Контакты
- ООО «АБ-сервис»
- г. Санкт-Петербург
- ул. Бестужевская, 4 к1
- (812) 989-30-90
- +7 (904) 555-03-09
- info@lsrf.ru
Цена: по запросу
Наличие:уточняйте
заказать по телефону
8 800 350 02 06
Оптимальная компактная серия преобразователей частоты M100 идеальна для небольших насосов, вентиляторов, конвейерных установок.
Отличительные особенности:
- Встроенный фильтр ЭМС (C2)
- Встроенный потенциометр
- Компактные размеры
- Встроенный тормозной ключ для 1,5 — 2,2 кВт
- Встроенный интерфейс RS485
- Монтаж на DIN-рейку, установка бок о бок (2 мм между преобразователями)
Дополнительная информация:
Переход в раздел технической документации
Запросить дополнительную информацию и цены

- Manuals
- Brands
- LSIS Manuals
- Inverter Drive
- LSLV-G100
- Operation manual
-
Contents
-
Table of Contents
-
Troubleshooting
-
Bookmarks
Quick Links
This operation manual is intended for users with basic knowledge of electricity and
electric devices.
* LSLV-G100 is the official name for G100.
Related Manuals for LSIS LSLV-G100
Summary of Contents for LSIS LSLV-G100
-
Page 1
This operation manual is intended for users with basic knowledge of electricity and electric devices. * LSLV-G100 is the official name for G100. -
Page 2
Safety Information Read and follow all safety instructions in this manual precisely to avoid unsafe operating conditions, property damage, personal injury, or even death. Safety Symbols in This Manual Indicates an imminently hazardous situation which, if not avoided, will result in severe injury or even death. -
Page 3
• Make sure to install ground connection between the equipment and the motor for safe use. Otherwise it may cause an electrical shock and result in personal injury or even death. • Do not turn on the power if the product is damaged or faulty. If you find that the product is faulty, disconnect the power supply and have the product professionally repaired. -
Page 4
électrique est défini dans la norme IEC 60439-1 comme égal à 100 kA. Selon le MCCB sélectionné, la série LSLV-G100 peut être utilisée sur des circuits pouvant fournir un courant RMS symétrique de 100 kA maximum en ampères à la tension nominale maximale du variateur. -
Page 5
Quick Reference Table The table below is a summary of situations that users encounter frequently while using the product. For faster and easier information searching, see the table below. Situation Ref. I want to run a slightly higher rated motor than the inverter’s rated capacity. p.179 I want to configure the inverter to start operating as soon as the power p.76… -
Page 6: Table Of Contents
Table of Contents 1 Preparing the Installation Product Identification Part Names Installation Considerations Selecting the Installation Site Cable Selection 2 Installing the Inverter Mount on the Wall or within the Panel Wiring Post-Installation Checklist Test Run 3 Learning to Perform Basic Operations About the Keypad 3.1.1 About the Display…
-
Page 7
command with the keypad [RUN] key Monitoring the Operation 3.4.1 Output Current Monitoring 3.4.2 Trip Condition Monitor 4 Learning Basic Features Frequency Reference Configuration 4.1.1 Set the Operation Frequency from the Keypad — Direct Input Set the Operation Frequency from the Keypad — Using [▲] and [▼] 4.1.2 keys 4.1.3… -
Page 8
4.11.1 Linear V/F Pattern Operation 4.11.2 Square Reduction V/F Pattern Operation 4.11.3 User V/F Pattern Operation 4.12 Torque Boost 4.12.1 Manual Torque Boost 4.12.2 Auto Torque Boost 4.13 Motor Output Voltage Adjustment 4.14 Start Mode Setting 4.14.1 Accelerating Start 4.14.2 DC Braking After Start 4.14.3 Initial Excitation of Stop Status (Pre-excite) 4.15 Stop Mode Setting 4.15.1 Deceleration Stop… -
Page 9
Slip Compensation Operation PID Control 5.8.1 Basic PID Operation 5.8.2 Pre-PID Operation 5.8.3 PID Operation Sleep mode 5.8.4 PID Switching (PID Openloop) Auto-tuning 5.10 Sensorless Vector Control for Induction Motors 5.10.1 Sensorless Vector Control Operation Setting for Induction Motors 5.10.2 Sensorless Vector Control Operation Guide for Induction Motors 5.11 Energy Buffering Operation (Kinetic Energy Buffering) 5.12 Energy Saving Operation 5.12.1 Manual Energy Saving Operation… -
Page 10
5.28.1 Current Analog Output 5.29 Digital Output 5.29.1 Multi-Function Relay Settings 5.29.2 Trip Output to Multi-Function Relay 5.29.3 Multi-Function Relay Terminal Delay Time Settings 5.30 Base Block 6 Learning Protection Features Motor Protection 6.1.1 Electronic Thermal Motor Overheating Prevention (ETH) 6.1.2 Overload Early Warning and Trip 6.1.3… -
Page 11
7.2.1 Communication Line Connection 7.2.2 Setting Communication Parameters 7.2.3 Setting Operation Command and Frequency 7.2.4 Command Loss Protective Operation 7.2.5 Setting Virtual Multi-Function Input 7.2.6 Saving Parameters Defined by Communication 7.2.7 Total Memory Map for Communication 7.2.8 Parameter Group for Data Transmission Communication Protocol 7.3.1 LS INV 485 Protocol… -
Page 12
9.1.1 Fault Trips 9.1.2 Warning Messages Troubleshooting Fault Trips Other Faults 10 Maintenance 10.1 Regular Inspection Lists 10.1.1 Daily Inspections 10.1.2 Annual Inspections 10.1.3 Bi-annual Inspections 10.2 Storage and Disposal 10.2.1 Storage 10.2.2 Disposal 11 Technical Specification 11.1 Input and Output Specification 11.2 Product Specification Details 11.3 External Dimensions 11.4 Peripheral Devices… -
Page 13: Preparing The Installation
1 Preparing the Installation This chapter provides details on product identification, part names, correct installation and cable specifications. To install the inverter correctly and safely, carefully read and follow the instructions. 1.1 Product Identification The G100 Inverter is manufactured in a range of product groups based on drive capacity and power source specifications.
-
Page 15: Part Names
1.2 Part Names See the assembly diagram below for the part names. Detailed images may vary between product groups. 0.4–4.0 kW (3-Phase)
-
Page 16
5.5–7.5 kW (3-Phase) -
Page 17: Installation Considerations
1.3 Installation Considerations Inverters are composed of various precision, electronic devices, and therefore the installation environment can significantly impact the lifespan and reliability of the product. The table below details the ideal operation and installation conditions for the inverter. Items Description Ambient Heavy load: -10–50℃, Normal load: -10–40℃…
-
Page 18: Selecting The Installation Site
Do not allow the ambient temperature to exceed the allowable range while operating the inverter. 1.4 Selecting the Installation Site When selecting an installation location consider the following points: • The location must be free from vibration, and the inverter must be installed on a wall that can support the inverter’s weight.
-
Page 19
• Make sure that sufficient air circulation is provided around the product. When installing the product inside the panel, carefully consider the position of the product’s cooling fan and the ventilation louver. The product must be placed for the cooling fan to discharge heat satisfactorily during the operation. -
Page 20
• If you are installing multiple inverters in one location, arrange them side-by-side and remove the top covers. The top covers MUST be removed for side-by-side installations. Use a flat head screwdriver to remove the top covers. -
Page 21
• If you are installing multiple inverters, of different ratings, provide sufficient clearance to meet the clearance specifications of the larger inverter. -
Page 22: Cable Selection
1.5 Cable Selection When you install power and signal cables in the terminal blocks, only use cables that meet the required specification for the safe and reliable operation of the product. Refer to the following information to assist you with cable selection. •…
-
Page 23: Installing The Inverter
2 Installing the Inverter This chapter describes the physical and electrical installation methods, including mounting and wiring of the product. Refer to the flowchart and basic configuration diagram provided below to understand the procedures and installation methods to be followed to install the product correctly. Installation Flowchart The flowchart lists the sequence to be followed during installation.
-
Page 24
Basic Configuration The diagram below shows the basic system configuration. Use the diagram for reference when configuring the system by connecting the product with peripheral devices. Ensure that the product has a suitable rating for the configuration and that all the required peripherals and optional devices (brake unit, reactors, noise filters, etc.) are available. -
Page 25: Mount On The Wall Or Within The Panel
2.1 Mount on the Wall or within the Panel Mount the inverter on a wall or inside a panel following the procedures provided below. Before installation, ensure that there is sufficient space to meet the clearance specifications, and that there are no obstacles impeding the cooling fan’s air flow. Select a wall or panel suitable to support the installation.
-
Page 26
Mount the inverter on a wall or inside a panel using two mounting bolts. Fully tighten the upper mounting bolts, then install two lower mounting bolts and tighten fully to mount the inverter. Ensure that the inverter is placed flat on the mounting surface, and that the installation surface can securely support the weight of the inverter. -
Page 27
• Do not transport the inverter by lifting with the inverter’s covers or plastic surfaces. The inverter may tip over if covers break, causing injuries or damage to the product. Always support the inverter using the metal frames when moving it. •… -
Page 28: Wiring
2.2 Wiring Open the front cover, remove the cable guides and control terminal cover, and then install the ground connection as specified. Complete the cable connections by connecting an appropriately rated cable to the terminals on the power and control terminal blocks.
-
Page 29
Step1 Remove the front cover For the power terminal and control terminal wiring, the front cover must be disassembled in order. Note that the disassembling procedure of front cover and control terminal cover may vary depending on the product group. Disassemble each cover in the following order: Loosen the bolt that secures the front cover (R). -
Page 30
Step2 Ground Connection Remove the front cover(s) and the control terminal cover. Then follow the instructions below to install the ground connection for the inverter. Locate the ground terminal and connect an appropriately rated ground cable to the terminals. Refer to 1.5 Cable Selection on page 10 to find the appropriate cable specification for your installation. -
Page 31
Step3 Power Terminal Wiring The following illustration shows the terminal layout on the power terminal block. Refer to the detailed descriptions to understand the function and location of each terminal before making wiring connections. Ensure that the cables selected meet or exceed the specifications in 1.5 Cable Selection on page 10 before installing them. -
Page 32
0.4–0.8 kW 1.5–2.2 kW 4.0 kW… -
Page 33
5.5–7.5 kW Power Terminal Labels and Descriptions Terminal Labels Name Description Ground Terminal Connect earth grounding. R(L1)/S(L2)/T(L3) AC power input terminal Mains supply AC power connections. B1/B2 Brake resistor terminals Brake resistor wiring connection. 3-phase induction motor wiring U/V/W Motor output terminals connections. -
Page 34
Do not connect power to the inverter until installation has been fully completed and the inverter is ready to be operated. Otherwise it may cause an electrical shock and result in personal injury or even death. • Power supply cables must be connected to the R, S, and T terminals and output wiring to the motor must be connected to the U, V, and W terminals. -
Page 35
Step 4 Control Terminal Wiring The illustrations below show the detailed layout of control wiring terminals, and control board switches. Ensure that the cables selected meet or exceed the specifications in 1.5 Cable Selection on page 10 before installing them. Control Board Switches Switch Description… -
Page 36
Input Terminal Labels and Descriptions Terminal Category Name Description Labels Configurable for multi-function input terminals. Factory default terminals and setup are as follows: Multi-function • P1: Fx P1–P5 Multi- Input 1-5 • P2: Rx function • P3: BX terminal configuration •… -
Page 37
Terminal Category Name Description Labels Used to setup or modify the frequency depending on the voltage input to the V1 Frequency setting terminal. (voltage) terminal • Unipolar: 0–10 V (12 V Max.) • Bipolar: -10–10 V (±12 V Max.) Used to setup or modify a frequency Current input for reference via the I2 terminal. -
Page 38
Pre-insulated Crimp Terminal Use pre-insulated crimp terminal connectors to increase reliability of the control terminal wiring. Refer to the specifications below to determine the crimp terminals to fit various cable sizes. Part Cable Spec. Dimensions (inches/mm) Number Manufacturer AWG mm (P/N) CE005006 0.50… -
Page 39
To connect cables to the control terminals without using crimp terminals, refer to the following illustration detailing the correct length of exposed conductor at the end of the control cable. Note • While making wiring connections at the control terminals, ensure that the total cable length does not exceed 165 ft (50 m). -
Page 40
Step 5 PNP/NPN Mode Selection The G100 inverter supports both PNP (Source) and NPN (Sink) modes for sequence inputs at the terminal. Select an appropriate mode to suit requirements using the PNP/NPN selection switch (SW1) on the control board. Refer to the following information for detailed applications. -
Page 41
NPN Mode (Sink) Select NPN using the PNP/NPN selection switch (SW1). CM is the common ground terminal for all analog inputs at the terminal, and P24 is 24 V internal source. Note that the factory default setting is NPN mode. -
Page 42
Step 6 Disabling the EMC Filter for Power Sources with Asymmetrical Grounding Built-in EMC type of G100 400V has a EMC filter which prevents eclectromagnetic interference by reducing radio emissions from the inverter. EMC filter features is set to ‘On’ by factory default. Current leakage increases when the EMC filter feature is used. -
Page 43
Before using the inverter, confirm the power supply’s grounding system. Disable the EMC filter if the power source has an asymmetrical grounding connection. Check the location of the EMC filter on/off screw and attach the plastic washer to the screw under the control terminal block. -
Page 44: Post-Installation Checklist
2.3 Post-Installation Checklist After completing the installation, check the items in the following table to make sure that the inverter has been safely and correctly installed. Items Details Ref. Result Is the installation location appropriate? Does the environment meet the inverter’s operating conditions? Does the power source match the inverter’s rated p.303…
-
Page 45
Items Details Ref. Result Are shielded twisted pair (STP) cables used for control terminal wiring? Is the shielding of the STP wiring properly grounded? If 3-wire operation is required, are the multi- function input terminals defined prior to the p.23 installation of the control wiring connections? Control Terminal Wiring… -
Page 46: Test Run
2.4 Test Run After the post-installation checklist has been completed, follow the instructions below to test the inverter. Turn on the power supply to the inverter. Ensure that the keypad display light is Select the command source. Set a frequency reference, and then check the following: •…
-
Page 47
Set a frequency reference. Press the [RUN] key. Motor starts forward operation. Observe the motor’s rotation from the load side and ensure that the motor rotates counterclockWise (forward). • Check the parameter settings before running the inverter. Parameter settings may have to be adjusted depending on the load. -
Page 49: Learning To Perform Basic Operations
3 Learning to Perform Basic Operations This chapter describes the keypad layout, functions, and the operation method as well as the function groups used for the inverter operation and the basic operation method using the keypad. Become familiar with the correct basic operation method before advancing to more complex uses by setting the various features of the inverter and giving an operation command by changing the frequency or input voltage.
-
Page 50: About The Display
3.1.1 About the Display The following table lists display part names and their functions. Name Function Displays current operational status and parameter ❶ 7-Segment Display information. LED flashes during parameter configuration and when ❷ SET Indicator the ESC key operates as the multi-function key. LED turns on (steady) during an operation, and ❸…
-
Page 51: Operation Keys
3.1.2 Operation Keys The following table lists the names and functions of the keypad’s operation keys. Name Function [RUN] key Used to run the inverter. STOP: Stops the inverter. [STOP/RESET] RESET: Resets the inverter if a fault or failure occurs. Switches between codes, or increases or decreases [▲] key, [▼] key parameter values.
-
Page 52: Learning To Use The Keypad
3.1.3 Control Menu The following table lists the functions groups under Parameter mode. Keypad Group Description Display Configures basic parameters for inverter Operation operation. Configures parameters for basic operations. These include jog operation, motor capacity Drive evaluation, torque boost, and other keypad related parameters.
-
Page 53: Group And Code Selection
3.2.1 Group and Code Selection Follow the examples below to learn how to switch between groups and codes. Step Instruction Keypad Display Move to the group you want using the [MODE] keys. Press the [MODE] key for longer than 1 second to move in the opposite direction.
-
Page 54: Navigating Directly To Different Codes (Jump Codes)
3.2.2 Navigating Directly to Different Codes (Jump Codes) The following example details navigating to code dr. 95, from the initial code in the Drive group (dr. 0). This example applies to all groups whenever you would like to navigate to a specific code number. Step Instruction Keypad Display…
-
Page 55
3.2.3 Setting Parameter Values Enable or disable features by setting or modifying parameter values for different codes. Directly enter setting values, such as frequency references, supply voltages, and motor speeds. Follow the instructions below to learn to set or modify parameter values. -
Page 56: Actual Application Examples
3.3 Actual Application Examples 3.3.1 Acceleration Time Configuration The following is an example demonstrating how to modify the Acceleration time (ACC) code value (from 5.0 to 16.0) from the Operation group. Step Instruction Keypad Display Ensure that the first code of the Operation group is selected, and code 0.00 (Command Frequency) is displayed.
-
Page 57: Frequency Reference Configuration
3.3.2 Frequency Reference Configuration The following is an example to demonstrate configuring a frequency reference of 30.05 Hz from the first code in the Operation group. Step Instruction Keypad Display Ensure that the first code of the Operation group is selected, and code 0.00 (Command Frequency) is displayed.
-
Page 58: Jog Frequency Configuration
3.3.3 Jog Frequency Configuration The following example demonstrates how to configure Jog Frequency by modifying code 11 (Jog Frequency) in the Drive group from 10.00 Hz to 20.00 Hz. You can configure the parameters for different codes in any other group in exactly the same way.
-
Page 59: Parameter Initialization
3.3.4 Parameter Initialization The following example demonstrates parameter initialization using code dr.93 (Parameter Initialization) in the Drive group. Step Instruction Keypad Display Go to code 0 in the Drive group. Press the [ENT] key. The current parameter value «9» will be displayed. To make the target value «93», press the [▼] key to change the ones’ place value to «3».
-
Page 60: Frequency Setting (Keypad) And Operation (Via Terminal Input)
Note Following parameter initialization, all parameters are reset to factory default values. Ensure that parameters are reconfigured before running the inverter again after an initialization. 3.3.5 Frequency Setting (Keypad) and Operation (via Terminal Input) Step Instruction Keypad Display Turn on the inverter. Ensure that the first code of the Operation group is selected, and code 0.00 (Command Frequency) is displayed, then press the [ENT] key.
-
Page 61: Frequency Setting (Potentiometer) And Operation (Terminal Input)
[Wiring Diagram] [Operation Pattern] Note The instructions in the table are based on the factory default parameter settings. The inverter may not work correctly if the default parameter settings are changed after the inverter is purchased. In such cases, initialize all parameters to reset the values to the factory default parameter settings before following the instructions in the table (refer to 5.21 Parameter initialization on page 157).
-
Page 62
Step Instruction Keypad Display frequency reference to 10 Hz. Refer to the wiring diagram at the bottom of the table, and turn on the switch between the P1 (FX) and CM terminals. The RUN indicator light flashes and the FWD indicator light comes on steady. -
Page 63: Frequency Setting With (Internal) Potentiometer And Operation
3.3.7 Frequency setting with (internal) potentiometer and operation command with the keypad [RUN] key Step Instruction Keypad Display Turn on the inverter. Ensure that the first code of the Operation group is selected, and code 0.00 (Command Frequency) is displayed. Press the [▲] key 3 times.
-
Page 64
Step Instruction Keypad Display When the frequency reaches the reference (10 Hz), press the [STOP/RESET] key on the keypad. The RUN indicator light flashes again and the current deceleration frequency is displayed. When the frequency reaches 0 Hz, the RUN and FWD indicator lights turn off, and the frequency reference, 10.00, is displayed again. -
Page 65: Monitoring The Operation
3.4 Monitoring the Operation 3.4.1 Output Current Monitoring The following example demonstrates how to monitor the output current in the Operation group using the keypad. Step Instruction Keypad Display Ensure that the first code of the Operation group is selected, and code 0.00 (Command Frequency) is displayed.
-
Page 66
3.4.2 Trip Condition Monitor The following example demonstrates how to monitor fault trip conditions in the Operation group using the keypad. Step Instruction Keypad Display Refer to the example keypad display. An over current trip fault has occurred. Press the [ENT] key, and then the [▲] key. The operation frequency at the time of the fault (30.00 Hz) is displayed. -
Page 67
Note • If multiple fault trips occur at the same time, a maximum of 3 fault trip records can be retrieved as shown in the following example. • If a warning situation occurs while operating with the entered frequency, a display and the current screen will flash in 1 second intervals. -
Page 69: Learning Basic Features
4 Learning Basic Features This chapter describes the basic features of the G100 inverter. Check the reference page in the table to see the detailed description for each of the basic features. Basic Tasks Use Example Ref. Frequency reference Configures the inverter to allow you to setup or source configuration for p.60 modify frequency reference using the Keypad.
-
Page 70
Basic Tasks Use Example Ref. For automatic start-up configuration to work, the operation command terminals at the terminal block must be turned on. Acc/Dec Time Based Configures the acceleration and deceleration p.78 on Maximum times for a motor based on a defined maximum Frequency frequency. -
Page 71
Basic Tasks Use Example Ref. before the motor starts rotating again. This configuration is used when the motor will be rotating before the voltage is supplied from the inverter. Deceleration stop is the typical method used to stop a motor. The motor decelerates to 0 Hz and Deceleration stop p.94 stops on a stop command, however there may be… -
Page 72: Frequency Reference Configuration
4.1 Frequency Reference Configuration The G100 inverter provides several methods to setup and modify a frequency reference for an operation. The keypad, analog inputs [for example voltage (V1) and current (I2) signals], or RS-485, and Fieldbus option card can be used. Group Code Name…
-
Page 73: Set The Operation Frequency From The Keypad — Using [▲] And [▼] Keys
4.1.2 Set the Operation Frequency from the Keypad — Using [▲] and [▼] keys You can use the [▲] and [▼] keys like a potentiometer to modify the frequency reference. Select the Frq (Frequency reference source) code in the Operation group to 1 (Keypad-2).
-
Page 74
Group Name Setting Setting Range Unit Operatio Frequency reference 0–8 source Frequency for maximum Maximum Start Frequency– analog input frequency Max. Frequency V1 input voltage display 0.00 0.00–12.00 Unipola V1 input polarity selection 0 0–1 V1 input filter time 0–10000 msec constant V1 minimum input voltage 0.00… -
Page 75
Code and Description Features These parameters are used to configure the gradient level and offset values of the Output Frequency, based on the Input Voltage. In.08 V1 volt x1– In.11 V1 Perc y2 In.16 V1 Inverts the input value of V1. Set this code to 1 (Yes) if you need the Inverting motor to run in the opposite direction from the current rotation. -
Page 76
Code and Description Features input signal value increases, the output frequency starts changing if the height becomes equivalent to 3/4 of the quantizing value. From then on, the output frequency increases according to the quantizing value. On the other hand, when the input signal decrease, the output frequency starts decreasing if the height becomes equivalent to 1/4 of the quantizing value. -
Page 77
4.1.3.2 Setting a Frequency Reference for -10–10 V Input Set the Frq (Frequency reference source) code in the Operation group to 2 (V1), and then set code 06 (V1 Polarity) to 1 (bipolar) in the Input Terminal group (IN). Use the output voltage from an external source to provide input to V1 (Frequency setting voltage terminal). -
Page 78
Group Code Name Setting Setting Range Unit voltage (%) V1 Maximum input -10.00 -12.00–0.00 V voltage V1 output at Maximum -100.00 -100.00–0.00% voltage (%) Rotational Directions for Different Voltage Inputs Operation Input voltage command 0–10 V -10–0 V -10–10 V Voltage Input Setting Details Code and Description Features… -
Page 79: Setting A Reference Frequency Using Input Current (I2)
4.1.4 Built-in Volume Input (V0) as the Source You can modify the frequency reference by using the built-in volume dial. Go to the Frq (Frequency reference source) code in the Operation group and change the parameter value to 4, and then rotate the built-in volume dial. You can monitor the parameter setting of the frequency reference at the 0.00 (command frequency) code in the Operation group.
-
Page 80
Group Code Name Setting Setting Range Unit I2 output at minimum 0.00 0–100 current (%) I2 maximum input current 20.00 0.00–20.00 I2 output at Maximum 100.00 0.00–100.00 current (%) Changing rotation direction 0–1 of I2 I2 quantization level 0.04 0.00*, 0.04–10.00 * Quantizing is disabled if «0»… -
Page 82: Communication
4.1.6 Frequency Reference Source Configuration for RS-485 Communication Set the Frq (Frequency reference source) code in the Operation group to 6 (Int 485). Control the inverter with upper-level controllers, such as PCs or PLCs, via RS-485 communication by using RS-485 signal input terminals (S+/S-) of the control terminal block.
-
Page 83: Multi-Step Frequency Configuration
4.3 Multi-step Frequency Configuration Multi-step operations can be carried out by assigning different speeds (or frequencies) to the Px terminals. Step 0 uses the frequency reference source set with the Frq code in the Operation group. Px terminal parameter values 7 (Speed-L), 8 (Speed-M) and 9 (Speed-H) are recognized as binary commands and work in combination with Fx or Rx run commands.
-
Page 84
Code and Description Features Choose the P1-P5 terminals to setup as multi-step inputs, and then set the relevant codes (In.65–69) to 7 (Speed-L), 8 (Speed-M), or 9 (Speed-H). Provided that terminals P3, P4 and P5 have been set to Speed-L, Speed-M and Speed-H respectively, the following multi-step operation will be available. -
Page 85: Command Source Configuration
4.4 Command Source Configuration Various devices can be selected as command input devices for the G100 inverter. Input devices available to select include keypad, multi-function input terminal, RS-485 communication and field bus adapter. Group Code Name Setting Setting Range Unit Keypad Fx/Rx-1 Command…
-
Page 86: Terminal Block As A Commcommand Input Device (Run Command Rotation Direction Commcommands)
Fwd/Rev Command by Multi-function Terminal – Setting Details Code and Description Features Operation group drv– Cmd Set to 1 (Fx/Rx-1). Source In.65–69 Px Assign a terminal for forward (Fx) operation. Define Assign a terminal for reverse (Rx) operation. 4.4.3 Terminal Block as a Command Input Device (Run and Rotation Direction Commands) Set the drv (command source) code in the Operation group to 2 (Fx/Rx-2).
-
Page 87: Forward Or Reverse Run Prevention
Code and Description Features In.65–69 Px Assign a terminal for run command (Fx). Define Assign a terminal for changing rotation direction (Rx). 4.4.4 RS-485 Communication as a Command Input Device Internal RS-485 communication can be selected as a command input device by setting the drv (command source) code in the Operation group to 3 (Int 485).
-
Page 88: Power-On Run
Forward/Reverse Run Prevention Setting Details Code and Description Features Choose a direction to prevent. Configuration Function Ad.09 Run None Do not set run prevention. Prevent Forward Prev Set forward run prevention. Reverse Prev Set reverse run prevention. 4.6 Power-on Run When the Power-on Run command is enabled and the terminal block operation command is ON for when there is a power supply to the inverter, it is started immediately.
-
Page 89: Reset And Restart
Take caution on any safety accidents when operating the inverter with Power-on Run enabled as the motor will begin rotating as soon as the inverter starts up. 4.7 Reset and Restart Reset and restart operations can be setup for inverter operation following a fault trip, based on the terminal block operation command (if it is configured).
-
Page 90: Setting Acceleration And Deceleration Times
Take caution on any safety accidents when operating the inverter with Automatic Restart After Reset enabled as the motor will begin rotating as soon as the inverter is reset from the terminal block or keypad after a trip occurs. 4.8 Setting Acceleration and Deceleration Times 4.8.1 Acc/Dec Time Based on Maximum Frequency Acc/Dec time values can be set based on maximum frequency, not on inverter operation frequency.
-
Page 91: Acc/Dec Time Based On Operation Frequency
Code and Description Features at 30 Hz, the time required to reach 30 Hz therefore is 2.5 seconds. Use the time scale for all time-related values. It is particularly useful when a more accurate Acc/Dec times are required because of load characteristics, or when the maximum time range needs to be extended.
-
Page 92: Multi-Step Acc/Dec Time Configuration
Acc/Dec Time Based on Operation Frequency – Setting Details Code and Description Features Set the parameter value to 1 (Delta Freq) to set Acc/Dec times based on Maximum frequency. Configuration Function Set the Acc/Dec time based on maximum Max Freq frequency.
-
Page 93
Acc/Dec Time Setup via Multi-function Terminals – Setting Details Code and Description Features bA. 70–82 Set multi-step acceleration time 1–7. Acc Time 1–7 bA.71–83 Set multi-step deceleration time 1–7. Dec Time 1–7 Choose and configure the terminals to use for multi-step Acc/Dec time inputs. -
Page 94
4.8.4 Acc/Dec Time Switch Frequency You can set a switch frequency for the Acc/Dec time to change the Acc/Dec gradients without configuring the multi-function terminals. Group Code Name Setting Setting Range Unit ACC Acceleration time 0.0–600.0 Operation dEC Deceleration time 10.0 0.0–600.0 Multi-step… -
Page 95: Acc/Dec Pattern Configuration
4.9 Acc/Dec Pattern Configuration Acc/Dec gradient level patterns can be configured to enhance and smooth the inverter’s acceleration and deceleration curves. Linear pattern features a linear increase or decrease to the output frequency, at a fixed rate. For an S-curve pattern a smoother and more gradual increase or decrease of output frequency, ideal for lift- type loads or elevator doors, etc.
-
Page 96
Code and Description Features [Acceleration / deceleration pattern configuration] [Acceleration / deceleration S-curve pattern configuration] Note The Actual Acc/Dec time during an S-curve application Actual acceleration time = user-configured acceleration time + user-configured acceleration time x starting gradient level/2 + user-configured acceleration time x ending gradient level/2. -
Page 97: Stopping The Acc/Dec Operation
Note that actual Acc/Dec times become greater than user defined Acc/Dec times when S-curve Acc/Dec patterns are in use. 4.10 Stopping the Acc/Dec Operation Configure the multi-function input terminals to stop acceleration or deceleration and operate the inverter at a fixed frequency. Grou Code Name…
-
Page 98: Square Reduction V/F Pattern Operation
Group Code Name Setting Setting Range Unit Control mode 0–4 Base frequency 60.00 30.00–400.00 Start frequency 0.50 0.01–10.00 V/F pattern Linear 0–3 Linear V/F Pattern Setting Details Code and Description Features Sets the base frequency. A base frequency is the inverter’s output frequency when running at its rated voltage.
-
Page 99: User V/F Pattern Operation
Square Reduction V/F Pattern Operation — Setting Details Code and Description Features Sets the parameter value to 1 (Square) or 2 (Square2) according to the load’s start characteristics. Configuration Function bA.07 V/F The inverter produces output voltage proportional Square Pattern to 1.5 square of the operation frequency.
-
Page 101
User V/F Pattern Setting Details Code and Description Features bA.41 User Freq Select the arbitrary frequency between the start and the maximum 1 – frequencies to set the user frequency (User Freq x). Also set the bA.48 User Volt voltage to correspond to each frequency in user voltage (User Volt x). The 100% output voltage in the figure below is based on the parameter settings of bA.15 (motor rated voltage). -
Page 102: Torque Boost
4.12 Torque Boost 4.12.1 Manual Torque Boost Manual torque boost enables users to adjust output voltage during low speed operation or motor start. Increase low speed torque or improve motor starting properties by manually increasing output voltage. Configure manual torque boost while running loads that require high starting torque, such as lift-type loads.
-
Page 103: Auto Torque Boost
4.12.2 Auto Torque Boost In V/F operation, this adjusts the output voltage if operation is unavailable due to a low output voltage. It is used when operation is unavailable, due to a lack of starting torque, by providing a voltage boost to the output voltage via the torque current. Group Code Name Setting…
-
Page 104: Motor Output Voltage Adjustment
4.13 Motor Output Voltage Adjustment Output voltage settings are required when a motor’s rated voltage differs from the input voltage to the inverter. Set the voltage value to configure the motor’s rated operating voltage. The set voltage becomes the output voltage of the inverter’s base frequency.
-
Page 105: Dc Braking After Start
4.14.2 DC Braking After Start This start mode supplies a DC voltage for a set amount of time to provide DC braking before an inverter starts to accelerate a motor. If the motor continues to rotate due to its inertia, DC braking will stop the motor, allowing the motor to accelerate from a stopped condition.
-
Page 106: Initial Excitation Of Stop Status (Pre-Excite)
4.14.3 Initial Excitation of Stop Status (Pre-excite) Use to apply the exciting current to the motor under a stop status. If you enter the multi-function input signal set with the initial excitation signal, DC voltage will be supplied to the motor. Group Code Name Setting…
-
Page 107: Dc Braking After Stop
4.15.2 DC Braking After Stop When the operation frequency reaches the set value during deceleration (DC braking frequency), the inverter stops the motor by supplying DC power to the motor. With a stop command input, the inverter begins decelerating the motor. When the frequency reaches the DC braking frequency set at Ad.17, the inverter supplies DC voltage to the motor and stops it.
-
Page 108: Free Run Stop
Code and Description Features Set the frequency to start DC braking. When the frequency is Ad.17 Dc-Brake reached, the inverter starts deceleration. Freq If the dwell frequency is set lower than the DC braking frequency, dwell operation will not work and DC braking will start instead. •…
-
Page 109: Power Braking
Note that when there is high inertia on the output side and the motor is operating at high speed, the load’s inertia will cause the motor to continue rotating even if the inverter output is blocked. 4.15.4 Power Braking When the inverter’s DC voltage rises above a specified level due to motor regenerated energy, a control is made to either adjust the deceleration gradient level or reaccelerate the motor in order to reduce the regenerated energy.
-
Page 110: Frequency Limit
• To prevent overheating or damaging the motor, do not apply power braking to the loads that require frequent deceleration. • Stall prevention and power braking only operate during deceleration, and power braking takes priority over stall prevention. In other words, when both bit3 of Pr.50 (stall prevention and flux braking) and Ad.08 (power braking) are set, power braking will take precedence and operate.
-
Page 111: Frequency Limit Using Upper And Lower Limit Frequency Values
4.16.2 Frequency Limit Using Upper and Lower Limit Frequency Values Group Code Name Setting Setting Range Unit Frequency limit 0–1 Frequency lower 0.0–maximum 0.50 limit value frequency Lower limit– Frequency upper Maximum maximum limit value frequency frequency Frequency Limit Using Upper and Lower Limit Frequencies — Setting Details Code and Description Features…
-
Page 112: Frequency Jump
4.16.3 Frequency Jump Use frequency jump to avoid mechanical resonance frequencies. Jump through frequency bands when a motor accelerates and decelerates. Operation frequencies cannot be set within the pre-set frequency jump band. When a frequency setting is increased, while the frequency parameter setting value (voltage, current, RS-485 communication, keypad setting, etc.) is within a jump frequency band, the frequency will be maintained at the lower limit value of the frequency band.
-
Page 113: Operation Mode
4.17 2 Operation Mode Apply two types of operation modes and switch between them as required. For both the first and second command source, set the frequency after shifting operation commands to the multi-function input terminal. Mode switching can be used to stop remote control during an operation using the communication option and to switch operation mode to operate via the local panel, or to operate the inverter from another remote control location.
-
Page 114: Multi-Function Input Terminal Control
4.18 Multi-Function Input Terminal Control Filter time constants and the type of multi-function input terminals can be configured to improve the response of input terminals. Group Code Name Setting Setting Range Unit Multi-function input 0–10000 terminal On filter Multi-function input 0–10000 terminal Off filter Multi-function input…
-
Page 115: Fire Mode Operation
Code and Description Features NO/NC Sel only or to use as NO (Normal Open) and NC(Normal Close). If set to 1: NO only, the terminal in which the functions are set to Fx/Rx cannot be set as NC. If set to 0: NO/NC, terminals set as Fx/Rx can also be set as NC. Display the configuration of each contact.
-
Page 116
trips, automatic Reset/Restart is not attempted, and the Fire Mode Count is not increased. -
Page 117
Fire mode operation may result in inverter malfunction. Note that if AD 83 Fire mode count is not «0m» the warranty is voided. Code Description Details Ad.81 The frequency set at Ad. 81 (Fire mode frequency) is used Fire mode Fire for the inverter operation in Fire mode. -
Page 119: Learning Advanced Features
5 Learning Advanced Features This chapter describes the advanced features of the G100 inverter. Check the reference page in the table to see the detailed description for each of the application features. Advanced Tasks Use Example Ref. Use the main and auxiliary frequencies in the predefined Auxiliary frequency formulas to create various operating conditions.
-
Page 120
Advanced Tasks Use Example Ref. operation motors during low-load and no-load conditions. Speed search Used to prevent fault trips when the inverter voltage is p.145 operation output while the motor is idling or free-running. Auto restart configuration is used to automatically restart the Auto restart inverter when a trip condition is released, after the inverter p.149… -
Page 121: Operating With Auxiliary References
5.1 Operating with Auxiliary References Frequency references can be configured with various calculated conditions that use the main and auxiliary frequency references simultaneously. The main frequency reference is used as the operating frequency, while auxiliary references are used to modify and fine-tune the main reference. Group Code Name…
-
Page 122
Code and Description Features Set the auxiliary reference gain with bA.03 (Aux Ref Gain) to configure the auxiliary reference and set the percentage to be reflected when calculating the main reference. Note that items 4–7 below may result in either plus (+) or minus (-) references (forward or reverse operation) even when unipolar analog inputs are used. -
Page 123
Auxiliary Reference Operation E.g. Keypad Frequency Setting is Main Frequency and V1 Analog Voltage is Auxiliary Frequency • Main frequency: Keypad (operation frequency 30 Hz) • Maximum frequency setting (dr.20): 400 Hz • Auxiliary frequency setting (bA.01): V1[Display by percentage(%) or auxiliary frequency (Hz) depending on the operation setting condition] •… -
Page 124
Keypad Frequency Setting is Main Frequency and I2 Analog Voltage is Auxiliary Frequency • Main frequency: Keypad (operation frequency 30 Hz) • Maximum frequency setting (dr.20): 400 Hz • Auxiliary frequency setting (bA.01): I2[Display by percentage(%) or auxiliary frequency (Hz) depending on the operation setting condition] •… -
Page 125: Jog Operation
V1 is Main Frequency and I2 is Auxiliary Frequency • Main frequency: V1 (frequency command setting to 5 V and is set to 30 Hz) • Maximum frequency setting (dr.20): 400 Hz • Auxiliary frequency (bA.01): I2[Display by percentage (%) or auxiliary frequency (Hz) depending on the operation setting condition] •…
-
Page 126: Jog Operation 1-Forward
5.2.1 Jog Operation 1-Forward The jog operation is available in either forward or reverse direction, using the keypad or multi-function terminal inputs. The table below lists parameter setting for a forward jog operation using the multi-function terminal inputs. Group Code Name Setting Setting Range…
-
Page 127: Jog Operation 2-Fwd/Rev Jog By Multi-Function Terminal
5.2.2 Jog Operation 2-Fwd/Rev Jog by Multi-Function Terminal For jog operation 1, an operation command must be entered to start operation, but while using jog operation 2, a terminal that is set for a forward or reverse jog also starts an operation. The priorities for frequency, Acc/Dec time and terminal block input during operation in relation to other operating modes (Dwell, 3-wire, up/down, etc.) are identical to jog operation 1.
-
Page 128
Enable is entered. For example, even if up-down signal is entered for the up-down operation while operating according to the analog voltage input V1, the inverter will operate according to the analog voltage input V1. If the up-down switchover (U/D Enable) signal is entered, the operation will follow the up-down operation terminal input and the analog voltage input V1 will not be used for the inverter operation until the up-down switchover (U/D Enable) signal is disabled. -
Page 129: 3-Wire Operation
Code and Description Features During a constant speed operation, the operating frequency is saved automatically in the following conditions: the operation command (Fx or Rx) is off, a fault trip occurs, or the power is off. When the operation command is turned on again, or when the inverter regains the power source or resumes to a normal operation from a fault trip, it resumes operation at the saved frequency.
-
Page 130
[Terminal connections for 3-wire operation] [3-wire operation]… -
Page 131: Safe Operation Mode
5.5 Safe Operation mode When the multi-function terminals are configured to operate in safe mode, operation commands can be entered in the Safe operation mode only. Safe operation mode is used to safely and carefully control the inverter through the multi-function terminals. Grou Code Name…
-
Page 132: Dwell Operation
Code and Description Features Time Stop) or 2 (Q-Stop Resume). 5.6 Dwell Operation The dwell operation is used to maintain torque during the application and release of the brakes on lift-type loads. Inverter dwell operation is based on the Acc/Dec dwell frequency and the dwell time set by the user.
-
Page 133
Group Code Name Setting Setting Range Unit Operation time during 0.0–60.0 deceleration Note Dwell operation does not work when: • Dwell operation time is set to 0 sec or dwell frequency is set to 0 Hz. • Re-acceleration is attempted from stop or during deceleration, as only the first acceleration dwell operation command is valid. -
Page 134: Slip Compensation Operation
When a dwell operation is carried out for a lift — type load before its mechanical brake is released, motors can be damaged or their reduced due to overflow current in the lifecycle motor. 5.7 Slip Compensation Operation Slip refers to the variation between the setting frequency (synchronous speed) and motor rotation speed.
-
Page 135: Pid Control
Code and Description Features bA.16 Efficiency Enter the efficiency from the motor rating place. Select load inertia based on motor inertia. Configuration Function Less than 10 times motor inertia 10 times motor inertia 2–8 More than 10 times motor inertia bA.17 Inertia Rate ��…
-
Page 136
Code Function Controls flow by using feedback about the amount of existing Flow Control flow in the equipment or machinery to be controlled. Control maintains consistent flow or operates at a target flow. Controls temperature by using feedback about the existing temperature level of the equipment or machinery to be Temperature Control controlled. -
Page 137
5.8.1 Basic PID Operation PID operates by controlling the output frequency of the inverter, through automated system process control to maintain speed, pressure, flow, temperature and tension. Grou Code Name Setting Setting Range Unit Application function Proc PID 0–2 selection PID output monitor PID reference monitor PID feedback monitor… -
Page 138
Grou Code Name Setting Setting Range Unit Openloop 24 P Gain2 Note When the PID switch operation (switching from PID operation to general operation) enters the multi-function input, [%] values are converted to [Hz] values. The normal PID output, PID OUT, is unipolar, and is limited by AP.29 (PID Limit Hi) and AP.30 (PID Limit Lo). A 100.0% calculation of the PID OUT value is based on the dr.20 (MaxFreq) parameter setting. -
Page 139
Code and Description Features Feedback cannot be set to an input item that is identical to the item selected as the reference. For example, when Ap.20 (Ref Source) is set to 1 (V1), for AP.21 (PID F/B Source), an input other than the V1 terminal must be selected. Sets the output ratio for differences (errors) between reference and AP.22 PID P- feedback. -
Page 140
[PID control block diagram]… -
Page 141: Pre-Pid Operation
5.8.2 Pre-PID Operation When an operation command is entered that does not include PID control, general acceleration occurs until the set frequency is reached. When the controlled variables increase to a particular point, the PID operation begins. Pre-PID Operation Setting Details Code and Description Features…
-
Page 142: Pid Switching (Pid Openloop)
PID Operation Sleep Mode Setting Details Code and Description Features AP.37 PID Sleep If an operation frequency lower than the value set at AP.38 is maintained for the time set at AP.37, the operation stops and the PID AP.38 PID Sleep operation sleep mode starts.
-
Page 143
5.9 Auto-tuning The motor parameters can be measured automatically and can be used for auto torque boost or sensorless vector control. Example — Auto-Tuning Based on 0.75kW, 200V, 60Hz, 4 Pole Motor Group Code Name Setting Setting Range Unit Motor capacity 0.75 kW 0–15 Number of motor… -
Page 144
Auto-Tuning Default Settings Stator Motor No-load Rated Slip Leakage Rated Capacity Current Frequency Resistance Inductance Current (A) (kW) (Rpm) (mH) () 14.0 40.4 6.42 38.8 0.75 2.951 25.20 1.156 12.07 200 V 0.809 6.44 13.8 0.485 4.02 20.0 0.283 3.24 25.5 0.183 2.523… -
Page 145
Code and Description Features type) stopped position. Measures stator resistance (Rs), leakage inductance (Lsigma), stator inductance (Ls), no-load current (Noload Curr), and rotor time constant (Tr). As the motor is not rotating while the parameters are measured, the measurements are not affected when the load is connected to the motor spindle. -
Page 146: Auto-Tuning
5.10 Sensorless Vector Control for Induction Motors Sensorless vector control is an operation to carry out vector control without the rotation speed feedback from the motor but with an estimation of the motor rotation speed calculated by the inverter. Compared to V/F control, sensorless vector control can generate greater torque at a lower level of current.
-
Page 147: Sensorless Vector Control Operation Setting For Induction Motors
Grou Code Name Setting Setting Range Unit adjustment gain Torque limit setting 0–12 Keypad-1 Forward direction 0.0–200.0 180.0 retrograde torque limit Forward direction 0.0–200.0 regenerative torque 180.0 limit Reverse direction 0.0–200.0 regenerative torque 180.0 limit Reverse direction 0.0–200.0 180.0 retrograde torque limit For high-performance operation, the parameters of the motor connected to the inverter output must be measured.
-
Page 148
After setting each code, set bA.20 (Auto tuning) to 1 (All — rotation type) or 2 (All — static type) and run auto tuning. Because rotation type auto tuning is more accurate for 1[(All(Rotation type)] than 2[(All(Static type)], set 1[(All(Rotation type)] and run auto tuning if the motor can be rotated. -
Page 149
Sensorless Vector Control Operation Setting Details for Induction Motors Code and Description Features Sets pre-excitation time. Pre-excitation is used to start the Cn.09 PreExTime operation after performing excitation up to the motor’s rated flux. Allows for the reduction of the pre-excitation time. The motor flux increases up to the rated flux with the time constant as shown in the following figure. -
Page 150
Code and Description Features Cn.24 mainly has an effect on the motor speed. For details, refer to Cn.24 Spd. Comp. p.139 5.10.2 Sensorless Vector Control Operation Guide in the Main Gain for Induction Motors. Cn.29 mostly has an effect on the error level of the estimated Cn.29 Spd. -
Page 151: Sensorless Vector Control Operation Guide For Induction Motors
Gain value can be adjusted according to the load characteristics. However, use with caution because motor overheating and system instability may occur depending on the Gain value settings. 5.10.2 Sensorless Vector Control Operation Guide for Induction Motors Relevant Problem Troubleshooting Function Code If the number of motor If there is a severe drop in the motor rotation to…
-
Page 152: Energy Buffering Operation (Kinetic Energy Buffering)
Relevant Problem Troubleshooting Function Code If torque is lacking due Cn.21 Out Trq. to a load increase in If torque is lacking under low speed, increase Comp. Gain at low speed (5 Hz or the Cn.21 value in 5% units. Low Spd less) If rotating in reverse…
-
Page 153
input power. Group Code Name Setting Setting Range Unit Input power voltage 220/380 170–480 settings None Energy buffering selection KEB-1 0–2 KEB-2 Energy buffering start level 125.0 110.0–200.0 Energy buffering stop level 130.0 Cn-78–210.0 Energy buffering P gain 1000 1–20000 Energy buffering I gain 0–20000 Energy buffering Slip gain… -
Page 154
Code and Description Features When the input power is blocked, it charges the DC link with regenerated energy. When the input power is restored, it restores normal operation from the KEB-1 energy buffering operation to the frequency reference operation. KEB Acc Time in Cn- 83 is applied as the operation frequency acceleration time when restoring to the normal operation. -
Page 155
Code and Description Features CON-79 CON-78 DC Link (DRV-04) Px(FX) Cn.78 KEB Start Sets the start and stop points of the kinetic energy buffering operation. Lev, The set values must be based on the low voltage trip level as 100% Cn.79 KEB Stop and the stop level (Cn.79) must be set higher than the start level (Cn.78). -
Page 156: Energy Saving Operation
5.12 Energy Saving Operation 5.12.1 Manual Energy Saving Operation If the inverter output current is lower than the current which is set at bA.14 (Noload Curr), the output voltage must be reduced as low as the level set at Ad.51 (Energy Save).
-
Page 157: Speed Search Operation
the energy saving operation. 5.13 Speed Search Operation This operation is used to prevent fault trips that can occur while the inverter output voltage is disconnected and the motor is idling. Because this feature estimates the motor rotation speed based on the inverter output current, it does not give the exact speed.
-
Page 158
Code and Description Features Select a speed search type. Configuration Function The speed search is carried out as it controls the inverter output current during idling below the Cn.72 (SS Sup-Current) parameter setting. If the direction of the idling motor and the direction of operation command at restart are the same, a stable Flying Start- speed search function can be performed at… -
Page 159
Code and Description Features bit4 bit3 bit2 bit1 Speed search for general acceleration Initialization after a fault trip Restart after instantaneous power interruption Starting with power-on • Speed search for general acceleration: If bit 1 is set to 1 and the inverter operation command runs, acceleration starts with speed search operation. -
Page 160
Code and Description Features • Starting with power-on: Set bit 4 to 1 and Ad.10 (Power-on Run) to 1 (Yes). If inverter input power is supplied while the inverter operation command is on, the speed search operation will accelerate the motor up to the frequency reference. The amount of current flow is controlled during speed search Cn.72 SS Sup- operation based on the motor’s rated current. -
Page 161: Auto Restart Settings
5.14 Auto Restart Settings When inverter operation stops due to a fault and a fault trip is activated, the inverter automatically restarts based on the parameter settings. Setting Group Name Setting Unit Range Selection of startup on trip reset 0 No 0–1 Number of automatic restarts 0–10…
-
Page 162: Operational Noise Settings (Change Of Carrier Frequency Settings)
[Example of auto restart with a setting of 2] If the auto restart number is set, be careful when the inverter resets from a fault trip. The motor may automatically start to rotate. 5.15 Operational Noise Settings (Change of Carrier Frequency Settings) Group Code Name…
-
Page 163
Refer to the table below for the change of carrier frequency settings according to the load level, control mode, and capacity. Heavy Duty Normal Duty Setting Range Setting Range Capacity Initial Initial Value Value Minimum Maximum Minimum Maximum Minimum Maximum Minimum Maximum 0.4~4.0kW 5.5~7.5kW Note… -
Page 164: Motor Operation
5.16 2 Motor Operation The 2nd motor operation is used when a single inverter switch operates two motors. Using the 2nd motor operation, a parameter for the 2nd motor is set. The 2nd motor is operated when a multi-function terminal input defined as a 2nd motor function is turned on.
-
Page 165
Code and Description Code Description Features continuous rating… -
Page 166: Commercial Power Source Transition
Example — 2nd Motor Operation Use the 2nd motor operation when switching operation between a 7.5 kW motor and a secondary 3.7 kW motor connected to terminal P3. Refer to the following settings. Setting Group Code Name Setting Unit Range P3 terminal function 2nd Motor setting…
-
Page 167: Cooling Fan Control
Code and Description Features This function sets the multi-function relay to the no. 17 inverter line and no. 18 comm line. Relay operation sequence is as follows. OU.31 Relay 1 –OU.33 Relay 2 5.18 Cooling Fan Control This function turns the inverter’s heat-sink cooling fan on and off. It is used in situations where the load stops and starts frequently, or noise free environment is required.
-
Page 168: Input Power Frequency And Voltage Settings
Code and Function Features the heat sink reaches the set temperature. Note Despite setting Ad.64 to 0 (During Run), if the heat sink temperature reaches a set level by current input harmonic wave or noise, the cooling fan may run as a protection function. Also, the cooling fan operates regardless of the cooling fan control settings to protect the internal circuit when the input voltage is 480 VAC or higher for 400 V products.
-
Page 169: Parameter Initialization
Setting Group Code Name Setting Unit Range 0 None Parameter save Parameter save 5.21 Parameter Initialization The parameter changed by the user can be initialized to the factory default settings. Initialize the data of all groups or initialize data by selecting specific groups. However, during a fault trip situation or operation, parameters cannot be initialized.
-
Page 171: Parameter Lock
5.22 Parameter Lock Use parameter view lock to hide parameters after registering and entering a user password. Setting Group Code Name Setting Unit Range Password registration 0–9999 Parameter lock settings 0–9999 Parameter Lock Setting Details Code and Description Features Register a password to prohibit parameter modifications. Follow the procedures below to register a password.
-
Page 172: Changed Parameter Display
5.23 Changed Parameter Display This feature displays all the parameters that are different from the factory defaults. Use this feature to track changed parameters. Grou Setting Code Name Setting Unit Range Changed parameter View All display Changed Parameter Display Setting Details Code and Description Features…
-
Page 173: Brake Control
Code and Description Features OU.31 Relay1, Set multi-function output terminal or relay to be used as a timer to 28 OU.33 Relay 2 (Timer out). OU.55 Input a signal (On) to the timer terminal to operate a timer output (Timer TimerOn Delay, out) after the time set at OU.55 has passed.
-
Page 174: Multi-Function Relay On/Off Control
delay time (BR Rls Dly). • Brake engage sequence: If a stop command is sent during operation, the motor decelerates. Once the output frequency reaches brake engage frequency (BR Eng Fr), the motor stops deceleration and sends out a brake engage signal to a preset output terminal.
-
Page 175: Press Regeneration Prevention
Multi-function Relay On/Off Control Setting Details Code and Features Description Ad.66 On/Off Ctrl Src Select analog input On/Off control. Ad.67 On-C Level, Set On/Off level at the output terminal. Ad.68 Off-C Level 5.27 Press Regeneration Prevention Press regeneration prevention is used during press operations to prevent braking during the regeneration process.
-
Page 176
Code and Description Features and disable the brake unit operation. Ad.75 RegenAvd Set brake operation prevention level voltage when the DC link Level voltage goes up due to regeneration. Ad.76 CompFreq Set alternative frequency width that can replace actual operation Limit frequency during regeneration prevention. -
Page 177: Analog Output
5.28 Analog Output An analog output terminal provides output of 0–10 V voltage and 4–20 mA current. 5.28.1 Current Analog Output An output size can be adjusted by selecting an output option at AO (Analog Output) terminal. Grou Name Setting Setting Range Unit Analog output 1 item…
-
Page 178
Code and Description Features Output Monitors output wattage. 200% of rated output is Power the maximum display voltage (10 V). Outputs the maximum voltage at 200% of no load current. Outputs 0 V during V/F operation or slip Idse compensation operation since it is an output of the magnitude of the current on the magnetic flux portion. -
Page 179
Code and Description Features OU.04 AO1 Filter Set filter time constant on analog output. If analog output at OU.01 (AO1 Mode) is set to 15 (Constant), the OU.05 A01 analog voltage output is dependent on the set parameter values (0– Const% 100%). -
Page 180
Multi-Function Relay Setting Details Code and Description Features OU.31 Relay1 Set the Relay 1 output item. OU.33 Relay 2 Set the Relay 2 output item. Set output terminal and relay functions according to OU.57 (FDT Frequency), OU.58 (FDT Band) settings and fault trip conditions. Configuration Function None… -
Page 181
Code and Description Features Outputs signal when the operation frequency below meets the conditions. Absolute value(output frequency–operation frequency) < detected frequency width/2 Detected frequency width is 10 Hz. When the detected frequency is set to 30 Hz, FDT-3 FDT-3 output is as shown in the graph below. Output signal can be separately set for acceleration and deceleration conditions. -
Page 182
Code and Description Features Outputs a signal when a fault is triggered from Inverter a protective function operation by inverter overload (IOL) overload inverse proportion. Under Load Outputs a signal at load fault warning. (Underload) Fan Warning Outputs a signal at fan fault warning. (Fan Warning) Stall Outputs a signal when a motor is overloaded… -
Page 183
Code and Description Features Outputs a signal during inverter speed search Speed Search operation. (Speed For details, refer to 5.13 Speed Search Search) Operation on page 145. Outputs signal if the motor is operating under regeneration mode. Regeneration Braking resistance is activated when the (Regeneration) inverter DC voltage is higher than the voltage set in Ad-79 and this feature operates only… -
Page 184
Using multi-function relays 1 and 2, you can output the trip status of inverter. Grou Name Setting Setting Range Unit Fault output item Multi-function relay 1 Trip item Multi-function relay 2 item Fault output On delay 0.00 0.00–100.00 Fault output Off delay 0.00 0.00–100.00… -
Page 185
Trip Setting Details to Multi-Function Relay Code and Description Features Fault trip relay operates based on the fault trip output settings. Items Bit On Status Bit Off Status Keypad After selecting the multi-function relay to use as the trip output, select 29 (Trip Mode) in OU.31, 33. -
Page 186
*Displayed as on the Keypad. -
Page 187
Output Terminal Delay Time Setting Details Code and Description Features Select the contact type of relay 1 and relay 2. By setting the relevant bit to 0, it will operate A terminal (Normally Open), and setting it to 1 will operate B terminal (Normally Closed). Shown below in the table are Relay 1 and Relay 2 settings starting from the right bit. -
Page 188
Base Block Operation Setting Details Code and Description Features Select the multi-function input terminal to receive the base block In 65–69 Px define signal and set the applicable terminal to 33 (Base Block). Set the multi-function relay terminal to 14 (Run). If the operation command is given, the inverter will accelerate up to the command frequency. -
Page 189: Learning Protection Features
6 Learning Protection Features Protection features provided by the G100 series inverter are categorized into two types: protection from overheating damage to the motor, and protection against the inverter malfunction. 6.1 Motor Protection 6.1.1 Electronic Thermal Motor Overheating Prevention (ETH) ETH is a protective function that uses the output current of the inverter without a separate temperature sensor, to predict a rise in motor temperature to protect the motor based on its heat characteristics.
-
Page 190
Code and Description Features Select the drive mode of the cooling fan, attached to the motor. Configuration Function As the cooling fan is connected to the motor axis, the cooling effect varies, based on motor Self-cool speed. Most universal induction motors have this design. -
Page 191: Overload Early Warning And Trip
6.1.2 Overload Early Warning and Trip A warning or fault ‘trip’ (cutoff) occurs when the motor reaches an overload state, based on the motor’s rated current. The amount of current for warnings and trips can be set separately. Setting Group Code Name Setting Unit…
-
Page 192
Code and Description Features Select the inverter protective action in the event of an overload fault trip. Configuration Function None No protective action is taken. Pr.20 OL Trip In the event of an overload fault, inverter output Select Free-Run is blocked and the motor will free-run due to inertia. -
Page 193: Stall Prevention And Flux Braking
6.1.3 Stall Prevention and Flux Braking The stall prevention function is a protective function that prevents motor stall caused by overloads. If a motor stall occurs due to an overload, the inverter operation frequency is adjusted automatically. When stall is caused by overload, high currents are induced in the motor may cause motor overheat or damage the motor and interrupt operation of the motor-driven devices.
-
Page 194
Code and Description Features Stall prevention can be configured for acceleration, deceleration, or while operating a motor at constant speed. When the top LCD segment is on, the corresponding bit is set. When the bottom LCD segment is on, the corresponding bit is off. Items Bit On Status Bit Off Status… -
Page 195
Code and Description Features Flux braking When using flux braking, deceleration time 1000 during may be reduced because regenerative deceleratio energy is expended at the motor. Stall protection Stall protection and flux braking operate and flux together during deceleration to achieve the 1100 braking shortest and most stable deceleration… -
Page 196
Code and Description Features Additional stall protection levels can be configured for different frequencies, based on the load type. As shown in the graph below, the stall level can be set above the base frequency. The lower and upper limits are set using numbers that correspond in ascending order. For example, the range for Stall Frequency 2 (Stall Freq 2) becomes the lower limit for Stall Frequency 1 (Stall Freq 1) and the upper limit for Stall Frequency 3 (Stall Freq 3). -
Page 197: Inverter And Sequence Protection
Note Stall protection and flux braking operate together only during deceleration. Turn on the third and fourth bits of Pr.50 (Stall Prevention) to achieve the shortest and most stable deceleration performance without triggering an overvoltage fault trip for loads with high inertia and short deceleration times.
-
Page 198: External Trip Signal
Input and Output Open-phase Protection Setting Details Code and Description Features Input and output phase protection can each be selected. When the dot is displayed above the switch, the corresponding bit is set to on. When it is below the switch, it is set to on. Items Bit On Status Bit Off Status…
-
Page 199: Inverter Overload Protection
External Trip Signal Setting Details Code and Description Features Selects the type of input contact. If the mark of the switch is at the bottom (0), it operates as an A contact (Normally Open). If the mark is at the top (1), it operates as a B contact (Normally Closed). The In.87 DI NC/NO corresponding terminals for each bit are as follows: Terminals…
-
Page 200
provided (signal output at 150%, 36 sec). -
Page 201: Speed Command Loss
6.2.4 Speed Command Loss When setting operation speed using an analog input at the terminal block, communication options, or the keypad, speed command loss setting can be used to select the inverter operation for situations when the speed command is lost due to the disconnection of signal cables.
-
Page 202
Code and Description Features Preset Pr. 14 (Lost Preset F). Configure the voltage and decision time for speed command loss when using analog input. Configuration Function Based on the values set at In.08 and In.12, protective operation starts when the input signal is reduced to half of the initial value of the analog input set using the speed command (Frq code of Operation group) and it continues for the time… -
Page 203: Dynamic Braking (Db) Resistor Configuration
Code and Description Features continue. Set Pr.15 (Al Lost Level) to 1 (Below x 1), Pr.12 (Lost Cmd Mode) to 2 (Dec), and Pr.13 (Lost Cmd Time) to 5 sec. Then it operates as follows: Note If speed command is lost while using communication options or the integrated RS-485 communication, the protection function operates after the command loss decision time set at Pr.13 (Lost Cmd Time) is passed.
-
Page 204
Code and Description Features braking is 15 sec and the braking resistor signal is not output from the inverter after the 15 sec period has expired. The time until braking resistance is available again after continuous use of braking resistance for 15 seconds is calculated as below. -
Page 205
Code and Description Features operation or the stop time from constant speed operation frequency • T_stop: Stop time until operation resumes Do not set the braking resistor to exceed the resistor’s power rating. If overloaded, it can overheat and cause a fire. When using a resistor with a heat sensor, the sensor output can be used as an external trip signal for the inverter’s multi-function input. -
Page 206: Under Load Fault Trip And Warning
6.3 Under load Fault Trip and Warning Group Code Name Setting Setting Range Unit Load level Normal Duty setting Under load warning 0–1 selection Under load 10.0 0–600 warning time Under load fault Free-Run selection Under load fault 30.0 0–600 time Under load lower 10–100…
-
Page 207: Fan Fault Detection
Code and Description Features • Setting Normal Duty — At Pr.29, the under load rate is decided based on twice the operation frequency of the motor’s rated slip speed (bA.12 Rated Slip). — At Pr.30, the under load rate is decided based on the base frequency set at dr.18 (Base Freq).
-
Page 208: Lifetime Diagnosis Of Components
Code and Description Features Set the cooling fan fault mode. Configuration Function The inverter output is blocked and the fan trip Pr.79 FAN Trip is displayed when a cooling fan error is Trip Mode detected. When OU.33 (Relay 2) and OU.31 (Relay 1) Warning are set to 8 (FAN Warning), the fan error signal is output and the operation continues.
-
Page 209: Output Block By Multi-Function Terminal
Group Code Name Setting Setting Range Unit Low voltage trip 0–60 decision delay time Multi-function relay 1 item 11 Low Voltage Multi-function relay 2 item Low Voltage Fault Trip Setting Details Code and Description Features If the code value is set to 11 (Low Voltage), the inverter output is blocked first when the low voltage trip occurs and the trip is handled after a set time.
-
Page 210
Restart the inverter using the keypad or analog input terminal, to reset the trip status. Group Code Name Setting Setting Range Unit Px terminal setting 65–69 options Trip Status Reset Setting Details Code and Description Features Press [Stop/Reset] key on the keypad or use the multi-function input In.65–69 Px terminal to restart the inverter. -
Page 211: Inverter Diagnosis State
6.3.6 Inverter Diagnosis State Check the diagnosis of components or devices for inverter to check if they need to be replaced. Group Code Name Setting Setting Range Unit 00–01 replacement warning FAN Warning 6.3.7 Operation Mode on Option Card Trip Option card trips may occur when an option card is used with the inverter.
-
Page 212: Low Voltage Trip
6.3.8 No Motor Trip If an operation command is run when the motor is disconnected from the inverter output terminal, a ‘no motor trip’ occurs and a protective operation is performed by the system. Setting Group Code Name Setting Unit Range None 0–1…
-
Page 213: Inverter Pre-Overheat Warning
6.3.10 Inverter Pre-overheat Warning This feature outputs a warning if the inverter temperature exceeds the temperature set by the user in Pr-77. The user can set up the operation for when the warning is generated before four types of overheating and output warning with the multi-function relay.
-
Page 214: Torque Detection Protection Action
6.3.11 Torque Detection Protection Action This feature outputs torque status to the multi-function relay if a motor overload or sudden underload occurs. This feature is activated when the multi-function relay (OU31, 33) is set to 43, 44. Setting Group Code Name Setting Unit…
-
Page 215
Under Torque Detection Action Motor Current hysteresis(10%) hysteresis(10%) OUT-68 or OUT-71 OUT-69 or OUT-72 OUT-69 or OUT-72 (42: Prt Trq Dect1 or 43: Prt Trq Dect2) The over and under torque detection level set as OU68, 71 parameters are set as the ratio on motor’s rated current. -
Page 216
Code and Description Features delay time delay time. -
Page 217: Fault/Warning List
6.4 Fault/Warning List The following list shows the types of faults and warnings that can occur while using the G100 inverter. Please refer to 6 Learning Protection Features on page 177 for details about faults and warnings. Category Description Over current trip Over voltage trip External signal trip Temperature sensor trip…
-
Page 218
Category Description Motor overload trip Minor fault Motor light load trip Command loss fault trip warning Overload warning Under load warning Inverter overload warning Fan operation warning Braking resistor braking rate warning Warning Rotor time constant tuning error Fan replacement warning Inverter pre-overheat warning Over torque 1 warning Under torque 1 warning… -
Page 220
7 RS-485 Communication Features This section in the user manual explains how to control the inverter with a PLC or a computer over a long distance using the RS-485 communication features. To use the RS-485 communication features, connect the communication cables and set the communication parameters on the inverter. -
Page 221
Connect the communication lines by referring to the illustration below. Use 2Pair STP (Shielded twisted Pair) cable (using only no.1 pin S+, no.8 pin S-/ no.1 and no.8 pins are twisted types) and a RJ45 STP plug. Use a RJ45 coupler for connection between products and cable extension (Y type LAN coupler where STP can be mounted). -
Page 222: Communication Line Connection
7.2 Communication System Configuration In an RS-485 communication system, the PLC or computer is the master device and the inverter is the slave device. When using a computer as the master, the RS- 232converter must be integrated with the computer, so that it can communicate with the inverter through the RS-232/RS-485 converter.
-
Page 223
7.2.2 Setting Communication Parameters Before proceeding with setting communication configurations, make sure that the communication lines are connected properly. Turn on the inverter and set the communication parameters. Grou Setting Code Name Setting Unit Range Built-in communication 1–250 inverter ID Built-in communication ModBus 0, 2… -
Page 224
Code and Description Features Set a communication setting speed up to 115,200 bps. Configuration Function 1200bps 2400bps 4800bps CM.03 Int485 BaudR 9600bps 19200bps 38400bps 56Kbps 115 Kbps (115,200 bps) Set a communication configuration. Set the data length, parity check method, and the number of stop bits. Configuration Function CM.04 Int485… -
Page 225: Setting Operation Command And Frequency
7.2.3 Setting Operation Command and Frequency Set the drv code of the operation group to 3 (Int 485) and the Frq code of the operation group to 6 (Int 485) in order to set the operation command and frequency of the common area parameters via communication.
-
Page 226: Setting Virtual Multi-Function Input
7.2.4 Command Loss Protective Operation Configure the command loss decision standards and protective operations run when a communication problem lasts for a specified period of time. Command Loss Protective Operation Setting Details Code and Description Features Select the operation to run when a communication error has occurred and lasted exceeding the time set at Pr.13.
-
Page 227: Saving Parameters Defined By Communication
Note The following are values and functions that are applied to address 0h0322: Setting Function 0h0001 Forward operation (Fx) 0h0003 Reverse operation (Rx) 0h0000 Stop 7.2.6 Saving Parameters Defined by Communication If you turn off the inverter after setting the common area parameters or keypad parameters via communication and operate the inverter, the changes are lost and the values changed via communication revert to the previous setting values when you turn on the inverter.
-
Page 228: Parameter Group For Data Transmission
7.2.8 Parameter Group for Data Transmission By defining a parameter group for data transmission, the communication addresses registered in the communication function group (CM) can be used in communication. Parameter group for data transmission may be defined to transmit multiple parameters at once, into the communication frame.
-
Page 229
Request Station ID Data 1 byte 2 bytes 1 byte n bytes 2 bytes 1 byte Normal Response Station ID Data 1 byte 2 bytes 1 byte n x 4 bytes 2 bytes 1 byte Error Response Station ID Error Code 1 byte 2 bytes 1 byte… -
Page 230
Number of Station ID Address Addresses ‘01’ ‘R’ ‘3000’ ‘1’ ‘A7’ 1 byte 2 bytes 1 byte 4 bytes 1 byte 2 bytes 1 byte Note Broadcasting Broadcasting sends commands to all inverters connected to the network simultaneously. When commands are sent from station ID 255, each inverter acts on the command regardless of the station ID. -
Page 231
7.3.1.2 Detailed Write Protocol Write Request Station Number of Address Data Addresses ‘01’–‘FA’ ‘W’ ‘XXXX’ ‘1’–‘8’ = n ‘XXXX…’ ‘XX’ n x 4 1 byte 2 bytes 1 byte 4 bytes 1 byte 2 bytes 1 byte bytes Total bytes= (12 x n x 4): a maximum of 44 Write Normal Response Station ID Data… -
Page 232
Station ID Error Code ‘01’–‘FA’ ‘X’ ‘**’ ‘XX’ 1 byte 2 bytes 1 byte 2 bytes 2 bytes 1 byte Total bytes=9 Monitor Registration Perform Request: A data read request for a registered address, received from a monitor registration request Station ID ‘01’–‘FA’… -
Page 233
7.3.1.5 ASCII Code Character Character Character space » & < >… -
Page 234: Modbus-Rtu Protocol
7.3.2 Modbus-RTU Protocol 7.3.2.1 Function Code and Protocol (Unit: byte) In the following section, station ID is the value set at CM.01 (Int485 St ID), and starting address is the communication address. (The starting address size is in bytes). For more information about communication addresses, refer to 7.4 DriveView9 on page 226 .
-
Page 235
Function Code #06: Preset Single Register Query Field Name Response Field Name Station ID Station ID Function (0x06) Function (0x06) Starting Address Hi Register Address Hi Register Address Lo Register Address Lo Preset Data Hi Preset Data Hi Preset Data Lo Preset Data Lo CRC Lo CRC Lo… -
Page 236
Exception Code Code 01: ILLEGAL FUNCTION 02: ILLEGAL DATA ADRESS 03: ILLEGAL DATA VALUE 06: SLAVE DEVICE BUSY Response Field Name Station ID Function* Exception Code CRC Lo CRC Hi * The function value uses the top level bit for all query values. Example of Modbus-RTU Communication in Use When the muti-step acceleration time1 (Communication address 0x1246) is changed to 5.0 sec and the Multi-step deceleration time1 (Communication address 0x1247) is… -
Page 238: Driveview9
7.4 DriveView9 For the G100 series, you can set the parameters and monitor the inverter status using DriveView9 which is a PC software provided free of charge. In DriveView9, both Modbus-RTU and LS INV 485 protocols are available. Reading/Writing Parameters In DriveView9, you can read/write individual parameters, groups, and all parameters.
-
Page 239
Detailed Information On the DriveView9 Detailed Information screen , you can see the drive information and the monitoring parameters. One output gauge and seven optional gauges are provided. On the output gauge, you can monitor the output frequency/speed. On the optional gauges, the user can select the items that can be monitored, such as the output voltage, output current, or analog input, to be monitored in the form of a gauge. -
Page 240
Trends Feature On the Trends screen of DriveView9, you can monitor the parameters in the graph form. Monitoring graphs provide 8 channels. Trends provide monitoring, recording, and trigger observation features. For more details, see DriveView9 user’s manual. -
Page 241: Compatible Common Area Parameter
7.5 Compatible Common Area Parameter The following are common area parameters compatible with iS5, iP5A, iV5, and iG5A. Comm. Parameter Scale Unit Assigned Content by Bit Address 0h0000 Inverter model 16: G100 0: 0.75kW, 1: 1.5kW, 2: 2.2kW, 4: 5.5kW, 5: 7.5kW, 0h0001 Inverter capacity 6: 11kW, 7: 15kW, 8: 18.5kW,…
-
Page 242
Comm. Parameter Scale Unit Assigned Content by Bit Address 0h0009 Output current 0h000A Output frequency 0.01 0h000B Output voltage 0h000C DC link voltage 0h000D Output power Reserved 1: Frequency command source by communication (built-in, option) 1: Operation command source by communication (built-in, option) Reverse operation… -
Page 243
Comm. Parameter Scale Unit Assigned Content by Bit Address Level Type trip Reserved Reserved Latch Type trip B15– Reserved Input terminal 0h0010 information Reserved Reserved Reserved Reserved Reserved Reserved Reserved Output terminal Reserved 0h0011 information Reserved Reserved Reserved Reserved Reserved Reserved Relay 2 Relay 1… -
Page 244: G100 Expansion Common Area Parameter
7.6 G100 Expansion Common Area Parameter 7.6.1 Monitoring Area Parameter (Read Only) Comm. Parameter Scale Unit Assigned Content by Bit Address 0h0300 Inverter model 16: G100 0.4kW : 1900h, 0.75kW: 3200h 1.5kW: 4015h, 2.2kW: 4022h 4.0kW: 4040h 0h0301 Inverter capacity 5.5kW: 4055h, 7.5kW: 4075h 11kW: 40B0h, 15kW: 40F0h 18.5kW: 4125h, 22kW: 4160h…
-
Page 245
Comm. Parameter Scale Unit Assigned Content by Bit Address 5: Decelerating to stop 6: H/W OCS 7: S/W OCS 8: Dwell operating 0: Stopped 1: Operating in forward direction 2: Operating in reverse direction 3: DC operating (0 speed control) Operation command source 0: Keypad 1: Communication option… -
Page 246
Comm. Parameter Scale Unit Assigned Content by Bit Address poles for the 1 motor first motor Display the number of Displays the number of poles for the 0h031B poles for the 2 motor 2nd motor Display the number of Display the number of poles for the 0h031C poles for the selected selected motor… -
Page 247
Comm. Parameter Scale Unit Assigned Content by Bit Address 0h032C Reserved Inverter module ℃ 0h032D temperature Inverter power 0h032E kWh — consumption Inverter power 0h032F MWh — consumption Fuse Open Trip Over Heat Trip Arm Short External Trip Overvoltage Trip Overcurrent Trip NTC Trip Latch type trip… -
Page 248
Comm. Parameter Scale Unit Assigned Content by Bit Address Reserved Reserved Keypad Lost Command Lost Command Reserved Reserved Reserved QueueFull H/W Diagnosis Trip 0h0333 Reserved information Watchdog-2 error Watchdog-1 error EEPROM error ADC error Reserved Reserved Reserved Auto Tuning failed Keypad lost Encoder disconnection Wrong installation of encoder… -
Page 249: Control Area Parameter (Read/ Write)
Comm. Parameter Scale Unit Assigned Content by Bit Address Total number of minutes excluding the 0h0343 Run Time minute total number of Run Time days Total number of days the heat sink fan 0h0344 Fan Time date has been running Total number of minutes excluding the 0h0345 Fan Time minute…
-
Page 250
Comm. Parameter Scale Unit Assigned Content by Bit Address Virtual DI 4 (CM.73) Virtual DI 3 (CM.72) Virtual DI 2 (CM.71) Virtual DI 1 (CM.70) Reserved Reserved Reserved Reserved Reserved Reserved Reserved Reserved Digital output control Reserved 0h0386 (0: Off, 1: On) Reserved Reserved Reserved… -
Page 251: Memory Control Area Parameter (Read And Write)
Set a frequency reference after setting the frequency reference source to 1 (Keypad- Set the frequency via communication into the parameter area frequency address (0h1D04). Perform the parameter save (0h03E0: ‘1’) before turning off the power. After the power cycle, the frequency set before turning off the power is displayed. 7.6.3 Memory Control Area Parameter (Read and Write) Changeabl Comm.
-
Page 252
Changeabl Comm. Parameter Scale Unit e During Function Address Operation operation time Note • When setting parameters in the inverter memory control area, the values are reflected to the inverter operation and saved. Parameters set in other areas via communication are reflected to the inverter operation, but are not saved. All set values are cleared following an inverter power cycle and revert back to its previous values. -
Page 254: Table Of Functions
8 Table of Functions This chapter lists all the function settings for G100 series inverter. Set the parameters required according to the following references. If a set value input is out of range, the following messages will be displayed on the keyboard. In these cases, the inverter will not operate with the [ENT] key.
-
Page 255: Drive Group (Par→Dr)
Comm. Keypad Setting Initial Code Name Property* V/F SL Ref. Address Display Range Value frequency 2 frequency (Hz) 0.00– Multi-step Maximum 0h1D07 speed 30.00 O p.71 frequency frequency 3 (Hz) Output 0h1D08 O p.53 current Motor 0h1D09 revolutions per minute Inverter DC 0h1D0A O p.53…
-
Page 256
Comm. Initial Property Addres Name Setting Range Ref. Value Jog run dr-12 0h110C acceleration 0.0–600.0 (s) 20.0 O p.114 time Jog run dr-13 0h110D deceleration 0.0–600.0 (s) 30.0 O p.114 time 0: 0.2 kW 1: 0.4 kW 2: 0.75 kW 3: 1.1 kW 4: 1.5 kW Varies by… -
Page 257
Comm. Initial Property Addres Name Setting Range Ref. Value Auto torque boost 0h111B 0.0–300.0[%] 50.0 motoring gain Auto torque boost 0h111C 0.0–300.0[%] 50.0 regeneratio n gain Select ranges inverter displays at power input Operation frequency Acceleration time Deceleration time Command Source Frequency reference source… -
Page 258
Comm. Initial Property Addres Name Setting Range Ref. Value monitor voltage selected code code Output voltage Output power (kW) Torque(kgf m) PID feedback monitor Display View All 0: View dr-89 0h03E3 changed O p.160 View Changed parameter None SmartDownload 0: None SmartUpLoad dr-91 0h115B Smart copy… -
Page 259: Basic Function Group (Par→Ba)
8.3 Basic Function Group (PAR→bA) In the following table, data shaded in grey will be displayed when the related code has been selected. SL: Sensorless vector control (dr.09), Property: Write-enabled during operation Comm. Initial Property Code Name Setting Range Ref. Address Value Jump…
-
Page 260
Comm. Initial Property Code Name Setting Range Ref. Address Value pattern Linear 1 Square 2 User V/F 3 Square 2 Acc/Dec 0 Max Freq 0: Max bA-08 0h1208 reference p.78 1 Delta Freq Freq frequency 0 0.01 sec Time bA-09 0h1209 scale 1 0.1 sec… -
Page 261
Comm. Initial Property Code Name Setting Range Ref. Address Value resistance setting t on motor Leakage setting inductanc bA-22 O p.131 Stator bA-23 inductanc O p.131 Rotor time 25–5000 (ms) O p.131 bA-24 constant User 0.00– 0h1229 Frequenc Maximum frequency 15.00 p.87 bA-41… -
Page 262
Comm. Initial Property Code Name Setting Range Ref. Address Value Multi-step 0.00–Maximum Maximum bA-56 0h1238 speed p.71 frequency (Hz) frequency frequency 7 Multi-step bA-70 0h1246 acceleration 0.0–600.0 (s) 20.0 p.80 time 1 Multi-step bA-71 0h1247 deceleration 0.0–600.0 (s) 20.0 p.80 time 1 Multi-step bA-72… -
Page 263: Expanded Function Group (Par→Ad)
Comm. Initial Property Code Name Setting Range Ref. Address Value Multi-step 0h1253 deceleration 0.0–600.0 (s) 20.0 p.80 bA-83 time 7 8.4 Expanded Function Group (PAR→Ad) In the following table, data shaded in grey will be displayed when the related code has been selected.
-
Page 264
Comm. Setting Initial Code Name Property* V/F SL Ref. Address Range Value 2 Free-Run Power Braking 0 None Forward Ad-09 0h1309 prevention Prev 0: None p.75 options Reverse Prev 0 No Starting with Ad-10 0h130A 0: No p.76 power on 1 Yes Start DC 0h130C… -
Page 265
Comm. Setting Initial Code Name Property* V/F SL Ref. Address Range Value frequency frequency– during Maximum deceleration frequency(Hz) Operation time Ad-23 0h1317 during 0.0–60.0 (s) O p.120 deceleration 0 No Frequency Ad-24 0h1318 0: No p.99 limit 1 Yes Frequency 0.00–Upper Ad-25 0h1319… -
Page 266
Comm. Setting Initial Code Name Property* V/F SL Ref. Address Range Value (Hz) Jump Jump frequency 0h1321 35.00 O p.100 Ad-33 frequency lower limit3– upper limit 3 Maximum frequency (Hz) Brake release Ad-41 0h1329 0.0–180.0 (%) 50.0 O p.161 current Brake release 0h132A 0.00–10.00 (s) 1.00… -
Page 267
Comm. Setting Initial Code Name Property* V/F SL Ref. Address Range Value 3 x 0.001 4 x 0.0001 0 Rpm Rotation count Ad-63 0h133F 0: rpm 1 mpm speed unit 0 During Run Cooling fan 0: During 1 Always ON Ad-64 0h1340 O p.155… -
Page 268: Control Function Group (Par→Cn)
Comm. Setting Initial Code Name Property* V/F SL Ref. Address Range Value 400 V regeneration evasion 400 V: 600– motion for 800 V press Compensation frequency limit Ad-76 0h134C 0.00–10.00 Hz 1.00 O p.163 regeneration evasion for press Regeneration Ad-77 0h134D evasion for 0.0–100.0%…
-
Page 269
In the following table, data shaded in grey will be displayed when the related code has been selected. SL: Sensorless vector control (dr.09), Property: Write-enabled during operation Comm. Initial Code Name Setting Range Property* V/F SL Ref. Address Value Cn-00 Jump Code 1–99 O O p.42… -
Page 270
Comm. Initial Code Name Setting Range Property* V/F SL Ref. Address Value No load speed deviation Cn-29 0h141D 0.50–2.00 1.06 X O p.137 compensation gain Speed response Cn-30 0h141E 2.0–10.0 X O p.137 adjustment gain Keypad-1 Keypad-2 Torque limit Cn-53 0h1435 Keypad- X O p.137 setting method… -
Page 271
Comm. Initial Code Name Setting Range Property* V/F SL Ref. Address Value acceleration. Initialization 0010 after a fault trip Restart after instantaneous 0100 power interruption Starting with 1000 power-on Speed search 80–200 (%) O O p.145 Cn-72 0h1448 reference current Flying Start-1 Speed search… -
Page 272: Input Terminal Block Function Group (Par→In)
Comm. Initial Code Name Setting Range Property* V/F SL Ref. Address Value buffering stop level Energy Cn-80 0h1450 buffering P 0–20000 1000 O O p.140 gain Energy Cn-81 0h1451 1–20000 O O p.140 buffering I gain Energy Cn-82 0h1452 buffering Slip 0–2000.0% 30.0 O O p.140…
-
Page 273
Comm. Initial Prop Code Addres Name Setting Range Ref. Value erty* V1 output at In-09 0h1509 Minimum 0.00–100.00 (%) 0.00 p.61 voltage (%) V1 Maximum 0.00–12.00 (V) In-10 0h150A 10.00 p.61 input voltage V1 output at Maximum 0.00–100.00 (%) In-11 0h150B 100.00 p.61… -
Page 274
Comm. Initial Prop Code Addres Name Setting Range Ref. Value erty* V0 Maximum In-40 0h1528 0.00–5.00 (V) 5.00 p.67 input voltage V0 output at In-41 0h1529 0.00–100.00 (%) 100.00 p.67 Maximum voltage (%) Changing rotation In-46 0h152E 0: No p.67 direction of 0.00 , 0.04–10.00… -
Page 275
Comm. Initial Prop Code Addres Name Setting Range Ref. Value erty* P3 terminal External Trip p.186 In-67 0h1543 function 5: BX p.197 setting P4 terminal p.113 In-68 0h1544 function 3: RST Speed-L p.71 setting P5 terminal Speed-M p.71 function In-69 0h1545 7: Sp-L Speed-H… -
Page 276: Output Terminal Block Function Group (Par→Ou)
Comm. Initial Prop Code Addres Name Setting Range Ref. Value erty* KEB-1 Select p.140 P5–P1 Multi-function input terminal Disable(Off) In-84 0h1554 O O p.102 1 1111 On filter selection Enable(On) Multi-function input terminal In-85 0h1555 0–10000 (ms) O O p.102 On filter Multi-function input terminal…
-
Page 277
SL: Sensorless vector control (dr.09), Property: Write-enabled during operation Comm. Initial Prop Code Addres Name Setting Range V/F SL Ref. Value erty* OU-00 Jump Code 1–99 O p.42 Frequency Output Current Output Voltage DCLink Voltage Torque Output Power Analog Idse OU-01 0h1601 output 1… -
Page 278
Comm. Initial Prop Code Addres Name Setting Range V/F SL Ref. Value erty* voltage Final failure of automatic restart None FDT-1 FDT-2 FDT-3 FDT-4 Over Load Under Load Fan Warning Stall 10 Over Voltage 11 Low Voltage 12 Over Heat Lost Command 14 Run… -
Page 279
Comm. Initial Prop Code Addres Name Setting Range V/F SL Ref. Value erty* function FDT-1 relay 2 item FDT-2 FDT-3 FDT-4 Over Load Under Load Fan Warning Stall 10 Over Voltage 11 Low Voltage 12 Over Heat Lost Command 14 Run 15 Stop 16 Steady 17 Inverter Line… -
Page 280
Comm. Initial Prop Code Addres Name Setting Range V/F SL Ref. Value erty* relay Off delay Relay2, Relay1 Multi-function A contact OU-52 0h1634 relay contact O p.173 (NO) selection B contact (NC) Fault output OU-53 0h1635 0.00–100.00 (s) 0.00 O p.171 On delay Fault output OU-54… -
Page 281: Communication Function Group (Par→Cm)
Comm. Initial Prop Code Addres Name Setting Range V/F SL Ref. Value erty* detection 2 OT CmdSpd operation Warn setting OT Warning CmdSpdTrip OT Trip UT CmdSpd Warn UT Warning CmdSpdTrip UT Trip Torque OU-71 0h1647 detection 2 0.0~200.0 100.0 O O p.202 level Torque…
-
Page 282
Comm. Initial Prop Code Name Setting Range Ref. Address Value erty* 19200 bps 38400 bps 56 Kbps 115 Kbps D8/PN/S1 Built-in D8/PN/S2 CM-04 0h1704 communication p.211 D8/PN/S1 D8/PE/S1 frame setting D8/PO/S1 Transmission CM-05 0h1705 delay after 0–1000 (ms) p.211 reception Communicatio CM-06 0h1706… -
Page 283
Comm. Initial Prop Code Name Setting Range Ref. Address Value erty* Output 0000–FFFF CM-35 0h1723 communication 0000 p.216 address 5 Output 0000–FFFF CM-36 0h1724 communication 0000 p.216 address 6 Output 0000–FFFF CM-37 0h1725 communication 0000 p.216 address 7 Output 0000–FFFF CM-38 0h1726 communication… -
Page 284
Comm. Initial Prop Code Name Setting Range Ref. Address Value erty* multi-function input 2 Communicatio CM-72 0h1748 n multi-function 0: None p.238 input 3 Communicatio CM-73 0h1749 n multi-function 0: None p.238 input 4 Communicatio External CM-74 0h174A n multi-function 0: None p.238 Trip… -
Page 285: Application Function Group (Par→Ap)
Comm. Initial Prop Code Name Setting Range Ref. Address Value erty* 46 FWD JOG 47 REV JOG 49 XCEL-H 51 Fire Mode KEB-1 Select Communicatio n multi-function CM-86 0h1756 p.214 input monitoring Int485 Selection of data frame CM-90 0h175A communication KeyPad monitor Rev Data…
-
Page 286
Comm. Setting Code Name Initial Value pert Ref. Address Range monitor PID feedback 0h1812 0.00 p.125 AP-18 monitor PID reference -100.00– 0h1813 50.00 p.125 AP-19 setting 100.00 (%) Keypad PID reference 0h1814 p.125 AP-20 source Keypad Int 485 FieldBus PID feedback AP-21 0h1815 0: V1… -
Page 287: Protection Function Group (Par→Pr)
Comm. Setting Code Name Initial Value pert Ref. Address Range PID output 0.1–1000.0 0h1820 100.0 p.125 AP-32 scale PID output 0h181F 0: No p.125 AP-33 inverse 0.00– PID controller Maximum 0h1822 motion 0.00 p.125 AP-34 frequency frequency (Hz) PID controller 0.0–100.0 AP-35 0h1823…
-
Page 288
In the following table, data shaded in grey will be displayed when the related code has been selected. SL: Sensorless vector control (dr.09), Property: Write-enabled during operation Comm. Initial Code Name Setting Range Property* V/F SL Ref. Address Value Pr-00 Jump Code 1–99 p.42… -
Page 289
Comm. Initial Code Name Setting Range Property* V/F SL Ref. Address Value Time to determine Pr-13 0h1B0D speed 0.1–120 (s) O p.189 command loss Operation 0, Start frequency at frequency– O p.189 Pr-14 0h1B0E speed 0.00 Maximum command frequency(Hz) loss Analog input Half of x1 0: Half… -
Page 290
Comm. Initial Code Name Setting Range Property* V/F SL Ref. Address Value Under load Pr-30 0h1B1E upper limit 10–100 (%) O p.194 level No motor None Pr-31 0h1B1F motion at 0: None O p.200 Free-Run detection No motor Pr-32 0h1B20 detection 1–100 (%) O p.200… -
Page 291
Comm. Initial Code Name Setting Range Property* V/F SL Ref. Address Value Start frequency2– Stall Pr-55 0h1B37 Stall frequency4 60.00 X p.181 frequency 3 (Hz) Pr-56 0h1B38 Stall level 3 30–250 (%) X p.181 Stall frequency3– Stall Pr-57 0h1B39 Maximum 60.00 X p.181 frequency 4… -
Page 292: 2Nd Motor Function Group (Par→M2)
Comm. Initial Code Name Setting Range Property* V/F SL Ref. Address Value Relay Open Pr-90 0h1B5A Trip selection Fault history Pr-91 0h1B5B 0h1B5C Fault history Pr-92 0h1B5D Fault history Pr-93 0h1B5E Fault history Pr-94 0h1B5F Fault history Pr-95 Fault history Pr-96 0h1B60 0: No…
-
Page 293
Comm. Setting Prop Code Name Initial Value Ref. Address Range erty* Slip M2-08 0h1C08 Control mode Compen 0: V/F O O p.152 Sensorless Number of M2-10 0h1C0A 2–48 O O p.152 motor poles Rated slip 0–3000 M2-11 0h1C0B O O p.152 speed (Rpm) Motor rated… -
Page 294
Comm. Setting Prop Code Name Initial Value Ref. Address Range erty* Low-speed Varies by torque M2-31 0h1C1F 50–300 (%) Motor O p 137 compensation capacity gain Stator leakage Varies by M2-32 0h1C20 inductance 50–300 (%) Motor O p 137 scale capacity Stator Varies by… -
Page 296: Troubleshooting
If the inverter is still in a fault condition after powering it on again, please contact the supplier or the LSIS customer service center.
-
Page 297
Keypad Name Type Description Display Displayed when inverter output current exceeds Over Current1 Latch 200% of the rated current. Displayed when internal DC circuit voltage Over Voltage Latch exceeds the specified value. Displayed when internal DC circuit voltage is less Low Voltage Level than the specified value. -
Page 298
Keypad Name Type Description Display 7, 8. Occurs when the output current is lower than the Under torque Latch level set in OU-71. Operates when OU-70 is set to trip2 7, 8. * The Ground Trip (GFT) feature is not provided in products under 4.0 kW except for 4.0 kW 200 V and 2.2 kW 200 V. -
Page 299
Keypad Name Type Description Display Displayed when pre-PID is operating with functions set at AP.34–AP.36. A fault trip occurs when a controlled variable (PID feedback) is Pre-PID Fail Latch measured below the set value and the low feedback continues, as it is treated as a load fault. -
Page 300
9.1.2 Warning Messages Keypad Name Description Display Displayed when the motor is overloaded. Operates when Pr.17 is set to 1. To operate, select 5. Set the digital output Over Load terminal or relay (OU.31 or OU.33) to 5 (Over Load) to receive overload warning output signals. -
Page 301
9.2 Troubleshooting Fault Trips When a fault trip or warning occurs due to a protection function, refer to the following table for possible causes and remedies. Items Cause Remedy Replace the motor and inverter with The load is greater than the motor’s models that have increased rated capacity. -
Page 302
The input wiring is faulty. Check the input wiring. Replace the DC link capacitor. The DC link capacitor needs to be Contact the retailer or the LSIS replaced. customer service center. Replace the motor and inverter with The load is greater than the rated models that have increased motor capacity. -
Page 303
Output wiring is short-circuited. Check the output wiring. Do not operate the inverter. Contact There is a fault with the electronic the retailer or the LSIS customer semiconductor (IGBT). service center. A ground fault has occurred in the Check the output wiring. -
Page 304
Items Cause Remedy level. The load is too high. Operate the motor independently. An emergency stop signal is input. Reset the emergency stop signal. The wiring for the control circuit Check the wiring for the control terminal is incorrect. circuit terminal. The input option for the frequency Check the input option for the command is incorrect. -
Page 305
Items Cause Remedy The ambient temperature of the Lower the ambient temperature of motor is too high. the motor. Use a motor that can withstand phase-to-phase voltages surges greater than the maximum surge voltage. Only use motors suitable for The phase-to-phase voltage of the applications with inverters. -
Page 306
Items Cause Remedy The motor rotation is Set a V/F pattern that is suitable The V/F pattern is set incorrectly. for the motor specification. different from the setting. The deceleration time is set too long. Change the setting accordingly. The motor deceleration If motor parameters are normal, it time is too long… -
Page 307
Items Cause Remedy The motor Check the input voltage and balance the voltage. vibrates The voltage between phases is severely and badly balanced. Check and test the motor’s does not rotate insulation. normally. Resonance occurs between the Slightly increase or decrease the motor’s natural frequency and the operating frequency. -
Page 308
10 Maintenance This chapter explains how to replace the cooling fan, the regular inspections to complete, and how to store and dispose of the product. An inverter is vulnerable to environmental conditions and faults also occur due to component wear and tear. To prevent breakdowns, please follow the maintenance recommendations in this section. -
Page 309
Inspection Inspection Inspection Inspection Judgment Inspection Area Item Details Method Standard Equipment Measure voltages Refer to 11.1 Are the input between R/ input and Digital Power and output S/ T-phases Output multimeter voltage voltages in. the Specification tester normal? inverter on page 303. -
Page 310
Inspection Inspectio Inspection Inspection Judgment Inspection Area n Item Details Method Standard Equipment Disconnect inverter and short R/S/T/U/V/W Megger test terminals, (between and then Must be input/output measure above 5 MΩ terminals and from each earth terminal) terminal to DC 500 V the ground Megger terminal… -
Page 311
Inspection Inspectio Inspection Inspection Judgment Inspection Area n Item Details Method Standard Equipment Protection the inverter is in inverter phases: within DC voltmeter operation. output 4 V for 200 V circuit terminal series and U/V/W. within 8 V for 400 V series. Test the inverter Is there an error… -
Page 312
10.2.1 Storage If you are not using the product for an extended period, store it in the following way: • Store the product in the same environmental conditions as specified for operation (refer to 1.3 Installation Considerations on page 5). •… -
Page 313
10.2.2 Disposal When disposing of the product, categorize it as general industrial waste. The product contains materials that can be recycled. Please consider the environment, energy, and resources and recycle unused products. The packing materials and all metal parts can be recycled. Although plastic can also be recycled, it can be incinerated under controlled conditions in some regions. -
Page 315
11 Technical Specification 11.1 Input and Output Specification 3 Phase 200 V (0.4–7.5 kW) Model Name 0004 0008 0015 0022 0040 0055 0075 LSLVG100-2□□□□□ Heavy load 0.75 Applied motor Normal load 0.75 Heavy 12.2 Rated load capacity Normal (kVA) 11.4 15.2 load Rated… -
Page 316
from the impact of the motor closing and opening (0.4–4.0 kW models only). 3 Phase 400 V (0.4–7.5 kW) Model Name 0004 0008 0015 0022 0040 0055 0075 LSLVG100-4□□□□□ Heavy load 0.75 Applied motor Normal load 0.75 Heavy Rated 12.2 load capacity Normal… -
Page 317
11.2 Product Specification Details Items Description Control method V/F control, slip compensation, sensorless vector Frequency Digital command: 0.01 Hz settings power Analog command: 0.06 Hz (60 Hz standard) resolution Frequency 1% of maximum output frequency Control accuracy V/F pattern Linear, square reduction, user V/F Overload Heavy load rated current: 150%, 1 minute, capacity… -
Page 318
Items Description Multi Less than (N.O., N.C.) AC function Fault output and inverter 250 V, 1 A, relay operation status output Less than DC 30 V, 1 A Output terminal Analog 0–12 Vdc: Select frequency, output current, output output voltage, DC terminal voltage and others •… -
Page 319
Items Description Storage -20℃–65℃ temperature Prevent contact with corrosive gases, inflammable Environmental gases, oil stains, dust, and other pollutants (Pollution factors Degree 2 Environment). No higher than 3280 ft (1,000 m). Less than 9.8 m/sec (1G). Operation (Apply derating of 1% at a time on voltage/output current altitude/oscillation for every 100 m increase starting from 1,000 m, going up to a maximum of 4,000m) -
Page 320
Items Ø 0004G100-4, 0008G100-4 Units: mm (inches) 1.5–2.2 kW Items Ø 0015G100- 0022G100- 150.5 0015G100- (3.98) (3.54) (6.57) (6.57) (6.97) (0.20) (5.93) (0.22) (0.18) (0.18) 0022G100- Units: mm (inches) -
Page 321
4.0 kW Items Ø 0040G100-2 150.5 0040G100-4 (5.31) (4.92) (7.20) (7.20) (7.60) (0.20) (5.93) (0.20) (0.18) (0.18) Units: mm (inches) -
Page 322
5.5–7.5 kW Items Ø 0055G100 Top: Top: Ø -1 : 0075G100 162(6.38 229.5 9(0.35) 4.5(0.18 (7.09 (8.66 (9.04 (9.45 (0.22 (5.67 Bottom (0.18 0055G100 Bottom: Ø -2 : 170(6.70 5(0.20) 6(0.24) 0075G100 Units: mm (inches) -
Page 323
11.4 Peripheral Devices Compatible Circuit Breaker, Leakage Breaker, and Magnetic Contactor Models (manufactured by LSIS) Leakage Magnetic Circuit Breaker Breaker Contactor Capacity (kW) Curren Curren Curren Model Specific Model Name Model Model t (A) t (A) t (A) MC-6a MC-9a, 0.75… -
Page 324
11.5 Fuse and Reactor Specifications AC Input Fuse AC Reactor Capacity (kW) Voltage Model Current (A) Inductance (mH) Current (A) DFJ-10 1.20 0.75 DFJ-15 0.88 3-phase DFJ-20 0.56 200 V DFJ-30 0.39 DFJ-50 0.30 DFJ-60 0.22 4.81 0.75 DFJ-10 3.23 3-phase DFJ-15 2.34… -
Page 325
11.6 Terminal Screw Specification Input/output Terminal Screw Specification Rated Screw Torque Capacity (kW) Terminal Screw Size (Kgfcm/Nm) R/S/T, U/V/W: M3 R/S/T, U/V/W: 5.1 / 0.5 0.75 R/S/T, U/V/W: M4 R/S/T, U/V/W: 12.1 / 1.2 3-phase 200 V R/S/T, U/V/W: M4 R/S/T, U/V/W: 18.4 / 1.8 R/S/T : 14.0 / 1.4 R/S/T, U/V/W : M4… -
Page 326
Apply rated torques to the terminal screws. Loose screws may cause short circuits and malfunctions. Tightening the screw too much may damage the terminals and cause short circuits and malfunctions. Use copper wires only with 600 V, 75℃ rating for the power terminal wiring, and 300 V, 75℃… -
Page 327
11.8 Continuous Rated Current Derating Carrier Frequency The continuous rated current of the inverter is limited based on the carrier frequency. Refer to the following graph. Continuous rated current Carrier frequency 0.4~2.2kW 4.0kW 5.5kW 7.5kW (kHz) 200V 400V 200V 400V 200V 400V 200V… -
Page 328
200 V 400 V Capacity (kW) DR (%) Capacity (kW) DR (%) 0.75 0.75 Input Voltage The continuous rated current of the inverter is limited based on the input voltage. Refer to the following graph. -
Page 329
Ambient Temperature/Installation Method The constant-rated current of the inverter is limited based on the ambient temperature and installation type. Refer to the following graph. 11.9 Heat Emission The following graph shows the G100 inverters’ heat emission characteristics (by product capacity). Heat emission has been measured based on the room temperature when the carrier frequency of inverter is set as default. -
Page 330
11.10 Remote Keypad Option It is comprised of a remote keypad and cables (1 m, 2 m, 3 m, and 5 m). Units: mm… -
Page 331
Installation Remove the RJ45 terminal cover on the inverter I/O cover. Connect the remote keypad cable to the I/O RJ45 connector. Connect the other end of the connector of the remote keypad cable to the remote keypad. Enable Once connected to the remote keypad, the key of the inverter keypad and the button input of the jog controller are ignored. -
Page 332
Warranty Service Information During the product warranty period, warranty service (free of charge) is provided for product malfunctions caused under normal operating conditions. For warranty service, contact an official LSIS agent or service center. -
Page 333
• power supply problems or from other appliances being connected to the product • acts of nature (fire, flood, earthquake, gas accidents etc.) • modifications or repair by unauthorized persons • missing authentic LSIS rating plates • expired warranty period Visit Our Website Visit us at for detailed service information. -
Page 334
UL mark The UL mark applies to products in the United States and Canada. This mark indicates that UL has tested and evaluated the products and determined that the products satisfy the UL standards for product safety. If a product received UL certification, this means that all components inside the product had been certified for UL standards as well. -
Page 335
Manual Revision History Revision History Date Edition Changes First 2019.01 Release… -
Page 336
Index configuration via multi-function 0 terminal Maximum frequency 0 – +10 V voltage input operation frequency Ad (Advanced function group) 1 Advanced feature group Refer to AP (Advanced function group) -10 – +10 V voltage input Advanced function group Refer to Ad (Advanced function group) 2… -
Page 337
final command frequency calculation derating Factory default output main reference Charge indicator Cleaning B CM (Communication function group) CM terminal B terminal (Normal Close) Cn (Control function group) bA (Basic function group) commercial power source transition Basic configuration diagram Communication Basic group Refer to bA (Basic function Comm. -
Page 338
Drive Group Refer to dr (Drive group) Fan Trip Dwell Operation Fan Warning Refer to Fan Warning Acc/Dec dwell frequency fatal acceleration Dwell fault deceleration Dwell fatal fault/warning list E latch Level type electronic thermal motor overheating major fault prevention (ETH) minor fault ETH trip trip… -
Page 339
Class 3 ground Mounting the Inverter Ground Cable Specifications Selecting location Ground Terminal Wiring Special class 3 ground Installation Environment Ground trip Refer to Ground Trip Air Pressure Ground Trip Ambient humidity ground fault trip Ambient temperature Environmental factors H Operation altitude/oscillation Instantaneous blackout half duplex system… -
Page 340
Multi-function input terminal On filter Start frequency Lost Command Px terminal setting options command loss fault trip warning Multi-function key Command loss trip multi-function output Low Voltage multi-function output terminal delay Low voltage trip time settings low voltage trip 2 trip output by multi-function output LS INV 485 protocol terminal and relay… -
Page 341
Output terminal function group Refer to OU PID Switching (output terminal function group) Pre-PID Fail Output/communication terminal Pre-PID Operation 24 terminal A1/C1/B1 terminal PNP mode (Source) AO terminal PNP/NPN mode selection switch (SW1) S+/S- terminal NPN mode (Sink) Over current trip Refer to Over Current1 PNP mode (Source) Over Current1… -
Page 342
terminal rated torque current SET indicator rating plate setting virtual multi-function input Reactor Side by side See side by side Regenerated energy Slave Reset Restart Refer to restarting after a trip resonance frequencies Slip Carrier frequency slip compensation operation Ripple speed command loss RS-232 speed search operation… -
Page 343
specification details Using the keypad terminal groups/codes A terminal Jump Code B terminal V Terminal for frequency reference setting Refer to VR terminal Test run V/F control Time scale setting Linear V/F pattern operation 0.01sec square reduction V/F pattern operation 0.1sec 1sec User V/F pattern Operation…
This manual is also suitable for:
G100
Однофазный частотный преобразователь LSLV0008M100-1EOFNA широко применяется в вентиляции, насосах, при тяжелых нагрузках, во всём общепроме за счет ряда отличительных особенностей:
- Встроенный потенциометр
- Компактные размеры с возможностью установки бок о бок. Зазор — 2мм
- Встроенный интерфейс RS485 (Есть возможность заказать более дешевый вариант исполнения без интерфейса RS485 — LSLV0008M100-1EOFNS)
- Монтаж на Din-рейку
- Встроенный ЭМС фильтр
Серия M100 пришла на смену другой серии IC5, в частности модели SV008iC5-1F.
Характеристики частотного преобразователя LSLV0008M100-1EOFNA:
- Производитель: LS Industrial Systems (LSIS)
- Страна производителя: Южная Корея
- Напряжение питания: 1 фаза 220В
- Выходное напряжение: 3 фазы 220В
- Мощность: 0,75 кВт
- Ток при полной нагрузке: 4,2 А
- Выходная частота: 0-400 Гц
- Рабочая температура: -10..+50 °С
- Количество входов: 7
- Количество аналоговых выходов: 1
- Габариты: Ширина — 85 мм/ Высота — 153 мм/ Глубина — 123 мм
- Вес: 1 кг
Посмотреть техническую документацию
Отзыв о товаре LSLV0008M100-1EOFNA частотный преобразователь
Файлы
Перетащите сюда файлы или нажмите для выбора
Максимальный размер загружаемого файла 10M в формате .
Максимальное количество файлов — 8 шт.
Нажимая кнопку «Отправить отзыв», я принимаю условия Пользовательского соглашения и даю своё согласие на обработку моих персональных данных, в соответствии с Федеральным законом от 27.07.2006 года №152-ФЗ «О персональных данных», на условиях и для целей, определенных Политикой конфиденциальности.
Для продолжения вы должны принять условия Пользовательского соглашения
Я согласен на обработку персональных данных
Для продолжения вы должны принять соглашение на обработку персональных данных