- Manuals
- Brands
- M-Audio Manuals
- Accessories
- Profire 610
- User manual
-
Contents
-
Table of Contents
-
Troubleshooting
-
Bookmarks
Quick Links
ProFire 610
English
User Guide
Related Manuals for M-Audio Profire 610
Summary of Contents for M-Audio Profire 610
-
Page 1: User Guide
ProFire 610 English User Guide…
-
Page 2: Table Of Contents
ProFire 610 User Guide 1 Introduction 2 What’s in the Box Your ProFire 610 package contains 3 ProFire 610 Features 4 Minimum System Requirements 5 Controls and Connectors Front Panel Descriptions Rear Panel Descriptions 6 Driver Installation 7 Hardware Connections Connecting Microphones and/or Instruments Connecting Line-Level Inputs Digital (S/PDIF) Connections…
-
Page 3
ProFire 610 User Guide About Tab Additional Functions File Edit View Help 9 Using ProFire 610 Setting Input Levels Mic/Inst Inputs Line Inputs S/PDIF inputs Configuring your Audio Software Selecting ProFire 610 as the audio device Routing your software outputs Setting the sample rate and bit depth of your session About Overdub Recording and Monitor Mixing Using the Monitor Mixer… -
Page 4: Introduction
ProFire 610 User Guide Introduction Congratulations on your purchase of the M-Audio ProFire 610 audio interface ProFire 610 is part of M-Audio’s award winning series of FireWire -based digital recording systems and features solid hardware design, robust driver technology, and a powerful Control Panel application to help you capture your best performances with the…
-
Page 5: Profire 610 Features
• Functions as a standalone two-channel mic preamp and A/D – D/A converter Minimum System Requirements Minimum system requirements can be found on the ProFire 610 product packaging as well as the M-Audio website A Note about Operating System Updates: Please check the M-Audio driver download page at http://www.m-audio.com/drivers for the availability of an updated driver before you decide to install operating…
-
Page 6: Controls And Connectors
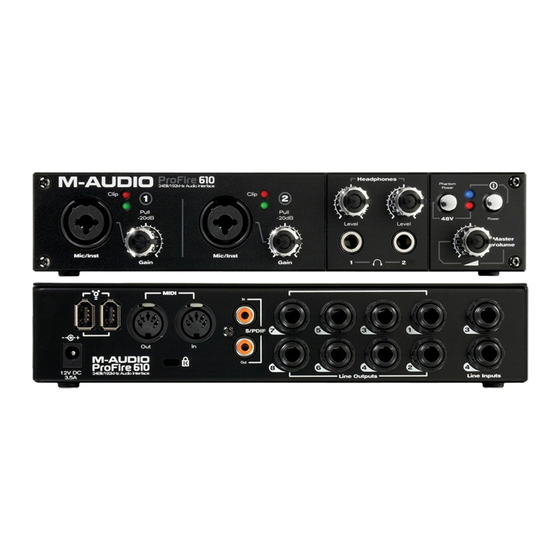
ProFire 610 User Guide Controls and Connectors Front Panel Descriptions Mic / Inst Input Combo Jack (Mic / Inst) — Balanced mic-level and unbalanced instrument-level combo inputs These combo connectors will accept a standard three-pin XLR plug or a 1/4” TS connector and will appear as the first pair of inputs (e g inputs 1/2) in your audio application Input levels are controlled by the corresponding Gain knobs Signal/Clip Indicators (Clip) — The green LED indicates the presence of a signal at the corresponding analog…
-
Page 7
ProFire 610 User Guide Master Volume ( ) — This knob controls the analog output levels of ProFire 610 Turning the knob clockwise will increase the output level while turning it counterclockwise will reduce the output level By default, this knob is assigned to control analog outputs 1/2, however, the Control Panel application provides the option of setting the Master Volume knob to control any combination of analog output pairs (i e , 1/2, 3/4, 5/6, or 7/8) This includes the ability to control the level of all eight analog outputs simultaneously This feature has been implemented to facilitate many kinds of stereo and surround mixing scenarios… -
Page 8: Rear Panel Descriptions
FireWire peripheral or the host computer’s FireWire port are rendered permanently inoperable. Please consult the Knowledge Base in the Support section at www.m-audio.com for updates on this important issue. 12 MIDI In and MIDI Out Connectors — MIDI input and output on standard 5-pin DIN connectors Connect a MIDI…
-
Page 9: Driver Installation
ProFire 610 User Guide Driver Installation For instructions on installing ProFire 610, please refer to the printed Quick Start Guide. Hardware Connections ProFire 610 front ProFire 610 rear…
-
Page 10: Connecting Microphones And/Or Instruments
ProFire 610 User Guide Connecting Microphones and/or Instruments ProFire 610 features two XLR/TS Combo input jacks on its front panel Microphones or instrument-level sources (electric guitars, basses, etc.) can be connected to these inputs using XLR or 1/4” cables, respectively. If you are using microphone(s) that require phantom power, activate the Phantom Power button after the microphone(s) have been connected…
-
Page 11: Connecting The Analog Outputs
ProFire 610 User Guide Connecting the Analog Outputs Connect the rear-panel line outputs to a mixing console, amplifier or powered monitors By default, analog output pair 1/2 is controlled by the front-panel Master Volume knob , however, this knob can be assigned to control other outputs pairs through the ProFire 610 Control Panel ! CAUTION: Analog output streams that are not assigned to be controlled by the Master Volume knob will be sent to the analog outputs at maximum level.
-
Page 12: Software Control Panel
The ProFire 610 Control Panel is installed in your system when you complete the driver installation procedure To open the Control Panel: • Windows XP/Vista users: A small M-Audio logo will be placed in the system tray, generally located at the bottom of your Windows desktop Double click this icon to open the Control Panel •…
-
Page 13: Level Meter
ProFire 610 User Guide The first six channels (on the left side of the mixer) correspond to the hardware inputs of the interface (i.e., analog inputs 1-4 and S/PDIF L/R). To the right of the hardware inputs are the ten “software return” channels that correspond to the outputs of your audio software.
-
Page 14: Level Fader
ProFire 610 User Guide Level Fader The Level Fader controls the output level for its corresponding channel Double-clicking or Alt/Option-Clicking on a channel fader will set the fader to unity gain Channel Name The name displayed at the bottom of each channel strip can be changed by clicking on the field Once you have entered a new name, press the enter/return key to confirm the new channel name Note that changing channel names only affects the appearance of the channel names within the Control Panel mixer tabs—this feature does not affect your audio application in any way Also note that renaming a channel in…
-
Page 15: Hosted Mode — Sync Source
ProFire 610 User Guide AHosted Mode – Sample Rate This drop-down menu sets the sample rate of ProFire 610 Note that when using the interface with an ASIO or CoreAudio application, the sample rate can also be determined by your audio application This parameter may not be editable from within the ProFire 610 Control Panel if your audio application is running In this case, any changes to the sample rate must be made through the audio application itself If the application does not provide a way to set the sample rate, quit the application, then change the sample rate through the ProFire…
-
Page 16: Standalone Mode — Sample Rate
ProFire 610 User Guide Mixers Active at Sample Rates Above 96 kHz When operating at sampling rates of 176 4 or 192 kHz, ProFire 610 can use two of its available Monitor Mixers These two drop-down menus allow you to select which two mixers will remain active at sampling rates above 96 kHz For example, if you would like to use the “Analog Out 1/2”…
-
Page 17: About Tab
This tab contains information on your hardware and current driver software versions This information may be helpful, should you ever have the occasion to call for technical support Clicking the buttons at the bottom of the panel will take you to useful links on the M-Audio website, if you are currently online Additional Functions…
-
Page 18: Edit
ProFire 610 User Guide Edit This menu lets you cut, copy and paste track names or entire mixer settings This menu will appear in one of two ways: If a mixer tab name or track name is selected for editing: the Edit menu displays “Cut, ” “Copy, ” and “Paste ”…
-
Page 19: Help
Help This menu gives you convenient access to the support, software update, and product documentation pages on the M-Audio website Note that clicking these options will open your web browser and that your computer must have Internet access for these pages to load…
-
Page 20: Using Profire 610
ProFire 610 User Guide Using ProFire 610 Setting Input Levels Mic/Inst Inputs To set gain levels for an analog input, begin by turning the Gain Knob for that channel fully counter- clockwise While the sound source is playing at its loudest levels, slowly turn the knob clockwise until the red clip indicator begins to illuminate Then, turn the knob counter-clockwise until the clip indicator no longer illuminates At this point, you should be ready to record with the optimum gain setting…
-
Page 21: Configuring Your Audio Software
ProFire 610 User Guide Configuring your Audio Software Once the ProFire 610 drivers are installed, you may need to configure your audio software before you can begin recording and mixing This configuration process varies from one application to another, but in general, there are three things you may need to do: Selecting ProFire 610 as the audio device You must make sure that your software is configured to use ProFire 610 as its audio input and output device…
-
Page 22: About Overdub Recording And Monitor Mixing
ProFire 610 User Guide In most cases, you can set the sample rate and bit depth of your project from within the audio application itself This configuration varies from program to program, but these settings are usually found in the “Setup” or “Project Setup”…
-
Page 23: Using The Monitor Mixer
ProFire 610 User Guide Using the Monitor Mixer To use the ProFire 610 Monitor Mixer: Select the tab that corresponds to the hardware outputs to which you would like to send your monitor mix For example, if you wish to create a mix that routes to analog outputs 7/8, select the “Analog Out 7/8”…
-
Page 24
ProFire 610 User Guide 4 If you are routing signals to Headphone Outputs 1 and 2, make sure the Headphone Level Knobs set properly Alternatively, if you are routing monitor mixes to external headphone amplifiers, make sure those amplifiers are set properly When selecting output channels 1/2 from your audio application, the signal is not sent directly to the physical hardware outputs on the rear-panel of ProFire 610;… -
Page 25: Standalone Operation
ProFire 610 User Guide Standalone Operation In addition to operating as an audio interface for your computer, ProFire 610 can also operate without a computer in “standalone mode ” In Standalone mode, ProFire 610 functions as an analog-to-digital (A/D) and digital-to-analog (D/A) converter Analog inputs 1-2 are “passed through”…
-
Page 26: Digital Clocking
ProFire 610 User Guide Digital Clocking Your computer-based DAW stores and manipulates music as digital samples Those samples are sent to and from your DAW as “snapshots” of data These snapshots are all the same size—16-bit or 24-bit, depending on your selected resolution—each with a beginning and an end, and are sent in sequential order (i e , one after the other) as a stream of data Think of this data stream as a sentence, made up of a series of words of identical length The rate at which these words are transmitted (i e , how many samples are transmitted each second) is…
-
Page 27: Scenario 1: Profire 610 As Clock Master
ProFire 610 User Guide Scenario 1: ProFire 610 as Clock Master By selecting “internal” as the sync source in the Control Panel, you designate ProFire 610 as the clock master You will then need to select “external” (or “slave” on certain devices) mode on your digitally connected device(s) This is usually an internal menu setting on the external device In Figure 1 below, a DAT machine is connected to the coaxial S/PDIF I/O.
-
Page 28: Scenario 2: Profire 610 Slaved To S/Pdif Input
ProFire 610 User Guide Scenario 2: ProFire 610 Slaved to S/PDIF Input Certain digital devices, such as consumer CD players, must be used as a clock master and cannot be synchronized to any other devices This is due to a lack of digital inputs on the CD player (i e , the device has no way to synchronize to an incoming signal) In this scenario, ProFire 610 can be configured to lock to the CD player (or other external device) through the S/PDIF input In Figure 2 below, the CD player is configured as the clock master, while ProFire 610 is configured to…
-
Page 29: Scenario 3: Creating A Synchronized «Digital Loop
ProFire 610 User Guide Scenario 3: Creating a Synchronized “Digital Loop” In certain scenarios, you may need to send digital signals to an external device while simultaneously receiving signals from that device For example, if you have connected an external A/D – D/A converter or digital effects processor to your ProFire 610, you will need to simultaneously send and receive digital audio through the S/PDIF ports In this case, either device (i e , the external digital device or your ProFire 610) can be configured as the clock…
-
Page 30: Midi
ProFire 610 User Guide MIDI ProFire 610 provides 16 channels of MIDI I/O over standard 5-pin DIN connectors on the rear panel of the interface These I/O ports can be used to connect MIDI-compatible devices to your computer such as controller keyboards, drum machines, or sound modules Alternatively, these ports can be used to send and receive MIDI Time Code (MTC) and other synchronization formats for locking to a hardware or software sequencer MIDI is an extensive protocol and covering it in detail is beyond the scope of this guide If you would like to…
-
Page 31: Troubleshooting
ProFire 610 User Guide Troubleshooting ProFire 610 has been designed to give you high performance and professional-quality audio on a wide range of systems and operating conditions However, there are a virtually limitless number of operating scenarios, any of which could affect your system’s performance While this section cannot cover all possible issues you may encounter, we would like to offer you some suggestions for dealing with common problems In general, it is recommended that you avoid connecting too many FireWire devices to your computer FireWire is a dependable high-bandwidth protocol that is ideally suited for digital audio Nonetheless, it’s important to…
-
Page 32
Buffer size settings can usually be changed through your audio application’s “setup” or “preferences” menu or the ProFire 610 Control Panel For more troubleshooting tips, visit the Knowledge Base at www.m-audio.com… -
Page 33: Warranty
Warranty Warranty Terms M-Audio warrants products to be free from defects in materials and workmanship, under normal use and provided that the product is owned by the original, registered user Visit www m-audio com/warranty for terms and limitations applying to your specific product…
-
Page 34
PC ……0 820 000 731 Web ……www.m-audio.jp Mac .
Руководства M Audio PROFIRE 610 Размер файлов: 1176 KB, Язык: English, Формат: pdf, Платформа: Windows/Linux, Дата: 2017-03-27
На данной странице вы можете скачать руководства M Audio PROFIRE 610. Мы предлагаем вам ознакомиться с руководством пользователя, инструкцией по сервисному обслуживанию и ремонту.
Также здесь вы найдете список заказных номеров на комплектующие M Audio PROFIRE 610.
Все файлы предоставляются исключительно в ознакомительных целях. И не являютя руководством по ремонту, а направлены лишь на то чтобы помочь вам более детально ознакомиться с принципом построения устройства.
Содержимое представленных здесь руководств требуют от вас знания технического английского языка.
Если вы собираетесь скачать руководство по сервисному обслуживанию M Audio PROFIRE 610, иными словами сервис мануал, вы дожны обладать хотя бы минимальными познаниями в области электроники и пониманием базовых принципов работы электромеханических устройств.
Для просмотра руководств вам понадобится Adobe Acrobat Reader версии 9 и выше либо другая программа для просмотра pdf файлов.
В связи с популярностью информации представленной на сайте и ее бесплатного предоставления конечному пользователю, убедительная просьба использовать специальные программные продукты для многопотокового скачивания файлов.
Руководства для M Audio PROFIRE 610
- Руководство пользователя (User manual)
- Руководство по сервисному обслуживанию (Service manual)
- Руководство по ремонту (Repair manual)
- Перечень комплектующих (PartList)
-
M-Audio Profire 610 — page 1
ProFire 6 10 User Guide English …
-
M-Audio Profire 610 — page 2
1 Introduction . . . . . . . . . . . . . . . . . . . . . . . . . . . . . . . . . . . . . . . . . . . . . . . . . . . . . . . . . . 3 2 What’s in the Box . . . . . . . . . . . . . . . . . . . . . . . . . . . . . . . . . . . . . . . . . . . . . . . . . . . . . . 3 Y our ProFire 610 package contains . . . . . . . . . . . . . . . . . . . . . . . . . …
-
M-Audio Profire 610 — page 3
About T ab . . . . . . . . . . . . . . . . . . . . . . . . . . . . . . . . . . . . . . . . . . . . . . . . . . . . . . . . . . . . . 16 Additional Functions . . . . . . . . . . . . . . . . . . . . . . . . . . . . . . . . . . . . . . . . . . . . . . . . . . . . . . . . 16 File . . . . . . . . . . . . . . . . . . . . . . . . . . . . . . . . . . . . . …
-
M-Audio Profire 610 — page 4
User Guide 3 ProFire 610 Introduction Congratulations on your purchase of the M-Audio ProFire 610 audio interface. ProFire 610 is part of M-Audio’s award winning series of FireW ire 1 -based digital recording systems and features solid hardware design, robust driver technology , and a powerful Control Panel application to help you capture your be …
-
M-Audio Profire 610 — page 5
User Guide 4 ProFire 610 ProFire 6 10 Features • Six-input,ten-outputaudioconguration • Upto24-bit/192kHzoperation • T wohigh-qualitymic/instrumentpreampsfeaturingOct ane TM tec hnology , LE D meters, and phantom power • T wofront-panelX LR /TSCombojac ksacceptingmicor …
-
M-Audio Profire 610 — page 6
User Guide 5 ProFire 610 Controls and Connectors Front Panel Descriptions 2008 1. Mic / Inst Input Combo Jack (Mic / Inst) — Balanced mic-level and unbalanced instrument-level combo inputs. Thesecomboconnectorswillacceptastandardthree-pinXLRplugora1/4”T …
-
M-Audio Profire 610 — page 7
User Guide 6 ProFire 610 9. Master V olume ( ) — This knob controls the analog output levels of ProFire 610. T urning the knob clockwise will increase the output level while turning it counterclockwise will reduce the output level. By default, this knob is assigned to control analog outputs 1/2, however , the Control Panel application provides the …
-
M-Audio Profire 610 — page 8
User Guide 7 ProFire 610 Rear Panel Descriptions 10. Power Input ( ) — Connect the 12VDC 2A power supply here when using ProFire 610 with a four-pin FireWire connection, or if your computer does not provide sufficient bus power on a 6-pin connection. If your computer can provide power over a 6-pin connecti …
-
M-Audio Profire 610 — page 9
User Guide 8 ProFire 610 Driv er Installation For instructions on installing ProFire 610, please refer to the printed Quick Start Guide. Hardware Connections -IC ‘UITAR»ASS (EADPHONES 8,2#ABLE v#ABLE ProFire 610 front %XTERNAL (ARD$RIVE #OMPUTER -ONITORS-IXER %FFECTS0ROCESSOR 0OWER 3UPPLY $ !4 &a …
-
M-Audio Profire 610 — page 10
User Guide 9 ProFire 610 Connecting Microphones and/or Instruments ProFire610featurestwoXLR /TSComboinputjac ks 1 on its front panel. Microphones or instrument-level sources(electricguitars,basses,etc.)canbeconnectedtotheseinputsusingX LRor1/4”cables,respectively . If you are …
-
M-Audio Profire 610 — page 11
User Guide 10 ProFire 610 Connecting the Analog Outputs Connect the rear-panel line outputs 13 to a mixing console, amplifier or powered monitors. By default, analog output pair 1/2 is controlled by the front-panel Master V olume knob 6 , however , this knob can be assigned to control other outputs pairs through the ProFire 610 Control Panel. ! CA …
-
M-Audio Profire 610 — page 12
User Guide 11 ProFire 610 Software Control Panel The ProFire 610 driver software provides a simple but powerful interface to connect with your computer’s Digital Audio W orkst ation software. T he Control Panel provides five independent multi-channel mixers, featuring six input channels sourced from the physical inputs, as well as ten output c h …
-
M-Audio Profire 610 — page 13
User Guide 12 ProFire 610 The first six c hannels (on the left side of the mixer) correspond to the hardware inputs of the interface (i.e., analog inputs 1-4 and S/ P DI F L/ R). T o the right of the hardware inputs are the ten “software return” channels that correspond to the outputs of your audio software. The remaining two c hannels (on the …
-
M-Audio Profire 610 — page 14
User Guide 13 ProFire 610 Level Fader The Level Fader controls the output level for its corresponding c hannel. Double-clicking or Alt/Option-Clic king on a channel fader will set the fader to unity gain. Channel Name The name displayed at the bottom of eac h channel strip can be c hanged by clicking on the field. Once you have entered a new name, …
-
M-Audio Profire 610 — page 15
User Guide 14 ProFire 610 AHosted Mode – Sample Rate This drop-down menu sets the sample rate of ProFire 610. Note that when using the interface with an ASIO or CoreAudio application, the sample rate can also be determined by your audio application. This parameter may not be editable from within the ProFire 610 Control Panel if your audio applica …
-
M-Audio Profire 610 — page 16
User Guide 15 ProFire 610 Mixers Active at Sample Rates Above 96 kHz W hen operating at sampling rates of 17 6.4 or 192 kHz, ProFire 610 can use two of its available Monitor Mixers. These two drop-down menus allow you to select whic h two mixers will remain active at sampling rates above 96 kHz. For example, if you would like to use the “ Analog …
-
M-Audio Profire 610 — page 17
User Guide 16 ProFire 610 About T ab This tab contains information on your hardware and current driver software versions. This information may be helpful, should you ever have the occasion to call for technical support. Clic king the buttons at the bottom of the panel will take you to useful links on the M-Audio website, if you are currently online …
-
M-Audio Profire 610 — page 18
User Guide 17 ProFire 610 Edit This menu lets you cut, copy and paste trac k names or entire mixer settings. This menu will appear in one of two ways: 1. If a mixer tab name or track name is selected for editing: the Edit menu displays “Cut, ” “Copy , ” and “Paste. ” T hese options let you cut, copy, and paste selected text just like a …
-
M-Audio Profire 610 — page 19
User Guide 18 ProFire 610 Peak Hold The meters of the ProFire 610 monitor mixers feature a “peak hold” function designed to assist in finding the loudest transients of a signal. These options determine how long the peak indicator remains before resetting: • Off – This setting turns the peak hold function off • 1 sec …
-
M-Audio Profire 610 — page 20
User Guide 19 ProFire 610 Using ProFire 6 10 Setting Input Le vels Mic/ Inst Inputs T o set gain levels for an analog input, begin by turning the Gain Knob 3 for that c hannel fully counter- clockwise. W hile the sound source is playing at its loudest levels, slowly turn the knob clockwise until the red clip indicator 2 begins to illuminate. Then, …
-
M-Audio Profire 610 — page 21
User Guide 20 ProFire 610 Configuring your A udio Software Once the ProFire 610 drivers are installed, you may need to configure your audio software before you can begin recording and mixing. This configuration process varies from one application to another , but in general, there are three things you may need to do: Selecting ProFire 610 as the …
-
M-Audio Profire 610 — page 22
User Guide 21 ProFire 610 In most cases, you can set the sample rate and bit depth of your project from within the audio application itself. This configuration varies from program to program, but these settings are usually found in the “Setup” or “Project Setup” menus of your program. If your audio application does not have a configuratio …
-
M-Audio Profire 610 — page 23
User Guide 22 ProFire 610 Using the Monitor Mixer T o use the ProFire 610 Monitor Mixer: 1. Select the tab that corresponds to the hardware outputs to which you would like to send your monitor mix. For example, if you wish to create a mix that routes to analog outputs 7 /8, select the “ Analog Out 7 /8” t ab. ✓ TIP : K eep in mind that the ? …
-
M-Audio Profire 610 — page 24
User Guide 23 ProFire 610 4. If you are routing signals to Headphone Outputs 1 and 2, make sure the Headphone Level K nobs 4 are set properly . Alternatively , if you are routing monitor mixes to external headphone amplifiers, make sure those amplifiers are set properly . 3 When selecting output c hannels 1/2 from your audio application, the sign …
-
M-Audio Profire 610 — page 25
User Guide 24 ProFire 610 Standalone Operation In addition to operating as an audio interface for your computer , ProFire 610 can also operate without a computer in “standalone mode. ” In Standalone mode, ProFire 610 functions as an analog-to-digit al (A/ D) and digit al-to-analog (D/ A) converter . Analog inputs 1-2 are “passed through” to …
-
M-Audio Profire 610 — page 26
User Guide 25 ProFire 610 Digital Clocking Y our computer-based DA W stores and manipulates music as digital s amples. Those samples are sent to and from your DA W as “snapshots” of dat a. T hese snapshots are all the s ame size—16-bit or 24-bit, depending on your selected resolution—each with a beginning and an end, and are sent in sequent …
-
M-Audio Profire 610 — page 27
User Guide 26 ProFire 610 Scenario 1: ProFire 610 as Clock Master By selecting “internal” as the sync source in the Control Panel, you designate ProFire 610 as the clock master . Y ou will then need to select “external” (or “slave” on cert ain devices) mode on your digit ally connected device(s). This is usually an internal menu setting …
-
M-Audio Profire 610 — page 28
User Guide 27 ProFire 610 Scenario 2: ProFire 610 Slaved to S/ P DI F Input Certain digit al devices, such as consumer CD players, must be used as a clock master and cannot be synchronized to any other devices. T his is due to a lack of digital inputs on the CD player (i.e., the device has no way to synchronize to an incoming signal). In this scena …
-
M-Audio Profire 610 — page 29
User Guide 28 ProFire 610 Scenario 3: Creating a Synchronized “Digital Loop” In certain scenarios, you may need to send digit al signals to an external device while simult aneously receiving signals from that device. For example, if you have connected an external A/ D – D/ A converter or digit al effects processor to your ProFire 610, you wil …
-
M-Audio Profire 610 — page 30
User Guide 29 ProFire 610 MID I ProFire 610 provides 16 channels of MI DI I /O over st andard 5-pin DI N connectors 12 on the rear panel of the interface. These I/O ports can be used to connect M I D I-compatible devices to your computer such as controller keyboards, drum machines, or sound modules. Alternatively , these ports can be used to send a …
-
M-Audio Profire 610 — page 31
User Guide 30 ProFire 610 T roubleshooting ProFire 610 has been designed to give you high performance and professional-quality audio on a wide range of systems and operating conditions. However , there are a virtually limitless number of operating scenarios, any of which could affect your system’s performance. W hile this section cannot cover all …
-
M-Audio Profire 610 — page 32
User Guide 31 ProFire 610 If you are experiencing clicks and pops in your recordings: • W henclockingtoanexternaldigitaldevice,makesuretheinputsourceontheSettingst aboftheControl Panel is set to “External — S/ P DI F . ” See the section about W ord Cloc k for more information. ? …
-
M-Audio Profire 610 — page 33
User Guide 32 ProFire 610 W arranty Warranty T erms M-Audio warrants products to be free from defects in materials and workmanship, under normal use and provided that the product is owned by the original, registered user . V isit www.m-audio.com/warranty for terms and limitations applying to your specific product. Warranty Registration Immediately …
-
M-Audio Profire 610 — page 34
M-Audio USA 5 7 95 Martin Rd., Irwindale, CA 91 7 0 6 T echnical Support web . . . . . . . . . . . . . . . . . . . . . . www.m-audio.com/tech tel (pro products) . . . . . . . . . . . . . . . . . . .(626) 633-9 055 tel (consumer products) . . . . . . . . . . . . . . (626) 633-90 66 fax (shipping) . . . . . . . . . . . . . . . . . . . . .(626) 633-9 …

249 ₽
Инструкция (руководство пользователя) на Аудиоустройство (9 стр.) M-Audio ProFire 610
Артикул: m-audio-profire-610
Категория: M-Audio
-
Описание
-
Детали
Описание
Инструкцию по эксплуатации M-Audio ProFire 610 на русском языке можно будет скачать в личном кабинете после оформления и оплаты заказа.
Детали
| Формат файла |
|
|---|---|
| Размер инструкции в кб |
356 |
-
Инструкции по эксплуатации
1

M-Audio ProFire 610 инструкция по эксплуатации
(34 страницы)
- Языки:Английский
-
Тип:
PDF -
Размер:
1.34 MB
Просмотр
На NoDevice можно скачать инструкцию по эксплуатации для M-Audio ProFire 610. Руководство пользователя необходимо для ознакомления с правилами установки и эксплуатации M-Audio ProFire 610. Инструкции по использованию помогут правильно настроить M-Audio ProFire 610, исправить ошибки и выявить неполадки.