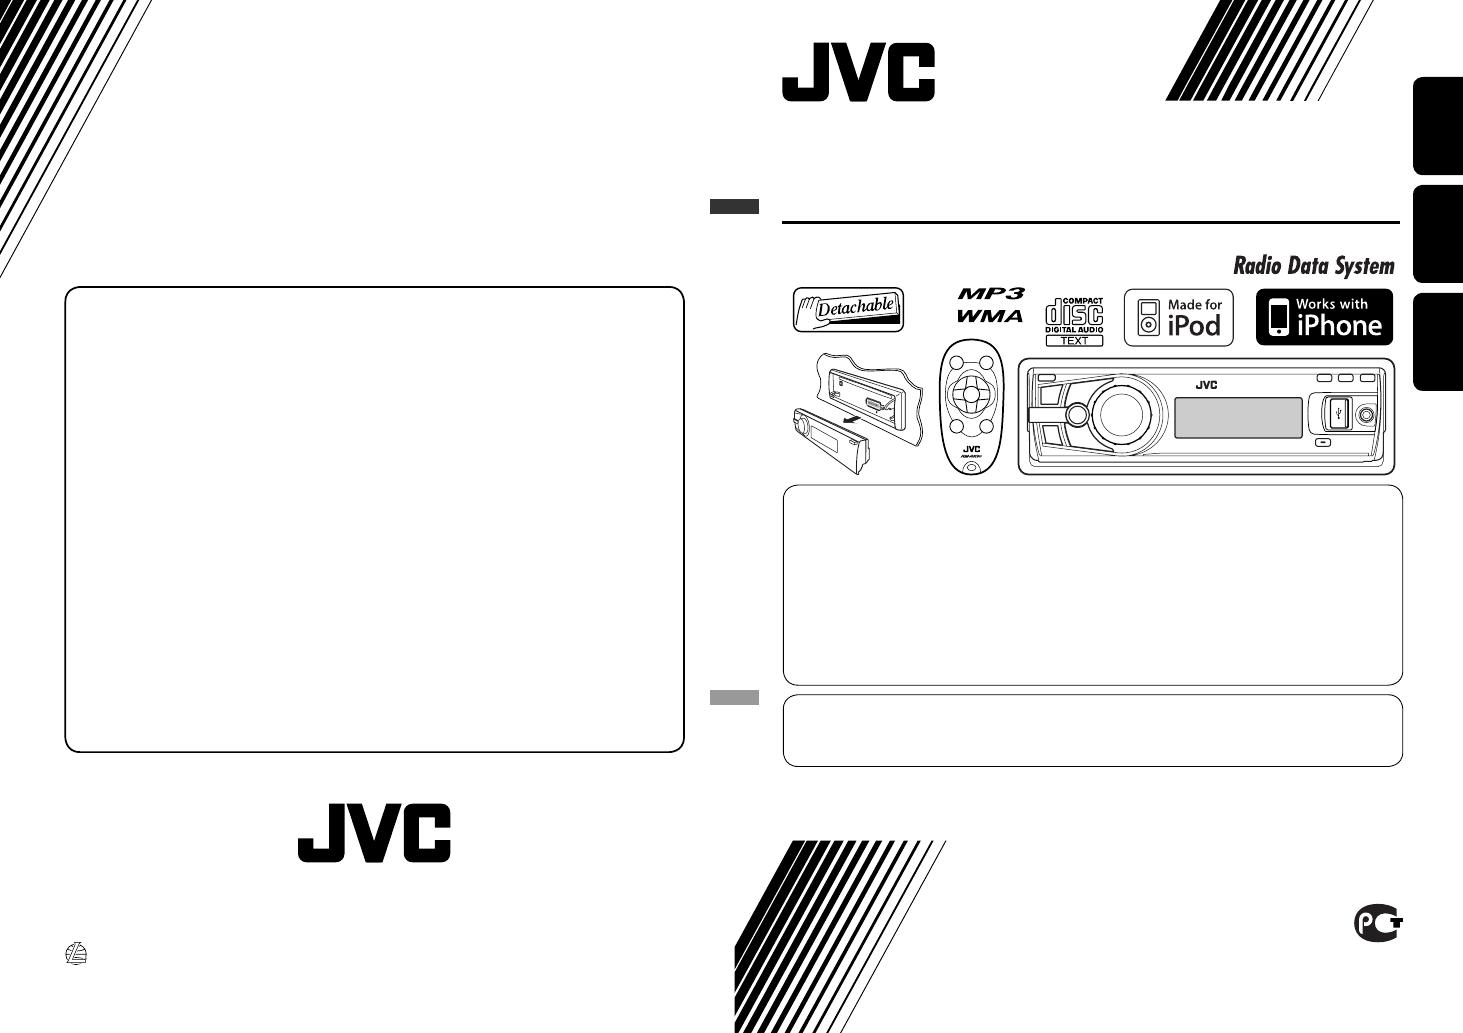
ENGLISHРУCCKИЙУКРАЇНА
CD RECEIVER
РЕСИВЕР С ПРОИГРЫВАТЕЛЕМ КОМПАКТ-ДИСКОВ
ПРИЙМАЧ З ПРОГРАВАЧЕМ КОМПАКТ-ДИСКІВ
For installation and connections, refer to the separate manual.
Указания по установке и выполнению соединений приводятся в отдельной инструкции.
Вказівки по встановленню та виконанню підключень наведені у окремій інструкції.
INSTRUCTIONS
ИНСТРУКЦИИ ПО ЭКСПЛУАТАЦИИ
ІНСТРУКЦІЇ
GET0597-001A
[EE]
For canceling the display demonstration, see page 7.
Информацию об отмене демонстрации функций дисплея см. на стр. 7.
Інформацію щодо відміни демонстрації функцій дисплею див. на стор. 7.
В соответствии с Законом Российской Федерации “О защите прав потре бителей” срок службы (годности) данного
товара “по истечении которого он может представлять опасность для жизни, здоровья потребителя, причинять вред
его имуществу или окружающей среде” составляет семь (7) лет со дня производства. Этот срок является временем, в
течение которого потребитель данного товара может безопасно им пользоваться при условии соблюдения
ин струк ции по эксплуатации данного товара, проводя необходимое обслуживание, включающее замену расходных
материалов и/или соответствующее ремонтное обеспечение в специализированном сервисном центре.
Дополнительные косметические материалы к данному товару, поставляе мые вместе с ним, могут храниться в
течение двух (2) лет со дня его производства.
Срок службы (годности), кроме срока хранения дополнительных космети ческих материалов, упомянутых в
предыдущих двух пунктах, не затрагивает никаких других прав потребителя, в частности, гарантийного свидетельства
JVC, которое он может получить в соответствии с законом о правах потребителя или других законов, связанных с ним.
EN, RU, UK
0109DTSMDTJEIN
Having TROUBLE with operation?
Please reset your unit
Refer to page of How to reset your unit
Затруднения при эксплуатации?
Пожалуйста, перезагрузите Ваше устройство
Для получения информации о перезагрузке Вашего устройства
обратитесь на соответствующую страницу
Маєте ПРОБЛЕМУ з функціонуванням?
Повторно налаштуйте систему
Див. сторінку “Як повторно налаштувати пристрій”
© 2009 Victor Company of Japan, Limited
Bіктор Компані оф Джепен Лімітед
12, 3-чоме, Морійя-чо, Канагава-ку, Йокогама, Канагава 221-8520, Японія
KD-R707
CoverRear_KD-R707[EE]_3.indd 1CoverRear_KD-R707[EE]_3.indd 1 23/1/09 12:00:51 PM23/1/09 12:00:51 PM
ENGLISH
2
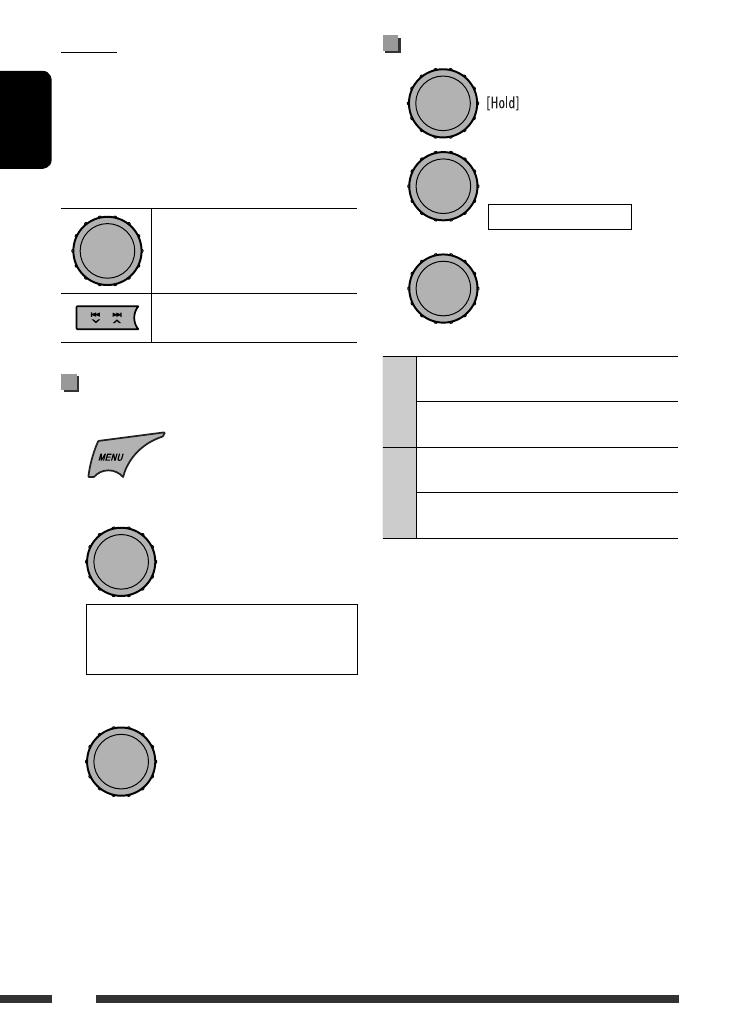
This mark is used to indicate…
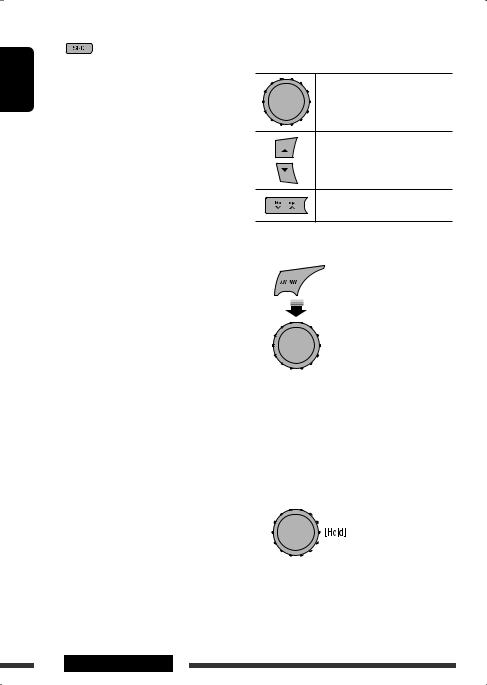
Turn the control dial to make a
selection, then press to confirm the
selection.
Warning:
If you need to operate the unit while driving, be sure to
look around carefully or you may be involved in a traffic
accident.
Caution on volume setting:
Digital devices (CD/USB) produce very little noise
compared with other sources. Lower the volume before
playing these digital sources to avoid damaging the
speakers by sudden increase of the output level.
For safety…
• Do not raise the volume level too much, as this will
block outside sounds, making driving dangerous.
• Stop the car before performing any complicated
operations.
Temperature inside the car…
If you have parked the car for a long time in hot or cold
weather, wait until the temperature in the car becomes
normal before operating the unit.
Thank you for purchasing a JVC product.
Please read all instructions carefully before operation, to ensure your complete understanding and to obtain the best
possible performance from the unit.
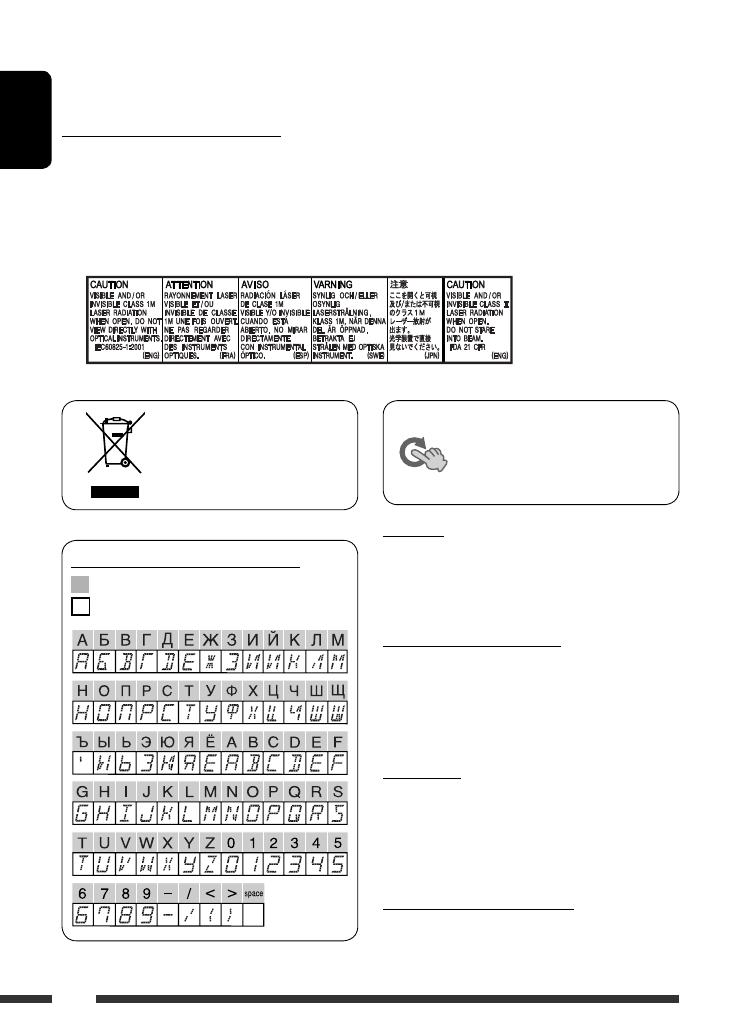
IMPORTANT FOR LASER PRODUCTS
1. CLASS 1 LASER PRODUCT
2. CAUTION: Do not open the top cover. There are no user serviceable parts inside the unit; leave all servicing to
qualified service personnel.
3. CAUTION: Visible and/or invisible class 1M laser radiation when open. Do not view directly with optical
instruments.
4. REPRODUCTION OF LABEL: CAUTION LABEL, PLACED OUTSIDE THE UNIT.
[European Union only]
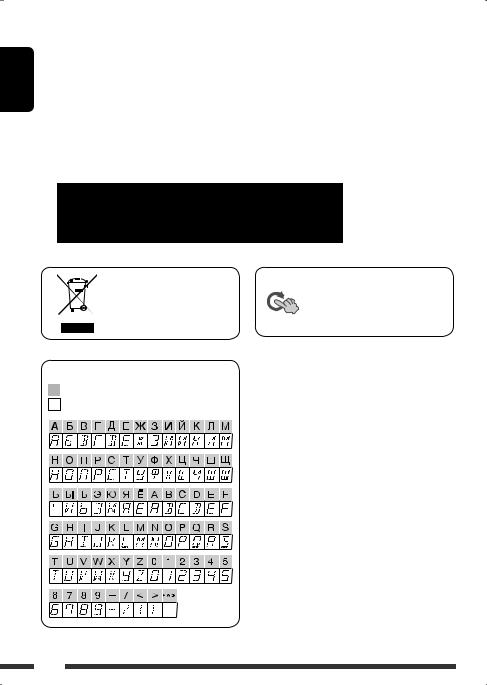
Available characters on the display
Available characters
Display indications
EN02-11_KD-R707[EE]_3.indd 2EN02-11_KD-R707[EE]_3.indd 2 23/1/09 11:59:21 AM23/1/09 11:59:21 AM
ENGLISH
3
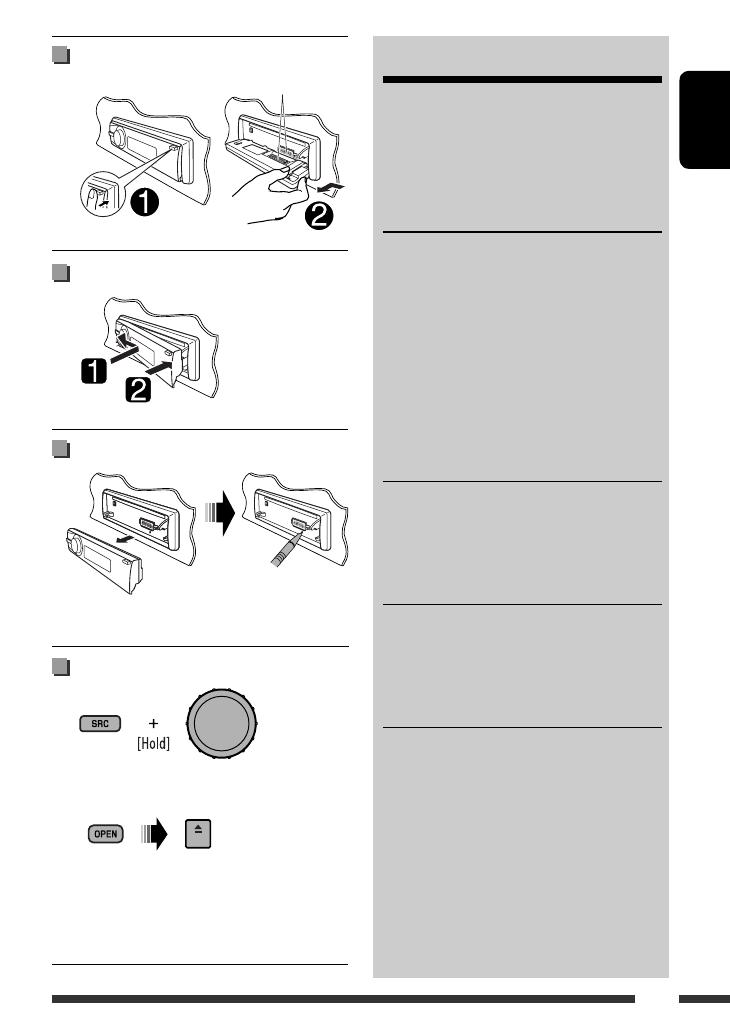
Detaching the control panel
Attaching the control panel
How to reset your unit
• Your preset adjustments will also be erased.
How to forcibly eject a disc
• “PLEASE” and “EJECT“ appear alternately on the
display.
• You can forcibly eject the loaded disc even if the disc is
locked. To lock/unlock the disc, see page 11.
• Be careful not to drop the disc when it ejects.
• If this does not work, reset your unit.
CONTENTS
Detaching the control panel ……………………. 3
Attaching the control panel ……………………. 3
How to reset your unit …………………………… 3
How to forcibly eject a disc ……………………… 3
OPERATIONS
Basic operations ……………………………………. 4
• Using the control panel …………………………. 4
• Using the remote controller (RM-RK50) …… 6
Preparation ………………………………………….. 7
Listening to the radio …………………………….. 8
Disc/USB operations ………………………………. 11
• Playing a disc ………………………………………. 11
• Playing a file on a USB device ………………… 11
• Disc/file operations ………………………………. 12
EXTERNAL DEVICES
Listening to the iPod/iPhone ………………….. 13
Listening to the other external
components ………………………………………. 15
SETTINGS
Selecting a preset sound mode ……………….. 16
Menu operations …………………………………… 17
Color settings ……………………………………….. 21
REFERENCES
More about this unit ……………………………… 22
Troubleshooting ……………………………………. 26
Maintenance ………………………………………… 29
Specifications ……………………………………….. 30
Avoid touching the connectors.
EN02-11_KD-R707[EE]_3.indd 3EN02-11_KD-R707[EE]_3.indd 3 23/1/09 11:59:26 AM23/1/09 11:59:26 AM
ENGLISH
4
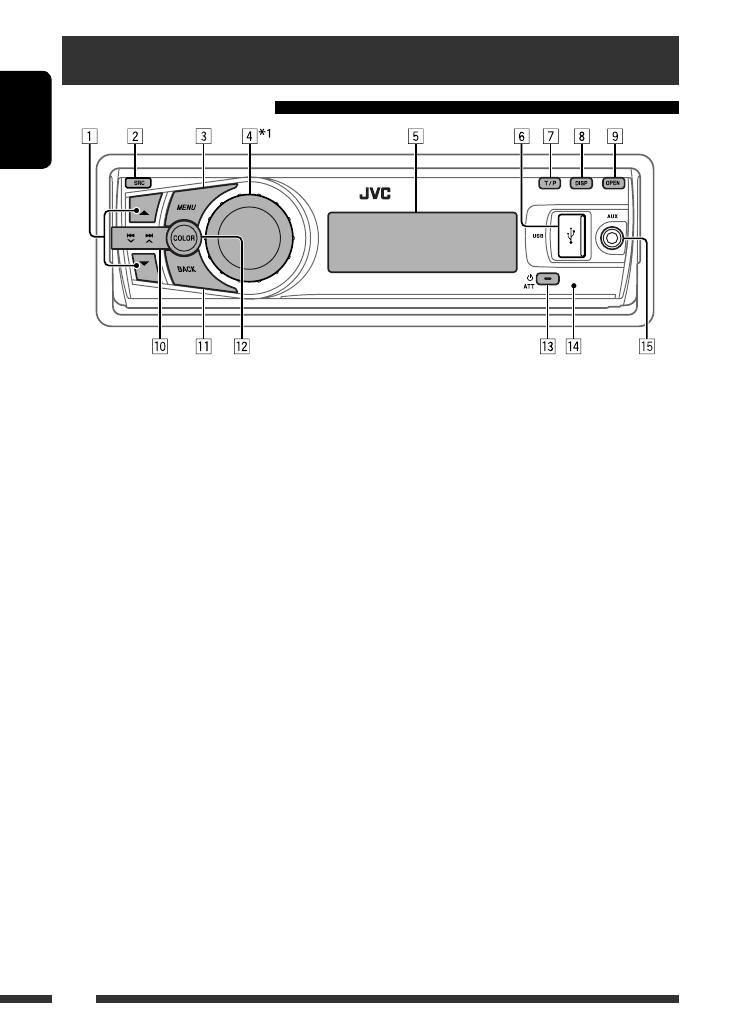
Basic operations
Using the control panel
q • Return to the previous menu.
• USB-IPOD: Switch the setting between “HEAD
MODE” and “IPOD MODE” *
6
[Hold].
w Select the display and button illumination color.
e • Turn on the power.
• Attenuate the sound (if the power is on).
• Turn off the power [Hold].
r Remote sensor
t AUX (auxiliary) input jack
*
1
Also known as “Control dial” in this manual.
*
2
You cannot select these sources if they are not ready
or not connected.
*
3
When connecting the iPod/iPhone to the USB input
jack for the first time, “USB” appears on the display
first, then “USB-IPOD.”
*
4
You cannot select these sources if they were disabled
in the Menu (see “ SRC SELECT” in “Menu
operations” on page 20).
*
5
You can still adjust the volume during pause when
the selected source is CD/USB/USB-IPOD.
Before resume playback, check to be sure that you
have not raise the volume level too much.
*
6
You can use this function only when “IPOD
MODE” is available for the connected iPod (see
page 24).
1 • FM/AM/FM-LO: Select preset station.
• CD/USB: Select folder.
2 Select the source.
FM = CD *
2
= USB/USB-IPOD *
2,
*
3
=
AUX IN *
4
= AM *
4
= FM-LO = (back to the
beginning)
3 • Enter list operations.
• Enter Menu setting [Hold] .
• USB-IPOD: Enter the main menu.
4 • Control the volume *
5
or select items [Turn].
• Confirm the selection [Press].
• FM/FM-LO: Enter SSM preset mode [Hold].
• CD/USB/USB-IPOD: Pause/resume playback *
5
[Press].
• CD/USB/USB-IPOD: Enter playback mode
[Hold].
5 Display window
6 USB (Universal Serial Bus) input jack
7 • Activate/deactivate TA Standby Reception.
• Enter PTY Searching mode [Hold].
8 Change the display information.
9 Flip down the control panel.
• To eject the disc, flip down the control panel
then press 0 on the unit.
p • FM/AM/FM-LO: Search for station.
• CD/USB/USB-IPOD: Select track.
EN02-11_KD-R707[EE]_3.indd 4EN02-11_KD-R707[EE]_3.indd 4 23/1/09 11:59:27 AM23/1/09 11:59:27 AM
ENGLISH
5OPERATIONS
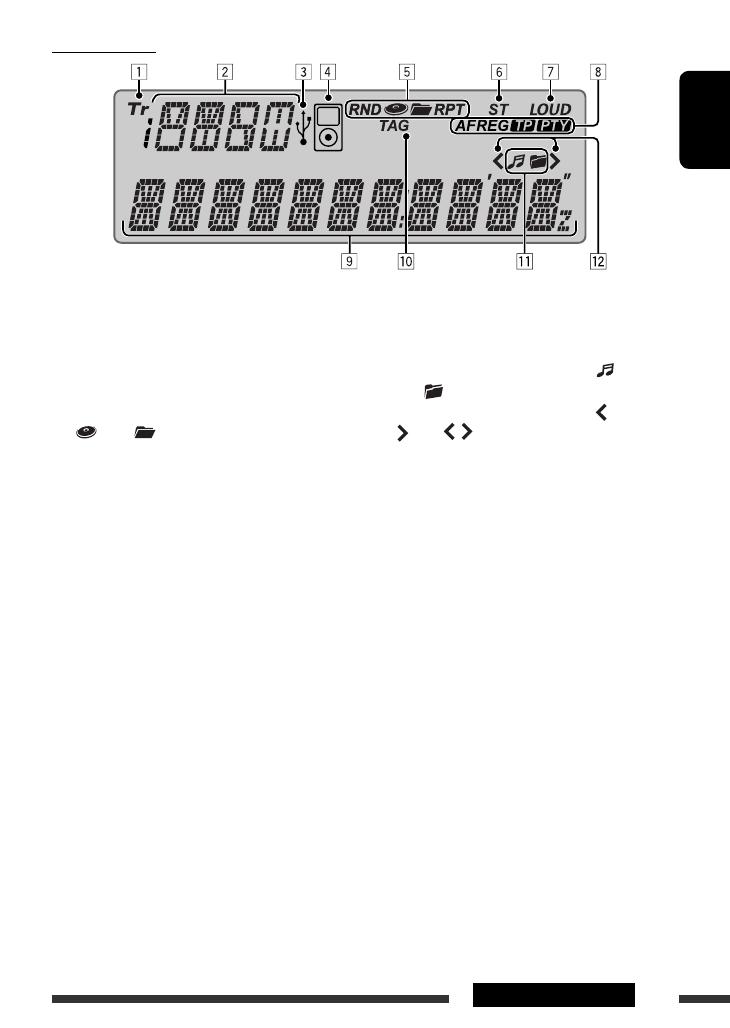
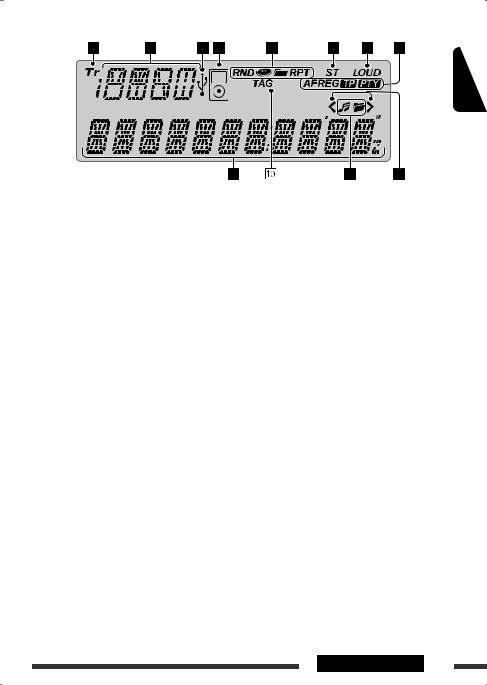
Display window
1 Tr (track) indicator
2 Source display / Track number / Folder number /
Time countdown indicator / Setting and list
operation information
3 USB indicator
4 iPod indicator
5 Playback mode / item indicators— RND (random),
(disc), (folder), RPT (repeat)
6 ST (stereo) indicator
7 LOUD (loudness) indicator
8 Radio Data System indicators—AF, REG, TP, PTY
9 Main display
p TAG (Tag information) indicator
q Disc/device information indicators— (track/
file), (folder)
w Menu hierarchy position indicator— (bottom),
(top), (middle)
EN02-11_KD-R707[EE]_3.indd 5EN02-11_KD-R707[EE]_3.indd 5 23/1/09 11:59:28 AM23/1/09 11:59:28 AM
ENGLISH
6
Using the remote controller (RM-RK50)
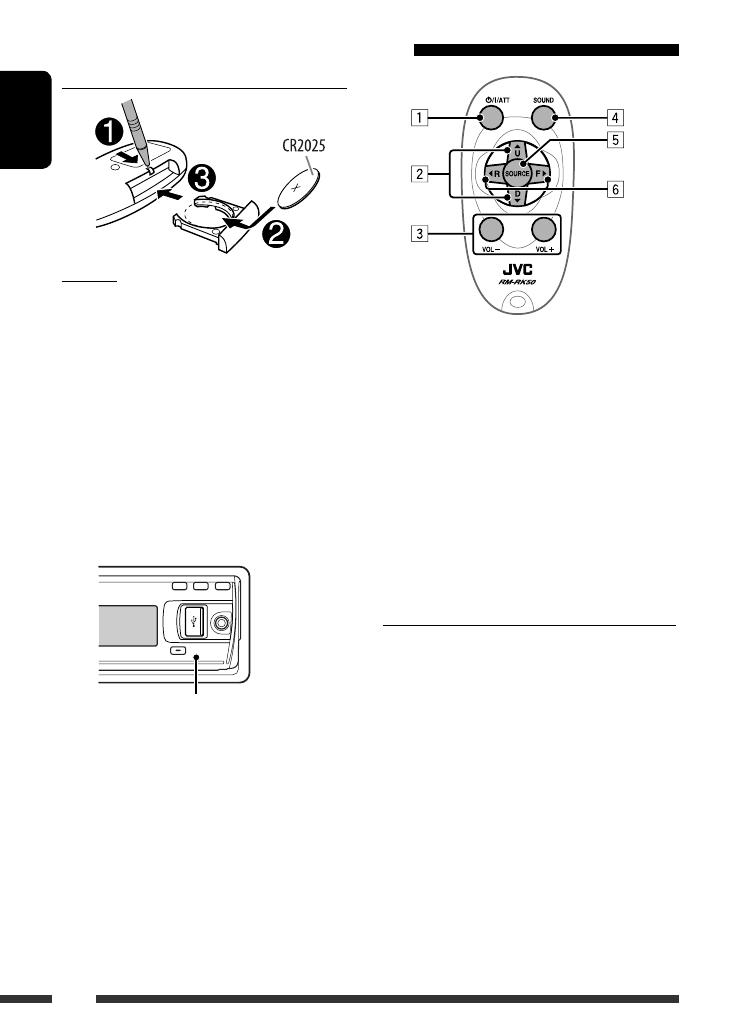
Installing the lithium coin battery (CR2025)
Caution:
• Danger of explosion if battery is incorrectly replaced.
Replace only with the same or equivalent type.
• Battery shall not be exposed to excessive heat such as
sunshine, fire, or the like.
If the effectiveness of the remote controller
decreases, replace the battery.
Before using the remote controller:
• Aim the remote controller directly at the remote
sensor on the unit.
• DO NOT expose the remote sensor to bright light
(direct sunlight or artificial lighting).
Remote sensor
1 • Turns the power on if pressed briefly or
attenuates the sound when the power is on.
• Turns the power off if pressed and held.
2 • Changes the preset stations.
• Changes the folder of the MP3/WMA.
3 Adjusts the volume level.
4 Selects the sound mode.
5 Selects the source.
6 • Searches for stations if pressed briefly.
• Fast-forwards or reverses the track if pressed and
held.
• Changes the tracks if pressed briefly.
Warning (to prevent accidents and damage):
• Do not install any battery other than CR2025 or its
equivalent.
• Do not leave the remote controller in a place (such
as dashboards) exposed to direct sunlight for a long
time.
• Store the battery in a place where children cannot
reach.
• Do not recharge, short, disassemble, heat the battery,
or dispose of it in a fire.
• Do not leave the battery with other metallic
materials.
• Do not poke the battery with tweezers or similar
tools.
• Wrap the battery with tape and insulate when
throwing away or saving it.
EN02-11_KD-R707[EE]_3.indd 6EN02-11_KD-R707[EE]_3.indd 6 23/1/09 11:59:29 AM23/1/09 11:59:29 AM

ENGLISH
7OPERATIONS
Preparation
Canceling the display demonstration and setting the clock
• See also page 17.
1
Turn on the power.
2
[Turn] = [Press]
Cancel the display demonstrations
Select “DEMO,” then “DEMO OFF.”
Set the clock
Select “CLOCK” = “CLOCK SET.”
Adjust the hour, then press control dial once to proceed to
adjust the minute.
Select “24H/12H,” then “24 HOUR” or “12 HOUR.”
• To return to the previous menu, press BACK.
Changing the display information
When the power is turned off: The current clock time is displayed if “CLOCK DISP” is set to “CLOCK OFF,”
(see page 17).
When the power is turned on: The display information of the current source changes as follows:
FM/AM/FM-LO Station Frequency = Clock = (back to the beginning)
FM Radio Data
System
Station name (PS) = Station Frequency = Programme type (PTY) = Clock =
(back to the beginning)
CD
CD/USB/USB-IPOD
Audio CD/CD Text: Disc title/performer *
1
= Track title *
1
= Current track number
with the elapsed playing time = Current track number with the
clock time = (back to the beginning)
MP3/WMA: Album name/performer (folder name) *
2,
*
3
= Track title (file
name) *
2,
*
3
= Current track number with the elapsed playing
time = Current track number with the clock time = (back to
the beginning)
*
1
If the current disc is an audio CD, “NO NAME” appears.
*
2
If an MP3/WMA file does not have Tag information or “TAG DISPLAY” is set to “TAG OFF” (see page 18),
folder name and file name appear.
*
3
Not applicable for “USB-IPOD.”
Press and hold until the
main menu is called up.
• Repeat this procedure.
EN02-11_KD-R707[EE]_3.indd 7EN02-11_KD-R707[EE]_3.indd 7 23/1/09 11:59:30 AM23/1/09 11:59:30 AM
ENGLISH
8
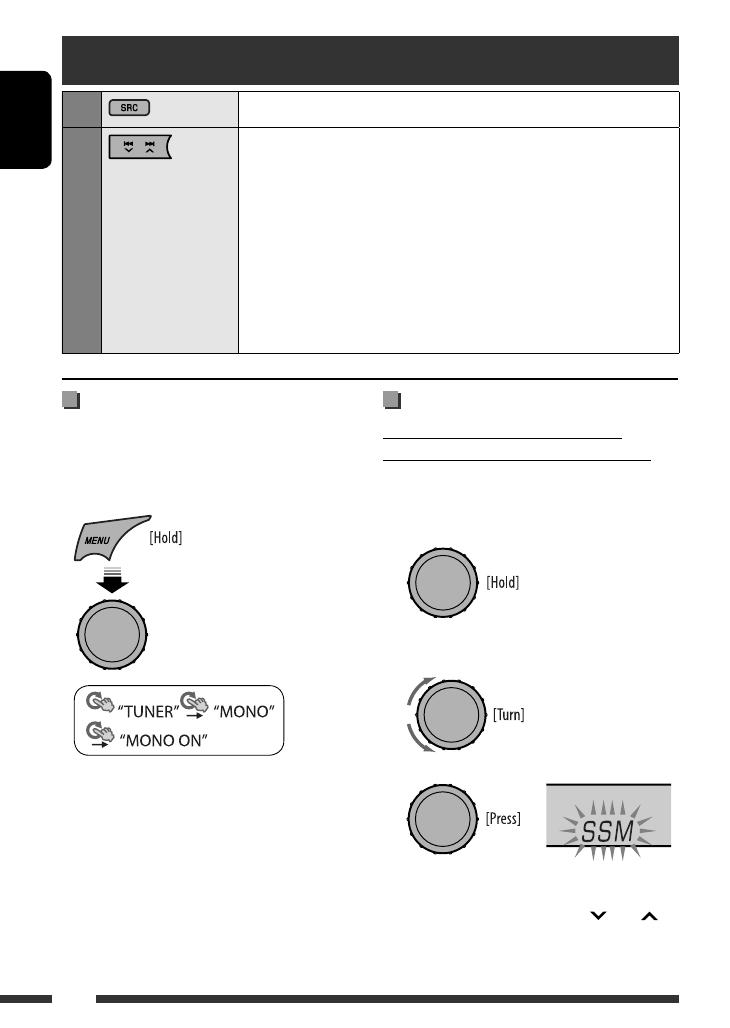
Improving the FM reception
When an FM stereo broadcast is hard to receive,
activate monaural mode for better reception.
• Not applicable when the source is “FM-LO.”
• See also page 18.
Reception improves, but stereo effect will be lost.
To restore the stereo effect, repeat the same
procedure to select “MONO OFF.”
Storing stations in memory
Automatic presetting (FM/FM-LO)—
SSM (Strong-station Sequential Memory)
You can preset up to 12 stations for FM, and 6 stations
for FM-LO.
1 While listening to a station…
2 Select the preset number range you want to
store.
FM:
SSM 01–06, SSM 07–12
FM-LO:
SSM 01–06
3
Local FM stations with the strongest signals are
searched and stored automatically.
• To stop searching, press 4 /¢ .
To preset other 6 stations, repeat from step 1 again.
[Turn] = [Press]
Listening to the radio
1
Select “FM,” “AM,” or “FM-LO.”
2
Search for a station to listen—Auto Search.
When a station is tuned in, searching stops. To stop searching, press the same
button again.
• You can also search for a station manually—Manual Search. Hold either one
of the buttons until “M” flashes on the display, then press it repeatedly.
• When receiving an FM stereo broadcast with sufficient signal strength, the ST
indicator lights up on the display.
Note:
FM: 87.5 MHz – 108.0 MHz
FM-LO: 65.00 MHz – 74.00 MHz
EN02-11_KD-R707[EE]_4.indd 8EN02-11_KD-R707[EE]_4.indd 8 29/1/09 11:11:56 AM29/1/09 11:11:56 AM
ENGLISH
9OPERATIONS
Continued on the next page
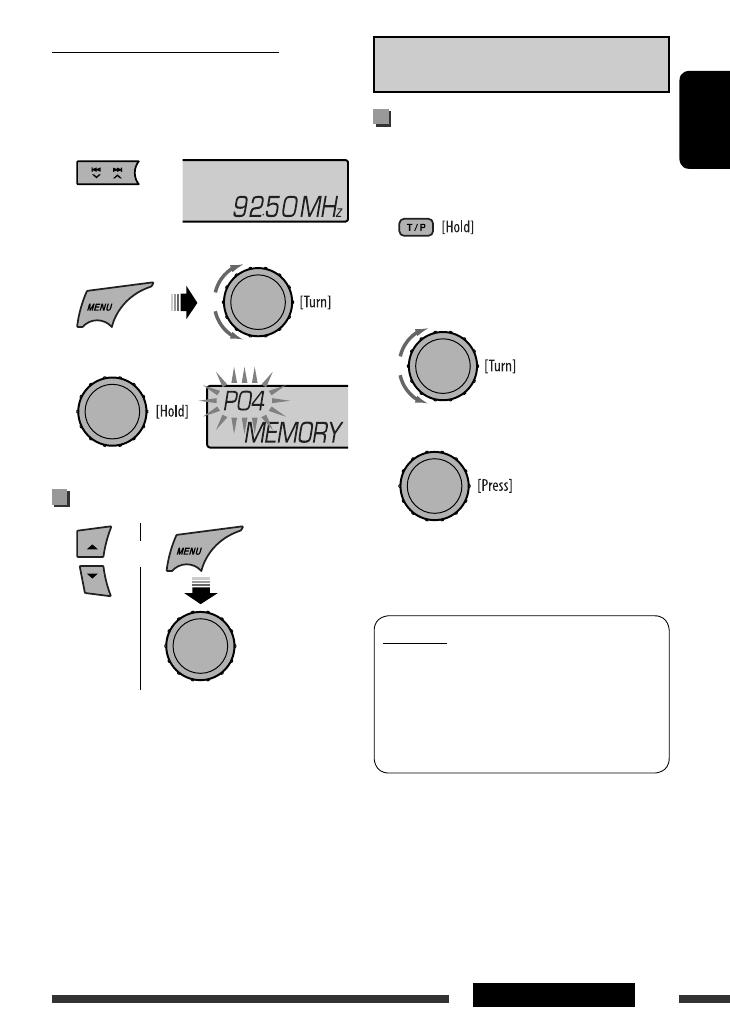
Manual presetting (FM/AM/FM-LO)
You can preset up to 12 stations for FM, 6 stations for
FM-LO, and 6 stations for AM.
Ex.: Storing FM station of 92.50 MHz into preset
number “04.”
1
2 Select preset number “04.”
3
Selecting preset station
[Turn] = [Press]
The following features are available only for FM
Radio Data System stations.
Searching for FM Radio Data
System programme—PTY Search
You can tune in to a station broadcasting your favorite
programme by searching for a PTY code.
1 The last selected PTY code
appears.
2 Select one of your favorite programme types
or a PTY code.
3 Start searching for your favorite programme.
If a station is broadcasting a programme of the
same PTY code as you have selected, that station is
tuned in.
PTY codes
NEWS, AFFAIRS, INFO, SPORT, EDUCATE, DRAMA, CULTURE,
SCIENCE, VARIED, POP M (music), ROCK M (music), EASY
M (music), LIGHT M (music), CLASSICS, OTHER M (music),
WEATHER, FINANCE, CHILDREN, SOCIAL, RELIGION, PHONE
IN, TRAVEL, LEISURE, JAZZ, COUNTRY, NATION M (music),
OLDIES, FOLK M (music), DOCUMENT
or
EN02-11_KD-R707[EE]_4.indd 9EN02-11_KD-R707[EE]_4.indd 9 29/1/09 11:12:02 AM29/1/09 11:12:02 AM
ENGLISH
10
Using the standby receptions
TA Standby Reception
TA Standby Reception allows the unit to switch
temporarily to Traffic Announcement (TA) from any
source other than AM and FM-LO.
The volume changes to the preset TA volume level if the
current level is lower than the preset level (see
page 18).
To activate TA Standby Reception
The TP (Traffic Programme)
indicator either lights up or flashes.
• If the TP indicator lights up, TA Standby Reception is
activated.
• If the TP indicator flashes, TA Standby Reception is
not yet activated. (This occurs when you are listening
to an FM station without the Radio Data System
signals required for TA Standby Reception.)
To activate the reception, tune in to another station
providing these signals. The TP indicator will stop
flashing and remain lit.
To deactivate the TA Standby Reception
The TP indicator goes off.
PTY Standby Reception
PTY Standby Reception allows the unit to switch
temporarily to your favorite PTY programme from any
source other than AM and FM-LO.
To activate and select your favorite PTY code for
PTY Standby Reception, see page 18.
The PTY indicator either lights up or flashes.
• If the PTY indicator lights up, PTY Standby Reception
is activated.
• If the PTY indicator flashes, PTY Standby Reception is
not yet activated.
To activate the reception, tune in to another station
providing these signals. The PTY indicator will stop
flashing and remain lit.
To deactivate the PTY Standby Reception, select
“PTY OFF” for the PTY code (see page 18). The PTY
indicator goes off.
Tracing the same programme—
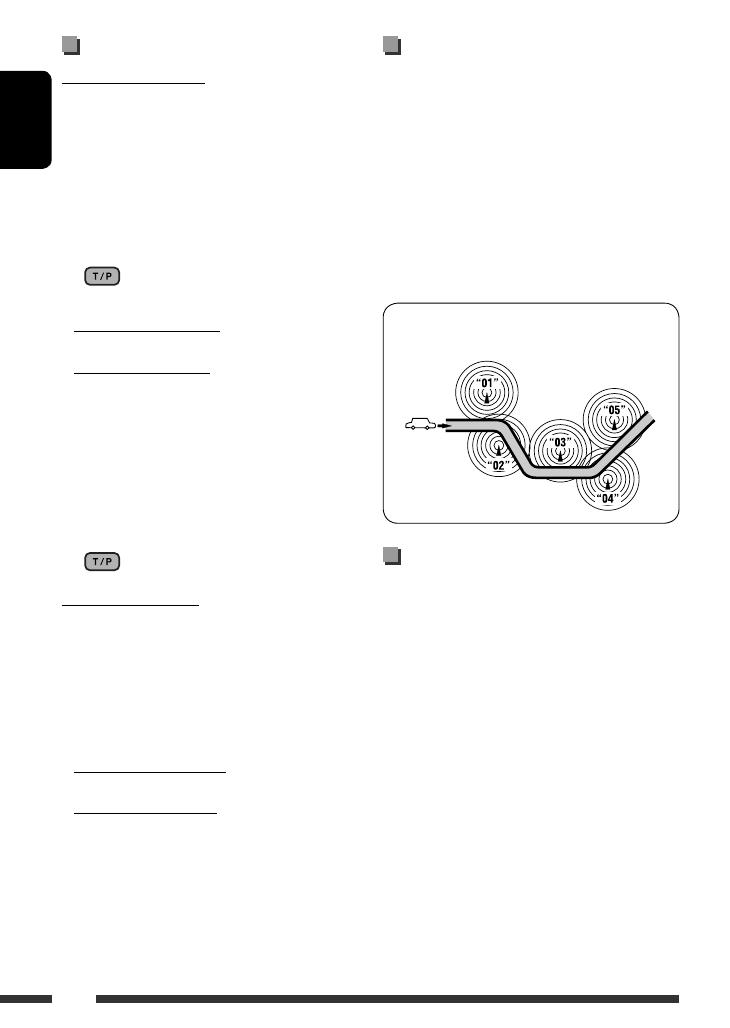
Network-Tracking Reception
When driving in an area where FM reception is not
sufficient enough, this unit automatically tunes in to
another FM Radio Data System station of the same
network, possibly broadcasting the same programme
with stronger signals (see the illustration below).
When shipped from the factory, Network-Tracking
Reception is activated.
To change the Network-Tracking Reception
setting, see “AF-REG” on page 18.
Programme A broadcasting on different frequency areas
(01 – 05)
Automatic station selection—
Programme Search
Usually when you select a preset number, the station
preset in that number is tuned in.
If the signals from the FM Radio Data System preset
station are not sufficient for good reception, this
unit, using the AF data, tunes in to another frequency
possibly broadcasting the same programme as the
original preset station is broadcasting.
• The unit takes some time to tune in to another
station using programme search.
• See also page 18.
EN02-11_KD-R707[EE]_3.indd 10EN02-11_KD-R707[EE]_3.indd 10 23/1/09 11:59:33 AM23/1/09 11:59:33 AM
ENGLISH
11OPERATIONS
Prohibiting disc ejection
To cancel the prohibition, repeat the same
procedure.
Disc/USB operations
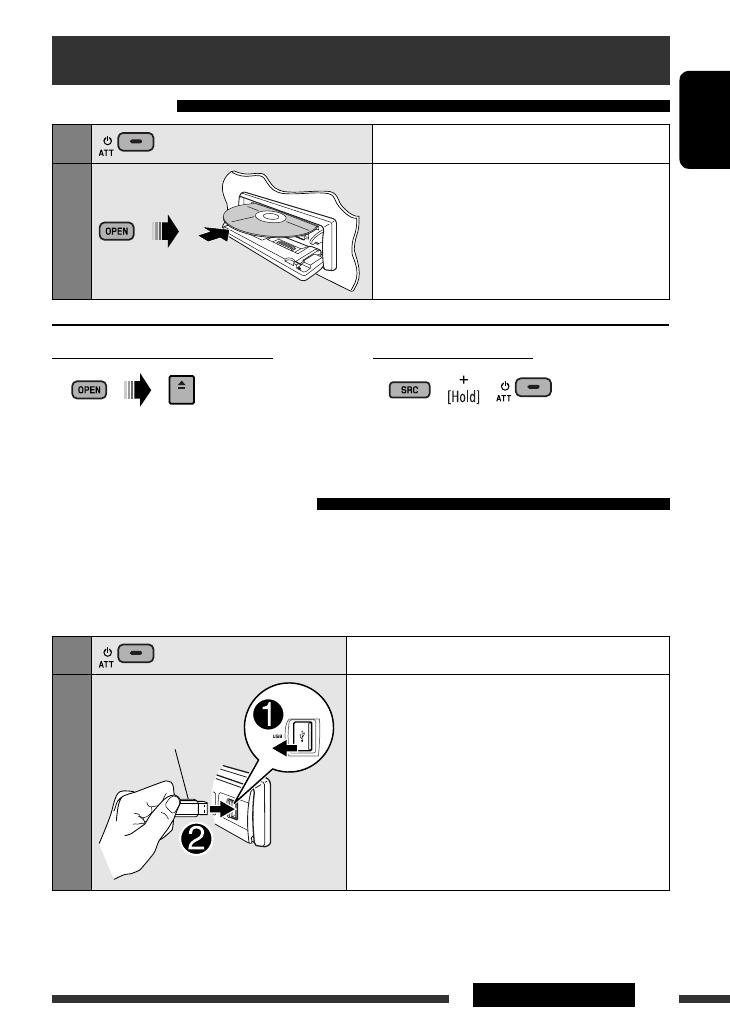
Playing a disc
1
Turn on the power.
2
Insert a disc.
All tracks will be played repeatedly until you change
the source or eject the disc.
Stop playing and ejecting the disc
• “NO DISC” appears. Press SRC to listen to another
playback source.
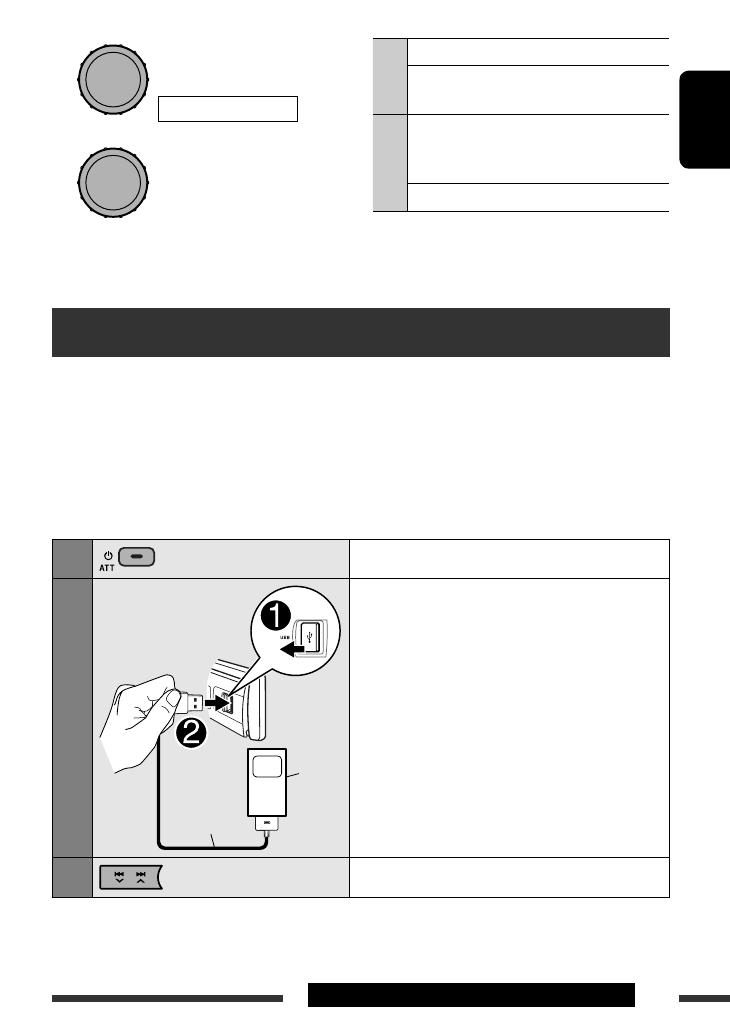
Playing a file on a USB device
This unit can play MP3/WMA files stored on a USB mass storage class device.
You can connect a USB mass storage class device such as a USB memory, Digital Audio Player, portable HDD, etc. to
the unit.
• You can also connect an Apple iPod/iPhone to the USB input jack. For details of the operations, see pages 13
and 14.
1
Turn on the power.
2
Connect a USB.
All tracks will be played repeatedly until you change the
source or disconnect a device.
USB memory
Continued on the next page
EN02-11_KD-R707[EE]_3.indd 11EN02-11_KD-R707[EE]_3.indd 11 23/1/09 11:59:34 AM23/1/09 11:59:34 AM
ENGLISH
12 OPERATIONS
Pressing (or holding) the following buttons allows you
to…
[Press] Pause/resume playback.
MP3/WMA: Select folder
[Press] Select track
[Hold] Reverse/fast-forward track
Selecting a track/folder
• For MP3/WMA discs, select the desired folder,
then the desired track by repeating the control dial
procedures.
• To return to the previous menu, press BACK.
Selecting the playback modes
You can use only one of the following playback modes
at a time.
1
[Turn] = [Press]
Disc/file operations
If a USB device has been attached…
Playback starts from where it has been stopped
previously.
• If a different USB device is currently attached,
playback starts from the beginning.
Stop playing and detaching the USB device
Straightly pull it out from the unit.
• “NO USB” appears. Press SRC to listen to another
playback source.
Cautions:
• Avoid using the USB device if it might hinder your
safety driving.
• Do not pull out and attach the USB device repeatedly
while “READING” is shown on the display.
• Do not start the car engine if a USB device is
connected.
• This unit may not be able to play the files depending
on the type of USB device.
• Operation and power supply may not work as
intended for some USB devices.
• You cannot connect a computer to the USB input
terminal of the unit.
• Make sure all important data has been backed up to
avoid losing the data.
• Do not leave a USB device in the car, expose to direct
sunlight, or high temperature to avoid deformation
or cause damages to the device.
• Some USB devices may not work immediately after
you turn on the power.
• For more details about USB operations, see page 24.
EN12-17_KD-R707[EE]_3.indd 12EN12-17_KD-R707[EE]_3.indd 12 23/1/09 12:00:09 PM23/1/09 12:00:09 PM
ENGLISH
13OPERATIONS & EXTERNAL DEVICES
2
3
REPEAT Ô RANDOM
[Turn] = [Press]
[Turn] = [Press]
REPEAT
TRACK RPT : Repeats current track
FOLDER RPT : MP3/WMA: Repeats current
folder
RANDOM
FOLDER RND : MP3/WMA: Randomly plays
all tracks of current folder,
then tracks of next folders
ALL RND : Randomly plays all tracks
• To cancel repeat play or random play, select
“RPT OFF” or “RND OFF.”
• To return to the previous menu, press BACK.
Listening to the iPod/iPhone
There are 2 control terminals in “USB-IPOD” source.
• “HEAD MODE”: Control by this unit.
• “IPOD MODE”: Control by the connected iPod/iPhone.
Preparation: Select the controlling terminal, “HEAD MODE” or “IPOD MODE” for iPod playback:
• Press and hold BACK button.
• Make the selection from “IPOD SWITCH” setting, see page 20.
The operations explained below are under “HEAD MODE.”
1
Turn on the power.
2
Connect the iPod/iPhone using the USB 2.0
cable (supplied with the iPod/iPhone).
Playback starts automatically.
3
Select a song.
• Disconnecting the iPod/iPhone will stop playback. Press SRC to listen to another playback source.
• For details, refer also to the manual supplied with your iPod/iPhone.
Continued on the next page
USB 2.0 cable
iPod/
iPhone
EN12-17_KD-R707[EE]_3.indd 13EN12-17_KD-R707[EE]_3.indd 13 23/1/09 12:00:13 PM23/1/09 12:00:13 PM
ENGLISH
14
Caution:
• Avoid using the iPod/iPhone if it might hinder your
safety while driving.
• Make sure all important data has been backed up to
avoid losing the data.
Pressing (or holding) the following buttons allows you
to…
[Press] Pause/resume playback.
[Press] Select track
[Hold] Reverse/fast-forward track
Selecting a track from the menu
1 Enter the main menu.
2 Select the desired menu.
PLAYLISTS Ô ARTISTS Ô ALBUMS Ô
SONGS Ô PODCASTS ÔGENRES Ô
COMPOSERS Ô AUDIOBOOKS
3 Select the desired track.
• To return to the previous menu, press BACK.
[Turn] = [Press]
REPEAT Ô RANDOM
[Turn] = [Press]
[Turn] = [Press]
[Turn] = [Press]
Selecting the playback modes
1
2
3
REPEAT
ONE RPT : Functions the same as “Repeat
One” of the iPod.
ALL RPT : Functions the same as “Repeat
All” of the iPod.
RANDOM
ALBUM
RND
: Functions the same as “Shuffle
Albums” of the iPod.
SONG RND : Functions the same as “Shuffle
Songs” of the iPod.
• To cancel repeat play or random play, select “RPT
OFF” or “RND OFF.”
• “ALBUM RND” is not available for some iPod.
• To return to the previous menu, press BACK.
EN12-17_KD-R707[EE]_3.indd 14EN12-17_KD-R707[EE]_3.indd 14 23/1/09 12:00:14 PM23/1/09 12:00:14 PM
ENGLISH
15
EXTERNAL DEVICES
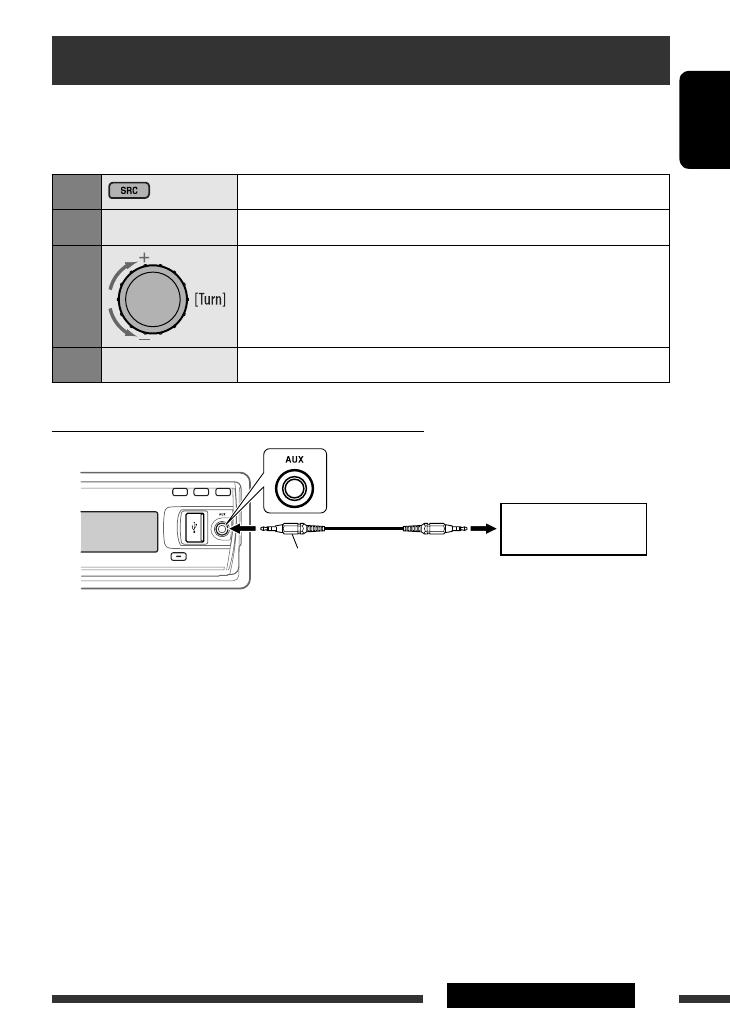
Listening to the other external components
You can connect an external component to AUX (auxiliary) input jack on the control panel.
Preparation: Make sure “AUX ON” is selected in the “SRC SELECT”
= “AUX IN” setting, see page 20.
1
Select “AUX IN.”
2
—
Turn on the connected component and start playing the source.
3
Adjust the volume.
4
—
Adjust the sound as you want (see page 16).
Connecting an external component to the AUX input jack
3.5 mm stereo mini plug
(not supplied)
Portable audio player, etc.
EN12-17_KD-R707[EE]_3.indd 15EN12-17_KD-R707[EE]_3.indd 15 23/1/09 12:00:15 PM23/1/09 12:00:15 PM
ENGLISH
16
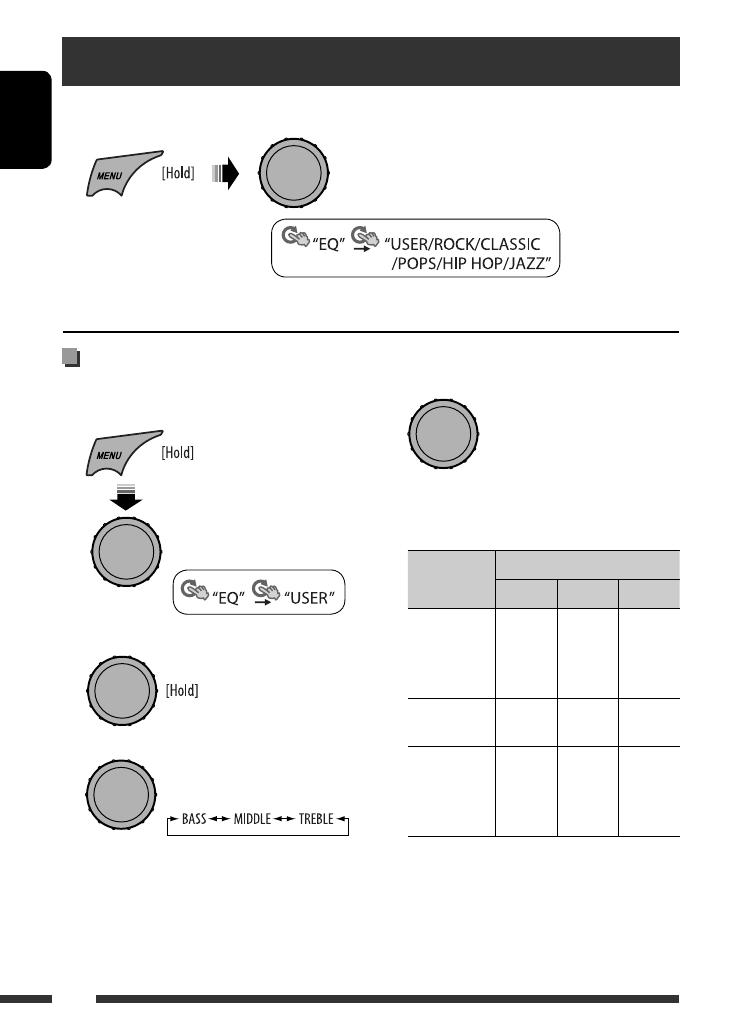
4 Adjust the sound elements of the selected
tone.
1 Adjust the frequency.
2 Adjust the level.
3 Adjust the Q-slope.
Sound
elements
Range/selectable items
BASS MIDDLE TREBLE
Frequency 60 Hz
80 Hz
100 Hz
200 Hz
0.5 kHz
1.0 kHz
1.5 kHz
2.5 kHz
10.0 kHz
12.5 kHz
15.0 kHz
17.5 kHz
Level –06 to
+06
–06 to
+06
–06 to
+06
Q Q1.0
Q1.25
Q1.5
Q2.0
Q0.75
Q1.0
Q1.25
Fix
5 Repeat steps 3 and 4 to adjust other sound
characteristics.
The adjustment made will be stored automatically.
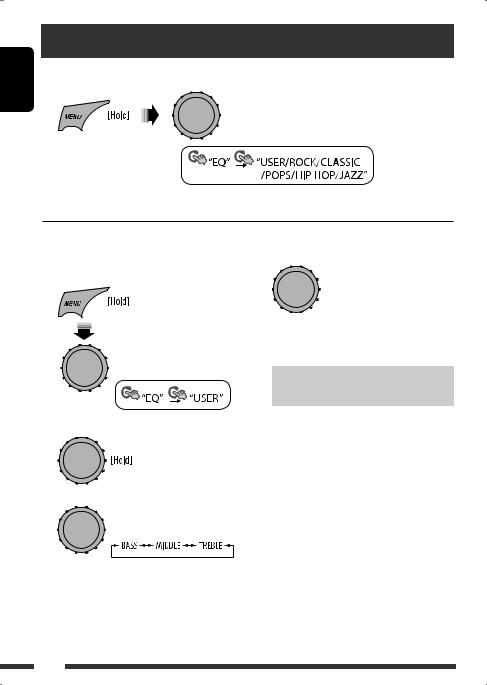
Storing your own sound mode
You can store your own adjustments in memory.
1 Select “USER.”
2 While “USER” is shown on the display…
3 Select a tone.
You can select a preset sound mode suitable to the music genre.
• See also page 17.
• See the following for “USER” settings.
Selecting a preset sound mode
[Turn] = [Press]
[Turn] = [Press]
[Turn] = [Press]
[Turn] = [Press]
EN12-17_KD-R707[EE]_3.indd 16EN12-17_KD-R707[EE]_3.indd 16 23/1/09 12:00:15 PM23/1/09 12:00:15 PM
ENGLISH
17
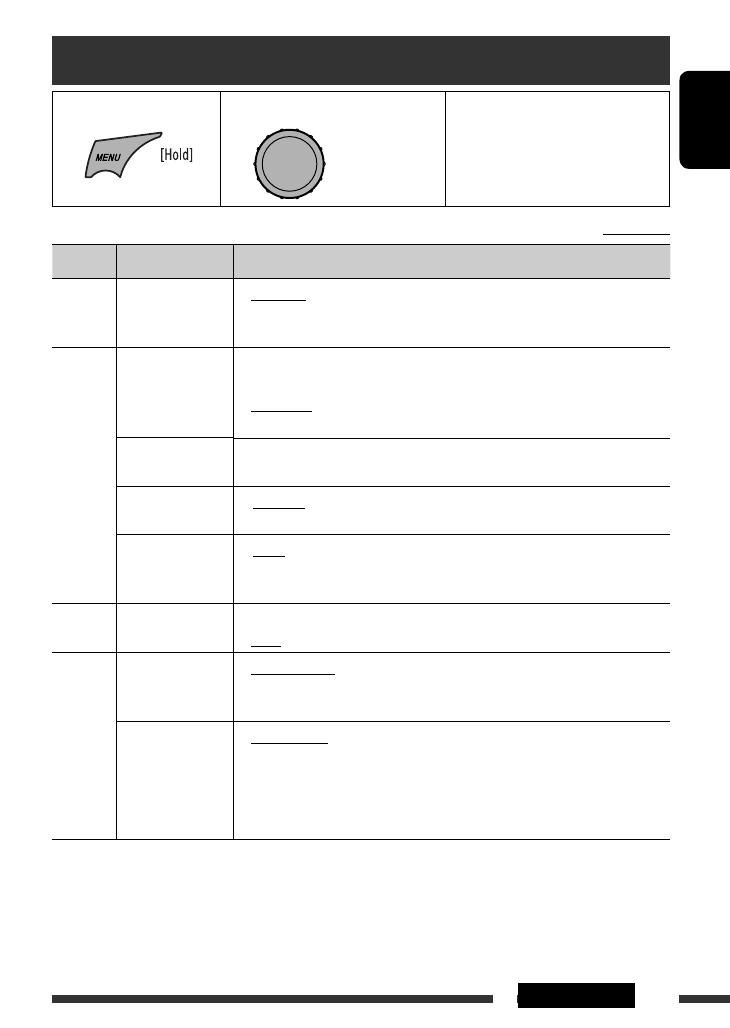
SETTINGS
Initial: Underlined
Menu operations
1 Call up the menu. 2 Select the desired item. 3 Repeat step 2 if necessary.
• To return to the previous menu,
press BACK.
• To exit from the menu, press
DISP or MENU.
Category
Menu items Selectable settings, [reference page]
DEMO
DEMO
Display
demonstration
• DEMO ON
• DEMO OFF
: Display demonstration will be activated automatically if
no operation is done for about 20 seconds, [7].
: Cancels.
CLOCK
CLOCK DISP *
1
Clock display
• CLOCK ON
• CLOCK OFF
: Clock time is shown on the display at all times when the
power is turned off.
: Cancels; pressing DISP will show the clock time for about
5 seconds when the power is turned off, [7].
CLOCK SET
Clock setting
: Adjust the hour, then the minute, [7].
(Initial: 0:00)
24H/12H
Time display mode
• 24 HOUR
• 12 HOUR
: See also page 7 for setting.
CLOCK ADJ *
2
Clock adjustment
• AUTO
• OFF
: The built-in clock is automatically adjusted using the CT
(clock time) data in the Radio Data System signal.
: Cancels.
EQ
EQ
Equalizer
: Select a preset sound mode suitable to the music genre.
USER, ROCK, CLASSIC, POPS, HIP HOP, JAZZ
DISPLAY
DIMMER
Dimmer
• DIMMER AUTO
• DIMMER ON
• DIMMER OFF
: Dims the display when you turn on the headlights. *
3
: Dims the display and button illumination.
: Cancels.
SCROLL*
4
Scroll
• SCROLL ONCE
• SCROLL AUTO
• SCROLL OFF
: Scrolls the displayed information once.
: Repeats scrolling (at 5-second intervals).
: Cancels.
Pressing DISP for more than one second can scroll the display regardless of the
setting.
*
1
If the power supply is not interrupted by turning off the ignition key of your car, it is recommended to select
“CLOCK OFF” to save the car’s battery.
*
2
Takes effect only when CT data is received.
*
3
The illumination control lead connection is required. (See “Installation/Connection Manual.”)
*
4
Some characters or symbols will not be shown correctly (or will be blanked) on the display.
[Turn] = [Press]
Continued on the next page
EN12-17_KD-R707[EE]_3.indd 17EN12-17_KD-R707[EE]_3.indd 17 23/1/09 12:00:16 PM23/1/09 12:00:16 PM
ENGLISH
18
Category
Menu items Selectable settings, [reference page]
DISPLAY
TAG DISPLAY
Tag display
• TAG ON
• TAG OFF
: Shows the Tag information while playing MP3/WMA
tracks.
: Cancels.
TUNER
AF-REG *
5
Alternative
frequency/
regionalization
reception
• AF ON
• AF-REG ON
• OFF
: When the currently received signals become weak, the
unit switches to another station (the programme may
differ from the one currently received), [10].
• The AF indicator lights up.
: When the currently received signals become weak, the
unit switches to another station broadcasting the same
programme.
• The AF and REG indicators light up.
: Cancels.
PTY-STANDBY *
5
PTY standby
PTY OFF, PTY
codes
: Activates PTY Standby Reception with one of the PTY
codes, [9].
TA VOLUME *
5
Traffic
announcement
volume
VOLUME 00
– VOLUME 50
(or VOLUME 00
– VOLUME 30)*
6
: (Initial: VOLUME 15)
P-SEARCH *
5
Programme search
• SEARCH ON
• SEARCH OFF
: Activates Programme Search, [10].
: Cancels.
MONO *
7
Monaural mode
• MONO ON
• MONO OFF
: Activate monaural mode to improve FM reception, but
stereo effect will be lost, [8].
: Restore the stereo effect.
IF BAND
Intermediate
frequency band
• AUTO
• WIDE
: Increases the tuner selectivity to reduce interference
noises between adjacent stations. (Stereo effect may be
lost.)
: Subject to interference noises from adjacent stations, but
sound quality will not be degraded and the stereo effect
will remain.
COLOR
COLOR 01
— COLOR 29,
USER
: Select one of the preset or user color for display and button (except T/P/DISP/
OPEN/ ) illumination.
(For customized color settings, “USER,” see page 21.)
*
5
Only for FM Radio Data System stations.
*
6
Depends on the amplifier gain control.
*
7
Displayed only when the source is “FM.”
EN18-25_KD-R707[EE]_3.indd 18EN18-25_KD-R707[EE]_3.indd 18 23/1/09 11:58:52 AM23/1/09 11:58:52 AM
ENGLISH
19
SETTINGS
Category
Menu items Selectable settings, [reference page]
MENU
COLOR
MENU COLOR
Menu color
• ON
• OFF
: Changes the display and button (except T/P/DISP/
OPEN/ ) illumination during menu, list search and
playback mode operations.
: Cancels.
AUDIO
FADER *
8,
*
9
Fader
R06 – F06 : Adjust the front and rear speaker output balance.
(Initial: 00)
BALANCE *
9
Balance
L06 – R06 : Adjust the left and right speaker output balance.
(Initial: 00)
LOUD
Loudness
• LOUD ON
• LOUD OFF
: Boost low and high frequencies to produce a
well-balanced sound at a low volume level.
: Cancels.
VOL ADJUST
Volume adjust
VOL ADJ –05 —
VOL ADJ +05
(Initial: VOL ADJ
00)
: Preset the volume adjustment level of each source
(except FM), compared to the FM volume level. The
volume level will automatically increase or decrease
when you change the source.
• Before making an adjustment, select the source you
want to adjust.
• “VOL ADJ FIX” appears on the display if “FM/FM-LO” is
selected as the source.
L/O MODE
Line output mode
• SUB.W
• REAR
: Select if the REAR LINE OUT terminals are used for
connecting a subwoofer (through an external amplifier).
: Select if the REAR LINE OUT terminals are used for
connecting the speakers (through an external amplifier).
SUB.W FREQ *
10
Subwoofer cutoff
frequency
• LOW
• MID
• HIGH
: Frequencies lower than 72 Hz are sent to the subwoofer.
: Frequencies lower than 111 Hz are sent to the subwoofer.
: Frequencies lower than 157 Hz are sent to the subwoofer.
SUB.W LEVEL *
10
Subwoofer level
SUB.W 00
— SUB.W 08
: Adjust the subwoofer output level.
(Initial: SUB.W 04)
*
8
If you are using a two-speaker system, set the fader level to “00.”
*
9
This adjustment will not affect the subwoofer output.
*
10
Displayed only when “L/O MODE” is set to “SUB.W.”
Continued on the next page
EN18-25_KD-R707[EE]_3.indd 19EN18-25_KD-R707[EE]_3.indd 19 23/1/09 11:58:57 AM23/1/09 11:58:57 AM
ENGLISH
20
Category
Menu items Selectable settings, [reference page]
AUDIO
BEEP
Key touch tone
• BEEP ON
• BEEP OFF
: Activates the key touch tone.
: Deactivates the key touch tone.
TEL MUTING
Telephone muting
• MUTING 1/
MUTING 2
• MUTING OFF
: Select either one which mutes the sounds while using a
cellular phone.
: Cancels.
AMP GAIN *
11
Amplifier gain
control
• LOW POWER
• HIGH POWER
: VOLUME 00 – VOLUME 30 (Select if the maximum power
of each speaker is less than 50 W to prevent damaging
the speaker.)
: VOLUME 00 – VOLUME 50
SRC SELECT
AM *
12
AM station
• AM ON
• AM OFF
: Enable “AM” in source selection, [4].
: Disable “AM” in source selection.
AUX IN *
13
Auxiliary input
• AUX ON
• AUX OFF
: Enable “AUX IN” in source selection, [4].
: Disable “AUX IN” in source selection.
AUDIOBOOKS
AUDIOBOOKS *
14
Speed control of
“Audiobooks”
• NORMAL
• FASTER
• SLOWER
: You can select the playback speed of the “Audiobooks”
sound file in your iPod/iPhone.
• Initial selected item depends on your iPod/iPhone setting.
IPOD
SWITCH
IPOD SWITCH *
15
iPod/iPhone control
• HEAD MODE
• IPOD MODE
: Controls iPod playback through the unit.
: Controls iPod playback through the iPod/iPhone.
*
11
The volume level automatically changes to “VOLUME 30” if you change to “LOW POWER” with the volume level
set higher than “VOLUME 30.”
*
12
Displayed only when any source other than “AM” is selected.
*
13
Displayed only when any source other than “AUX IN” is selected.
*
14
Displayed only when an iPod/iPhone playback is controlled from the unit.
*
15
Displayed only when “USB-IPOD” is selected as the source and “IPOD MODE” is available for the connected iPod/
iPhone (see page 24).
EN18-25_KD-R707[EE]_3.indd 20EN18-25_KD-R707[EE]_3.indd 20 23/1/09 11:58:58 AM23/1/09 11:58:58 AM

Having TROUBLE with operation?
Please reset your unit
Refer to page of How to reset your unit
Затруднения при эксплуатации?
Пожалуйста, перезагрузите Ваше устройство
Для получения информации о перезагрузке Вашего устройства обратитесь на соответствующую страницу
Маєте ПРОБЛЕМУ з функціонуванням?
Повторно налаштуйте систему
Див. сторінку “Як повторно налаштувати пристрій”
Bіктор Компані оф Джепен Лімітед
12, 3-чоме, Морійя-чо, Канагава-ку, Йокогама, Канагава 221-8520, Японія
|
EN, RU, UK |
|
|
© 2009 Victor Company of Japan, Limited |
0109DTSMDTJEIN |
|
CD RECEIVER |
ENGLISH |
|
РЕСИВЕР С ПРОИГРЫВАТЕЛЕМ КОМПАКТ-ДИСКОВ |
РУCCKИЙ |
|
KD-R707 |
|
|
ПРИЙМАЧ З ПРОГРАВАЧЕМ КОМПАКТ-ДИСКІВ |
|
|
УКРАЇНА |
В соответствии с Законом Российской Федерации “О защите прав потребителей” срок службы (годности) данного товара “по истечении которого он может представлять опасность для жизни, здоровья потребителя, причинять вред его имуществу или окружающей среде” составляет семь (7) лет со дня производства. Этот срок является временем, в течение которого потребитель данного товара может безопасно им пользоваться при условии соблюдения инструкции по эксплуатации данного товара, проводя необходимое обслуживание, включающее замену расходных материалов и/или соответствующее ремонтное обеспечение в специализированном сервисном центре.
Дополнительные косметические материалы к данному товару, поставляемые вместе с ним, могут храниться в течение двух (2) лет со дня его производства.
Срок службы (годности), кроме срока хранения дополнительных косметических материалов, упомянутых в предыдущих двух пунктах, не затрагивает никаких других прав потребителя, в частности, гарантийного свидетельства JVC, которое он может получить в соответствии с законом о правах потребителя или других законов, связанных с ним.
For canceling the display demonstration, see page 7.
Информацию об отмене демонстрации функций дисплея см. на стр. 7. Інформацію щодо відміни демонстрації функцій дисплею див. на стор. 7.
For installation and connections, refer to the separate manual.
Указания по установке и выполнению соединений приводятся в отдельной инструкции. Вказівки по встановленню та виконанню підключень наведені у окремій інструкції.
INSTRUCTIONS
ИНСТРУКЦИИ ПО ЭКСПЛУАТАЦИИ ІНСТРУКЦІЇ
GET0597-001A
[EE]
ENGLISH
Thank you for purchasing a JVC product.
Please read all instructions carefully before operation, to ensure your complete understanding and to obtain the best possible performance from the unit.
IMPORTANT FOR LASER PRODUCTS
1.CLASS 1 LASER PRODUCT
2.CAUTION: Do not open the top cover. There are no user serviceable parts inside the unit; leave all servicing to
qualified service personnel.
3. CAUTION: Visible and/or invisible class 1M laser radiation when open. Do not view directly with optical instruments.
4. REPRODUCTION OF LABEL: CAUTION LABEL, PLACED OUTSIDE THE UNIT.
[European Union only]
Available characters on the display
Available characters
Display indications
This mark is used to indicate…
Turn the control dial to make a selection, then press to confirm the selection.
Warning:
If you need to operate the unit while driving, be sure to look around carefully or you may be involved in a traffic accident.
Caution on volume setting:
Digital devices (CD/USB) produce very little noise compared with other sources. Lower the volume before playing these digital sources to avoid damaging the speakers by sudden increase of the output level.
For safety…
•Do not raise the volume level too much, as this will block outside sounds, making driving dangerous.
•Stop the car before performing any complicated operations.
Temperature inside the car…
If you have parked the car for a long time in hot or cold weather, wait until the temperature in the car becomes normal before operating the unit.
2

 Detaching the control panel
Avoid touching the connectors.
 Attaching the control panel
 How to reset your unit
• Your preset adjustments will also be erased.
 How to forcibly eject a disc
•“PLEASE” and “EJECT“ appear alternately on the display.
•You can forcibly eject the loaded disc even if the disc is locked. To lock/unlock the disc, see page 11.
•Be careful not to drop the disc when it ejects.
•If this does not work, reset your unit.
|
CONTENTS |
|
|
Detaching the control panel……………………. |
3 |
|
Attaching the control panel ……………………. |
3 |
|
How to reset your unit …………………………… |
3 |
|
How to forcibly eject a disc……………………… |
3 |
|
OPERATIONS |
|
|
Basic operations……………………………………. |
4 |
|
• Using the control panel…………………………. |
4 |
|
• Using the remote controller (RM-RK50)…… |
6 |
|
Preparation………………………………………….. |
7 |
|
Listening to the radio…………………………….. |
8 |
|
Disc/USB operations………………………………. |
11 |
|
• Playing a disc………………………………………. |
11 |
|
• Playing a file on a USB device ………………… |
11 |
|
• Disc/file operations………………………………. |
12 |
|
EXTERNAL DEVICES |
|
|
Listening to the iPod/iPhone ………………….. |
13 |
|
Listening to the other external |
|
|
components………………………………………. |
15 |
|
SETTINGS |
|
|
Selecting a preset sound mode ……………….. |
16 |
|
Menu operations…………………………………… |
17 |
|
Color settings ……………………………………….. |
21 |
|
REFERENCES |
|
|
More about this unit ……………………………… |
22 |
|
Troubleshooting……………………………………. |
26 |
|
Maintenance………………………………………… |
29 |
|
Specifications……………………………………….. |
30 |
ENGLISH
3

ENGLISH
Basic operations
Using the control panel 
1• FM/AM/FM-LO: Select preset station.
• CD/USB: Select folder.
2Select the source.
FM = CD*2 = USB/USB-IPOD*2,*3 =
AUX IN*4 = AM*4 = FM-LO = (back to the beginning)
3• Enter list operations.
•Enter Menu setting [Hold].
•USB-IPOD: Enter the main menu.
4• Control the volume*5 or select items [Turn].
•Confirm the selection [Press].
•FM/FM-LO: Enter SSM preset mode [Hold].
•CD/USB/USB-IPOD: Pause/resume playback*5 [Press].
•CD/USB/USB-IPOD: Enter playback mode
[Hold].
5 Display window
6 USB (Universal Serial Bus) input jack
7 • Activate/deactivate TA Standby Reception.
•Enter PTY Searching mode [Hold]. 8 Change the display information. 9 Flip down the control panel.
•To eject the disc, flip down the control panel then press 0 on the unit.
p• FM/AM/FM-LO: Search for station.
• CD/USB/USB-IPOD: Select track.
q• Return to the previous menu.
•USB-IPOD: Switch the setting between “HEAD MODE” and “IPOD MODE”*6 [Hold].
w Select the display and button illumination color.
e• Turn on the power.
•Attenuate the sound (if the power is on).
•Turn off the power [Hold].
r Remote sensor
t AUX (auxiliary) input jack
*1 Also known as “Control dial” in this manual.
*2 You cannot select these sources if they are not ready or not connected.
*3 When connecting the iPod/iPhone to the USB input jack for the first time, “USB” appears on the display first, then “USB-IPOD.”
*4 You cannot select these sources if they were disabled in the Menu (see “SRC SELECT” in “Menu operations” on page 20).
*5 You can still adjust the volume during pause when the selected source is CD/USB/USB-IPOD.
Before resume playback, check to be sure that you have not raise the volume level too much.
*6 You can use this function only when “IPOD MODE” is available for the connected iPod (see page 24).
4
1 Tr (track) indicator
2Source display / Track number / Folder number / Time countdown indicator / Setting and list operation information
3 USB indicator
4 iPod indicator
5Playback mode / item indicators— RND (random),  (disc),
 (folder), RPT (repeat)
6 ST (stereo) indicator
7 LOUD (loudness) indicator
8 Radio Data System indicators—AF, REG, TP, PTY
9 Main display
p TAG (Tag information) indicator
qDisc/device information indicators— (track/ file),
  (folder)
wMenu hierarchy position indicator— (bottom),
  (top),
 (middle)
OPERATIONS 5

ENGLISH
Using the remote controller (RM-RK50) 
Installing the lithium coin battery (CR2025)
Caution:
•Danger of explosion if battery is incorrectly replaced. Replace only with the same or equivalent type.
•Battery shall not be exposed to excessive heat such as sunshine, fire, or the like.
If the effectiveness of the remote controller decreases, replace the battery.
Before using the remote controller:
•Aim the remote controller directly at the remote sensor on the unit.
•DO NOT expose the remote sensor to bright light (direct sunlight or artificial lighting).
Remote sensor
1• Turns the power on if pressed briefly or attenuates the sound when the power is on.
•Turns the power off if pressed and held.
2• Changes the preset stations.
•Changes the folder of the MP3/WMA. 3 Adjusts the volume level.
4 Selects the sound mode.
5 Selects the source.
6• Searches for stations if pressed briefly.
•Fast-forwards or reverses the track if pressed and held.
•Changes the tracks if pressed briefly.
Warning (to prevent accidents and damage):
•Do not install any battery other than CR2025 or its equivalent.
•Do not leave the remote controller in a place (such as dashboards) exposed to direct sunlight for a long time.
•Store the battery in a place where children cannot reach.
•Do not recharge, short, disassemble, heat the battery, or dispose of it in a fire.
•Do not leave the battery with other metallic materials.
•Do not poke the battery with tweezers or similar tools.
•Wrap the battery with tape and insulate when throwing away or saving it.
6

Preparation
 Canceling the display demonstration and setting the clock
• See also page 17.
|
1 |
Turn on the power. |
|
2 |
Cancel the display demonstrations |
|
Press and hold until the |
Select “DEMO,” then “DEMO OFF.” |
|
Set the clock |
|
|
main menu is called up. |
Select “CLOCK” = “CLOCK SET.” |
|
Adjust the hour, then press control dial once to proceed to |
|
|
[Turn] = [Press] |
adjust the minute. |
•Repeat this procedure. Select “24H/12H,” then “24 HOUR” or “12 HOUR.”
•To return to the previous menu, press BACK.
Changing the display information
When the power is turned off: The current clock time is displayed if “CLOCK DISP” is set to “CLOCK OFF,” (see page 17).
When the power is turned on: The display information of the current source changes as follows:
|
FM/AM/FM-LO |
Station Frequency = Clock = (back to the beginning) |
|
|
FM Radio Data |
Station name (PS) = Station Frequency = Programme type (PTY) = Clock = |
|
|
System |
(back to the beginning) |
|
|
CD |
Audio CD/CD Text: Disc title/performer*1 = Track title*1 = Current track number |
|
|
with the elapsed playing time = Current track number with the |
||
|
clock time = (back to the beginning) |
||
|
CD/USB/USB-IPOD |
MP3/WMA: |
Album name/performer (folder name)*2,*3 = Track title (file |
|
name)*2,*3 = Current track number with the elapsed playing |
||
|
time = Current track number with the clock time = (back to |
||
|
the beginning) |
*1 If the current disc is an audio CD, “NO NAME” appears.
*2 If an MP3/WMA file does not have Tag information or “TAG DISPLAY” is set to “TAG OFF” (see page 18), folder name and file name appear.
*3 Not applicable for “USB-IPOD.”
ENGLISH
OPERATIONS 7

ENGLISH
Listening to the radio
|
1 |
Select “FM,” “AM,” or “FM-LO.” |
||
|
2 |
Search for a station to listen—Auto Search. |
||
|
When a station is tuned in, searching stops. To stop searching, press the same |
|||
|
button again. |
|||
|
• You can also search for a station manually—Manual Search. Hold either one |
|||
|
of the buttons until “M” flashes on the display, then press it repeatedly. |
|||
|
• When receiving an FM stereo broadcast with sufficient signal strength, the ST |
|||
|
indicator lights up on the display. |
|||
|
Note: |
|||
|
FM: |
87.5 MHz – 108.0 MHz |
||
|
FM-LO: 65.00 MHz – 74.00 MHz |
|||
 Improving the FM reception
When an FM stereo broadcast is hard to receive, activate monaural mode for better reception.
•Not applicable when the source is “FM-LO.”
•See also page 18.
[Turn] = [Press]
Reception improves, but stereo effect will be lost.
To restore the stereo effect, repeat the same procedure to select “MONO OFF.”
 Storing stations in memory
Automatic presetting (FM/FM-LO)— SSM (Strong-station Sequential Memory)
You can preset up to 12 stations for FM, and 6 stations for FM-LO.
1 While listening to a station…
2Select the preset number range you want to store.
FM:
SSM 01–06, SSM 07–12
FM-LO:
SSM 01–06
3
Local FM stations with the strongest signals are searched and stored automatically.
• To stop searching, press 4  /¢
/¢  .
.
To preset other 6 stations, repeat from step 1 again.
8

Manual presetting (FM/AM/FM-LO)
You can preset up to 12 stations for FM, 6 stations for FM-LO, and 6 stations for AM.
Ex.: Storing FM station of 92.50 MHz into preset number “04.”
1 
2 Select preset number “04.”
The following features are available only for FM Radio Data System stations.
 Searching for FM Radio Data System programme—PTY Search
You can tune in to a station broadcasting your favorite programme by searching for a PTY code.
|
1 |
The last selected PTY code |
|
|
appears. |
2Select one of your favorite programme types or a PTY code.
ENGLISH
3
 Selecting preset station
or
[Turn] = [Press]
3 Start searching for your favorite programme.
If a station is broadcasting a programme of the same PTY code as you have selected, that station is tuned in.
PTY codes
NEWS, AFFAIRS, INFO, SPORT, EDUCATE, DRAMA, CULTURE, SCIENCE, VARIED, POP M (music), ROCK M (music), EASY M (music), LIGHT M (music), CLASSICS, OTHER M (music), WEATHER, FINANCE, CHILDREN, SOCIAL, RELIGION, PHONE IN, TRAVEL, LEISURE, JAZZ, COUNTRY, NATION M (music), OLDIES, FOLK M (music), DOCUMENT
Continued on the next page
OPERATIONS 9

ENGLISH
 Using the standby receptions
TA Standby Reception
TA Standby Reception allows the unit to switch temporarily to Traffic Announcement (TA) from any source other than AM and FM-LO.
The volume changes to the preset TA volume level if the current level is lower than the preset level (see
page 18).
To activate TA Standby Reception
The TP (Traffic Programme) indicator either lights up or flashes.
•If the TP indicator lights up, TA Standby Reception is activated.
•If the TP indicator flashes, TA Standby Reception is not yet activated. (This occurs when you are listening to an FM station without the Radio Data System signals required for TA Standby Reception.)
To activate the reception, tune in to another station providing these signals. The TP indicator will stop flashing and remain lit.
To deactivate the TA Standby Reception
The TP indicator goes off.
PTY Standby Reception
PTY Standby Reception allows the unit to switch temporarily to your favorite PTY programme from any source other than AM and FM-LO.
To activate and select your favorite PTY code for PTY Standby Reception, see page 18.
The PTY indicator either lights up or flashes.
•If the PTY indicator lights up, PTY Standby Reception is activated.
•If the PTY indicator flashes, PTY Standby Reception is not yet activated.
To activate the reception, tune in to another station providing these signals. The PTY indicator will stop flashing and remain lit.
To deactivate the PTY Standby Reception, select “PTY OFF” for the PTY code (see page 18). The PTY indicator goes off.
 Tracing the same programme— Network-Tracking Reception
When driving in an area where FM reception is not sufficient enough, this unit automatically tunes in to another FM Radio Data System station of the same network, possibly broadcasting the same programme with stronger signals (see the illustration below).
When shipped from the factory, Network-Tracking Reception is activated.
To change the Network-Tracking Reception setting, see “AF-REG” on page 18.
Programme A broadcasting on different frequency areas (01 – 05)
 Automatic station selection— Programme Search
Usually when you select a preset number, the station preset in that number is tuned in.
If the signals from the FM Radio Data System preset station are not sufficient for good reception, this unit, using the AF data, tunes in to another frequency possibly broadcasting the same programme as the original preset station is broadcasting.
•The unit takes some time to tune in to another station using programme search.
•See also page 18.
10
![]()
Disc/USB operations
Playing a disc 
|
1 |
Turn on the power. |
|
2 |
Insert a disc. |
|
All tracks will be played repeatedly until you change |
|
|
the source or eject the disc. |
ENGLISH
|
Stop playing and ejecting the disc |
Prohibiting disc ejection |
||||
•“NO DISC” appears. Press SRC to listen to another playback source.
To cancel the prohibition, repeat the same procedure.
Playing a file on a USB device 
This unit can play MP3/WMA files stored on a USB mass storage class device.
You can connect a USB mass storage class device such as a USB memory, Digital Audio Player, portable HDD, etc. to the unit.
•You can also connect an Apple iPod/iPhone to the USB input jack. For details of the operations, see pages 13 and 14.
Turn on the power.
Connect a USB.
All tracks will be played repeatedly until you change the
|
USB memory |
source or disconnect a device. |
Continued on the next page
OPERATIONS 11
ENGLISH
If a USB device has been attached…
Playback starts from where it has been stopped previously.
•If a different USB device is currently attached, playback starts from the beginning.
Stop playing and detaching the USB device
Straightly pull it out from the unit.
•“NO USB” appears. Press SRC to listen to another playback source.
Cautions:
•Avoid using the USB device if it might hinder your safety driving.
•Do not pull out and attach the USB device repeatedly while “READING” is shown on the display.
•Do not start the car engine if a USB device is connected.
•This unit may not be able to play the files depending on the type of USB device.
•Operation and power supply may not work as intended for some USB devices.
•You cannot connect a computer to the USB input terminal of the unit.
•Make sure all important data has been backed up to avoid losing the data.
•Do not leave a USB device in the car, expose to direct sunlight, or high temperature to avoid deformation or cause damages to the device.
•Some USB devices may not work immediately after you turn on the power.
•For more details about USB operations, see page 24.
Disc/file operations 
Pressing (or holding) the following buttons allows you
to…
[Press] Pause/resume playback.
MP3/WMA: Select folder
|
[Press] |
Select track |
|
[Hold] |
Reverse/fast-forward track |
 Selecting a track/folder
[Turn] = [Press]
•For MP3/WMA discs, select the desired folder, then the desired track by repeating the control dial procedures.
•To return to the previous menu, press BACK.
 Selecting the playback modes
You can use only one of the following playback modes at a time.
1
12 OPERATIONS

2
[Turn] = [Press]
REPEAT Ô RANDOM
3
[Turn] = [Press]
|
REPEAT |
TRACK RPT : Repeats current track |
||
|
FOLDER RPT : MP3/WMA: Repeats current |
|||
|
folder |
|||
|
RANDOM |
FOLDER RND : MP3/WMA: Randomly plays |
||
|
all tracks of current folder, |
|||
|
then tracks of next folders |
|||
|
ALL RND |
: Randomly plays all tracks |
||
• To cancel repeat play or random play, select “RPT OFF” or “RND OFF.”
• To return to the previous menu, press BACK.
Listening to the iPod/iPhone
There are 2 control terminals in “USB-IPOD” source.
•“HEAD MODE”: Control by this unit.
•“IPOD MODE”: Control by the connected iPod/iPhone.
Preparation: Select the controlling terminal, “HEAD MODE” or “IPOD MODE” for iPod playback:
•Press and hold BACK button.
•Make the selection from “IPOD SWITCH” setting, see page 20.
The operations explained below are under “HEAD MODE.”
|
1 |
Turn on the power. |
|
2 |
Connect the iPod/iPhone using the USB 2.0 |
|
cable (supplied with the iPod/iPhone). |
|
|
Playback starts automatically. |
|
iPod/ |
|
|
iPhone |
|
|
USB 2.0 cable |
|
|
3 |
Select a song. |
•Disconnecting the iPod/iPhone will stop playback. Press SRC to listen to another playback source.
•For details, refer also to the manual supplied with your iPod/iPhone.
Continued on the next page
ENGLISH
OPERATIONS & EXTERNAL DEVICES 13

Caution:
|
ENGLISH |
• Avoid using the iPod/iPhone if it might hinder your |
|
|
safety while driving. |
||
|
• Make sure all important data has been backed up to |
||
|
avoid losing the data. |
||
|
Pressing (or holding) the following buttons allows you |
||
|
to… |
||
|
[Press] |
Pause/resume playback. |
|
|
[Press] |
Select track |
|
|
[Hold] |
Reverse/fast-forward track |
|
|
Selecting a track from the menu |
||
|
1 Enter the main menu. |
||
|
2 Select the desired menu. |
||
|
[Turn] = [Press] |
||
|
PLAYLISTS Ô ARTISTS Ô ALBUMS Ô |
||
|
SONGS Ô PODCASTS ÔGENRES Ô |
||
|
COMPOSERS Ô AUDIOBOOKS |
||
|
3 Select the desired track. |
||
|
[Turn] = [Press] |
||
|
• To return to the previous menu, press BACK. |
14
Selecting the playback modes
1
2
[Turn] = [Press]
REPEAT Ô RANDOM
3
|
[Turn] = [Press] |
|||
|
REPEAT |
ONE RPT |
: Functions the same as “Repeat |
|
|
ALL RPT |
: Functions the same as “Repeat |
||
|
One” of the iPod. |
|||
|
All” of the iPod. |
|||
|
RANDOM |
ALBUM |
: Functions the same as “Shuffle |
|
|
RND |
Albums” of the iPod. |
||
|
SONG RND : Functions the same as “Shuffle |
|||
|
Songs” of the iPod. |
• To cancel repeat play or random play, select “RPT OFF” or “RND OFF.”
• “ALBUM RND” is not available for some iPod.
• To return to the previous menu, press BACK.

Listening to the other external components
You can connect an external component to AUX (auxiliary) input jack on the control panel.
Preparation: Make sure “AUX ON” is selected in the “SRC SELECT” = “AUX IN” setting, see page 20.
|
1 |
Select “AUX IN.” |
|
|
2 |
— |
Turn on the connected component and start playing the source. |
|
3 |
Adjust the volume. |
|
4 |
— |
Adjust the sound as you want (see page 16). |
Connecting an external component to the AUX input jack
Portable audio player, etc.
3.5 mm stereo mini plug (not supplied)
ENGLISH
 EXTERNAL DEVICES 15
ENGLISH
Selecting a preset sound mode
You can select a preset sound mode suitable to the music genre.
• See also page 17.
[Turn] = [Press]
• See the following for “USER” settings.
 Storing your own sound mode
You can store your own adjustments in memory.
1 Select “USER.”
[Turn] = [Press]
2 While “USER” is shown on the display…
3 Select a tone.
[Turn] = [Press]
4Adjust the sound elements of the selected tone.
[Turn] = [Press]
|
1 |
Adjust the frequency. |
|
2 |
Adjust the level. |
|
3 |
Adjust the Q-slope. |
|
Sound |
Range/selectable items |
||
|
elements |
BASS |
MIDDLE |
TREBLE |
|
Frequency |
60 Hz |
0.5 kHz |
10.0 kHz |
|
80 Hz |
1.0 kHz |
12.5 kHz |
|
|
100 Hz |
1.5 kHz |
15.0 kHz |
|
|
200 Hz |
2.5 kHz |
17.5 kHz |
|
|
Level |
–06 to |
–06 to |
–06 to |
|
+06 |
+06 |
+06 |
|
|
Q |
Q1.0 |
Q0.75 |
Fix |
|
Q1.25 |
Q1.0 |
||
|
Q1.5 |
Q1.25 |
||
|
Q2.0 |
|||
5Repeat steps 3 and 4 to adjust other sound characteristics.
The adjustment made will be stored automatically.
16

Menu operations
|
1 Call up the menu. |
2 Select the desired item. |
3 Repeat step 2 if necessary. |
|||||||||
|
• To return to the previous menu, |
|||||||||||
|
[Turn] = [Press] |
press BACK. |
||||||||||
|
• To exit from the menu, press |
|||||||||||
|
DISP or MENU. |
|||||||||||
|
Initial: Underlined |
|||||||||||
|
Category |
Menu items |
Selectable settings, [reference page] |
|||||||||
|
DEMO |
DEMO |
• |
DEMO ON |
: |
Display demonstration will be activated automatically if |
||||||
|
Display |
no operation is done for about 20 seconds, [7]. |
||||||||||
|
demonstration |
• |
DEMO OFF |
: |
Cancels. |
|||||||
|
CLOCK DISP*1 |
• |
CLOCK ON |
: |
Clock time is shown on the display at all times when the |
|||||||
|
Clock display |
power is turned off. |
||||||||||
|
• |
CLOCK OFF |
: |
Cancels; pressing DISP will show the clock time for about |
||||||||
|
5 seconds when the power is turned off, [7]. |
|||||||||||
|
CLOCK |
CLOCK SET |
: |
Adjust the hour, then the minute, [7]. |
||||||||
|
Clock setting |
(Initial: 0:00) |
||||||||||
|
24H/12H |
• |
24 HOUR |
: |
See also page 7 for setting. |
|||||||
|
Time display mode |
• |
12 HOUR |
|||||||||
|
CLOCK ADJ *2 |
• |
AUTO |
: The built-in clock is automatically adjusted using the CT |
||||||||
|
Clock adjustment |
(clock time) data in the Radio Data System signal. |
||||||||||
|
• |
OFF |
: |
Cancels. |
||||||||
|
EQ |
EQ |
: |
Select a preset sound mode suitable to the music genre. |
||||||||
|
Equalizer |
USER, ROCK, CLASSIC, POPS, HIP HOP, JAZZ |
||||||||||
|
DIMMER |
• |
DIMMER AUTO |
: Dims the display when you turn on the headlights.*3 |
||||||||
|
Dimmer |
• |
DIMMER ON |
: Dims the display and button illumination. |
||||||||
|
DISPLAY |
• |
DIMMER OFF |
: |
Cancels. |
|||||||
|
SCROLL*4 |
• |
SCROLL ONCE |
: Scrolls the displayed information once. |
||||||||
|
Scroll |
• |
SCROLL AUTO |
: Repeats scrolling (at 5-second intervals). |
||||||||
|
• |
SCROLL OFF |
: |
Cancels. |
||||||||
|
Pressing DISP for more than one second can scroll the display regardless of the |
|||||||||||
|
setting. |
|||||||||||
|
*1 |
If the power supply is not interrupted by turning off the ignition key of your car, it is recommended to select |
||||||||||
|
“CLOCK OFF” to save the car’s battery. |
|||||||||||
|
*2 |
Takes effect only when CT data is received. |
||||||||||
|
*3 |
The illumination control lead connection is required. (See “Installation/Connection Manual.”) |
||||||||||
|
*4 |
Some characters or symbols will not be shown correctly (or will be blanked) on the display. |
||||||||||
|
Continued on the next page |
ENGLISH
SETTINGS 17

ENGLISH
|
Category |
Menu items |
Selectable settings, [reference page] |
||
|
DISPLAY |
TAG DISPLAY |
• |
TAG OFF |
: Cancels. |
|
• |
TAG ON |
: Shows the Tag information while playing MP3/WMA |
||
|
Tag display |
tracks. |
|||
|
AF-REG *5 |
• |
AF ON |
: When the currently received signals become weak, the |
|
|
Alternative |
unit switches to another station (the programme may |
|||
|
frequency/ |
differ from the one currently received), [10]. |
|||
|
regionalization |
• The AF indicator lights up. |
|||
|
reception |
• |
AF-REG ON |
: When the currently received signals become weak, the |
|
|
unit switches to another station broadcasting the same |
||||
|
programme. |
||||
|
• The AF and REG indicators light up. |
||||
|
• |
OFF |
: Cancels. |
||
|
PTY-STANDBY *5 |
PTY OFF, PTY |
: Activates PTY Standby Reception with one of the PTY |
||
|
PTY standby |
codes |
codes, [9]. |
||
|
TUNER |
TA VOLUME *5 |
VOLUME 00 |
: (Initial: VOLUME 15) |
|
|
Traffic |
– VOLUME 50 |
|||
|
announcement |
(or VOLUME 00 |
|||
|
volume |
– VOLUME 30)*6 |
|||
|
P-SEARCH *5 |
• |
SEARCH ON |
: Activates Programme Search, [10]. |
|
|
Programme search |
• |
SEARCH OFF |
: Cancels. |
|
|
MONO*7 |
• |
MONO ON |
: Activate monaural mode to improve FM reception, but |
|
|
Monaural mode |
stereo effect will be lost, [8]. |
|||
|
• |
MONO OFF |
: Restore the stereo effect. |
||
|
IF BAND |
• |
AUTO |
: Increases the tuner selectivity to reduce interference |
|
|
Intermediate |
noises between adjacent stations. (Stereo effect may be |
|||
|
frequency band |
lost.) |
|||
|
• |
WIDE |
: Subject to interference noises from adjacent stations, but |
||
|
sound quality will not be degraded and the stereo effect |
||||
|
will remain. |
||||
|
COLOR |
COLOR 01 |
: |
Select one of the preset or user color for display and button (except T/P/DISP/ |
|
|
— COLOR 29, |
OPEN/ |
) illumination. |
||
|
USER |
(For customized color settings, “USER,” see page 21.) |
|||
*5 Only for FM Radio Data System stations. *6 Depends on the amplifier gain control. *7 Displayed only when the source is “FM.”
18

|
Category |
Menu items |
Selectable settings, [reference page] |
||||
|
MENU COLOR |
MENU COLOR |
• |
ON |
: Changes the display and button (except T/P/DISP/ |
||
|
Menu color |
OPEN/ |
) illumination during menu, list search and |
||||
|
OFF |
playback mode operations. |
|||||
|
• |
: Cancels. |
|||||
|
FADER*8,*9 |
R06 – F06 |
: Adjust the front and rear speaker output balance. |
||||
|
Fader |
(Initial: 00) |
|||||
|
BALANCE*9 |
L06 – R06 |
: Adjust the left and right speaker output balance. |
||||
|
Balance |
(Initial: 00) |
|||||
|
LOUD |
• |
LOUD ON |
: Boost low and high frequencies to produce a |
|||
|
Loudness |
well-balanced sound at a low volume level. |
|||||
|
• |
LOUD OFF |
: Cancels. |
||||
|
VOL ADJUST |
VOL ADJ –05 — |
: Preset the volume adjustment level of each source |
||||
|
Volume adjust |
VOL ADJ +05 |
(except FM), compared to the FM volume level. The |
||||
|
(Initial: VOL ADJ |
volume level will automatically increase or decrease |
|||||
|
AUDIO |
00) |
when you change the source. |
||||
|
want to adjust. |
||||||
|
• Before making an adjustment, select the source you |
||||||
|
• “VOL ADJ FIX” appears on the display if “FM/FM-LO” is |
||||||
|
selected as the source. |
||||||
|
L/O MODE |
• |
SUB.W |
: Select if the REAR LINE OUT terminals are used for |
|||
|
Line output mode |
connecting a subwoofer (through an external amplifier). |
|||||
|
• |
REAR |
: Select if the REAR LINE OUT terminals are used for |
||||
|
connecting the speakers (through an external amplifier). |
||||||
|
SUB.W FREQ*10 |
• |
LOW |
: Frequencies lower than 72 Hz are sent to the subwoofer. |
|||
|
Subwoofer cutoff |
• |
MID |
: Frequencies lower than 111 Hz are sent to the subwoofer. |
|||
|
frequency |
• |
HIGH |
: Frequencies lower than 157 Hz are sent to the subwoofer. |
|||
|
SUB.W LEVEL*10 |
SUB.W 00 |
: Adjust the subwoofer output level. |
||||
|
Subwoofer level |
— SUB.W 08 |
(Initial: SUB.W 04) |
||||
|
*8 |
If you are using a two-speaker system, set the fader level to “00.” |
|||||
|
*9 |
This adjustment will not affect the subwoofer output. |
|||||
|
*10 Displayed only when “L/O MODE” is set to “SUB.W.” |
Continued on the next page
ENGLISH
SETTINGS 19

|
Category |
Menu items |
Selectable settings, [reference page] |
SWITCH
AUDIOBOOKS SRC SELECT
IPOD
|
BEEP |
• |
BEEP ON |
: |
Activates the key touch tone. |
|
Key touch tone |
• |
BEEP OFF |
: |
Deactivates the key touch tone. |
|
TEL MUTING |
• |
MUTING 1/ |
: Select either one which mutes the sounds while using a |
|
|
Telephone muting |
MUTING 2 |
cellular phone. |
||
|
• |
MUTING OFF |
: |
Cancels. |
|
|
AMP GAIN*11 |
• |
LOW POWER |
: VOLUME 00 – VOLUME 30 (Select if the maximum power |
|
|
Amplifier gain |
of each speaker is less than 50 W to prevent damaging |
|||
|
control |
the speaker.) |
|||
|
• |
HIGH POWER |
: VOLUME 00 – VOLUME 50 |
||
|
AM*12 |
• |
AM ON |
: |
Enable “AM” in source selection, [4]. |
|
AM station |
• |
AM OFF |
: |
Disable “AM” in source selection. |
|
AUX IN*13 |
• |
AUX ON |
: |
Enable “AUX IN” in source selection, [4]. |
|
Auxiliary input |
• |
AUX OFF |
: |
Disable “AUX IN” in source selection. |
|
AUDIOBOOKS*14 |
• |
NORMAL |
: |
You can select the playback speed of the “Audiobooks” |
|
Speed control of |
• |
FASTER |
sound file in your iPod/iPhone. |
|
|
“Audiobooks” |
• |
SLOWER |
• |
Initial selected item depends on your iPod/iPhone setting. |
|
IPOD SWITCH*15 |
• |
HEAD MODE |
: |
Controls iPod playback through the unit. |
|
iPod/iPhone control |
• |
IPOD MODE |
: |
Controls iPod playback through the iPod/iPhone. |
*11 The volume level automatically changes to “VOLUME 30” if you change to “LOW POWER” with the volume level set higher than “VOLUME 30.”
*12 Displayed only when any source other than “AM” is selected. *13 Displayed only when any source other than “AUX IN” is selected.
*14 Displayed only when an iPod/iPhone playback is controlled from the unit.
*15 Displayed only when “USB-IPOD” is selected as the source and “IPOD MODE” is available for the connected iPod/ iPhone (see page 24).
20
![]()
Color settings
|
Selecting a preset color |
3 |
|
|
You can select a preset color for the buttons and display. |
[Turn] = [Press] |
|
|
• See also page 18. |
||
|
4 |
Select a primary color. |
ENGLISH
 Creating your own color —USER Color
You can create your own colors—“DAY COLOR” or “NIGHT COLOR.”
DAY COLOR: Color for the display and buttons. NIGHT COLOR: Color for the display and buttons
when the display is dimmed. To dim the display, see “DIMMER” on page 17.
1 Select “USER.”
[Turn] = [Press]
2 While “USER” is shown on the display…
[Turn] = [Press]
5Adjust the level (00 to 31) of the selected primary color.
[Turn] = [Press]
If “00” is selected for all the primary colors, nothing appear on the display.
6Repeat steps 4 and 5 to adjust other primary colors.
7Exit from the setting.
 or
or
Select “USER” to show your own colors for the buttons and display.
SETTINGS 21

ENGLISH
More about this unit
 Basic operations
Turning on the power
•By pressing SRC button on the unit, you can also turn on the power. If the source is ready, playback also starts.
Turning off the power
•If you turn off the power while listening to a track, playback will start from where it had been stopped previously next time you turn on the power.
General
•If you change the source while listening to a disc, playback stops.
Next time you select “CD” as the playback source, playback will start from where it had been stopped previously.
•If the ejected disc is not removed within 15 seconds, it is automatically inserted into the loading slot again to protect it from dust.
•After ejecting a disc or disconnect a USB device, “NO DISC” or “NO USB“ appears and you cannot operate some of the buttons. Insert another disc,
reconnect a USB device, or press SRC to select another playback source.
•If no operation is done for about 30 seconds after pressing MENU button or control dial, the operation will be canceled.
 Tuner operations
Storing stations in memory
•During SSM search…
–All previously stored stations are erased and the stations are stored anew.
–When SSM is over, the station stored in the lowest preset number will be automatically tuned in.
•When storing a station manually, the previously preset station is erased when a new station is stored in the same preset number.
FM Radio Data System operations
•Network-Tracking Reception requires two types of Radio Data System signals—PI (Programme Identification) and AF (Alternative Frequency) to work correctly. Without receiving these data correctly, Network-Tracking Reception will not operate correctly.
•If a Traffic Announcement is received by TA Standby Reception, the volume level automatically changes to the preset level (TA VOL) if the current level is lower than the preset level.
•When Alternative Frequency Reception is activated (with AF selected), Network-Tracking Reception is also activated automatically.
 Disc operations
Caution for DualDisc playback
•The Non-DVD side of a “DualDisc” does not comply with the “Compact Disc Digital Audio” standard. Therefore, the use of Non-DVD side of a DualDisc on this product may not be recommended.
General
•This unit has been designed to reproduce CDs/CD Texts, and CD-Rs (Recordable)/CD-RWs (Rewritable) in audio CD (CD-DA), MP3/WMA formats.
•When a disc is inserted upside down, “PLEASE” and “EJECT” appear alternately on the display. Press OPEN, then 0 to eject the disc.
•MP3 and WMA “tracks” (words “file” and “track” are used interchangeably) are recorded in “folders.”
•While fast-forwarding or reversing on an MP3 or WMA disc, you can only hear intermittent sounds.
22

Playing a CD-R or CD-RW
•Use only “finalized” CD-Rs or CD-RWs.
•This unit can only play back files of the same type as those detected first if a disc includes both audio CD (CD-DA) files and MP3/WMA files.
•This unit can play back multi-session discs; however, unclosed sessions will be skipped while playing.
•Some CD-Rs or CD-RWs may not play back on this unit because of their disc characteristics, or for the following reasons:
–Discs are dirty or scratched.
–Moisture condensation has occurred on the lens inside the unit.
–The pickup lens inside the unit is dirty.
–The files on the CD-R/CD-RW are written using the “Packet Write” method.
–There are improper recording conditions (missing data, etc.) or media conditions (stained, scratched, warped, etc.).
•CD-RWs may require a longer readout time since the reflectance of CD-RWs is lower than that of regular CDs.
•Do not use the following CD-Rs or CD-RWs:
–Discs with stickers, labels, or a protective seal stuck to the surface.
–Discs on which labels can be directly printed by an ink jet printer.
Using these discs under high temperature or high humidity may cause malfunctions or damage to the unit.
Playing an MP3/WMA disc
•This unit can play back MP3/WMA files with the extension code <.mp3> or <.wma> (regardless of the letter case—upper/lower).
•This unit can show the names of albums, artists (performer), and Tag (Version 1.0, 1.1, 2.2, 2.3, or 2.4) for MP3 files and for WMA files.
•This unit can display only one-byte characters. No other characters can be correctly displayed.
•This unit can play back MP3/WMA files meeting the conditions below:
–Bit rate of MP3/WMA: 32 kbps — 320 kbps
–Sampling frequency of MP3:
32 kHz, 44.1 kHz, 48 kHz (for MPEG-1) 16 kHz, 22.05 kHz, 24 kHz (for MPEG-2)
–Sampling frequency of WMA: 22.05 kHz, 32 kHz, 44.1 kHz, 48 kHz
–Disc format: ISO 9660 Level 1/Level 2, Romeo, Joliet, Windows extension.
•The maximum number of characters for file/folder names vary depending on the disc format used (includes 4 extension characters—<.mp3> or <.wma>).
–ISO 9660 Level 1: up to 12 characters
–ISO 9660 Level 2: up to 31 characters
–Romeo: up to 64 characters
–Joliet: up to 32 characters
–Windows extension: up to 64 characters
•This unit can recognize a total of 512 files, 255 folders, and 8 hierarchical levels.
•This unit can play back files recorded in VBR (variable bit rate).
Files recorded in VBR have a discrepancy in the elapsed time display, and do not show the actual elapsed time. In particular, this difference becomes noticeable after performing the search function.
•This unit cannot play back the following files:
–MP3 files encoded in MP3i and MP3 PRO format.
–MP3 files encoded in an inappropriate format.
–MP3 files encoded with Layer 1/2.
–WMA files encoded in lossless, professional, and voice format.
–WMA files which are not based upon Windows Media® Audio.
–WMA files copy-protected with DRM.
–Files which have data such as AIFF, ATRAC3, etc.
•The search function works but search speed is not constant.
ENGLISH
Continued on the next page
REFERENCES 23

ENGLISH
Playing MP3/WMA tracks from a USB device
•While playing from a USB device, the playback order may differ from other players.
•This unit may be unable to play back some USB devices or some files due to their characteristics or recording conditions.
•Depending on the shape of the USB devices and connection ports, some USB devices may not be attached properly or the connection might be loose.
•Connect one USB mass storage class device to the unit at a time. Do not use a USB hub.
•If the connected USB device does not have the correct files, “CANNOT PLAY” appears.
•If the files have not been formatted correctly, “NOT SUPPORT” appears.
•This unit can show Tag (Version 1.0, 1.1, 2.2, 2.3, or 2.4) for MP3 files and for WMA files.
•This unit can play back MP3/WMA files meeting the conditions below:
–Bit rate of MP3/WMA: 32 kbps — 320 kbps
–Sampling frequency of MP3:
32 kHz, 44.1 kHz, 48 kHz (for MPEG-1) 16 kHz, 22.05 kHz, 24 kHz (for MPEG-2)
–Sampling frequency of WMA: 22.05 kHz, 32 kHz, 44.1 kHz, 48 kHz
•This unit can play back MP3 files recorded in VBR (variable bit rate).
•The maximum number of characters for:
–Folder names : 32 characters
–File names : 32 characters
–MP3 Tag : 64 characters
–WMA Tag : 32 characters
•This unit can recognize a total of 5 000 files, 255 folders (255 files per folder including folder without unsupported files), and of 8 hierarchies.
•This unit does not support SD card reader.
•This unit cannot recognize a USB device whose rating is other than 5 V and exceeds 500 mA.
•USB devices equipped with special functions such as data security functions cannot be used with the unit.
•Do not use a USB device with 2 or more partitions.
•This unit may not recognized a USB device connected through a USB card reader.
•When connecting with a USB cable, use the USB 2.0 cable.
•This unit may not play back files in a USB device properly when using a USB extension cord.
•This unit cannot play back the following files:
–MP3 files encoded with MP3i and MP3 PRO format.
–MP3 files encoded in an inappropriate format.
–MP3 files encoded with Layer 1/2.
–WMA files encoded in lossless, professional, and voice format.
–WMA files not based on Windows Media® Audio.
 iPod/iPhone operations
•You can control the following types of iPods/iPhone:
–iPod with video (5th Generation)*1
–iPod classic*1, *2
–iPod nano
–iPod nano (2nd Generation)
–iPod nano (3rd Generation)*1, *2
–iPod nano (4th Generation)*1, *2
–iPod Touch*1, *2
–iPod Touch (2nd Generation)*1, *2
–iPhone/iPhone 3G*1, *2
*1 It is not possible to browse video files on the “Videos” menu.
*2 “IPOD MODE” is available (see page 13).
•If the iPod does not play correctly, please update your iPod software to the latest version. For details about updating your iPod, visit <http://www.apple.com>.
•When you turn on this unit, the iPod is charged through this unit.
•iPod shuffle cannot be used with this unit.
•The song order displayed on the selection menu of this unit may differ from that of the iPod.
•The text information may not be displayed correctly:
–Some characters such as accented letters cannot be shown correctly on the display.
–Communication between the iPod and the unit is not stable.
•If the text information includes more than 11 characters, it scrolls on the display. This unit can display up to 64 characters.
24

Notice:
When operating an iPod, some operations may not be performed correctly or as intended. In this case, visit the following JVC web site: <http://www.jvc. co.jp/english/car/> (English website only)
 Menu operations
•If you change the “AMP GAIN” setting from “HIGH POWER” to “LOW POWER” while the volume level is set higher than “VOLUME 30,” the unit automatically changes the volume level to “VOLUME 30.”
ENGLISH
Preset value setting for each sound mode
|
Sound |
Preset value |
|||||||||||
|
BASS |
MIDDLE |
TREBLE |
LOUD |
|||||||||
|
mode |
||||||||||||
|
(loudness) |
||||||||||||
|
Freq. |
Level |
Q |
Freq. |
Level |
Q |
Freq. |
Level |
Q |
||||
|
USER |
60 Hz |
00 |
Q1.25 |
1.0 kHz |
00 |
Q1.0 |
10.0 kHz |
00 |
— |
|||
|
ROCK |
100 Hz |
+03 |
Q1.0 |
1.0 kHz |
00 |
Q1.25 |
10.0 kHz |
+02 |
— |
|||
|
CLASSIC |
80 Hz |
+01 |
Q1.25 |
1.0 kHz |
00 |
Q1.25 |
10.0 kHz |
+03 |
— |
OFF |
||
|
POPS |
100 Hz |
+02 |
Q1.25 |
1.0 kHz |
+01 |
Q1.25 |
10.0 kHz |
+02 |
— |
|||
|
HIP HOP |
60 Hz |
+04 |
Q1.0 |
1.0 kHz |
–02 |
Q1.0 |
10.0 kHz |
+01 |
— |
|||
|
JAZZ |
80 Hz |
+03 |
Q1.25 |
1.0 kHz |
00 |
Q1.25 |
10.0 kHz |
+03 |
— |
|||
|
Freq.: Frequency |
Q: Q-slope |
JVC bears no responsibility for any loss of data in an iPod/iPhone and/or USB mass storage class device while using this System.
•Microsoft and Windows Media are either registered trademarks or trademarks of Microsoft Corporation in the United States and/or other countries.
•“Made for iPod” means that an electronic accessory has been designed to connect specifically to iPod and has been certified by the developer to meet Apple performance standards.
•“Works with iPhone” means that an electronic accessory has been designed to connect specifically to iPhone and has been certified by the developer to meet Apple performance standards.
•Apple is not responsible for the operation of this device or its compliance with safety and regulatory standards.
•iPod is a trademark of Apple Inc., registered in the U.S. and other countries.
•iPhone is a trademark of Apple Inc.
REFERENCES 25

ENGLISH
Troubleshooting
What appears to be trouble is not always serious. Check the following points before calling a service center.
|
Symptoms |
Remedies/Causes |
||
|
• Sound cannot be heard from the |
• Adjust the volume to the optimum level. |
||
|
speakers. |
• Check the cords and connections. |
||
|
General |
|||
|
• “AUX IN” cannot be selected. |
Check the “SRC SELECT” = “AUX IN” setting (see |
||
|
• The unit does not work at all. |
Reset the unit (see page 3). |
||
|
page 20). |
|||
|
• Nothing appear on the display. |
Check the “USER” color settings (see page 21). |
||
|
• SSM automatic presetting does not work. |
Store stations manually. |
||
|
FM/AM |
|||
|
• Static noise while listening to the radio. |
Connect the aerial firmly. |
||
|
• “AM” cannot be selected. |
Check the “SRC SELECT” = “AM” setting (see |
||
|
page 20). |
|||
|
• Disc cannot be played back. |
Insert the disc correctly. |
||
|
• CD-R/CD-RW cannot be played back. |
• Insert a finalized CD-R/CD-RW. |
||
|
• Tracks on the CD-R/CD-RW cannot be |
• Finalize the CD-R/CD-RW with the component which |
||
|
skipped. |
you used for recording. |
||
|
generalin |
|||
|
• Disc can neither be played back nor |
• Unlock the disc (see page 11). |
||
|
ejected. |
• Eject the disc forcibly (see page 3). |
||
|
Discs |
• Disc sound is sometimes interrupted. |
• Stop playback while driving on rough roads. |
|
|
• Change the disc. |
|||
|
• Check the cords and connections. |
|||
|
• “NO DISC” appears on the display. |
Insert a playable disc into the loading slot. |
||
|
• “PLEASE” and “EJECT“ appear alternately |
Press OPEN, then 0 to eject the disc, then insert a disc |
||
|
on the display. |
correctly. |
||
26

|
Symptoms |
Remedies/Causes |
|||
|
• Disc cannot be played back. |
• Use a disc with MP3/WMA tracks recorded in a format |
|||
|
compliant with ISO 9660 Level 1, Level 2, Romeo, or |
||||
|
Joliet. |
||||
|
• Add the extension code <.mp3> or <.wma> to the file |
||||
|
names. |
||||
|
• |
Noise is generated. |
Skip to another track or change the disc. (Do not add the |
||
|
extension code <.mp3> or <.wma> to non-MP3 or WMA |
||||
|
tracks.) |
||||
|
playback |
• A longer readout time is required |
Do not use too many hierarchical levels and folders. |
||
|
(“READING” keeps flashing on the |
||||
|
display). |
||||
|
MP3/WMA |
||||
|
• |
The elapsed playing time is not correct. |
This sometimes occurs during playback. This is caused by |
||
|
• Tracks do not play back in the order you |
The playback order is determined when the files are |
|||
|
have intended them to play. |
recorded. |
|||
|
how the tracks are recorded on the disc. |
||||
|
• “NO FILE” appears on the display. |
Selected folder is an empty folder*. Select another folder |
|||
|
that contains MP3/WMA tracks. |
||||
|
• “NOT SUPPORT” appears on the display |
Check whether the track is a playable file format. |
|||
|
and track skips. |
||||
|
• The correct characters are not displayed |
This unit can only display Roman alphabets (upper case), |
|||
|
(e.g. album name). |
Cyrillic alphabets (upper case), numbers, and a limited |
|||
|
number of symbols (see page 2). |
||||
|
• |
Noise is generated. |
The track played back is not an MP3/WMA track. Skip to |
||
|
another file. (Do not add the extension code <.mp3> or |
||||
|
playback |
<.wma> to non-MP3 or WMA tracks.) |
|||
|
• “READING” keeps flashing on the display. |
• Readout time varies depending on the USB device. |
|||
|
device |
• Do not use too many hierarchy or folders. |
|||
|
• Do not pull out or connect the USB device repeatedly |
||||
|
• Turn off the power then on again. |
||||
|
USB |
while “READING” is displayed on the display. |
|||
|
• “NO FILE” appears on the display. |
Selected folder is an empty folder*. Select another folder |
|||
|
that contains MP3/WMA tracks. |
||||
* Folder that is physically empty or folder that contains data but does not contain valid MP3/WMA track.
Continued on the next page
ENGLISH
REFERENCES 27

ENGLISH
USB device playback
iPod/iPhone
|
Symptoms |
Remedies/Causes |
|
• Tracks/folders are not played back in the |
The playback order is determined by the write-in time |
|
order you have intended. |
stamp. The first track/folder written into the USB device |
|
will be the first track/folder for playback. |
|
|
• “CANNOT PLAY” appears on the display. |
• Connect a USB device that contains tracks encoded in an |
|
• “NO USB” appears on the display. |
appropriate format. |
|
• The unit cannot detect the USB device. |
• Connect the USB device again. |
|
• “NOT SUPPORT” appears on the display |
Check whether the track is a playable file format. |
|
and track skips. |
|
|
• Correct characters are not displayed (e.g. |
This unit can only display Roman alphabets (upper case), |
|
album name). |
Cyrillic alphabets (upper case), numbers, and a limited |
|
number of symbols (see page 2). |
|
|
• While playing a track, sound is sometimes |
The tracks have not been properly copied into the USB |
|
interrupted. |
device. |
|
Copy tracks again into the USB device, and try again. |
|
|
• The iPod does not turn on or does not |
• Check the connecting cable and its connection. |
|
work. |
• Update the firmware version of the iPod/iPhone. |
|
• Charge the battery of the iPod/iPhone. |
|
|
• Reset the iPod/iPhone. |
|
|
• Check whether “IPOD SWITCH” setting is |
|
|
appropriate (see page 20). |
|
|
• The sound is distorted. |
Deactivate the equalizer either on this unit or the iPod/ |
|
iPhone. |
|
|
• No sound can be heard in “IPOD |
Check whether “IPOD SWITCH” setting is appropriate |
|
MODE.” |
(see page 20). |
|
• Playback stops. |
The headphones are disconnected during playback. Restart |
|
the playback operation (see pages 13 and 14). |
|
|
• “CANNOT PLAY” appears on the display. |
No tracks are stored. Import tracks to the iPod/iPhone. |
|
• “RESTRICTED” appears on the display. |
Check whether the connected iPod/iPhone is compatible |
|
with this unit (see page 24). |
28
 Loading…
Магнитола JVC KD R707 — это современное устройство, которое обеспечивает высококачественное звучание и широкий спектр функций. Настройка данной модели магнитолы может показаться сложной, особенно для тех, кто впервые сталкивается с устройствами такого типа. Однако, с помощью данной подробной инструкции, вы сможете освоить все основные настройки и функции магнитолы JVC KD R707.
Итак, первым шагом при настройке магнитолы JVC KD R707 является установка самого устройства. Выберите подходящее место для монтажа магнитолы в автомобиле, затем следуйте инструкции по установке из руководства пользователя. Убедитесь, что магнитола надежно закреплена и не создает проблем с видимостью и доступностью водителю.
После установки магнитолы JVC KD R707 вам необходимо подсоединить все необходимые кабели. В основном, это будет включать провод питания, антенну и аудиокабели. Убедитесь, что все соединения выполнены правильно и надежно зафиксированы. При необходимости, обратитесь к руководству пользователя для получения подробной информации о правильном подключении кабелей.
После успешного подключения необходимо включить магнитолу. На дисплее магнитолы появится главное меню. Используя крутилку или кнопки на лицевой панели, выберите язык отображения и требуемые настройки. Магнитола JVC KD R707 предоставляет возможность настройки разного рода предпочтений пользователя, включая настройку радиостанций, пресетов эквалайзера, яркости и контрастности дисплея и других функций. Внимательно изучите руководство пользователя для полного понимания всех настроек и возможностей вашей магнитолы JVC KD R707.
Содержание
- Качественный звук в вашем автомобиле
- Подключение и настройка магнитолы
- Подключение магнитолы
- Настройка магнитолы
- Настройка радиоприемника
- Настройка аудиосистемы
Качественный звук в вашем автомобиле
Один из ключевых аспектов при выборе магнитолы для автомобиля является качество звука, которое она способна обеспечить. Качественный звук позволяет наслаждаться любимой музыкой и создает комфортную атмосферу в салоне автомобиля.
Для достижения качественного звука важно учесть несколько факторов:
- Выбор магнитолы: При выборе магнитолы необходимо обратить внимание на такие параметры, как выходная мощность, наличие встроенных усилителей, наличие эффектов обработки звука и возможность подключения внешнего усилителя.
- Качество акустики: Выбор качественных динамиков и компонентов акустической системы является важным шагом для достижения качественного звука. Рекомендуется обратить внимание на параметры акустики, такие как частотный диапазон, чувствительность и импеданс.
- Настройка звука: После установки магнитолы и акустики необходимо провести настройку звука. Это включает в себя балансировку громкости динамиков, настройку эквалайзера и других звуковых эффектов. Рекомендуется использовать специальные тестовые треки для настройки звука.
- Обработка звука: Для улучшения качества звука можно использовать дополнительные устройства, такие как цифровые процессоры звука или эквалайзеры. Они позволяют более точно настроить звук и убрать помехи или гармонические искажения.
Качественный звук в автомобиле не только делает поездку более приятной, но и помогает улучшить впечатление от прослушиваемой музыки. Следуя указанным рекомендациям, можно достичь высокого качества звука и создать идеальную атмосферу в салоне автомобиля.
Подключение и настройка магнитолы
Магнитола JVC KD R707 предлагает широкий спектр функций и возможностей. Но перед тем, как начать пользоваться всеми преимуществами этого устройства, необходимо правильно подключить и настроить его. В этой подробной инструкции мы расскажем, как это сделать.
Подключение магнитолы
Для начала убедитесь, что вы имеете все необходимые компоненты для подключения магнитолы JVC KD R707:
- Магнитола JVC KD R707
- Комплект проводов для подключения магнитолы
- Автомобильная электрическая система с рабочей аккумуляторной батареей
- Автомобильные динамики
Следуйте этим шагам для правильного подключения магнитолы:
- Отключите зажигание автомобиля и удалите отрицательный провод от аккумулятора.
- Используя комплект проводов, подключите контроль провода магнитолы к проводу памяти автомобиля.
- Подключите постоянный провод магнитолы к постоянному проводу автомобиля.
- Подключите земляной провод магнитолы к каркасу автомобиля.
- Подключите выходные провода магнитолы к соответствующим разъемам динамиков автомобиля.
- Подключите антенный кабель магнитолы к антенне автомобиля.
- Проверьте, что все провода надежно закреплены.
- Подключите отрицательный провод аккумулятора обратно.
Настройка магнитолы
После успешного подключения магнитолы JVC KD R707 можно приступать к настройке устройства:
- Включите зажигание автомобиля.
- Нажмите кнопку «SRC» на магнитоле, чтобы выбрать источник звука (радио, CD, USB и т. Д.).
- Используйте кнопки «VOL» для регулировки громкости.
- Используйте кнопки «SEL» и «VOL» для выбора и настройки различных функций магнитолы, таких как радио, эффекты звука, равномерный баланс и т. Д.
- Подключите свой мобильный телефон или другое устройство через USB-порт или Bluetooth для прослушивания музыки.
Теперь ваша магнитола JVC KD R707 подключена и настроена. Вы можете наслаждаться своей любимой музыкой и другими функциями, которые предлагает данное устройство.
Настройка радиоприемника
Для начала работы с радиоприемником магнитолы JVC KD R707 вам понадобятся следующие действия:
- Включите магнитолу, нажав кнопку питания.
- Нажмите кнопку «SRC» на передней панели, чтобы выбрать режим «Radio».
- Используйте кнопку «FM» или «AM» для выбора желаемого радиочастотного диапазона.
- Нажмите кнопку «Seek» или используйте регулятор «Tune» для настройки на нужную радиостанцию.
- Для сохранения радиостанции в памяти нажмите и удерживайте любую из кнопок «1»-«6» на панели управления до появления мигающего индикатора.
Вы также можете использовать функцию автопоиска станций. Для этого:
- Нажмите кнопку «Auto» на передней панели магнитолы.
- Магнитола автоматически сканирует доступные радиостанции и запоминает их в памяти.
- Используйте кнопку «Seek» или регулятор «Tune» для выбора радиостанции из списка.
- Для сохранения радиостанции в памяти нажмите и удерживайте любую из кнопок «1»-«6» на панели управления до появления мигающего индикатора.
Если у вас возникли проблемы с приемом радиостанций, проверьте следующие возможные решения:
- Убедитесь в точности настройки на выбранную радиостанцию.
- Проверьте антенну для надежного соединения.
- При необходимости переместите автомобиль для усиления сигнала.
- Обратитесь к инструкции по эксплуатации для проверки других возможных причин проблем с приемом радио.
Пользуйтесь радиоприемником магнитолы JVC KD R707 с удовольствием!
Настройка аудиосистемы
Магнитола JVC KD R707 обладает большим количеством опций настройки аудиосистемы, позволяющих вам настроить звучание по вашему вкусу.
Вот некоторые из основных настроек, которые вы можете использовать на магнитоле JVC KD R707:
-
Эквалайзер: Магнитола KD R707 имеет встроенный эквалайзер с предустановленными настройками. Вы можете выбрать одну из предустановленных настроек, таких как «Rock», «Pop» или «Jazz», или настроить эквалайзер вручную, чтобы подстроить звучание под ваш вкус.
-
Баланс: Эта опция позволяет вам регулировать баланс звучания между левыми и правыми динамиками. Вы можете установить баланс так, чтобы звучание было равномерным в обоих каналах или сместить баланс в одну сторону, если вам это удобно.
-
Фэйдер: Фэйдер позволяет вам регулировать баланс звучания между передними и задними динамиками. Вы можете установить фэйдер так, чтобы звучание было равномерным в обоих каналах или сместить баланс в одну сторону, если вам это удобно.
-
Громкость: Вы можете регулировать громкость звучания вашей аудиосистемы непосредственно с помощью кнопок на лицевой панели магнитолы или с помощью пульта дистанционного управления.
-
Настройка подзвучивания: Магнитола JVC KD R707 также имеет функцию подзвучивания, которая позволяет вам настроить басы и высокие частоты для достижения более глубокого и насыщенного звучания.
Вы можете настроить эти опции аудиосистемы с помощью кнопок на лицевой панели магнитолы или через меню на экране.
| Клавиша | Описание |
|---|---|
| EQ | Включение/выключение эквалайзера |
| Balance | Регулировка баланса |
| Fader | Регулировка фэйдера |
| Vol + / — | Регулировка громкости |
| Audio | Доступ к настройкам аудио |
С помощью этих опций вы можете настроить звучание вашей магнитолы JVC KD R707 и наслаждаться качественным звуком в автомобиле.
Страницы и текст этой инструкции
 Инструкция автомагнитолы JVC KD-R707
 Информация отображена на картинке
 Информация отображена на картинке
 Информация отображена на картинке
 Информация отображена на картинке
Как использовать наш сайт инструкций OnlineManuals.ru
Наша цель состоит в том, чтобы предоставить вам быстрый доступ к содержанию инструкции для автомагнитолы JVC KD-R707.
С помощью онлайн просмотра, Вы можете быстро просмотреть содержимое инструкции и найти решение проблемы с автомагнитолы JVC KD-R707.
Для Вашего удобства
Если листать руководство пользователя автомагнитолы JVC KD-R707 прямо на сайте, не очень удобно для Вас, есть два возможных решения:
• Просмотр в полноэкранном режиме — легко просмотреть руководство пользователя (без загрузки его на свой компьютер), Вы можете использовать режим полноэкранного просмотра.
Для просмотра инструкции пользователя автомагнитолы JVC KD-R707 на полном экране, используйте кнопку «Открыть в Pdf-viewer».
• Загрузка на компьютер — Вы можете также скачать Инструкция автомагнитолы JVC KD-R707 на свой компьютер и сохранить его в файлах.
Многие люди предпочитают читать документы не на экране, а в печатной версии.
Возможность печати руководства пользователя также была предусмотрена на нашем сайте,
и вы можете использовать ее, нажав на иконку «печать» в Pdf-viewer.
Нет необходимости печатать все руководство автомагнитолы JVC KD-R707, можно выбрать только нужные страницы инструкции.