
-
Contents
-
Table of Contents
-
Bookmarks
Quick Links
MVH-A210BT
RDS AV RECEIVER
Operation Manual
Related Manuals for Pioneer MVH-A210BT
Summary of Contents for Pioneer MVH-A210BT
-
Page 1
MVH-A210BT RDS AV RECEIVER Operation Manual… -
Page 2: Table Of Contents
Contents ■ Settings ……29 Thank you for buying this Pioneer product. Displaying the setting screen…….. 29 Please read through these instructions System settings …………29 so you will know how to operate your Theme settings …………34 model properly. After you have finished Audio settings………….
-
Page 3: Precaution
• If liquid or foreign matter should get inside this product, park your vehicle in a safe place, turn the ignition switch off (ACC OFF) immediately and consult your dealer or the nearest authorised Pioneer — 3 -…
-
Page 4
• If you notice smoke, a strange noise or odour from this product, or any other abnormal signs on the LCD screen, turn off the power immediately and consult your dealer or the nearest authorised Pioneer Service Station. Using this product in this condition may result in permanent damage to the system. -
Page 5
• To prevent data loss and damage to the storage device, never remove it from this product while data is being transferred. • Pioneer cannot guarantee compatibility with all USB mass storage devices and assumes no responsibility for any loss of data on media players, iPhone, smartphone, or other devices while using this product. -
Page 6
• We offer the latest information about PIONEER CORPORATION on our website. • Pioneer regularly provides software updates to further improve it’s products. Please check the support section of the Pioneer website for all available software updates. About this product •… -
Page 7: Parts And Controls
About this manual This manual uses diagrams of actual screens to describe operations. However, the screens on some units may not match those shown in this manual depending on the model used. Meanings of symbols used in this manual This indicates to touch the appropriate soft key on the touch screen. This indicates to touch and hold the appropriate soft key on the touch screen.
-
Page 8: Basic Operation
RESET Press to reset the microprocessor (page 8). LCD screen Basic operation Resetting the microprocessor CAUTION • Pressing the RESET button resets settings and recorded contents to the factory settings. – Do not perform this operation when a device is connected to this product. –…
-
Page 9
Common touch panel keys Switches between playback and pause. Skips files (or tracks) forwards or backwards. Performs fast reverse or fast forwards. Touch again to change the playback speed. Stops playback. Text When all characters are not displayed, the rests are automatically scrolled on information the display. -
Page 10
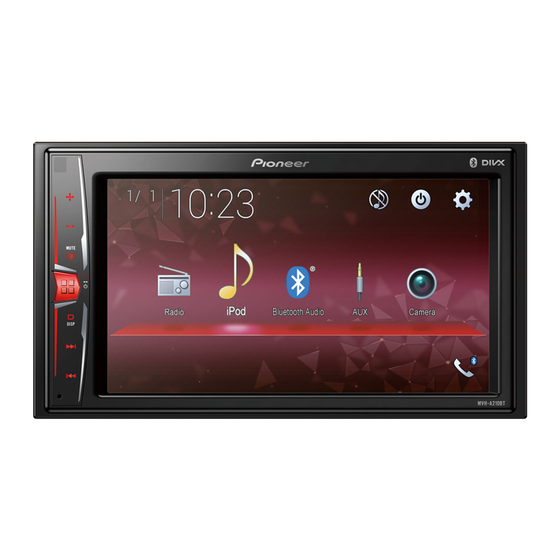
Operating the time bar You can change the playback point by dragging the key. NOTE The time bar function may vary depending on the activating source. Top menu screen 6/10 Radio BluetoothAudio Camera Source icons Setting the time and date (page 38) Settings (page 29) and Favourite menu (page 38) Hands-free phoning (page 13) AV source off… -
Page 11: Bluetooth
Bluetooth Bluetooth connection Turn on the Bluetooth function on the device. Press Touch then The Bluetooth menu screen appears. Touch [Connection]. Touch The unit starts to search for available devices, then displays them in the device list. Touch the Bluetooth device name. After the device is successfully registered, a Bluetooth connection is established by the system.
-
Page 12
Menu Item Description [Connection] Connect, disconnect, or delete registered Bluetooth device manually. Touch to delete registered device. To connect a registered Bluetooth device manually, touch the name of the device. To disconnect the device, touch the name of the connected device in the list. -
Page 13
Hands-free phoning To use this function you need to connect your mobile phone to this product via Bluetooth in advance (page 11). CAUTION For your safety, avoid talking on the phone as much as possible while driving. Making a phone call Press , then touch The phone menu screen appears. -
Page 14
Using the preset dial lists ▶Registering a phone number You can easily store up to six phone numbers per device as presets. Press , then touch Touch On the [Phone Book] screen, touch the desired name to display the contact’s phone number. -
Page 15
Menu Item Description [Invert Name] Select [Yes] to change the order of the first and last names in the phone book. Setting the private mode During a conversation, you can switch to private mode (talk directly on your mobile phone). Touch to turn private mode on or off. -
Page 16
▶The received call and dialled number histories • You cannot make a call to the entry of an unknown user (no phone number) in the received call history. • If calls are made by operating your mobile phone, no history data will be recorded in this product. -
Page 17: Av Source
Basic operation Description of Bluetooth audio playback screen Track number indicator Sets a repeat play range. Plays files in random order. Selects a file or folder from the list to playback. NOTE This function is available only when the AVRCP version of the Bluetooth device is 1.4 or higher.
-
Page 18: Smartphone Connection For Av Source
Source on the source list Touch on the AV Source screen. Touch the source key. When you select [AV OFF], the AV source is turned off. Smartphone connection for AV source When using a smartphone with this product, the settings are automatically configured according to the device to be connected.
-
Page 19: Radio
Radio Starting procedure Press Touch [Radio]. The Radio screen appears. Basic operation Description of Radio screen Recalls the preset channel stored to a key from memory. Stores the current broadcast frequency to a key. Displays the preset channel list. Select an item on the list ([1] to [6]) to switch to the preset channel. Selects the FM1, FM2, FM3, MW, or LW band.
-
Page 20
Touch to begin search. While searching, the six strongest broadcast frequencies will be stored under the preset channel keys in the order of their signal strength. To cancel the storage process Touch [Cancel]. Radio settings Press Touch then The system setting screen appears. Touch [AV Source Settings]. -
Page 21: Compressed Files
Menu Item Description [Auto PI] Searches for the same PI (Programme [On] [Off] Identification) code broadcast station from all frequency bands automatically when the broadcasting station contains RDS data. NOTE Even if you set to [Off], the PI search is automatically performed when the tuner cannot get a good reception.
-
Page 22
• A USB cable is required for connection. Unplugging a USB storage device Pull out the USB storage device from the USB cable. NOTES • Check that no data is being accessed before pulling out the USB storage device. • Turn off (ACC OFF) the ignition switch before unplugging the USB storage device. Starting procedure Plug the USB storage device into the USB cable (page 21). -
Page 23
Selects a file from the list. Touch a file on the list to playback. Touching a folder on the list shows its contents. You can play a file on the list by touching it. When you touch the memory select icon while connecting an Android device, it switches between internal memory and external memory. -
Page 24: Ipod
Selects a file from the list. Touch a file on the list to playback. Touching a folder on the list shows its contents. You can play a file on the list by touching it. Still image source Description of Still image screen Touch anywhere on the screen, the touch panel keys appear.
-
Page 25
iPod/iPhone compatibility This product supports only the following iPod/iPhone models and iPod software versions. Other may not work correctly. • iPhone 7 • iPhone 7 Plus • iPhone SE • iPhone 6s • iPhone 6s Plus • iPhone 6 • iPhone 6 Plus •… -
Page 26
When you touch text information, all information is displayed by scrolling only when the handbrake is applied. Sets a repeat play range for all in the selected list/the current song. Plays songs within the selected list/album randomly. Displays the hidden function bar. Selects a song from the list. -
Page 27: Aux
Select Apple Music Radio station. When you select a song, the audio source screen appears. The video image or sound can be played via the device connected to AUX input. CAUTION For safety reasons, video images cannot be viewed while your vehicle is in motion. To view video images, stop in a safe place and apply the handbrake.
-
Page 28: Using The Karaoke Function
Using the Karaoke Function WARNING • Do not attempt to operate the unit while driving. Make sure to pull off the road and park your vehicle in a safe location before attempting to use the controls on the device. • A driver should never sing with a microphone while driving. Doing so may result in an accident. •…
-
Page 29: Settings
Settings You can adjust various settings in the main menu. Displaying the setting screen Press Touch Touch one of the following categories, then select the options. System settings (page 29) Theme settings (page 34) Audio settings (page 35) Video settings (page 37) Bluetooth settings (page 11) System settings The menu items vary according to the source.
-
Page 30
To set the rear view camera as the camera for Camera View mode, set [Back Camera Input] to [On] (page 30). CAUTION Pioneer recommends the use of a camera which outputs mirror reversed images, otherwise the screen image may appear reversed. • Immediately verify whether the display changes to the rear view camera image when the gearstick is moved to REVERSE (R) from another position. -
Page 31
[System Language] Menu Item Description [System Language] Select the system language. NOTES • If the embedded language and the selected language setting are not the same, the text information may not display properly. • Some characters may not be displayed properly. [Restore Settings] Menu Item Description… -
Page 32
Menu Item Description [Touch panel calibration] Touch [Yes]. Touch four corners of the screen along the arrows. Press The adjustment results are saved. Press once again. Proceed to 16-point adjustment. Gently touch the centre of the [+] mark displayed on the screen. -
Page 33
Menu Item Description [Dimmer Duration] Adjust the time that the dimmer is turned on or off by dragging the cursors or touching You can use this function when [Dimmer Trigger] is set to [Time]. TIPS • Each touch of moves the cursor backwards or forwards in the 15 minute width. -
Page 34: Theme Settings
* With some pictures, you cannot adjust [Hue] and [Colour]. NOTES • The adjustments of [Brightness], [Contrast], and [Dimmer] are stored separately when your vehicle’s headlights are off (daytime) and on (nighttime). • [Brightness] and [Contrast] are switched automatically depending on the setting of [Dimmer Settings].
-
Page 35: Audio Settings
Audio settings The menu items vary according to the source. Some of the menu items become unavailable when the volume is set to mute. Menu Item Description [Graphic EQ] Select or customise the equaliser curve. [S.Bass] [Powerful] Select a curve that you want to use as the basis of customising [Natural] [Vocal] [Flat] then touch the frequency that you want to adjust.
-
Page 36
Menu Item Description [Speaker Level] Adjust the speaker output level of the listening position. [Front Left] [Front Right] Touch to select the listening position then [Rear Left] [Rear Right] select the output speaker. [Subwoofer] [Listening Touch to adjust the selected speaker output Position] level. -
Page 37: Video Settings
The following speakers can be adjusted: Front, Rear, Subwoofer. NOTE [Subwoofer Settings] is available only when [Subwoofer] is [On]. Press Touch then Touch [Crossover] or [Subwoofer Settings]. Touch to switch the speaker. Touch to set the cutoff position. Touch to set the cutoff slope. The following items can also be set.
-
Page 38: Favourite Menu
Favourite menu Registering your favourite menu items in shortcuts allows you to quickly jump to the registered menu screen by a simple touch on the [Favourites] screen. NOTE Up to 12 menu items can be registered in the favourite menu. Creating a shortcut Press then touch…
-
Page 39
• You can change the order of date display format: Day-month, Month-day. Changing the wide screen mode You can set the screen mode for AV screen and image files. Touch the screen display mode key. Screen display mode key Touch the desired mode. [Full] Displays 16:9 images on the full screen without changing the ratio. -
Page 40: Appendix
Sound from the iPod cannot be heard. here, contact your dealer or the nearest → The audio output direction may switch authorised Pioneer service facility. automatically when the Bluetooth and USB connections are used at the same Common problems time.
-
Page 41
If the error persists, displayed, reconnect the iPod and record the error message and contact your reset it. dealer or your nearest Pioneer service Error-02-60 centre. → The iPod firmware version is old. – Update the iPod version. -
Page 42
• It may not be possible to play some music • This product corresponds to a DivX file files from USB because of file display of up to 1 590 minutes 43 characteristics, file format, recorded seconds. Search operations beyond this application, playback environment, time limit are prohibited. -
Page 43
• If multiple subtitles are programmed to Sampling frequency: 8, 11.025, 12, 16, display within a very short time frame, 22.05, 24, 32, 44.1, 48 kHz such as 0.1 seconds, the subtitles may not WAV compatibility be displayed at the correct time. •… -
Page 44
Detailed information word mark and logos are regarding connected iPod registered trademarks owned by the Bluetooth SIG, Inc. and any use of such marks by PIONEER devices CORPORATION is under license. Other trademarks and trade names are those of their respective owners. -
Page 45
iPod malfunction due to the resulting Notice regarding video high temperature. • Do not leave the iPod in any location with viewing high temperatures. • Firmly secure the iPod when driving. Do Remember that use of this system for not let the iPod fall onto the floor, where commercial or public viewing purposes it may become jammed under the brake may constitute an infringement on the… -
Page 46
Heat visible. In that case, please consult your from the heater may break the LCD dealer or the nearest authorised Pioneer screen, and cool air from the cooler may Service Station. cause moisture to form inside this product, resulting in possible damage. -
Page 47
Chassis: Frequency: 178 mm × 100 mm × 159 mm 25 Hz/31.5 Hz/40 Hz/50 Hz/63 Hz/80 Nose: Hz/100 Hz/125 Hz/160 Hz/200 Hz/250 171 mm × 97 mm × 5 mm Weight: Slope: 1.1 kg -6 dB/oct, -12 dB/oct, -18 dB/oct, -24 dB/oct, -30 dB/oct, -36 dB/oct, OFF Display Phase: Normal/Reverse… -
Page 48
BMP decoding format: NOTE .bmp Specifications and design are subject to possible Decode Size: modifications without notice due to improvements. MAX: 1 920 (H) × 936 (W) MIN: 32 (H) × 32 (W) <USB video> DivX decoding format: Home Theater (Except ultra and HD) : avi, divx MPEG video decoding format: MPEG1 (Low Level), MPEG2 (Main Level),… -
Page 49
© 2018 PIONEER CORPORATION. All rights reserved. <OPM_MVHA210BTEW5_engb_A> EW…
Если вы только что приобрели автомагнитолу Pioneer MVH A210BT, то возможно вам будет нужен некоторый набор инструкций, чтобы правильно ее настроить. Раньше настройка автомагнитолы могла вызвать проблемы, но в наше время производители стараются сделать процесс максимально удобным, и в настоящее время даже начинающий пользователь сможет быстро настроить Pioneer MVH A210BT.
Многие люди выбирают автомагнитолу Pioneer MVH A210BT благодаря ее высокому качеству звука и дополнительным функциям. Сочетание этих двух качеств делает ее одной из лучших в ее ценовой категории. Тем не менее, без инструкций начинающий пользователь может столкнуться с трудностями, настраивая это устройство впервые. Поэтому мы предлагаем полное и понятное руководство по настройке автомагнитолы Pioneer MVH A210BT.
В этой статье вы найдете все детальные инструкции, необходимые для правильной настройки автомагнитолы Pioneer MVH A210BT. Мы покажем вам, как подключить ее к вашей машине, как настроить радио, подключить Bluetooth и многое другое. Следуя нашим инструкциям, вы сможете за короткое время использовать все функции этой автомагнитолы.
Содержание
- Как настроить Pioneer MVH A210BT: полное руководство
- 1. Установка и подключение
- 2. Основные настройки
- 3. Bluetooth
- 4. Навигация и мультимедиа
- 5. Запоминание настроек
- Подготовка к установке и подключению аудиосистемы
- Шаг 1: Выберите правильную аудиосистему
- Шаг 2: Приобретите необходимые кабели и инструменты
- Шаг 3: Отключите аккумулятор автомобиля
- Шаг 4: Установите аудиосистему
- Шаг 5: Выполните подключение
- Шаг 6: Проверьте подключение
- Первоначальные настройки устройства
- 1. Проверка содержимого упаковки
- 2. Установка головного устройства
- 3. Настройка языкового меню
- 4. Подключение телефона через Bluetooth
- 5. Настройка радиостанций
- 6. Настройка эквалайзера
- Подключение Bluetooth и настройка беспроводного соединения
- Шаг 1: Включите Bluetooth на устройстве
- Шаг 2: Найдите устройство в списке Bluetooth устройств
- Шаг 3: Соедините устройства
- Шаг 4: Настройте звуковые параметры
- Настройка радио и сохранение любимых станций
- Шаг 1: Включите радио
- Шаг 2: Выбор радиостанций
- Шаг 3: Сохранение любимых станций
- Настройка эквалайзера и звука в автомобиле
- Шаг 1: Настройка эквалайзера
- Шаг 2: Настройка звука
- Настройка динамиков и баланса звука на каждом из них
- Регулировка баланса звука
- Регулировка динамиков
- Использование USB и AUX-портов для воспроизведения музыки
- Подключение USB-накопителя
- Подключение устройства через AUX-порт
- Управление воспроизведением музыки
- Обновление прошивки и дополнительные настройки для улучшения работы
- Обновление прошивки
- Дополнительные настройки
- Вопрос-ответ
- Что делать, если музыка не проигрывается через Bluetooth?
- Как настроить радио на Pioneer MVH A210BT?
- Как установить время на Pioneer MVH A210BT?
- Как подключить аудио-устройство через AUX кабель?
- Можно ли использовать Pioneer MVH A210BT hands-free для звонков?
- Как включить режим «Demo» на Pioneer MVH A210BT?
- Какие форматы файлов поддерживает Pioneer MVH A210BT?
Как настроить Pioneer MVH A210BT: полное руководство
1. Установка и подключение
Перед началом настройки, убедитесь, что устройство правильно установлено и подключено. Для этого нужно подключить кабели питания, громкоговорители, антенну и USB-порт.
2. Основные настройки
После установки и подключения, включите устройство и перейдите в настройки. Здесь вы можете настроить язык, время, дату, радио и многое другое.
Чтобы вызвать меню настроек, нажмите кнопку «SRC» и выберите «Settings».
3. Bluetooth
Чтобы настроить Bluetooth, нужно зайти в меню Bluetooth и активировать функцию. Затем устройство автоматически начнет искать доступные устройства. Выберите нужное устройство и оно подключится.
На этом же экране можно настроить громкость звука и настроить функцию автоподключения.
4. Навигация и мультимедиа
Устройство Pioneer MVH A210BT также поддерживает функции навигации и мультимедиа. Для этого нужно зайти в соответствующие настройки и настроить нужные параметры.
Вы можете установить приложение для навигации на своем смартфоне и зеркалировать экран на экран устройства Pioneer MVH A210BT.
5. Запоминание настроек
Устройство Pioneer MVH A210BT запоминает все настройки, которые вы ввели. Таким образом, вы можете быстро и легко вернуться к ранее настроенным параметрам.
Чтобы сохранить настройки, нажмите кнопку «Menu», затем выберите «System». Здесь вы можете включить функцию автоматического сохранения настроек.
- Для успешной настройки Pioneer MVH A210BT нужно:
- Правильно установить и подключить устройство
- Настроить язык, дату и время в меню настроек
- Настроить Bluetooth, навигацию и мультимедиа в соответствующих меню
- Сохранить настройки для удобного использования в будущем.
Подготовка к установке и подключению аудиосистемы
Шаг 1: Выберите правильную аудиосистему
Перед покупкой аудиосистемы проверьте совместимость ее с вашим автомобилем. Определите необходимые функции, которые должны быть включены в систему.
Убедитесь, что вы выбрали подходящее качество звука и мощность для вашего автомобиля.
Шаг 2: Приобретите необходимые кабели и инструменты
Перед установкой аудиосистемы убедитесь, что у вас есть все необходимые инструменты и кабели. Инструменты могут включать в себя отвертки, пилы и ножницы, а кабели — ISO-разъемы, RCA-кабели, кабели питания и динамические кабели.
Также необходимо убедиться, что вы владеете необходимыми знаниями для установки аудиосистемы самостоятельно. Если нет, то обратитесь за помощью к специалисту.
Шаг 3: Отключите аккумулятор автомобиля
Прежде, чем начать установку, убедитесь, что вы отключили аккумулятор автомобиля. Это уменьшит риск короткого замыкания или порчи оборудования.
Шаг 4: Установите аудиосистему
Когда вы подготовлены, установите аудиосистему в соответствии с инструкциями. Обычно, аудиосистему можно установить в одном из двух мест: либо на месте стандартного радиоприемника, либо внизу диагонали с ручками и кнопками.
Шаг 5: Выполните подключение
Следуя инструкциям, выполните все соединения между аудиосистемой и кабелями. Обычно, штатный магнитолу необходимо отключить, путем отсоединения ISO-коннектора. Вам также потребуется подключить аудиосистему к фактическим динамикам и к источнику питания автомобиля.
Шаг 6: Проверьте подключение
После качественного подключения всех элементов, их необходимо проверить. Удостоверьтесь, что система правильно работает, обратите внимание на красный индикатор питания — он должен загореться, когда к автомобилю подается питание.
Если все работает правильно, то оставшиеся соединения можно сделать более надежными путем установки надлежащих зажимов или креплений.
Первоначальные настройки устройства
1. Проверка содержимого упаковки
Перед началом установки Pioneer MVH A210BT необходимо убедиться, что в упаковке присутствуют все компоненты: головное устройство, провода подключения, микрофон, инструкция по эксплуатации.
2. Установка головного устройства
В первую очередь следует установить головное устройство в автомобиль. Для этого необходимо снять старое устройство, если оно имеется, распаковать новое и подключить провода.
3. Настройка языкового меню
После того, как головное устройство установлено, необходимо выбрать язык меню. Для этого необходимо подключить устройство к питанию, включить его и перейти в меню настроек.
4. Подключение телефона через Bluetooth
Pioneer MVH A210BT может использоваться для воспроизведения музыки с телефона через Bluetooth. Для этого необходимо подключить телефон к устройству по Bluetooth.
5. Настройка радиостанций
Чтобы использовать радиоприемник, нужно настроить радиостанции. Для этого необходимо найти нужный диапазон частот и выбрать наиболее интересную радиостанцию.
6. Настройка эквалайзера
Pioneer MVH A210BT обладает функцией эквалайзера, позволяющей настраивать звук. Для этого необходимо зайти в меню настроек и выбрать нужные параметры.
Подключение Bluetooth и настройка беспроводного соединения
Шаг 1: Включите Bluetooth на устройстве
Для того чтобы подключить ваш телефон или планшет к Pioneer MVH A210BT по Bluetooth, необходимо включить Bluetooth на устройстве.
Шаг 2: Найдите устройство в списке Bluetooth устройств
Затем нужно найти Pioneer MVH A210BT в списке доступных Bluetooth устройств на вашем телефоне или планшете. Как правило, это устройство будет отображено в списке как «Pioneer MVH A210BT».
Шаг 3: Соедините устройства
Когда вы найдете Pioneer MVH A210BT в списке Bluetooth устройств на вашем телефоне или планшете, нажмите на него, чтобы соединить устройства. Они должны автоматически начать к синхронизации, и вам может потребоваться ввести пароль, который указан в руководстве пользователя вашего Pioneer MVH A210BT.
Шаг 4: Настройте звуковые параметры
После того как устройства успешно соединятся, вы можете настроить звуковые параметры для Bluetooth соединения. Настроить громкость, баланс и другие параметры вы можете просто на экране своего Pioneer MVH A210BT.
Настройка радио и сохранение любимых станций
Шаг 1: Включите радио
Перед настройкой радио необходимо включить радио-ресивер. Для этого нажмите на кнопку «Source» на лицевой панели или на пульте управления и выберите «Radio».
Шаг 2: Выбор радиостанций
После того, как вы выбрали режим радио, нажмите кнопку «Band» для выбора диапазона частот. Pioneer MVH A210BT поддерживает диапазоны частот AM и FM.
Для выбора нужной радиостанции используйте кнопки с цифрами на лицевой панели или на пульте управления. Для быстрого поиска радиостанций можно использовать автоматический поиск (требует нажатия кнопки «AS»).
Шаг 3: Сохранение любимых станций
Для сохранения любимых радиостанций настроек можно использовать функцию выбора предустановленных станций. Сначала выберите станцию, которую хотите сохранить, затем нажмите и удерживайте одну из кнопок с цифрами (1-6) на лицевой панели или на пульте управления. Сохраненная станция может быть воспроизведена при нажатии соответствующей кнопки.
- Совет: Обычно используют цифры от 1 до 6 для сохранения станций наиболее удобных для использования.
Настройка эквалайзера и звука в автомобиле
Шаг 1: Настройка эквалайзера
Первым шагом при настройке звука в автомобиле является настройка эквалайзера. Эквалайзер позволяет регулировать уровень звука на определенных частотах. Для того чтобы настроить эквалайзер на Pioneer MVH A210BT, следуйте следующим шагам:
- Нажмите кнопку «EQ» на главном экране.
- Выберите желаемый режим эквалайзера, такой как «Pop», «Rock», «Jazz» и т.д. Или нажмите кнопку «Custom» для настройки своей собственной эквалайзерной информации.
- Для настройки своей собственной эквалайзерной информации, нажмите на кнопки «Manual Settings» и «Edit Setting».
- Выберите нужную частоту и регулируйте ее уровень до желаемой точки.
- После того, как вы закончили настраивать свой эквалайзер, нажмите кнопку «Save» и назовите свой профиль эквалайзера.
Шаг 2: Настройка звука
После настройки эквалайзера, следующим шагом является настройка звука в общем. Для этого вы можете использовать регуляторы баланса и фейдера, которые позволяют настроить баланс звука между передними и задними колонками, а также между левой и правой сторонами.
- Нажмите кнопку «Audio» на главном экране.
- Выберите режим «Settings».
- Выберите пункт «Fader/Balance».
- Регулируйте баланс звука между передними и задними колонками с помощью регулятора «Fader».
- Регулируйте баланс звука между левой и правой сторонами с помощью регулятора «Balance».
- После того, как вы настроили звук по своему вкусу, сохраните настройки, нажав кнопку «Save».
Теперь вы можете наслаждаться прекрасным звуком в вашем автомобиле, настроенным на Pioneer MVH A210BT.
Настройка динамиков и баланса звука на каждом из них
Регулировка баланса звука
Для настройки баланса звука на Pioneer MVH A210BT нужно:
- Нажать на кнопку «Audio» на передней панели устройства.
- Выбрать кнопку «Fader/Balance» в верхнем меню.
- С помощью колеса настройки переместить курсор по горизонтальной панели на правую или левую сторону, чтобы установить нужный баланс между левым и правым динамиком.
- Нажать на курсор, чтобы сохранить настройки.
Регулировка динамиков
Для настройки уровня звука на каждом динамике Pioneer MVH A210BT нужно:
- Нажать на кнопку «Audio» на передней панели устройства.
- Выбрать кнопку «Balance/Fader» в верхнем меню.
- С помощью колеса настройки переместить курсор по вертикальной панели вверх и вниз, чтобы увеличить или уменьшить громкость каждого динамика.
- Нажать на курсор, чтобы сохранить настройки.
Примечание: Вы также можете использовать кнопку «EQ» на передней панели для выбора готовой звуковой настройки из списка для улучшения звучания, такой как «Rock», «Pop», «Classical» и т.д.
Использование USB и AUX-портов для воспроизведения музыки
Подключение USB-накопителя
Чтобы использовать USB-порт для воспроизведения музыки, необходимо подключить к нему USB-накопитель. Вставьте USB-накопитель в соответствующий порт на передней панели головного устройства. Перед использованием USB-накопителя убедитесь, что формат файлов поддерживается головным устройством. Форматы, которые поддерживает Pioneer MVH A210BT: MP3, WMA и WAV.
Подключение устройства через AUX-порт
Для подключения устройства через AUX-порт используйте соединительный кабель mini-jack (3,5 мм). Подключите один конец кабеля к выходу наушников устройства, а другой конец – к AUX-порту передней панели головного устройства. После этого выберите на головном устройстве источник звука – AUX.
Управление воспроизведением музыки
Чтобы управлять музыкальным воспроизведением, необходимо выбрать источник звука на головном устройстве и зафиксировать метод управления в боковой панели. Для USB-накопителя – это кнопки «назад», «вперед», «остановить/воспроизвести». Для AUX-источника настройте устройство на воспроизведение с помощью элементов управления на нем.
Обновление прошивки и дополнительные настройки для улучшения работы
Обновление прошивки
Для улучшения функциональности и исправления ошибок в работе Pioneer MVH A210BT можно обновить прошивку устройства. Для этого:
- Скачайте последнюю версию прошивки с официального сайта производителя
- Перекиньте файл прошивки на флеш-накопитель и подключите его к устройству
- Зайдите в настройки Pioneer MVH A210BT и выберите пункт «Обновление прошивки»
- Дождитесь окончания процесса обновления. При этом не выключайте устройство и не отключайте флеш-накопитель
После обновления прошивки проверьте работу устройства, а также новые функции, которые могут быть добавлены в прошивке.
Дополнительные настройки
Помимо обновления прошивки, существуют дополнительные настройки, которые могут улучшить работу Pioneer MVH A210BT. Некоторые из них:
- Настройка Басов, ВЧ и других параметров звука. Для этого зайдите в меню «Настройки Звука»
- Настройка радиоприемника и автосканирования станций. Для этого зайдите в меню «Радио»
- Настройка подключения Bluetooth и парение с устройствами. Для этого зайдите в меню «Bluetooth»
- Настройка микрофона и громкости звонков. Для этого зайдите в меню «Настройки Телефона»
- Настройка дисплея, яркости и цвета. Для этого зайдите в меню «Настройки Дисплея»
Выбирая настройки, уделите внимание особенностям и требованиям вашего автомобиля. Создайте конфигурацию звука и дисплея, которая будет оптимальной для вас во время вождения.
Вопрос-ответ
Что делать, если музыка не проигрывается через Bluetooth?
Сначала убедитесь, что Bluetooth включен на вашем телефоне и он зарегистрирован с прибором Pioneer MVH A210BT. Если все правильно, проверьте, что громкость на устройстве на максимуме и что музыкальный поток выбран правильно.
Как настроить радио на Pioneer MVH A210BT?
В меню выберите «Tuner» и затем нажмите «Band» для выбора диапазона. Затем используйте кнопки «Seek» или «Manual» для поиска станций. Нажмите и удерживайте «Presets» для сохранения любимых станций в память.
Как установить время на Pioneer MVH A210BT?
Перейдите в меню «Settings» и выберите «Clock». Чтобы изменить время, выберите «Time» и используйте кнопки влево/вправо для изменения часов и минут. Нажмите «Enter» для сохранения.
Как подключить аудио-устройство через AUX кабель?
Нажмите на «Source» кнопку и выберите «AUX». Подключите аудио-устройство через AUX кабель. Затем настройте громкость на устройстве и на Pioneer MVH A210BT.
Можно ли использовать Pioneer MVH A210BT hands-free для звонков?
Да, вы можете подключить свой телефон через Bluetooth и использовать Pioneer MVH A210BT hands-free для звонков. Кнопка ответа звонка находится на главной панели и имеет значок телефонной трубки.
Как включить режим «Demo» на Pioneer MVH A210BT?
Перейдите в меню «Settings», выберите «Demo», а затем «On». Режим «Demo» позволяет увидеть возможности прибора без необходимости подключения к музыкальному устройству.
Какие форматы файлов поддерживает Pioneer MVH A210BT?
Прибор поддерживает воспроизведение файлов MP3, WMA, WAV и FLAC через USB и Bluetooth. Для подключения кабеля USB, используйте разъем на задней панели прибора.
- Manuals
- Brands
- Pioneer Manuals
- Receiver
- MVH-A210BT
- Installation manual
-
Contents
-
Table of Contents
-
Bookmarks
Quick Links
MVH-A210BT
RDS AV RECEIVER
AUTORADIO MULTIMÉDIA RDS
SINTOLETTORE AV CON RDS
AV RECEPTOR RDS
RDS-AV-RECEIVER
RDS AV-ONTVANGER
Installation Manual
Manuel d’installation
Manuale d’installazione
Manual de instalación
Installationsanleitung
Installatiehandleiding
Related Manuals for Pioneer MVH-A210BT
Summary of Contents for Pioneer MVH-A210BT
-
Page 1
MVH-A210BT RDS AV RECEIVER AUTORADIO MULTIMÉDIA RDS SINTOLETTORE AV CON RDS AV RECEPTOR RDS RDS-AV-RECEIVER RDS AV-ONTVANGER Installation Manual Manuel d’installation Manuale d’installazione Manual de instalación Installationsanleitung Installatiehandleiding… -
Page 2: Important Safeguards
, use speakers over 50 W Pioneer does not recommend that you • It is extremely dangerous to allow cables (Maximum input power) and between 4 install this product yourself. This product is to become wound around the steering Ω…
-
Page 3: Rear Panel
control terminal, the auto-aerial relay Red (3*) Grey/black: Front right – or high range Power cord control terminal, or the aerial booster Connect to terminal controlled by right – power control terminal (max. 300 mA 12 ignition switch (12 V DC). Green: Rear left + or middle range left + V DC).
-
Page 4: Ipod/Iphone With Lightning Connector
USB — micro USB cable (Type USB A — iPod/iPhone and iPhone with 30-pin micro USB B) (supplied with CD-MU200 smartphone connector (sold separately)) USB Type-C cable (Type USB A — USB C) (supplied with CD-CU50 (sold NOTE separately)) For details on how to connect an external Connecting via the USB port Smartphone device using a separately sold cable, refer…
-
Page 5
NOTE External video component The appropriate setting is required to use and the display the external video component. For details, refer to the Operation Manual. WARNING NEVER install the rear display in a location that enables the driver to watch the video source while driving. -
Page 6: Precautions Before Installation
Installation you leave ample space behind the rear Installation with the panel and wrap any loose cables so they are not blocking the vents. holder Install the holder into the dashboard. Precautions before Before installing 5 cm Secure the mounting sleeve by using a installation screwdriver to bend the metal tabs •…
-
Page 7: Installing The Microphone
Use separately sold clamps to secure the lead where necessary inside the vehicle. For installation, contact your dealer or an Factory radio-mounting bracket authorised Pioneer Service Station for If the pawl interferes with assistance. installation, you may bend it down out of the way.
-
Page 8: Précautions Importantes
à un • Assurez-vous que les fils et les câbles ne technicien agréé Pioneer, qui possède les ATTENTION gêneront pas le mouvement des parties compétences et l’expérience nécessaires Votre nouveau produit et le •…
-
Page 9: Remarque Concernant Le Fil Bleu/Blanc
À raccorder à la borne commandée par Panneau arrière Câble d’alimentation l’interrupteur d’allumage (12 V c.c.). Raccordez les fils de même couleur ensemble. Orange/blanc À la borne de l’interrupteur d’éclairage. Position ACC Pas de position ACC Noir (terre) À la carrosserie (métal) du véhicule. •…
-
Page 10: Amplificateur De Puissance (Vendu Séparément)
Blanc/noir : Avant gauche – ou aigus À la sortie arrière Câble d’interface USB pour iPod/iPhone Amplificateur de gauche – Haut-parleur arrière (CD-IU52) (vendu séparément) Gris : Avant droit + ou aigus droit + puissance (vendu À la sortie avant iPhone muni d’un connecteur Lightning Gris/noir : Avant droit –…
-
Page 11
CAMÉRA DE RECUL. TOUTE AUTRE Reportez-vous à la section Câble À l’entrée vidéo Raccordement via le port USB UTILISATION RISQUE D’ENTRAÎNER DES d’alimentation à la page 3. Câbles RCA (vendus séparément) DOMMAGES MATÉRIELS OU CORPORELS. Ce produit REMARQUES Sortie vidéo (V OUT) PRÉCAUTION •… -
Page 12: Avant L’installation
Installation Connexion karaoké connaître la zone de déploiement des Précautions avant airbags avant. l’installation Avant l’installation PRÉCAUTION • Prenez contact avec le revendeur le plus • N’installez jamais ce produit dans des proche s’il s’avère nécessaire de pratiquer endroits : des trous ou d’effectuer d’autres –…
-
Page 13: Avant D’installer Ce Produit
Tirez sur l’appareil pour le dégager de son support. • Lors de l’installation, laissez suffisamment d’espace derrière le panneau arrière pour Clé d’extraction permettre une dissipation correcte de la chaleur et enroulez les câbles volants de Installation avec le Garniture façon qu’ils ne bloquent pas les orifices Rainure d’aération.
-
Page 14
Le microphone est monté sur le système de commandes du volant. Utilisez des pinces (vendues séparément) pour fixer le fil aux points nécessaires dans le véhicule. Pour l’installation, contactez votre revendeur ou un centre Pioneer agréé pour obtenir de l’aide. -
Page 16: Norme Di Sicurezza Importanti
50 W (massima potenza Pioneer, adeguatamente formati e dotati modo che non impediscano o ostacolino in ingresso) e tra i 4 Ω e gli 8 Ω (valore di dell’esperienza necessaria con i dispositivi…
-
Page 17: Pannello Posteriore
• Per evitare cortocircuiti, coprire il cavo Questo prodotto Per l’alimentazione Utilizzato per rilevare lo stato ON/OFF scollegato con nastro isolante. È Jack antenna In base al tipo di veicolo, la funzione di del freno a mano. Il cavo deve essere particolarmente importante isolare tutti i Ingresso remoto cablato 2* e 4* può…
-
Page 18
cavo viola e viola/nero dell’unità. Non Amplificatore di potenza (venduto Porta USB Connessione attraverso la porta collegare nulla ai cavi verde e verde/nero. separatamente) Cavo di prolunga USB da 1,5 m Collegare con il cavo RCA (venduto Cavo interfaccia USB per iPod/iPhone separatamente) (CD-IU52) (venduto separatamente) Amplificatore di… -
Page 19
Alimentazione Componente video esterno (venduto Componente video AVVERTENZA Cavo di alimentazione separatamente) UTILIZZARE L’INGRESSO SOLO PER LA Viola/bianco (REVERSE-GEAR SIGNAL esterno e display NOTA VIDEOCAMERA A VISTA POSTERIORE CON INPUT) Per usare il componente video esterno, è IMMAGINE SPECULARE O INVERTITA. Fare riferimento a Cavo di richiesta un’impostazione appropriata. -
Page 20: Precauzioni Prima Dell’installazione
Installazione Questo prodotto Ingresso AUX Cavo AV mini-jack (venduto separatamente) Mic dinamico (venduto separatamente) Precauzioni prima Prima dell’installazione dell’installazione • Rivolgersi al rivenditore se l’installazione richiede la creazione di fori o altre modifiche del veicolo. ATTENZIONE • Prima di effettuare l’installazione finale •…
-
Page 21: Installazione Con Il Supporto
Estrarre l’unità dal supporto. • Per assicurare un’adeguata dispersione Chiave di estrazione del calore del prodotto nel corso del suo utilizzo, durante l’installazione si Installazione con il raccomanda di lasciare ampio spazio Ghiera dietro il pannello posteriore e di supporto Scanalatura avvolgere i cavi allentati affinché…
-
Page 22
Il microfono è installato sul parasole. Il microfono è installato sul piantone dello sterzo. Utilizzare morsetti venduti separatamente per fissare il cavo laddove necessario all’interno del veicolo. Durante l’installazione, contattare il rivenditore o un centro Pioneer autorizzato per richiedere assistenza. -
Page 24: Precauciones Importantes
50 W (potencia de entrada máxima) y de servicio autorizado de Pioneer con manera que no obstruyan o dificulten la entre 4 Ω y 8 Ω (valor de impedancia). No formación y experiencia especial en…
-
Page 25: Panel Posterior
los cables de altavoz no utilizados; si se Conexión con la interfaz de control caso, es importante conectar 1* a 4* y 3* lado de la fuente de alimentación del dejan descubiertos podrían causar un desde el volante de su vehículo. Para a 2*.
-
Page 26: Amplificador De Potencia (Se Vende Por Separado)
a los cables violeta y violeta/negro de Amplificador de potencia (se vende por Puerto USB Conexión mediante el puerto esta unidad. No conecte nada a los cables separado) Cable alargador USB de 1,5 m verde y verde/negro. Conéctelo con un cable RCA (se vende Cable de interfaz USB para iPod/iPhone por separado) (CD-IU52) (vendido por separado)
-
Page 27: Componente De Vídeo Externo Y Pantalla
LA CÁMARA DE VISIÓN TRASERA A la entrada de vídeo NOTAS Conexión de karaoke ESPECULAR. CUALQUIER OTRO USO Cables RCA (se venden por separado) • Para instalar la cámara, siga las PODRÍA DERIVAR EN LESIONES O DAÑOS. Este producto instrucciones de montaje de la misma. Salida de vídeo (V OUT) Utilice una cámara cuyo cable de PRECAUCIÓN…
-
Page 28: Notas Acerca De La Instalación
Instalación la pantalla de ubicación del vehículo, y Anillo embellecedor podría disminuir el rendimiento de dicha Introduzca las llaves de extracción pantalla. suministradas en ambos lados de la unidad hasta que queden encajadas en su sitio. del vehículo. Consulte el manual del Precauciones previas a Extraiga la unidad del soporte.
-
Page 29: Instalación Del Micrófono
Asegúrese de que utiliza los tornillos instalación, póngase en contacto con su de este producto suministrados con este producto. distribuidor o con un punto de servicio técnico Pioneer autorizado para obtener ayuda. Fije este producto al soporte de Instalación del montaje de radio de fábrica.
-
Page 30: Wichtige Sicherheitshinweise
• Beachten Sie alle Vorschriften und Anleitung an dem Punkt außer Kraft setzen, an dem Sicherheitshinweise des Kfz-Herstellers, Pioneer empfiehlt nicht, dieses Produkt das Kabel von der Fahrgastzelle in den insbesondere die Vorschriften zu eigenhändig zu installieren. Dieses Produkt • Dieses Produkt, Applikationen und die Motorraum führt.
-
Page 31: Anmerkung Zum Blau/ Weißen Kabel
*Informationen zur Anschlussmethode Rot (3*) Anmerkung zum blau/ Stromkabel finden Sie unter Anschluss. Mit dem durch den Zündschalter (12 V • Die schwarze Leitung ist Masse. Bitte weißen Kabel DC) gesteuerten Terminal verbinden. erden Sie diese Leitung separat von der Verbinden Sie Leitungen derselben Masse von Hochstromprodukten, wie Farbe miteinander.
-
Page 32
Lautsprecherleitungen An den Frontausgang Leistungsverstärker iPhone mit 30-poligem Weiß: Front links + oder Hochton links + Frontlautsprecher Weiß/Schwarz: Front links – oder (separat erhältlich) An den Subwooferausgang Anschluss Hochton links – Subwoofer Grau: Front rechts + oder Hochton HINWEISE rechts + •… -
Page 33
USB-Anschluss Unterhaltungszwecken verwendet • Verbinden Sie nur die Heckkamera mit Miniklinkenstecker-AV-Kabel (separat USB-Verlängerungskabel 1,5 m werden. dem R.C IN. Schließen Sie kein anderes erhältlich) USB-Micro-USB-Kabel (Typ USB A-Micro- • In Rückansicht dargestellte Objekte Gerät an. Gelb USB B) (im Lieferumfang des CD-MU200 können weiter weg oder näher •… -
Page 34: Vor Der Installation Zu Beachten
Installation Karaoke-Verbindung Einzelheiten zum Entfaltungsbereich der Vor der Installation zu Frontairbags finden Sie im beachten Benutzerhandbuch Ihres Fahrzeugs. Vor dem Einbau VORSICHT • Dieses Produkt niemals so einbauen, • Wenden Sie sich an einen Fachhändler in dass: der Nähe, wenn zum Einbau des Geräts –…
-
Page 35: Einbau Mit Der Halterung
Fahrzeugpositionsanzeige; zudem kann Führen Sie die mitgelieferten 9 mm) oder Senkschrauben (5 mm × dies die Anzeigeleistung beeinträchtigen. Entriegelungsschlüssel bis zum 9 mm), je nach Form der Einrasten an beiden Seiten des Geräts Schraubbohrungen an der Halterung. ein. Ziehen Sie das Gerät aus der Halterung.
-
Page 36
Das Mikrofon ist an der Sonnenblende befestigt. Das Mikrofon ist an der Lenksäule befestigt. Sichern Sie das Kabel je nach Bedarf mit getrennt erhältlichen Kabelklemmen im Fahrzeuginnenraum. Wenden Sie sich zur Installation an Ihren Händler oder ein autorisiertes Pioneer- Kundencenter. -
Page 38
Als de handleiding • Gebruik dit product uitsluitend met een Pioneer raadt het u af om dit product zelf isolatie van de gele draad slijt als gevolg 12-volt batterij en negatieve aarde. Als u te monteren. Dit product is gemaakt om van contact met metalen onderdelen, de •… -
Page 39
brand en/of schade aan de producten witte draad, zelfs als de geluidsbron is Rood (3*) Stroomkabel veroorzaken als de massadraden uitgeschakeld. Aansluiten op de aansluiting die onder losraken. aansturing van de contactschakelaar • Zorg tijdens het vervangen/ staat (12 V DC). Achterpaneel terugplaatsen van een zekering dat u Sluit draden van dezelfde kleur op… -
Page 40
Handremschakelaar Naar uitgang voorkant Stroomversterker iPhone met een stekker Kant van de massa Luidspreker vóór Luidsprekerdraden (apart verkrijgbaar) Naar uitgang subwoofer met 30 pinnen Wit: Links vóór + of hoge tonen links + Subwoofer Wit/zwart: Links vóór – of hoge tonen OPMERKINGEN links –… -
Page 41
USB-aansluiting kleiner lijken dan dat deze in instellingen vereist. Raadpleeg de Op geel USB-verlengkabel 1,5 m werkelijkheid is. bedieningshandleiding voor meer Op rood, wit USB — micro USB-kabel (Type USB A — • De beeldweergave op volledige informatie. Op video-uitgang micro USB B) (meegeleverd met CD- schermgrootte kan tijdens het Op audio-uitgangen… -
Page 42: Voorzorgsmaatregelen Voor Installatie
Installatie Aansluiting voor karaoke • Monteer dit product nooit vóór of naast Voorzorgsmaatregelen de locatie in het dashboard, de deur, of voor installatie de stijl van waaruit de airbag geactiveerd kan worden. Raadpleeg de handleiding van uw voertuig ter referentie voor de locaties waar de airbags zich aan de LET OP voorkant bevinden.
-
Page 43: Installatie Met De Houder
tolerantiewaarde, dan neemt de kans op fouten in de beeldweergave in het voertuig toe en kan anderzijds een slechte beeldweergave veroorzaken. Sierrand Dashboard Steek de meegeleverde treksleutel in Monteer de sierrand. beide kanten van het apparaat totdat • Om verzekerd te zijn van voldoende ze op hun plaats klikken.
-
Page 44
De microfoon is bevestigd aan de zonneklep. De microfoon is bevestigd aan de stuurkolom. Gebruik apart verkrijgbare klemmen om de draad waar nodig in het voertuig vast te klemmen. Neem voor hulp bij de installatie contact op met uw dealer of een erkend Pioneer- servicecentrum. -
Page 48
© 2018 PIONEER CORPORATION. All rights reserved. <CRD5106-A> EW…
Автомобильная магнитола Pioneer MVH-A210BT — стильный дизайн и превосходный звук!
Большие возможности
Воспроизводить треки вы сможете с USB-носителей и мобильных устройств. С Bluetooth вы подключите смартфон к магнитоле без использования проводов.
С цифровым тюнером вы по-настоящему насладитесь прослушиванием радио. Удобно, что у вас будет возможность с точностью настраивать частоту и вносить понравившиеся радиостанции в память.
Яркий дисплей
На 6,2-дюймовом экране отобразится яркая картинка, и вы с удовольствием будете смотреть фильмы прямо в автомобиле.
Потрясающее звучание
Благодаря пиковой мощности в 4×50 Вт звук будет очень громким и чистым.
Для вашего комфорта
С помощью кнопки паузы вы моментально приглушите звук магнитолы в салоне при поступившем вызове или необходимости совершить звонок. А повторное нажатие восстановит первоначальную громкость.
Функция поиска по папкам и файлам поможет легко и быстро ориентироваться в большом количестве композиций.