инструкцияMakita UR3502

GB
Electric Grass Trimmer Instruction Manual
F
Coupe-Herbe Electrique Manuel d’instructions
D
Elektro-Trimmer Gebrauchsanleitung
I
Tosaerba elettrico Istruzioni per l’uso
NL
Elektrische grastrimmer Gebruiksaanwijzing
E
Cortadora de Cesped Manual de instrucciones
P
Aparador de Grama Elétrico Manual de instruções
DK
Elektrisk græstrimmer Brugervejledning
GR
Ηλεκτρικό κουρευτικό γκαζόν Εγχειρίδιο οδηγιών
TR
Elektrikli Çim Biçme Makinesi Kullanım Kılavuzu
PL
Wykaszarka Elektryczna Instrukcja obsługi
UR2300
Посмотреть инструкция для Makita UR3502 бесплатно. Руководство относится к категории электротриммеры, 5 человек(а) дали ему среднюю оценку 8.2. Руководство доступно на следующих языках: английский. У вас есть вопрос о Makita UR3502 или вам нужна помощь? Задайте свой вопрос здесь
Энергопитание
| Источник питания | Кабель переменного тока |
| Мощность | 1000 W |
Свойства
| Цвет товара | Black, Blue |
| Скорость вращения | 5700 RPM |
| Диаметр резки (макс) | 350 mm |
| Тип | Триммер |
| Защита насаждений | Да |
| Материал лезвия | Нейлон |
| Тип головки | Нейлоновая леска |
| Уровень звукового давления | 85.3 dB |
| Уровень звуковой мощности | 93.84 dB |
| Погрешность уровня звуковой мощности | 1.58 dB |
| Погрешность уровня звукового давления | 2.5 dB |
| Погрешность K | 1.5 m/s² |
Вес и размеры
показать больше
Не можете найти ответ на свой вопрос в руководстве? Вы можете найти ответ на свой вопрос ниже, в разделе часто задаваемых вопросов о Makita UR3502.
Какой вес Makita UR3502?
Makita UR3502 имеет вес 4900 g.
Насколько коротко необходимо скашивать траву?
Скашивайте траву, если она выше 4,5 см. Идеальная высота составляет от 3 до 4,5 см.
Как часто необходимо скашивать траву?
Весной траву необходимо скашивать каждую неделю, а летом — раз в две недели.
Можно ли косить газон по мокрой траве?
Можно, но в сухую погоду результат будет лучше. Когда трава влажная, легко образовываются комки травы, которые могут легко засорить косилку.
Инструкция Makita UR3502 доступно в русский?
К сожалению, у нас нет руководства для Makita UR3502, доступного в русский. Это руководство доступно в английский.
Не нашли свой вопрос? Задайте свой вопрос здесь
Узнавай о новинках и акциях первым
Вы успешно зарегистрированы на сайте.
Вам доступен личный кабинет пользователя.
Перейти к покупкам
Ваш пароль воcстановлен!
Теперь вы можете полноценно пользоваться
всеми возможностями нашего интернет-магазина.
Здравствуйте, Ваша претензия принята и зарегистрирована.
В течение 3-х рабочих дней Вам, на электронную почту, будет дан письменный ответ. В случае возникновения дополнительных вопросов, менеджер претензионного отдела свяжется с Вами.
Перейти к покупкам

Ваше сообщение об ошибке на сайте успешно отправлено.
Большое спасибо!
Добавить отзыв о магазине
Торг для данного товара сейчас не возможен!
Сколько вы готовы заплатить за этот товар?
Введите ваше ценовое предложение
Мы согласны с вашим предложением
Мы принимаем вашу цену, и вы можете купить товар по цене:
0 руб.
![]()
|
Electric Grass Trimmer |
Instruction Manual |
||
|
GB |
|||
|
Электрокоса |
Инструкция по эксплуатации |
||
|
RUS |
|||
|
Електротример |
Інструкція з експлуатації |
||
|
UA |
|||
UR2300
UR3502
|
UR2300 |
UR3502 |
|||||
|
1 |
1 |
|||||
|
3 |
3 |
|||||
|
4 |
2 |
4 |
2 |
|||
|
6 |
5 |
6 |
5 |
|||
|
7 |
7 |
|||||
|
12 |
8 |
8 |
||||
|
11 |
||||||
|
9 |
9 |
|||||
|
10 |
10 |
|||||
|
1 |
||||||
|
4 |
13 |
|||||
|
5 |
||||||
|
2 |
3 |
|||||
|
2 |
|
16 |
17 |
||
|
16 |
|||
|
8 |
9 |
||
|
20 |
2322 |
||
|
18 |
21 |
||
|
19 |
19 |
18 |
|
|
10 |
11 |
3

|
24 |
||
|
18 |
26 |
|
|
25 |
||
|
19 |
19 |
18 |
12
27
14
ENGLISH (Original instructions)
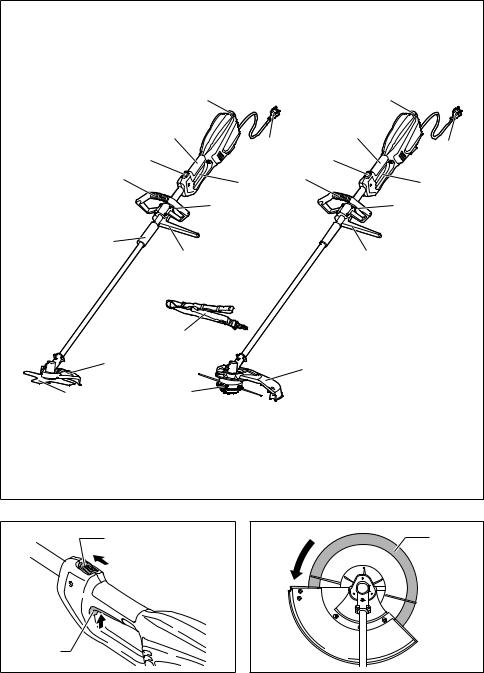
Explanation of general view
|
1 |
Cable holder |
10 |
Cutting tool |
21 |
Clamp washer |
|
2 |
Power supply cord (the shape |
11 |
Shoulder harness |
22 |
Cup |
|
may differ from country to |
12 |
Cushion |
23 |
Nut |
|
|
country) |
13 |
Most effective cutting area |
24 |
Nylon cutting head |
|
|
3 |
Rear handle |
14 |
Handle |
25 |
Cord cutter |
|
4 |
Lock-off lever |
15 |
Rubber part |
26 |
Cover |
|
5 |
Switch trigger |
16 |
Inner protector |
27 |
Hanger |
|
6 |
Front handle |
17 |
Outer protector |
28 |
80 – 100 mm |
|
7 |
Hanger (suspension point) |
18 |
Receive washer |
29 |
Spool |
|
8 |
Barrier |
19 |
Round bar |
||
|
9 |
Cutting tool guard (protector) |
20 |
Blade |
SPECIFICATIONS
|
Model |
UR2300 |
UR3502 |
|||||
|
Type of handle |
Loop handle |
||||||
|
Overall length |
1,630 mm |
||||||
|
Continuous rating input |
1,000 W |
||||||
|
No load speed |
7,800 min–1 |
6,500 min–1 |
|||||
|
Cutting tool |
Cutter blade |
Nylon cutting head |
|||||
|
Cutting width |
230 mm |
350 mm |
|||||
|
Net weight |
4.7 kg |
4.9 kg |
|||||
|
Safety class |
/ II |
||||||
|
• Due to our continuing program of research and |
|||||||
|
development, the specifications herein are subject to |
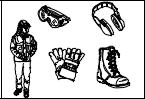
• Wear protective gloves. |
||||||
|
change without notice. |
|||||||
|
• Specifications may differ from country to country. |
|||||||
|
• Weight according to EPTA-Procedure 01/2003 |
• Wear sturdy boots with nonslip |
||||||
|
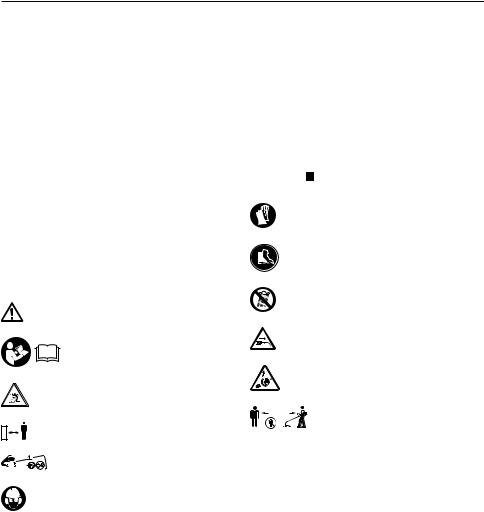
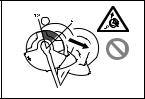
Symbols |
soles. Steeltoed safety boots are |
||||||
|
The following show the symbols used for the equipment. |
recommended. |
||||||
|
Be sure that you understand their meaning before use. |
|||||||
|
• Do not expose to moisture. |
|||||||
|
• Take particular care and attention. |
|||||||
|
• Disconnect the mains plug if the cord |
|||||||
|
• Read instruction manual. |
is damaged or entangled. |
||||||
|
• Avoid kickback. |
|||||||
• Danger; be aware of thrown objects.
|
15m(50FT) |
• Keep distance at least 15 m. |
|
|
• The distance between the tool and |
||
|
bystanders must be at least 15 m. |
•Wear a helmet, goggles and ear protection.
6
IMPORTANT SAFETY INSTRUCTIONS
 WARNING! Read all safety warnings and all instructions. Failure to follow the warnings and instructions may result in electric shock, fire and/or serious injury.
Save all warnings and instructions for future reference.
Intended use
1.The grass trimmer/ brushcutter/ string trimmer is only intended for cutting grass, weeds, bushes and undergrowth. It should not be used for any other purpose such as edging or hedge cutting as this may cause injury.
General instructions
1.Neverallowpeopleunfamiliarwiththeseinstructions, people (including children) with reduced physical, sensory or mental capabilities, or lack of experience and knowledge to use the tool. Children should be supervised to ensure that they do not play with the tool.
2.Before starting the tool, read this instruction manual to become familiar with the handling of the tool.
3.Do not lend the tool to a person with insufficient experience or knowledge regarding handling of brushcutters and string trimmers.
4.When lending the tool, always attach this instruction manual.
5.Handle the tool with the utmost care and attention.
6.Never use the tool after consuming alcohol or drugs, or if feeling tired or ill.
7.Never attempt to modify the tool.
8.Take care against injury from any device fitted for trimming the filament line length.After extending new cutter line always return the machine to its normal operating position before switching on.
9.Followtheregulationsabouthandlingofbrushcutters and string trimmers in your country.
Personal protective equipment
1.Wearsafetyhelmet,protectivegogglesandprotective gloves to protect yourself from flying debris or falling objects.
2.Wear ear protection such as ear muffs to prevent hearing loss.
3.Wear proper clothing and shoes for safe operation, such as a work overall and sturdy, non-slip shoes. Do not wear loose clothing or jewelry. Loose clothes, jewelry or long hair can be caught in moving parts.
4.When touching the cutting blade, wear protective gloves. Cutting blades can cut bare hands severely.
Work area safety
1.Operate the tool under good visibility and daylight conditions only. Do not operate the tool in darkness or fog.
2.Do not operate the tool in explosive atmospheres, such as in the presence of flammable liquids, gases or dust. The tool creates sparks which may ignite the dust or fumes.
3.During operation, never stand on an unstable or slippery surface or a steep slope. During the cold season, beware of ice and snow and always ensure secure footing.
4.During operation, keep bystanders or animals at least 15 m away from the tool. Stop the tool as soon as someone approaches.
5.Before operation, examine the work area for stones or other solid objects. They can be thrown or cause dangerous kickback and result in serious injury and/ or property damage.
6. WARNING: Use of this product can create dust containing chemicals which may cause respiratory or other illnesses. Some examples of these chemicals are compounds found in pesticides, insecticides, fertilizers and herbicides. Your risk from these exposures varies, depending on how often you do this type of work. To reduce your exposure to these chemicals: work in a well ventilated area, and work with approved safety equipment, such as those dust masks that are specially designed to filter out microscopic particles.
Electrical safety
1.Power tool plugs must match the outlet. Never modify the plug in any way. Do not use any adapter plugs with earthed (grounded) power tools. Unmodified plugs and matching outlets will reduce risk of electric shock.
2.Avoid body contact with earthed or grounded surfaces such as pipes, radiators, ranges and refrigerators. There is an increased risk of electric shock if your body is earthed or grounded.
3.Do not expose the tool to rain or wet conditions. Water entering the tool will increase the risk of electric shock.
4.Do not abuse the cord. Never use the cord for carrying, pulling or unplugging the power tool. Keep cord away from heat, oil, sharp edges or moving parts. Damaged or entangled cords increase the risk of electric shock.
5.Do not use the tool if the switch does not turn it on and off. Any tool that cannot be controlled with the switch is dangerous and must be repaired.
6.When operating a power tool outdoors, use an extension cord suitable for outdoor use. Use of a cord suitable for outdoor use reduces the risk of electric shock.
7.If operating a power tool in a damp location is unavoidable, use a residual current device (RCD) protected supply. Use of an RCD reduces the risk of electric shock.
8.Use of power supply via a RCD with a rated residual current of 30 mA or less is always recommended.
9.Prevent unintentional starting. Ensure the switch is in the off-position before connecting to power source, picking up or carrying the tool. Carrying power tools with your finger on the switch or energising power tools that have the switch on invites accidents.
7
10.Before use, check the supply and extension cord for signs of damage or ageing.
11.Ifthecordbecomesdamagedduringuse,disconnect the cord from the supply immediately. Do not touch the cord before disconnecting the supply.
12.Do not use the tool if the cords are damaged or worn.
13.Keep extension cord away from cutting elements.
Putting into operation
1.Before assembling or adjusting the tool, disconnect the plug from the power source.
2.Before handling the cutter blade, wear protective gloves.
3.Before plugging in, inspect the tool for damages, loose screws/nuts or improper assembly. Sharpen blunt cutter blade. If the cutter blade is bent or damaged, replace it. Check all control levers and switches for easy action. Clean and dry the handles.
4.Never attempt to switch on the tool if it is damaged or not fully assembled. Otherwise serious injury may result.
5.Remove any adjusting key or wrench before turning the tool on. A wrench or a key left attached to a rotating part of the tool may result in personal injury.
6.Adjust the shoulder harness and hand grip to suit the operator’s body size.
7.When plugging in, keep the cutting attachment clear of your body and other object, including the ground. It may rotate when starting and may cause injury or damage to the tool and/or property.
Operation
1.In the event of an emergency, switch off the tool immediately.
2.Ifyoufeelanyunusualcondition(e.g.noise,vibration) during operation, switch off the tool. Do not use the tool until the cause is recognized and solved.
3.Warning. The cutting attachment continues to rotate for a short period after turning the tool off. Don’t rush to contact the cutting attachment.
4.During operation, use the shoulder harness. Keep the tool on your right side firmly.
5.Do not overreach. Keep proper footing and balance at all times. Watch for hidden obstacles such as tree stumps, roots and ditches to avoid stumbling.
6.Never work on a ladder or tree to avoid loss of control.
7.Before using the machine and after any heavy impact or fall, check the condition before continuing work. Check the controls and safety devices for malfunction. If there is any damage or doubt, ask our authorized service center for the inspection and repair.
8.Do not touch the gear case. The gear case becomes hot during operation.
9.Take a rest to prevent loss of control caused by fatigue. We recommend taking a 10 to 20-minute rest every hour.
10.When you leave the tool, even if it is a short time, always withdraw the mains plug. The unattended tool with the mains plugged in may be used by unauthorized person and cause serious accident.
11.If grass or branches get caught between the cutting attachment and guard, always turn the tool off and withdraw the mains plug before cleaning. Otherwise the cutting attachment may rotate unintentionally and cause serious injury.
12.If the cutting attachment hits stones or other hard objects, immediately turn the tool off. Then withdraw the mains plug and inspect the cutting attachment.
13.Check the cutting attachment frequently during operation for cracks or damages. Before the inspection, withdraw the mains plug and wait until the cutting attachment stops completely. Replace damaged cutting attachment immediately, even if it has only superficial cracks.
14.Never cut above waist height.
15.Before starting the cutting operation, wait until the cutting attachment reaches a constant speed after turning the tool on.
16.When using metal blades, swing the tool evenly in half-circle from right to left, like using a scythe.
17.Hold the tool by insulated gripping surfaces only, because the cutter blade may contact hidden wiring. Cutter blades contacting a “live” wire may make exposed metal parts of the tool “live” and could give the operator an electric shock.
18.Always ensure that ventilation openings are kept clear of debris.
Cutting attachments
1.Use an applicable cutting attachment for the job in hand.
−Nylon cutting heads (string trimmer heads) are suitable for trimming lawn grass.
−Metal blades are suitable for cutting weeds, high grasses, bushes, shrubs, underwood, thicket, and the like.
−Never use other blades including metal multipiece pivoting chains and flail blades. It may result in serious injury.
2.Always use the cutting attachment guard properly suited for the cutting attachment used.
3.Never fit metal cutting elements with nylon cutting models.
4.When using metal blades, avoid “kickback” and always prepare for an accidental kickback. See the section “Kickback.”
Kickback (Blade thrust)
1.Kickback (blade thrust) is a sudden reaction to a caught or bound cutting blade. Once it occurs, the tool is thrown sideway or toward the operator at great force and it may cause serious injury.
2.Kickback occurs particularly when applying the blade segment between 12 and 2 o’clock to solids, bushes and trees with 3 cm or larger diameter.
8
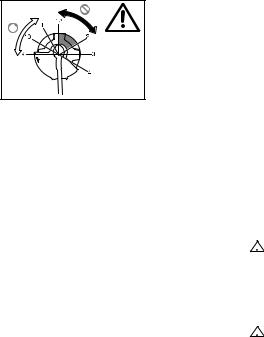
3.To avoid kickback:
−Apply the segment between 8 and 11 o’clock.
−Never apply the segment between 12 and 2 o’clock.
−Never apply the segment between 11 and 12 o’clock and between 2 and 5 o’clock, unless the operator is well trained and experienced and does it at his/her own risk.
−Never use cutting blades close to solids, such as fences, walls, tree trunks and stones.
−Never use cutting blades vertically, for such operations as edging and trimming hedges.
1.People with poor circulation who are exposed to excessive vibration may experience injury to blood vessels or the nervous system. Vibration may cause the following symptoms to occur in the fingers, hands or wrists: “Falling asleep” (numbness), tingling, pain, stabbing sensation, alteration of skin color or of the skin. If any of these symptoms occur, see a physician!
2.To reduce the risk of “white finger disease”, keep your hands warm during operation and well maintain the tool and accessories.
Transport
1.Before transporting the tool, turn it off and withdraw the mains plug. Attach the cover to the cutting blade.
2.When transporting the tool, carry it in a horizontal position by holding the shaft.
3.When transporting the tool in a vehicle, properly secure it to avoid turnover. Otherwise damage to the tool and other baggage may result.
Maintenance
1.Have your tool serviced by our authorized service center, always using only genuine replacement parts. Incorrect repair and poor maintenance can shorten the life of the tool and increase the risk of accidents.
2.Before doing any maintenance or repair work or cleaning the tool, always turn it off and withdraw the mains plug.
3.Always wear protective gloves when handling the cutting blade.
4.Always clean dust and dirt off the tool. Never use gasoline, benzine, thinner, alcohol or the like for the purpose. Discoloration, deformation or cracks of the plastic components may result.
5.After each use, tighten all screws and nuts.
6.Do not attempt any maintenance or repair not described in the instruction manual. Ask our authorized service center for such work.
7.Always use our genuine spare parts and accessories only. Using parts or accessories supplied by a third party may result in the tool breakdown, property damage and/or serious injury.
8.Request our authorized service center to inspect and maintain the tool at regular interval.
Storage
1.Before storing the tool, perform full cleaning and maintenance. Withdraw the mains plug. Attach the cover to the cutting blade.
2.Store the tool in a dry and high or locked location out of reach of children.
3.Do not prop the tool against something, such as a wall. Otherwise it may fall suddenly and cause an injury.
First aid
1.Always have a first-aid kit close by. Immediately replace any item taken from the first aid kit.
2.When asking for help, give the following information:
−Place of the accident
−What happened
−Number of injured persons
−Nature of the injury
−Your name
SAVE THESE INSTRUCTIONS.
 WARNING:
DONOTletcomfortorfamiliaritywithproduct(gained from repeated use) replace strict adherence to safety rules for the subject product. MISUSE or failure to follow the safety rules stated in this instruction manual may cause serious personal injury.
PARTS DESCRIPTION (Fig. 1)
FUNCTIONAL DESCRIPTION
 WARNING:
•Always be sure that the tool is switched off and unplugged before adjusting or checking the functions on the tool. Failure to switch off and unplug may result in serious personal injury from accidental start-up.
Power switch action (Fig. 2)
 WARNING:
•Before plugging in, always check to see that the switch trigger actuates properly and returns to the “OFF” position when released. Do not pull the switch trigger hard without sliding the lock-off lever. This can cause switch breakage. Operating a tool with a switch that does not actuate properly can lead to loss of control and serious personal injury.
To prevent the switch trigger from being accidentally pulled, a lock-off lever is provided.
To start the tool, slide the lock-off lever forward and then pull the switch trigger. Release the switch trigger to stop.
9

Nylon cutting head (Fig. 3)
NOTICE:
•Do not attempt to bump feed the head while the tool is operating at a high RPM. Bump feeding at a high RPM may cause damage to the nylon cutting head.
•The bump feed will not operate properly if the head is not rotating.
NOTE:
•Standard accessory varies depending on the model and country.
The nylon cutting head is a dual grass trimmer head provided with a bump & feed mechanism.
To feed out the nylon cord, bump the cutting head against the ground while the cutting head is rotating.
NOTE:
•If the nylon cord does not feed out while bumping the head, rewind/replace the nylon cord by following the procedures described under “Maintenance.”
Cable holder (Fig. 4)
Make a small loop of power cable, and hang it onto the cable holder.
ASSEMBLY
 WARNING:
•Always be sure that the tool is switched off and unplugged before carrying out any work on the tool.
Failure to switch off and unplug may result in serious personal injury from accidental start-up.
•Never start the tool unless it is completely assembled. Operation of the tool in a partially assembled state may result in serious personal injury from accidental start-up.
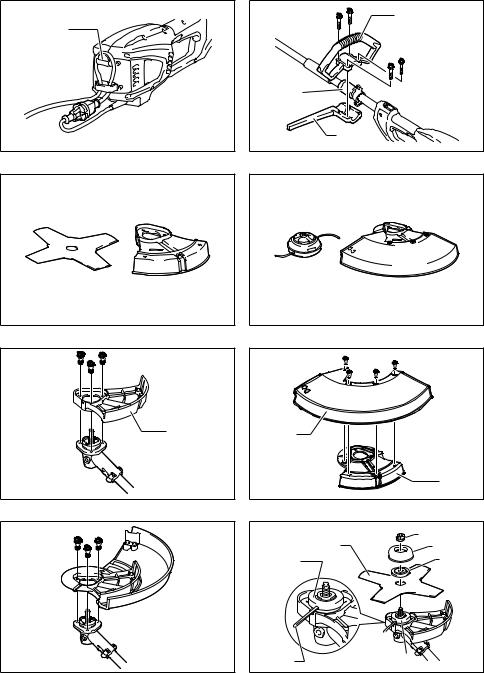
Installing the handle (Fig. 5)
 WARNING:
•Do not remove or shrink the spacer or cushion. The spacer keeps a certain distance between both hands. Setting the grip/barrier assembly close to the other grip beyond the length of the spacer may cause loss of control and serious personal injury.
Fit the handle and the barrier onto the rubber part on the shaft pipe. Adjust the location of the handle, and then tighten them with four bolts.
Approved combination of cutting tool and protector
 WARNING:
•Always use the tool with the approved combination of the safety equipments. Otherwise contact with a cutting tool may cause serious injury.
•Never use the tool without the guard illustrated in place. Failure to do so can cause serious personal injury.
NOTE:
•Standard accessory varies depending on the model and country.
For cutter blade (Fig. 6)
For nylon cutting head (Fig. 7)
Installing the protector for cutter blade (Fig. 
1.Align the holes on the inner protector and the holes of the gear case.
2.Then tighten them with three bolts.
Installing the protector for nylon head
 CAUTION:
•Take care not to injure yourself on the cutter for cutting the nylon cord.
•Do not forget to remove the cutter protector before using.
1.Align the four bolts on the outer protector along the holes on the inner protector. (Fig. 9)
2.Tighten them with the four bolts.
3.Align the holes on the inner protector and the holes of the gear case.
4.Tighten them with bolts. (Fig. 10)
Installing the cutter blade
 WARNING:
•The outside diameter of the cutter blade must be 230 mm. Never use any blade exceeding 230 mm in outside diameter.
 CAUTION:
•The cutter blade must be well polished, free of cracks or breakage. Polish or replace the cutter blade every three hours of operation.
•Always wear gloves when handling the cutter blade.
•Always attach the blade cover when the tool is not in use or is being transported.
•The cutter blade-fastening nut wears out in course of time. If there appears any wear or deformation on, replace the nut. Ask your local authorized service center to order it.
NOTICE:
• Be sure to use genuine cutter blade.
Turn the tool upside down so that you can replace the cutter blade easily. (Fig. 11)
1.Fit the receive washer on the axis.
2.Turnthereceivewasheruntilthenotchonthereceive washer comes on the notch of the gear case.
3.Insert the round bar through both notches so that receive washer can not be turned.
4.Put the blade on the receive washer.
5.Put the clamp washer on the blade.
6.Put the cup on the plate.
7.Tighten them with the nut by turning it counterclockwise while holding the round bar.
To remove the blade, perform the above steps in reverse.
Installing nylon cutting head (Fig. 12)
NOTICE:
• Be sure to use genuine nylon cutting head.
Turn the tool upside down so that you can replace the nylon cutting head easily.
NOTE:
• Remove the cover on the cord cutter before use.
1.Fit the receive washer on the axis.
2.Turnthereceivewasheruntilthenotchonthereceive washer comes on the notch of the gear case.
3.Insert the round bar through both notches so that receive washer can not be turned.
4.Fit the nylon cutting head by turning it counterclockwise.
5.Remove the round bar after installing the nylon cutting head.
To remove the nylon head, perform the above steps in revere.
10
 Loading…