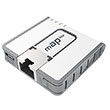
RouterBOARD mAP lite
Quick Setup Guide and Warranty Information
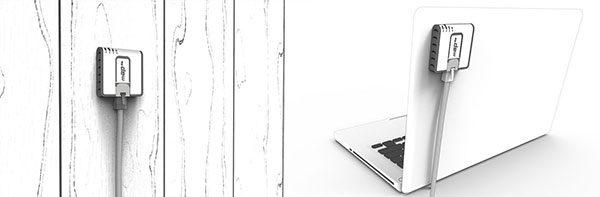
The mAP is a small AP device with one ethernet port, the Ethernet port supports powering by PoE.
First use
1. Plug the included USB power adapter into the power socket, and connect the USB cable to the mAP lite
2. Connect your Internet cable to the mAP lite Ethernet port
3. Wireless AP mode is enabled by default, you can connect from your computer to the SSID «MikroTik». Log
into the mAP router from your web browser by opening 192.168.88.1 in the address bar
Powering
The device accepts powering from the USB port or from the Ethernet port:
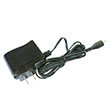
micro USB power jack accepts 5V DC, a USB 5V adapter is included with the product
The Ethernet port accepts passive Power over Ethernet 11-57V DC.
The Ethernet port also accepts PoE power from a 802.3af switch over
Under maximum load, the power consumption of this device is 4W.
Booting process
The device is preinstalled with MikroTik RouterOS software. It can be configured in several ways.
This device doesn’t come fitted with a Serial Port connector, so initial connection has to be done via the Ethernet
cable. Connect to wireless SSID «MikroTik» and open 192.168.88.1 in your web browser. Username is admin
and there is no password. In case IP connection is not available, Winbox can be used to connect to the MAC
address of the device. More information here:
In case you wish to boot the device from network, for example to use MikroTik Netinstall, hold the RESET button
of the device when starting it until the LED light turns off, then release the button and the device will start
looking for Netinstall servers.
By default, the device is preconfigured with a simple firewall on the WAN port, this configuration can be viewed
when first connecting to the Router via Winbox. It will ask whether to keep this configuration or clean it to use
your own. LAN/WLAN ports have DHCP server enabled.
Extension Slots and Ports
One 10/100 Ethernet port, supporting automatic cross/straight cable connection (Auto MDI/X), so you
can use either straight or cross-over cables for connecting to other network devices.
One Integrated Wireless 2.4GHz 802.11b/g/n 2×2 MIMO, Onboard PIF antennas, max gain 2dBi
One microUSB 2.0 port for powering only
Resetting the device
In case you wish to return the device to its original configuration, you can use the RESET button. Hold this button
during boot time until LED lights start flashing, then release the button to reset RouterOS configuration. You
can use this procedure if you have forgotten the password to access the device, or simply wish to return the unit
to its default configuration state.
See
www.routerboard.com
for more information. Contact
http://wiki.mikrotik.com/wiki/First_time_startup
support@mikrotik.com
for support questions.
the pins +4,5/-7,8 or +3,6/-1,2
9-Sep-15

Настройка MikroTik mAP lite (RBmAPL-2nD)
-
Описание
-
Отзывы (0)
Описание
MikroTik mAP lite (модель RBmAPL-2nD) — это Wi-Fi точка доступа на 2,4 ГГц с одним Ethernet портом и миниатюрными размерами. Ее можно использовать как для раздачи Wi-Fi, так и для приема.
Основные характеристики
|
 |
Устройство подойдет в качестве компактного Wi-Fi роутера для путешествий, поскольку позволяет следующее:
- Принять в гостинице интернет по кабелю и раздать по Wi-Fi на свои устройства.
- Принять интернет по Wi-Fi и раздать по кабелю в ноутбук.
mAP lite будет недорогим решением для раздачи Wi-Fi в номерах гостиницы. Все точки можно объединить в единую бесшовную Wi-Fi сеть, в которой клиент будет перемещаться от точки к точке без обрыва соединения. Для управления бесшовной сетью понадобится роутер MikroTik и настроенный на нем контроллер CAPsMAN.
Питание подается на устройство с помощью блока питания microUSB, входящего в комплект поставки. Также устройство можно удаленно запитать по технологии POE по стандартам Passive PoE или 802.3af/at с напряжением 10 – 60 В. Длина сетевого кабеля от POE инжектора до Wi-Fi точки может достигать 70 метров, при условии использования качественной медной “витой пары”.
Настройка точки доступа WiFi MikroTik mAP lite (RBmAPL-2nD)
Для настройки точки доступа WiFi MikroTik mAP lite воспользуйтесь инструкциями:
- Базовая настройка MikroTik →
- Настройка интернета →
- Настройка локальный сети LAN(+Bribge+DHCP) →
- Настройка WiFi 2.4ГГц и 5ГГц →
- Проброс портов →
- Настройка FireWall →
- Настройка VPN сервера L2TP →
- Настройка FastTrack Connection →
- Настройка CapsMan WiFi →
- Backup конфигурации →
- Настройка MikroTik IpSec VPN →
- Изменение MAC адреса →
- Сброс до заводских настроек →
- Строгий FireWall в MikroTik →
- Настройка MikroTik VPN IpSec →
- Блокировка сканера портов →
- Два провайдера, балансировка и автопереключение →
- Ограничение скорости →
- Настройка DNS сервера →
- Настройка DDNS MikroTik Cloud →
Комплект поставки
|
|
|
|
||
|
Точка доступа |
Блок питания |
Крепежный |
Характеристики
| Система | |
|---|---|
| Процессор: | AR9533 650 MГц |
| RAM: | 64 MB |
| Flash: | 16 MB |
| Разъемы: | 1 × 10/100 Base-TX (Cat. 5, RJ-45) Ethernet |
| ОС: | MikroTik RouterOS Level4 license |
| Радиомодуль | |
| Стандарты: | 802.11b/g/n |
| Режимы работы: | Access Point Station Point-to-point |
| Пропускная способность: | 300 Мбит/с |
| Частота: | 2,4 ГГц |
| Антенна | |
| Вид: | 2 × встроенные всенаправленные антенны |
| Усиление: | 1,5 дБи |
| Другое | |
| Размеры: | 48 × 49 × 11 мм |
| Вес: | |
| Электропитание: | microUSB 5V DC; PoE input 10V – 60V (802.3af/at or passive PoE) |
| Потребление: | ≤ 3.5 Вт |
| Рабочая температура: | от -30°C до +70°С |
Характеристики Wi-Fi
|
RATE (2.4 GHz) |
Tx (dBm) |
Rx (dBm) |
Tx (mW) |
|
|---|---|---|---|---|
| 1MBit/s | 22 | -96 | 158 | |
| 11MBit/s | 22 | -89 | 158 | |
| 6MBit/s | 20 | -93 | 100 | |
| 54MBit/s | 18 | -74 | 63 | |
| MCS0 | 20 | -93 | 100 | |
| MCS7 | 16 | -71 | 40 |
Результаты теста производительности
|
RBmAPL-2nD |
QCA9533 100M one port test |
||||||
|---|---|---|---|---|---|---|---|
|
Mode |
Configuration |
1518 byte |
512 byte |
64 byte |
|||
| kpps | Mbps | kpps | Mbps | kpps | Mbps | ||
| Bridging | none (fast path) | 8.1 | 98.4 | 23.5 | 96.3 | 173.6 | 88.9 |
| Bridging | 25 bridge filter rules | 8.1 | 98.4 | 23.5 | 96.3 | 70.9 | 36.3 |
| Routing | none (fast path) | 8.1 | 98.4 | 23.5 | 96.3 | 160.8 | 82.3 |
| Routing | 25 simple queues | 8.1 | 98.4 | 23.5 | 96.3 | 90.8 | 46.5 |
| Routing | 25 ip filter rules | 8.1 | 98.4 | 23.5 | 96.3 | 43.2 | 22.1 |
25.04.2017
Использование mAP-lite в качестве универсального беспроводного адаптера, для домашних устройств
Современное развитие беспроводной связи привело к тому, что многие люди, планируя ремонт дома или квартиры, не организуют проводную слаботочную разводку для сетевой коммутации, а используют возможности Wi-Fi. Однако, часто бывают ситуации, когда для определенного устройства остро необходимо кабельное подключение.
При переезде в новую квартиру, я обнаружил что в ней полностью отсутствует слаботочная разводка или какие-либо розетки «под Интернет», но не придал этому значения, т.к. все мои устройства отлично работают с Wi-Fi. Но столкнулся с необходимостью решения этой проблемы, когда решил установить дома старый Smart TV без Wi-Fi модуля и старый спутниковый ресивер, на котором с нерабочим комплектным USB-WiFi адаптером.
На помощь пришло устройство mAP lite от MikroTik. Внимание привлекло, что питание устройства может осуществляться не только посредством Passive PoE или PoE 802.3af/at (PoE+), но и с помощью USB-порта. Входящее напряжение устройства составляет всего 5 В! Удобство в том, что можно запитать mAP lite обычным USB-microUSB data-кабелем от любого разъема USB, на котором есть питание! В качестве маршрутизатора решил использовать RB2011UiAS-2HnD-IN
также от MikroTik, «по воздуху» с помощью mAP lite подключив к нему спутниковый ресивер и телевизор, при этом. Важно: устройства, работающие под управлением RouterOS, поддерживают режим работы Station Bridge, который позволяет сквозное прохождение трафика без необходимости настраивать NAT на клиентском устройстве. Все это дает возможность подключения к Вашей беспроводной сети любого устройства, не оснащенного модулем Wi-Fi – без прокладки кабелей, без использования дополнительных электрических розеток, и с минимальными затратами!
Настройка устройства для подключения к WiFi-сети очень проста. Для примера, все настройки мы будем осуществлять с помощью программы winbox.
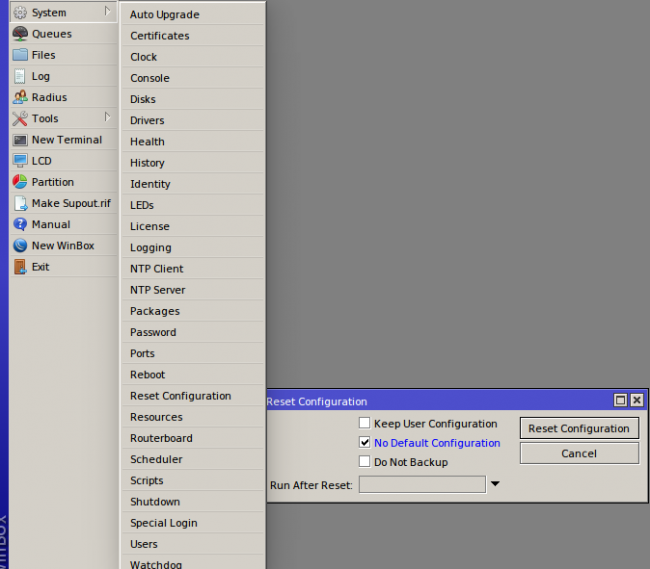
Для начала подключимся к устройству в соответствии с кратким руководством и выполним полный сброс устройства — System → Reset Configuration.
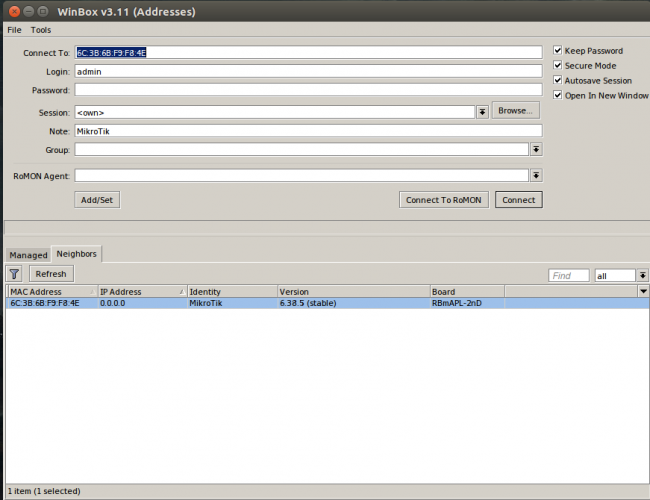
Далее подключим устройство напрямую к компьютеру, с которого будем осуществлять настройку используя winbox.
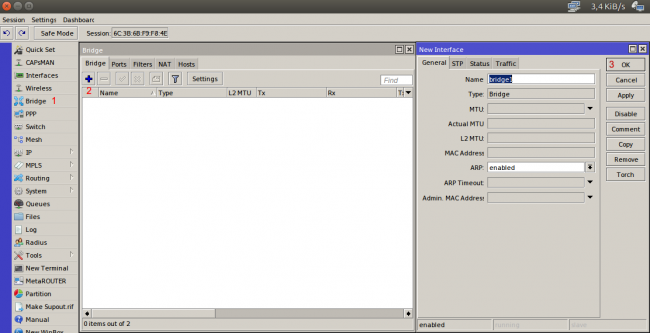
После первого подключения, открываем меню «Bridge» и добавляем новый интерфейс-бридж.
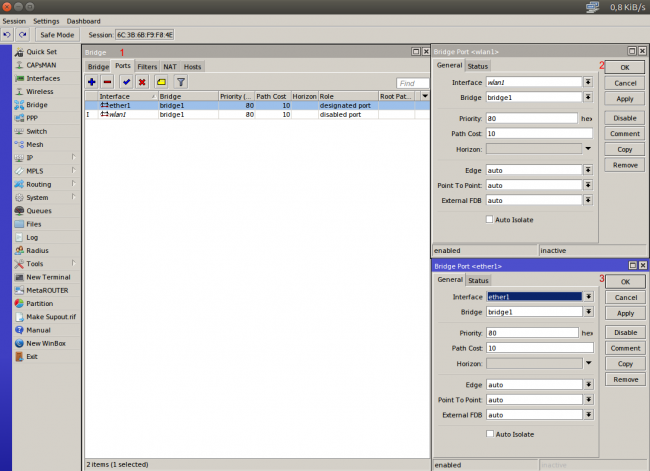
Далее переходим на вкладку «Ports» и объединяем два новых порта в созданный бридж — ether1 и wlan1, подтверждая добавление нажатием кнопки OK при добавлении каждого интерфейса.
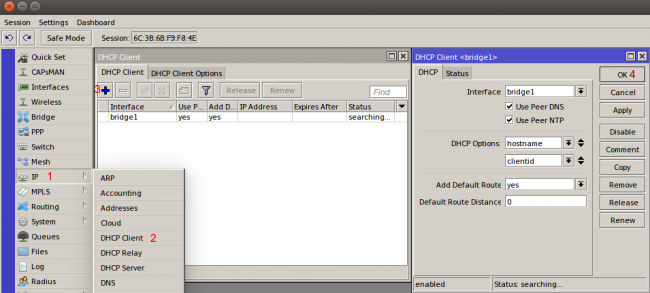
Теперь необходимо, чтобы устройство получало настройки сети (адрес, ДНС, шлюз), от нашего центрального маршрутизатора. Для этого мы включаем функцию DHCP-client на интерфейсе созданного бриджа: открываем IP→DHCP Client и нажимаем «Добавить». Необходимо убедиться, что в поле «Interface» выбран интерфейс созданного бриджа.
Далее осуществляем подключение нашего устройства к общей сети. Для этого, для начала, нужно указать ключ, который необходим для подключения к Wi-Fi: открываем слева меню «Wireless», вкладку «Security Profiles» и добавляем новый профиль безопасности. В профиле необходимо заполнить поле с ключем и выбрать режимы безопасности актуальный для настроек подключения к вашей сети.

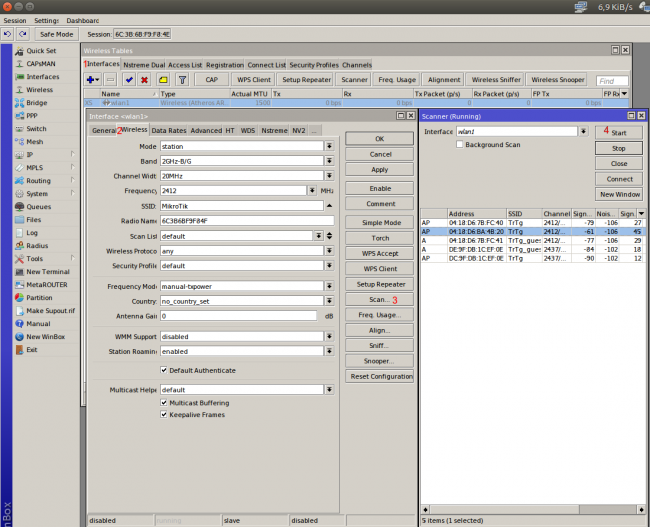
Выполняем подключение к сети: открываем вкладку «Interfaces» и двойным кликом открываем настройки сетевого интерфейса; там открываем вкладку «Wireless» и нажимаем кнопку «Scan». Затем нажимаем кнопку «Start». Когда в поле ниже отобразятся сети Wi-Fi, выберете левой кнопкой вашу сеть и нажмите «Connect». После этого необходимо проверить, чтобы устройство работало в режиме station-bridge (Mode = station bridge).
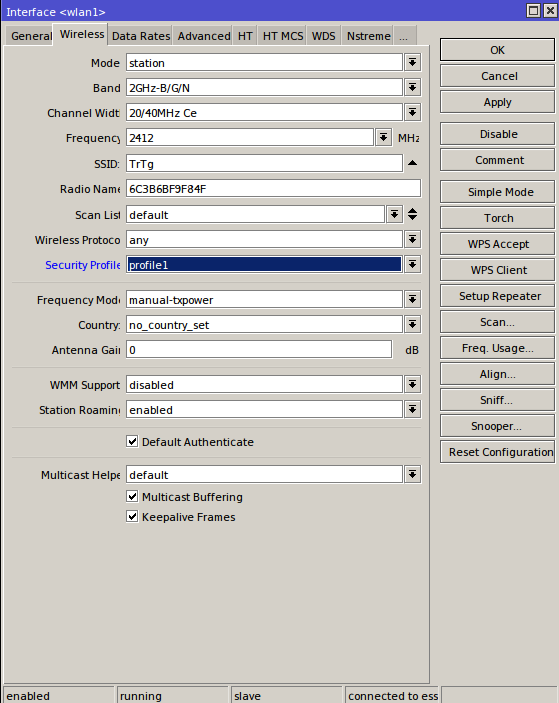
«Финальный штрих»: выбираем в поле Security Profile профиль безопасности с нашим именем.
MikroTik Map Lite — это компактное и мощное устройство, предназначенное для настройки и управления сетью. Если вы новичок в области сетевых технологий, то вам может понадобиться подробная инструкция для настройки этого устройства. В статье мы пошагово рассмотрим основные этапы настройки MikroTik Map Lite, чтобы вы смогли без проблем настроить и использовать его для своей сети.
Первым шагом при настройке MikroTik Map Lite является подключение устройства к вашему роутеру или модему. У вас должно быть стабильное соединение с интернетом, чтобы правильно настроить MikroTik Map Lite. Подключите устройство к роутеру с помощью сетевого кабеля и убедитесь, что оно было подключено правильно.
Затем вам потребуется открыть веб-браузер и ввести IP-адрес MikroTik Map Lite в адресной строке. По умолчанию, IP-адрес устройства — 192.168.88.1. Если вы впервые настраиваете MikroTik Map Lite, то вам может потребоваться ввести логин и пароль администратора. По умолчанию, логин — admin, а пароль — без пароля. В целях безопасности рекомендуется установить свой пароль после первого входа.
После успешного входа вы попадете в интерфейс управления MikroTik Map Lite. Здесь вы можете настроить различные параметры сети, создать безопасные соединения, ограничить доступ к определенным ресурсам и многое другое. Для начала рекомендуется обновить прошивку устройства до последней версии, чтобы учесть все последние исправления и улучшения.
Микротик Map Lite: подробная настройка для начинающих
Микротик Map Lite — это мощное и компактное устройство, предназначенное для настройки и управления сетью. В данной инструкции мы рассмотрим подробную настройку Map Lite для начинающих.
-
Подключение к устройству
Для начала работы с Map Lite, подключите его к компьютеру с помощью Ethernet-кабеля. Удостоверьтесь, что устройство подключено к источнику питания.
-
Настройка IP-адреса
Откройте веб-браузер и введите в адресной строке IP-адрес устройства (например, 192.168.88.1). Введите логин и пароль (admin по умолчанию).
После успешной аутентификации, перейдите в раздел «IP» и выберите «Addresses». Нажмите «Add new» и введите IP-адрес, маску подсети и шлюз по умолчанию для устройства.
-
Настройка интернет-подключения
Для подключения к интернету, перейдите в раздел «PPP» и выберите «Interface». Нажмите «Add new» и выберите тип подключения (например, PPPoE для ADSL-подключения). Введите необходимые настройки, предоставленные вашим интернет-провайдером.
-
Настройка беспроводной сети
Перейдите в раздел «Wireless» и выберите «Interface». Нажмите «Add new» и настройте параметры беспроводной сети, такие как название сети (SSID) и тип шифрования (WPA2 рекомендуется).
-
Настройка DHCP-сервера
Для автоматической выдачи IP-адресов в сети, перейдите в раздел «IP» и выберите «DHCP Server». Нажмите «DHCP Setup» и введите пул IP-адресов для выдачи клиентам.
-
Настройка межсетевого экрана (Firewall)
Для обеспечения безопасности сети, перейдите в раздел «IP» и выберите «Firewall». Настройте правила для блокировки нежелательного трафика и открытия портов для необходимых сервисов.
-
Настройка VPN (при необходимости)
Если вам требуется создать защищенное подключение к сети, перейдите в раздел «PPP» и выберите «Interface». Нажмите «Add new» и выберите тип VPN-подключения (например, PPTP). Введите необходимые настройки VPN-сервера.
После выполнения всех вышеперечисленных шагов, ваш Микротик Map Lite должен быть полностью настроен и готов к использованию. Запомните, что безопасность вашей сети — это важный аспект, поэтому регулярно обновляйте пароли и проверяйте настройки межсетевого экрана.
Надежная настройка MikroTik Map Lite для обеспечения безопасности сети
Настройка MikroTik Map Lite является важным шагом для обеспечения безопасности вашей сети. В этом разделе мы расскажем о нескольких ключевых мероприятиях, которые помогут усилить безопасность вашего устройства.
1. Обновление прошивки
Перед началом настройки необходимо установить последнюю версию прошивки для MikroTik Map Lite. Это важно, так как новые версии прошивки содержат исправления уязвимостей и добавленную безопасность.
2. Установка паролей
При первом входе в систему по умолчанию имя пользователя и пароль для доступа к устройству могут быть установлены вручную. Убедитесь, что задаете сложные пароли и изменяете их регулярно. Используйте комбинацию букв, цифр и специальных символов.
3. Ограничение доступа
Настройте доступ к устройству только для необходимых пользователей. Отключите доступ по умолчанию и ограничьте его только на нужные порты и протоколы.
4. Установка брандмауэра
Включите брандмауэр на устройстве и настройте его по своему усмотрению. Можно задать правила, которые разрешают или блокируют определенные типы трафика, а также заблокировать доступ к определенным портам или IP-адресам.
5. Регулярное резервное копирование
Регулярно делайте резервные копии конфигураций, чтобы в случае проблем или сбоев можно было быстро восстановить устройство в работоспособное состояние.
6. Фильтрация трафика
Настройте фильтрацию трафика для определенных приложений или IP-адресов. Это поможет предотвратить несанкционированный доступ пользователей к определенным ресурсам.
7. Мониторинг
Включите мониторинг, чтобы получать оповещения о потенциальных проблемах или аномальной активности в вашей сети.
Это лишь некоторые меры, которые можно принять для обеспечения безопасности вашей сети при настройке MikroTik Map Lite. Всегда помните о важности безопасности и следуйте лучшим практикам настройки и обслуживания вашего устройства.
Safety Warnings
Before you work on any equipment, be aware of the hazards involved with electrical circuitry, and be familiar with standard practices for preventing accidents.
Ultimate disposal of this product should be handled according to all national laws and regulations.
The Installation of the equipment must comply with local and national electrical codes.
This unit is intended to be installed in the rackmount. Please read the mounting instructions carefully before beginning installation. Failure to use the correct hardware or to follow the correct procedures could result in a hazardous situation to people and damage to the system.
This product is intended to be installed indoors. Keep this product away from water, fire, humidity or hot environments.
Use only the power supply and accessories approved by the manufacturer, and which can be found in the original packaging of this product.
Read the installation instructions before connecting the system to the power source.
We cannot guarantee that no accidents or damage will occur due to the improper use of the device. Please use this product with care and operate at your own risk!
In the case of device failure, please disconnect it from power. The fastest way to do so is by unplugging the power plug from the power outlet.
It is the customer’s responsibility to follow local country regulations, including operation within legal frequency channels, output power, cabling requirements, and Dynamic Frequency Selection (DFS) requirements. All Mikrotik radio devices must be professionally installed.
Exposure to Radio Frequency Radiation: This MikroTik equipment complies with the FCC, IC, and European Union radiation exposure limits set forth for an uncontrolled environment. This MikroTik device should be installed and operated no closer than 20 centimeters from your body, occupational user, or the general public.
Quick Setup Guide
The mAP is a small wireless access point with one ethernet port, the ethernet port supports powering by PoE. Depending on software configuration, it can function as a wireless client, an access point or a repeater.
First use
- Connect the device to the included power adapter;
- Connect your computer to the wireless network;
- Open 192.168.88.1 in your web browser to start the configuration;
- User name: admin and there is no password by default (or, for some models, check user and wireless passwords on the sticker).;
Powering
The device accepts power from the USB port or from the Ethernet port.
- Micro USB power jack accepts 5 V DC, a USB 5 V adapter is included with the product.
- The Ethernet port accepts passive Power over Ethernet 11-57 V DC.
- The Ethernet port also accepts PoE power from an 802.3af switch over the pins +4,5/-7,8 or +3,6/-1,2.
Under maximum load, the power consumption of this device is 4 W.
Booting process
RouterOS includes many configuration options in addition to what is described in this document. We suggest starting here to get yourself accustomed to the possibilities: https://mt.lv/help![]()
In case IP connection is not available, the Winbox tool (https://mt.lv/winbox![]() ) can be used to connect to the MAC address of the device from the LAN side (all access is blocked from the internet port by default).
) can be used to connect to the MAC address of the device from the LAN side (all access is blocked from the internet port by default).
For recovery purposes, it is possible to boot the device from the network, see section Buttons and jumpers
Extension Slots and Ports
- One 10/100 Ethernet port, supporting automatic cross/straight cable connection (Auto MDI/X), so you can use either straight or cross-over cables for connecting to other network devices.
- One Integrated Wireless 2.4GHz 802.11b/g/n 2×2 MIMO, Onboard PIF antennas, max gain 2dBi.
- One microUSB 2.0 port for powering only.
Buttons and jumpers
RouterBOOT reset button has the following functions:
- Hold the button before powering on the device, and at power-up, the button will force load the backup boot loader. Continue holding the button for the other two functions of this button.
- Release the button when green LED starts flashing, to reset RouterOS configuration. To not load the backup boot loader, you can start holding the button after power is already applied.
- Release the button after LED is no longer flashing (~20 seconds) to cause the device to look for Netinstall servers (required for reinstalling RouterOS over the network).
Regardless of the above option used, the system will load the backup RouterBOOT loader if the button is pressed before power is applied to the device. Useful for RouterBOOT debugging and recovery.
Operating System Support
The device supports RouterOS software version 7. The specific factory-installed version number is indicated in the RouterOS menu /system resource.
To avoid pollution of the environment, please separate the device from household waste and dispose of it in a safe manner, such as in designated waste disposal sites. Familiarize yourself with the procedures for the proper transportation of the equipment to the designated disposal sites in your area.
Federal Communication Commission Interference Statement
FCC ID: TV7MAPL2ND![]()
This equipment has been tested and found to comply with the limits for a Class B digital device, pursuant to Part 15 of the FCC Rules. These limits are designed to provide reasonable protection against harmful interference in a residential installation.
This equipment generates, uses and can radiate radio frequency energy and, if not installed and used in accordance with the instructions, may cause harmful interference to radio communications. However, there is no guarantee that interference will not occur in a particular installation. If this equipment does cause harmful interference to radio or television reception, which can be determined by turning the equipment off and on, the user is encouraged to try to correct the interference by one of the following measures:
- Reorient or relocate the receiving antenna.
- Increase the separation between the equipment and receiver.
- Connect the equipment into an outlet on a circuit different from that to which the receiver is connected.
- Consult the dealer or an experienced radio/TV technician for help.
FCC Caution: Any changes or modifications not expressly approved by the party responsible for compliance could void the user’s authority to operate this equipment.
This device complies with Part 15 of the FCC Rules. Operation is subject to the following two conditions: (1) This device may not cause harmful interference, and (2) this device must accept any interference received, including interference that may cause undesired operation. This device and its antenna must not be co-located or operation in conjunction with any other antenna or transmitter.
IMPORTANT: Exposure to Radio Frequency Radiation.
This equipment complies with the FCC RF radiation exposure limits set forth for an uncontrolled environment. This equipment should be installed and operated with a minimum distance of 20 cm between the radiator and any part of your body.
Innovation, Science and Economic Development Canada
IC: TV7MAPL2ND
This device complies with Industry Canada’s licence-exempt RSS standard(s). Operation is subject to the following two conditions: (1) this device may not cause interference, and (2) this device must accept any interference, including interference that may cause undesired operation of the device.
Le présent appareil est conforme aux CNR d’Industrie Canada applicables aux appareils radio exempts de licence. L’exploitation est autorisée aux deux conditions suivantes : (1) l’appareil ne doit pas produire de brouillage, et (2) l’utilisateur de l’appareil doit accepter tout brouillage radioélectrique subi, même si le brouillage est susceptible d’en compromettre le fonctionnement.
IMPORTANT: Exposure to Radio Frequency Radiation.
This equipment complies with the IC radiation exposure limits set forth for an uncontrolled environment. This equipment should be installed and operated with a minimum distance of 20 cm between the radiator and any part of your body.
Cet équipement est conforme aux limites d’exposition au rayonnement IC définies pour un environnement non contrôlé. Cet équipement doit être installé et utilisé à une distance minimale de 20 cm entre le radiateur et toute partie de votre corps.
This Class B digital apparatus complies with Canadian ICES-003.
Cet appareil numérique de la classe [B] est conforme à la norme NMB-003 du Canada.
CAN ICES-003 (B) / NMB-003 (B)
UKCA marking

Eurasian Conformity Mark
|
Частотный диапазон |
Мощность передатчика |
|---|---|
|
2400-2483.5 МГц |
≤100 мВт |
*Доступные частотные каналы могут различаться в зависимости от модели продукта и сертификации.
Информация о дате изготовления устройства указана в конце серийного номера на его наклейке через дробь. Первая цифра означает номер года (последняя цифра года), две последующие означают номер недели.
Изготовитель: Mikrotikls SIA, Aizkraukles iela 23, Riga, LV-1006, Латвия, support@mikrotik.com. Сделано в Китае, Латвии или Литве. Cм. на упаковке.
Для получения подробных сведений о гарантийном обслуживании обратитесь к продавцу. Информация об импортерах продукции MikroTik в Российскую Федерацию: https://mikrotik.com/buy/europe/russia
Продукты MikroTik, которые поставляются в Евразийский таможенный союз, оцениваются с учетом соответствующих требований и помечены знаком EAC, как показано ниже:

Norma Oficial Mexicana
Rango de frecuencia (potencia de salida máxima): 2400-2483.5 MHz (30 dBm). Los canales de frecuencia disponibles pueden variar según el modelo y la certificación del producto.
EFICIENCIA ENERGETICA CUMPLE CON LA NOM-029-ENER-2017.
La operacion de este equipo esta sujeta a las siguientes dos condiciones:
- Es posible que este equipo o dispositivo no cause interferencia perjudicial y.
- Este equipo debe aceptar cualquier interferencia, incluyendo la que pueda causar su operacion no deseada.
Fabricante: Mikrotikls SIA, Brivibas gatve 214i, Riga, LV-1039, Latvia.
País De Origen: Letonia; Lituania; China (Republica Popular); Estados Unidos De America; Mexico.
Por favor contacte a su distribuidor local para preguntas regionales específicas. La lista de importadores se puede encontrar en nuestra página de inicio – https://mikrotik.com/buy/latinamerica/mexico.
The National Commission for the State Regulation of Communications and Informatization by Ukraine
Виробник: Mikrotikls SIA, Brivibas gatve 214i Рига, Латвія, LV1039.
Робоча частота (Максимальна вихідна потужність): 2400-2483.5 МГц (20 дБм).
Справжнім Mikrotikls SIA заявляє, що маршрутизатор відповідає основним вимогам та іншим відповідним положенням директиви 2014/53/EC, а також суттєвим вимогам Технічного регламенту радіообладнання, затвердженого постановою Кабінету Міністрів України від 24 травня 2017 року № 355.
Для експлуатації в Україні необхідно отримати дозвіл на експлуатацію у порядку, затвердженому рішенням НКРЗІ від 01.11.2012 № 559, зареєстрованому в Міністерстві юстиції України 03.01.2013 за № 57/22589.
CE Declaration of Conformity
Manufacturer: Mikrotikls SIA, Brivibas gatve 214i Riga, Latvia, LV1039.
Hereby, Mikrotīkls SIA declares that the radio equipment type RBmAPL-2nD is in compliance with Directive 2014/53/EU. The full text of the EU declaration of conformity is available at the following internet address: https://mikrotik.com/products![]()
Frequency bands terms of use
|
Frequency range (for applicable models) |
Channels used |
Maximum Output Power (EIRP) |
Restriction |
|
2400-2483.5 MHz |
1 — 13 |
20 dBm |
Without any restriction to use in all EU Member States |
* It is the customer’s responsibility to follow local country regulations, including operation within legal frequency channels, output power, cabling requirements, and Dynamic Frequency Selection (DFS) requirements. All Mikrotik radio devices must be professionally installed!
This MikroTik device meets Maximum WLAN transmit power limits per ETSI regulations. For more detailed information see Declaration of Conformity above / Dieses MikroTik-Gerät erfüllt die maximalen WLAN- Sendeleistung Grenzwerte gemäß ETSI-Bestimmungen. Weitere Informationen finden Sie oben unter Konformitätserklärung / Cet appareil MikroTik respecte les limites maximales de puissance de transmission WLAN conformément aux réglementations ETSI. Pour plus d’informations, voir la déclaration de conformité ci-dessus / Questo dispositivo MikroTik è conforme ai limiti massimi di potenza di trasmissione WLAN in conformità con le normative ETSI. Per ulteriori informazioni, consultare la dichiarazione di conformità sopra / Este dispositivo MikroTik cumple con los límites máximos de potencia de transmisión WLAN de acuerdo con las regulaciones ETSI. Para obtener más información, consulte la declaración de conformidad anterior / Это устройство MikroTik соответствует максимальным пределам мощности передачи WLAN в соответствии с правилами ETSI. Для получения дополнительной информации см. Декларацию соответствия выше.
Note. The information contained here is subject to change. Please visit the product page on www.mikrotik.com for the most up to date version of this document.