![]()
Download Article
![]()
Download Article
You can make your own muppet-style puppet like the lovable characters that star on the Muppets Show and Sesame Street. A muppet-style puppet has a big foam head and a movable mouth, that opens and closes to look like it’s talking. You can create your own muppet-style puppet with some foam, fleece, felt, and glue. Soon you’ll be putting on your own Muppet show!
-

1
Fold a ½ yard (.46 meter) of fleece in half. Choose the color of fleece that you want your puppet body to be. Don’t worry about choosing a “realistic” skin color. Your puppet can be green, purple, or any other color you want![1]
- You can buy fleece of all different colors and patterns at your local fabric store, or online.
- Avoid getting “minky” fleece. Although it’s very soft, it’s trickier to sew and cut, because it is so fluffy.
-

2
Print the puppet pattern from bit.ly/puppetpattern and cut it out. There are many puppet patterns online, but we’ll follow this one for the rest of the steps. You can print the pattern on ordinary printer paper, and cut it out thoroughly with scissors.[2]
Advertisement
-

3
Trace the pattern onto the fleece with chalk. Place the pattern on top of your folded fleece, close to the edge, to save fabric. Trace around the pattern in chalk. The pattern will look like a long rectangle for the neck, and a circle for the head with a triangle cut out for the open mouth. Make sure to trace the 2 little triangles going into the top of the head. [3]
- The little triangles in the top of the head are called darts. They should be about 1 inch (2.5cm) in height. They will help you make the head 3-dimensional later.
-
4
Sew along your pattern, skipping the bottom of the neck, the darts and the mouth. Sew with a simple running stitch through both layers of fleece, all along both sides of the neck and around the head. Skip the mouth, the darts, and the bottom of the neck. When you get to a part that you have to skip, tie off your thread, if you’re hand sewing, or run the needle back and forth a few times if you’re using the sewing machine. Then cut your thread, move over to the new place you want to sew, and start again.[4]
- Your hand will go in the bottom of the neck to control the puppet, so you definitely don’t want to sew it closed!
- It is easiest to use a sewing machine, but if you don’t have access to one, you can hand sew.
-
5
Cut the shape out of the fleece just outside the stitches. Don’t cut right next to your stitches. Leave a tiny rim around your stitches to make sure you don’t accidentally cut them. Do cut directly on your chalk line for the mouth, so that you can get access to the interior of the head. Also cut directly on the chalk line for the darts.[5]
-
6
Sew across the darts to give the puppet a spherical head. Pick up your puppet and fold it so that the darts are not triangles but a straight line connecting the back and front of the puppet. Use a sewing machine or hand sew the two edges of each dart together. Now the puppet head will be a spherical shape.[6]
-
7
Turn the puppet inside out, so that your stitches are on the inside. Now your puppet will have clean, invisible seams. All that’s left is to add a mouth plate, and decorate!
Advertisement
-

1
Trace an oval onto a piece of cardboard to make the mouth. Trace the biggest oval that can fit onto a 9 inch by 12 inch (23 cm by 30 cm) piece of cardboard. Position it so that if you draw a line across the short direction of the oval, that’s the same direction the cardboard is corrugated. This will help you fold a hinge in the middle of the oval so that the mouth can open and close.[7]
-

2
Cut out the cardboard oval with a utility knife. Place the rectangle of cardboard on a scratch-proof surface, like a cutting board. Hold the cardboard with one hand, and with the other, cut around the circle with a utility knife. Always cut in the direction away from your body, to avoid accidentally cutting yourself. The sharper the blade, the easier it will be to cut through the cardboard.
- It’s possible to cut cardboard with scissors, but you’ll need heavy-duty cardboard scissors, not the ones you use for fabric or paper.
-
3
Fold a midline through the cardboard oval, the short way across. You can lightly score the cardboard with scissors or a knife to help you fold it. Make sure you don’t cut all the way through the cardboard. The two halves of the oval should still be connected. You just want the mouth to be able to open and close.[8]
-
4
Cover the cardboard mouth with black felt and glue it down. Apply hot glue to the cardboard and glue black felt to one side of the cardboard mouth. Fold over the edges of the felt and glue them to the back side of the cardboard so that the edges of the mouth are smooth and covered in fabric.[9]
- If you like, you can cut a tongue shape out of red felt and glue it on the middle of the bottom half of your mouth.
-
5
Glue the cardboard mouth into the head. Put your non-dominant hand inside the puppet and, from the inside, hold the cardboard mouth in place in the mouth opening. Use your dominant hand to squeeze a line of hot glue onto the edges of the cardboard and glue it to the fleece.[10]
- If you’re a kid, get help from an adult with the hot glue, because it can burn your fingers.
- Make sure to keep all of the glue inside the puppet.[11]
Advertisement
-
1
Cut a piece of modeling foam to fit the top half of your puppet head. Cut a circle of modeling foam just a bit smaller in diameter as your puppet’s head. Cut out a triangle in the modeling foam, and then use hot glue to glue the edges of the triangle together, so that the modeling foam bunches up into the shape of the crown of a head. Insert the modeling foam into the puppet head to make the head more rigid.[12]
- Alternatively, you could stuff your puppet head with cotton stuffing, but then you have to make sure you leave room to put your hand in to control the puppet.
-
2
Roll felt cylinders and stuff them with cotton for arms. Take a rectangle of felt of about 10 inches by 5 inches (25 cm by 12 cm) and roll it lengthwise into a cylinder. Sew it closed along the long side and one short side. Repeat this with a second cylinder. Stuff both cylinders with cotton stuffing, and sew them closed on the other short side. Now you have 2 arms you can sew onto your puppet![13]
- You can decide how long and thick you want the arms to be, these are just suggestions.
-
3
Cut circles of colored felt for eyes and glue them onto your puppet. Cut circles of colored felt, about 1 inch (2.5cm) in diameter, and glue them onto your puppet for eyes. If you want the eyes to be bigger or smaller, it’s up to you. You can use a permanent marker to draw details on the eyes, and other details on the face, like eyebrows.[14]
- If you want your puppet to be an animal, you can draw on whiskers, and sew on some ears.
-
4
Sew on a button for a nose or glue on a craft pom pomp. Either way will give your puppet a cute nose! If you choose to glue on a pom pom nose, use hot glue to make sure it sticks.[15]
-
5
Dress your puppet with doll’s clothes or handmade clothes. If you want your puppet to wear an outfit, you can try dressing it up in doll clothes. If those don’t fit right, you can sew clothes for your puppet on the sewing machine, or just use a permanent marker to draw pretend clothes on your puppet.[16]
- You can also glue or sew buttons down the puppet’s body to make it look like your puppet is wearing a button-down shirt.
-

6
Sew yarn onto your puppet to give it long hair. If you want to give your puppet a head of long hair, lay yarn across the head and sew it onto the puppet. Sew the yarn down the middle of the head, where the part of the hair would be.[17]
- If you want to make a mostly bald puppet, with a few tufts of white hair, then just glue on some cotton fluff!
- If you don’t want to give your puppet hair, you could put on a hat! Buy or knit a baby beanie hat and put it on your puppet.
Advertisement
Add New Question
-
Question
How can I make my muppet’s mouth to move like sock puppets?

You will need to put your hand inside it. Decide on a cut where you will put your hand through. Either keep an open side of the fabric as is without sewing it, or make a cut at the back of the muppet, big enough for your palm to go in to make a moving puppet.
Ask a Question
200 characters left
Include your email address to get a message when this question is answered.
Submit
Advertisement
Thanks for submitting a tip for review!
Things You’ll Need
- 1/2 yard of fleece (.46 meter)
- Puppet pattern from bit.ly/puppetpattern
- Sewing Machine (optional)
- Fabric scissors
- Needle and thread
- Chalk
- 9″ x 12″ cardboard (23 cm by 30 cm)
- Utility knife
- Hot glue
- Black felt
- Red felt
- Modeling foam
- Extra fleece
- Cotton stuffing
- Craft pom pom (optional)
- Buttons (optional)
- Yarn (optional)
- Doll clothes (optional)
- Baby beanie hat (optional)
References
About This Article
Thanks to all authors for creating a page that has been read 196,327 times.
Reader Success Stories
-

«I want to make a custom professional looking puppet, and this seems to be the most logical way. :)»
Did this article help you?
![]()
![]()
![]()
![]()
![]()
![]()
![]()
![]()
![]()
![]()
![]()
Подробный Мастер-класс. Пошаговые инструкции.Профессионально сделанные лекала.
Безупречное соединение деталей.Даны описания десяти кукол и подбор лекал для каждой.
С картами раскроя и расхода материалов.
Описания — как можно сделать разных кукол по одной конструкции лекал.
В Мастер-классе 6 разделов (файлов) в формате PDF
![]()
![]()
![]()
![]()
![]()
Маппет-кукла «Хохотун» мастер-класс
Авторская работа
педагога дополнительного образования
МБУ ДО «ДДТ г. Байкальска»
Шевелевой Ирины Александровны
2020 г
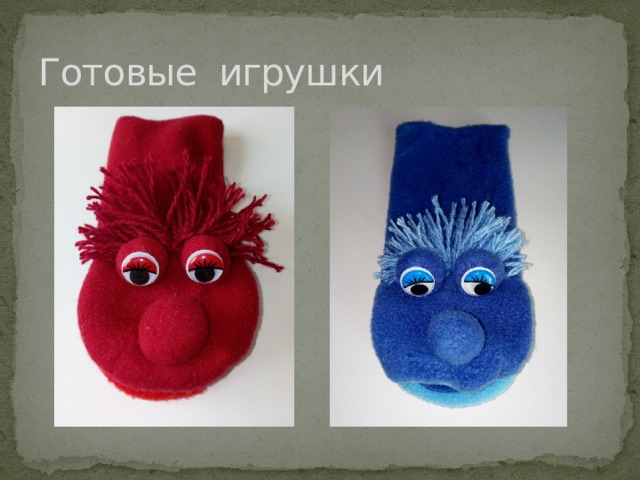
Готовые игрушки
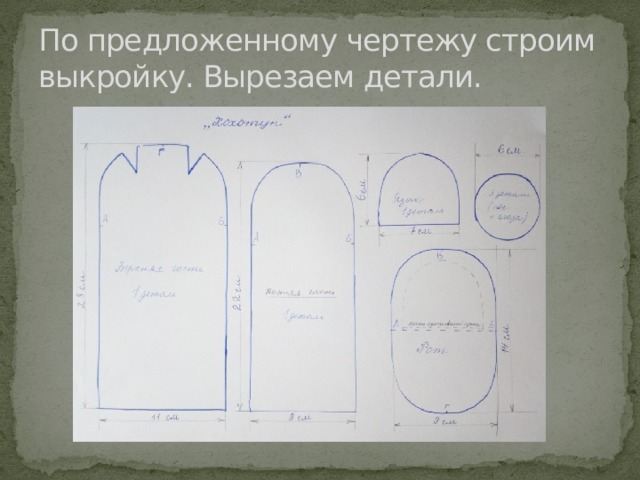
По предложенному чертежу строим выкройку. Вырезаем детали.
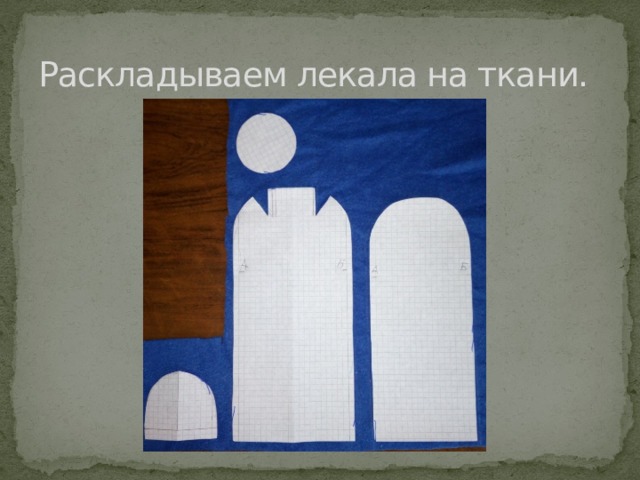
Раскладываем лекала на ткани.
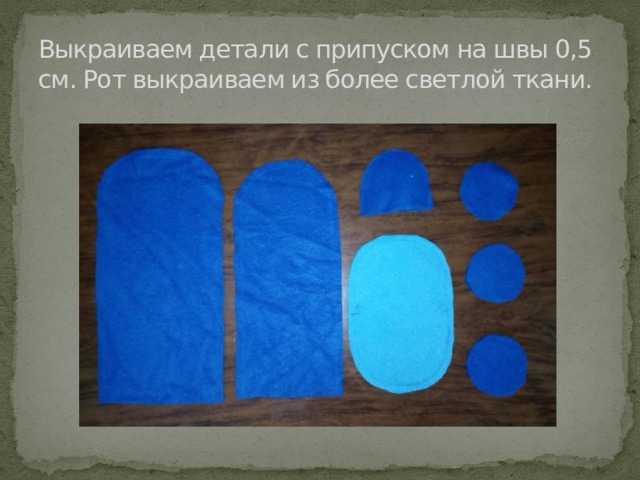
Выкраиваем детали с припуском на швы 0,5 см. Рот выкраиваем из более светлой ткани.
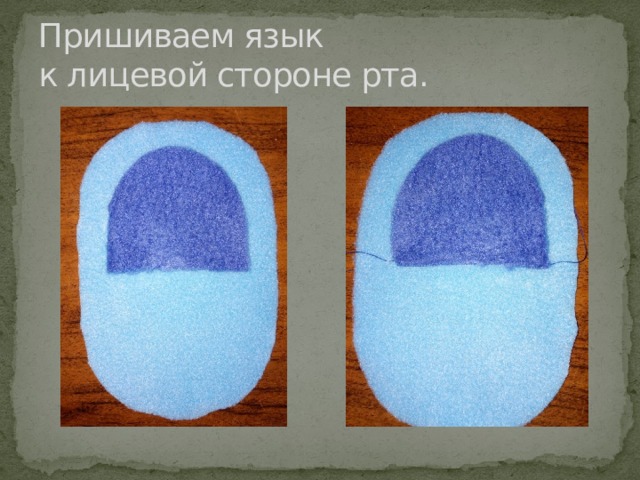
Пришиваем язык к лицевой стороне рта.
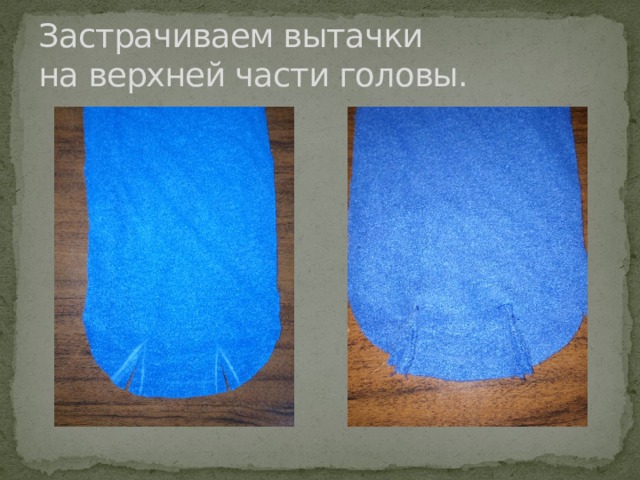
Застрачиваем вытачки на верхней части головы.
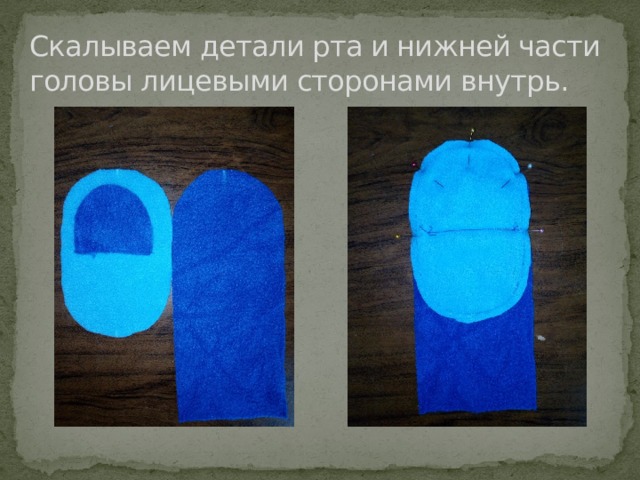
Скалываем детали рта и нижней части головы лицевыми сторонами внутрь.

Шьем по дуге через точки А,В,Б.
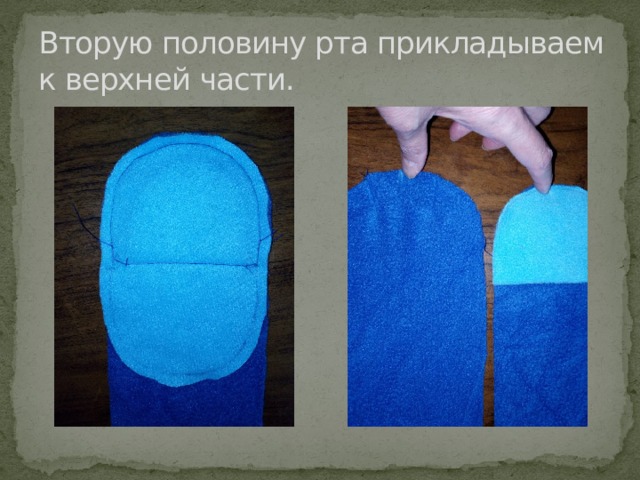
Вторую половину рта прикладываем к верхней части.
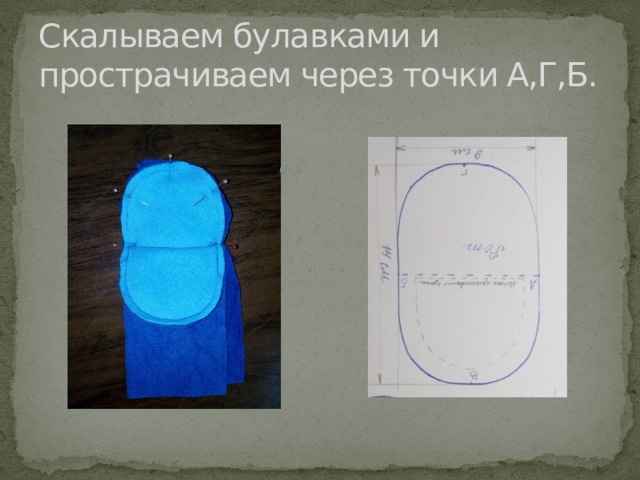
Скалываем булавками и прострачиваем через точки А,Г,Б.
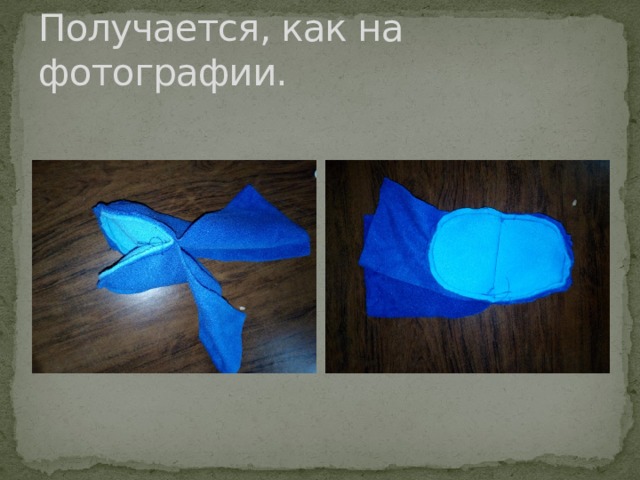
Получается, как на фотографии.
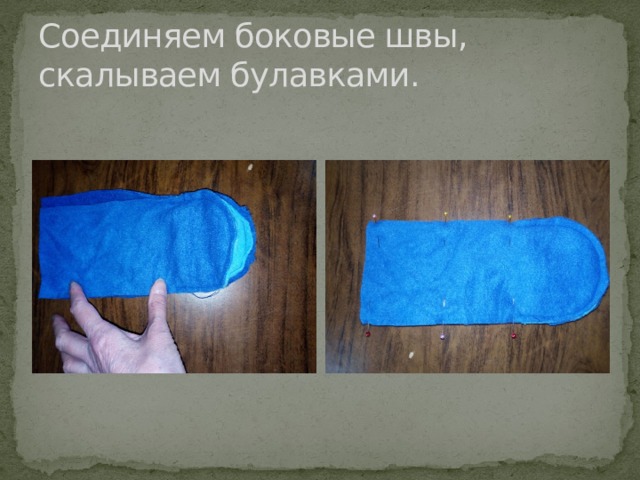
Соединяем боковые швы, скалываем булавками.
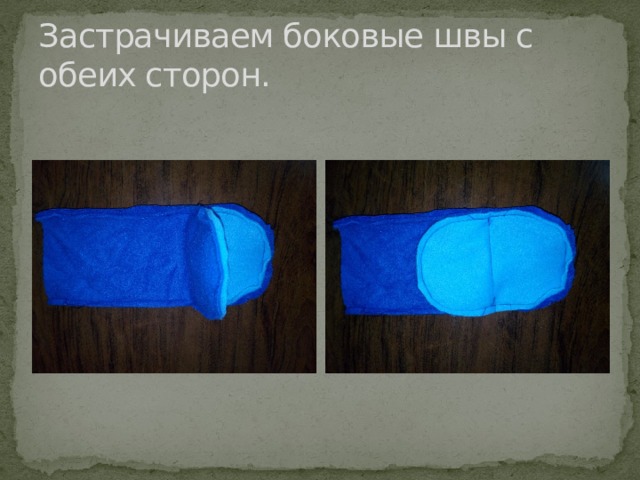
Застрачиваем боковые швы с обеих сторон.
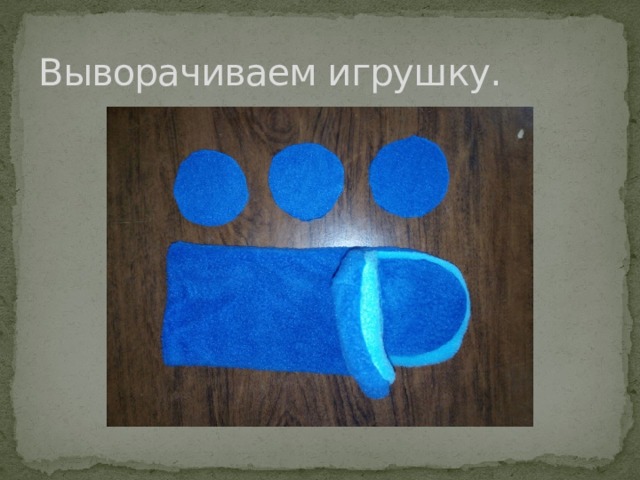
Выворачиваем игрушку.
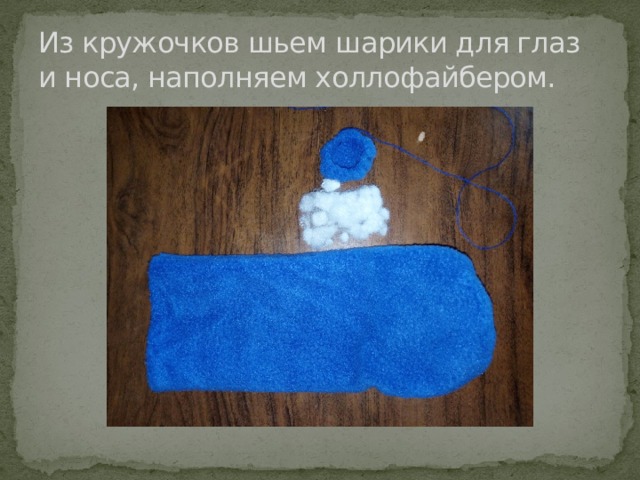
Из кружочков шьем шарики для глаз и носа, наполняем холлофайбером.
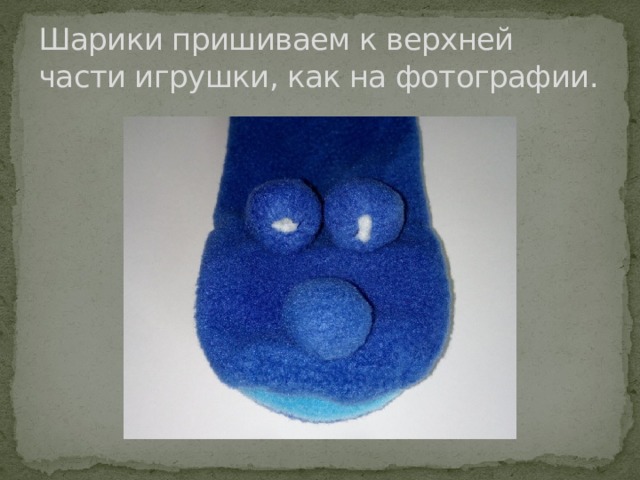
Шарики пришиваем к верхней части игрушки, как на фотографии.
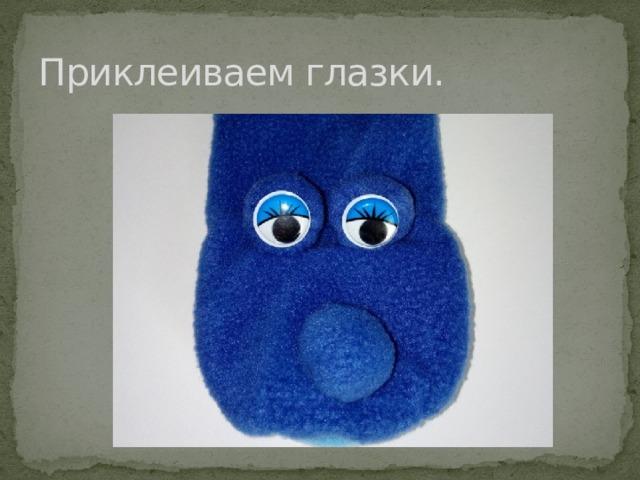
Приклеиваем глазки.
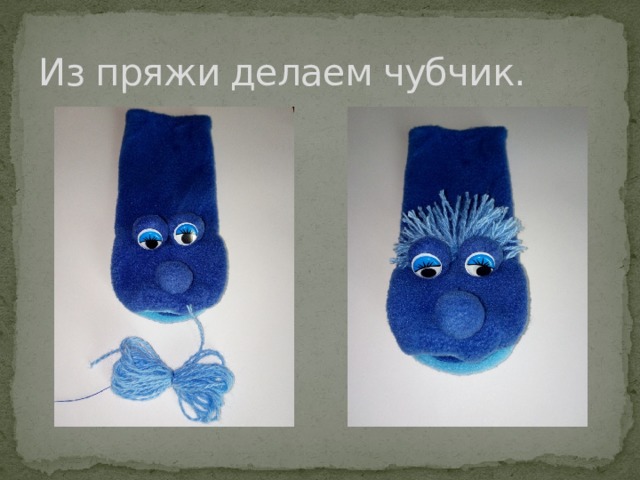
Из пряжи делаем чубчик.
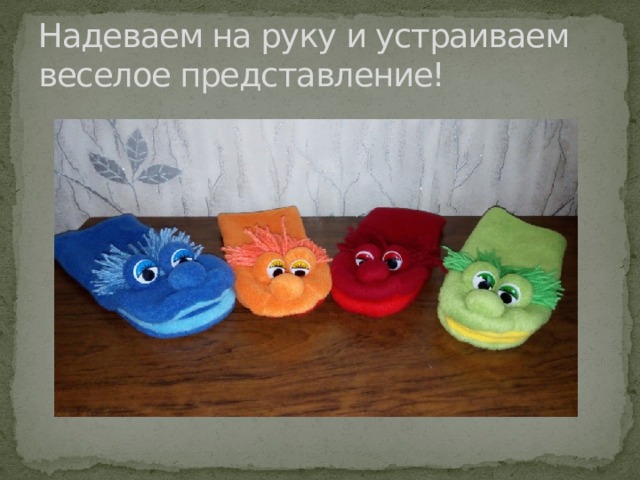
Надеваем на руку и устраиваем веселое представление!
Источники:
- В презентации использованы фотографии автора.

Благодарю за внимание!
-
Маппет-кукла «Хохотун» мастер-класс
Авторская работа
педагога дополнительного образования
МБУ ДО «ДДТ г. Байкальска»
Шевелевой Ирины Александровны
2020 г
Готовые игрушки
По предложенному чертежу строим выкройку. Вырезаем детали.
Раскладываем лекала на ткани.
Выкраиваем детали с припуском на швы 0,5 см. Рот выкраиваем из более светлой ткани.
Пришиваем язык к лицевой стороне рта.
Застрачиваем вытачки на верхней части головы.
Скалываем детали рта и нижней части головы лицевыми сторонами внутрь.
Шьем по дуге через точки А,В,Б.
Вторую половину рта прикладываем к верхней части.
Скалываем булавками и прострачиваем через точки А,Г,Б.
Получается, как на фотографии.
Соединяем боковые швы, скалываем булавками.
Застрачиваем боковые швы с обеих сторон.
Выворачиваем игрушку.
Из кружочков шьем шарики для глаз и носа, наполняем холлофайбером.
Шарики пришиваем к верхней части игрушки, как на фотографии.
Приклеиваем глазки.
Из пряжи делаем чубчик.
Надеваем на руку и устраиваем веселое представление!
Источники:
- В презентации использованы фотографии автора.
Благодарю за внимание!
-
-
October 25 2013, 08:01
- Дети
- Cancel
Как сделать куклу для вашего ребенка
Кукла (маппет) своими руками.
Такую замечательную куклу несложно изготовить своими руками.
Для этого нам понадобится:
— 0,5 метра флиса или искусственного меха;
— 15х15 см. картон (можно от упаковки сока) или тонкий пластик;
— 20х20 см. тонкий поролон
— вата, нитки
Идея подсмотрена в интернете, автор описания и мастер класса Овчаренко Олеся.
1. Делаем выкройку. Обводим подходящую по размеру тарелку, это будет голова куклы.
2. Рисуем туловище и ручки будущей куклы. Размер туловища — обхват кулака плюс 5 сантиметров, с учетом того, что кукла надевается на руку.
Читать далее…
http://molodaya-babushka.ru/kak-sdelat-kuklu-dlya-vashego-rebenka/
Кукла маппет своими руками — пошаговое видео

Дорогие друзья, на нашем сайте вы можете найти множество идей по оформлению школьных классов и различных мероприятий, оформлению групп в детском саду, различные поделки и многое другое. Тема данной страницы: кукла маппет своими руками, и все что с этим связано. Мы подобрали видеоролики, которые пошагово раскрывают весь процесс.
Важно помнить, что при оформлении рабочего места ребенка, нужно заботиться не только о красоте, но и о функциональности интерьера. Просматривая ролики на нашем сайте, вы сможете почерпнуть много полезного на эту тему. Обратите внимание, что тема: кукла маппет своими руками, может пополниться новыми видеороликами, если мы найдем для вас что то подходящее.