Marshall MG100FX/MG30FX Manual
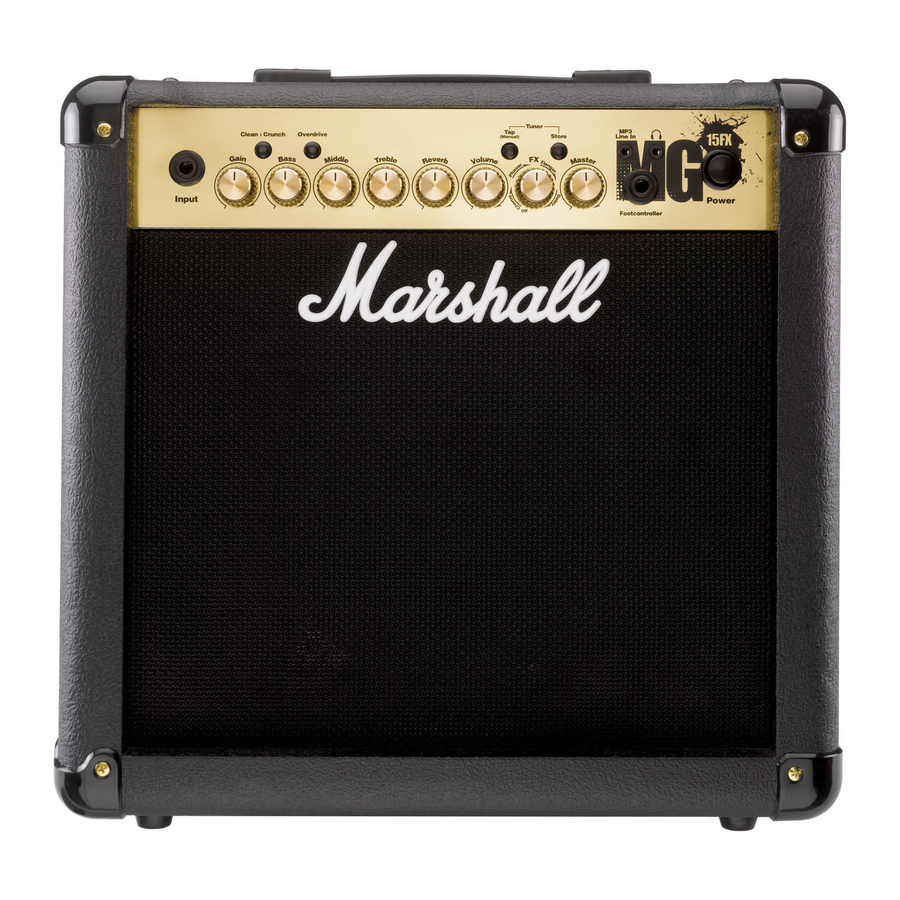
MG15FX & MG30FX
MG15FX

MG30FX

- Input Jack Socket
Jack input for your guitar. Use a good quality guitar cable (i.e. one that’s screened/shielded) to help prevent noise, interference and unwanted feedback. - Gain Control
Controls the amount of signal entering the pre-amp and the amount of distortion created in the selected channel. - Clean: Crunch Switch
Selects between Clean (green) and Crunch (red) channels. - Bass Control
Turning up the Bass control will add warmth and lowend depth to your sound. - OD Switch
Selects between OD1 (green) and OD2 (red) channels. - Middle Control
Adjusting the middle frequencies will vary the amount of body in your sound. - Treble Control
Increasing the Treble will make your sounds brighter and more cutting, turning it down will decrease your tone’s edge and make it sound softer as a result. - Reverb Control
This control lets you add a lush reverb to the selected channel, from a subtle hint to cavernous and all points in-between. - Volume Control
Controls the volume of the selected channel. - Tap (Manual) Switch
Matches the delay FX time to the time between two pushes. The LED flashes at the selected delay time. Holding down the Tap switch for longer than 2 seconds switches the amp between manual and preset mode (pg 2). When using the optional footcontroller, holding both the Tap switch and the Store switch will activate the tuner. - FX Control
Selects and adjusts one of four effects — Chorus, Phaser, Flanger & Delay. - Store Switch
Stores the current amp settings into the current channel or into the optional footcontroller. When in manual mode the Store button lights red. - Master Control
Controls the master volume of the amplifier. - MP3 Line In Socket
Jam to your favourite MP3, CD or tape track by connecting the line out or headphone output of your player here. Adjust the volume of your player to match that of your guitar and you’ve got the perfect ‘playalong’ practice system. - Footcontroller Socket
¼» Jack socket for the connection of the optional footcontroller (PEDL-90008). - Headphones Socket
For use when silent practice is the order of the day. Connection of headphones will automatically mute the internal speaker. - Power Switch
The power switch turns your amplifier on and off. A channel switch will light up when your amplifier is turned on and none will be lit when the amplifier is switched off.
Note: The specific mains input voltage rating that your amplifier has been built for is shown on the back panel. Before connecting to the mains electricity supply, always ensure that your amplifier is compatible with your electricity supply. If you have any doubt, please get advice from a qualified technician. Your Marshall dealer will help you in this respect.
Please ensure the amplifier is switched off and unplugged from the mains electricity supply before being moved.
MG15FX & MG30FX Overview
Channel Selection
The amplifier has 4 channels — Clean, Crunch, OD1 & OD2.
Pressing the Clean/Crunch switch (3) selects between the Clean (Green Light) and Crunch (Red Light) channels.
Pressing the OD switch (5) selects between the OD1 (Green Light) and OD2 (Red Light) channels.
When moving from an OD channel to a Clean/Crunch channel, the unit remembers the last channel you were in before leaving. E.g. If you have moved from the Crunch Channel to an OD channel and you press the Clean/Crunch switch (3), the amplifier will revert back to the Crunch channel — rather than starting again in the Clean channel.
Modes
The amplifier operates in two modes — Preset and Manual.
To change between these two modes, you must hold the Tap switch (10) down for at least two seconds. When in manual mode the Store switch (12) lights red and the selected channel light (3 or 5) will start to flash.
The amplifier will remember the last mode it was in after power off and revert to it the next time it is powered on.
Preset
This is the factory default operation of the amplifier.
In Preset mode the position of all controls except Master Volume (13) are stored within each channel. Each channel should be considered a preset.
Selecting a channel automatically recalls the settings stored within the channel. Note: The physical position of the front panel controls, except Master Volume (13) which is not storable, will now not match the actual settings of the amplifier. All front panel switches will automatically update.
Altering a control will cause the associated parameter to jump to the current physical position of that control.
When a control is altered the selected channel light (3 or 5) will start to flash indicating that the current preset has been altered.
To store the updated settings, push the Store switch (12).
If you select another channel without pressing Store (12) then any altered settings will be lost as the new channel and its settings are recalled.
Manual
In manual mode the amp’s settings always match the physical positions of the controls.
Changing channel only changes the channel, NO presets are recalled, NO other controls are altered.
Pressing Store (12) will store the current settings into the selected channel. These can then be recalled when using the unit in Preset mode.
When channel settings have been stored the current channel light (3 or 5) will stop flashing indicating the preset has been saved.
Reverb & FX
The amplifier provides two simultaneous effects, Reverb and one of four FXs (Chorus, Phaser, Flanger or Delay) Reverb The Reverb control (8) sets the amount of signal sent to the reverb section — allowing the reverb to spill between channels as different presets are recalled. When the Reverb control (8) is set to ‘0’ the reverb is switched off, the status of the reverb is also indicated on the optional footcontroller.
FX
The FX control is split into four segments and selects the type of FX and adjusts its associated settings. When the FX control is set to ‘0’ the FX are switched off, the status of the FX is also indicated on the optional footcontroller.
| 0 | FX Off |
| Chorus | Speed increases and depth is reduced as knob is turned clockwise. |
| Phaser | Speed increases as knob is turned clockwise. |
| Flanger | Speed increases, feedback and depth are reduced as knob is turned clockwise. |
| Delay | Delay level is increased as knob turned clockwise. |
Tap Tempo
The Tap Tempo switch (10) is used for the Delay effect only.
The Tap Tempo switch matches the delay time to the time between two presses.
The Tap Tempo LED flashes red at the selected/recalled delay time.
The number of repeats is reduced as the delay time decreases.
If you change from a channel with delay to one without delay the effect will spill between channels.
If you change from a channel with delay to a channel with delay set to a different delay time the delay effect will not spill between channels.
MP3 / Line In
The 3.5mm MP3 / Line In socket (14) allows the connection of an external audio source e.g. MP3 or CD player.
Headphones
The 3.5mm Headphones socket (16) allows the connection of a pair of headphones. When a jack is inserted into the headphones socket the unit’s speaker is muted.
Power
The Power switch (17) turns the amplifier on and off. If current settings have not been stored they will be lost.
Restoring Settings
ALL AMP & FOOTCONTROLLER SETTINGS WILL BE LOST
To restore the unit to factory settings (see handbook rear cover) you must hold the Store switch (12) while powering on the unit. The Clean/Crunch (3) and OD (5) lights will light orange. You can then release the Store switch (12).
Resetting the amplifier will erase all user Channel presets and all user Footcontroller settings, replacing them with the factory presets.
MG15FX Technical Specification
| Power (RMS) | 15W |
| Channels | 4 |
| Speaker | 1×8″ |
| Weight (kg) | 7.7kg |
| Size (mm) W, H, D | 382 x379 x205 |
MG30FX Technical Specification
| Power (RMS) | 30W |
| Channels | 4 |
| Speaker | 1×10″ |
| Weight (kg) | 10.8kg |
| Size (mm) W, H, D | 480 x420 x225 |
MG50FX / MG100FX

Rear panel shows MG50FX combo — MG100FX combo has the same features
MG100HFX head is identical except features two loudspeaker sockets

- Input Jack Socket
Jack input for your guitar. Use a good quality guitar cable (i.e. one that’s screened/shielded) to help prevent noise, interference and unwanted feedback. - Gain Control
Controls the amount of signal entering the pre-amp and the amount of distortion created in the selected channel. - Clean: Crunch Switch
Selects between Clean (green) and Crunch (red) channels. - Bass Control
Turning up the Bass control will add warmth and lowend depth to your sound. - OD Switch
Selects between OD1 (green) and OD2 (red) channels. - Middle Control
Adjusting the middle frequencies will vary the amount of body in your sound. - Treble Control
Increasing the Treble will make your sounds brighter and more cutting, turning it down will decrease your tone’s edge and make it sound softer as a result. - Rev Switch
This control lets you add a lush reverb to the selected channel, from a subtle hint to cavernous and all points in-between. - Reverb Control
This control lets you add a lush reverb to the selected channel, from a subtle hint to cavernous and all points in-between. - Volume Control
Controls the volume of the selected channel. - FX Switch
Switches the FX section (Modulation and Delay) on and off. - Mod Control
Selects and adjusts one of three modulation effects Chorus, Phaser & Flanger. - Tap Switch
Matches the delay FX time to the time between two pushes. The LED flashes at selected delay time. - Delay Control
Controls the amount of signal sent to the delay effect. - Ext FX Switch
Switches the external FX Loop on and off. - Master Control
Controls the master volume of the amplifier. - Damping (Manual) Switch
Switches the power amp damping between classic amp feeling (LED off) and modern response (LED on). Holding down the Damping switch for longer than 2 seconds switches the amp between manual and preset mode.
When using the footcontroller, holding both the Damping switch and the Store switch will activate the tuner. - Headphones / Line Out Socket
3.5mm headphones / Line out. - Store Switch
Stores the current amp settings into the current channel or into the footcontroller. When in manual mode the Store button lights red. - Power Switch
The power switch turns your amplifier on and off. A channel switch will light up when your amplifier is turned on and none will be lit when the amplifier is switched off.
Please ensure the amplifier is switched off and unplugged from the mains electricity supply before being moved. - Mains Input Connector
Your amp is provided with a detachable mains (power) lead, which is connected here. The specific mains input voltage rating that your amplifier has been built for is indicated on the back panel. Before connecting for the first time, please ensure that your amplifier is compatible with your electricity supply. If you have any doubt, please get advice from a qualified technician. Your Marshall dealer will help you in this respect.
The correct value of mains fuse located in the small drawer at the bottom of the mains socket is specified on the rear panel of the amplifier. The drawer contains a space for a spare fuse. NEVER attempt to bypass the fuse or fit one of the incorrect value! - Footcontroller Socket
Jack socket for the connection of the footcontroller. - Loudspeaker Output(s) Socket
The MG50FX, MG100FX combos have 1 loudspeaker output and the MG100HFX head has 2 loudspeaker outputs.
Always use a non-screened Marshall approved speaker lead when connecting an extension cabinet to these amplifiers. - MP3 Line In Socket
Jam to your favourite MP3, CD or tape track by connecting the line out or headphone output of your player here. Adjust the volume of your player to match that of your guitar and you’ve got the perfect ‘playalong’ practice system. - Return Socket
Connect to the output of an external effects processor or pedal here. - Send Socket
Connect to the input of an external effects processor or pedal here.
Technical Specifications
MG50FX Combo
| Power (RMS) | 50W |
| Channels | 4 |
| Speaker | 1×12″ |
| Weight (kg) | 16.6kg |
| Size (mm) W, H, D | 518 x494 x278 |
MG100FX 1X12″ Combo (MG101FX)
| Power (RMS) | 100W |
| Channels | 4 |
| Speaker | 1×12″ |
| Weight (kg) | 20kg |
| Size (mm) W, H, D | 591 x528 x283 |
MG100FX 2×12″ Combo (MG102FX)
| Power (RMS) | 100W |
| Channels | 4 |
| Speaker | 2×12″ |
| Weight (kg) | 22.4kg |
| Size (mm) W, H, D | 674 x494 x278 |
MG100HFX Head
| Power (RMS) | 100W |
| Channels | 4 |
| Speaker | — |
| Weight (kg) | 11.4kg |
| Size (mm) W, H, D | 591 x249 x275 |
MG50FX & MG100FX / MG100HFX Overview
Channel Selection
The amplifier has 4 channels — Clean, Crunch, OD1 & OD2.
Pressing the Clean/Crunch switch (3) selects between the Clean (Green Light) and Crunch (Red Light) channels.
Pressing the OD switch (5) selects between the OD1 (Green Light) and OD2 (Red Light) channels.
When moving from an OD channel to a Clean/Crunch channel, the unit remembers the last channel you were in before leaving. E.g. If you have moved from the Crunch Channel to an OD channel and you press the Clean/Crunch switch (3), the amplifier will revert back to the Crunch channel — rather than starting again in the Clean channel.
Modes
The amplifier operates in two modes — Preset and Manual.
To change between these two modes, you must hold the Damping switch (17) down for at least two seconds. When in manual mode the Store switch (19) lights red and the selected channel light (3 or 5) will start to flash.
The amplifier will remember the last mode it was in after power off and revert to it the next time it is powered on.
Preset
This is the factory default operation of the amplifier.
In Preset mode the position of all controls except Master Volume (16) are stored within each channel. Each channel should be considered a preset.
Selecting a channel automatically recalls the settings stored within the channel. Note: The physical position of the front panel controls, except Master Volume (16) which is not storable, will now not match the actual settings of the unit. All front panel switches will automatically update.
Altering a control will cause the associated parameter to jump to the current physical position of that control.
When a control is altered the selected channel light (3 or 5) will start to flash indicating that the current preset has been altered.
To store the updated settings, push the Store switch (19).
If you select another channel without pressing Store (19) then any altered settings will be lost as the new channel and its settings are recalled.
Manual
In manual mode the amps settings always match the physical positions of the controls.
Changing channel only changes the channel, NO presets are recalled, NO other controls are altered.
Pressing Store (19) will store the current settings into the selected channel. These can then be recalled when using the unit in Preset mode.
When channel settings have been stored the current channel light (3 or 5) will stop flashing indicating the preset has been saved.
Reverb & FX
The amplifier provides three simultaneous effects, Reverb, Delay and one of three Modulation effects (Chorus, Phaser, or Flanger).
Reverb
The Reverb control sets the amount of signal sent to the reverb section — allowing the reverb to spill between channels as different presets are recalled. The Rev switch (8) switches the reverb effect on and off, the status of the reverb is also indicated on the footcontroller.
FX
The FX section consists of two effects, Delay and Modulation. The FX section can be globally turned on and off via the FX switch (11).
Delay
The Delay control (14) sets the amount of signal sent to the delay section. When the Delay control (14) is set to ‘0’ the delay is switched off.
Modulation
The Mod control (12) is split into three segments and selects the type of modulation effects and adjusts its associated settings. When the Mod control (12) is set to ‘0’ the modulation effects are switched off.
| 0 | Modulation Off |
| Chorus | Speed increases and depth is reduced as knob is turned clockwise. |
| Phaser | Speed increases as knob is turned clockwise. |
| Flanger | Speed increases, feedback and depth are reduced as knob is turned clockwise. |
Tap Tempo
The Tap Tempo switch (13) is used for the Delay effect only.
The Tap Tempo switch matches the delay time to the time between two presses.
The Tap Tempo LED flashes red at the selected/recalled delay time.
The number of repeats is reduced as the delay time decreases.
If you change from a channel with delay to one without delay the effect will spill between channels.
If you change from a channel with delay to a channel with delay set to a different delay time the delay effect will not spill between channels.
MP3 / Line In
The 3.5mm MP3 / Line In socket (24) on the rear panel allows the connection of an external audio source e.g. MP3 or CD player.
Headphones & Line Out
The 3.5mm Headphones socket (18) allows the connection of a pair of headphones. When a jack is inserted into the headphones socket the unit’s speaker is muted.
Additionally the Headphones socket (18) can also be used as a Line Out to send the signal to an external equipment e.g. A computer, digital recorder or mixer. When a jack is inserted into the socket the unit’s speaker is muted providing ‘silent recording’. The unit’s output can then be monitored directly from the external equipment used.
Damping
The Damping switch (17) selects between the two modes of power amp damping. When Damping is off (LED off), the power amp response resembles the feel of a classic power amp with emphasized middle and limited bass and treble. Switching Damping on (LED on) will boost the speaker resonances both in the bass and high frequency ranges.
FX Loop
The FX Return socket (25) on the rear panel is used to connect the OUTPUT of the effects processor or pedal you are using in the effects loop.
The FX loop is series and set at instrument level so both guitar FX or professional units can be connected.
The FX Send socket (26) on the rear panel is used to connect to the INPUT of the unit you are using in the effects loop.
The FX loop is switched on and off via the Ext FX switch (15) on the front panel.
Loudspeaker
ALWAYS USE A NON-SCREENED MARSHALL APPROVED SPEAKER LEAD WHEN CONNECTING AN EXTENSION CABINET TO THESE AMPLIFIERS.
MG50FX
The single Loudspeaker socket (22) is used to connect either the internal speaker or an external speaker cabinet to the unit’s power amp. When using external cabinets ensure the total load impedance is equal to, or exceeds, 8 ohms.
MG100FX 1×12″ & 2×12″ Combos
The single Loudspeaker socket (22) is used to connect either the internal speaker or an external speaker cabinet to the unit’s power amp. When using external cabinets ensure the total load impedance is equal to, or exceeds, 4 ohms.
MG100HFX Head
The two Loudspeaker sockets are used to connect to 1 or 2 external cabinets. When using external cabinets ensure the total load impedance is equal to, or exceeds, 4 ohms.
Power
The Power switch (20) turns the amplifier on and off. If current settings have not been stored they will be lost.
Restoring Settings
ALL AMP & FOOTSWITCH SETTINGS WILL BE LOST
To restore the unit to factory settings (see handbook rear cover) you must hold the Store switch (19) while powering on the amplifier. The Clean/Crunch (3) and OD (5) lights will light orange. You can then release the Store switch (19).
Resetting the amplifier will erase all user Channel presets and all user Footcontroller settings, replacing them with the factory presets.

- Footswitches
Each footswitch can be assigned a different stored function. - LED Status Panel
This always reflects the current status of the amplifier or tuner details:- CLN & OD: Current Channel
- REV: Reverb On/Off
- FX: FX Section On / Off
- Ext FX: External FX Loop On/Off (MG50FX & MG100FX)
- Damp: Damping Mode (MG50FX & MG100FX)
- Tap: Tap Tempo speed.
- Digital Display
This display indicates the various functions of the footcontroller.
Footcontroller Factory Settings
Footswitch 1: Clean: Crunch Switch
Footswitch 2: Overdrive Switch
Footswitch 3: Tap Tempo Switch
Footswitch 4: Tuner
Programming
The footswitch can be programmed to store front panel switches (Switch Store) or complete presets (Preset Store). Switch Store To assign a front panel switch to a Footswitch (1), press and hold the front panel switch and while held down press the Footswitch (1) you wish to assign it to.
The Digital Display (3) will swirl to show that the footswitch has been assigned. You can then release the footswitch and front panel switch.
Preset Store
To assign a preset to a Footswitch (1), select the required channel and modify the front panel controls if required, press and hold the Store switch on the front panel and while held down, press your chosen Footswitch (1).
The Digital Display (3) will swirl to show that the footswitch has been assigned. You can then release the footswitch and Store switch. Footcontroller Presets are independent of the dedicated Channel presets stored within the amplifier. This allows you to create a number of presets based on the same channel/pre-amp setting.
When either a Channel preset or Footswitch preset has been altered the Digital Display (3) will begin to flash. The footcontroller will flash the relevant number if a Footswitch preset has been altered or will flash a «-» if a Channel preset has been altered.
Pressing only the Store switch at this point will overwrite the altered Channel or Footswitch preset.
To store an altered Channel preset to the Footswitch instead, hold the Store switch and while held down, press your chosen Footswitch (1) — Just like a normal Preset Store.
To store an altered Footswitch Preset to another Footswitch hold the Store switch and while held down, press your chosen Footswitch (1) — Just like a normal Preset Store.
Digital Display
When recalling a footswitch preset, the Digital Display (3) will indicate which footswitch number has been pressed.
If a Channel preset has been recalled the Digital Display (3) will remain blank.
When either a Channel preset or Footswitch preset has been altered the Digital Display (3) will begin to flash. The footswitch will flash the relevant number if a Footswitch preset has been altered or will flash a «-» if a Channel preset has been altered.
Tuner
The Tuner can be accessed in two ways:
MG15FX & MG30FX
By simultaneously pushing the Tap (10) and Store (12) switches on the front panel or by assigning the Tuner to the footswitch. Note: On factory reset / first switch on, the Tuner is already assigned to Footswitch number 4.
Assigning the Tuner to a footswitch is carried out like any other Switch Store. To assign the Tuner to the footswitch hold down the Tap (10) and Store (12) switches and press the chosen footswitch you wish to assign it to. The Digital Display (3) will swirl to show that the footswitch has been assigned. You can then release the footswitch and front panel switch.
MG50FX & MG100FX
By simultaneously pushing the Damping (17) and Store (19) switches on the front panel or by assigning the Tuner to the footswitch. Note: On factory reset / first switch on, the Tuner is already assigned to Footswitch number 4.
Assigning the Tuner to a footswitch is carried out like any other Switch Store. To assign the Tuner to the footswitch hold down the Damping (17) and Store (19) switches and press the chosen footswitch you wish to assign it to. The Digital Display (3) will swirl to show that the footswitch has been assigned. You can then release the footswitch and front panel switch.
For all amplifiers, when entering Tuner mode the unit mutes and Clean: Crunch (3) and OD (5) switches light yellow.
The Digital Display (3) indicates the closest current note being played. The indicator dot on the lower right hand corner shows if the current closest note is #.
The LED Status Panel (2) is used to show how far away from the closest note the current note being played is. When the central FX Status LED lights, it indicates the correct tuning, with the others progressively indicating the tuning is up to 50 cents up or down.
To exit the Tuner push any footswitch, the amplifier will then exit returning to the settings before entering.
Marshall Factory Presets
Clean: pure guitar tone with a touch of chorus + reverb
Crunch: low gain bluesy tone with subtle reverb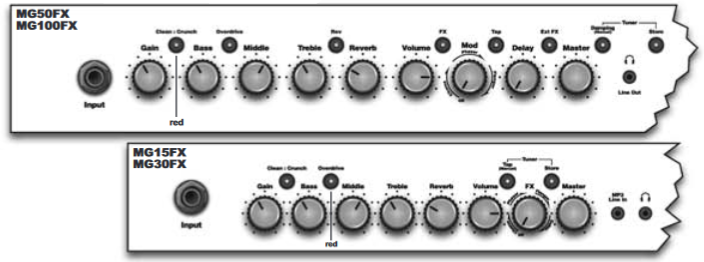
OD1: raw heavy crunch, no effects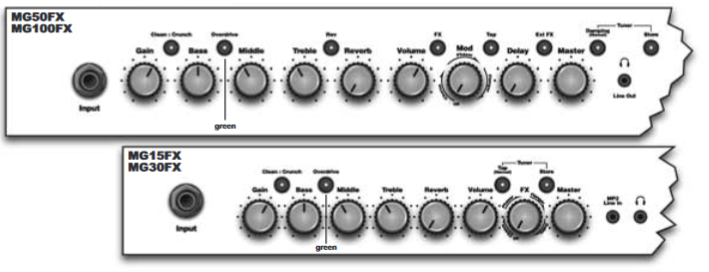
OD2: high gain solo, reverb + delay
Compliance
* EUROPE ONLY ![]() Note: This equipment has been tested and found to comply with the requirements of the EMC Directive Environments E1, E2 and E3 EN 55103-1/2) and the Low Voltage Directive in the E.U.
Note: This equipment has been tested and found to comply with the requirements of the EMC Directive Environments E1, E2 and E3 EN 55103-1/2) and the Low Voltage Directive in the E.U.
* EUROPE ONLY — Note:
The Peak Inrush current for the MG15FX is 2.5 amps.
The Peak Inrush current for the MG30FX is 5 amps.
Note: This equipment has been tested and found to comply with the limits for a Class B digital device, pursuant to part 15 of the FCC rules. These limits are designed to provide reasonable protection against harmful interference in a residential installation. This equipment generates, uses and can radiate radio frequency energy and, if not installed and used in accordance with the instructions, may cause harmful interference to radio communications. However, there is no guarantee that interference will not occur in a particular installation. If this equipment does cause harmful interference to radio or television reception, which can be determined by turning the equipment off and on, the user is encouraged to try to correct the interference by one or more of the following measures:
- Reorient or relocate the receiving antenna.
- Increase the separation between the equipment and the receiver.
- Connect the equipment into an outlet on a circuit different from that to which the receiver is connected.
- Consult the dealer or an experienced radio/TV technician for help.
Follow all instructions and heed all warnings
KEEP THESE INSTRUCTIONS!
Marshall Amplification plc
Denbigh Road, Bletchley, Milton Keynes, MK1 1DQ, England.
Tel : +44 (0)1908 375411 Fax : +44 (0)1908 376118
www.marshallamps.com
Whilst the information contained herein is correct at the time of publication, due to our policy of constant improvement and development, Marshall Amplification plc reserve the right to alter specifications without prior notice.
BOOK-900025-00 / 11 / 08

Documents / Resources
References
Marshall Home — marshall.com
Download manual
Here you can download full pdf version of manual, it may contain additional safety instructions, warranty information, FCC rules, etc.
Download Marshall MG100FX/MG30FX Manual
MG15FX & MG30FX
MG15FX
MG30FX
- Input Jack Socket
Jack input for your guitar. Use a good quality guitar cable (i.e. one that’s screened/shielded) to help prevent noise, interference and unwanted feedback. - Gain Control
Controls the amount of signal entering the pre-amp and the amount of distortion created in the selected channel. - Clean: Crunch Switch
Selects between Clean (green) and Crunch (red) channels. - Bass Control
Turning up the Bass control will add warmth and lowend depth to your sound. - OD Switch
Selects between OD1 (green) and OD2 (red) channels. - Middle Control
Adjusting the middle frequencies will vary the amount of body in your sound. - Treble Control
Increasing the Treble will make your sounds brighter and more cutting, turning it down will decrease your tone’s edge and make it sound softer as a result. - Reverb Control
This control lets you add a lush reverb to the selected channel, from a subtle hint to cavernous and all points in-between. - Volume Control
Controls the volume of the selected channel. - Tap (Manual) Switch
Matches the delay FX time to the time between two pushes. The LED flashes at the selected delay time. Holding down the Tap switch for longer than 2 seconds switches the amp between manual and preset mode (pg 2). When using the optional footcontroller, holding both the Tap switch and the Store switch will activate the tuner. - FX Control
Selects and adjusts one of four effects — Chorus, Phaser, Flanger & Delay. - Store Switch
Stores the current amp settings into the current channel or into the optional footcontroller. When in manual mode the Store button lights red. - Master Control
Controls the master volume of the amplifier. - MP3 Line In Socket
Jam to your favourite MP3, CD or tape track by connecting the line out or headphone output of your player here. Adjust the volume of your player to match that of your guitar and you’ve got the perfect ‘playalong’ practice system. - Footcontroller Socket
¼» Jack socket for the connection of the optional footcontroller (PEDL-90008). - Headphones Socket
For use when silent practice is the order of the day. Connection of headphones will automatically mute the internal speaker. - Power Switch
The power switch turns your amplifier on and off. A channel switch will light up when your amplifier is turned on and none will be lit when the amplifier is switched off.
Note: The specific mains input voltage rating that your amplifier has been built for is shown on the back panel. Before connecting to the mains electricity supply, always ensure that your amplifier is compatible with your electricity supply. If you have any doubt, please get advice from a qualified technician. Your Marshall dealer will help you in this respect.
Please ensure the amplifier is switched off and unplugged from the mains electricity supply before being moved.
MG15FX & MG30FX Overview
Channel Selection
The amplifier has 4 channels — Clean, Crunch, OD1 & OD2.
Pressing the Clean/Crunch switch (3) selects between the Clean (Green Light) and Crunch (Red Light) channels.
Pressing the OD switch (5) selects between the OD1 (Green Light) and OD2 (Red Light) channels.
When moving from an OD channel to a Clean/Crunch channel, the unit remembers the last channel you were in before leaving. E.g. If you have moved from the Crunch Channel to an OD channel and you press the Clean/Crunch switch (3), the amplifier will revert back to the Crunch channel — rather than starting again in the Clean channel.
Modes
The amplifier operates in two modes — Preset and Manual.
To change between these two modes, you must hold the Tap switch (10) down for at least two seconds. When in manual mode the Store switch (12) lights red and the selected channel light (3 or 5) will start to flash.
The amplifier will remember the last mode it was in after power off and revert to it the next time it is powered on.
Preset
This is the factory default operation of the amplifier.
In Preset mode the position of all controls except Master Volume (13) are stored within each channel. Each channel should be considered a preset.
Selecting a channel automatically recalls the settings stored within the channel. Note: The physical position of the front panel controls, except Master Volume (13) which is not storable, will now not match the actual settings of the amplifier. All front panel switches will automatically update.
Altering a control will cause the associated parameter to jump to the current physical position of that control.
When a control is altered the selected channel light (3 or 5) will start to flash indicating that the current preset has been altered.
To store the updated settings, push the Store switch (12).
If you select another channel without pressing Store (12) then any altered settings will be lost as the new channel and its settings are recalled.
Manual
In manual mode the amp’s settings always match the physical positions of the controls.
Changing channel only changes the channel, NO presets are recalled, NO other controls are altered.
Pressing Store (12) will store the current settings into the selected channel. These can then be recalled when using the unit in Preset mode.
When channel settings have been stored the current channel light (3 or 5) will stop flashing indicating the preset has been saved.
Reverb & FX
The amplifier provides two simultaneous effects, Reverb and one of four FXs (Chorus, Phaser, Flanger or Delay) Reverb The Reverb control (8) sets the amount of signal sent to the reverb section — allowing the reverb to spill between channels as different presets are recalled. When the Reverb control (8) is set to ‘0’ the reverb is switched off, the status of the reverb is also indicated on the optional footcontroller.
FX
The FX control is split into four segments and selects the type of FX and adjusts its associated settings. When the FX control is set to ‘0’ the FX are switched off, the status of the FX is also indicated on the optional footcontroller.
| 0 | FX Off |
| Chorus | Speed increases and depth is reduced as knob is turned clockwise. |
| Phaser | Speed increases as knob is turned clockwise. |
| Flanger | Speed increases, feedback and depth are reduced as knob is turned clockwise. |
| Delay | Delay level is increased as knob turned clockwise. |
Tap Tempo
The Tap Tempo switch (10) is used for the Delay effect only.
The Tap Tempo switch matches the delay time to the time between two presses.
The Tap Tempo LED flashes red at the selected/recalled delay time.
The number of repeats is reduced as the delay time decreases.
If you change from a channel with delay to one without delay the effect will spill between channels.
If you change from a channel with delay to a channel with delay set to a different delay time the delay effect will not spill between channels.
MP3 / Line In
The 3.5mm MP3 / Line In socket (14) allows the connection of an external audio source e.g. MP3 or CD player.
Headphones
The 3.5mm Headphones socket (16) allows the connection of a pair of headphones. When a jack is inserted into the headphones socket the unit’s speaker is muted.
Power
The Power switch (17) turns the amplifier on and off. If current settings have not been stored they will be lost.
Restoring Settings
ALL AMP & FOOTCONTROLLER SETTINGS WILL BE LOST
To restore the unit to factory settings (see handbook rear cover) you must hold the Store switch (12) while powering on the unit. The Clean/Crunch (3) and OD (5) lights will light orange. You can then release the Store switch (12).
Resetting the amplifier will erase all user Channel presets and all user Footcontroller settings, replacing them with the factory presets.
MG15FX Technical Specification
| Power (RMS) | 15W |
| Channels | 4 |
| Speaker | 1×8″ |
| Weight (kg) | 7.7kg |
| Size (mm) W, H, D | 382 x379 x205 |
MG30FX Technical Specification
| Power (RMS) | 30W |
| Channels | 4 |
| Speaker | 1×10″ |
| Weight (kg) | 10.8kg |
| Size (mm) W, H, D | 480 x420 x225 |
MG50FX / MG100FX
Rear panel shows MG50FX combo — MG100FX combo has the same features
MG100HFX head is identical except features two loudspeaker sockets
- Input Jack Socket
Jack input for your guitar. Use a good quality guitar cable (i.e. one that’s screened/shielded) to help prevent noise, interference and unwanted feedback. - Gain Control
Controls the amount of signal entering the pre-amp and the amount of distortion created in the selected channel. - Clean: Crunch Switch
Selects between Clean (green) and Crunch (red) channels. - Bass Control
Turning up the Bass control will add warmth and lowend depth to your sound. - OD Switch
Selects between OD1 (green) and OD2 (red) channels. - Middle Control
Adjusting the middle frequencies will vary the amount of body in your sound. - Treble Control
Increasing the Treble will make your sounds brighter and more cutting, turning it down will decrease your tone’s edge and make it sound softer as a result. - Rev Switch
This control lets you add a lush reverb to the selected channel, from a subtle hint to cavernous and all points in-between. - Reverb Control
This control lets you add a lush reverb to the selected channel, from a subtle hint to cavernous and all points in-between. - Volume Control
Controls the volume of the selected channel. - FX Switch
Switches the FX section (Modulation and Delay) on and off. - Mod Control
Selects and adjusts one of three modulation effects Chorus, Phaser & Flanger. - Tap Switch
Matches the delay FX time to the time between two pushes. The LED flashes at selected delay time. - Delay Control
Controls the amount of signal sent to the delay effect. - Ext FX Switch
Switches the external FX Loop on and off. - Master Control
Controls the master volume of the amplifier. - Damping (Manual) Switch
Switches the power amp damping between classic amp feeling (LED off) and modern response (LED on). Holding down the Damping switch for longer than 2 seconds switches the amp between manual and preset mode.
When using the footcontroller, holding both the Damping switch and the Store switch will activate the tuner. - Headphones / Line Out Socket
3.5mm headphones / Line out. - Store Switch
Stores the current amp settings into the current channel or into the footcontroller. When in manual mode the Store button lights red. - Power Switch
The power switch turns your amplifier on and off. A channel switch will light up when your amplifier is turned on and none will be lit when the amplifier is switched off.
Please ensure the amplifier is switched off and unplugged from the mains electricity supply before being moved. - Mains Input Connector
Your amp is provided with a detachable mains (power) lead, which is connected here. The specific mains input voltage rating that your amplifier has been built for is indicated on the back panel. Before connecting for the first time, please ensure that your amplifier is compatible with your electricity supply. If you have any doubt, please get advice from a qualified technician. Your Marshall dealer will help you in this respect.
The correct value of mains fuse located in the small drawer at the bottom of the mains socket is specified on the rear panel of the amplifier. The drawer contains a space for a spare fuse. NEVER attempt to bypass the fuse or fit one of the incorrect value! - Footcontroller Socket
Jack socket for the connection of the footcontroller. - Loudspeaker Output(s) Socket
The MG50FX, MG100FX combos have 1 loudspeaker output and the MG100HFX head has 2 loudspeaker outputs.
Always use a non-screened Marshall approved speaker lead when connecting an extension cabinet to these amplifiers. - MP3 Line In Socket
Jam to your favourite MP3, CD or tape track by connecting the line out or headphone output of your player here. Adjust the volume of your player to match that of your guitar and you’ve got the perfect ‘playalong’ practice system. - Return Socket
Connect to the output of an external effects processor or pedal here. - Send Socket
Connect to the input of an external effects processor or pedal here.
Technical Specifications
MG50FX Combo
| Power (RMS) | 50W |
| Channels | 4 |
| Speaker | 1×12″ |
| Weight (kg) | 16.6kg |
| Size (mm) W, H, D | 518 x494 x278 |
MG100FX 1X12″ Combo (MG101FX)
| Power (RMS) | 100W |
| Channels | 4 |
| Speaker | 1×12″ |
| Weight (kg) | 20kg |
| Size (mm) W, H, D | 591 x528 x283 |
MG100FX 2×12″ Combo (MG102FX)
| Power (RMS) | 100W |
| Channels | 4 |
| Speaker | 2×12″ |
| Weight (kg) | 22.4kg |
| Size (mm) W, H, D | 674 x494 x278 |
MG100HFX Head
| Power (RMS) | 100W |
| Channels | 4 |
| Speaker | — |
| Weight (kg) | 11.4kg |
| Size (mm) W, H, D | 591 x249 x275 |
MG50FX & MG100FX / MG100HFX Overview
Channel Selection
The amplifier has 4 channels — Clean, Crunch, OD1 & OD2.
Pressing the Clean/Crunch switch (3) selects between the Clean (Green Light) and Crunch (Red Light) channels.
Pressing the OD switch (5) selects between the OD1 (Green Light) and OD2 (Red Light) channels.
When moving from an OD channel to a Clean/Crunch channel, the unit remembers the last channel you were in before leaving. E.g. If you have moved from the Crunch Channel to an OD channel and you press the Clean/Crunch switch (3), the amplifier will revert back to the Crunch channel — rather than starting again in the Clean channel.
Modes
The amplifier operates in two modes — Preset and Manual.
To change between these two modes, you must hold the Damping switch (17) down for at least two seconds. When in manual mode the Store switch (19) lights red and the selected channel light (3 or 5) will start to flash.
The amplifier will remember the last mode it was in after power off and revert to it the next time it is powered on.
Preset
This is the factory default operation of the amplifier.
In Preset mode the position of all controls except Master Volume (16) are stored within each channel. Each channel should be considered a preset.
Selecting a channel automatically recalls the settings stored within the channel. Note: The physical position of the front panel controls, except Master Volume (16) which is not storable, will now not match the actual settings of the unit. All front panel switches will automatically update.
Altering a control will cause the associated parameter to jump to the current physical position of that control.
When a control is altered the selected channel light (3 or 5) will start to flash indicating that the current preset has been altered.
To store the updated settings, push the Store switch (19).
If you select another channel without pressing Store (19) then any altered settings will be lost as the new channel and its settings are recalled.
Manual
In manual mode the amps settings always match the physical positions of the controls.
Changing channel only changes the channel, NO presets are recalled, NO other controls are altered.
Pressing Store (19) will store the current settings into the selected channel. These can then be recalled when using the unit in Preset mode.
When channel settings have been stored the current channel light (3 or 5) will stop flashing indicating the preset has been saved.
Reverb & FX
The amplifier provides three simultaneous effects, Reverb, Delay and one of three Modulation effects (Chorus, Phaser, or Flanger).
Reverb
The Reverb control sets the amount of signal sent to the reverb section — allowing the reverb to spill between channels as different presets are recalled. The Rev switch (8) switches the reverb effect on and off, the status of the reverb is also indicated on the footcontroller.
FX
The FX section consists of two effects, Delay and Modulation. The FX section can be globally turned on and off via the FX switch (11).
Delay
The Delay control (14) sets the amount of signal sent to the delay section. When the Delay control (14) is set to ‘0’ the delay is switched off.
Modulation
The Mod control (12) is split into three segments and selects the type of modulation effects and adjusts its associated settings. When the Mod control (12) is set to ‘0’ the modulation effects are switched off.
| 0 | Modulation Off |
| Chorus | Speed increases and depth is reduced as knob is turned clockwise. |
| Phaser | Speed increases as knob is turned clockwise. |
| Flanger | Speed increases, feedback and depth are reduced as knob is turned clockwise. |
Tap Tempo
The Tap Tempo switch (13) is used for the Delay effect only.
The Tap Tempo switch matches the delay time to the time between two presses.
The Tap Tempo LED flashes red at the selected/recalled delay time.
The number of repeats is reduced as the delay time decreases.
If you change from a channel with delay to one without delay the effect will spill between channels.
If you change from a channel with delay to a channel with delay set to a different delay time the delay effect will not spill between channels.
MP3 / Line In
The 3.5mm MP3 / Line In socket (24) on the rear panel allows the connection of an external audio source e.g. MP3 or CD player.
Headphones & Line Out
The 3.5mm Headphones socket (18) allows the connection of a pair of headphones. When a jack is inserted into the headphones socket the unit’s speaker is muted.
Additionally the Headphones socket (18) can also be used as a Line Out to send the signal to an external equipment e.g. A computer, digital recorder or mixer. When a jack is inserted into the socket the unit’s speaker is muted providing ‘silent recording’. The unit’s output can then be monitored directly from the external equipment used.
Damping
The Damping switch (17) selects between the two modes of power amp damping. When Damping is off (LED off), the power amp response resembles the feel of a classic power amp with emphasized middle and limited bass and treble. Switching Damping on (LED on) will boost the speaker resonances both in the bass and high frequency ranges.
FX Loop
The FX Return socket (25) on the rear panel is used to connect the OUTPUT of the effects processor or pedal you are using in the effects loop.
The FX loop is series and set at instrument level so both guitar FX or professional units can be connected.
The FX Send socket (26) on the rear panel is used to connect to the INPUT of the unit you are using in the effects loop.
The FX loop is switched on and off via the Ext FX switch (15) on the front panel.
Loudspeaker
ALWAYS USE A NON-SCREENED MARSHALL APPROVED SPEAKER LEAD WHEN CONNECTING AN EXTENSION CABINET TO THESE AMPLIFIERS.
MG50FX
The single Loudspeaker socket (22) is used to connect either the internal speaker or an external speaker cabinet to the unit’s power amp. When using external cabinets ensure the total load impedance is equal to, or exceeds, 8 ohms.
MG100FX 1×12″ & 2×12″ Combos
The single Loudspeaker socket (22) is used to connect either the internal speaker or an external speaker cabinet to the unit’s power amp. When using external cabinets ensure the total load impedance is equal to, or exceeds, 4 ohms.
MG100HFX Head
The two Loudspeaker sockets are used to connect to 1 or 2 external cabinets. When using external cabinets ensure the total load impedance is equal to, or exceeds, 4 ohms.
Power
The Power switch (20) turns the amplifier on and off. If current settings have not been stored they will be lost.
Restoring Settings
ALL AMP & FOOTSWITCH SETTINGS WILL BE LOST
To restore the unit to factory settings (see handbook rear cover) you must hold the Store switch (19) while powering on the amplifier. The Clean/Crunch (3) and OD (5) lights will light orange. You can then release the Store switch (19).
Resetting the amplifier will erase all user Channel presets and all user Footcontroller settings, replacing them with the factory presets.
- Footswitches
Each footswitch can be assigned a different stored function. - LED Status Panel
This always reflects the current status of the amplifier or tuner details:- CLN & OD: Current Channel
- REV: Reverb On/Off
- FX: FX Section On / Off
- Ext FX: External FX Loop On/Off (MG50FX & MG100FX)
- Damp: Damping Mode (MG50FX & MG100FX)
- Tap: Tap Tempo speed.
- Digital Display
This display indicates the various functions of the footcontroller.
Footcontroller Factory Settings
Footswitch 1: Clean: Crunch Switch
Footswitch 2: Overdrive Switch
Footswitch 3: Tap Tempo Switch
Footswitch 4: Tuner
Programming
The footswitch can be programmed to store front panel switches (Switch Store) or complete presets (Preset Store). Switch Store To assign a front panel switch to a Footswitch (1), press and hold the front panel switch and while held down press the Footswitch (1) you wish to assign it to.
The Digital Display (3) will swirl to show that the footswitch has been assigned. You can then release the footswitch and front panel switch.
Preset Store
To assign a preset to a Footswitch (1), select the required channel and modify the front panel controls if required, press and hold the Store switch on the front panel and while held down, press your chosen Footswitch (1).
The Digital Display (3) will swirl to show that the footswitch has been assigned. You can then release the footswitch and Store switch. Footcontroller Presets are independent of the dedicated Channel presets stored within the amplifier. This allows you to create a number of presets based on the same channel/pre-amp setting.
When either a Channel preset or Footswitch preset has been altered the Digital Display (3) will begin to flash. The footcontroller will flash the relevant number if a Footswitch preset has been altered or will flash a «-» if a Channel preset has been altered.
Pressing only the Store switch at this point will overwrite the altered Channel or Footswitch preset.
To store an altered Channel preset to the Footswitch instead, hold the Store switch and while held down, press your chosen Footswitch (1) — Just like a normal Preset Store.
To store an altered Footswitch Preset to another Footswitch hold the Store switch and while held down, press your chosen Footswitch (1) — Just like a normal Preset Store.
Digital Display
When recalling a footswitch preset, the Digital Display (3) will indicate which footswitch number has been pressed.
If a Channel preset has been recalled the Digital Display (3) will remain blank.
When either a Channel preset or Footswitch preset has been altered the Digital Display (3) will begin to flash. The footswitch will flash the relevant number if a Footswitch preset has been altered or will flash a «-» if a Channel preset has been altered.
Tuner
The Tuner can be accessed in two ways:
MG15FX & MG30FX
By simultaneously pushing the Tap (10) and Store (12) switches on the front panel or by assigning the Tuner to the footswitch. Note: On factory reset / first switch on, the Tuner is already assigned to Footswitch number 4.
Assigning the Tuner to a footswitch is carried out like any other Switch Store. To assign the Tuner to the footswitch hold down the Tap (10) and Store (12) switches and press the chosen footswitch you wish to assign it to. The Digital Display (3) will swirl to show that the footswitch has been assigned. You can then release the footswitch and front panel switch.
MG50FX & MG100FX
By simultaneously pushing the Damping (17) and Store (19) switches on the front panel or by assigning the Tuner to the footswitch. Note: On factory reset / first switch on, the Tuner is already assigned to Footswitch number 4.
Assigning the Tuner to a footswitch is carried out like any other Switch Store. To assign the Tuner to the footswitch hold down the Damping (17) and Store (19) switches and press the chosen footswitch you wish to assign it to. The Digital Display (3) will swirl to show that the footswitch has been assigned. You can then release the footswitch and front panel switch.
For all amplifiers, when entering Tuner mode the unit mutes and Clean: Crunch (3) and OD (5) switches light yellow.
The Digital Display (3) indicates the closest current note being played. The indicator dot on the lower right hand corner shows if the current closest note is #.
The LED Status Panel (2) is used to show how far away from the closest note the current note being played is. When the central FX Status LED lights, it indicates the correct tuning, with the others progressively indicating the tuning is up to 50 cents up or down.
To exit the Tuner push any footswitch, the amplifier will then exit returning to the settings before entering.
Marshall Factory Presets
Clean: pure guitar tone with a touch of chorus + reverb
Crunch: low gain bluesy tone with subtle reverb
OD1: raw heavy crunch, no effects
OD2: high gain solo, reverb + delay
Compliance
* EUROPE ONLY ![]() Note: This equipment has been tested and found to comply with the requirements of the EMC Directive Environments E1, E2 and E3 EN 55103-1/2) and the Low Voltage Directive in the E.U.
Note: This equipment has been tested and found to comply with the requirements of the EMC Directive Environments E1, E2 and E3 EN 55103-1/2) and the Low Voltage Directive in the E.U.
* EUROPE ONLY — Note:
The Peak Inrush current for the MG15FX is 2.5 amps.
The Peak Inrush current for the MG30FX is 5 amps.
Note: This equipment has been tested and found to comply with the limits for a Class B digital device, pursuant to part 15 of the FCC rules. These limits are designed to provide reasonable protection against harmful interference in a residential installation. This equipment generates, uses and can radiate radio frequency energy and, if not installed and used in accordance with the instructions, may cause harmful interference to radio communications. However, there is no guarantee that interference will not occur in a particular installation. If this equipment does cause harmful interference to radio or television reception, which can be determined by turning the equipment off and on, the user is encouraged to try to correct the interference by one or more of the following measures:
- Reorient or relocate the receiving antenna.
- Increase the separation between the equipment and the receiver.
- Connect the equipment into an outlet on a circuit different from that to which the receiver is connected.
- Consult the dealer or an experienced radio/TV technician for help.
Follow all instructions and heed all warnings
KEEP THESE INSTRUCTIONS!
Marshall Amplification plc
Denbigh Road, Bletchley, Milton Keynes, MK1 1DQ, England.
Tel : +44 (0)1908 375411 Fax : +44 (0)1908 376118
www.marshallamps.com
Whilst the information contained herein is correct at the time of publication, due to our policy of constant improvement and development, Marshall Amplification plc reserve the right to alter specifications without prior notice.
BOOK-900025-00 / 11 / 08
Documents / Resources
References
Marshall Home — marshall.com
Download manual
Here you can download full pdf version of manual, it may contain additional safety instructions, warranty information, FCC rules, etc.
Download Marshall MG100FX/MG30FX Manual
2
Marshall MG Series. Ðóêîâîäñòâî ïîëüçîâàòåëÿ
Èñêðåííå Âàø,
Dr. Jim Marshall OBE
Äîðîãîé ïîëüçîâàòåëü!
Ñ÷èòàþ ñâîèì äîëãîì ëè÷íî ïîçäðàâèòü Âàñ ñ ïîêóïêîé ãèòàðíîãî
óñèëèòåëÿ íîâîãî ïîêîëåíèÿ Marshall MG.
Êàê ìóçûêàíò, ÿ îòëè÷íî ïîíèìàþ, êàêèõ óñèëèé ìîãóò ñòîèòü äîñòèæåíèå
ïîñòàâëåííîé öåëè è âîïëîùåíèå â æèçíü çàäóìàííîãî. Ïîìèìî
òàëàíòà, öåëåóñòðåìëåííîñòè è òÿæåëåéøåãî òðóäà, òðåáóåòñÿ
îáîðóäîâàíèå, ïîçâîëÿþùåå ðåàëèçîâàòü çàìûñåë èñïîëíèòåëÿ. Çà
äîëãèå ãîäû
ÿ âèäåë, êàê ïîÿâëÿëèñü âñå íîâûå è íîâûå òåõíîëîãèè óñèëåíèÿ
çâóêà, è ìíå î÷åíü õîòåëîñü, ÷òîáû â ñåðèè MG íàøëè ñâîå
âîïëîùåíèå âñå ýòè èííîâàöèè. ×òîáû äîñòè÷ü ýòîé öåëè,
òðàíçèñòîðíûå óñèëèòåëè ñåðèè MG äîëæíû áûëè îáúåäèíèòü
çâó÷àíèå, î êîòîðîì ìå÷òàåò ëþáîé ñîâðåìåííûé ãèòàðèñò, ñ
öèôðîâûìè òåõíîëîãèÿìè îáðàáîòêè ýôôåêòàìè è õðàíåíèÿ
òåìáðîâ â ïàìÿòè. Óõâàòèâøèñü çà ýòó èäåþ,
ÿ ïîðó÷èë ñàìûì ëó÷øèì ñïåöèàëèñòàì íàøåãî îòäåëà ðàçðàáîòêè
ñîçäàòü íîâîå ñåìåéñòâî äîñòóïíûõ ïî öåíå óñèëèòåëåé MG, îáëàäàþùèõ
íå òîëüêî ïîòðÿñàþùèì çâó÷àíèåì, íî è èíòóèòèâíûì, ïîëíîñòüþ
ïðîãðàììèðóåìûì èíòåðôåéñîì äëÿ ðåäàêòèðîâàíèÿ è õðàíåíèÿ ñîçäàííûõ
èñïîëíèòåëåì òåìáðîâ è ýôôåêòîâ îò êîìïàíèè Marshall.
Áåçóêîðèçíåííàÿ ñáîðêà è ñòðîæàéøèé êîíòðîëü êà÷åñòâà ãàðàíòèðóþò,
÷òî àáñîëþòíî êàæäûé óñèëèòåëü íîâîé ñåðèè MG áóäåò îòâå÷àòü ñàìûì
âûñîêèì ñòàíäàðòàì — èìåííî ýòîãî æäóò îò ïðîäóêöèè Marshall
íàøè êëèåíòû.
Íåâàæíî — ïåðâûé ëè ýòî óñèëèòåëü Marshall â Âàøåé æèçíè èëè æå
î÷åðåäíîå äîïîëíåíèå ê áîãàòîìó êîìïëåêòó ìóçûêàëüíîé àïïàðàòóðû,
âåëèêîëåïíûé çâóê è ïðîñòîòà èíòóèòèâíîãî óïðàâëåíèÿ ýòîãî êîìïàêòíîãî
è íàäåæíîãî ïðèáîðà áóäóò âîñòðåáîâàíû àáñîëþòíî âåçäå —
îò ðåïåòèöèîííîé êàìîðêè äî áîëüøîé ñöåíû, îò ñîçäàíèÿ ïåðâîíà÷àëüíûõ
íàáðîñêîâ ïåñíè äî ñòóäèéíîé çàïèñè!
Îò âñåé äóøè æåëàþ Âàì óñïåøíîé ðàáîòû ñ íîâûì óñèëèòåëåì Marshall!
Äîáðî ïîæàëîâàòü â íàøó ñåìüþ!

Marshall MG30CFX – это полноценный комбоусилитель новой серии Carbon Fibre MG, которая прекрасно подходит для тихих занятий в спальне, но имеет достаточно мощности и обаяния, чтобы помочь вам и на небольшом концерте! Имея четыре поразительных канала, цифровые эффекты, в том числе ревербератор, дилэй и октавер, линейный вход для MP3 плееров, выход для подключения наушников для тихих занятий, и возможность расширения универсальности посредством контроллера Stompware, MG30CFX, согласитесь, предлагает многое за ваши деньги. И не забывайте, что вы получаете аутентичный Marshall’овский звук!
Нужен ли вам яркий британский чистый звук или британский бульдог-дисторшн, MG30CFX поможет. Благодаря цифровой памяти настроек, MG30CFX предлагает лучшее сочетание аналоговой схемы и цифровых эффектов, скомбинированных для создания прекрасные звуков Marshall без ограничений. Идеально подходит для джемов, репетиций и бесшумных занятий.
30-тиваттный комбоусилитель с 4-мя каналами и одним 10-тидюймовым динамиком, DFX и 4 программируемые ячейки памяти.
Аналоговые мускулы, цифровой мозг
В отличие от большинства программируемых усилителей на рынке, единственное «цифровое» в MG30CFX – это его встроенные эффекты и память. Пока звук продолжает пульсировать, а цифровое сердце биться, MG30CFX остается на 100% аналоговым. В отличие от моделирующих усилителей, которые выражают претензию на олицетворение превосходства, и широко-уважаемых комбоусилителей, сделанными другими брендами, MG30CFX – это Marshall, как с гордостью провозглашает рукописный логотип!
Разделенный цифровой ревербератор – новое свойство
Встроенный цифровой ревербератор с гордостью представляет два режима – студийный и пружинный ревербератор. Оба являются высококачественными, цифровыми эмуляциями ревербераторов, которые были спроектированы специально для нового MG30CFX.
Больше модуляции – новое свойство
В дополнение к высококачественному цифровому хорусу, флэнджеру и фэйзеру, MG30CFX имеет октавер, который добавляет к оригинальному сигналу гитары и еще одну гитару, звучащую октавой ниже.
Больше дилэйя дилэйя дилэйя – новое свойство
Совершенно новый MG, с “X” в названии, имеет цифровой дилэй, с удобной клавишей “tap tempo”, которая позволит легко настраивать дилэй.
Вход и выход для прекрасных занятий
MG30CFX имеет два разъема 1/8’’ для подключения CD/MP3/медиа-плеера и выходом на наушники, который, когда используется, блокирует звук динамика комбоусилителя. MG30CFX делает «тихие» занятия здорово звучащими с превосходной легкостью.
Демпинг динамика
Одна из вещей, которая делает «чувство» комбоусилителей MG таким же хорошим, как и их звучание – это использование встроенного демпинга динамика. В двух словах, это свойство эмулирует способ, которым ламповые усилители мощности позволяют динамику «дурно вести себя», что приводит к рождению всеми любимых звуков.
Спасительный Stompware
Все программируемые комбоусилители этого диапазона хранят и мгновенно вызывают каждую настройку фронтальной панели (в том числе FX) за исключением общей громкости, которая устанавливается вручную в зависимости от ситуации. Чтобы добавить больше к многофункциональности комбоусилителя, вы можете приобрести специальный футсвитч Stompware, который прекрасно расширит программируемость комбоусилителя и позволит вам управлять переключением каналов, эффектов, tap tempo, настройкой гитары, или сохранением четырех программ, совершенно независимых от каналов усилителя. Например, если вы хотите сохранить и немедленно вызвать две различных настройки канал Clean и две настройки канала OD-2, вы сможете сделать это.
СВОЙСТВА
• Современная шлифованная серебряная панель и углеволоконное покрытие из винилапластика
• Новый программируемый FX включает в себя студийный и пружинный ревербератор; октавер
• 2 цифровых эффекта FX могут работать одновременно
• 4 программируемых аналоговых канала – Clean (чистый), Crunch (кранч), OD1 (овердрайв 1), OD2 (овердрайв 2)
• Возможность подключения педали Stompware
• 3-хполосный эквалайзер
• Входной разъем MP3 Input для подключения MP3-плеера
• Разъем для подключения наушников
• Мощность: 30 Вт
Обзор №1
Отзыв: Гитарный комбоусилитель Marshall MG30CFX — Отличный усилитель для занятий и репетиций от Marshall
Достоинства:
Хороший звук, гибкие настройки, встроенные эффекты, стильный дизайн
Недостатки:
Footswitch приобретается отдельно
Я уже посвящал свои обзоры гитарным усилителям для занятий дома и эта тема сейчас особенно актуальна. Цифровые технологии постепенно уверенно одерживают победу в сегменте домашних усилителей и их преимущества очевидны. Сейчас практически каждая компания, производящая музыкальное оборудование, выпускает линейку недорогих комбоусилителей на основе технологии моделирования звучания и это новый этап в развитии музыкального оборудования для гитаристов.
Первый мой обзор был посвящён комбоусилителю Fender Mustang I и это действительно отличный вариант домашнего усилителя, но со своими особенностями, которые я подробно описал. Усилители Fender знамениты именно своим чистым звуком и это подтверждается даже в вариантах звучания серии Mustang. В ней, конечно, представлены и модуляции перегруженного звука усилителей Marshall, Mesa Boogie, VOX, но звучат они не очень убедительно, в отличии от модуляции чистого звука Fender. Если Вы играете в стилях Jazz, Blues и Coutry, где главный акцент именно на чистом или слегка подгруженном звуке гитары, то вариант приобретения усилителей серии Fender Mustang очевиден. Но если Вы помимо хорошего чистого звука желаете получить ещё и качественный перегруженный звук, то Вам однозначно стоит обратить внимание на линейку комбоусилителей Marshall Carbon Fibre MG.
Серия усилителей Marshall Carbon Fibre MG в настоящее время включает в себя девять различный вариантов комбоусилителей и два усилителя в формате «голова». Они различаются по мощности и вариантам встроенных эффектов и для своего обзора я выбрал комбоусилитель Marshall MG30CFX, который, как мне кажется, является лучшим по соотношению цены и качества и самым универсальным по звучанию и функциям из серии Carbon Fibre MG.
В настоящее время не представляет сложности выпустить комбоусилитель с хорошим моделированием звука и эффектов, но намного сложнее заставить этот усилитель выдавать фирменное узнаваемое звучание и компании Marshall это однозначно удалось. Серия Marshall Carbon Fibre MG пришла на смену выпускаемое ранее серии транзисторных усилителей Marshall MG. Стоит отметить, что новая серия хоть и представляет собой цифровое моделирование звучания Marshall, но звучит на порядок лучше транзисторной MG. Корпус комбоусилителя обтянут материалом напоминающий карбон и выглядит очень стильно, гармонично впишется в любой интерьер. Вместо привычной многим золотой панели управления усилителей Marshall в серии Carbon Fibre MG панель выполнена в расцветке хром и выгодно дополняет дизайн усилителя.
Очень грамотно реализована секция управления и если это Ваш первый комбоусилитель, то даже интуитивно можно довольно быстро разобраться в настройках и функциях. Инструкцию на русском языке можно свободно скачать в интернете, но и без неё можно легко разобраться во всех предлагаемых функциях. Слева расположено гнездо подключения гитары, далее идут ручки регулировки уровня перегруза, эквалайзер на три полосы и два типа реверберации — studio и spring. Глубина реверберации немного уступает усилителям Fender, но звучание эффекта очень качественное.
Сверху расположены два переключателя режима звучания. Первая переключает режимы clean/crunch, вторая, соответственно, вариации перегруза OD1/OD2. Режим clean даёт отличный чистый звук. Прекрасно сочетается с эффектами и, в зависимости от настоек, отлично впишется в любой стиль музыки. Канал crunch даёт лёгкий подгруз чистого канала и напоминает звучание усилителей Marshall JTM45. Плотный, драйвовый и в меру злой перегруз с отличной читаемостью.
Режим OD1 это классический перегруженный звук Marshall JCM800 — сухой, плотный, читаемый драйв, прекрасно подходящий для игры риффов.
Канал OD2 даёт ещё больший уровень перегруза и его звучания должно хватить любому гитарному маньяку, любящему десятиминутные сольные запилы. Все режимы звучат очень убедительно и действительно напоминают фирменное звучание Marshall, характер звучания, безусловно, похож, но говорить о полном сходстве с ламповыми усилителями Marshall не стоит.
Далее расположены регуляторы громкости канала, выбор эффекта обработки, мастер громкость и кнопки tap tempo и сохранения готового пресета. Функция tap tempo очень полезна для отстройки темпа эффектов delay и модуляции, а при одновременном нажатии этих двух кнопок управления включается режим гитарного тюнера. Всё просто и очень удобно. Звучание встроенных эффектов также хорошего качества и для игра дома этих возможностей более чем достаточно.
C правой стороны расположены гнёзда подключение mp3 плеера, выход на наушники и гнездо подключения внешнего контролёра управления и кнопка включения. Marshall MG30CFX можно использовать не только дома, но и взять с собой на концерт, а подключив mp3 плеер с минусовкой вполне можно озвучить небольшое помещения без дополнительной подзвучки комбоусилителя микрофоном. Также очень удобно заниматься под минусовки дома, а для занятий ночью можно использовать наушники. Контролёр Marshall STOMPWARE приобретает отдельно.
Комбоусилитель весит не много и для его переноски вполне хватает удобной ручки, расположенной сверху.
Marshall MG30CFX имеет динамик 10 дюймов и закрытую заднюю стенку корпуса, что даёт плотное звучание и хороший резонанс. Качество изготовления не вызывает вопросов и эта серия усилителей раскупается как горячие пирожки. Я считаю комбоусилитель Marshall MG30CFX отличным вариантом для занятий дома и благодаря регулятору master volume можно легко настроить комфортную громкость звучания и не мешать соседям. Но запаса громкости вполне хватит для озвучки небольшого помещения и это позволяет использовать Marshall MG30CFX на концерте.
Серия Marshall Carbon Fibre MG включает в себя и более мощные модели и они находят своё применение, но для использования дома я в них не вижу смысла. Я считаю новую серию моделирующих усилителей Marshall отличным вариантом для начинающих гитаристов и даёт полное представление о гитарном звуке и позволяет получить первый опыт в использовании эффектов обработки.
Стоимость: 10650 руб.
Год выпуска/покупки: 2013
Общее впечатление: Отличный усилитель для занятий и репетиций от Marshall
Просмотр
Доступно к просмотру 15 страниц. Рекомендуем вам скачать файл инструкции, поскольку онлайн просмотр документа может сильно отличаться от оригинала.
-
Ai?iaie iieuciaaoaeu!
N?eoa? naiei aieaii ee?ii iica?aaeou Aan n iieoieie aeoa?iiai
oneeeoaey iiaiai iieieaiey Marshall MG.
Eae iocueaio, y ioee?ii iiieia?, eaeeo oneeee iiaoo noieou ainoe?aiea
iinoaaeaiiie oaee e aiieiuaiea a ?eciu caaoiaiiiai. Iiieii
oaeaioa, oaeaono?aieaiiinoe e oy?aeaeoaai o?oaa, o?aaoaony
iai?oaiaaiea, iicaiey?uaa ?aaeeciaaou caiunae eniieieoaey. Ca
aieaea aiau
y aeaae, eae iiyaeyeenu ana iiaua e iiaua oaoiieiaee oneeaiey
caoea, e iia i?aiu oioaeinu, ?oiau a na?ee MG iaoee naia
aiieiuaiea ana yoe eiiiaaoee. ?oiau ainoe?u yoie oaee,
o?aicenoi?iua oneeeoaee na?ee MG aie?iu auee iauaaeieou
cao?aiea, i eioi?ii ia?oaao e?aie nia?aiaiiue aeoa?eno, n
oeo?iauie oaoiieiaeyie ia?aaioee yooaeoaie e o?aiaiey
oaia?ia a iaiyoe. Ooaaoeaoenu ca yoo eaa?,
y ii?o?ee naiui eo?oei niaoeaeenoai iaoaai ioaaea ?ac?aaioee
nicaaou iiaia naiaenoai ainooiiuo ii oaia oneeeoaeae MG, iaeaaa?ueo
ia oieuei iio?yna?uei cao?aieai, ii e eiooeoeaiui, iieiinou?
i?ia?aiie?oaiui eioa?oaenii aey ?aaaeoe?iaaiey e o?aiaiey nicaaiiuo
eniieieoaeai oaia?ia e yooaeoia io eiiiaiee Marshall.
Aacoei?eciaiiay nai?ea e no?i?aeoee eiio?ieu ea?anoaa aa?aioe?o?o,
?oi aanie?oii ea?aue oneeeoaeu iiaie na?ee MG aoaao ioaa?aou naiui
aunieei noaiaa?oai — eiaiii yoiai ?aoo io i?iaoeoee Marshall
iaoe eeeaiou.
Iaaa?ii — ia?aue ee yoi oneeeoaeu Marshall a Aaoae ?ecie eee ?a
i?a?aaiia aiiieiaiea e aiaaoiio eiiieaeoo iocueaeuiie aiia?aoo?u,
aaeeeieaiiue caoe e i?inoioa eiooeoeaiiai oi?aaeaiey yoiai eiiiaeoiiai
e iaaa?iiai i?eai?a aoaoo aino?aaiaaiu aanie?oii aacaa —
io ?aiaoeoeiiiie eaii?ee ai aieuoie noaiu, io nicaaiey ia?aiia?aeuiuo
iaa?ineia ianie ai nooaeeiie caiene!
Io anae aooe ?aea? Aai oniaoiie ?aaiou n iiaui oneeeoaeai Marshall!
Aia?i ii?aeiaaou a iaoo naiu?!
Ene?aiia Aao,
Dr. Jim Marshall OBE
2                               Marshall MG Series. ?oeiaianoai iieuciaaoaey
-
Iauaa iienaiea iiaaeae MG15CFX/MG30CFX
MG15CFX
TUNER
MG 15CFX
TAP
CLEAN / CRUNCH  OD-1 / O D-2  (MANUAL)  STO RE
GAIN  BASS  MIDDLE  TREBLE  REVERB  VOLUME  FX  MASTER
PHASER
HASER  FLANG ER
PH
FLANG ER
STUDIO STUDIO  SPRING  SPRING  SPRING
DELA Y Y Y DELA ELA
INPUT                                C HO C HO RUS         POWER
C HO RUS
0 0  1010  0 0  1010  0 0  1010  00  1010  00  1010  O OFFFF  O OC TAVECTAVE  0 0  10 10  FOOTCON TROLLER
1    2  3  4  5  6    7    8     9  10  11 12  13  14  15  16  17
MG30CFX
TUNER
MG 30CFX
TAP
CLEAN / CRUNCH  OD-1 / O D-2      STO RE
(MANUAL)
GAIN  BASS  MIDDLE  TREBLE  REVERB  VOLUME  FX  MAS TER
PHASER
PHASER  FLANG ER
PH
LANG ER
STUDIO STUDIO  SPRING  SPRING  SPRING
DELA Y Y Y ELA DELA
S
C HO
INPUT                                  C HO RUS             FOOTCONTROLLER  POWER
C H HO RUS
0 0  10 10  0 0  10 10  0 0  10 10  00  1010  00  1010  O OFFFF  OC TAVECTAVE  00  1010
O
1        2  3  4  5  6    7    8    9  10  11  12  13  14  16  15            17
1.  ?acuai Input
Neo?eo aey iiaee??aiey aeoa?u. Ai ecaa?aiea iiyaeaiey oiiiaiai ooia, iiiao e ia?aeaoaeuiie
aeonoe?aneie ia?aoiie nayce eniieucoeoa aunieiea?anoaaiiue ye?aie?iaaiiue aeoa?iue eaaaeu.
2.  ?aaoeyoi? Gain
Neo?eo aey oi?aaeaiey o?iaiai caoeiaiai neaiaea, iinooia?uaai n aeoa?u ia i?aaaa?eoaeuiue oneeeoaeu
e, niioaaonoaaiii, aeoaeiu ia?aa?ocee a aua?aiiii eaiaea.
3.  Eiiiea Clean/Crunch
Neo?eo aey ia?aee??aiey ia?ao eaiaeaie Clean (iianaaoea caeaiiai oaaoa) e Crunch (iianaaoea
e?aniiai oaaoa).
4.  ?aaoeyoi? Bass
Neo?eo aey aiaaaeaiey a caoe oaieiou e aeoaeiu a iecei?anoioiii aeaiaciia.
5.  Eiiiea OD-1/OD-2
Neo?eo aey ia?aee??aiey ia?ao eaiaeaie OD-1 (iianaaoea caeaiiai oaaoa) e OD-2 (iianaaoea
e?aniiai oaaoa).
6.  ?aaoeyoi? Middle
Neo?eo aey oi?aaeaiey o?iaiai n?aaieo ?anoio, ?aaoee?oy oai naiui ieioiinou cao?aiey.
7.  ?aaoeyoi? Treble
Oneeaiea o?iaiy aunieeo ?anoio aaeaao caoe aieaa y?eei e i?i?aca?uei, nie?aiea o?iaiy aaeaao
cao?aiea iya?a.
8.  ?aaoeyoi? Reverb
Neo?eo aey ieaaiiai oi?aaeaiey aeoaeiie yooaeoa ?aaa?aa?aoee a aua?aiiii eaiaea — io eaaeiai i?ecaoea
ai eieoaoee aeonoeee ia?iiiiai caea. E?iia oiai, iieuciaaoaeu ii?ao auae?aou ia?ao aaoiy
i?eioeieaeuii ?acee?iuie aeai?eoiaie ?aaa?aa?aoee — Studio e Spring. Aeai?eoi Studio eieoe?oao
cao?aiea nooaeeiiai ieanoei?aoiai ?aaa?aa?aoi?a, a oi a?aiy eae aeai?eoi Spring eieoe?oao cao?aiea
eeanne?aneiai i?o?eiiiai ?aaa?aa?aoi?a.
9.  ?aaoeyoi? Volume
Neo?eo aey oi?aaeaiey a?iieinou? aua?aiiiai eaiaea.
10. Eiiiea Tap (Manual)
Neo?eo aey ianooeeaaiey oaiia aey yooaeoa Delay. Naaoiaeiaiue eiaeeaoi? ieaaao neio?iiii
n onoaiiaeaiiui oaiiii. Oaa??eaaeoa eiiieo Tap aieaa 2 naeoia aey ia?aee??aiey oneeeoaey ia?ao
?a?eiaie Manual e Preset. I?e eniieuciaaiee iaaaeuiiai eiio?ieea?a (i?eia?aoaaony ioaaeuii)
i?e iaiia?aiaiiii ia?aoee ia eiiiee Tap e Store aeoeae?oaony ano?iaiiue o?ia?.
Marshall MG Series. ?oeiaianoai iieuciaaoaey                                                   3
-
11. ?aaoeyoi? FX Control
Neo?eo aey auai?a e oi?aaeaiey aeoaeiie iaiiai ec iyoe ano?iaiiuo yooaeoia — Chorus, Phaser, Flanger,
Delay e Octave.
12. Eiiiea Store
Neo?eo aey nio?aiaiey iano?iae oaeouaai eaiaea oneeeoaey eee aey auciaa iano?iae i?e iiiiue
iioeiiaeuiiai iaaaeuiiai eiio?ieea?a. A ?a?eia Manual iianaaoea eiiiee Store caai?aaony e?aniui.
13. ?aaoeyoi? Master
Neo?eo aey oi?aaeaiey iauae a?iieinou? oneeeoaey.
14. ?acuai MP3 Line In
Neo?eo aey iiaee??aiey aiaoiaai CD-/MP3-aoaeiieaa?a aey ea?u iia aeeiiiaiaiaio e?aeiuo ianai.
Aey iano?ieee a?iieinoe oiiia?aiiu eniieucoeoa nianoaaiiue ?aaoeyoi? a?iieinoe aoaeiieaa?a.
15. ?acuai Footcontroller
Neo?eo aey iiaee??aiey iaaaeuiiai eiio?ieea?a PEDL-90008 (i?eia?aoaaony ioaaeuii).
16. ?acuai Headphone
Neo?eo aey iiaee??aiey iaooieeia, ?oi iicaieyao ea?aou, ia aaniieiy ie?o?a?ueo. I?e iiaee??aiee
iaooieeia ano?iaiiue aeiaiee oneeeoaey ioee??aaony.
17. Eiiiea Power
Neo?eo aey aee??aiey e ioee??aiey ieoaiey oneeeoaey. I?e aee??aiee ieoaiey caai?aaony naaoiaeia
aeoeaiiai a aaiiue iiiaio eaiaea, i?e ioee??aiee ieoaiey ana naaoiaeiau aanioo.
CAIA?AIEA: ?aai?aa iai?y?aiea yeaeo?inaoe oneeeoaey oeacuaaaony ia oueuiie iaiaee i?eai?a. I?a?aa ?ai
aee??eou ieoaiea, oaaaeoanu, ?oi aaiiay iiaaeu ?ann?eoaia ia eniieuciaaiea niioaaonoao?uaai
iai?y?aiey a naoe. A neo?aa aicieeiiaaiey e?auo niiiaiee ia?aoeoanu e eaaeeoeoe?iaaiiiio
niaoeaeenoo eee e ianoiiio aeea?o Marshall.
Ia?aa o?ainii?oe?iaeie oneeeoaey iaycaoaeuii ioee??eoa ieoaiea e ioniaaeieoa ana neeiaua e neaiaeuiua
eaaaee io ?acuaiia.
4                               Marshall MG Series. ?oeiaianoai iieuciaaoaey
- 1
- 2
- 3
- 4
- 15