![]()
MatterControl
Состояние выпуска: действующий
| Описание |
графический интерфейс пользователя к отправителю G-кода и различные программы нарезки… |
| Лицензия |
BSD 2-Clause License |
| Автор |
User:MatterHackers |
| Соавторы | |
| На основе | |
| Категории |
Software/ru |
| CAD модели | |
| Ссылка на внешний ресурс |
MatterControl] |
Contents
- 1 Введение
- 2 Обзор
- 3 Особенности
- 3.1 Очередь печати
- 3.2 Просмотр 3D-модели
- 3.3 Просмотр слоев (Layer view)
- 3.4 Библиотека
- 3.5 О нас
- 3.6 Управление принтером
- 3.6.1 Контроль температуры
- 3.6.2 Управление движением
- 3.7 Настройка и калибровка
- 3.7.1 Автоматическое выравнивание стола
- 3.7.2 Терминал
- 3.8 Настройки
- 3.9 MatterControl Image Converter
Введение
MatterControl — это бесплатная программа, разработанная MatterHackers для управления RepRap и другими 3D-принтерами на основе G-кода. Это позволяет пользователям организовать
и управлять процессом печати. В настоящее время он доступен для загрузки в Windows, MacOS X и Linux Ubuntu и Debian.
Обзор
Программа включает в себя:
- 3D-просмотрщик с возможностью поворота, масштабирования и зеркального отображения
- 2D-просмотрщик для изучения отдельных слоев нарезанного дизайна
- библиотека, позволяющая пользователям организовывать, искать и управлять своими файлами дизайна
- Очередь печати для управления большими проектами
- быстрый мастер подключения принтера и выпадающий список для управления несколькими 3D-принтерами
- функция автоматического выравнивания печатного стола
- возможность переключения между движками срезов, включая MatterSlice/ru, CuraEngine/ru и Slic3r
- терминал для просмотра и редактирования G-code/ru
Особенности
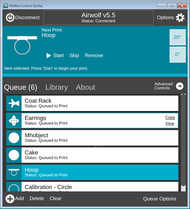
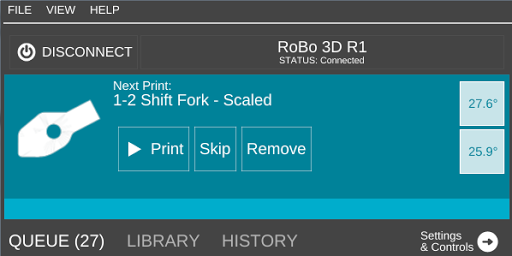
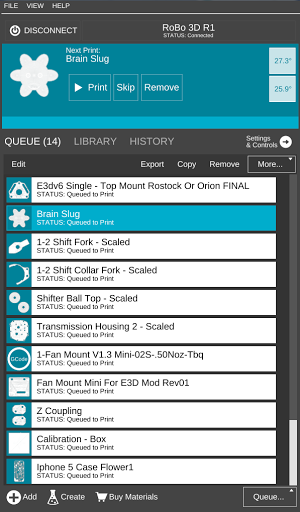
Очередь печати
Пользователи могут импортировать файлы дизайна в формате STL, выбрав
Значок «+ Добавить» и просмотр их каталога или перетаскивание их файлов в очередь. Вертикальная очередь
раскрывается по мере добавления каждого файла. Пользователи могут перемещать проекты с помощью щелчков и перетаскивания; копировать, перемещать или удалять дизайны, очищать очередь. Меню параметров очереди позволяет пользователям импортировать серию файлов (.3dz), экспортировать их в проект или SD-карту и создавать лист детали из своей очереди.

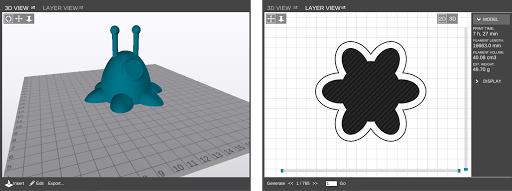
Просмотр 3D-модели
После импорта дизайнов пользователи могут выбрать для них соответствующие аватар(ы), и открывать отдельные окна. Представлением по умолчанию является 3D-симуляция детали (деталей) для печати.
Пользователи могут вращать деталь по осям X, Y и Z и выбирать «выравнивать по кровати»
разместить деталь на платформе. Пользователи могут масштабировать деталь до максимума
область, которую охватывают размеры их принтера. Опция включена для преобразования
между метрическими и имперскими единицами. Пользователи могут также зеркально отразить детали на каждой оси X, Y и Z.
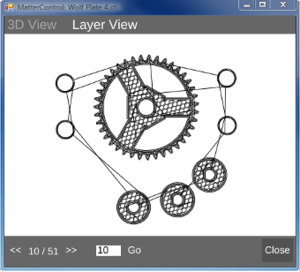
Просмотр слоев (Layer view)
После ввода нужных параметров срезов для выбранного дизайна пользователи могут щелкнуть 2D-аватар дизайна в очереди печати, перейти на вкладку «Просмотр слоев» (Layer view) и выбрать «Отрисовать слои» (Generate Layers) для предварительного просмотра каждого отдельного слоя нарезанного дизайна.
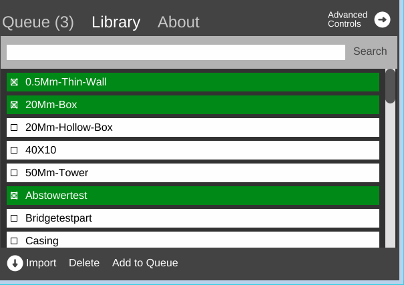
Библиотека
Вкладка справа от очереди — это библиотека. Это пространство для импорта и сбора файлов дизайна. Есть дополнительные
флажки слева от каждого имени файла, чтобы отслеживать прогресс библиотеки и встроенную функцию поиска.
О нас
Третья и последняя вкладка — это раздел «О нас». В этом пространстве отображается информация, связанная с программой и параметрами
на «Проверить наличие обновлений» и «Отправить отзыв».
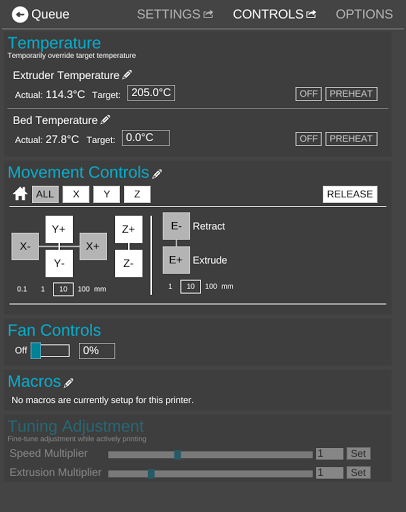
Управление принтером
Вкладка «Элементы управления принтером», расположенная в разделе «Дополнительные элементы управления», позволяет пользователям управлять своим принтером с ручным управлением. После начала печати появляется новый раздел «Тонкая настройка», который позволяет пользователям настраивать температуру, скорость и параметры экструзии при печати детали.
Контроль температуры
Печатный стол и экструдер принтера можно нагреть вручную с помощью ползунков. Есть также предустановки для экструдера и температуры слоя.
Для температуры экструдера предустановки PLA и ABS равны 180ºC и 230ºC соответственно. Для температуры печатного стола, предустановки PLA и ABS — 70ºC и 130ºC соответственно. Целевые и фактические температуры экструдера отображаются справа от ползунков.
Текущая температура печатного стола и экструдера отображается в виде двух белых значков в правом верхнем углу интерфейса.
Управление движением
Элементы управления перемещением для осей X, Y и Z расположены под настройками температуры. Значки ALL, X, Y и Z
дома соответствующие оси или оси. Значок разблокировки останавливает двигатели.
Оси X, Y и Z также можно перемещать с шагом 0,1 мм, 1 мм и 10 мм, нажимая соответствующие «+» и «-»
иконки.
Секция управления движением исчезает в процессе печати и заменяется секцией «Тонкая настройка».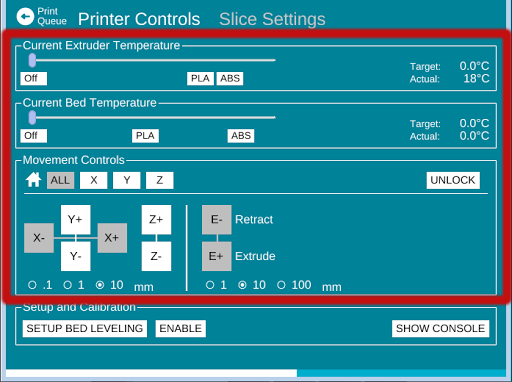
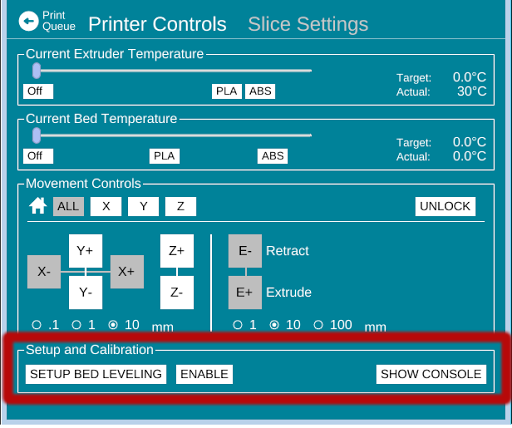
Настройка и калибровка
Автоматическое выравнивание стола
Значок «SETUP BED LEVELING» предоставляет мастера выравнивания кровати, который, измеряя несколько точек на кровати, определяет текущий угол печатного стола и компенсирует
неровности при печати. Таким образом, идеально выровненный отпечаток может быть достигнут без
правильно выровненного стола. Эта функция может быть включена или отключена.
Терминал
Доступ к Терминалу можно получить, выбрав значок ПОКАЗАТЬ КОНСОЛЬ. Эта функция позволяет пользователям связываться со своим принтером вручную с помощью G-code/ru.
Настройки
Вкладка «Настройки», также расположенная в разделе «Дополнительные элементы управления», позволяет пользователям устанавливать высоту слоя, заполнение, материал поддержки, экструдер, температуру печатного стола и устанавливать пользовательские инструкции G-code/ru. Флажок «Показать справку» будет отображать описание каждого параметра при выборе. Раскрывающийся список «Уровень пользователя» позволяет пользователям выбирать уровень пользователя принтера. Эти уровни простые, промежуточные и продвинутые.
Простой позволяет вам внести незначительные изменения в ваш отпечаток, например, высоту слоя, плотность заполнения и выбрать использование вспомогательного материала и плотов.
Промежуточное звено позволяет настраивать слой и периметр, заполнение, юбки и края, а также поддерживать материал с большей детализацией, чем в простых настройках. Вы даже можете настроить характеристики нити и принтера.
Расширенный позволяет вам контролировать каждый аспект вашей печати, включая все перечисленные выше функции, а также «Ремонт», «Параметры вывода», «Несколько экструдеров» и другой расширенный контент. вводит дополнительные параметры нарезки для более продвинутых пользователей. Пользователи также могут переключаться между различными механизмами срезов, включая MatterSlice/ru, CuraEngine/ru и Slic3r.

MatterControl Image Converter
С новым дополнением к конвертеру изображений для MatterControl превращение 2D-изображений в 3D-печатные объекты стало еще проще.
Последнее обновление MatterControl включает в себя новый мощный дополнительный инструмент — конвертер изображений. С помощью Image Converter любой может создать объекты для 3D-печати, просто вставив существующее изображение (предварительные знания в области 3D-печати не требуются).

Изображение T-Rex после преобразования в 3D модель
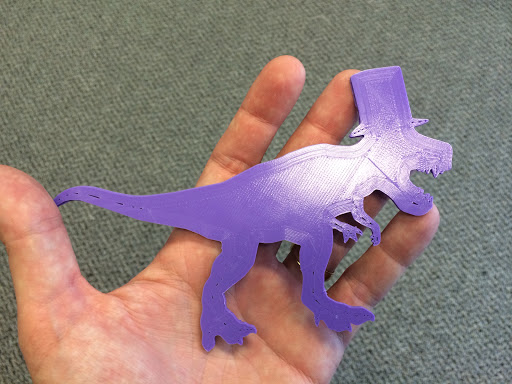
Финальный 3D-принт — T-Rex, готовый к буйству или чему-то более формальному.
Чтобы попробовать Image Converter, скачайте MatterControl по адресу www.mattercontrol.com

Здравствуйте, коллеги.
Многим из вас известна свободно распространяемая программа «MatterControl» (скачать её можно здесь). О самой программе можно сказать, что она по своим возможностям не уступает Slic3r, RepetierHost и другим.
В «MatterControl» лично мне особенно понравилась функция «автоматического выравнивания печати». При всех достоинствах этой программы у неё есть один существенный минус – она официально не русифицирована.
Для тех, кому хотелось бы поближе познакомиться с этим инструментом предлагаю свой вариант перевода интерфейса и подсказок.
Прежде всего, скачайте дистрибутив программы и установите его на свой компьютер. В папке, где была установлена программа найдите подпапку StaticDataTranslations (обычно полный путь что-то вроде — C:Program Files (x86)MatterControlStaticDataTranslations). В ней есть несколько подпапок с кодовыми обозначениями локализаций (de, es, fr и так далее,
u – пока отсутствует), в каждой из которых находятся по два файла — ‘Readme.txt’ и ‘Translation.txt’.
Далее вам нужно скачать файл русификации. Этим файлом замените исходный файл ‘Translation.txt’ в папке того языка, который вам меньше всего нравится (например, в папке es).
После замены файла запускаете ‘MatterControl’, по умолчанию установлен англоязычный интерфейс.

Нажимаете ‘Settings&Controls’, далее выбираете вкладку ‘Options’. В выпадающем списке поля выбора языка (‘Languages’) указываете тот язык, в папке которого был заменён файл ‘Translation.txt’ (в нашем примере это будет — Espanol).

Слева от поля выбора языка появляется кнопка ‘Restart’. Нажимаете её и после перезапуска программы получаете русифицированный ‘MatterControl’.
MatterControl is an all-in-one desktop 3D printing software application created by MatterHackers, Inc. to organize and manage 3D prints. It features an intuitive approach to 3D printing, allowing users to queue multiple parts for printing without pre-slicing, preview and manipulate designs, as well as an integrated library which enables users to organize and search their design files.
MatterControl is currently available for Windows/PC (Vista and above), Mac OS X (10.7+) and Linux (Ubuntu and Mint). Check out http://www.mattercontrol.com for more details.
This tutorial is a quick how-to guide for new users. It will cover:
Contents
- 1 Setup and Install
- 2 Connecting to a Printer
- 3 Printing a 3D Object
- 4 Managing the Queue
- 5 Previewing an Object
- 6 Temperature and Movement Controls
- 7 Automatic Bed Leveling Controls
- 8 Tuning Adjustment Printer Controls
- 9 Settings
- 10 Show All Settings / User Level (Basic, Intermediate, Advanced)
- 11 Customization
Setup and Install
Select the download appropriate to your platform (Windows/Mac/Linux). Run the downloaded setup file. Review and accept the End-User License Agreement. After finishing the installation select ‘Launch MatterControl’.
Download MatterControl for Windows
Download MatterControl for Mac
Download MatterControl for Linux
Connecting to a Printer
When opening the application you will see a grey bar at the top of the window. Select ‘Connect to a Printer’. If you have connected to this printer before, you should be able to select it from the list in the pop-up window (which will disappear after selection), and it will appear in the grey bar of the application’s screen. To complete the connection process, select ‘Connect’ in the top left corner.
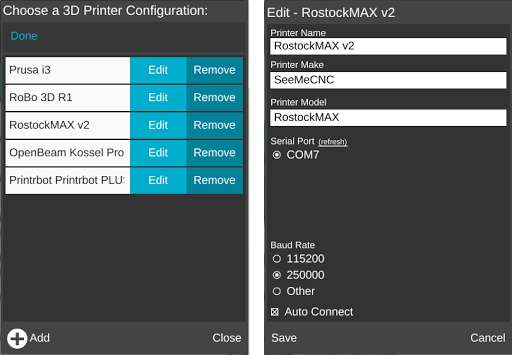
Editing a printer: Step 1 (left) and 2 (right).
If you are unable to connect for any reason — ensure that your printer is turned on and connected, select ‘Connect to a Printer’, toggle edit mode, select the ‘Edit’ link next to your recently added printer, and double check the settings.
This will bring you to a page where you can edit the name, make, and model of the selected printer- similar to the same page where you first set up the printer. Under the section that says ‘Serial Port’: turn on the printer, take out the usb plug, and hit ‘refresh’- you will see the USB port where it was become grey. Then plug it in, hit ‘refresh’, then select the port that became highlighted. Hit ‘Save’, then it will take you back to the screen where you select a printer. Select the printer, which will take you back to the main screen, then click ‘Connect’ in the top left corner.
Select the baud rate specific to your printer type. (TIP: 250000 is the most common and is set as the default. If you are unsure about your baud rate, trial and error can help you find the proper setting).
If it is not your first time connecting a printer, this will bring you to a list of printers that you have previously set up with the computer. Connect your printer via USB cable and turn it on. Select the printer you wish to connect to.
Printing a 3D Object
Printing a 3D object with MatterControl.
To print a 3D object using MatterControl, you’ll first need an object to print. Press the ‘Add’ button, either at the bottom of the Queue or near the top of the application. A file dialog will open allowing you to select a .STL, .AMF or .GCODE file. Once you’ve selected a file, it will be added to your Queue and available for printing.
To begin a print, check to make sure that the bed is clear, then press ‘Print’. You can pause or cancel a print by selecting ‘Pause’ or ‘Cancel’ once the print has begun. After a print has finished, you can choose to reprint the object or select ‘Done’ to remove it from your print queue.
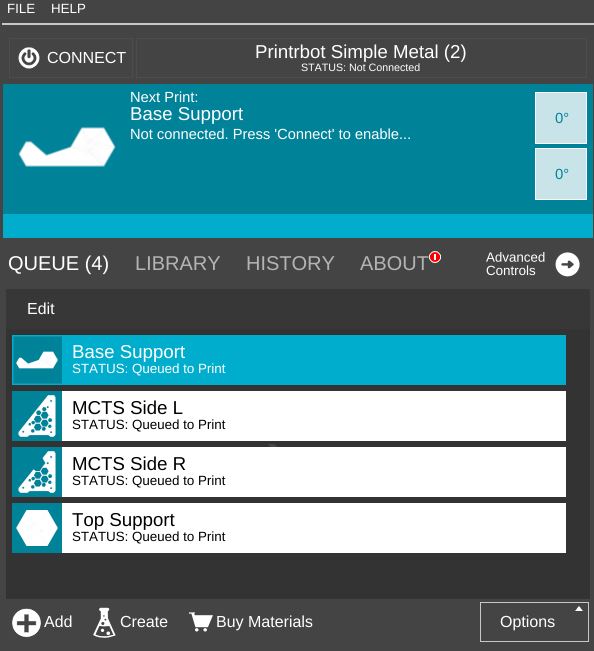
Managing the Queue
Multiple items in the Queue.
You can add objects to your print queue individually or you can select multiple files in the file dialog that appears once the ‘Add’ button is clicked. You can drag and drop single or multiple files into your queue at any time. You can remove individual files within your queue by clicking the ‘Remove’ button on a queue item, or by selecting a queue item in edit mode and then selecting the ‘Remove’ button at the bottom of your queue. Alternatively, to delete your entire queue at once, you can navigate to the ‘Queue’ menu in the bottom of the queue and select ‘Remove All’.
See also: Queue
Previewing an Object
MatterControl lets you preview your part and shows in detail how it will be printed.
You can preview a part at any time by clicking on the part’s icon — an automatically generated silhouette of the part as it will appear from the top looking down. Clicking the part’s icon will open the preview window. If available, a rotatable, zoom-able 3D representation of how your part will be printed will appear in the 3D View. Certain types of files (such as pre-generated .gcode files) cannot be previewed in this way. For more information, visit 3D View.
Parts can also be previewed in Layer View — a layer-by-layer representation of how the 3D printer will construct your object. The Layer View is dependent on your current print settings and is only generated on demand — to create the layer view with your current settings click the ‘Generate’ button.
See also: 3D View, Layer View
Temperature and Movement Controls
Outside of printing you may want to manually control some of the functions of your printer. To access these controls, select the ‘Settings’ button and select ‘Controls’.
Extruder And Bed Temperature Settings:
- To set the temperature of your extruder or your temperature controlled heated bed (Note: Not all printers include bed temperature control), connect to your printer, select the appropriate entry box and type in the desired value. To disable heating — select the ‘off’ label. To move to one of the preset temperatures for common materials (PLA and ABS), select the label.
Movement Controls:
- To move your printer manually, select the desired axis (this may differ by printer, but generally z is up and down) and either add or reduce position. You can adjust the movement increment by selecting the amount at the bottom of the movement controls. To ‘home’ your printer on all axes, select the ‘All’ button to the right of the home icon. To ‘home’ a single axis, select the appropriate button to the right of the home icon.
See also: Controls
Automatic Bed Leveling Controls
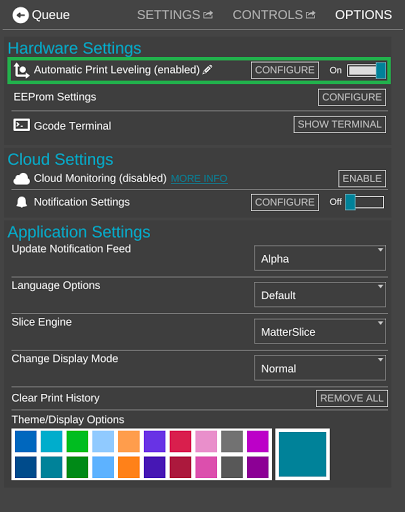
When selecting the ‘Options’ tab,under ‘Hardware Settings’ there is a section titled ‘Automatic Print Leveling’. Here, we can actuate the Automatic Print Leveling feature. This walks you through a process where your printer becomes pre-calibrated at its most level so that, with every print thereafter, the printer will correct itself in such a way that every print will always be level. You can read more about this feature in-depth, as well as watch videos of it working, on the Bed Leveling page.
See also: Options/Software Print Leveling
Tuning Adjustment Printer Controls
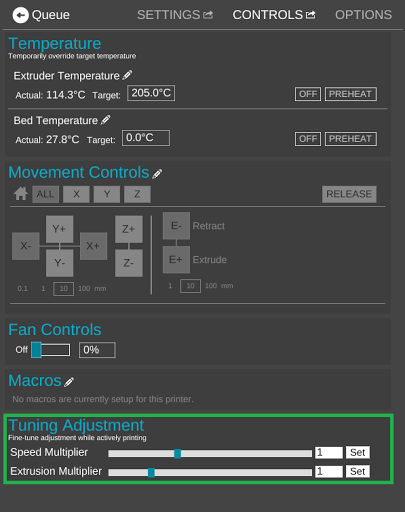
While printing, the Tuning Adjustment meters allow you to adjust the speed of the extruder as well as the amount of filament being extruded. This can be helpful if you realize mid-print that the extruder is moving too fast for the filament to stick or if not enough filament is being extruded. These are the only settings you can adjust during a print; otherwise, you have to cancel the print, adjust the settings, and start over.
See also: Controls/Tuning Adjustment
Settings
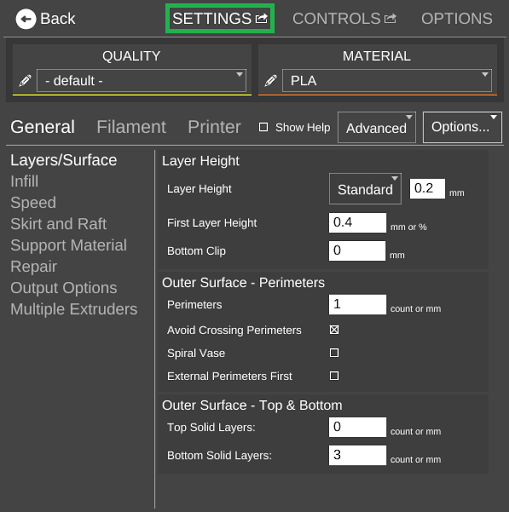
Slicing is the process of turning your digital 3D model into instructions that your 3D printer can use to print an object. In MatterControl slicing is done on an ‘as-needed’ basis based on your current slicing settings. To modify your slice settings, click on the ‘Advanced Controls’ link and select ‘Slice Settings’.
Depending on the slicing engine you have chosen, there are a myriad of options for configuration. Don’t panic! Many are optional and are meant to provide fine-grained control of your prints. Here is a breakdown of the most important settings:
- Filament > Diameter: A printer-specific setting that will not change, usually 1.75mm or 3mm.
- Filament > Temperature: Separated into first layer/other layers, this setting will dependent on your material. If you find that your filament has trouble sticking to the bed, try setting the temperature a few degrees hotter for the first layer than the rest of the layers.
- Print > Layer Height: Think of this as the speed versus quality setting, a lower layer height will have fewer visible layers, but take longer to print.
If you modify your slice settings while connected to a specific printer you have the option to ‘Save’ or ‘Revert’. Unsaved changes will still be used in your current prints, but not they will not be saved when the application is closed. When you ‘Revert’ the slice settings you restore them to the latest saved state.
See also: Settings
Show All Settings / User Level (Basic, Intermediate, Advanced)
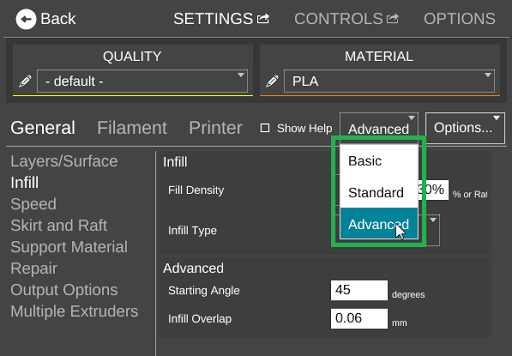
From the ‘Settings’ screen, a drop down box allows for selection of the printer user level. These levels are Basic, Standard and Advanced.
- Basic mode allows for minor adjustments to the print, like layer height, fill density, and chose to use support material and rafts. It is useful for beginners.
- Intermediate mode offers a few more options for the customization of layers and perimeters, infill, skirts and brims, and support material. At this level Filament and Printer specifications can also be adjusted.
- Advanced mode gives control over every aspect of the print, including all the above features, plus Repairs, Output Options, Multiple Extruders, and other advanced content.
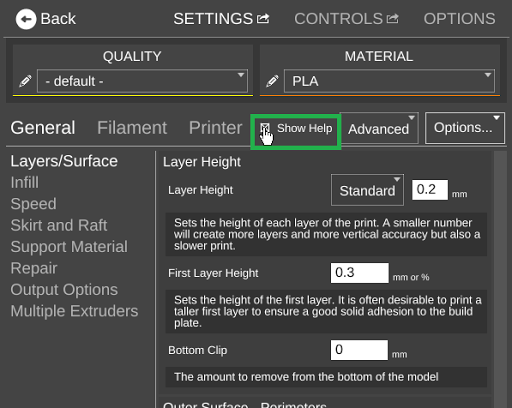
For clarification on any of the extra settings, select ‘Show Help’, which will have a short description under every one. For further clarification, check out these slice settings articles:
- SLICE SETTINGS EXPLAINED — PART 1
- SLICE SETTINGS EXPLAINED — PART 2
- SLICE SETTINGS EXPLAINED — PART 3
See also: Settings#Settings Level Menu
Customization
You can change the accent color to match your preference by selecting ‘Options’ under the ‘Settings’ tab in the top right corner of the main screen.

See also: Options/Theme
![]()
MatterControl
Состояние выпуска: действующий
| Описание |
графический интерфейс пользователя к отправителю G-кода и различные программы нарезки… |
| Лицензия |
BSD 2-Clause License |
| Автор |
User:MatterHackers |
| Соавторы | |
| На основе | |
| Категории |
Software/ru |
| CAD модели | |
| Ссылка на внешний ресурс |
MatterControl] |
Contents
- 1 Введение
- 2 Обзор
- 3 Особенности
- 3.1 Очередь печати
- 3.2 Просмотр 3D-модели
- 3.3 Просмотр слоев (Layer view)
- 3.4 Библиотека
- 3.5 О нас
- 3.6 Управление принтером
- 3.6.1 Контроль температуры
- 3.6.2 Управление движением
- 3.7 Настройка и калибровка
- 3.7.1 Автоматическое выравнивание стола
- 3.7.2 Терминал
- 3.8 Настройки
- 3.9 MatterControl Image Converter
Введение
MatterControl — это бесплатная программа, разработанная MatterHackers для управления RepRap и другими 3D-принтерами на основе G-кода. Это позволяет пользователям организовать
и управлять процессом печати. В настоящее время он доступен для загрузки в Windows, MacOS X и Linux Ubuntu и Debian.
Обзор
Программа включает в себя:
- 3D-просмотрщик с возможностью поворота, масштабирования и зеркального отображения
- 2D-просмотрщик для изучения отдельных слоев нарезанного дизайна
- библиотека, позволяющая пользователям организовывать, искать и управлять своими файлами дизайна
- Очередь печати для управления большими проектами
- быстрый мастер подключения принтера и выпадающий список для управления несколькими 3D-принтерами
- функция автоматического выравнивания печатного стола
- возможность переключения между движками срезов, включая MatterSlice/ru, CuraEngine/ru и Slic3r
- терминал для просмотра и редактирования G-code/ru
Особенности
Очередь печати
Пользователи могут импортировать файлы дизайна в формате STL, выбрав
Значок «+ Добавить» и просмотр их каталога или перетаскивание их файлов в очередь. Вертикальная очередь
раскрывается по мере добавления каждого файла. Пользователи могут перемещать проекты с помощью щелчков и перетаскивания; копировать, перемещать или удалять дизайны, очищать очередь. Меню параметров очереди позволяет пользователям импортировать серию файлов (.3dz), экспортировать их в проект или SD-карту и создавать лист детали из своей очереди.
Просмотр 3D-модели
После импорта дизайнов пользователи могут выбрать для них соответствующие аватар(ы), и открывать отдельные окна. Представлением по умолчанию является 3D-симуляция детали (деталей) для печати.
Пользователи могут вращать деталь по осям X, Y и Z и выбирать «выравнивать по кровати»
разместить деталь на платформе. Пользователи могут масштабировать деталь до максимума
область, которую охватывают размеры их принтера. Опция включена для преобразования
между метрическими и имперскими единицами. Пользователи могут также зеркально отразить детали на каждой оси X, Y и Z.
Просмотр слоев (Layer view)
После ввода нужных параметров срезов для выбранного дизайна пользователи могут щелкнуть 2D-аватар дизайна в очереди печати, перейти на вкладку «Просмотр слоев» (Layer view) и выбрать «Отрисовать слои» (Generate Layers) для предварительного просмотра каждого отдельного слоя нарезанного дизайна.
Библиотека
Вкладка справа от очереди — это библиотека. Это пространство для импорта и сбора файлов дизайна. Есть дополнительные
флажки слева от каждого имени файла, чтобы отслеживать прогресс библиотеки и встроенную функцию поиска.
О нас
Третья и последняя вкладка — это раздел «О нас». В этом пространстве отображается информация, связанная с программой и параметрами
на «Проверить наличие обновлений» и «Отправить отзыв».
Управление принтером
Вкладка «Элементы управления принтером», расположенная в разделе «Дополнительные элементы управления», позволяет пользователям управлять своим принтером с ручным управлением. После начала печати появляется новый раздел «Тонкая настройка», который позволяет пользователям настраивать температуру, скорость и параметры экструзии при печати детали.
Контроль температуры
Печатный стол и экструдер принтера можно нагреть вручную с помощью ползунков. Есть также предустановки для экструдера и температуры слоя.
Для температуры экструдера предустановки PLA и ABS равны 180ºC и 230ºC соответственно. Для температуры печатного стола, предустановки PLA и ABS — 70ºC и 130ºC соответственно. Целевые и фактические температуры экструдера отображаются справа от ползунков.
Текущая температура печатного стола и экструдера отображается в виде двух белых значков в правом верхнем углу интерфейса.
Управление движением
Элементы управления перемещением для осей X, Y и Z расположены под настройками температуры. Значки ALL, X, Y и Z
дома соответствующие оси или оси. Значок разблокировки останавливает двигатели.
Оси X, Y и Z также можно перемещать с шагом 0,1 мм, 1 мм и 10 мм, нажимая соответствующие «+» и «-»
иконки.
Секция управления движением исчезает в процессе печати и заменяется секцией «Тонкая настройка».
Настройка и калибровка
Автоматическое выравнивание стола
Значок «SETUP BED LEVELING» предоставляет мастера выравнивания кровати, который, измеряя несколько точек на кровати, определяет текущий угол печатного стола и компенсирует
неровности при печати. Таким образом, идеально выровненный отпечаток может быть достигнут без
правильно выровненного стола. Эта функция может быть включена или отключена.
Терминал
Доступ к Терминалу можно получить, выбрав значок ПОКАЗАТЬ КОНСОЛЬ. Эта функция позволяет пользователям связываться со своим принтером вручную с помощью G-code/ru.
Настройки
Вкладка «Настройки», также расположенная в разделе «Дополнительные элементы управления», позволяет пользователям устанавливать высоту слоя, заполнение, материал поддержки, экструдер, температуру печатного стола и устанавливать пользовательские инструкции G-code/ru. Флажок «Показать справку» будет отображать описание каждого параметра при выборе. Раскрывающийся список «Уровень пользователя» позволяет пользователям выбирать уровень пользователя принтера. Эти уровни простые, промежуточные и продвинутые.
Простой позволяет вам внести незначительные изменения в ваш отпечаток, например, высоту слоя, плотность заполнения и выбрать использование вспомогательного материала и плотов.
Промежуточное звено позволяет настраивать слой и периметр, заполнение, юбки и края, а также поддерживать материал с большей детализацией, чем в простых настройках. Вы даже можете настроить характеристики нити и принтера.
Расширенный позволяет вам контролировать каждый аспект вашей печати, включая все перечисленные выше функции, а также «Ремонт», «Параметры вывода», «Несколько экструдеров» и другой расширенный контент. вводит дополнительные параметры нарезки для более продвинутых пользователей. Пользователи также могут переключаться между различными механизмами срезов, включая MatterSlice/ru, CuraEngine/ru и Slic3r.
MatterControl Image Converter
С новым дополнением к конвертеру изображений для MatterControl превращение 2D-изображений в 3D-печатные объекты стало еще проще.
Последнее обновление MatterControl включает в себя новый мощный дополнительный инструмент — конвертер изображений. С помощью Image Converter любой может создать объекты для 3D-печати, просто вставив существующее изображение (предварительные знания в области 3D-печати не требуются).
Изображение T-Rex после преобразования в 3D модель
Финальный 3D-принт — T-Rex, готовый к буйству или чему-то более формальному.
Чтобы попробовать Image Converter, скачайте MatterControl по адресу www.mattercontrol.com
Здравствуйте, коллеги.
Многим из вас известна свободно распространяемая программа «MatterControl» (скачать её можно здесь). О самой программе можно сказать, что она по своим возможностям не уступает Slic3r, RepetierHost и другим.
В «MatterControl» лично мне особенно понравилась функция «автоматического выравнивания печати». При всех достоинствах этой программы у неё есть один существенный минус – она официально не русифицирована.
Для тех, кому хотелось бы поближе познакомиться с этим инструментом предлагаю свой вариант перевода интерфейса и подсказок.
Прежде всего, скачайте дистрибутив программы и установите его на свой компьютер. В папке, где была установлена программа найдите подпапку StaticDataTranslations (обычно полный путь что-то вроде — C:Program Files (x86)MatterControlStaticDataTranslations). В ней есть несколько подпапок с кодовыми обозначениями локализаций (de, es, fr и так далее,
u – пока отсутствует), в каждой из которых находятся по два файла — ‘Readme.txt’ и ‘Translation.txt’.
Далее вам нужно скачать файл русификации. Этим файлом замените исходный файл ‘Translation.txt’ в папке того языка, который вам меньше всего нравится (например, в папке es).
После замены файла запускаете ‘MatterControl’, по умолчанию установлен англоязычный интерфейс.
Нажимаете ‘Settings&Controls’, далее выбираете вкладку ‘Options’. В выпадающем списке поля выбора языка (‘Languages’) указываете тот язык, в папке которого был заменён файл ‘Translation.txt’ (в нашем примере это будет — Espanol).
Слева от поля выбора языка появляется кнопка ‘Restart’. Нажимаете её и после перезапуска программы получаете русифицированный ‘MatterControl’.
Introduction: 3D Printing With the MatterControl Touch
Welcome to my Instructables on «3D printing with the MatterControl Touch». This instructable will cover the basics of connecting the MatterControl Touch (MCT) to your 3D printer, and using the MCT with your 3D printer for computer-less slicing and printing.
I recently purchased my MCT from Amazon (http://amznly.com/1tk), although you can purchase this particular controller from MatterHackers themselves (http://www.matterhackers.com/store/printer-accesso… The MCT allows you, the end-user, to connect an Android-based tablet to your 3D printer, download a 3D part from a website (such as thingiverse.com), slice it and send the GCode to your 3D printer via a USB cable.
Luckily the MCT supports Delta printers, such as my 2013 SeeMeCNC Orion Delta printer, so I was able to download a test print from thingiverse, slice it, send the GCode to the printer and was printing within 15 minutes of unboxing.
Step 1: Step 1. Unbox the MatterControl Touch Tablet
Fairly simple, cut the tape and remove the box from the packaging sleeve.
Step 2: Step 2: Remove the MatterControl Touch From the Packaging
Once the packaging sleeve has been removed, you can remove the tablet, power cable, and USB adapter cable.
Step 3: Step 3: Connect the USB Adapter Cable to Your Printer
If your 3D printer has an USB cable to connect to your laptop/desktop, you can use this same cable to connect to the MCT.
Connect the USB adapter cable to the MCT, then connect the adapter cable to the USB cable from your printer.
Step 4: Step 4: Connect Power to the MatterControl Touch
Once the USB cable has been connected, you can turn on your 3D printer, then connect the power cable to the MCT.
The MCT will begin the booting process, then you can select your printer model from a menu. The MCT will connect to the printer and will assume control over the printer. You should be able to adjust the hotend or bed temperatures, raise and lower the hotend, and even home all of the axises before printing.
Step 5: Step 5: Find and Download a 3D Model for Printing
Go to your favorite repository for 3D models, such as Thingiverse, and download a model to the MCT. By default the STL file will by located in the Downloads folder, unless you specified a different folder during configuration.
Step 6: Step 6: Slice and Print the 3D Object
Once you have download the 3D object of your choice, you can open the MatterControl application (labeled «MC» in the main menu), then open the STL file.
If you are ready to start printing, press the «Print» button in the MatterControl application, and wait while the application slices the 3D object, writes the GCode to the 3D printer and activates the heating elements on the bed and hotend.
After a few minutes (depending on how fast the heating elements work, and if your 3D printer has a heated bed), the 3D printer will start printing, as the MCT streams the GCode in real time to the printer.
Step 7: Step 7: Enjoy the Print
At this point, you can work on other tasks, while your 3D printer prints the 3D object. Depending on the object and how solid you want the part, the MCT will adjust the GCode to complete the print.
Step 8: Step 8: Remove the Print, Power Down the Printer, Etc
Once the printer has completed the print, you can power down the MCT (after the printer has begun its cooldown process!) and remove your print from the print bed.
If necessary you can remove any support, brim or raft material and enjoy your new 3D printed object!
Step 9: Summation
Now that you have learned how to use the MCT, you can use it for larger projects, such as this Bottle Opener, this Coaster Set, or even this GoPro Handlebar Kit!
If you liked this Instructable, and you want more 3D printing worklogs/videos, you can go to my blog here:
802printer
Manage 3D prints with MatterControl!
MatterControl is an all-in-one desktop 3D printing software application created by MatterHackers, Inc. to organize and manage 3D prints. It features an intuitive approach to 3D printing, allowing users to queue multiple parts for printing without pre-slicing, preview and manipulate designs, as well as an integrated library which enables users to organize and search their design files.
MatterControl is currently available for Windows/PC (Vista and above), Mac OS X (10.7+) and Linux (Ubuntu and Mint). Check out http://www.mattercontrol.com for more details.
This tutorial is a quick how-to guide for new users. It will cover:
Contents
- 1 Setup and Install
- 2 Connecting to a Printer
- 3 Printing a 3D Object
- 4 Managing the Queue
- 5 Previewing an Object
- 6 Temperature and Movement Controls
- 7 Automatic Bed Leveling Controls
- 8 Tuning Adjustment Printer Controls
- 9 Settings
- 10 Show All Settings / User Level (Basic, Intermediate, Advanced)
- 11 Customization
Setup and Install
Select the download appropriate to your platform (Windows/Mac/Linux). Run the downloaded setup file. Review and accept the End-User License Agreement. After finishing the installation select ‘Launch MatterControl’.
Download MatterControl for Windows
Download MatterControl for Mac
Download MatterControl for Linux
Connecting to a Printer
When opening the application you will see a grey bar at the top of the window. Select ‘Connect to a Printer’. If you have connected to this printer before, you should be able to select it from the list in the pop-up window (which will disappear after selection), and it will appear in the grey bar of the application’s screen. To complete the connection process, select ‘Connect’ in the top left corner.
Editing a printer: Step 1 (left) and 2 (right).
If you are unable to connect for any reason — ensure that your printer is turned on and connected, select ‘Connect to a Printer’, toggle edit mode, select the ‘Edit’ link next to your recently added printer, and double check the settings.
This will bring you to a page where you can edit the name, make, and model of the selected printer- similar to the same page where you first set up the printer. Under the section that says ‘Serial Port’: turn on the printer, take out the usb plug, and hit ‘refresh’- you will see the USB port where it was become grey. Then plug it in, hit ‘refresh’, then select the port that became highlighted. Hit ‘Save’, then it will take you back to the screen where you select a printer. Select the printer, which will take you back to the main screen, then click ‘Connect’ in the top left corner.
Select the baud rate specific to your printer type. (TIP: 250000 is the most common and is set as the default. If you are unsure about your baud rate, trial and error can help you find the proper setting).
If it is not your first time connecting a printer, this will bring you to a list of printers that you have previously set up with the computer. Connect your printer via USB cable and turn it on. Select the printer you wish to connect to.
Printing a 3D Object
Printing a 3D object with MatterControl.
To print a 3D object using MatterControl, you’ll first need an object to print. Press the ‘Add’ button, either at the bottom of the Queue or near the top of the application. A file dialog will open allowing you to select a .STL, .AMF or .GCODE file. Once you’ve selected a file, it will be added to your Queue and available for printing.
To begin a print, check to make sure that the bed is clear, then press ‘Print’. You can pause or cancel a print by selecting ‘Pause’ or ‘Cancel’ once the print has begun. After a print has finished, you can choose to reprint the object or select ‘Done’ to remove it from your print queue.
Managing the Queue
Multiple items in the Queue.
You can add objects to your print queue individually or you can select multiple files in the file dialog that appears once the ‘Add’ button is clicked. You can drag and drop single or multiple files into your queue at any time. You can remove individual files within your queue by clicking the ‘Remove’ button on a queue item, or by selecting a queue item in edit mode and then selecting the ‘Remove’ button at the bottom of your queue. Alternatively, to delete your entire queue at once, you can navigate to the ‘Queue’ menu in the bottom of the queue and select ‘Remove All’.
See also: Queue
Previewing an Object
MatterControl lets you preview your part and shows in detail how it will be printed.
You can preview a part at any time by clicking on the part’s icon — an automatically generated silhouette of the part as it will appear from the top looking down. Clicking the part’s icon will open the preview window. If available, a rotatable, zoom-able 3D representation of how your part will be printed will appear in the 3D View. Certain types of files (such as pre-generated .gcode files) cannot be previewed in this way. For more information, visit 3D View.
Parts can also be previewed in Layer View — a layer-by-layer representation of how the 3D printer will construct your object. The Layer View is dependent on your current print settings and is only generated on demand — to create the layer view with your current settings click the ‘Generate’ button.
See also: 3D View, Layer View
Temperature and Movement Controls
Outside of printing you may want to manually control some of the functions of your printer. To access these controls, select the ‘Settings’ button and select ‘Controls’.
Extruder And Bed Temperature Settings:
- To set the temperature of your extruder or your temperature controlled heated bed (Note: Not all printers include bed temperature control), connect to your printer, select the appropriate entry box and type in the desired value. To disable heating — select the ‘off’ label. To move to one of the preset temperatures for common materials (PLA and ABS), select the label.
Movement Controls:
- To move your printer manually, select the desired axis (this may differ by printer, but generally z is up and down) and either add or reduce position. You can adjust the movement increment by selecting the amount at the bottom of the movement controls. To ‘home’ your printer on all axes, select the ‘All’ button to the right of the home icon. To ‘home’ a single axis, select the appropriate button to the right of the home icon.
See also: Controls
Automatic Bed Leveling Controls
When selecting the ‘Options’ tab,under ‘Hardware Settings’ there is a section titled ‘Automatic Print Leveling’. Here, we can actuate the Automatic Print Leveling feature. This walks you through a process where your printer becomes pre-calibrated at its most level so that, with every print thereafter, the printer will correct itself in such a way that every print will always be level. You can read more about this feature in-depth, as well as watch videos of it working, on the Bed Leveling page.
See also: Options/Software Print Leveling
Tuning Adjustment Printer Controls
While printing, the Tuning Adjustment meters allow you to adjust the speed of the extruder as well as the amount of filament being extruded. This can be helpful if you realize mid-print that the extruder is moving too fast for the filament to stick or if not enough filament is being extruded. These are the only settings you can adjust during a print; otherwise, you have to cancel the print, adjust the settings, and start over.
See also: Controls/Tuning Adjustment
Settings
Slicing is the process of turning your digital 3D model into instructions that your 3D printer can use to print an object. In MatterControl slicing is done on an ‘as-needed’ basis based on your current slicing settings. To modify your slice settings, click on the ‘Advanced Controls’ link and select ‘Slice Settings’.
Depending on the slicing engine you have chosen, there are a myriad of options for configuration. Don’t panic! Many are optional and are meant to provide fine-grained control of your prints. Here is a breakdown of the most important settings:
- Filament > Diameter: A printer-specific setting that will not change, usually 1.75mm or 3mm.
- Filament > Temperature: Separated into first layer/other layers, this setting will dependent on your material. If you find that your filament has trouble sticking to the bed, try setting the temperature a few degrees hotter for the first layer than the rest of the layers.
- Print > Layer Height: Think of this as the speed versus quality setting, a lower layer height will have fewer visible layers, but take longer to print.
If you modify your slice settings while connected to a specific printer you have the option to ‘Save’ or ‘Revert’. Unsaved changes will still be used in your current prints, but not they will not be saved when the application is closed. When you ‘Revert’ the slice settings you restore them to the latest saved state.
See also: Settings
Show All Settings / User Level (Basic, Intermediate, Advanced)
From the ‘Settings’ screen, a drop down box allows for selection of the printer user level. These levels are Basic, Standard and Advanced.
- Basic mode allows for minor adjustments to the print, like layer height, fill density, and chose to use support material and rafts. It is useful for beginners.
- Intermediate mode offers a few more options for the customization of layers and perimeters, infill, skirts and brims, and support material. At this level Filament and Printer specifications can also be adjusted.
- Advanced mode gives control over every aspect of the print, including all the above features, plus Repairs, Output Options, Multiple Extruders, and other advanced content.
For clarification on any of the extra settings, select ‘Show Help’, which will have a short description under every one. For further clarification, check out these slice settings articles:
- SLICE SETTINGS EXPLAINED — PART 1
- SLICE SETTINGS EXPLAINED — PART 2
- SLICE SETTINGS EXPLAINED — PART 3
See also: Settings#Settings Level Menu
Customization
You can change the accent color to match your preference by selecting ‘Options’ under the ‘Settings’ tab in the top right corner of the main screen.
See also: Options/Theme

MatterControl — программа для комфортной подготовки и проведения 3D-печати.
- обычная процедура установки и настолько же обычный интерфейс делают программу обычный и понятной для хоть какого юзера;
- обучающие материалы тщательно обрисуют всякую функцию программы;
- хоть какой подключаемый принтер можно зарегистрироваться, чтоб в последующий раз подключаться автоматом;
- в базе данных программы есть набор готовых 3D-моделей. Юзер может расширять эту базу, добавляя свои выработки либо скачивая готовые проекты в вебе;
- широкий набор инструментов даст возможность редактировать 3D-модели хоть какой трудности перед выполнением печати.
Это набор инструментов, с помощью которых создаются проекты, проводится работа с файлами, настраиваются любые характеристики 3D-моделей. С таковым ассистентом можно будет очень отлично воспользоваться 3D-принтерам.
- Язык интерфейса: на Русском языке, на Английском и других
- Лечение: Крякнутый
- Системные требования: Windows 10 / 11 / 8.1 / 8 / 7 (х32/x64/x86 бит)
- Типы файлов: RAR, EXE
Пароль к архиву: 1progs
Search code, repositories, users, issues, pull requests…
Provide feedback
Saved searches
Use saved searches to filter your results more quickly
Sign up