Посмотреть инструкция для DJI Mavic 2 Pro бесплатно. Руководство относится к категории дроны, 53 человек(а) дали ему среднюю оценку 8.7. Руководство доступно на следующих языках: русский. У вас есть вопрос о DJI Mavic 2 Pro или вам нужна помощь? Задайте свой вопрос здесь
Не можете найти ответ на свой вопрос в руководстве? Вы можете найти ответ на свой вопрос ниже, в разделе часто задаваемых вопросов о DJI Mavic 2 Pro.
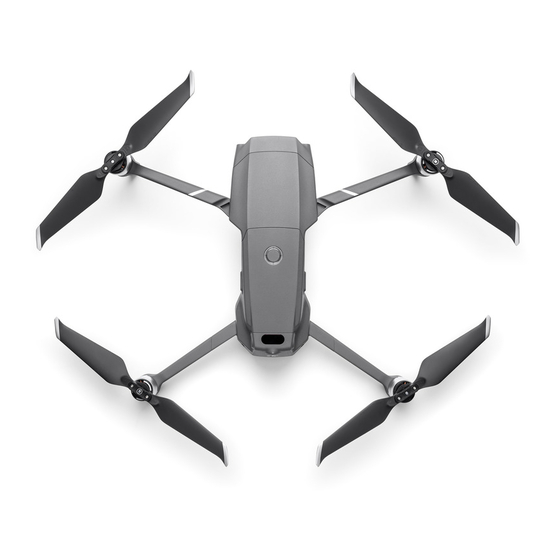
Какой вес DJI Mavic 2 Pro?
DJI Mavic 2 Pro имеет вес 907 g.
Могу ли я запускать дрон в ближайших аэропортах?
Никогда не запускайте дрон вблизи аэропортов.
Может ли аккумулятор моего дрон взорваться?
Убедитесь, что аккумулятор вашего дрон не сильно нагревается, в этом случае вероятность взрыва аккумулятора очень мала.
Какая высота DJI Mavic 2 Pro?
DJI Mavic 2 Pro имеет высоту 84 mm.
Какая ширина DJI Mavic 2 Pro?
DJI Mavic 2 Pro имеет ширину 242 mm.
Какая толщина DJI Mavic 2 Pro?
DJI Mavic 2 Pro имеет толщину 322 mm.
Инструкция DJI Mavic 2 Pro доступно в русский?
Да, руководствоDJI Mavic 2 Pro доступно врусский .
Не нашли свой вопрос? Задайте свой вопрос здесь
- Manuals
- Brands
- dji Manuals
- Drones
- MAVIC 2 PRO
- User manual
-
Contents
-
Table of Contents
-
Bookmarks
Quick Links
MAVIC 2 PRO/ZOOM
User Manual
v1.0
2018.08
Related Manuals for dji MAVIC 2 PRO
Summary of Contents for dji MAVIC 2 PRO
-
Page 1
MAVIC 2 PRO/ZOOM User Manual v1.0 2018.08… -
Page 2: Using This Manual
2 Pro/Zoom Quick Start Guide and refer to this Mavic 2 Pro/Zoom User Manual for more details. Video Tutorials Go to the address below or scan the QR code on the right to watch the Mavic 2 Pro/ Zoom tutorial videos, which demonstrate how to use the Mavic 2 Pro/Zoom safely: http://www.dji.com/mavic-2/info#video…
-
Page 3: Table Of Contents
Contents Using This Manual Legend Read Before the First Flight Video Tutorials Download the DJI GO 4 App Download DJI Assistant 2 Product Profile Introduction Preparing the Mavic 2 Pro/Zoom Preparing the Remote Controller Aircraft Diagram Activation Aircraft Flight Modes…
-
Page 4
Flight Flight Environment Requirements Flight Limits and GEO Zones Pre-Flight Checklist Auto Takeoff/Landing Starting/Stopping the Motors Test Flight Appendix Specifications Calibrating the Compass Firmware Updates Remote Controller LCD Screen Menu Information After-Sales Information © 2018 DJI All Rights Reserved. -
Page 5
Product Profile This section introduces Mavic 2 Pro/ Zoom and lists the components of the aircraft and remote controller. © 2018 DJI All Rights Reserved. -
Page 6: Product Profile
2.0, offering a maximum transmission range of 5 mi (8 km) and displaying video from the aircraft on to DJI GO 4 on your mobile device at up to 1080p. The remote controller works at both 2.4 GHz and 5.8 GHz, and it can select the best transmission channel automatically without any latency.
-
Page 7
Mavic 2 Pro/Zoom User Manual *Attach the gimbal cover when not in use. 1) Hold the gimbal in place and insert gimbal clamp between the aircraft and the gimbal. 2) Make sure the hooks on the Gimbal Protector are locked in the grooves of the aircraft, then lower the Gimbal Protector over the gimbal and secure with the buckle. -
Page 8: Preparing The Remote Controller
Mavic 2 Pro/Zoom User Manual Preparing the Remote Controller 1. Unfold the mobile device clamps and the antennas. 2. Remove the control sticks from their storage slots on the remote controller and screw them into place. 3. Choose an appropriate RC cable based on the type of mobile device. A cable with a Lightning connector is connected by default to the cable slider.
-
Page 9: Aircraft Diagram
Mavic 2 Pro/Zoom User Manual Aircraft Diagram 1. Forward Vision System 2. Propellers 3. Motors 4. Front LEDs 5. Antennas 6. Gimbal and Camera 7. Backward Vision System 8. Aircraft Status Indicator 9. Battery Buckles 10. Lateral Vision System 11. USB-C Port 12.
-
Page 10
The removable control sticks are easy to 10. Flight Mode Switch store. The default flight control is set to Mode Switch between S-mode, P-mode, and 2. Set the flight control mode in DJI GO 4. T-mode. 5. Flight Pause Button 11. Power Button… -
Page 11: Activation
Priority and Manual mode), or shutter (when in S-mode). Activation The Mavic 2 Pro/Zoom requires activation before first time use. Follow the onscreen guide to activate the Mavic 2 Pro/Zoom using DJI GO 4. © 2018 DJI All Rights Reserved.
-
Page 12
Aircraft This section introduces the flight controller, Forward, Backward and Downward Vision Systems, and the Intelligent Flight Battery. © 2018 DJI All Rights Reserved. -
Page 13: Aircraft
Intelligent Flight Battery. Refer to the aircraft diagram in the Product Profile section. Flight Modes The Mavic 2 Pro/Zoom has three flight modes, plus a fourth flight mode that the aircraft switches to in certain circumstances: P-mode (Positioning): P-mode works best when the GPS signal is strong. The aircraft utilizes GPS and the Vision Systems to locate itself, stabilize, and navigate between obstacles.
-
Page 14: Aircraft Leds And Status Indicator
Mavic 2 Pro/Zoom User Manual Aircraft LEDs and Status Indicator The Mavic 2 Pro/Zoom has Front LEDs and Aircraft Status Indicators as shown in the figure below. Front LEDs Aircraft Status Indicator Front LEDs Aircraft Status Indicator The Front LEDs show the orientation of the aircraft and glow solid red when the aircraft is turned on to indicate the front of the aircraft (they can be turned off in the DJI GO 4 app).
-
Page 15: Return To Home
Low Battery RTH is triggered when the Intelligent Flight Battery is depleted to the point that the safe return of the aircraft may be affected. Return home or land the aircraft immediately when prompted. DJI GO 4 will display a warning when a low battery level warning is triggered. The aircraft will automatically return to the Home Point if no action is taken after a ten-second countdown.
-
Page 16
This procedure cannot be canceled. If there is a danger of a collision, push the throttle up and try to navigate away. If the battery level is sufficient, the battery level indicator bar in DJI GO 4 displays the estimated remaining flight time based on the current battery level. -
Page 17
Mavic 2 Pro/Zoom User Manual RTH and Battery Level Warnings (when using updated firmware v01.00.00.00) Aircraft Status Warning Instructions DJI GO 4 App Actions Indicator Select an option. If no action Remaining battery Choose RTH or is taken, the aircraft will enter level supports RTH. -
Page 18
Obstacle Avoidance during RTH Provided that lighting conditions are sufficient for the Forward and Backward Vision Systems to operate, the Mavic 2 Pro/Zoom senses and actively attempts to avoid obstacles during RTH. The obstacle avoidance procedure is as follows: 1. The aircraft decelerates when an obstacle is sensed. -
Page 19
3. If Landing Protection is not operational, the DJI GO 4 app displays a landing prompt when the aircraft descends below 0.5 m. Pull down on the throttle for one second or use the auto landing slider in the app to land. -
Page 20: Vision Systems And Infrared Sensing Systems
Mavic 2 Pro/Zoom User Manual Vision Systems and Infrared Sensing Systems The Mavic 2 Pro/Zoom is equipped with Forward, Backward, Downward, and Lateral Vision Systems, and Upward and Downward Infrared Sensing Systems, providing omnidirectional obstacle sensing (if lighting conditions are adequate).
-
Page 21
Pan and tilt the aircraft When a vision system calibration is required, DJI GO 4 sends a notification. If a computer is not nearby, however, a quick calibration can be performed in the app. Tap the Aircraft Status bar and Vision Sensors to start quick calibration. -
Page 22
Be sure to maintain line of sight with the aircraft and pay attention to prompts in DJI GO 4. DJI takes no responsibility for any aircraft that is damaged or lost while using Lateral Vision Systems. -
Page 23: Intelligent Flight Modes
2.0, Point of Interest (POI 2.0), Waypoint (coming soon), TapFly, and Cinematic Mode. Select an Intelligent Flight Mode in DJI GO 4. Ensure the battery level is sufficient and the aircraft is working on P-mode when using the Intelligent Flight Modes.
-
Page 24
CourseLock With the Mavic 2 Pro/Zoom, Course Lock can be used in two ways. In the first way, the orientation of the aircraft is fixed, but a subject cannot be selected. In the second way, the orientation of the aircraft is fixed and the aircraft flies around a selected object. -
Page 25
QuickShot shooting modes include Dronie, Circle, Helix, Rocket, Boomerang, Asteroid, and Dolly Zoom (only available with Mavic 2 Zoom). The Mavic 2 Pro/Zoom records a video according to the selected shooting mode and then automatically generates a 10-second video. The video can then be viewed, edited, or shared to social media from Playback. -
Page 26
Exiting QuickShots Toggle the Flight Mode switch to S-mode or T-mode to exit QuickShots anytime during shooting (when Multiple Flight Modes is enabled in the DJI GO 4 app). Press the Flight Pause button on the remote controller or tap in DJI GO 4 or for the emergency brake. -
Page 27
ActiveTrack 2.0 allows you to select an object on your mobile device screen. The aircraft adjusts its flight to track the subject. No external tracking device is required. Mavic 2 Pro/Zoom can automatically identify up to 16 objects and uses different tracking strategies to track people, vehicles, and boats. -
Page 28
Use the roll stick on the direction of the subject and use the slider in DJI GO 4 to the remote control to fly in during flight. The remote fly in a circle around the subject. -
Page 29
2. Select a subject through GPS positioning: Manually fly the aircraft above the subject, and then press the C1 button or select in DJI GO 4 to confirm the subject. Fly the aircraft at least 5 m away from the Point of Interest. -
Page 30
The aircraft flies to the waypoints in order according to the settings. The flight orientation and speed can be controlled during flight. You can select the waypoints by flying the Mavic 2 Pro/Zoom to the waypoints and record them individually. The waypoints can also be selected and edited in the map before takeoff: 1. -
Page 31
Mavic 2 Pro/Zoom User Manual TapFly TapFly features three sub-modes; Forward, Backward, and Free. Providing that lighting conditions are suitable, the aircraft automatically avoids obstacles it senses. Forward: The aircraft flies towards the target with the Forward Vision System sensing obstacles. -
Page 32: Advanced Pilot Assistance Systems
APAS may not function properly when the aircraft is flying near its Flight Limits or in No-fly Zones. Pay attention to the Aircraft Status Bar in DJI GO 4 and ensure the aircraft is working in APAS mode normally. Flight Recorder Flight data including flight telemetry, aircraft status information, and other parameters are automatically saved to the aircraft’s internal data recorder.
-
Page 33: Attaching And Detaching The Propellers
Mavic 2 Pro/Zoom User Manual Attaching and Detaching the Propellers The Mavic 2 Pro/Zoom use low-noise propellers. There are two varieties of the propellers, which are designed to spin in different directions. White marks are used to indicate which propellers should be attached to which motors.
-
Page 34: Intelligent Flight Battery
7. Over-discharge Protection: Discharging stops automatically to prevent excess discharge. 8. Short Circuit Protection: The power supply is automatically cut if a short circuit is detected. 9. Battery Cell Damage Protection: DJI GO 4 displays a warning message when a damaged battery cell is detected.
-
Page 35
2. Batteries cannot be used in extremely low-temperature environments of < 14° F (-10° C). 3. When in low-temperature environments, end the flight as soon as DJI GO 4 displays the low battery level warning. -
Page 36
Mavic 2 Pro/Zoom User Manual Battery Level LEDs During Charging LED1 LED2 LED3 LED4 Battery Level LEDs During Charging Battery Level 0%~25% 25%~50% 50%~75% Fully Charged Battery Protection Battery Protection Mechanisms LED1 LED2 LED3 LED4 Blinking Pattern Battery Protection Item… -
Page 37: Gimbal And Camera
F2.8-F11. The camera supports auto focus, which can focus at 1 m to infinity. The filters on the camera can also be replaced. The Mavic 2 Pro camera shoots up to 4K30fps video and 20 MP photos, supports shooting modes such as Single shot, Burst shooting, Interval, Panorama, Slow motion, and Enhanced HDR.
-
Page 38
H.265 is supported. For the Mavic 2 Pro, Full FOV down samples from the 5.5K sensor to 4K resolution while HW crops in the center for finer image quality but less FOV. Full FOV view is 75° and HQ view is 55°. You can select between them according to your actual shooting demands. -
Page 39
Remote Controller This section describes the features of the remote controller and includes instructions for controlling the aircraft and the camera. © 2018 DJI All Rights Reserved. -
Page 40: Remote Controller
Built into the remote controller is DJI’s long-range transmission technology OcuSync 2.0, offering a maximum transmission range of 5 mi (8 km) and displaying video from the aircraft to DJI GO 4 on your mobile device at up to 1080p. Easily control the aircraft and camera using the onboard buttons. An onboard LCD screen gives real-time aircraft data information and the detachable control sticks make the remote controller easier to store.
-
Page 41
AC Power Adapter USB Adapter Controlling the Camera Use the Aperture/Shutter Adjustment Dial to adjust the aperture and shutter parameters (Mavic 2 Pro only). Use the Record button to start/stop recording. Use the Focus/Shutter button to auto focus and take photos. -
Page 42
Three preprogrammed modes (Mode 1, Mode 2, and Mode 3) are available and custom modes can be configured in DJI GO 4. The default mode is Mode 2. In each of the three pre-programmed modes, the Mavic 2 hovers in place at a constant orientation when both sticks are centered. -
Page 43
Mavic 2 Pro/Zoom User Manual Remote Aircraft Controller Remarks Indicates Nose Direction) (Mode 2) Moving the left stick up or down changes the aircraft’s altitude. Push the stick up to ascend and down to descend. The more the stick is pushed away from the center position, the faster the aircraft will change altitude. -
Page 44
C1 and C2 Button The functions of the C1 and C2 buttons are set in DJI GO 4. The default configuration for the C1 button is Center Focus and the default configuration for the C2 button is Playback. Remote Controller Alert Remote controller will sound an alert during RTH or when the battery level is low. -
Page 45
Mavic 2 Pro/Zoom User Manual strong weak Ensure that the aircraft is flying within the optimal transmission zone. To maintain optimal transmission performance, adjust the remote controller and antennas according to the figure above. LCD Screen The LCD Screen displays various system statuses including real-time flight telemetry and battery levels. -
Page 46: Dual Remote Controller Mode (Coming Soon)
Mavic 2 Pro/Zoom User Manual Dual Remote Controller Mode (Coming soon) The Mavic 2 Pro/Zoom supports Dual Remote Controller Mode, which allows two remote controllers to connect to the same aircraft. Both the Primary remote controller and the Secondary remote controller can control the orientation of the aircraft and the movement of the gimbal and camera operation.
-
Page 47: Linking The Remote Controller
Mavic 2 Pro/Zoom User Manual Linking the Remote Controller The remote controller is linked to your aircraft before delivery. Linking is only required when using a new remote controller for the first time. Follow these steps to link a new remote controller: 1.
-
Page 48
DJI GO 4 App This section introduces the main functions of the DJI GO 4 app. © 2018 DJI All Rights Reserved. -
Page 49: Dji Go 4 App
Equipment Device Menu If it is not already selected, select Mavic 2 Pro/Zoom from the device menu in the top left corner of the screen. Function Menu in the top right corner of the screen to open the Function menu. The menu has five options: Scan QR Code: Scan a QR code to connect to an aircraft.
-
Page 50
: This icon shows the strength of the remote controller signal. The icon will blink when an interference is recognized during flight. When there are no additional warnings in DJI GO 4, it means that the interference will not affect operation and overall flight experience. -
Page 51
Mavic 2 Pro/Zoom User Manual 11. Focus/Metering Button : Tap to switch between focus and metering mode. Tap to select object for focusing or metering. Auto Focus-Continuous will be triggered automatically according to the status of the aircraft and camera after enabling Auto Focus. -
Page 52: Editor
SkyPixel View and share the photos and videos in the SkyPixel page. If you already have a DJI account, you will be able to participate in forum discussions, and share your creation with the community. ©…
-
Page 53
The app is designed to assist your operation. Please use your sound discretion and DO NOT rely on the app to control your aircraft. Your use of the app is subject to DJI GO 4 Terms of Use and DJI Privacy Policy. Please read them carefully in the app. -
Page 54
Flight This section describes safe flight practices and flight restrictions. © 2018 DJI All Rights Reserved. -
Page 55: Flight
Flight Once pre-flight preparation is complete, it is recommended to use the flight simulator in DJI GO 4 to hone your flight skills and practice flying safely. Ensure that all flights are carried out in an open area. Refer to the Remote Controller and DJI GO 4 sections for information about using the remote controller and the app to control the aircraft.
-
Page 56
Fly the aircraft only within your line of sight. GEO Zones All GEO Zones are listed on the DJI official website at http://www.dji.com/flysafe. GEO Zones are divided into different categories and include locations such as airports, flying fields where manned aircraft operate at low altitudes, borders between countries, and sensitive locations such as power plants. -
Page 57: Pre-Flight Checklist
2. If conditions are safe to land, slide the slider to confirm. The aircraft will commence the auto landing procedure. Warnings will appear in DJI GO 4 if the aircraft detects that conditions are not suitable to land. Be sure to respond promptly.
-
Page 58: Starting/Stopping The Motors
1. Place the aircraft in an open, flat area with the Aircraft Status Indicator facing towards you. 2. Turn on the aircraft and the remote controller. 3. Launch DJI GO 4 and enter Camera View. 4. Wait until the Aircraft Status Indicator blinks green indicating that the Home Point has been recorded and it is now safe to fly.
-
Page 59
1. The pre-flight checklist is designed to help you fly safely and to ensure that you can shoot video during flight. Go through the full pre-flight checklist before each flight. 2. Select the desired gimbal operation mode in DJI GO 4. 3. Only shoot video when flying in P-mode or T-mode. -
Page 60
Appendix © 2018 DJI All Rights Reserved. -
Page 61: Appendix
Appendix Specifications Aircraft Takeoff Weight 907 g (Mavic 2 Pro); 905 g (Mavic 2 Zoom) Dimensions Folded: 214×91×84 mm (length×width×height) Unfolded: 322×242×84 mm (length×width×height) Diagonal Distance 354 mm Max Ascent Speed 5 m/s (S-mode), 4 m/s (P-mode) Max Descent Speed…
-
Page 62
Mavic 2 Pro/Zoom User Manual Sensing System Sensing System Omnidirectional Obstacle Sensing Forward: Horizontal: 40°, Vertical: 70°; Backward:Horizontal: 60°, Vertical: 77°; Downward: Front and Back: 100°, Left and Right: 83° Lateral: Horizontal: 80°, Vertical: 65° Obstacle Sensing Range Forward: Precision Measurement Range: 0.5 — 20 m Detectable Range: 20 — 40 m Effective Sensing Speed: ≤… -
Page 63
Mavic 2 Pro/Zoom User Manual Color Mode Dlog-M (10-bit), support HDR video D-Cinelike (HLG 10-bit) Max Video Bitrate 100 Mbps 100 Mbps Supported File System FAT32: ≤ 32 GB FAT32: ≤ 32 GB exFAT: > 32 GB exFAT: > 32 GB… -
Page 64: Calibrating The Compass
Choose an open area to carry out the following procedure. 1. Tap the System Status Bar in DJI GO 4, select “Calibrate”, and follow the on-screen instructions. 2. Hold the aircraft horizontally and rotate it 360 degrees. The Aircraft Status Indicator will turn solid green.
-
Page 65: Firmware Updates
Using DJI GO When you connect the aircraft or remote controller to DJI GO 4, you will be notified if a new firmware update is available. To start updating, connect your mobile device to the internet and follow the on- screen instructions.
-
Page 66: Remote Controller Lcd Screen Menu Information
Mavic 2 Pro/Zoom User Manual Ensure the aircraft is connected to the computer before powering on. The firmware update will take around 15 minutes. It is normal that the gimbal goes limp, aircraft status indicators blink, and the aircraft reboots. Please wait patiently until the update is complete.
-
Page 67
WHEEL ERR+RE-CTR WHEL Left Dial on the remote controller is not centered. Re-center it. STICK ERR Control stick error. Calibrate the control sticks in the DJI GO 4 app. MECH ERR Remote Controller Error. Calibrate the remote controller in the DJI GO 4 app. -
Page 68: After-Sales Information
Mavic 2 Pro/Zoom User Manual After-Sales Information Visit https://www.dji.com/support to learn more about after-sales service policies, repair services and support. © 2018 DJI All Rights Reserved.
-
Page 69
This content is subject to change. Download the latest version from http://www.dji.com/mavic-2 If you have any questions about this document, please contact DJI by sending a message to DocSupport@dji.com. MAVIC is a trademark of DJI. Copyright © 2018 DJI All Rights Reserved.
Инструкцию для DJI Mavic 2 Pro Smart Controller на русском языке, в формате pdf можно скачать с нашего сайта. Наш каталог предоставляем Вам инструкцию производителя фирмы DJI, которая была взята из открытых источников. Ознакомившись с руководством по эксплуатации от DJI, Вы на все 100% и правильно сможете воспользоваться всеми функциями устройства.
Для сохранения инструкции «Квадрокоптер DJI Mavic 2 Pro Smart Controller» на русском языке на вашем компьютере либо телефоне, нажмите кнопку «Скачать инструкцию». Если активна кнопка «Инструкция онлайн», то Вы можете просмотреть документ (manual), в своём браузере онлайн.
Если у Вас нет возможности скачать инструкцию по эксплуатации либо просмотреть её, Вы можете поделиться ссылкой на эту страницу в социальных сетях и при удобном моменте скачать инструкцию. Либо добавьте эту страницу в закладки Вашего браузера, нажав кнопку «Добавить страницу в закладки браузера».