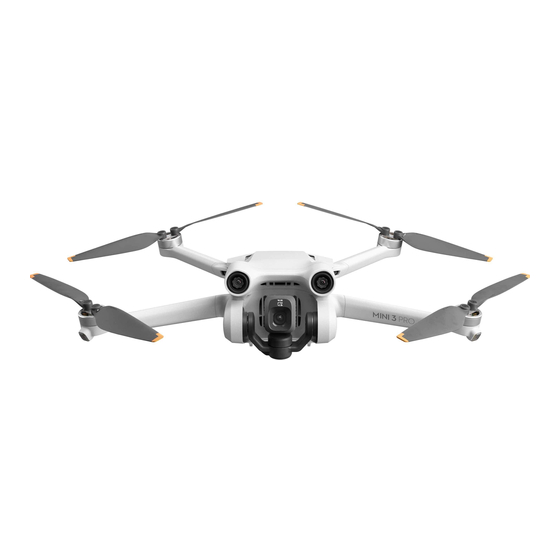
About DJI Mini 3 Pro
Before going airborne, take a few minutes to become familiar with your drone. We have prepared [Video Tutorial], [Product Specifications], and [User Manual] for your reference, to help you get a quick overview of the product.
Video Tutorial
This new drone will give both professional and casual content creators additional ways to capture photos and videos. For a step-by-step guide to the usage of DJI Mini 3 Pro, please click the below picture to view the tutorials.
Product Specifications
To get more details about specifications of the product, please click on the link: DJI Mini 3 Pro Specifications
To compare DJI Mini 3 Pro with other DJI consumer drones, click: Consumer Drones Comparison
User Manual
For details about product usage, check: DJI Mini 3 Pro User Manual
Unboxing and Getting Started
Unboxing
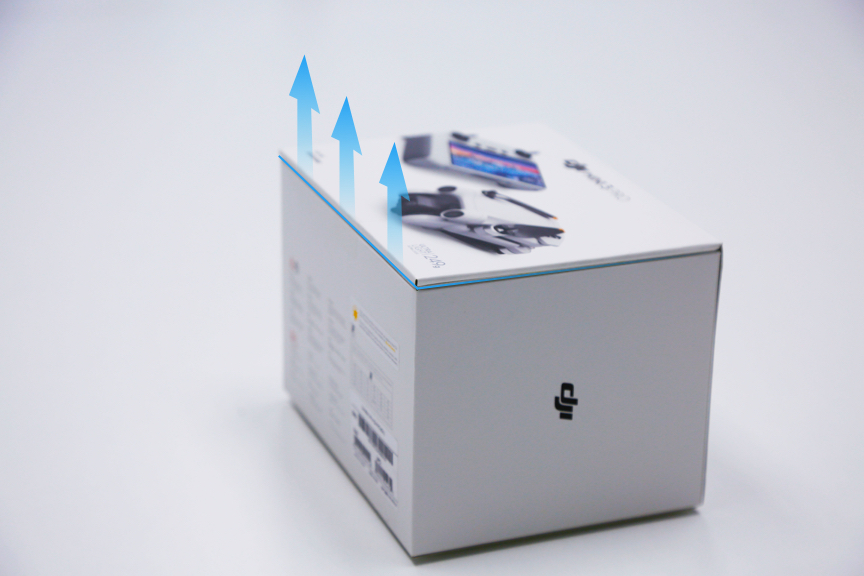
1. First, use a knife to gently open the packaging along the blue line as shown in the figure below, and then open the packaging box in the direction indicated by the arrow (please take the greatest of care when using a sharp tool).
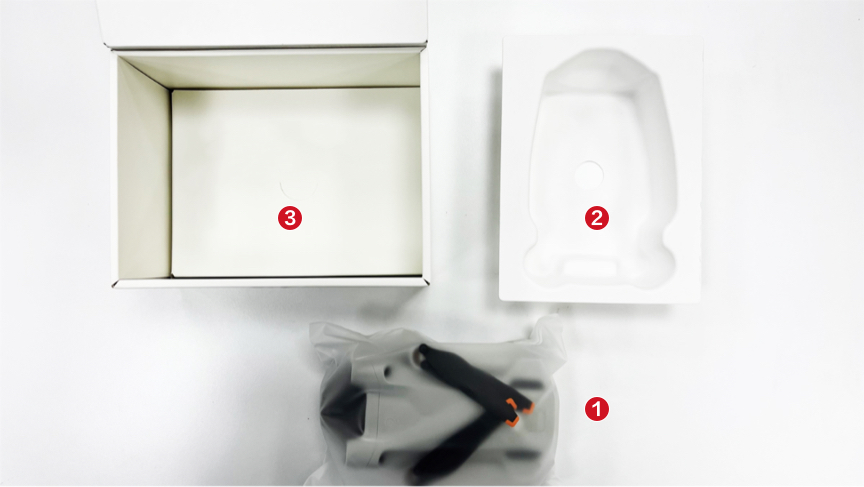
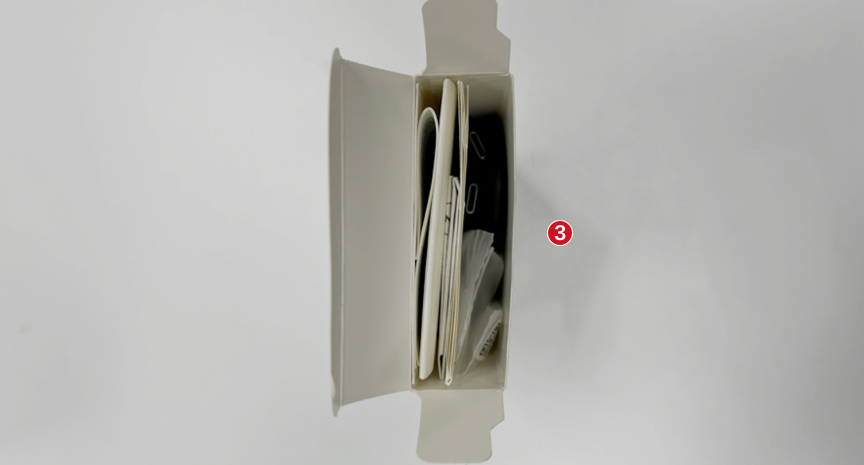
2. Take out the drone, remove the inner container, and there is an accessory box inside the package.
For DJI Mini 3 Pro (RC/RC-N1) combo, there is a remote controller under the accessory box.
In the Box for Different Combos:
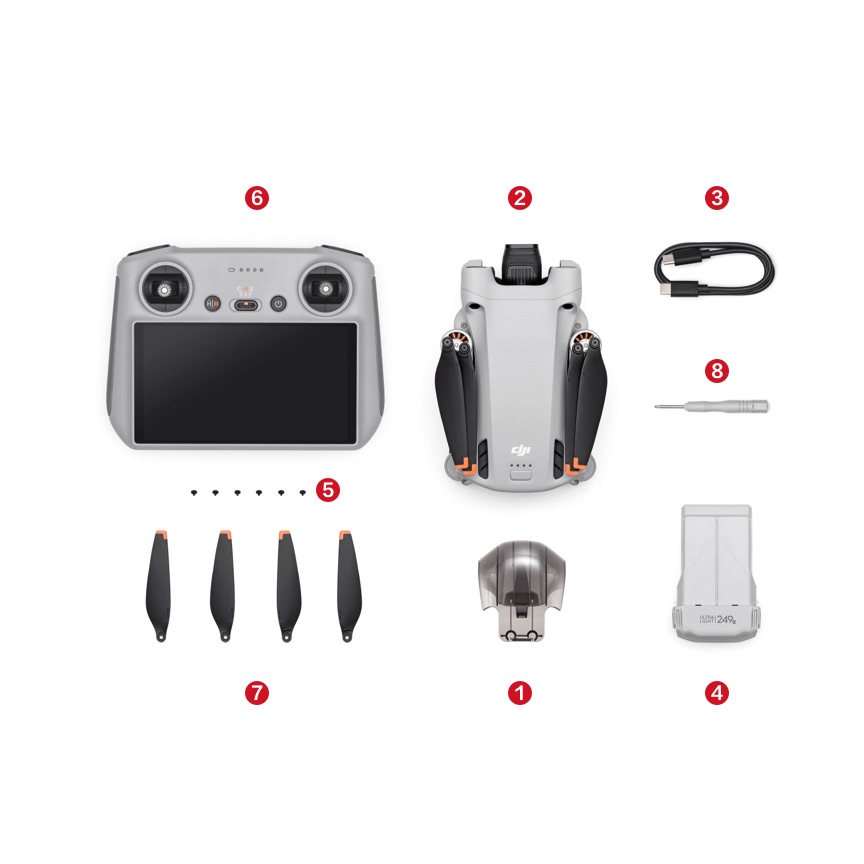
1. DJI Mini 3 Pro (DJI RC)
①Gimbal Protector; ②DJI Mini 3 Pro; ③Type-C to Type-C PD Cable; ④DJI Mini 3 Pro Intelligent Flight Battery; ⑤Screws; ⑥DJI RC; ⑦Spare Propellers; ⑧Screwdriver
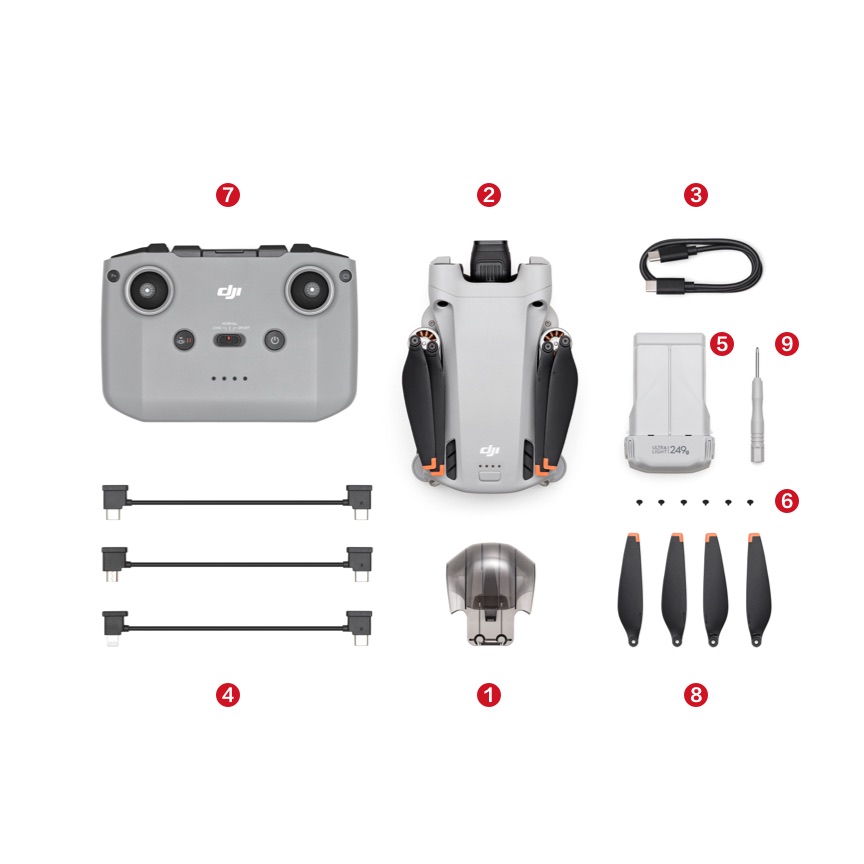
2. DJI Mini 3 Pro (RC-N1)
①Gimbal Protector; ②DJI Mini 3 Pro; ③Type-C to Type-C PD Cable; ④DJI RC-N1 RC Cable; ⑤DJI Mini 3 Pro Intelligent Flight Battery; ⑥Screws; ⑦DJI RC-N1 Remote Controller; ⑧Spare Propellers; ⑨Screwdriver
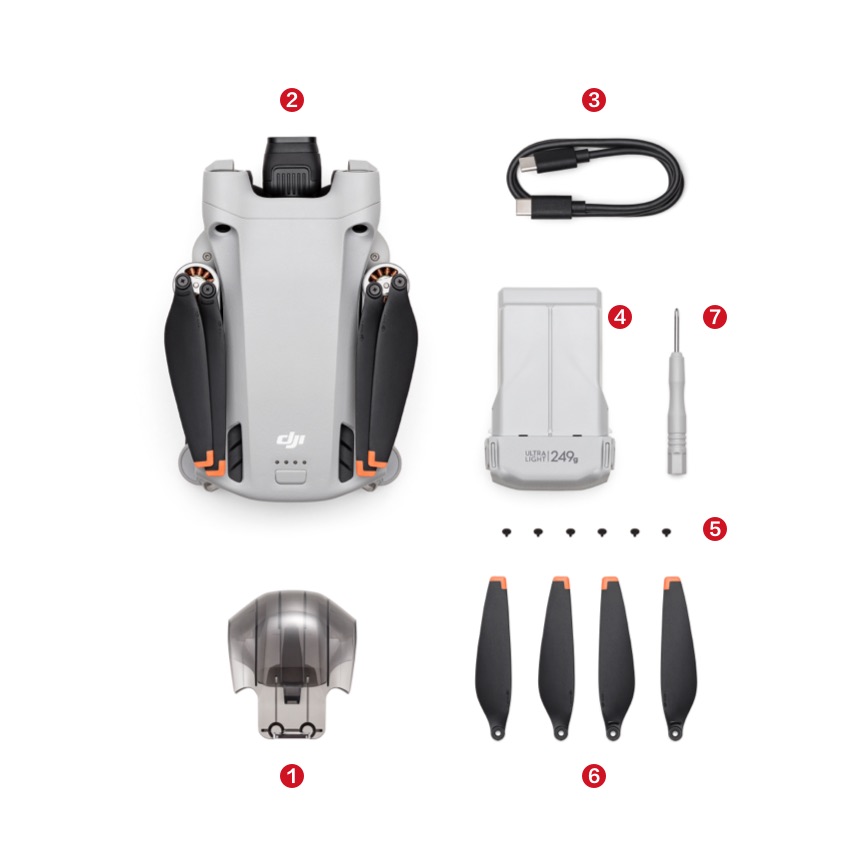
3. DJI Mini 3 Pro (No RC)
①Gimbal Protector; ②DJI Mini 3 Pro; ③Type-C to Type-C PD Cable; ④DJI Mini 3 Pro Intelligent Flight Battery; ⑤Screws; ⑥Spare Propellers; ⑦Screwdriver
Tips:
Please pay special attention to the following two accessories:
1. RC Control Stick
Remove the control sticks from the storage slots and mount them on the remote controller.
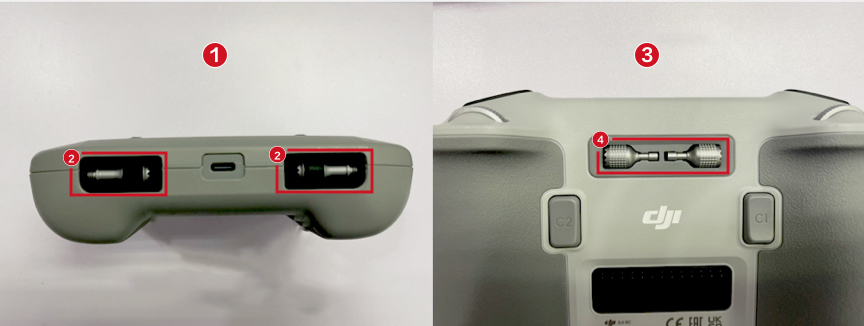
The control sticks of RC-N1 are located at the bottom of the remote controller, while the control sticks of DJI RC are at the back of the remote controller. Please see the figures below:
RC-N1: The control sticks are at the bottom of the remote controller.
DJI RC: The control sticks are at the back of the remote controller.
2. RC Cable
DJI RC-N1 comes with a built-in RC Cable (Lightning Connector). Please see the figure below:
Removing the Gimbal Protector
[Important] Remove the gimbal protector from the camera before powering on the drone.
· When powering on the drone, the gimbal will rotate and perform self-check*. If the gimbal protector is not removed, the motor may be damaged or the service life will be affected, or even impact the flight safety after takeoff.
· To safeguard the camera lens and gimbal axis arm, you’d better attach the gimbal protector to your drone during daily storage or carrying outdoors.
* If the drone is powered on without activation, the gimbal will not rotate and run self-check.
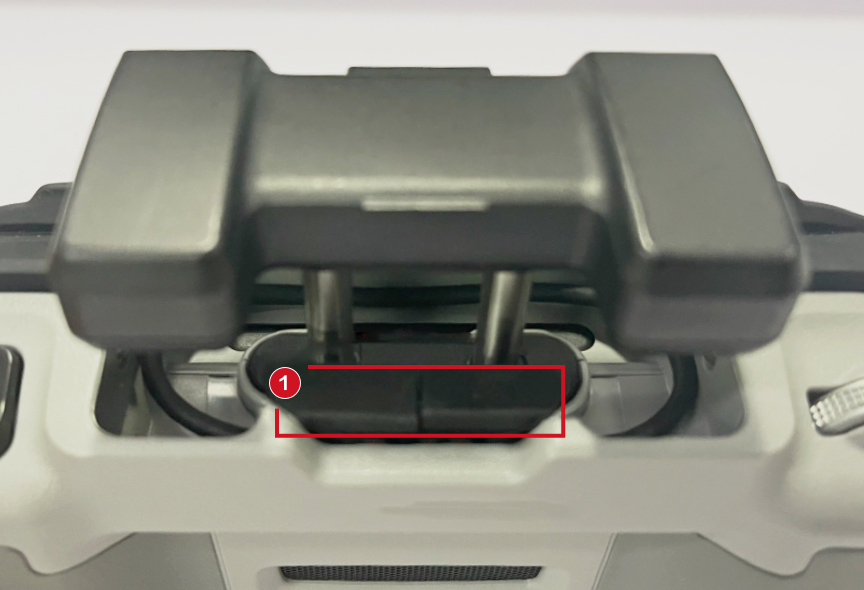
How to Remove the Gimbal Protector?
Push the lower buckle towards the camera to remove the gimbal protector.
How to Attach the Gimbal Protector?
Fit in the upper buckle of the gimbal protector to the aircraft slot first.
Press the lower buckle into the slot at the bottom of the aircraft.
Powering on or off the Device
The most crucial point of flying a drone is powering on and off.
Powering on the Drone
Press the Power button at the top of the drone once, and then press and hold it for 2 s until the battery level LEDs blink green and a warning tone is played. If the aircraft status indicator on the drone blinks red, yellow, and green alternately, the drone is powered on successfully.
Powering off the Drone
Press the Power button once, and then press and hold it for 2 s until the aircraft status indicator and battery status LED light off, which indicates that the drone is powered off successfully.
Powering on the Remote Controller
Press the Power button once, and then press and hold it for 2 s until the battery level LEDs blink green and a warning tone is played, which indicates that the remote controller is powered on successfully.
Powering off the Remote Controller
It is the same as powering on: Press the Power button once, and then press and hold it for 2 s until the battery level LEDs light off and a warning tone is played, which indicates that the remote controller is powered off successfully.
Status Indicator Descriptions
You can tell the status of your device through the blinking patterns of the aircraft status indicator. Different color indicates different status of the aircraft, and the blinking frequency as well.
Refer to the table below for more information about the aircraft status indicators.
Attaching and Removing the Propellers
As we all know, there are two types of propeller/motor: CW and CCW, and you can easily recognize it through the mark on it. Before mounting the propeller, better confirm the mark on each first.
Mounting the Propellers
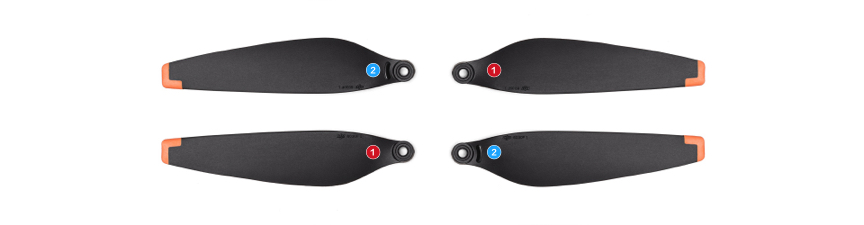
1. Distinguishing between Propellers
Distinguish Between propellers by checking whether there are marks on it.
If the propeller is mounted in an improper way, the drone cannot take off.
①Without a raised mark; ②With a raised mark.
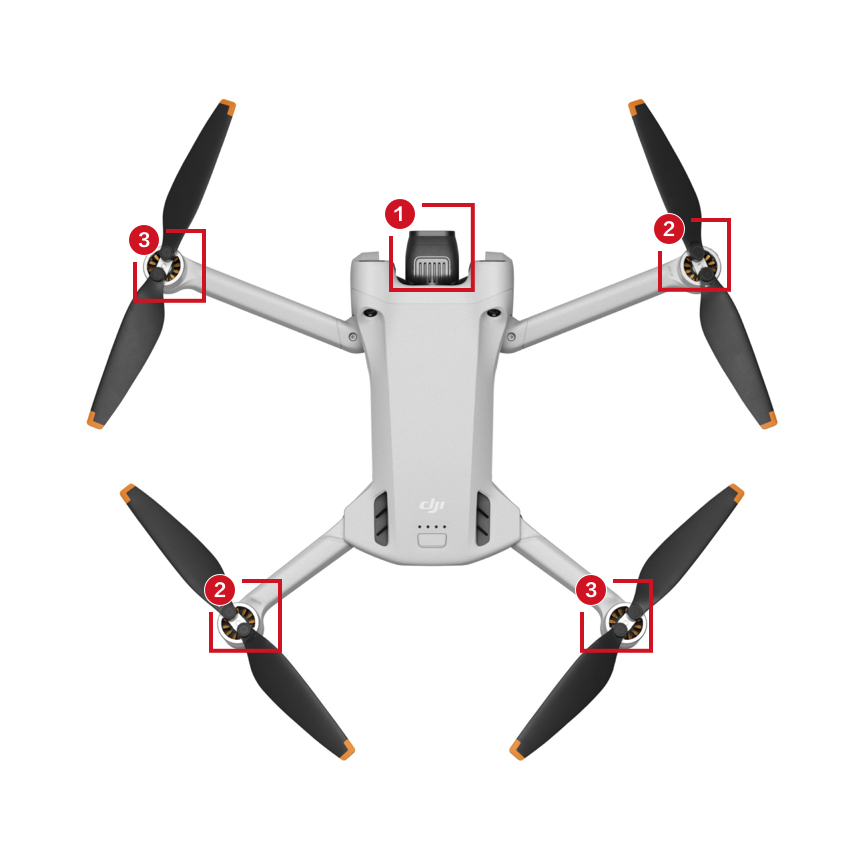
2. Mounting the Propellers
Step 1: Place the drone and confirm the orientation of the drone’s camera as shown below;
Step 2: Use the given screwdriver to mount the propeller with a mark to the motor;
Step 3: Mount the propeller without a mark to the motor.
①Orientation of the Drone’s Camera; ②Mount the propellers with a raised mark; ③Mount the propellers without a raised mark.
Removing the Propellers
Use the given screwdriver to unscrew the screws, and then remove the propellers.
Mounting and Removing the Battery
Note that the battery can be charged without being removed from the drone. If you would like to install or remove the battery from the drone, please see below:
Updating the Firmware
Power on the drone and remote controller, and launch DJI Fly. If a new firmware update is available, follow the on-screen instructions to update the firmware.
Click here and watch the tutorial (Jump to 2 minutes 28 seconds).
Activating Your Device
DJI Mini 3 Pro requires activation before first use. After powering on the aircraft and remote controller, follow the on-screen prompts to activate the device using DJI Fly.
Step 1: Download the app.
DJI Fly is required for product activation and connection. Click Here to download and install the app.
Step 2: Connect the drone to other devices.
Before takeoff, connect the drone to the remote controller and mobile device to realize flight control and image transmission. Brand-new aircraft have already been linked upon shipment. Therefore, you can use your device directly without linking.
Linking via DJI Fly
1. Connect the aircraft, remote controller and the mobile device (There is no need to connect the mobile device for DJI RC).
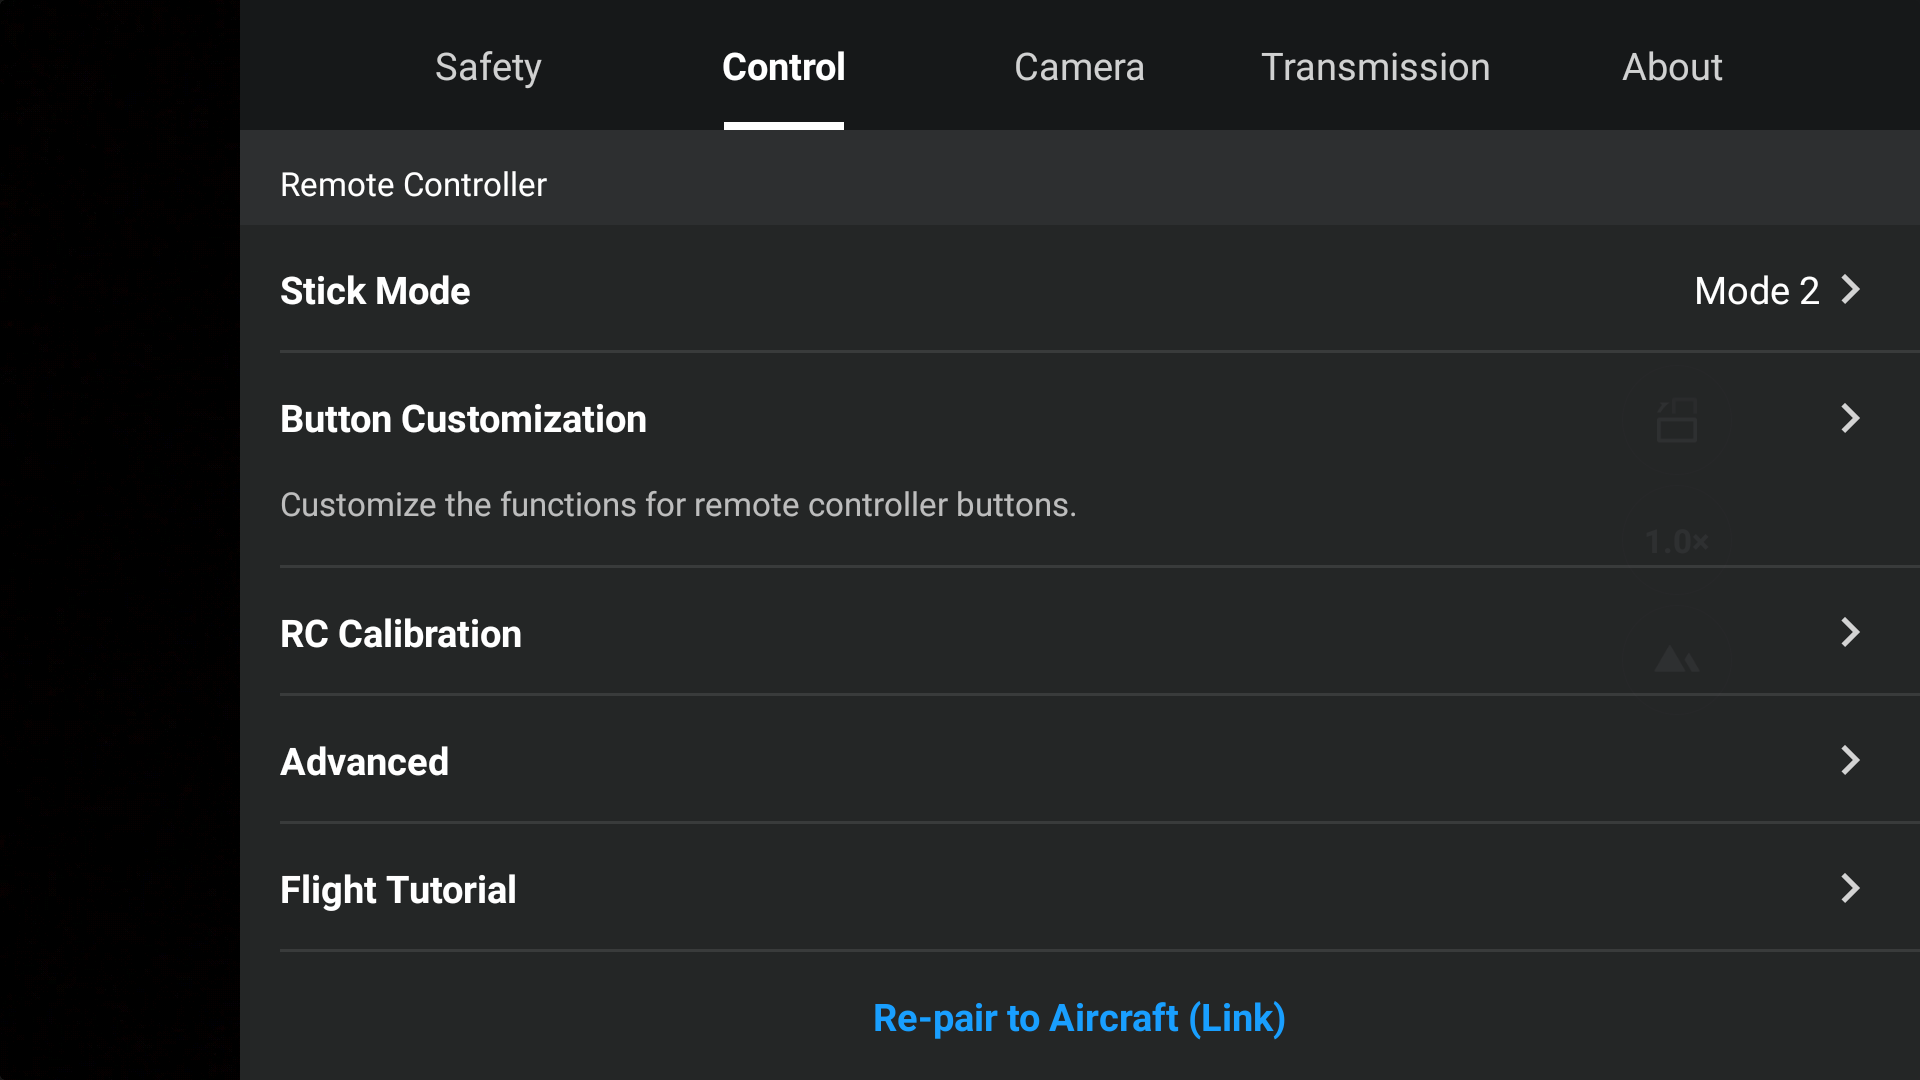
2. In the Camera View of the DJI Fly app, tap “…” in the top right corner to enter the Control interface, and then tap “Re-pair to Aircraft (Link)”.
3. Press and hold the Power button on the aircraft. The aircraft will beep once when it is ready to link. After the linking is successfully, the aircraft will beep twice and the battery level LEDs of the remote controller start blinking and turn solid.
For more details about linking, refer to: Aircraft Linking Guide
Step 3: Activate for the First Time.
Power on the aircraft and remote controller, launch the DJI Fly app, and then complete the activation according to the on-screen instructions (An Internet connection is required for activation).
For an overview of how to activate your device, click here and watch the video.
Checking Activation Information
Check the activation details of your device through the Activation Information Inquiry page.
* For your reference, click to know about how to Check Your Product’s Serial Number
* Your device is warranted by DJI from the date of receipt, which will not be affected by the activation status of your device. Go to After-Sales Service Policies to learn more about the warranty period of product and components.
Using the Remote Controller
This guide includes a comprehensive and exhaustive overview and explanation of buttons on the remote controller: Using DJI RC-N1 Remote Controller and DJI RC
Remote Controller Compatibility
DJI Mini 3 Pro currently supports two remote controllers: DJI RC and DJI RC-N1 Remote Controller
|
Remote Controller Model |
Applicable Products |
|
DJI RC |
DJI Mini 3 DJI Mavic 3 Classic DJI Mini 3 Pro DJI Mavic 3 DJI Air 2S |
|
RC-N1 Remote Controller |
DJI Mini 3 DJI Mavic 3 Classic DJI Mini 3 Pro DJI Mavic 3 DJI Air 2S Mavic Air 2 DJI Mini 2 |
Mobile Device Compatibility
The mobile devices in the compatibility list that have been strictly tested for DJI Mini 3 Pro. To know more about the compatibility of DJI Mini 3 Pro, check: DJI Mini 3 Pro Supported Mobile Devices
If your phone is not on the list of supported devices?
Mobile devices that are not on the compatibility list have not been verified for stable use. In theory, a device that meets system requirements can be used, but stable performance cannot be guaranteed. We recommend that you download the app first and go to a nearby DJI retail store to check whether your phone is compatible with Mini 3 Pro.
Charging Instructions
It is a general curiosity to know the battery level of your drone, which is typically used by pilots to efficiently prepare for a swift flight to the blue skies.
Press the Power button on the aircraft/remote controller for 1s to check the battery level. The battery level LEDs display the power level of the battery. If no more than two LEDs light up, please charge the battery soon.
Choosing a Charger
DJI Mini 3 Pro package does not come with a charger, so please refer to the following instructions to choose an appropriate charger.
· DJI Mini 3 Pro supports the PD fast charging protocol, so you can use the PD charger with the included PD fast charging cable (Type-C to Type-C PD Cable) to charge the aircraft;
· If you need one, we recommend DJI 30W USB-C Charger.
· Other common PD fast chargers can be used, such as Apple USB-C Power Adapter or Android GaN charger.

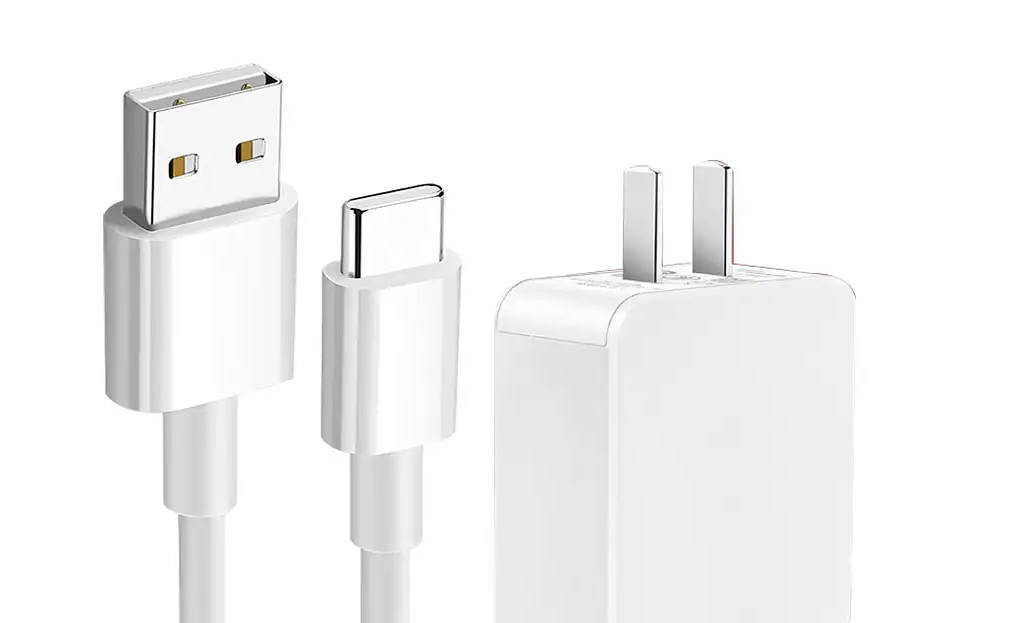
· If no PD charger is available, try using USB-C charger and USB-A to USB-C cable as shown below for charging.
Charging Duration
1. Charging the Drone
· Charging the battery mounted to the aircraft
When used with the DJI 30W USB-C Charger, it takes about 64 minutes to fully charge one Intelligent Flight Battery and 101 minutes for one Intelligent Flight Battery Plus.
· Using the Battery Charging Hub
When used with the DJI 30W USB-C Charger, the charging hub can fully charge one Intelligent Flight Battery in approximately 56 minutes and one Intelligent Flight Battery Plus in approximately 78 minutes.
2. Charging the Remote Controller
· DJI RC
The battery can be fully charged in about 1 hour and 30 minutes with a maximum charging power of 15W.
RC-N1 Remote Controller
The battery can be fully charged in about 3 hours and 30 minutes with a maximum charging power of 10W.
Charging Method
Prepare your drone, remote controller, and USB-C charger, then follow the instructions below for charging.
Battery Maintenance
1. Discharge the battery to 40%-65% (the third battery level LED lights up or blinks) if it will not be used for 10 days or more.
2. Charge and discharge the battery about every three months to maintain good battery health. If the battery is stored after completely drained, it may over-discharge and be damaged.
3. Always store Intelligent Flight Batteries in a well-ventilated place.
4. The battery will enter hibernation mode if depleted and stored for an extended period of time. Recharge the battery to bring it out of hibernation.
Exporting Footage
Storage
· DJI Mini 3 Pro includes a modest 1.2GB of internal storage, so you can snap some photos and record videos if you forget to bring a memory card.Photos and videos are stored in the internal storage by default if a microSD card is not installed.
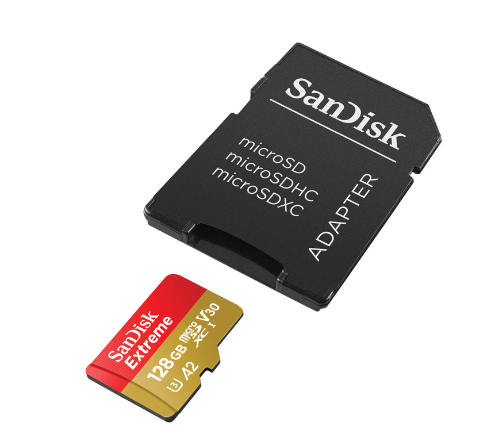
· The combo does not come with a microSD card. We recommend you choose a microSD card that is UHS-I Speed Class 3 or above. Click to buy if necessary: SanDisk Extreme microSD Card 128 GB.
· DJI RC does not come with the internal storage, but can be equipped with a microSD card. After a memory card is installed, you can use the product for capturing photos/videos, keeping cache files, and recording screen.
If you won’t use it for caching files or recording screen, the memory card is not a must.
Installing and Removing a Memory Card
If you have purchased a memory card, you can insert it into the black memory card adapter, which can be attached to the TF slot on PC for further file transfer. Please note that the memory card is inserted into the drone without the card adapter.
If only one microSD card is available, please insert it into the microSD card slot on the aircraft following “Inserting MicroSD Card to Aircraft” as shown below.
Exporting the Photos/Videos
QuickTransfer is a handy feature that DJI added to the drone to make it easy to download unaltered footage from the drone wirelessly. Or you can connect the drone to the remote controller and mobile device for exporting.
QuickTransfer: Only DJI Mini 3、DJI Mavic 3 Classic、DJI Mavic 3 series, DJI Mini 3 Pro, and DJI Mini 2 support the QuickTransfer function. With QuickTransfer, DJI enables a direct connection of the drone with the smartphone to upload photos and videos from the drone to the smartphone.
Connecting your aircraft to the remote controller and mobile device: It is applicable to all DJI drones. Connect the remote controller to your drone and the mobile device, and download the photos or videos through the app. (It is more suitable for downloading the wonderful moments after the flight.)
QuickTransfer
1. Power on the drone, and wait until the aircraft self-diagnostics is completed.
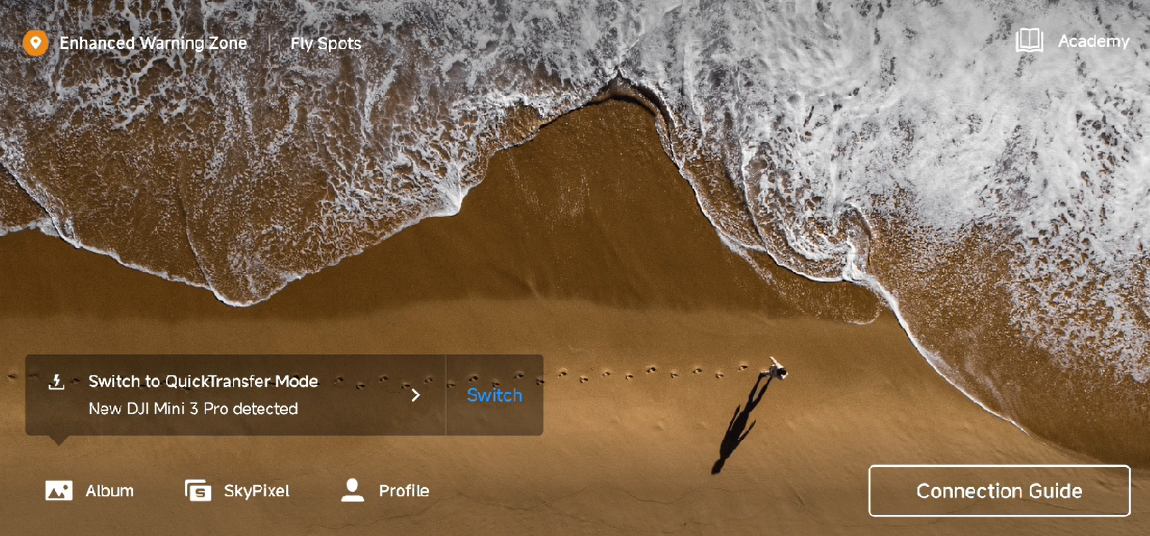
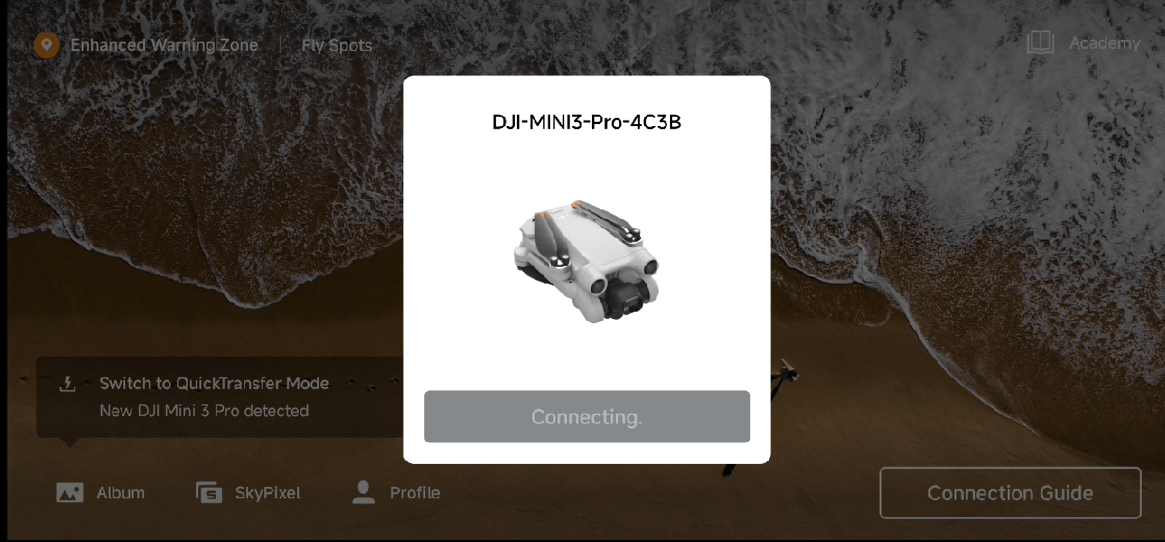
2. Enable the Bluetooth and Wi-Fi functions of the mobile device, launch DJI Fly to check if a “Switch to QuickTransfer Mode (DJI Mini 3 Pro)” prompt pops up. Then tap to enter. (When using QuickTransfer for the first time, press and hold the Power button on the aircraft for two seconds to switch to QuickTransfer mode.)
3. Choose to connect to the aircraft Wi-Fi.
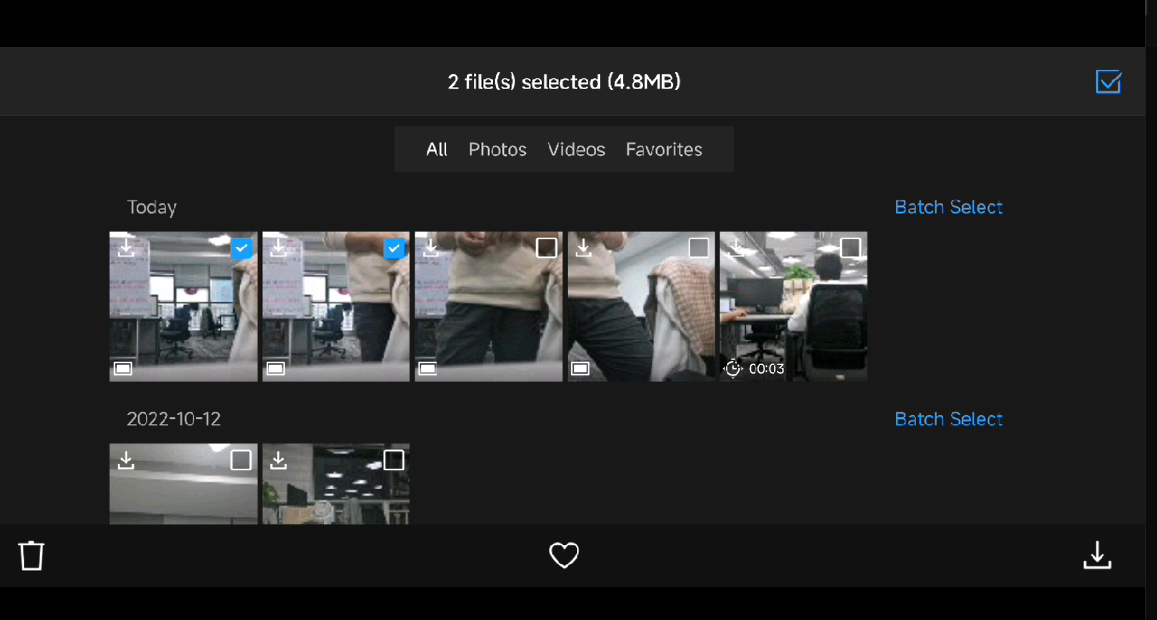
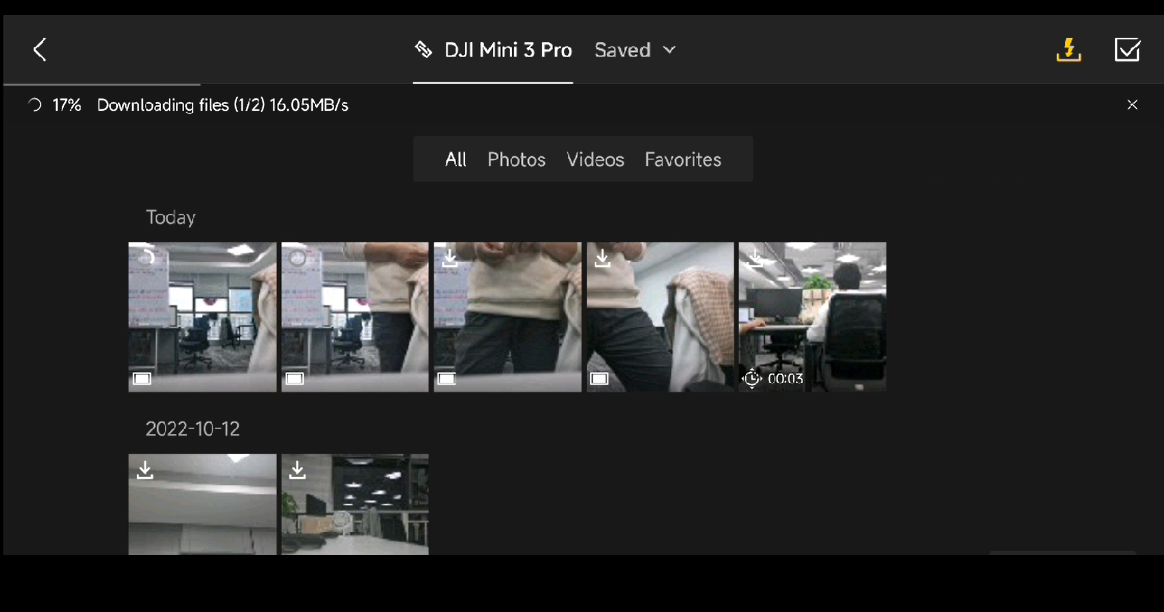
4. Select the required footage and choose the download path to download photos and videos from the aircraft to the mobile device.
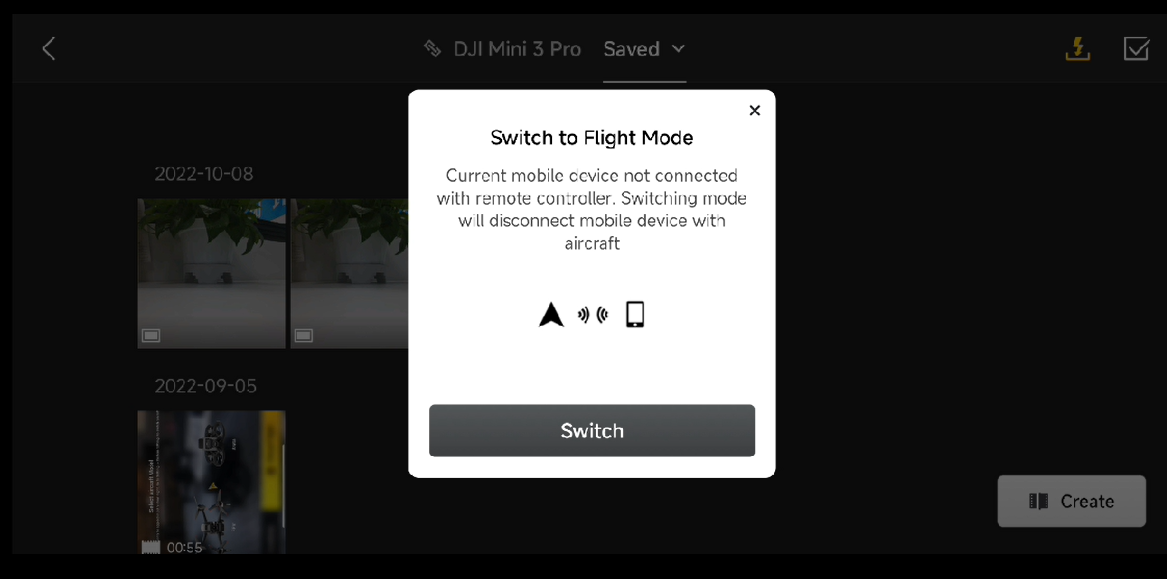
When the mobile device is already connected to the remote controller and QuickTransfer is required, make sure that the aircraft is connected to the remote controller, and tap the icon at the upper right corner to access the files on the aircraft. In this mode, the file download speed increases but the aircraft cannot be controlled via a remote controller.
Safety Flight
Flight Polices
1. Laws and Regulations
Please check local policies and regulations before flying:Checking Policies and Regulations
2. GEO Zone
To determine whether you’ll need to unlock an area before flying there, start by checking:
· Click to check GEO Zone.
Flight Environment Requirements
1. Always fly in open areas and keep your drone within line of sight. For safety reasons, you should never fly above people, animals, or moving vehicles.
2. Always fly at a safe altitude and at locations that are clear of building and other obstacles
The maximum flight altitude can be set to 500 m above ground level. For details about maximum flight distance, refer to the official specifications. Beginner pilots should not be able to fly very far.
Safety Tips
1. Keep your hands on the control sticks to maintain control throughout flight
2. Take off with strong GPS signal to set a Home Point and ensure positioning stability.
3. Check your drone for damage and fully charge your equipment before each flight.
Intermediate Operations
Hyperlapse
Hyperlapse shooting modes include Free, Circle, Course Lock, and Waypoint.
A Hyperlapse video is one that speeds up real-time footage so that the viewer can quickly see what has happened. The process of slowly changing objects or scenes is compressed, which will present a strange and wonderful sight in a short period of time.
FocusTrack
FocustTrack includes Spotlight, ActiveTrack, and Point of Interest.
Portrait Mode
DJI Mini 3 Pro has a unique capability of rotating the camera to portrait orientation. Tap the Portrait Mode Switch on the app view to enter Portrait Mode.

Zooming
DJI Mini 3 Pro supports digital zoom.
Live Streaming
When using DJI RC-N1 remote controller with your mobile device, you can live stream with your Mini 3 Pro via DJI Fly. Live streaming is not available when using DJI RC.
Go to 「“…” > Transmission > Enable Livestreaming」to broadcast the camera view in real time. Mini 3 Pro supports livestream platforms and multiple resolutions for you to choose from and connect with your world face-to-face at any time.
Note to input the RTMP address as below: RTMP address/stream key. Please do add the “/” forward slash between the RTMP address and the stream key. Only in this way, the live streaming screen can be displayed.
Panorama
DJI Mini 3 Pro supports Panorama shooting mode: Sphere, 180°, Wide Angle, and Vertical.
Smart RTH
Smart RTH is initiated either by tapping the RTH icon at the left side of the screen or by pressing and holding the RTH button on the remote controller.
Click here and watch the tutorial (Jump to 5 minutes 42 seconds).
Waypoints
DJI Mini 3 Pro does not support Waypoint Flight or Mission Planning.
Point of Interest
DJI Mini 3 Pro supports Point of Interest.
Click here and watch the tutorial (Jump to 1 minutes 50 seconds).
Available Accessories
Accessory Purchase
4 must-have accessories for your Mini 3 Pro to fly longer and more safely, and get great video.
Popular Accessories
DJI Mini 3 Pro Fly More Kit Plus
DJI Mini 3 Pro Fly More Kit
DJI Mini 3 Pro Intelligent Flight Battery Plus
DJI Mini 3 Pro Intelligent Flight Battery
- Manuals
- Brands
- dji Manuals
- Drones
- MINI 3 PRO
- User manual
-
Contents
-
Table of Contents
-
Bookmarks
Quick Links
Related Manuals for dji MINI 3 PRO
Summary of Contents for dji MINI 3 PRO
-
Page 1
User Manual 2022.06 v1.2… -
Page 2
Printing this Document This document supports high resolution printing. Revision Log Version Date Revisions Added support for FocusTrack, QuickShots (Dronie, Rocket, Circle, Helix, v1.2 2022.6 and Boomerang), and Hyperlapse in portrait mode, and added USB mode. © 2022 DJI All Rights Reserved. -
Page 3: Using This Manual
The DJI RC remote controller has the DJI Fly app already installed. Users are required to download DJI Fly to their mobile device when using DJI RC-N1 remote controller. The Android version of DJI Fly is compatible with Android v6.0 and later. The iOS version of DJI Fly is compatible with iOS v11.0 and later.
-
Page 4: Table Of Contents
Contents Using this manual Legend Read Before the First Flight Video Tutorials Download the DJI Fly App Download DJI Assistant 2 (Consumer Drones Series) Product Profile Introduction Using for the First Time Diagram Aircraft Introduction Flight Modes Aircraft Status Indicator…
-
Page 5
Auto Takeoff/Landing Starting/Stopping the Motors Flight Test Appendix Specifications Firmware Update Aftersales Information © 2022 DJI All Rights Reserved. -
Page 6
Product Profile This section introduces DJI Mini 3 Pro and lists the components of the aircraft and remote controller. © 2022 DJI All Rights Reserved. -
Page 7: Product Profile
3.0) technology, DJI Mini 3 Pro offers a maximum transmission range of 12 km and video quality at up to 1080p 30fps from the aircraft to DJI Fly. The remote controller works at both 2.4 and 5.8 GHz, and is capable of selecting the best transmission channel automatically.
-
Page 8: Using For The First Time
DJI Mini 3 Pro User Manual Using for the First Time DJI Mini 3 Pro is folded before being packaged. Follow the steps below to unfold the aircraft and remote controller. Preparing the Aircraft All aircraft arms are folded before the aircraft is packaged. Follow the steps below to unfold the aircraft.
-
Page 9
Activating the DJI Mini 3 Pro Aircraft DJI Mini 3 Pro requires activation before first use. After powering on the aircraft and remote controller, follow the on-screen prompts to activate DJI Mini 3 Pro using DJI Fly. An internet connection is required for activation. -
Page 10: Diagram
Binding the Aircraft and Remote Controller After activation, the aircraft is bound to the remote controller automatically. If automatic binding fails, follow the on-screen prompts on DJI Fly to bind the aircraft and remote controller for optimal warranty services. Updating Firmware A prompt will appear in DJI Fly when new firmware is available.
-
Page 11
DJI Mini 3 Pro User Manual DJI RC Remote Controller Systems are available). Press and hold to initiate RTH. Press again to cancel RTH. 5. Flight Mode Switch Switch between Cine, Normal, and Sport mode. 6. Power Button Press once to check the current battery level. -
Page 12
Controls the tilt of the camera. Press and hold The control sticks are removable and easy to the customizable button to use the gimbal dial store. Set the flight control mode in DJI Fly. for zoom control. 6. Customizable Button The functions of the button can be set in 14. -
Page 13
Aircraft DJI Mini 3 Pro contains a flight controller, video downlink system, vision systems, infrared sensing system, propulsion system, and an Intelligent Flight Battery. © 2022 DJI All Rights Reserved. -
Page 14: Aircraft
Intelligent Flight Battery. Flight Modes DJI Mini 3 Pro has three flight modes, plus a fourth flight mode that the aircraft switches to in certain scenarios. Flight modes can be switched via the Flight Mode switch on the remote controller.
-
Page 15: Aircraft Status Indicator
Lighting requirements vary depending on the region. Observe local laws and regulations. QuickTransfer DJI Mini 3 Pro can connect directly to mobile devices via Wi-Fi, enabling users to download photos and videos from the aircraft to the mobile device through DJI Fly without using the DJI RC-N1 remote controller.
-
Page 16: Return To Home
DJI Mini 3 Pro User Manual 2. Make sure Bluetooth and Wi-Fi are enabled on the mobile device. Launch DJI Fly and a prompt will appear to connect to the aircraft. 3. Tap Connect. Once successfully connected, the files on the aircraft can be accessed and downloaded at high speed.
-
Page 17
The action the aircraft performs once it loses the remote controller signal can be set as Return to Home, Land, or Hover in DJI Fly. If the action was set as Return to Home in advance, and where the Home ©… -
Page 18
The aircraft will hover in place for a while before landing. It is important to set a suitable RTH altitude before each flight. Launch DJI Fly and set the RTH altitude. In RTH, if the current altitude of the aircraft is lower than the RTH altitude, it will automatically ascend to the RTH altitude first. -
Page 19: Vision Systems And Infrared Sensing Systems
2. If the ground is determined unsuitable for landing, the aircraft will hover and wait for pilot confirmation. 3. If Landing Protection is not operational, DJI Fly will display a landing prompt when the aircraft descends to 0.5 m from the ground. Push the throttle stick down for one second to land.
-
Page 20
The Forward and Backward Vision Systems will activate automatically when the aircraft is in Normal or Cine mode and Obstacle Avoidance is set to Bypass or Brake in DJI Fly. The Forward and Backward Vision Systems work best with adequate lighting and clearly marked or textured obstacles. Due to inertia, users must make sure to brake the aircraft within a reasonable distance. -
Page 21: Intelligent Flight Mode
Use soft cloth if there is any dirt, dust, or water on the glass of the infrared sensing and vision systems. DO NOT use any cleaning product that contains alcohol. c) Contact DJI Support if there is any damage to the glass of the Infrared Sensing System or Vision Systems.
-
Page 22
Move the roll stick to circle the subject, pitch stick to alter the distance from the subject, throttle stick to change the altitude, and yaw stick to adjust the frame. The aircraft will bypass obstacles in ActiveTrack 4.0 regardless of the settings in DJI Fly when the vision systems are working normally. -
Page 23
3. Tap the shutter/record button to take photos or start recording. View the footage in Playback. Exiting FocusTrack Tap Stop in DJI Fly or press the Flight Pause button once on the remote controller to exit FocusTrack. DO NOT use FocusTrack in areas with people and animals running or vehicles moving. -
Page 24
1. Launch the aircraft and make it hover at least 2 m (6.6 ft) above ground. 2. In DJI Fly, tap the shooting mode icon to select MasterShots and read the instructions. Make sure you understand how to use the shooting mode and there are no obstacles in the surrounding area. -
Page 25
Make sure to follow local privacy laws and regulations when using MasterShots. QuickShots QuickShots shooting modes include Dronie, Rocket, Circle, Helix, Boomerang, and Asteroid. DJI Mini 3 Pro records according to the selected shooting mode and automatically generates a short video. The video can be viewed, edited, or shared to social media from playback. -
Page 26
DJI Mini 3 Pro User Manual 2. In DJI Fly, tap the shooting mode icon to select QuickShots and follow the prompts. Make sure you understand how to use the shooting mode and there are no obstacles in the surrounding area. -
Page 27
2. Tap the shutter/record button to begin. Cruise Control: Set the function of the customizable button (C1 or C2 button for DJI RC and Fn button for the DJI RC-N1 remote controller) to Cruise Control, and press the customizable button and control stick at the same time to enter Cruise Control. -
Page 28: Advanced Pilot Assistance Systems (Apas 4.0)
DJI Mini 3 Pro User Manual orientation and gimbal. Follow the steps below to use Course Lock: 1. Set the interval time, video duration, and max speed. The screen displays the number of photos that will be taken and the shooting duration.
-
Page 29: Flight Recorder
(Consumer Drones Series). Propellers There are two types of DJI Mini 3 Pro propellers, which are designed to spin in different directions. The marked propellers should be attached to the marked motors, and unmarked propellers to the unmarked motors. The two propeller blades attached to one motor are the same. Make sure to match the propellers and motors by following the instructions.
-
Page 30
Use two propellers from the same package. DO NOT mix with propellers from other packages. Only use official DJI propellers. DO NOT mix propeller types. Purchase additional propellers if necessary. Make sure that the propellers and motors are installed securely before each flight. Check to make sure the screws on the propellers are tightened after every 30 hours of flying time (approx. -
Page 31: Intelligent Flight Battery
Intelligent Flight Battery DJI Mini 3 Pro Intelligent Flight Battery is a 7.38 V, 2453 mAh battery. DJI Mini 3 Pro Intelligent Flight Battery Plus is a 7.38 V, 3850 mAh battery. The two batteries have the same structure and dimensions but different weight and capacity.
-
Page 32
DJI Mini 3 Pro User Manual Using the Battery Checking the Battery Level Press the power button once to check the battery level. LED1 LED2 LED3 LED4 Battery Level LEDs Power Button The battery level LEDs display the power level of the battery during charging and discharging. The… -
Page 33
Fully charge the battery before each use. It is recommended to use the charging devices provided by DJI, such as the DJI Mini 3 Pro Two-Way Charging Hub, DJI 30W USB-C Charger, or other USB Power Delivery chargers. The DJI Mini 3 Pro Two-Way Charging Hub and the DJI 30W USB-C Charger are both optional accessories. -
Page 34
1. Insert the batteries into the charging hub until there is a click. 2. Connect the charging hub to a power outlet (100-240V, 50/60 Hz) using a USB-C cable and a DJI 30W USB-C charger or other USB Power Delivery chargers. -
Page 35
When using the DJI 30W USB-C Charger, the charging time for Mini 3 Pro Intelligent Flight Battery is approximately 1 hour and 4 minutes, while for Mini 3 Pro Intelligent Flight Battery Plus it is approximately 1 hour and 41 minutes. -
Page 36
DJI Mini 3 Pro User Manual Battery Protection Mechanisms Status LED1 LED2 LED3 LED4 Blinking Pattern LED2 blinks twice per second Overcurrent detected LED2 blinks three times per second Short circuit detected LED3 blinks twice per second Overcharge detected LED3 blinks three times per second Over-voltage charger detected… -
Page 37: Gimbal And Camera
Gimbal Profile The DJI Mini 3 Pro 3-axis gimbal stabilizes the camera, allowing you to capture clear and steady images and videos at high flight speed. The gimbal has a control tilt range of -90˚ to +60˚, and two control roll angles of -90˚…
-
Page 38
Storing Photos and Videos DJI Mini 3 Pro supports the use of a microSD card to store your photos and videos. A microSD card with a UHS-I Speed Grade 3 rating or above is required due to the fast read and write speeds necessary for high-resolution video data. -
Page 39
Remote Controller This section describes the features of the remote controller and includes instructions for controlling the aircraft and the camera. © 2022 DJI All Rights Reserved. -
Page 40: Remote Controller
Remote Controller DJI RC When used with DJI Mini 3 Pro, DJI RC remote controller features OcuSync O3 video transmission, works at both 2.4 GHz and 5.8 GHz frequency bands. It is capable of selecting the best transmission channel automatically and can transmit 1080p 30fps HD live view from the aircraft to the remote controller at a distance of up to 12 km (7.5 mi) (compliant with FCC standards, and measured in…
-
Page 41
(throttle), and left/right movement (roll). The control stick mode determines the function of each control stick movement. Three preprogrammed modes (Mode 1, Mode 2, and Mode 3) are available and custom modes can be configured in DJI Fly. Mode 1… -
Page 42
DJI Mini 3 Pro User Manual The default control mode of the remote controller is Mode 2. In this manual, Mode 2 is used as the example to illustrate how to use the control sticks. Stick Neutral/Center Point: Control sticks are in the center. -
Page 43
RTH and to regain control of the aircraft. Customizable Buttons Go to System Settings in DJI Fly and select Control to set the functions of the customizable C1 and C2 buttons. Status LED and Battery Level LEDs Description… -
Page 44
The remote controller beeps when there is an error or warning. Pay attention when prompts appear on the touch screen or in DJI Fly. Slide down from the top and select Mute to disable all alerts, or slide the volume bar to 0 to disable some alerts. -
Page 45
DJI Mini 3 Pro User Manual Make sure the remote controller is within 0.5 m of the aircraft during the linking. The remote controller will automatically unlink from an aircraft if a new remote controller is linked to the same aircraft. -
Page 46
×2 Slide down from the top of the screen to Slide down twice from the top open the status bar when in DJI Fly. of the screen to open Quick Settings when in DJI Fly. The status bar displays the time, Wi-Fi signal, battery level of the remote controller, etc. -
Page 47
DJI Mini 3 Pro User Manual 4. Adjusting Brightness Slide the bar to adjust the screen brightness. 5. Adjusting Volume Slide the bar to adjust the volume. Advanced Features Calibrating the Compass The compass may need to be calibrated after the remote controller is used in areas with electromagnetic interference. -
Page 48: Dji Rc-N1
DJI Mini 3 Pro User Manual DJI RC-N1 When used with DJI Mini 3 Pro, DJI RC-N1 features OcuSync O3 video transmission, works at both 2.4 GHz and 5.8 GHz frequency bands, is capable of selecting the best transmission channel automatically, and offers 1080p 30fps HD live view transmission from the aircraft to DJI Fly on a mobile device (depending on mobile device performance) at a maximum transmission range of 12 km (7.5 mi)
-
Page 49
(throttle), and left/right movement (roll). The control stick mode determines the function of each control stick movement. Three preprogrammed modes (Mode 1, Mode 2, and Mode 3) are available and custom modes can be configured in DJI Fly. Mode 1… -
Page 50
DJI Mini 3 Pro User Manual The default control mode of the remote controller is Mode 2. In this manual, Mode 2 is used as the example to illustrate how to use the control sticks. Stick Neutral/Center Point: Control sticks are in the center. -
Page 51
RTH and to regain control of the aircraft. Customizable Button To customize the function of this button, go to System Settings in DJI Fly and select Control. Customizable functions include recentering the gimbal and toggling between the map and live view. -
Page 52
DJI Mini 3 Pro User Manual Optimal Transmission Zone The signal between the aircraft and the remote controller is most reliable when the remote controller is positioned towards the aircraft as depicted below. Weak Weak Strong Optimal Transmission Zone Linking the Remote Controller The remote controller is already linked to the aircraft when purchased together as a combo. -
Page 53
DJI Fly App This section introduces the main functions of the DJI Fly app. © 2022 DJI All Rights Reserved. -
Page 54: Dji Fly App
Enter SkyPixel to view videos and photos shared by users. Profile View account information, flight records; visit the DJI forum, online store; access the Find My Drone feature, and other settings such as firmware updates, camera view, cached data, account privacy, and language.
-
Page 55: Camera View
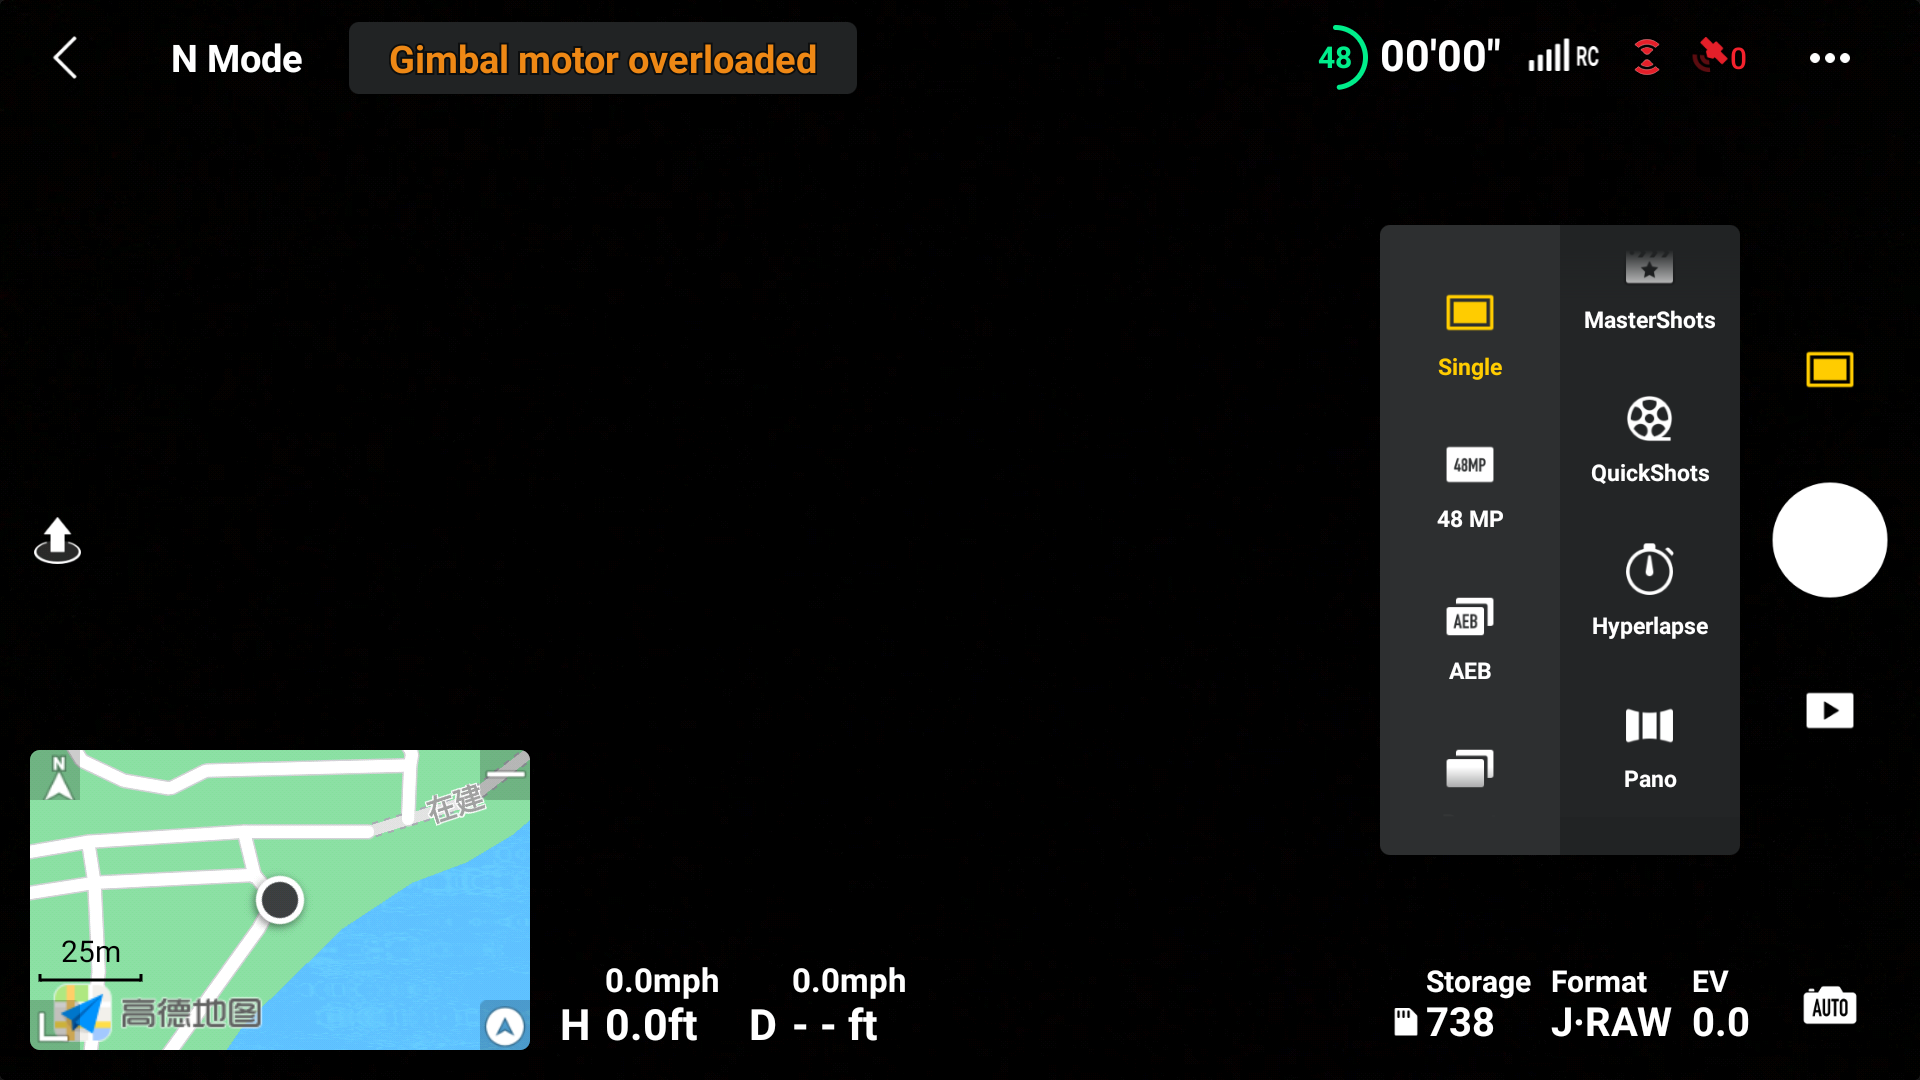
DJI Mini 3 Pro User Manual Camera View 1. Flight Mode N: Displays the current flight mode. 2. System Status Bar In Flight: Indicates the aircraft flight status and displays various warning messages. Tap to view more information when a warning prompt appears.
-
Page 56
USB mode and connect to a computer to use USB mode. To disable USB mode, restart the aircraft and disable USB mode in DJI Fly. In USB mode, the aircraft will disconnect from the remote controller. -
Page 57
DJI Mini 3 Pro User Manual About View device information, firmware information, app version, battery version, and more. 8. Shooting Modes Photo: Single, Burst Shooting, AEB, 48MP, or Timed Shot. Video: Normal, Slow Motion. Digital zoom is supported in normal video mode. -
Page 58
The app is designed to assist in your operations. Use your sound discretion and DO NOT rely on the app to control your aircraft. Your use of the app is subject to DJI Fly Terms of Use and DJI Privacy Policy. -
Page 59
Flight This section describes safe flight practices and flight restrictions. © 2022 DJI All Rights Reserved. -
Page 60: Flight
Flight Limits GEO (Geospatial Environment Online) System DJI’s Geospatial Environment Online (GEO) System is a global information system that provides real-time information on flight safety and restriction updates and prevents UAVs from flying in restricted airspace. Under exceptional circumstances, restricted areas can be unlocked to allow flights in. Prior to that, the user must submit an unlocking request based on the current restriction level in the intended flight area.
-
Page 61
Flight Altitude and Distance Limits Maximum flight altitude restricts an aircraft’s flight altitude, while maximum flight distance restricts an aircraft’s flight radius around the Home Point. These limits can be set using the DJI Fly app for improved flight safety. -
Page 62: Pre-Flight Checklist
Zones, which are further divided into Restricted Zones, Authorization Zones, Warning Zones, Enhanced Warning Zones, and Altitude Zones. Users can view such information in real time in DJI Fly. GEO Zones are specific flight areas, including but not limited to airports, large event venues, locations where public emergencies have occurred (such as forest fires), nuclear power plants, prisons, government properties, and military facilities.
-
Page 63: Starting/Stopping The Motors
2. Power on the remote controller and the aircraft. 3. Launch DJI Fly and enter the camera view. 4. Wait for the aircraft self-diagnostics to complete. If DJI Fly does not show any irregular warning, you can start the motors.
-
Page 64
1. The pre-flight checklist is designed to help you fly safely and shoot videos during flight. Go through the full pre-flight checklist before each flight. 2. Select the desired gimbal operation mode in DJI Fly. 3. It is recommended to take photos or record videos when flying in Normal or Cine mode. -
Page 65
Appendix © 2022 DJI All Rights Reserved. -
Page 66: Appendix
C Mode: 25° Max Angular Velocity S Mode: 130°/s by default (the adjustable range on DJI Fly is 20-250°/s) N Mode: 75°/s by default (the adjustable range on DJI Fly is 20-120°/s) C Mode: 30°/s by default (the adjustable range on DJI Fly is 20-60°/s) Operating Temperature -10°…
-
Page 67
DJI Mini 3 Pro User Manual Hovering Accuracy Range Vertical: Vision Positioning: ±0.1 m GNSS Positioning: ±0.5 m Horizontal: Vision Positioning: ±0.3 m High Accuracy System Positioning: ±0.5 m Transmission Video Transmission System Operating Frequency 2.400-2.4835 GHz, 5.725-5.850 GHz Transmitter Power (EIRP) 2.4 GHz: <26 dBm (FCC), <20 dBm (CE/SRRC/MIC) -
Page 68
DJI RC-N1 Remote Controller Transmission Video Transmission System When used with different aircraft hardware configurations, the DJI RC-N1 Remote Controller will automatically select the corresponding firmware version for updating, and support the following transmission technologies depending on the linked aircraft model: a. -
Page 69
DJI RC Remote Controller Transmission Video Transmission System When used with different aircraft hardware configurations, the DJI RC Remote Controller will automatically select the corresponding firmware version for updating. It supports the O3 transmission technology when linked with DJI Mini 3 Pro. -
Page 70
DJI Mini 3 Pro User Manual Supported microSD Cards for UHS-I Speed Grade 3 rating microSD card DJI RC Remote Controller Recommended microSD SanDisk Extreme 64GB V30 A1 microSDXC SanDisk Extreme 128GB V30 A2 microSDXC Cards for DJI RC Remote… -
Page 71
When DJI Mini 3 Pro stays in standby mode for a long time, its temperature may continuously rise. With a built-in temperature control system, the drone, when in standby mode can detect the current temperature and decide whether to automatically power off to prevent overheating. -
Page 72: Firmware Update
Using DJI Fly When connecting the aircraft or remote controller to DJI Fly, you will be notified if a new firmware update is available. To start updating, connect your remote controller or mobile device to the internet and follow the on-screen instructions.
-
Page 73: Aftersales Information
Before performing an update, make sure the Intelligent Flight Battery has at least 40% power and the remote controller 30%. Do not unplug the USB-C cable during an update. Aftersales Information Visit https://www.dji.com/support to learn more about aftersales service policies, repair services, and support. © 2022 DJI All Rights Reserved.
-
Page 74
This content is subject to change. Download the latest version from http://www.dji.com/mini-3-pro If you have any questions about this document, please contact DJI by sending a message to DocSupport@dji.com. is a trademark of DJI. Copyright © 2022 DJI All Rights Reserved.
Посмотреть инструкция для DJI Mini 3 Pro бесплатно. Руководство относится к категории дроны, 24 человек(а) дали ему среднюю оценку 9.1. Руководство доступно на следующих языках: русский. У вас есть вопрос о DJI Mini 3 Pro или вам нужна помощь? Задайте свой вопрос здесь
Не можете найти ответ на свой вопрос в руководстве? Вы можете найти ответ на свой вопрос ниже, в разделе часто задаваемых вопросов о DJI Mini 3 Pro.
Могу ли я запускать дрон в ближайших аэропортах?
Никогда не запускайте дрон вблизи аэропортов.
Может ли аккумулятор моего дрон взорваться?
Убедитесь, что аккумулятор вашего дрон не сильно нагревается, в этом случае вероятность взрыва аккумулятора очень мала.
Инструкция DJI Mini 3 Pro доступно в русский?
Да, руководствоDJI Mini 3 Pro доступно врусский .
Не нашли свой вопрос? Задайте свой вопрос здесь
-
Dji-Club
-
→
Файлы -
→
Документация -
→
Руководство пользователя DJI Mini 3 Pro — на русском языке
Загрузил
Информация
-
Загружен:
авг 12 2022 03:50 -
Последнее обновление:
авг 12 2022 04:41 -
Размер:
8,92МБ -
Просмотров:
6034 -
Скачан:
189


5 Голосов
DJI Mini 3 Pro
![]() 2
2
Не нашел в нете руководства пользователя по дрону DJI Mini 3 Pro на русском языке. Пришлось потратить свое время и перевести. Если кто может предложить более удачные формулировки в руководстве, то можно предлагать, готов скорректировать документ.
Что нового в этой версии 1.2 (Посмотреть все изменения)
- Добавлена поддержка FocusTrack, QuickShots (Dronie, Rocket, Circle, Helix и Boomerang) и Hyperlapse в портретном режиме, а также добавлен режим USB.
Так же вам могут быть интересны файлы
Случайные файлы
-
78
Всего файлов -
3
Всего категорий -
5
Всего авторов -
17 910
Всего загрузок -
Руководство пользователя DJI Mini 3 Pro — на русском языке
Последний файл -
NAlex
Последний автор
- Dji-Club
- → Файлы
- → Документация
- → Руководство пользователя DJI Mini 3 Pro — на русском языке
- Политика конфиденциальности
перейти к содержанию
![]()
![]()
![]() Краткое руководство v1.0
Краткое руководство v1.0
 https://s.dji.com/guidell
Mini 3 Pro Легкий и складной дрон с камерой
Перед первым использованием зарядите аккумулятор Intelligent Flight Battery, чтобы активировать его.
Проверьте уровень заряда батареи: нажмите один раз.
Включение / выключение питания: нажмите, затем нажмите и удерживайте.

Режим 2 |
 |
 https://Awww.dji.com/mini-3-pro/downloads
является торговой маркой компании Dul.
Copyright © 2022 DJI. Все права защищены.
YC.BZ.SS001944.01 WM162_Документы / Ресурсы