![]() МАВИК ЭЙР
МАВИК ЭЙР
Руководство по быстрому старту
Самолет
DJI™ MAVIC™Air отличается новой складной конструкцией и полностью стабилизированной 3-осевой карданной камерой, способной снимать видео 4K и фотографии с разрешением 12 мегапикселей. Фирменные технологии DJI, такие как предотвращение препятствий и интеллектуальные режимы полета, такие как SmartCapture, Panorama, Advanced Pilot Assistance Systems, QuickShot, ActiveTrack™, упрощают и упрощают съемку сложных снимков. Mavic Air может похвастаться максимальной скоростью полета 42.5 миль в час (68.4 км/ч) и максимальным временем полета* 21 минуты.

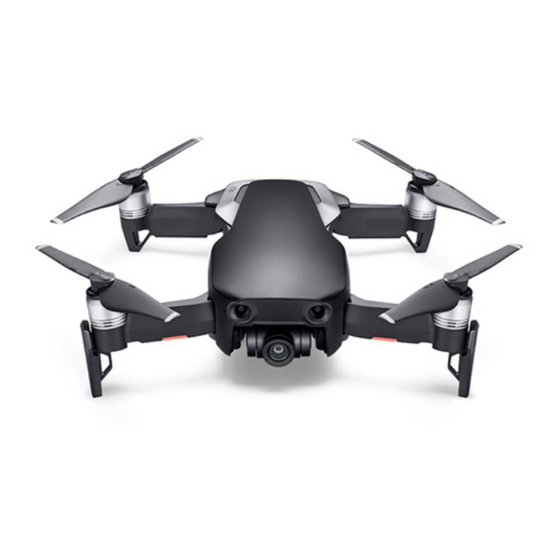
| 1. Система переднего обзора** | 10. Пряжки для батарей. |
| 2. Пропеллеры | 11. Система нижнего обзора** |
| 3. Моторы | 12. Антенны GPS |
| 4. Подвес и камера | 13. Вентс |
| 5. Передние светодиоды. | 14. Порт USB-C |
| 6. Шасси (встроенные антенны) | 15. Слот для карты Micro SD камеры. |
| 7. Кнопка питания | 16. Индикатор состояния дрона/функциональная кнопка |
| 8. Светодиоды уровня заряда батареи. | 17. Система заднего обзора** |
| 9. Интеллектуальная летная батарея |
* Максимальное время полета было проверено при нулевом ветре на постоянной скорости 0 миль/ч (15.5 км/ч). Это значение следует использовать только для справки.
** На работу систем переднего, нижнего и заднего обзора влияют окружающие условия. Прочтите Заявление об отказе от ответственности и Руководство по технике безопасности, а также просмотрите обучающее видео в приложении DJI GO 4 или на официальном сайте DJI. webсайт, чтобы узнать больше. http://www.dji.com/mavic-air
Пульт дистанционного управления
В пульт дистанционного управления встроена усовершенствованная технология DJI Wi-Fi, обеспечивающая максимальную дальность передачи 2.49 км и видео с дрона в приложение DJI GO™ 4 на вашем мобильном устройстве с разрешением до 4p на близком расстоянии. и 1080p на больших расстояниях. Съемные джойстики облегчают хранение пульта дистанционного управления. Mavic Air также поддерживает полеты на вашем телефоне с помощью виртуальных джойстиков. Максимальное время работы: 720 часа*
| 1. Антенны | 7. Переключатель режима полета. |
| 2. Индикатор состояния | 8. Порт USB / Assistant Video Link |
| 3. Кнопка возврата домой | 9. Светодиоды уровня заряда батареи. |
| 4. Зарядка/основной порт видеосвязи (Micro USB) | 10. Кнопка питания |
| 5. Джойстики управления | 11. Функциональная кнопка |
| 6. Кнопка паузы полета. | 12. Мобильное устройство Clamp |

* Пульт дистанционного управления может достигать своего максимального расстояния передачи (FCC) на широком открытом пространстве без электромагнитных помех и на высоте около 400 футов (120 метров).
Максимальное время работы проверено в лабораторных условиях, только для справки.
Загрузка приложения DJI GO 4 и просмотр обучающих видео
Найдите «DJI GO 4» в App Store или Google Play или отсканируйте QR-код, чтобы загрузить приложение на свое мобильное устройство.
 http://m.dji.net/djigo4
Смотрите обучающие видео на www.dji.com/mavic-air или в приложении DJI GO 4, коснувшись значка в правом верхнем углу экрана.
 https://www.dji.com/mavic-air/info#video
![]() DJI GO 4 поддерживает iOS 9.0 (или более позднюю версию) или Android 4.4 (или более позднюю версию).
DJI GO 4 поддерживает iOS 9.0 (или более позднюю версию) или Android 4.4 (или более позднюю версию).
Подготовка самолета
 |
|||
| Снимите защиту стабилизатора с камеры. |
Разложите задние рычаги. | Разложите передние рычаги и шасси. | развернувшиеся |
Рекомендуется установить защиту пропеллера при полете в начальном режиме или в помещении для обеспечения большей безопасности. Дополнительные сведения см. в руководстве пользователя Mavic Air Propeller Guards.
 Рекомендуется прикреплять защиту стабилизатора, когда коптер не используется. Убедитесь, что стабилизатор находится в горизонтальном положении при установке или снятии защитного кожуха.
- Перед использованием убедитесь, что шасси правильно разложено. В противном случае встроенная антенна может быть повреждена, что приведет к серьезным проблемам с видеоканалом. Убедитесь, что вы складываете шасси, прежде чем складывать рычаги коптера.
Зарядка батарей
Используйте прилагаемое зарядное устройство, чтобы полностью зарядить батарею Intelligent Flight Battery перед первым использованием.

Снимите батарею Intelligent Flight Battery с коптера.

Подключите Intelligent Flight Battery к зарядному устройству через порт, как показано выше.
Время зарядки аккумулятора Intelligent Flight Battery:
53 минуты в окружающей среде при температуре от 15° до 40° C; 1 час 40 минут при температуре окружающей среды от 5° до 15° C.
Время зарядки пульта дистанционного управления: 2.5 часа
После полной зарядки вставьте батарею Intelligent Flight Battery в коптер до щелчка, убедившись, что батарея надежно закреплена на месте.
Дополнительный концентратор для зарядки аккумуляторов может одновременно заряжать до четырех аккумуляторов. Пожалуйста, посетите официальный интернет-магазин DJI, чтобы узнать больше.
Отсоедините кабель пульта дистанционного управления перед зарядкой. Подключите прилагаемый кабель связи с USB-адаптером к зарядному устройству.
Проверьте уровень заряда батареи и включение/выключение питания
 |
|
| Нажмите один раз, чтобы проверить уровень заряда батареи. Нажмите один раз, затем еще раз и удерживайте для включения / выключения. | Нажмите кнопку питания один раз, чтобы проверить текущий уровень заряда батареи. Нажмите один раз, затем еще раз и удерживайте, чтобы включить/выключить пульт дистанционного управления. |
Подготовка пульта дистанционного управления
 |
||
| Разложите антенны и мобильное устройство clamps, затем прикрепите ручки управления. | Вставьте один конец кабеля пульта дистанционного управления в разъем на боковой стороне пульта дистанционного управления. | Подключите мобильное устройство к clamps. |

- Убедитесь, что ручки управления надежно закреплены.
- Кабель пульта дистанционного управления с разъемом Lightning установлен по умолчанию. Используйте соответствующий кабель для вашего мобильного устройства для подключения к пульту дистанционного управления.
- При использовании iPad или планшета используйте порт USB на пульте дистанционного управления.
- Не используйте порты Micro USB и USB одновременно для подключения видео. Отключите один порт от устройства видеосвязи, если другой порт используется.
Подготовка к взлету
 |
||
| Включите пульт дистанционного управления | Включите самолет | Запустите приложение DJI GO 4. |
![]() Используйте свою учетную запись DJI для активации коптера. Для активации требуется подключение к Интернету.
Используйте свою учетную запись DJI для активации коптера. Для активации требуется подключение к Интернету.
Авиабилет
Перед взлетом убедитесь, что в строке состояния дрона в приложении DJI GO 4 отображается сообщение «Готов к работе».
Готов к работе (GPS)
![]() Двигатели можно остановить только в полете, когда полетный контроллер обнаружит критическую ошибку.
Двигатели можно остановить только в полете, когда полетный контроллер обнаружит критическую ошибку.
Работа с пультом дистанционного управления
Управление полетом по умолчанию известно как режим 2. Левый джойстик управляет высотой и курсом дрона, а правый джойстик управляет его движением вперед, назад, влево и вправо.
движения. Регулятор подвеса управляет наклоном камеры.

![]() Нажмите кнопку Flight Pause для экстренного торможения во время полета.
Нажмите кнопку Flight Pause для экстренного торможения во время полета.
- Управление полетом с помощью виртуальных джойстиков на мобильном устройстве через Wi-Fi

- Включите самолет.
- Нажмите и удерживайте функциональную кнопку на дроне в течение четырех секунд, пока не услышите двойной звуковой сигнал, означающий переключение в режим управления по Wi-Fi.
- Запустите приложение DJI GO 4 и коснитесь значка в правом верхнем углу экрана. Затем отсканируйте QR-код Wi-Fi на передней панели, чтобы начать соединение.
- Коснитесь Автовзлет.
- Теперь вы можете управлять самолетом с помощью сенсорного управления с помощью виртуальных джойстиков.
- Включите Wi-Fi на своем мобильном устройстве и введите пароль Wi-Fi, указанный на дроне, чтобы подключиться к сети Mavic Air, если по какой-либо причине вы не можете отсканировать QR-код.
- При использовании Wi-Fi на широкой открытой площадке без электромагнитных помех дальность передачи составляет примерно 262 фута (80 м) на высоте 164 фута (50 м).
- Связывание требуется при переключении обратно в режим удаленного управления. Частота Wi-Fi вашего мобильного устройства может быть установлена на 2.4 ГГц или 5 ГГц. Установите для Wi-Fi частоту 5 ГГц, чтобы избежать помех. После подключения к Mavic Air вы можете изменить пароль Wi-Fi или сбросить подключение к Wi-Fi. (Дополнительную информацию см. в руководстве пользователя.)
В приложении DJI GO 4

- Посмотрите руководство в приложении DJI GO 4 или на официальном сайте DJI. webсайт, чтобы узнать больше.
- Перед взлетом всегда устанавливайте подходящую высоту возврата домой. Когда дрон возвращается в исходную точку, вы должны направлять его с помощью джойстиков.
Fly Safe

Избегайте полетов над препятствиями, толпами и рядом с ними, а также над ними.tagЛинии электропередач, деревья или водоемы.
НЕ летайте рядом с сильными электромагнитными источниками, такими как линии электропередач и базовые станции, поскольку это может повлиять на работу бортового компаса.

НЕ используйте дрон в неблагоприятных погодных условиях, таких как дождь, снег, туман и скорость ветра, превышающая 10 м/с или 22 мили в час.
![]() Чтобы обеспечить безопасность как вас, так и окружающих, важно понимать основные правила полета. Не забудьте прочитать Заявление об отказе от ответственности и правила техники безопасности.
Чтобы обеспечить безопасность как вас, так и окружающих, важно понимать основные правила полета. Не забудьте прочитать Заявление об отказе от ответственности и правила техники безопасности.
Характеристики
| Вес | 430 гр |
| Макс. скорость | 42.5 mph (68.4 kph) в спортивном режиме без ветра |
| Максимальное время полета | 21 минут (при нулевом ветре при постоянной скорости 0 миль/ч (15.5 км/ч)) |
| Рабочая Температура | 32 ° до 104 ° F (0 ° до 40 ° C) |
| GNSS | GPS / ГЛОНАСС |
| Рабочая частота | 2.4-2.4835 ГГц; 5.725-5.850 ГГц |
| Мощность передатчика | 2.4 ГГц: 28 дБм (FCC), 19 дБм (CE), 19 дБм (SRRC), 19 дБм (MIC) 5.8 ГГц: 31 дБм (FCC), 14 дБм (CE), 27 дБм (SRRC) |
карданный подвес
| Контролируемый диапазон | Шаг: от -90° до +0° (настройки по умолчанию) от -90° до +17° (расширенный) |
камера
| датчик | CMOS |
| Максимальный размер изображения | 4056 × 3040 |
| Режимы фотосъемки | Одиночный выстрел HDR Серийная съемка: 3/5/7 кадров Автоматический брекетинг экспозиции (AEB): 3 / 5 с рамками в 0.7 EV Bias Интервал: 2 / 3 / 5 / 7 / 10 / 15 / 20 / 30 / 60 с Панорама (3×1, 3×3, 3×7, Сфера) |
| Режимы видеозаписи | 4K Ультра HD: 3840×2160 24/25/30p 2.7K: 2720 × 1530 24/25/30/48/50/60p FHD: 1920 × 1080 24/25/30/48/50/60/120p |
| Битрейт видео хранилища | 100 Mbps |
| Фото | JPEG, DNG |
| Видео | MP4, MOV (MPEG-4 AVC/H.264) |
| Поддерживаемые SD-карты | микроSD. Требуется класс 10 или UHS-1. |
Пульт дистанционного управления
| Габаритные размеры: | 143.9×78.3×61.2 мм (в сложенном виде) |
| Рабочая частота | 2.4-2.4835 ГГц; 5.725-5.850 ГГц |
| Максимальное расстояние передачи | 2.4 ГГц: FCC: 2.5 мили (4 км); CE/SRRC/MIC: 1.2 мили (2 км) 5.8 ГГц: FCC: 2.5 мили (4 км); CE: 0.3 мили (0.5 км) SRRC: 1.6 мили (2.5 км) (беспрепятственный и свободный от помех) |
| Рабочая Температура | 32 ° до 104 ° F (0 ° до 40 ° C) |
| Батарея | 2970 мАч |
| Мощность передатчика | 2.4 ГГц: 26 дБм (FCC), 18 дБм (CE), 18 дБм (SRRC), 18 дБм (MIC) 5.8 ГГц: 30 дБм (FCC), 14 дБм (CE), 26 дБм (SRRC) |
| Рабочий объемtage | 1000 мА при 3.7 В |
| Поддерживаемое мобильное устройство Размер |
Поддерживаемая толщина: 6.5–8.5 мм, максимальная длина: 160 мм Поддерживаемые типы портов USB: Lightning, Micro USB (Type-B), USB-C |
Адаптер питания
| Voltage | 13.2 V |
| Номинальная мощность | 50 W |
Интеллектуальная батарея полета
| Пропускная способность | 2375 мАч |
| Voltage | 11.55 В, макс. 13.2 В |
| Тип батареи | LiPo 3S |
| Энергия | 27.43 Wh |
| вес нетто | Прибл. 140 g |
| Температура зарядки Диапазон |
41 ° до 104 ° F (5 ° до 40 ° C) |
| Максимальная зарядная мощность | 60 W |
Для получения дополнительной информации прочтите руководство пользователя:
http://www.dji.com/mavic-air
※ Это содержание может быть изменено без предварительного уведомления.
MAVIC является товарным знаком DJI.
© DJI, 2018.Все права защищены.
Разработан DJI.
www.dji.com
Напечатано в Чипа.
Документы / Ресурсы
Рекомендации
- Manuals
- Brands
- dji Manuals
- Drones
- mavic
- User manual
-
Contents
-
Table of Contents
-
Bookmarks
Quick Links
MAVIC AIR
User Manual
v1.0
2018.01
Related Manuals for dji MAVIC AIR
Summary of Contents for dji MAVIC AIR
-
Page 1
MAVIC AIR User Manual v1.0 2018.01… -
Page 2: Using This Manual
Quick Start Guide and refer to this Mavic Air User Manual for more details. Video Tutorials Go to the address below or scan the QR code on the right to watch the Mavic Air tutorial videos, which demonstrate how to use the Mavic Air safely: http://www.dji.com/mavic-air/info#video…
-
Page 3: Table Of Contents
Contents Using This Manual Legend Read Before the First Flight Video Tutorials Download the DJI GO 4 App Download DJI Assistant 2 Product Profile Introduction Feature Highlights Preparing the Mavic Air Aircraft Diagram Remote Controller Diagram Activation Aircraft Flight Modes…
-
Page 4
Flight Flight Environment Requirements Flight Limits and GEO Zones Preflight Checklist Auto Takeoff and Auto Landing Starting/Stopping the Motors Flight Test Appendix Specifications Calibrating the Compass Firmware Updates After-Sales Information © 2018 DJI All Rights Reserved. -
Page 5
Product Profile This section introduces the Mavic Air and lists the components of the aircraft and remote controller. © 2018 DJI All Rights Reserved. -
Page 6: Product Profile
Feature Highlights Camera and Gimbal: With the Mavic Air, you are able to shoot 4K video at up to 30 frames per second and capture 12 megapixel photos that look crisp and clear, all stabilized by the onboard 3-axis gimbal.
-
Page 7
3. For safety reasons it is recommended that the propeller guards are mounted when flying in Beginner Mode or indoors. Refer to the Mavic Air Propeller Guards User Guide to learn more. It is recommended that the gimbal protector be attached when the aircraft is not in use. -
Page 8: Aircraft Diagram
Mavic Air User Manual Aircraft Diagram 1. Forward Vision System 2. Propellers 3. Motors 4. Front LEDs 5. Landing Gear (with built-in antennas) 6. Gimbal and Camera 7. GPS Antennas 8. Vents 9. USB-C Port 10. Camera microSD Card Slot 11.
-
Page 9: Activation
Activation The Mavic Air requires activation before first time use. Follow the steps below to activate the Mavic Air using the DJI GO 4 app: 1. Connect your mobile device to the remote controller and then launch DJI GO 4.
-
Page 10
Aircraft This section introduces the flight controller, Forward, Backward and Downward Vision Systems, and the Intelligent Flight Battery. © 2018 DJI All Rights Reserved. -
Page 11: Aircraft
Flight Battery. Refer to the aircraft diagram in the Product Profile section. Flight Modes The Mavic Air has two flight modes that users can select, plus a third flight mode that the aircraft falls back to in certain circumstances: P-mode (Positioning): P-mode works best when the GPS signal is strong. The aircraft utilizes GPS and the Vision Systems to locate itself, stabilize, and navigate between obstacles.
-
Page 12: Aircraft Leds And Status Indicator
Mavic Air User Manual Aircraft LEDs and Status Indicator The Mavic Air has Front LEDs and an Aircraft Status Indicator. The positions of these LEDs are shown in the figure below: Front LED Front LED Aircraft Status Indicator The Front LEDs show the orientation of the aircraft and the status of some of the functions (refer to the function sections for more details).
-
Page 13: Return To Home
This procedure cannot be cancelled. If there is danger of collision occurring, push the throttle up and try to navigate away. If the battery level is sufficient the battery level indicator bar in the DJI GO 4 app displays the estimated remaining flight time based on current battery level.
-
Page 14
Mavic Air User Manual If a battery level warning appears, take action as described in the table below. RTH and Battery Level Warnings Aircraft Status Remote Warning DJI GO 4 App Remarks/Instructions Indicator Controller Tap “Go-home” to have the aircraft return to the… -
Page 15
If the aircraft is between 5 m and 20 m from the Home Point: i. If the RTH at Current Altitude option is enabled (the default setting in DJI GO 4) the aircraft flies to the Home Point at the current altitude, unless the current altitude is less than 2.5 m, in which case the aircraft ascends to 2.5 m and then flies to the Home Point. -
Page 16: Vision Systems
1. When Landing Protection determines that the ground is suitable for landing, the Mavic Air will land gently. 2. If Landing Protection determines that the ground is not suitable for landing, the Mavic Air will hover and wait for pilot confirmation.
-
Page 17
Calibrating Vision System Cameras The Forward, Backward, and Downward Vision System cameras installed on the aircraft are factory- calibrated, but may require calibration via DJI Assistant 2 or the DJI GO 4 app if the aircraft is subjected to an impact. -
Page 18
Mavic Air User Manual Using the Vision Systems The Downward Vision System is activated automatically when the aircraft is turned on. No further action is required. Using the Downward Vision System, the aircraft can hover precisely even without GPS. The Downward Vision System is typically used in indoor environments where GPS is unavailable. The Downward Vision System works best when the aircraft is at altitudes of 1.6 to 26 ft (0.5 to 8 m). -
Page 19: Intelligent Flight Modes
QuickShots shooting modes include Dronie, Circle, Helix, Rocket, Boomerang, and Asteroid. The Mavic Air records a video according to the selected shooting mode and then automatically generates a 10-second video. The video can then be viewed, edited, or shared to social media from the playback menu.
-
Page 20
When using QuickShots, the aircraft cannot avoid obstacles automatically. Only use QuickShots in wide open areas. Exiting QuickShots in DJI GO 4 or toggle the Flight Mode switch to S-mode to exit QuickShots anytime during shooting. Press the Flight Pause button on the remote controller for emergency breaking. ActiveTrack ActiveTrack allows you to mark and track several moving objects on your mobile device’s screen. -
Page 21
Use the roll stick during flight. The remote controller controller or the slider in DJI on the remote control to fly in a can be used to maneuver the GO 4 to fly in a circle around circle around the subject. -
Page 22
Deep learning gesture recognition allows you to take selfies, record videos, and control the aircraft using simple hand gestures. The Mavic Air features brand new modes like GestureLaunch, Follow, and GestureLand. (Note: Aircraft firmware v1.0.1.0 or higher is required to use SmartCapture.) -
Page 23
Mavic Air User Manual b) If the aircraft is already airborne, raise and extend your arm and position your palm about 6.6 ft (2 m) in front of the aircraft’s nose. Keep your palm open and your fingers close together. After about two seconds the Front LEDs will blink green slowly to indicate that PalmControl has been activated. -
Page 24
Mavic Air User Manual Follow Drop your hand towards the floor to activate Follow. Once Follow is activated, the front LEDs will turn solid green. As you move your body, the Front LEDs solid aircraft will follow you automatically. Whilst Follow… -
Page 25
Mavic Air User Manual Tripod Mode in the DJI GO 4 app to select Tripod mode. In Tripod mode, the maximum flight speed is limited to 2.2 mph (3.6 kph). Responsiveness to stick movements is also reduced for smoother, more controlled movements. -
Page 26
Mavic Air User Manual 3. Tap once on the target and wait for the “GO” button to appear. Tap the “GO” button to confirm the selection and the aircraft will fly to the target automatically. A prompt will appear if the target cannot be reached. -
Page 27: Advanced Pilot Assistance Systems
When APAS is enabled, pressing the Flight Pause button on the remote controller or tapping the DJI GO 4 app brings the aircraft to a stop. The aircraft will hover for three seconds and await pilot commands.
-
Page 28: Intelligent Flight Battery
Before carrying Intelligent Flight Batteries on an airline flight, they must be discharged to 30% or lower. This can be done by flying your Mavic Air outdoors until there is less than 30% charge left or until the Intelligent Flight Battery no longer turns on.
-
Page 29
2. Batteries cannot be used in extremely low temperature (< 14° F (-10° C)) environments. 3. End the flight as soon as the DJI GO 4 app displays the low battery level warning in low temperature environments. 4. To ensure optimal performance of the battery, keep the battery temperature above 68° F (20° C). -
Page 30
(41° to 104° F (5° to 40° C)). The ideal charging temperature is 71.6° to 82.4° F (22° to 28° C). The optional Battery Charging Hub can charge up to four batteries. Please visit the official DJI Online Store to learn more. -
Page 31
Power button to turn the battery off, unplug the battery from the AC power adapter, and then plug it back in to resume charging. DJI does not take any responsibility for damage caused by third-party AC power adapters. Inserting the Intelligent Flight Battery Insert the Intelligent Flight Battery into the aircraft’s battery compartment, making sure that it is mounted… -
Page 32: Gimbal And Camera
Use the gimbal dial on the remote controller to control camera tilt. Alternatively, in DJI GO 4, go to Camera View, press and hold on the screen until a blue circle appears, and drag the circle up and down to control camera tilt.
-
Page 33
Camera microSD Card Slot The Mavic Air comes with 8 GB of internal storage, and it also supports using a microSD card to store your photos and videos. A UHS-1 microSD card is required due to the fast read and write speeds required for high-resolution video data. -
Page 34: Remote Controller
Remote Controller This section describes the features of the remote controller and includes instructions for controlling the aircraft and the camera. © 2018 DJI All Rights Reserved.
-
Page 35: Remote Controller
Built into the remote controller is DJI’s enhanced Wi-Fi technology, enabling a maximum transmission distance of 2.49 miles (4 km)* and downlinking of 720p video from the aircraft to the DJI GO 4 app on your mobile device. The detachable control sticks make the remote controller easier to store. Maximum remote controller battery life is approximately 3 hours**.
-
Page 36
DJI GO 4 app. The default mode is Mode 2. In each of the three pre-programmed modes the Mavic Air hovers in place at a constant orientation when both sticks are centered. Pushing a control stick away from the center position performs the functions show in the figure below. -
Page 37
Mavic Air User Manual The figure below explains how to use each control stick, using Mode 2 as an example. Remote Aircraft Controller Remarks Indicates Nose Direction) (Mode 2) Moving the left stick up or down changes the aircraft’s altitude. Push the stick up to ascend and down to descend. -
Page 38: Optimal Transmission Zone
Refer to the Return to Home section for more information about RTH. Function Button and Customizable Button The functions of the Function button and Customizable button are set in the DJI GO 4 app. Optimal Transmission Zone The signal between the aircraft and the remote controller is most reliable when the antennas are positioned in relation to the aircraft as depicted below.
-
Page 39: Linking The Remote Controller
Mavic Air User Manual Linking the Remote Controller Remote controllers that are bought together with a Mavic Air are linked before shipment. To link a remote controller to a Mavic Air, follow the instructions below: 1. Power on the aircraft and the remote controller.
-
Page 40
DJI GO 4 App This section introduces the main functions of the DJI GO 4 app. © 2018 DJI All Rights Reserved. -
Page 41: Dji Go 4 App
4. Flight Mode : The text next to this icon indicates the current flight mode. Tap to configure the Flight Controller settings. These settings allow you to modify flight limits and set gain values. © 2018 DJI All Rights Reserved.
-
Page 42
: Tap to enter the Camera Settings menu. to set the camera’s ISO, shutter, and auto exposure settings. to select picture shooting modes. The Mavic Air supports Single Shot, Burst Shot, Interval Shot, and various Panorama modes. Panorama supports four shooting sub-modes and can capture and generate 32 megapixel sphere panorama photos. -
Page 43: Editor
SkyPixel View and share the photos and videos in the SkyPixel page. If you already have a DJI account, you will be able to participate in forum discussions, and share your creation with the community. ©…
-
Page 44: Controlling The Aircraft With A Mobile Device
3. Launch the DJI GO 4 app and tap the icon in the top right corner of the screen. Next, scan the Wi-Fi QR Code on the aircraft to start the connection procedure.
-
Page 45
Mavic Air User Manual Left Right The area beyond the white circles is also responsive to control commands. © 2018 DJI All Rights Reserved. -
Page 46
Flight This section describes safe flight practices and flight restrictions. © 2018 DJI All Rights Reserved. -
Page 47: Flight
The flight altitude and distance limits may be changed in the DJI GO 4 app. The maximum flight altitude setting cannot exceed 1640 ft (500 m). Based on these settings, your Mavic Air will fly in a restricted cylinder, as shown below:…
-
Page 48: Preflight Checklist
Fly the aircraft only within your line of sight. GEO Zones All GEO Zones are listed on the DJI official website at http://www.dji.com/flysafe. GEO Zones are divided into different categories and include locations such as airports, flying fields where manned aircraft operate at low altitudes, borders between countries, and sensitive locations such as power plants.
-
Page 49: Auto Takeoff And Auto Landing
2. If conditions are safe for landing condition slide the slider to confirm and the aircraft will commence the auto landing procedure. Warnings will appear in the DJI GO 4 app if the aircraft detects that conditions are not suitable for landing. Be sure to respond promptly.
-
Page 50: Flight Test
If the Aircraft Status Indicator blinking red slowly or quickly during flight a low battery level warning or critically low battery level warning has occurred. Watch the Mavic Air video tutorials to learn more about takeoff/landing procedures. Video Suggestions and Tips 1.
-
Page 51
Mavic Air User Manual 4. Always fly in good weather and avoid flying in rain or wind. 5. Choose the camera settings that suit your needs. Settings include photo format and exposure compensation. 6. Perform flight tests to establish flight routes and preview scenes. -
Page 52
Appendix © 2018 DJI All Rights Reserved. -
Page 53: Appendix
Operating Range 1.6 to 98 ft (0.5 to 30 m) Operating Environment Surfaces with diffuse reflection material, size > 20×20 mm and reflectivity > 20% (such as wall, trees, humans), adequate lighting (> 15 lux) © 2018 DJI All Rights Reserved.
-
Page 54
Mavic Air User Manual Directions Forward/Backward/Downward Forward: Horizontal: 50°, Vertical: 38° Backward: Horizontal: 50°, Vertical: 38° Downward: Front and Back: 67°, Left and Right: 53° Sensing Range Forward: Precision Measurement Range: 0.5-12 m Detectable Range: 12-24 m Backward: Precision Measurement Range: 0.5-10 m… -
Page 55: Calibrating The Compass
1. Flying at a location farther than 31 miles (50 km) away from the last flight location. 2. The aircraft has not been flown for more than 30 days. 3. A compass interference warning appears in the DJI GO 4 app and/or the Aircraft Status Indicator blinks alternating red and yellow quickly.
-
Page 56
Calibration Procedure Choose an open area to carry out the following procedure. 1. Tap the System Status Bar in the DJI GO 4 app and select “Calibrate”, then follow the on-screen instructions. 2. Hold the aircraft horizontally and rotate it 360 degrees. The Aircraft Status Indicator will turn solid green. -
Page 57: Firmware Updates
Using DJI GO 4 When you connect the aircraft or remote controller to the DJI GO 4 app you will be notified if a new firmware update is available. To start updating, connect your mobile device to the Internet and follow the on-screen instructions.
-
Page 58
This content is subject to change. Download the latest version from http://www.dji.com/mavic-air If you have any questions about this document, please contact DJI by sending a message to DocSupport@dji.com. MAVIC is a trademark of DJI. Copyright © 2018 DJI All Rights Reserved.
This manual is also suitable for:
Mavic air
Посмотреть инструкция для DJI Mavic Air бесплатно. Руководство относится к категории дроны, 23 человек(а) дали ему среднюю оценку 8.2. Руководство доступно на следующих языках: английский. У вас есть вопрос о DJI Mavic Air или вам нужна помощь? Задайте свой вопрос здесь
Не можете найти ответ на свой вопрос в руководстве? Вы можете найти ответ на свой вопрос ниже, в разделе часто задаваемых вопросов о DJI Mavic Air.
Могу ли я запускать дрон в ближайших аэропортах?
Никогда не запускайте дрон вблизи аэропортов.
Может ли аккумулятор моего дрон взорваться?
Убедитесь, что аккумулятор вашего дрон не сильно нагревается, в этом случае вероятность взрыва аккумулятора очень мала.
Какая высота DJI Mavic Air?
DJI Mavic Air имеет высоту 64 mm.
Какая ширина DJI Mavic Air?
DJI Mavic Air имеет ширину 184 mm.
Какая толщина DJI Mavic Air?
DJI Mavic Air имеет толщину 168 mm.
Инструкция DJI Mavic Air доступно в русский?
Да, руководствоDJI Mavic Air доступно врусский .
Не нашли свой вопрос? Задайте свой вопрос здесь