В настоящий момент изучаю семейство Аэробусов. Нашел много разного материала и мануалов (исключительно на английском), но ваше внимание хочу обратить на великолепную работу Павла (DOB117) Козловского по A320 Wilco. На его создание ушло более года. Забрать мануал можно здесь.
Вот содержание данной работы:
Введение
ГЛАВА 1.      Матчасть
ГЛАВА 2.      Общие положения, начало планирования рейса
ГЛАВА 3.      Загрузка на стоянке
ГЛАВА 4.      Предполетная подготовка
ГЛАВА 5.      Продолжение предполетной подготовки. Расчет топлива
ГЛАВА 6.      Расчет взлетных параметров
ГЛАВА 7.      Буксировка и запуск
ГЛАВА 8.      Руление
ГЛАВА 9.      Взлет
ГЛАВА 10.     Набор высоты
ГЛАВА 11.     Полет на эшелоне
ГЛАВА 12.     Снижение
ГЛАВА 13.     Заход на посадку
ГЛАВА 14.     Посадка
ГЛАВА 15.     Руление на стоянку и послеполетные работы
ПРИЛОЖЕНИЕ 1. Normal Check List
Об авторе
This entry was posted on 25.08.2011, 13:52 and is filed under Мануалы, статьи и др.. You can follow any responses to this entry through RSS 2.0.
Вы можете оставить отзыв или обратную ссылку с вашего сайта.
00:00:01
![]()
привет всем любителям авиасимуляторов
00:00:04
![]()
виртуальной авиации приветствую вас на
00:00:06
![]()
своем канале и в этом видео я вам покажу
00:00:09
![]()
как правильно и быстро заполнить им
00:00:11
![]()
сидела на примере самолета airbus a320
00:00:14
![]()
microsoft flight simulator и в этом
00:00:16
![]()
видео мы разберем самое главное функциям
00:00:19
![]()
сидел которые понадобятся вам для полета
00:00:22
![]()
если вы летаете в других авиасимуляторах
00:00:24
![]()
на самолетах airbus то это видео также
00:00:27
![]()
для вас будет полезным и
00:00:31
![]()
так мы в кабине самолета airbus a320 это
00:00:35
![]()
у нас бесплатная модель от flywire
00:00:38
![]()
находимся мы в берлине аэропорт
00:00:40
![]()
бранденбург условно полетим на в город
00:00:42
![]()
вену и прежде чем мы начнем нам
00:00:45
![]()
понадобится полетный план который я уже
00:00:47
![]()
составил на сайте 7 бриф точка ком
00:00:51
![]()
на земли ты довольно быстро и удобно
00:00:53
![]()
делать полетные планы так же у вас есть
00:00:55
![]()
маршрут вся нужная вам информация и
00:00:57
![]()
также всем прив интегрирован уже в эту в
00:01:00
![]()
эту модель самолета поэтому использовать
00:01:01
![]()
мы будем 7 гриф ссылку на него оставлю в
00:01:04
![]()
описании а также на другие сервисы где
00:01:06
![]()
вы можете планировать маршрут итак
00:01:09
![]()
давайте перейдем к семью который
00:01:12
![]()
находится на нижней панели и у нас
00:01:15
![]()
с левой и с правой
00:01:18
![]()
стороны от дисплея у нас расположены
00:01:21
![]()
клавиши
00:01:22
![]()
называются они lines and keys от каждой
00:01:26
![]()
этой клавиши есть указатель который
00:01:28
![]()
указывает на соответствующую строку куда
00:01:31
![]()
мы будем наносить информацию или
00:01:33
![]()
выбирать из них информацию дальше в
00:01:36
![]()
нижней части у нас меню самого им сидию
00:01:38
![]()
справа у нас кнопка или клавиша
00:01:42
![]()
регулировки яркости дисплея и дальше у
00:01:45
![]()
нас обычно клавиатур нижней части у нас
00:01:49
![]()
есть клавиша space то есть пробел потом
00:01:52
![]()
клавишу overfly которая пока не работает
00:01:54
![]()
microsoft flight simulator и и клавиша
00:01:57
![]()
клео то есть удаление информации
00:02:01
![]()
итак microsoft flight simulator и есть
00:02:03
![]()
условно два варианта заполнением сиди а
00:02:06
![]()
первый вариант мы заполняем все вручную
00:02:09
![]()
то есть вводим всю информацию вручную и
00:02:11
![]()
второй вариант часть информации из 7
00:02:15
![]()
бритвам мы можем через datalink
00:02:17
![]()
перенести уже сама семью мы рассмотрим
00:02:21
![]()
эти два варианта и начнем с более
00:02:23
![]()
сложного то есть будем вводить всю
00:02:26
![]()
информацию вручную
00:02:28
![]()
итак в первую очередь если вы делали
00:02:32
![]()
полетный план не носил брифе вам
00:02:35
![]()
понадобится
00:02:37
![]()
указать загрузку самолета количество
00:02:39
![]()
пассажиров также топлива
00:02:41
![]()
этого делать мы не будем почему расскажу
00:02:45
![]()
во второй части видео поскольку это нам
00:02:48
![]()
не понадобится потом
00:02:50
![]()
итак для того чтобы не запутаться и
00:02:55
![]()
правильной быстро заполнить им сидию
00:02:57
![]()
есть такое сокращение div ribs где буква
00:03:01
![]()
д это у нас дата то есть статус нашего
00:03:03
![]()
самолета или все информационная панель
00:03:06
![]()
вторая буква и это у нас страницей
00:03:09
![]()
который мы заполняем дальше у нас буква
00:03:12
![]()
i to the flight plan потом буквар от nav
00:03:16
![]()
или буква р это роднов вторая буква и
00:03:18
![]()
это страницы не бен потом буква по это
00:03:22
![]()
прогресс вторая буква по это performance
00:03:25
![]()
и с это цикл дарит лайки если вы будете
00:03:28
![]()
следовать этому условному сокращению вы
00:03:31
![]()
ничего не пропустите и быстро заполнить
00:03:34
![]()
он сидел и так давайте начинать и
00:03:37
![]()
переходим мы
00:03:39
![]()
в data и
00:03:42
![]()
статус нашего самолета
00:03:44
![]()
здесь у нас указано тип данного самолета
00:03:48
![]()
двигатели которые установлены на данный
00:03:51
![]()
самолет и что для нас здесь очень важно
00:03:54
![]()
это надо ты которые обновляются каждые
00:03:59
![]()
28 дней
00:04:01
![]()
microsoft flight simulator и они
00:04:04
![]()
изменяются с каждым обновлением самого
00:04:07
![]()
симулятора если у вас есть подписка на
00:04:11
![]()
на видов вы можете также это с вами
00:04:13
![]()
делать не только microsoft flight
00:04:14
![]()
simulator и также и в других а где
00:04:17
![]()
симуляторах и в программах и так на этой
00:04:20
![]()
странице нам больше ничего не интересно
00:04:22
![]()
и мы сразу же переходим к следующей и
00:04:26
![]()
это у нас будет страница и нет эй
00:04:33
![]()
итак название страницы у нас
00:04:34
![]()
отображаются в верхней части дисплея с
00:04:38
![]()
правой стороны у нас есть
00:04:40
![]()
стрелка вправо и влево то есть это
00:04:43
![]()
значит у нас есть еще странице здесь это
00:04:45
![]()
у нас меню нет и начинаем мы с меню и и
00:04:49
![]()
не 3 и все что у нас отображается в этих
00:04:52
![]()
желтых квадратах эту информацию которую
00:04:55
![]()
мы обязательно должны заполнить
00:04:58
![]()
все что отображается синим цветом эту
00:05:00
![]()
информацию которой можно изменить
00:05:03
![]()
изменить итак начинаем мы с
00:05:06
![]()
правой стороны и нам надо указать откуда
00:05:10
![]()
и куда мы летим
00:05:12
![]()
то есть здесь мы указываем код аэропорта
00:05:15
![]()
и так у нас мы находимся в берлине и
00:05:18
![]()
коды рапорту она сверху дельта дельта
00:05:20
![]()
браво также через слеш указываем код и
00:05:23
![]()
рапорта вены это лима оскар виски виски
00:05:28
![]()
забыл слэш
00:05:31
![]()
лима оскар близкие близки и так как вы
00:05:35
![]()
видите
00:05:36
![]()
информация отображается в начале в
00:05:39
![]()
нижней части дисплея то есть здесь мы
00:05:41
![]()
можем изменить или удалить и дальше мы
00:05:45
![]()
ее переносим в нужную нам строку
00:05:52
![]()
итак здесь уже информацию нас готова и
00:05:54
![]()
следующим пунктом у нас будет запасной
00:05:58
![]()
аэродром
00:05:59
![]()
случае если мы не сможем совершить
00:06:02
![]()
посадку
00:06:03
![]()
про порту вены нам придется уходить на
00:06:06
![]()
запасной аэродром и давайте посмотрим в
00:06:09
![]()
полетном плане у нас он также указан это
00:06:12
![]()
у нас будет город будапешт и
00:06:15
![]()
код его lima отель
00:06:18
![]()
правого папа носим у нас сюда
00:06:21
![]()
так следующий пункт у нас flight member
00:06:25
![]()
здесь не обязательно должен быть light
00:06:27
![]()
member это так называемый так называемый
00:06:30
![]()
эти сиквел сайт то есть наш позывной и у
00:06:34
![]()
нас авиакомпания люфтганза и код и к у
00:06:37
![]()
неё дельта h и дальше выбираем любые
00:06:41
![]()
цифры если вы будете летать василий или
00:06:46
![]()
его с диспетчером обязательно указывайте
00:06:50
![]()
этот позывной
00:06:51
![]()
так следующим пунктом у нас cost index
00:06:56
![]()
здесь можно нести значение от единицы до
00:07:01
![]()
999 и рассчитать самому cost index на
00:07:04
![]()
получится поскольку это довольно сложные
00:07:06
![]()
расчеты и зависят они от многих факторов
00:07:09
![]()
таких как
00:07:11
![]()
стоимость топлива стоимость самого
00:07:13
![]()
полета также от авиакомпании суть cost
00:07:18
![]()
индекса в том если мы укажем здесь
00:07:21
![]()
допустим максимальное значение 999 то
00:07:26
![]()
наш самолет будет лететь быстро то есть
00:07:28
![]()
максимально допустимой скоростью и
00:07:32
![]()
при этом не эконом если мы укажем
00:07:36
![]()
единицу то наш самолет будет ли тик так
00:07:40
![]()
сказать в экономном режиме
00:07:43
![]()
это cost index у нас также есть нашим
00:07:46
![]()
полетном плане и он у нас составляет 15
00:07:50
![]()
если вы не знаете какой код cost index
00:07:53
![]()
установить ставьте среднее значение это
00:07:56
![]()
от 15 до 25 также cost index можно
00:08:00
![]()
изменить во время полета если мы
00:08:02
![]()
допустим не успеваем аэропорт прибытия
00:08:05
![]()
мы можем увеличить этот cost index top
00:08:08
![]()
учиться поставить из 15
00:08:10
![]()
40 или 50
00:08:13
![]()
и наш самолет будет лететь быстрее
00:08:15
![]()
итак следующий пункт у нас шёл он то
00:08:19
![]()
есть высота нашего полета и
00:08:22
![]()
смотрим у нас
00:08:25
![]()
35 тысяч футов
00:08:31
![]()
также если вы не знаете какой пожилом
00:08:34
![]()
установить
00:08:36
![]()
если вы летите на восток у вас будет
00:08:39
![]()
нечетный эшелон то есть
00:08:41
![]()
330
00:08:43
![]()
350 370 и так далее если вы летите на
00:08:47
![]()
запад у вас будет четные шел он 3203
00:08:50
![]()
4036 но
00:08:52
![]()
так следующим у нас
00:08:55
![]()
как вы видите синим цветом отображается
00:08:58
![]()
эту информацию которую можно но не
00:09:00
![]()
обязательно изменять итак у нас здесь
00:09:02
![]()
высота трупа паузы
00:09:04
![]()
здесь она также указано у нас в полетном
00:09:07
![]()
плане она у нас сегодня 28 754
00:09:13
![]()
если у вас нет этой информации можете
00:09:16
![]()
оставить ее стандартные
00:09:18
![]()
так здесь у нас еще есть меню
00:09:21
![]()
позиционирования то есть rs здесь у нас
00:09:23
![]()
отображается зеленым
00:09:26
![]()
все правильно и дальше мы можем также
00:09:29
![]()
указать информацию о температуре и ветры
00:09:33
![]()
при наборе на эшелоне и при снижении
00:09:38
![]()
также к информация есть в полетном плане
00:09:43
![]()
так вы на у нас здесь вот у нас есть
00:09:46
![]()
высота 10 тысяч то есть у нас
00:09:49
![]()
температура минус 16 также информацию
00:09:52
![]()
или водитель на не будем поскольку это
00:09:54
![]()
довольно много информации оставляем ее и
00:09:57
![]()
следующим пунктом а мы забыли еще здесь
00:10:01
![]()
у нас grown темп речи
00:10:03
![]()
который пока у нас указано здесь плюс 15
00:10:06
![]()
но это не работает в microsoft flight
00:10:08
![]()
simulator и
00:10:09
![]()
давайте попробуем на это не работ когда
00:10:11
![]()
пока не работает других симуляторах она
00:10:13
![]()
точно работает итак сменил не нет и мы
00:10:16
![]()
закончили и дальше мы переходим в меню
00:10:20
![]()
flight plan
00:10:27
![]()
так меню flight plan у нас уже есть
00:10:29
![]()
некоторая информация которую мы внесли в
00:10:33
![]()
меню и не 3 то есть у нас уже есть
00:10:36
![]()
аэропорт вылета и
00:10:38
![]()
аэропорт прибытия
00:10:39
![]()
нижней части у нас расчетное время и
00:10:42
![]()
дистанция здесь нам надо указать маршрут
00:10:47
![]()
то есть мы сейчас если мы посмотрим на
00:10:49
![]()
план у нас отображается по прямой то
00:10:51
![]()
есть мы вылетим из точки а в точку б по
00:10:53
![]()
прямой
00:10:54
![]()
так же так конечно самолёты не летают
00:10:57
![]()
поэтому нам надо указать наш маршрут это
00:11:00
![]()
в первую очередь смотрим наш план и
00:11:04
![]()
у нас полоса 7 правая и мы летим на
00:11:09
![]()
точку у роз по схеме выхода glu рос один
00:11:12
![]()
квидак давайте будем искать или давайте
00:11:16
![]()
начала посмотрим начали посмотрим на эту
00:11:19
![]()
схему выхода
00:11:20
![]()
тут он убираем
00:11:26
![]()
так смотрим наш аэропорт
00:11:34
![]()
смотрим выхода
00:11:37
![]()
выбираем 20
00:11:39
![]()
7 pro седьмую правую полосу и смотрим
00:11:43
![]()
нашу схему выхода у роз 1 кладок
00:11:48
![]()
так ищем я здесь
00:11:53
![]()
так и вот наша схема выхода
00:11:56
![]()
то есть мы идем на
00:11:59
![]()
по этой схеме на точку are books потом и
00:12:03
![]()
дома и на точку у роз
00:12:07
![]()
так давайте теперь посмотрим здесь
00:12:10
![]()
выбираем аэропорт вылета departure
00:12:14
![]()
здесь у нас указаны все полосы также
00:12:17
![]()
длина их не и нам нужно 7 правая полоса
00:12:21
![]()
выбираемые и ищем нашу схему выхода
00:12:25
![]()
она у нас здесь рос один квебек выбираю
00:12:28
![]()
и
00:12:29
![]()
давайте посмотрим на план
00:12:32
![]()
здесь она у нас это он отображает план
00:12:34
![]()
отображается желтым цветом то есть мы
00:12:36
![]()
его не подтвердили и он у нас такой же
00:12:39
![]()
как
00:12:40
![]()
чартах
00:12:42
![]()
подтверждаем нажимаем insert и
00:12:45
![]()
теперь он у нас должен отображаться
00:12:48
![]()
зеленым цветом
00:12:51
![]()
итак из точки la rose смотрим дальше из
00:12:55
![]()
точки у роз мы идем на точку отель
00:12:57
![]()
дельта оскар по трассе майк 725 и
00:13:02
![]()
так выбираем нашу точку у роз
00:13:06
![]()
выбираем рвс то есть трасса и
00:13:09
![]()
указываем номер нашей трассы это у нас
00:13:13
![]()
майк
00:13:14
![]()
725 но сами сюда
00:13:23
![]()
этот раз у нас есть и мы идем на точку
00:13:25
![]()
отель дельта оскар и
00:13:28
![]()
вновь меня в правую часть и
00:13:32
![]()
смотрим опять же
00:13:39
![]()
здесь опять у нас плану отображается
00:13:42
![]()
желтым цветом то есть он временной
00:13:43
![]()
нажимаем enter
00:13:49
![]()
так и дальше у нас
00:13:52
![]()
после точки
00:13:55
![]()
отель дельта оскар мы идем по прямой то
00:13:58
![]()
есть не по трассе а по прямой на точку
00:14:00
![]()
уголок
00:14:03
![]()
ищем нашу точку и
00:14:09
![]()
мы трасса уже не выбираем а сразу пишем
00:14:14
![]()
2 вот и вот и вводим и the next в японии
00:14:20
![]()
также подтверждаем и как вы видите здесь
00:14:23
![]()
у нас отображается
00:14:25
![]()
схема выхода то есть точки по схемы
00:14:28
![]()
выхода сверху название схемы выхода то
00:14:30
![]()
есть у роз 1 квебек если мы дальше
00:14:34
![]()
посмотрим мы идем дальше по трассе майк
00:14:37
![]()
725 и
00:14:40
![]()
дальше у нас трассы уже нету то есть у
00:14:43
![]()
нас указан курс
00:14:45
![]()
так смотрим следующую точку мы также
00:14:48
![]()
идем по прямой на точку битси
00:14:54
![]()
выбираем галоп
00:15:01
![]()
и дальше . биться и указываемые также
00:15:03
![]()
next waypoint и подтверждаем смотрим
00:15:07
![]()
дальше и последняя точка у нас также по
00:15:10
![]()
прямой . миков
00:15:17
![]()
с точки пиццы указываем миков
00:15:25
![]()
и нажимаем enter и так дальше нам надо
00:15:29
![]()
указать полосу прибытия и схему захода у
00:15:33
![]()
нас полоса 29 и схема захода у нас
00:15:36
![]()
называется миков s7 диски и так давайте
00:15:40
![]()
посмотрим чартах
00:15:42
![]()
открываем рапорт прибытия
00:15:50
![]()
и смотрим заход на 29 полосу и
00:15:56
![]()
у нас мика все английский
00:16:00
![]()
так и у нас где-то должен быть здесь
00:16:04
![]()
итак давайте посмотрим вызов мы приходим
00:16:07
![]()
на точку миков аэропорт у нас здесь и
00:16:11
![]()
смотрим наш доход мика всем диске то
00:16:13
![]()
есть с точки миков мы идем через точку
00:16:15
![]()
на бот
00:16:17
![]()
так давайте будем это носить так было бы
00:16:21
![]()
выбираем аэропорт прибытия нажимаем
00:16:23
![]()
эрайвал
00:16:25
![]()
ищем нашу полосу 29 и л.с.
00:16:30
![]()
ищем схему захода не ко всем диски
00:16:34
![]()
идем на через точку на бот и
00:16:38
![]()
нажимаем insert
00:16:42
![]()
итак давайте проверим наш маршрут
00:16:51
![]()
так сделано сделаем поближе
00:17:05
![]()
так мы идем на точку лу роз
00:17:09
![]()
дисциплина
00:17:11
![]()
потом по трассе м 725 через точки & bass
00:17:17
![]()
кабуз buster идем на точку в отель
00:17:22
![]()
дельта вас карт дальше голов дальше
00:17:25
![]()
биться ников и схема захода через точку
00:17:28
![]()
могут на полосу
00:17:30
![]()
29
00:17:34
![]()
то есть план у нас
00:17:38
![]()
указан украина
00:17:41
![]()
итак самом слайд плане у нас есть такие
00:17:44
![]()
розовые точки
00:17:47
![]()
которые у нас указывают нам на то что у
00:17:50
![]()
нас есть на этой точке какое-то
00:17:52
![]()
ограничение для того чтобы она так жила
00:17:55
![]()
отображалось на дисплее мы нажимаем
00:17:57
![]()
constrain то есть ограничения и видим
00:17:59
![]()
здесь что на этих точках у нас есть
00:18:01
![]()
ограничение по высоте то есть мы должны
00:18:04
![]()
быть больше или выше шести тысяч футов
00:18:08
![]()
для того чтобы их здесь посмотреть
00:18:10
![]()
нажимаем на эту точку и также видим
00:18:13
![]()
здесь этот constrain то есть эти
00:18:15
![]()
constrain и мы все проверяем с нашими
00:18:17
![]()
чертами если они также там указаны то
00:18:20
![]()
значит это значит нас все правильно
00:18:22
![]()
внесено если допустим constrain он не
00:18:26
![]()
указан или там другое значение допустим
00:18:31
![]()
выше 3000 или ниже 3000 если ниже мы
00:18:33
![]()
ставим минус 3 тысячи если выше то плюс
00:18:36
![]()
3000 у нас плюс 6.000 по высоте также у
00:18:40
![]()
нас есть constrain а я по скорости если
00:18:43
![]()
у нас здесь не указано ограничение по
00:18:45
![]()
скорости в чартах она есть мы также
00:18:47
![]()
можем здесь
00:18:49
![]()
указать итак возвращаемся и смотрим у
00:18:53
![]()
нас также изменилась полетное расчетное
00:18:56
![]()
время а также дистанция
00:19:01
![]()
и на этом наш
00:19:03
![]()
полетный план
00:19:05
![]()
готов и
00:19:07
![]()
так следующим у нас меню
00:19:12
![]()
рад над давайте перейдем к нему и
00:19:17
![]()
в этом меню мы указываем частоты вор
00:19:22
![]()
л.с. и одарят при вылете мы можем
00:19:27
![]()
указать частоту
00:19:29
![]()
дел с полосы вылета то есть это у нас 7
00:19:33
![]()
правы
00:19:36
![]()
давайте посмотрим правильно ли она у нас
00:19:38
![]()
здесь указано
00:19:42
![]()
это надо для того если мы допустим нам
00:19:46
![]()
придется вернуться
00:19:47
![]()
в аэропорт вылета
00:19:50
![]()
случае отказа у нас будет уже внесена
00:19:54
![]()
эти данные то есть для захода на полосу
00:19:57
![]()
7 prof итак у нас частота ls ls 109 и 7
00:20:03
![]()
она также у нас указана правильно и
00:20:06
![]()
здесь мы можем
00:20:10
![]()
допустим еще указать частоту форма и к
00:20:15
![]()
мы указываем
00:20:17
![]()
брал управу индия
00:20:22
![]()
и мы видим у нас есть три таких точки и
00:20:26
![]()
ближе к нам это две мили это значит это
00:20:30
![]()
наша . и при включении word но также оно
00:20:33
![]()
отображается у нас левой части дисплея
00:20:37
![]()
при заходе на посадку мы также указываем
00:20:40
![]()
частоту полосы захода это у нас будет
00:20:43
![]()
полоса 29 аэропорту вены
00:20:47
![]()
то есть при заходе нам надо указать эту
00:20:51
![]()
частоту смотрим 29 полосу и у нас
00:20:55
![]()
частота при заходе будет стоить 100 9.55
00:20:58
![]()
и так же у нас есть форма як 110 и 4 то
00:21:03
![]()
есть при заходим мы указываем эту
00:21:05
![]()
информацию и
00:21:07
![]()
так
00:21:09
![]()
переходим дальше и следующим пунктом у
00:21:12
![]()
нас будет и нет by и
00:21:16
![]()
так минимум в небе здесь мы указываем
00:21:21
![]()
вес нашего самолета и верхней части у
00:21:24
![]()
нас есть зиру fill light это без
00:21:27
![]()
самолета без топлива и также зиру fill
00:21:30
![]()
light city то есть центр тяжести дальше
00:21:33
![]()
нам надо указать количество топлива на
00:21:36
![]()
борту и так
00:21:38
![]()
зиру fill light и сиди поскольку мы не
00:21:41
![]()
знаем не загружали наш самолет он у нас
00:21:44
![]()
будет стандартным и при нажатии клавиши
00:21:47
![]()
возле этой строке нижней части у нас
00:21:51
![]()
будет отображаться
00:21:52
![]()
без самолета т.е. стандартный и также
00:21:55
![]()
центр тяжести стандарт центр тяжести мы
00:21:59
![]()
разберем следующем меню это будет меню
00:22:01
![]()
performance
00:22:03
![]()
без нашего самолета мы можем взять из
00:22:06
![]()
нашего план и так давайте посмотрим
00:22:08
![]()
зиру фил weight то есть у нас
00:22:11
![]()
предварительные 54 772 и максимальные 64
00:22:16
![]()
300 то есть эти расчеты сделаны
00:22:21
![]()
всем брифе после того как мы указали
00:22:25
![]()
количество пассажиров и так дальше
00:22:28
![]()
окончательный без самолета в реальной
00:22:32
![]()
жизни пилоты получают после закрытия
00:22:34
![]()
гейта то есть когда все пассажиры на
00:22:36
![]()
борту и
00:22:37
![]()
багаж загружен а не получать уже
00:22:40
![]()
окончательный зиру фил итак давайте
00:22:44
![]()
внесем из плана зиру fill light и это у
00:22:48
![]()
нас будет 50 4.7
00:22:54
![]()
так это удаляем информацию внизу
00:22:58
![]()
4.7 и через ваш мы указываем центр
00:23:01
![]()
тяжести становилась стандартным это
00:23:03
![]()
будет 25.0
00:23:05
![]()
в следующей части видео мы загрузим
00:23:08
![]()
правильно самолет и так давайте
00:23:10
![]()
переносим это все
00:23:12
![]()
в эту строку и дальше нам надо указать
00:23:15
![]()
количество топлива на борту и так
00:23:19
![]()
количество топливного топлива у нас так
00:23:21
![]()
же на дисплее отображается это филу on
00:23:22
![]()
board и она у нас неправильно давайте
00:23:25
![]()
посмотрим сколько нам надо на этот полет
00:23:27
![]()
и нам надо
00:23:30
![]()
4530 3 килограмма это также загрузку
00:23:34
![]()
топлива можно сделать через планшет
00:23:38
![]()
давайте его изменим здесь 4 2033 и
00:23:43
![]()
подтверждаю
00:23:46
![]()
итак смотрим на дисплее у нас указано
00:23:48
![]()
правильное количество топлива этом у нас
00:23:51
![]()
будет четыре дома 5
00:23:54
![]()
но сильно то все сюда и дальше компьютер
00:23:57
![]()
у нас делать расчеты давайте посмотрим
00:24:00
![]()
на них и так тикси это руление то есть
00:24:04
![]()
на рулении нам понадобится 200 килограмм
00:24:05
![]()
на наш полет до вены нам понадобятся две
00:24:10
![]()
тонны топлива также расчетное время у
00:24:12
![]()
нас есть пять процентов резерва дальше к
00:24:18
![]()
запасному родному то есть будапешт нам
00:24:21
![]()
понадобится 900 килограмм и по прибытию
00:24:24
![]()
будапешт у нас будет еще топлива на 30
00:24:27
![]()
минут полета то есть эти две цифры
00:24:29
![]()
суммируется и у нас есть в общем 1 из 7
00:24:34
![]()
тонны топлива запас и так дальше у нас
00:24:39
![]()
пункт где мы должны указать
00:24:43
![]()
ветер или информацию о ветре нашем
00:24:47
![]()
паллете здесь указано ожидая то значит
00:24:49
![]()
head wind давайте посмотрим в план и
00:24:53
![]()
также у нас здесь есть три paint и здесь
00:24:56
![]()
у нас стоит 33 это значит ты элвин то
00:24:58
![]()
есть попутный ветер давайте укажем его
00:25:02
![]()
также сюда так и пишем 33
00:25:08
![]()
и сразу у нас меняется
00:25:10
![]()
расчете то есть у нас было две тонны
00:25:12
![]()
сейчас 19 на полет также есть форматы
00:25:16
![]()
полетных планов у вас может быть здесь
00:25:19
![]()
указано ни т а н или п где п это плюс
00:25:23
![]()
33-м это минус 33 то есть p33 или плюс
00:25:28
![]()
тридцать три это то же что и те 33 то
00:25:30
![]()
есть таиланд если будет м33 это будет
00:25:34
![]()
твоим то есть минус давайте посмотрим
00:25:36
![]()
если мы введем здесь плюс тридцать три
00:25:40
![]()
это то же что и тайвин то есть ничего не
00:25:43
![]()
изменяется если мы введем -33 это будет
00:25:46
![]()
от vint
00:25:48
![]()
то есть у нас сразу сыпали итак давайте
00:25:51
![]()
обратно ведем 33 или + 33 и
00:25:55
![]()
это у нас будет
00:25:57
![]()
итак меню и нет им и заполнен и
00:26:00
![]()
следующим у нас будет минимум прогресс и
00:26:04
![]()
так меню прогресс здесь у нас верхней
00:26:08
![]()
части указанного высота нашего полета
00:26:10
![]()
оптимальная а также максимально
00:26:12
![]()
из интересного что нам понадобится это
00:26:16
![]()
пункт где мы можем указать любую точку
00:26:19
![]()
нашего маршрута и мы будем знать
00:26:21
![]()
расстояние до нее а также курс
00:26:23
![]()
даже если нам понадобится вернуться в
00:26:26
![]()
аэропорт прибытия мы также можем нести
00:26:28
![]()
нашу полосу на аэропорт допустим это
00:26:32
![]()
дельта дельта дрова у нас было 7 правая
00:26:35
![]()
полоса и то есть мы будем знать в полете
00:26:38
![]()
дистанцию то с расстояния до нее а также
00:26:41
![]()
курс это также полезно если для расчета
00:26:45
![]()
снижения
00:26:47
![]()
давайте возьмём какую точку
00:26:50
![]()
нашего полета
00:26:52
![]()
твоем чарты
00:26:59
![]()
возьмем схема захода
00:27:04
![]()
и допустим возьмем
00:27:06
![]()
любую точку давайте возьмем точку на бот
00:27:09
![]()
нам надо быть выше шести тысяч возьмем
00:27:12
![]()
6000 на точки могут
00:27:16
![]()
и укажем
00:27:19
![]()
работ у
00:27:20
![]()
нас есть расстояние до него то есть
00:27:22
![]()
двести пятьдесят семь миль давайте
00:27:25
![]()
перейдем в калькулятор и у нас высота
00:27:28
![]()
будет 35 тысяч футов
00:27:30
![]()
нам нужно 6 тысяч футов
00:27:34
![]()
давайте укажем скорость у нас будет
00:27:38
![]()
400 то есть 90 одна миля
00:27:42
![]()
нам надо снижаться
00:27:46
![]()
так что закроем здесь
00:27:50
![]()
итак если у нас будет 90 одна миля мы
00:27:53
![]()
можем начинать снижение это очень удобно
00:27:56
![]()
также мы можем другие точки указать
00:27:58
![]()
нашего маршрута допустим не точку могут
00:28:00
![]()
возьмём какую какую другую
00:28:03
![]()
давайте посмотрим
00:28:10
![]()
возьмем точку
00:28:14
![]()
допустим а вот это слишком рано возьмем
00:28:17
![]()
точку
00:28:20
![]()
виски виски 961
00:28:27
![]()
у нас мы сюда и так же у нас будет
00:28:29
![]()
расстояние до нее и когда у нас будет 91
00:28:33
![]()
миллион мы можем начинать снижение и так
00:28:36
![]()
меню прогресс мы больше ничего не делаем
00:28:38
![]()
то есть здесь больше никакой интересный
00:28:40
![]()
для нас информации нет и сразу же
00:28:42
![]()
переходим меню performance и
00:28:46
![]()
так мини performance при включении этого
00:28:49
![]()
меню мы сразу попадаем на так называемую
00:28:53
![]()
фазу то есть
00:28:54
![]()
фазу полета в которой мы находимся
00:28:57
![]()
то есть сейчас у нас фазы тайком также
00:29:00
![]()
мы можем переключаться между этими
00:29:01
![]()
фазами у
00:29:03
![]()
нас есть набор круиз снижения также
00:29:06
![]()
захода на посадку и уход на второй круг
00:29:09
![]()
и так начинаем мы стейков и начинаем с
00:29:14
![]()
правой стороны и здесь у нас первым
00:29:16
![]()
таков shift это понадобится если мы не
00:29:20
![]()
используем всю полосу для взлета только
00:29:23
![]()
частью и эту разницу нам надо указать в
00:29:27
![]()
он сидел
00:29:28
![]()
давайте посмотрим у нас 7 правая полоса
00:29:32
![]()
которую мы указали в им семью и это
00:29:34
![]()
значит мы взлетаем сначала полосы то
00:29:36
![]()
есть этой точке если мы взлетаем с точки
00:29:40
![]()
майк 3 то есть interception майтри то
00:29:42
![]()
эту часть полосы в метрах нам надо
00:29:45
![]()
указать там сидел
00:29:47
![]()
давайте посмотрим на нас полосами 4000
00:29:50
![]()
метров с точки майк 3 это
00:29:54
![]()
2475 то есть отнимаем от 4000
00:29:58
![]()
2475 и эту разницу до 89 и так дальше у
00:30:02
![]()
нас положение закрылок а также положение
00:30:04
![]()
стабилизатора закрылки 90 процентов
00:30:09
![]()
случаев это закрылки один
00:30:12
![]()
горизонтальный стабилизатор это
00:30:14
![]()
поверхность хвостовой части самолета то
00:30:17
![]()
здесь у нас есть руль высоты и передней
00:30:20
![]()
части это у нас стабилизатор и
00:30:23
![]()
так положение стабилизатор зависит от
00:30:27
![]()
центра тяжести то есть это то что мы
00:30:29
![]()
указывали в меню и нет by то есть он у
00:30:33
![]()
нас 20 5 0 это значит если мы загрузим
00:30:36
![]()
наш самолет в задней части полностью и
00:30:39
![]()
при отрыве от полосы нам понадобится
00:30:42
![]()
малые усилия на сайт стик для того чтобы
00:30:44
![]()
самолет оторвался полосы и тем самым
00:30:47
![]()
самолет может сделать тейлз trike plus
00:30:49
![]()
удариться хвостом а полосу также если мы
00:30:52
![]()
загрузим самолет передней части то нам
00:30:54
![]()
понадобится более усилия для отрыва
00:30:57
![]()
самолета полосы и так для того чтобы это
00:31:01
![]()
усилие было было всегда одинаковым нам
00:31:03
![]()
надо установить правильный угол
00:31:06
![]()
стабилизатора
00:31:08
![]()
я оставлю ссылку в описании на
00:31:11
![]()
калькулятор
00:31:13
![]()
в котором вы можете рассчитать угол
00:31:17
![]()
стабилизатора также flexx температуру и
00:31:19
![]()
скорость для взлета если же у нас нет
00:31:22
![]()
калькулятора мы смотрим на триммер
00:31:24
![]()
стабилизатора и
00:31:26
![]()
здесь у нас указано положение
00:31:29
![]()
стабилизатора то есть опыта вверх-вниз и
00:31:33
![]()
если мы
00:31:34
![]()
посмотрим поближе у нас здесь есть центр
00:31:37
![]()
тяжести который у нас
00:31:40
![]()
25.0 то есть устанавливаем примерно 25
00:31:45
![]()
включаем flight control и
00:31:49
![]()
видим наше положение
00:31:51
![]()
стабилизатор то есть верх 0.4 градуса
00:31:54
![]()
также вводим это он седеют и так
00:31:57
![]()
закрылки у нас один через слазь
00:32:00
![]()
пишем об
00:32:02
![]()
0.4 и вносим это суда и так стабилизатор
00:32:07
![]()
установлен
00:32:08
![]()
дальше следующим у нас clicks
00:32:10
![]()
температура это понадобится если мы не
00:32:15
![]()
используем всю тягу двигателя при взлете
00:32:18
![]()
это значит мы не взлетаем в режиме тога
00:32:21
![]()
а взлетаем режимы flex для этого нам
00:32:25
![]()
надо указать температуру
00:32:27
![]()
также в этом калькулятор и вы можете
00:32:29
![]()
рассчитать эту температуру если вы
00:32:32
![]()
оставите это поле пустым это значит мы
00:32:34
![]()
взлетаем с
00:32:36
![]()
в режиме тога так дальше мы переходим в
00:32:40
![]()
левую часть и здесь нам надо указать
00:32:43
![]()
скорости взлет эту скорость в иван bear
00:32:47
![]()
with ул скоростью иван это скорость
00:32:50
![]()
принятия решения это значит до этой
00:32:53
![]()
скорости мы можем отменить взлет после
00:32:56
![]()
прохождения этой скорости мы обязаны
00:32:59
![]()
продолжить взлет скорость bear это
00:33:02
![]()
скорость отрыва от полосы и скорость
00:33:05
![]()
биту это безопасная скорость набор
00:33:10
![]()
здесь у нас рассчитывается автоматически
00:33:15
![]()
давайте также введём
00:33:18
![]()
и так дальше у нас транзишен altitude
00:33:21
![]()
это высота на которой мы переходим на
00:33:24
![]()
стандартные давления
00:33:26
![]()
стандарт
00:33:30
![]()
это указано в чартах открываем любой
00:33:34
![]()
полосу раппорта и верхней части у нас
00:33:36
![]()
есть strange multitude который на
00:33:38
![]()
составляет 5000 фунтов и также указан
00:33:41
![]()
здесь
00:33:42
![]()
правильно
00:33:44
![]()
дальше у нас траст для такси на лте
00:33:47
![]()
тью’ти траст acceleration altitude это
00:33:51
![]()
высота при которой мы
00:33:53
![]()
уменьшаем наш режим двигателей с режима
00:33:57
![]()
тога если у нас было если у нас было
00:34:01
![]()
поле пустым для flexo или же мы взлетали
00:34:03
![]()
в режиме flexo то есть из режимов лекса
00:34:05
![]()
в режим kline
00:34:07
![]()
то есть если мы летим в режиме тога при
00:34:11
![]()
достижении этой высоты мы уменьшаем
00:34:15
![]()
режим двигателей в режим клайн также на
00:34:19
![]()
перди будет отображаться соответствующая
00:34:21
![]()
информация в левой стороне здесь то есть
00:34:24
![]()
ловил kline это значит мы уже на этой
00:34:27
![]()
высоте и нам надо переключить
00:34:30
![]()
же двигателя в kline
00:34:32
![]()
следующим у нас acceleration то есть это
00:34:35
![]()
разгон самолета это значит на этой
00:34:38
![]()
высоте у нас уменьшается вертикальная
00:34:41
![]()
скорость самолета и наш самолет начинает
00:34:44
![]()
разгоняться
00:34:45
![]()
дальше у нас есть энджин out
00:34:48
![]()
acceleration это
00:34:50
![]()
высота при которой при отказе одного
00:34:52
![]()
двигателя если мы уходим на второй круг
00:34:54
![]()
при достижении этой высоты наш самолет
00:34:58
![]()
также будет разгоняться и так треков мы
00:35:01
![]()
заполнили
00:35:02
![]()
дальше при перед снижением аэропорт
00:35:07
![]()
прибытия нам также надо заполнить
00:35:09
![]()
approach здесь мы указываем давление
00:35:12
![]()
порта прибытия температуру ветер также
00:35:16
![]()
транзишен altitude это все также можно
00:35:19
![]()
увидеть в планшете то здесь у нас есть
00:35:22
![]()
давление температура и
00:35:24
![]()
ветер также нам надо указать минимум это
00:35:29
![]()
минимум по давлению или по радио высота
00:35:33
![]()
мир и так меню performance мы также
00:35:36
![]()
закончили и следующим у нас будет унес
00:35:39
![]()
secondary flight plan которые к
00:35:41
![]()
сожалению пока также не работает в
00:35:43
![]()
microsoft flight simulator и я
00:35:45
![]()
постараюсь записать отдельное видео в
00:35:47
![]()
другом симуляторы летсплей не и покажу
00:35:49
![]()
вам как можно создать второй план и как
00:35:53
![]()
не пользоваться также в им сидию есть
00:35:56
![]()
меню которая не входила в это условное
00:35:58
![]()
сокращение div ribs
00:36:00
![]()
это меню директу и здесь нас указанной
00:36:04
![]()
точке маршрута также как и флаг плане то
00:36:07
![]()
есть если нам надо лететь напрямую
00:36:10
![]()
какой-либо точки от положения нашего
00:36:11
![]()
самолета мы выбираем эту выбираем эту
00:36:14
![]()
точку и нажимаем дайрект то есть на
00:36:16
![]()
самолет двигается напрямую к этой точке
00:36:19
![]()
минуя все предыдущие точки маршрута и
00:36:23
![]()
так в этом в этой части видео мы
00:36:26
![]()
рассмотрели самые главные пункты меню м
00:36:29
![]()
сидию которые вам понадобится для полета
00:36:31
![]()
и давайте перейдем во вторую часть видео
00:36:33
![]()
и посмотрим как можно часть информации
00:36:36
![]()
из 7 грифа принести
00:36:37
![]()
в mcd
00:36:40
![]()
в этой части видео мы начинаем все
00:36:44
![]()
сначала и
00:36:45
![]()
загружать самолет через меню загрузки мы
00:36:48
![]()
не будем мы переходим сразу планшету и
00:36:50
![]()
для отображения всей информации на
00:36:53
![]()
планшете вам понадобится вначале указать
00:36:55
![]()
ваш иди или никнейм сим брифа потом вы
00:36:59
![]()
переходите на первую страницу нажимайте
00:37:01
![]()
from tim бриф и у вас вся информация в
00:37:04
![]()
планшете то есть полетный план итак
00:37:07
![]()
давайте загрузим самолет топливом это у
00:37:09
![]()
нас 4 тысячи пятьсот тридцать три
00:37:12
![]()
килограмма
00:37:16
![]()
подтверждаем и
00:37:18
![]()
переходим к м сидел и
00:37:21
![]()
так заполняем мы также им сидию по
00:37:23
![]()
сокращению де фриз но вначале мы заходим
00:37:26
![]()
insyde у меню и нажимаем эти сию это air
00:37:30
![]()
traffic service unit
00:37:32
![]()
дальше мы нажимаем нажимаем operations
00:37:35
![]()
control
00:37:36
![]()
выбираем и нет и
00:37:39
![]()
нажимаем и не do the request
00:37:42
![]()
так у нас информация загрузилась
00:37:45
![]()
возвращаемся нажимаем python баланс
00:37:49
![]()
также нажимаем request и у нас здесь вся
00:37:53
![]()
информация о
00:37:55
![]()
наших пассажиров то есть ту которую мы
00:37:58
![]()
подавали в сем брифе нажимаем
00:38:01
![]()
старт порт и и у нас началась загрузка
00:38:05
![]()
самолет
00:38:07
![]()
дальше мы переходим в дата икра статус
00:38:11
![]()
проверяем информацию дальше переходим в
00:38:15
![]()
инет
00:38:16
![]()
и здесь мы ничего не заполняем нажимаем
00:38:19
![]()
линий 3 класть и
00:38:22
![]()
также у нас информация загружается
00:38:25
![]()
проверяем эту информацию
00:38:27
![]()
переходим дальше flight plan здесь у нас
00:38:30
![]()
уже все точки маршрута
00:38:32
![]()
загрузились нам надо указать полосу
00:38:36
![]()
вылета который у нас было
00:38:39
![]()
это у нас 7 правая полоса и
00:38:44
![]()
. выхода у нас была у
00:38:47
![]()
роз один квидак
00:38:55
![]()
нажимаем на нее подтверждаем дальше нам
00:38:59
![]()
надо указать полосу прилета
00:39:02
![]()
это у нас была полоса 29 схема мика всем
00:39:06
![]()
лески
00:39:14
![]()
через точку могут
00:39:17
![]()
подтверждаем
00:39:19
![]()
дальше проверяем наш план
00:39:25
![]()
и у нас здесь есть разрыв выбираем его
00:39:29
![]()
нажимаем
00:39:30
![]()
клеем
00:39:34
![]()
смотрим дальше
00:39:38
![]()
и
00:39:40
![]()
на этом наш план готов
00:39:45
![]()
дальше приходим роднов вносим
00:39:48
![]()
маяк
00:39:55
![]()
идем бениды
00:39:58
![]()
и здесь у нас уже отображается
00:40:00
![]()
правильной
00:40:01
![]()
правильная загрузка
00:40:06
![]()
так указываем топлива
00:40:09
![]()
45
00:40:14
![]()
указываем ветер
00:40:17
![]()
т 33
00:40:24
![]()
итак дальше мы переходим прогресс
00:40:29
![]()
укажем нашу полосу вылета
00:40:37
![]()
заполняем performance
00:40:41
![]()
так у нас было 25 4
00:40:45
![]()
центр тяжести
00:40:51
![]()
посмотрим 25 4
00:40:56
![]()
это у нас будет так это у нас на 0 2
00:41:00
![]()
градуса
00:41:06
![]()
вносим рефлекс оставляем пустым
00:41:12
![]()
вносим скорости
00:41:15
![]()
и
00:41:17
![]()
на этом наш м сиди и заполнен
00:41:21
![]()
и
00:41:23
![]()
на этом всё я надеюсь это видео вам
00:41:26
![]()
понравилось и помогло разобраться с mcd
00:41:29
![]()
спасибо всем кто смотрел
00:41:31
![]()
это видео ставьте лайки подписывайтесь
00:41:33
![]()
на канал и до скорых встреч всем пока
00:41:36
![]()
[музыка]
00:41:49
![]()
и
00:41:54
![]()
[музыка]
This guide will help you prepare the MCDU in the A32NX for your departure. It includes a simple route that you can use to follow along easily and replicate in the simulator.
Disclaimer
The level of detail in this guide is meant to provide a FlyByWire A320neo beginner the ability to adequately program the MCDU to conduct and complete a flight.
A beginner is defined as someone familiar with flying a GA aircraft or different types of airliners. Aviation terminology and know-how is a requirement to fly any airliner, even in Microsoft Flight Simulator.
You will find many great videos on YouTube on how to fly the FlyByWire A32NX.
Check out the FlyByWire YouTube Channel as well: FlyByWire on YouTube
The simBrief route used in this guide:
AIRAC Updates
Please note, we may update this OFP and guide from occasionally to ensure it is current with the latest AIRAC provided by the simulator or external navdata.
Download simBrief OFP
Prerequisites
Below are a few Prerequisites before programming the MCDU.
Visit Starting the Aircraft to learn more.
- Make sure the aircraft is powered up.
- External Power OR APU
- Make sure the ADIRS are set to NAV.
- Have a valid flight plan.
- Ensure IFR clearance has been obtained.
Requesting IFR Clearance
Before departing for the flight, we must obtain an IFR clearance from ATC. The clearance may be obtained from clearance delivery or another specific frequency, depending on the airport and available services.
If you are not flying on a network and are using the built-in ATC menu, simply find the appropriate selection in the menu and request for IFR clearance.
Clearances will usually provide the following information below. As a pilot, you would need to read back the clearance correctly or acknowledge it if using the built-in ATC menu.
- Cleared to the destination via specified route in the filed flight plan.
- Initial cleared altitude after departure.
- Assigned SID for departure OR radar vectors
- Assigned departing runway.
- Transponder/squawk code.
- Departure frequency.
Additional reading material: The CRAFT mnemonic
Chapters / Phases
This guide will cover the following topics:
- Understanding the MCDU
- MCDU Programming
- DATA
- INIT A
- FLIGHT PLAN
- SECONDARY FLIGHT PLAN
- RAD NAV
- INIT FUEL PRED
- PERF
- A32NX simBrief Integration
Understanding the MCDU
During this guide we will be referring to a few key terms which are defined below.
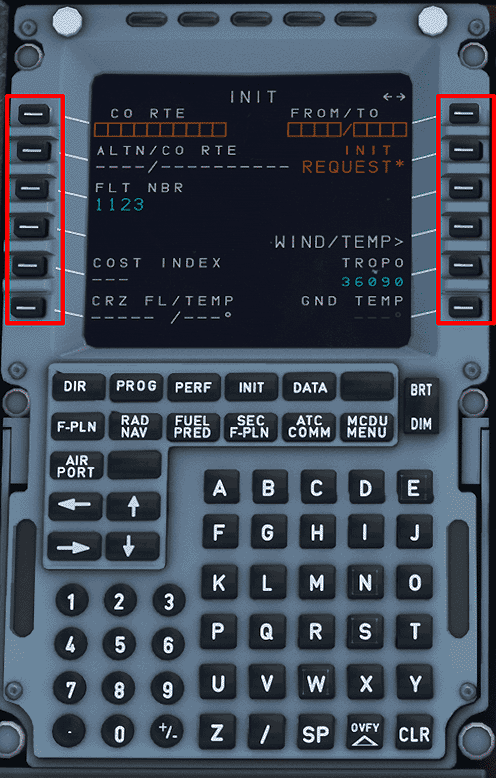
Line Select Key (LSK)
LSK for short. These keys are on the left and right-hand side of the MCDU screen. They are highlighted in the image below.
- Left-hand keys are referenced (in descending order) as
LSK1L - LSK6L. - Right-hand keys are referenced (in descending order) as
LSK1R - LSK6R.
Slew Keys
These keys are referenced below.
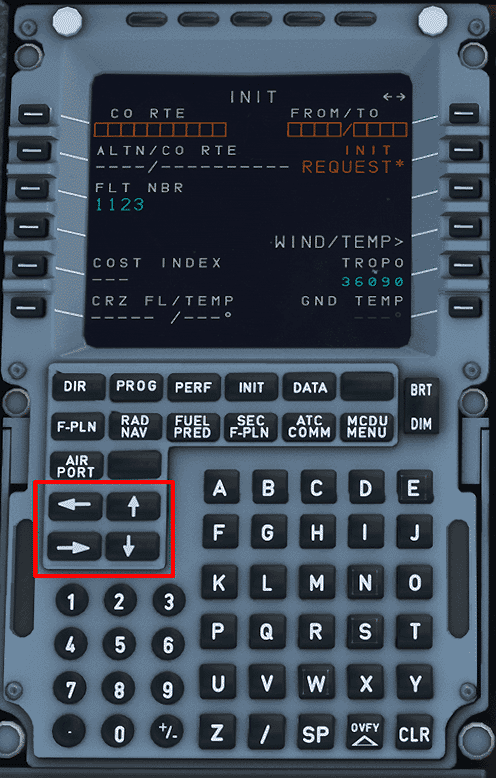
Info
Horizontal Slew KeysVertical Slew Keys
These keys scroll between certain pages, i.e., INIT A and INIT FUEL PRED when the INIT page is selected.
These keys scroll vertically on certain pages, i.e., F-PLN page.
MCDU Programming
D.I.F.S.R.I.P.
Pilots commonly use the acronym above when programming the MCDU. It represents the following flow on the MCDU:
- DATA
- INIT A
- FLIGHT PLAN
- SECONDARY FLIGHT PLAN
- RAD NAV
- INIT FUEL PRED
- PERF
The simBrief route used in this guide — Available Here
DATA
This MCDU page provides various data for the pilots. It has two pages (accessed by using the horizontal slew keys). It will not be used for this tutorial.
DATA includes the pages below:
- Position Monitor
- IRS Monitor
- GPS Monitor
- A/C Status
- Closest Airports
- Equitime Point
- Waypoints
- NavAids
- Runways
- Routes
INIT A
Automatic OFP Imports via INIT REQUEST
Please note that the INIT REQUEST option will not appear if you have selected both a departure and arrival on the MSFS world menu before loading into your flight.
For more information and a guide to our simBrief A32NX features, visit the page below:
FMS (MCDU) and simBrief Integration
FROM/TO Field
- Using the keypad, type in
EGFF/EGCC - Once this is in the scratch pad, press LSK1R.
- This following screen would show «company routes». Since there are none stored, select
Returnusing LSK6L.

FLT NBR
- Using the keypad, type in
EZY123and press LSK3L. Feel free to use your own flight number here! - If you have the Free Text module enabled for your flight, this will enable other users flying the A32NX to send you messages. This will not be covered in this guide.
COST INDEX

The cost index can be found in the image above.
- Using the keypad, type in
44 - Press LSK5L.
Wind Requests
Pilots can choose to import your wind data at this stage through the WIND/TEMP option by pressing LSK 4R. For more information on using this feature, please see the guide below.
Wind Request Guide
Please also note the following:
- Per-waypoint entry and request of cruise winds is still being implemented.
- Wind Request functionality is not 100% accurate to the real aircraft.
- In real life, selecting the wind requests option on the climb page would populate the wind data for all stages of flight.
CRZ FL/TEMP

Input the desired cruise flight level in this field. On our OFP, this is listed as 0220 or FL220.
- Using the keypad, type in
220 - Press LSK6L
This will input FL220 and the temperature as well.
FLIGHT PLAN
Upon loading the flight plan page, there will be three entries. Departure airport, (DECEL), and arrival airport.
Our route for this flight can be found on the 2nd page of the OFP
Routing Disclaimer
Note that waypoints, STARs, and SIDs may be called differently due to different nav-databases or different AIRAC cycles between simBrief and the simulator.

EGFF/30 BCN1A BCN N864 OKTEM OKTEM1M EGCC/23R
Inputting a SID
SID
Standard Instrument Departure Route
These are procedures that are defined and published that take a flight from the take-off phase to the en route phase.
Also see: SIDS and STARS
To program the Standard Instrument Departure (SID):
- Press LSK1L or EGFF (the departure airport)
- Select
DEPARTUREshown next to LSK1L - Select the runway we are departing from. In this case
30using LSK3L - On the list of SIDs select the
BCN1Adeparture
The MCDU should now show at the top of the screen in yellow what is selected for our departure from EGFF.
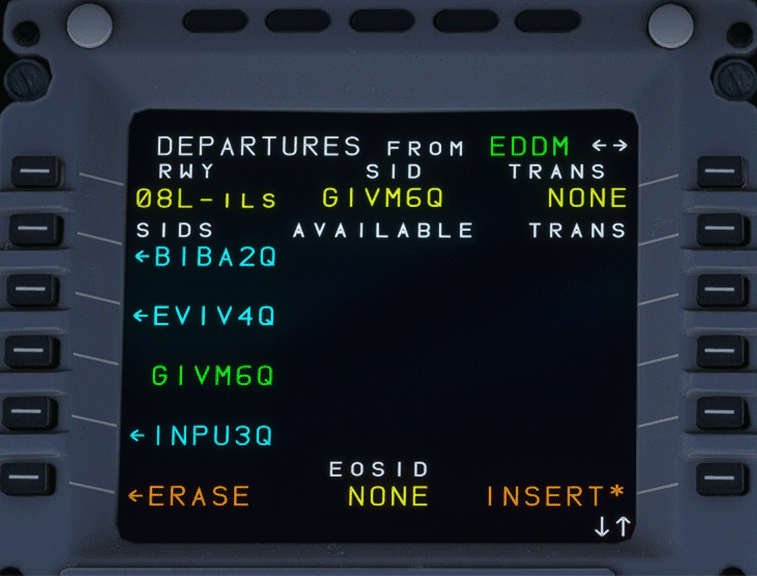
- Press
INSERTusing LSK6R to program this into the flight plan.
Our flight plan should now have the associated waypoints for the BCN1A SID. We can scroll through the flight plan using the vertical slew keys. The SID terminates at BCN and this is where we can begin to fill out the rest of the flight plan.
BCN1A ILS Frequency
When selecting a departure SID that pairs with a LOC/ILS frequency, the respective frequency will be autopopulated in RADNAV provided it is available from the navdata.
Enroute Flight Plan
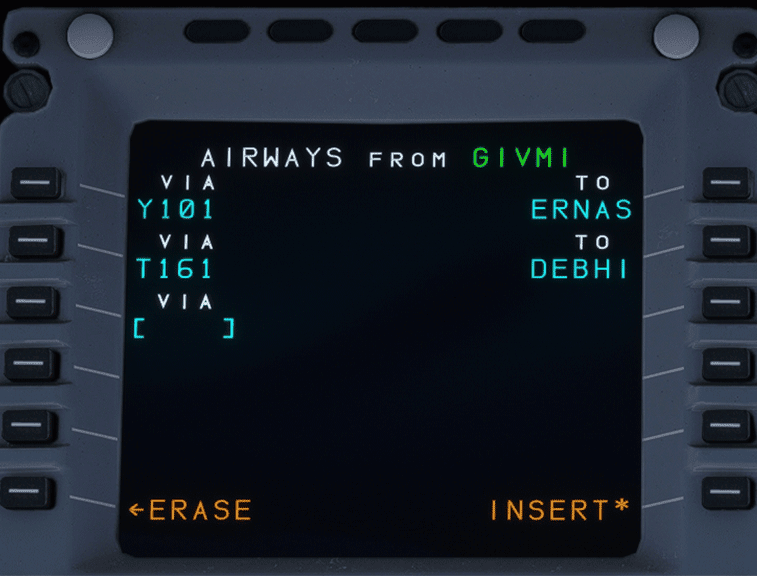
- Press the LSK that matches the location of
BCNon the MCDU screen. - Select
AIRWAYSusing LSK5R. - Using the keypad, type in
N864(the airway) and press LSK1L. - Using the keypad, type in
OKTEM(waypoint) and press LSK1R.- Remember: Airways are on the left and waypoints are on the right.
DCT Before a Waypoint
There will be cases where your flight plan has waypoints and no airways, or a mix of both. When you go direct from one waypoint to another, it will usually look like the following: WAYPOINT DCT WAYPOINT. You might also see directs represented as two waypoints without a separator, which looks like WAYPOINT WAYPOINT.
Let’s look at an example and understand how to program these into the MCDU. (Please note this is not applicable to the sample flight plan in this guide, and we plan to create a more advanced flight plan entry guide at a later time.)
Below is the current flight plan we are utilizing:
Current Sample Flight Plan
EGFF/30 BCN1A BCN N864 OKTEM OKTEM1M EGCC/23R
Let’s imagine for this example that there was no airway between BCN and OKTEM. The flight plan would look like the following:
Example NO AIRWAY Flight Plan
EGFF/30 BCN1A BCN DCT OKTEM OKTEM1M EGCC/23R
The airway N864 was replaced with DCT indicating from waypoint BCN proceed direct to OKTEM.
When you encounter this type of routing, there are a couple of ways to input this leg without the use of the airways page on the MCDU.
One of the easiest ways is utilizing the lateral revision page. To do this, simply find the starting waypoint on your F-PLN page, which in this case is BCN.
- Use the relevant LSK to select it.
-
You will then be on the following page:
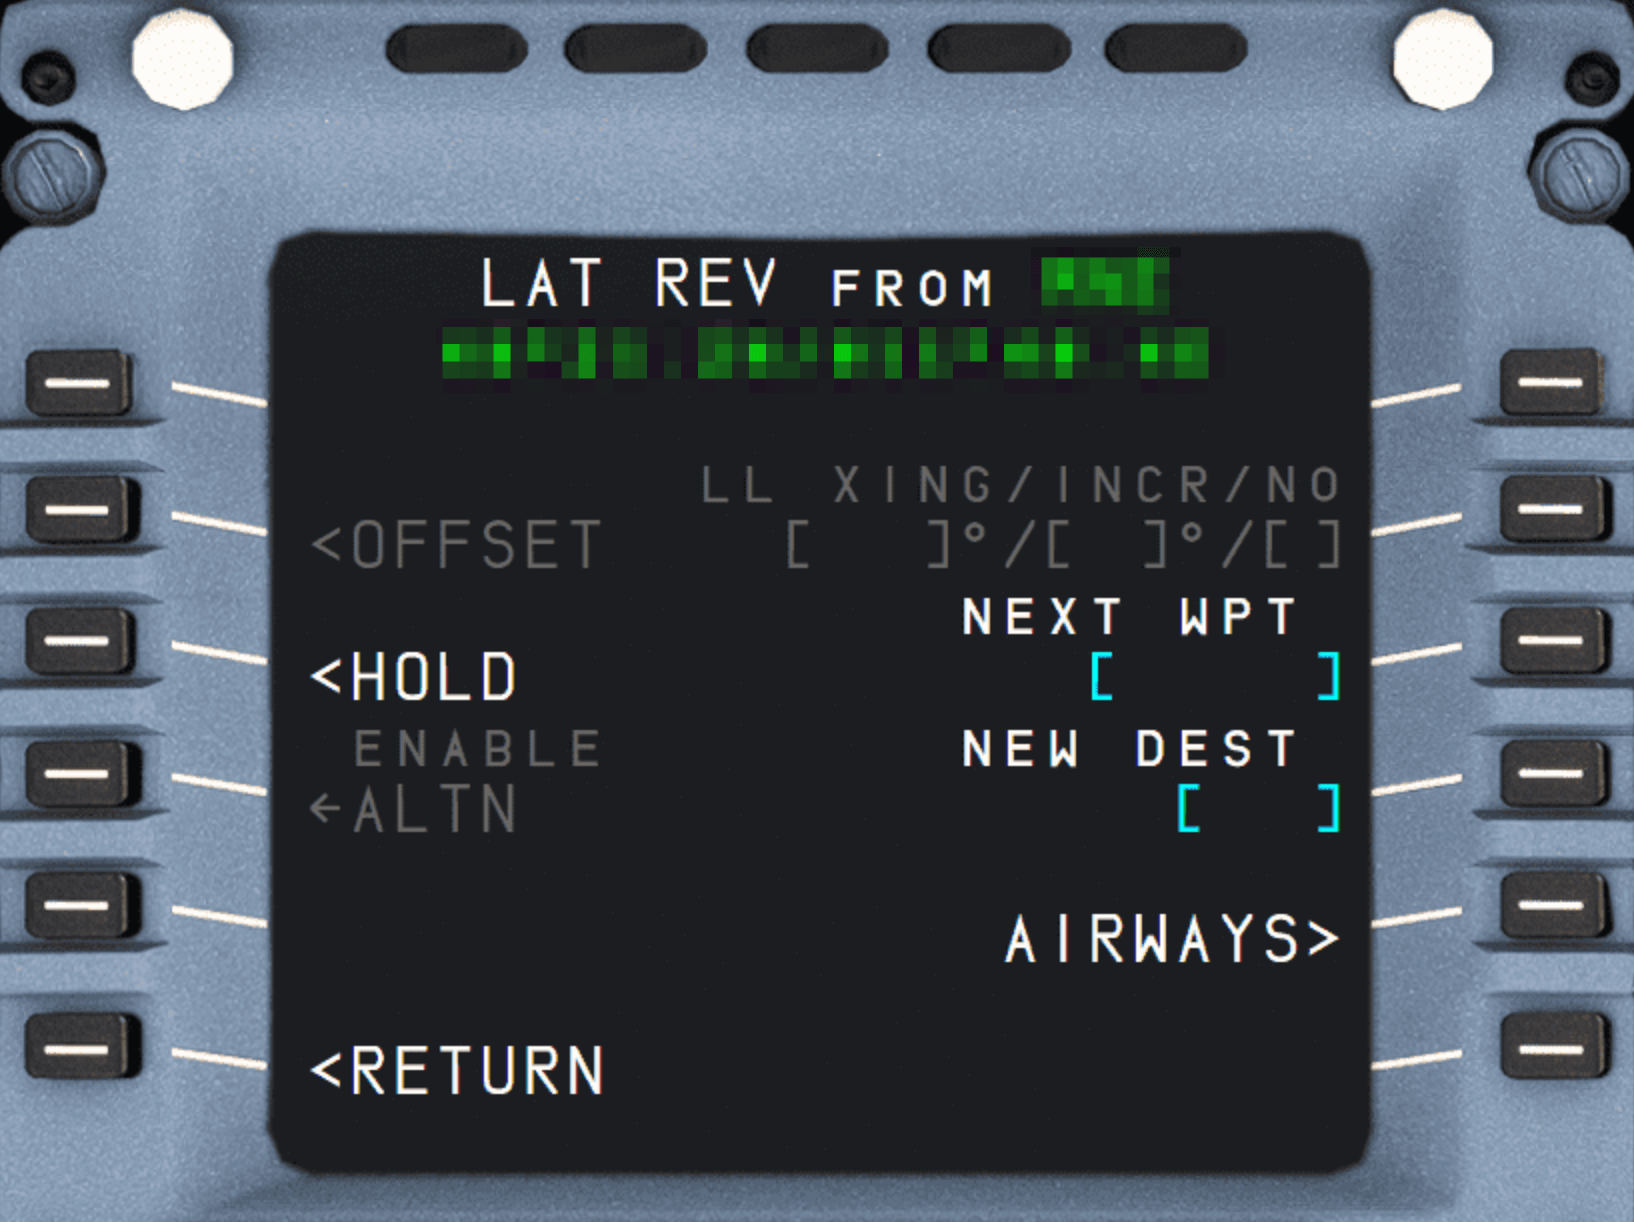
-
Type in
OKTEMso it’s visible in the scratchpad. - Use
LSK3Rto enterOKTEMas the next waypoint on your flight plan.
Planning the Arrival
For the purposes of this guide, we will pre-plan our arrival into EGCC via the OKTEM1M STAR into 23R.
STAR
Standard Terminal Arrival Route
Similar to the SID, these are procedures that are defined and published that take a flight from the last point in a route (in our case MONTY) to the first point in the approach or the initial approach fix (IAF).
Also see: SIDS and STARS
Find EGCC in green in the flight plan OR select EGCC in white under DEST using the corresponding LSK.
- Select
ARRIVALusing LSK1R- We will be shown the approaches available, designated by
TypeRwy. - For this guide, we will shoot for an ILS to keep it simple.
- We will be shown the approaches available, designated by
- Use the vertical slew keys to find
ILS23Rand select it using the corresponding LSK. - Again, use the vertical slew keys to find the STAR for this flight
OKTEM1Mand select it using the corresponding LSK. - We won’t have any via for this flight. Select
NO VIASusing LSK2L. On the following page we can choose transitions if available, but for this flight we don’t. - Insert this STAR into the flight plan using LSK6R.
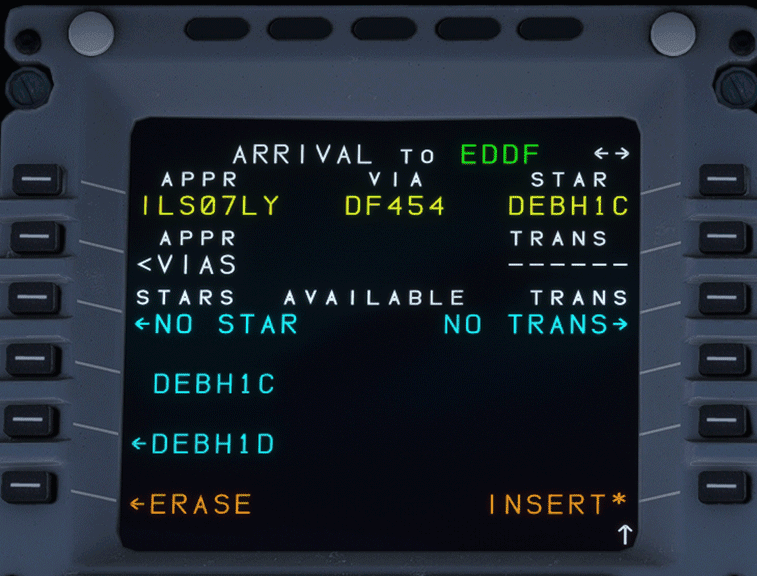
Verify the flight plan by using the vertical slew keys to scroll through it.
Discontinuity
Discontinuity
The flight plan might contain so-called discontinuities. These are breaks in the flight plan and often separate two flight plan sections, like the SID and first in-route waypoint or the STAR and the APPR. They are also often inserted when the flight plan is modified.
Sometimes discontinuities are also part of a procedure to indicate that manual input is required (mostly clearance by ATC). The preceding legs are called MANUAL legs.
See our detailed documentation for Discontinuities to understand how to appropriately handle these when encountered on your F-PLN page.
Additionally, make note of this Special Case on the discontinuity page.
Viewing Flight Plan on ND
We can also verify the route looks correct by selecting Plan on the EFIS control panel and watching the ND as we scroll through.
SECONDARY FLIGHT PLAN
This page allows us to input a secondary flight plan. This page is currently inoperable in the A32NX. We will update this portion of the guide when it is usable.
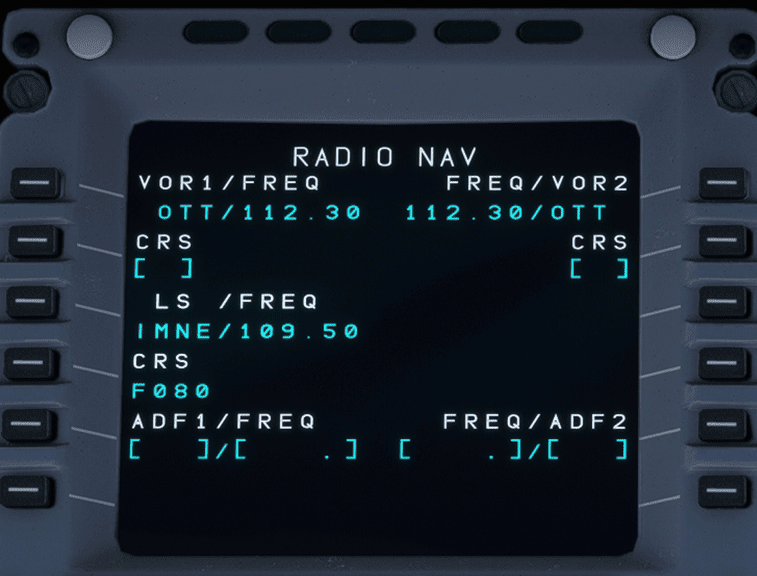
RAD NAV
On this page, we would set any frequencies or identifiers needed for the departure and subsequently later en route those required for the arrival.
For the purposes of this guide, we will be using frequencies on the RADNAV page.
If we would like to have additional navaids for the departure, we can input the runway localizer for runway centerline guidance on the PFD and the initial procedure turn, including the BRECON VOR (BCN) to verify the track en route to BCN. This is a little more advanced than this guide allows for, but we will cover how to input frequencies.
VOR
On this departure, we have the BCN VOR with a frequency of 117.45
- Using the keypad, type in
117.45and press LSK1L. This will autopopulate the identifier of the VOR when within range. - We can also set the desired course to track
031and press LSK2L to input it.
Departure ILS
When selecting the SID earlier in the flight plan section, the A32NX should have autopopulated the ILS/LOC frequency. If it hasn’t, we can manually insert it for centerline guidance on take off.
Our departure runway is EGFF/30 (runway 30) which has a frequency of 110.7. When inputting a frequency, and we are in range of the ILS, it will autopopulate the identifier and course. There is no need to fill these fields.
- Using the keypad, type in
110.7and press LSK3L to input it.
Arrival ILS
With an ILS or LOC approach selected, the arrival ILS frequency should be automatically tuned correctly whenever the aircraft is at climb phase or greater and within 250 NM of the destination. Ensure that we verify the ILS frequency when we reach the arrival phase of the flight — see Approach and Landing (ILS).
Remember, our arrival airport/rwy is EGCC/23R with ILS23R having a frequency of 109.5. When inputting a frequency, and we are in range of the ILS, it will autopopulate the identifier and course. There is no need to fill these fields.
- Using the keypad, type in
109.5and press LSK3L to input it.
ADF
This works much in the same way as the examples above.
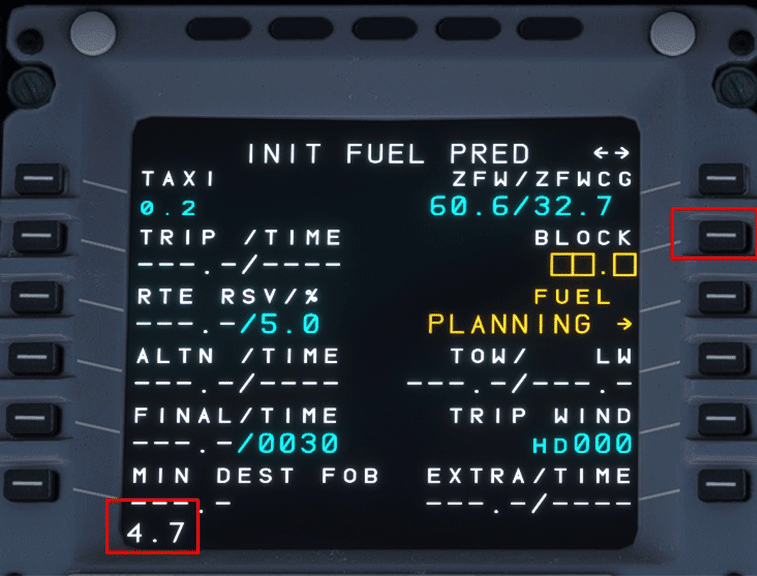
INIT FUEL PRED
To navigate to the INIT FUEL PRED page, we first have to select the INIT button. Once on INIT A, use the horizontal slew keys to switch the page to INIT FUEL PRED.
On this page, we can input our zero fuel weight (ZFW) and zero fuel weight center of gravity (ZFWCG).
Important Info — FMS Gross Weight (FMS GW)
Fuel and payload have to be set in the aircraft (see link below) and passenger boarding has to be complete for the ZFW/ZFWCG to be correct.
Gross Weight (GW) value on the ECAM will appear only when certain conditions are satisfied:
- This page (INIT FUEL PRED) has a ZFW/ZFWCG value. Reminder: After engines are started, INIT FUEL PRED changes to the FUEL PRED page.
- At least one engine is running.
Please see our Fuel and Weights Guide for more detailed information.
The A32NX can autopopulate this information.
- Press LSK1R to load in the calculated ZFW/ZFWCG into the scratch pad at the bottom of the MCDU.
- Press LSK1R a second time to input the above calculation into the MCDU. (The empty orange boxes should now be filled in by the scratch pad entry).
Now we can add our fuel on board (FOB). The amount we input in this field can be done in one of three ways:
- Indicated FOB on the upper ECAM.
- We can have the MCDU plan the amount of fuel required.
- The amount indicated in the OFP.
ECAM FOB
Look at the upper ECAM and note the FOB indicated. Let’s say that amount is 3091 kg. When inputting the block fuel into the MCDU, it is referenced in «Tons» and we should round to the closest decimal point.
- Using the keypad, type in
3.1and press LSK2R.
MCDU Planning
A Note on Fuel Planning
The fuel planning feature on the MCDU should only be used as a reference point before fueling the aircraft using the EFB.
Generating / using the value provided by this feature may not be accurate and does not actually load fuel into the aircraft.
We can choose to have the MCDU provide a recommended amount of fuel for the planned flight.
- Press LSK3R to compute an amount of fuel.
The Block field will be populated with a calculated fuel amount.
- Press LSK3R again to confirm the fuel.
- We should load this amount of fuel via the EFB.
SimBrief OFP
We can use the planned block fuel stated on the OFP, which in this case is 3091 kg.
- Using the keypad, type in
3.1and press LSK2R - We should load this amount of fuel via the EFB option.
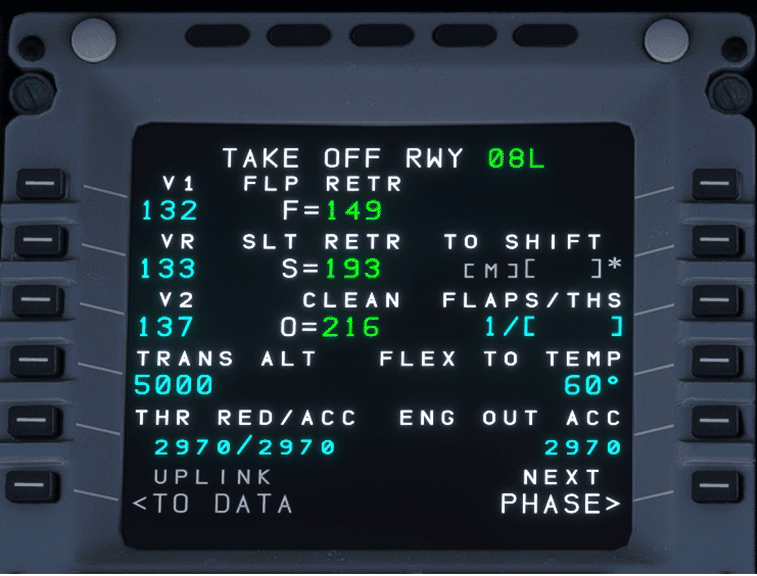
PERF
The performance page changes based on the relative stages of flight until we land the aircraft. When programming the MCDU on the ground, we start on the take-off performance page.
For this flight, we will be taking off with a 1+F flaps configuration.
- Using the keypad, type in
1and press LSK3R
THS Field MCDU
Entry of the THS field is subject to airline SOP and may not be required.
The Trimmable Horizontal Stabilizer (THS) field is where we enter the stabilizer trim for takeoff based on the aircraft’s takeoff CG (TOCG). Entering this value in the MCDU will trigger the F/CTL PITCH TRIM/MCDU/CG DISAGREE ECAM caution, if appropriate.
If you have already entered your flaps configuration in the step above, applicable entries are formatted /X.XDN or /X.XUP representing a trim value and nose down or up respectively.
Examples:
- Nose down trim of 0.4 can be inputted as
/0.4DN - Nose up trim of 1.5 can be inputted as
/1.5UP
For the purposes of simulation, there are a couple of methods to set the value of THS, described below. We intend to add a better visual representation of the TOCG at a later time, since loadsheets are not available.
See the After Engine Start section to find the appropriate trim value and to physically set your trim.
GW CG
Insert a THS value based on the GW CG values found in the EFB Ground Services > Payload page or the Fuel Prediction page in the MCDU. While this will be slightly off versus TOCG because of taxi fuel consumption, this will be close enough to accurate values until a better TOCG display is implemented.
GW CG Values can be found:
- On the Payload Tab on the Grounds Services Page in the flyPad EFB.
- On the Fuel Prediction page in the MCDU.
CG to THS calculation:
- CG to THS can be found in the downloable FBW checklist in our Standard Operating Procedures resources page.
- The CG/THS markings on the trim wheel can be used to validate this.
GW CG in the flyPad payload page and correct CG trim values on the trim wheel in the cockpit are not yet implemented in the stable release version
Make sure to update this value or set the correct trim once your engines have started.
After Engine Start
Once the engines have been started, we can use the auto-calculated CG value (not the ZFWCG value) on the FUEL PRED page for determining the pitch trim setting. You can now update the THS setting (if you chose to input a THS value) in the take-off performance page and set the pitch trim using the trim wheel. Although the TOCG may be slightly different due to fuel being used for taxi, it will not change enough to require a change in pitch trim.
We can also choose to set a FLEX TO TEMP for the flight. The example we are using today is 60 degrees. (This will normally be calculated via a pilot’s company EFB or other tools).
- Using the keypad, type in
60and press LSK4R
Flex Temp
What is Flex Temp?
Flex temp is entered into the MCDU, enabling the computer to use the pilot-specified air temperature to allow for take-off thrust that is less than TOGA but not less than CLB. This is a method of creating cost savings by increasing engine life, resulting in reduced overhaul and fuel costs. This value is normally calculated via a pilot’s company EFB or other tools.
Unfortunately, A320neo performance data for FLEX temp performance calculators alongside other various tools are not publicly available and are guarded by Airbus. For the purposes of simulation, it’s important to note the following:
Flex temps are above ISA+29 °C (44 °C at sea level) and above current temp, but no higher than ISA+59 °C (74 °C at sea level). Usable Flex temps at sea level are from 45 °C (or current OAT if it is higher) to 74 °C.
Additionally, a decent rule of thumb for simulation purposes is to use a lower number if heavy or on a short runway and higher for the opposite.
Our SID chart mentions that the TRANS ALT for this departure is 6000ft.
- Using the keypad, type in
6000and press LSK4L
The A32NX can calculate the V-Speeds automatically. To do this simply:
- Press LSK1L to have the calculated V1 speed appear in the scratchpad.
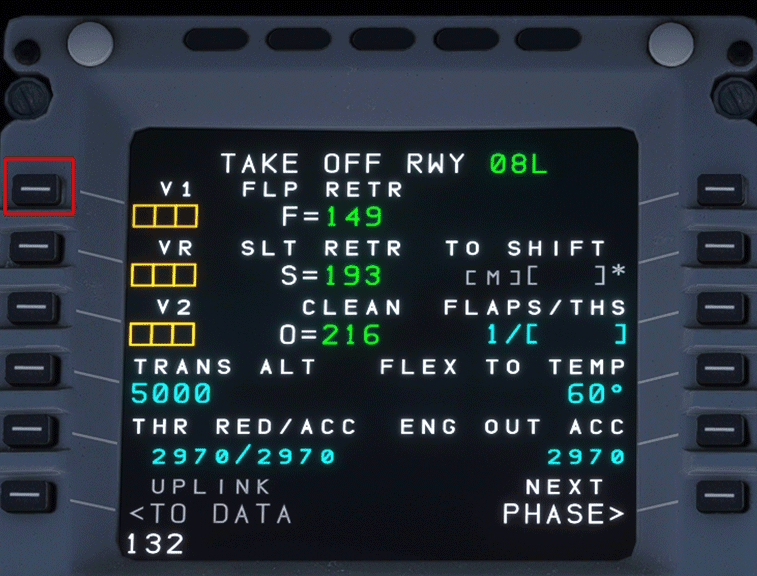
- Press LSK1L again to have 130 inputted into the V1 speed.
- Repeat this procedure for VR and V2.
The performance page should now look like this:
A32NX simBrief Integration
This section has been moved to our dedicated simBrief Integration feature guide.
After setting up the MCDU, continue with Engine Start and Taxi
Прежде чем перейти к собственно
производству нашего рейса, считаю своим
долгом провести краткий курс ликбеза
по некоторым компонентам матчасти
семейства А320. К сегодняшнему дню уже
существует ряд мануалов и примеров
полета: скорее всего, большинство
симмеров знакомо с ними. В то же время,
не лишним будет обновить в памяти
названия и функционал некоторых систем
рассматриваемого нами ВС4,
а может и чего новенького узнать:).
Быстренько пробежимся по ним:
Начнем с комбинаций, которыми будем
вызывать 2-Dпанели:
SHIFT+3 = Pedestal SHIFT+4 = Overhead
SHIFT+5 = MCDU

Type in OKTEM so it’s visible in the scratchpad.
LSK3R to enter OKTEM as the next waypoint on your flight plan.Planning the Arrival
For the purposes of this guide, we will pre-plan our arrival into EGCC via the OKTEM1M STAR into 23R.
STAR
Standard Terminal Arrival Route
Similar to the SID, these are procedures that are defined and published that take a flight from the last point in a route (in our case MONTY) to the first point in the approach or the initial approach fix (IAF).
Also see: SIDS and STARS
Find EGCC in green in the flight plan OR select EGCC in white under DEST using the corresponding LSK.
- Select
ARRIVALusing LSK1R- We will be shown the approaches available, designated by
TypeRwy. - For this guide, we will shoot for an ILS to keep it simple.
- We will be shown the approaches available, designated by
- Use the vertical slew keys to find
ILS23Rand select it using the corresponding LSK. - Again, use the vertical slew keys to find the STAR for this flight
OKTEM1Mand select it using the corresponding LSK. - We won’t have any via for this flight. Select
NO VIASusing LSK2L. On the following page we can choose transitions if available, but for this flight we don’t. - Insert this STAR into the flight plan using LSK6R.
Verify the flight plan by using the vertical slew keys to scroll through it.
Discontinuity
Discontinuity
The flight plan might contain so-called discontinuities. These are breaks in the flight plan and often separate two flight plan sections, like the SID and first in-route waypoint or the STAR and the APPR. They are also often inserted when the flight plan is modified.
Sometimes discontinuities are also part of a procedure to indicate that manual input is required (mostly clearance by ATC). The preceding legs are called MANUAL legs.
See our detailed documentation for Discontinuities to understand how to appropriately handle these when encountered on your F-PLN page.
Additionally, make note of this Special Case on the discontinuity page.
Viewing Flight Plan on ND
We can also verify the route looks correct by selecting Plan on the EFIS control panel and watching the ND as we scroll through.
SECONDARY FLIGHT PLAN
This page allows us to input a secondary flight plan. This page is currently inoperable in the A32NX. We will update this portion of the guide when it is usable.
RAD NAV
On this page, we would set any frequencies or identifiers needed for the departure and subsequently later en route those required for the arrival.
For the purposes of this guide, we will be using frequencies on the RADNAV page.
If we would like to have additional navaids for the departure, we can input the runway localizer for runway centerline guidance on the PFD and the initial procedure turn, including the BRECON VOR (BCN) to verify the track en route to BCN. This is a little more advanced than this guide allows for, but we will cover how to input frequencies.
VOR
On this departure, we have the BCN VOR with a frequency of 117.45
- Using the keypad, type in
117.45and press LSK1L. This will autopopulate the identifier of the VOR when within range. - We can also set the desired course to track
031and press LSK2L to input it.
Departure ILS
When selecting the SID earlier in the flight plan section, the A32NX should have autopopulated the ILS/LOC frequency. If it hasn’t, we can manually insert it for centerline guidance on take off.
Our departure runway is EGFF/30 (runway 30) which has a frequency of 110.7. When inputting a frequency, and we are in range of the ILS, it will autopopulate the identifier and course. There is no need to fill these fields.
- Using the keypad, type in
110.7and press LSK3L to input it.
Arrival ILS
With an ILS or LOC approach selected, the arrival ILS frequency should be automatically tuned correctly whenever the aircraft is at climb phase or greater and within 250 NM of the destination. Ensure that we verify the ILS frequency when we reach the arrival phase of the flight — see Approach and Landing (ILS).
Remember, our arrival airport/rwy is EGCC/23R with ILS23R having a frequency of 109.5. When inputting a frequency, and we are in range of the ILS, it will autopopulate the identifier and course. There is no need to fill these fields.
- Using the keypad, type in
109.5and press LSK3L to input it.
ADF
This works much in the same way as the examples above.
INIT FUEL PRED
To navigate to the INIT FUEL PRED page, we first have to select the INIT button. Once on INIT A, use the horizontal slew keys to switch the page to INIT FUEL PRED.
On this page, we can input our zero fuel weight (ZFW) and zero fuel weight center of gravity (ZFWCG).
Important Info — FMS Gross Weight (FMS GW)
Fuel and payload have to be set in the aircraft (see link below) and passenger boarding has to be complete for the ZFW/ZFWCG to be correct.
Gross Weight (GW) value on the ECAM will appear only when certain conditions are satisfied:
- This page (INIT FUEL PRED) has a ZFW/ZFWCG value. Reminder: After engines are started, INIT FUEL PRED changes to the FUEL PRED page.
- At least one engine is running.
Please see our Fuel and Weights Guide for more detailed information.
The A32NX can autopopulate this information.
- Press LSK1R to load in the calculated ZFW/ZFWCG into the scratch pad at the bottom of the MCDU.
- Press LSK1R a second time to input the above calculation into the MCDU. (The empty orange boxes should now be filled in by the scratch pad entry).
Now we can add our fuel on board (FOB). The amount we input in this field can be done in one of three ways:
- Indicated FOB on the upper ECAM.
- We can have the MCDU plan the amount of fuel required.
- The amount indicated in the OFP.
ECAM FOB
Look at the upper ECAM and note the FOB indicated. Let’s say that amount is 3091 kg. When inputting the block fuel into the MCDU, it is referenced in «Tons» and we should round to the closest decimal point.
- Using the keypad, type in
3.1and press LSK2R.
MCDU Planning
A Note on Fuel Planning
The fuel planning feature on the MCDU should only be used as a reference point before fueling the aircraft using the EFB.
Generating / using the value provided by this feature may not be accurate and does not actually load fuel into the aircraft.
We can choose to have the MCDU provide a recommended amount of fuel for the planned flight.
- Press LSK3R to compute an amount of fuel.
The Block field will be populated with a calculated fuel amount.
- Press LSK3R again to confirm the fuel.
- We should load this amount of fuel via the EFB.
SimBrief OFP
We can use the planned block fuel stated on the OFP, which in this case is 3091 kg.
- Using the keypad, type in
3.1and press LSK2R - We should load this amount of fuel via the EFB option.
PERF
The performance page changes based on the relative stages of flight until we land the aircraft. When programming the MCDU on the ground, we start on the take-off performance page.
For this flight, we will be taking off with a 1+F flaps configuration.
- Using the keypad, type in
1and press LSK3R
THS Field MCDU
Entry of the THS field is subject to airline SOP and may not be required.
The Trimmable Horizontal Stabilizer (THS) field is where we enter the stabilizer trim for takeoff based on the aircraft’s takeoff CG (TOCG). Entering this value in the MCDU will trigger the F/CTL PITCH TRIM/MCDU/CG DISAGREE ECAM caution, if appropriate.
If you have already entered your flaps configuration in the step above, applicable entries are formatted /X.XDN or /X.XUP representing a trim value and nose down or up respectively.
Examples:
- Nose down trim of 0.4 can be inputted as
/0.4DN - Nose up trim of 1.5 can be inputted as
/1.5UP
For the purposes of simulation, there are a couple of methods to set the value of THS, described below. We intend to add a better visual representation of the TOCG at a later time, since loadsheets are not available.
See the After Engine Start section to find the appropriate trim value and to physically set your trim.
GW CG
Insert a THS value based on the GW CG values found in the EFB Ground Services > Payload page or the Fuel Prediction page in the MCDU. While this will be slightly off versus TOCG because of taxi fuel consumption, this will be close enough to accurate values until a better TOCG display is implemented.
GW CG Values can be found:
- On the Payload Tab on the Grounds Services Page in the flyPad EFB.
- On the Fuel Prediction page in the MCDU.
CG to THS calculation:
- CG to THS can be found in the downloable FBW checklist in our Standard Operating Procedures resources page.
- The CG/THS markings on the trim wheel can be used to validate this.
GW CG in the flyPad payload page and correct CG trim values on the trim wheel in the cockpit are not yet implemented in the stable release version
Make sure to update this value or set the correct trim once your engines have started.
After Engine Start
Once the engines have been started, we can use the auto-calculated CG value (not the ZFWCG value) on the FUEL PRED page for determining the pitch trim setting. You can now update the THS setting (if you chose to input a THS value) in the take-off performance page and set the pitch trim using the trim wheel. Although the TOCG may be slightly different due to fuel being used for taxi, it will not change enough to require a change in pitch trim.
We can also choose to set a FLEX TO TEMP for the flight. The example we are using today is 60 degrees. (This will normally be calculated via a pilot’s company EFB or other tools).
- Using the keypad, type in
60and press LSK4R
Flex Temp
What is Flex Temp?
Flex temp is entered into the MCDU, enabling the computer to use the pilot-specified air temperature to allow for take-off thrust that is less than TOGA but not less than CLB. This is a method of creating cost savings by increasing engine life, resulting in reduced overhaul and fuel costs. This value is normally calculated via a pilot’s company EFB or other tools.
Unfortunately, A320neo performance data for FLEX temp performance calculators alongside other various tools are not publicly available and are guarded by Airbus. For the purposes of simulation, it’s important to note the following:
Flex temps are above ISA+29 °C (44 °C at sea level) and above current temp, but no higher than ISA+59 °C (74 °C at sea level). Usable Flex temps at sea level are from 45 °C (or current OAT if it is higher) to 74 °C.
Additionally, a decent rule of thumb for simulation purposes is to use a lower number if heavy or on a short runway and higher for the opposite.
Our SID chart mentions that the TRANS ALT for this departure is 6000ft.
- Using the keypad, type in
6000and press LSK4L
The A32NX can calculate the V-Speeds automatically. To do this simply:
- Press LSK1L to have the calculated V1 speed appear in the scratchpad.
- Press LSK1L again to have 130 inputted into the V1 speed.
- Repeat this procedure for VR and V2.
The performance page should now look like this:
A32NX simBrief Integration
This section has been moved to our dedicated simBrief Integration feature guide.
After setting up the MCDU, continue with Engine Start and Taxi


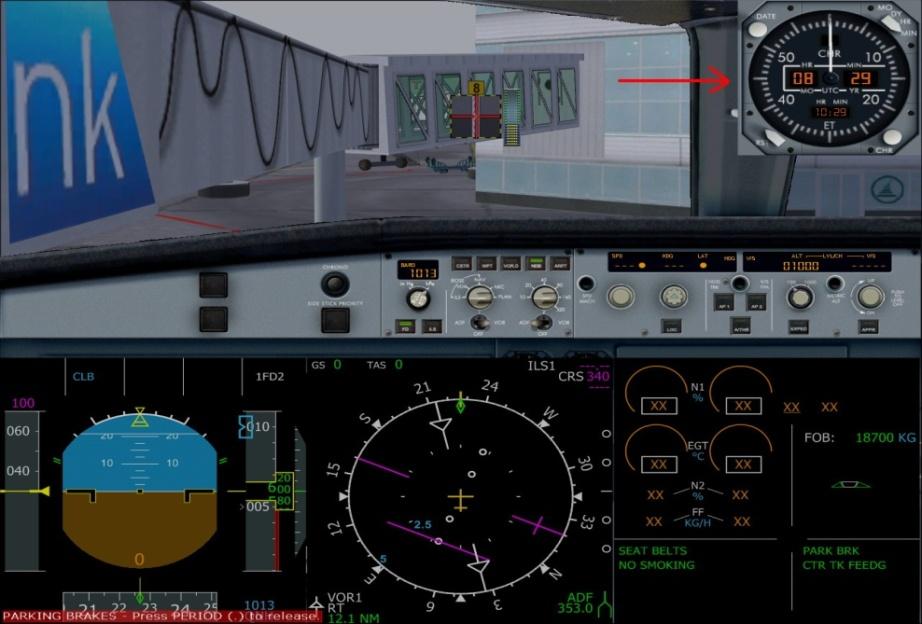


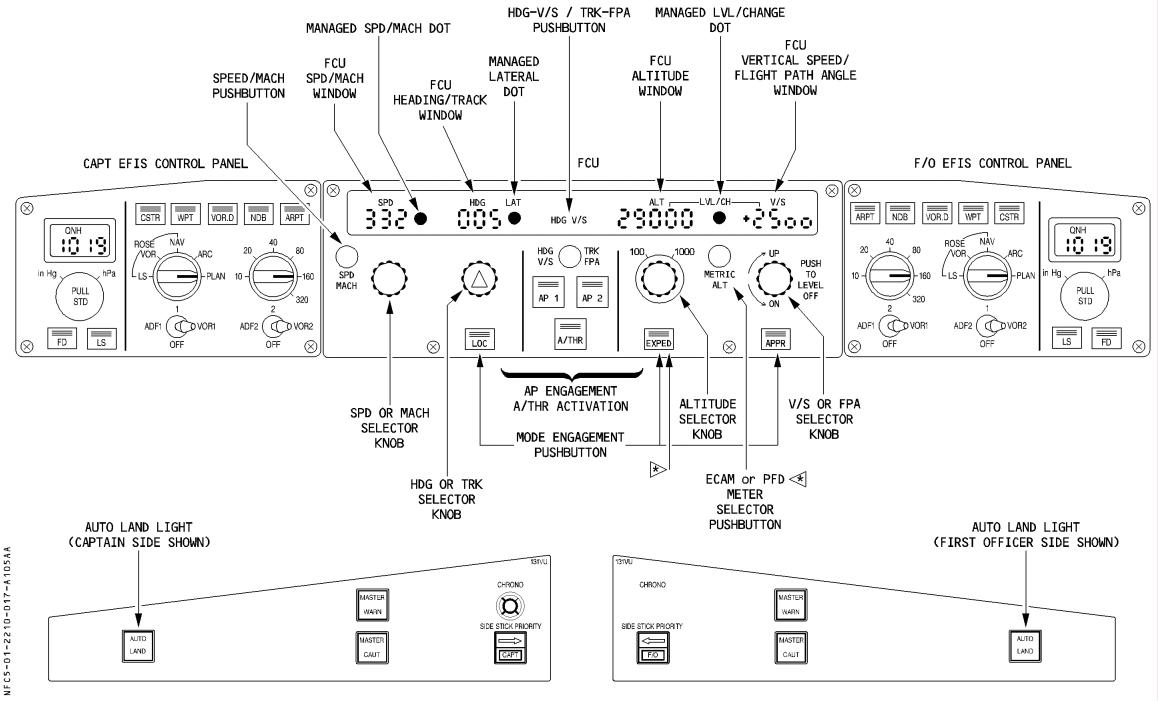
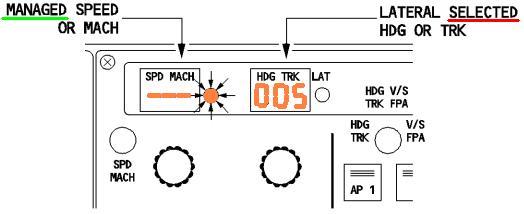


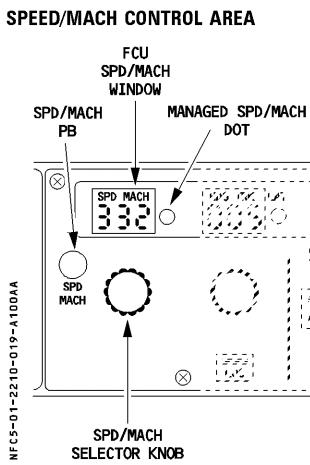

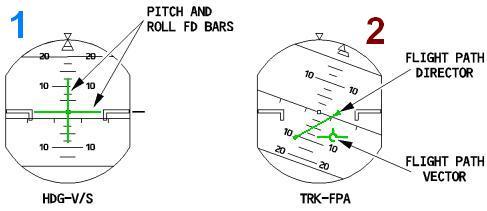


 алее
алее