- Manuals
- Brands
- Garrett Manuals
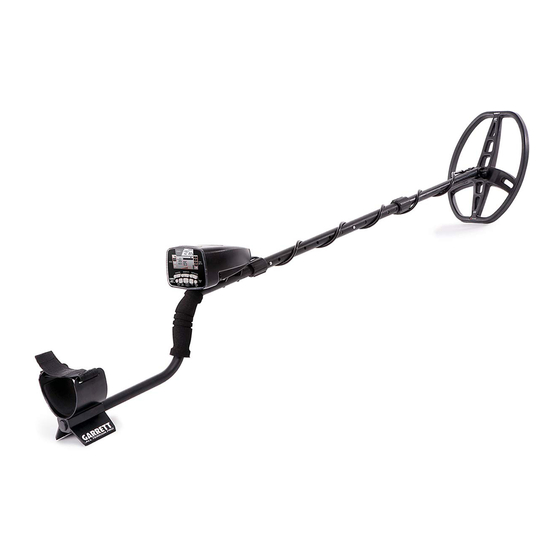
- Metal Detector
- AT Pro
- Owner’s manual
-
Contents
-
Table of Contents
-
Troubleshooting
-
Bookmarks
Quick Links
Owner´s Manual AT PRO International
1
AT Pro International™
DTI Detector Trade International GmbH & Co. KG
Related Manuals for Garrett Garrett AT Pro
Summary of Contents for Garrett Garrett AT Pro
-
Page 1
Owner´s Manual AT PRO International AT Pro International™ DTI Detector Trade International GmbH & Co. KG… -
Page 2
PRO Mode for experienced hunters. Backed by more than 45 years of extensive research and development, your Garrett AT Pro metal detector is the most advanced of its kind in the industry. Whether you are experienced or a beginner, this machine is well suited for a wide variety of detecting environments. -
Page 3: Table Of Contents
TABLE OF CONTENTS AT PRO CONTROL PANEL …………..4 QUICK START GUIDE …………….5 AT PRO COMPONENTS …………… 6 LIST OF PARTS ………………7 ASSEMBLY ………………8 POWERING ON ……………… 11 SEARCH MODES …………….12 Overview of STD Mode vs PRO Mode ……..12 Standard (STD) Detection Modes ……….
-
Page 4: At Pro Control Panel
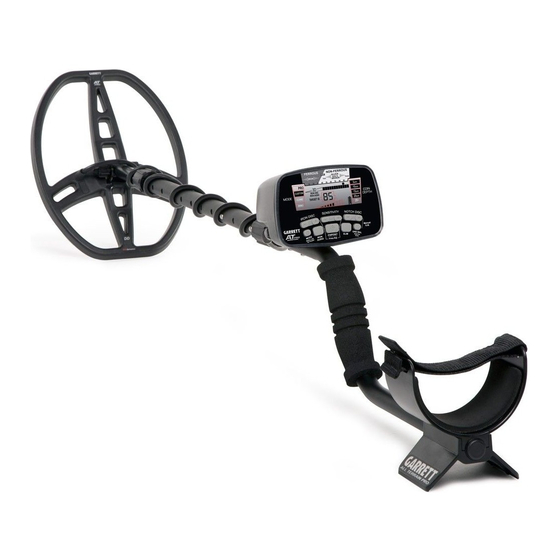
AT Pro CONTROL PANEL Target ID Legend indicates Lower Scale metal types. Digital indicates notch Target ID Target ID discrimination pattern. Cursor (also shows indicates High Resolution ground balance probable Coin Depth Iron Discrimination settings while in target identity. Indicator indicates level of iron GND-BAL mode.) indicates depth of…
-
Page 5: Quick Start Guide
QUICK START GUIDE 1. Install batteries. The AT Pro operates with four (4) AA batteries which are already installed by Garrett. 2. Power ON. Press and release the ON / OFF Power button. The AT Pro powers on in the last mode used and is ready to search. (Factory default mode is Coins.) 3.
-
Page 6: At Pro Components
AT Pro COMPONENTS Search coil Lower Control Upper Stem Housing Stem Screen Pushbutton Controls Spring Clip strap S-shaped Stem Handle Grip Detector Stand Padded Arm Cuff Garrett Metal Detectors…
-
Page 7: List Of Parts
LIST OF PARTS No tools are required to assemble the AT Pro. Four (4) AA batteries are included with the detector. The box for your detector contains the following parts: One (1) control housing with One (1) 28×22 cm DD S-shaped stem searchcoil …
-
Page 8: Assembly
ASSEMBLY Align the holes in the mounting washers with the small posts on the lower stem and press firmly into place. Slide the searchcoil onto the stem. Insert the threaded bolt through the holes of the lower stem and searchcoil. Hand-tighten the searchcoil assembly with the wing nut.
-
Page 9
Depress the spring clip in the lower stem and adjust to the most comfortable operating length. Wrap the cable snugly about the stem with the first turn of the cable over the stem. Insert the coil connector into the 4-pin connector of the control housing and hand-tighten. -
Page 10
If desired, attach headphones to the 2-pin connector of the Control Housing. Note: Headphones are not required but are desired by many hunters to hear faint targets. Connecting the headphones will silence the detector’s speaker. Note: The provided headphones are for dry use only; see page 54 for optional waterproof headphones. -
Page 11: Powering On
POWERING ON ON/OFF Power and MODE Pushbutton Switch the detector on with the power button. Press and release to switch the unit ON and resume hunting with the same settings used prior to switching the unit OFF. To turn off the detector, press and hold this pushbutton for one (1) second (until the detector produces a second beep).
-
Page 12: Search Modes
SEARCH MODES The AT Pro includes six detection modes: three Standard (STD) Modes and three Professional (PRO) Modes. It is recommended to begin searching with one of the Standard Modes to become familiar with the AT Pro before switching to the more advanced audio features provided by the Pro Modes.
-
Page 13: Standard (Std) Detection Modes
STANDARD (STD) DETECTION MODES In the STD modes, the AT Pro produces a full-strength binary audio beep to indicate a detected target. Standard detection mode operation is ideal for learning the AT Pro because of its consistent audio signals. Detected targets are heard at the same full-strength beep regardless of their size or depth.
-
Page 14
• COINS Mode Designed to find most types of coins, jewelry, etc., while eliminating trash items such as iron and foil. High-Res Iron Discrimination level has been preset to 35 to exclude most iron targets. In addition, one pixel of foil has been excluded. Be aware that most pulltabs and pieces of tabs have not be eliminated from detection as these trash items have conductivities similar to small coins and jewelry. -
Page 15: Pro Detection Modes
PRO DETECTION MODES Zero, Coins or Custom have the same discrimination patterns as in STD Mode. In PRO Mode, however, the AT Pro utilizes its Pro Audio functions—including Proportional Audio and Tone Roll Audio—to offer more target information. The Pro Mode audio provides more target information and faster recovery speed for separating adjacent targets.
-
Page 16
Audio Target Response Comparison: Standard vs Pro Mode Shallow coin Deep coin Notice the differences in Standard binary audio versus PRO audio in the two target scenarios above. The binary audio gives a solid, consistent beep for both the shallow and the deep coin. In contrast, PRO Mode’s proportional audio provides a stronger signal for the shallow coin and a softer signal for the deeper coin. -
Page 17
Adjacent Targets Comparison: Standard vs Pro Mode Adjacent targets These two adjacent coins would produce one strong signal while in STD Mode. In PRO Mode, the proportional audio provides two peaks of audio response to allow the user to identify multiple targets. AT Pro International™… -
Page 18: Tone Roll Audio (Pro Mode)
Tone Roll Audio (Pro Mode) This feature of Pro Mode provides the user with more audible target information to help identify targets, particularly flat iron objects, such as bottle caps and washers. Standard Mode audio produces a single tone based upon the target’s strongest signal.
-
Page 19: Target Id Information
TARGET ID INFORMATION Target ID Cursor Target ID Legend Discrimination (Upper Scale) Pattern (Lower Scale) Target ID Legend—Works in conjunction with the Target ID Cursor to indicate a target’s probable identity. Ferrous (iron) targets will indicate on the left half, non-ferrous targets that are thin or have low conductivity will indicate in the middle, and thick or high conductivity targets (e.g.
-
Page 20: Digital Target Id
DIGITAL TARGET ID Target ID Digital Cursor Target The AT Pro’s Digital Target ID system provides a specific target value to help identify targets more precisely. Targets are identified on the LCD by number, with items near 1 being the most ferrous. The most conductive targets (such as thick silver) register closer to to 99.
-
Page 21: Tone Id
Note: Target values can vary based on the orientation of the target in the ground, amount of ground mineralization, etc. It is important to practice in the field to learn how these factors can affect Target ID. TONE ID The Tone ID feature produces three distinct audible tones based on a target’s metal type and conductivity: Low-Tone: Ferrous targets such as nails, iron,…
-
Page 22: Discrimination
DISCRIMINATION Notch Discrimination—The AT Pro’s NOTCH DISC pushbuttons are used in conjunction with the ELIM pushbutton to eliminate trash objects from detection such as foil or pull- tabs. NOTCH DISC ELIM Pushbutton Pushbutton The AT Pro has 12 pixels or «notches» of discrimination (in addition to the 40 points of High-Res Iron Discrimination).
-
Page 23
Example: Manual Modification of Notch Discrimination Pattern Use the NOTCH DISC buttons to position the Target ID Cursor above the pixel you wish to eliminate (see above illustration). Use the ELIM pushbutton to delete this pixel from the Lower Scale (see below). This item is now rejected. The second method of modifying the Notch Discrimination pattern involves the use of only the ELIM pushbutton. -
Page 24: Iron Discrimination
on either side. The AT Pro is now programmed to find the missing earring based on the conductivity of its matching pair. Note: The notch discrimination function can be used to modify each Mode’s discrimination pattern. Notch Discrimination modifications made while in CUSTOM (either in Standard or Pro mode) will be retained when the detector is switched OFF.
-
Page 25
The examples shown below illustrate how an iron object can often «mask» out the signal of an adjacent good target when too much iron discrimination has been applied. Using the AT Pro’s High-Res Iron Discrimination, apply just enough iron discrimination to reject the undesired iron nail shown in this example. -
Page 26
Example: Detecting Targets in Trash with High-Res Iron Discrimination In the illustration above, the AT Pro is operating with an IRON DISC setting of 20. The nail seen in Illustration 1 (on page 25) registers from 10 to 25 on the Digital Target ID scale. -
Page 27: Iron Audio
IRON AUDIO Iron Audio IRON AUDIO Pushbutton Press and release the IRON AUDIO pushbutton to switch the Iron Audio feature ON/OFF. When this feature is on the words «IRON AUDIO» appear on the LCD (as shown in the illustration above). The Iron Audio feature can be used in any of the AT Pro’s six modes.
-
Page 28
Refer to the illustrations below regarding the use of the Iron Audio feature: IRON AUDIO OFF: Normal division of low, mid and high tones. IRON AUDIO OFF: With the Iron Discrimination set to 20, all targets below 20 are silent. IRON AUDIO ON: Targets below 20 are now heard as a low tone and targets above 20 will produce a mid or high tone. -
Page 29
iron object like a bottle cap or steel washer will produce a very distinctive Low-High-Low response. Tip for using Iron Audio: In areas with high concentrations of iron, it is recommended to switch off Iron Audio. Otherwise, it may produce far too many signals. Then, if a target is detected that has a questionable or inconsistent response, switch on Iron Audio to check if it is iron. -
Page 30: Sensitivity
SENSITIVITY SENSITIVITY Sensitivity Pushbutton Indicator The AT Pro has eight (8) settings for sensitivity. Use the (+) or (-) SENSITIVITY buttons to step through the eight levels, which are continuously shown on the LCD. Use higher sensitivity levels when searching for very small or very deep targets.
-
Page 31: Ground Balance
GROUND BALANCE GND BAL Indicator (only displays on LCD when in use) GND BAL Setting (only displays while in Ground Balance mode) NOTCH DISC GND BAL Pushbutton Pushbutton (use with GND BAL) GND BAL Pushbutton—Hold for Automatic Ground Balance or use in conjunction with the NOTCH DISC pushbuttons for Manual Ground Balance.
-
Page 32: Manual Ground Balance
balance values indicate conductive soil; high ground balance values indicate ferrous soil. Manual Ground Balance: You may want to use the Manual Ground Balance function to ground balance slightly positive to enhance detection of small targets or balance slightly negative to reduce detection of «hot rocks» and terra cotta. Press and release the GND BAL pushbutton and continually bounce (pump) the searchcoil from 2 to 20 cm above the ground.
-
Page 33: Frequency Adjustment
FREQUENCY ADJUSTMENT PINPOIINT/ SENSITIVITY Freq Adjust Pushbutton Pushbutton Use the PINPOINT/Freq Adj pushbutton in conjunction with the (+) or (-) SENSITIVITY pushbuttons to adjust frequency. The AT Pro is capable of operating at four slightly different frequencies in order to minimize the interference caused by electrical sources (e.g.
-
Page 34: Pinpointing
PINPOINTING Press and hold the Pinpoint pushbutton to determine the exact location of a target. To use the pinpoint function, position the searchcoil to the side of the target’s suspected location at a fixed height above the ground (e.g. 2cm). Press and hold the Pinpoint button and sweep the searchcoil over the target area while maintaining the same fixed height above the ground (e.g.
-
Page 35
Coin Depth Upper Scale indicates Indicator signal strength PINPOINT Pushbutton (Press and hold to pinpoint) Traditional pinpointing technique using Pinpoint pushbutton. Note: For best pinpointing results, maintain a constant height above the ground (e.g. 2cm) and ensure that the detector is properly ground balanced. -
Page 36: Narrowing The Detection Area
Tip for narrowing the detection area: Large targets can produce wide signals while pinpointing, making it difficult to precisely locate the target’s center. To help pinpoint, the detector can be retuned to the target to narrow the detection field as follows. While holding down the Pinpoint pushbutton, move the coil toward the target until the LCD just reaches a full-scale response.
-
Page 37: Alternative Pinpointing Methods
• Alternative pinpointing technique: DD-tip or tail. In the standard pinpointing method described on pages 34, the target is pinpointed beneath the center of the searchcoil. Some detectorists using DD coils prefer to pinpoint off the tip or tail of the searchcoil. DD «tip» pinpointing technique Image A Press and hold the Pinpoint…
-
Page 38
You can reverse this pinpointing technique to pinpoint off the DD coil’s tail; in this case, push the coil away from you. The audio and LCD meter will place the target just off the searchcoil’s tail. • Alternative pinpointing technique: DD-wiggle. Quickly locate targets without using the Pinpoint button as follows. -
Page 39: Hunting Tips
HUNTING TIPS • Begin hunting in STD Mode, then switch to PRO Mode after you have become more experienced. • If you are new to metal detecting, start searching in areas with sandy and loose soil to make it easier to learn how to use your metal detector, pinpoint and dig targets.
-
Page 40
Walk slowly to allow overlapping of the searchcoil Scan side to side approx. 1m per second. 40 Garrett Metal Detectors… -
Page 41
• Walk slowly as you scan your searchcoil in a straight line from side to side at a speed of about 1 meter per second. Advance the searchcoil about half the length of the searchcoil at the end of each sweep. Overlap Swing 1m/sec by 14 cm… -
Page 42
• Swing the searchcoil flat and at a constant height. Do not bounce the coil and do not lift the coil at the end of swings. • Swing the searchcoil parallel to the water’s edge. • If necessary, notch out the first pixel under Foil. It is important to note that by notching out this pixel, detection of some small jewelry items will be reduced. -
Page 43
• Isolating adjacent targets. The narrow detection field of the AT Pro’s DD searchcoil allows better separation of adjacent targets versus a similar size concentric searchcoil. Use narrow swings of the searchcoil in trashy areas to isolate good targets amongst the trash. Concentric Searchcoil Searchcoil… -
Page 44: Bench Tests
BENCH TESTS You should conduct bench tests to become more familiar with the AT Pro’s operation in both Standard and PRO modes. In addition, the use of the Iron Audio feature should be tested in both Standard and PRO modes. Suggested test items should include: •…
-
Page 45
with ZERO discrimination and pass the same coins across the searchcoil. Observe the sounds as well as the Target ID as each target is tested. The proportional audio characteristics of the PRO Mode can be easily understood using such bench testing. Pass the coins across the searchcoil at distances that vary from 5 cm to 10 cm to 15 cm. -
Page 46
at a distance of 8 to 10 cm. Note that the bottle cap’s flat surface gives a Digital Target ID reading in the 75–85 range and produces the high tone of a «good» target. Next, switch to PRO Mode and pass the bottle cap across the coil again and notice the different audio. -
Page 47: Underwater Operation
UNDERWATER OPERATION The AT Pro can be immersed in water to a 3-meter depth (maximum) to search in and along shorelines, rivers, piers, docks or swimming holes. Use of the AT Pro at depths exceeding 3 meters can cause leaks and damage the detector.
-
Page 48: Care And Maintenance
CARE AND MAINTENANCE Battery Level Indicator Battery Replacement—The AT Pro is operating with fresh or fully charged batteries when 4 illuminated bars on the Battery Level Indicator (see above) are displayed. The detector will maintain full performance until the batteries need to be replaced.
-
Page 49
one segment remaining. NiMH rechargeable batteries may be used. Expect 20 to 40 hours of operation depending on battery type and quality. Access and replace the batteries by rotating the battery cover housing one-quarter turn counterclockwise. Pull and remove the cap to slide battery holder out. Remove batteries when the AT Pro will be stored for longer than 30 days. -
Page 50: Troubleshooting Guide
TROUBLESHOOTING GUIDE SYMPTOM SOLUTION 1. Ensure batteries are installed in the correct position. No power 2. Replace all old batteries with all new batteries. 1. Ensure your searchcoil is securely connected and the coil cable is snugly wound around the stem. 2.
-
Page 51: Metal Detecting Code Of Ethics
METAL DETECTING CODE OF ETHICS The following is a Code of Ethics that many treasure hunt clubs endorse and hobbyists follow to preserve our exciting hobby of metal detecting. We encourage you to do the same: • I will respect private and public property, all historical and archaeological sites and will do no metal detecting on these lands without proper permission.
-
Page 52: Cautions
CAUTIONS When searching for treasure with your Garrett detector, observe these precautions: • Never trespass or hunt on private property without permission. • Avoid areas where pipelines or electric lines may be buried. • National and state parks / monuments, etc are absolutely off-limits.
-
Page 53: Warranty / Service
WARRANTY & SERVICE Your AT Pro detector is warranted for 36 months, limited parts and labor, but does not cover damage caused by alteration, modification, neglect, accident or misuse. Use of the AT Pro at submerged depths exceeding 3 meters will void this warranty.
Инструкции по эксплуатации
Условия гарантии Запчасти Инструкции FAQ Сервисный центр
| Garrett Axiom | Смотреть PDF | Скачать ZIP |
| Garrett GoldMaster 24K | Смотреть PDF | Скачать ZIP |
| Garrett ACE Apex | Смотреть PDF | Скачать ZIP |
| Garrett AT Max | Смотреть PDF | Скачать ZIP |
| Garrett AT Gold | Смотреть PDF | Скачать ZIP |
| Garrett AT Pro | Смотреть PDF | Скачать ZIP |
| Garrett ATX | Смотреть PDF | Скачать ZIP |
| Garrett ACE 200i | Смотреть PDF | Скачать ZIP |
| Garrett ACE 300i | Смотреть PDF | Скачать ZIP |
| Garrett ACE 400i | Смотреть PDF | Скачать ZIP |
| Garrett Euro ACE | Смотреть PDF | Скачать ZIP |
| Garrett ACE 250 | Смотреть PDF | Скачать ZIP |
| Garrett ACE 150 | Смотреть PDF | Скачать ZIP |
| Garrett GTI 2500 | Смотреть PDF | Скачать ZIP |
| Garrett Sea Hunter Mark II | Смотреть PDF | Скачать ZIP |
| Garrett Pro-Pointer AT Z-Lynk | Смотреть PDF | Скачать ZIP |
| Garrett Pro-Pointer AT | Смотреть PDF | Скачать ZIP |
| Garrett Pro-Pointer II | Смотреть PDF | Скачать ZIP |
| Garrett Infinium LS | Смотреть PDF | Скачать ZIP |
| Garrett GTP 1350 | Смотреть PDF | Скачать ZIP |
| Garrett Master Hunter CX Plus | Смотреть PDF | Скачать ZIP |
| Garrett Scorpion Gold Stinger | Смотреть PDF | Скачать ZIP |
| Garrett GTAx 550 | Смотреть PDF | Скачать ZIP |
| Garrett MS-3 | Смотреть PDF | Скачать ZIP |
МИРОВОЙ ЛИДЕР В ТЕХНОЛОГИИ ОБНАРУЖЕНИЯ МЕТАЛЛОВ
vk.com

Купить Garrett
Почему Garrett
Каталог
Где купить
Контроль подлинности
Публикации
Новинки
Сотрудничество
Стать дилером
О Garrett
Направления деятельности
Для дилеров
Розничные цены
Техподдержка
Инструкции по эксплуатации
Контроль подлинности
Частые вопросы
Условия гарантии
Покупка/замена запчастей
Сервисный центр
РЕЙКОМ ГРУПП
Официальный дистрибьютор
Официальный магазин
Контакты
Вакансии
2021 © Garrett Metal Detectors | При использовании материалов ссылка на сайт обязательна. Все права защищены.
- Manuals
- Brands
- Garrett Manuals
- Metal Detector
- AT Pro INTERNATIONAL
- Owner’s manual
-
Contents
-
Table of Contents
-
Troubleshooting
-
Bookmarks
Quick Links
TM
The powerful, all-terrain solution for locating
deeply buried European coins and artefacts!
1881 W. State Street
Garland, Texas 75042
Tel: 1.972.494.6151
Email: sales@garrett.com
Fax: 1.972.494.1881
Owner’s Manual
© 2012 Garrett Electronics, Inc. PN 1533300.C.1012
Related Manuals for Garrett AT Pro INTERNATIONAL
Summary of Contents for Garrett AT Pro INTERNATIONAL
-
Page 1
The powerful, all-terrain solution for locating deeply buried European coins and artefacts! 1881 W. State Street Garland, Texas 75042 Tel: 1.972.494.6151 Email: sales@garrett.com Fax: 1.972.494.1881 Owner’s Manual © 2012 Garrett Electronics, Inc. PN 1533300.C.1012… -
Page 2
THANK YOU FOR CHOOSING GARRETT METAL DETECTORS! Congratulations on the purchase of your new Garrett AT Pro ™ metal detector. This enhanced metal detector has been specifically designed for use in Europe’s challenging environments. The AT Pro includes Garrett’s exclusive Target ID technology and patented discrimination features. -
Page 3: Table Of Contents
CARE AND MAINTENANCE …………… 48 Battery Replacement …………..48 TROUBLESHOOTING GUIDE …………. 50 METAL DETECTING CODE OF ETHICS ……….51 CAUTIONS ………………52 WARRANTY / SERVICE …………..53 ACCESSORIES ………………. 54 SUGGESTED READING …………..56 Garrett Metal Detectors AT Pro International™…
-
Page 4: At Pro Control Panel
1. Install batteries. Legend indicates Lower Scale The AT Pro operates with four (4) AA batteries which are metal types. Digital indicates notch Target ID already installed by Garrett. Target ID discrimination pattern. Cursor (also shows indicates High Resolution ground balance probable…
-
Page 5: At Pro Components
Controls one (1) threaded bolt Camlocks strap If any part is missing, please contact your local dealer. S-shaped Stem Handle Grip Detector Stand Padded Arm Cuff Garrett Metal Detectors AT Pro International™…
-
Page 6: Assembly
Note: If the O-ring is properly seated, the connector’s collar can be easily tightened; if the collar is difficult to turn, the O-ring may not be seated properly. Garrett Metal Detectors AT Pro International™…
-
Page 7: Powering On
(1) second (until the detector produces a second beep). To restore the factory settings, press and hold the power button for 5 to 10 seconds (until the detector produces a fast double beep). 10 Garrett Metal Detectors AT Pro International™…
-
Page 8: Search Modes
For those who want to hear more target information, material of the desired object is unknown. All 12 Garrett offers a Pro Mode. The benefits of operating in Pro discrimination pixels are switched on and High-Res Mode include the ability to hear a target’s size and depth via Iron Discrimination is set to 0 (zero)—indicating that…
-
Page 9: Pro Detection Modes
Note: Changes made to the ZERO or COINS modes will not be retained after the detector is switched off. (For information on the use of IRON DISC and NOTCH DISC, see pages 22–26.) 14 Garrett Metal Detectors AT Pro International™…
-
Page 10
In contrast, PRO Mode’s proportional audio provides a stronger signal for the shallow coin and a softer signal for the deeper coin. The actual profile, or signature, of the target’s response is heard, thereby providing more information. 16 Garrett Metal Detectors AT Pro International™… -
Page 11: Tone Roll Audio (Pro Mode)
As shown, the bottle cap will The discrimination pattern can be adjusted (as described produce a distinctive response of Low-High-Low as compared to the coin’s response of only High tone. in the «Discrimination» section). 18 Garrett Metal Detectors AT Pro International™…
-
Page 12: Digital Target Id
Target ID). High/Bell Tone: Non-ferrous targets with medium to high conductivity, including most coins and jewelry. Note: PRO Mode produces a high tone; STD Mode produces a bell tone. 20 Garrett Metal Detectors AT Pro International™…
-
Page 13: Discrimination
Note: Depending upon how the lost earring is laying in the illustrations on next page.) ground, its Target ID may shift a little; therefore, your ability to find it will be enhanced by turning on an additional pixel 22 Garrett Metal Detectors AT Pro International™…
-
Page 14: Iron Discrimination
Iron detect the good target shown in Illustration 2. Discrimination up or down. The small two-digit number above the words «IRON DISC» on the LCD indicates the iron discrimination setting. 24 Garrett Metal Detectors AT Pro International™…
-
Page 15: Iron Audio
“ghost signals” that appear to be a good Therefore, the good target is detected due to the combined conductivity target. Garrett’s selectable Iron Audio feature allows the user being higher than that of the discriminated target (nail) alone.
-
Page 16
When Iron Audio is on in the PRO Mode, iron targets will not only be heard, but they will produce an even more distinctive response with multiple tones. For example, a nail will produce several fast low tones as the searchcoil passes over. A flat 28 Garrett Metal Detectors AT Pro International™… -
Page 17: Sensitivity
2 to 20 centimeters above the ground. When there is a minimal audio response from the ground, release the pushbutton and begin hunting. The ground balance value will have been indicated in the center of the LCD. Low ground 30 Garrett Metal Detectors AT Pro International™…
-
Page 18: Frequency Adjustment
Release the PINPOINT button when finished. 20–60: Likely an iron object Note: Frequency adjustments are small and therefore do 0–20: Highly conductive, non-ferrous minerals such as not affect target detection capabilities. saltwater 32 Garrett Metal Detectors AT Pro International™…
-
Page 19: Pinpointing
Note: For best pinpointing results, maintain a constant height 28 x 22 cm DD your reference point searchcoil. above the ground (e.g. 2cm) and ensure that the detector is for pinpointing. properly ground balanced. 34 Garrett Metal Detectors AT Pro International™…
-
Page 20
5-10cm A quality hand-held pinpointer such as Garrett’s Pro- strength is displayed on the LCD). Pointer is a recommended accessory item to speed the target recovery process and to aid in locating secondary targets. -
Page 21: Hunting Tips
Tip: Practice any or all of these various pinpointing options in your test plot. Choose the technique that works best for you. CORRECT As you improve your pinpointing accuracy, you will dig smaller SWING holes and increase your productive hunting time. INCORRECT SWING 38 Garrett Metal Detectors AT Pro International™…
-
Page 22
• Swing the searchcoil flat and at a constant height. second. Do not bounce the coil or lift the coil at end of swings. • Swing the searchcoil parallel to the water’s edge. 40 Garrett Metal Detectors AT Pro International™… -
Page 23
The Iron Audio feature can also be used so that all targets above the point of discrimination produce either a medium or high tone (i.e. «good» targets). 42 Garrett Metal Detectors AT Pro International™… -
Page 24: Bench Tests
First, set the detector to Standard Mode with Zero For bench testing, place the searchcoil on a flat, stable, non-metallic discrimination and pass the bottle cap across the searchcoil surface that is several feet from other metallic objects. 44 Garrett Metal Detectors AT Pro International™…
-
Page 25: Underwater Operation
For submersion, optional waterproof completely across the coil again and note the high-tone chirp headphones (available from Garrett) must be used. that is flanked by distinctive low tones on either side. Again, use a conductive, coin-sized target to compare its signature to that of a bottle cap in this PRO Mode Iron Audio setting.
-
Page 26: Care And Maintenance
Slide optimum performance. battery tray out to replace the batteries. • Replace protective cover on the connector when not using headphones. 48 Garrett Metal Detectors AT Pro International™…
-
Page 27: Troubleshooting Guide
50 Garrett Metal Detectors AT Pro International™…
-
Page 28: Cautions
• Do not disturb any pipeline, particularly if it could be detector was purchased. To avoid excessive shipping and carrying flammable gas or liquid. import charges, do not attempt to return a Garrett product to the factory in the United States. • Use reasonable caution in digging toward any target,…
-
Page 29: Accessories
Additional searchcoils, recovery tools, headphones, carrying bags, mineralized soils. searchcoil covers, Garrett caps and Garrett shirts are available for all detecting accessory needs. Waterproof Headphones— Part No. 2202100 Required when the entire headphone set will be immersed in water.
-
Page 30: Suggested Reading
SUGGESTED READING RAM BOOKS TITLES Also available—pocket size treasure- RAM Books, a division of Garrett Metal Detectors, publishes hunting field guides written by new titles each year related to treasure hunting, gold pros- Charles Garrett. Collect them all! pecting, coin hunting and relic recovery.
-
Page 31
PN 1533300.C.1012 with illustrations. TO VIEW OTHER RAM BOOKS: Go to www.garrett.com and visit the Hobby Division. An order form is available on our site which can be printed and mailed with your requested titles and payment. 58 Garrett Metal Detectors…
| В категории материалов: 7 Показано материалов: 1-5 Страницы : 1 2 » |
Инструкции металлоискателя Гарретт
металлодетекторы Garrett выпускает Американская фирма. Все наши инструкции по использованию МД Гарретт можно скачать бесплатно.
Сортировать по:
Дате ·
Названию ·
Рейтингу ·
Комментариям ·
Загрузкам ·
Просмотрам
|
AT pro обладает повышенной чувствительностью к широкому диапазону целей и возможностью использовать два вида баланса грунта, что дает возможность вести поиск как на простых почвах Средней полосы, так и на сложных грунтах, присущих северным районам, каменистым предгорьям, то есть в таких местах, где к полезным находкам можно пробиться, используя только ручную балансировку грунта. |
||

|
|
||

|
|
||
 Инструкция к металлодетектору. GARRETT GTI 2500 использует уникальную технологию с помощью которой есть возможность одновременного вывода на экран информации о проводимости металла из которого сделан обнаруженый объект, его размере и глубине залегания.
|
|
||
 Инструкция по эксплуатации металлодетектора GARRETT Treasure ACE 250 Микропроцессорный грунтовый металлоискатель типа VLF. Использует современные технологии Garrett, аналогичные более дорогим моделям.
|
Прибор легкий и отлично сконструирован. Имеет два уровня звуковой индикации для сигнализации о железном или цветном сигнале.Прибор имеет функцию дискриминации, позволяющую исключать поиск нежелательных «мусорных» объектов из железа. |
||