30
WEATHER STATION MA10920
Instruction Manual
INTRODUCTION
Congratulations on purchasing this weather station as an example of innovative design and
quality piece of engineering. Providing time, date, indoor and outdoor temperature, indoor and
outdoor relative humidity, and air pressure history information, this unit will never keep you
guessing on current and future weather conditions. Operation of this product is simple and
straightforward. By reading this operating manual, the user will receive a better understanding
of the weather station together with the optimum benefit of all its features.
FEATURES
The Weather Station
DCF Radio controlled time with manual setting option
Time reception ON/OFF setting
Weekday, date and month display (year only in setting mode)
Time zone option (-12h to +12h)
Alarm setting
Temperature display in degree Celsius (°C)
Indoor temperature display with MIN/MAX recordings
Permanent outdoor temperature MIN/MAX display with recordings with time and date
received
All MIN/MAX recordings can be reset
Indoor and outdoor humidity display in RH%
Weather forecast with weather tendency indicator
Relative air pressure history for the past 12 hours
Low battery indicator for outdoor sensor
Table standing
Thermo-Hygro Transmitter
Remote transmission of outdoor temperature and humidity to weather station by
868MHz
Wall mounting case
Mounting at a sheltered place. Avoid direct rain and sunshine
SETTING UP
Note: This weather station receives only one outdoor transmitter.
1. First, insert the batteries in the transmitter (see “How to install and replace batteries
in the thermo-hygro transmitter” above).
2. Within 30 seconds of powering up the transmitter, insert batteries and AC adapter in
the weather station (see “How to install and replace batteries in the weather
station” above). Once the batteries and AC adapter are in place, all segments of the
LCD will light up briefly and a short signal tone will sound. Then the indoor temperature,
humidity and the time as 0:00 will be displayed. If these informations are not displayed
on the LCD after 60 seconds, remove the batteries and wait for at least 60 seconds
before reinserting them. Once the indoor data is displayed user may proceed to the
next step.
3. After the batteries are inserted, the weather station will start receiving data signal from
the transmitter. The outdoor temperature and humidity data should then be displayed
on the weather station. If this does not happen after 2 minutes, the batteries will need
to be removed from both units and reset from step 1.
4. In order to ensure successful 868 MHz transmission, the distance between the weather
station and the transmitter should be within 100 meters (see notes on “Positioning”
and “868 MHz Reception”).
5. Once the outdoor data reception test period is completed, the DCF tower icon in the
clock display will start flashing in the upper left corner. This indicates that the clock has
detected that there is a radio signal present and is trying to receive it. When the time
code is received, the DCF tower becomes permanently lit and the time will be
displayed.
TO INSTALL AND REPLACE BATTERIES IN THE WEATHER STATION
The weather station uses 2 x AA, IEC LR6, 1.5V
batteries AND the AC adapter. To install and replace
the batteries, please follow the steps below:
1. Insert finger or other solid object in the space at
the bottom center of the battery compartment and
lift up to remove the cover.
2. Insert batteries observing the correct polarity (see
marking).
3. Replace compartment cover.
TO INSTALL AND REPLACE BATTERIES IN THE THERMO-HYGRO
TRANSMITTER
The outdoor thermo-hygro transmitter uses 2 x AA, IEC LR6, 1.5V batteries.
To install and replace the batteries, please follow the steps below:
1. Remove the battery cover by pushing the battery cover upwards with
your thumb.
2. Insert the batteries, observing the correct polarity (see battery
compartment marking).
3. Replace the battery cover on the unit.
Note:
In the event of changing batteries in any of the units, all units need to be reset by following
the setting up procedures. This is due to a random security code assigned by the transmitter
at start-up. This code must be received and stored by the weather station in the first 3
minutes of power being supplied to the transmitter.
ADD DEVICE TO MOBILE-ALERTS SYSTEM
(MOBILE ALERTS gateway needed, sold separately)
Open the app, dashboard is displayed. Tap «Add new sensor» and scan the QR code on the
back of the MA10920. Then set a name for the sensor. To set a name, select the transmitter
and then tap on the left area of the pencil icon in the upper right.
Note: only the data for indoor, outdoor temperature and indoor, outdoor humidity are
transmitted to Mobile-Alerts.
DCF RADIO CONTROLLED TIME
The time base for the radio controlled time is a Cesium Atomic Clock operated by the
Physikalisch Technische Bundesanstalt Braunschweig which has a time deviation of less than
one second in one million years. The time is coded and transmitted from Mainflingen near
Frankfurt via frequency signal DCF-77 (77.5 kHz) and has a transmitting range of
approximately 1,500 km. Your radio-controlled weather station receives this signal and
converts it to show the precise time in summer or wintertime.
The quality of the reception depends greatly on the geographic location. In normal cases,
there should be no reception problems within a 1,500 km radius of Frankfurt.
DCF reception is done twice daily at 02:00 and 03:00 am. If the reception is not successful at
03:00 am, then the next reception takes place the next hour and so on until 06:00am, or until
the reception is successful. If the reception is not successful at 06:00 am, then the next
attempt will take place the next day at 02:00 am.
If the tower icon flashes, but does not set the time or the DCF tower does not appear at all,
then please take note of the following:
Recommended distance to any interfering sources like computer monitors or TV sets is
a minimum of 1.5 — 2 meters.
Within ferro-concrete rooms (basements, superstructures), the received signal is
naturally weakened. In extreme cases, please place the unit close to a window and/ or
point its front or back towards the Frankfurt transmitter.
During nighttime, the atmospheric disturbances are usually less severe and reception is
possible in most cases. A single daily reception is adequate to keep the accuracy
deviation below 1 second.
FUNCTION KEYS:
Weather station:
The weather station has 5 easy to use function keys:
SET / DISPLAY / SELECT – key
— Single press to toggle time/indoor humidity display, date/indoor humidity display and
time/second display
— Hold 3s to enter set mode
— Single press SET key to change set items
— set items sequence: time zone, RCC ON/OFF, year, month, day, hour, minute, master reset,
quit set mode
— exit alarm set mode
— exit min/max display mode
— Stop learning transmitter
— Stop RCC reception
MIN/MAX/(RESET) – key
— Increase set items at set mode or alarm set mode
— Auto increase set items at set mode or alarm set mode when press and hold it
— Switches display in sequence max indoor temperature / min indoor temperature / max
outdoor temperature with time stamp / max outdoor temperature with date stamp / min
outdoor temperature with time stamp / min outdoor temperature with date stamp. The
min/max display will be timeout for 15s and back to normal display
— Hold 3s to clear all maximum minimum temperature
— Stop learning transmitter
— Stop RCC reception
ALM – key
— Single press to display pre-set alarm time for 15s
— Single press to toggle time alarm on/off when pre-set alarm time is shown
— Holds 3 s to enter alarm set mode when pre-set alarm time is shown
— Single press ALM key to change set items
— Set items sequence: alarm hour, alarm minute, quit alarm set mode
— Single press to change Alarm display from clock display or Date display
— Toggle alarm on/off during Alarm display
— exit min/max display mode
— Stop learning transmitter
— Stop RCC reception
DIM – key
— Adjust back light brightness in sequence, Strong, Middle and Weak. Will display “d1” for
Strong, “d2” for middle and “d3” for weak
— Stop learning transmitter
— Stop RCC reception
MODE – key
— Single press to toggle back light colour mode as sequence: temperature colour mode, single
colour mode and rotate colour mode (22 colours).
— Manual search of outdoor sensor
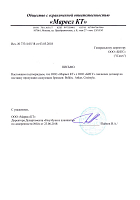
LCD SCREEN
The LCD screen is split into 3 sections displaying the information for time/calendar, indoor
data, weather forecast and air pressure history, and outdoor data.
* When the signal is successfully received by the weather station, the outdoor transmission
icon will be switched on. (If not successful, the icon will not be shown on LCD). The user can
then easily see whether the last reception was successful (icon on) or not (icon off).
MANUAL SETTINGS
The following settings can be changed when pressing and holding the SET key:
Time zone setting
Time reception ON/OFF setting
Manual setting : year, month, date, time and minutes
Reset of the weather station
TIME ZONE SETTING:
The time zone default of the weather station is “0”. To set a different time zone:
1. The current time zone value starts flashing.
2. Use the MIN/MAX key to set the time zone. The range runs from -12h to +12h hours in
1-hour intervals.
3. Confirm with the SET key and enter the Time Reception ON/OFF Setting.
TIME RECEPTION ON/OFF SETTING
In area where reception of the DCF-77 time signal is not possible, the DCF-77 time reception
function can be turned OFF. The clock will then work as a normal quartz clock. (Default
setting is ON).
1. “On” will start flashing on the LCD.
2. Use the MIN/MAX key to turn OFF the time reception function.
3. Confirm with the SET key and enter the Calendar Setting.
Note:
If the Time Reception function is turned OFF manually, the clock will not attempt any
reception of the DCF time as long as the Time Reception OFF function is activated.
The time reception “ “ and the “DCF” icons will not be displayed on the LCD.
CALENDAR SETTING
1. The year digits will start flashing.
2. Use the MIN/MAX key to set the year. Keep holding the key allows the value to
advance faster.
3. Press the SET key to confirm and enter the month setting mode.
4. The month digit will be flashing. Use the MIN/MAX key to set the month. Keep holding
the key allows the value to advance faster.
5. Press the SET key to enter date setting.
6. The date digit will be flashing. Use the MIN/MAX key to set the date. Keep holding the
key allows the value to advance faster.
7. Confirm with the SET key and enter Manual Time setting.
Note:
The weekday is automatically displayed above the time in short form (from Monday to
Sunday): MO / TU / WE / TH / FR / SA / SU.
MANUAL TIME SETTING:
In case the weather station cannot detect the DCF-signal (for example due to disturbances,
transmitting distance, etc.), the time can be manually set. The clock will then work as a
normal quartz clock.
1. The hour digit will start flashing.
2. Use the MIN/MAX key to set the hour. Keep holding the key allows the digit to advance
faster.
3. Press again the SET key to set the minutes. The minute digits start flashing.
4. Use the MIN/MAX key to set the minutes. Keep holding the key allows the digit to
advance faster
5. Confirm with the SET key and enter the Reset setting.
Note:
The unit will still try and receive the signal despite it being manually set. When it does
receive the signal, it will change the manually set time into the received time. During
reception attempts the DCF tower icon will flash. If reception has been unsuccessful,
then the DCF tower icon will not appear but reception will still be attempted the
following day.
The time reception “ “ and the “DCF” icons will not be displayed on the LCD after
manual time setting.
RESET SETTING
You will be able to make a reset of the weather station at the very end of the setttings :
— Once rSt is displayed, hold the MIN/MAX key until all segments will be display
The station will then go back to time display. All previous settings are suppressed.
TO EXIT THE MANUAL SETTING MODE
To exit the manual setting mode anytime during the manual setting, press the ALM key. The
mode will return to normal time display.
ALARM SETTING
To set the alarm:
1. Press and hold ALM key for 3 seconds until the alarm time shown.
2. The hour digit will be flashing. Use the MIN/MAX key to adjust the hour. Keep holding
the key allows the value to advance faster.
3. Use the ALM key again, and the minute digits will be flashing. Press MIN/MAX key to
set the minute. Keep holding the key allows the value to advance faster.
4. Press the ALM key to confirm the setting.
Note:
To activate/deactivate the alarm function, press the ALM key once. The display of the alarm
icon represents that the alarm is «ON».
The duration of alarm sounding is 2 minutes. Press any key will stop the alarm sound.
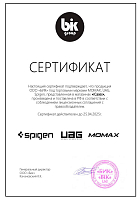
WEATHER FORECASTING ICONS:
The weather icons in the second section of LCD can be displayed in any of the following
combinations:
For every sudden or significant change in the air pressure, the weather icons will update
accordingly to represent the change in weather. If the icons do not change, then it means
either the air pressure has not changed or the change has been too slow for the weather
station to register. However, if the icon displayed is a sun or raining cloud, there will be no
change of icon if the weather gets any better (with sunny icon) or worse (with rainy icon) since
the icons are already at their extremes.
The icons displayed forecasts the weather in terms of getting better or worse and not
necessarily sunny or rainy as each icon indicates. For example, if the current weather is
cloudy and the rainy icon is displayed, it does not mean that the product is faulty because it is
not raining. It simply means that the air pressure has dropped and the weather is expected to
get worse but not necessarily rainy.
Note:
After setting up, readings for weather forecasts should be disregarded for the next 12-24
hours. This will allow sufficient time for the weather station to collect air pressure data at a
constant altitude and therefore result in a more accurate forecast.
Common to weather forecasting, absolute accuracy cannot be guaranteed. The weather
forecasting feature is estimated to have an accuracy level of about 75% due to the varying
areas the weather station has been designed for use. In areas that experience sudden
changes in weather (for example from sunny to rain), the weather station will be more
accurate compared to use in areas where the weather is stagnant most of the time (for
example mostly sunny).
If the weather station is moved to another location significantly higher or lower than its initial
standing point (for example from the ground floor to the upper floors of a house), discard the
weather forecast for the next 12-24 hours. By doing this, the weather station will not mistake
the new location as being a possible change in air-pressure when really it is due to the slight
change of altitude.
WEATHER TENDENCY INDICATOR
The weather tendency indicators (located on the left side of the weather icons) are working
together with the weather icons. When the indicator points upwards, it means that the air-
Alarm time (flashing)
Sunny
Cloudy with sunny intervals
Rainy
Alarm indicator (ON)
Flashing
Hour flashing
Minutes flashing
Flashing
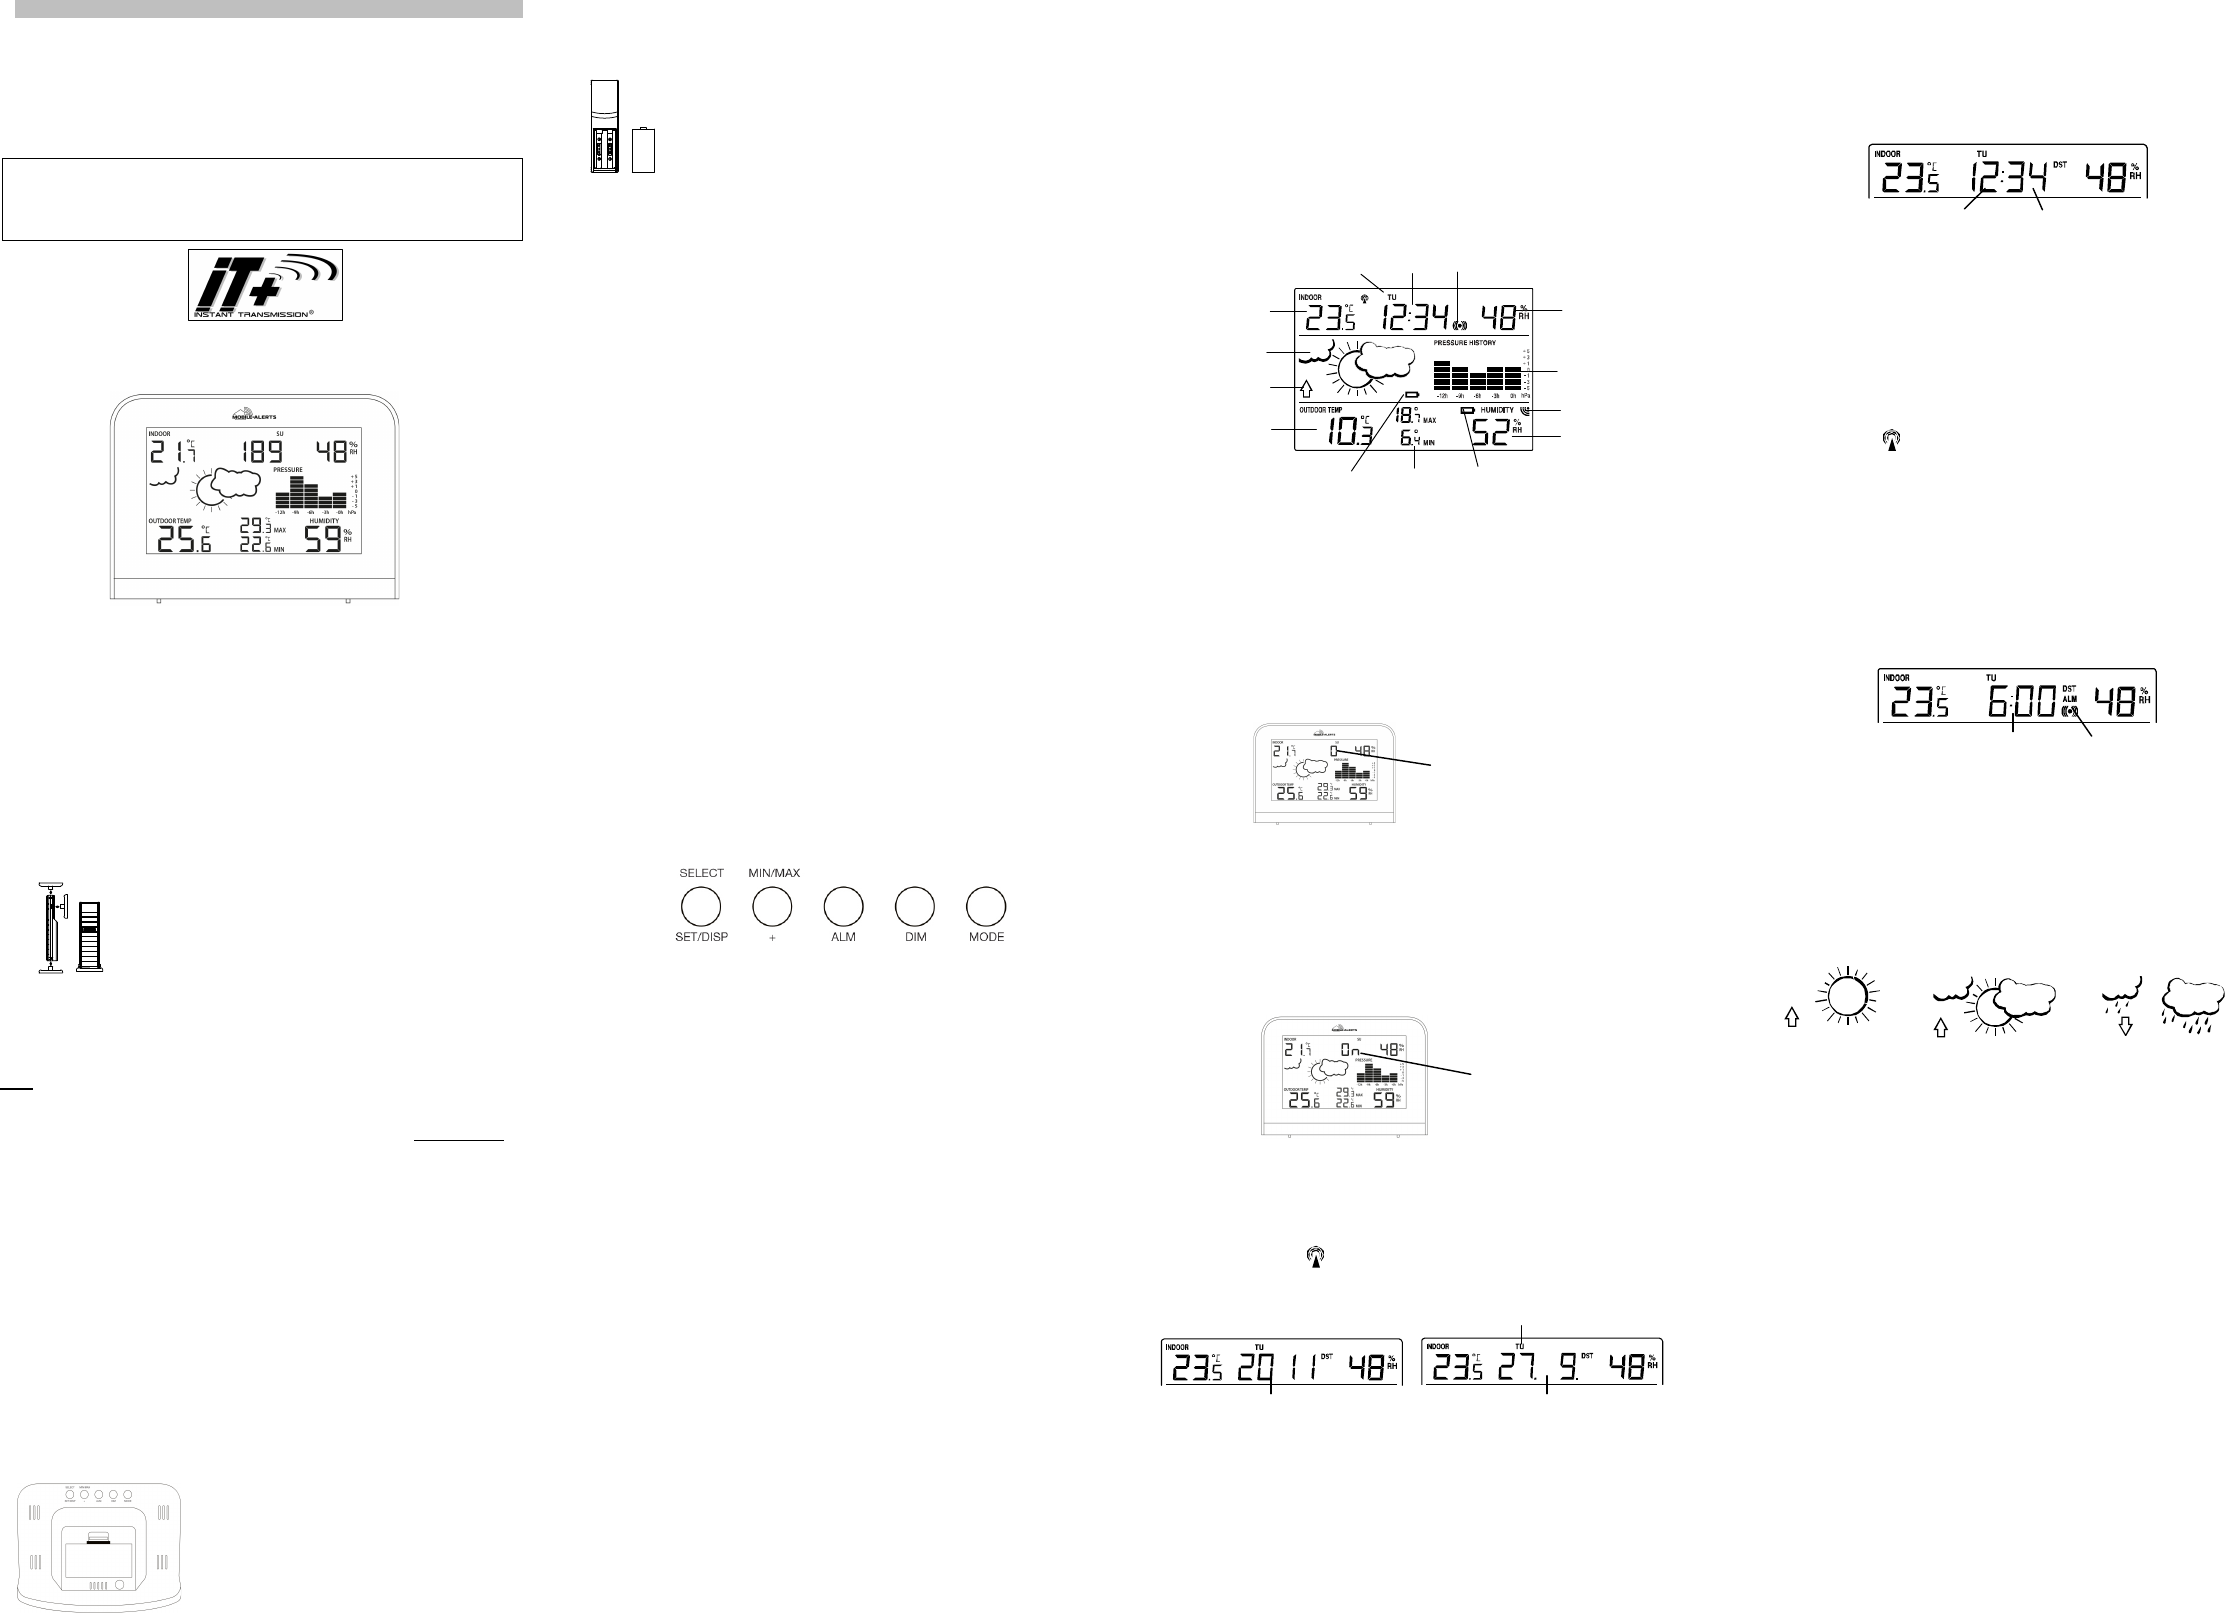
Instant Transmission+» is the up and coming state
transmission technology, exclusively designed and developed by LA CROSSE
TECHNOLOGY.
“IT +” offers you an immediate update of all your outdoor data measured from the
transmitters: follow your climatic variations in real-time!
Indoor humidity
display in RH%
(weather station)
forecast icon
Air pressure history
bar graph
Outdoor data signal
reception indicator *
Low battery indicator
(outdoor transmitter)
MIN/MAX outdoor
temperature display
Weekday
Time
Alarm icon
Outdoor humidity
display in RH%
Weekday
Year
Date. Month.


-
Модель
Цифровая метеостанция -
Материал
Алюминий, пластик -
Ёмкость аккумулятора
2 батарейки ААА -
Интерфейс подключения
Сеть 220V ~50 Hz/ 2*AAA -
Диапазон частот
Диапазон измерения температуры в помещении: от -10°C до 50°C / Диапазон измерения температуры снаружи: от -40°C до 60°C
Модификации
Завернуть в подарочную упаковку?+390 ₽
Выберите для кого:
Для нее
Для него
Перманентный Глазурин
Крафтовый Гугенхайм
Радужный Авантюрин
Перманентный Глазурин
Оригинальный «Лав Ис»
Радужный Авантюрин
Классический Сильвестер
Криптоносный Остин
Крафтовый Гугенхайм

Наша компания более
двенадцати лет на рынке!
С этим товаром покупают

Респиратор KN95 Protective Mask класса защиты FFP2 с клапаном (10 шт)
590 ₽
- Описание
- Характеристики
-
Наличие в магазинах
2
Наличие в магазинах
Интернет-магазин
+7 (495) 960-31-54
Есть в наличии
На Багратионовской
Москва, улица Барклая, дом 10 ТЦ «Вкусные сезоны», пав. А-55, вывеска iCases
+7 (495) 960-31-54
Есть в наличии
Описание
Французский бренд La Crosse – это лучшие метеостанции для дома и офиса. Любая погодная станция этой марки характеризуется европейским качеством изготовления и точностью показаний. Одна из новейших разработок компании — это запатентованная и внедренная технология беспроводной передачи данных «IT+», которая позволяет стабильно работать оборудованию в условиях плотной городской застройки. С домашней метеостанцией LaCrosse WS6827 вы всегда будете в курсе всех погодных и климатических нюансов!
Домашняя метеостанция LaCrosse MA10920 с разными цветами экрана

Надёжность и простота в использовании!
Домашняя метеостанция LaCrosse MA10920 – это удобный и понятный интерфейс, простые настройки, всегда необходимая и точная информация на одном мониторе, который можно установить на горизонтальной поверхности или закрепить на стене (крепления в комплекте). Домашняя метеостанция LaCrosse MA10920 отобразит всегда только актуальную информацию, которая будет полезна абсолютно всем. Незаменимой LaCrosse окажется и для тех, кто по характеру своего здоровья или занятости постоянно следит за погодными изменениями, а также людям, желающим в своих планах учитывать состояние атмосферных нюансов текущего дня. Погодная станция La Crosse не требует сложных настроек и длительных подключений. LaCrosse MA10920 максимально просто установить и использовать! Работает от сети или 2-х батареек ААА.
Характеристики
-
Модель
Цифровая метеостанция -
Материал
Алюминий, пластик -
Ёмкость аккумулятора
2 батарейки ААА -
Интерфейс подключения
Сеть 220V ~50 Hz/ 2*AAA -
Диапазон частот
Диапазон измерения температуры в помещении: от -10°C до 50°C / Диапазон измерения температуры снаружи: от -40°C до 60°C
Дисплей
-
Наличие дисплея
Есть, «хамелеон»
Особенности
-
Функции (Режимы)
Измерение температуры / Измерение влажности / Давление/ Встроенные часы с будильником / Календарь -
Датчики
Датчик влажности, термометр
Дополнительная информация
-
Комплектация
Домашний модуль, уличный модуль, крепления, адаптер питания, документация
Доставка
по Москве в течение 90 минут:
(с 10 до 22 часов)
600 քруб.
по Москве в течение 4х часов:
(с 10 до 22 часов)
400 քруб.
по Москве стандартная:
(с 10 до 22 часов)
300 քруб. в течение всего дня
за пределы МКАД:
(с 10 до 22 часов)
590 քруб. на завтра
400 քруб. на послезавтра
по России и области:
от 160 քруб. до 990 քруб.
в течение 2-6 рабочих дней
в зависимости от удаленности
Почему люди выбирают именно нас?
Все просто — мы сертифицированный партнер известных мировых производителей.

Picooc

Xd Design

Trust
Anker
UAG
Вы смотрели

- Для дома и отдыха
- Домашние метеостанции


Код товара: 141936
нет в наличии в
временно недоступен
Описание
Домашняя метеостанция LaCrosse MA10920 с контрастным ЖК-дисплеем эфеективное устройство для прогнозирования метеоданных и отслеживания их показателей в доме и за его пределами.
- Основной блок с дисплеем «хамелеоном» — позволяет подобрать оптимальный цвет свечения и отражения данных.
- Беспроводной датчик устанавливается на улице на расстоянии от основного блока до 100 метров.
- Мобильный шлюз МА 10000 для передачи данных через интернет на смартфон или планшет.
- Все полученные метеоданные (температура, влажность, давление) отражаются на дисплее.
- Данные обновляются каждые 16 секунд.
- Графическое изображение типа погоды: солнечно, пасмурно, облачно, пременная облачность, дождь, снег и т.п.
- Диаграмма изменения температуры в течении последних 12 часов.
- Прогноз погоды на ближайшие 12-24 часов.
- Сохранение данных и вывод максимальных и минимальных значений за период.
- Измерение температуры в Цельсиях и Фарренгейтах.
- Диапазон измерения температуры в помещении от -10 до +50 градусов Цельсия.
- Диапазон измерения температуры снаружи от -40 до +60 градусов Цельсия.
- Возможность подключения до 50 внешних датчиков.
- Встроенный календарь, часы с будильником — данные также отражаются на мониторе.
- Основной монитор можно установить на горизонтальной поверхности или закрепить на стене (крепления в комплекте).
- Работает от сети или 2-х батареек АА.
Гарантия
На каждый продаваемый нами товар распространяется гарантия. Мы всегда идем навстречу клиенту и стараемся решить все спорные ситуации. Более подробно Вы можете ознакомиться с условиями обмена и возврата в нашем магазине по ссылке.
- Характеристики
- Отзывы (0)
Характеристики
Диапазон измерения влажности воздуха, %:
1-99
Диапазон измерения температуры, С:
-40 — 60
Рекомендуем купить
Рейтинг магазина la crosse technology
на основе 1146 оценок покупателей и данных службы качества Маркета
Читайте отзывы с Яндекс.Маркета о магазине la crosse technology — нам можно доверять!

Достоинства: Отличный выбор и цены на интеллектуальные зарядные устройства Kweller, La Crosse. Брал Kweller X-1800 – отличное устройство. Несколько магазинов самовывоза и служб доставки.
Достоинства: Большой ассортимент;
множество пунктов самовывоза (от СДЭК)
Недостатки: не обнаружены
Комментарий: нужен был таймер обратного отсчёта для вилки 220В. Обыскал весь интернет, оказалось это — достаточно редкий прибор. На Али о таком даже не знают. В Москве пару мест где можно приобрести, и в la crosse technology по стоимости и способам получения вышло выгоднее и комфортнее всего.
Достоинства: Цена на заказанные мною товары была минимальна по сравнению с конкурентами. Хороший ассортимент. Письмо с подтверждением оплаты пришло на почту сразу. Много вариантов доставки (2-3 /микрорайон, нашел даже на своей улице)
Недостатки: Странно, что не перезвонили и не подтвердили. Заказ был отправлен через 7 дней после оплаты и только после моего звонка. Многовато.
Достоинства: Хороший магазин. Быстро все сделали.
Достоинства: Быстро передали заказ в транспортную компанию. Доставка СДЭК всего 200 р. привезли уже на следующий день.
Лучшая стоимость на товар.
Дали скидку 5% на следующий заказ.
Недостатки: Нет
Комментарий: Буду покупать здесь еще.
30
WEATHER STATION MA10920
Instruction Manual
INTRODUCTION
Congratulations on purchasing this weather station as an example of innovative design and
quality piece of engineering. Providing time, date, indoor and outdoor temperature, indoor and
outdoor relative humidity, and air pressure history information, this unit will never keep you
guessing on current and future weather conditions. Operation of this product is simple and
straightforward. By reading this operating manual, the user will receive a better understanding
of the weather station together with the optimum benefit of all its features.
FEATURES
The Weather Station
DCF Radio controlled time with manual setting option
Time reception ON/OFF setting
Weekday, date and month display (year only in setting mode)
Time zone option (-12h to +12h)
Alarm setting
Temperature display in degree Celsius (°C)
Indoor temperature display with MIN/MAX recordings
Permanent outdoor temperature MIN/MAX display with recordings with time and date
received
All MIN/MAX recordings can be reset
Indoor and outdoor humidity display in RH%
Weather forecast with weather tendency indicator
Relative air pressure history for the past 12 hours
Low battery indicator for outdoor sensor
Table standing
Thermo-Hygro Transmitter
Remote transmission of outdoor temperature and humidity to weather station by
868MHz
Wall mounting case
Mounting at a sheltered place. Avoid direct rain and sunshine
SETTING UP
Note: This weather station receives only one outdoor transmitter.
1. First, insert the batteries in the transmitter (see “How to install and replace batteries
in the thermo-hygro transmitter” above).
2. Within 30 seconds of powering up the transmitter, insert batteries and AC adapter in
the weather station (see “How to install and replace batteries in the weather
station” above). Once the batteries and AC adapter are in place, all segments of the
LCD will light up briefly and a short signal tone will sound. Then the indoor temperature,
humidity and the time as 0:00 will be displayed. If these informations are not displayed
on the LCD after 60 seconds, remove the batteries and wait for at least 60 seconds
before reinserting them. Once the indoor data is displayed user may proceed to the
next step.
3. After the batteries are inserted, the weather station will start receiving data signal from
the transmitter. The outdoor temperature and humidity data should then be displayed
on the weather station. If this does not happen after 2 minutes, the batteries will need
to be removed from both units and reset from step 1.
4. In order to ensure successful 868 MHz transmission, the distance between the weather
station and the transmitter should be within 100 meters (see notes on “Positioning”
and “868 MHz Reception”).
5. Once the outdoor data reception test period is completed, the DCF tower icon in the
clock display will start flashing in the upper left corner. This indicates that the clock has
detected that there is a radio signal present and is trying to receive it. When the time
code is received, the DCF tower becomes permanently lit and the time will be
displayed.
TO INSTALL AND REPLACE BATTERIES IN THE WEATHER STATION
The weather station uses 2 x AA, IEC LR6, 1.5V
batteries AND the AC adapter. To install and replace
the batteries, please follow the steps below:
1. Insert finger or other solid object in the space at
the bottom center of the battery compartment and
lift up to remove the cover.
2. Insert batteries observing the correct polarity (see
marking).
3. Replace compartment cover.
TO INSTALL AND REPLACE BATTERIES IN THE THERMO-HYGRO
TRANSMITTER
The outdoor thermo-hygro transmitter uses 2 x AA, IEC LR6, 1.5V batteries.
To install and replace the batteries, please follow the steps below:
1. Remove the battery cover by pushing the battery cover upwards with
your thumb.
2. Insert the batteries, observing the correct polarity (see battery
compartment marking).
3. Replace the battery cover on the unit.
Note:
In the event of changing batteries in any of the units, all units need to be reset by following
the setting up procedures. This is due to a random security code assigned by the transmitter
at start-up. This code must be received and stored by the weather station in the first 3
minutes of power being supplied to the transmitter.
ADD DEVICE TO MOBILE-ALERTS SYSTEM
(MOBILE ALERTS gateway needed, sold separately)
Open the app, dashboard is displayed. Tap «Add new sensor» and scan the QR code on the
back of the MA10920. Then set a name for the sensor. To set a name, select the transmitter
and then tap on the left area of the pencil icon in the upper right.
Note: only the data for indoor, outdoor temperature and indoor, outdoor humidity are
transmitted to Mobile-Alerts.
DCF RADIO CONTROLLED TIME
The time base for the radio controlled time is a Cesium Atomic Clock operated by the
Physikalisch Technische Bundesanstalt Braunschweig which has a time deviation of less than
one second in one million years. The time is coded and transmitted from Mainflingen near
Frankfurt via frequency signal DCF-77 (77.5 kHz) and has a transmitting range of
approximately 1,500 km. Your radio-controlled weather station receives this signal and
converts it to show the precise time in summer or wintertime.
The quality of the reception depends greatly on the geographic location. In normal cases,
there should be no reception problems within a 1,500 km radius of Frankfurt.
DCF reception is done twice daily at 02:00 and 03:00 am. If the reception is not successful at
03:00 am, then the next reception takes place the next hour and so on until 06:00am, or until
the reception is successful. If the reception is not successful at 06:00 am, then the next
attempt will take place the next day at 02:00 am.
If the tower icon flashes, but does not set the time or the DCF tower does not appear at all,
then please take note of the following:
Recommended distance to any interfering sources like computer monitors or TV sets is
a minimum of 1.5 — 2 meters.
Within ferro-concrete rooms (basements, superstructures), the received signal is
naturally weakened. In extreme cases, please place the unit close to a window and/ or
point its front or back towards the Frankfurt transmitter.
During nighttime, the atmospheric disturbances are usually less severe and reception is
possible in most cases. A single daily reception is adequate to keep the accuracy
deviation below 1 second.
FUNCTION KEYS:
Weather station:
The weather station has 5 easy to use function keys:
SET / DISPLAY / SELECT – key
— Single press to toggle time/indoor humidity display, date/indoor humidity display and
time/second display
— Hold 3s to enter set mode
— Single press SET key to change set items
— set items sequence: time zone, RCC ON/OFF, year, month, day, hour, minute, master reset,
quit set mode
— exit alarm set mode
— exit min/max display mode
— Stop learning transmitter
— Stop RCC reception
MIN/MAX/(RESET) – key
— Increase set items at set mode or alarm set mode
— Auto increase set items at set mode or alarm set mode when press and hold it
— Switches display in sequence max indoor temperature / min indoor temperature / max
outdoor temperature with time stamp / max outdoor temperature with date stamp / min
outdoor temperature with time stamp / min outdoor temperature with date stamp. The
min/max display will be timeout for 15s and back to normal display
— Hold 3s to clear all maximum minimum temperature
— Stop learning transmitter
— Stop RCC reception
ALM – key
— Single press to display pre-set alarm time for 15s
— Single press to toggle time alarm on/off when pre-set alarm time is shown
— Holds 3 s to enter alarm set mode when pre-set alarm time is shown
— Single press ALM key to change set items
— Set items sequence: alarm hour, alarm minute, quit alarm set mode
— Single press to change Alarm display from clock display or Date display
— Toggle alarm on/off during Alarm display
— exit min/max display mode
— Stop learning transmitter
— Stop RCC reception
DIM – key
— Adjust back light brightness in sequence, Strong, Middle and Weak. Will display “d1” for
Strong, “d2” for middle and “d3” for weak
— Stop learning transmitter
— Stop RCC reception
MODE – key
— Single press to toggle back light colour mode as sequence: temperature colour mode, single
colour mode and rotate colour mode (22 colours).
— Manual search of outdoor sensor
LCD SCREEN
The LCD screen is split into 3 sections displaying the information for time/calendar, indoor
data, weather forecast and air pressure history, and outdoor data.
* When the signal is successfully received by the weather station, the outdoor transmission
icon will be switched on. (If not successful, the icon will not be shown on LCD). The user can
then easily see whether the last reception was successful (icon on) or not (icon off).
MANUAL SETTINGS
The following settings can be changed when pressing and holding the SET key:
Time zone setting
Time reception ON/OFF setting
Manual setting : year, month, date, time and minutes
Reset of the weather station
TIME ZONE SETTING:
The time zone default of the weather station is “0”. To set a different time zone:
1. The current time zone value starts flashing.
2. Use the MIN/MAX key to set the time zone. The range runs from -12h to +12h hours in
1-hour intervals.
3. Confirm with the SET key and enter the Time Reception ON/OFF Setting.
TIME RECEPTION ON/OFF SETTING
In area where reception of the DCF-77 time signal is not possible, the DCF-77 time reception
function can be turned OFF. The clock will then work as a normal quartz clock. (Default
setting is ON).
1. “On” will start flashing on the LCD.
2. Use the MIN/MAX key to turn OFF the time reception function.
3. Confirm with the SET key and enter the Calendar Setting.
Note:
If the Time Reception function is turned OFF manually, the clock will not attempt any
reception of the DCF time as long as the Time Reception OFF function is activated.
The time reception “ “ and the “DCF” icons will not be displayed on the LCD.
CALENDAR SETTING
1. The year digits will start flashing.
2. Use the MIN/MAX key to set the year. Keep holding the key allows the value to
advance faster.
3. Press the SET key to confirm and enter the month setting mode.
4. The month digit will be flashing. Use the MIN/MAX key to set the month. Keep holding
the key allows the value to advance faster.
5. Press the SET key to enter date setting.
6. The date digit will be flashing. Use the MIN/MAX key to set the date. Keep holding the
key allows the value to advance faster.
7. Confirm with the SET key and enter Manual Time setting.
Note:
The weekday is automatically displayed above the time in short form (from Monday to
Sunday): MO / TU / WE / TH / FR / SA / SU.
MANUAL TIME SETTING:
In case the weather station cannot detect the DCF-signal (for example due to disturbances,
transmitting distance, etc.), the time can be manually set. The clock will then work as a
normal quartz clock.
1. The hour digit will start flashing.
2. Use the MIN/MAX key to set the hour. Keep holding the key allows the digit to advance
faster.
3. Press again the SET key to set the minutes. The minute digits start flashing.
4. Use the MIN/MAX key to set the minutes. Keep holding the key allows the digit to
advance faster
5. Confirm with the SET key and enter the Reset setting.
Note:
The unit will still try and receive the signal despite it being manually set. When it does
receive the signal, it will change the manually set time into the received time. During
reception attempts the DCF tower icon will flash. If reception has been unsuccessful,
then the DCF tower icon will not appear but reception will still be attempted the
following day.
The time reception “ “ and the “DCF” icons will not be displayed on the LCD after
manual time setting.
RESET SETTING
You will be able to make a reset of the weather station at the very end of the setttings :
— Once rSt is displayed, hold the MIN/MAX key until all segments will be display
The station will then go back to time display. All previous settings are suppressed.
TO EXIT THE MANUAL SETTING MODE
To exit the manual setting mode anytime during the manual setting, press the ALM key. The
mode will return to normal time display.
ALARM SETTING
To set the alarm:
1. Press and hold ALM key for 3 seconds until the alarm time shown.
2. The hour digit will be flashing. Use the MIN/MAX key to adjust the hour. Keep holding
the key allows the value to advance faster.
3. Use the ALM key again, and the minute digits will be flashing. Press MIN/MAX key to
set the minute. Keep holding the key allows the value to advance faster.
4. Press the ALM key to confirm the setting.
Note:
To activate/deactivate the alarm function, press the ALM key once. The display of the alarm
icon represents that the alarm is «ON».
The duration of alarm sounding is 2 minutes. Press any key will stop the alarm sound.
WEATHER FORECASTING ICONS:
The weather icons in the second section of LCD can be displayed in any of the following
combinations:
For every sudden or significant change in the air pressure, the weather icons will update
accordingly to represent the change in weather. If the icons do not change, then it means
either the air pressure has not changed or the change has been too slow for the weather
station to register. However, if the icon displayed is a sun or raining cloud, there will be no
change of icon if the weather gets any better (with sunny icon) or worse (with rainy icon) since
the icons are already at their extremes.
The icons displayed forecasts the weather in terms of getting better or worse and not
necessarily sunny or rainy as each icon indicates. For example, if the current weather is
cloudy and the rainy icon is displayed, it does not mean that the product is faulty because it is
not raining. It simply means that the air pressure has dropped and the weather is expected to
get worse but not necessarily rainy.
Note:
After setting up, readings for weather forecasts should be disregarded for the next 12-24
hours. This will allow sufficient time for the weather station to collect air pressure data at a
constant altitude and therefore result in a more accurate forecast.
Common to weather forecasting, absolute accuracy cannot be guaranteed. The weather
forecasting feature is estimated to have an accuracy level of about 75% due to the varying
areas the weather station has been designed for use. In areas that experience sudden
changes in weather (for example from sunny to rain), the weather station will be more
accurate compared to use in areas where the weather is stagnant most of the time (for
example mostly sunny).
If the weather station is moved to another location significantly higher or lower than its initial
standing point (for example from the ground floor to the upper floors of a house), discard the
weather forecast for the next 12-24 hours. By doing this, the weather station will not mistake
the new location as being a possible change in air-pressure when really it is due to the slight
change of altitude.
WEATHER TENDENCY INDICATOR
The weather tendency indicators (located on the left side of the weather icons) are working
together with the weather icons. When the indicator points upwards, it means that the air-
Alarm time (flashing)
Sunny
Cloudy with sunny intervals
Rainy
Alarm indicator (ON)
Flashing
Hour flashing
Minutes flashing
Flashing
Instant Transmission+» is the up and coming state
transmission technology, exclusively designed and developed by LA CROSSE
TECHNOLOGY.
“IT +” offers you an immediate update of all your outdoor data measured from the
transmitters: follow your climatic variations in real-time!
Indoor humidity
display in RH%
(weather station)
forecast icon
Air pressure history
bar graph
Outdoor data signal
reception indicator *
Low battery indicator
(outdoor transmitter)
MIN/MAX outdoor
temperature display
Weekday
Time
Alarm icon
Outdoor humidity
display in RH%
Weekday
Year
Date. Month.
![]()
Русский
- Bedienungsanleitung La Crosse MA10920
- La Crosse MA10920 User Manual
- Manual Usuario La Crosse MA10920
- Mode d’emploi La Crosse MA10920
- Istruzioni La Crosse MA10920
- инструкция La Crosse MA10920
- La Crosse MA10920の取扱説明書
- Handleiding La Crosse MA10920
- Manual de uso La Crosse MA10920
Вам нужна инструкция? Мы поможем Вам ее найти и сэкономить Ваше время.
- 2 stron
- 1.38 mb
Изделие La Crosse MA10920, а также другие, которыми Вы пользуетесь ежедневно, наверняка вы получили в комплекте с инструкцией обслуживания. Из опыта наших пользователей мы знаем, что большинство из Вас не уделили этому особого внимания. Большая часть инструкций, сразу же после покупки попадает в корзину для мусора вместе с коробкой — это ошибка. Ознакомьтесь с информацией, касающейся инструкции La Crosse MA10920, которая поможет Вам в будущем сэкономить нервы и избежать головной боли.
Важная подсказка — не забывайте хотя бы раз прочитать инструкцию La Crosse MA10920
Если вы не хотите каждый раз читать информационные брошюры, касающиеся, тех или La Crosse MA10920 иных изделий, достаточно, прочитать их раз — сразу же после покупки устройства. Вы получите основное знания, касающиеся поддержания изделия La Crosse MA10920 в хорошем эксплуатационном состоянии, так, чтобы без проблем достигнуть его планируемого цикла работы. Затем инструкцию можно отложить на полку и вернуться к ней только в случае, если вы не уверены, правильно ли проводится техобслуживание изделия. Правильный уход является необходимым элементом Вашего удовольствия La Crosse MA10920.
Раз в году пересмотрите шкафчик, в котором держите инструкции для всех устройств, — выбросите те, которыми вы уже не пользуетесься. Это поможет Вам сохранять порядок в своей домашней базе инструкций обслуживания.
Summary of Contents for La Crosse MA10920
Что находится в инструкции La Crosse MA10920? Почему стоит ее прочитать?
- Гарантия и подробности, касающиеся техобслуживания изделия
Хорошей идеей будет прикрепить чек к странице инструкции. Если что-то плохое случится во время использования La Crosse MA10920, у вас будет комплект документов, необходимый для гарантийного ремонта. В этой части инструкции вы найдете информацию об авторизованных сервисных центрахLa Crosse MA10920 а также, как самостоятельно правильно ухаживать за оборудованием — так, чтобы не потерять гарантийных прав. - Указания по монтажу и Setup
Не терять нервов и времени на самостоятельную попытку установки и первого запуска изделия. Воспользуйтесь рекомендациями производителя La Crosse MA10920 чтобы правильно запустить изделие, без лишнего риска повреждения оборудования. - Информация, касающаяся дополнительных запчастей (входящих в комплект а также являющихся опцией)
Пересматривая эту часть документа вы сможете проверить, доставлен ли ваш La Crosse MA10920 с полним комплектом аксессуаров. Вы также сможете узнать, какие дополнительные запчасти или аксессуары для La Crosse MA10920 Вы сможете найти и докупить к своему устройству. - Troubleshooting
Самые частые проблемы, касающиеся La Crosse MA10920 и методы их решения. Это очень полезная часть руководства по обслуживанию — она позволит Вам сэкономить много времени на поиск решений. 90% проблем с La Crosse MA10920 повторяется у многих пользователей. - Требования, касающиеся питания и энергетический класс
Информация, касающаяся количества потребляемой энергии, а также рекомендации, касающиеся установки и питания La Crosse MA10920. Прочитайте, чтобы оптимально пользоваться La Crosse MA10920 и не использовать большего количества ресурсов, нежели это необходимо для правильной работы изделия. - Специальные функции La Crosse MA10920
Здесь вы можешь узнать, как персонализировать изделие La Crosse MA10920. Вы узнаете, какие дополнительные функции могут помочь Вам удобно использовать продукт La Crosse MA10920 а также, какие функции Вашего устройства оптимальны для выполнения конкретной деятельности.
Как видите в инструкции вы найдете информацию, которая реально поможет Вам в использовании Вашего изделия. Стоит с ней ознакомиться, чтобы избежать разочарований, возникающих из более короткого, нежели предусматривалось, периода исправности изделия La Crosse MA10920. Если все же вы не хотите копить инструкции в своем доме, наш сайт поможет Вам в этом — вы должны найти у нас руководство по обслуживанию большинства из своих устройств, а также La Crosse MA10920.