MMCS — Mitsubishi Multi Communication System — штатное головное устройство премиум-класса для автомобилей Mitsubishi Motors Company.
В зависимости от модели, включает в себя FM/AM радио, музыкальный сервер, Audio CD проигрыватель, DVD проигрыватель, проигрыватель мультимедиа файлов с внешних носителей (USB, iPod, SD-Card), а также навигационную систему.
Поддерживает работу с Hands Free, Sattelite Radio, позволяет изменять некоторые настройки автомобиля, интегрируется с премиум аудио системой Rockford Fosgate.

MMCS HDD-based: |

MMCS SD-based: |
- Manuals
- Brands
- Mitsubishi MOTORS Manuals
- Car Navigation system
- Multi-Communication System
- User manual
-
Contents
-
Table of Contents
-
Troubleshooting
-
Bookmarks
Quick Links
Mitsubishi
Multi-Communication
System
Summary of Contents for Mitsubishi MOTORS Multi-Communication System
-
Page 1
Mitsubishi Multi-Communication System… -
Page 2
Introduction Thank you for buying a Mitsubishi Motors product. In order to fully utilize the functionality of this product and ensure safe and correct operation, please read the “User Manual” carefully before operation. After reading the “User Manual”, ensure this is kept readily available, and refer to it again if you… -
Page 3: Table Of Contents
Table of contents Operations from the Scroll Menu ..42 Set as the Destination ……… 42 Set as the Waypoint……..42 Set in the Address Book ……43 Search for Nearby Establishments ….43 Introduction NAVI Check the Location of Your Car….44 Freeway Information …….
-
Page 4
Change the Route ……61 DISC Change Search Conditions ……61 Listen to CDs ……… 107 Set and Change a Waypoint ……61 Audio Functions Display a List ……….107 Select from Four Routes ……64 Display Contents ……..108 Basic Operation …… -
Page 5
INFO/SETTINGS HD Radio Data Information … 159 SETTINGS Displaying ……….159 Navi Settings ……… 196 Fuel price Information Screen ….160 INFO Guidance ……….. 197 Check the Location of Gas Stations ..160 Screen …………199 Calendar ……..131 Weather Information Screen …… 162 RTT Options ………. -
Page 6: Before Use
The map data may contain wrong or this product over to anyone else or disposing missing characters, incorrect locations etc. of it. Mitsubishi Motors will in no way be held responsible.
-
Page 7: Important Points On Usage
Important Points on Usage FCC NOTE • The following phenomena are characteristic of LCD screens. They do not indicate a This device complies with part 15 of the FCC Common malfunction. Rules. — Small black dots or bright dots (red, blue, Operation is subject to the following two •…
-
Page 8: Restrictions On Operations While The Vehicle Is Driving
Restrictions on Operations Trademarks ©1987-2013 HERE. All rights reserved. while the Vehicle Is Driving • Product names and other proper names are the trademarks or registered trademarks of their respective owners. Some operations are restricted while the • Furthermore, even if there is no specifi c denotation of vehicle is driving.
-
Page 9
iPod iPod classic “Made for iPod,” “Made for iPhone” mean that an electronic accessory has been designed to connect specifi cally to iPod or iPhone, respectively, and has been certifi ed by the developer to meet Apple performance standards. iPhone, iPod, iPod classic, iPod nano, and iPod touch are trademarks of Apple Inc., registered in the U.S. -
Page 10: Important Points On Safety For The Customer
Important Points WARNING WARNING • The driver should not pay close • Do not insert foreign objects into on Safety for the attention to the images on the the disc slot or card slot. Customer screen while driving. This may lead to fi re, electric shock, or This may prevent the driver looking where malfunction.
-
Page 11
CAUTION • Do not block ventilation holes or heat sinks on the product. Blocking ventilation holes or heat sinks may prevent heat from escaping from within the product, leading to fi re or malfunction. • Do not turn the volume up to the extent that you cannot hear sounds from outside the vehicle while driving. -
Page 12: How To Read This Manual
How to Read This Manual or [○○○] ○○○ Shows a touch switch displayed on the The notation used in this manual and what it means are as follows. screen. 10) (P000) Shows the page to refer to. It contains relevant explanations etc. 11) Continued on the next page Used when the explanation of operations is continued.
-
Page 13: Basic Operation
Basic Operation key/ Allows you to seek a radio station, or select a CD track. Also, holding down This Product either of these keys allows you to fast- forward/fast-rewind a CD. Main Unit Panel key (P24) MODE This gives the names of each section of the main unit panel and explains their functions. Used to select an audio source.
-
Page 14
When the panel is open key/ — ZOOM ZOOM + Zooms in or zooms out the map. →“Switch the Scale”(P40) key (P47) DEST Used to set a navigation destination. Allows you to switch the map screen color Auto, Daytime, and Nighttime according to the car lighting state. -
Page 15: Start
Start SD Cards ADVICE Start the system. • Immediately after the ignition key This product supports two types of SD cards: is switched to “ACC” or “ON”, if the map cards used with the navigation function CAUTION navigation functions are used, some and audio SD cards used with audio functions.
-
Page 16: Insert An Sd Card
Important Points on Handling Insert an SD Card NOTE • Mitsubishi Motors will in no way be held • Fingerprints or other marks on the terminals responsible for any losses resulting from of an SD card may result in its content being Map Card SD card data loss.
-
Page 17
Audio SD Card Insert the map card into Insert the audio SD card into Insert the audio SD card used for the audio the map slot. the user slot. functions. Insert until you hear the “click”. Insert until you hear the “click”. Press the key. -
Page 18: Remove The Sd Card
Remove the SD Card Push the audio SD card in the user slot Map Card until you hear a “click”. The map card that contains the map data for the navigation functions is inserted. This device cannot be used if the map card is Audio SD Card Audio SD Card Audio SD Card…
-
Page 19: How To Perform Touch Operations
How to Perform Searching Items from a List Touch Operations By touching , you can select one item at a time from the list. This system uses a touch panel that is By touching , you can move the operated by touching the display directly. display one page.
-
Page 20: How To Input Characters
How to Input Characters ADVICE • For some functions and character types, This section explains the menu items for the character input keyboard. some touch switches may either not be displayed or changed into some other touch switch. For details, refer to the Keyboard for Character Input explanations of individual functions.
-
Page 21: Keyboard For Number Input
Types of Characters That Can Keyboard for Number Input Input assist for searches Be Input The input keyboard makes it possible to input house numbers and latitude/longitude. The input keyboard is capable of inputting various characters. Character input is displayed when it becomes necessary during the operation of functions.
-
Page 22: Top Menu
Top Menu Touch Display contents switch By pressing the corresponding key, you can use various functions from the top menus. Display Types The top menus have a number of display methods. You can use the one you like best. You can switch by touching the display switch menu at the top of each top menu.
-
Page 23: Destination Menu
Destination Menu (P49) Address Book Allows you to select a location from the This section explains the destination menu displayed when you press the key. DEST address book. This may be the key depending on the model. (P53) Advanced Search Allows you to search for an establishment around the current location or destination, along the route, etc.
-
Page 24: Navi Menu
Navi Menu This section explains the navigation menu displayed when you press the key. NAVI MENU (P58) (P204) Route Menu Navi Voice/Others Allows you to check and edit the set route. Allows you to set up the navigation audio guidance. Also allows you to check vehicle (P197) Guidance signals.
-
Page 25: Mode
Mode *1, *2 (P130) When an external input device is This section explains the Mode displayed when you press the key. MODE connected to this product, the audio from the external input device is played. (P125) Bluetooth Audio When a Bluetooth-capable audio device is connected to this product, the Bluetooth audio function can be used.
-
Page 26: Info Menu
INFO Menu (P154) Maintenance Allows you to make settings for This section explains the info menu displayed when you press the key. INFO notifi cations when engine oil, oil fi lter, and The order of display items may differ depending on the model. In that case, 9) changes to Fuel/Weather…
-
Page 27: Settings Menu
SETTINGS Menu This section explains the settings menu displayed when you press the key. SETTINGS may not be displayed depending on the model. Sound Quality Control (P216) Display Off System Allows you to switch OFF the screen Allows you to make settings for the Time (P211) , Language (P211) , Opening display.
-
Page 28: Basic Operation
NAVI GPS Antenna This chapter explains navigation function operations. Basic Operation GPS antenna Navigation • The GPS satellites are managed by the Department of Defense of the United States Functions of America, which sometimes deliberately The location of your car is measured by reduces the location precision.
-
Page 29: Map Data
Reasons Why the Location of Your 3D Position Measurement Map Data Car Is Not Displayed Correctly When effective radio signals for which The map data may contain wrong or missing • When a freeway and general road are near positional precision can be expected can be characters, incorrect locations etc.
-
Page 30: Route Search Methods
Precautions for operating the Route Search Methods Route Guidance navigation • The route displayed in the route guidance • When your car is driving on the searched is a reference route to the destination. It route, this displays the distance until the •…
-
Page 31: Navigation Screen
Navigation Screen
 Direction icon Touching this displays the map switching This section explains the navigation map screen and the display contents for the menu screen. screens. →“Select the Map Screen”(P34) Map Display Contents 9) Scale icon The map screens include the current location screen and scroll screens (P31) . Shows the scale of the displayed map.
 -
Page 32
Scroll Screens ADVICE This section explains the contents displayed on the scroll screens displayed when the map is • The display of 7) POI icons can be scrolled or after a search is performed (P40) . removed from the map screen by setting [Hide All] for [Screen] “POI icons”. -
Page 33: Display The Destination Menu
Individual Icons Display the Destination Menu Display the Scroll Menu This section explains the icons displayed on You can set the destination and erase routes You can set the location scrolled (P40) to the current location screen (P30) . from this menu screen. as the destination or set it in the address book.
-
Page 34: Display The Sub-Menu
Display the Current Location Display the Sub-menu Set as Dest. location can be set as the Screen destination. This section explains how to display the sub- →“Set as the Destination”(P42) menu displayed from the current location You can display the current location screen Address Book The location can be screen (P30) .
-
Page 35: Select The Map Screen
Select the Map Types of Maps ADVICE Screen • You can select the map type and the This section explains the types of maps you reference orientation separately. can change to. You can change the map type and reference • To change the right screen for Two Maps One Map orientation.
-
Page 36
Freeway Info Turn List Arrow Guide This displays a list of freeway exit service The location for the next route guidance is This displays a list of the locations for route areas with the current location as the starting displayed with an arrow on the left screen. guidance on the left screen. -
Page 37: Map Reference Orientation
2D(N-up) Map Reference Orientation This displays a map with north as up. This displays a map as seen looking down This section explains the map reference from above. orientation, which you can change. 2D(H-up) This displays a map with the direction in which your car is moving as up.
-
Page 38: Change The P Side P Display Information
Change the P side P Display Touch the “item” to display. Information Change the information displayed on the P side P sub-screen. Touch the “Direction icon”. ▼ Direction icon Touch PsideP The screen for the selected item is displayed Touch on the left screen.
-
Page 39: Guidance Display
Guidance Display Toll Booth Guidance Map Lane Guidance Displayed when you approach a toll booth. Displayed when there is lane information for This product displays various guidance the junction ahead. according to the situation. Junction Guidance Map When you are traveling the route, as you approach a guidance point, this map is displayed together with the voice guidance.
-
Page 40: Junction View
Junction View Speed Indicator Guidance When you approach a junction on a freeway, Displayed if there is speed indicator the actual junction confi guration, which way to information while you are driving. go, the junction name, etc. are displayed. CAUTION CAUTION •…
-
Page 41: Operate The Map
Operate the Map Touch the location to view. ADVICE • By holding down , you can This section explains how to perform such use the free zoom function displaying operations as changing the scale and gradually in four steps to the next scale. scrolling the map.
-
Page 42
Scroll Fine Adjustment This fi nely adjusts the scroll position. [Adjust] may change to [Tuning] and [Adjust Off] may change to [Tuning Off] depending on the model. After scrolling, touch Adjust Touch the direction. Touch a few times to fi nely adjust. Touch Adjust Off ▼… -
Page 43: Operations From The Scroll Menu
Operations from the Set as the Waypoint Touch Start Scroll Menu Set the scroll screen (P31) location as a ▼ waypoint. When you display the scroll menu, you can ADVICE set the destination, waypoints, address book, etc. • It is necessary to set a destination. Display the scroll menu (P32) .
-
Page 44: Set In The Address Book
Search for Nearby Set in the Address Book Touch any “type”. Establishments Set the scroll screen (P31) location as an address in the address book. Search for establishments around (P31) location on the scroll screen. Display the scroll menu (P32) . Here, as an example, petrol stations are searched for around the location.
-
Page 45: Check The Location Of Your Car
Check the Location of Your Car. You can check the relationship between the scroll screen (P31) location and your current location. Display the scroll menu (P32) . Touch Location check ▼ You can check the relationship between your current location and the cursor location. ADVICE •…
-
Page 46: Freeway Information
Freeway Information Information on Establishments When you drive on a Freeway, “Freeway Info” (P35) is displayed. You can check service area and parking area establishment information and junction information. This displays information on the establishment. (Up to for 4 establishments can be displayed.) Display Contents Icon Explanation of marks…
-
Page 47: Displaying
Displaying Check Area Information ADVICE With the factory settings, when you drive on You can check information on SA, PA, IC, • Touching [Set] displays the scroll menu. a freeway, “freeway Info” (P35) is displayed and JCT and you can display maps of their You can set the destination, waypoints, automatically, so no operation is required.
-
Page 48: Destination Settings
Destination Settings Set Your Home as Touch Start the Destination ▼ You can set your pre-registered home (P68) as the destination. key may change to the DEST key depending on the model. Press the key. DEST This displays the destination menu. The search for the route with your home as Touch Go Home…
-
Page 49: Set The Searched For Location As The Destination
Set the Searched When the location you NOTE for Location as the searched for is displayed, • If a route using the HOV lane is in the search result with set conditions, a telop touch Start Destination that confi rms the use of the HOV lane is displayed.
-
Page 50: Search For A Location
Search for a Load a Frequently Used ADVICE Location from the Address Location • Touching [info] displays a map of the Book surroundings and related information. With this product, you can use various • While the guidance start screen is methods to search for locations.
-
Page 51: Use The Search History
Deleting from the Search Use the Search History Search from Address History You can use the search history of locations Searches for a location from an address. that were set as the destination and display You can delete a registered search history. Press the DEST key.
-
Page 52: Search By Inputting An Establishment Name
Search by Inputting an Touch , then Touch , then input the All Categories All POIs Establishment Name input the “category name”. “name of the establishment” The name of an establishment can be input to you are searching for. search for its location. Press the DEST key.
-
Page 53
Editing My Categories ADVICE Touch Back Registers a frequently used establishment • If the list has the “+” mark, touch [Sub Returns to the previous screen. category in “My Categories”. POI], select the detailed establishment ADVICE Up to 6 entries can be registered in “My name. -
Page 54: Search For Nearby Establishments
Search for Nearby Searching for Establishments Touch the “establishment” you Establishments near the Route are searching for. You can search for establishments near the Press the key. DEST current location and destination and along the route. This displays the destination menu. Touch Advanced Search Searching for Establishments…
-
Page 55
Searching for Establishments Searching for Establishments Input the “name of the near the Destination or a near a Street establishment” you are Waypoint This searches for establishments near any searching for. desired street. Press the DEST key. Press the key, then DEST This displays the destination menu. -
Page 56: Search From Telephone Number
Searching for Establishments Search from Telephone Search from Zip Code along a Freeway or near an Number Used when you know the zip code of the Exit location you are searching for. Used when you know the telephone number of the location you are searching for. This searches for establishments along a Press the DEST…
-
Page 57: Search By Latitude And Longitude
Search by Latitude and Set the Start Location as the Longitude Destination You can set the destination by specifying the You can set the start location set for the route latitude and longitude. as a new destination. Press the DEST key.
-
Page 58: Guidance Start Screen
Guidance Start Screen Show Route This section explains the screen displayed This is the screen displayed when the location to set as the destination is decided. when you touch [Show Route]. This section explains the operations you can do on this screen. Start Starts route guidance.
-
Page 59: Route Checking And Changing Route Checking
Route Checking and Changing Check the Route You can scroll along the route to check and check maps of the surroundings. Route Checking On the current location screen, ADVICE touch the “junction guidance If a route has been set, you can check it. •…
-
Page 60: Check The Entire Route
Types of Check Methods Remaining Check the Entire Route This displays the map at a scale that can This displays the map at a scale that allows Backward Scrolls from the destination display all of the route that has not been you to check the route from the start location toward the start location.
-
Page 61: View A Demo Trip
Route Outline Ending View a Demo Trip This displays a list of junctions at which turns You can travel the prepared route virtually to During the demo trip, press the must be made on the route to the destination. check. NAVI MENU key.
-
Page 62: Change The Route
Change the Route Change Search Conditions Set and Change a Waypoint You can change the route search conditions. A detour route or a different route can be ADVICE set for the route currently set. The route On the itinerary list screen, •…
-
Page 63
Search Method Selection Touch for the location to Phone Used when you know the Screen Number telephone number of the location add. you are searching for. The procedure is the same as from Step 2 onward in “Search from Telephone Number”(P55) . Map Point The location scrolled to on the map (P40) can be set. -
Page 64
Deleting a Waypoint Operating from a Sub-menu Re-ordering waypoints You can delete the next waypoint you are Delete a set waypoint. The order for reaching the destination and scheduled to pass through. waypoints is changed. ADVICE On the current location screen, ADVICE •… -
Page 65: Select From Four Routes
Selecting a detouring road Select from Four Routes Search for a Detour Route Select the street that will be the starting point You can simultaneously search for routes with You can search for a route that detours ahead and the street that will be the ending point, four different conditions, then select one of the distance you specify.
-
Page 66: Searching For A Different Route
Searching for a Different Pause Route Guidance Delete a Route Route This pauses route guidance. This deletes the input destination and waypoint and deletes the route. This repeats the searches for the route. On the current location screen, Press the NAVI MENU key.
-
Page 67: Select The Drg Route
Select the DRG route Register an Avoid Area Touch an item, then input the “location”. When the RTT message is detected, a route You can register and edit areas you want to based on the detected information is searched avoid passing through for route searches. and DRG (Dynamic Route Guidance) route NOTE can be selected.
-
Page 68
Editing an Avoid Area Deleting an Avoid Area Touch Set Area You can change and set avoid areas. This deletes a registered area. Touch again. Set Area Execute up to Step 2 in Execute up to Step 2 in “Register an Avoid Area”(P66) . “Register an Avoid Area”(P66) . -
Page 69: Set An Address In The Address Book
Set an Address in the Address Book ADVICE • You can change the address book information displayed here. Register a Home Execute the procedure for Steps 5 Touch any “search method” and beyond in “Change Address Book Location and search for the location. Information”(P74) .
-
Page 70: Change The Home Location
Change the Home Location Erase Your Home Registration You can edit your home information. This deletes your home registration. Execute up to Step 2 Press the NAVI MENU key. in “Change the Home This displays the navi menu. Location”(P69) . Touch Personal Touch…
-
Page 71: Set A Frequently Used Location In The Address Book
Set a Frequently Touch any “search method” ADVICE Used Location in and search for the location. • You can change the address book information displayed here. the Address Book Execute the procedure for Steps 5 and beyond in “Change Address Book You can register locations frequently used Information”(P74) .
-
Page 72: Change A Frequently Used Location
Change a Frequently Used Delete a Frequently Used Location Location You can edit frequently used locations. Execute up to Step 2 in Press the NAVI MENU key. “Change a Frequently Used This displays the navi menu. Location”(P71) . Touch Personal Touch in “Special Delete…
-
Page 73: Set An Address In The Address Book
Set an Address in Register a Searched for ADVICE Location the Address Book • Depending on the search method, the establishment name and telephone This section explains the series of operations Setting a location you have gone to, a number may not be displayed. for registering a location searched for from the location you want to go see, or the like destination menu (P22) in the address book.
-
Page 74: Change The List Order
Delete an Address from the Change the List Order Address Book You can change the order of items in the address book list. Delete an address registered in the address book. Press the DEST key. Press the NAVI MENU key. This displays the destination menu.
-
Page 75: Change Address Book Information
Change Address Address Book Information Touch the “information” to Screen Book Information change. This section explains the address book You can change and delete addresses from information you can change. the address book. key may change to the DEST Icon key depending on the model.
-
Page 76
Adjust Name Street or City You can change the location in the address You can change the name of the location mark You can change the street name or city name. book. for the location in the address book displayed On the address book on the map screen. -
Page 77
You can register the telephone number in the address book. On the address book information screen,touch “TEL”. Input telephone number by touching “numbers”, then touch ▼ The telephone number change is complete. NOTE • Telephone numbers up to 24 digits long can be input. -
Page 78: Rtt
ADVICE • If a broadcast station is not received, the below screen is displayed. RTT Switches You can receive or check traffi c messages. You can use the real-time traffi c message. On the current location screen, touch DRG (Dynamic Route Guidance) ▼…
-
Page 79: Display Contents
RTT Event Icons Display Contents Each traffi c message is displayed with the This section explains the RTT messages displayed on the map. following marks on the map. ADVICE • Whether or not to display “RTT Event Icons” can be selected with [RTT] → [RTT Icons on Map].
-
Page 80: Checking The Rtt Traffi C Messages
Checking the RTT ADVICE Traffi c Messages • When “RTT Event Icons” are displayed overlapped, a list is displayed to select You can check the traffi c messages using the icon. RTT. On the current location screen, touch Touch the “RTT Event Icons” to check.
-
Page 81: Registering The Rtt Surveillance Map
Registering the RTT Registering from Scroll Menu Surveillance Map Scroll the map (P40) and line up Areas can be registered to check traffi c mark with the “location” messages. to register. NOTE • Up to 3 areas can be registered. Registering from RTT Traffi…
-
Page 82: Audio Functions
Adjust Volume Adjust the audio function volume. During audio play, turn the The following explains audio function operations. key counter- PWR/VOL Audio Functions clockwise. Basic Operation Switch Audio ON/OFF You can switch the audio function ON/OFF. NOTE ADVICE • The album names, titles, etc. in the title •…
-
Page 83: Insert/Eject Discs
Inserting the Disc Ejecting the Disc Insert/Eject Discs The following explains how to insert a disc into Press the key. Press the key. OPEN OPEN this product. CAUTION Touch Touch Monitor OPEN DISC Eject • When replacing discs, fi rst ensure that the vehicle is stopped in an area in which stopping is permitted.
-
Page 84: Av Icons
Forcing Disc Ejection AV Icons NOTE Usually, when the disc loading ends normally, During audio playback, an icon is displayed • The audio screen currently being played the inserted disc can be ejected with the on the navigation screen as below in order to can be displayed by touching the AV icon method in the “Ejecting the Disc”…
-
Page 85: Steering Remote Control Switch Operation
Steering Remote Control Switch Operation MODE Hold down to turn the audio function ON/OFF. Additionally, each time this is A type B type C type D type pressed, this switches the audio source. The order of switching is as shown below. If devices are not connected, then these are to be skipped, and the next source selected.
-
Page 86: Handling Of Discs
Handling of Discs Important Points on Storage • When not using discs, ensure these are kept This explains care that should be taken in in cases, and stored out of direct sunlight. the handling of discs. • If discs are not going to be used for a long period of time, remove these from the Important Points on Handling product.
-
Page 87: Types Of Disc That Can Be Played Back
Nonstandard CDs Types of Disc That Can Be Played Back This product will play back audio CDs, The following marks are printed on the disc label, package, or jacket. however please be aware of the following points regarding CD standards. Type Size Maximum…
-
Page 88: Audio Files(Mp3/Wma/Aac/Wav)
Audio Files(MP3/ CAUTION ADVICE WMA/AAC/WAV) • Actions such as copying audio CDs or • Depending on the condition of the disc fi les and either distributing these to others recorder or recording software used, This product can play back MP3/WMA/ for free or for charge, or uploading fi…
-
Page 89: Folder Structure
Folder Structure Name Specifi cation Explanation Up to 8 folder levels can be recognized. Format ISO9660 Level 1 Maximum 8 character fi le name, and 3 character fi le specifi cations You can create a folder structure such as extension. (single-byte alphanumeric capital letters, numerals, “_”…
-
Page 90: What Is Mp3
Standards for MP3 Files That Can Be Played Back What Is MP3? Specifi cations for MP3 fi les that can be played are as below. MP3 is an abbreviation of “MPEG-1 Audio Layer 3”. MPEG is an abbreviation of “Motion ®…
-
Page 91: What Is Wma
Standards for WMA Files That Can Be Played Back What Is WMA? Specifi cations for WMA fi les that can be played are as below. WMA is an abbreviation of Windows Media Audio, and this is an audio compression ® ®…
-
Page 92: What Is Aac
Standards for AAC Files That Can Be Played Back What Is AAC? Specifi cations for AAC fi les that can be played are as below. AAC is an abbreviation of Advanced Audio ® ® * For vehicles with the Bluetooth 2.0 interface, refer to the vehicle’s user manual (Bluetooth 2.0 interface).
-
Page 93: What Is Wav
Standards for WAV Files That Can Be Played Back What Is WAV? Specifi cations for WAV fi les that can be played are as below. WAV is an abbreviation of “RIFF wave form Audio Format” and is mostly used ® ®…
-
Page 94: Radio
Radio Listen to Radio Turn the key to FOLDER/TUNE select a station. This explains how to listen to FM and AM radio broadcasts. HD Radio broadcast or analog broadcast can be received. Press the key. MODE This displays the mode. Digital, CD-quality sound.
-
Page 95: Display Contents
Display Contents FM Radio Broadcast Information Screen * ) 1) Source plate 12) PTY Station List Displays the name of the currently Displays a list of the stations that can Displays the PTY (Program Type) being be received. → “Search for Broadcast selected source, preset channel number, received.
-
Page 96
AM Radio Broadcast Information Screen * ) 1) Source plate 10) Artist Radio Setting Displays the name of the currently Allows you to set Reception Mode. Displays the acquired artist name. → “Set Reception Mode” (P98) selected source, preset channel number, SCAN reception frequency, and station name. -
Page 97: Register Your Favorite Broadcast Stations
Register Your Favorite Search for Broadcast Starting the Scan Broadcast Stations Stations with Strong Signals This searches for stations that can be received. You can register your favorite 6 stations for This is handy for searching for broadcast each band, FM1, FM2, and AM. stations you can receive when you drive to a On the radio broadcast different area, for example for vacation.
-
Page 98: Search For Broadcast Stations From The Station List
Search for Broadcast Updating the Station List Touch Preset Stations from the Station List You can manually update the station list. ▼ You can select a station from the list of On the station list, touch The display returns to the original radio receivable broadcast stations.
-
Page 99: Emergency Broadcasts
Emergency Broadcasts Set Reception Mode P side P Display Screen If an emergency broadcast starts, it will begin You can set Reception Mode to digital or This section explains the screens displayed to be received automatically. analog. when selecting the [AV] (radio) in the P side P If on the map screen, the FM radio source display information (P37) .
-
Page 100: Listen To Satellite Radio
Turn the key to FOLDER/TUNE Equipment by type Listen to Satellite select a station. Radio This section explains how to listen to SIRIUS radio. NOTE • A subscription is required to listen to SIRIUS radio. For details, please consult your Mitsubishi Motors Dealer.
-
Page 101: Display Contents
10) Composer name Display Contents Displays the acquired composer name. SIRIUS Broadcast Information Screen Lock Allows you to set Lock on a channel being received. → “Setting Listening Restrictions” (P102) Skip Allows you to set Skip on a channel being received.
-
Page 102: Search For Your Favorite Channel
Search for Your Favorite Selecting Channels Directly Begin Scanning Channels by Channel. Category On the SIRIUS broadcast Channels in the category are received in order information screen, touch and take 10 seconds each. Searching from a Channel List Direct On the SIRIUS broadcast On the SIRIUS broadcast information screen, touch Enter the “channel number”,…
-
Page 103: Register Your Favorite Channel
Canceling a Scan Register Your Favorite Setting Listening Restrictions Channel You can set listening restrictions on channels During the scan, touch Scan and categories. You can save up to 6 of your favorite channels again. Scan List If a channel that has listening restrictions is for each band (1, 2, 3, 4).
-
Page 104
Setting from Channel List Setting from Category List ADVICE Sets listening restrictions from the channel list. Sets listening restrictions on all channels in • “Channel locked” is displayed in the the category. channel name on the source plate. On the SIRIUS broadcast •… -
Page 105
Unlocking All Locked Changing the Lock Passcode ADVICE Channels Changes the listening restriction passcode. • “Channel locked” is displayed in the channel name on the source plate. Cancels the listening restrictions on all On the passcode entry screen, channels. • “CH Locked” is displayed in the preset touch Change Password switch and the channel list. -
Page 106: Set The Channel Skip
Setting from Channel List Setting from Category List Set the channel skip. Sets Skip from the channel list. Sets Skip on all channels in the category. You can set Skip on channels and categories. Channels in which Skip is set will be skipped On the SIRIUS broadcast On the SIRIUS broadcast and not received when cycling up and down…
-
Page 107: The Sirius Id Is Displayed
Canceling Skip on All The SIRIUS ID is displayed. P side P Display Screen Channels This section explains the screens displayed On the SIRIUS broadcast when selecting the [AV] (SIRIUS) in the P side Cancels the Skip setting on all channels. P display information (P37) .
-
Page 108: Listen To Cds
DISC Display a List You can display a track list. On the audio CD playback Listen to CDs ADVICE information screen, touch • You can fast forward or rewind the This explains how to listen to audio CDs List track being played by holding down the (CD-DA/CD-TEXT).
-
Page 109: Display Contents
Lists Display Contents Playback Information Screen 1) Source plate 1) Cursor switch ▲ Displays the name of the currently Displays a sub-menu to change the Allows you to select a track. selected source and the playback mode. playback mode. 2) Track number →“Switch Playback Mode”(P109) 2) Album name 3) Track name…
-
Page 110: Switch Playback Mode
Play Mode Switch Playback Mode P side P Display Screen Repeat playback, random playback, and scan This section explains the screens displayed Repeat Repeat playback of the track playback are possible. when selecting the [AV] (CD) in the P side P currently being played.
-
Page 111: Listen To Audio Files On A Disc
Listen to Audio Files Display a List ADVICE on a Disc • You can fast forward or rewind the When you display a list, you can check the track being played by holding down the folder levels while searching for tracks. This explains how to listen to audio fi…
-
Page 112: Display Contents
Display Contents Playback Information Screen 1) Source plate 6) Playback mode display Displays the name of the currently Displays the current playback mode. →“Switch Playback Mode”(P112) selected source and the playback mode. : Repeat play 2) Album name : Folder repeat play If there is an album name in the title : Scan play information, displays it.
-
Page 113: Switch Playback Mode
Lists Switch Playback Mode Repeat playback, random playback, and scan playback are possible. On the audio fi le playback information screen or on the list display, touch ▲ This displays the sub-menu. Touch the “mode” to change to. 1) ROOT Playback Shows the topmost level.
-
Page 114: P Side P Display Screen
Play Mode P side P Display Screen PsideP Change the information displayed on the This section explains the screens displayed Repeat Each time this is touched, the P side P sub-screen. when selecting the [AV] (DISC) in the P side P mode switches in the order display information (P37) .
-
Page 115: Play Ipod
iPod/USB/SD NOTE • When connecting an iPod/iPhone, use the connection cable included in the iPod/ iPhone. NOTE Equipment by type • Set up the device in order that no Play iPod • For information regarding details such unsafe actions, such as plugging in the as types of iPod/iPhone that can be connection cable are taken while driving.
-
Page 116: Switch Playback Mode
Play Mode Switch Playback Mode Press the key. MODE Repeat playback, random playback, etc. are This displays the mode. Repeat Each time this is touched, the possible. mode switches between “Repeat” Touch iPod and “Cancel”. On the iPod playback Repeat: Repeat playback of the The iPod playback information screen is information screen, track currently being played.
-
Page 117: Display Contents
Artist name Display Contents If there is an artist name in the title information, displays it. iPod Playback Information Screen 9) Playback time Menu Displays the iPod menu. →“iPod Menu”(P117) 1) Source plate 6) Playback mode display Displays the name of the currently Displays the current playback mode. -
Page 118: Search By List
iPod Menu Search by List Touch the “item” to play from Touching [Menu] on the iPod playback the list. Touching a category on the iPod menu (P117) information screen will display the iPod menu. displays a list of the categories. By touching Lists of various categories can be displayed the list, you can check album names and track from the iPod menu.
-
Page 119: P Side P Display Screen
Displaying the playback 4) Playback time P side P Display Screen information screen. 5) Status icon This section explains the screens displayed when selecting the [AV] (iPod) in the P side P When a list is displayed, the iPod playback : Play display information (P37) .
-
Page 120: Listen To Audio Files On A Usb Device/Sd Card
NOTE NOTE Equipment by type Listen to Audio Files • USB devices can be used in vehicles that • Set up the device in order that no have a USB port. unsafe actions, such as plugging in the on a USB Device/SD connection cable are taken while driving.
-
Page 121: Switch Playback Mode
Play Mode Switch Playback Mode Press the key. MODE Repeat playback, random playback, and scan This displays the mode. Repeat Each time this is touched, the playback are possible. mode switches in the order Touch “Repeat”, “Folder repeat”, and On the USB device or SD card The playback information screen is “Cancel”.
-
Page 122: Display Contents
9) Playback mode display Display Contents Displays the current playback mode. Playback Information Screen →“Switch Playback Mode”(P120) : Repeat play : Folder repeat play : Scan play : Folder scan play : Random play : All random play 10) Track number/name If there is a song name in the title information, displays it.
-
Page 123: Display A List
Folder List Display a List When you display a list, you can check the folder levels while searching for tracks. On the USB device or SD card playback information screen, touch List ▼ 1) ROOT 6) Folder name Shows the topmost level. Touching this expands the folder.
-
Page 124: Display The Music Menu
Music Menu Display the Music Menu Touch any “menu”. The following explains the menu displayed When the music menu is displayed, you can when [Playlist] is ON on the playback display a music list for each artist or album. information screen and you touch [Music On the USB device or SD card Menu].
-
Page 125: P Side P Display Screen
4) Playback time P side P Display Screen This section explains the screens displayed ▲ when selecting the [AV] (USB/SD) in the P Touching this displays the submenu. (P33) side P display information (P37) . 6) Playback mode display Displays the current playback mode. : Repeat play : Folder repeat play : Scan play…
-
Page 126: External Input Devices
External Input Devices Supported Profi les and Functions This section explains the functions supported for each profi le. NOTE Equipment by type ® (Vehicles with a Bluetooth 2.0 interface). • Confi rm together with the user manuals Function A2DP Use Bluetooth Audio for the commercially-available Bluetooth- Audio output during playback ○…
-
Page 127: Connect A Bluetooth-Capable Audio Device
Connect a Bluetooth-capable Listen to a Bluetooth-capable Audio Device Audio Device This product and the Bluetooth-capable audio Press the MODE key. device use the Bluetooth function to connect. For details on how to connect, refer to This displays the mode. “Bluetooth Setting”(P213) .
-
Page 128: Display Contents
7) Status icon Display Contents : Play Playback Information Screen : Pause : Stop : Fast forward : Rewind Allows you to stop, play, or pause. 9) Playback time This is used when selecting a song. 1) Source plate 4) Playback mode display *1, *2 Continue touching for fast forward or Displays the name of the currently…
-
Page 129: Switch Playback Mode
Play Mode Switch Playback Mode P side P Display Screen * Depending on the type of Bluetooth-capable Repeat playback, random playback, and scan This section explains the screens displayed audio devices, the details of playback modes playback are possible. when selecting the [AV] (Bluetooth Audio) in may differ.
-
Page 130
4) Playback time 5) Status icon : Play : Pause : Stop : Fast forward : Rewind ▲ Touching this displays the submenu. (P33) PsideP Change the information displayed on the P side P sub-screen. *1 Not displayed when AVRCP is v1.0. *2 Not displayed when information cannot be obtained. -
Page 131: Use Aux
Outputting Audio Equipment by type Use AUX Press the MODE key. By connecting AUX devices to this product, This displays the mode. you can input audio from these devices to the product and play it back. Touch ▼ CAUTION • Video from AUX devices cannot be viewed.
-
Page 132: Info
INFO/SETTINGS INFO Calendar NOTE • Icons are displayed for days set as This displays the calendar. You can check special days or anniversaries. and set special days and anniversaries. • If one day is set as both a special day and an anniversary, the special day icon has priority.
-
Page 133: Setting Special Days
Display Contents Setting Special Days This sets a new special day. Up to 200 special days can be set. Touch the day on the calendar that you want to set as a special day. ▼ 1) Year and month of the calendar (P134) Anniversary displayed…
-
Page 134
Editing Special Days Deleting Special Days Touch Memo This edits a special day that has already been This deletes a special day that has already Input a name for the special set. been set. day, then touch While the calendar is displayed, While the calendar is displayed, →“How to Input Characters”(P19) touch… -
Page 135: Setting Anniversaries
Setting Anniversaries Touch any “icon”. Touch This sets a new anniversary. Up to 20 ▼ anniversaries can be set. The anniversary setting is complete. While the calendar is displayed, touch Anniversary This displays the anniversary list. Touch New Event Touch Date ▼…
-
Page 136
Editing Anniversaries Deleting Anniversaries This edits an anniversary that has already While the calendar is displayed, been set. touch Anniversary While the calendar is displayed, This displays the list of set anniversaries. touch Anniversary Touch the anniversary to This displays the list of set anniversaries. delete. -
Page 137: User Sd
User SD If the audio SD card is inserted in this device, you can check the SD card capacity and space available. You can also perform various information updates. Displaying Press the key. INFO This displays the info menu. Touch User SD ▼…
-
Page 138: Update The Map Database
Update the Map Database You can perform an update of the map database with an SD card. NOTE • For details, please consult your Mitsubishi Motors Dealer. Update the Map Database…
-
Page 139: Trip
Display Contents Equipment by type Trip You can check and set trip information. Displaying Press the INFO key. This displays the info menu. Touch Trip 1) Fuel consumption graph 6) Distance to Empty ▼ Allows you to check the average fuel Measures and displays the possible consumption and the instantaneous fuel cruising distance based on the remaining…
-
Page 140: Changing The Reset Mode
Fuel Consumption Graph Reset Trip Information Changing the Reset Mode On the trip screen, Standard vehicle Average Fuel Economy Average Speed touch Manual 2) 3) 4) ▼ 1) Average fuel consumption 2) Average fuel consumption graph Displays the fuel consumption with 16 levels.
-
Page 141: Check The History
Change the Fuel Consumption Check the History Lap Time History Display You can check the fuel consumption and Eco You can measure the time, distance, vehicle score history. speed, and fuel consumption. There is a long-term fuel consumption history and a short-term fuel consumption history. On the trip screen, On the trip screen, touch On the fuel consumption…
-
Page 142
Delete Lap Times Touch ADVICE This deletes the recorded measurement • In Step 3, if you touch [Lap] again, the ▼ results. measurement results in “A” are recorded in “B”, and the previous measurement On the lap time screen, touch results are recorded in “A”. -
Page 143: Air Conditioner
Air Conditioner Display Contents You can check the air conditioner status. Dual-zone automatic climate control Other than dual-zone automatic (Only on vehicles that support this function) air conditioner climate control air conditioner Displaying Press the key. INFO This displays the info menu. Touch Air Conditioner ▼…
-
Page 144: Gps Information
GPS Information Display Contents You can check the name of the current location, its latitude/longitude, the number of GPS satellites being received, and a map of satellite locations. Displaying Press the key. INFO This displays the info menu. 1) Current location name North Up Touch GPS Information.
-
Page 145: P Side P Display Screen
P side P Display Screen Heading Up Touching this allows you to change the This section explains the screens displayed map of satellite locations to the heading when selecting the [GPSInfo] in the P side P display information (P37) . reference so that up is the direction your car is traveling.
-
Page 146: Mobile Phone
Display the Phonebook Register in Phonebook Equipment by type ® (Vehicles with a Bluetooth 2.0 interface). There is the vehicle phonebook registered in Telephone numbers can be registered. Mobile Phone this product and the mobile phonebook that can draw on the data in your mobile phone. Input and Register the Connecting your mobile phone to this product with Bluetooth lets you use the…
-
Page 147
Registering from Mobile NOTE Touch Back Phone • For details on how to operate your mobile ▼ phone, please refer to the user manual You can register each entry in the phonebook Registration in the vehicle phonebook is for your mobile phone. in your mobile phone into the vehicle complete. -
Page 148: Edit A Phonebook
Reading in one Entry Reading in All Entries Edit a Phonebook Display the vehicle phonebook Display the mobile phonebook You can edit a phonebook that has been registered. screen. screen. Display the vehicle phonebook →“Display the Phonebook”(P145) →“Display the Phonebook”(P145) screen.
-
Page 149: Dial A Telephone
Deleting a Phonebook Calling the Person You Were Dial a Telephone Just Talking with You can delete a phonebook that has been There are a number of ways to make a call. registered. CAUTION On the mobile phone screen, Display the vehicle phonebook •…
-
Page 150
Making a Call from a Call a Telephone Number Touch the “telephone number Phonebook Registered on the Map to call”. If there is a telephone number in the Display the vehicle phonebook information for an establishment registered screen or the mobile in the navigation function, you can call that telephone number. -
Page 151: Incoming Calls
Answering an Incoming Call Ending a Telephone Call Incoming Calls The incoming call ring is sounded and the Press the “OFF HOOK” key on Press the “ON HOOK” key on incoming call screen is displayed. the steering wheel. the steering wheel. →“Steering Remote Control Switch →“Steering Remote Control Switch Operation”(P84)
-
Page 152: Setting Passcode
• If you have set a passcode, after turning the ignition switch ON, check that the passcode is set correctly. • If you forget your passcode, consult your Mitsubishi Motors Dealer. ▼ The passcode setting is complete. Touch , and then ▲…
-
Page 153: Camera
Displaying Equipment by type Camera When a rear view camera, available Display Pictures from the separately, is connected, the picture from Rear View Camera this rear view camera can be displayed on the display. Move the gear shift position to For details, refer to the user manual for the “R”.
-
Page 154: Environment
Display Contents Equipment by type Environment You can check the altitude, air pressure, and outside temperature. Displaying Press the key. INFO This displays the info menu. Touch Environment 1) Altimeter 5) Outside temperature graph ▼ 2) Barometer 6) Altitude graph 3) Outside Back Touching this returns the display to the…
-
Page 155: Maintenance
ADVICE Equipment by type Maintenance • When the date approaches on which a part is scheduled to be replaced or the You can manage parts replacement timing travel distance since the last replacement for your car. approaches the distance for part replacement, this is displayed in yellow.
-
Page 156: Set Maintenance Information
Display Contents Set Maintenance Information You can set the maintenance fi xed date and maintenance distances. Press the INFO key. This displays the info menu. Touch Maintenance Touch the “part” to set. 1) Guidance 5) Date of Change This sets whether or not to display Displays the dates on which maintenance guidance when the parts replacement date was carried out.
-
Page 157
Add Maintenance Information Delete Maintenance Touch in Distance. Setup Information You can add maintenance items that you want to add. This deletes the “Date”, “Changed at Odometer” and “Remaining Distance” for the Press the key. INFO set part. This displays the info menu. Press the key. -
Page 158: Update Maintenance Information
Update Maintenance Batch Updating Set Maintenance Information Information Guidance This updates all the “Engine Oil”, “Oil Filter”, “Rotate Tires”, “Air Purifi er” and “Brake When parts are replaced, the maintenance If maintenance information guidance is set, System” replacement dates, odometer information is updated.
-
Page 159
When Setting “Give Guidance” When a parts replacement date approaches or passes, after this product is started, a message like the following is displayed. Touching a touch switch puts out the message. The operations after the next time this product is started are as follows. Do not show From the next start-up, messages again… -
Page 160: Info/Settings Hd Radio Data Information
HD Radio Data Fuel price Information Screen Information You can check Fuel price and weather information. NOTE • Depending on the region, it may not be possible to acquire information. You can check Fuel prices. → “Fuel price Information Screen” (P160) Displaying Weather Information Screen Press the…
-
Page 161: Fuel Price Information Screen
Check the Location of Gas Fuel price Information Screen Stations You can check the location of gas stations. In the HD Radio Data Information screen, touch Fuel Price This displayed a list of gas stations. Touch the “gas station” to check.
-
Page 162
Switching between Gas Station Information In the gas station list screen, touch Update ▼ Updates the gas station list. NOTE • 3) [Update] may change to [Near] depending on the model. HD Radio Data Information… -
Page 163: Weather Information Screen
Weather Information Screen 1) City name 4) Date Today Displays today’s weather information. 2) Weather information 5) Future weather
Weekly weather information Displays today’s weather information. Displays weather 3 — 6 hours ahead, 6 — Displays the weather (icon), the current 12 hours ahead, and 12 — 24 hours ahead. -
Page 164: Check The Weather Information
Check the Weather Switching between Weather Information Information You can switch between today’s weather You can check weather information by region. information and weekly weather information. In the HD Radio Data In the Weather Today screen, Information screen, touch touch Weekly Weather This displays the region list.
-
Page 165: P Side P Display Screen
Displaying Fuel price P side P Display Screen Information This section explains the screens displayed when [Fuel Price] or [Weather] is selected in display information (P37) of P side P. Displaying Weather Information Update Touching this updates the gas station list. 1) Weather information 3) City list Displays today’s weather information.
-
Page 166: Version Info
Version Info Checking the map request Version Updating Method code A map database or system can be updated You can check the map database, to a newer version by replacing the main unit navigation program version, and map Press the key.
-
Page 167
Push in the map card until you NOTE hear a “click”. • When reading map data, “Map cannot be displayed.” is displayed. • When it is necessary to update the system to a newer version, the system MAP Card MAP Card MAP Card update screen is displayed. -
Page 168: Voice Operation Voice Control
Voice Operation ADVICE NOTE • You can check the usage for voice The voice control function may have control, a list of voice commands, etc. diffi culty in some environments and with Voice Control → “Check the Voice Control Help” (P195) the way some people speak.
-
Page 169: About The Learning Function
About the Learning Function Audio operable screens The voice control system has a learning Operable commands differ according to the display screen. The screen shows an example. Even function. (This function cannot be used by corresponding screens may not operate. Also, non-corresponding screens may be operated. ®…
-
Page 170: Navigation Function Operation
Navigation Function Creating a Waypoint Creating a Route to Your Home Operation Select a Point on the Map. Press the “SPEECH” key on Can be operated in the navigation screen. This can be done by map scrolling or When a nearby establishment or destination selecting a destination.
-
Page 171: Search For A Location
Registering a Location Search for a Location ADVICE Location search is done through voice control. • The displayed numbers have the Select a Point on the Map. following meanings: ADVICE This can be done by map scrolling or Distance: The distance from the location selecting a destination.
-
Page 172
Searching by Telephone Searching by Postal Code After you hear the beep, say Number “212XXXX1XX”. Press the “SPEECH” key on ▼ Press the “SPEECH” key on the steering wheel. the steering wheel. After you hear the “beep”, say “Voice commands”. After you hear the “beep”, say “Voice commands”. -
Page 173: Operating The Map
Changing the Map Scale Operating the Map After you hear the beep, say “Search”. Basic map operations are done through voice Press the “SPEECH” key on control. ▼ the steering wheel. Scrolling the Map After you hear the “beep”, say “Voice commands”.
-
Page 174
Change the Two-screen Map Changing the Map Orientation Changing the Map Type Scale Press the “SPEECH” key on Press the “SPEECH” key on Press the “SPEECH” key on the steering wheel. the steering wheel. the steering wheel. After you hear the “beep”, say “Voice After you hear the “beep”, say “Voice commands”. -
Page 175: Checking And Changing The Route
Checking and Changing the Displaying All Routes Deleting a Route Route Press the “SPEECH” key on Press the “SPEECH” key on Confi rmation and editing of created routes the steering wheel. the steering wheel. and basic operations are done through voice control.
-
Page 176: Audio Function Operation
Audio Function Repeating Playback Selecting and Playing Tracks Operation You can do this operation if you know the Press the “SPEECH” key on track number of the media you want to play. the steering wheel while audio Press the “SPEECH” key on Selecting and Playing Media is playing.
-
Page 177: Switch To Other Functions
Switch to Other Equipment by type ® (Vehicles with a Bluetooth 2.0 interface). Functions Telephone (Hands-free) Press the “SPEECH” key on Displaying Information the steering wheel. After you hear the “beep”, say “Voice Press the “SPEECH” key on commands”. the steering wheel. Say“Telephone”…
-
Page 178: List Of Accepted Commands
List of Accepted Searching Setting Destination, Address Book, etc. Commands Search nearby Search nearby Destination Destination Setting Search area Setting Go here Search vicinity Navigation Function Search by Set as destination Search by Telephone Operation Telephone Number Set destination Number Describes the words that can operate Telephone number Go there…
-
Page 179
Confi rming Go to Special Current Time Go to Special Location X Current Time Location X Special location Time Guidance Guidance Special location X What time? Next junction Go to special location Confi rm time Estimated Time Estimated Time of Arrival at of Arrival at Address Book Destination… -
Page 180
Editing Route/Changing Detour Route 6 Alternative Route Alternative Route Detour Route 6 mile Search Conditions mile Length of detour 6 mile Search alternative route 6 mile detour route Search detour Erase Route Erase Route Search detour within 6 miles Search for detour Delete the route Detour Route 20 km Detour Route 20 km Search other route… -
Page 181
Character Size Mobile Phone Character Size Mobile Phone Icon Icon Font size Telephone Icon RTT Traffi c RTT Traffi c Messages Messages Letter size Phone image RTT message Motorway Motorway Simplifi ed Map Phone picture Display RTT message Simplifi ed Map Automatic Display Speed Indicator Speed Indicator… -
Page 182
Route Guidance RTT Icons on Map RTT Icons on Map Sound Route Guidance Frequency Sound Frequency Set Route Guidance RTT icons display setting Navi Voice Frequency Current Station Current Station Volume setting Route guidance frequency Set Time Display Search for RTT stations Set Time Display settings Display Progress… -
Page 183
Charging Timer User SD Maintenance Charging Timer User SD Maintenance Timer Charge Setting SD Information Maintenance Information Timer Charge SD Card Information Maintenance screen Remote Climate Remote Climate Control SD card info Maintenance Information Control screen Pre-Air Conditioning Settings SD card display Air Conditioner Air Conditioner Pre-Air Conditioning… -
Page 184
Scroll Down-Left Zoom In XX km/m Scroll Down-Left Zoom In DetailsXX km/m Scroll Left Scroll Left Enlarge XX (k)m scale Scroll Up-Left Scroll Up-Left Zoom In Right Screen XX (k)m Right Screen Details Scale Right Screen XX (k)m Changing Scale Enlarge Right Screen Right: XX (k)m Right Screen Zoom In… -
Page 185
Switching Maps Changing Map Orientation Changing Left Screen Scale One Map North Up Zoom Out left One Map North Up Zoom Out left screen screen 1 screen Right screen North up Left screen Reduce 1-screen Map Right North up Zoom out left screen Single Map North up mode Left Wide view… -
Page 186: Audio Function Operation
Changing Left Screen Map Audio Function Operation * If the display is in km/m, the XX will be replaced by 1000 (km), 500 (km), 250 (km), 100 (km), 50 (km), Orientation Describes the words that can operate audio 20 (km), 10 (k m), 5 (km), 2 (km), 1 (km), 100 (m), 50 (m), 25 (m), or 10 (m).
-
Page 187
AV Operations Previous Preset Previous Preset Station Station Listen to SD Previous Preset Audio Off Audio Off SD Playback Last Preset Turn audio off Set to SD Last Preset station Turn off music Play Play SD Play Stop music Pause SD Card Pause Stop audio… -
Page 188
All Repeat Random Album Shuffl e All Repeat Random Album Shuffl e Start Repeat All Start Random Start Album Shuffl e Repeat All ON Random ON Album Shuffl e ON Playlist Random Stop Shuffl e Repeat all Playlist Random Stop Shuffl e Repeat all songs Start Playlist Random Play Stop album shuffl… -
Page 189: Searchable Genre Names In The Surroundings
Searchable genre names in the FINA PEMEX FINA PEMEX surroundings below FLYING J PETRO-CANADA FLYING J PETRO-CANADA FOOD MART PETROLEUM FOOD MART PETROLEUM MITSUBISHI MOTORS GATE PHILLIPS 66 GATE PHILLIPS 66 DEALER GETGO MITSUBISHI MOTORS PILOT GETGO PILOT GETTY DEALER PIONEER…
-
Page 190
RACEWAY EV STATION 240V BANCO POPULAR BANCO POPULAR RACEWAY EV STATION 240V (PUBLIC) SHEETZ BANCORPSOUTH SHEETZ EV STATION 240V PUBLIC BANCORPSOUTH SHELL BANK OF SHELL PUBLIC EV STATION 240V BANK OF AMERICA AMERICA SINCLAIR SINCLAIR EV STATION BANK OF BANK OF MONTREAL SPEEDWAY EV STATION 240V SPEEDWAY… -
Page 191
FIRST NATIONAL WELLS FARGO ROAD FIRST NATIONAL BANK WELLS FARGO ROAD ASSISTANCE BANK ASSISTANCE WOODFOREST WOODFOREST NATIONAL FIRST NIAGARA NATIONAL BANK PHYSICIAN FIRST NIAGARA BANK PHYSICIAN FIRSTBANK POLICE SERVICE FIRSTBANK POLICE SERVICE HARRIS BANK MEDICAL COMMUNITY HARRIS BANK MEDICAL SERVICE SERVICE HSBC HSBC… -
Page 192
HISTORICAL FONDUE CAJUN/ HISTORICAL MONUMENT FONDUE CAJUN MONUMENT CARIBBEAN FRENCH FRENCH CARIBBEAN MARINA MARINA GERMAN CANADIAN GERMAN CANADIAN MUSEUM MUSEUM GREEK CREPERIE GREEK CREPERIE NIGHT LIFE/ NIGHT LIFE GRILL/ DUTCH GRILL DUTCH MUSIC CLUB BARBECUE MUSIC CLUB FUSION BARBECUE FUSION RECREATION RECREATION AREA INDIAN… -
Page 193
COFFEE SHOP FAST FOOD MRS FIELDS MRS FIELDS ORANGE JULIUS ORANGE JULIUS COFFEE SHOP FAST FOOD COFFEE SHOP FAST FOOD POPEYES POPEYES CARIBOU AUNTIE ANNE’S CARIBOU COFFEE AUNTIE ANNE’S COFFEE RALLY’S RALLY’S BACK YARD BACK YARD BURGERS COFFEE TIME BURGERS SMOOTHIE KING COFFEE TIME SMOOTHIE KING… -
Page 194
DISCOUNT WINE & LIQUOR BAYMONT INN & DISCOUNT STORE WINE and LIQUOR BAYMONT INN and SUITES STORE SUITES WINE ELECTRONICS BEST WESTERN ELECTRONICS BEST WESTERN LIQUOR / OFFICE BUDGET HOST INN BUDGET HOST INN OFFICE SUPPLIES SUPPLIES CANDLEWOOD CANDLEWOOD SUITES FLOWERS/ FLOWERS TRAVEL… -
Page 195
HOLIDAY INN SHERATON OTHER GENERAL HOLIDAY INN SHERATON OTHER GENERAL MERCHANDISE MERCHANDISE HOLIDAY INN SHONEY’S INN HOLIDAY INN EXPRESS SHONEY’S INN EXPRESS GENERAL MERCHANDISE SLEEP INN SLEEP INN HOMESTEAD HAIR & BEAUTY HOMESTEAD VILLAGE HAIR and BEAUTY SOFITEL SOFITEL VILLAGE HEALTH CLUB HEALTH CLUB STAYBRIDGE… -
Page 196: Check The Voice Control Help
Check the Voice Verifi able Information Control Help How to use This explains the operations voice control common to all voice control You can check the usage for voice control operations. (P167) , a list of voice commands, etc. voice control This explains the voice control help operations for individual functions.
-
Page 197: Navi Settings
SETTINGS Navi Settings Types That Can Be Set This changes the settings concerning Guidance Allows you to set up the guidance navigation. display. →“Guidance”(P197) Press the key. NAVI MENU Screen Allows you to set up the navigation display. This displays the navi menu. →“Screen”(P199) Touch the “type”…
-
Page 198: Guidance
Guidance You can change the settings for the guidance display. Settings name Settings value Settings content Travel Time Arrival Time Sets the arrival time as the display method for the time of arrival at the destination. Local Time Sets the local time as the display method for the time of arrival at the destination.
-
Page 199
Settings name Settings value Settings content Default Returns the guidance to their factory default settings. NOTE • “Intersection Guidance Map” may not be displayed. Navi Settings… -
Page 200: Screen
Screen You can change the settings for the display. Settings name Settings value Settings content 3D Bldg. Enables/disables display of buildings in 3D (P36) display. Show Hide 3D Polygon Show Enables/disables display of 3D polygon landmark when Landmark displaying a map screen in 3D. Hide 3D Landmark Show…
-
Page 201
NOTE Settings name Settings value Settings content • “3D Landmark” is may not be Freeway Display Allows you to set whether or not to automatically display Simplifi ed Map displayed. Freeway Info (P35) when traveling on a freeway. Not Display Automatic Display Current Street Enables/disables display of the name of the current location. -
Page 202
POI Icons on Map Map Color Change 3D point of view You can enable/disable display of each POI You can set the display colors for the map You can change the 3D (P36) point of view. icon type. screen. Press the key. -
Page 203: Rtt Options
RTT Surveillance Map Selecting the Current Station RTT Options Displays the registered area using “Registering Select a station to receive RTT messages. You can make the settings concerning RTT. the RTT Surveillance Map” (P80) . Press the key. NAVI MENU RTT Icons on Map Press the key.
-
Page 204: Route Options
Route Options You can change the settings concerning route searches. Settings name Settings value Settings content Route Priority Fast Searches for the route with the shortest driving time (earliest arrival at the destination) by using freeways and major roads. Short Searches for the route with the shortest distance on the map.
-
Page 205: Navi Voice/Others
Navi Voice/Others You can set the settings for the volume and other settings. Settings name Settings value Settings content Beep Sound Allows you to set the operation volume. Volume The larger the number, the higher the volume. [Off] mutes the operation sound.
-
Page 206
Sensor Calibration The levels for the speed sensor and gyro sensor are raises through automatic learning. When a tire is replaced, it is necessary to erase the speed learning data and relearn it. Precision of Your Car’s Location and Press the key. -
Page 207: Personal
Personal You can register, edit, and delete locates in the address book, your home, frequently used locations, etc. Settings name Settings value Settings content Address Book Allows you to register a new location. After you touch [New], the procedure is the same as in Step 2 in “Register a Searched for Location”…
-
Page 208: Adjust Audio Sound Quality
Adjust Audio Sound Touch to adjust ▲ ▼ vehicles with and without premium amp Quality the fader. Balance/Fader You can set F11 to F1, 0, or R1 to R11. The level of the sound output from each Change audio quality settings. speaker can be adjusted with the cursor ▼…
-
Page 209: Equalizer Settings
Tone Settings NOTE vehicles with and without premium amp Equalizer Settings Allows you to set the level of each sound • If your car is equipped with premium quality. audio, you can set the “Punch” level. You Allows you to set the sound type. can set one of 7 levels from 0 to 6.
-
Page 210: Surround Settings
Setting Contents Other Settings vehicles equipped with premium amp Surround Settings The settings are different for vehicles with and BASS Allows you to set the bass to one without premium audio. of 11 levels, from -5 to +5. You can set the surround and sound fi eld Allows you to set the medium vehicles equipped with premium amp center.
-
Page 211
Setting Contents vehicles not equipped with premium amp Speed Press the SETTINGS key. Sets the levels for when the Compensated volume is adjusted automatically This displays the settings menu. Volume according to the vehicle speed. PremiDIA Allows you to adjust the amount Touch Sound Quality Control *1,*2,*3… -
Page 212: System Settings
System Settings Language Touch the “date and time display format” to set. This changes the language used. You can make system related settings, such as the time, language, units, and Bluetooth Press the SETTINGS key. device. This displays the settings menu. Touch , and then System…
-
Page 213: Opening Setting
Opening Setting A/C Cut-in Units Enables/disables the opening animation. This sets whether or not to display an interrupt This changes the unit. Disabling the opening animation makes for air conditioner operations.(Only on vehicles Press the SETTINGS key. startup faster. that support this function) This function may not be available depending This displays the settings menu.
-
Page 214: Bluetooth Setting
Registering a Bluetooth NOTE Equipment by type ® (Vehicles with a Bluetooth 2.0 interface). Device • This function can be used on vehicles Bluetooth Setting ® equipped with a Bluetooth 2.0 interface. Register a Bluetooth device with this product. • Cancel functions such as the mobile You can use the Bluetooth function to connect Press the key.
-
Page 215
Selecting a Bluetooth Device Setting a Passkey Touch Connect If you have registered multiple Bluetooth This sets whether to keep the same passkey ▼ devices, you must select the one to connect. (factory setting “1212”) or to set a different This completes selection of the Bluetooth (From then on, the Bluetooth device you set passkey each time is registered. -
Page 216: Keyboard Layout
Set Passcode Keyboard Layout Voice control settings You can lock the telephone functions with a This changes the keyboard layout. Allows you to enable or disable the voice passcode. control guide and reset training data. Press the SETTINGS key. Press the key.
-
Page 217: Other Settings
Other Settings Picture Control Vehicle Settings This adjusts the brightness, contrast, etc., for You can make settings for the vehicle You can make the settings concerning the the menu screen, navigation screen, etc. equipment.(Only on vehicles that support this screen and sound volume. function) Press the SETTINGS…
-
Page 218
Items That Can Be Set NOTE • * are items that may not be displayed, depending on the supporting vehicle specifi cations. • Either “Keyless Entry System” or “Keyless Operation System” is displayed, depending on the vehicle equipment. Keyless Entry System Item Settings content Turn Signal Lights Answerback… -
Page 219
Wipers Item Settings content Windshield Wipers Intermittent Sets the operation interval for the windshield wipers. Operation * Some setting items are disabled for certain grades and vehicle models. Wipers Linked to Washer Sets automatic operation of the windshield wipers when the washer fl… -
Page 220
Theft Alarm Item Settings content Panic Alarm Enables/disables the panic alarm. Turn Signal Item Settings content Operation in Key Position Sets the turn signal operation conditions. Lane-change Signals (Flash 3 Times Enables/disables the function that fl ashes three times if you with 1 Touch) gently operate the direction indicator lever when changing lanes. -
Page 221
Others Reset the Vehicle Settings Item Settings content Execute up to Step 2 in “Vehicle Horn Answerback with Remote Enables/disables the function that sounds the horn when the Settings”(P216) . Engine Start engine is started with the remote controller. ▼ Accessory Power Timeout Sets the duration ACC stays ON when the ignition switch is ACC. -
Page 222: Clock Screen
Clock Screen Displays the clock over the entire screen. Press the SETTINGS key. This displays the settings menu. Touch Clock Screen ▼ The clock is displayed. ADVICE • Touching the screen returns the display to the original screen. • With [System Setting], [Time], and [Format Change], you can change the format for time display.
-
Page 223: Other
Other Troubleshooting Please check these items if a message appears on the screen, or if you think something is not working properly. If This Message Appears… A message is displayed on the screen of this product according to the situation. Navigation Functions Message Cause…
-
Page 224
Audio Functions Message Cause Response Play is impossible due to a mechanism error. The drive has malfunctioned for some reason. Check that there is no problem with the disc, and insert the disc again. If the problem persists, consult with your dealer. -
Page 225: If You Think Something Is Not Working Properly
If You Think Something Is Not Working Properly… Here is a list of symptoms, causes and responses if you think something is not working properly. Common Symptoms Cause Response The operation sound is not made. The operation sound is set to [OFF]. Set the [Navi Voice/Others] “Beep Sound Volume”…
-
Page 226
Navigation Functions Symptoms Cause Response The navigation function does not start. No map card is inserted. Insert the map card. →“Insert an SD Card”(P15) The wrong SD card is inserted. Insert the special map card. There is a problem with the radio signals from the Please go on for a little while in the GPS receiving GPS satellite. -
Page 227
Audio Functions Symptoms Cause Response There is no sound or quiet sound. The volume is turned to its minimum. Adjust the volume. →“Adjust Volume”(P81) The balance or fader is turned to one side. Adjust the balance or fader. →“Balance/Fader”(P207) “Audio OFF”. Switch to “Audio ON”. -
Page 228: After The Car Battery Has Been Replaced
After the Car Battery Has Been Replaced When the car battery is replaced, some of the memory contents are deleted. Example: the set route (The set destination and any waypoints are retained.) Troubleshooting…
-
Page 229: End User License Agreement Of The Here Database
END USER LICENSE AGREEMENT OF THE HERE DATABASE END-USER TERMS Additional License Limitations: Except where you have been specifi cally The content provided (“Data”) is licensed, not sold. By opening this package, or licensed to do so by HERE in a separate written agreement, and without installing, copying, or otherwise using the Data, you agree to be bound by the limiting the preceding paragraph, your license is conditioned on use of the Data terms of this agreement.
-
Page 230
Disclaimer of Liability: HERE AND ITS LICENSORS (INCLUDING THEIR Governing Law: The above terms and conditions shall be governed by the laws LICENSORS AND SUPPLIERS) SHALL NOT BE LIABLE TO YOU IN RESPECT of the State of Illinois (for Data for the Americas and/or the Asia Pacifi c region) or OF ANY CLAIM, DEMAND OR ACTION, IRRESPECTIVE OF THE NATURE OF The Netherlands (for Data for Europe, the Middle East and Africa), without giving THE CAUSE OF THE CLAIM, DEMAND OR ACTION ALLEGING ANY LOSS,…
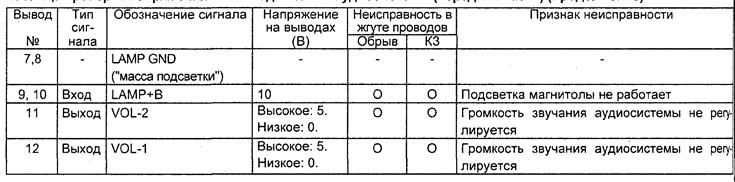
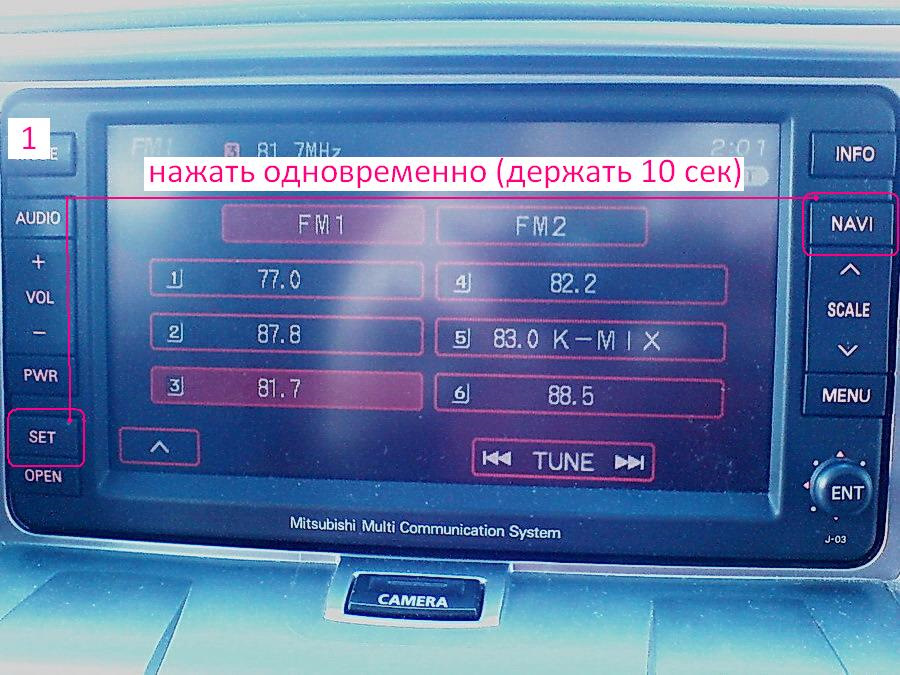
Установка времени:
Для установки времени обязательно нужно отключить антенну GPS иначе время будет сбиваться (устанавливается японское).
Далее по фото инструкции:
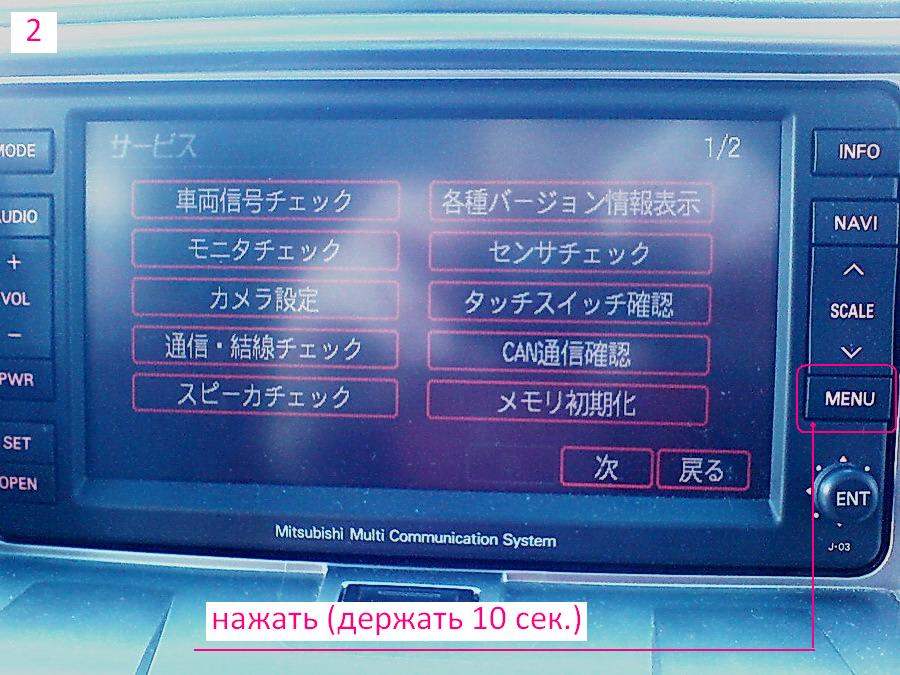

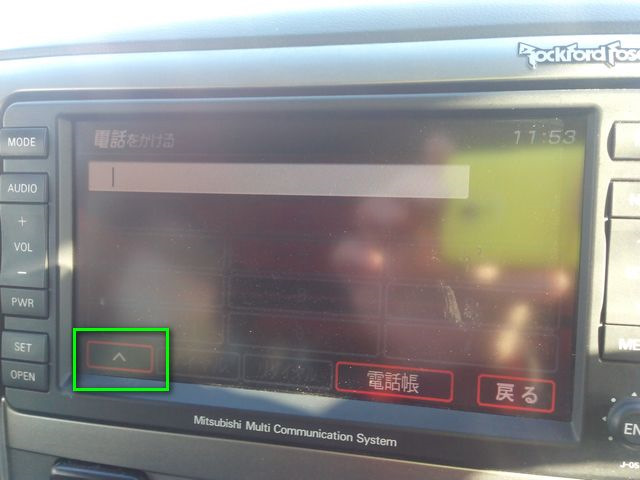
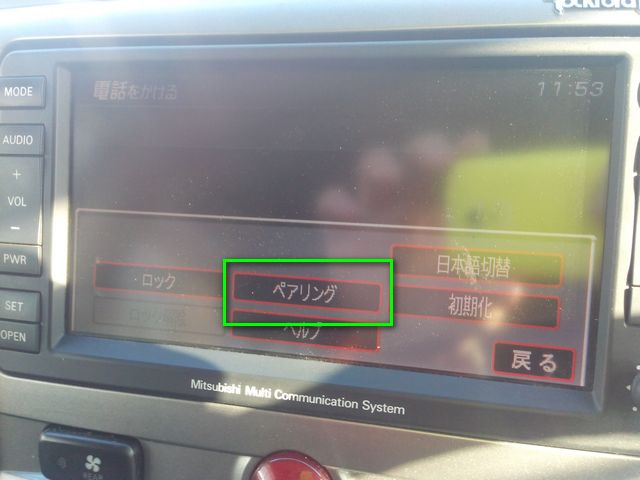
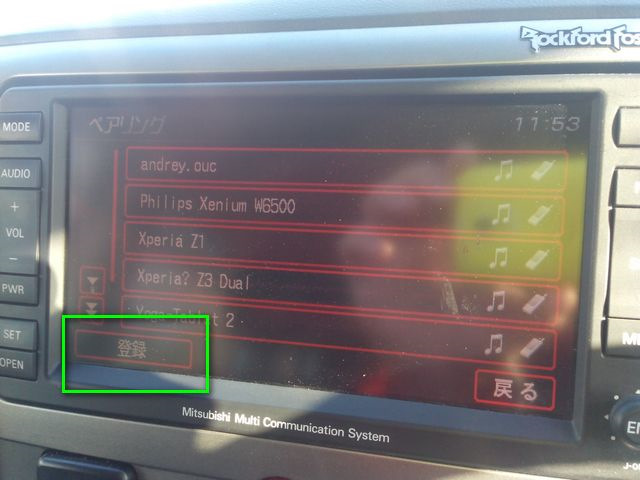
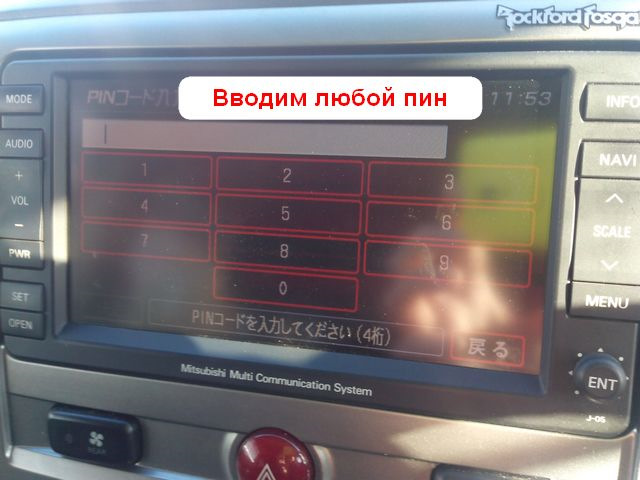
Подключение телефона через BlueTooth:
нажимаем кнопку INFO и дальше по фото инструкции:


Информация взята с сайта DROM.RU
Добавлена в бортовой журнал не как плагиат, а потому, что часто использую эти функции и постоянно искать их на сайте не удобно. Проще и быстрее найти в своем бортовом журнале.
Спасибо огромное тем кто выложил эти инструкции!
• WinCe 4.2
• Процессор Renesas SH7770
• 30 Гб жесткий диск
R-01 Toshiba MK3029GAC
R-02 Toshiba MK4036GAC
• Навигационная система double wide DIN
• 7 «дисплей
• Предварительно установленны европейские японские российские дорожные карты
• Touch screen полнофункциональный экран
• Регулировки Аудио кнопками руля
• 8 Гб музыкальный сервер (22 ГБ для навигации)
• Cовместима с MP3 и WMA
• DVD / CD слот
• Стандартный TMC-тюнер (ТВ-в японской версии)
• Информация бортового компьютера
• Опция пользовательских настроек систем автомобиля (открытие с пульта, освещение в дневное время, работа стеклоочистителей, индикаторы) (( в европейско-американской версии))
• Подключаются 6 динамиков стандартной системы и 9 динамиков
Rockford Fosgate
• 4 канала х 45W
• Телефонный адаптер для подключения портативного аудио оборудования
(необязательно)
MZ313870
MMCS имеет обозначения JM — Япония, UM — США, EM — Европа, RM(EMR) — Россия.
Вид прошивки NR-261 + обозначение страны, например NR-261 R M — Россия.
1.1. Если Вы хотите обновить официально , тогда Вам потребуется официальный диск и ключ, который вставляется в торец открывающего экрана. Вставляете этот диск и ключ, программа находит новую программу и обновляет .
1.2. Если Вы хотите «сделать сами» обновление, тогда Вам придется приложить небольшие усилия для этого.
1.2.1. Если Вам надо обновить полностью программу с картами, CDDB и т.д., тогда воспользуйтесь пунктом № 2 ( через съем HDD (жесткого диска) из MMCS и его разлочки).
1.2.2. Если Вам надо обновить только версию программы (с одной версии на другую), т.е. LOADING.KWI, тогда смотрите пункт № 1.3.
1.3. Обновление LOADING.KWI.
1.3.1. Скачиваем или берем два новых файла: LOADING.KWI и ALLDATA.KWI.
1.3.2. Их надо записать на CD-диск или на DVD -диск (не важно, какой R или RW).
1.3.3. Потом идем к машине, заводим и вставляем этот записанный диск.
1.3.4. Затем жмите SET+NAVI и держите 5 сек. Вылезает сервисное меню. Там выбираем «Versions Indication», внутри которого жмите и держите 5 сек MENU. Вылезает меню апгрейда (обновления). Выбираем «Disk Load» (первое в меню будет). Появляется окошко обновления (первые 2-3 секунды не пугайтесь, будет черный экран). После обновления, система перезагрузится.
1.3.5. Если Вы хотите обнулить систему, тогда после обновления и перезагрузки, опять жмите SET+NAVI и держите 5 сек. и выбираем там «Memory Initialization» (эта функция появится на следующей странице (надо внизу нажать next). Система еще раз перезагрузится и все будет «по умолчанию». Осторожно вся музыка, записанная на HDD исчезнет.
P.S. к пункту 1.3. Если Вы вставите диск и система будет Вас спрашивать обновить, то Вы нажимайте «No» и после перезагрузки тоже (после перезагрузки системы, CD-диск можно, кстати вынуть). Вам надо только через сервисное меню обновить.
Обновлять надо постепенно, т.е. если у вас 1-я версия, надо сначала обновить до 2-й и далее.
>>Для разблокировки родного диска в качестве одного из необходимых условий требуется обеспечение совместимости с доступными утилитами, например, Victoria или MHDD. Устойчивое сочетание — это подключение к физическому порту IDE на материнской плате с чипсетом от INTEL >> ДЛЯ ХОЛОДНОГО СТАРТА СИСТЕМЫ (ПРИ ОБНОВЛЕНИИ ИЛИ ПОСЛЕ ОТКЛЮЧЕНИЯ АККУМУЛЯТОРА) НУЖЕН ОРИГИНАЛЬНЫЙ ЖЕСТКИЙ ДИСК! Toshiba MK3029GAC, MK4036GAC или любой жесткий диск из тошибовской серии GA
Инструкция по съему (HDD из MMCS) и разлочки HDD в картинках >>>
Все необходимые для разлочки утилиты в одном архиве, архив rar, 13,6 МБ >>>
Коды для разлочки
RM B2BAB3BCB0DFACBEB1BBBEDFB1ADD2CDC9CE AD B2DFB19E8996DFAA8C9A8DDFDF
EM и EMR B2BAB3BCB0DFACBEB1BBBEDFB1ADD2CDC9CE BA B2DFB19E8996DFAA8C9A8DDFDF
JM B2BAB3BCB0DFACBEB1BBBEDFB1ADD2CDC9CE B5 B2DFB19E8996DFAA8C9A8DDFDF
UM B2BAB3BCB0DFACBEB1BBBEDFB1ADD2CDC9CE AA B2DFB19E8996DFAA8C9A8DDFDF
P . S . Для RM (русской версии) может подойти и EM код.
Чтобы винт больше не лочился нужно следующее
1. Через флоппи >>>
2. Из под Windows >>>
Р усская MMCS
Список наиболее полезных вещей для владельцев русскоязычной версии MMCS (c) LA_
- Песни на сервер записываются только с CD-дисков (аудио, не mp3). Технические детали
- Приоритет записи можно менять (автоматическая запись / запись по требованию)
- mp3-файлы воспроизводятся только с CD/CD-RW/CD-R (не с DVD)
- поддерживаются как ID3v1, так и ID3v2 теги
- русский язык: в именах файлов не поддерживается, в тегах должны быть в кодировке iso-8859-5 — (1), (2), программа для массового перекодирования; utf-8/unicode не поддерживаются
- Многоканальная музыка штатно поддерживается только для DVD Video
- Кнопки для управления на руле перепутаны? Нет. для подключения задних мониторов
- VIDEO-AUX в движении не работает
- Смена «времён года» на стартовой заставке предусмотрена только в японских версиях. В остальных — только вручную путём замены файла (переименования заменяющего файла на opening_normal.jpg). От типа транспортного средства не зависит.
- Сервисное меню: Удерживайте нажатыми SET+NAVI, чтобы попасть в Сервисное меню. В нем удерживайте MENU — чтоб попасть в Development Service. на форуме 4pda в PDF MMCS на русском
- Версия магнитолы на лицевой стороне написана под джойстиком
- Время в 24-часовой формат перевести нельзя
Скрытый текст
R-01 (EMR-01)
Английскй язык и нет карт
Версия SW: A
Версия MAP:
Версия CDDB:
R-02 ( RM-02) от R-01 :
Русский язык*
Навигация** по картам Москвы и Санкт-Петербурга
Изменения в ПО (появилась возможность выбрать цвет оболочки, синий или красный)
Версия SW: B
Версия MAP: 2008
Версия CDDB:
R-03 (RM-03) от R-02 :
Более подробные карты России
Исправления в ПО («Штуки» переименовали в «Единицы измерения»)
Версия SW: C
Версия MAP: 2009
Версия CDDB:
R-03 (RM-03 ) от R-03 :
Более подробные карты России + добавили карты Украины
Bзменения в ПО (появилась возможность вводить адреса на украинском)
Версия SW: D
Версия MAP: 2010
Версия CDDB: 3155-0000
R-03 (RM-03):
Версия SW: E
Версия MAP:
Версия CDDB:
R-03 (RM-03):
Версия SW: F
Версия MAP: 2011-A
Версия CDDB: 4214-0000
R-03 (RM-03):
Версия SW: G
Версия MAP: 2013-A
Версия CDDB: 4214-0000
*Русский язык — кодировка ISO 8859-5
**Навигация — не показывает номера домов
Скрытый текст
Русификация MMCS R-01 (полная) и другие версии частично (могут возникать проблемы с отображением меню , или не работой модулей , которых нету в русской прошивке))
Вот ссылка http://ifolder.ru/12152523 или http://www.rapidshare.ru/1040868
Там архив, его надо разархивировать, у Вас получится два файла: LOADING.KWI и ALLDATA.KWI.
Их надо записать на CD-диск (не важно какой R или RW).
Потом идем к машине заводим и вставляем этот записанный диск.
Затем жмите SET+NAVI и держите 5 сек. Вылезает сервисное меню. Там выбираем «Versions Indication», внутри которого жмите и держите 5 сек MENU. Вылезает меню апгрейда (обновления). Выбираем «Load Disk» (первое в меню будет). Появляется окошко обновления (первые 2-3 секунды не пугайтесь , будет черный экран). После обновления, система перезагрузится.
После обновления и перезагрузки, опять жмите SET+NAVI и держите 5 сек. и выбираем там «Memory Initialization» (эта фунция появится на следующей странице (надо внизу нажать next). Система еще раз перезагрузится и все будет уже по-русски .
P.S. Когда Вы ставите диск система будет Ваш спрашивать обновить, но Вы нажимайте «No» и после перезагрузки тоже (после перезагрузки системы, диск-CD можно, кстати вынуть). Вам надо только через сервисное меню обновить.
Сначало идет обновления файла LOADING.KWI с R-01 на R-02.
После «Memory Initialization» происходит русификация.
Идея подмены принадлежит melin, а техническое исполнение holod.
Скрытый текст
Просмотр DVD в движении для версии R-01(02)_RM (DVD in motion allowed for R-01(02)_RM)
Цитата:1. Скачиваем архив R-01(02)_RM (просмотр DVD в движении>) 11,9 МБ.
2. Архив надо разархивировать, у Вас получится два файла: LOADING.KWI и ALLDATA.KWI.
3. Их надо записать на CD-диск (не важно какой R или RW).
4. Потом идем к машине заводим и вставляем этот записанный диск.
5. Затем жмите SET+NAVI и держите 5 сек. Вылезает сервисное меню. Там выбираем «Versions Indication», внутри которого жмите и держите 5 сек MENU. Вылезает меню апгрейда (обновления). Выбираем «Disk Load» (первое в меню будет). Появляется окошко обновления (первые 2-3 секунды не пугайтесь, будет черный экран). После обновления, система перезагрузится.
P.S. Если Вы вставите диск и система будет Вас спрашивать обновить, то Вы нажимайте «No» и после перезагрузки тоже (после перезагрузки системы, диск-CD можно, кстати вынуть). Вам надо только через сервисное меню обновить.
Получается можно скачать сразу этот архив и сделать два в одном, и русификацию и просмотр DVD в движении. Если нужна еще и русификация, не забудьте сделать «Memory Initialization». Образы можно копировать на другой винт. Проверялось на AcronisTrueImageHome 11.0.
ПРЕЖДЕ ЧЕМ ОБНОВЛЯТЬ, ПОСМОТРИТЕ КАКАЯ У ВАС ВЕРСИЯ (она написана под джойстиком)
Прошивки, загрузчики для русской MMCS, навигационные карты и базы CDDB
Качаем отсюда: >>>>>
Европейская MMCS
Русификация европейской головы EM >>>, >>>
Карты Европы, версия 2014-B (11.06.2014), архив rar, 5,9 ГБ >>>
Loading SW: для NR261EM + просмотр DVD в движении, 11,8 МБ >>>
Японская MMCS
Англофикация >>>
Видео по меню и навигации в японской версии >>>
Перевод некоторых ошибок >>>
Разные файлы
Русская прошивка от R-02 — >>>
LOADING.KWI от европейской версии E-06 — >>>
LOADING.KWI от японской версии J-01 — >>>
Загрузчик (LOADING.KWI) для американок (N) и японок (J), SW Ver: K, English, DVD в движении разрешён. — >>>
RM-02_DVD_in_motion_allowed — >>>
Оригинальный LOADING.KWI C-01, 12,5 МБ >>>
LOADING.KWI R-03 для R-01, 11,8 МБ (DVD в движении, формат времени 24h) >>> обновление только через HDD!
Универсальный (кроме J-01) LOADING.KWI: DVD в движении, русский язык, часовые пояса от +3 до +12, формат времени 24 часа, 44.6 МБ, автор прошивки donnnn1
Образ карты с оболочкой J13 (спасибо Юре)
MMCS NR-261 (HDD+DVD) серия R, C, P, E, J, N. FAQ по штатной 2DIN системе MMCS R, C, P, E, J, N-series Mitsubishi, Citroen, Peugeot: перепрошивка, разлочка, работа навигации и пр.
Навигатор темы
Штатная 2DIN система MMCS (Mitsubishi Multi Communication System) Mitsubishi Outlander XL
2DIN система MMCS NR-261 (HDD+DVD) серия R, C, P, E, J, N
MMCS R-01. MMCS R-02. MMCS R-03. MMCS E-01. MMCS E-02. MMCS E-03.
MMCS J-01. MMCS J-02. MMCS J-03. MMCS J-04. MMCS J-05. MMCS J-06.
Штатная 2DIN система MMCS Citroen C-Crosser: MMCS C-01. MMCS C-02.
Штатная 2DIN система MMCS Peugeot 4007: MMCS P-01. MMCS P-02.

Полная библиотека файлов, инструкций, прошивок находится здесь ==> Файлы для MMCS серии NR-261 с HDD
НЕЛЬЗЯ перешить на РУССКИЙ язык ЯПОНСКУЮ и АМЕРИКАНСКУЮ версии! ДРУГУЮ НАВИГАЦИЮ поставить НЕЛЬЗЯ! Почему? Читаем здесь
Скрытый текст
R-01 (EMR-01)
Английскй язык и нет карт
Версия SW: A
Версия MAP:
Версия CDDB:
R-02 ( RM-02) от R-01 :
Русский язык*
Навигация** по картам Москвы и Санкт-Петербурга
Изменения в ПО (появилась возможность выбрать цвет оболочки, синий или красный)
Версия SW: B
Версия MAP: 2008
Версия CDDB:
R-03 (RM-03) от R-02 :
Более подробные карты России
Исправления в ПО («Штуки» переименовали в «Единицы измерения»)
Версия SW: C
Версия MAP: 2009
Версия CDDB:
R-03 (RM-03 ) от R-03 :
Более подробные карты России + добавили карты Украины
Bзменения в ПО (появилась возможность вводить адреса на украинском)
Версия SW: D
Версия MAP: 2010
Версия CDDB: 3155-0000
R-03 (RM-03 ) от R-03 :
Версия SW: E
Версия MAP:
Версия CDDB:
*Русский язык — кодировка ISO 8859-5
**Навигация — не показывает номера домов
Скрытый текст
Русификация MMCS R-01 (полная) и другие версии частично (могут возникать проблемы с отображением меню , или не работой модулей , которых нету в русской прошивке))
Ссылка http://ifolder.ru/12152523 или http://www.rapidshare.ru/1040868
Там архив, его надо разархивировать, у Вас получится два файла: LOADING.KWI и ALLDATA.KWI.
Их надо записать на CD-диск (не важно какой R или RW).
Потом идем к машине заводим и вставляем этот записанный диск.
Затем жмите SET+NAVI и держите 5 сек. Вылезает сервисное меню. Там выбираем «Versions Indication», внутри которого жмите и держите 5 сек MENU. Вылезает меню апгрейда (обновления). Выбираем «Load Disk» (первое в меню будет). Появляется окошко обновления (первые 2-3 секунды не пугайтесь , будет черный экран). После обновления, система перезагрузится.
После обновления и перезагрузки, опять жмите SET+NAVI и держите 5 сек. и выбираем там «Memory Initialization» (эта фунция появится на следующей странице (надо внизу нажать next). Система еще раз перезагрузится и все будет уже по-русски .
P.S. Когда Вы ставите диск система будет Ваш спрашивать обновить, но Вы нажимайте «No» и после перезагрузки тоже (после перезагрузки системы, диск-CD можно, кстати вынуть). Вам надо только через сервесное меню обновить.
Сначало идет обновления файла LOADING.KWI с R-01 на R-02.
После «Memory Initialization» происходит русификация.
Идея подмены принадлежит melin, а техническое исполнение holod.
Скрытый текст
Просмотр DVD в движении для версии R-01(02)_RM (DVD in motion allowed for R-01(02)_RM)
1. Скачиваем ахрив: http://ifolder.ru/12842756
2. Архив надо разархивировать, у Вас получится два файла: LOADING.KWI и ALLDATA.KWI.
3. Их надо записать на CD-диск (не важно какой R или RW).
4. Потом идем к машине заводим и вставляем этот записанный диск.
5. Затем жмите SET+NAVI и держите 5 сек. Вылезает сервисное меню. Там выбираем «Versions Indication», внутри которого жмите и держите 5 сек MENU. Вылезает меню апгрейда (обновления). Выбираем «Disk Load» (первое в меню будет). Появляется окошко обновления (первые 2-3 секунды не пугайтесь, будет черный экран). После обновления, система перезагрузится.
P.S. Если Вы вставите диск и система будет Вас спрашивать обновить, то Вы нажимайте «No» и после перезагрузки тоже (после перезагрузки системы, диск-CD можно, кстати вынуть). Вам надо только через сервесное меню обновить.
LOADING R-01(F) (DVD в движении) — скачать
LOADING R-03(F) (DVD в движении) — скачать
Скрытый текст
Лоадинг от R-01 — скачать
Прошивка R-01 — скачать
Русская прошивка от R-02 — скачать
RM-02_DVD_in_motion_allowed — скачать
Mitsubishi Outlander Multi Communication System (MMCS) — штатная 2DIN аудио-видео система с навигацией для автомобилей Peugeot 4007, Citroen C-Crosser, Mitsubishi Outlander XL, Peugeot 4008, Mitsubishi ASX, Citroen C4 Aircross, Mitsubishi Lancer X, Mitsubishi Pajero 4 и других автомобилей Mitsubishi
Каталожный номер MZ313870
Цена от 2500 евро б/у до 5000 евро новая
MMCS имеет обозначения JM — Япония, UM — США, EM — Европа, RM или EMR — Россия.
Вид прошивки NR-261 + обозначение страны, например NR-261RM — Россия.
Технические характеристики устройства
• Операционная система WinCe 4.2
• Процессор Renesas SH7770
• 30 Гб жесткий диск
• Навигационная система Double wide DIN
• 7″ жидкокристаллический Touch Screen дисплей
• Предварительно установленны европейские, японские и российские дорожные карты
• Регулировки Аудио кнопками руля
• 8 Гб музыкальный сервер (22 ГБ для навигации)
• Cовместим с MP3 и WMA
• DVD / CD слот
• Стандартный TMC-тюнер (ТВ-в японской версии)
• Информация бортового компьютера
• Опция пользовательских настроек систем автомобиля (открытие с пульта, освещение в дневное время, работа стеклоочистителей, индикаторы) (( в европейско-американской версии))
• Подключаются 6 динамиков стандартной системы и 9 динамиков
Rockford Fosgate
• 4 канала х 45W
• Телефонный адаптер для подключения портативного аудио оборудования (необязательно)
FAQ по штатной 2DIN Peugeot 4007 (перепрошивка, разлочка, работа навигации и пр.)
разъем C-141
81 ANTENNA POWER ON
82 AMP POWER ON
разъем C-144
43 CAN-BOX DATA RX
45 HFM SIGNAL (+)
46 HFM SIGNAL (-)
47 VIDEO2-IN
48 VIDEO2-R
49 SEIELD (VIDEO2-L/R)
53 AUDIO REMOTE
58 CAN-BOX DATA CLK
59 CAN-BOX DATA TX
63 SEIELD (VIDEO2-IN)
64 VIDEO2-L
65 VIDEO2 DETECT
69 SEIELD (STEERING REMO)
21 BATTERY (+)
24 PS-R Sift lever or selector lever : R position
25 GND
2 SPEAKER RL (-)
3 SPEAKER FL (-)
6 AMP DATA
7 SPEAKER FR (-)
8 SPEAKER RR (-)
9 MAIN GND
10 ILLUMINATION (+)
11 SPEAKER RL (+)
12 SPEAKER FL (+)
13 VSS
14 ACCESSORY (+)
15 SPEAKER FR (+)
16 SPEAKER RR (+)
17 BATTERY (+)
FAQ по штатной 2DIN Peugeot 4007 (перепрошивка, разлочка, работа навигации и пр.)
Вид прошивки NR-261 + обозначение страны, например NR-261 R M — Россия.
Обновить свою версию, можно двумя способами:
1. Через CD(DVD)-диск.
1.1. Если Вы хотите обновить официально , тогда Вам потребуется официальный диск и ключ, который вставляется в торец открывающего экрана. Вставляете этот диск и ключ, программа находит новую программу и обновляет .
1.2. Если Вы хотите «сделать сами» обновление, тогда Вам придется приложить небольшие усилия для этого.
1.2.1. Если Вам надо обновить полностью программу с картами, CDDB и т.д., тогда воспользуйтесь пунктом № 2 ( через съем HDD (жесткого диска) из MMCS и его разлочки).
1.2.2. Если Вам надо обновить только версию программы (с одной версии на другую), т.е. LOADING.KWI, тогда смотрите пункт № 1.3.
1.3. Обновление LOADING.KWI.
1.3.1. Скачиваем или берем два новых файла: LOADING.KWI и ALLDATA.KWI.
1.3.2. Их надо записать на CD-диск или на DVD -диск (не важно, какой R или RW).
1.3.3. Потом идем к машине, заводим и вставляем этот записанный диск.
1.3.4. Затем жмите SET+NAVI и держите 5 сек. Вылезает сервисное меню. Там выбираем «Versions Indication», внутри которого жмите и держите 5 сек MENU. Вылезает меню апгрейда (обновления). Выбираем «Disk Load» (первое в меню будет). Появляется окошко обновления (первые 2-3 секунды не пугайтесь, будет черный экран). После обновления, система перезагрузится.
1.3.5. Если Вы хотите обнулить систему, тогда после обновления и перезагрузки, опять жмите SET+NAVI и держите 5 сек. и выбираем там «Memory Initialization» (эта функция появится на следующей странице (надо внизу нажать next). Система еще раз перезагрузится и все будет «по умолчанию». Осторожно вся музыка, записанная на HDD исчезнет.
P.S. к пункту 1.3. Если Вы вставите диск и система будет Вас спрашивать обновить, то Вы нажимайте «No» и после перезагрузки тоже (после перезагрузки системы, CD-диск можно, кстати вынуть). Вам надо только через сервисное меню обновить.
2. Через съем HDD (жесткого диска) из MMCS и его разлочки.
Инструкция по съему (HDD из MMCS) и разлочки HDD в картинках — читаем тут
Коды для разлочки
RM B2BAB3BCB0DFACBEB1BBBEDFB1ADD2CDC9CE AD B2DFB19E8996DFAA8C9A8DDFDF
EM и EMR B2BAB3BCB0DFACBEB1BBBEDFB1ADD2CDC9CE BA B2DFB19E8996DFAA8C9A8DDFDF
JM B2BAB3BCB0DFACBEB1BBBEDFB1ADD2CDC9CE B5 B2DFB19E8996DFAA8C9A8DDFDF
UM B2BAB3BCB0DFACBEB1BBBEDFB1ADD2CDC9CE AA B2DFB19E8996DFAA8C9A8DDFDF
P . S . Для RM (русской версии) может подойти и EM код.
Чтобы винт больше не лочился нужно следующее
1.
Через флоппи
Чтобы винт больше не лочился нужно следующее.
Комп с флоппи дисководом. Прога MHDD у меня 4.6 После скачки проги она установится на дискетку.В биосе поставить приоритетный запуск с флоппи.(Рассказывать смысла нет биосы разные интерфейсы тоже).
Разлочить винт Викторией (есть в шапке) и перезапустить комп с флоппи дисковода со вставленной дискеткой MHDD
Вылезит окно ,нужен пункт without
В следующем окне нужно выбрать тошибу
Далее EID затем CONFIG
Затем будит ряд вопросов ,отвечаем как на картинке
Вконце вылезит DONE значит всё ОК . Выключаем комп снимаем винт , всё больше не лочится.
Программа для просмотра стуктуры loading.kwi — скачать
MMCS NR-261 (HDD+DVD) серия R, C, P, E, J, N. FAQ по штатной 2DIN системе MMCS R, C, P, E, J, N-series Mitsubishi, Citroen, Peugeot: перепрошивка, разлочка, работа навигации и пр.
Навигатор темы
Штатная 2DIN система MMCS (Mitsubishi Multi Communication System) Mitsubishi Outlander XL
2DIN система MMCS NR-261 (HDD+DVD) серия R, C, P, E, J, N
MMCS R-01. MMCS R-02. MMCS R-03. MMCS E-01. MMCS E-02. MMCS E-03.
MMCS J-01. MMCS J-02. MMCS J-03. MMCS J-04. MMCS J-05. MMCS J-06.
Штатная 2DIN система MMCS Citroen C-Crosser: MMCS C-01. MMCS C-02.
Штатная 2DIN система MMCS Peugeot 4007: MMCS P-01. MMCS P-02.
Полная библиотека файлов, инструкций, прошивок находится здесь ==> Файлы для MMCS серии NR-261 с HDD
НЕЛЬЗЯ перешить на РУССКИЙ язык ЯПОНСКУЮ и АМЕРИКАНСКУЮ версии! ДРУГУЮ НАВИГАЦИЮ поставить НЕЛЬЗЯ! Почему? Читаем здесь
Скрытый текст
R-01 (EMR-01)
Английскй язык и нет карт
Версия SW: A
Версия MAP:
Версия CDDB:
R-02 ( RM-02) от R-01 :
Русский язык*
Навигация** по картам Москвы и Санкт-Петербурга
Изменения в ПО (появилась возможность выбрать цвет оболочки, синий или красный)
Версия SW: B
Версия MAP: 2008
Версия CDDB:
R-03 (RM-03) от R-02 :
Более подробные карты России
Исправления в ПО («Штуки» переименовали в «Единицы измерения»)
Версия SW: C
Версия MAP: 2009
Версия CDDB:
R-03 (RM-03 ) от R-03 :
Более подробные карты России + добавили карты Украины
Bзменения в ПО (появилась возможность вводить адреса на украинском)
Версия SW: D
Версия MAP: 2010
Версия CDDB: 3155-0000
R-03 (RM-03 ) от R-03 :
Версия SW: E
Версия MAP:
Версия CDDB:
*Русский язык — кодировка ISO 8859-5
**Навигация — не показывает номера домов
Скрытый текст
Русификация MMCS R-01 (полная) и другие версии частично (могут возникать проблемы с отображением меню , или не работой модулей , которых нету в русской прошивке))
Ссылка http://ifolder.ru/12152523 или http://www.rapidshare.ru/1040868
Там архив, его надо разархивировать, у Вас получится два файла: LOADING.KWI и ALLDATA.KWI.
Их надо записать на CD-диск (не важно какой R или RW).
Потом идем к машине заводим и вставляем этот записанный диск.
Затем жмите SET+NAVI и держите 5 сек. Вылезает сервисное меню. Там выбираем «Versions Indication», внутри которого жмите и держите 5 сек MENU. Вылезает меню апгрейда (обновления). Выбираем «Load Disk» (первое в меню будет). Появляется окошко обновления (первые 2-3 секунды не пугайтесь , будет черный экран). После обновления, система перезагрузится.
После обновления и перезагрузки, опять жмите SET+NAVI и держите 5 сек. и выбираем там «Memory Initialization» (эта фунция появится на следующей странице (надо внизу нажать next). Система еще раз перезагрузится и все будет уже по-русски .
P.S. Когда Вы ставите диск система будет Ваш спрашивать обновить, но Вы нажимайте «No» и после перезагрузки тоже (после перезагрузки системы, диск-CD можно, кстати вынуть). Вам надо только через сервесное меню обновить.
Сначало идет обновления файла LOADING.KWI с R-01 на R-02.
После «Memory Initialization» происходит русификация.
Идея подмены принадлежит melin, а техническое исполнение holod.
Скрытый текст
Просмотр DVD в движении для версии R-01(02)_RM (DVD in motion allowed for R-01(02)_RM)
1. Скачиваем ахрив: http://ifolder.ru/12842756
2. Архив надо разархивировать, у Вас получится два файла: LOADING.KWI и ALLDATA.KWI.
3. Их надо записать на CD-диск (не важно какой R или RW).
4. Потом идем к машине заводим и вставляем этот записанный диск.
5. Затем жмите SET+NAVI и держите 5 сек. Вылезает сервисное меню. Там выбираем «Versions Indication», внутри которого жмите и держите 5 сек MENU. Вылезает меню апгрейда (обновления). Выбираем «Disk Load» (первое в меню будет). Появляется окошко обновления (первые 2-3 секунды не пугайтесь, будет черный экран). После обновления, система перезагрузится.
P.S. Если Вы вставите диск и система будет Вас спрашивать обновить, то Вы нажимайте «No» и после перезагрузки тоже (после перезагрузки системы, диск-CD можно, кстати вынуть). Вам надо только через сервесное меню обновить.
LOADING R-01(F) (DVD в движении) — скачать
LOADING R-03(F) (DVD в движении) — скачать
Скрытый текст
Лоадинг от R-01 — скачать
Прошивка R-01 — скачать
Русская прошивка от R-02 — скачать
RM-02_DVD_in_motion_allowed — скачать
Mitsubishi Outlander Multi Communication System (MMCS) — штатная 2DIN аудио-видео система с навигацией для автомобилей Peugeot 4007, Citroen C-Crosser, Mitsubishi Outlander XL, Peugeot 4008, Mitsubishi ASX, Citroen C4 Aircross, Mitsubishi Lancer X, Mitsubishi Pajero 4 и других автомобилей Mitsubishi
Каталожный номер MZ313870
Цена от 2500 евро б/у до 5000 евро новая
MMCS имеет обозначения JM — Япония, UM — США, EM — Европа, RM или EMR — Россия.
Вид прошивки NR-261 + обозначение страны, например NR-261RM — Россия.
Технические характеристики устройства
• Операционная система WinCe 4.2
• Процессор Renesas SH7770
• 30 Гб жесткий диск
• Навигационная система Double wide DIN
• 7″ жидкокристаллический Touch Screen дисплей
• Предварительно установленны европейские, японские и российские дорожные карты
• Регулировки Аудио кнопками руля
• 8 Гб музыкальный сервер (22 ГБ для навигации)
• Cовместим с MP3 и WMA
• DVD / CD слот
• Стандартный TMC-тюнер (ТВ-в японской версии)
• Информация бортового компьютера
• Опция пользовательских настроек систем автомобиля (открытие с пульта, освещение в дневное время, работа стеклоочистителей, индикаторы) (( в европейско-американской версии))
• Подключаются 6 динамиков стандартной системы и 9 динамиков
Rockford Fosgate
• 4 канала х 45W
• Телефонный адаптер для подключения портативного аудио оборудования (необязательно)
FAQ по штатной 2DIN Peugeot 4007 (перепрошивка, разлочка, работа навигации и пр.)
разъем C-141
81 ANTENNA POWER ON
82 AMP POWER ON
разъем C-144
43 CAN-BOX DATA RX
45 HFM SIGNAL (+)
46 HFM SIGNAL (-)
47 VIDEO2-IN
48 VIDEO2-R
49 SEIELD (VIDEO2-L/R)
53 AUDIO REMOTE
58 CAN-BOX DATA CLK
59 CAN-BOX DATA TX
63 SEIELD (VIDEO2-IN)
64 VIDEO2-L
65 VIDEO2 DETECT
69 SEIELD (STEERING REMO)
21 BATTERY (+)
24 PS-R Sift lever or selector lever : R position
25 GND
2 SPEAKER RL (-)
3 SPEAKER FL (-)
6 AMP DATA
7 SPEAKER FR (-)
8 SPEAKER RR (-)
9 MAIN GND
10 ILLUMINATION (+)
11 SPEAKER RL (+)
12 SPEAKER FL (+)
13 VSS
14 ACCESSORY (+)
15 SPEAKER FR (+)
16 SPEAKER RR (+)
17 BATTERY (+)
FAQ по штатной 2DIN Peugeot 4007 (перепрошивка, разлочка, работа навигации и пр.)
Вид прошивки NR-261 + обозначение страны, например NR-261 R M — Россия.
Обновить свою версию, можно двумя способами:
1. Через CD(DVD)-диск.
1.1. Если Вы хотите обновить официально , тогда Вам потребуется официальный диск и ключ, который вставляется в торец открывающего экрана. Вставляете этот диск и ключ, программа находит новую программу и обновляет .
1.2. Если Вы хотите «сделать сами» обновление, тогда Вам придется приложить небольшие усилия для этого.
1.2.1. Если Вам надо обновить полностью программу с картами, CDDB и т.д., тогда воспользуйтесь пунктом № 2 ( через съем HDD (жесткого диска) из MMCS и его разлочки).
1.2.2. Если Вам надо обновить только версию программы (с одной версии на другую), т.е. LOADING.KWI, тогда смотрите пункт № 1.3.
1.3. Обновление LOADING.KWI.
1.3.1. Скачиваем или берем два новых файла: LOADING.KWI и ALLDATA.KWI.
1.3.2. Их надо записать на CD-диск или на DVD -диск (не важно, какой R или RW).
1.3.3. Потом идем к машине, заводим и вставляем этот записанный диск.
1.3.4. Затем жмите SET+NAVI и держите 5 сек. Вылезает сервисное меню. Там выбираем «Versions Indication», внутри которого жмите и держите 5 сек MENU. Вылезает меню апгрейда (обновления). Выбираем «Disk Load» (первое в меню будет). Появляется окошко обновления (первые 2-3 секунды не пугайтесь, будет черный экран). После обновления, система перезагрузится.
1.3.5. Если Вы хотите обнулить систему, тогда после обновления и перезагрузки, опять жмите SET+NAVI и держите 5 сек. и выбираем там «Memory Initialization» (эта функция появится на следующей странице (надо внизу нажать next). Система еще раз перезагрузится и все будет «по умолчанию». Осторожно вся музыка, записанная на HDD исчезнет.
P.S. к пункту 1.3. Если Вы вставите диск и система будет Вас спрашивать обновить, то Вы нажимайте «No» и после перезагрузки тоже (после перезагрузки системы, CD-диск можно, кстати вынуть). Вам надо только через сервисное меню обновить.
2. Через съем HDD (жесткого диска) из MMCS и его разлочки.
Инструкция по съему (HDD из MMCS) и разлочки HDD в картинках — читаем тут
Коды для разлочки
RM B2BAB3BCB0DFACBEB1BBBEDFB1ADD2CDC9CE AD B2DFB19E8996DFAA8C9A8DDFDF
EM и EMR B2BAB3BCB0DFACBEB1BBBEDFB1ADD2CDC9CE BA B2DFB19E8996DFAA8C9A8DDFDF
JM B2BAB3BCB0DFACBEB1BBBEDFB1ADD2CDC9CE B5 B2DFB19E8996DFAA8C9A8DDFDF
UM B2BAB3BCB0DFACBEB1BBBEDFB1ADD2CDC9CE AA B2DFB19E8996DFAA8C9A8DDFDF
P . S . Для RM (русской версии) может подойти и EM код.
Чтобы винт больше не лочился нужно следующее
1.
Через флоппи
Чтобы винт больше не лочился нужно следующее.
Комп с флоппи дисководом. Прога MHDD у меня 4.6 После скачки проги она установится на дискетку.В биосе поставить приоритетный запуск с флоппи.(Рассказывать смысла нет биосы разные интерфейсы тоже).
Разлочить винт Викторией (есть в шапке) и перезапустить комп с флоппи дисковода со вставленной дискеткой MHDD
Вылезит окно ,нужен пункт without
В следующем окне нужно выбрать тошибу
Далее EID затем CONFIG
Затем будит ряд вопросов ,отвечаем как на картинке
Вконце вылезит DONE значит всё ОК . Выключаем комп снимаем винт , всё больше не лочится.
Программа для просмотра стуктуры loading.kwi — скачать

Всем привет.
Я часто получаю от вас вопросы о MMCS J-серии. Многим интересно, чем они отличаются от моделей для нашего рынка. В данном посте я постараюсь подробно расписать отличия модели J-03, как самой распространенной среди японок, от R-03.
Все, что написано ниже, т.ж. относится и к модели J-04, т.к. по функционалу они полностью идентичны, разница лишь в том, что у J-04 объем жесткого диска составляет 40 Гб.
Приступим по порядку:
До прошивки магнитола имеет следующий вид.
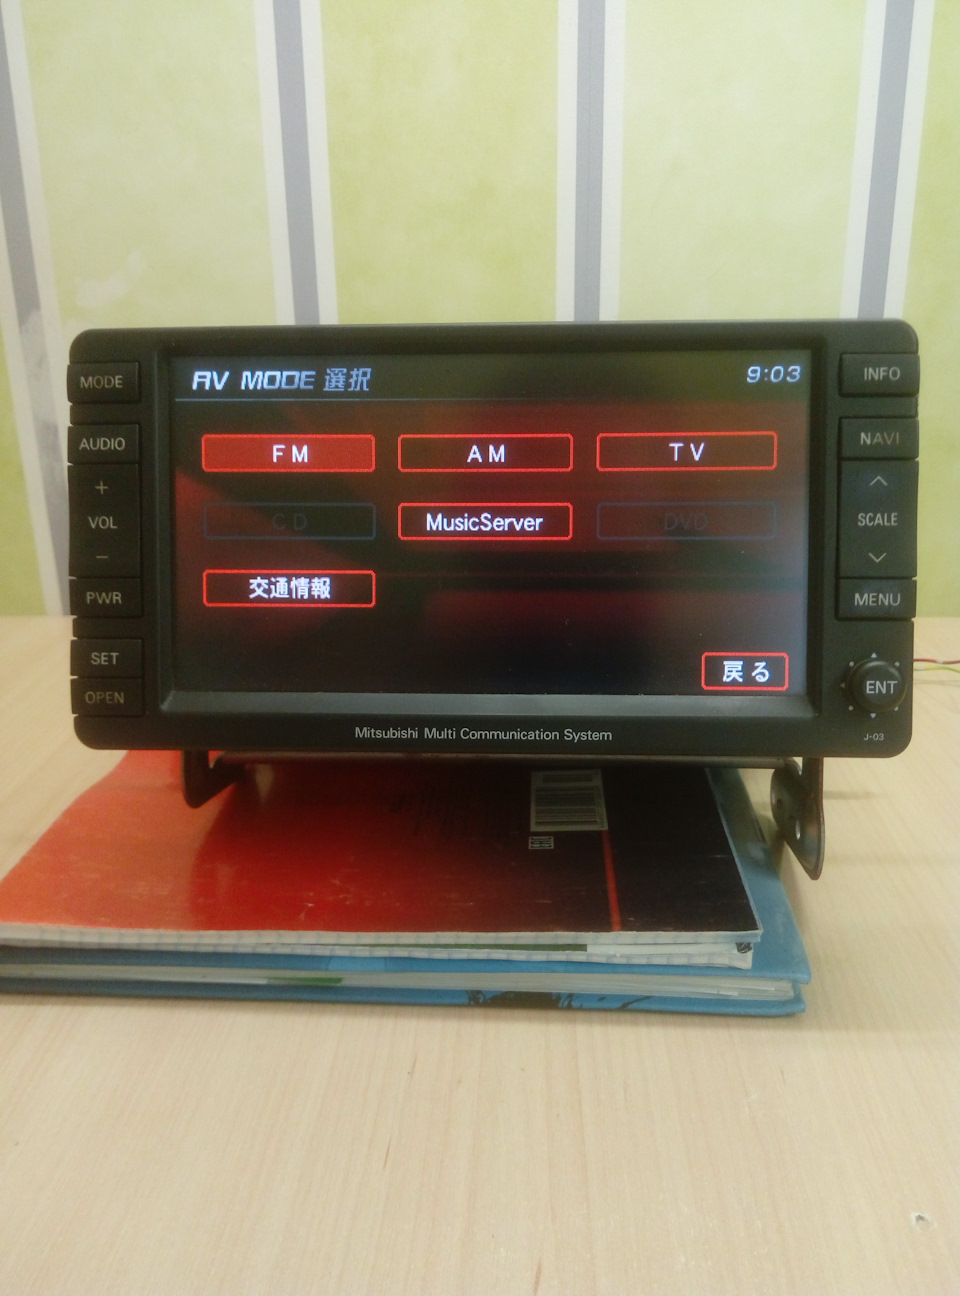

С иероглифами многие не дружат, поэтому все магнитолы по приходу я сразу прошиваю на русский язык, закачиваю свежие карты и прочие доступные фишки. Как это сделать — смотрите по ссылкам в начале моего поста. После прошивки становится намного понятнее.
Далее пойдет сравнение именно с русифицированной MMCS J-03.
При включении нас встречает следующая картинка.

Меню выбора источника после прошивки имеет нормальный вид.

Переходим в меню «Радиостанции».
Так как в Японии и России разные сетки вещания радиочастот, то для нормальной работы наших радиостанций потребуется установка FM-конвертора. Для удобства подключения я припаиваю к нему оригинальный разъем. После установки конвертора нужно попробовать как лучше будет прием радиостанций — с подачей питания +12 вольт на штатную антенну (она у нас активная) или без подачи питания. Я питание на антенну не подавал, магнитола за несколько секунд в режиме автопоиска сама нашла и сохранила 12 радиостанций.

После прошивки в основном меню отображаются наши радиочастоты, а сверху они дублируются в японском диапазоне. У R-03 в FM-диапазоне 3 вкладки по 6 станций (всего 18 шт.), у J-03 2 вкладки по 6 станций (всего 12 шт.).

Частота на иконках и фактическая частота вещания радиостанции не совпадают.
Для примера — у нас радиостанция Dfm вещает на частоте 105,6 МГц, на иконке она отображается как 106,9 МГц, а сверху в японском диапазоне видим 85,6 МГц. Такой вот винегрет получается))

В меню «Музыкальный сервер» все просто — при загрузке CD-диска (не MP3) магнитола автоматом копирует все его содержимое к себе на жесткий диск (30 Гб у J-03 и 40 Гб у R-03).

Следующее меню — «Диски».
CD и MP-3 диски работают без проблем. С DVD дисками есть следующий нюанс.
Т.к. в Японии используется видеостандарт NTSC, а в России PAL, то японские магнитолы отказываются читать наши DVD диски. Можно самому записать DVD диск в формате NTSC программой Nero или аналогичной. Как это делается коротко у меня написано здесь. У меня для проверки имеется японский DVD-диск, а т.ж. нарезан тестовый DVD-диск.
После записи DVD в NERO появляется возможность просмотра диска, в том числе и в движении (блокировка на запрет просмотра в движении снимается при прошивке магнитолы).


Далее меню -«Навигация».
После прошивки и заливки нам доступны карты России и Украины (последнее обновление от 2014 года).
Навигация работает с единственным отличием от R-03 — на данной прошивке нет голосовых подсказок, не важно, есть CAN-модуль или нет. На более ранней прошивке (только английский язык меню) при отсутствии CAN-модуля голосовые подсказки работали. Для их включения нужно было зайти в сервисное меню — жмем одновременно кнопки SET и NAVI 2 секунды, выбираем пункт Handle settings, в нем нужно переключиться с иконки RHD на LHD, затем вновь переключиться на RHD и выйти из сервисного меню.
С прошивками еще предстоит разобраться для восстановления звуковых подсказок.
MMCS NR-261 (HDD+DVD) серия R, C, P, E, J, N. FAQ по штатной 2DIN системе MMCS R, C, P, E, J, N-series Mitsubishi, Citroen, Peugeot: перепрошивка, разлочка, работа навигации и пр.
Навигатор темы
Штатная 2DIN система MMCS (Mitsubishi Multi Communication System) Mitsubishi Outlander XL
2DIN система MMCS NR-261 (HDD+DVD) серия R, C, P, E, J, N
MMCS R-01. MMCS R-02. MMCS R-03. MMCS E-01. MMCS E-02. MMCS E-03.
MMCS J-01. MMCS J-02. MMCS J-03. MMCS J-04. MMCS J-05. MMCS J-06.
Штатная 2DIN система MMCS Citroen C-Crosser: MMCS C-01. MMCS C-02.
Штатная 2DIN система MMCS Peugeot 4007: MMCS P-01. MMCS P-02.
Полная библиотека файлов, инструкций, прошивок находится здесь ==> Файлы для MMCS серии NR-261 с HDD
НЕЛЬЗЯ перешить на РУССКИЙ язык ЯПОНСКУЮ и АМЕРИКАНСКУЮ версии! ДРУГУЮ НАВИГАЦИЮ поставить НЕЛЬЗЯ! Почему? Читаем здесь
Скрытый текст
R-01 (EMR-01)
Английскй язык и нет карт
Версия SW: A
Версия MAP:
Версия CDDB:
R-02 ( RM-02) от R-01 :
Русский язык*
Навигация** по картам Москвы и Санкт-Петербурга
Изменения в ПО (появилась возможность выбрать цвет оболочки, синий или красный)
Версия SW: B
Версия MAP: 2008
Версия CDDB:
R-03 (RM-03) от R-02 :
Более подробные карты России
Исправления в ПО («Штуки» переименовали в «Единицы измерения»)
Версия SW: C
Версия MAP: 2009
Версия CDDB:
R-03 (RM-03 ) от R-03 :
Более подробные карты России + добавили карты Украины
Bзменения в ПО (появилась возможность вводить адреса на украинском)
Версия SW: D
Версия MAP: 2010
Версия CDDB: 3155-0000
R-03 (RM-03 ) от R-03 :
Версия SW: E
Версия MAP:
Версия CDDB:
*Русский язык — кодировка ISO 8859-5
**Навигация — не показывает номера домов
Скрытый текст
Русификация MMCS R-01 (полная) и другие версии частично (могут возникать проблемы с отображением меню , или не работой модулей , которых нету в русской прошивке))
Ссылка http://ifolder.ru/12152523 или http://www.rapidshare.ru/1040868
Там архив, его надо разархивировать, у Вас получится два файла: LOADING.KWI и ALLDATA.KWI.
Их надо записать на CD-диск (не важно какой R или RW).
Потом идем к машине заводим и вставляем этот записанный диск.
Затем жмите SET+NAVI и держите 5 сек. Вылезает сервисное меню. Там выбираем «Versions Indication», внутри которого жмите и держите 5 сек MENU. Вылезает меню апгрейда (обновления). Выбираем «Load Disk» (первое в меню будет). Появляется окошко обновления (первые 2-3 секунды не пугайтесь , будет черный экран). После обновления, система перезагрузится.
После обновления и перезагрузки, опять жмите SET+NAVI и держите 5 сек. и выбираем там «Memory Initialization» (эта фунция появится на следующей странице (надо внизу нажать next). Система еще раз перезагрузится и все будет уже по-русски .
P.S. Когда Вы ставите диск система будет Ваш спрашивать обновить, но Вы нажимайте «No» и после перезагрузки тоже (после перезагрузки системы, диск-CD можно, кстати вынуть). Вам надо только через сервесное меню обновить.
Сначало идет обновления файла LOADING.KWI с R-01 на R-02.
После «Memory Initialization» происходит русификация.
Идея подмены принадлежит melin, а техническое исполнение holod.
Скрытый текст
Просмотр DVD в движении для версии R-01(02)_RM (DVD in motion allowed for R-01(02)_RM)
1. Скачиваем ахрив: http://ifolder.ru/12842756
2. Архив надо разархивировать, у Вас получится два файла: LOADING.KWI и ALLDATA.KWI.
3. Их надо записать на CD-диск (не важно какой R или RW).
4. Потом идем к машине заводим и вставляем этот записанный диск.
5. Затем жмите SET+NAVI и держите 5 сек. Вылезает сервисное меню. Там выбираем «Versions Indication», внутри которого жмите и держите 5 сек MENU. Вылезает меню апгрейда (обновления). Выбираем «Disk Load» (первое в меню будет). Появляется окошко обновления (первые 2-3 секунды не пугайтесь, будет черный экран). После обновления, система перезагрузится.
P.S. Если Вы вставите диск и система будет Вас спрашивать обновить, то Вы нажимайте «No» и после перезагрузки тоже (после перезагрузки системы, диск-CD можно, кстати вынуть). Вам надо только через сервесное меню обновить.
LOADING R-01(F) (DVD в движении) — скачать
LOADING R-03(F) (DVD в движении) — скачать
Скрытый текст
Лоадинг от R-01 — скачать
Прошивка R-01 — скачать
Русская прошивка от R-02 — скачать
RM-02_DVD_in_motion_allowed — скачать
Mitsubishi Outlander Multi Communication System (MMCS) — штатная 2DIN аудио-видео система с навигацией для автомобилей Peugeot 4007, Citroen C-Crosser, Mitsubishi Outlander XL, Peugeot 4008, Mitsubishi ASX, Citroen C4 Aircross, Mitsubishi Lancer X, Mitsubishi Pajero 4 и других автомобилей Mitsubishi
Каталожный номер MZ313870
Цена от 2500 евро б/у до 5000 евро новая
MMCS имеет обозначения JM — Япония, UM — США, EM — Европа, RM или EMR — Россия.
Вид прошивки NR-261 + обозначение страны, например NR-261RM — Россия.
Технические характеристики устройства
• Операционная система WinCe 4.2
• Процессор Renesas SH7770
• 30 Гб жесткий диск
• Навигационная система Double wide DIN
• 7″ жидкокристаллический Touch Screen дисплей
• Предварительно установленны европейские, японские и российские дорожные карты
• Регулировки Аудио кнопками руля
• 8 Гб музыкальный сервер (22 ГБ для навигации)
• Cовместим с MP3 и WMA
• DVD / CD слот
• Стандартный TMC-тюнер (ТВ-в японской версии)
• Информация бортового компьютера
• Опция пользовательских настроек систем автомобиля (открытие с пульта, освещение в дневное время, работа стеклоочистителей, индикаторы) (( в европейско-американской версии))
• Подключаются 6 динамиков стандартной системы и 9 динамиков
Rockford Fosgate
• 4 канала х 45W
• Телефонный адаптер для подключения портативного аудио оборудования (необязательно)
FAQ по штатной 2DIN Peugeot 4007 (перепрошивка, разлочка, работа навигации и пр.)
разъем C-141
81 ANTENNA POWER ON
82 AMP POWER ON
разъем C-144
43 CAN-BOX DATA RX
45 HFM SIGNAL (+)
46 HFM SIGNAL (-)
47 VIDEO2-IN
48 VIDEO2-R
49 SEIELD (VIDEO2-L/R)
53 AUDIO REMOTE
58 CAN-BOX DATA CLK
59 CAN-BOX DATA TX
63 SEIELD (VIDEO2-IN)
64 VIDEO2-L
65 VIDEO2 DETECT
69 SEIELD (STEERING REMO)
21 BATTERY (+)
24 PS-R Sift lever or selector lever : R position
25 GND
2 SPEAKER RL (-)
3 SPEAKER FL (-)
6 AMP DATA
7 SPEAKER FR (-)
8 SPEAKER RR (-)
9 MAIN GND
10 ILLUMINATION (+)
11 SPEAKER RL (+)
12 SPEAKER FL (+)
13 VSS
14 ACCESSORY (+)
15 SPEAKER FR (+)
16 SPEAKER RR (+)
17 BATTERY (+)
FAQ по штатной 2DIN Peugeot 4007 (перепрошивка, разлочка, работа навигации и пр.)
Вид прошивки NR-261 + обозначение страны, например NR-261 R M — Россия.
Обновить свою версию, можно двумя способами:
1. Через CD(DVD)-диск.
1.1. Если Вы хотите обновить официально , тогда Вам потребуется официальный диск и ключ, который вставляется в торец открывающего экрана. Вставляете этот диск и ключ, программа находит новую программу и обновляет .
1.2. Если Вы хотите «сделать сами» обновление, тогда Вам придется приложить небольшие усилия для этого.
1.2.1. Если Вам надо обновить полностью программу с картами, CDDB и т.д., тогда воспользуйтесь пунктом № 2 ( через съем HDD (жесткого диска) из MMCS и его разлочки).
1.2.2. Если Вам надо обновить только версию программы (с одной версии на другую), т.е. LOADING.KWI, тогда смотрите пункт № 1.3.
1.3. Обновление LOADING.KWI.
1.3.1. Скачиваем или берем два новых файла: LOADING.KWI и ALLDATA.KWI.
1.3.2. Их надо записать на CD-диск или на DVD -диск (не важно, какой R или RW).
1.3.3. Потом идем к машине, заводим и вставляем этот записанный диск.
1.3.4. Затем жмите SET+NAVI и держите 5 сек. Вылезает сервисное меню. Там выбираем «Versions Indication», внутри которого жмите и держите 5 сек MENU. Вылезает меню апгрейда (обновления). Выбираем «Disk Load» (первое в меню будет). Появляется окошко обновления (первые 2-3 секунды не пугайтесь, будет черный экран). После обновления, система перезагрузится.
1.3.5. Если Вы хотите обнулить систему, тогда после обновления и перезагрузки, опять жмите SET+NAVI и держите 5 сек. и выбираем там «Memory Initialization» (эта функция появится на следующей странице (надо внизу нажать next). Система еще раз перезагрузится и все будет «по умолчанию». Осторожно вся музыка, записанная на HDD исчезнет.
P.S. к пункту 1.3. Если Вы вставите диск и система будет Вас спрашивать обновить, то Вы нажимайте «No» и после перезагрузки тоже (после перезагрузки системы, CD-диск можно, кстати вынуть). Вам надо только через сервисное меню обновить.
2. Через съем HDD (жесткого диска) из MMCS и его разлочки.
Инструкция по съему (HDD из MMCS) и разлочки HDD в картинках — читаем тут
Коды для разлочки
RM B2BAB3BCB0DFACBEB1BBBEDFB1ADD2CDC9CE AD B2DFB19E8996DFAA8C9A8DDFDF
EM и EMR B2BAB3BCB0DFACBEB1BBBEDFB1ADD2CDC9CE BA B2DFB19E8996DFAA8C9A8DDFDF
JM B2BAB3BCB0DFACBEB1BBBEDFB1ADD2CDC9CE B5 B2DFB19E8996DFAA8C9A8DDFDF
UM B2BAB3BCB0DFACBEB1BBBEDFB1ADD2CDC9CE AA B2DFB19E8996DFAA8C9A8DDFDF
P . S . Для RM (русской версии) может подойти и EM код.
Чтобы винт больше не лочился нужно следующее
1.
Через флоппи
Чтобы винт больше не лочился нужно следующее.
Комп с флоппи дисководом. Прога MHDD у меня 4.6 После скачки проги она установится на дискетку.В биосе поставить приоритетный запуск с флоппи.(Рассказывать смысла нет биосы разные интерфейсы тоже).
Разлочить винт Викторией (есть в шапке) и перезапустить комп с флоппи дисковода со вставленной дискеткой MHDD
Вылезит окно ,нужен пункт without
В следующем окне нужно выбрать тошибу
Далее EID затем CONFIG
Затем будит ряд вопросов ,отвечаем как на картинке
Вконце вылезит DONE значит всё ОК . Выключаем комп снимаем винт , всё больше не лочится.
Программа для просмотра стуктуры loading.kwi — скачать
Читайте также:
- План конспект причины возникновения дтп
- Кто включается в число раненых при дтп
- Рено логан неисправности топливной системы
- Кто из водителей обязан уступить дорогу при движении по многоуровневому паркингу
- Рено дастер регламент то 90000
Общая информация
1. Система MMCS объединяет навигационную систему, аудиосистему, систему кондиционирования, маршрутный компьютер, ТВ-тюнер, систему самодиагностики, справочную систему в комплексную информационную систему автомобиля.
Внимание: навигационная система и ТВ-тюнер не работают на территории РФ.
2. Отображение информации осуществляется с помощью многофункционального дисплея высокой контрастности, расположенного на центральной отделке панели приборов, ввод информации осуществляется с помощью специальных кнопок (расположение кнопок смотрите на рисунке «Кнопки управления системой MMCS»).
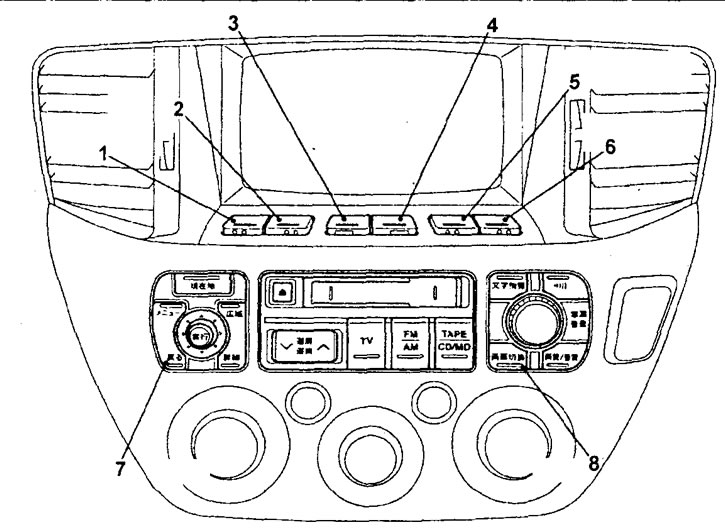
Кнопки управления системой MMCS. 1 — кнопка №1 дополнительных функций, 2 — кнопка №2 дополнительных функций, 3 — кнопка №3 дополнительных функций, 4 — кнопка №4 дополнительных функций, 5 — кнопка №5 дополнительных функций, 6 — кнопка №6 дополнительных функций, 7 — кнопка возврата дисплея в предыдущее состояние, 8 — кнопка переключения режимов дисплея.
3. Функции сервисного режима системы MMCS.
Примечание: для использования сервисных функций необходимо войти в сервисный режим.
а) Функция самодиагностики, которая проверяет наличие сигналов между всеми блоками системы и выполняет проверку шины данных на наличие ошибок.
б) Функция проверки DVD или CD, которая проверяет работу DVD или CD привода.
Примечание: при невозможности считывания данных с компакт-диска или если компакт-диск не вставлен, то на экране появляется соответствующая надпись.
в) Функция диагностики, которая проверяет наличие сигналов между всеми блоками системы.
г) Функция проверки состояния ЖК дисплея, в которой осуществляется проверка ЖК дисплея на битые пиксели.
д) Функция проверки аудиосистемы, в которой осуществляется последовательная проверка работы динамиков аудиосистемы.
е) Функция навигационной системы, в которой осуществляется проверка каждого датчика системы навигации,
ж) Функция проверки автомобиля, в которой отображается текущее состояние автомобиля.
з) Функция проверки программного обеспечения навигационной системы, в которой отображаются версия загруженного программного обеспечения и все блоки подсоединенные к блоку навигационной системы,
и) Функция результатов диагностики, в которой отображается соответствующий код неисправности, указывающий на датчик или блок управления, когда ключ замка зажигания находится в положении «АСС».
к) Функция проверки шины данных, в которой отображаются, ошибки и коды неисправности шины данных.
л) Функция памяти ошибок шины данных, в которой хранится история ошибок шины данных.
4. Перед поиском и устранением неисправностей рекомендуется ознакомиться с таблицей состояний систем при отсоединении аккумуляторной батареи.
Таблица. Состояния памяти системы MMCS после отсоединения проводов от клемм аккумуляторной батареи.
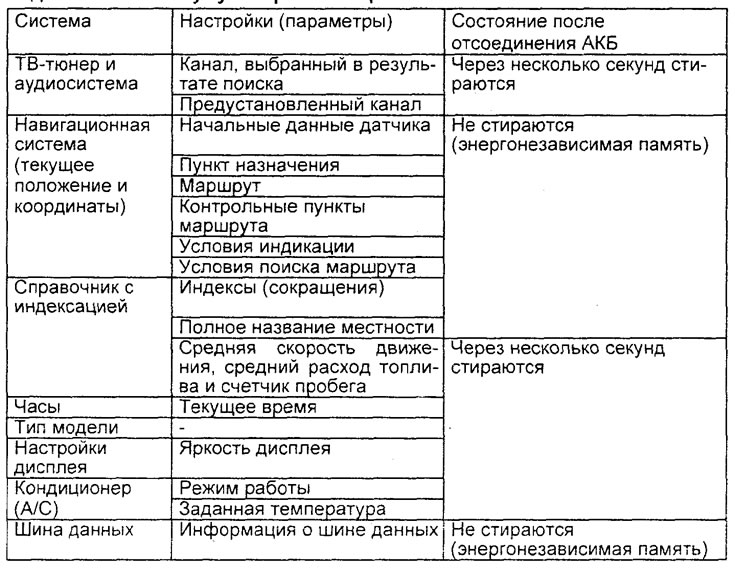
Внимание: на моделях с системой MMCS в памяти блоков управления различных систем хранится большое, количество данных, которые будут стерты после отсоединения питания (аккумуляторной батареи). Поэтому рекомендуется запомнить настройки наиболее важных систем и считать коды неисправностей перед отсоединением провода от отрицательной клеммы аккумуляторной батареи.
Особенности диагностики систем
1. Неправильная работа системы MMCS может быть вызвана неисправностями, из-за которых нарушается взаимодействие между различными блоками управления. Поэтому необходимо выполнить проверку сервисных функций и функций самодиагностики.
2. При появлении кода неисправности для какой-либо системы, сначала проверьте правильность подсоединения разъема жгута проводов к сам разъем.
3. Если неисправность не была устранена, то причина неисправности вероятно в жгуте проводов или блоке управления. Проверьте жгут проводов, и если он не соответствует норме, то замените блок управления в сборе. Перед заменой блока запишите код неисправности.
Особенности диагностики интерфейса системы MMCS
1. Если присутствует признак неисправности интерфейса системы MMCS, то необходимо проверить сервисную функцию (дисплей системы MMCS), работу специальных кнопок и работу экрана.
2. При появлении кода неисправности для системы MMCS сначала проверьте правильность подсоединения разъема жгута проводов и сам разъем.
3. Если неисправность не была устранена, то причина неисправности вероятно в жгуте проводов или соответствующем блоке. Проверьте жгут проводов, и если он не соответствует норме, га замените блок в сборе.
Работа в сервисном режиме
1. Для входа в сервисный режим:
- а) Поверните ключ замка зажигания в положение «OFF».
- б) Удерживая нажатыми кнопку №6 дополнительных функций и кнопку переключения режимов дисплея системы MMCS, включите зажигание. Удерживайте кнопки нажатыми в течение 5 секунд, после включения зажигания и на дисплее появится первое меню сервисного режима.
Примечание:
- Если первое меню сервисного режима не появилось, то необходимо выполнить все операции сначала.
- Для входа в конкретную функцию сервисного режима нажимайте кнопки № 1 — №4 дополнительных функций.
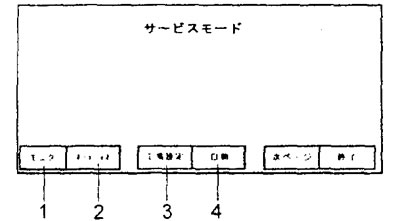
Первое меню сервисного режима. 1 — функция проверки состояния ЖК дисплея, 2 — функция проверки самодиагностики, 3 — настройки системы, 4 — функция диагностики.
2. После того, как система вошла в первое меню сервисного режима, для входа во второе меню сервисного режима нажмите кнопку №5 дополнительных функций.
Примечание: для возврата в первое меню сервисного режима, также нажмите на кнопку №5 дополнительных функций.
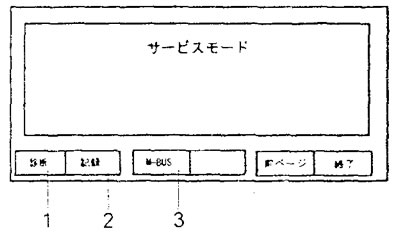
Второе меню сервисного режима. 1 — функция самодиагностики, 2 — функция результатов диагностики, 3 — функция памяти ошибок шины данных.
3. Для выхода из сервисного режима нажмите на кнопку №6 дополнительных функций или поверните ключ замка зажигания в положение «OFF».
Считывание и удаление диагностических кодов неисправности
1. Для входа в меню функции результатов диагностики во втором меню сервисного режима нажмите на кнопку №2 дополнительных функций.
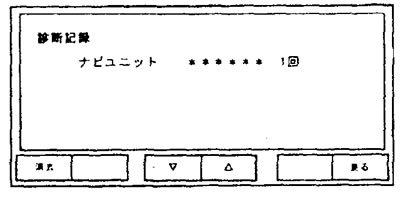
Меню функции результатов диагностики.
2. Определите место неисправности по полученным диагностическим кодам в соответствии с «Таблицей кодов неисправностей системы MMCS», устраните неисправность, затем повторите процедуру проверки.
Таблица. Коды неисправностей системы MMCS.
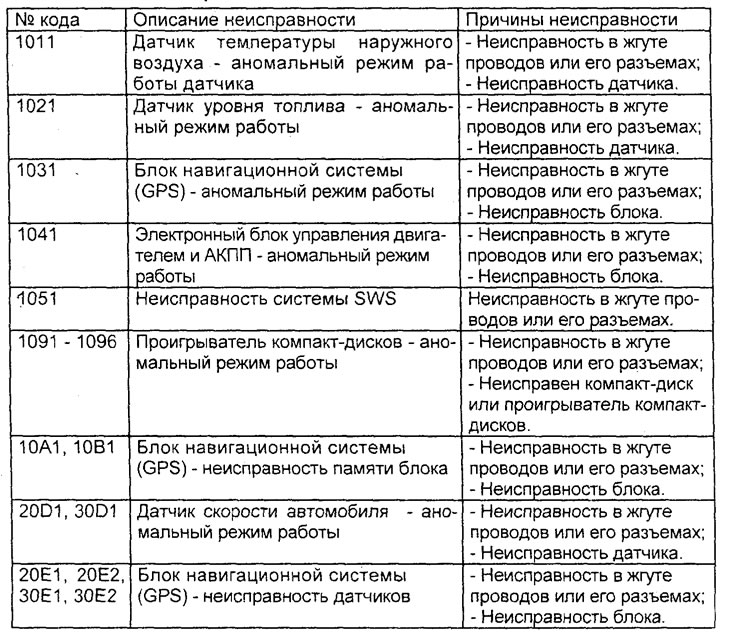
3. Для удаления высвеченных кодов неисправности в меню функции результатов диагностики нажмите на кнопку №1 дополнительных функций На дисплее высветится запрос о подтверждении удаления кодов. Для удаления кодов нажмите на кнопку №5 дополнительных функций, а для возврата в меню функции результатов диагностики без удаления кодов неисправности нажмите на кнопку №6 дополнительных функций.
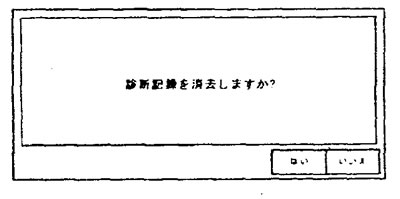
Запрос на подтверждение удаления кода неисправности.
4. Для выхода из меню функции результатов диагностики нажмите на кнопку №6 дополнительных функций.
Снятие и установка компонентов системы MMCS
− Снятие деталей производится в порядке номеров, указанных на рисунке «Снятие компонентов системы MMCS».
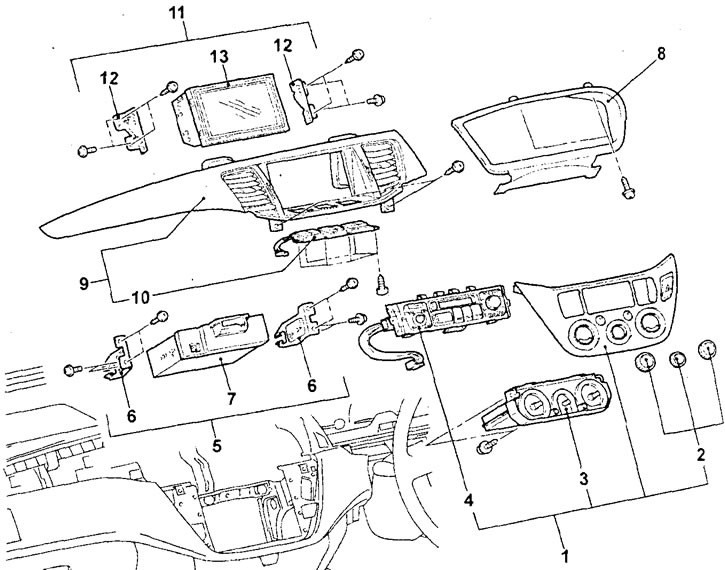
Снятие компонентов системы MMCS. 1 — панель управления отопителем и кондиционером в сборе, 2 — ручки переключателей управления кондиционером в сборе, 3 — панель управления отопителем и кондиционером (электронный блок управления кондиционером), 4 — панель управления системой MMCS, 5 — блок аудиосистемы в сборе, 6 — кронштейн крепления блока аудиосистемы, 7 — блок аудиосистемы, 8 — отделка комбинации приборов, 9 — центральная отделка панели приборов, 10 — панель кнопок дополнительных функций системы MMCS, 11 — многофункциональный дисплей в сборе, 12 — кронштейн крепления многофункционального дисплея, 13 — многофункциональный дисплей.
− Установка деталей производится в порядке, обратном снятию.
Снятие и установка блока навигационной системы (GPS)
Внимание: данная система не работает на территории РФ.
− Снятие деталей производится в порядке номеров, указанных на рисунке «Снятие блока навигационной системы».

Снятие блока навигационной системы (седан). 1 — боковой кронштейн крепления блока навигационной системы, 2 — блок навигационной системы в сборе, 3 — нижний кронштейн крепления блока навигационной системы, 4 — блок навигационной системы.
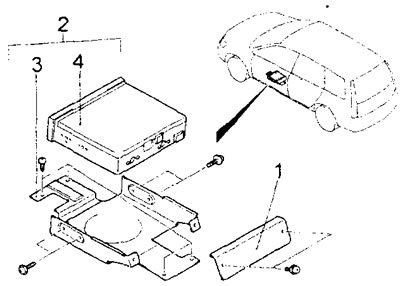
Снятие блока навигационной системы (универсал). 1 — боковой кронштейн крепления блока навигационной системы, 2 — блок навигационной системы в сборе, 3 — нижний кронштейн крепления блока навигационной системы, 4 — блок навигационной системы.
− Установка деталей производится в порядке, обратном снятию.
Снятие и установка кабеля стандарта DIN
1. Снимите нижнюю часть центральной отделки панели приборов.
2. Снимите CD-чейнджер.
3. Снимите блок аудиосистемы.
4. Снимите блок навигационной системы.
5. Снимите панель приборов и центральную консоль.
6. Снимите переднее сиденье в сборе.
7. Снимите напольный коврик.
8. Снимите кабель стандарта DIN.
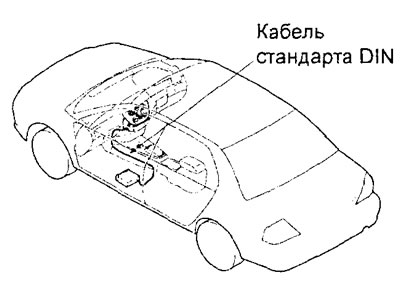
Модели седан
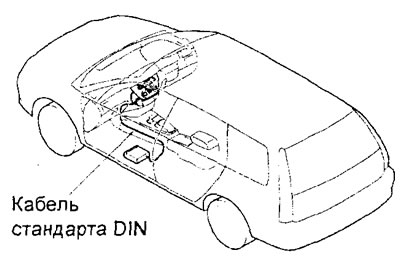
Модели универсал
Проверка напряжения на выводах разъемов блоков системы MMCS
1. Измерьте напряжение между выводом «массы» автомобиля и каждым соответствующим выводом блока системы MMCS.
2. Расположение выводов показано на соответствующих рисунках.
3. Номинальное значение напряжения для каждого проверяемого вывода указано в соответствующей таблице.
4. Номинальные значения напряжений выводов указаны в таблицах проверки напряжения на выводах разъемов соответствующих блоков системы MMCS.
Примечание к таблице: «Обрыв» — означает обрыв в цепи, «КЗ» — означает короткое замыкание, «33» — замок зажигания, напряжение «АКБ» — это напряжение бортсети.
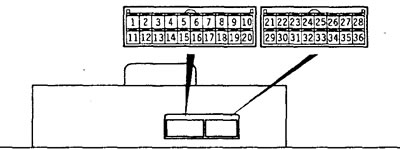
Разъёмы многофункционального дисплея
Таблица. Проверка напряжения на выводах разъема многофункционального дисплея.

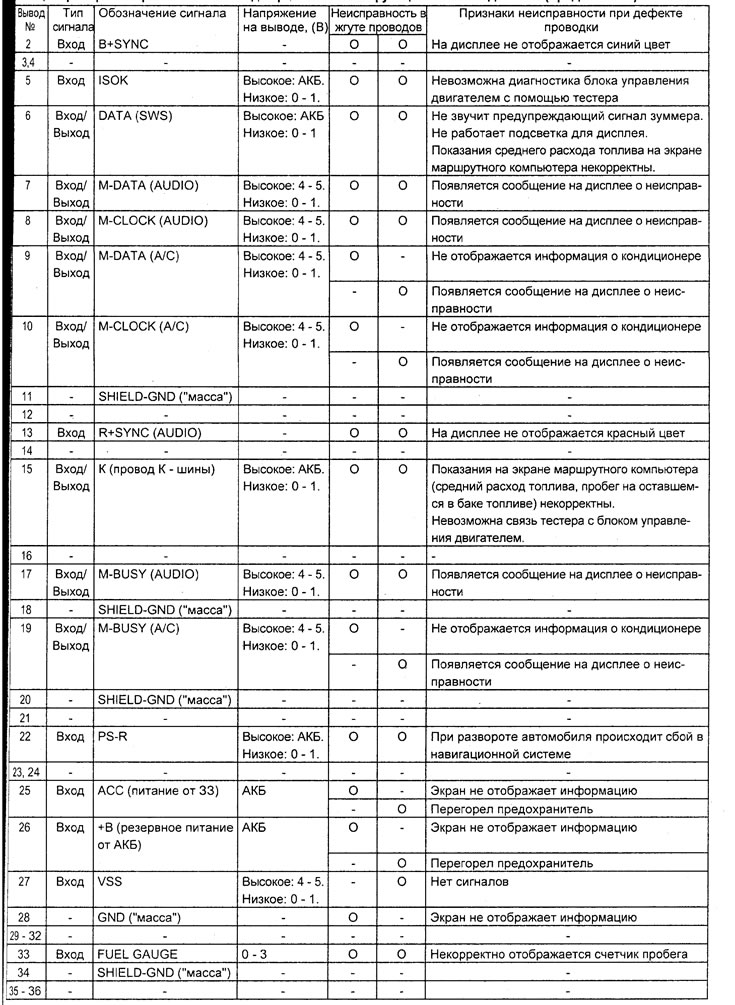
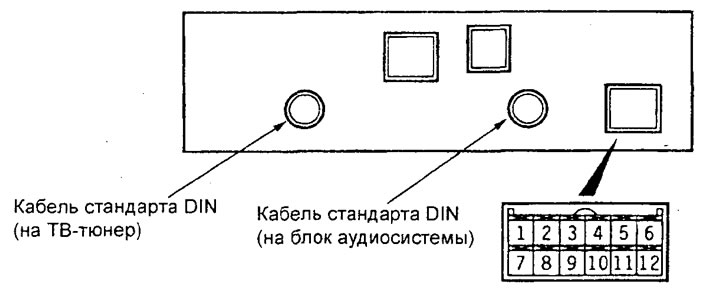
Разъемы блока навигационной системы.
Таблица проверки напряжения на выводах блока навигационной системы.
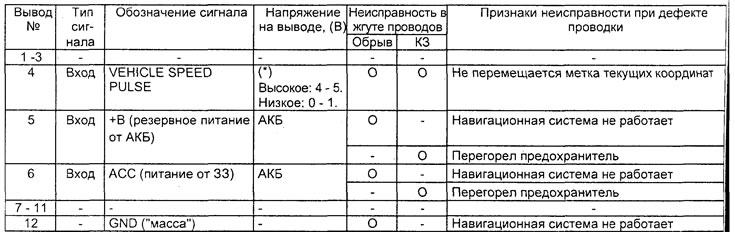
Примечание: (*) — при вращении колес напряжение будет изменяться.
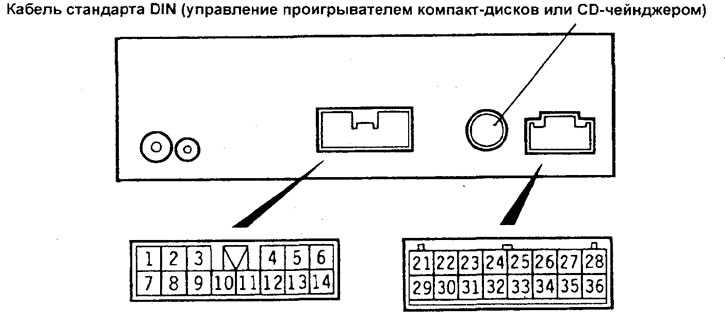
Разъемы блока аудиосистемы (задняя часть).
Таблица проверки напряжения на выводах блока аудиосистемы (задняя часть).
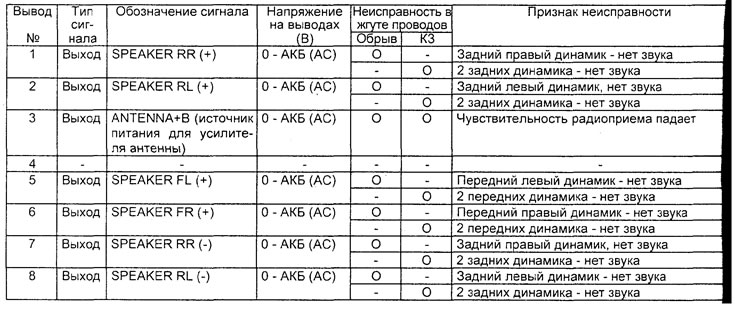
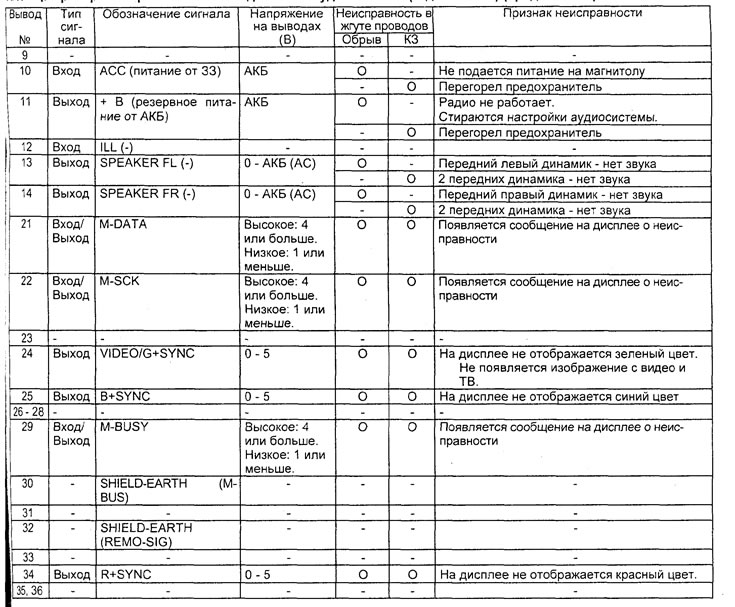
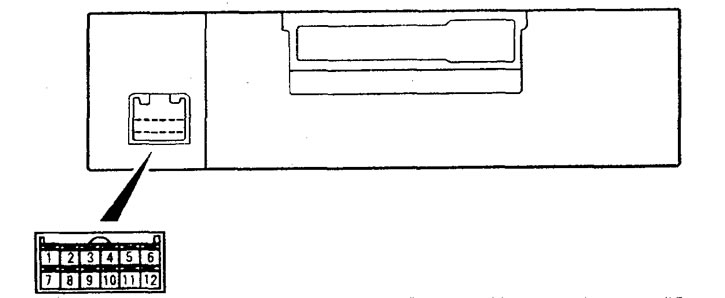
Разъем блока аудиосистемы (передняя часть).
Таблица проверки напряжения на выводах блока аудиосистемы (передняя часть).