Посмотреть инструкция для Moulinex HV8 ME605127 бесплатно. Руководство относится к категории мясорубки, 1 человек(а) дали ему среднюю оценку 7.5. Руководство доступно на следующих языках: русский, английский. У вас есть вопрос о Moulinex HV8 ME605127 или вам нужна помощь? Задайте свой вопрос здесь
Не можете найти ответ на свой вопрос в руководстве? Вы можете найти ответ на свой вопрос ниже, в разделе часто задаваемых вопросов о Moulinex HV8 ME605127.
Инструкция Moulinex HV8 ME605127 доступно в русский?
Да, руководствоMoulinex HV8 ME605127 доступно врусский .
Не нашли свой вопрос? Задайте свой вопрос здесь
EN p 1 – p 6
RU p 7 – p 12
UK p 13 – p 18
CS p 19 – p 24
SK p 25 – p 30
HU p 31 – p 36
PL p 37 – p 42
LT p 43 – p 48
LV p 49 – p 54
ET p 55 – p 60
BG p 61 – p 66
SR p 67 – p 72
HR p 73 – p 78
SL p 79 – p 84
RO p 85 – p 90
BS p 91 – p 96
Réf. 2643130
J
C
J2 J1
B
SR
HR
SL
RO
BS
LT
LV
ET
BG
CS
SK
HU
PL
EN
RU
UK
www.moulinex.com
I
I2 I1
A4b A4c
E G
A
H
A5 A4a A3 A2
K
K3a K3b
A1
K3c
K2
K1
F
D
!!
1.1
2
2
3
1
2
1
1.2
3
3
!!
4
4
5
6
1
2
7
2
!! 1
8
9
1
10
11
2
101
Благодарим за покупку прибора серии Moulinex.
RU
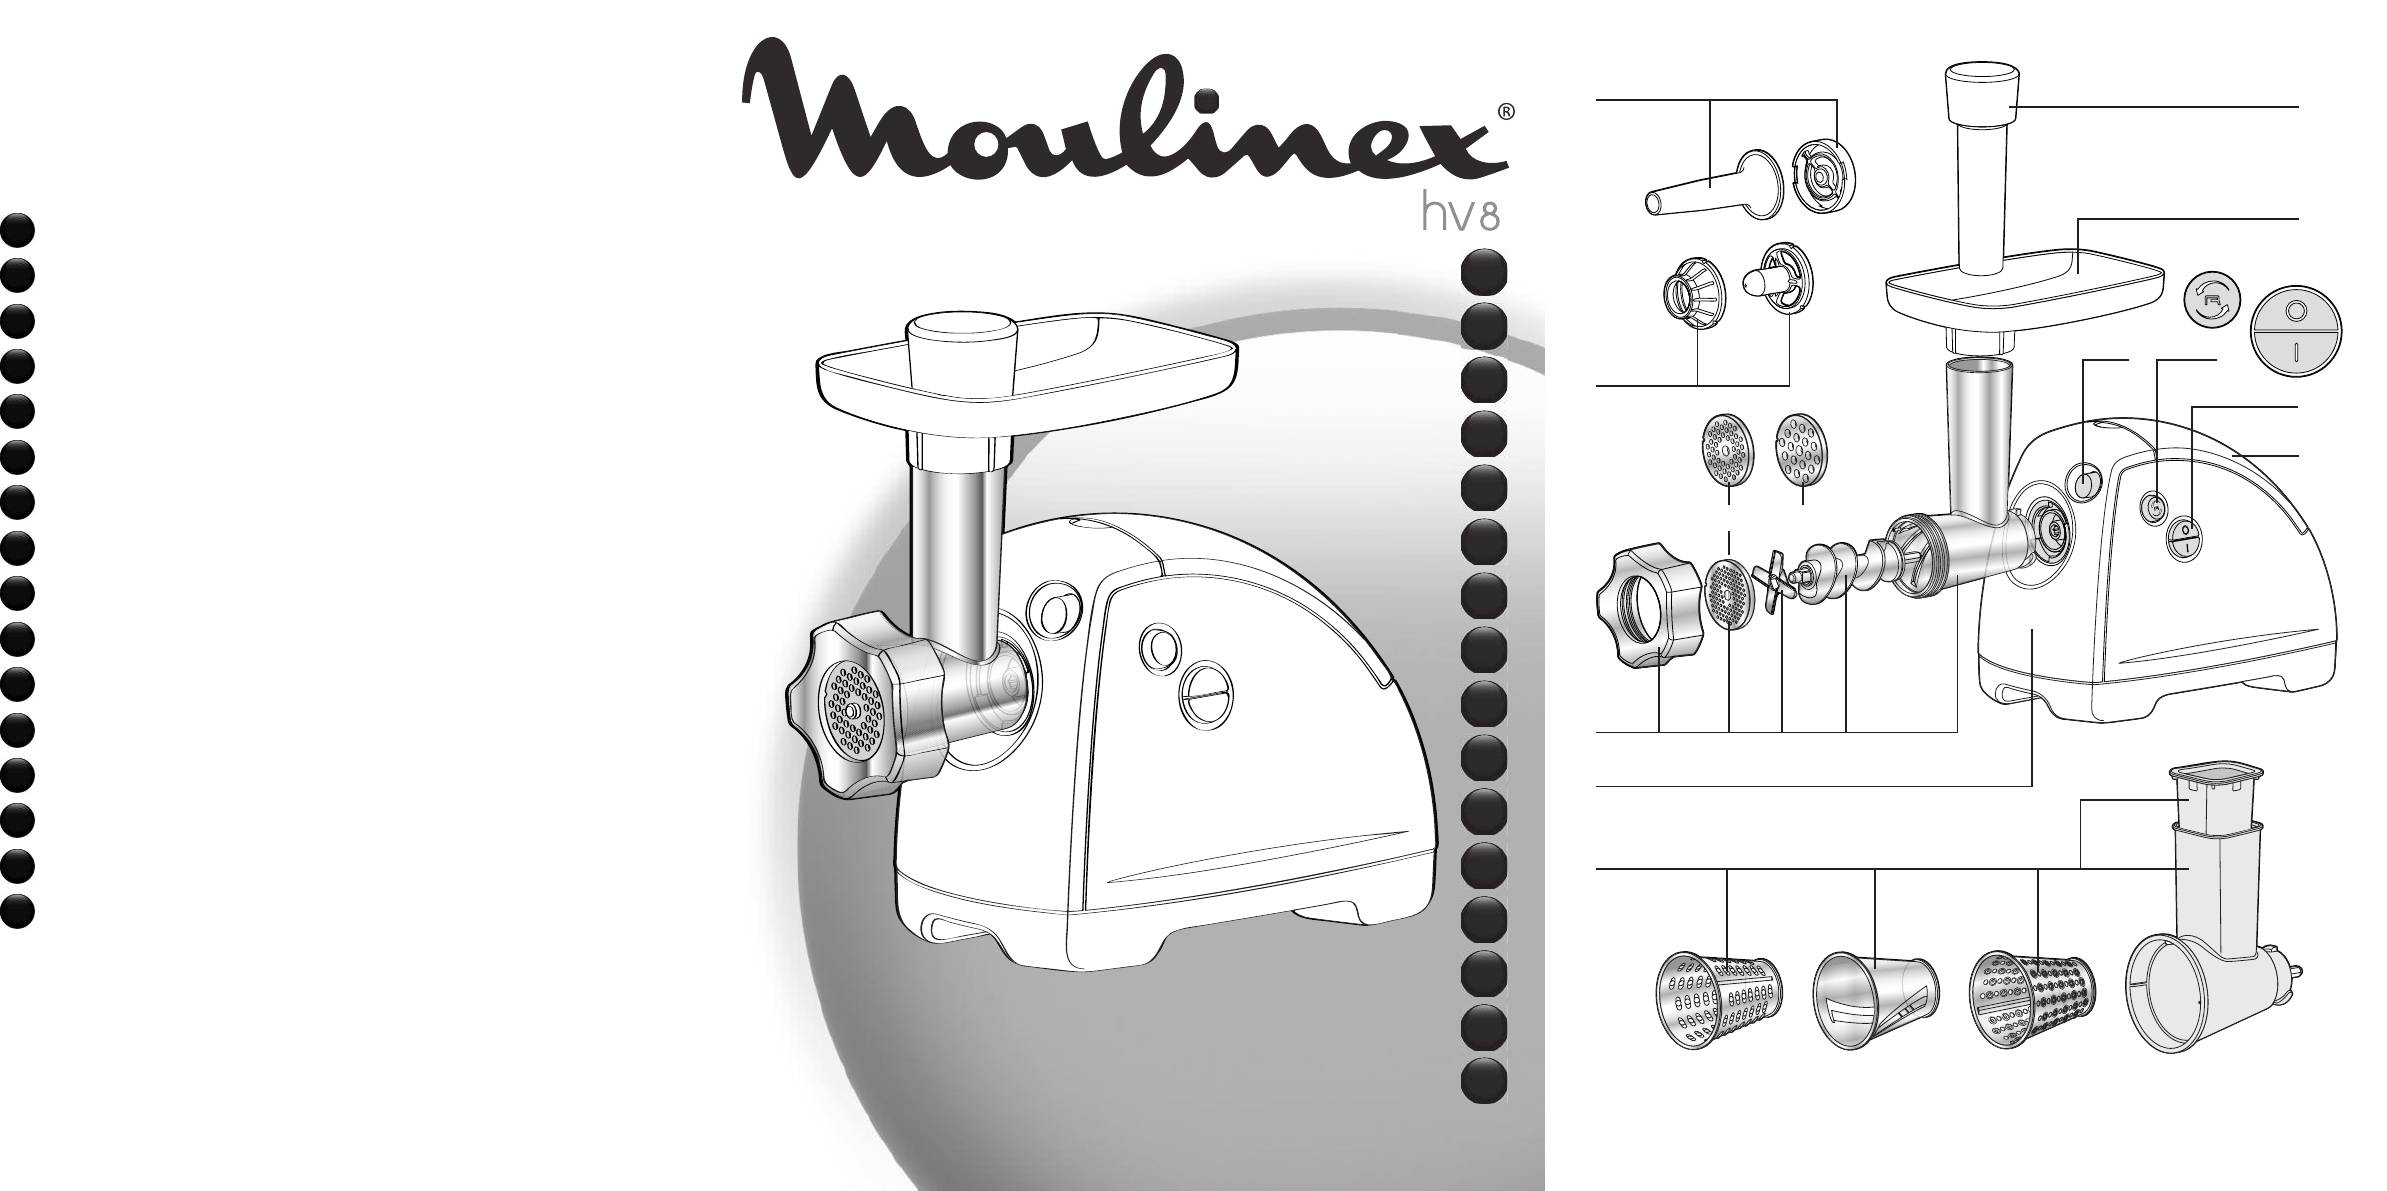
ОПИСАНИЕ
A
Съемная головка мясорубки
A1
Алюминиевый корпус
A2
Винт
A3
Самозатачивающийся нож из нержавеющей стали
A4
Решетка
A4a
Мелкая решетка (2.4 мм)
(в зависимости от модели
)
Для очень мелкой рубки
A4b
Средняя решетка (4.7 мм)
Для мелкой рубки
A4c
Широкая решетка (8 мм)
Для крупной рубки
A5
Алюминиевая гайка
B
Съемный поддон
C
Толкатель мяса
D
Чехол для аксессуаров
E
Кнопка для снятия головки мясорубки
F
Кнопка запуска/остановки (0-1)
G
Кнопка «Реверс» (движение тотчас меняется на противоположное)
H
Блок мотора
I
Аксессуар КЕББЕ
I1
Фильерная насадка
I2
Кольцевое уплотнение
J
Воронка для колбасок
(в зависимости от модели)
J1
Устройство для центрирования винта
J2
Воронка
K
Овощерезка
(в зависимости от модели)
K1
Конусный корпус с загрузочной горловиной
K2
Толкатель
K3
Конусы
K3a
Конус-терка
K3b
Конус для резки тонкими ломтиками
K3c
Конус для скобления
МЕРЫ ПРЕДОСТОРОЖНОСТИ :
— Внимательно прочитайте инструкцию перед началом работы: использование прибора, не
соответству ющее инструкции, освобождает Moulinex от ответстенности.
— Данный прибор не предназначен для использования лицами (включая детей), чьи физические,
сенсорные или умственные способности ограничены, или ли цами, не имеющими опыта или
необ ходимых знаний, за исключением случаев, когда за ними присматривало или помогало третье лицо ответственное за и х безопасность.
— Необходимо ограничить доступ детей к прибору, который не является игрушкой.
— Напряжение питания вашего прибора должно соответствовать напряжению вашего электрического питания.
— Любое неправильное подключение аннулирует гарантию.
— Прибор предназначен только для домашнего использования и приготовления блюд и под присмотром.
— Используйте прибор только на ровной поверхности, чистой и сухой.
— Не оставляйте неубранными длинные волосы, шарф или галстук над аксессуарами, приведенными в действие.
— Следует отключить прибор от питания, как только вы прекратили работу, отключение требуется также, когда вы его моете, ставите на место или убираете аксессуары.
7
— Не используйте прибор, если он работает неправильно или поврежден. В этом случае, следует обратиться в сервисный центр Moulinex ( см.список в брошюре по обслуживанию ).
— Любое вмешательство, отличное от чистки и ежедневного ухода клиентом должно осуществляться в сервисном центре Moulinex.
— Если поврежден провод, не используйте прибор. Для устранения опасности обратитесь для замены в
сервисный центр Moulinex ( см.список в брошюре по обслуживанию ).
— Не кладите прибор, кабель питания или штепсель в воду или другую жидкость.
— Убирайте кабель питания от детей.
— Кабель питания не должен находиться вблизи или в контакте с нагревающимися элементами, источником тепла или острым углом.
— Для вашей безопасности следует использовать только аксессуары и запасные части Moulinex отвечающие
требованиям вашего прибора.
— Не пользуйтесь прибором свыше 14 мин.
— Для вашей безопасности данный прибор отвечает действующим нормам и правилам :
• Директива низкого напряжения
• Электромагнитная совместимость
• Окружающая среда
• Материалы, контактирующие с продуктами питания.
ПЕРЕД НАЧАЛОМ ИСПОЛЬЗОВАНИЯ:
Вымойте все аксессуары водой с мылом. Сполосните и тщательно вытрите.
Решетка и нож должны оставаться жирными. Необходимо покрыть их маслом.
Не включайте прибор в холостую, не смазав предварительно решетку.
ВНИМАНИЕ : Следует осторожно обращаться с конусами, так как лезвия конусов очень острые.
ЗАПУСК:
ГОЛОВКА МЯСОРУБКИ ( A) :
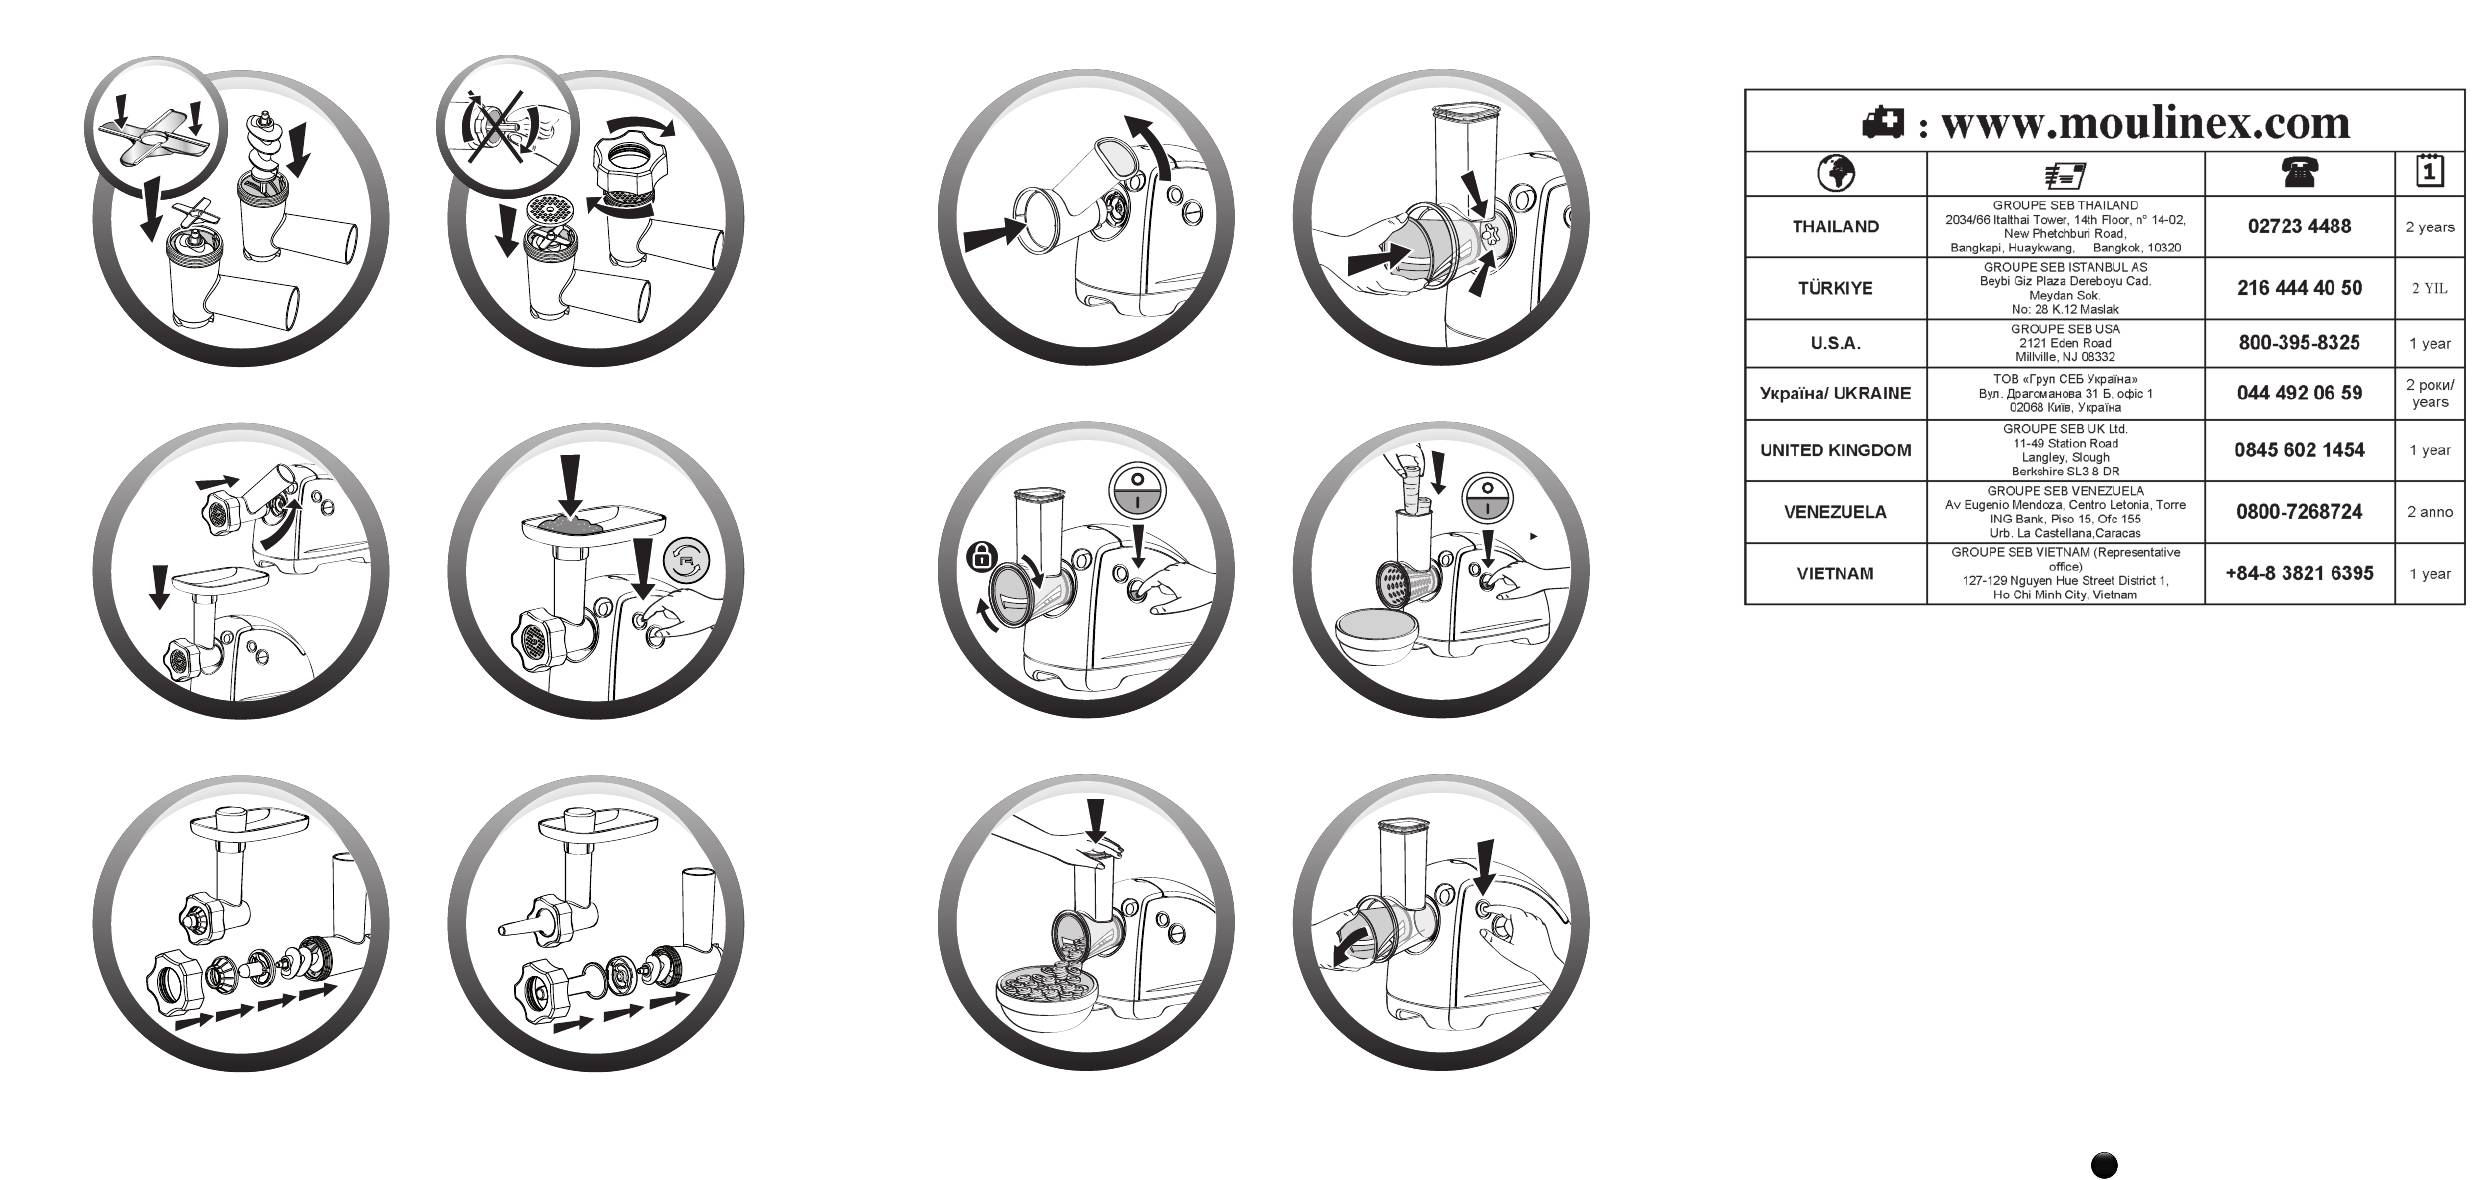
Сборка головки мясорубки (схемы 1.1 и 1.2)
Необходимо взять корпус A1 за загрузочную горловину, направив самое широкое отверстие к верху. Затем вставьте винт A2 ( длинную ось сначала ) в корпус A1.
Вставьте нож из нержавеющей стали A3 на короткую ось, которая выходит за винт A2, режущими гранями к себе. Любую решетку по вашему выбору наденьте на нож A3, выступ должен попасть в паз корпуса A1.
Закрутите (не блокируйте) гайку A5
Установка головки мясорубки (схема 2) :
• Перед отключенным от питания блоком мотора H держите головку мясорубки, загрузочная горловина
направлена вправо. Состыкуйте 2 байонетных соединения головки мясорубки и 2 паза блока мотора.
Голову мясорубки вставьте в блок мотора H , загрузочную горловину поверните затем влево до метки
(загрузочная горловина должна занять вертикальное положение).
• Установите съемный поддон B на выступы загрузочной горловины мясорубки.
Включите прибор, он готов к эксплуатации.
Использование:
Приготовьте необходимое для рубки количество продуктов, удалите кости, хрящи и сухожилия.
Нарежьте мясо кусками (приблизительно 2 см X 2 см).
Под головку мясорубки поставьте емкость.
Нажмите на положение « I » кнопки запуска/остановки F , чтобы включить прибор.
Положите куски мяса на поддон B и по одному опускайте в отверстие с помощью толкателя C.
Ни в коем случае не пытайтесь проталкивать пальцами или другим инструментом.
Чтобы получить мягкое тесто Киббе или Кефта, пропустите мясо 2 — 3 раза через мясорубку до получения массы желаемой консистенции.
Полезный совет:
В конце работы вы можете пропустить несколько кусков хлеба, чтобы вышли остатки рубленого мяса.
Что делать в случае застревания? (схема 3)
Выключите мясорубку, нажав на положение «0» кнопки запуска/остановки F.
8
Затем несколько секунд держите нажатой кнопку «Реверс» G , чтобы освободить застрявшие продукты.
Нажмите на положение « I » кнопки запуска/остановки F , чтобы продолжить работу.
Важно:
дождитесь окончательной остановки прибора перед тем, как активировать команду «Пуск» F или команду «Реверс»
G.
АКСЕССУАР КЕББЕ ( I)
Сборка (схема 4) :
Вставьте винт A2 в корпус A1 головки мясорубки. Установите фильерную насадку I1 так, чтобы выступ попал в паз корпуса A1. Наденьте кольцевое уплотнение I2 на фильерную насадку и закрутите гайку A5 до конца.
Собранную таким образом головку установите на блок мотора как указано в схеме 4.
Примечание:
данный аксессуар используется без решетки и без ножа.
ВОРОНКА ДЛЯ КОЛБАСОК ( J) (в зависимости от модели)
Данный аксессуар, прикрепляемый к головке мясорубки, позволит делать любые колбаски, которые вам
останется только приправить по своему вкусу.
Сборка (схема 5)
Вставьте винт A2 в корпус A1. Установите затем воронку J2, закрутите гайку A5 до конца. Установите головку мясорубки собранную таким образом на блок мотора, как указано в схеме 5.
Примечание: данный аксессуар используется без решетки и без ножа. Устройство для центрирования винта
позволяет удержать винт в нужном положении при приготовлении рецепта.
Использование:
Важно:
данный аксессуар следует использовать только после того, как мясо было порублено, специи добавлены и масса хорошо перемешана.
Предварительно вымоченную в теплой воде колбасную оболочку, ставшую снова эластичной, наденьте на
воронку J2 , оставив приблизительно 5 см.
Рубленое мясо поместите в загрузочную горловину корпуса A1 мясорубки A, включите и толкайте толкателем
C так, чтобы рубленое мясо вышло на край воронки.
Выключите прибор.
Сделайте узел с оставленных 5 см колбасной оболочки. Передвиньте узел к краю воронки, чтобы не блокировать воздух в колбасной оболочке.
Включите прибор и продолжайте накладывать рубленое мясо. Следите за колбасной оболочкой, пока она не
наполнится. Чтобы сильно не растягивать оболочку, не делайте слишком толстых колбасок.
Примечание: работу лучше выполнять вдвоем, один накладывает рубленое мясо, а второй держит
оболочку, пока она наполняется.
Колбаски можно делать любой желаемой длины, сжимая и перекладывая оболочку с места на место.
Чтобы получить качественные колбаски, необходимо следить за тем, чтобы при наполнении воздух не собирался внутри, рекомендуем делать колбаски длиной 10-15 см (отделяйте колбаски, оставляя кусок оболочки для
формирования узла).
ОВОЩЕРЕЗКА ( K) (в зависимости от модели)
Использование:
● Выберите конус, соответствующий желаемому использованию.
● Вставьте выбранный конус в отверстие, находящееся в передней части корпуса K1, конус должен занимать правильное положение внутри несущего элемента (рис. 7).
● Подключите прибор к питанию.
● Нажмите один или два раза на кнопку запуска/остановки F , чтобы блокировать конус (рис. 8),
● Включите прибор, затем через загрузочную горловину корпуса накладывайте продукты K1 ( рис. 9 ) и
проталкивайте их с помощью толкателя K2 ( рис. 10 ).
● Чтобы заменить конус, необходимо дождаться полной остановки конуса. Удерживайте нажатой в течение
1 секунды кнопку G Реверс, конус выйдет автоматически
(рис. 11)
.
ВНИМАНИЕ : Перед включением прибора убедитесь, что конус правильно занял положение на несущем элементе.
9
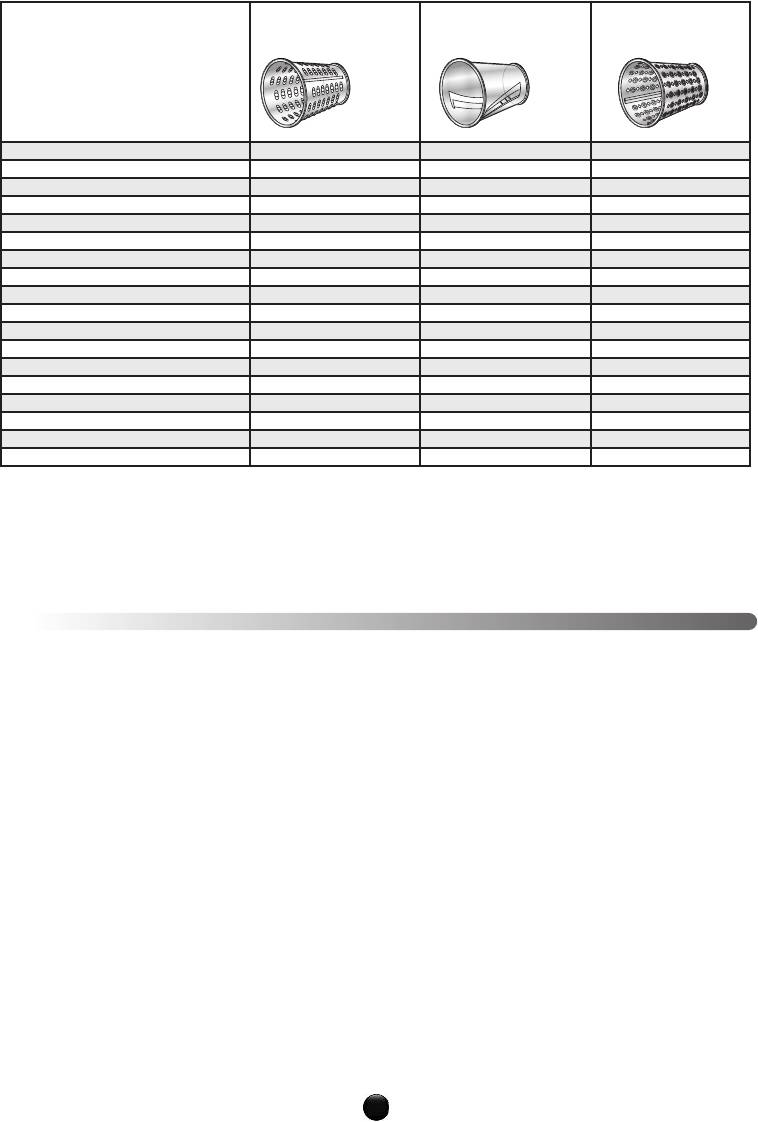
Используйте рекомендуемый конус для каждого типа продукта:
(*) Конус-терка K3a (*) Конус для резки тонкими ломтиками K3b
(*) Конус для скобления K3c
Морковь
Кабачки
Картофель
Огурец
Перец
Лук
Свекла
Капуста (белая/красная)
Яблоки
Редька черная
Корневой сельдерей
Бананы
Пармезан
Грюйер
Шоколад
Сухой хлеб/сухари
Лесной орех/грецкий орех/миндаль
Кокосовый орех
X
X
X
X
X
X
X
X
X
X
X
X
X
X
X
X
X
X
X
X
X
X
X
X
X
X
(*) в зависимости от модели
Советы для получения хорошего результата:
Чтобы получить удовлетворительный результат и предотвратить застревание продуктов в корпусе, используемые ингредиенты должны быть крепкими и свежими. Не используйте прибор, чтобы тереть или резать ломтиками продукты слишком жесткие такие, как сахар или куски мяса. Разрезайте продукты, чтобы их было проще
проталкивать в отверстие корпуса.
ЧИСТКА:
•
Перед чисткой блока мотора Н всегда отключайте прибор от питания.
● Не погружайте блок мотора в воду, не подставляйте его под воду. Чистите блок мотора влажной тряпкой.
После чистки следует полностью высушить.
1) Аксессуары мясорубки :
— Снимите блокировку головки или аксессуара овощерезки, нажав на кнопку E.
— Поверните головку мясорубки A вправо и потяните на себя, чтобы разъединить блок мотора H.
— Чтобы снять головку овощерезки A, выньте толкатель C и снимите поддон B, отвинтите гайку A5, снимите решетку A4, нож A3 и винт A2.
—
Осторожно обращайтесь с острыми запчастями.
— Вымойте все запчасти под горячей водой с мылом, сполосните и тщательно вытрите.
— Не мойте головку мясорубки A в посудомоечной машине (то есть корпус A1, винт A2, гайку A5, нож A3 и решетки A4 ).
2) Аксессуары овощерезки (в зависимости от модели) :
● Корпус ( K1 ), толкатель ( K2 ), конусы ( K3a, K3b, K3c ) можно мыть в посудомоечной машине в корзине,
используя программу «ЭКО» или «НЕ СИЛЬНО ГРЯЗНОЕ».
● Следует осторожно обращаться с конусами, так как лезвия конусов очень острые.
● Если пластмассовые части покрасились от продуктов таких как, например, морковь, протрите их тряпкой, смоченной в пищевом масле, затем вымойте обычным способом.
ХРАНЕНИЕ:
Решетки, нож, устройство для центрирования винта, аксессуары Кеббе и для колбасок ( I1, I2 и J1, J2 ) можно хранить на задней стенке прибора (в специальном отделении D ).
10
ЕСЛИ ПРИБОР НЕ РАБОТАЕТ, ЧТО ДЕЛАТЬ?
Проверьте питание.
Если прибор так и не заработал, обратитесь в сервисный центр Moulinex
(см.список в брошюре по обслуживанию).
СРОК ЭКСПЛУАТАЦИИ ЭЛЕКТРОННЫХ ИЛИ ЭЛЕКТРИЧЕСКИХ
ПРИБОРОВ ЗАКАНЧИВАЕТСЯ
Поучаствуем в защите окружающей среды!
Ваш прибор содержит много материала, пригодного к переработке.
Сдайте его в пункт сбора или в сервисный центр для переработки.
РЕЦЕПТЫ
Обратить внимание: Для рецептов, для которых требуется более высокая мощность, время использования прибора не должно превы шать 20 сек.
Пример рецепта (со средней решеткой – отверстия 4,7мм A4b) :
KIBBE BI LABAN
(котлеты киббе с йогуртом) – 6 пор ций
Приготовление: 1 ч. Поставить на 1 ч в холодильник
Ингредиенты для пасты киббе :
600 г мяса – 300 г бульгура (дробленое зерно) – соль
Ингредиенты для соуса :
1 кг йогурта – 1 пучок кориандра – 4 зубчика чеснока – 3 столовые ложки
кукурузной муки – соль, перец
1. Разрежьте мясо на 4 куска. Установите решетку 4,7 мм в мясорубку. Пропустите мясо, добавьте бульгур.
Посолите, поставьте полученную массу в холодное место на 1 час.
2. Чтобы сформировать котлеты киббе: установите на мясорубку аксессуар кеббе. Пропустите массу, края котлеты склейте небольшим количеством воды.
3. Для приготовления соуса: промойте пучок кориандра, промокните бумагой и оторвите листья. Почистите чеснок и раздавите его. Чеснок и кориандр подержите 1-2 минуты на сковородке на слабом огне. Оставьте в сторону.
4. Взбейте йогурт и кукурузную муку, посолите, поперчите. Вылейте все в кастрюлю через мелкое ситечко.
Доведите смесь до кипения, затем уменьшите огонь. Присматривайте за приготовлением, постоянно
помешивая, чтобы йогурт не приставал.
5. Добавьте чеснок и кориандр. Подержите котлеты киббе в горячей смеси 10 минут.
Вариант:
Вы также можете начинить котлеты (смесью лука и рубленого мяса, предварительно прожаренного в небольшом количестве масла с пряностями).
САМСА
4 пор ции – Приготовление: 40 мин. Время запекания: 35 мин.
Ингредиенты:
250 г слоёного теста – 350 г говядины – 1 луковица – 2 яйца – паприка – молотая корица и имбирь – петрушка –кориандр – кервель – сахар – 60 г масла – оливковое масло
1. Установите решетку с отверстием 4,7 мм в мясорубку. Разрежьте лук на 8 частей и пропустите через
мясорубку. Подогрейте 4 столовые ложки оливкового масла в сотейнике, затем добавьте лук. Потомите на слабом огне до получения золотистого цвета. Отставьте в сторону.
2. Измельчите говядину. Подрумяньте на слабом огне вместе с луком в течение 10 минут. Отставьте в сторону.
3. Приправы пропустите через мясорубку. Высыпьте их в сотейник вместе с солью и перцем, добавьте
полчайной ложки паприки, щепотку имбиря и немного корицы.
4. Затем введите взбитые яйца, помешайте и выключите огонь.
5. Раскатайте довольно тонко слоёное тесто. Разрежьте на квадраты по 10 см. Смажьте маслом используемую поверхность.
6. На каждый квадрат положите немного фарша. Заверните, склеив затем края.
7. Жарьте самса́ в кипящем масле. После жарки выложите на несколько минут на впитывающую бумагу.
11
Посыпьте сахаром и корицей. Подавайте горячим.
Вариант:
Установите решетку с отверстиями 4,7 мм в мясорубку. Разрежьте лук на 8 частей. Нарубите немного мяса, лук пропустите через мясорубку.
Пропустите еще немного мяса, затем приправы и, наконец, остаток мяса. Взбейте яйца и введите их в фарш вместе с солью и перцем, полчайной ложкой паприки, щепоткой имбиря и небольшим количеством корицы.
Все перемешайте. Повторите пункты 5-7.
ПИРОЖКИ С РЫБОЙ
(маленькие пирожки с рыбой)
4 пор ции – Приготовление: 25 мин. Время запекания: 10 — 15 мин.
Ингредиенты:
250 г слоёного теста – 300 г вареной рыбы или копченого лосося – 2 яйца, сваренных вкрутую
– 1 пучок душистого укропа – 2 луковицы – 100 г солёного сливочного масла маленькими кусочками – растительное масло
1. Установит решетку с отверстиями 4,7 мм в мясорубку. Разрежьте лук на 8 частей и пропустите через
мясорубку. Припустите на слабом огне в сотейнике в небольшом количестве растительного масла. Оставьте в сторону.
2. Нарежьте немного рыбы, добавьте затем приготовленный лук, сливочное масло, душистый укроп и
оставшуюся рыбу.
3. Раскатайте тонким слоем слоёное тесто, вырежьте круги стаканом или бокалом (более или менее большим).
4. Предварительно разогрейте духовку до 210 ° C ( п.6
).
5. На каждый кружок положите немного фарша, сложите тесто и заклейте края.
6. Готовьте в духовке 10 -15 минут.
Котлеты из говядины
4 пор ции – Приготовление: 20 мин. Время запекания: 10 — 15 мин.
Ингредиенты:
11 кг говядины – 1 луковица – 1 зубчик чеснока – 2 кусочка черного хлеба замоченного в
молоке – 2 яйца – 1 картошина– мука – соль, перец
1. Для приготовления этого рецепта выберите нежирные куски говядины. Пропустите мясо через мясорубку с кусочками хлеба.
2. Нарежьте лук тонкими ломтиками конусом ( K3b ) и натрите чеснок и картофель конусом-теркой ( K3a ).
3. Смешайте рубленое мясо с хлебом, нарезанным луком, чесноком и картофелем.
4. Добавьте в смесь яйца, молотый черный перец, соль и сформируйте котлеты.
5. Обваляйте колеты в муке и жарьте в растительном масле.
Картофельный пудинг, приготовленный в ду ховке
4 пор ции – Приготовление: 30 мин. Время запекания: 45 мин.
Ингредиенты:
1 зубчик чеснока – 1,5 столовой ложки сливочного масла – 2 столовые ложки растительного масла – соль, перец
1. Почистите, вымойте и высушите картофель. Нарежьте его тонкими ломтиками конусом ( K3b ).
2. Говядину пропустите через мясорубку, и прожарьте рубленое мясо в духовке в масле в течение 5 минут.
3. Натрите внутреннюю поверхность блюда чесноком, затем смажьте одной частью сливочного масла.
4. Слоями выложите 2/3 картофеля и рубленого мяса, посолите, поперчите, затем выложите оставшийся
картофель.
5. Взбейте яйца с теплым молоком и вылейте смесь на картофель. Добавьте оставшееся сливочное масло.
Готовьте в духовке при средней температуре 45 минут.
Печеные яблоки с миндалем
4 пор ции – Приготовление: 40 мин. Время запекания: 30 мин.
Ингредиенты:
6 яблок – 60 г сахара-сырца – 50 г сливочного масла – 50 г цельного миндаля – 20 мл сливок –
1 чайная ложка корицы
Почистите яблоки, удалите сердцевину и разрежьте на четверти. Нарежьте яблоки тонкими ломтиками
конусом ( K3b ) и прожарьте в 30 г сливочного масла. Смажьте слегка маслом блюдо и выложите засахаренные яблоки на дно. Измельчите миндаль в порошок конусом ( K3c ). В салатнице перемешайте молотый миндаль, сливки и корицу. Выложите смесь на яблоки и посыпьте сахаром-сырцом. Блюдо поставьте в духовку,
готовьте при 160° C.
12
98
99
100
J
C
J2 J1
B
GE
I1I2
I
F
D
A4b A4c
A5 A3
A4a
A2 A1
A
H
K2
K1
K
K3a K3b K3c
EN
p 1 – p 6
RU
p 7 – p 12
UK
p 13 – p 18
CS
p 19 – p 24
SK
p 25 – p 30
HU
p 31 – p 36
PL
p 37 – p 42
LT
p 43 – p 48
LV
p 49 – p 54
ET
p 55 – p 60
BG
p 61 – p 66
SR
p 67 – p 72
HR
p 73 – p 78
SL
p 79 – p 84
RO
p 85 – p 90
BS
p 91 – p 96
EN
RU
UK
CS
SK
HU
PL
LT
LV
ET
BG
SR
HR
SL
RO
BS
www.moulinex.com
Réf. 2643130
101
!!
!!

choosing an appliance from the Moulinex range.
EN
DESCRIPTION:
A Removable mincer head
A1 Aluminium casing
A2 Screw feeder
A3 Self-sharpening stainless steel blades
A4 Screens
A4a Fine hole screen (2.4 mm)
(availability depends on model) very fine mincing
A4b Medium hole screen (4.7 mm) fine mincing
A4c Large hole screen (8 mm)coarse mincing
A5 Aluminium locking nut
B Removable tray
C Pusher
D Accessory storage compartment
E Mincer head release button
F On/off switch
G Reverse button (momentary reverse action)
H Motor unit
I KEBBE accessory
I1 Ring fitting
I2 Ring
J Sausage nozzle
(availability depends on model)
J1 Screw feeder centring ring
J2 Nozzle
K Vegetable cutter (availability depends on model)
K1 Drum holder / hopper
K2 Pusher
K3 Drums
K4a Shredder
K4b Slicer
K4c Grater
SAFETY RECOMMENDATIONS:
— Always read the instructions carefully before using your appliance for the first time: Moulinex will not accept
responsibility for any use which does not comply with the instructions for use.
— This appliance is not intended to be used by persons (including children) with reduced physical, sensory or
mental capacities or lack of experience and knowledge, unless they are supervised or have been given
instructions beforehand concerning use of the appliance by a person responsible for their safety.
— Children should be supervised to ensure they do not play with the appliance.
— Check that the voltage of your appliance corresponds to your domestic power supply.
— Any incorrect connection to the power supply will invalidate the guarantee.
— This product has been designed for domestic use only. Any commercial use, inappropriate use or failure to comply
with the instructions, the manufacturer accepts no responsibility and the guarantee will not apply
— Do not leave the appliance unattended when switched on and in use.
— Use the appliance on a flat, clean and dry surface.
— Never allow long hair, scarves or ties to hang down over the appliance when it is in use.
— Unplug the appliance after use and when you clean it or fit or remove accessories.
— Do not use the appliance if it is not working correctly or if it has been damaged. In this case contact an approved
Moulinex service centre (see list in service booklet).
1

— Any servicing other than cleaning and normal upkeep by the customer must be carried out by an approved service
centre.
— Do not use the appliance if the power lead is damaged. To avoid all possible danger, have it replaced at an approved
service centre (see list in the service booklet).
— Never place the appliance, the power cord or the plug in water or any other liquid.
— Keep the power lead out of the reach of children.
— The power lead should never touch hot surfaces, or be placed near heat sources or sharp edges.
— For your own safety, only use Moulinex accessories and spare parts which are suitable for your appliance.
— Do not use the appliance for longer than 14 minutes.
— For your safety, this appliance complies with all applicable standards and regulations:
• Low voltage directive
• Electro-magnetic compatibility
• Environmental regulations
• Regulations regarding materials in contact with foodstuffs.
BEFORE USING THE APPLIANCE FOR THE FIRST TIME:
Wash all accessories in soapy water. Rinse and dry carefully.
The screen and blades must be kept lubricated. Apply a little oil to them.
Do not run the appliance empty if the screen has not been oiled.
WARNING! Handle the drums carefully as the blades are extremely sharp.
USING THE APPLIANCE:
MINCER HEAD ASSEMBLY (A) :
Assembling the mincer head (figures 1.1 and 1.2)
Hold section A1 by the hopper with the wider opening at the top. Insert the screw feeder (A2) (long shaft first) in the
head assembly A1.
Fit the stainless steel blades (A3) on the short shaft of the screw feeder (A2), so that the cutting edges face outward.
Fit the screen of your choice over the blades (A3) ensuring that the pin fits into the notch on the assembly (A1).
Tighten the locking nut A5 (do not apply excessive pressure).
Fitting the mincer head to the appliance (diagram 2):
• The motor unit (H) must be unplugged. Position the mincer head in front of the unit with the hopper tilted to the
right. Fit the two pins on the mincer head into the two notches on the motor unit.
Push the mincer head firmly into the motor unit (H) and then turn the hopper to the left until it locks into position
(the hopper should be vertical).
• Fit the removable tray (B) onto the pins of the hopper.
Plug the appliance in. It is now ready for use.
Use:
Prepare all the food you wish to mince, eliminating any bones, cartilage or nerves.
Cut the meat into pieces (approximately 2 cm x 2 cm).
Place a container under the mincer head.
Press the On / Off switch (F) to start the appliance.
Place the pieces of meat on the tray (B) and use the pusher (C) to push them into the hopper one by one.
Never use your fingers or any other object to push the meat into the hopper.
To make extra fine Kebbe or Kefta mince, pass the meat through the mincer 2 or 3 times until it has the right consistency.
Tip:
When you have finished mincing put a few pieces of bread through the mincer to push out all the meat.
What to do if the mincer is blocked (diagram 3)
Turn off the mincer by pressing the On / Off switch (F).
Press the Reverse button (G) for a few seconds to clear the blockage.
Press the On / Off switch (F) to continue mincing.
Important : wait until the appliance stops completely before you use the On (F) or Reverse (G) buttons.
KEBBE ACCESSORY (I)
2

Assembly (diagram 4):
Fit the screw feeder (A2) into the mincer head assembly (A1). Insert the ring fitting (I1) in the head assembly (A1),
so that the pin fits into the notch.
Place the ring (I2) over the ring fitting and then secure them by tightening the locking nut (A5).
When assembled, fit the mincer head to the motor unit, as shown in diagram 4.
Note: this accessory is used without a screen or blades.
SAUSAGE NOZZLE (J) (availability depends on model)
This accessory can be fitted to the mincer head so that you can make sausages of all kinds, flavouring them to your
own taste.
Assembly (diagram 5) :
Fit the screw feeder (A2) into the mincer head assembly (A1). Fit the screw feeder centring plate (J1), aligning the
pin with the notch on the head assembly (A1). Fit the nozzle (J2) and secure it by tightening the locking nut (A5).
When assembled, fit the mincer head to the motor unit, as shown in diagram 5.
NB : this accessory is used without a screen or blades. The centring plate keeps the screw feeder in position while
the appliance is being used.
Use:
Important: this accessory should only be used after you have minced the meat, added seasoning and mixed the
preparation thoroughly.
Soak the sausage casing in warm water to soften it and insert the nozzle (J2) in it leaving about 5 cm clear.
Fill the hopper (A1) on the head assembly (A) with mince, turn the appliance on and push down with the pusher (C)
until the mince reaches the end of the nozzle.
Turn off the appliance.
Tie a knot in the 5 cm length of free casing. Slide the knot up to the end of the nozzle so that air is not trapped in
the casing.
Turn the appliance on again and continue to add mince. Ease the casing along as it fills. Do not overfill the sausages
as this will stretch the casing.
NB : this operation is easier if two people do it together, one feeding the mince into the mincer and the other
holding the casing in position as it fills.
Make sausages of the desired length by pinching the casing and twisting it where appropriate.
For the best results take care to prevent air becoming trapped in the casing during filling and make sausages 10 cm to
15 cm in length (separate the sausages by tying a knot round the casing).
VEGETABLE CUTTER (K) (availability depends on model)
Assembly (diagram 6):
The motor unit must be unplugged. Position the vegetable cutting unit (K1) in front of the motor unit tilted to the
right so that the lugs are aligned with the notches in the motor unit (H). Insert the shaft of the unit in the centre
hole of of the motor unit (H). Turn the hopper to the left until the unit clicks home with the hopper in the upright
position.
Use:
• Select the drum you wish to use.
• Fit the drum into the opening at the front of the vegetable cutter (K1), ensuring that it is pushed firmly home
(Fig. 7).
• Plug in the appliance.
• Press the On / Off button (F) once or twice to lock the drum into position (Fig. .
• Start the appliance and feed the vegetables into the hopper (K1) (Fig. 9), pushing them down with the pusher (K2)
(Fig. 10).
• To change the drum, wait for the appliance to stop completely and then press the Reverse button (G) for 1 second.
The drum will be released automatically (Fig. 11).
WARNING! Before starting the appliance, check that the drum is correctly fitted on the shaft.
3

Use the right drum for each type of food:
(*) K3a Shredder (*) K3b Slicer (*) K3c Grater
C
arrots
X X
Courgettes
X X
Potatoes
X X
C
ucumber
X X
P
epper
X X
O
nions
X
Beetroot
X
Cabbage (white/red)
X
Apples
X
Black radish
X X
Celeriac
X
Banana
X
Parmesan
X
Gruyère
X X
Chocolate
X X
Dry bread/biscuits
X
Hazelnuts/walnuts/almonds
X
Coconut
X
(*) available according to model
Recommendations for the best results:
For best results the ingredients you use should be firm. Do not allow food remains to build up inside the unit. Do not
use the appliance to grate or mince substances which are too hard, such as sugar or large pieces of meat.
Cut food into small pieces so that it can be fed easily into the hopper.
CLEANING:
• Always unplug the appliance before cleaning the motor unit (H).
• Do not put the motor unit in water or hold it under a running tap. Clean the motor unit with a damp cloth and dry
it carefully.
1) Mincer accessories:
— Release the head or accessory by pressing button E.
— Turn the mincer head unit (A) to the right and pull it towards you to remove it from the motor unit (H).
— To remove the head unit (A), lift off the pusher (C) and the tray (B), unscrew the locking nut (A5), remove the screen
(A4), the blades (A3) and the screw feeder (A2).
— Take special care when handling sharp components.
— Wash all pieces in warm soapy water, rinse and dry carefully.
Do not put any parts of the head unit (A) in the dishwasher (main body (A1), screw feeder (A2), blades (A3),
screens (A4), locking nut (A5)).
2) Vegetable cutter accessories (available according to model):
• The drum holder (K1), the pusher (K2) and the drums (K3a, K3b, K3c) can be washed in the dishwasher in the
top tray using the ECONOMY or QUICK WASH settings.
• Handle the drums carefully as the blades are extremely sharp.
• If the plastic parts become stained by foods such as carrots, rub the discoloured areas with a cloth soaked in
vegetable oil and then clean as normal.
STORAGE:
The screens, the blades, the screw feeder centring plate, the Kebbe and sausage accessories (I1, I2 and J1, J2) can
be stored in the compartment (D) at the back of the appliance.
WHAT DO I DO IF THE APPLIANCE DOESN’T WORK?
Check that it is correctly connected to the power supply.
4

If the problem persists, contact an approved Moulinex service centre (see list in service booklet).
DISPOSAL OF ELECTRICAL OR ELECTRONIC PRODUCTS
Let’s work together to protect the environment!
Your appliance contains valuable materials which can be recovered or recycled.
Leave it at a local civic waste collection point.
RECIPES
N.B. When preparing recipes that require extensive use of the mincer take care not to operate it continuously
for more than 20 seconds.
Sample recipe, using 4.7 mm medium screen (A4b):
LEBANESE KEBBE
(meat balls with yoghurt)
(Serves 6) – Preparation time: 1 h
Leave to stand for 1 h in fridge
Ingredients for kebbe paste:
600 g of meat – 300 g of cracked bulgur wheat — Salt
Ingredients for sauce:
1 kg yoghurt – 1 bunch coriander – 4 cloves garlic – 3 soupspoons cornflour – Salt, pepper
1. Cut the meat into 4 pieces. Fit the 4.7 mm screen on your mincer. Mince the meat, adding the bulgur wheat as you
do so. Add salt and allow to stand for 1 hour in a cool place.
2. To make the kebbe balls: fit the kebbe accessory on to the mincer. Roll the paste into a ball, sealing the ends with
a little water.
3. To prepare the sauce: wash the coriander, dry it with kitchen paper and remove the leaves. Peel and crush the garlic.
Warm the coriander and garlic gently in a pan for 1 – 2 minutes. Set aside.
4. Beat the yoghurt and cornflour together. Add salt and pepper. Put the mixture into a saucepan after passing it
through a fine sieve. Heat until the mixture boils and then turn down the heat. Stir the mixture while it is cooking
to ensure that the yoghurt does not curdle.
5. Add the garlic and coriander. Warm the kebbe balls in the mixture for 10 minutes.
Variation on the recipe: You can also stuff the balls with a mixture of onion and minced meat (previously lightly
browned in a little oil with a few pine nuts).
BRIOUATS
(Serves 4) – Preparation time: 40 min. Cooking time: 35 min.
Ingredients:
250 g puff pastry – 350 g beef – 1 onion – 2 eggs – Paprika – Powdered cinnamon and ginger – Parsley – Coriander –
Chervil – Sugar – 60 g butter – Olive oil
1. Fit the 4.7 mm screen on your mincer. Cut the onion into 8 pieces and put it through the mincer. Warm 4 soupspoons
of olive oil in a pan and add the onion. Sweat it on a low heat without allowing it to brown. Set aside.
2. Mince the beef. Brown it on a low heat with the onion for 10 minutes. Set aside.
3. Mince the herbs. Add them to the pan with salt and pepper, half a coffeespoon of paprika, a pinch of ginger and a
small spoonful of cinnamon.
4. Add the beaten eggs, stir into the mixture and then remove from the heat.
5. Roll out the puff pastry. It should be quite thin. Cut it into squares 10 cm x 10 cm. Rub the edges with butter.
6. Put a small spoonful of filling on each square. Roll the squares up and seal the ends.
7. Fry the briouats in very hot oil. When fried, place on kitchen paper for a few seconds. Sprinkle with sugar and
cinnamon. Serve very hot.
Variation on the recipe:
Fit the 4.7 mm screen on your mincer. Cut the onion in 8 pieces. Mince a little meat and then the onion.
Then mince a little more meat, then the herbs and then the rest of the meat. Beat the eggs and add them to the stuf-
5

fing with salt and pepper, half a coffee spoon of paprika, a pinch of ginger and a small spoonful of cinnamon. Mix all
the ingredients together. Proceed as in steps 5 to 7 above.
PIROZHKI
(small fish pasties)
(
Serves 4) – Preparation time: 25 min. Cooking time: 10 — 15 min.
Ingredients:
250 g puff pastry – 300 g cooked fish or smoked salmon – 2 hard boiled eggs – 1 bunch dill – 2 onions – 100 g salted
butter, diced small — Oil
1. Fit the 4.7 mm screen on your mincer. Cut the onions into 8 and put them through the mincer. Brown them in a pan
with a little oil over a low heat. Set aside.
2. Mince a little fish, then put the cooked onion, butter and dill through the mincer and finally the rest of the fish.
3. Roll out the puff pastry so that it is quite thin and then cut circles out using a glass or a fairly large bowl.
4. Pre-heat the oven to 210oC (Th.6)
5. Place a little filling on each circle, fold the edges over and seal them together.
6. Brown in the oven for 10 – 15 minutes.
Beef balls
(Serves 4) – Preparation time: 20 min. Cooking time: 10 — 15 min.
Ingredients:
1 kg beef – 1 onion – 1 clove garlic – 2 slices black bread soaked in milk – 2 eggs – 1 potato – Flour – Salt, peppe
1. For this recipe choose lean pieces of beef. Mince the beef with the slices of bread.
2. Slice the onion using the slicing drum (K3b) and grate the garlic and the potato using the shredder drum (K3a).
3. Mix the minced meat and bread with the sliced onion, garlic and potato.
4. Add the eggs, ground black pepper and salt, and shape the mixture into balls.
5. Roll the balls in flour and fry in the oil.
Oven baked potato pie
(Serves 4) – Preparation time: 30 min. Cooking time: 45 min.
Ingredients:
400 g minced meat – 1 kg potatoes- 2 eggs – 2 glasses milk – 1 clove garlic – 1½ soupspoons butter – 2 soupspoons oil
– Salt, pepper
1. Clean wash and dry the potatoes. Slice them using the K3b drum.
2. Mince the beef and fry it in a pan with oil for 5 minutes.
3. Rub the inside of an oven dish with garlic and then grease it with some of the butter.
4. Put a first layer in the dish using Î of the potato. Then add a layer of meat, add salt and pepper and then a final
layer with the rest of the potato.
5. Beat the eggs with hot milk and pour this mixture over the potato. Add the rest of the butter and cook in a medium
oven for 45 minutes.
Apple gratin with almonds
(Serves 4) – Preparation time: 40 min. Cooking time: 30 min.
Ingredients:
6 apples – 60 g soft brown sugar – 50 g butter – 50 g whole almonds – 20 cl cream – 1 coffeespoons cinnamon
Peel the apples, remove the pips and cut into quarters. Slice finely using the K3b slicer attachment and brown with
30 g of butter. Lightly grease a gratin dish with butter and spread the caramelised apple over the bottom. Powder
the almonds using the K3c grater drum. Mix the powdered almond, the cream and the cinnamon in a bowl. Pour the
mixture over the apples and sprinkle with soft brown sugar. Heat the dish in the oven at 160°C.
6

‹²§ªµ«§·¯³®§¶µ±º¶±º¶·¯¨µ·§¸¬·¯¯Moulinex.
RU
ОПИСАНИЕ
A
šÁ¬³´§Æªµ²µ©±§³Æ¸µ·º¨±¯
A1
Š²Å³¯´¯¬©Â°±µ·¶º¸
A2
Œ¯´¹
A3
š§³µ®§¹§¾¯©§ÅÀ¯°¸Æ´µ-¯®´¬·-§©¬ÅÀ¬°¸¹§²¯
A4
™¬¿¬¹±§
A4a
•¬²±§Æ·¬¿¬¹±§³³
ž£œž¤-¤¨ª-®¤ª®¨ª ¡§¤
Ž²Æµ¾¬´Ã³¬²±µ°·º¨±¯
A4b
š·¬«´ÆÆ·¬¿¬¹±§³³
Ž²Æ³¬²±µ°·º¨±¯
A4c
¡¯·µ±§Æ·¬¿¬¹±§³³
Ž²Æ±·º¶´µ°·º¨±¯
A5
Š²Å³¯´¯¬©§Æª§°±§
B
šÁ¬³´Â°¶µ««µ´
C
›µ²±§¹¬²Ã³Æ¸§
D
¬¼µ²«²Æ§±¸¬¸¸º§·µ©
E
“´µ¶±§«²Æ¸´Æ¹¯Æªµ²µ©±¯³Æ¸µ·º¨±¯
F
“´µ¶±§®§¶º¸±§µ¸¹§´µ©±¯
G
“´µ¶±§T™¬©¬·¸U«©¯-¬´¯¬¹µ¹¾§¸³¬´Æ¬¹¸Æ´§¶·µ¹¯©µ¶µ²µ-´µ¬
H
‹²µ±³µ¹µ·§
I
Š±¸¬¸¸º§·“•‹‹•
I1
•¯²Ã¬·´§Æ´§¸§«±§
I2
“µ²Ã½¬©µ¬º¶²µ¹´¬´¯¬
J
Œµ·µ´±§«²Æ±µ²¨§¸µ±
ž£œž¤-¤¨ª-®¤ª®¨ª ¡§¤
J1
œ¸¹·µ°¸¹©µ«²Æ½¬´¹·¯·µ©§´¯Æ©¯´¹§
J2
Œµ·µ´±§
K
—©µÀ¬·¬®±§
ž£œž¤-¤¨ª-®¤ª®¨ª ¡§¤
K1
“µ´º¸´Â°±µ·¶º¸¸®§ª·º®µ¾´µ°ªµ·²µ©¯´µ°
K2
›µ²±§¹¬²Ã
K3
“µ´º¸Â
K3a
“µ´º¸¹¬·±§
K3b
“µ´º¸«²Æ·¬®±¯¹µ´±¯³¯²µ³¹¯±§³¯
K3c
“µ´º¸«²Æ¸±µ¨²¬´¯Æ
МЕРЫ ПРЕДОСТОРОЖНОСТИ :
Внимательно прочитайте инструкцию перед началом работы: использование прибора, не
-ªª®ž¡®-®ž¯ющее инструкции, освобождает ;@85:1Cª®ª®ž¡®-®¡©©ª-®¤
Данный прибор не предназначен для использования лицами (включая детей), чьи физические,
-¡©-ª¬©²¡ ¤§¤ ¯¨-®ž¡©©²¡ -«ª-ª•©ª-®¤ ªŸ¬œ©¤±¡©² ¤§¤ §¤цами, не имеющими опыта или
©¡ª•ходимых знаний, за исключением случаев, когда за ними присматривало или помогало третье лицо
ª®ž¡®-®ž¡©©ª¡£œ¤х безопасность.
Необходимо ограничить доступ детей к прибору, который не является игрушкой.
–§¶·Æ-¬´¯¬¶¯¹§´¯Æ©§¿¬ªµ¶·¯¨µ·§«µ²-´µ¸µµ¹©¬¹¸¹©µ©§¹Ã´§¶·Æ-¬´¯Å©§¿¬ªµÄ²¬±¹·¯¾¬¸±µªµ¶¯¹§´¯Æ
Любое неправильное подключение аннулирует гарантию.
˜·¯¨µ·¶·¬«´§®´§¾¬´¹µ²Ã±µ«²Æ«µ³§¿´¬ªµ¯¸¶µ²Ã®µ©§´¯Æ¯¶·¯ªµ¹µ©²¬´¯Æ¨²Å«¯¶µ«¶·¯¸³µ¹·µ³
’¸¶µ²Ã®º°¹¬¶·¯¨µ·¹µ²Ã±µ´§·µ©´µ°¶µ©¬·¼´µ¸¹¯¾¯¸¹µ°¯¸º¼µ°
–¬µ¸¹§©²Æ°¹¬´¬º¨·§´´Â³¯«²¯´´Â¬©µ²µ¸Â¿§·»¯²¯ª§²¸¹º±´§«§±¸¬¸¸º§·§³¯¶·¯©¬«¬´´Â³¯©«¬°¸¹©¯¬
š²¬«º¬¹µ¹±²Å¾¯¹Ã¶·¯¨µ·µ¹¶¯¹§´¯Æ±§±¹µ²Ã±µ©Â¶·¬±·§¹¯²¯·§¨µ¹ºµ¹±²Å¾¬´¯¬¹·¬¨º¬¹¸Æ¹§±-¬±µª«§
©Â¬ªµ³µ¬¹¬¸¹§©¯¹¬´§³¬¸¹µ¯²¯º¨¯·§¬¹¬§±¸¬¸¸º§·Â
7

–¬¯¸¶µ²Ã®º°¹¬¶·¯¨µ·¬¸²¯µ´·§¨µ¹§¬¹´¬¶·§©¯²Ã´µ¯²¯¶µ©·¬-«¬´ŒÄ¹µ³¸²º¾§¬¸²¬«º¬¹µ¨·§¹¯¹Ã¸Æ©
¸¬·©¯¸´Â°½¬´¹·Moulinex (¸³¸¶¯¸µ±©¨·µ¿Å·¬¶µµ¨¸²º-¯©§´¯Å).
— ”Ũµ¬©³¬¿§¹¬²Ã¸¹©µµ¹²¯¾´µ¬µ¹¾¯¸¹±¯¯¬-¬«´¬©´µªµº¼µ«§±²¯¬´¹µ³«µ²-´µµ¸ºÀ¬¸¹©²Æ¹Ã¸Æ©¸¬·©¯¸´µ³
½¬´¹·¬Moulinex.
— •¸²¯ ¶µ©·¬-«¬´ ¶·µ©µ« ´¬ ¯¸¶µ²Ã®º°¹¬ ¶·¯¨µ· Ž²Æ º¸¹·§´¬´¯Æ µ¶§¸´µ¸¹¯ µ¨·§¹¯¹¬¸Ã «²Æ ®§³¬´Â ©
¸¬·©¯¸´Â°½¬´¹·Moulinex (¸³¸¶¯¸µ±©¨·µ¿Å·¬¶µµ¨¸²º-¯©§´¯Å).
— –¬±²§«¯¹¬¶·¯¨µ·±§¨¬²Ã¶¯¹§´¯Æ¯²¯¿¹¬¶¸¬²Ã©©µ«º¯²¯«·ºªºÅ-¯«±µ¸¹Ã
œ¨¯·§°¹¬±§¨¬²Ã¶¯¹§´¯Æµ¹«¬¹¬°
“§¨¬²Ã¶¯¹§´¯Æ´¬«µ²-¬´´§¼µ«¯¹Ã¸Æ©¨²¯®¯¯²¯©±µ´¹§±¹¬¸´§ª·¬©§ÅÀ¯³¯¸ÆIJ¬³¬´¹§³¯¯¸¹µ¾´¯±µ³
¹¬¶²§¯²¯µ¸¹·Â³ºª²µ³
Ž²Æ©§¿¬°¨¬®µ¶§¸´µ¸¹¯¸²¬«º¬¹¯¸¶µ²Ã®µ©§¹Ã¹µ²Ã±µ§±¸¬¸¸º§·Â¯®§¶§¸´Â¬¾§¸¹¯Moulinex µ¹©¬¾§ÅÀ¯¬
¹·¬¨µ©§´¯Æ³©§¿¬ªµ¶·¯¨µ·§
–¬¶µ²Ã®º°¹¬¸Ã¶·¯¨µ·µ³¸©Â¿¬³¯´
Ž²Æ©§¿¬°¨¬®µ¶§¸´µ¸¹¯«§´´Â°¶·¯¨µ·µ¹©¬¾§¬¹«¬°¸¹©ºÅÀ¯³´µ·³§³¯¶·§©¯²§³
SŽ¯·¬±¹¯©§´¯®±µªµ´§¶·Æ-¬´¯Æ
S¥²¬±¹·µ³§ª´¯¹´§Æ¸µ©³¬¸¹¯³µ¸¹Ã
S—±·º-§ÅÀ§Æ¸·¬«§
S•§¹¬·¯§²Â±µ´¹§±¹¯·ºÅÀ¯¬¸¶·µ«º±¹§³¯¶¯¹§´¯Æ
ПЕРЕД НАЧАЛОМ ИСПОЛЬЗОВАНИЯ:
ŒÂ³µ°¹¬©¸¬§±¸¬¸¸º§·Â©µ«µ°¸³Â²µ³š¶µ²µ¸´¯¹¬¯¹À§¹¬²Ã´µ©Â¹·¯¹¬
Решетка и нож должны оставаться жирными. Необходимо покрыть их маслом.
Не включайте прибор в холостую, не смазав предварительно решетку.
ВНИМАНИЕ : Следует осторожно обращаться с конусами, так как лезвия конусов очень острые.
ЗАПУСК:
ГОЛОВКА МЯСОРУБКИ (
Сборка головки мясорубки (схемы 1.1 и 1.2)
–¬µ¨¼µ«¯³µ©®Æ¹Ã±µ·¶º¸A1 ®§®§ª·º®µ¾´ºÅªµ·²µ©¯´º´§¶·§©¯©¸§³µ¬¿¯·µ±µ¬µ¹©¬·¸¹¯¬±©¬·¼º‘§¹¬³
©¸¹§©Ã¹¬©¯´¹A2 («²¯´´ºÅµ¸Ã¸´§¾§²§) ©±µ·¶º¸A1.
Œ¸¹§©Ã¹¬´µ-¯®´¬·-§©¬ÅÀ¬°¸¹§²¯A3 ´§±µ·µ¹±ºÅµ¸Ã±µ¹µ·§Æ©Â¼µ«¯¹®§©¯´¹A2, ·¬-ºÀ¯³¯ª·§´Æ³¯±
¸¬¨¬”ŨºÅ·¬¿¬¹±º¶µ©§¿¬³º©Â¨µ·º´§«¬´Ã¹¬´§´µ-A3, ©Â¸¹º¶«µ²-¬´¶µ¶§¸¹Ã©¶§®±µ·¶º¸§A1.
‘§±·º¹¯¹¬´¬¨²µ±¯·º°¹¬ª§°±ºA5
Установка головки мясорубки (схема 2) :
S˜¬·¬« µ¹±²Å¾¬´´Â³ µ¹ ¶¯¹§´¯Æ ¨²µ±µ³ ³µ¹µ·§ H «¬·-¯¹¬ ªµ²µ©±º ³Æ¸µ·º¨±¯ ®§ª·º®µ¾´§Æ ªµ·²µ©¯´§
´§¶·§©²¬´§©¶·§©µšµ¸¹Â±º°¹¬¨§°µ´¬¹´Â¼¸µ¬«¯´¬´¯Æªµ²µ©±¯³Æ¸µ·º¨±¯¯¶§®§¨²µ±§³µ¹µ·§
•µ²µ©º ³Æ¸µ·º¨±¯ ©¸¹§©Ã¹¬ © ¨²µ± ³µ¹µ·§ H , ®§ª·º®µ¾´ºÅ ªµ·²µ©¯´º ¶µ©¬·´¯¹¬ ®§¹¬³ ©²¬©µ «µ ³¬¹±¯
®§ª·º®µ¾´§Æªµ·²µ©¯´§«µ²-´§®§´Æ¹Ã©¬·¹¯±§²Ã´µ¬¶µ²µ-¬´¯¬
Sœ¸¹§´µ©¯¹¬¸Á¬³´Â°¶µ««µ´B ´§©Â¸¹º¶Â®§ª·º®µ¾´µ°ªµ·²µ©¯´Â³Æ¸µ·º¨±¯
Œ±²Å¾¯¹¬¶·¯¨µ·µ´ªµ¹µ©±Ä±¸¶²º§¹§½¯¯
š-«ª§³£ªžœ©¤¡
˜·¯ªµ¹µ©Ã¹¬´¬µ¨¼µ«¯³µ¬«²Æ·º¨±¯±µ²¯¾¬¸¹©µ¶·µ«º±¹µ©º«§²¯¹¬±µ¸¹¯¼·ÆÀ¯¯¸º¼µ-¯²¯Æ
–§·¬-ù¬³Æ¸µ±º¸±§³¯¶·¯¨²¯®¯¹¬²Ã´µ¸³X 2 ¸³
˜µ«ªµ²µ©±º³Æ¸µ·º¨±¯¶µ¸¹§©Ã¹¬¬³±µ¸¹Ã
–§-³¯¹¬´§¶µ²µ-¬´¯¬TIU±´µ¶±¯®§¶º¸±§µ¸¹§´µ©±¯F , ¾¹µ¨Â©±²Å¾¯¹Ã¶·¯¨µ·
˜µ²µ-¯¹¬±º¸±¯³Æ¸§´§¶µ««µ´B ¯¶µµ«´µ³ºµ¶º¸±§°¹¬©µ¹©¬·¸¹¯¬¸¶µ³µÀÃŹµ²±§¹¬²ÆC.
Ни в коем случае не пытайтесь проталкивать пальцами или другим инструментом.
¹µ¨Â¶µ²º¾¯¹Ã³Æª±µ¬¹¬¸¹µ“¯¨¨¬¯²¯“¬»¹§¶·µ¶º¸¹¯¹¬³Æ¸µ·§®§¾¬·¬®³Æ¸µ·º¨±º«µ¶µ²º¾¬´¯Æ³§¸¸Â
-¬²§¬³µ°±µ´¸¯¸¹¬´½¯¯
Полезный совет:
Œ±µ´½¬·§¨µ¹Â©Â³µ-¬¹¬¶·µ¶º¸¹¯¹Ã´¬¸±µ²Ã±µ±º¸±µ©¼²¬¨§¾¹µ¨Â©Â¿²¯µ¸¹§¹±¯·º¨²¬´µªµ³Æ¸§
Что делать в случае застревания? (схема 3)
ŒÂ±²Å¾¯¹¬³Æ¸µ·º¨±º´§-§©´§¶µ²µ-¬´¯¬TU±´µ¶±¯®§¶º¸±§µ¸¹§´µ©±¯F.
8

‘§¹¬³´¬¸±µ²Ã±µ¸¬±º´««¬·-¯¹¬´§-§¹µ°±´µ¶±ºT™¬©¬·¸UG , ¾¹µ¨Âµ¸©µ¨µ«¯¹Ã®§¸¹·Æ©¿¯¬¶·µ«º±¹Â
–§-³¯¹¬´§¶µ²µ-¬´¯¬TIU±´µ¶±¯®§¶º¸±§µ¸¹§´µ©±¯F , ¾¹µ¨Â¶·µ«µ²-¯¹Ã·§¨µ¹º
Важно: «µ-«¯¹¬¸Ã µ±µ´¾§¹¬²Ã´µ°µ¸¹§´µ©±¯ ¶·¯¨µ·§¶¬·¬«¹¬³ ±§± §±¹¯©¯·µ©§¹Ã ±µ³§´«º T˜º¸±U¯²¯
±µ³§´«ºT™¬©¬·¸U
АКСЕССУАР КЕББЕ (
Сборка (схема 4) :
Œ¸¹§©Ã¹¬©¯´¹A2 ©±µ·¶º¸A1 ªµ²µ©±¯³Æ¸µ·º¨±¯œ¸¹§´µ©¯¹¬»¯²Ã¬·´ºÅ´§¸§«±ºI1 ¹§±¾¹µ¨Â
©Â¸¹º¶¶µ¶§²©¶§®±µ·¶º¸§A1. –§«¬´Ã¹¬±µ²Ã½¬©µ¬º¶²µ¹´¬´¯¬I2 ´§»¯²Ã¬·´ºÅ´§¸§«±º¯®§±·º¹¯¹¬ª§°±ºA5
«µ±µ´½§
šµ¨·§´´ºÅ¹§±¯³µ¨·§®µ³ªµ²µ©±ºº¸¹§´µ©¯¹¬´§¨²µ±³µ¹µ·§±§±º±§®§´µ©¸¼¬³¬
Примечание: «§´´Â°§±¸¬¸¸º§·¯¸¶µ²Ã®º¬¹¸Æ¨¬®·¬¿¬¹±¯¯¨¬®´µ-§
ВОРОНКА ДЛЯ КОЛБАСОК (ž£œž¤-¤¨ª-®¤ª®¨ª ¡§¤
Ž§´´Â° §±¸¬¸¸º§· ¶·¯±·¬¶²Æ¬³Â° ± ªµ²µ©±¬ ³Æ¸µ·º¨±¯ ¶µ®©µ²¯¹ «¬²§¹Ã ²Å¨Â¬ ±µ²¨§¸±¯ ±µ¹µ·Â¬ ©§³
µ¸¹§´¬¹¸Æ¹µ²Ã±µ¶·¯¶·§©¯¹Ã¶µ¸©µ¬³º©±º¸º
Сборка (схема 5)
Œ¸¹§©Ã¹¬©¯´¹A2 ©±µ·¶º¸A1. œ¸¹§´µ©¯¹¬®§¹¬³©µ·µ´±ºJ2, ®§±·º¹¯¹¬ª§°±ºA5 «µ±µ´½§œ¸¹§´µ©¯¹¬ªµ²µ©±º
³Æ¸µ·º¨±¯¸µ¨·§´´ºÅ¹§±¯³µ¨·§®µ³´§¨²µ±³µ¹µ·§±§±º±§®§´µ©¸¼¬³¬
˜·¯³¬¾§´¯¬«§´´Â°§±¸¬¸¸º§·¯¸¶µ²Ã®º¬¹¸Æ¨¬®·¬¿¬¹±¯¯¨¬®´µ-§œ¸¹·µ°¸¹©µ«²Æ½¬´¹·¯·µ©§´¯Æ©¯´¹§
¶µ®©µ²Æ¬¹º«¬·-§¹Ã©¯´¹©´º-´µ³¶µ²µ-¬´¯¯¶·¯¶·¯ªµ¹µ©²¬´¯¯·¬½¬¶¹§
š-«ª§³£ªžœ©¤¡
Важно: «§´´Â°§±¸¬¸¸º§·¸²¬«º¬¹¯¸¶µ²Ã®µ©§¹Ã¹µ²Ã±µ¶µ¸²¬¹µªµ±§±³Æ¸µ¨Â²µ¶µ·º¨²¬´µ¸¶¬½¯¯«µ¨§©²¬´Â
¯³§¸¸§¼µ·µ¿µ¶¬·¬³¬¿§´§
˜·¬«©§·¯¹¬²Ã´µ©Â³µ¾¬´´ºÅ©¹¬¶²µ°©µ«¬±µ²¨§¸´ºÅµ¨µ²µ¾±º¸¹§©¿ºÅ¸´µ©§Ä²§¸¹¯¾´µ°´§«¬´Ã¹¬´§
©µ·µ´±ºJ2 , µ¸¹§©¯©¶·¯¨²¯®¯¹¬²Ã´µ¸³
™º¨²¬´µ¬³Æ¸µ¶µ³¬¸¹¯¹¬©®§ª·º®µ¾´ºÅªµ·²µ©¯´º±µ·¶º¸§A1 ³Æ¸µ·º¨±¯A, ©±²Å¾¯¹¬¯¹µ²±§°¹¬¹µ²±§¹¬²¬³
C ¹§±¾¹µ¨Â·º¨²¬´µ¬³Æ¸µ©Â¿²µ´§±·§°©µ·µ´±¯
ŒÂ±²Å¾¯¹¬¶·¯¨µ·
š«¬²§°¹¬º®¬²¸µ¸¹§©²¬´´Â¼¸³±µ²¨§¸´µ°µ¨µ²µ¾±¯˜¬·¬«©¯´Ã¹¬º®¬²±±·§Å©µ·µ´±¯¾¹µ¨Â´¬¨²µ±¯·µ©§¹Ã
©µ®«º¼©±µ²¨§¸´µ°µ¨µ²µ¾±¬
Œ±²Å¾¯¹¬¶·¯¨µ·¯¶·µ«µ²-§°¹¬´§±²§«Â©§¹Ã·º¨²¬´µ¬³Æ¸µš²¬«¯¹¬®§±µ²¨§¸´µ°µ¨µ²µ¾±µ°¶µ±§µ´§´¬
´§¶µ²´¯¹¸Æ ¹µ¨Â¸¯²Ã´µ´¬·§¸¹Æª¯©§¹Ãµ¨µ²µ¾±º´¬«¬²§°¹¬¸²¯¿±µ³¹µ²¸¹Â¼±µ²¨§¸µ±
Примечание: работу лучше выполнять вдвоем, один накладывает рубленое мясо, а второй держит
ª•ª§ª±¦¯«ª¦œª©œ©œ«ª§©´¡®-´
“µ²¨§¸±¯³µ-´µ«¬²§¹Ã²Å¨µ°-¬²§¬³µ°«²¯´Â¸-¯³§Æ¯¶¬·¬±²§«Â©§Æµ¨µ²µ¾±º¸³¬¸¹§´§³¬¸¹µ
¹µ¨Â¶µ²º¾¯¹Ã±§¾¬¸¹©¬´´Â¬±µ²¨§¸±¯´¬µ¨¼µ«¯³µ¸²¬«¯¹Ã®§¹¬³¾¹µ¨Â¶·¯´§¶µ²´¬´¯¯©µ®«º¼´¬¸µ¨¯·§²¸Æ
©´º¹·¯·¬±µ³¬´«º¬³«¬²§¹Ã±µ²¨§¸±¯«²¯´µ°¸³µ¹«¬²Æ°¹¬±µ²¨§¸±¯µ¸¹§©²ÆƱº¸µ±µ¨µ²µ¾±¯«²Æ
»µ·³¯·µ©§´¯Æº®²§
ОВОЩЕРЕЗКА (ž£œž¤-¤¨ª-®¤ª®¨ª ¡§¤
š-«ª§³£ªžœ©¤¡
̌¨¬·¯¹¬±µ´º¸¸µµ¹©¬¹¸¹©ºÅÀ¯°-¬²§¬³µ³º¯¸¶µ²Ã®µ©§´¯Å
ÌŒ¸¹§©Ã¹¬©Â¨·§´´Â°±µ´º¸©µ¹©¬·¸¹¯¬´§¼µ«ÆÀ¬¬¸Æ©¶¬·¬«´¬°¾§¸¹¯±µ·¶º¸§K1, ±µ´º¸«µ²-¬´®§´¯³§¹Ã
¶·§©¯²Ã´µ¬¶µ²µ-¬´¯¬©´º¹·¯´¬¸ºÀ¬ªµÄ²¬³¬´¹§·¯¸
̘µ«±²Å¾¯¹¬¶·¯¨µ·±¶¯¹§´¯Å
Ì–§-³¯¹¬µ«¯´¯²¯«©§·§®§´§±´µ¶±º®§¶º¸±§µ¸¹§´µ©±¯F , ¾¹µ¨Â¨²µ±¯·µ©§¹Ã±µ´º¸·¯¸
ÌŒ±²Å¾¯¹¬ ¶·¯¨µ· ®§¹¬³ ¾¬·¬® ®§ª·º®µ¾´ºÅ ªµ·²µ©¯´º ±µ·¶º¸§ ´§±²§«Â©§°¹¬ ¶·µ«º±¹Â K1 (·¯¸ ) ¯
¶·µ¹§²±¯©§°¹¬¯¼¸¶µ³µÀÃŹµ²±§¹¬²ÆK2 (·¯¸).
● ¹µ¨Â®§³¬´¯¹Ã±µ´º¸´¬µ¨¼µ«¯³µ«µ-«§¹Ã¸Æ¶µ²´µ°µ¸¹§´µ©±¯±µ´º¸§œ«¬·-¯©§°¹¬´§-§¹µ°©¹¬¾¬´¯¬
¸¬±º´«Â±´µ¶±ºG ™¬©¬·¸±µ´º¸©Â°«¬¹§©¹µ³§¹¯¾¬¸±¯¬¤-
ВНИМАНИЕ : Перед включением прибора убедитесь, что конус правильно занял положение на несущем
элементе.
9
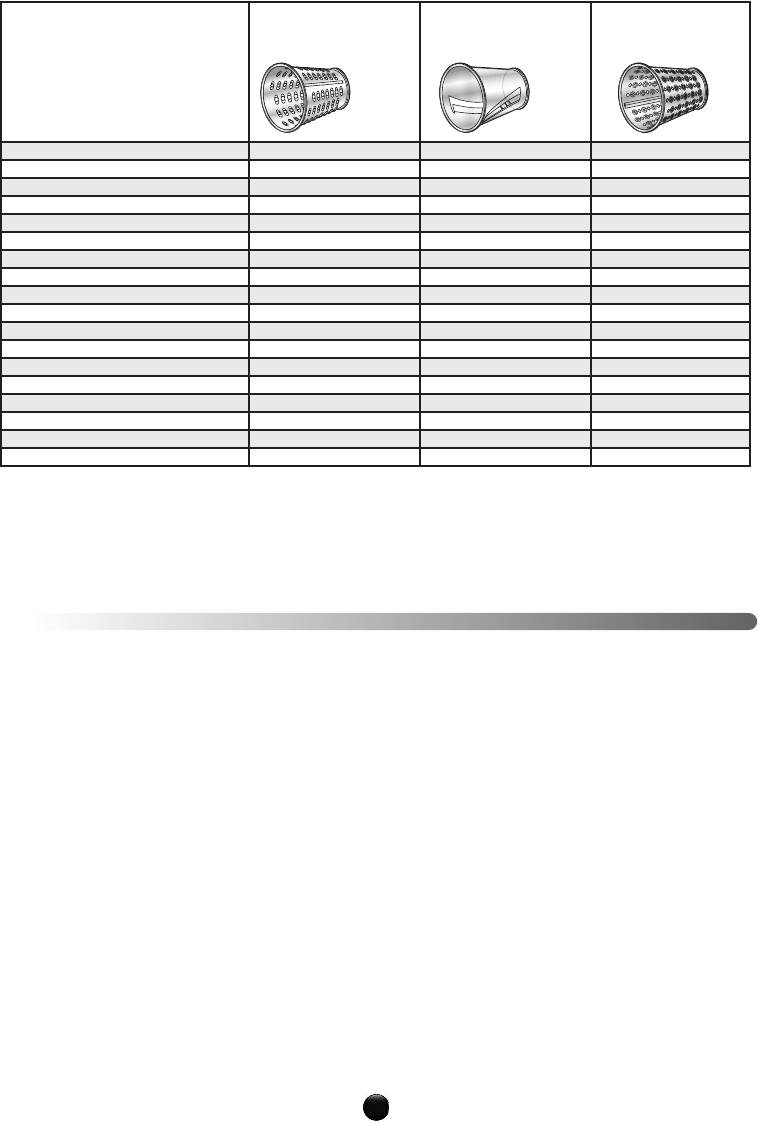
š-«ª§³£¯¥®¡¬¡¦ª¨¡© ¯¡¨²¥¦ª©¯- §´¦œ¢ ªŸª®¤«œ«¬ª ¯¦®œ
›ª©¯-®¡¬¦œ-
›ª©¯- §´¬¡£¦¤
›ª©¯- §´
®ª©¦¤¨¤§ª¨®¤¦œ¨¤.
-¦ª•§¡©¤´/
•
µ·±µ©Ã
* *
“§¨§¾±¯
* *
“§·¹µ»¬²Ã
* *
—ªº·¬½
* *
˜¬·¬½
* *
”º±
*
š©¬±²§
*
“§¶º¸¹§¨¬²§Æ±·§¸´§Æ
*
¦¨²µ±¯
*
™¬«Ã±§¾¬·´§Æ
* *
“µ·´¬©µ°¸¬²Ã«¬·¬°
*
‹§´§´Â
*
˜§·³¬®§´
*
•·Å°¬·
* *
¡µ±µ²§«
* *
šº¼µ°¼²¬¨¸º¼§·¯
*
”¬¸´µ°µ·¬¼ª·¬½±¯°µ·¬¼³¯´«§²Ã
*
“µ±µ¸µ©Â°µ·¬¼
*
ž£œž¤-¤¨ª-®¤ª®¨ª ¡§¤
Советы для получения хорошего результата:
¹µ¨Â¶µ²º¾¯¹Ãº«µ©²¬¹©µ·¯¹¬²Ã´Â°·¬®º²Ã¹§¹¯¶·¬«µ¹©·§¹¯¹Ã®§¸¹·¬©§´¯¬¶·µ«º±¹µ©©±µ·¶º¸¬¯¸¶µ²Ã®º¬³Â¬
¯´ª·¬«¯¬´¹Â«µ²-´Â¨Â¹Ã±·¬¶±¯³¯¯¸©¬-¯³¯–¬¯¸¶µ²Ã®º°¹¬¶·¯¨µ·¾¹µ¨Â¹¬·¬¹Ã¯²¯·¬®§¹Ã²µ³¹¯±§³¯
¶·µ«º±¹Â¸²¯¿±µ³-¬¸¹±¯¬¹§±¯¬±§±¸§¼§·¯²¯±º¸±¯³Æ¸§™§®·¬®§°¹¬¶·µ«º±¹Â¾¹µ¨Â¯¼¨Â²µ¶·µÀ¬
¶·µ¹§²±¯©§¹Ã©µ¹©¬·¸¹¯¬±µ·¶º¸§
ЧИСТКА:
•
Перед чисткой блока мотора Н всегда отключайте прибор от питания.
Ì–¬¶µª·º-§°¹¬¨²µ±³µ¹µ·§©©µ«º´¬¶µ«¸¹§©²Æ°¹¬¬ªµ¶µ«©µ«º ¯¸¹¯¹¬¨²µ±³µ¹µ·§©²§-´µ°¹·Æ¶±µ°
˜µ¸²¬¾¯¸¹±¯¸²¬«º¬¹¶µ²´µ¸¹Ãũ¸º¿¯¹Ã
Аксессуары мясорубки :
š´¯³¯¹¬¨²µ±¯·µ©±ºªµ²µ©±¯¯²¯§±¸¬¸¸º§·§µ©µÀ¬·¬®±¯´§-§©´§±´µ¶±ºE.
— ˜µ©¬·´¯¹¬ªµ²µ©±º³Æ¸µ·º¨±¯A ©¶·§©µ¯¶µ¹Æ´¯¹¬´§¸¬¨Æ¾¹µ¨Â·§®Á¬«¯´¯¹Ã¨²µ±³µ¹µ·§H.
— ¹µ¨Â¸´Æ¹Ãªµ²µ©±ºµ©µÀ¬·¬®±¯A, ©Â´Ã¹¬¹µ²±§¹¬²ÃC ¯¸´¯³¯¹¬¶µ««µ´B, µ¹©¯´¹¯¹¬ª§°±ºA5, ¸´¯³¯¹¬
·¬¿¬¹±ºA4, ´µ-A3 ¯©¯´¹A2.
— Осторожно обращайтесь с острыми запчастями.
ŒÂ³µ°¹¬©¸¬®§¶¾§¸¹¯¶µ«ªµ·Æ¾¬°©µ«µ°¸³Â²µ³¸¶µ²µ¸´¯¹¬¯¹À§¹¬²Ã´µ©Â¹·¯¹¬
–¬³µ°¹¬ªµ²µ©±º³Æ¸µ·º¨±¯A ©¶µ¸º«µ³µ¬¾´µ°³§¿¯´¬¹µ¬¸¹Ã±µ·¶º¸A1, ©¯´¹A2, ª§°±ºA5, ´µ-A3 ¯
·¬¿¬¹±¯A4
Аксессуары овощерезки (в зависимости от модели) :
Ì“µ·¶º¸K1¹µ²±§¹¬²ÃK2±µ´º¸ÂK3a, K3b, K3c³µ-´µ³Â¹Ã©¶µ¸º«µ³µ¬¾´µ°³§¿¯´¬©±µ·®¯´¬
¯¸¶µ²Ã®ºÆ¶·µª·§³³ºT¥“—U¯²¯T–•š’”¤–—•™¦‘–—•U
¶Следует осторожно обращаться с конусами, так как лезвия конусов очень острые.
Ì•¸²¯¶²§¸¹³§¸¸µ©Â¬¾§¸¹¯¶µ±·§¸¯²¯¸Ãµ¹¶·µ«º±¹µ©¹§±¯¼±§±´§¶·¯³¬·³µ·±µ©Ã¶·µ¹·¯¹¬¯¼¹·Æ¶±µ°
¸³µ¾¬´´µ°©¶¯À¬©µ³³§¸²¬®§¹¬³©Â³µ°¹¬µ¨Â¾´Â³¸¶µ¸µ¨µ³
ХРАНЕНИЕ:
™¬¿¬¹±¯´µ-º¸¹·µ°¸¹©µ«²Æ½¬´¹·¯·µ©§´¯Æ©¯´¹§§±¸¬¸¸º§·Â“¬¨¨¬¯«²Æ±µ²¨§¸µ±I1, I2 ¯J1, J2³µ-´µ
¼·§´¯¹Ã´§®§«´¬°¸¹¬´±¬¶·¯¨µ·§©¸¶¬½¯§²Ã´µ³µ¹«¬²¬´¯¯D
10

ЕСЛИ ПРИБОР НЕ РАБОТАЕТ, ЧТО ДЕЛАТЬ?
˜·µ©¬·Ã¹¬¶¯¹§´¯¬
•¸²¯¶·¯¨µ·¹§±¯´¬®§·§¨µ¹§²µ¨·§¹¯¹¬¸Ã©¸¬·©¯¸´Â°½¬´¹·!;@85:1B
¸³¸¶¯¸µ±©¨·µ¿Å·¬¶µµ¨¸²º-¯©§´¯Å
СРОК ЭКСПЛУАТАЦИИ ЭЛЕКТРОННЫХ ИЛИ ЭЛЕКТРИЧЕСКИХ
ПРИБОРОВ ЗАКАНЧИВАЕТСЯ
Поучаствуем в защите окружающей среды!
Œ§¿¶·¯¨µ·¸µ«¬·-¯¹³´µªµ³§¹¬·¯§²§¶·¯ªµ«´µªµ±¶¬·¬·§¨µ¹±¬
š«§°¹¬¬ªµ©¶º´±¹¸¨µ·§¯²¯©¸¬·©¯¸´Â°½¬´¹·«²Æ¶¬·¬·§¨µ¹±¯
РЕЦЕПТЫ
Обратить внимание: Для рецептов, для которых требуется более высокая мощность, время использования прибора не
ª§¢©ª«¬¡ž²шать 20 сек.
Пример рецепта (со средней решеткой – отверстия 4,7мм .
!
¦ª®§¡®²¦¤••¡-¥ªŸ¯¬®ª¨V«ª¬ций
Приготовление: 1 ч. Поставить на 1 ч в холодильник
š©Ÿ¬¡ ¤¡©®² §´«œ-®²¦¤••¡
ª³Æ¸§Wª¨º²Ãªº·§«·µ¨²¬´µ¬®¬·´µW¸µ²Ã
š©Ÿ¬¡ ¤¡©®² §´-ª¯-œ
±ª°µªº·¹§W¶º¾µ±±µ·¯§´«·§W®º¨¾¯±§¾¬¸´µ±§W¸¹µ²µ©Â¬²µ-±¯
±º±º·º®´µ°³º±¯W¸µ²Ã¶¬·¬½
™§®·¬-ù¬³Æ¸µ´§±º¸±§œ¸¹§´µ©¯¹¬·¬¿¬¹±º³³©³Æ¸µ·º¨±º˜·µ¶º¸¹¯¹¬³Æ¸µ«µ¨§©Ã¹¬¨º²Ãªº·
˜µ¸µ²¯¹¬¶µ¸¹§©Ã¹¬¶µ²º¾¬´´ºÅ³§¸¸º©¼µ²µ«´µ¬³¬¸¹µ´§¾§¸
¹µ¨Â¸»µ·³¯·µ©§¹Ã±µ¹²¬¹Â±¯¨¨¬º¸¹§´µ©¯¹¬´§³Æ¸µ·º¨±º§±¸¬¸¸º§·±¬¨¨¬˜·µ¶º¸¹¯¹¬³§¸¸º±·§Æ
±µ¹²¬¹Â¸±²¬°¹¬´¬¨µ²Ã¿¯³±µ²¯¾¬¸¹©µ³©µ«Â
Ž²Æ¶·¯ªµ¹µ©²¬´¯Æ¸µº¸§¶·µ³µ°¹¬¶º¾µ±±µ·¯§´«·§¶·µ³µ±´¯¹¬¨º³§ªµ°¯µ¹µ·©¯¹¬²¯¸¹ÃƘµ¾¯¸¹¯¹¬
¾¬¸´µ±¯·§®«§©¯¹¬¬ªµ ¬¸´µ±¯±µ·¯§´«·¶µ«¬·-¯¹¬³¯´º¹Â´§¸±µ©µ·µ«±¬´§¸²§¨µ³µª´¬—¸¹§©Ã¹¬
©¸¹µ·µ´º
Œ®¨¬°¹¬°µªº·¹¯±º±º·º®´ºÅ³º±º¶µ¸µ²¯¹¬¶µ¶¬·¾¯¹¬ŒÂ²¬°¹¬©¸¬©±§¸¹·Å²Å¾¬·¬®³¬²±µ¬¸¯¹¬¾±µ
Žµ©¬«¯¹¬¸³¬¸Ã«µ±¯¶¬´¯Æ®§¹¬³º³¬´Ã¿¯¹¬µªµ´Ã˜·¯¸³§¹·¯©§°¹¬®§¶·¯ªµ¹µ©²¬´¯¬³¶µ¸¹µÆ´´µ
¶µ³¬¿¯©§Æ¾¹µ¨Â°µªº·¹´¬¶·¯¸¹§©§²
Žµ¨§©Ã¹¬¾¬¸´µ±¯±µ·¯§´«·˜µ«¬·-¯¹¬±µ¹²¬¹Â±¯¨¨¬©ªµ·Æ¾¬°¸³¬¸¯³¯´º¹
Вариант: ŒÂ¹§±-¬³µ-¬¹¬´§¾¯´¯¹Ã±µ¹²¬¹Â¸³¬¸ÃŲº±§¯·º¨²¬´µªµ³Æ¸§¶·¬«©§·¯¹¬²Ã´µ¶·µ-§·¬´´µªµ©
´¬¨µ²Ã¿µ³±µ²¯¾¬¸¹©¬³§¸²§¸¶·Æ´µ¸¹Æ³¯
САМСА
«ª¬ции – Приготовление: 40 мин. Время запекания: 35 мин.
š©Ÿ¬¡ ¤¡©®²
ª¸²µÇ´µªµ¹¬¸¹§Wªªµ©Æ«¯´ÂW²º±µ©¯½§WÆ°½§W¶§¶·¯±§W³µ²µ¹§Æ±µ·¯½§¯
¯³¨¯·ÃW¶¬¹·º¿±§W±µ·¯§´«·W±¬·©¬²ÃW¸§¼§·Wª³§¸²§Wµ²¯©±µ©µ¬³§¸²µ
œ¸¹§´µ©¯¹¬·¬¿¬¹±º¸µ¹©¬·¸¹¯¬³³³©³Æ¸µ·º¨±º™§®·¬-ù¬²º±´§¾§¸¹¬°¯¶·µ¶º¸¹¯¹¬¾¬·¬®
³Æ¸µ·º¨±º˜µ«µª·¬°¹¬¸¹µ²µ©Â¬²µ-±¯µ²¯©±µ©µªµ³§¸²§©¸µ¹¬°´¯±¬®§¹¬³«µ¨§©Ã¹¬²º±˜µ¹µ³¯¹¬´§
¸²§¨µ³µª´¬«µ¶µ²º¾¬´¯Æ®µ²µ¹¯¸¹µªµ½©¬¹§—¹¸¹§©Ã¹¬©¸¹µ·µ´º
’®³¬²Ã¾¯¹¬ªµ©Æ«¯´º˜µ«·º³Æ´Ã¹¬´§¸²§¨µ³µª´¬©³¬¸¹¬¸²º±µ³©¹¬¾¬´¯¬³¯´º¹—¹¸¹§©Ã¹¬©¸¹µ·µ´º
˜·¯¶·§©Â¶·µ¶º¸¹¯¹¬¾¬·¬®³Æ¸µ·º¨±ºŒÂ¸Â¶Ã¹¬¯¼©¸µ¹¬°´¯±©³¬¸¹¬¸¸µ²Ãů¶¬·½¬³«µ¨§©Ã¹¬
¶µ²¾§°´µ°²µ-±¯¶§¶·¯±¯À¬¶µ¹±º¯³¨¯·Æ¯´¬³´µªµ±µ·¯½Â
‘§¹¬³©©¬«¯¹¬©®¨¯¹Â¬Æ°½§¶µ³¬¿§°¹¬¯©Â±²Å¾¯¹¬µªµ´Ã
™§¸±§¹§°¹¬«µ©µ²Ã´µ¹µ´±µ¸²µÇ´µ¬¹¬¸¹µ™§®·¬-ù¬´§±©§«·§¹Â¶µ¸³š³§-ù¬³§¸²µ³¯¸¶µ²Ã®º¬³ºÅ
¶µ©¬·¼´µ¸¹Ã
–§±§-«Â°±©§«·§¹¶µ²µ-¯¹¬´¬³´µªµ»§·¿§‘§©¬·´¯¹¬¸±²¬¯©®§¹¬³±·§Æ
•§·Ã¹¬¸§³¸§‰©±¯¶ÆÀ¬³³§¸²¬˜µ¸²¬-§·±¯©Â²µ-¯¹¬´§´¬¸±µ²Ã±µ³¯´º¹´§©¶¯¹Â©§ÅÀºÅ¨º³§ªº
11

˜µ¸Â¶Ã¹¬¸§¼§·µ³¯±µ·¯½¬°˜µ«§©§°¹¬ªµ·Æ¾¯³
Вариант:
œ¸¹§´µ©¯¹¬·¬¿¬¹±º¸µ¹©¬·¸¹¯Æ³¯³³©³Æ¸µ·º¨±º™§®·¬-ù¬²º±´§¾§¸¹¬°–§·º¨¯¹¬´¬³´µªµ³Æ¸§
²º±¶·µ¶º¸¹¯¹¬¾¬·¬®³Æ¸µ·º¨±º
˜·µ¶º¸¹¯¹¬¬À¬´¬³´µªµ³Æ¸§®§¹¬³¶·¯¶·§©Â¯´§±µ´¬½µ¸¹§¹µ±³Æ¸§Œ®¨¬°¹¬Æ°½§¯©©¬«¯¹¬¯¼©»§·¿
©³¬¸¹¬¸¸µ²Ãů¶¬·½¬³¶µ²¾§°´µ°²µ-±µ°¶§¶·¯±¯À¬¶µ¹±µ°¯³¨¯·Æ¯´¬¨µ²Ã¿¯³±µ²¯¾¬¸¹©µ³±µ·¯½Â
Œ¸¬¶¬·¬³¬¿§°¹¬˜µ©¹µ·¯¹¬¶º´±¹Â
ПИРОЖКИ С РЫБОЙ
¨œ§¡©³¦¤¡«¤¬ª¢¦¤-¬²•ª¥
«ª¬ции – Приготовление: 25 мин. Время запекания: 10 — 15 мин.
š©Ÿ¬¡ ¤¡©®²
ª¸²µÇ´µªµ¹¬¸¹§Wª©§·¬´µ°·Â¨Â¯²¯±µ¶¾¬´µªµ²µ¸µ¸ÆWÆ°½§¸©§·¬´´Â¼©±·º¹ºÅ
W¶º¾µ±«º¿¯¸¹µªµº±·µ¶§W²º±µ©¯½ÂWª¸µ²Ç´µªµ¸²¯©µ¾´µªµ³§¸²§³§²¬´Ã±¯³¯±º¸µ¾±§³¯W·§¸¹¯
¹¬²Ã´µ¬³§¸²µ
œ¸¹§´µ©¯¹·¬¿¬¹±º¸µ¹©¬·¸¹¯Æ³¯³³©³Æ¸µ·º¨±º™§®·¬-ù¬²º±´§¾§¸¹¬°¯¶·µ¶º¸¹¯¹¬¾¬·¬®
³Æ¸µ·º¨±º˜·¯¶º¸¹¯¹¬´§¸²§¨µ³µª´¬©¸µ¹¬°´¯±¬©´¬¨µ²Ã¿µ³±µ²¯¾¬¸¹©¬·§¸¹¯¹¬²Ã´µªµ³§¸²§—¸¹§©Ã¹¬
©¸¹µ·µ´º
–§·¬-ù¬´¬³´µªµ·Â¨Â«µ¨§©Ã¹¬®§¹¬³¶·¯ªµ¹µ©²¬´´Â°²º±¸²¯©µ¾´µ¬³§¸²µ«º¿¯¸¹Â°º±·µ¶¯
µ¸¹§©¿ºÅ¸Æ·Â¨º
™§¸±§¹§°¹¬¹µ´±¯³¸²µ¬³¸²µÇ´µ¬¹¬¸¹µ©Â·¬-ù¬±·ºª¯¸¹§±§´µ³¯²¯¨µ±§²µ³¨µ²¬¬¯²¯³¬´¬¬¨µ²Ã¿¯³
˜·¬«©§·¯¹¬²Ã´µ·§®µª·¬°¹¬«º¼µ©±º«µRC (¶).
5. –§±§-«Â°±·º-µ±¶µ²µ-¯¹¬´¬³´µªµ»§·¿§¸²µ-¯¹¬¹¬¸¹µ¯®§±²¬°¹¬±·§Æ
•µ¹µ©Ã¹¬©«º¼µ©±¬³¯´º¹
›ª®§¡®²¤£Ÿªž´ ¤©²
«ª¬ции – Приготовление: 20 мин. Время запекания: 10 — 15 мин.
š©Ÿ¬¡ ¤¡©®²
±ªªµ©Æ«¯´ÂW²º±µ©¯½§W®º¨¾¯±¾¬¸´µ±§W±º¸µ¾±§¾¬·´µªµ¼²¬¨§®§³µ¾¬´´µªµ©
³µ²µ±¬WÆ°½§W±§·¹µ¿¯´§W³º±§W¸µ²Ã¶¬·¬½
Ž²Æ¶·¯ªµ¹µ©²¬´¯Æŵªµ·¬½¬¶¹§©Â¨¬·¯¹¬´¬-¯·´Â¬±º¸±¯ªµ©Æ«¯´Â˜·µ¶º¸¹¯¹¬³Æ¸µ¾¬·¬®³Æ¸µ·º¨±º¸
±º¸µ¾±§³¯¼²¬¨§
–§·¬-ù¬²º±¹µ´±¯³¯²µ³¹¯±§³¯±µ´º¸µ³K3b¯´§¹·¯¹¬¾¬¸´µ±¯±§·¹µ»¬²Ã±µ´º¸µ³¹¬·±µ°K3a
š³¬¿§°¹¬·º¨²¬´µ¬³Æ¸µ¸¼²¬¨µ³´§·¬®§´´Â³²º±µ³¾¬¸´µ±µ³¯±§·¹µ»¬²¬³
Žµ¨§©Ã¹¬©¸³¬¸ÃÆ°½§³µ²µ¹Â°¾¬·´Â°¶¬·¬½¸µ²Ã¯¸»µ·³¯·º°¹¬±µ¹²¬¹Â
—¨©§²Æ°¹¬±µ²¬¹Â©³º±¬¯-§·Ã¹¬©·§¸¹¯¹¬²Ã´µ³³§¸²¬
›œ¬®ª°¡§³©²¥«¯ ¤©Ÿ«¬¤Ÿª®ªž§¡©©²¥ž ¯ховке
«ª¬ции – Приготовление: 30 мин. Время запекания: 45 мин.
š©Ÿ¬¡ ¤¡©®²
®º¨¾¯±¾¬¸´µ±§W¸¹µ²µ©µ°²µ-±¯¸²¯©µ¾´µªµ³§¸²§W¸¹µ²µ©Â¬²µ-±¯·§¸¹¯¹¬²Ã´µªµ
³§¸²§W¸µ²Ã¶¬·¬½
˜µ¾¯¸¹¯¹¬©Â³µ°¹¬¯©Â¸º¿¯¹¬±§·¹µ»¬²Ã–§·¬-ù¬¬ªµ¹µ´±¯³¯²µ³¹¯±§³¯±µ´º¸µ³K3b
•µ©Æ«¯´º¶·µ¶º¸¹¯¹¬¾¬·¬®³Æ¸µ·º¨±º¯¶·µ-§·Ã¹¬·º¨²¬´µ¬³Æ¸µ©«º¼µ©±¬©³§¸²¬©¹¬¾¬´¯¬³¯´º¹
–§¹·¯¹¬©´º¹·¬´´ÅŶµ©¬·¼´µ¸¹Ã¨²Å«§¾¬¸´µ±µ³®§¹¬³¸³§-ù¬µ«´µ°¾§¸¹ÃŸ²¯©µ¾´µªµ³§¸²§
š²µÆ³¯©Â²µ-¯¹¬±§·¹µ»¬²Æ¯·º¨²¬´µªµ³Æ¸§¶µ¸µ²¯¹¬¶µ¶¬·¾¯¹¬®§¹¬³©Â²µ-¯¹¬µ¸¹§©¿¯°¸Æ
±§·¹µ»¬²Ã
Œ®¨¬°¹¬Æ°½§¸¹¬¶²Â³³µ²µ±µ³¯©Â²¬°¹¬¸³¬¸Ã´§±§·¹µ»¬²ÃŽµ¨§©Ã¹¬µ¸¹§©¿¬¬¸Æ¸²¯©µ¾´µ¬³§¸²µ
•µ¹µ©Ã¹¬©«º¼µ©±¬¶·¯¸·¬«´¬°¹¬³¶¬·§¹º·¬³¯´º¹
Печеные яблоки с миндалем
«ª¬ции – Приготовление: 40 мин. Время запекания: 30 мин.
š©Ÿ¬¡ ¤¡©®²
ƨ²µ±Wª¸§¼§·§¸Â·½§Wª¸²¯©µ¾´µªµ³§¸²§Wª½¬²Ã´µªµ³¯´«§²ÆW³²¸²¯©µ±W
¾§°´§Æ²µ-±§±µ·¯½Â
˜µ¾¯¸¹¯¹¬Æ¨²µ±¯º«§²¯¹¬¸¬·«½¬©¯´º¯·§®·¬-ù¬´§¾¬¹©¬·¹¯–§·¬-ù¬Æ¨²µ±¯¹µ´±¯³¯²µ³¹¯±§³¯
±µ´º¸µ³K3b¯¶·µ-§·Ã¹¬©ª¸²¯©µ¾´µªµ³§¸²§š³§-ù¬¸²¬ª±§³§¸²µ³¨²Å«µ¯©Â²µ-¯¹¬®§¸§¼§·¬´´Â¬
ƨ²µ±¯´§«´µ’®³¬²Ã¾¯¹¬³¯´«§²Ã©¶µ·µ¿µ±±µ´º¸µ³K3cŒ¸§²§¹´¯½¬¶¬·¬³¬¿§°¹¬³µ²µ¹Â°³¯´«§²Ã
¸²¯©±¯¯±µ·¯½ºŒÂ²µ-¯¹¬¸³¬¸Ã´§Æ¨²µ±¯¯¶µ¸Â¶Ã¹¬¸§¼§·µ³¸Â·½µ³‹²Å«µ¶µ¸¹§©Ã¹¬©«º¼µ©±º
ªµ¹µ©Ã¹¬¶·¯RC.
12

ŽÆ±ºÈ³µ®§¶µ±º¶±º¶·¯²§«º¸¬·ÉÊMoulinex.
UK
ОПИС:
A
‘´É³´§ªµ²É©±§³Æ¸µ·º¨±¯
A1
Š²Å³É´ÉÈ©¯°±µ·¶º¸
A2
¡´¬±
A3
š§³µ®§ªµ¸¹·Å©§²Ã´¯°´É-©¯ªµ¹µ©²¬´¯°®´¬·-§©ÉžµÊ¸¹§²É
A4
™¬¿É¹±§
A4a
Ž·É¨´§·¬¿É¹±§³³
£œ§¡¢©ªžµ ¨ª ¡§µ
Ž²Æ«º-¬«·É¨´µÊ·º¨±¯
A4b
š¬·¬«´Æ·¬¿É¹±§³³
Ž²Æ«·É¨´µÊ·º¨±¯
A4c
¡¯·µ±§·¬¿É¹±§³³
Ž²Æª·º¨µÊ·º¨±¯
A5
Š²Å³É´ÉÈ©§ª§°±§
B
‘´É³´¯°²µ¹µ±
C
¡¹µ©¼§¾³Æ¸§
D
µ¼µ²«²Æ§±¸¬¸º§·É©
E
“´µ¶±§¨²µ±º©§´´Æ·µ®¨²µ±º©§´´Æªµ²É©±¯
F
“´µ¶±§®§¶º¸±º®º¶¯´±¯
G
“´µ¶±§T™¬©¬·¸U·º¼©É«·§®º-®³É´Åȹøƴ§®©µ·µ¹´É°
H
‹²µ±³µ¹µ·§
I
Š±¸¬¸º§·“•‹•
I1
•É²ÃÈ·´§´§¸§«±§
I2
“ɲý¬©¬ºÀɲô¬´´Æ
J
Œµ·µ´±§«²Æ±µ©¨§¸µ±
£œ§¡¢©ªžµ ¨ª ¡§µ
J1
˜·¯¸¹·É°«²Æ½¬´¹·º©§´´Æ¿´¬±§
J2
Œµ·µ´±§
K
—©µ¾¬·É®±§
£œ§¡¢©ªžµ ¨ª ¡§µ
K1
“µ´º¸´¯°±µ·¶º¸®ªµ·²µ©¯´µÅ
K2
›µ©±§¾
K3
“µ´º¸¯
K3a
“µ´º¸¹¬·¹±§
K3b
“µ´º¸«²Æ´§·É®±¯¹µ´±¯³¯¸±¯¨µ¾±§³¯
K3c
“µ´º¸«²Æ¸±µ¨²É´´Æ
ЗАХОДИ БЕЗПЕКИ:
Перед початком роботи уважно прочитайте інструкцію: неналежне використання приладу звільняє
¦ª¨«œ©µю « ;@85:1C» від відповідальності.
Цей пристрій не призначений для використання особами (включаючи дітей) з обмеженими фізичними,
-¡©-ª¬©¤¨¤œ•ª¬ª£¯¨ªž¤¨¤£ µ•©ª-®´¨¤œ•ªª-ª•œ¨¤що не мають досвіду або необхідних знань, за
ž¤©´®¦ª¨ž¤«œ ¦µž¦ª§¤£œ©¤¨¤©œŸ§´ œє або допомагає третя особа, відповідальна за їхню безпеку.
Необхідно обмежити доступ дітей до приладу, який не є іграшкою.
–§¶·ºª§-¯©²¬´´Æ©§¿µªµ¶·¯²§«º¶µ©¯´´§©É«¶µ©É«§¹¯´§¶·º®É¬²¬±¹·µ³¬·¬-ɺ©§¿µ³º«µ³É
‹º«ÃƱ¬´¬¶·§©¯²Ã´¬¶É«±²Å¾¬´´Æ§´º²ÅȪ§·§´¹ÉÅ
˜·¯²§«¶·¯®´§¾¬´¯°¹É²Ã±¯«²Æ«µ³§¿´Ãµªµ©¯±µ·¯¸¹§´´Æɶ·¯ªµ¹º©§´´Æ¸¹·§©¹§¶É«´§ª²Æ«µ³
Œ¯±µ·¯¸¹µ©º°¹¬¶·¯²§«¹É²Ã±¯´§·É©´É°¾¯¸¹É°¹§¸º¼É°¶µ©¬·¼´É
–¬«µ¶º¸±§°¹¬®©¯¸§´´Æ«µ©ªµªµ©µ²µ¸¸Æ¿§·»§¾¯±·§©§¹±¯´§«¶·¯©¬«¬´¯³¯©«Éŧ±¸¬¸º§·§³¯
˜É¸²Æ¶·¯¶¯´¬´´Æ·µ¨µ¹¯¸²É«®·§®º-©É«±²Å¾¯¹¯¶·¯²§«©É«¬²¬±¹·µ³¬·¬-É©É«±²Å¾¬´´Æ¶µ¹·É¨´¬¹§±µ-
±µ²¯©¯°µªµ³¯È¹¬¸¹§©¯¹¬´§³É¸½¬§¨µ®´É³§È¹¬§±¸¬¸º§·¯
13

–¬©¯±µ·¯¸¹µ©º°¹¬¶·¯²§«Æ±Àµ©É´¶·§½ÅÈ´¬¶·§©¯²Ã´µ§¨µ¶µ¿±µ«-¬´¯°œ½Ãµ³º©¯¶§«±º¸²É«®©¬·´º¹¯¸Æ
«µ¸¬·©É¸´µªµ½¬´¹·º±µ³¶§´ÉÊTMoulinexU«¯©¸¶¯¸µ±©¨·µ¿º·É®µ¨¸²ºªµ©º©§´´Æ
‹º«ÃƱ¬©¹·º¾§´´Æµ±·É³¾¯À¬´´ÆÉÀµ«¬´´µªµ«µª²Æ«º±²ÉÈ´¹µ³¶µ©¯´´µ®«É°¸´Å©§¹¯¸Æ©¸¬·©É¸´µ³º½¬´¹·É
TMoulinexU
–¬©¯±µ·¯¸¹µ©º°¹¬¶·¯²§«Æ±Àµ¿´º·-¯©²¬´´Æ¶µ¿±µ«-¬´¯°Ž²Æº¸º´¬´´Æ´¬¨¬®¶¬±¯®©¬·´É¹Ã¸Æ©¸¬·©É¸´¯°
½¬´¹·TMoulinexU«²Æ®§³É´¯«¯©¸¶¯¸µ±º¨·µ¿º·É®µ¨¸²ºªµ©º©§´´Æ
–¬±²§«É¹Ã¶·¯²§«¿´º·-¯©²¬´´Æ§¨µ¿¹¬¶¸¬²Ã´º©¯²±ºº©µ«º§¨µÉ´¿º·É«¯´º
‹¬·¬-ɹÿ´º·-¯©²¬´´Æ©É««É¹¬°
¡´º·-¯©²¬´´Æ´¬¶µ©¯´¬´®´§¼µ«¯¹¯¸Æ¶µ¨²¯®º§¨µ±µ´¹§±¹º©§¹¯®´§ª·É©§Å¾¯³¯¬²¬³¬´¹§³¯«-¬·¬²µ³
¹¬¶²§§¨µªµ¸¹·¯³¯±º¹§³¯
Ž²Æ ©§¿µÊ ¨¬®¶¬±¯ ¸²É« ©¯±µ·¯¸¹µ©º©§¹¯ ¹É²Ã±¯ §±¸¬¸º§·¯ É ®§¶§¸´É ¾§¸¹¯´¯ ±µ³¶§´ÉÊ TMoulinexU ƱÉ
©É«¶µ©É«§Å¹Ã©¯³µª§³©§¿µªµ¶·¯²§«º
–¬±µ·¯¸¹º°¹¬¸Æ¶·¯²§«µ³«µ©¿¬´É-¼©
Ž²Æ©§¿µÊ¨¬®¶¬±¯«§´¯°¶·¯²§«©É«¶µ©É«§È¾¯´´¯³´µ·³§³É¶·§©¯²§³
SŽ¯·¬±¹¯©§´¯®Ã±µÊ´§¶·ºª¯
S•²¬±¹·µ³§ª´É¹´§¸º³É¸´É¸¹Ã
S–§©±µ²¯¿´È¸¬·¬«µ©¯À¬
S•§¹¬·É§²¯Àµ±µ´¹§±¹ºÅ¹Ã®¶·µ«º±¹§³¯¼§·¾º©§´´Æ
ПЕРЕД ПОЧАТКОМ ВИКОРИСТАННЯ:
Œ¯³¯°¹¬©¸É§±¸¬¸º§·¯©µ«µÅ®³¯²µ³š¶µ²µ¸´É¹ÃÉ·¬¹¬²Ã´µ©¯¹·É¹Ã
Решітка і ніж повинні залишатися жирними. Необхідно змастити їх олією.
Не вмикайте прилад в холосту, не змастивши попередньо решітку.
УВАГА: Оскільки леза конусів дуже гострі, з ними слід поводитися обережно.
ЗАПУСК:
ГОЛІВКА М’ЯСОРУБКИ (
Складання голівки м’ясорубки (схеми 1.1 і 1.2)
–¬µ¨¼É«´µ©®Æ¹¯±µ·¶º¸A1 ®§ªµ·²µ©¯´º´§¶·§©¯©¿¯´§°¿¯·¿¯°µ¹©É·©ªµ·º˜µ¹É³©¸¹§©¹¬¿´¬±A2 (¸¶µ¾§¹±º
«µ©ªº©É¸Ã) ©±µ·¶º¸A1.
–§«É´Ã¹¬´É- ® ´¬·-§©ÉžµÊ ¸¹§²É A3 ´§ ±µ·µ¹±º©É¸ÃƱ§ ©¯¸¹º¶§È®§¿´¬±A2, ·É-º¾¯³¯²¬®§³¯«µ¸¬¨¬
‹º«ÃƱº·¬¿É¹±º®§©§¿¯³©¯¨µ·µ³´§«É´Ã¹¬´§´É-A3, ©¯¸¹º¶¶µ©¯´¬´¶µ¹·§¶¯¹¯©¶§®±µ·¶º¸ºA1.
‘§±·º¹É¹Ã´¬¨²µ±º°¹¬ª§°±ºA5.
Установка голівки м’ясорубки (схема 2) :
S˜¬·¬«©É«±²Å¾¬´¯³©É«¬²¬±¹·µ³¬·¬-ɨ²µ±º³µ¹µ·§H ¹·¯³§°¹¬ªµ²É©±º³Æ¸µ·º¨±¯ªµ·²µ©¯´§¸¶·Æ³µ©§´§
©¶·§©µ‘ɸ¹¯±º°¹¬¨§°µ´¬¹´É®È«´§´´Æªµ²É©±¯³Æ¸µ·º¨±¯É¶§®¯¨²µ±§³µ¹µ·§•µ²É©±º³Æ¸µ·º¨±¯©¸¹§©¹¬
© ¨²µ± ³µ¹µ·§ H, ¶É¸²Æ ¾µªµ ¶µ©¬·´É¹Ã ªµ·²µ©¯´º «µ ³É¹±¯ ªµ·²µ©¯´§ ¶µ©¯´´§ ®§°´Æ¹¯ ©¬·¹¯±§²Ã´¬
¶µ²µ-¬´´Æ
SŒ¸¹§´µ©É¹Ã®´É³´¯°²µ¹µ±B ´§©¯¸¹º¶¯ªµ·²µ©¯´¯ªµ²É©±¯³Æ¸µ·º¨±¯
œ©É³±´É¹Ã¶·¯²§«©É´ªµ¹µ©¯°«µ¬±¸¶²º§¹§½ÉÊ
Використання:
˜·¯ªµ¹º°¹¬´¬µ¨¼É«´º«²Æ·º¨±¯±É²Ã±É¸¹Ã¶·µ«º±¹É©©¯«§²É¹Ã±É¸¹±¯¼·ÆÀÉɸº¼µ-¯²²Æ
–§·É-¹¬³Æ¸µ¿³§¹±§³¯¶·¯¨²¯®´µ¸³X 2 ¸³
˜É«ªµ²É©±º³Æ¸µ·º¨±¯¶µ¸¹§©¹¬È³´É¸¹Ã
–§¹¯¸´É¹Ã´§¶µ²µ-¬´´ÆTIU±´µ¶±¯®§¶º¸±º®º¶¯´±¯F, Àµ¨©±²Å¾¯¹¯¶·¯²§«
˜µ±²§«É¹Ã¿³§¹±¯³Æ¸§´§¶É««µ´B ɶµµ«´µ³ºµ¶º¸±§°¹¬©µ¹©É·®§«µ¶µ³µªµÅ¿¹µ©¼§¾§C.
Ні в якому разі не намагайтеся проштовхувати пальцями або іншим інструментом.
¢µ¨µ¹·¯³§¹¯³Æ±¬¹É¸¹µ“¬¨¬§¨µ“¬»¹§¶·µ¶º¸¹É¹Ã³Æ¸µ·§®¯¾¬·¬®³Æ¸µ·º¨±º«µµ¹·¯³§´´Æ³§¸¯
¨§-§´µÊ±µ´¸¯¸¹¬´½ÉÊ
›ª¬¤-©œ«ª¬œ œ
Œ±É´½É·µ¨µ¹¯©¯³µ-¬¹¬¶·µ¶º¸¹¯¹¯±É²Ã±§¿³§¹±É©¼²É¨§Àµ¨©¯°¿²¯®§²¯¿±¯³¬²¬´µªµ³Æ¸§
Що робити у випадку застрягання? (Схема 3)
Œ¯³±´É¹Ã³Æ¸µ·º¨±º´§¹¯¸´º©¿¯´§¶µ²µ-¬´´ÆTU±´µ¶±¯®§¶º¸±º®º¶¯´±¯F.
14

˜µ¹É³±É²Ã±§¸¬±º´«¹·¯³§°¹¬´§-§¹µÅ±´µ¶±ºT™¬©¬·¸U‘©µ·µ¹´¯°¼É«G, Àµ¨®©É²Ã´¯¹¯®§¸¹·Æª²É¶·µ«º±¹¯
–§¹¯¸´É¹Ã´§¶µ²µ-¬´´ÆTIU±´µ¶±¯®§¶º¸±º®º¶¯´±¯F, Àµ¨¶·µ«µ©-¯¹¯·µ¨µ¹º
Важливо: дочекайтеся остаточної зупинки приладу перед тим, як активувати команду «Пуск» œ•ª
¦ª¨œ© ¯«Зворотний хід»
АКСЕСУАР КЕБЕ (
Складання (схема 4) :
Œ¸¹§©¹¬¿´¬±A2 ©±µ·¶º¸A1 ªµ²É©±¯³Æ¸µ·º¨±¯Œ¸¹§´µ©É¹Ã»É²ÃÈ·´º´§¸§«±ºI1 ¹§±Àµ¨©¯¸¹º¶¶µ¹·§¶¯©º¶§®
±µ·¶º¸ºA1. –§«É´Ã¹¬±É²Ã½¬©¬ºÀɲô¬´´ÆI2 ´§»É²ÃÈ·´º´§¸§«±ºÉ®§±·º¹É¹Ãª§°±ºA5 «µ±É´½Æ
‘ɨ·§´º¹§±¯³¾¯´µ³ªµ²É©±º©¸¹§´µ©É¹Ã´§¨²µ±³µ¹µ·§Æ±®§®´§¾¬´µ©¸¼¬³É
Примітка: даний аксесуар використовується без решітки та без ножа.
ВОРОНКА ДЛЯ КОВБАСОК (£œ§¡¢©ªžµ ¨ª ¡§µ
Ž§´¯° §±¸¬¸º§· Àµ ¶·¯±·É¶²ÅÈ¹Ã¸Æ «µ ªµ²É©±¯ ³Æ¸µ·º¨±¯ «µ®©µ²¯¹Ã ·µ¨¯¹¯ ¨º«ÃÆ±É ±µ©¨§¸±¯ Æ±É ©§³
®§²¯¿¯¹Ã¸Æ¹É²Ã±¯¶·¯¶·§©¯¹¯®§¸©µÊ³¸³§±µ³
Складання (схема 5)
Œ¸¹§©¹¬¿´¬±A2 ©±µ·¶º¸A1. ˜µ¹É³©¸¹§´µ©É¹Ã©µ·µ´±ºJ2, ®§±·º¹É¹Ãª§°±ºA5 «µ±É´½ÆŒ¸¹§´µ©É¹Ãªµ²É©±º
³Æ¸µ·º¨±¯®É¨·§´º´§¨²µ±³µ¹µ·§©É«¶µ©É«´µ«µ¸¼¬³¯
Примітка: даний аксесуар використовується без решітки та без ножа. Пристрій для центрування шнека
ª£žª§´є утримати шнек у потрібному положенні при приготуванні рецепта.
Використання:
Важливо: «§´¯°§±¸¬¸º§·¸²É«©¯±µ·¯¸¹µ©º©§¹¯¹É²Ã±¯¶É¸²Æ¹µªµÆ±³Æ¸µ¨º²µ¶µ³¬²¬´¬¸¶¬½ÉÊ«µ«§´Éɳ§¸§
«µ¨·¬¶¬·¬³É¿§´§
˜µ¶¬·¬«´Ãµ©¯³µ¾¬´º©¹¬¶²É°©µ«É±µ©¨§¸´ºµ¨µ²µ´±ºÆ±§¸¹§²§®´µ©º¬²§¸¹¯¾´µÅ´§«Æª´É¹Ã´§©µ·µ´±ºJ2,
®§²¯¿¯©¿¯¶·¯¨²¯®´µ¸³
•¬²¬´¬³Æ¸µ¶µ³É¸¹É¹Ã©ªµ·²µ©¯´º±µ·¶º¸ºA1 ªµ²É©±¯³Æ¸µ·º¨±¯A, ©±²Å¾É¹Ãɶ·µ¿¹µ©¼º°¹¬®§«µ¶µ³µªµÅ
¿¹µ©¼§¾§C ¹§±Àµ¨³¬²¬´¬³Æ¸µ©¯°¿²µ´§±·§°©µ·µ´±¯
Œ¯³±´É¹Ã¶·¯²§«
‘·µ¨É¹Ã©º®µ²®®§²¯¿¬´¯¼¸³±µ©¨§¸´µÊµ¨µ²µ´±¯˜¬·¬¸º´Ã¹¬©º®µ²«µ±·§Å©µ·µ´±¯Àµ¨´¬¨²µ±º©§¹¯
¶µ©É¹·Æ©±µ©¨§¸´µÊµ¨µ²µ´½É
œ©É³±´É¹Ã ¶·¯²§«É¶·µ«µ©-º°¹¬ ´§±²§«§¹¯³¬²¬´¬ ³Æ¸µ š¹¬-¹¬ ®§ ±µ©¨§¸´µÅ µ¨µ²µ´±µÅ ¶µ±¯ ©µ´§´¬
´§¶µ©´¯¹Ã¸Æ¢µ¨¸¯²Ã´µ´¬·µ®¹Æªº©§¹¯µ¨µ²µ´±º´¬·µ¨É¹Ã´§«¹µ¹µ©¸¹¯¼±µ©¨§¸µ±
Примітка: роботу краще виконувати удвох, один накладає мелене м’ясо, а інший тримає оболонку, поки
žª©œ©œ«ªž©юється.
“µ©¨§¸±¯³µ-´§·µ¨¯¹¯¨º«ÃƱµÊ¨§-§´µÊ«µ©-¯´¯¸¹¯¸±§Å¾¯É¶¬·¬±²§«§Å¾¯µ¨µ²µ´±º®³É¸½Æ´§³É¸½¬
¢µ¨µ¹·¯³§¹¯Æ±É¸´É±µ©¨§¸±¯´¬µ¨¼É«´µ¸¹¬-¯¹¯®§¹¯³Àµ¨¶·¯´§¶µ©´¬´´É¶µ©É¹·Æ´¬®¨¯·§²µ¸Æ©¸¬·¬«¯´É
™¬±µ³¬´«ºÈ³µ·µ¨¯¹¯±µ©¨§¸±¯«µ©-¯´µÅ¸³©É«µ±·¬³²Å°¹¬±µ©¨§¸±¯®§²¯¿§Å¾¯¾§¸¹¯´ºµ¨µ²µ´±¯«²Æ
»µ·³º©§´´Æ©º®²§
ОВОЧЕРІЗКА (£œ§¡¢©ªžµ ¨ª ¡§µ
Складання (схема 6) :
–§¶·µ¹¯©É«±²Å¾¬´µªµ©É«¬²¬±¹·µ³¬·¬-ɨ²µ±º³µ¹µ·§©¸¹§´µ©É¹Ã±µ·¶º¸K1, ´§¼¯²¬´¯°©¶·§©µ©º¿±§±µ·¶º¸º
¶µ©¯´´Éº©É°¹¯©µ¹©µ·¯¨²µ±§³µ¹µ·§H. Œ¸¹§´µ©É¹Ã¸¹¬·-¬´ÃÀµ©¯¼µ«¯¹Ã®±µ·¶º¸ºK1, º©É¸Ã¨²µ±§³µ¹µ·§H.
•µ·²µ©¯´º±µ·¶º¸§K1 ¶µ©¬·´É¹Ã©²É©µ«µ³É¹±¯
Використання:
ÌŒ¯¨¬·É¹Ã©É«¶µ©É«´¯°«²Æ©¯±µ·¯¸¹§´´Æ±µ´º¸
ÌŒ¸¹§©¹¬©¯¨·§´¯°±µ´º¸©µ¹©É·Àµ®´§¼µ«¯¹Ã¸Æ©¶¬·¬«´É°¾§¸¹¯´É±µ·¶º¸ºK1, ±µ´º¸¶µ©¯´¬´®§°³§¹¯
¶·§©¯²Ã´¬¶µ²µ-¬´´Æº¸¬·¬«¯´É´¬¸º¾µªµ¬²¬³¬´¹§³§²
̘ɫ±²Å¾É¹Ã¶·¯²§««µ¬²¬±¹·µ³¬·¬-É
Ì–§¹¯¸´É¹Ãµ«¯´§¨µ«©§·§®¯´§±´µ¶±º®§¶º¸±º®º¶¯´±¯F, Àµ¨¨²µ±º©§¹¯±µ´º¸³§²
Ìœ©É³±´É¹Ã¶·¯²§«¶µ¹É³¾¬·¬®ªµ·²µ©¯´º±µ·¶º¸º´§±²§«§°¹¬¶·µ«º±¹¯K1 (³§²) ɶ·µ¿¹µ©¼º°¹¬Ê¼®§
«µ¶µ³µªµÅ¿¹µ©¼§¾§K2 (³§²).
● ¢µ¨®§³É´¯¹¯±µ´º¸´¬µ¨¼É«´µ«µ¾¬±§¹¯¸Æ¶µ©´µÊ®º¶¯´±¯±µ´º¸§œ¹·¯³º°¹¬¶·µ¹Æªµ³¸¬±º´«¯±´µ¶±º
T™¬©¬·¸UG, ±µ´º¸©¯°«¬§©¹µ³§¹¯¾´µ³§²
УВАГА: Перед увімкненням приладу переконайтеся, що конус зайняв правильне положення на несучому
¡§¡¨¡©®µ
15
Використовуйте рекомендований конус для кожного типу продукту:
›ª©¯-®¡¬®¦œ
›ª©¯- §´©œ¬µ£¦¤
›ª©¯- §´
-
®ª©¦¤¨¤-¦¤•ª±¦œ¨¤.
-¦ª•§µ©©´/
•
µ·±©§
* *
“§¨§¾±¯
* *
“§·¹µ¶²Æ
* *
—ªÉ·µ±
* *
˜¬·¬½Ã
* *
Ÿ¯¨º²Æ
*
ܼ᮱
*
“§¶º¸¹§¨É²§¾¬·©µ´§
*
¦¨²º±§
*
™¬«Ã±§¾µ·´§
* *
“µ·¬´¬©§¸¬²¬·§
*
‹§´§´¯
*
˜§·³¬®§´
*
•·Å°¬·
* *
¡µ±µ²§«
* *
Œ¯¸º¿¬´¯°¼²É¨¸º¼§·É
*
”ɸµ©¯°ªµ·É¼ª·¬½Ã±¯°ªµ·É¼³¯ª«§²Ã
*
“µ±µ¸µ©¯°ªµ·É¼
*
£œ§¡¢©ªžµ ¨ª ¡§µ
Поради для отримання хорошого результату:
¢µ¨µ¹·¯³§¹¯®§«µ©É²Ã´¯°·¬®º²Ã¹§¹É®§¶µ¨Éª¹¯®§¸¹·Æª§´´Å¶·µ«º±¹É©º±µ·¶º¸É©¯±µ·¯¸¹µ©º©§´ÉÉ´ª·¬«ÉÈ´¹¯
¶µ©¯´´É¨º¹¯³É½´¯³¯É¸©É-¯³¯–¬©¯±µ·¯¸¹µ©º°¹¬¶·¯²§«Àµ¨¹¬·¹¯§¨µ·É®§¹¯¸±¯¨µ¾±§³¯®§´§«¹µ¹©¬·«É
¶·µ«º±¹¯¹§±ÉƱ½º±µ·§¨µ¿³§¹±¯³Æ¸§™µ®·É®§°¹¬¶·µ«º±¹¯Àµ¨Ê¼¨º²µ¶·µ¸¹É¿¬¶·µ¿¹µ©¼º©§¹¯©µ¹©É·
±µ·¶º¸º
ЧИЩЕННЯ:
•
Перед чищенням блока мотора Н завжди відключайте прилад від електромережі
Ì–¬®§´º·Å°¹¬¨²µ±³µ¹µ·§º©µ«º´¬¶É«¸¹§©²Æ°¹¬°µªµ¶É«©µ«º—¾¯¸¹É¹Ã¨²µ±³µ¹µ·§©µ²µªµÅª§´¾É·±µÅ
˜É¸²Æ¾¯À¬´´Æ©§·¹µ¶µ©´É¸¹Å©¯¸º¿¯¹¯
Аксесуари м’ясорубки:
‘´É³É¹Ã¨²µ±º©§´´Æªµ²É©±¯§¨µ§±¸¬¸º§·§µ©µ¾¬·É®±¯´§¹¯¸´º©¿¯´§±´µ¶±ºE.
— ˜µ©¬·´É¹Ãªµ²É©±º³Æ¸µ·º¨±¯A ©¶·§©µÉ¶µ¹Æª´É¹Ã´§¸¬¨¬Àµ¨©É«ZÈ«´§¹¯ÊÊ©É«¨²µ±§³µ¹µ·§H.
— ¢µ¨®´Æ¹¯ªµ²É©±ºµ©µ¾¬·É®±¯A, ©¯°³É¹Ã¿¹µ©¼§¾C É®´É³É¹Ã²µ¹µ±B, ©É«ª©¯´¹É¹Ãª§°±ºA5, ®´É³É¹Ã·¬¿É¹±º
A4, ´É-A3 É¿´¬±A2.
— Обережно поводьтеся з гострими деталями.
Œ¯³¯°¹¬©¸É®§¶¾§¸¹¯´¯¶É«ª§·Æ¾µÅ©µ«µÅ®³¯²µ³¸¶µ²µ¸´É¹ÃÉ·¬¹¬²Ã´µ©¯¹·É¹Ã
–¬³¯°¹¬ªµ²É©±º³Æ¸µ·º¨±¯A ©¶µ¸º«µ³¯°´É°³§¿¯´É¹µ¨¹µ±µ·¶º¸A1, ¿´¬±A2, ª§°±ºA5, ´É-A3 É
·¬¿É¹±¯A4
Аксесуари овочерізки (залежно від моделі):
Ì“µ·¶º¸K1¿¹µ©¼§¾K2±µ´º¸¯K3a, K3b, K3c³µ-´§³¯¹¯º¶µ¸º«µ³¯°´É°³§¿¯´É©±µ¿¯±º
©¯±µ·¯¸¹µ©ºÅ¾¯¶·µª·§³ºT•“—U§¨µT–•Žœ••‹™œŽ–•U
Ì—¸±É²Ã±¯²¬®§±µ´º¸É©«º-¬ªµ¸¹·É®´¯³¯¸²É«¶µ©µ«¯¹¯¸Æµ¨¬·¬-´µ
̦±Àµ¶²§¸¹³§¸µ©É¾§¸¹¯´¯¶µ»§·¨º©§²¯¸Æ¶·µ«º±¹§³¯¹§±¯³¯Æ±´§¶·¯±²§«³µ·±©§¶·µ¹·É¹Ãʼª§´¾É·±µÅ
®³µ¾¬´µÅ©¼§·¾µ©É°µ²Éʶµ¹É³©¯³¯°¹¬®©¯¾§°´¯³¸¶µ¸µ¨µ³
ЗБЕРІГАННЯ:
™¬¿É¹±¯´É-¶·¯¸¹·É°«²Æ½¬´¹·º©§´´Æ¿´¬±§§±¸¬¸º§·¯±¬¨¬É«²Æ±µ©¨§¸µ±I1, I2 i J1, J2³µ-´§®¨¬·Éª§¹¯
´§®§«´É°¸¹É´½É¶·¯²§«ºº¸¶¬½É§²Ã´µ³º©É««É²¬´´ÉD
16

ЩО РОБИТИ, ЯКЩО ПРИЛАД НЕ ПРАЦЮЄ?
˜¬·¬©É·¹¬-¯©²¬´´Æ
¦±Àµ¶·¯²§«¹§±É´¬®§¶·§½Å©§©®©¬·´É¹Ã¸Æ«µ¸¬·©É¸´µªµ½¬´¹·ºMoulinex
(Ž¯©¸¶¯¸µ±º¨·µ¿º·É®µ¨¸²ºªµ©º©§´´Æ).
ПІСЛЯ ЗАКІНЧЕННЯ ТЕРМІНУ ЕКСПЛУАТАЦІЇ ЕЛЕКТРОННИХ АБО
ЕЛЕКТРИЧНИХ ПРИЛАДІВ
Візьмімо участь у захисті навколишнього середовища!
Œ§¿¶·¯²§«³É¸¹¯¹Ã¨§ª§¹µ³§¹¬·É§²º¶·¯«§¹´µªµ«µ¶¬·¬·µ¨±¯
‘«§°¹¬°µªµ©¶º´±¹®¨µ·º§¨µ©¸¬·©É¸´¯°½¬´¹·«²Æ¶¬·¬·µ¨±¯
РЕЦЕПТИ
Зверніть увагу: Для рецептів, приготування яких вимагає більш високої потужності, час використання приладу не
«ªž¤©¡©«¡¬¡ž¤щувати 20 сек.
Приклад рецепту (з середньою решіткою — отвори 4,7 мм .
!¦ª®§¡®¤¦µ•¡£¥ªŸ¯¬®ª¨
«ª¬цій — Приготування: 1 година
Покласти на 1 год у холодильник
Інгредієнти для пасти кібе:
ª³Æ¸§ª¨º²Ãªº·º¶µ«·É¨´¬´¬®¬·´µ¸É²Ã
Інгредієнти для соусу:
±ª°µªº·¹º¶º¾µ±±µ·É§´«·º®º¨¾¯±¯¾§¸´¯±º¸¹µ²µ©É²µ-±¯
±º±º·º«®Æ´µªµ¨µ·µ¿´§¸É²Ã¶¬·¬½Ã
™µ®·É-¹¬³Æ¸µ´§¿³§¹±¯œ¸¹§´µ©É¹Ã·¬¿É¹±º®µ¹©µ·§³¯³³©³Æ¸µ·º¨±º˜·µ¶º¸¹É¹Ã³Æ¸µ«µ«§°¹¬
¨º²Ãªº·˜µ¸µ²É¹Ã¶µ¸¹§©¹¬µ¹·¯³§´º³§¸º©¼µ²µ«´¬³É¸½¬´§ªµ«¯´º
¢µ¨¸»µ·³º©§¹¯±µ¹²¬¹¯±É¨¬©¸¹§´µ©É¹Ã´§³Æ¸µ·º¨±º§±¸¬¸º§·±¬¨¬˜·µ¶º¸¹É¹Ã³§¸º±·§Ê±µ¹²¬¹¯
¸±²¬°¹¬´¬©¬²¯±µÅ±É²Ã±É¸¹Å©µ«¯
Ž²Æ¶·¯ªµ¹º©§´´Æ¸µº¸º¶·µ³¯°¹¬¶º¾µ±±µ·É§´«·º¶·µ³µ±´É¹Ã¶§¶¬·µ³É©É«É·©É¹Ã²¯¸¹Æ˜µ¾¯¸¹É¹Ã¾§¸´¯±
É·µ®«§©É¹Ã°µªµ §¸´¯±É±µ·É§´«·¶µ¹·¯³§°¹¬¼©¯²¯´¯´§¸±µ©µ·É«½É´§¸²§¨±µ³º©µª´ÉŒÉ«±²§«É¹Ãº
¨É±
‘¨¯°¹¬°µªº·¹É±º±º·º«®Æ´º³º±º¶µ¸µ²É¹Ã¶µ¶¬·¾É¹ÃŒ¯²¯°¹¬©¸¬©±§¸¹·º²Å¾¬·¬®«·É¨´¬¸¯¹¬¾±µ
Žµ©¬«É¹Ã¸º³É¿«µ±¯¶É´´Æ¶µ¹É³®³¬´¿¹¬©µªµ´Ãš¹¬-¹¬®§¶·¯ªµ¹º©§´´Æ³¶µ¸¹É°´µ¶µ³É¿ºÅ¾¯Àµ¨
°µªº·¹´¬¶·¯¸¹§©§©
Žµ«§°¹¬¾§¸´¯±É±µ·É§´«·˜µ¹·¯³§°¹¬±µ¹²¬¹¯±É¨¬©ª§·Æ¾É°¸º³É¿É¼©¯²¯´
Варіант: Ви також можете нафарширувати котлети (сумішшю цибулі і меленого м’яса, попередньо
«¬ª¢œ¬¡©ªŸªž©¡ž¡§¤¦µ¥¦µ§³¦ª-®µª§µї з прянощами).
САМСА
«ª¬ції – Приготування: 40 хвил. Час запікання: 35 хвил.
Інгредієнти:
ª²¯¸¹±µ©µªµ¹É¸¹§WªÆ²µ©¯¾¯´¯W½¯¨º²¯´§WÆ°½ÆW¶§¶·¯±§³¬²¬´§±µ·¯½Æ¹§
ɳ¨¯·W¶¬¹·º¿±§W±µ·É§´«·±¬·©¬²ÃW½º±µ·Wª³§¸²§Wµ²¯©±µ©§µ²ÉÆ
œ¸¹§´µ©É¹Ã·¬¿É¹±º®µ¹©µ·§³¯³³©³Æ¸µ·º¨±º™µ®·É-¹¬½¯¨º²Å´§¾§¸¹¯´É¶·µ¶º¸¹É¹Ã¾¬·¬®
³Æ¸µ·º¨±º˜É«Éª·É°¹¬¸¹µ²µ©É²µ-±¯µ²¯©±µ©µÊµ²ÉÊ©¸µ¹¬°´¯±º¶µ¹É³«µ«§°¹¬½¯¨º²Å˜µ¹º¿±º°¹¬´§
³§²µ³º©µª´É«µµ¹·¯³§´´Æ®µ²µ¹¯¸¹µªµ±µ²Ãµ·ºŒÉ«¸¹§©¹¬º¨É±
˜µ«·É¨´É¹ÃƲµ©¯¾¯´º˜É«·º³Æ´Ã¹¬´§¸²§¨±µ³º©µª´É·§®µ³®½¯¨º²¬Å¶·µ¹Æªµ³¼©¯²¯´ŒÉ«¸¹§©¹¬º¨É±
˜·¯¶·§©¯¶·µ¶º¸¹É¹Ã¾¬·¬®³Æ¸µ·º¨±ºŒ¯¸¯¶¹¬Ê¼©¸µ¹¬°´¯±·§®µ³®¸É²²Åɶ¬·½¬³«µ«§°¹¬¶É©¾§°´µÊ
²µ-±¯¶§¶·¯±¯Àɶ±ºÉ³¨¯·ºÉ¹·µ¼¯±µ·¯½É
˜µ¹É³«µ«§°¹¬®¨¯¹ÉÆ°½Æ¶¬·¬³É¿§°¹¬É©¯³±´É¹Ã©µªµ´Ã
™µ®±§¾§°¹¬«µ¸¯¹Ã¹µ´±µ²¯¸¹±µ©¬¹É¸¹µ˜µ·É-¹¬´§±©§«·§¹¯¶µ¸³‘³§¸¹É¹Ã³§¸²µ³¶µ©¬·¼´ÅƱ§
©¯±µ·¯¸¹µ©ºÈ¹Ã¸Æ
–§±µ-¬´±©§«·§¹¶µ±²§«É¹Ã¹·µ¼¯»§·¿º‘§ªµ·´É¹Ã§¶µ¹É³®§²É¶É¹Ã±·§Ê
17

š³§-¹¬¸§³¸§©±¯¶²Æ¾µ³º³§¸²É˜É¸²Æ¸³§-¬´´Æ©¯±²§«É¹Ã´§±É²Ã±§¼©¯²¯´´§¶µª²¯´§Å¾¯°¶§¶É·
˜µ¸¯¶¹¬½º±·µ³É±µ·¯½¬Å˜µ«§©§°¹¬ª§·Æ¾¯³
Вариант:
œ¸¹§´µ©É¹Ã·¬¿É¹±º®µ¹©µ·§³¯³³©³Æ¸µ·º¨±º™µ®·É-¹¬½¯¨º²Å´§¾§¸¹¯´–§³¬²É¹Ã¹·µ¼¯³Æ¸§
½¯¨º²Å¶·µ¶º¸¹É¹Ã¾¬·¬®³Æ¸µ·º¨±º
˜·µ¶º¸¹É¹ÃÀ¬¹·µ¼¯³Æ¸§¶µ¹É³¶·¯¶·§©¯É´§·¬¿¹É³Æ¸µÆ±¬®§²¯¿¯²µ¸Æ‘¨¯°¹¬Æ°½ÆÉ«µ«§°¹¬Ê¼«µ
»§·¿º·§®µ³®¸É²²Åɶ¬·½¬³¶µ²µ©¯´µÅ¾§°´µÊ²µ-±¯¶§¶·¯±¯Àɶ±µÅɳ¨¯·ºÉ´¬©¬²¯±µÅ±É²Ã±É¸¹Å
±µ·¯½ÉŒ¸¬¶¬·¬³É¿§°¹¬˜µ©¹µ·É¹Ã¶º´±¹¯
ПИРІЖКИ З РИБОЮ
«ª¬ції – Приготування: 25 хвил. Час запікання: 10 — 15 хвил.
Інгредієнти:
ª²¯¸¹±µ©µªµ¹É¸¹§Wª©§·¬´µÊ·¯¨¯§¨µ±µ¶¾¬´µªµ²µ¸µ¸ÆW®©§·¬´¯¼±·º¹µÆ°½ÆW
¶º¾µ±®§¶§¿´µªµ±·µ¶º½¯¨º²¯´¯Wª¸µ²µ´µªµ©¬·¿±µ©µªµ³§¸²§³§²¬´Ã±¯³¯¿³§¹µ¾±§³¯W
·µ¸²¯´´§µ²ÉÆ
œ¸¹§´µ©É¹Ã·¬¿É¹±º®µ¹©µ·§³¯³³©³Æ¸µ·º¨±º™µ®·É-¹¬½¯¨º²Å´§¾§¸¹¯´É¶·µ¶º¸¹É¹Ã¾¬·¬®
³Æ¸µ·º¨±º›º¿±º°¹¬´§¸²§¨±µ³º©µª´É©¸µ¹¬°´¯±º©´¬©¬²¯±É°±É²Ã±µ¸¹É·µ¸²¯´´µªµ³§¸²§ŒÉ«¸¹§©¹¬º
¨É±
–§·É-¹¬¹·µ¼¯·¯¨¯¶µ¹É³«µ«§°¹¬¶·¯ªµ¹µ©§´º½¯¨º²Å©¬·¿±µ©¬³§¸²µ®§¶§¿´¯°±·É¶É·¯¨ºÆ±§
®§²¯¿¯²§¸Æ
™µ®±§¾§°¹¬¹µ´±¯³¿§·µ³²¯¸¹±µ©¬¹É¸¹µ©¯·É-¹¬±·º-¬¾±¯¸±²Æ´±µÅ§¨µ±¬²¯¼µ³¨É²Ã¿³¬´¿©¬²¯±µªµ
·µ®³É·º
˜µ¶¬·¬«´Ãµ·µ®Éª·É°¹¬«º¼µ©±º«µRC (¶).
5. –§±µ-¬´±·º-¬¾µ±¶µ±²§«É¹Ã¹·µ¼¯»§·¿º¸±²§«É¹Ã¹É¸¹µÉ®§²É¶É¹Ã±·§Ê
•µ¹º°¹¬©«º¼µ©½É¶·µ¹Æªµ³¼©¯²¯´
›ª®§¡®¤£´§ªž¤±¤©¤
«ª¬ції – Приготування: 20 хвил. Час запікання: 10 — 15 хвил.
Інгредієнти
±ªÆ²µ©¯¾¯´¯W½¯¨º²¯´§W®º¨¾¯±¾§¸´¯±ºW¿³§¹µ¾±¯¾µ·´µªµ¼²É¨§®§³µ¾¬´µªµ©³µ²µ½É
WÆ°½ÆW±§·¹µ¶²¯´§W¨µ·µ¿´µW¸É²Ã¶¬·¬½Ã
Ž²Æ¶·¯ªµ¹º©§´´Æ½Ãµªµ·¬½¬¶¹º©¯¨¬·É¹Ã´¬-¯·´É¿³§¹±¯Æ²µ©¯¾¯´¯˜·µ¶º¸¹É¹Ã³Æ¸µ¾¬·¬®³Æ¸µ·º¨±º®
¿³§¹µ¾±§³¯¼²É¨§
–§·É-¹¬½¯¨º²Å¹µ´±¯³¯¸±¯¨µ¾±§³¯±µ´º¸µ³K3bÉ´§¹·É¹Ã¾§¸´¯±É±§·¹µ¶²Å±µ´º¸µ³¹¬·¹±µÅK3a
‘³É¿§°¹¬³¬²¬´¬³Æ¸µ®¼²É¨µ³¶µ·É®§´µÅ½¯¨º²¬Å¾§¸´¯±µ³É±§·¹µ¶²¬Å
Žµ«§°¹¬©¸º³É¿Æ°½Æ³¬²¬´¯°¾µ·´¯°¶¬·¬½Ã¸É²Ãɸ»µ·³º°¹¬±µ¹²¬¹¯
—¨©§²Æ°¹¬±µ¹²¬¹¯©¨µ·µ¿´Éɸ³§-¹¬´§·µ¸²¯´´É°µ²ÉÊ
›œ¬®ª«§´©¤¥«¯ ¤©Ÿ«¬¤Ÿª®ªžœ©¤¥ž ¯ховці
«ª¬ції – Приготування: 30 хвил. Час запікання: 45 хвил.
Інгредієнти:
ª³¬²¬´µªµ³Æ¸§W±ª±§·¹µ¶²ÉWÆ°½ÆW¸±²Æ´±¯³µ²µ±§W®º¨¾¯±¾§¸´¯±ºW
¸¹µ²µ©µÊ²µ-±¯©¬·¿±µ©µªµ³§¸²§W¸¹µ²µ©É²µ-±¯·µ¸²¯´´µÊµ²ÉÊW¸É²Ã¶¬·¬½Ã
˜µ¾¯¸¹É¹Ã©¯³¯°¹¬É©¯¸º¿É¹Ã±§·¹µ¶²Å–§·É-¹¬Êʹµ´±¯³¯¸±¯¨µ¾±§³¯±µ´º¸µ³K3b
¦²µ©¯¾¯´º¶·µ¶º¸¹É¹Ã¾¬·¬®³Æ¸µ·º¨±ºÉ¶·µ-§·¹¬·º¨²¬´¬³Æ¸µ©«º¼µ©½É´§µ²Éʶ·µ¹Æªµ³¼©¯²¯´
–§¹·É¹Ã©´º¹·É¿´Å¶µ©¬·¼´Å¨²Å«§¾§¸´¯±µ³¶µ¹É³®³§¸¹É¹Ãµ«´ÉÈž§¸¹¯´µÅ©¬·¿±µ©µªµ³§¸²§
Œ¯±²§«É¹Ã¿§·§³¯±§·¹µ¶²Éɳ¬²¬´¬³Æ¸µ¶µ¸µ²É¹Ã¶µ¶¬·¾É¹Ã¶µ¹É³©¯±²§«É¹Ã±§·¹µ¶²ÅÀµ®§²¯¿¯²§¸Æ
‘¨¯°¹¬Æ°½Æ®¹¬¶²¯³³µ²µ±µ³É©¯²¯°¹¬¸º³É¿´§±§·¹µ¶²ÅŽµ«§°¹¬©¬·¿±µ©¬³§¸²µÀµ®§²¯¿¯²µ¸Æ
•µ¹º°¹¬©«º¼µ©½É¶·¯¸¬·¬«´É°¹¬³¶¬·§¹º·É¼©¯²¯´
Печені яблука з мигдалем
«ª¬ції – Приготування: 40 хвил. Час запікання: 30 хвил.
Інгредієнти:
ƨ²º±Wª½º±·ºWª©¬·¿±µ©µªµ³§¸²§Wª½É²Ã´µªµ³¯ª«§²ÅW³²©¬·¿±É©W
¾§°´§²µ-±§±µ·¯½É
˜µ¾¯¸¹É¹Ãƨ²º±§©¯«§²É¹Ã¸¬·½¬©¯´ºÉ·µ®·É-¹¬´§¾©¬·¹É–§·É-¹¬¹µ´±¯³¯¸±¯¨µ¾±§³¯Æ¨²º±§±µ´º¸µ³K3b
ɶ·µ-§·¹¬©ª©¬·¿±µ©µªµ³§¸²§‘²¬ª±§®³§¸¹É¹Ã¨²Å«µ³§¸²µ³É©¯±²§«É¹Ã®§½º±·µ©§´Éƨ²º±§´§«´µ
˜µ«·É¨´É¹Ã³¯ª«§²Ã©¶µ·µ¿µ±±µ´º¸µ³K3c˜¬·¬³É¿§°¹¬º¸§²§¹´¯½É³¬²¬´¯°³¯ª«§²Ã©¬·¿±¯É±µ·¯½Å
Œ¯±²§«É¹Ã¸º³É¿´§Æ¨²º±§É¶µ¸¯¶¹¬½º±·µ³˜µ¸¹§©¹¬¨²Å«µ©«º¼µ©±ºªµ¹º°¹¬¶·¯¹¬³¶¬·§¹º·ÉRC.
18
Раздел: Бытовая, кухонная техника, электроника и оборудование
Тип: Мясорубка
Характеристики, спецификации
Мощность:
максимальная — 1800 Вт
Производительность:
2.9 кг/мин
Защита двигателя от перегрузки:
есть
Перфорированный диск для фарша:
есть, 2 в комплекте, диаметр отверстий 4.7 мм, 7.5 мм
Насадка для шинковки:
есть
Насадка для приготовления колбас:
есть
Материал изготовления лотка:
пластик
Материал изготовления корпуса:
пластик
Отсек для хранения насадок:
есть
Инструкция к Мясорубке Moulinex HV8 ME625
J
C
J2 J1
B
GE
I1I2
I
F
D
A4b A4c
A5 A3
A4a
A2 A1
A
H
K2
K1
K
K3a K3b K3c
EN
p 1 – p 6
RU
p 7 – p 12
UK
p 13 – p 18
CS
p 19 – p 24
SK
p 25 – p 30
HU
p 31 – p 36
PL
p 37 – p 42
LT
p 43 – p 48
LV
p 49 – p 54
ET
p 55 – p 60
BG
p 61 – p 66
SR
p 67 – p 72
HR
p 73 – p 78
SL
p 79 – p 84
RO
p 85 – p 90
BS
p 91 – p 96
EN
RU
UK
CS
SK
HU
PL
LT
LV
ET
BG
SR
HR
SL
RO
BS
www.moulinex.com
Réf. 2643130
101
!!
!!
choosing an appliance from the Moulinex range.
EN
DESCRIPTION:
A Removable mincer head
A1 Aluminium casing
A2 Screw feeder
A3 Self-sharpening stainless steel blades
A4 Screens
A4a Fine hole screen (2.4 mm)
(availability depends on model) very fine mincing
A4b Medium hole screen (4.7 mm) fine mincing
A4c Large hole screen (8 mm)coarse mincing
A5 Aluminium locking nut
B Removable tray
C Pusher
D Accessory storage compartment
E Mincer head release button
F On/off switch
G Reverse button (momentary reverse action)
H Motor unit
I KEBBE accessory
I1 Ring fitting
I2 Ring
J Sausage nozzle
(availability depends on model)
J1 Screw feeder centring ring
J2 Nozzle
K Vegetable cutter (availability depends on model)
K1 Drum holder / hopper
K2 Pusher
K3 Drums
K4a Shredder
K4b Slicer
K4c Grater
SAFETY RECOMMENDATIONS:
— Always read the instructions carefully before using your appliance for the first time: Moulinex will not accept
responsibility for any use which does not comply with the instructions for use.
— This appliance is not intended to be used by persons (including children) with reduced physical, sensory or
mental capacities or lack of experience and knowledge, unless they are supervised or have been given
instructions beforehand concerning use of the appliance by a person responsible for their safety.
— Children should be supervised to ensure they do not play with the appliance.
— Check that the voltage of your appliance corresponds to your domestic power supply.
— Any incorrect connection to the power supply will invalidate the guarantee.
— This product has been designed for domestic use only. Any commercial use, inappropriate use or failure to comply
with the instructions, the manufacturer accepts no responsibility and the guarantee will not apply
— Do not leave the appliance unattended when switched on and in use.
— Use the appliance on a flat, clean and dry surface.
— Never allow long hair, scarves or ties to hang down over the appliance when it is in use.
— Unplug the appliance after use and when you clean it or fit or remove accessories.
— Do not use the appliance if it is not working correctly or if it has been damaged. In this case contact an approved
Moulinex service centre (see list in service booklet).
1
— Any servicing other than cleaning and normal upkeep by the customer must be carried out by an approved service
centre.
— Do not use the appliance if the power lead is damaged. To avoid all possible danger, have it replaced at an approved
service centre (see list in the service booklet).
— Never place the appliance, the power cord or the plug in water or any other liquid.
— Keep the power lead out of the reach of children.
— The power lead should never touch hot surfaces, or be placed near heat sources or sharp edges.
— For your own safety, only use Moulinex accessories and spare parts which are suitable for your appliance.
— Do not use the appliance for longer than 14 minutes.
— For your safety, this appliance complies with all applicable standards and regulations:
• Low voltage directive
• Electro-magnetic compatibility
• Environmental regulations
• Regulations regarding materials in contact with foodstuffs.
BEFORE USING THE APPLIANCE FOR THE FIRST TIME:
Wash all accessories in soapy water. Rinse and dry carefully.
The screen and blades must be kept lubricated. Apply a little oil to them.
Do not run the appliance empty if the screen has not been oiled.
WARNING! Handle the drums carefully as the blades are extremely sharp.
USING THE APPLIANCE:
MINCER HEAD ASSEMBLY (A) :
Assembling the mincer head (figures 1.1 and 1.2)
Hold section A1 by the hopper with the wider opening at the top. Insert the screw feeder (A2) (long shaft first) in the
head assembly A1.
Fit the stainless steel blades (A3) on the short shaft of the screw feeder (A2), so that the cutting edges face outward.
Fit the screen of your choice over the blades (A3) ensuring that the pin fits into the notch on the assembly (A1).
Tighten the locking nut A5 (do not apply excessive pressure).
Fitting the mincer head to the appliance (diagram 2):
• The motor unit (H) must be unplugged. Position the mincer head in front of the unit with the hopper tilted to the
right. Fit the two pins on the mincer head into the two notches on the motor unit.
Push the mincer head firmly into the motor unit (H) and then turn the hopper to the left until it locks into position
(the hopper should be vertical).
• Fit the removable tray (B) onto the pins of the hopper.
Plug the appliance in. It is now ready for use.
Use:
Prepare all the food you wish to mince, eliminating any bones, cartilage or nerves.
Cut the meat into pieces (approximately 2 cm x 2 cm).
Place a container under the mincer head.
Press the On / Off switch (F) to start the appliance.
Place the pieces of meat on the tray (B) and use the pusher (C) to push them into the hopper one by one.
Never use your fingers or any other object to push the meat into the hopper.
To make extra fine Kebbe or Kefta mince, pass the meat through the mincer 2 or 3 times until it has the right consistency.
Tip:
When you have finished mincing put a few pieces of bread through the mincer to push out all the meat.
What to do if the mincer is blocked (diagram 3)
Turn off the mincer by pressing the On / Off switch (F).
Press the Reverse button (G) for a few seconds to clear the blockage.
Press the On / Off switch (F) to continue mincing.
Important : wait until the appliance stops completely before you use the On (F) or Reverse (G) buttons.
KEBBE ACCESSORY (I)
2
Assembly (diagram 4):
Fit the screw feeder (A2) into the mincer head assembly (A1). Insert the ring fitting (I1) in the head assembly (A1),
so that the pin fits into the notch.
Place the ring (I2) over the ring fitting and then secure them by tightening the locking nut (A5).
When assembled, fit the mincer head to the motor unit, as shown in diagram 4.
Note: this accessory is used without a screen or blades.
SAUSAGE NOZZLE (J) (availability depends on model)
This accessory can be fitted to the mincer head so that you can make sausages of all kinds, flavouring them to your
own taste.
Assembly (diagram 5) :
Fit the screw feeder (A2) into the mincer head assembly (A1). Fit the screw feeder centring plate (J1), aligning the
pin with the notch on the head assembly (A1). Fit the nozzle (J2) and secure it by tightening the locking nut (A5).
When assembled, fit the mincer head to the motor unit, as shown in diagram 5.
NB : this accessory is used without a screen or blades. The centring plate keeps the screw feeder in position while
the appliance is being used.
Use:
Important: this accessory should only be used after you have minced the meat, added seasoning and mixed the
preparation thoroughly.
Soak the sausage casing in warm water to soften it and insert the nozzle (J2) in it leaving about 5 cm clear.
Fill the hopper (A1) on the head assembly (A) with mince, turn the appliance on and push down with the pusher (C)
until the mince reaches the end of the nozzle.
Turn off the appliance.
Tie a knot in the 5 cm length of free casing. Slide the knot up to the end of the nozzle so that air is not trapped in
the casing.
Turn the appliance on again and continue to add mince. Ease the casing along as it fills. Do not overfill the sausages
as this will stretch the casing.
NB : this operation is easier if two people do it together, one feeding the mince into the mincer and the other
holding the casing in position as it fills.
Make sausages of the desired length by pinching the casing and twisting it where appropriate.
For the best results take care to prevent air becoming trapped in the casing during filling and make sausages 10 cm to
15 cm in length (separate the sausages by tying a knot round the casing).
VEGETABLE CUTTER (K) (availability depends on model)
Assembly (diagram 6):
The motor unit must be unplugged. Position the vegetable cutting unit (K1) in front of the motor unit tilted to the
right so that the lugs are aligned with the notches in the motor unit (H). Insert the shaft of the unit in the centre
hole of of the motor unit (H). Turn the hopper to the left until the unit clicks home with the hopper in the upright
position.
Use:
• Select the drum you wish to use.
• Fit the drum into the opening at the front of the vegetable cutter (K1), ensuring that it is pushed firmly home
(Fig. 7).
• Plug in the appliance.
• Press the On / Off button (F) once or twice to lock the drum into position (Fig.  .
.
• Start the appliance and feed the vegetables into the hopper (K1) (Fig. 9), pushing them down with the pusher (K2)
(Fig. 10).
• To change the drum, wait for the appliance to stop completely and then press the Reverse button (G) for 1 second.
The drum will be released automatically (Fig. 11).
WARNING! Before starting the appliance, check that the drum is correctly fitted on the shaft.
3
Use the right drum for each type of food:
(*) K3a Shredder (*) K3b Slicer (*) K3c Grater
C
arrots
X X
Courgettes
X X
Potatoes
X X
C
ucumber
X X
P
epper
X X
O
nions
X
Beetroot
X
Cabbage (white/red)
X
Apples
X
Black radish
X X
Celeriac
X
Banana
X
Parmesan
X
Gruyère
X X
Chocolate
X X
Dry bread/biscuits
X
Hazelnuts/walnuts/almonds
X
Coconut
X
(*) available according to model
Recommendations for the best results:
For best results the ingredients you use should be firm. Do not allow food remains to build up inside the unit. Do not
use the appliance to grate or mince substances which are too hard, such as sugar or large pieces of meat.
Cut food into small pieces so that it can be fed easily into the hopper.
CLEANING:
• Always unplug the appliance before cleaning the motor unit (H).
• Do not put the motor unit in water or hold it under a running tap. Clean the motor unit with a damp cloth and dry
it carefully.
1) Mincer accessories:
— Release the head or accessory by pressing button E.
— Turn the mincer head unit (A) to the right and pull it towards you to remove it from the motor unit (H).
— To remove the head unit (A), lift off the pusher (C) and the tray (B), unscrew the locking nut (A5), remove the screen
(A4), the blades (A3) and the screw feeder (A2).
— Take special care when handling sharp components.
— Wash all pieces in warm soapy water, rinse and dry carefully.
Do not put any parts of the head unit (A) in the dishwasher (main body (A1), screw feeder (A2), blades (A3),
screens (A4), locking nut (A5)).
2) Vegetable cutter accessories (available according to model):
• The drum holder (K1), the pusher (K2) and the drums (K3a, K3b, K3c) can be washed in the dishwasher in the
top tray using the ECONOMY or QUICK WASH settings.
• Handle the drums carefully as the blades are extremely sharp.
• If the plastic parts become stained by foods such as carrots, rub the discoloured areas with a cloth soaked in
vegetable oil and then clean as normal.
STORAGE:
The screens, the blades, the screw feeder centring plate, the Kebbe and sausage accessories (I1, I2 and J1, J2) can
be stored in the compartment (D) at the back of the appliance.
WHAT DO I DO IF THE APPLIANCE DOESN’T WORK?
Check that it is correctly connected to the power supply.
4
If the problem persists, contact an approved Moulinex service centre (see list in service booklet).
DISPOSAL OF ELECTRICAL OR ELECTRONIC PRODUCTS
Let’s work together to protect the environment!
Your appliance contains valuable materials which can be recovered or recycled.
Leave it at a local civic waste collection point.
RECIPES
N.B. When preparing recipes that require extensive use of the mincer take care not to operate it continuously
for more than 20 seconds.
Sample recipe, using 4.7 mm medium screen (A4b):
LEBANESE KEBBE
(meat balls with yoghurt)
(Serves 6) – Preparation time: 1 h
Leave to stand for 1 h in fridge
Ingredients for kebbe paste:
600 g of meat – 300 g of cracked bulgur wheat — Salt
Ingredients for sauce:
1 kg yoghurt – 1 bunch coriander – 4 cloves garlic – 3 soupspoons cornflour – Salt, pepper
1. Cut the meat into 4 pieces. Fit the 4.7 mm screen on your mincer. Mince the meat, adding the bulgur wheat as you
do so. Add salt and allow to stand for 1 hour in a cool place.
2. To make the kebbe balls: fit the kebbe accessory on to the mincer. Roll the paste into a ball, sealing the ends with
a little water.
3. To prepare the sauce: wash the coriander, dry it with kitchen paper and remove the leaves. Peel and crush the garlic.
Warm the coriander and garlic gently in a pan for 1 – 2 minutes. Set aside.
4. Beat the yoghurt and cornflour together. Add salt and pepper. Put the mixture into a saucepan after passing it
through a fine sieve. Heat until the mixture boils and then turn down the heat. Stir the mixture while it is cooking
to ensure that the yoghurt does not curdle.
5. Add the garlic and coriander. Warm the kebbe balls in the mixture for 10 minutes.
Variation on the recipe: You can also stuff the balls with a mixture of onion and minced meat (previously lightly
browned in a little oil with a few pine nuts).
BRIOUATS
(Serves 4) – Preparation time: 40 min. Cooking time: 35 min.
Ingredients:
250 g puff pastry – 350 g beef – 1 onion – 2 eggs – Paprika – Powdered cinnamon and ginger – Parsley – Coriander –
Chervil – Sugar – 60 g butter – Olive oil
1. Fit the 4.7 mm screen on your mincer. Cut the onion into 8 pieces and put it through the mincer. Warm 4 soupspoons
of olive oil in a pan and add the onion. Sweat it on a low heat without allowing it to brown. Set aside.
2. Mince the beef. Brown it on a low heat with the onion for 10 minutes. Set aside.
3. Mince the herbs. Add them to the pan with salt and pepper, half a coffeespoon of paprika, a pinch of ginger and a
small spoonful of cinnamon.
4. Add the beaten eggs, stir into the mixture and then remove from the heat.
5. Roll out the puff pastry. It should be quite thin. Cut it into squares 10 cm x 10 cm. Rub the edges with butter.
6. Put a small spoonful of filling on each square. Roll the squares up and seal the ends.
7. Fry the briouats in very hot oil. When fried, place on kitchen paper for a few seconds. Sprinkle with sugar and
cinnamon. Serve very hot.
Variation on the recipe:
Fit the 4.7 mm screen on your mincer. Cut the onion in 8 pieces. Mince a little meat and then the onion.
Then mince a little more meat, then the herbs and then the rest of the meat. Beat the eggs and add them to the stuf-
5
fing with salt and pepper, half a coffee spoon of paprika, a pinch of ginger and a small spoonful of cinnamon. Mix all
the ingredients together. Proceed as in steps 5 to 7 above.
PIROZHKI
(small fish pasties)
(
Serves 4) – Preparation time: 25 min. Cooking time: 10 — 15 min.
Ingredients:
250 g puff pastry – 300 g cooked fish or smoked salmon – 2 hard boiled eggs – 1 bunch dill – 2 onions – 100 g salted
butter, diced small — Oil
1. Fit the 4.7 mm screen on your mincer. Cut the onions into 8 and put them through the mincer. Brown them in a pan
with a little oil over a low heat. Set aside.
2. Mince a little fish, then put the cooked onion, butter and dill through the mincer and finally the rest of the fish.
3. Roll out the puff pastry so that it is quite thin and then cut circles out using a glass or a fairly large bowl.
4. Pre-heat the oven to 210oC (Th.6)
5. Place a little filling on each circle, fold the edges over and seal them together.
6. Brown in the oven for 10 – 15 minutes.
Beef balls
(Serves 4) – Preparation time: 20 min. Cooking time: 10 — 15 min.
Ingredients:
1 kg beef – 1 onion – 1 clove garlic – 2 slices black bread soaked in milk – 2 eggs – 1 potato – Flour – Salt, peppe
1. For this recipe choose lean pieces of beef. Mince the beef with the slices of bread.
2. Slice the onion using the slicing drum (K3b) and grate the garlic and the potato using the shredder drum (K3a).
3. Mix the minced meat and bread with the sliced onion, garlic and potato.
4. Add the eggs, ground black pepper and salt, and shape the mixture into balls.
5. Roll the balls in flour and fry in the oil.
Oven baked potato pie
(Serves 4) – Preparation time: 30 min. Cooking time: 45 min.
Ingredients:
400 g minced meat – 1 kg potatoes- 2 eggs – 2 glasses milk – 1 clove garlic – 1½ soupspoons butter – 2 soupspoons oil
– Salt, pepper
1. Clean wash and dry the potatoes. Slice them using the K3b drum.
2. Mince the beef and fry it in a pan with oil for 5 minutes.
3. Rub the inside of an oven dish with garlic and then grease it with some of the butter.
4. Put a first layer in the dish using Î of the potato. Then add a layer of meat, add salt and pepper and then a final
layer with the rest of the potato.
5. Beat the eggs with hot milk and pour this mixture over the potato. Add the rest of the butter and cook in a medium
oven for 45 minutes.
Apple gratin with almonds
(Serves 4) – Preparation time: 40 min. Cooking time: 30 min.
Ingredients:
6 apples – 60 g soft brown sugar – 50 g butter – 50 g whole almonds – 20 cl cream – 1 coffeespoons cinnamon
Peel the apples, remove the pips and cut into quarters. Slice finely using the K3b slicer attachment and brown with
30 g of butter. Lightly grease a gratin dish with butter and spread the caramelised apple over the bottom. Powder
the almonds using the K3c grater drum. Mix the powdered almond, the cream and the cinnamon in a bowl. Pour the
mixture over the apples and sprinkle with soft brown sugar. Heat the dish in the oven at 160°C.
6
‹²§ªµ«§·¯³®§¶µ±º¶±º¶·¯¨µ·§¸¬·¯¯Moulinex.
RU
ОПИСАНИЕ
A
šÁ¬³´§Æªµ²µ©±§³Æ¸µ·º¨±¯
A1
Š²Å³¯´¯¬©Â°±µ·¶º¸
A2
Œ¯´¹
A3
š§³µ®§¹§¾¯©§ÅÀ¯°¸Æ´µ-¯®´¬·-§©¬ÅÀ¬°¸¹§²¯
A4
™¬¿¬¹±§
A4a
•¬²±§Æ·¬¿¬¹±§³³
ž£œž¤-¤¨ª-®¤ª®¨ª ¡§¤
Ž²Æµ¾¬´Ã³¬²±µ°·º¨±¯
A4b
š·¬«´ÆÆ·¬¿¬¹±§³³
Ž²Æ³¬²±µ°·º¨±¯
A4c
¡¯·µ±§Æ·¬¿¬¹±§³³
Ž²Æ±·º¶´µ°·º¨±¯
A5
Š²Å³¯´¯¬©§Æª§°±§
B
šÁ¬³´Â°¶µ««µ´
C
›µ²±§¹¬²Ã³Æ¸§
D
¬¼µ²«²Æ§±¸¬¸¸º§·µ©
E
“´µ¶±§«²Æ¸´Æ¹¯Æªµ²µ©±¯³Æ¸µ·º¨±¯
F
“´µ¶±§®§¶º¸±§µ¸¹§´µ©±¯
G
“´µ¶±§T™¬©¬·¸U«©¯-¬´¯¬¹µ¹¾§¸³¬´Æ¬¹¸Æ´§¶·µ¹¯©µ¶µ²µ-´µ¬
H
‹²µ±³µ¹µ·§
I
Š±¸¬¸¸º§·“•‹‹•
I1
•¯²Ã¬·´§Æ´§¸§«±§
I2
“µ²Ã½¬©µ¬º¶²µ¹´¬´¯¬
J
Œµ·µ´±§«²Æ±µ²¨§¸µ±
ž£œž¤-¤¨ª-®¤ª®¨ª ¡§¤
J1
œ¸¹·µ°¸¹©µ«²Æ½¬´¹·¯·µ©§´¯Æ©¯´¹§
J2
Œµ·µ´±§
K
—©µÀ¬·¬®±§
ž£œž¤-¤¨ª-®¤ª®¨ª ¡§¤
K1
“µ´º¸´Â°±µ·¶º¸¸®§ª·º®µ¾´µ°ªµ·²µ©¯´µ°
K2
›µ²±§¹¬²Ã
K3
“µ´º¸Â
K3a
“µ´º¸¹¬·±§
K3b
“µ´º¸«²Æ·¬®±¯¹µ´±¯³¯²µ³¹¯±§³¯
K3c
“µ´º¸«²Æ¸±µ¨²¬´¯Æ
МЕРЫ ПРЕДОСТОРОЖНОСТИ :
Внимательно прочитайте инструкцию перед началом работы: использование прибора, не
-ªª®ž¡®-®ž¯ющее инструкции, освобождает ;@85:1Cª®ª®ž¡®-®¡©©ª-®¤
Данный прибор не предназначен для использования лицами (включая детей), чьи физические,
-¡©-ª¬©²¡ ¤§¤ ¯¨-®ž¡©©²¡ -«ª-ª•©ª-®¤ ªŸ¬œ©¤±¡©² ¤§¤ §¤цами, не имеющими опыта или
©¡ª•ходимых знаний, за исключением случаев, когда за ними присматривало или помогало третье лицо
ª®ž¡®-®ž¡©©ª¡£œ¤х безопасность.
Необходимо ограничить доступ детей к прибору, который не является игрушкой.
–§¶·Æ-¬´¯¬¶¯¹§´¯Æ©§¿¬ªµ¶·¯¨µ·§«µ²-´µ¸µµ¹©¬¹¸¹©µ©§¹Ã´§¶·Æ-¬´¯Å©§¿¬ªµÄ²¬±¹·¯¾¬¸±µªµ¶¯¹§´¯Æ
Любое неправильное подключение аннулирует гарантию.
˜·¯¨µ·¶·¬«´§®´§¾¬´¹µ²Ã±µ«²Æ«µ³§¿´¬ªµ¯¸¶µ²Ã®µ©§´¯Æ¯¶·¯ªµ¹µ©²¬´¯Æ¨²Å«¯¶µ«¶·¯¸³µ¹·µ³
’¸¶µ²Ã®º°¹¬¶·¯¨µ·¹µ²Ã±µ´§·µ©´µ°¶µ©¬·¼´µ¸¹¯¾¯¸¹µ°¯¸º¼µ°
–¬µ¸¹§©²Æ°¹¬´¬º¨·§´´Â³¯«²¯´´Â¬©µ²µ¸Â¿§·»¯²¯ª§²¸¹º±´§«§±¸¬¸¸º§·§³¯¶·¯©¬«¬´´Â³¯©«¬°¸¹©¯¬
š²¬«º¬¹µ¹±²Å¾¯¹Ã¶·¯¨µ·µ¹¶¯¹§´¯Æ±§±¹µ²Ã±µ©Â¶·¬±·§¹¯²¯·§¨µ¹ºµ¹±²Å¾¬´¯¬¹·¬¨º¬¹¸Æ¹§±-¬±µª«§
©Â¬ªµ³µ¬¹¬¸¹§©¯¹¬´§³¬¸¹µ¯²¯º¨¯·§¬¹¬§±¸¬¸¸º§·Â
7
–¬¯¸¶µ²Ã®º°¹¬¶·¯¨µ·¬¸²¯µ´·§¨µ¹§¬¹´¬¶·§©¯²Ã´µ¯²¯¶µ©·¬-«¬´ŒÄ¹µ³¸²º¾§¬¸²¬«º¬¹µ¨·§¹¯¹Ã¸Æ©
¸¬·©¯¸´Â°½¬´¹·Moulinex (¸³¸¶¯¸µ±©¨·µ¿Å·¬¶µµ¨¸²º-¯©§´¯Å).
— ”Ũµ¬©³¬¿§¹¬²Ã¸¹©µµ¹²¯¾´µ¬µ¹¾¯¸¹±¯¯¬-¬«´¬©´µªµº¼µ«§±²¯¬´¹µ³«µ²-´µµ¸ºÀ¬¸¹©²Æ¹Ã¸Æ©¸¬·©¯¸´µ³
½¬´¹·¬Moulinex.
— •¸²¯ ¶µ©·¬-«¬´ ¶·µ©µ« ´¬ ¯¸¶µ²Ã®º°¹¬ ¶·¯¨µ· Ž²Æ º¸¹·§´¬´¯Æ µ¶§¸´µ¸¹¯ µ¨·§¹¯¹¬¸Ã «²Æ ®§³¬´Â ©
¸¬·©¯¸´Â°½¬´¹·Moulinex (¸³¸¶¯¸µ±©¨·µ¿Å·¬¶µµ¨¸²º-¯©§´¯Å).
— –¬±²§«¯¹¬¶·¯¨µ·±§¨¬²Ã¶¯¹§´¯Æ¯²¯¿¹¬¶¸¬²Ã©©µ«º¯²¯«·ºªºÅ-¯«±µ¸¹Ã
œ¨¯·§°¹¬±§¨¬²Ã¶¯¹§´¯Æµ¹«¬¹¬°
“§¨¬²Ã¶¯¹§´¯Æ´¬«µ²-¬´´§¼µ«¯¹Ã¸Æ©¨²¯®¯¯²¯©±µ´¹§±¹¬¸´§ª·¬©§ÅÀ¯³¯¸ÆIJ¬³¬´¹§³¯¯¸¹µ¾´¯±µ³
¹¬¶²§¯²¯µ¸¹·Â³ºª²µ³
Ž²Æ©§¿¬°¨¬®µ¶§¸´µ¸¹¯¸²¬«º¬¹¯¸¶µ²Ã®µ©§¹Ã¹µ²Ã±µ§±¸¬¸¸º§·Â¯®§¶§¸´Â¬¾§¸¹¯Moulinex µ¹©¬¾§ÅÀ¯¬
¹·¬¨µ©§´¯Æ³©§¿¬ªµ¶·¯¨µ·§
–¬¶µ²Ã®º°¹¬¸Ã¶·¯¨µ·µ³¸©Â¿¬³¯´
Ž²Æ©§¿¬°¨¬®µ¶§¸´µ¸¹¯«§´´Â°¶·¯¨µ·µ¹©¬¾§¬¹«¬°¸¹©ºÅÀ¯³´µ·³§³¯¶·§©¯²§³
SŽ¯·¬±¹¯©§´¯®±µªµ´§¶·Æ-¬´¯Æ
S¥²¬±¹·µ³§ª´¯¹´§Æ¸µ©³¬¸¹¯³µ¸¹Ã
S—±·º-§ÅÀ§Æ¸·¬«§
S•§¹¬·¯§²Â±µ´¹§±¹¯·ºÅÀ¯¬¸¶·µ«º±¹§³¯¶¯¹§´¯Æ
ПЕРЕД НАЧАЛОМ ИСПОЛЬЗОВАНИЯ:
ŒÂ³µ°¹¬©¸¬§±¸¬¸¸º§·Â©µ«µ°¸³Â²µ³š¶µ²µ¸´¯¹¬¯¹À§¹¬²Ã´µ©Â¹·¯¹¬
Решетка и нож должны оставаться жирными. Необходимо покрыть их маслом.
Не включайте прибор в холостую, не смазав предварительно решетку.
ВНИМАНИЕ : Следует осторожно обращаться с конусами, так как лезвия конусов очень острые.
ЗАПУСК:
ГОЛОВКА МЯСОРУБКИ (
Сборка головки мясорубки (схемы 1.1 и 1.2)
–¬µ¨¼µ«¯³µ©®Æ¹Ã±µ·¶º¸A1 ®§®§ª·º®µ¾´ºÅªµ·²µ©¯´º´§¶·§©¯©¸§³µ¬¿¯·µ±µ¬µ¹©¬·¸¹¯¬±©¬·¼º‘§¹¬³
©¸¹§©Ã¹¬©¯´¹A2 («²¯´´ºÅµ¸Ã¸´§¾§²§) ©±µ·¶º¸A1.
Œ¸¹§©Ã¹¬´µ-¯®´¬·-§©¬ÅÀ¬°¸¹§²¯A3 ´§±µ·µ¹±ºÅµ¸Ã±µ¹µ·§Æ©Â¼µ«¯¹®§©¯´¹A2, ·¬-ºÀ¯³¯ª·§´Æ³¯±
¸¬¨¬”ŨºÅ·¬¿¬¹±º¶µ©§¿¬³º©Â¨µ·º´§«¬´Ã¹¬´§´µ-A3, ©Â¸¹º¶«µ²-¬´¶µ¶§¸¹Ã©¶§®±µ·¶º¸§A1.
‘§±·º¹¯¹¬´¬¨²µ±¯·º°¹¬ª§°±ºA5
Установка головки мясорубки (схема 2) :
S˜¬·¬« µ¹±²Å¾¬´´Â³ µ¹ ¶¯¹§´¯Æ ¨²µ±µ³ ³µ¹µ·§ H «¬·-¯¹¬ ªµ²µ©±º ³Æ¸µ·º¨±¯ ®§ª·º®µ¾´§Æ ªµ·²µ©¯´§
´§¶·§©²¬´§©¶·§©µšµ¸¹Â±º°¹¬¨§°µ´¬¹´Â¼¸µ¬«¯´¬´¯Æªµ²µ©±¯³Æ¸µ·º¨±¯¯¶§®§¨²µ±§³µ¹µ·§
•µ²µ©º ³Æ¸µ·º¨±¯ ©¸¹§©Ã¹¬ © ¨²µ± ³µ¹µ·§ H , ®§ª·º®µ¾´ºÅ ªµ·²µ©¯´º ¶µ©¬·´¯¹¬ ®§¹¬³ ©²¬©µ «µ ³¬¹±¯
®§ª·º®µ¾´§Æªµ·²µ©¯´§«µ²-´§®§´Æ¹Ã©¬·¹¯±§²Ã´µ¬¶µ²µ-¬´¯¬
Sœ¸¹§´µ©¯¹¬¸Á¬³´Â°¶µ««µ´B ´§©Â¸¹º¶Â®§ª·º®µ¾´µ°ªµ·²µ©¯´Â³Æ¸µ·º¨±¯
Œ±²Å¾¯¹¬¶·¯¨µ·µ´ªµ¹µ©±Ä±¸¶²º§¹§½¯¯
š-«ª§³£ªžœ©¤¡
˜·¯ªµ¹µ©Ã¹¬´¬µ¨¼µ«¯³µ¬«²Æ·º¨±¯±µ²¯¾¬¸¹©µ¶·µ«º±¹µ©º«§²¯¹¬±µ¸¹¯¼·ÆÀ¯¯¸º¼µ-¯²¯Æ
–§·¬-ù¬³Æ¸µ±º¸±§³¯¶·¯¨²¯®¯¹¬²Ã´µ¸³X 2 ¸³
˜µ«ªµ²µ©±º³Æ¸µ·º¨±¯¶µ¸¹§©Ã¹¬¬³±µ¸¹Ã
–§-³¯¹¬´§¶µ²µ-¬´¯¬TIU±´µ¶±¯®§¶º¸±§µ¸¹§´µ©±¯F , ¾¹µ¨Â©±²Å¾¯¹Ã¶·¯¨µ·
˜µ²µ-¯¹¬±º¸±¯³Æ¸§´§¶µ««µ´B ¯¶µµ«´µ³ºµ¶º¸±§°¹¬©µ¹©¬·¸¹¯¬¸¶µ³µÀÃŹµ²±§¹¬²ÆC.
Ни в коем случае не пытайтесь проталкивать пальцами или другим инструментом.
¹µ¨Â¶µ²º¾¯¹Ã³Æª±µ¬¹¬¸¹µ“¯¨¨¬¯²¯“¬»¹§¶·µ¶º¸¹¯¹¬³Æ¸µ·§®§¾¬·¬®³Æ¸µ·º¨±º«µ¶µ²º¾¬´¯Æ³§¸¸Â
-¬²§¬³µ°±µ´¸¯¸¹¬´½¯¯
Полезный совет:
Œ±µ´½¬·§¨µ¹Â©Â³µ-¬¹¬¶·µ¶º¸¹¯¹Ã´¬¸±µ²Ã±µ±º¸±µ©¼²¬¨§¾¹µ¨Â©Â¿²¯µ¸¹§¹±¯·º¨²¬´µªµ³Æ¸§
Что делать в случае застревания? (схема 3)
ŒÂ±²Å¾¯¹¬³Æ¸µ·º¨±º´§-§©´§¶µ²µ-¬´¯¬TU±´µ¶±¯®§¶º¸±§µ¸¹§´µ©±¯F.
8
‘§¹¬³´¬¸±µ²Ã±µ¸¬±º´««¬·-¯¹¬´§-§¹µ°±´µ¶±ºT™¬©¬·¸UG , ¾¹µ¨Âµ¸©µ¨µ«¯¹Ã®§¸¹·Æ©¿¯¬¶·µ«º±¹Â
–§-³¯¹¬´§¶µ²µ-¬´¯¬TIU±´µ¶±¯®§¶º¸±§µ¸¹§´µ©±¯F , ¾¹µ¨Â¶·µ«µ²-¯¹Ã·§¨µ¹º
Важно: «µ-«¯¹¬¸Ã µ±µ´¾§¹¬²Ã´µ°µ¸¹§´µ©±¯ ¶·¯¨µ·§¶¬·¬«¹¬³ ±§± §±¹¯©¯·µ©§¹Ã ±µ³§´«º T˜º¸±U¯²¯
±µ³§´«ºT™¬©¬·¸U
АКСЕССУАР КЕББЕ (
Сборка (схема 4) :
Œ¸¹§©Ã¹¬©¯´¹A2 ©±µ·¶º¸A1 ªµ²µ©±¯³Æ¸µ·º¨±¯œ¸¹§´µ©¯¹¬»¯²Ã¬·´ºÅ´§¸§«±ºI1 ¹§±¾¹µ¨Â
©Â¸¹º¶¶µ¶§²©¶§®±µ·¶º¸§A1. –§«¬´Ã¹¬±µ²Ã½¬©µ¬º¶²µ¹´¬´¯¬I2 ´§»¯²Ã¬·´ºÅ´§¸§«±º¯®§±·º¹¯¹¬ª§°±ºA5
«µ±µ´½§
šµ¨·§´´ºÅ¹§±¯³µ¨·§®µ³ªµ²µ©±ºº¸¹§´µ©¯¹¬´§¨²µ±³µ¹µ·§±§±º±§®§´µ©¸¼¬³¬
Примечание: «§´´Â°§±¸¬¸¸º§·¯¸¶µ²Ã®º¬¹¸Æ¨¬®·¬¿¬¹±¯¯¨¬®´µ-§
ВОРОНКА ДЛЯ КОЛБАСОК (ž£œž¤-¤¨ª-®¤ª®¨ª ¡§¤
Ž§´´Â° §±¸¬¸¸º§· ¶·¯±·¬¶²Æ¬³Â° ± ªµ²µ©±¬ ³Æ¸µ·º¨±¯ ¶µ®©µ²¯¹ «¬²§¹Ã ²Å¨Â¬ ±µ²¨§¸±¯ ±µ¹µ·Â¬ ©§³
µ¸¹§´¬¹¸Æ¹µ²Ã±µ¶·¯¶·§©¯¹Ã¶µ¸©µ¬³º©±º¸º
Сборка (схема 5)
Œ¸¹§©Ã¹¬©¯´¹A2 ©±µ·¶º¸A1. œ¸¹§´µ©¯¹¬®§¹¬³©µ·µ´±ºJ2, ®§±·º¹¯¹¬ª§°±ºA5 «µ±µ´½§œ¸¹§´µ©¯¹¬ªµ²µ©±º
³Æ¸µ·º¨±¯¸µ¨·§´´ºÅ¹§±¯³µ¨·§®µ³´§¨²µ±³µ¹µ·§±§±º±§®§´µ©¸¼¬³¬
˜·¯³¬¾§´¯¬«§´´Â°§±¸¬¸¸º§·¯¸¶µ²Ã®º¬¹¸Æ¨¬®·¬¿¬¹±¯¯¨¬®´µ-§œ¸¹·µ°¸¹©µ«²Æ½¬´¹·¯·µ©§´¯Æ©¯´¹§
¶µ®©µ²Æ¬¹º«¬·-§¹Ã©¯´¹©´º-´µ³¶µ²µ-¬´¯¯¶·¯¶·¯ªµ¹µ©²¬´¯¯·¬½¬¶¹§
š-«ª§³£ªžœ©¤¡
Важно: «§´´Â°§±¸¬¸¸º§·¸²¬«º¬¹¯¸¶µ²Ã®µ©§¹Ã¹µ²Ã±µ¶µ¸²¬¹µªµ±§±³Æ¸µ¨Â²µ¶µ·º¨²¬´µ¸¶¬½¯¯«µ¨§©²¬´Â
¯³§¸¸§¼µ·µ¿µ¶¬·¬³¬¿§´§
˜·¬«©§·¯¹¬²Ã´µ©Â³µ¾¬´´ºÅ©¹¬¶²µ°©µ«¬±µ²¨§¸´ºÅµ¨µ²µ¾±º¸¹§©¿ºÅ¸´µ©§Ä²§¸¹¯¾´µ°´§«¬´Ã¹¬´§
©µ·µ´±ºJ2 , µ¸¹§©¯©¶·¯¨²¯®¯¹¬²Ã´µ¸³
™º¨²¬´µ¬³Æ¸µ¶µ³¬¸¹¯¹¬©®§ª·º®µ¾´ºÅªµ·²µ©¯´º±µ·¶º¸§A1 ³Æ¸µ·º¨±¯A, ©±²Å¾¯¹¬¯¹µ²±§°¹¬¹µ²±§¹¬²¬³
C ¹§±¾¹µ¨Â·º¨²¬´µ¬³Æ¸µ©Â¿²µ´§±·§°©µ·µ´±¯
ŒÂ±²Å¾¯¹¬¶·¯¨µ·
š«¬²§°¹¬º®¬²¸µ¸¹§©²¬´´Â¼¸³±µ²¨§¸´µ°µ¨µ²µ¾±¯˜¬·¬«©¯´Ã¹¬º®¬²±±·§Å©µ·µ´±¯¾¹µ¨Â´¬¨²µ±¯·µ©§¹Ã
©µ®«º¼©±µ²¨§¸´µ°µ¨µ²µ¾±¬
Œ±²Å¾¯¹¬¶·¯¨µ·¯¶·µ«µ²-§°¹¬´§±²§«Â©§¹Ã·º¨²¬´µ¬³Æ¸µš²¬«¯¹¬®§±µ²¨§¸´µ°µ¨µ²µ¾±µ°¶µ±§µ´§´¬
´§¶µ²´¯¹¸Æ ¹µ¨Â¸¯²Ã´µ´¬·§¸¹Æª¯©§¹Ãµ¨µ²µ¾±º´¬«¬²§°¹¬¸²¯¿±µ³¹µ²¸¹Â¼±µ²¨§¸µ±
Примечание: работу лучше выполнять вдвоем, один накладывает рубленое мясо, а второй держит
ª•ª§ª±¦¯«ª¦œª©œ©œ«ª§©´¡®-´
“µ²¨§¸±¯³µ-´µ«¬²§¹Ã²Å¨µ°-¬²§¬³µ°«²¯´Â¸-¯³§Æ¯¶¬·¬±²§«Â©§Æµ¨µ²µ¾±º¸³¬¸¹§´§³¬¸¹µ
¹µ¨Â¶µ²º¾¯¹Ã±§¾¬¸¹©¬´´Â¬±µ²¨§¸±¯´¬µ¨¼µ«¯³µ¸²¬«¯¹Ã®§¹¬³¾¹µ¨Â¶·¯´§¶µ²´¬´¯¯©µ®«º¼´¬¸µ¨¯·§²¸Æ
©´º¹·¯·¬±µ³¬´«º¬³«¬²§¹Ã±µ²¨§¸±¯«²¯´µ°¸³µ¹«¬²Æ°¹¬±µ²¨§¸±¯µ¸¹§©²ÆƱº¸µ±µ¨µ²µ¾±¯«²Æ
»µ·³¯·µ©§´¯Æº®²§
ОВОЩЕРЕЗКА (ž£œž¤-¤¨ª-®¤ª®¨ª ¡§¤
š-«ª§³£ªžœ©¤¡
̌¨¬·¯¹¬±µ´º¸¸µµ¹©¬¹¸¹©ºÅÀ¯°-¬²§¬³µ³º¯¸¶µ²Ã®µ©§´¯Å
ÌŒ¸¹§©Ã¹¬©Â¨·§´´Â°±µ´º¸©µ¹©¬·¸¹¯¬´§¼µ«ÆÀ¬¬¸Æ©¶¬·¬«´¬°¾§¸¹¯±µ·¶º¸§K1, ±µ´º¸«µ²-¬´®§´¯³§¹Ã
¶·§©¯²Ã´µ¬¶µ²µ-¬´¯¬©´º¹·¯´¬¸ºÀ¬ªµÄ²¬³¬´¹§·¯¸
̘µ«±²Å¾¯¹¬¶·¯¨µ·±¶¯¹§´¯Å
Ì–§-³¯¹¬µ«¯´¯²¯«©§·§®§´§±´µ¶±º®§¶º¸±§µ¸¹§´µ©±¯F , ¾¹µ¨Â¨²µ±¯·µ©§¹Ã±µ´º¸·¯¸
ÌŒ±²Å¾¯¹¬ ¶·¯¨µ· ®§¹¬³ ¾¬·¬® ®§ª·º®µ¾´ºÅ ªµ·²µ©¯´º ±µ·¶º¸§ ´§±²§«Â©§°¹¬ ¶·µ«º±¹Â K1 (·¯¸ ) ¯
¶·µ¹§²±¯©§°¹¬¯¼¸¶µ³µÀÃŹµ²±§¹¬²ÆK2 (·¯¸).
● ¹µ¨Â®§³¬´¯¹Ã±µ´º¸´¬µ¨¼µ«¯³µ«µ-«§¹Ã¸Æ¶µ²´µ°µ¸¹§´µ©±¯±µ´º¸§œ«¬·-¯©§°¹¬´§-§¹µ°©¹¬¾¬´¯¬
¸¬±º´«Â±´µ¶±ºG ™¬©¬·¸±µ´º¸©Â°«¬¹§©¹µ³§¹¯¾¬¸±¯¬¤-
ВНИМАНИЕ : Перед включением прибора убедитесь, что конус правильно занял положение на несущем
элементе.
9
š-«ª§³£¯¥®¡¬¡¦ª¨¡© ¯¡¨²¥¦ª©¯- §´¦œ¢ ªŸª®¤«œ«¬ª ¯¦®œ
›ª©¯-®¡¬¦œ-
›ª©¯- §´¬¡£¦¤
›ª©¯- §´
®ª©¦¤¨¤§ª¨®¤¦œ¨¤.
-¦ª•§¡©¤´/
•
µ·±µ©Ã
* *
“§¨§¾±¯
* *
“§·¹µ»¬²Ã
* *
—ªº·¬½
* *
˜¬·¬½
* *
”º±
*
š©¬±²§
*
“§¶º¸¹§¨¬²§Æ±·§¸´§Æ
*
¦¨²µ±¯
*
™¬«Ã±§¾¬·´§Æ
* *
“µ·´¬©µ°¸¬²Ã«¬·¬°
*
‹§´§´Â
*
˜§·³¬®§´
*
•·Å°¬·
* *
¡µ±µ²§«
* *
šº¼µ°¼²¬¨¸º¼§·¯
*
”¬¸´µ°µ·¬¼ª·¬½±¯°µ·¬¼³¯´«§²Ã
*
“µ±µ¸µ©Â°µ·¬¼
*
ž£œž¤-¤¨ª-®¤ª®¨ª ¡§¤
Советы для получения хорошего результата:
¹µ¨Â¶µ²º¾¯¹Ãº«µ©²¬¹©µ·¯¹¬²Ã´Â°·¬®º²Ã¹§¹¯¶·¬«µ¹©·§¹¯¹Ã®§¸¹·¬©§´¯¬¶·µ«º±¹µ©©±µ·¶º¸¬¯¸¶µ²Ã®º¬³Â¬
¯´ª·¬«¯¬´¹Â«µ²-´Â¨Â¹Ã±·¬¶±¯³¯¯¸©¬-¯³¯–¬¯¸¶µ²Ã®º°¹¬¶·¯¨µ·¾¹µ¨Â¹¬·¬¹Ã¯²¯·¬®§¹Ã²µ³¹¯±§³¯
¶·µ«º±¹Â¸²¯¿±µ³-¬¸¹±¯¬¹§±¯¬±§±¸§¼§·¯²¯±º¸±¯³Æ¸§™§®·¬®§°¹¬¶·µ«º±¹Â¾¹µ¨Â¯¼¨Â²µ¶·µÀ¬
¶·µ¹§²±¯©§¹Ã©µ¹©¬·¸¹¯¬±µ·¶º¸§
ЧИСТКА:
•
Перед чисткой блока мотора Н всегда отключайте прибор от питания.
Ì–¬¶µª·º-§°¹¬¨²µ±³µ¹µ·§©©µ«º´¬¶µ«¸¹§©²Æ°¹¬¬ªµ¶µ«©µ«º ¯¸¹¯¹¬¨²µ±³µ¹µ·§©²§-´µ°¹·Æ¶±µ°
˜µ¸²¬¾¯¸¹±¯¸²¬«º¬¹¶µ²´µ¸¹Ãũ¸º¿¯¹Ã
Аксессуары мясорубки :
š´¯³¯¹¬¨²µ±¯·µ©±ºªµ²µ©±¯¯²¯§±¸¬¸¸º§·§µ©µÀ¬·¬®±¯´§-§©´§±´µ¶±ºE.
— ˜µ©¬·´¯¹¬ªµ²µ©±º³Æ¸µ·º¨±¯A ©¶·§©µ¯¶µ¹Æ´¯¹¬´§¸¬¨Æ¾¹µ¨Â·§®Á¬«¯´¯¹Ã¨²µ±³µ¹µ·§H.
— ¹µ¨Â¸´Æ¹Ãªµ²µ©±ºµ©µÀ¬·¬®±¯A, ©Â´Ã¹¬¹µ²±§¹¬²ÃC ¯¸´¯³¯¹¬¶µ««µ´B, µ¹©¯´¹¯¹¬ª§°±ºA5, ¸´¯³¯¹¬
·¬¿¬¹±ºA4, ´µ-A3 ¯©¯´¹A2.
— Осторожно обращайтесь с острыми запчастями.
ŒÂ³µ°¹¬©¸¬®§¶¾§¸¹¯¶µ«ªµ·Æ¾¬°©µ«µ°¸³Â²µ³¸¶µ²µ¸´¯¹¬¯¹À§¹¬²Ã´µ©Â¹·¯¹¬
–¬³µ°¹¬ªµ²µ©±º³Æ¸µ·º¨±¯A ©¶µ¸º«µ³µ¬¾´µ°³§¿¯´¬¹µ¬¸¹Ã±µ·¶º¸A1, ©¯´¹A2, ª§°±ºA5, ´µ-A3 ¯
·¬¿¬¹±¯A4
Аксессуары овощерезки (в зависимости от модели) :
Ì“µ·¶º¸K1¹µ²±§¹¬²ÃK2±µ´º¸ÂK3a, K3b, K3c³µ-´µ³Â¹Ã©¶µ¸º«µ³µ¬¾´µ°³§¿¯´¬©±µ·®¯´¬
¯¸¶µ²Ã®ºÆ¶·µª·§³³ºT¥“—U¯²¯T–•š’”¤–—•™¦‘–—•U
¶Следует осторожно обращаться с конусами, так как лезвия конусов очень острые.
Ì•¸²¯¶²§¸¹³§¸¸µ©Â¬¾§¸¹¯¶µ±·§¸¯²¯¸Ãµ¹¶·µ«º±¹µ©¹§±¯¼±§±´§¶·¯³¬·³µ·±µ©Ã¶·µ¹·¯¹¬¯¼¹·Æ¶±µ°
¸³µ¾¬´´µ°©¶¯À¬©µ³³§¸²¬®§¹¬³©Â³µ°¹¬µ¨Â¾´Â³¸¶µ¸µ¨µ³
ХРАНЕНИЕ:
™¬¿¬¹±¯´µ-º¸¹·µ°¸¹©µ«²Æ½¬´¹·¯·µ©§´¯Æ©¯´¹§§±¸¬¸¸º§·Â“¬¨¨¬¯«²Æ±µ²¨§¸µ±I1, I2 ¯J1, J2³µ-´µ
¼·§´¯¹Ã´§®§«´¬°¸¹¬´±¬¶·¯¨µ·§©¸¶¬½¯§²Ã´µ³µ¹«¬²¬´¯¯D
10
ЕСЛИ ПРИБОР НЕ РАБОТАЕТ, ЧТО ДЕЛАТЬ?
˜·µ©¬·Ã¹¬¶¯¹§´¯¬
•¸²¯¶·¯¨µ·¹§±¯´¬®§·§¨µ¹§²µ¨·§¹¯¹¬¸Ã©¸¬·©¯¸´Â°½¬´¹·!;@85:1B
¸³¸¶¯¸µ±©¨·µ¿Å·¬¶µµ¨¸²º-¯©§´¯Å
СРОК ЭКСПЛУАТАЦИИ ЭЛЕКТРОННЫХ ИЛИ ЭЛЕКТРИЧЕСКИХ
ПРИБОРОВ ЗАКАНЧИВАЕТСЯ
Поучаствуем в защите окружающей среды!
Œ§¿¶·¯¨µ·¸µ«¬·-¯¹³´µªµ³§¹¬·¯§²§¶·¯ªµ«´µªµ±¶¬·¬·§¨µ¹±¬
š«§°¹¬¬ªµ©¶º´±¹¸¨µ·§¯²¯©¸¬·©¯¸´Â°½¬´¹·«²Æ¶¬·¬·§¨µ¹±¯
РЕЦЕПТЫ
Обратить внимание: Для рецептов, для которых требуется более высокая мощность, время использования прибора не
ª§¢©ª«¬¡ž²шать 20 сек.
Пример рецепта (со средней решеткой – отверстия 4,7мм .
!
¦ª®§¡®²¦¤••¡-¥ªŸ¯¬®ª¨V«ª¬ций
Приготовление: 1 ч. Поставить на 1 ч в холодильник
š©Ÿ¬¡ ¤¡©®² §´«œ-®²¦¤••¡
ª³Æ¸§Wª¨º²Ãªº·§«·µ¨²¬´µ¬®¬·´µW¸µ²Ã
š©Ÿ¬¡ ¤¡©®² §´-ª¯-œ
±ª°µªº·¹§W¶º¾µ±±µ·¯§´«·§W®º¨¾¯±§¾¬¸´µ±§W¸¹µ²µ©Â¬²µ-±¯
±º±º·º®´µ°³º±¯W¸µ²Ã¶¬·¬½
™§®·¬-ù¬³Æ¸µ´§±º¸±§œ¸¹§´µ©¯¹¬·¬¿¬¹±º³³©³Æ¸µ·º¨±º˜·µ¶º¸¹¯¹¬³Æ¸µ«µ¨§©Ã¹¬¨º²Ãªº·
˜µ¸µ²¯¹¬¶µ¸¹§©Ã¹¬¶µ²º¾¬´´ºÅ³§¸¸º©¼µ²µ«´µ¬³¬¸¹µ´§¾§¸
¹µ¨Â¸»µ·³¯·µ©§¹Ã±µ¹²¬¹Â±¯¨¨¬º¸¹§´µ©¯¹¬´§³Æ¸µ·º¨±º§±¸¬¸¸º§·±¬¨¨¬˜·µ¶º¸¹¯¹¬³§¸¸º±·§Æ
±µ¹²¬¹Â¸±²¬°¹¬´¬¨µ²Ã¿¯³±µ²¯¾¬¸¹©µ³©µ«Â
Ž²Æ¶·¯ªµ¹µ©²¬´¯Æ¸µº¸§¶·µ³µ°¹¬¶º¾µ±±µ·¯§´«·§¶·µ³µ±´¯¹¬¨º³§ªµ°¯µ¹µ·©¯¹¬²¯¸¹ÃƘµ¾¯¸¹¯¹¬
¾¬¸´µ±¯·§®«§©¯¹¬¬ªµ ¬¸´µ±¯±µ·¯§´«·¶µ«¬·-¯¹¬³¯´º¹Â´§¸±µ©µ·µ«±¬´§¸²§¨µ³µª´¬—¸¹§©Ã¹¬
©¸¹µ·µ´º
Œ®¨¬°¹¬°µªº·¹¯±º±º·º®´ºÅ³º±º¶µ¸µ²¯¹¬¶µ¶¬·¾¯¹¬ŒÂ²¬°¹¬©¸¬©±§¸¹·Å²Å¾¬·¬®³¬²±µ¬¸¯¹¬¾±µ
Žµ©¬«¯¹¬¸³¬¸Ã«µ±¯¶¬´¯Æ®§¹¬³º³¬´Ã¿¯¹¬µªµ´Ã˜·¯¸³§¹·¯©§°¹¬®§¶·¯ªµ¹µ©²¬´¯¬³¶µ¸¹µÆ´´µ
¶µ³¬¿¯©§Æ¾¹µ¨Â°µªº·¹´¬¶·¯¸¹§©§²
Žµ¨§©Ã¹¬¾¬¸´µ±¯±µ·¯§´«·˜µ«¬·-¯¹¬±µ¹²¬¹Â±¯¨¨¬©ªµ·Æ¾¬°¸³¬¸¯³¯´º¹
Вариант: ŒÂ¹§±-¬³µ-¬¹¬´§¾¯´¯¹Ã±µ¹²¬¹Â¸³¬¸ÃŲº±§¯·º¨²¬´µªµ³Æ¸§¶·¬«©§·¯¹¬²Ã´µ¶·µ-§·¬´´µªµ©
´¬¨µ²Ã¿µ³±µ²¯¾¬¸¹©¬³§¸²§¸¶·Æ´µ¸¹Æ³¯
САМСА
«ª¬ции – Приготовление: 40 мин. Время запекания: 35 мин.
š©Ÿ¬¡ ¤¡©®²
ª¸²µÇ´µªµ¹¬¸¹§Wªªµ©Æ«¯´ÂW²º±µ©¯½§WÆ°½§W¶§¶·¯±§W³µ²µ¹§Æ±µ·¯½§¯
¯³¨¯·ÃW¶¬¹·º¿±§W±µ·¯§´«·W±¬·©¬²ÃW¸§¼§·Wª³§¸²§Wµ²¯©±µ©µ¬³§¸²µ
œ¸¹§´µ©¯¹¬·¬¿¬¹±º¸µ¹©¬·¸¹¯¬³³³©³Æ¸µ·º¨±º™§®·¬-ù¬²º±´§¾§¸¹¬°¯¶·µ¶º¸¹¯¹¬¾¬·¬®
³Æ¸µ·º¨±º˜µ«µª·¬°¹¬¸¹µ²µ©Â¬²µ-±¯µ²¯©±µ©µªµ³§¸²§©¸µ¹¬°´¯±¬®§¹¬³«µ¨§©Ã¹¬²º±˜µ¹µ³¯¹¬´§
¸²§¨µ³µª´¬«µ¶µ²º¾¬´¯Æ®µ²µ¹¯¸¹µªµ½©¬¹§—¹¸¹§©Ã¹¬©¸¹µ·µ´º
’®³¬²Ã¾¯¹¬ªµ©Æ«¯´º˜µ«·º³Æ´Ã¹¬´§¸²§¨µ³µª´¬©³¬¸¹¬¸²º±µ³©¹¬¾¬´¯¬³¯´º¹—¹¸¹§©Ã¹¬©¸¹µ·µ´º
˜·¯¶·§©Â¶·µ¶º¸¹¯¹¬¾¬·¬®³Æ¸µ·º¨±ºŒÂ¸Â¶Ã¹¬¯¼©¸µ¹¬°´¯±©³¬¸¹¬¸¸µ²Ãů¶¬·½¬³«µ¨§©Ã¹¬
¶µ²¾§°´µ°²µ-±¯¶§¶·¯±¯À¬¶µ¹±º¯³¨¯·Æ¯´¬³´µªµ±µ·¯½Â
‘§¹¬³©©¬«¯¹¬©®¨¯¹Â¬Æ°½§¶µ³¬¿§°¹¬¯©Â±²Å¾¯¹¬µªµ´Ã
™§¸±§¹§°¹¬«µ©µ²Ã´µ¹µ´±µ¸²µÇ´µ¬¹¬¸¹µ™§®·¬-ù¬´§±©§«·§¹Â¶µ¸³š³§-ù¬³§¸²µ³¯¸¶µ²Ã®º¬³ºÅ
¶µ©¬·¼´µ¸¹Ã
–§±§-«Â°±©§«·§¹¶µ²µ-¯¹¬´¬³´µªµ»§·¿§‘§©¬·´¯¹¬¸±²¬¯©®§¹¬³±·§Æ
•§·Ã¹¬¸§³¸§‰©±¯¶ÆÀ¬³³§¸²¬˜µ¸²¬-§·±¯©Â²µ-¯¹¬´§´¬¸±µ²Ã±µ³¯´º¹´§©¶¯¹Â©§ÅÀºÅ¨º³§ªº
11
˜µ¸Â¶Ã¹¬¸§¼§·µ³¯±µ·¯½¬°˜µ«§©§°¹¬ªµ·Æ¾¯³
Вариант:
œ¸¹§´µ©¯¹¬·¬¿¬¹±º¸µ¹©¬·¸¹¯Æ³¯³³©³Æ¸µ·º¨±º™§®·¬-ù¬²º±´§¾§¸¹¬°–§·º¨¯¹¬´¬³´µªµ³Æ¸§
²º±¶·µ¶º¸¹¯¹¬¾¬·¬®³Æ¸µ·º¨±º
˜·µ¶º¸¹¯¹¬¬À¬´¬³´µªµ³Æ¸§®§¹¬³¶·¯¶·§©Â¯´§±µ´¬½µ¸¹§¹µ±³Æ¸§Œ®¨¬°¹¬Æ°½§¯©©¬«¯¹¬¯¼©»§·¿
©³¬¸¹¬¸¸µ²Ãů¶¬·½¬³¶µ²¾§°´µ°²µ-±µ°¶§¶·¯±¯À¬¶µ¹±µ°¯³¨¯·Æ¯´¬¨µ²Ã¿¯³±µ²¯¾¬¸¹©µ³±µ·¯½Â
Œ¸¬¶¬·¬³¬¿§°¹¬˜µ©¹µ·¯¹¬¶º´±¹Â
ПИРОЖКИ С РЫБОЙ
¨œ§¡©³¦¤¡«¤¬ª¢¦¤-¬²•ª¥
«ª¬ции – Приготовление: 25 мин. Время запекания: 10 — 15 мин.
š©Ÿ¬¡ ¤¡©®²
ª¸²µÇ´µªµ¹¬¸¹§Wª©§·¬´µ°·Â¨Â¯²¯±µ¶¾¬´µªµ²µ¸µ¸ÆWÆ°½§¸©§·¬´´Â¼©±·º¹ºÅ
W¶º¾µ±«º¿¯¸¹µªµº±·µ¶§W²º±µ©¯½ÂWª¸µ²Ç´µªµ¸²¯©µ¾´µªµ³§¸²§³§²¬´Ã±¯³¯±º¸µ¾±§³¯W·§¸¹¯
¹¬²Ã´µ¬³§¸²µ
œ¸¹§´µ©¯¹·¬¿¬¹±º¸µ¹©¬·¸¹¯Æ³¯³³©³Æ¸µ·º¨±º™§®·¬-ù¬²º±´§¾§¸¹¬°¯¶·µ¶º¸¹¯¹¬¾¬·¬®
³Æ¸µ·º¨±º˜·¯¶º¸¹¯¹¬´§¸²§¨µ³µª´¬©¸µ¹¬°´¯±¬©´¬¨µ²Ã¿µ³±µ²¯¾¬¸¹©¬·§¸¹¯¹¬²Ã´µªµ³§¸²§—¸¹§©Ã¹¬
©¸¹µ·µ´º
–§·¬-ù¬´¬³´µªµ·Â¨Â«µ¨§©Ã¹¬®§¹¬³¶·¯ªµ¹µ©²¬´´Â°²º±¸²¯©µ¾´µ¬³§¸²µ«º¿¯¸¹Â°º±·µ¶¯
µ¸¹§©¿ºÅ¸Æ·Â¨º
™§¸±§¹§°¹¬¹µ´±¯³¸²µ¬³¸²µÇ´µ¬¹¬¸¹µ©Â·¬-ù¬±·ºª¯¸¹§±§´µ³¯²¯¨µ±§²µ³¨µ²¬¬¯²¯³¬´¬¬¨µ²Ã¿¯³
˜·¬«©§·¯¹¬²Ã´µ·§®µª·¬°¹¬«º¼µ©±º«µRC (¶).
5. –§±§-«Â°±·º-µ±¶µ²µ-¯¹¬´¬³´µªµ»§·¿§¸²µ-¯¹¬¹¬¸¹µ¯®§±²¬°¹¬±·§Æ
•µ¹µ©Ã¹¬©«º¼µ©±¬³¯´º¹
›ª®§¡®²¤£Ÿªž´ ¤©²
«ª¬ции – Приготовление: 20 мин. Время запекания: 10 — 15 мин.
š©Ÿ¬¡ ¤¡©®²
±ªªµ©Æ«¯´ÂW²º±µ©¯½§W®º¨¾¯±¾¬¸´µ±§W±º¸µ¾±§¾¬·´µªµ¼²¬¨§®§³µ¾¬´´µªµ©
³µ²µ±¬WÆ°½§W±§·¹µ¿¯´§W³º±§W¸µ²Ã¶¬·¬½
Ž²Æ¶·¯ªµ¹µ©²¬´¯Æŵªµ·¬½¬¶¹§©Â¨¬·¯¹¬´¬-¯·´Â¬±º¸±¯ªµ©Æ«¯´Â˜·µ¶º¸¹¯¹¬³Æ¸µ¾¬·¬®³Æ¸µ·º¨±º¸
±º¸µ¾±§³¯¼²¬¨§
–§·¬-ù¬²º±¹µ´±¯³¯²µ³¹¯±§³¯±µ´º¸µ³K3b¯´§¹·¯¹¬¾¬¸´µ±¯±§·¹µ»¬²Ã±µ´º¸µ³¹¬·±µ°K3a
š³¬¿§°¹¬·º¨²¬´µ¬³Æ¸µ¸¼²¬¨µ³´§·¬®§´´Â³²º±µ³¾¬¸´µ±µ³¯±§·¹µ»¬²¬³
Žµ¨§©Ã¹¬©¸³¬¸ÃÆ°½§³µ²µ¹Â°¾¬·´Â°¶¬·¬½¸µ²Ã¯¸»µ·³¯·º°¹¬±µ¹²¬¹Â
—¨©§²Æ°¹¬±µ²¬¹Â©³º±¬¯-§·Ã¹¬©·§¸¹¯¹¬²Ã´µ³³§¸²¬
›œ¬®ª°¡§³©²¥«¯ ¤©Ÿ«¬¤Ÿª®ªž§¡©©²¥ž ¯ховке
«ª¬ции – Приготовление: 30 мин. Время запекания: 45 мин.
š©Ÿ¬¡ ¤¡©®²
®º¨¾¯±¾¬¸´µ±§W¸¹µ²µ©µ°²µ-±¯¸²¯©µ¾´µªµ³§¸²§W¸¹µ²µ©Â¬²µ-±¯·§¸¹¯¹¬²Ã´µªµ
³§¸²§W¸µ²Ã¶¬·¬½
˜µ¾¯¸¹¯¹¬©Â³µ°¹¬¯©Â¸º¿¯¹¬±§·¹µ»¬²Ã–§·¬-ù¬¬ªµ¹µ´±¯³¯²µ³¹¯±§³¯±µ´º¸µ³K3b
•µ©Æ«¯´º¶·µ¶º¸¹¯¹¬¾¬·¬®³Æ¸µ·º¨±º¯¶·µ-§·Ã¹¬·º¨²¬´µ¬³Æ¸µ©«º¼µ©±¬©³§¸²¬©¹¬¾¬´¯¬³¯´º¹
–§¹·¯¹¬©´º¹·¬´´ÅŶµ©¬·¼´µ¸¹Ã¨²Å«§¾¬¸´µ±µ³®§¹¬³¸³§-ù¬µ«´µ°¾§¸¹ÃŸ²¯©µ¾´µªµ³§¸²§
š²µÆ³¯©Â²µ-¯¹¬±§·¹µ»¬²Æ¯·º¨²¬´µªµ³Æ¸§¶µ¸µ²¯¹¬¶µ¶¬·¾¯¹¬®§¹¬³©Â²µ-¯¹¬µ¸¹§©¿¯°¸Æ
±§·¹µ»¬²Ã
Œ®¨¬°¹¬Æ°½§¸¹¬¶²Â³³µ²µ±µ³¯©Â²¬°¹¬¸³¬¸Ã´§±§·¹µ»¬²ÃŽµ¨§©Ã¹¬µ¸¹§©¿¬¬¸Æ¸²¯©µ¾´µ¬³§¸²µ
•µ¹µ©Ã¹¬©«º¼µ©±¬¶·¯¸·¬«´¬°¹¬³¶¬·§¹º·¬³¯´º¹
Печеные яблоки с миндалем
«ª¬ции – Приготовление: 40 мин. Время запекания: 30 мин.
š©Ÿ¬¡ ¤¡©®²
ƨ²µ±Wª¸§¼§·§¸Â·½§Wª¸²¯©µ¾´µªµ³§¸²§Wª½¬²Ã´µªµ³¯´«§²ÆW³²¸²¯©µ±W
¾§°´§Æ²µ-±§±µ·¯½Â
˜µ¾¯¸¹¯¹¬Æ¨²µ±¯º«§²¯¹¬¸¬·«½¬©¯´º¯·§®·¬-ù¬´§¾¬¹©¬·¹¯–§·¬-ù¬Æ¨²µ±¯¹µ´±¯³¯²µ³¹¯±§³¯
±µ´º¸µ³K3b¯¶·µ-§·Ã¹¬©ª¸²¯©µ¾´µªµ³§¸²§š³§-ù¬¸²¬ª±§³§¸²µ³¨²Å«µ¯©Â²µ-¯¹¬®§¸§¼§·¬´´Â¬
ƨ²µ±¯´§«´µ’®³¬²Ã¾¯¹¬³¯´«§²Ã©¶µ·µ¿µ±±µ´º¸µ³K3cŒ¸§²§¹´¯½¬¶¬·¬³¬¿§°¹¬³µ²µ¹Â°³¯´«§²Ã
¸²¯©±¯¯±µ·¯½ºŒÂ²µ-¯¹¬¸³¬¸Ã´§Æ¨²µ±¯¯¶µ¸Â¶Ã¹¬¸§¼§·µ³¸Â·½µ³‹²Å«µ¶µ¸¹§©Ã¹¬©«º¼µ©±º
ªµ¹µ©Ã¹¬¶·¯RC.
12
ŽÆ±ºÈ³µ®§¶µ±º¶±º¶·¯²§«º¸¬·ÉÊMoulinex.
UK
ОПИС:
A
‘´É³´§ªµ²É©±§³Æ¸µ·º¨±¯
A1
Š²Å³É´ÉÈ©¯°±µ·¶º¸
A2
¡´¬±
A3
š§³µ®§ªµ¸¹·Å©§²Ã´¯°´É-©¯ªµ¹µ©²¬´¯°®´¬·-§©ÉžµÊ¸¹§²É
A4
™¬¿É¹±§
A4a
Ž·É¨´§·¬¿É¹±§³³
£œ§¡¢©ªžµ ¨ª ¡§µ
Ž²Æ«º-¬«·É¨´µÊ·º¨±¯
A4b
š¬·¬«´Æ·¬¿É¹±§³³
Ž²Æ«·É¨´µÊ·º¨±¯
A4c
¡¯·µ±§·¬¿É¹±§³³
Ž²Æª·º¨µÊ·º¨±¯
A5
Š²Å³É´ÉÈ©§ª§°±§
B
‘´É³´¯°²µ¹µ±
C
¡¹µ©¼§¾³Æ¸§
D
µ¼µ²«²Æ§±¸¬¸º§·É©
E
“´µ¶±§¨²µ±º©§´´Æ·µ®¨²µ±º©§´´Æªµ²É©±¯
F
“´µ¶±§®§¶º¸±º®º¶¯´±¯
G
“´µ¶±§T™¬©¬·¸U·º¼©É«·§®º-®³É´Åȹøƴ§®©µ·µ¹´É°
H
‹²µ±³µ¹µ·§
I
Š±¸¬¸º§·“•‹•
I1
•É²ÃÈ·´§´§¸§«±§
I2
“ɲý¬©¬ºÀɲô¬´´Æ
J
Œµ·µ´±§«²Æ±µ©¨§¸µ±
£œ§¡¢©ªžµ ¨ª ¡§µ
J1
˜·¯¸¹·É°«²Æ½¬´¹·º©§´´Æ¿´¬±§
J2
Œµ·µ´±§
K
—©µ¾¬·É®±§
£œ§¡¢©ªžµ ¨ª ¡§µ
K1
“µ´º¸´¯°±µ·¶º¸®ªµ·²µ©¯´µÅ
K2
›µ©±§¾
K3
“µ´º¸¯
K3a
“µ´º¸¹¬·¹±§
K3b
“µ´º¸«²Æ´§·É®±¯¹µ´±¯³¯¸±¯¨µ¾±§³¯
K3c
“µ´º¸«²Æ¸±µ¨²É´´Æ
ЗАХОДИ БЕЗПЕКИ:
Перед початком роботи уважно прочитайте інструкцію: неналежне використання приладу звільняє
¦ª¨«œ©µю « ;@85:1C» від відповідальності.
Цей пристрій не призначений для використання особами (включаючи дітей) з обмеженими фізичними,
-¡©-ª¬©¤¨¤œ•ª¬ª£¯¨ªž¤¨¤£ µ•©ª-®´¨¤œ•ªª-ª•œ¨¤що не мають досвіду або необхідних знань, за
ž¤©´®¦ª¨ž¤«œ ¦µž¦ª§¤£œ©¤¨¤©œŸ§´ œє або допомагає третя особа, відповідальна за їхню безпеку.
Необхідно обмежити доступ дітей до приладу, який не є іграшкою.
–§¶·ºª§-¯©²¬´´Æ©§¿µªµ¶·¯²§«º¶µ©¯´´§©É«¶µ©É«§¹¯´§¶·º®É¬²¬±¹·µ³¬·¬-ɺ©§¿µ³º«µ³É
‹º«ÃƱ¬´¬¶·§©¯²Ã´¬¶É«±²Å¾¬´´Æ§´º²ÅȪ§·§´¹ÉÅ
˜·¯²§«¶·¯®´§¾¬´¯°¹É²Ã±¯«²Æ«µ³§¿´Ãµªµ©¯±µ·¯¸¹§´´Æɶ·¯ªµ¹º©§´´Æ¸¹·§©¹§¶É«´§ª²Æ«µ³
Œ¯±µ·¯¸¹µ©º°¹¬¶·¯²§«¹É²Ã±¯´§·É©´É°¾¯¸¹É°¹§¸º¼É°¶µ©¬·¼´É
–¬«µ¶º¸±§°¹¬®©¯¸§´´Æ«µ©ªµªµ©µ²µ¸¸Æ¿§·»§¾¯±·§©§¹±¯´§«¶·¯©¬«¬´¯³¯©«Éŧ±¸¬¸º§·§³¯
˜É¸²Æ¶·¯¶¯´¬´´Æ·µ¨µ¹¯¸²É«®·§®º-©É«±²Å¾¯¹¯¶·¯²§«©É«¬²¬±¹·µ³¬·¬-É©É«±²Å¾¬´´Æ¶µ¹·É¨´¬¹§±µ-
±µ²¯©¯°µªµ³¯È¹¬¸¹§©¯¹¬´§³É¸½¬§¨µ®´É³§È¹¬§±¸¬¸º§·¯
13
–¬©¯±µ·¯¸¹µ©º°¹¬¶·¯²§«Æ±Àµ©É´¶·§½ÅÈ´¬¶·§©¯²Ã´µ§¨µ¶µ¿±µ«-¬´¯°œ½Ãµ³º©¯¶§«±º¸²É«®©¬·´º¹¯¸Æ
«µ¸¬·©É¸´µªµ½¬´¹·º±µ³¶§´ÉÊTMoulinexU«¯©¸¶¯¸µ±©¨·µ¿º·É®µ¨¸²ºªµ©º©§´´Æ
‹º«ÃƱ¬©¹·º¾§´´Æµ±·É³¾¯À¬´´ÆÉÀµ«¬´´µªµ«µª²Æ«º±²ÉÈ´¹µ³¶µ©¯´´µ®«É°¸´Å©§¹¯¸Æ©¸¬·©É¸´µ³º½¬´¹·É
TMoulinexU
–¬©¯±µ·¯¸¹µ©º°¹¬¶·¯²§«Æ±Àµ¿´º·-¯©²¬´´Æ¶µ¿±µ«-¬´¯°Ž²Æº¸º´¬´´Æ´¬¨¬®¶¬±¯®©¬·´É¹Ã¸Æ©¸¬·©É¸´¯°
½¬´¹·TMoulinexU«²Æ®§³É´¯«¯©¸¶¯¸µ±º¨·µ¿º·É®µ¨¸²ºªµ©º©§´´Æ
–¬±²§«É¹Ã¶·¯²§«¿´º·-¯©²¬´´Æ§¨µ¿¹¬¶¸¬²Ã´º©¯²±ºº©µ«º§¨µÉ´¿º·É«¯´º
‹¬·¬-ɹÿ´º·-¯©²¬´´Æ©É««É¹¬°
¡´º·-¯©²¬´´Æ´¬¶µ©¯´¬´®´§¼µ«¯¹¯¸Æ¶µ¨²¯®º§¨µ±µ´¹§±¹º©§¹¯®´§ª·É©§Å¾¯³¯¬²¬³¬´¹§³¯«-¬·¬²µ³
¹¬¶²§§¨µªµ¸¹·¯³¯±º¹§³¯
Ž²Æ ©§¿µÊ ¨¬®¶¬±¯ ¸²É« ©¯±µ·¯¸¹µ©º©§¹¯ ¹É²Ã±¯ §±¸¬¸º§·¯ É ®§¶§¸´É ¾§¸¹¯´¯ ±µ³¶§´ÉÊ TMoulinexU ƱÉ
©É«¶µ©É«§Å¹Ã©¯³µª§³©§¿µªµ¶·¯²§«º
–¬±µ·¯¸¹º°¹¬¸Æ¶·¯²§«µ³«µ©¿¬´É-¼©
Ž²Æ©§¿µÊ¨¬®¶¬±¯«§´¯°¶·¯²§«©É«¶µ©É«§È¾¯´´¯³´µ·³§³É¶·§©¯²§³
SŽ¯·¬±¹¯©§´¯®Ã±µÊ´§¶·ºª¯
S•²¬±¹·µ³§ª´É¹´§¸º³É¸´É¸¹Ã
S–§©±µ²¯¿´È¸¬·¬«µ©¯À¬
S•§¹¬·É§²¯Àµ±µ´¹§±¹ºÅ¹Ã®¶·µ«º±¹§³¯¼§·¾º©§´´Æ
ПЕРЕД ПОЧАТКОМ ВИКОРИСТАННЯ:
Œ¯³¯°¹¬©¸É§±¸¬¸º§·¯©µ«µÅ®³¯²µ³š¶µ²µ¸´É¹ÃÉ·¬¹¬²Ã´µ©¯¹·É¹Ã
Решітка і ніж повинні залишатися жирними. Необхідно змастити їх олією.
Не вмикайте прилад в холосту, не змастивши попередньо решітку.
УВАГА: Оскільки леза конусів дуже гострі, з ними слід поводитися обережно.
ЗАПУСК:
ГОЛІВКА М’ЯСОРУБКИ (
Складання голівки м’ясорубки (схеми 1.1 і 1.2)
–¬µ¨¼É«´µ©®Æ¹¯±µ·¶º¸A1 ®§ªµ·²µ©¯´º´§¶·§©¯©¿¯´§°¿¯·¿¯°µ¹©É·©ªµ·º˜µ¹É³©¸¹§©¹¬¿´¬±A2 (¸¶µ¾§¹±º
«µ©ªº©É¸Ã) ©±µ·¶º¸A1.
–§«É´Ã¹¬´É- ® ´¬·-§©ÉžµÊ ¸¹§²É A3 ´§ ±µ·µ¹±º©É¸ÃƱ§ ©¯¸¹º¶§È®§¿´¬±A2, ·É-º¾¯³¯²¬®§³¯«µ¸¬¨¬
‹º«ÃƱº·¬¿É¹±º®§©§¿¯³©¯¨µ·µ³´§«É´Ã¹¬´§´É-A3, ©¯¸¹º¶¶µ©¯´¬´¶µ¹·§¶¯¹¯©¶§®±µ·¶º¸ºA1.
‘§±·º¹É¹Ã´¬¨²µ±º°¹¬ª§°±ºA5.
Установка голівки м’ясорубки (схема 2) :
S˜¬·¬«©É«±²Å¾¬´¯³©É«¬²¬±¹·µ³¬·¬-ɨ²µ±º³µ¹µ·§H ¹·¯³§°¹¬ªµ²É©±º³Æ¸µ·º¨±¯ªµ·²µ©¯´§¸¶·Æ³µ©§´§
©¶·§©µ‘ɸ¹¯±º°¹¬¨§°µ´¬¹´É®È«´§´´Æªµ²É©±¯³Æ¸µ·º¨±¯É¶§®¯¨²µ±§³µ¹µ·§•µ²É©±º³Æ¸µ·º¨±¯©¸¹§©¹¬
© ¨²µ± ³µ¹µ·§ H, ¶É¸²Æ ¾µªµ ¶µ©¬·´É¹Ã ªµ·²µ©¯´º «µ ³É¹±¯ ªµ·²µ©¯´§ ¶µ©¯´´§ ®§°´Æ¹¯ ©¬·¹¯±§²Ã´¬
¶µ²µ-¬´´Æ
SŒ¸¹§´µ©É¹Ã®´É³´¯°²µ¹µ±B ´§©¯¸¹º¶¯ªµ·²µ©¯´¯ªµ²É©±¯³Æ¸µ·º¨±¯
œ©É³±´É¹Ã¶·¯²§«©É´ªµ¹µ©¯°«µ¬±¸¶²º§¹§½ÉÊ
Використання:
˜·¯ªµ¹º°¹¬´¬µ¨¼É«´º«²Æ·º¨±¯±É²Ã±É¸¹Ã¶·µ«º±¹É©©¯«§²É¹Ã±É¸¹±¯¼·ÆÀÉɸº¼µ-¯²²Æ
–§·É-¹¬³Æ¸µ¿³§¹±§³¯¶·¯¨²¯®´µ¸³X 2 ¸³
˜É«ªµ²É©±º³Æ¸µ·º¨±¯¶µ¸¹§©¹¬È³´É¸¹Ã
–§¹¯¸´É¹Ã´§¶µ²µ-¬´´ÆTIU±´µ¶±¯®§¶º¸±º®º¶¯´±¯F, Àµ¨©±²Å¾¯¹¯¶·¯²§«
˜µ±²§«É¹Ã¿³§¹±¯³Æ¸§´§¶É««µ´B ɶµµ«´µ³ºµ¶º¸±§°¹¬©µ¹©É·®§«µ¶µ³µªµÅ¿¹µ©¼§¾§C.
Ні в якому разі не намагайтеся проштовхувати пальцями або іншим інструментом.
¢µ¨µ¹·¯³§¹¯³Æ±¬¹É¸¹µ“¬¨¬§¨µ“¬»¹§¶·µ¶º¸¹É¹Ã³Æ¸µ·§®¯¾¬·¬®³Æ¸µ·º¨±º«µµ¹·¯³§´´Æ³§¸¯
¨§-§´µÊ±µ´¸¯¸¹¬´½ÉÊ
›ª¬¤-©œ«ª¬œ œ
Œ±É´½É·µ¨µ¹¯©¯³µ-¬¹¬¶·µ¶º¸¹¯¹¯±É²Ã±§¿³§¹±É©¼²É¨§Àµ¨©¯°¿²¯®§²¯¿±¯³¬²¬´µªµ³Æ¸§
Що робити у випадку застрягання? (Схема 3)
Œ¯³±´É¹Ã³Æ¸µ·º¨±º´§¹¯¸´º©¿¯´§¶µ²µ-¬´´ÆTU±´µ¶±¯®§¶º¸±º®º¶¯´±¯F.
14
˜µ¹É³±É²Ã±§¸¬±º´«¹·¯³§°¹¬´§-§¹µÅ±´µ¶±ºT™¬©¬·¸U‘©µ·µ¹´¯°¼É«G, Àµ¨®©É²Ã´¯¹¯®§¸¹·Æª²É¶·µ«º±¹¯
–§¹¯¸´É¹Ã´§¶µ²µ-¬´´ÆTIU±´µ¶±¯®§¶º¸±º®º¶¯´±¯F, Àµ¨¶·µ«µ©-¯¹¯·µ¨µ¹º
Важливо: дочекайтеся остаточної зупинки приладу перед тим, як активувати команду «Пуск» œ•ª
¦ª¨œ© ¯«Зворотний хід»
АКСЕСУАР КЕБЕ (
Складання (схема 4) :
Œ¸¹§©¹¬¿´¬±A2 ©±µ·¶º¸A1 ªµ²É©±¯³Æ¸µ·º¨±¯Œ¸¹§´µ©É¹Ã»É²ÃÈ·´º´§¸§«±ºI1 ¹§±Àµ¨©¯¸¹º¶¶µ¹·§¶¯©º¶§®
±µ·¶º¸ºA1. –§«É´Ã¹¬±É²Ã½¬©¬ºÀɲô¬´´ÆI2 ´§»É²ÃÈ·´º´§¸§«±ºÉ®§±·º¹É¹Ãª§°±ºA5 «µ±É´½Æ
‘ɨ·§´º¹§±¯³¾¯´µ³ªµ²É©±º©¸¹§´µ©É¹Ã´§¨²µ±³µ¹µ·§Æ±®§®´§¾¬´µ©¸¼¬³É
Примітка: даний аксесуар використовується без решітки та без ножа.
ВОРОНКА ДЛЯ КОВБАСОК (£œ§¡¢©ªžµ ¨ª ¡§µ
Ž§´¯° §±¸¬¸º§· Àµ ¶·¯±·É¶²ÅÈ¹Ã¸Æ «µ ªµ²É©±¯ ³Æ¸µ·º¨±¯ «µ®©µ²¯¹Ã ·µ¨¯¹¯ ¨º«ÃÆ±É ±µ©¨§¸±¯ Æ±É ©§³
®§²¯¿¯¹Ã¸Æ¹É²Ã±¯¶·¯¶·§©¯¹¯®§¸©µÊ³¸³§±µ³
Складання (схема 5)
Œ¸¹§©¹¬¿´¬±A2 ©±µ·¶º¸A1. ˜µ¹É³©¸¹§´µ©É¹Ã©µ·µ´±ºJ2, ®§±·º¹É¹Ãª§°±ºA5 «µ±É´½ÆŒ¸¹§´µ©É¹Ãªµ²É©±º
³Æ¸µ·º¨±¯®É¨·§´º´§¨²µ±³µ¹µ·§©É«¶µ©É«´µ«µ¸¼¬³¯
Примітка: даний аксесуар використовується без решітки та без ножа. Пристрій для центрування шнека
ª£žª§´є утримати шнек у потрібному положенні при приготуванні рецепта.
Використання:
Важливо: «§´¯°§±¸¬¸º§·¸²É«©¯±µ·¯¸¹µ©º©§¹¯¹É²Ã±¯¶É¸²Æ¹µªµÆ±³Æ¸µ¨º²µ¶µ³¬²¬´¬¸¶¬½ÉÊ«µ«§´Éɳ§¸§
«µ¨·¬¶¬·¬³É¿§´§
˜µ¶¬·¬«´Ãµ©¯³µ¾¬´º©¹¬¶²É°©µ«É±µ©¨§¸´ºµ¨µ²µ´±ºÆ±§¸¹§²§®´µ©º¬²§¸¹¯¾´µÅ´§«Æª´É¹Ã´§©µ·µ´±ºJ2,
®§²¯¿¯©¿¯¶·¯¨²¯®´µ¸³
•¬²¬´¬³Æ¸µ¶µ³É¸¹É¹Ã©ªµ·²µ©¯´º±µ·¶º¸ºA1 ªµ²É©±¯³Æ¸µ·º¨±¯A, ©±²Å¾É¹Ãɶ·µ¿¹µ©¼º°¹¬®§«µ¶µ³µªµÅ
¿¹µ©¼§¾§C ¹§±Àµ¨³¬²¬´¬³Æ¸µ©¯°¿²µ´§±·§°©µ·µ´±¯
Œ¯³±´É¹Ã¶·¯²§«
‘·µ¨É¹Ã©º®µ²®®§²¯¿¬´¯¼¸³±µ©¨§¸´µÊµ¨µ²µ´±¯˜¬·¬¸º´Ã¹¬©º®µ²«µ±·§Å©µ·µ´±¯Àµ¨´¬¨²µ±º©§¹¯
¶µ©É¹·Æ©±µ©¨§¸´µÊµ¨µ²µ´½É
œ©É³±´É¹Ã ¶·¯²§«É¶·µ«µ©-º°¹¬ ´§±²§«§¹¯³¬²¬´¬ ³Æ¸µ š¹¬-¹¬ ®§ ±µ©¨§¸´µÅ µ¨µ²µ´±µÅ ¶µ±¯ ©µ´§´¬
´§¶µ©´¯¹Ã¸Æ¢µ¨¸¯²Ã´µ´¬·µ®¹Æªº©§¹¯µ¨µ²µ´±º´¬·µ¨É¹Ã´§«¹µ¹µ©¸¹¯¼±µ©¨§¸µ±
Примітка: роботу краще виконувати удвох, один накладає мелене м’ясо, а інший тримає оболонку, поки
žª©œ©œ«ªž©юється.
“µ©¨§¸±¯³µ-´§·µ¨¯¹¯¨º«ÃƱµÊ¨§-§´µÊ«µ©-¯´¯¸¹¯¸±§Å¾¯É¶¬·¬±²§«§Å¾¯µ¨µ²µ´±º®³É¸½Æ´§³É¸½¬
¢µ¨µ¹·¯³§¹¯Æ±É¸´É±µ©¨§¸±¯´¬µ¨¼É«´µ¸¹¬-¯¹¯®§¹¯³Àµ¨¶·¯´§¶µ©´¬´´É¶µ©É¹·Æ´¬®¨¯·§²µ¸Æ©¸¬·¬«¯´É
™¬±µ³¬´«ºÈ³µ·µ¨¯¹¯±µ©¨§¸±¯«µ©-¯´µÅ¸³©É«µ±·¬³²Å°¹¬±µ©¨§¸±¯®§²¯¿§Å¾¯¾§¸¹¯´ºµ¨µ²µ´±¯«²Æ
»µ·³º©§´´Æ©º®²§
ОВОЧЕРІЗКА (£œ§¡¢©ªžµ ¨ª ¡§µ
Складання (схема 6) :
–§¶·µ¹¯©É«±²Å¾¬´µªµ©É«¬²¬±¹·µ³¬·¬-ɨ²µ±º³µ¹µ·§©¸¹§´µ©É¹Ã±µ·¶º¸K1, ´§¼¯²¬´¯°©¶·§©µ©º¿±§±µ·¶º¸º
¶µ©¯´´Éº©É°¹¯©µ¹©µ·¯¨²µ±§³µ¹µ·§H. Œ¸¹§´µ©É¹Ã¸¹¬·-¬´ÃÀµ©¯¼µ«¯¹Ã®±µ·¶º¸ºK1, º©É¸Ã¨²µ±§³µ¹µ·§H.
•µ·²µ©¯´º±µ·¶º¸§K1 ¶µ©¬·´É¹Ã©²É©µ«µ³É¹±¯
Використання:
ÌŒ¯¨¬·É¹Ã©É«¶µ©É«´¯°«²Æ©¯±µ·¯¸¹§´´Æ±µ´º¸
ÌŒ¸¹§©¹¬©¯¨·§´¯°±µ´º¸©µ¹©É·Àµ®´§¼µ«¯¹Ã¸Æ©¶¬·¬«´É°¾§¸¹¯´É±µ·¶º¸ºK1, ±µ´º¸¶µ©¯´¬´®§°³§¹¯
¶·§©¯²Ã´¬¶µ²µ-¬´´Æº¸¬·¬«¯´É´¬¸º¾µªµ¬²¬³¬´¹§³§²
̘ɫ±²Å¾É¹Ã¶·¯²§««µ¬²¬±¹·µ³¬·¬-É
Ì–§¹¯¸´É¹Ãµ«¯´§¨µ«©§·§®¯´§±´µ¶±º®§¶º¸±º®º¶¯´±¯F, Àµ¨¨²µ±º©§¹¯±µ´º¸³§²
Ìœ©É³±´É¹Ã¶·¯²§«¶µ¹É³¾¬·¬®ªµ·²µ©¯´º±µ·¶º¸º´§±²§«§°¹¬¶·µ«º±¹¯K1 (³§²) ɶ·µ¿¹µ©¼º°¹¬Ê¼®§
«µ¶µ³µªµÅ¿¹µ©¼§¾§K2 (³§²).
● ¢µ¨®§³É´¯¹¯±µ´º¸´¬µ¨¼É«´µ«µ¾¬±§¹¯¸Æ¶µ©´µÊ®º¶¯´±¯±µ´º¸§œ¹·¯³º°¹¬¶·µ¹Æªµ³¸¬±º´«¯±´µ¶±º
T™¬©¬·¸UG, ±µ´º¸©¯°«¬§©¹µ³§¹¯¾´µ³§²
УВАГА: Перед увімкненням приладу переконайтеся, що конус зайняв правильне положення на несучому
¡§¡¨¡©®µ
15
Використовуйте рекомендований конус для кожного типу продукту:
›ª©¯-®¡¬®¦œ
›ª©¯- §´©œ¬µ£¦¤
›ª©¯- §´
-
®ª©¦¤¨¤-¦¤•ª±¦œ¨¤.
-¦ª•§µ©©´/
•
µ·±©§
* *
“§¨§¾±¯
* *
“§·¹µ¶²Æ
* *
—ªÉ·µ±
* *
˜¬·¬½Ã
* *
Ÿ¯¨º²Æ
*
ܼ᮱
*
“§¶º¸¹§¨É²§¾¬·©µ´§
*
¦¨²º±§
*
™¬«Ã±§¾µ·´§
* *
“µ·¬´¬©§¸¬²¬·§
*
‹§´§´¯
*
˜§·³¬®§´
*
•·Å°¬·
* *
¡µ±µ²§«
* *
Œ¯¸º¿¬´¯°¼²É¨¸º¼§·É
*
”ɸµ©¯°ªµ·É¼ª·¬½Ã±¯°ªµ·É¼³¯ª«§²Ã
*
“µ±µ¸µ©¯°ªµ·É¼
*
£œ§¡¢©ªžµ ¨ª ¡§µ
Поради для отримання хорошого результату:
¢µ¨µ¹·¯³§¹¯®§«µ©É²Ã´¯°·¬®º²Ã¹§¹É®§¶µ¨Éª¹¯®§¸¹·Æª§´´Å¶·µ«º±¹É©º±µ·¶º¸É©¯±µ·¯¸¹µ©º©§´ÉÉ´ª·¬«ÉÈ´¹¯
¶µ©¯´´É¨º¹¯³É½´¯³¯É¸©É-¯³¯–¬©¯±µ·¯¸¹µ©º°¹¬¶·¯²§«Àµ¨¹¬·¹¯§¨µ·É®§¹¯¸±¯¨µ¾±§³¯®§´§«¹µ¹©¬·«É
¶·µ«º±¹¯¹§±ÉƱ½º±µ·§¨µ¿³§¹±¯³Æ¸§™µ®·É®§°¹¬¶·µ«º±¹¯Àµ¨Ê¼¨º²µ¶·µ¸¹É¿¬¶·µ¿¹µ©¼º©§¹¯©µ¹©É·
±µ·¶º¸º
ЧИЩЕННЯ:
•
Перед чищенням блока мотора Н завжди відключайте прилад від електромережі
Ì–¬®§´º·Å°¹¬¨²µ±³µ¹µ·§º©µ«º´¬¶É«¸¹§©²Æ°¹¬°µªµ¶É«©µ«º—¾¯¸¹É¹Ã¨²µ±³µ¹µ·§©µ²µªµÅª§´¾É·±µÅ
˜É¸²Æ¾¯À¬´´Æ©§·¹µ¶µ©´É¸¹Å©¯¸º¿¯¹¯
Аксесуари м’ясорубки:
‘´É³É¹Ã¨²µ±º©§´´Æªµ²É©±¯§¨µ§±¸¬¸º§·§µ©µ¾¬·É®±¯´§¹¯¸´º©¿¯´§±´µ¶±ºE.
— ˜µ©¬·´É¹Ãªµ²É©±º³Æ¸µ·º¨±¯A ©¶·§©µÉ¶µ¹Æª´É¹Ã´§¸¬¨¬Àµ¨©É«ZÈ«´§¹¯ÊÊ©É«¨²µ±§³µ¹µ·§H.
— ¢µ¨®´Æ¹¯ªµ²É©±ºµ©µ¾¬·É®±¯A, ©¯°³É¹Ã¿¹µ©¼§¾C É®´É³É¹Ã²µ¹µ±B, ©É«ª©¯´¹É¹Ãª§°±ºA5, ®´É³É¹Ã·¬¿É¹±º
A4, ´É-A3 É¿´¬±A2.
— Обережно поводьтеся з гострими деталями.
Œ¯³¯°¹¬©¸É®§¶¾§¸¹¯´¯¶É«ª§·Æ¾µÅ©µ«µÅ®³¯²µ³¸¶µ²µ¸´É¹ÃÉ·¬¹¬²Ã´µ©¯¹·É¹Ã
–¬³¯°¹¬ªµ²É©±º³Æ¸µ·º¨±¯A ©¶µ¸º«µ³¯°´É°³§¿¯´É¹µ¨¹µ±µ·¶º¸A1, ¿´¬±A2, ª§°±ºA5, ´É-A3 É
·¬¿É¹±¯A4
Аксесуари овочерізки (залежно від моделі):
Ì“µ·¶º¸K1¿¹µ©¼§¾K2±µ´º¸¯K3a, K3b, K3c³µ-´§³¯¹¯º¶µ¸º«µ³¯°´É°³§¿¯´É©±µ¿¯±º
©¯±µ·¯¸¹µ©ºÅ¾¯¶·µª·§³ºT•“—U§¨µT–•Žœ••‹™œŽ–•U
Ì—¸±É²Ã±¯²¬®§±µ´º¸É©«º-¬ªµ¸¹·É®´¯³¯¸²É«¶µ©µ«¯¹¯¸Æµ¨¬·¬-´µ
̦±Àµ¶²§¸¹³§¸µ©É¾§¸¹¯´¯¶µ»§·¨º©§²¯¸Æ¶·µ«º±¹§³¯¹§±¯³¯Æ±´§¶·¯±²§«³µ·±©§¶·µ¹·É¹Ãʼª§´¾É·±µÅ
®³µ¾¬´µÅ©¼§·¾µ©É°µ²Éʶµ¹É³©¯³¯°¹¬®©¯¾§°´¯³¸¶µ¸µ¨µ³
ЗБЕРІГАННЯ:
™¬¿É¹±¯´É-¶·¯¸¹·É°«²Æ½¬´¹·º©§´´Æ¿´¬±§§±¸¬¸º§·¯±¬¨¬É«²Æ±µ©¨§¸µ±I1, I2 i J1, J2³µ-´§®¨¬·Éª§¹¯
´§®§«´É°¸¹É´½É¶·¯²§«ºº¸¶¬½É§²Ã´µ³º©É««É²¬´´ÉD
16
ЩО РОБИТИ, ЯКЩО ПРИЛАД НЕ ПРАЦЮЄ?
˜¬·¬©É·¹¬-¯©²¬´´Æ
¦±Àµ¶·¯²§«¹§±É´¬®§¶·§½Å©§©®©¬·´É¹Ã¸Æ«µ¸¬·©É¸´µªµ½¬´¹·ºMoulinex
(Ž¯©¸¶¯¸µ±º¨·µ¿º·É®µ¨¸²ºªµ©º©§´´Æ).
ПІСЛЯ ЗАКІНЧЕННЯ ТЕРМІНУ ЕКСПЛУАТАЦІЇ ЕЛЕКТРОННИХ АБО
ЕЛЕКТРИЧНИХ ПРИЛАДІВ
Візьмімо участь у захисті навколишнього середовища!
Œ§¿¶·¯²§«³É¸¹¯¹Ã¨§ª§¹µ³§¹¬·É§²º¶·¯«§¹´µªµ«µ¶¬·¬·µ¨±¯
‘«§°¹¬°µªµ©¶º´±¹®¨µ·º§¨µ©¸¬·©É¸´¯°½¬´¹·«²Æ¶¬·¬·µ¨±¯
РЕЦЕПТИ
Зверніть увагу: Для рецептів, приготування яких вимагає більш високої потужності, час використання приладу не
«ªž¤©¡©«¡¬¡ž¤щувати 20 сек.
Приклад рецепту (з середньою решіткою — отвори 4,7 мм .
!¦ª®§¡®¤¦µ•¡£¥ªŸ¯¬®ª¨
«ª¬цій — Приготування: 1 година
Покласти на 1 год у холодильник
Інгредієнти для пасти кібе:
ª³Æ¸§ª¨º²Ãªº·º¶µ«·É¨´¬´¬®¬·´µ¸É²Ã
Інгредієнти для соусу:
±ª°µªº·¹º¶º¾µ±±µ·É§´«·º®º¨¾¯±¯¾§¸´¯±º¸¹µ²µ©É²µ-±¯
±º±º·º«®Æ´µªµ¨µ·µ¿´§¸É²Ã¶¬·¬½Ã
™µ®·É-¹¬³Æ¸µ´§¿³§¹±¯œ¸¹§´µ©É¹Ã·¬¿É¹±º®µ¹©µ·§³¯³³©³Æ¸µ·º¨±º˜·µ¶º¸¹É¹Ã³Æ¸µ«µ«§°¹¬
¨º²Ãªº·˜µ¸µ²É¹Ã¶µ¸¹§©¹¬µ¹·¯³§´º³§¸º©¼µ²µ«´¬³É¸½¬´§ªµ«¯´º
¢µ¨¸»µ·³º©§¹¯±µ¹²¬¹¯±É¨¬©¸¹§´µ©É¹Ã´§³Æ¸µ·º¨±º§±¸¬¸º§·±¬¨¬˜·µ¶º¸¹É¹Ã³§¸º±·§Ê±µ¹²¬¹¯
¸±²¬°¹¬´¬©¬²¯±µÅ±É²Ã±É¸¹Å©µ«¯
Ž²Æ¶·¯ªµ¹º©§´´Æ¸µº¸º¶·µ³¯°¹¬¶º¾µ±±µ·É§´«·º¶·µ³µ±´É¹Ã¶§¶¬·µ³É©É«É·©É¹Ã²¯¸¹Æ˜µ¾¯¸¹É¹Ã¾§¸´¯±
É·µ®«§©É¹Ã°µªµ §¸´¯±É±µ·É§´«·¶µ¹·¯³§°¹¬¼©¯²¯´¯´§¸±µ©µ·É«½É´§¸²§¨±µ³º©µª´ÉŒÉ«±²§«É¹Ãº
¨É±
‘¨¯°¹¬°µªº·¹É±º±º·º«®Æ´º³º±º¶µ¸µ²É¹Ã¶µ¶¬·¾É¹ÃŒ¯²¯°¹¬©¸¬©±§¸¹·º²Å¾¬·¬®«·É¨´¬¸¯¹¬¾±µ
Žµ©¬«É¹Ã¸º³É¿«µ±¯¶É´´Æ¶µ¹É³®³¬´¿¹¬©µªµ´Ãš¹¬-¹¬®§¶·¯ªµ¹º©§´´Æ³¶µ¸¹É°´µ¶µ³É¿ºÅ¾¯Àµ¨
°µªº·¹´¬¶·¯¸¹§©§©
Žµ«§°¹¬¾§¸´¯±É±µ·É§´«·˜µ¹·¯³§°¹¬±µ¹²¬¹¯±É¨¬©ª§·Æ¾É°¸º³É¿É¼©¯²¯´
Варіант: Ви також можете нафарширувати котлети (сумішшю цибулі і меленого м’яса, попередньо
«¬ª¢œ¬¡©ªŸªž©¡ž¡§¤¦µ¥¦µ§³¦ª-®µª§µї з прянощами).
САМСА
«ª¬ції – Приготування: 40 хвил. Час запікання: 35 хвил.
Інгредієнти:
ª²¯¸¹±µ©µªµ¹É¸¹§WªÆ²µ©¯¾¯´¯W½¯¨º²¯´§WÆ°½ÆW¶§¶·¯±§³¬²¬´§±µ·¯½Æ¹§
ɳ¨¯·W¶¬¹·º¿±§W±µ·É§´«·±¬·©¬²ÃW½º±µ·Wª³§¸²§Wµ²¯©±µ©§µ²ÉÆ
œ¸¹§´µ©É¹Ã·¬¿É¹±º®µ¹©µ·§³¯³³©³Æ¸µ·º¨±º™µ®·É-¹¬½¯¨º²Å´§¾§¸¹¯´É¶·µ¶º¸¹É¹Ã¾¬·¬®
³Æ¸µ·º¨±º˜É«Éª·É°¹¬¸¹µ²µ©É²µ-±¯µ²¯©±µ©µÊµ²ÉÊ©¸µ¹¬°´¯±º¶µ¹É³«µ«§°¹¬½¯¨º²Å˜µ¹º¿±º°¹¬´§
³§²µ³º©µª´É«µµ¹·¯³§´´Æ®µ²µ¹¯¸¹µªµ±µ²Ãµ·ºŒÉ«¸¹§©¹¬º¨É±
˜µ«·É¨´É¹ÃƲµ©¯¾¯´º˜É«·º³Æ´Ã¹¬´§¸²§¨±µ³º©µª´É·§®µ³®½¯¨º²¬Å¶·µ¹Æªµ³¼©¯²¯´ŒÉ«¸¹§©¹¬º¨É±
˜·¯¶·§©¯¶·µ¶º¸¹É¹Ã¾¬·¬®³Æ¸µ·º¨±ºŒ¯¸¯¶¹¬Ê¼©¸µ¹¬°´¯±·§®µ³®¸É²²Åɶ¬·½¬³«µ«§°¹¬¶É©¾§°´µÊ
²µ-±¯¶§¶·¯±¯Àɶ±ºÉ³¨¯·ºÉ¹·µ¼¯±µ·¯½É
˜µ¹É³«µ«§°¹¬®¨¯¹ÉÆ°½Æ¶¬·¬³É¿§°¹¬É©¯³±´É¹Ã©µªµ´Ã
™µ®±§¾§°¹¬«µ¸¯¹Ã¹µ´±µ²¯¸¹±µ©¬¹É¸¹µ˜µ·É-¹¬´§±©§«·§¹¯¶µ¸³‘³§¸¹É¹Ã³§¸²µ³¶µ©¬·¼´ÅƱ§
©¯±µ·¯¸¹µ©ºÈ¹Ã¸Æ
–§±µ-¬´±©§«·§¹¶µ±²§«É¹Ã¹·µ¼¯»§·¿º‘§ªµ·´É¹Ã§¶µ¹É³®§²É¶É¹Ã±·§Ê
17
š³§-¹¬¸§³¸§©±¯¶²Æ¾µ³º³§¸²É˜É¸²Æ¸³§-¬´´Æ©¯±²§«É¹Ã´§±É²Ã±§¼©¯²¯´´§¶µª²¯´§Å¾¯°¶§¶É·
˜µ¸¯¶¹¬½º±·µ³É±µ·¯½¬Å˜µ«§©§°¹¬ª§·Æ¾¯³
Вариант:
œ¸¹§´µ©É¹Ã·¬¿É¹±º®µ¹©µ·§³¯³³©³Æ¸µ·º¨±º™µ®·É-¹¬½¯¨º²Å´§¾§¸¹¯´–§³¬²É¹Ã¹·µ¼¯³Æ¸§
½¯¨º²Å¶·µ¶º¸¹É¹Ã¾¬·¬®³Æ¸µ·º¨±º
˜·µ¶º¸¹É¹ÃÀ¬¹·µ¼¯³Æ¸§¶µ¹É³¶·¯¶·§©¯É´§·¬¿¹É³Æ¸µÆ±¬®§²¯¿¯²µ¸Æ‘¨¯°¹¬Æ°½ÆÉ«µ«§°¹¬Ê¼«µ
»§·¿º·§®µ³®¸É²²Åɶ¬·½¬³¶µ²µ©¯´µÅ¾§°´µÊ²µ-±¯¶§¶·¯±¯Àɶ±µÅɳ¨¯·ºÉ´¬©¬²¯±µÅ±É²Ã±É¸¹Å
±µ·¯½ÉŒ¸¬¶¬·¬³É¿§°¹¬˜µ©¹µ·É¹Ã¶º´±¹¯
ПИРІЖКИ З РИБОЮ
«ª¬ції – Приготування: 25 хвил. Час запікання: 10 — 15 хвил.
Інгредієнти:
ª²¯¸¹±µ©µªµ¹É¸¹§Wª©§·¬´µÊ·¯¨¯§¨µ±µ¶¾¬´µªµ²µ¸µ¸ÆW®©§·¬´¯¼±·º¹µÆ°½ÆW
¶º¾µ±®§¶§¿´µªµ±·µ¶º½¯¨º²¯´¯Wª¸µ²µ´µªµ©¬·¿±µ©µªµ³§¸²§³§²¬´Ã±¯³¯¿³§¹µ¾±§³¯W
·µ¸²¯´´§µ²ÉÆ
œ¸¹§´µ©É¹Ã·¬¿É¹±º®µ¹©µ·§³¯³³©³Æ¸µ·º¨±º™µ®·É-¹¬½¯¨º²Å´§¾§¸¹¯´É¶·µ¶º¸¹É¹Ã¾¬·¬®
³Æ¸µ·º¨±º›º¿±º°¹¬´§¸²§¨±µ³º©µª´É©¸µ¹¬°´¯±º©´¬©¬²¯±É°±É²Ã±µ¸¹É·µ¸²¯´´µªµ³§¸²§ŒÉ«¸¹§©¹¬º
¨É±
–§·É-¹¬¹·µ¼¯·¯¨¯¶µ¹É³«µ«§°¹¬¶·¯ªµ¹µ©§´º½¯¨º²Å©¬·¿±µ©¬³§¸²µ®§¶§¿´¯°±·É¶É·¯¨ºÆ±§
®§²¯¿¯²§¸Æ
™µ®±§¾§°¹¬¹µ´±¯³¿§·µ³²¯¸¹±µ©¬¹É¸¹µ©¯·É-¹¬±·º-¬¾±¯¸±²Æ´±µÅ§¨µ±¬²¯¼µ³¨É²Ã¿³¬´¿©¬²¯±µªµ
·µ®³É·º
˜µ¶¬·¬«´Ãµ·µ®Éª·É°¹¬«º¼µ©±º«µRC (¶).
5. –§±µ-¬´±·º-¬¾µ±¶µ±²§«É¹Ã¹·µ¼¯»§·¿º¸±²§«É¹Ã¹É¸¹µÉ®§²É¶É¹Ã±·§Ê
•µ¹º°¹¬©«º¼µ©½É¶·µ¹Æªµ³¼©¯²¯´
›ª®§¡®¤£´§ªž¤±¤©¤
«ª¬ції – Приготування: 20 хвил. Час запікання: 10 — 15 хвил.
Інгредієнти
±ªÆ²µ©¯¾¯´¯W½¯¨º²¯´§W®º¨¾¯±¾§¸´¯±ºW¿³§¹µ¾±¯¾µ·´µªµ¼²É¨§®§³µ¾¬´µªµ©³µ²µ½É
WÆ°½ÆW±§·¹µ¶²¯´§W¨µ·µ¿´µW¸É²Ã¶¬·¬½Ã
Ž²Æ¶·¯ªµ¹º©§´´Æ½Ãµªµ·¬½¬¶¹º©¯¨¬·É¹Ã´¬-¯·´É¿³§¹±¯Æ²µ©¯¾¯´¯˜·µ¶º¸¹É¹Ã³Æ¸µ¾¬·¬®³Æ¸µ·º¨±º®
¿³§¹µ¾±§³¯¼²É¨§
–§·É-¹¬½¯¨º²Å¹µ´±¯³¯¸±¯¨µ¾±§³¯±µ´º¸µ³K3bÉ´§¹·É¹Ã¾§¸´¯±É±§·¹µ¶²Å±µ´º¸µ³¹¬·¹±µÅK3a
‘³É¿§°¹¬³¬²¬´¬³Æ¸µ®¼²É¨µ³¶µ·É®§´µÅ½¯¨º²¬Å¾§¸´¯±µ³É±§·¹µ¶²¬Å
Žµ«§°¹¬©¸º³É¿Æ°½Æ³¬²¬´¯°¾µ·´¯°¶¬·¬½Ã¸É²Ãɸ»µ·³º°¹¬±µ¹²¬¹¯
—¨©§²Æ°¹¬±µ¹²¬¹¯©¨µ·µ¿´Éɸ³§-¹¬´§·µ¸²¯´´É°µ²ÉÊ
›œ¬®ª«§´©¤¥«¯ ¤©Ÿ«¬¤Ÿª®ªžœ©¤¥ž ¯ховці
«ª¬ції – Приготування: 30 хвил. Час запікання: 45 хвил.
Інгредієнти:
ª³¬²¬´µªµ³Æ¸§W±ª±§·¹µ¶²ÉWÆ°½ÆW¸±²Æ´±¯³µ²µ±§W®º¨¾¯±¾§¸´¯±ºW
¸¹µ²µ©µÊ²µ-±¯©¬·¿±µ©µªµ³§¸²§W¸¹µ²µ©É²µ-±¯·µ¸²¯´´µÊµ²ÉÊW¸É²Ã¶¬·¬½Ã
˜µ¾¯¸¹É¹Ã©¯³¯°¹¬É©¯¸º¿É¹Ã±§·¹µ¶²Å–§·É-¹¬Êʹµ´±¯³¯¸±¯¨µ¾±§³¯±µ´º¸µ³K3b
¦²µ©¯¾¯´º¶·µ¶º¸¹É¹Ã¾¬·¬®³Æ¸µ·º¨±ºÉ¶·µ-§·¹¬·º¨²¬´¬³Æ¸µ©«º¼µ©½É´§µ²Éʶ·µ¹Æªµ³¼©¯²¯´
–§¹·É¹Ã©´º¹·É¿´Å¶µ©¬·¼´Å¨²Å«§¾§¸´¯±µ³¶µ¹É³®³§¸¹É¹Ãµ«´ÉÈž§¸¹¯´µÅ©¬·¿±µ©µªµ³§¸²§
Œ¯±²§«É¹Ã¿§·§³¯±§·¹µ¶²Éɳ¬²¬´¬³Æ¸µ¶µ¸µ²É¹Ã¶µ¶¬·¾É¹Ã¶µ¹É³©¯±²§«É¹Ã±§·¹µ¶²ÅÀµ®§²¯¿¯²§¸Æ
‘¨¯°¹¬Æ°½Æ®¹¬¶²¯³³µ²µ±µ³É©¯²¯°¹¬¸º³É¿´§±§·¹µ¶²ÅŽµ«§°¹¬©¬·¿±µ©¬³§¸²µÀµ®§²¯¿¯²µ¸Æ
•µ¹º°¹¬©«º¼µ©½É¶·¯¸¬·¬«´É°¹¬³¶¬·§¹º·É¼©¯²¯´
Печені яблука з мигдалем
«ª¬ції – Приготування: 40 хвил. Час запікання: 30 хвил.
Інгредієнти:
ƨ²º±Wª½º±·ºWª©¬·¿±µ©µªµ³§¸²§Wª½É²Ã´µªµ³¯ª«§²ÅW³²©¬·¿±É©W
¾§°´§²µ-±§±µ·¯½É
˜µ¾¯¸¹É¹Ãƨ²º±§©¯«§²É¹Ã¸¬·½¬©¯´ºÉ·µ®·É-¹¬´§¾©¬·¹É–§·É-¹¬¹µ´±¯³¯¸±¯¨µ¾±§³¯Æ¨²º±§±µ´º¸µ³K3b
ɶ·µ-§·¹¬©ª©¬·¿±µ©µªµ³§¸²§‘²¬ª±§®³§¸¹É¹Ã¨²Å«µ³§¸²µ³É©¯±²§«É¹Ã®§½º±·µ©§´Éƨ²º±§´§«´µ
˜µ«·É¨´É¹Ã³¯ª«§²Ã©¶µ·µ¿µ±±µ´º¸µ³K3c˜¬·¬³É¿§°¹¬º¸§²§¹´¯½É³¬²¬´¯°³¯ª«§²Ã©¬·¿±¯É±µ·¯½Å
Œ¯±²§«É¹Ã¸º³É¿´§Æ¨²º±§É¶µ¸¯¶¹¬½º±·µ³˜µ¸¹§©¹¬¨²Å«µ©«º¼µ©±ºªµ¹º°¹¬¶·¯¹¬³¶¬·§¹º·ÉRC.
18