- Manuals
- Brands
- Moulinex Manuals
- Toaster
- Principio
Manuals and User Guides for Moulinex Principio. We have 5 Moulinex Principio manuals available for free PDF download: Manual, User Manual
Moulinex Principio Manual (45 pages)
Brand: Moulinex
|
Category: Blender
|
Size: 3.49 MB
Table of Contents
-
Conseils D’utilisation
2
-
Instructions D’utilisation
3
-
Safety Instructions
8
-
Tips for Using Your Appliance
8
-
What to Do if Your Appliance Does Not Work
9
-
Bedienung des Gerätes
12
-
Entsorgung des Gerätes
13
-
Istruzioni DI Sicurezza
14
-
Consigli Per L’uso
14
-
Instruções de Segurança
17
-
Conselhos de Utilização
17
-
Antes da Primeira Utilização
18
-
Consignas de Seguridad
20
-
Consejos de Utilización
20
-
Instrucciones de Utilización
20
-
Laitteen Kuvaus
32
-
Laitteen Puhdistus
33
-
Περιγραφη Τησ Συσκευησ
35
-
Οδηγιεσ Χρησησ
35
-
Güvenlik Talimatlari
38
-
Kullanim Talimatlari
38
Advertisement
Moulinex Principio Manual (51 pages)
Brand: Moulinex
|
Category: Electric Steamer
|
Size: 1.05 MB
Table of Contents
-
Table of Contents
3
-
Français
7
-
English
12
-
Deutsch
17
-
Nederlands
22
-
Español
27
-
Italiano
32
-
Türkçe
37
Moulinex Principio Manual (12 pages)
Brand: Moulinex
|
Category: Toaster
|
Size: 1.56 MB
Table of Contents
-
Consignes de Sécurité
7
-
Safety Instructions
9
-
Important Safeguards
9
-
Cosa Non Fare
10
-
Consignas de Seguridad
11
-
Precauciones Importantes
11
Advertisement
Moulinex Principio User Manual (8 pages)
Brand: Moulinex
|
Category: Vacuum Cleaner
|
Size: 0.34 MB

Moulinex Principio Manual (10 pages)
Brand: Moulinex
|
Category: Toaster
|
Size: 0.57 MB
Advertisement
Related Products
-
Moulinex Principio Plus LS260800
-
Moulinex Noveo Plus TT1928KR
-
Moulinex HV8 PRO 4IN1
-
Moulinex PREP’MIX
-
Moulinex Frutti Pro BKA1
-
Moulinex Frutti Pro BKA2
-
Moulinex Frutti Pro BKA3
-
Moulinex PREP’MIX+
-
Moulinex HV7 PRO 8in1
-
Moulinex HV7 PRO 5in1
Moulinex Categories
Kitchen Appliances
Food Processor
Blender
Juicer
Coffee Maker
More Moulinex Manuals
Описание модели
Moulinex MV 1000 Principio
Компактная пароварка
ПОТРЕБИТЕЛЬСКИЙ АНАЛИЗ
Пароварка — полезный аппарат на любой кухне (рассыпчатый рис, овощи для салатов, ароматная рыбка, фаршированный перчик и пр.пр.). Пользоваться удобно — не нужно следить за процессом, ничего не пригорит, не убежит, воды хватает и без долива, т.к. ее размер предусматривает приготовление не слишком больших порций. Эту модель выбрали ввиду невысокой цены и компактности.
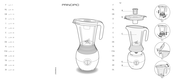
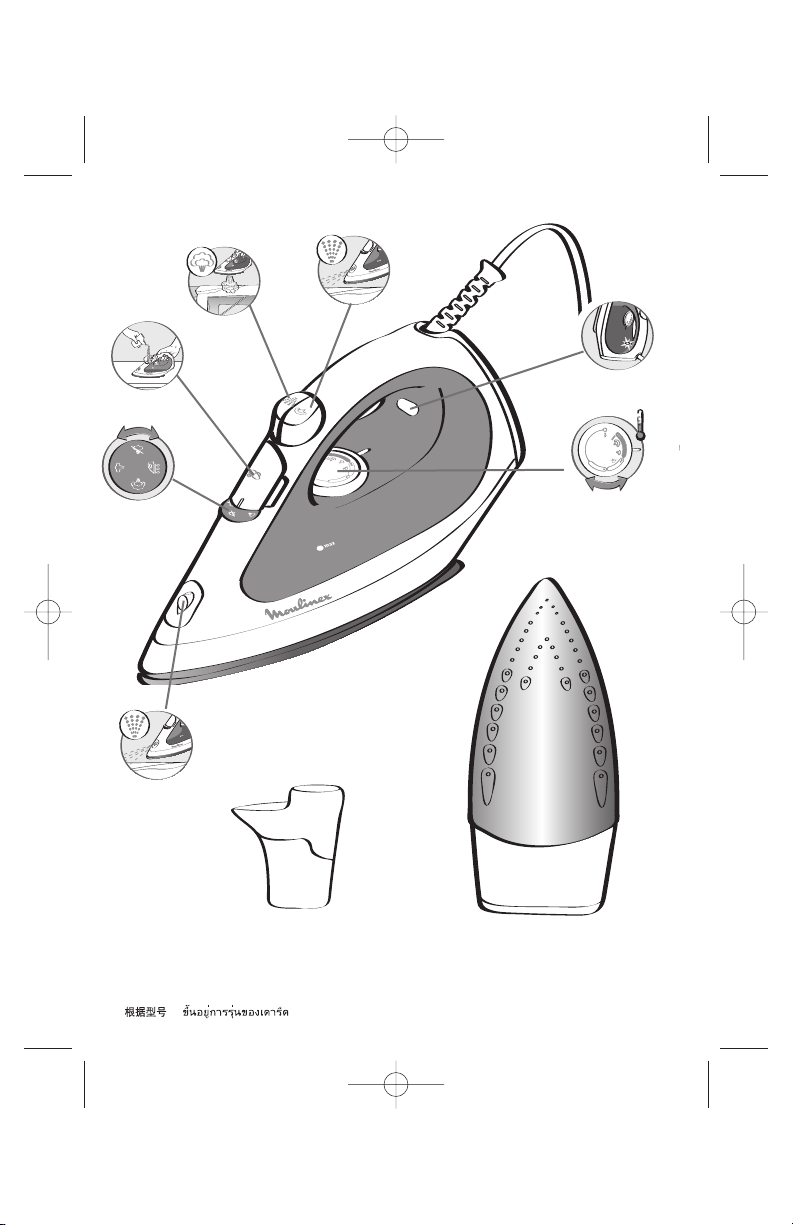
ОЦЕНКА ВНЕШНЕГО ВИДА: пароварка состоит из блока с нагревательным элементом и резервуара для воды, двух корзин для приготовления продуктов и крышки. Корпус изготовлен из белого пластика, корзины и крышка — из прозрачного. Впрочем, прозрачные стенки в эксплуатации не дают никаких преимуществ, так как они практически моментально полностью запотевают.
Нагревательный элемент открытого типа.
В комплект входит всего 2 корзины для продуктов. На решетках каждого яруса есть по 6 углублений для варки яиц.
УПРАВЛЕНИЕ: механическое с помощью поворотного таймера. Слева расположена пямятка-табличка с изображением основных видов продуктов (рыба, яйца, крупа, овощи, фрукты) и указанием примерного времени их приготовления. Чуть ниже имеется световой индикатор, работающий при включенном таймере.
ЭКПЛУАТАЦИЯ:
1. Подготовка к работе. В резервуар пароварки необходимо налить нужное количество воды. Сразу после установки времени таймера включается индикатор, и пароварка начинает процесс парообразования.
2. Приготовление блюд.
а) Рис. В таблице инструкции все обозначения даны в виде изображений. В том числе и вид продукта. В разделе варки круп мы обнаружили две картинки, на которых изображена тарелка с крупой, а какой именно, видимо, пользователь должен догадаться сам. Так как на одно из этих блюд отводилось всего 11 минут, а на второе — 21—26, то мы решили, что рис изображен в последнем случае. В инструкции есть указание, что необходимо в крупу добавлять воду, но соотношения, к сожалению, нет, поэтому данное решение пришлось брать на себя. Воду добавляли из расчета 1:1 (на 200 г — 200 мл). Время приготовления — 26 минут. Но его оказалось недостаточно: вода выпарилась полностью, но рис готов еще не был. Добавили еще 4 ст. ложки воды, включили таймер на 8 минут. В общей сложности варка риса заняла у нас 34 минуты.
б) Котлеты и цветная капуста. Времени для приготовления котлет мы не нашли, поэтому решили ориентироваться на приготовление курицы. Опять пришлось догадываться, какая именно часть курицы изображена в таблице (кроме ножки были еще две). В общем, мы выставили таймер на 26 минут. На верхнем уровне в это время готовилась цветная капуста (21 минута по таймеру). Через 18 минут капусту уже можно было снимать, котлеты готовились 21 минуту.
в) Яйца. На каждом уровне можно варить по 6 яиц, в общей сложности 12 штук. Время, указанное в инструкции, составило 16 минут. Как и в случае с другими пароварками, никаких недоразумений у нас не возникло.
3. Итоговые комментарии. Интересный момент: однократный звуковой сигнал звучит не по истечении заданного времени, а за 3—4 минуты до этого, видимо для того, чтобы хозяйка успела закончить необходимые дела.
В инструкции указано, что готовые блюда после окончания работы пароварки еще в течение 20 минут будут сохраняться в горячем виде, но специальная функция поддержания блюд в горячем виде отсутствует.
Резервуар вмещает в себя 1,5 л воды. Из-за небольшого объема корзин вода выпаривается медленно — 1 л примерно за 80—85 минут.
ОСОБЕННОСТИ МОДЕЛИ: данная модель не оснащена никакими дополнительными функциями или элементами.
ЧИСТКА: чтобы избавить нагревательный элемент от известкового налета, производитель советует закрепить турбокольцо и непосредственно в него налить раствор уксуса, т. е. в заполнении резервуара жидкостью полностью необходимость отсутствует. Раствор следует оставить на 12 часов (например, на ночь), а затем сполоснуть резервуар водой и тщательно протереть мягкой тканью.
Все съемные элементы пароварки можно мыть под краном или в посудомоечной машине.
ИНСТРУКЦИЯ: в текстовом варианте пользователь найдет только указания по безопасности при использовании прибора. Инструкция же содержит только изображения. Конечно, наглядный вариант всегда интереснее и понятнее для изучения. И данная инструкция не стала исключением. Однако когда дело дошло до таблички с наименованием продуктов и времени их приготовления, возникли недоразумения, связанные с элементарным непониманием того, какие именно продукты обозначены в некоторых случаях.
РЕЗЮМЕ
ДОСТОИНСТВА: компактна, проста в применении.
Пища получается полезной и с более насыщенным вкусом.
Не надо долго «зависать» на кухне: положил-включил-ушел.
ОГРАНИЧЕНИЯ: 1. Малофункциональна
2. Нет уровня воды.
3. Поддон для воды очень НЕ глубокий, и через определенное время бульон через края выливается на стол. Это ужасно… Приходится прерывать процесс готовки не один раз, для того, чтобы сливать воду.
4.Нет долива воды.
5. Таймер доходит до 30 минут и останавливается.
6. Чаши для риса в ней нет, это огромный минус!
ОБЩАЯ ОЦЕНКА: в поддоне для воды скапливается вода, которая на определнном этапе готовки начинает просто вытекать из поддона на поверхность, на которой стоит пароварка. Для того, чтобы это прекратить, нужно снимать все поддоны и выливать воду. Легко сильно обжечь руки паром. Долива воды нет. Уровня воды также нет. Нагревательный элемент после месяца использования покрылся накипью. За такую же цену можно купить пароварку с большим набором удобных функциий (чаша для риса, индикатор уровня воды, безопасный долив воды во время приготовления и проч.)
Страницы и текст этой инструкции
 Инструкция пароварки Moulinex MV 1000
 Информация отображена на картинке
 Информация отображена на картинке
 Информация отображена на картинке
 Информация отображена на картинке
Как использовать наш сайт инструкций OnlineManuals.ru
Наша цель состоит в том, чтобы предоставить вам быстрый доступ к содержанию инструкции для пароварки Moulinex MV 1000.
С помощью онлайн просмотра, Вы можете быстро просмотреть содержимое инструкции и найти решение проблемы с пароварки Moulinex MV 1000.
Для Вашего удобства
Если листать руководство пользователя пароварки Moulinex MV 1000 прямо на сайте, не очень удобно для Вас, есть два возможных решения:
• Просмотр в полноэкранном режиме — легко просмотреть руководство пользователя (без загрузки его на свой компьютер), Вы можете использовать режим полноэкранного просмотра.
Для просмотра инструкции пользователя пароварки Moulinex MV 1000 на полном экране, используйте кнопку «Открыть в Pdf-viewer».
• Загрузка на компьютер — Вы можете также скачать Инструкция пароварки Moulinex MV 1000 на свой компьютер и сохранить его в файлах.
Многие люди предпочитают читать документы не на экране, а в печатной версии.
Возможность печати руководства пользователя также была предусмотрена на нашем сайте,
и вы можете использовать ее, нажав на иконку «печать» в Pdf-viewer.
Нет необходимости печатать все руководство пароварки Moulinex MV 1000, можно выбрать только нужные страницы инструкции.

www.moulinex.com
gb
F
E
I
D
FIN
TR
RUS
UA
PL
CZ
SK
H
RO
SR
HR
BG
TH
RC
AR
EST
LT
LV
1800115954 IM2XXX:Mise en page 1 2/04/09 10:57 Page 1
2
* selon modèle • depending on model • según modelo • a seconda del modello • je nach Modell
• bazı modellerde • mallista riippuen • в зависимости от модели • один раз на мiсяць • w zależności od modelu podle
modelu • podl’a modelu • modelltől függően • w zależności od modelu • ovisno o modelu • zavisno od modela спорeд модeла
• • • • Vastavalt mudelile •Priklausomai nuo modelio • Atkarīgi no modeļa
•ºV «∞Luœ¥q
*
200 cc
1800115954 IM2XXX:Mise en page 1 2/04/09 10:57 Page 2

3
* selon modèle • depending on model • según modelo • a seconda del modello • je nach Modell
• bazı modellerde • mallista riippuen • в зависимости от модели • один раз на мiсяць • w zależności od modelu podle
modelu • podl’a modelu • modelltől függően • w zależności od modelu • ovisno o modelu • zavisno od modela спорeд модeла
• • • • Vastavalt mudelile •Priklausomai nuo modelio • Atkarīgi no modeļa
•ºV «∞Luœ¥q
1800115954 IM2XXX:Mise en page 1 2/04/09 10:57 Page 3
1800115954 IM2XXX:Mise en page 1 2/04/09 10:57 Page 4
1800115954 IM2XXX:Mise en page 1 2/04/09 10:57 Page 5
1800115954 IM2XXX:Mise en page 1 2/04/09 10:57 Page 6
6
*
7
* selon modèle • depending on model • según modelo • a seconda del modello • je nach Modell
• bazı modellerde • mallista riippuen • в зависимости от модели • один раз на мiсяць • w zależności od modelu podle
modelu • podl’a modelu • modelltől függően • w zależności od modelu • ovisno o modelu • zavisno od modela спорeд модeла
• • • • Vastavalt mudelile •Priklausomai nuo modelio • Atkarīgi no modeļa
•ºV «∞Luœ¥q
1800115954 IM2XXX:Mise en page 1 2/04/09 10:57 Page 7

* selon modèle • depending on model • según modelo • a seconda del modello • je nach Modell
• bazı modellerde • mallista riippuen • в зависимости от модели • один раз на мiсяць • w zależności od modelu podle
modelu • podl’a modelu • modelltől függően • w zależności od modelu • ovisno o modelu • zavisno od modela спорeд модeла
• • • • Vastavalt mudelile •Priklausomai nuo modelio • Atkarīgi no modeļa
•ºV «∞Luœ¥q
1800115954 IM2XXX:Mise en page 1 2/04/09 10:57 Page 8
9
* selon modèle • depending on model • según modelo • a seconda del modello • je nach Modell
• bazı modellerde • mallista riippuen • в зависимости от модели • один раз на мiсяць • w zależności od modelu podle
modelu • podl’a modelu • modelltől függően • w zależności od modelu • ovisno o modelu • zavisno od modela спорeд модeла
• • • • Vastavalt mudelile •Priklausomai nuo modelio • Atkarīgi no modeļa
•ºV «∞Luœ¥q
1800115954 IM2XXX:Mise en page 1 2/04/09 10:57 Page 9
10
FOR YOUR SAFETY
This appliance complies with the technical rules
and standards for safety currently in force (Electromagnetic Compatibility, Low Voltage, Environment).
This appliance is not intended for use by persons
(including children) with reduced physical, sensory
or mental capabilities, or lack of experience and
knowledge, unless they have been given supervision or instruction concerning
use of the appliance by a person responsible for
their safety. Children should be supervised to ensure that they do not play with the appliance.
Warning ! The voltage of your electrical installation
must correspond to that of the iron (220V-240V).
Connecting to the wrong voltage may cause irreversible damage to the iron and will invalidate the
guarantee.
This iron must always be plugged into an earthed
socket. If using a mains extension lead,
ensure that it is correctly rated (10A), with an earth
connection.
If the electrical cord becomes damaged, it must
be immediately replaced by an Approved
Service Centre to avoid any danger.
The appliance should not be used if it has fallen, if
it has obvious damage, if it leaks or if it functions incorrectly. Never dismantle your appliance: have it
inspected by an Approved Service Centre, so as
to avoid any danger.
Never immerse your iron in water !
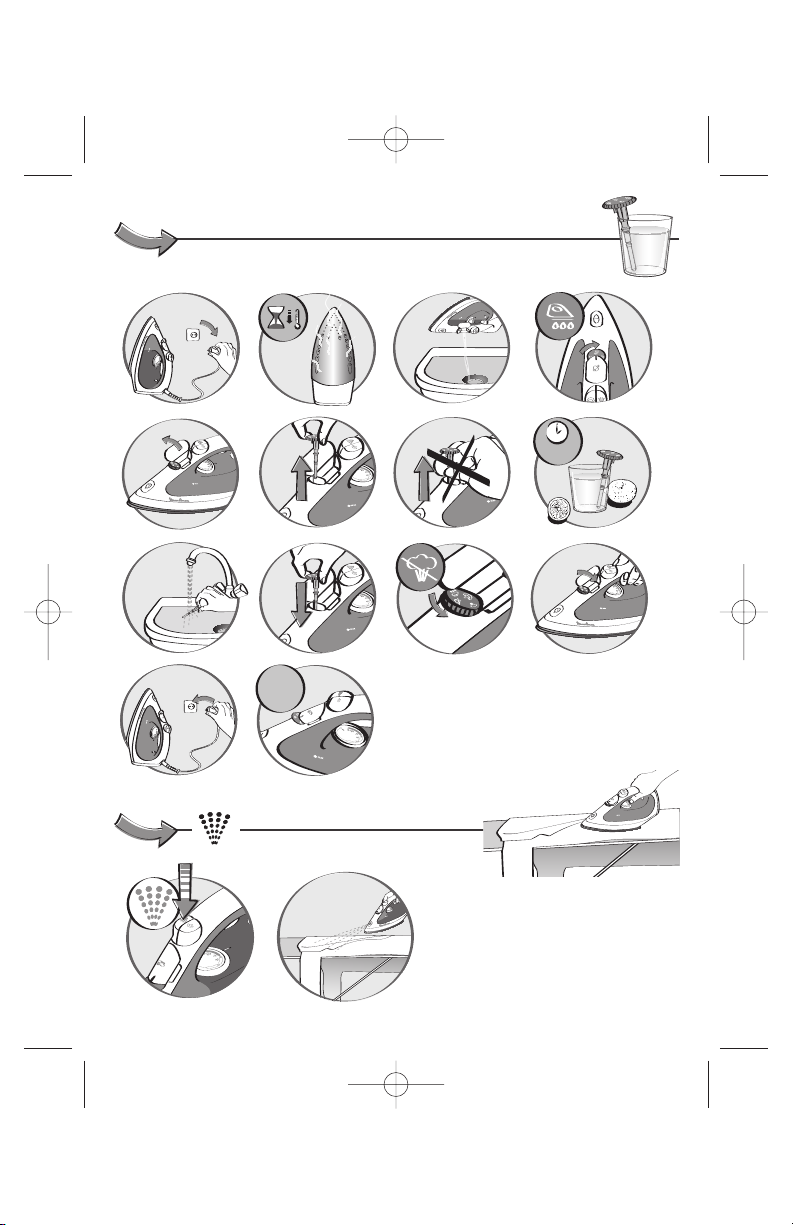
Do not unplug your appliance by pulling on the
cord. Always unplug your appliance: before filling
or rinsing the water tank, before cleaning it, after
each use.
Never leave the appliance unsupervised when it is
connected to a power source; if it has not cooled
down for approximately 1 hour.
The soleplate may be very hot : never touch it and
always let it cool down before putting it away.
Your appliance gives off steam, which may cause
burns, especially when you are ironing on
a corner of your ironing board. Never direct the
steam towards people or animals.
Your iron should be used and placed on a flat, stable, heat-resistant surface. When you put your
iron onto its iron rest, make sure that the surface
on which you put it is stable.
This product has been designed for domestic use
only. Any commercial use, inappropriate use or
failure to comply with the instructions, the manufacturer accepts no responsibility and the guarantee will not apply.
RECOMMENDATIONS
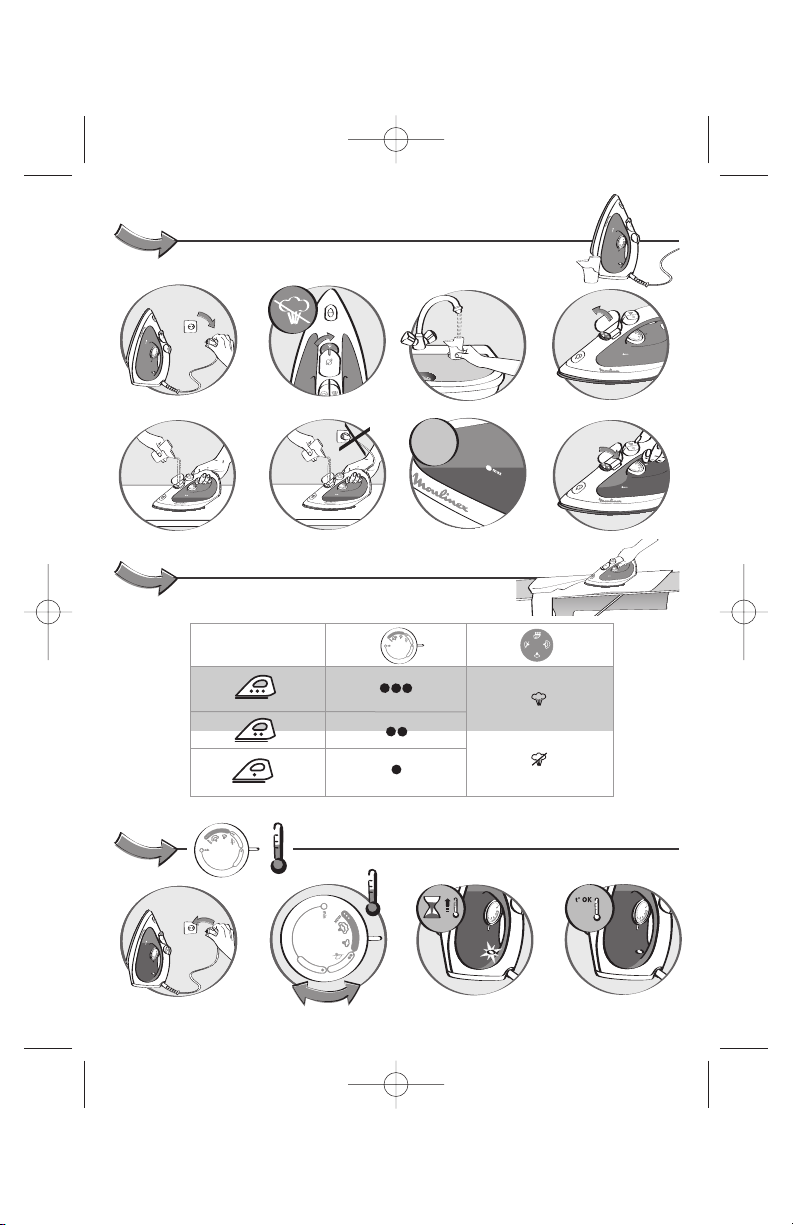
Your iron heats up quickly : so begin by ironing fabrics that are ironed at low temperatures first,
then go on to those requiring a higher temperature.
When ironing fabrics with mixed fibres, set the ironing temperature for the most delicate fibre
Never exceed the water tank MAX level..
Store the cold iron on its heel.
Never use abrasive or aggressive products to clean
the soleplate and the other parts of the iron.
WHAT WATER TO USE ?
Your appliance has been designed to function with
untreated tap water. If you have very hard water, mix
untreated tap water with commercially available demineralised or distilled water in the following ratio:
— 50% untreated tap water,
— 50% demineralised or distilled water.
Types of water not to use: Heat concentrates the elements contained in water during evaporation. The
types of water listed below may contain organic
waste, mineral or chemical elements that can cause
spitting, brown staining or premature wear of the appliance: water from clothes dryers, scented or softened water, water from refrigerators, batteries, air
conditioners, rain water, boiled, filtered or bottled
water. These types of water should not be used in
your Moulinex iron. Also only use distilled or demineralised water as advised above.
Important recommandations
1800115954 IM2XXX:Mise en page 1 2/04/09 10:57 Page 10

GB
11
If there is a problem
PROBLEM CAUSES SOLUTIONS
Water drips from
the holes in the
soleplate.
The chosen temperature is too low
and does not allow for the formation of steam.
You are using steam while the iron
is not hot enough.
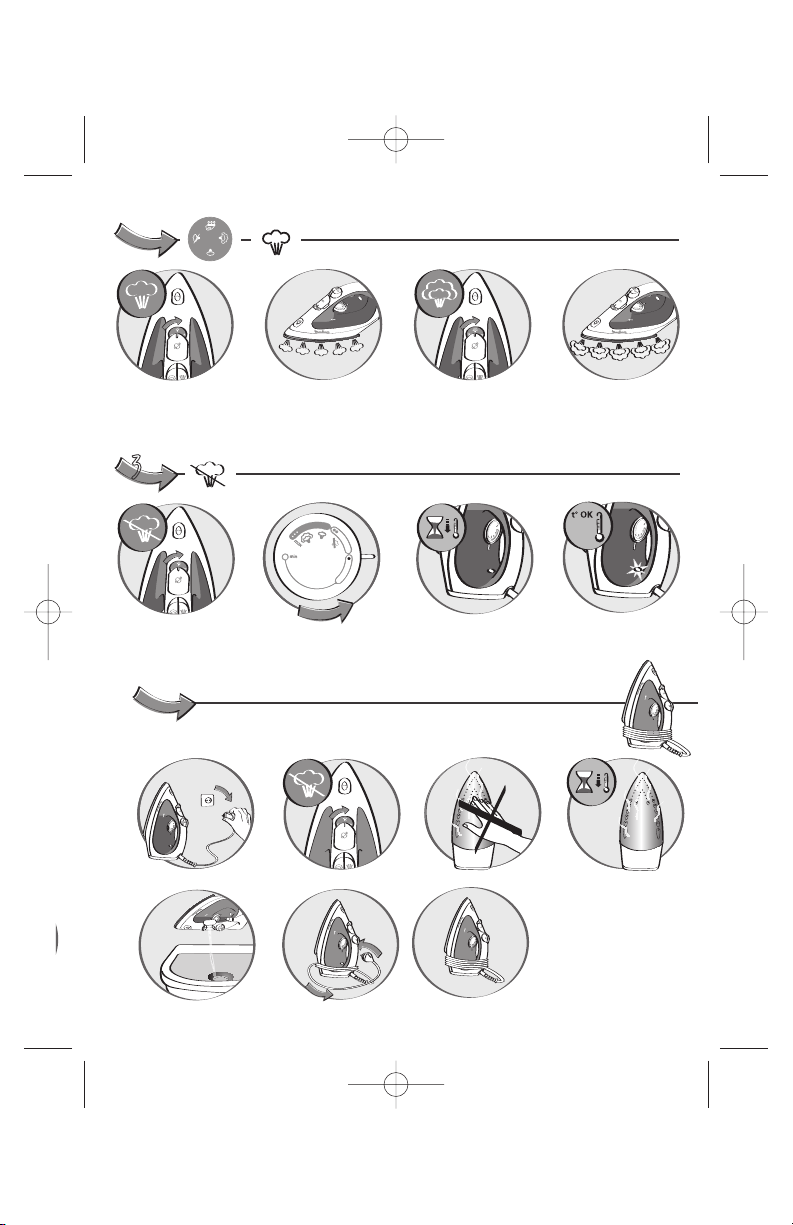
You are using the Shot of Steam
button too often.
There is too much steam.
You have stored the iron horizontally, without emptying it and without setting it to .
Position the thermostat in the steam range
(from •• to MAX).
Wait until the thermostat light goes out.
Wait a few seconds between each use of
the button.
Reduce the steam.
Always store your iron on its heel.
Brown streaks
come through the
holes in the soleplate and stain
the linen.
You are using chemical descaling
agents.
You are not using the right type of
water.
Fabric fibres have accumulated in
the holes of the soleplate and are
burning.
Your linen has not been rinsed sufficiently or you have ironed a new
garment before washing it.
Do not add any descaling agents to the
water in the water tank.
Perform a self-cleaning operation and
consult the section «What water to use?».
Perform the self-cleaning operation and
clean the soleplate with a damp sponge.
Vacuum the holes of the soleplate from
time to time.
Make sure that your laundry is rinsed sufficiently so as to remove any deposits of
soap or chemical products on new
clothes.
The soleplate is
dirty or brown and
can stain the
linen.
Your are ironing with an inappropriate setting (temperature too
high).
Clean the soleplate as indicated above.
Select the appropriate setting.
There is little or no
steam.
The water tank is empty.
The anti-calc valve is dirty.
Your iron has a build-up of scale.
Your iron has been used dry for
too long.
Fill it.
Clean the anti-calc valve.
Clean the anti-calc valve and carry out a
self-clean.
Carry out a self-clean.
The soleplate is
scratched or
damaged.
You have placed your iron flat on
a metallic rest-plate or ironed
over a zip.
Always set your iron on its heel.
Environment protection first !
If you have any problem or queries, please contact our Customer Relations team first for expert
help and advice:
0845 602 1454 — UK (01) 4751947 — Ireland or consult our website — www.moulinex.co.uk
Your appliance contains valuable materials which can be recovered or recycled.
Leave it at a local civic waste collection point.
Steam or water
comes out from
the iron as you finish filling the
tank.
The spray does
not spray.
The steam control is not set to .
The water tank is overfilled.
There is not enough water in the
water tank.
Check that the steam control is set to .
Never overfill the water tank.
Empty out the excess.
Fill up the water tank.
E E
1800115954 IM2XXX:Mise en page 1 2/04/09 10:57 Page 11
12
POUR VOTRE SÉCURITÉ
Pour votre sécurité, cet appareil est conforme aux
normes et réglementations applicables (Directives
Basse Tension, Compatibilité Electromagnétique,
Environnement …).
Cet appareil n’est pas prévu pour être utilisé par
des personnes (y compris les enfants) dont les capacités physiques, sensorielles ou mentales sont réduites, ou des personnes dénuées d’expérience ou
de connaissance, sauf si elles ont pu bénéficier, par
l’intermédiaire d’une personne responsable de leur
sécurité, d’une surveillance ou d’instructions préalables concernant l’utilisation de l’appareil. Il
convient de surveiller les enfants pour s’assurer
qu’ils ne jouent pas avec l’appareil
Attention! la tension de votre installation électrique
doit correspondre à celle du fer
(220-240V). Toute erreur de branchement peut
causer un dommage irréversible au fer et annule
la garantie.
Ce fer doit être obligatoirement branché sur une
prise de courant avec terre. Si vous utilisez une rallonge, vérifiez qu’elle est de type bipolaire (10A)
avec conducteur de terre.
Si le câble d’alimentation est endommagé, il doit
être immédiatement remplacé par un Centre Service Agréé, afin d’éviter un danger.
L’appareil ne doit pas être utilisé s’il a chuté, s’il
présente des dommages apparents, s’il fuit ou présente des anomalies de fonctionnement. Ne démontez jamais votre appareil : faites-le examiner
dans un Centre Service Agréé, afin d’éviter un
danger.
Ne plongez jamais le fer dans l’eau!
Ne débranchez pas l’appareil en tirant sur le cordon. Débranchez toujours votre appareil : avant
de le remplir ou de rincer le réservoir, avant de le
nettoyer, après chaque utilisation.
Ne laissez jamais l’appareil sans surveillance
lorsqu’il est raccordé à l’alimentation électrique ;
tant qu’il n’a pas refroidi environ 1 heure.
La semelle du fer peut être très chaude : ne la touchez jamais et laissez toujours refroidir votre fer
avant de le ranger.
Votre appareil émet de la vapeur qui peut occasionner des brûlures, spécialement lorsque vous repassez sur un angle de votre table à repasser. Ne
dirigez jamais la vapeur sur des personnes ou des
animaux.
Votre fer doit être utilisé et posé sur une surface stable. Lorsque vous posez votre fer sur son repose-fer,
assurez-vous que la sur face sur laquelle vous le
posez est stable.
Ce produit a été conçu pour un usage domestique uniquement. Pour tout usage inapproprié ou
contraire aux instructions, la marque décline toute
responsabilité et la garantie n’est plus valable.
RECOMMANDATIONS
Le temps de refroidissement du fer est plus long
que le temps de chauffe.
Nous vous recommandons de commencer votre
repassage par les tissus délicats à la température
minimale.
Si vous repassez un tissu fait de fibres mélangées,
réglez la température de repassage sur la fibre la
plus fragile.
Ne dépassez jamais le niveau Max du réservoir.
Ne rangez jamais votre fer en position horizontale.
N’utilisez jamais de produits de nettoyage et d’objets tranchants ou abrasifs pour nettoyer la semelle
et les autres parties de l’appareil.
QUELLES EAUX UTILISER ?
Votre appareil a été conçu pour fonctionner avec
l’eau du robinet. Si votre eau est très calcaire, mélangez 50% d’eau du robinet et 50% d’eau déminéralisée du commerce.
N’ajoutez rien au contenu du réservoir d’eau.
N’utilisez pas l’eau des sèche-linge, l’eau parfumée ou adoucie, l’eau déminéralisée, l’eau des
réfrigérateurs, des batteries, des climatiseurs, de
l’eau pure distillée ou de l’eau de pluie. Ces eaux
contiennent des déchets organiques ou des éléments minéraux qui se concentrent avec la chaleur et peuvent provoquer des crachements, des
coulures brunes ou un vieillissement prématuré de
votre appareil.
Recommandations importantes
1800115954 IM2XXX:Mise en page 1 2/04/09 10:57 Page 12
 Loading…