-
Contents
-
Table of Contents
-
Bookmarks
Quick Links
THREE-CD CHANGER
MINI-COMPACT SYSTEM
CD-R/RW PLAYBACK
MAX-L42
MAX-L45
Instruction Manual
Downloaded From Disc-Player.com Samsung Manuals
Related Manuals for Samsung MAX-L42
Summary of Contents for Samsung MAX-L42
-
Page 1: Instruction Manual
THREE-CD CHANGER MINI-COMPACT SYSTEM CD-R/RW PLAYBACK MAX-L42 MAX-L45 Instruction Manual Downloaded From Disc-Player.com Samsung Manuals…
-
Page 2: Safety Warnings
The wire coloured BROWN must be connected to the terminal marked with the letter L or coloured BROWN or RED. WARNING: DO NOT CONNECT EITHER WIRE TO THE EARTH TERMINAL WHICH IS MARKED WITH THE LETTER E OR BY THE EARTH SYMBOL , OR COLOURED GREEN OR GREEN AND YELLOW. Downloaded From Disc-Player.com Samsung Manuals…
-
Page 3: Table Of Contents
Cleaning Your Mini-Compact System …………………………23 Precautions When Using Compact Discs …………………………23 Precautions When Using Audio Cassettes ………………………… 23 Before Contacting the After-Sales Service ………………………… 23 Technical Specifications …………………………….24 Symbols Downloaded From Disc-Player.com Samsung Manuals Press Push Important Note…
-
Page 4: Front Panel View
27. Disc Selection buttons 11. TAPE Normal Dubbing 28. Function Selection buttons 12. TAPE Hi-Speed Dubbing 29. Search Function buttons 13. Multi Jog 30. Stop button 14. Enter 31. Skip Function buttons 15. Program 16. EQ Downloaded From Disc-Player.com Samsung Manuals…
-
Page 5: Remote Control
16. Tuner Band 6. TAPE Fast-Forward 17. Mono/ST. 7. TAPE Rewind 18. AUX 8. CD Stop 19. Program/Set 9. CD Track or Radio Station Search(Skip) 20. Mute 10. Volume Decrease 21. Timer On/Off 11. Tuning Mode(MANUAL,PRESET) Downloaded From Disc-Player.com Samsung Manuals…
-
Page 6: Rear Panel View
Rear Panel View 1. CD Digital out (OPTICAL) 2. FM Aerial Connector Terminal 3. AM Aerial Connector Terminal 4. AUX-Input 5. Loudspeaker Connector Terminals Downloaded From Disc-Player.com Samsung Manuals…
-
Page 7: Where To Install Your Mini-Compact System
Before plugging your system into a main socket, you must check the voltage. Plug the main lead (marked AC Cord on the rear of the system) into an appropriate socket. Press the On/Standby button to switch your mini-compact system Downloaded From Disc-Player.com Samsung Manuals…
-
Page 8: Connecting The Am (Mw)/Lw Aerial
If reception is poor, you may need to install an outdoor aerial. To do so, connect an outdoor FM aerial to the FM socket on the rear of the system using a 75Ω coaxial cable (not supplied). Downloaded From Disc-Player.com Samsung Manuals…
-
Page 9: Inserting Remote Control Batteries
Result: The various functions available are listed in turn on the dis- play. All these functions are described in detail in this booklet. For instructions on how to use them, refer to the appropriate 3,5,7 sections. To cancel this function, press Demo again. Downloaded From Disc-Player.com Samsung Manuals…
-
Page 10: Loading And Changing Compact Discs
CD-RWs may require a longer readout time.(This is cause by the fact that reflectance of CD-RWs is lower than for regular CDs.) Downloaded From Disc-Player.com Samsung Manuals…
-
Page 11: Selecting A Cd In The Disc Changer
Multi Jog one notch to the left When you have finished the random playback, press or press the Shuffle button again. Repeat and CD Synchro function are not availabe in Shuffle playing mode. Downloaded From Disc-Player.com Samsung Manuals…
-
Page 12: Repeating One Or All Tracks On The Compact Discs
Select the required track by turning the Multi Jog knob: To the left to move back through the tracks To the right to move forward through the tracks Press Program to confirm your selection. Result: The selection is stored and is displayed. Downloaded From Disc-Player.com Samsung Manuals…
-
Page 13: Checking Or Changing Programmed Tracks
Program Disc Skip /Set Deck 1/2 2,3,4,7 AI Off Mono/ST. Tuner Sleep Band TAPE Deck 1/2 AI Off Mono/ST. Tuner Sleep Band TAPE VOL. Tuning Mode VOL. VOL. Tuning Tuning Mode Mode Downloaded From Disc-Player.com Samsung Manuals VOL.
-
Page 14: Selecting A Stored Station
In Preset tuning mode, you can use Multi Jog or ty of the sound will be improved. button to search a stored radio station. On/Standby Timer On/Off Mute Program Disc Skip /Set Deck 1/2 AI Off Mono/ST. Tuner Sleep Band TAPE VOL. Downloaded From Disc-Player.com Samsung Manuals…
-
Page 15: About Rds Broadcasting
To select the CT time, set the RDS Display button to CT MODE. The CT information will take up to 2 minutes to be decoded there- fore the clock isn’t displayed immediately. If there is no received CT information, «NO CT» is displayed. Downloaded From Disc-Player.com Samsung Manuals…
-
Page 16: Pty (Program Type) Indication And Pty-Search Function
• Travel TRAVEL • Leisure LEISURE • Jazz Music JAZZ • Country Music COUNTRY • National Music NATION M • Oldies Music OLDIES • Folk Music FOLK M • Documentary DOCUMENT • Alarm Test TEST Downloaded From Disc-Player.com Samsung Manuals…
-
Page 17: Tape
Press the to start playing the track. Result: The track is recorded on the cassette. When you have finished recording, press TAPE on the remote control or on the front panel to stop recording. 3,6,8 Downloaded From Disc-Player.com Samsung Manuals…
-
Page 18: Recording A Radio Programme
Insert the tape to be copied in Deck 1. To copy a cassette at… Press… Normal speed Normal High speed High Downloaded From Disc-Player.com Samsung Manuals Result: The appropriate indications are displayed and the cassette in Deck 1 is copied to the cassette in Deck 2.
-
Page 19: Selecting The Cassette Playback Mode (Deck 2 Only)
Set the minutes by tuning the Multi Jog knob to the right or to the left. Press Enter. Result: OFF TIME is displayed (instead of the equalizer symbols) for a few seconds, followed by any switch-off time already set; you can now set the timer switch-off time. Downloaded From Disc-Player.com Samsung Manuals…
-
Page 20: Cancelling The Timer
To cancel this function, press Power Sound button again and “OFF” is displayed for a few seconds. On/Standby Timer On/Off Mute Program Disc Skip /Set Deck 1/2 AI Off Mono/ST. Tuner Sleep Band TAPE Downloaded From Disc-Player.com Samsung Manuals…
-
Page 21: Setting The System To Switch Off Automatically
TAPE Connect the headphones to the Phones jack on the front panel. Result: The loudspeakers are no longer used to output the sound. Prolonged use of headphones at a high volume may damage your hearing. Downloaded From Disc-Player.com Samsung Manuals…
-
Page 22: Connecting To An External Source
Do not remove any equipment panels. main lead. Main cable damage can The inside of the unit lead to damage of the equipment (fire contains live components, which hazard) and can cause electric cause electric shock. Downloaded From Disc-Player.com Samsung Manuals shock.
-
Page 23: Cleaning Your Mini-Compact System
If the above guidelines do not allow you to solve the problem, take a note of: The model and serial numbers, normally printed on the rear of the system Your warranty details A clear description of the problem Then contact your local dealer or SAMSUNG after-sales service. Downloaded From Disc-Player.com Samsung Manuals…
-
Page 24: Technical Specifications
Technical Specifications SAMSUNG strives to improve its products at all times. Both the design specifications and these user instructions are thus subject to change without notice. RADIO Usable sensitivity 60 dB AM (MW) Signal/noise ratio 40 dB Usable sensitivity 54 dB…
-
Page 25
THIS APPLIANCE IS MANUFACTURED BY: ELECTRONICS AH68-00750B Downloaded From Disc-Player.com Samsung Manuals…
This manual is also suitable for:
Max-l45
CD-R / CD-RW
L42/L42G
L45/L45G
!"#!$%&
2
!"#
#
!"
$%&'()&*+,-.&/0+,&*1%/+*'.,-2/.01'-/&*3--'*4%&',.,-.%/&5.61/,.&%-$+,,47*6+,,&8,$9/135--
:&;.9%/-*.$9-3&%+$,&:1&<'1=.,->'+)./&:
9&9$-:*&'13+)4*+.9=9&*,19/-6+,,&0&
-)6.'-2-:..9$2&%+$,&.,+%/2;.,-.3&9&/&.
:&;.9%/-*.$9-3%&/+;.,->?'.39/-=.$3-:
9&3&:
9&9$-:*&'13+)4*+.9=9&*6&31:.,9+5--,+
-)6.'-.-:..9$2*+;,+2-,$9/135-2%&.0&
-$%&'()&*+,->-'-&<$'1;-*+,->
9&<41:.,(@-9(/-$3%&/+;.,-2
?'.39/-=.$3-:9&3&:,.6&%1$3+89.
%&%+6+,-26+,,&0&-)6.'-2%&6
6&;6(-'-*1$'&*-2*4$&3&8
*'+;,&$9-
3
!
"
"
!
#$
#%
&
'(&
)
%
*
%&
%%
♦ !"# $! %&'#()(*+,! %&,* -(#.)%()/& A
♦ )/.%(01.0.2 31(4#.1/%(34&%&)&)/ 45
-6%./.6,.8%+,.'- B
1'(96-$9+,5-&,,&0&1%/+*'.,-2 C
-6)+6,.8%+,.'- D
6.1$9+,+*'-*+9(*+@13&:%+39,1>:-,-E$-$9.:1 F
&6$&.6-,.,-.*[email protected]$-$9.:43$.9-%./.:.,,&0&9&3+ F
&6$&.6-,.,-.+31$9-=.$3-7$-$9.: F
&6$&.6-,.,-.GHIJK+,9.,,4 L
&6$&.6-,.,-.MHE+,9.,,4 L
$9+,&*3+<+9+/.8*%1'(96-$9+,5-&,,&0&1%/+*'.,-2 N
/&$:&9//+)'-=,47O1,35-8*[email protected]$-$9.:4 N
$9+,&*3+=+$&* N
♦ (&650./ +71(4#.1/!&)1(0
+0/1)3+-$:.,+3&:%+39E6-$3&* PQ
/&$'1@-*+,-.3&:%+39E6-$3+ PQ
4<&/6-$3+*3+/1$.'(,&:'&93. PP
4<&/6&/&;3-,+3&:%+39E6-$3. PP
&-$33&,3/.9,&0&:.$9+,+3&:%+39E6-$3. PP
"1,35-2*&$%/&-)*.6.,-2*$'1=+8,&:%&/263. PP
&*9&/&6,&8-'-*$.76&/&;.3,+3&:%+39E6-$3+7 PA
/&0/+::-/&*+,-.%&/263+*&$%/&-)*.6.,-2 PA
&,9/&'(-'--):.,.,-.)+%/&0/+::-/&*+,,476&/&;.3 PR
♦ ,% &-$3/+6-&$9+,5-8-)+%&:-,+,-.,+$9/&83-,+,-7*%+:29-$-$9.:4 PR
4<&/)+%&:,.,,&8/+6-&$9+,5-- PB
'1=@.,-.3+=.$9*+%/-.:+ PB
♦ .)) /%.'! 1.
/&$'1@-*+,-.3+$$.94 PC
-,7/&,-)-/&*+,,+2)+%-$(3&:%+39E6-$3+ PC
+%-$(3&:%+39E6-$3+ PC
+%-$(%./.6+=-/+6-&$9+,5-- PD
&%-/&*+,-.3+$$.94I%./.)+%-$(J PD
=.9=-3'.,94IMAX-L42J PD
4<&//.;-:+*&$%/&-)*.6.,-23+$$.94I9&'(3&.3+AJIMAX-L4CJ PD
♦ "6& 8"%19&&
"1,35-29+8:./+ PF
9:.,+6.8$9*-29+8:./+ PL
/.:.,,&.&93'>=.,-.)*13+IHSTUJ PL
4<&/%/.61$9+,&*'.,,47,+$9/&.3?3*+'+8)./+ PL
"1,35-2 Power Sound........................................................................................................... 1L
$9+,&*3+$-$9.:4,++*9&:+9-=.$3&.*43'>=.,-. PN
-$9.:+1$-'.,-2,-)3-7=+$9&9VSWUXYZ[[ PN
&6$&.6-,.,-.,+1@,-3&* PN
"1,35-2:-3/&O&,+I,.*&*$.7:&6.'27J PN
&6$&.6-,.,-.3*,.@,.:1-$9&=,-31$-0,+'+ AQ
♦ 1(4 %!.9&&#(&)#(+7-(0.%&,
./4%/.6&$9&/&;,&$9- AQ
-$93+*[email protected]&:%+39,&8:-,-E$-$9.:4 AP
./4%/.6&$9&/&;,&$9-%/--$%&'()&*+,--3&:%+39E6-$3&* AP
./4%/.6&$9&/&;,&$9-%/--$%&'()&*+,--+16-&3+$$.9 AP
/.;6.=.:&</+\+9($2*5.,9/%&$'.%/&6+;,&0&&<$'1;-*+,-2 AP
.7,-=.$3-.7+/+39./-$9-3- AA
.$./7
(+1%"/7
.$%(
&4 :.%&
4
A
;
/) 1!+'1(4#.1/!&)1(0
B .)) /%.'! 1.<
< 4(%)/.9&(%%53 $&4
C .#&)7>."-.
= .34 >:.)5
E &)/ 4.")&+ %&'%&-1&H:.)/(/IJKLMMN
? %(#1.&/.%& > $&46(/(0%()/&
<F &%H(%&-&(0.%%.'-.#&)71(4#.1/!&)1.
@ 1+,: %& >051+,: %& /.34 .
< % -!(!+'#(!)( !&% %&'%."2%&1(0
A 1.><
<< ()#(&-0 ! %& 0)+":.3%(4#('!1
B $&4 0 ).(MAX-L42)
*()): /:&1.+ %/5(MAX-L45)
<= /15/& >-.15/& (/) 1.!+'1(4#.1/!&)1(0
C %(#1.D0/(4./&: )1( 051+,: %& >(%D
<@ 4 %.!&)1.
E (0/(1(4#.1/!&)1.
F .)) /%.'! 1.
-.#&)71.)) /5)%(4.+7%(3)1(()/7,
< -.#&)71.)) /5)05)(1(3)1(()/7,
= %(6(8"%19&(%.+7%.'":1.
? %(#1.D0(!D
@ %(#1.D(6.44.D
A G10.+.3- <? %(#1.8"%19&&Power Sound
<A 6"+'/(6(41()/&
<B %(#1&05*(.!&)1.
<C %(#1&05*(.8"%19&3
<E %(#1&8"%19&&D(&)1D
=F %(#1.D/(#D
= %(#1&8"%19&&D(#")1D
&12&(0.%&
)&6%.+.(/4&1(8(%.O
&1(8(%O&1(8(%<I#9&'N
5
&/.%& > $&46(/(0%()/&
< 0 +&: %& 6(41()/&
< (#")1!&)1.
= ()#(&-0 ! %& >."-.1(4#.1/!&)1.
= G10.+.3- ? ()#(&-0 ! %& 1.)) /5
? 0/(4./&: )1( 051+,: %& >(%D
@ /(#1.)) /5
@ 1.><
A &.#.-(%/,% .
A 4(/1.1.)) /50# !
B 5*( $&4.(%(>/ (
B 4(/1.1.)) /5%.-.!
C 5*(!(#(+%&/ +7%(6(0H(!.-0"1.
C /(#1(4#.1/!&)1.
E (6.44.>)/.%(01.
E (&)1I#(#")1N!(($1&1(4#.1/!&)1.&+&
.!&()/.%9&&
<F 4 %%( (/1+,: %& -0"1.
F4 %72 %& 6(41()/&
$&4%.)/(31&%..!&()/.%9&&I":%(3O
!0.&/ +7%5 %.)/(31&N
< 1+,: %& >051+,: %& /.34 .
6
<
=
?
+ 445!+'#(!)( !&% %&'FM.%/ %%5
+ 445!+'#(!)( !&% %&'AM.%/ %%5
(#(+%&/ +7%530H(!
+ 445!+'#(!)( !&% %&'.1")/&: )1&H)&)/ 4
7
!"
%
#
"
♦ ♦ ♦ ♦ !
"#
$
!
$
♦ $% $
$
&
♦ '!
$!
$
$ (
)
!
♦ $!(
♦ * $
%
$
$
&
'
♦ *
$-$
2/
♦ *
$-$
3/
'
♦ 4$
565
♦ 7
$
8&9
7 $
%
!$:
♦ ,(
,
!
%
!$!:
♦ ,
♦ ,
'
!:+!%
%
+
%
!"
#
!
+
%
(
!
$%$
%
,
(-
!
$ACCord-.
//
!
%
On$Standby-+
01/
$(&
8
#$%&
()*
#
#
#+"'
♦
♦
+
+
-$%$
$/
1
!
$%
$!
$$AM
,! %
!(
%
$
$
,
%
;
'$
Ω !
"#
$%&
%,(%-.(/0&,1,2.3(
%
♦ +
<;Ω
=>&
$
♦ ,
(
=>&
$
$
!-<;Ω/
=>
!
$
♦ $
43 $
(
$
♦ +
%
%
,
%=>&
=>
!
!
$<;Ω
-
/
9
(
5
!!'
♦ ?&
♦ @ %
+!
!
!$
!
$
-ABCDBEFG/
$
+
(
$(
-%
/
$(
!
HHA23#I
$
:
♦ 6 565
♦ & 8&9
,!
$(
!
$(
(!
"
'
♦ 4$ &
♦ +
♦ +
$
!
♦ ! $
$
!
♦ +$
%(
!
L$
$
,
%
On$Standby
-+
01/
*%$%
Timer$Clock-
0$/
'
!:+!$
M2NMO-$/
%
Enter-/
'
!:P)$
3
!6
+
$
,
+
$! ,
4
%
$%
Enter
'
!:P)$
!")
3
!6
+
$
,
+
$! ,
4 %
Enter
'
!:7$!$
%
%
-Standby/
"
6
%
Demo-*
$
%/
♦ ,$%
$
%
$!
)
!
%Timer$Clock
♦ ,
Enter(I;<$%
%
!Program$Set-+0
/
♦ ,
!6(QR$
%
%
!I
0
I
'
!:
!$
)
(
,
) $J
K!! !
*
$
%)%
Demo
10
*
!
"!"
#
47
8
+$!$
&
!
$
%
$%
,
% (&
S
!
8T
$
%!&
9
74
,
%
9:$;<=:>?@
-+
01/
%
,$A- /
'
!:@
&$
+
&
$
$ $
+
%
!$
&
%
L$%
!!
&%
DiscChange-
/
-DiscSkip-+/
/
'
!:4
$
"U#°
K
%
,$
A- /
L$
!
$
$%
%
!
&"
D!
#'
CD Text, CD-R CD-RW
%!!!
"
!
E
#
6*6
!+"
"
!
*"MV-
BB/VEWX"
*UVEWXU
*IVEWXI
@
!$
!
$ 7 $
$!!$
&
.7&C
'
!:
'"()#&*"&
"+&,
-&%.
'/012#&"3(45"
"$"&*"&
"
.
671#8$&&"%""
"$".
*"&
"#
&
1$&
&"&
"#
&
#%$&3&&7#
1&.
/871#80$&7"
"$"9&0#$#
18$%
)1$.
17#1#71"%9""10#9
1$:
♦ +11#)"-1"%&
1$&
&.
♦ *"&
";&
#%$&3&&7
#
1&.
<0/1&&
1&%
18$&9&*"&
"#
.
<0/
1$*%
18$&$"9&%&*
"&
"#
.
7$/8"&)
1#=&9&*"&
"#.
♦ +1
18$&"
"$"/*871#*%&/
$"9&&7
18$&.<0/>$%9
"1"$"
"$"&*"&
"
&$"871#8&/$"$0$&/?#7#0&
$&?%"#0&9"10/871#*&
18$/$".'1
18$&$"/&
*
1)%"1#%&/".
♦ 7$
171/%&871#*&&$&7$"9$
"8/0@&A
B$".
♦ &0//01&2#&"3
+1"
"
$"9
"&)&
18$&?1?$"
171/%"
"$")"&.
4$
!
$
&
%
&!$$
$
$
$
,$%
!%$%&
$ $)(
$
(
!"#$!%&'()(*%()%"+!'CD-R %,%-D-RW
./#%"0'/(10(#!,2&!'/3(,(1)%"+%3%#/CD-R 4"!)*!+$/3*!5
&/#%"267%-D-RW4#($(&/#%"0'/(10(71!893'!"#$!%&'!)%32":
3!,2+!'",9;/(<(",%!*%9=(&/#%"/*0>!+!*;/3(,2*!>?
♦ '/*
18$%0&&/$"CD-R DRW98
&&/21#8/"%&/?#$"
"$"
$&"98*&%?
18$&8?
?1"1"#/
&&8
.
♦ +1$
18$&$" CD-R D-RW&%&
1)>&1#"3.
♦ "1/$" CD-R D-RW7#&
18$%>
171/88??1"1"98718&&
1*$&$"8718&&&8/81&7
8#"&.
♦ C$"
D-RW*
10%0%=1&$
)/&&213$1*$"
7871#8"
8879)1*%&
0&%$"D-RW&%=9
)1*%&
0&%0/)&/?"
"$".
11
"FB;G;HBI*3
+
3
6GF*%
+
$$ $%
7
FJKL*47M+
%
DiscSkip
%
,
!
'
!:
$ L$
!
%
Repeat-+/
!
%
4CD-"*/
"
"
*+"
!!
#
"N-O!
3
!6
%
?
% +
$
% *%(
$ "
"P"
T$
(!
!)
&""
"
"
Y%
4
B
$
Y%
4B
$
*
!$%
%
%
%B
B
+
!
♦ L$!
!
FJKL*47M+
(
%MV-&
/
♦ L$ $
$!%
!
♦ *$ %$%
%
!
BB
B
B
""
"
!
"
%
Shuffle-$/
'
!:
Shuffle
%!
!$
%
!
+!
%
$
%
:
♦ +
%
-$ /!%B
0
B
!6
♦ Y$%
%
%B
0
B
!6
4$!(
%
-/%
Shuffle
!
Z)!!
&!
&
12
"
"
"!'
♦ 4
%&
♦ ,
%
$ &
♦ ,
!%
$
$
*$ %
.TU
BB+ $(
%
CD*
&"QRSR=<
"
?
%
3[\[A]"-%/
,$ $ 3[\[A]"CD-"/
,
!%
$
3[\[A]A22CD-
/
L$
%%
QRSR=<
%
5A22
CD"5"CD"%
$ $
%
$
!$
3
!6
+(
%
+(
$
% +(
% + %
7 $
$ %
%
-/:
♦ @!
$
&
'
!:
(
!$
IQVW
♦ L$
&
$
$ %
♦ L$$ $
!%
%
&
$ $
!%
♦ *$ %$%
$
.C
X$%
%
!B
B
"
'
♦ +$ (%
!%
$
♦ *%$
$
(
♦ ,$%
!UQ%
♦ +
%
$ %$%$
$
&
♦ ^)%
!
)
3G_GD`-/
L$ )MV-&/
$
%
-/
K!
$ $
&
%
Program-+/
!:*
!$
'
):
- #"a
$D"a
&&a
%
/
L
$ %
%%
FJKL*47M+
,$ %
)!6:
♦ ,
$
!%!
♦ , $
!%
%
Program $
(
$ '
!:,$ !
!$
:
13
,
"
"
"
"
"#
'
♦ ";!
FM
♦ c!
,
♦ <!
*,
L$%
($ $
%
!%
%
Program-+/
'
!:
):
3
-CHa+
#"ab$D"a
&&a
%
/
MH-J!
/!$
\R-+
/%
Program, $%
!UQ
%
, %
Program.
'
!:+!$
$ % MH-J!
/
%
Program
!
!
%$
!
L
%
FJKL
*47M+!
%
I
0
I
)!6$ %
7 $
!
%
Program
%
GF-
BB/ $(
$ $
%
'
!:,!
$ %
,
%
9:$;<=:>?@
-+
01/
,$ )]de[3-
/%
YZ[\Q
,$ %
$!%
YZ[\Q*]=:>+-*!
/
Y^:R_*]=:>+
'
!:
!
!:
7
♦ FM
$
♦ AM (MW)
*$
$
♦ 2f
E
&"Y^:J:`Wa>R
*b"
+
,
@
!
%
Wc[Zcd-'/
+
@
!
%
PRESET-+
$
/
,$ $
:
♦ +!6
(
$
♦ %Y^:J:`-/∨∧
♦ 7 $
%
$
!
%
%
]gFEFhVijFd_-!
!/
♦ ,
%
L!
%
@
:
♦ +eaf^gR-1/
♦ %e9dh
,$ %8
989%
Wa:a$;Y-T0
/
14
"
%&
L$
,
%
9:$;<=:>?@
.T
,
:
%
Program-+/
'
!:,
!$
PRGM-+/
%
TuningDownUp
!6
$
%"";
%
Program $
'
!:
(
PRGM
*
$
.M8
"
'
-+
01/
,$ %]de[3-?
/%
Y^:R_
,$ %
$!%
♦ Z\3Nk3A>%
$! $
!
$
Y^:R_-lDFm/-!
/
%YZ[\Q
-lDFm/
%
I
0
I
$
Y^:J:`Wa>R-'
%/
%
8\3[n[]9-
$
/
+
)!6
$
%
I
0
%
I
$
,$ %
%
Y^:J:`∨∧
'
!:?
$
%
♦ ,
%
$%
!)!6
I
0
I
♦ ,
%
$%
%
%I
0
I
Y^:J:`-/∨∧
$
%
♦ ,
%
I
0
I
)!6
♦ +
!
$$%
!$ )!6
I
0
I
(!!
"
'
♦ ,
-!
/=>A>->f/
$
♦ +
!
=>
A>->f/
!
L
=>!
%
Wa:a$;Y
-T0
/
!
%8
9
%89^(
!
15
♦ !
"#
$%&'(!
♦ ♦ !
"
)*
+,-./0$(
1
"23
!
$ (
$4#
(!
"#
!
5
#!
67
***
*
##!
8
"
"!
8*
"
$)2&3(
,
*!
67
***-./02-./03!
#$%&'($)*+
!
"
#$
%#&!
%$
'#()
*
#,-
!
+
,#,
*!
$$#-!
$$#-##
#,SynchroC
*
#
,-Synchro
#.$
!
/#
01
$-./,+
,Synchro.
!
2$
0
"""
+
!!!!!!!!!!
9MAX-L45
!"#$%&!!! '%()*+,-!,#
:
; !!!!!!!!!!!!!!!!!!! -./0$
(
)2)3
:
!!!!!!!!!!!!!!!!!!! -./0$
(!!9)3
67<#
*!
9MAX-L42
!"#$%&!!!
'%()*+,-!,#
:
;, !!!!!!!!!!!!!!!!!!!!!!!!!!!!-./0$
(
67<#
*!
<
"
+,
7
'%()*+,-!,#
%
!!!!!!!!I
%
!!!!!!
I
1
2
3!
"
♦ #.#
#%#&!
♦ $#,#
,.
!
#$%&'($)*+
!
"
#$
%#&!
%$
'#()3
*
#,-
!
+
,#,
*!
$$#-!
$$#-##
*
#
44
#
44
#
,#
.$#
,
*4
#
5!
1
#./,%5(678+
#
/#
01
$-REC+
!
2$
*
.
#
44!
/#
0%
#!
%
-
#TAPE
#
,#
#
!
16
)*
*
TAPE$:(
,
*!
. )(++/%!*%&0 %--#10%)*%2*!++2%3#
♦ ")3!
♦ *
*!
"#
$%&'(!
=)3!
+,"->?0@$9"
(
45!
,"
#
678$4
(∧∨
,
*
TuningDownUp$4
(
!
45
69$5&%(!
67A
@0B*
,
#*!
)*
*TAPE$:
(,
*
!
!"#$%
>*0!*/0+2+-**,%+ -%2*!"++!<0"<1<
!,%/%-*<3+3*,%"+- ?3!/0"<+0%))+*&
+@!,%/%-*<0-%3%"+,%(2@)#/ ,%"&-@
!*/0+2+-*<*?"%@2%<A)#?!"#3*&
0/)(-&02%"&-+B$+)-%3*-%&0!*/0+2+-*+
-%3%"%!*/0+2+-*<?,+0 (+"%++!"#$%&
%*##**
*!
%
#*
*###
*##
C6D59$:
##(
!
. )(++,!*0%&,%+#:+,*-%:+,#
;)+1<20%0%*%-%,!*0%-*<=
♦ <
"!
♦ <
"!
♦ *
*!
♦ C#)3
"
#!
"#
$%&'(!
=)3!
=
*
*)
2!
,!*0%&,%+#
'%()*+,-!,#
:
"!!!!!!!!!!!!!! Normal
:
" !!!!!!!!!!!!!!!!!!! High
67 4"*"
*)2
*)3!
&'(
)%MAX-L4*
.%$%,)!%,-%<)*-*E*+)%*)++*+(*)%
0!*/0+2+-*<,%+?, +!/0"<10%)
!"#$*0%&+- ,%+ %0)%*3+,*
'%(*)%B+,-!,#5FModeGH+(*)+0+%I?!,%
2*!"+B-+!,%(+*)0"0+0#1J+@+(*)%
K@2%2*!"+B
!,%/ 0%+
K)!%,-%<)*-*E*+)%
0!*/02*
!!!!!!!!!!!!!!!!!!!!! 1
*
!!!!!!!!!!!!!!!!!!! 1
!
)
"
*
!!!!!!!!!!!!!!!!!!! 1
!
17
+,
92:
2
2
"
;0<
"
8#
**"#*
"#*
0@@D@$1(!
6$7.$
.
!
♦ ,
.#$.
!
♦ %
,7
,
7
#$#-!6
8.
!
#
#$%&'($)*+
!
1
#=>?8@%,ABCD9
2
.
$-:;<=>9
!
1
#Enter!
/#
0 #$#
$-?@:;<=
8
.
##
A#
!
"
#!
"
'
E3
!
1
#Enter!
/#
0B'#
,
!
"
'#E3
!
31
#Enter!
/#
0 #$#
$-#FF=4G/
8
.
##
A
#
!
"
#!
"
'
E3
!
1
#Enter!
/#
0B'#
,
!
"
'#E3
!
31
#Enter!
/#
0%
$-H#IJJ CC.,CC###
##
,!
1
=6$>$K-BL$MN1
,##,
#Enter!
/#
0%
$-.
,
-
$
#
E3
$
#.$#
$
#!
O
"""!
"""
TAPE
!!!!!!!!!!!!!!!!!!!!!!
"
#
#
#
,!
TUNER
!!!!!!!!!!!!!!!!!!!!!
1
#Enter!
$
D<E<
E3
!
1
#Enter!
3$
#
E3
!
CD
*!!!!!!!!!!!!!!!!!
+
,#!
$
$#-!
1
#/$'8@.$#
#
!
1
#On%Standby.$#
#
,!
/#
0#
#-,
.
.$#
!
$#!
*
)
♦ %
L-@M#-,N*-%"&-#1#3,#
&
I
I
EFGHI!
♦ %
EJFGHIK
Program
Set$%
&
=(,
*
D!
18
,
,
&'
2
,
"+@?,%,0 #%-0*"*%B)+?--%3*-%+
>
%%&%0)%*3+,*?-%3#,%/ 0%+*)0"
OPQLRHP-%2*!"++R"*0 "&$+-+S*+
!"&/0%&<%B)+)?0 2"(- ,"13*&+@
.%$%,)!%,-%<)*-*E*+)%#20%-%
A,0%"%B/+)!+2#%-0"+-- )*-%B,%)*?
, B!/0"<+0%)0 %&-%*"++!2S2<J*B
%"%-0 ,*S*-*/,*S3%?0+0#1J*B
)#/ ,+?,#10 "#$%++
"#
"
*$
"#
*
(!
'%()*+,-!,#7TDE
UUG.,"13+-*+
0 ,"13+-*+%B)+%I
1"#
!!!!!!!! 1
!
67:
*
"#
)
!
674
***!
4W$M
(
,
*
"*
!
!"#3*&
. +*+
1##$(!!!!!!!!!!!!!!!!!!!!!PASS
C**N !!!!!!!!!!!!!!!!!!/D/
C**
N !!!!!!!!!!!!!!!!!!!@DBO
C**# !!!BP.QQRB
&.
/01
+ Power Sound
. )(++0+)+--,"13*&/0#,-%0%$+B*+)+
>*)+=. S*+0+*&-%+"+M-- B/0-,
.%$%,)!%,-%<)*-*E*+)%*+)%-%(+-%
M#-,N*+BPowerSoundGLJ- B/0#,I
X#-,N*<CYDC6#*"*0%+-*/,*+3% *?,)+
@?020%%/%#"#3$%+-0 ,*S*"*%0 S
/0#,0+)?3 0 )@"*-%"%(2%&<!
-%<J+)#)J- )/0#3%-*+)
4V6$
"#(!
L"#$
"#
(V6
Volume$'
(!
L
+,"PowerSound!
♦ 4PowerSound
PSOUND!
♦ )*S+,
PowerSound#
OFF $!(!
19
3
.
.!N++!"#$*0%-*<,)!%,E2*,%*"*,%+
0 )(++#%-0*&*+)#-%%0)%*3+,+
0 ,"13+-*+
>*)+=. S*+/%-#&?"#$%<)#/ ,#
4ZUU
[\$;#
"#&(!
674#*
"7
TUVR?$TUA4=9(
4ZUU
[\
#
#"#*!
. )(++!2+2*-*&-%#$-*,*,0%$+B,)!%,-B
)*-*E*+)+?%,30 )(++"#$%&)#/ ,#*"*
%2*!++2%3*?-+2%0"<<-+#20%2#@*)"12<)?
-%S2<J*)<0,)-%+'%#$-*,*2"(- *)+&
%/_+)2*%)+)`?a))*"*0+0#1J*B%2%!+
%bC9$4(
!
67;#
"*
*
*!
%
!
"
*7
♦ %
**"#*
ZUU
[\!
♦ A
**"#*
E!
4ZUU
[\
**.RQP00/
$;#"#(!
67:#"#*
#N!
)**+,#
"#*ZUU
[\
**
OFF$"#(!
+:;
L*,M-!/0"<+!"&/0%+"1)*,$*0%&0B
@"2"<@?3 !+&!2M-@%))#
%
%"#
+
X
HJ
*
+!
)*
+
*
MICMixing$'
+(!
4/5167899
.%$%,)!%,-%<)*-*E*+)%#20%-%*+)B
#*"+-*<-*/,*S3%?-%/ 0%+)B]99G*+)%
#!+%0I^%M#-,N*<2+"%+/0#3%-*+*+)
"++)J- )*++0+-- )
4Bass$:
(
!
67#
]ASW]ONW!
L+,"]99!
20
=(
'*(+!*0+2+-- +*#-,**""1*#1)+
!+2(-*?, +-%20 !"-<&!*
A,!"#%%N***"*%-!*0,+0%$+B,)!%,-B
)*-*E*+) <
)+1J*B<0*+)+2!"-*+"&- B0S2)(+
;
&*!"&/0%-2"<@?3 0!"&/0%&<
!+*)#J+0%)*,%3+0%/0#,%?+!+3*0%+)@0%$+B
,)!%,-B)*-*E*+)B?!*!"#$*0%-***@-%"%
2#@*S*3-*,0
>*)+ 7 ♦ 9
♦ %
♦ Y+
+
Z.-ZBB
♦ +HINFIstereo
L"##
*!<
*
X
@B.$" (!
"##
!
%*
/
$##
-
0
/
$
#
F°(GHF°(
0IJGKFL
M$,
#,,
#,
!N
,#
#7
$!
1
#
,7
!
#
8
!
#
!
,
7#!
,
.
.,#
!
6$#
,
.$
#
,
#
!
$
#
#
!
#7
#
7
$7#,#
!
#7
$7,
#
7#!
1
7#
!
,7#
#
8
!
1
7#!#
##.
-
.
,#
8!
!
>2+2*-*+
K@-+/2#?)%,*0%--)#
<
!!!!!!!!!!! @$
(
C !!!!!!!!!!!!!! P$(
)*#*##*
*
!
"N
On
Standby$%&
'(#"#!
*
#c$)(
!
67)c!
"##!
4
#
**7
♦6*
♦M
%
7
+*
#*
#
**
$
(!
21
>
,,
P3
P
<3
2:
♦ 1
##!
♦ ,
*!
♦ 3
,.#-
!
,
#0
♦ .
!
♦ 6$#
,
!
/,#
##.#,##
$
-,
!1#
$
7
.
8#
!
1,
#
#
7
!
*
.,-
,
*!1#
.
!
O#
*
!
/,#,
*-
,-,
,$
7,,
!
1
PUSHEJECT
.$#!
M#
#-#.
0
♦ I
♦ &
♦ #-
H
♦ 6$#
#
,
#
,.,
$
$
!
♦ C
7
#
#.
7$
,
#
#
,
,
$
.
,,
.
!
♦ 6
$.
$
=(
♦ P$
-
7
*
!,
.$
$-!
♦ 3,
*.,
-
,
$#!
♦ 1
$#
,###
!
♦ 2
'!
♦ C
7
*
,
,
.,$##,
#!
♦ ,
#
*.
!
=(
♦ .$
$
7
#
!
♦ 2$
#
.
.#
-
!2$
#.
$#
.
!
♦ 3,
#.,
-
$#!
♦ C
7
,,
.
,$##,
#!
♦ M$,
I&J#
.
,#,
!
('?
(<'(
3
<
"O
<
P"QR
3
2"
• • •
!"#$%&"'()*+#
,-
P
• ,
Q •
.
/
*01 23456+740894:2 07
R 5+5: 902:; <=905> 94-
M • ?@
6 3
P
S
O
3
9
*
%
M
3
3
O
6
9
T
/
O
%
M
P
!
"
#
$
%
$
&
'
• A
@
• *@
• 0@
*?@#@•
SBass
@B
@
+CD
E
•
.
/FG*8-
• HEDI
D/
• :D
D
• D
E
• +/D
DJ
@@
•
•
•
•
•
•
•
.
/KLMN*:4
4
:E
,D
+
AD
:
•
•
.
/KOPNQ*0@
D
• 7
/+@
@
/
• ?
J
7$#
6
7#
#.
7
$#
,0
♦ 1
.$#
♦
#'
♦ 2
$
+
$
7###
'SAMSUNG!
22
@
!
"!#$%&!!&%$!
!
!"
#$%#&
)*+,--.$/&+
2!
#$%#&
)*+,--.$/&+
&+
6
#$%#&
+:
/;;&:+&
&/)+
6
#$%#&
/;;&:+&
/CA*,--+
);&A$/+Ω"
);&A$/+Ω"
/;;&:+&
#$%#&
!
8E/)/&/)
'
('
01
0
3
451
5+&6+7+
08.70+8.±3"
93+8."-/&
4(13+8."
<'
&/=30>&&?@A=340&&
30(8.B>+8.
'
5(
0;0D6)*+,--.$/&+=31"
&MAX-L42/42G)
0;'D6)*+,--.$/&+=31"
&MAX-L45/45G)
'(
<(
0<F";53<";5<8"&&
23
Посмотреть инструкция для Samsung MAX-L42 бесплатно. Руководство относится к категории hi-fi системы, 1 человек(а) дали ему среднюю оценку 5.9. Руководство доступно на следующих языках: английский. У вас есть вопрос о Samsung MAX-L42 или вам нужна помощь? Задайте свой вопрос здесь
Не можете найти ответ на свой вопрос в руководстве? Вы можете найти ответ на свой вопрос ниже, в разделе часто задаваемых вопросов о Samsung MAX-L42.
Когда звук считается слишком громким?
Уровень звука выше 80 децибел может нанести вред слуху. Уровень звука выше 120 децибел может нанести прямое повреждение слуху. Вероятность повреждения слуха зависит от частоты и продолжительности прослушивания.
Могут ли устройства разных марок подключаться друг к другу при помощи Bluetooth?
Да, Bluetooth — универсальный метод, позволяющий различным устройствам, оснащенным Bluetooth, подключаться друг к другу.
Что такое Bluetooth?
Bluetooth — это способ обмена данными по беспроводной сети между электронными устройствами с помощью радиоволн. Расстояние между двумя устройствами обменивающимися данными в большинстве случаев составляет не более десяти метров.
Что такое HDMI?
HDMI расшифровывается как «интерфейс для мультимедиа высокой четкости». Кабель HDMI используется для передачи аудио- и видеосигналов между устройствами.
Как лучше всего выполнять чистку hi-fi система?
Для удаления отпечатков пальцев лучше всего использовать слегка влажную салфетку для уборки или мягкую чистую ткань. Пыль в труднодоступных местах лучше всего удаляется потоком сжатого воздуха.
Что такое Dolby Atmos?
Dolby Atmos — это технология, которая обеспечивает отражение звука от потолка к месту нахождения слушателя. Это позволяет создать эффект 5.1 при помощи всего лишь одного динамика.
Инструкция Samsung MAX-L42 доступно в русский?
К сожалению, у нас нет руководства для Samsung MAX-L42, доступного в русский. Это руководство доступно в английский.
Не нашли свой вопрос? Задайте свой вопрос здесь

THREE-CD CHANGER MINI-COMPACT SYSTEM
CD-R/RW PLAYBACK
MAX-L42
MAX-L45
Instruction Manual

Safety Warnings
GB
CLASS 1 LASER PRODUCT
KLASSE 1 LASER PRODUKT
LUOKAN 1 LASER LAITE
KLASS 1 LASER APPARAT
PRODUCTO LASER CLASE 1
CAUTION
RISK OF ELECTRIC SHOCK.
DO NOT OPEN
CAUTION:
TO REDUCE THE RISK OF ELECTRIC SHOCK, DO NOT REMOVE REAR COVER. NO USER SERVICEABLE PARTS INSIDE. REFER SERVICING TO QUALIFIED SERVICE PERSONNEL.
CLASS 1 LASER PRODUCT
This Compact Disc player is classified as a CLASS 1 LASER product.
Use of controls, adjustments or performance of procedures other than those specified herein may result in hazardous radiation exposure.
CAUTION-INVISIBLE LASER RADIATION WHEN OPEN AND INTERLOCKS DEFEATED, AVOID EXPOSURE TO BEAM.
This symbol indicates that dangerous voltage which can cause electric shock is present inside this unit.
This symbol alerts you to important operating and maintenance instructions accompanying the unit.
WARNING: To reduce the risk of fire or electric shock, do not expose this appliance to rain or moisture.
CAUTION: TO PREVENT ELECTRIC SHOCK, MATCH WIDE BLADE OF PLUG TO WIDE SLOT, FULLY INSERT.
Plug(UK Only)
moulded plug incorporating a fuse. The value of the fuse is indicated on the pin to BS1362 of the same rating must be used.
cover is detachable and a replacement is required, it must be of the same are available from your dealer.
house or the cable is not long enough to reach a power point, you should your dealer for assistance.
remove the fuse and then safely dispose of the plug. Do not connect the from the bared flexible cord.
socket. A plug and fuse must be used at all times.
IMPORTANT
with the following code:–
NEUTRAL BROWN = LIVE
markings identifying the terminals in your plug, proceed as fol-
terminal marked with the letter N or coloured BLUE or BLACK. the terminal marked with the letter L or coloured BROWN or RED.
WIRE TO THE EARTH TERMINAL WHICH IS MARKED WITH EARTH SYMBOL  , OR COLOURED GREEN OR GREEN
2

Contents
Thank you for buying this
SAMSUNG mini-compact system.
Please take time to read these instructions.
They will allow you to operate your GB system with ease and take full advantage
of its features.
|
SAFETY WARNINGS ……………………………………………………………………………………………………………………………………………………………. |
2 |
|
INSTALLING YOUR MINI-COMPACT SYSTEM |
|
|
Front Panel View ……………………………………………………………………………………………………………………………………………………………….. |
4 |
|
Remote Control …………………………………………………………………………………………………………………………………………………………………. |
5 |
|
Rear Panel View ……………………………………………………………………………………………………………………………………………………………….. |
6 |
|
Where to Install Your Mini-Compact System ………………………………………………………………………………………………………………………….. |
7 |
|
Connecting your System to the Power Supply ………………………………………………………………………………………………………………………. |
7 |
|
Connecting the Loudspeakers……………………………………………………………………………………………………………………………………………… |
7 |
|
Connecting the AM (MW)/LW Aerial …………………………………………………………………………………………………………………………………….. |
8 |
|
Connecting the FM Aerial …………………………………………………………………………………………………………………………………………………… |
8 |
|
Inserting Remote Control Batteries………………………………………………………………………………………………………………………………………. |
9 |
|
Viewing the Various Functions on Your System ………………………………………………………………………………………………………………………. |
9 |
|
Setting the Clock ……………………………………………………………………………………………………………………………………………………………….. |
9 |
|
CD-PLAYER |
|
|
Loading and Changing Compact Discs…………………………………………………………………………………………………………………………………. |
10 |
|
Listening to a Compact Disc ……………………………………………………………………………………………………………………………………………….. |
10 |
|
Selecting a CD in the Disc changer …………………………………………………………………………………………………………………………………….. |
11 |
|
Selecting a Track ……………………………………………………………………………………………………………………………………………………………….. |
11 |
|
Searching for a Specific Music Passage on a CD …………………………………………………………………………………………………………………. |
11 |
|
Shuffle Play Function ………………………………………………………………………………………………………………………………………………………… |
11 |
|
Repeating One or All Tracks on the Compact Discs ……………………………………………………………………………………………………………….. |
12 |
|
Programming the Order of Playback…………………………………………………………………………………………………………………………………….. |
12 |
|
Checking or Changing Programmed Tracks ………………………………………………………………………………………………………………………….. |
13 |
|
TUNER |
|
|
Searching for and Storing the Radio Stations ………………………………………………………………………………………………………………………. |
13 |
|
Selecting a Stored Station…………………………………………………………………………………………………………………………………………………… |
14 |
|
Improving Radio Reception…………………………………………………………………………………………………………………………………………………. |
14 |
|
About RDS broadcasting…………………………………………………………………………………………………………………………………………………….. |
15 |
|
About RDS DISPLAY function……………………………………………………………………………………………………………………………………………… |
15 |
|
PTY (Program Type) indication and PTY-SEARCH function…………………………………………………………………………………………………….. |
16 |
|
TAPE DECK |
|
|
Listening to a Cassette ………………………………………………………………………………………………………………………………………………………. |
17 |
|
CD Synchro Record Feature……………………………………………………………………………………………………………………………………………….. |
17 |
|
Recording a Compact Disc …………………………………………………………………………………………………………………………………………………. |
17 |
|
Recording a Radio Programme……………………………………………………………………………………………………………………………………………. |
18 |
|
Copying a Cassette (Dubbing) ……………………………………………………………………………………………………………………………………………. |
18 |
|
Tape Counter…………………………………………………………………………………………………………………………………………………………………….. |
18 |
|
Selecting the Cassette Playback Mode (Deck 2 Only) ……………………………………………………………………………………………………………. |
19 |
|
OTHER FUNCTIONS |
|
|
Timer Function …………………………………………………………………………………………………………………………………………………………………. |
19 |
|
Cancelling the Timer ………………………………………………………………………………………………………………………………………………………….. |
20 |
|
Mute Function …………………………………………………………………………………………………………………………………………………………………… |
20 |
|
Selecting an Equalizer Preset ……………………………………………………………………………………………………………………………………………… |
20 |
|
Power Sound Function ………………………………………………………………………………………………………………………………………………………. |
20 |
|
Setting the System to Switch off Automatically………………………………………………………………………………………………………………………. |
21 |
|
Super Bass Sound ……………………………………………………………………………………………………………………………………………………………. |
21 |
|
Connecting Headphones…………………………………………………………………………………………………………………………………………………….. |
21 |
|
Connecting to an External Source ………………………………………………………………………………………………………………………………………. |
22 |
|
CD Digital Out Jack……………………………………………………………………………………………………………………………………………………………. |
22 |
|
RECOMMENDATIONS FOR USE |
|
|
Safety Precautions ……………………………………………………………………………………………………………………………………………………………. |
22 |
|
Cleaning Your Mini-Compact System …………………………………………………………………………………………………………………………………… |
23 |
|
Precautions When Using Compact Discs ……………………………………………………………………………………………………………………………… |
23 |
|
Precautions When Using Audio Cassettes ……………………………………………………………………………………………………………………………. |
23 |
|
Before Contacting the After-Sales Service ……………………………………………………………………………………………………………………………. |
23 |
|
Technical Specifications …………………………………………………………………………………………………………………………………………………….. |
24 |
Symbols
|
Press |
Push |
Important |
Note |
3

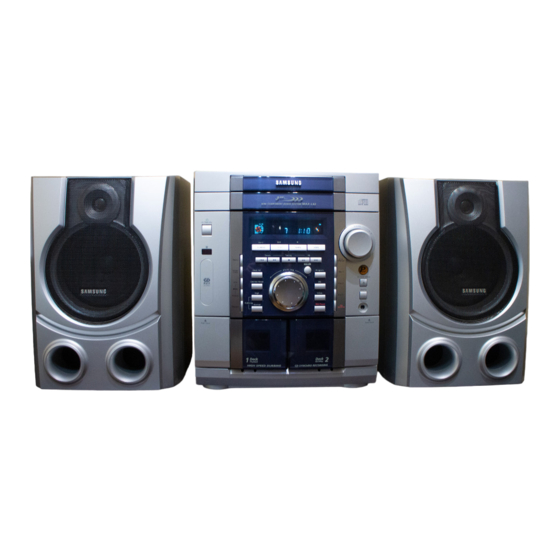
Front Panel View
GB
|
31 30 29 |
28 |
27 |
|
1 |
||
|
2 |
||
|
3 |
26 |
|
|
4 |
||
|
5 |
25 |
|
|
6 |
24 |
|
|
7 |
23 |
|
|
8 |
22 |
|
|
9 |
21 |
|
|
20 |
||
|
19 |
||
|
18 |
||
|
10 |
17 |
|
|
11 12 |
13 1415 16 |
|
1. |
Compact Disc Compartment |
17. |
Cassette Deck 2 |
|
2. |
Demo |
18. |
REC/Pause |
|
3. |
Timer/Clock |
19. |
S.Bass |
|
4. |
On/Standby |
20. |
CD Synchro Recording |
|
5. |
PTY (RDS) |
21. |
Headphone Jack Connector |
|
6. |
Deck 1/2 |
22. |
Shuffle |
|
7. |
Counter Reset (MAX-L42) |
23. |
CD Open/Close |
|
REV. Mode (MAX-L45) |
24. |
Power Sound |
|
|
8. |
Display (RDS) |
25. |
Disc Change |
|
9. |
Repeat |
26. |
Volume |
|
10. |
Cassette Deck 1 |
27. |
Disc Selection buttons |
|
11. |
TAPE Normal Dubbing |
28. |
Function Selection buttons |
|
12. |
TAPE Hi-Speed Dubbing |
29. |
Search Function buttons |
|
13. |
Multi Jog |
30. |
Stop button |
|
14. |
Enter |
31. |
Skip Function buttons |
15.Program
16.EQ
4

Remote Control
GB
|
Timer |
21 |
||||
|
On/Standby |
Mute |
||||
|
On/Off |
20 |
||||
|
1 |
|||||
|
2 |
Program |
19 |
|||
|
EQ |
Disc Skip |
/Set |
AUX |
18 |
|
|
3 |
|||||
|
4 |
AI Off |
Mono/ST. |
Tuner |
17 |
|
|
Deck 1/2 |
|||||
|
5 |
16 |
||||
|
6 |
Sleep |
Band |
15 |
||
|
TAPE |
|||||
|
7 |
14 |
||||
|
CD |
MAX-L42 |
||||
|
8 |
13 |
||||
|
VOL. |
12 |
||||
|
9 |
|||||
|
Tuning |
|||||
|
CD |
Mode |
CD |
|||
|
11 |
|||||
|
10 |
VOL. |
|
1. |
On/Standby |
12. |
Volume Increase |
|
2. |
Disc Number Skip |
13. |
CD Play/Pause |
|
3. |
EQ |
14. |
TAPE Play |
|
4. |
AI off/Sleep |
15. |
TAPE Stop |
|
5. |
Deck 1/2 |
16. |
Tuner Band |
|
6. |
TAPE Fast-Forward |
17. |
Mono/ST. |
|
7. |
TAPE Rewind |
18. |
AUX |
|
8. |
CD Stop |
19. |
Program/Set |
|
9. |
CD Track or Radio Station Search(Skip) |
20. |
Mute |
|
10. |
Volume Decrease |
21. |
Timer On/Off |
|
11. |
Tuning Mode(MANUAL,PRESET) |
5

Rear Panel View
GB
1.CD Digital out (OPTICAL)
2.FM Aerial Connector Terminal
3.AM Aerial Connector Terminal
4.AUX-Input
5.Loudspeaker Connector Terminals
6

Where to Install Your
Mini-Compact System
To take full advantage of your new mini-compact system, follow these installation instructions before connecting the unit.
 Install the system on a flat, stable surface.
 Never place this unit on carpeting.
 Never place this unit in an outdoor area.
 Maintain an open space of approximately 6 inches (15 cm) on the sides and rear of the system, for ventilation purposes.
 Make sure that you have enough room to open the compact disc compartment easily.
 Place the loudspeakers at a reasonable distance on either side of the system to ensure good stereo sound.
 Direct the loudspeakers towards the listening area.
 For optimum performance, make sure that both speakers are placed at an equal distance above the floor.
Connecting your System to the Power Supply
The main lead must be plugged into an appropriate socket.
 Before plugging your system into a main socket, you must check the voltage.
Connecting the Loudspeakers
GB
The loudspeaker connector terminals are located on the rear of the system.
There are four terminals on the system:
|
Two for the left speaker (marked L) |
|
|
Two for the right speaker (marked R) |
|
|
To achieve the correct sound quality, connect the: |
|
|
Red wire to the + terminals |
|
|
Black wire to the – terminals |
|
|
1 |
To connect a wire to a terminal, push the tab as far as it will go: |
|
To the right on the system |
|
|
2 |
Insert the wire, up to the plastic sheathing, in the hole. |
|
3 |
Push the tab back: |
|
To the left on the system, until it clicks into place |
|
|
To the top on the loudspeaker |
|
|
Result: The wire is pinched and held firmly in place. |
|
|
4 |
Repeat the operation for each wire. |
L
R
1 Plug the main lead (marked AC Cord on the rear of the system) into an appropriate socket.
2 Press the On/Standby button to switch your mini-compact system
7

Connecting the AM (MW)/LW Aerial
GB
The AM aerial (for long and medium waves) can be:
 Placed on a stable surface
 Fixed to the wall (you must first remove the base)
The AM aerial connector terminals are located on the rear of the system and are marked AM .
 To avoid noise interference, check that the loudspeaker wires do not run close to the aerial wires.
Always keep them at least 2 inches (5 cm) away.
Connecting the FM Aerial
How to connect a COAXIAL TYPE aerial.
 Connect a 75Ω antenna to the FM antenna terminal.
 Plug the connector on the FM aerial supplied into the coaxial socket (75Ω ) marked FM on the rear of the system.
 Follow the instructions given on Page 13 to tune into a radio station, and determine the best position for the aerial.
 If reception is poor, you may need to install an outdoor aerial.
To do so, connect an outdoor FM aerial to the FM socket on the rear of the system using a 75Ω coaxial cable (not supplied).
8
Samsung MAX-L42 CD Player PDF User Guides and Manuals for Free Download: Found (3) Manuals for Samsung MAX-L42 Device Model (Instruction Manual, Service Manual)
More Stereo System Device Models:
-
Leviton
1×6 Passive Audio Module
Instructions for Use Directives d’utilisation Instrucciones de uso1x6 Passive Audio Module Module audio passif 1×6 1×6 Módulo de AudioPasivo 48211-6A1x6 Passive Audio Module DESCRIPTIONConnects up to 6 pairs of speakers to one amplifier or receiver. Parallelconnection scheme assures best sound quality. Easily inst …
1×6 Passive Audio Module Stereo System, 3
-
Philips
AZ102C
PhilipsCD Soundmachine with Dynamic Bass BoostCDAZ102CProgramme your favourite musicYou take pleasure in the simple things in life and delight in convenience. The sleek and portable design lets you indulge in the pleasures of enjoying your favourite music with the help of easy-to-use functions.Easy to use• CD shuffle …
AZ102C Portable Stereo System, 2
-
LG
OM4560
SIMPLE MANUALMINI HI-FIAUDIOTo view the instructions of advanced features, visit http://www.lg.com and then download Owner’s Manual. Some of the content in this manual may differ from your unit.MODEL OM4560ENGLISHHRVATSKI SRPSKISLOVENČINAБЪЛГАРСКИМАКЕДОНСКИPOLSKI ROMÂNĂРУССКИЙLATVIEŠU …
OM4560 Stereo System, 4
-
Grundig
UMS 200
UMS 200GLK0850Zusätzlich erforderliche Unterlagen für den KomplettserviceAdditionally required Service Documents for the Complete ServiceServiceManualGrundig ServiceHotline Deutschland…TVTVSATVCR/LiveCamHiFi/AudioCar Audio TelekommunikationFax:Planatron (8.00-22.00 Uhr)0180/52318-410180/52318-490180/52318-480180/52 …
UMS 200 Stereo System, 36
Recommended Documentation: